
How to Share a Canva Presentation with Someone

Canva is a popular graphic design platform that makes it easy for anyone to create stunning presentations, even without prior design experience. With its drag-and-drop interface, premade templates, and huge library of fonts, images, and graphics, you can put together a polished presentation in no time.
But creating an amazing presentation is only half the battle. You also need to be able to effectively share your work with your intended audience. In this step-by-step guide, we’ll walk you through the different ways to share a Canva presentation so others can view and even collaborate on your project.
Step 1: Open Your Presentation in Canva
First, log in to your Canva account and open the presentation you want to share. You can access all your designs right from your Canva homepage.
Once the presentation is open in the editor, you’re ready to start sharing.
Step 2: Click on the “Share” Button
In the top right corner of the editing screen, you’ll see a blue “Share” button. Go ahead and click on it to open up the sharing menu.
This menu contains all the options for sharing your Canva presentation, from creating a simple view-only link to enabling real-time collaboration capabilities.
Step 3: Get a Shareable Link
The easiest way to share your Canva presentation is by generating a shareable link. This allows you to share your design with anyone, even if they don’t have a Canva account.
To get a presentation link, select “Share Link” from the sharing menu. Then choose “Anyone with the link” to create a public link that doesn’t require people to log in. You can also create private links or restrict editing access for more control.
Once you create the link, copy it and send it out to people via email, chat, social media posts, or however else you want recipients to access it.
Step 4: Set Link Permissions (Optional)
When creating a shareable link, you have the option to set permissions that determine what recipients can do with your presentation.
By default, anyone with the link can view, comment on, and download your design. But you can limit capabilities to view-only or disable downloading if needed.
To update permissions, click the dropdown next to “Anyone with the link” and choose a different option before copying the link to share.
Step 5: Share Via Email
Another way to share your Canva presentation is by sending it directly via email.
From the sharing menu, select “Share Via Email.” Then enter the email addresses you want to share it with.
You can choose to send it as an attachment, a view-only link, or an editable link if you want recipients to collaborate. Customize permission settings here too.
Once everything looks good, hit send and your presentation will be on its way!
Step 6: Share to Social Media
For wider sharing, you can post your Canva presentation directly to your social media profiles.
From the sharing menu, choose “Share to Social Media.” Select the platform you want to share it on like Facebook, Twitter or LinkedIn.
A preview of your post will appear. You can tweak the text and settings as needed before publishing it to your followers and connections.
Step 7: Invite Collaborators
One of the best features of Canva is the ability to collaborate with others on the same design in real-time. This can be extremely helpful when creating presentations as a team.
To invite collaborators, open the sharing menu and select “Invite Collaborators.” Enter the name, email address or Canva username of anyone you want to invite.
You can give collaborators edit access to work together on the presentation live. Or you can give view-only access to get feedback.
Step 8: Share Your Presenter View
When you’re ready to present your design live, Canva offers a special presenter view. This shows your slides in a presentation format with tools like a timer and notes.
To start the presenter view, click the “Present” button in the top right corner of the editor. Then select “Presenter View” to open your slides in a new tab.
From here, you can share your screen to present the slides live on a Zoom, Google Meet, or other video call. Everyone will see your presentation while you view notes and controls.
Step 9: Export and Share the File
For recipients without Canva access, you can export your presentation and share the file.
From the sharing menu, choose “Download.” Select whether you want to export as a PDF, Powerpoint, or PNG file. You can also add speaker notes and animations.
Once exported, attach the file to an email, upload it to a file-sharing platform, or transfer it however you need to share it with your audience.
Step 10: Create a Public Viewing Link
Your last option for sharing is to create a public view-only link that lets anyone view your presentation with no login required.
From the sharing menu, select “Public View Link” then click “Create View Link.” This generates a unique URL for the published design.
Send out this public link to your wider audience for easy access to the presentation. Disable downloading in the link settings to prevent content theft.
And that covers the main ways to share your Canva presentations! With the right link settings and sharing methods, you can easily distribute your designs to clients, team members, or the general public.
Now put these steps into action and start spreading your amazing Canva presentation creations! Let us know in the comments if you have any other questions.
About The Author
Vegaslide staff, related posts.

How to Print Canva Presentation

How to Make Canva Presentation Animate on Click

How to Download Canva Presentation with Animation

How to Add Background Music to Canva Presentation
Canva Presentations: How to Create and Share Them
Canva may not be your first thought for creating a presentation. However, this popular web-based design tool offers a robust slideshow feature set. We’ll walk through how to create a Canva presentation, present it to your audience, and share it using a variety of methods.
Create a Canva Presentation
If you’ve never made a presentation with Canva, don’t worry. This online graphic design application goes beyond creating images and crafting infographics. Canva makes it super easy to create and set up a presentation for your audience.
On the Canva home page, select Presentations below the Search bar. Then, choose a slideshow size or Canva presentation template to get started.

Note : If you’re using Canva Docs , you can also convert your document to a presentation by selecting Convert at the top. Follow the prompts, and you’ll see your presentation open in the Canva editor.
Once in the Canva editor, use the menu on the left side to add slide elements. You can select or drag items like shapes, images, or text boxes onto your slides.

You can also edit or remove a slide element by selecting it and using the tools that display near the item or in the top toolbar. For example, you can change the style of text or transparency of an image.

Be sure to check out the full set of Canva presentation tools in the editor. You can add animations, insert slide transitions, use the grid view to rearrange presentation slides, and more.
Set Up the Presentation
After you tap your creativity to make an attractive and informative presentation, you can add notes, clock your speaking time, and adjust the slide durations.
Add Presenter Notes
To add presenter notes to a slide, select Notes in the bottom toolbar. Then, type your note in the panel that displays on the left. You can then move to your other slides and add notes the same way.

When you finish, deselect Notes in the toolbar.
Use the Timer
If you’d like to time your presentation, you can use the built-in countdown Timer feature. Select Timer in the bottom toolbar to display the timer. By default, the timer is set for five minutes, but you can change this using the plus and minus buttons.

Press the Play button to start the countdown, the Pause button to temporarily stop the timer, and the Reset button to restart the timer.

To close the Timer, deselect Timer in the toolbar.
Set the Slide Duration
Maybe you’re using Autoplay (described below) and would like to display particular slides for a longer or shorter time. You can adjust the slide duration for each or all slides in two different ways in Canva.
Use the Duration Slider
Expand the bottom section by selecting the Show Pages arrow. Then, choose Duration on the left to see the default timing for each slide.

Select a slide thumbnail (page) and hover your cursor over the left or right side of it to display the duration slider. Then, drag the slider in or out to shorten or lengthen the duration.

When you finish, deselect Duration in the toolbar and optionally use the Hide Pages arrow to minimize the bottom section.
Use the Timing Feature
Another way to change the duration of a slide is by using the Timing option at the top of the editor. Select a slide to see its duration and choose the current timing to enter a new duration, or use the slider to adjust it.
You can also turn on the toggle to apply the new duration to all pages (slides) in the presentation.

To close the Timing tool, deselect it in the top toolbar.
Show a Canva Presentation
The great thing about creating a presentation in Canva is that you can present from it as well. If you prefer not to download and present using a different application, you have a few options to show your slideshow directly from Canva.
When you’re ready to present or practice your presentation, select Present on the top right. You’ll then see the options below.

Present in Full Screen Mode
Choose the Present full screen option to enter presentation mode. You’ll see your presentation consume your entire screen and have controls at the bottom.

Use the arrows on the left to move through the slides and the controls on the right to zoom, interact, use shortcuts, or exit full-screen mode.
Use Presenter View
To see your notes and controls on one screen with your presentation on another for your audience, choose Presenter view .

Your screen shows the time, a count-up timer, and other controls for a countdown, AutoPlay, and the font size for your notes.
You can drag the other screen wherever needed for your audience to view.

Present and Record
Maybe you want to incorporate your smiling face into your presentation. For this, pick the Present and record option to record yourself live as the presentation plays. You can then share the whole presentation as if you’re in the same room.
Note : This feature is currently only available when using the Google Chrome web browser.
You’ll see your face appear in a circle on the bottom left of the presentation. You can use the Pause and End recording buttons at the top to control the recording as well as see your presenter notes.

When you finish, you’ll see a link that you can copy and have the option to download the recorded presentation immediately.

Use Autoplay
Like Autoplay for a PowerPoint presentation, this is one more way to present a slideshow using Canva. With Autoplay, you can start the presentation and let it play on its own. This is ideal for kiosk presentations or when you are unable to present yourself.

When you choose Autoplay , the presentation begins and moves through each slide using the Durations you set (explained earlier). You can also manually control the presentation if needed using the same tools as the Present Full Screen option.
Share a Canva Presentation
Along with or instead of actually presenting a slideshow with Canva, you can share it in a variety of ways. Whether you want to collaborate with your team, download the file to your device, or pop the presentation up on social media, Canva has you covered.
Select Share in the top right corner and then choose one of the following ways to share.

Collaborate With Others
Maybe you want to work on the final presentation with a team member or coworker. You can grant access to others and provide them with a collaboration link.
Enter the people, groups, teams, or email addresses in the People with access field. Then, open the Collaboration link drop-down menu and pick Anyone with link to provide access.

Download a Presentation
If you’d like to save your presentation to your device or download it as a Microsoft PowerPoint file, this is easy too.
Select Download and use the File type drop-down to pick PDF, PPTX, GIF, PNG, or another format.
You can then choose to flatten the PDF, include notes, or download only certain pages (slides).

Share on Social Media
Want to post your presentation directly to Facebook, Instagram, or another social media network? Select Share on social , choose the location, and follow the subsequent prompts to sign in and set up the social media post.

More Sharing Options
If you don’t see the sharing avenue you want, don’t despair because there are even more. Select More at the bottom of the Share menu.
You’ll then see sections for Share, Social, Save, Messaging, Design, and More Options giving you a ton of sharing methods. As examples, you can obtain a public link, send it to your phone, get an embed code for your blog, upload it to Dropbox or Google Drive, send it to Slack or WhatsApp, and more.

Will You Create a Presentation in Canva?
Now that you know the basics, are you going to use Canva for your next presentation? If so, let us know what you think of the tools and features. For doing even more, check out how to blur a face in a photo using Canva .

Sandy Writtenhouse is a freelance technology writer and former Project, Department, and Program Manager. She turned her education, job experience, and love of technology into a full-time writing career. With all sorts of gadgets in her home and her hands, she seeks to help others make life easier through technology. Read Sandy's Full Bio
Read More Posts:
Creating and Sharing a Professional Canva Presentation
Learn how to create stunning and professional canva presentation.
Discover the tips and tricks to make your slides stand out and captivate your audience.
Canva is a versatile graphic design tool that can be used for a variety of purposes, including creating professional presentations. Whether you’re a student, a business professional, or someone who simply wants to impress an audience, Canva has all the features you need to design eye-catching presentation that grabs attention and delivers your message effectively.
Understanding the Basics of Canva
Before we dive into the world of Canva presentations, let’s first understand what Canva is all about. Canva is a web-based design tool that allows users to create stunning visuals, ranging from social media graphics to posters and presentations. It offers an intuitive interface and a wide range of pre-designed templates to help users get started quickly and easily.
Canva has revolutionized the way people create visuals for their personal and professional projects. With its user-friendly features and extensive library of design elements, Canva has become a go-to tool for individuals and businesses alike.
When you first visit the Canva website, you’ll be greeted with a clean and modern interface. The homepage showcases some of the most popular design categories, such as social media posts, presentations, and flyers. This allows you to quickly navigate to the type of project you want to create.
Setting up your Canva presentation first requires an account, which is a straightforward process. Simply click on the “Sign up” button and fill in your details. You can choose to sign up with your email address or use your Google or Facebook account for a seamless registration process.
Once you’re logged in, you’ll have access to a plethora of design tools and resources that will help you create professional-looking presentations. Canva offers a wide range of fonts, colors, and graphics to choose from, allowing you to customize your designs to match your unique style or brand identity.
In addition to the design elements, Canva also provides a variety of templates to get you started. Whether you’re creating a presentation for a business meeting or a slideshow for a school project, Canva has a template that will suit your needs. These templates are professionally designed and can be easily customized to fit your content.
One of the standout features of Canva is its collaboration capabilities. You can invite team members or colleagues to work on a design together, making it a great tool for group projects or remote teams. The real-time collaboration feature allows everyone to see changes as they happen, ensuring seamless communication and efficient workflow.
With Canva’s drag-and-drop functionality, designing presentations becomes a breeze. You can easily add text, images, and shapes to your slides, rearrange them with a simple drag of the mouse, and resize them to fit your layout. This intuitive interface makes it accessible for users of all skill levels, from beginners to experienced designers.
Once you’re satisfied with your Canva presentation, Canva offers various options for exporting and sharing your work. You can download your Canva presentation as a PDF, PowerPoint, or image file, making it easy to share with others or present it in different formats.
Overall, Canva is a powerful and versatile design tool that empowers users to create visually stunning presentations. Whether you’re a student, professional, or entrepreneur, Canva has the tools and resources to bring your ideas to life and make a lasting impression.
Exploring Canva’s Interface
Navigating the Canva dashboard is a breeze, even for beginners. The interface is clean and user-friendly, making it easy to find the tools and features you need. The dashboard is divided into several sections, including a toolbar at the top, a sidebar on the left, and a canvas area in the center where you can design your presentations.
One of the key components of Canva’s interface is its tools. These tools allow you to manipulate and customize elements of your designs, such as text, images, and background colors. Understanding how to use these tools is essential for creating professional presentations that stand out.
Let’s take a closer look at the toolbar. At the top of the dashboard, you’ll find a range of options that give you control over the design process. For example, there’s a text tool that lets you add and edit text in your presentation. You can choose from a variety of fonts, sizes, and styles to create the perfect look for your content. Additionally, there’s an image tool that allows you to upload your own images or choose from Canva’s extensive library of high-quality stock photos. This tool also lets you crop, resize, and apply filters to your images, giving you full creative control.
Moving on to the sidebar, this is where you’ll find even more tools and features to enhance your designs. One notable tool is the shapes tool, which allows you to add various shapes to your presentation. These shapes can be resized, rotated, and customized to fit your needs. Whether you want to add a simple circle, a starburst, or a speech bubble, the shapes tool has got you covered. Additionally, the sidebar contains options for adding icons, charts, and even videos to your presentation. This wide range of options ensures that you can create visually appealing and engaging content.
Now, let’s focus on the canvas area. This is where the magic happens – where you bring your ideas to life. The canvas area is like a blank canvas, waiting for you to unleash your creativity. Here, you can arrange and layer elements, adjust their positions and sizes, and experiment with different layouts. You can also add backgrounds, apply gradients, and play with transparency to create stunning visual effects. The canvas area provides a spacious and flexible workspace that allows you to design presentations that truly reflect your unique style and vision.
As you can see, Canva’s interface is not only intuitive but also packed with powerful tools and features. Whether you’re a beginner or an experienced designer, you’ll find everything you need to create professional presentations that leave a lasting impression. So, dive in, explore the interface, and let your creativity soar!
Designing Your First Canva Presentation
Are you ready to take your presentation skills to the next level? With Canva’s user-friendly interface, designing your first presentation has never been easier. Let’s explore the step-by-step process to create a visually stunning and engaging presentation that will captivate your audience.
Step 1: Choose the Perfect Template
When it comes to creating a Canva presentation, the first step is to select the right template. Canva offers a vast collection of professionally designed presentation templates, each tailored to serve a specific purpose or theme. Whether you’re pitching a business proposal, delivering a keynote speech, or sharing a quarterly report, Canva has got you covered.
Take your time to browse through the impressive selection of templates and choose the one that best aligns with your content and objectives. Remember, a well-chosen template can set the tone for your entire presentation and make it visually cohesive.
Step 2: Unleash Your Creativity
Now that you have the perfect template, it’s time to unleash your creativity and customize your design. Canva’s powerful editing tools allow you to personalize every aspect of your presentation, ensuring it reflects your unique style and brand identity.
Experiment with different color schemes to find the perfect combination that resonates with your message. You can easily change the fonts to match your branding or create visual hierarchy within your slides. Don’t be afraid to play around with the layout options to create a visually pleasing and balanced composition.
Step 3: Enhance with Visuals
A visually appealing presentation is not complete without captivating visuals. Canva makes it effortless to add your own images or choose from a vast library of stock photos and graphics. Whether you need eye-catching icons, stunning illustrations, or high-quality photographs, Canva has an extensive collection to cater to your needs.
Remember, visuals can greatly enhance the impact of your message and help your audience connect with the content. Choose images that are relevant, high-resolution, and align with the overall tone of your presentation. With Canva’s drag-and-drop feature, you can easily position and resize visuals to create a polished and professional look.
Step 4: Fine-Tune and Review
Once you have customized your presentation to your heart’s content, it’s crucial to take a step back and review your work. Check for any spelling or grammatical errors, ensure consistency in design elements, and make sure your content flows smoothly from one slide to another.
Consider sharing your presentation with a trusted colleague or friend for feedback. Fresh eyes can provide valuable insights and help you identify any areas that may need improvement. Don’t be afraid to make adjustments and fine-tune your design until you are completely satisfied with the final result.
Now that you have learned the essential steps to design your first presentation using Canva, it’s time to put your newfound knowledge into practice. With Canva’s intuitive platform and extensive features, you can create presentations that not only impress but also effectively communicate your message to your audience. Get ready to captivate, inspire, and leave a lasting impression with your beautifully crafted presentation.
Advanced Canva Features for Presentations
In addition to the basic design tools, Canva offers advanced features that can take your presentations to the next level. One such feature is the ability to add and edit text. Canva provides a variety of font styles and sizes, as well as options to align, format, and animate your text. This allows you to create visually appealing and dynamic presentations that captivate your audience.
Another powerful feature of Canva is its image and graphic integration. You can easily add images, icons, and illustrations to your presentations to make them more engaging and visually appealing. Canva also allows you to edit these elements, such as adjusting their size, position, and opacity, to ensure they fit perfectly in your design.
Collaborating on Canva
Canva makes it easy to collaborate with others on your presentations. You can share your Canva presentation with team members, clients, or stakeholders, allowing them to view and edit the design in real-time. This collaborative feature streamlines the feedback and approval process, making it seamless and efficient.
If you’re looking for secure file sharing, look no further than Canva’s integration with Sizle. Sizle is an online file sharing platform that provides advanced security features to protect your presentations. With Sizle, you can confidently share your Canva presentations knowing that they are secure and accessible only to the intended recipients. Learn more about the Canva and Sizle integration here .
Creating professional presentations with Canva is a game-changer. Its intuitive interface, vast collection of templates, and powerful design tools make it the go-to tool for anyone looking to create visually stunning presentations. Whether you’re a beginner or a seasoned designer, Canva is the perfect platform to showcase your ideas and captivate your audience.
So why wait? Start exploring Canva today and take your presentations to the next level. With Canva by your side, creating professional presentations has never been easier or more enjoyable. Embrace the power of Canva and unlock your creativity!
Convert more leads with Sizle.io
Create links, share files and monitor insights – in one place. Used by teams in over 170 countries.
Sizle Resources Team

Tutorials, tips & tricks to be more productive at work.
Convert leads to customers with Sizle.io Trusted by teams in 170 countries. Learn more about Sizle.io
#ezw_tco-2 .ez-toc-title{ font-size: 120%; ; ; } #ezw_tco-2 .ez-toc-widget-container ul.ez-toc-list li.active{ background-color: #f3efff; } Contents
More articles & resources, the ultimate guide to high ticket closing: boost your sales, the ultimate guide to saas sales: boosting revenue with effective strategies, how to password protect a folder: a step-by-step guide.
- What Is Sales Enablement: A Comprehensive Guide
- The Ultimate Press Release Template: A Comprehensive Guide for Effective Communication
- How to Create a Link: A Step-by-Step Guide
- The Ultimate Guide to Enterprise Sales: Strategies and Best Practices
- Choosing a demo deck tool for your pitch
- A Comprehensive Case Study Template: A Step-by-Step Guide
- The Ultimate Guide to Choosing the Best Virtual Dataroom
Recommended For You
Get started.
Sign In Sign Up Pricing Help
Sharing Analytics Approvals Workspaces
Professional Services Technology Sales Media & Advertising Financial Management
Blog About Terms Privacy Support
© 2024 Sizle. All rights reserved
- Professional Services
- Technology Sales
- Media & Advertising
- Access your workspaces
How to Use Canva to Create and Give Presentations
Canva makes it easy to edit text, make GIFs , and create content for social media like Instagram . But Canva also makes it easy to create presentations and if you are in a hurry and forgot your PC, Canva allows you to give that presentation using your smartphone. Here is how you can create and give presentations using Canva while on the move.
Table of Contents
Create Presentation Using Canva Templates
One of the things that make Canva so much easier to use is templates. They offer free and paid templates for almost all sorts of content that you may think of. We will be using a free template to create a presentation on Canva’s web app.
1. Open Canva in your browser and search for Presentation in the search bar.

2. You will be taken to the presentation templates page . You can filter by category or just scroll through until you find something that catches your eye or meets the criteria. You can also click on the empty frame with +sign to create a new presentation from scratch but that would be time-consuming.
Note: Templates with a golden crown icon are paid templates.

3. Click on any template and you will see a pop-up menu with more details about the template. Click on Customize this template to begin making your template. Click on the star icon to bookmark it for later perusal.

4. Now, in the left sidebar, you will find all the slides in the presentation. When you select a slide, you will be able to edit it on the right side. Each element can be edited or removed including text, image, and various elements. It is easy to add, edit, and format text .

5. You can choose from a variety of apps from the marketplace to make your work easier including AI apps like Dall-E. Simply click on Apps in the left sidebar and choose the one that you want to use.

6. You can also draw on slides or use stock images from sources like Pixabay and Pexels without having to leave Canva.

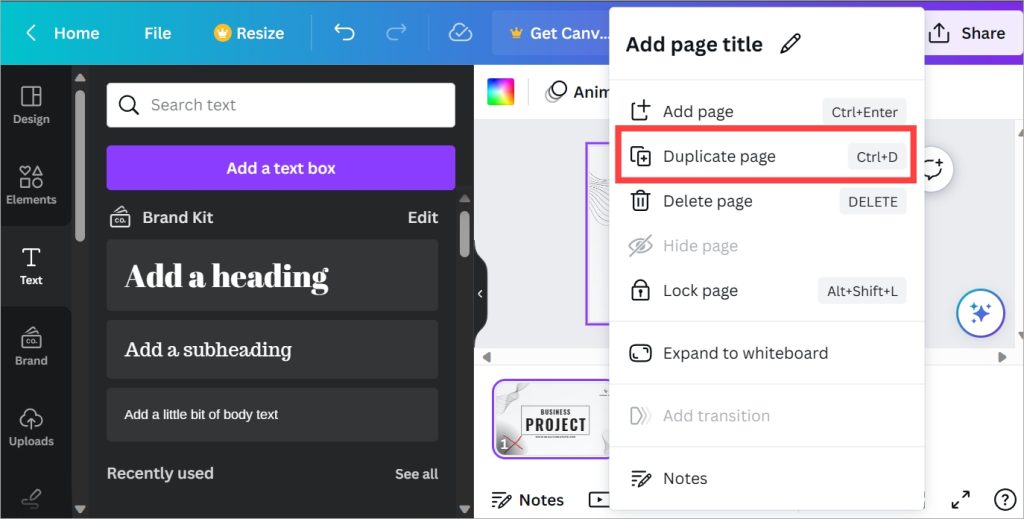
7. To add a slide, click on the plus icon at the bottom. You can also right-click on the existing slide and select Duplicate page to create an identical new slide that will retain the formatting and layout of the first slide. So all you have to do is change the text and some elements.
When you are happy with the presentation, you have a couple of options. Let’s have a look at them in the below sections.
Give a Presentation Using Canva
There are two ways to do it. You can present a presentation made in Canva using both the web app and the Android or iPhone app.
Give Canva Presentation on PC
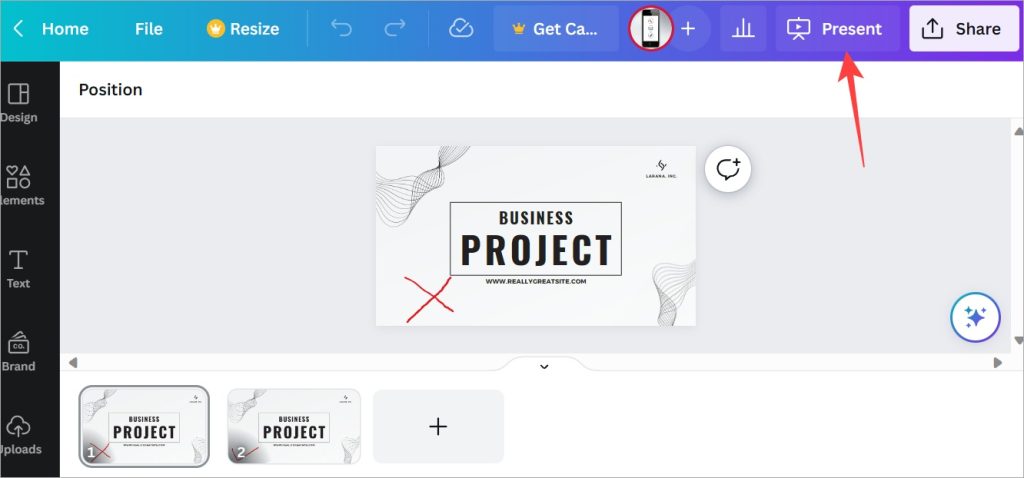
1. Go to Canva homepage and click on Projects in the left sidebar.

2. Click on the presentation that you want to give to open it.

3. Click on the Present button in the upper right corner. You will see three options to present.
- Present full screen – this will begin a full-screen presentation for everyone to see.
- Presenter view – this presents the slides that you have created along with notes that you may have.
- Autoplay – this will let you set a timer so that once you begin the presentation on Canva, slides will change after the chosen time (in seconds) automatically.

4. Once you selected a form of presentation, click on the Present button to begin.
Have you heard of Adobe Spark? We did an in-depth comparison between Canva and Spark . Find out who won and why.
Give Canva Presentation on Mobile
If you are working remotely or traveling and don’t have your laptop on you, Canva allows you to give presentations directly from mobile.
By Sharing Presentation Link
Open the Canva app and go to the Projects tab. Now open the presentation and then select the Presentation menu (TV icon).
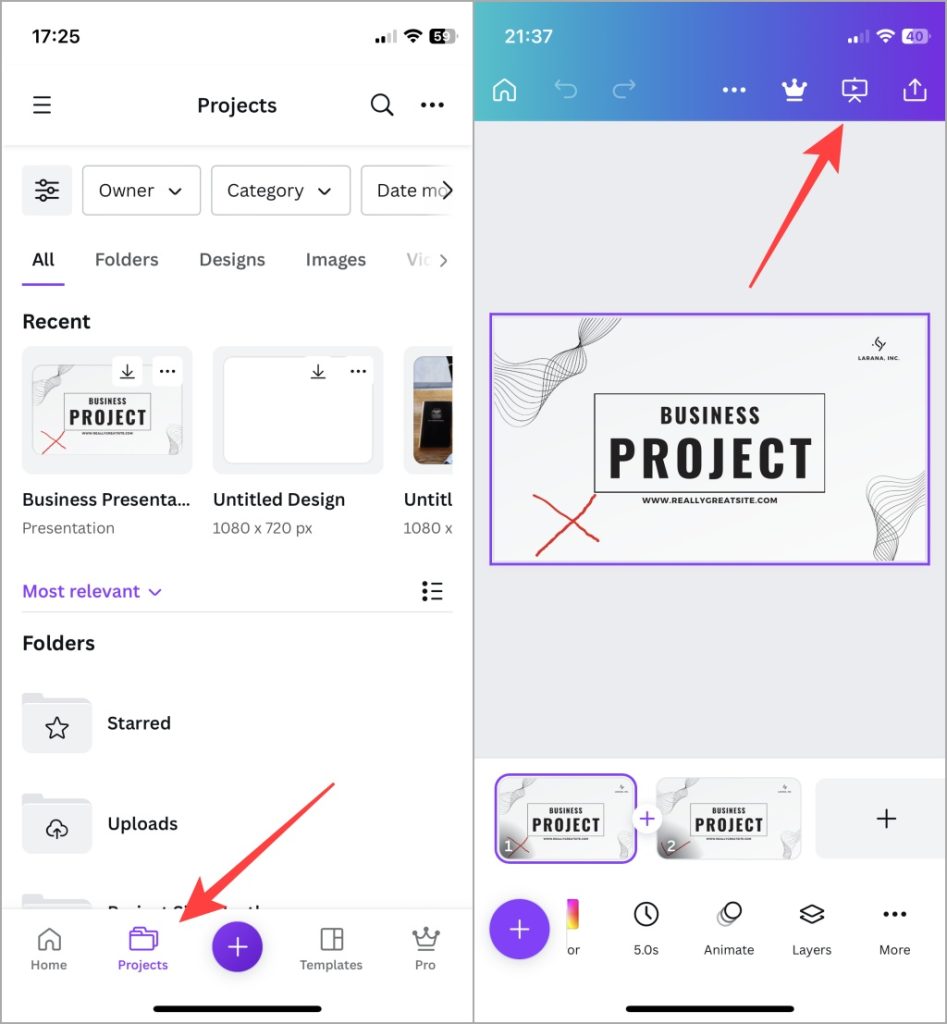
If you are casting your mobile screen on a bigger screen, this will work beautifully.
Using Phone as Remote to Give Presentations
This is one neat trick up Canva’s sleeve. You would have noticed how presenters on stage have a small remote in their hands that they use to change slides. You don’t need anything but your smartphone to give presentations saved on Canva now. And it is quite easy.
1. Open the presentation on your web or mobile Canva app. Here we are using the web app. Click on the Present button to begin the presentation.
2. Select an option depending on how you want to present. We discussed the three options above. Now click on Present button.

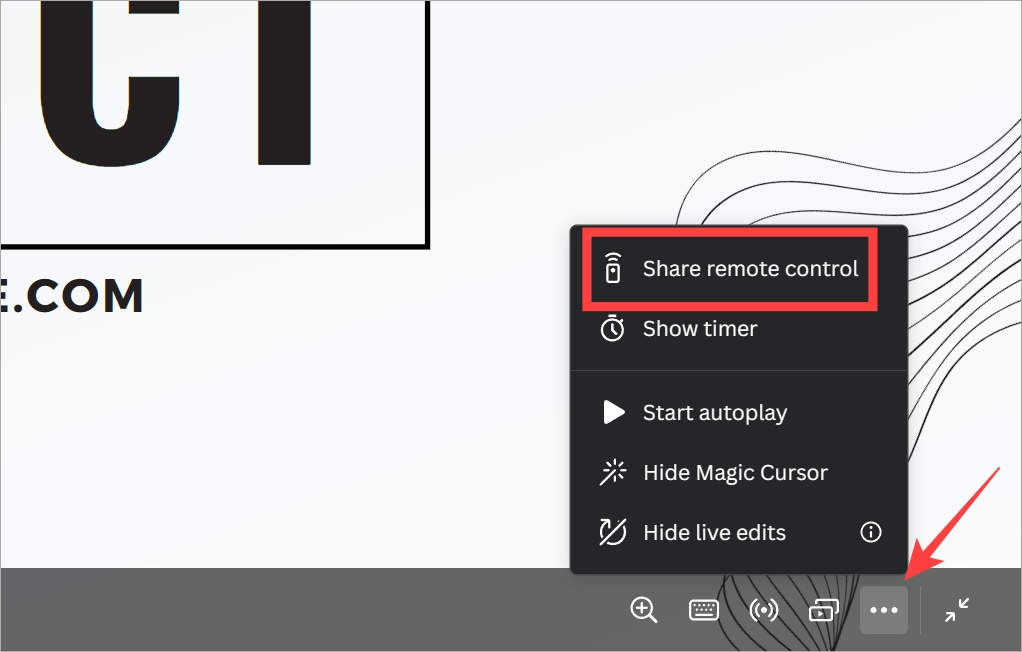
3. Once the presentation begins, click on the meatballs menu (three-dot icons) at the bottom right corner of the screen and select Share remote control option.
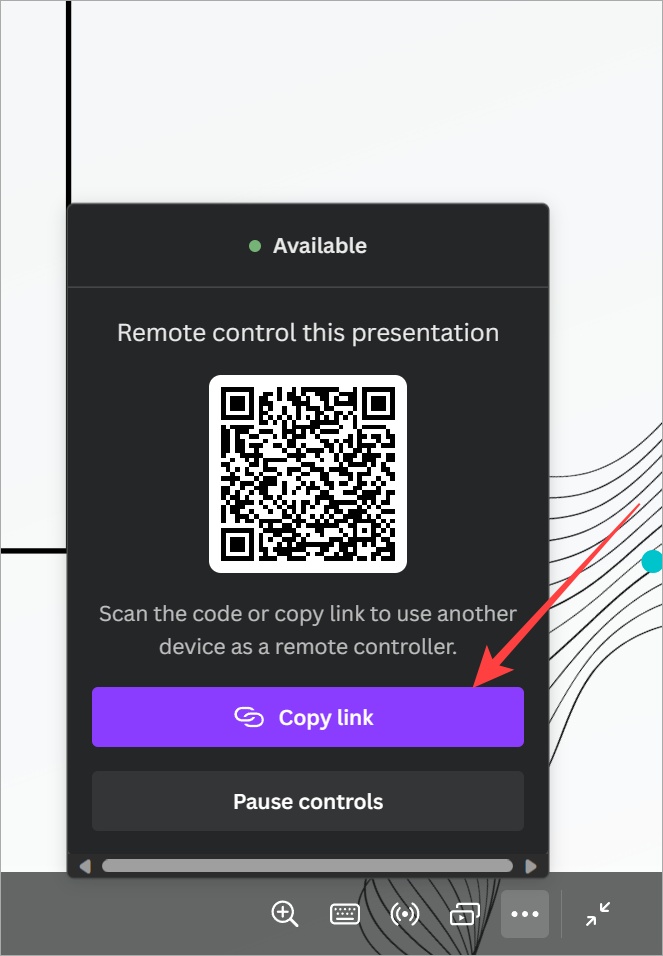
4. Either scan the QR code or Copy the link and paste it on your mobile browser. Any browser will do.
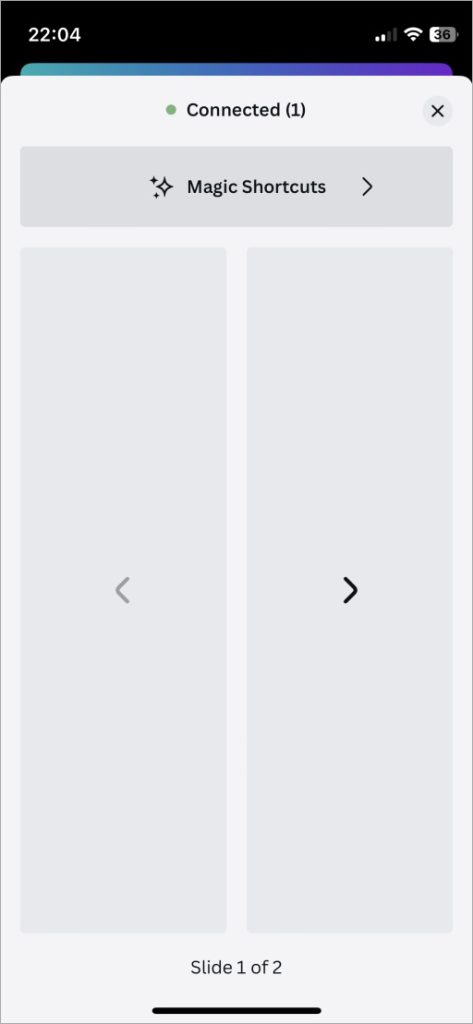
5. You can now control the presentation and slide movements right from your mobile browser. Here is how it looks. Tap on the left or right button to move slides.
Presenting, Canva!
Canva not only makes creating presentations easy thanks to the wide variety or free and paid templates, but it also offers intuitive ways to present your slides. But that’s not all that Canva can do. We use Canva to create featured images, resize images , make background transparent , and so much more.

Gaurav Bidasaria
Gaurav is an editor here at TechWiser but also contributes as a writer. He has more than 10 years of experience as a writer and has written how-to guides, comparisons, listicles, and in-depth explainers on Windows, Android, web, and cloud apps, and the Apple ecosystem. He loves tinkering with new gadgets and learning about new happenings in the tech world. He has previously worked on Guiding Tech, Make Tech Easier, and other prominent tech blogs and has over 1000+ articles that have been read over 50 million times.
You may also like
How to check storage type and speed of..., 4 best airpods apps for android to get..., 10 ways to fix circle to search not..., this is the best way to lock whatsapp..., you’re using your galaxy phone wrong if you..., how to lock apps on your samsung galaxy..., how to switch back to google assistant from..., what do icons and symbols mean in messages..., 5 ways to mark all messages as read..., how to use transcribe assist on samsung galaxy....

Make AND RECORD Your Presentations in Canva
I'm going to be honest with you, if you've been recording presentations via Loom or Zoom, you no longer need to add that step. Canva has integrated recording into the editor so you can record your presentations and export audio files if necessary. I'll show you how to make that happen so you can simplify your virtual presentations in the future. Without further ado, let's hop in.
Canva Presentation is an incredible way for you to design powerful and engaging presentation slides. In a previous post, I specifically covered how you can import an old PowerPoint into Canva , refresh the look, and even export it as a PowerPoint file. So if you missed that the tutorial feel free to check it out here . But in this tutorial, I'm really going to emphasize all of the options that are available if you are presenting or recording your presentation. Canva allows you to really make that presentation more engaging through a lot of the features that they have built-in and I want to make sure that you guys see Canva from the admin side of things, that you see the things that you can click on within the Canva Design Editor to accomplish tasks as you are presenting your presentations. So if you do not have access to Canva Pro and you would like access free for 45 days, feel free to utilize my link lashondabrown.com/canva45 . With a Pro account, you are going to have access to all of the features that I demo in this tutorial.
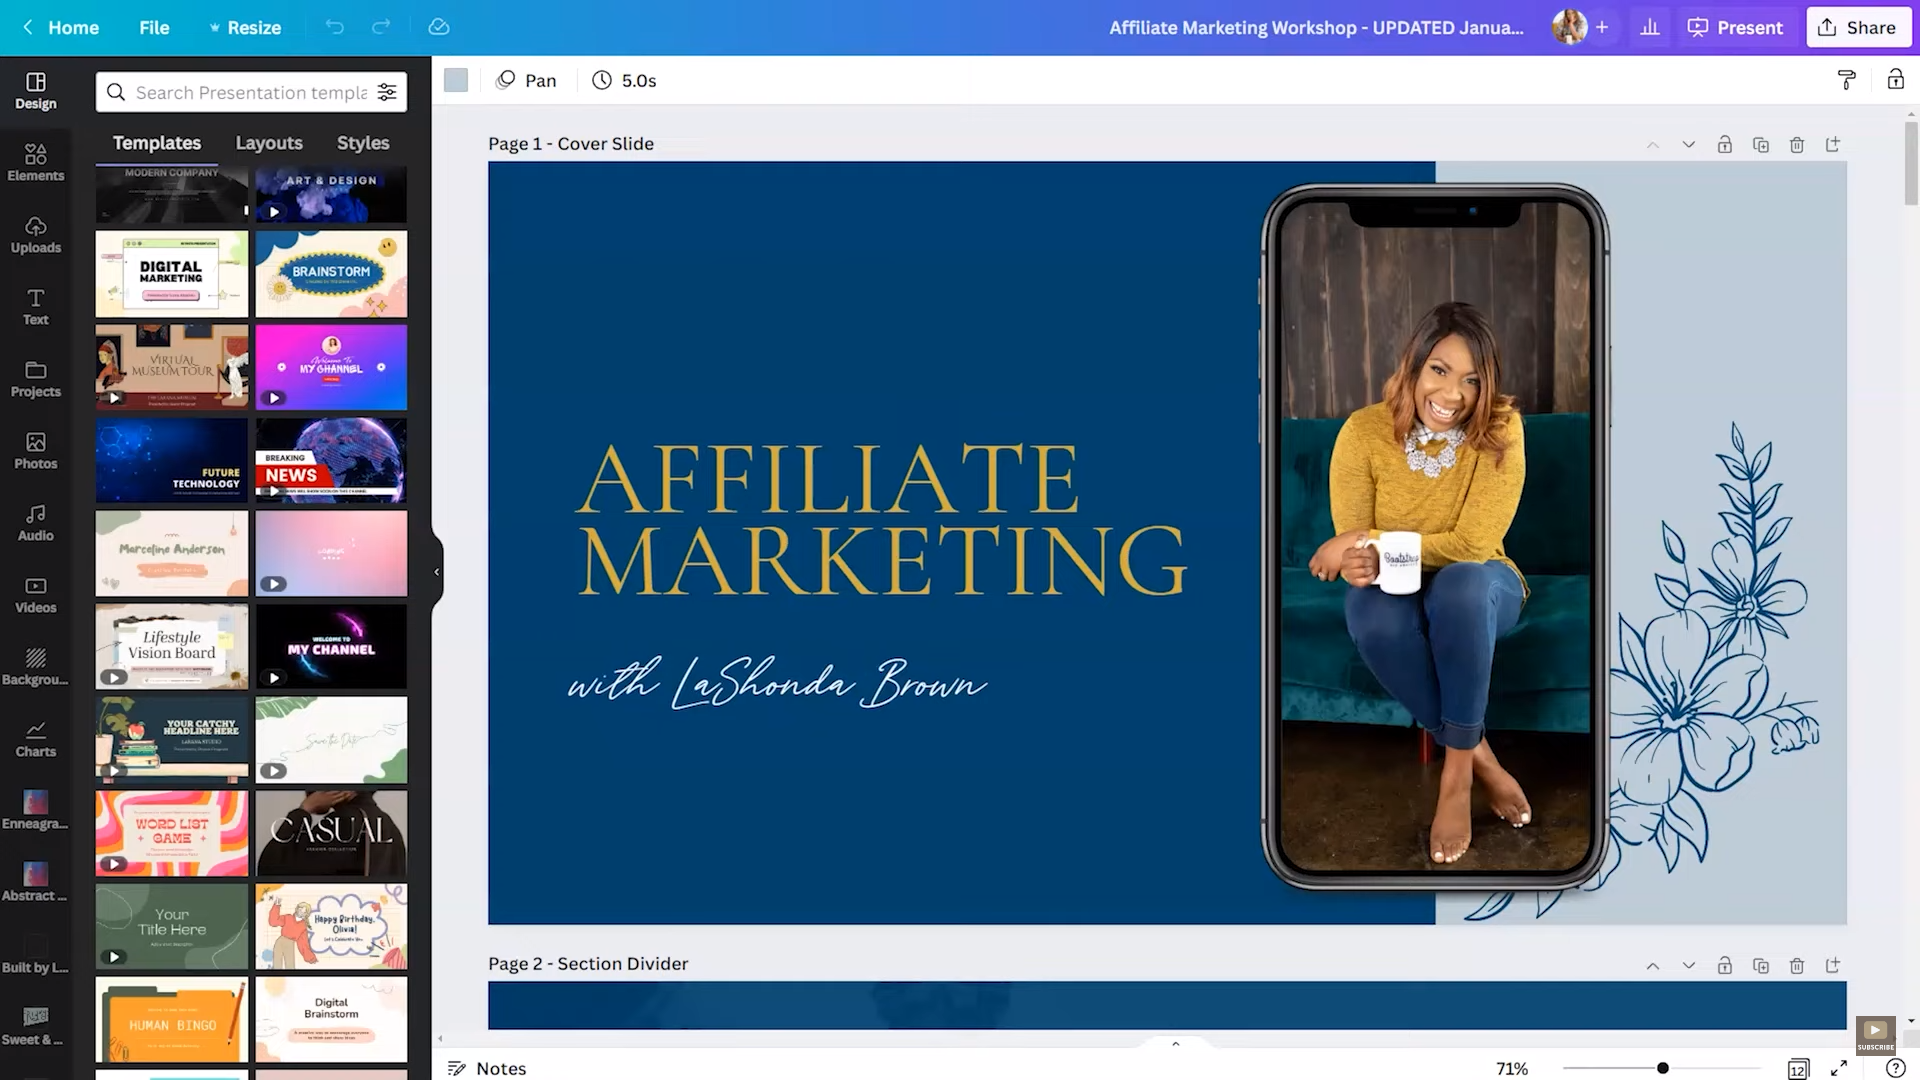
If you are starting from scratch, you can always search for presentations within Canva and there are over 11,000 templates to choose from. Now for this example, I'm actually going to use a previous slide deck that I created about affiliate marketing. What's interesting about my journey as a full-time content creator, is I actually took a gap year between 10 years of client work and becoming a full-time content creator. So my income was heavily slanted toward affiliate marketing and I get some incredible conversion rates on the tools that I recommend. For some of the companies that I work with, my conversion rates are as high as 60%. So I'm asked to speak about this a lot and so this is a slide deck that I reference quite often to show people how to do what I do.

Now this slide deck has 12 different slides and it's one of my text-heavy presentations. But quite often when I am speaking on a stage, I tend to have more photos versus text to make it more engaging for an in-person audience. But if I'm teaching just a very quick webinar, masterclass, however, I tend to have more text on screen. So you have a little cover slide with my name and my photo, you have a cover at the end with my contact information, what you'll learn in this session, and then the different slides.
Now within Canva you have a couple options and I want to make sure you are aware of in the top right-hand corner. Present will allow you to present your presentation to an in-person or virtual audience. So imagine this button is reserved for when you have an audience available. But if you are recording your presentation and you want to go to the Canva recording studio, you're actually going to click on the share button and I'm going to show you what that looks like.
When you click on present you have three options. Number one, you can do a standard presentation, which will allow you to advance your slides at your own pace, you can use autoplay to set a speed and have your slides progress automatically, or you can do Presenter View which will allow you to view your notes and your upcoming slides. I'm going to select Presenter View but you also have the option to share your presentation so that people can view your slides without editing it. So if you happen to share your slides after a presentation, I would use the view-only link so your students don't have the ability to change the wording of your slide.
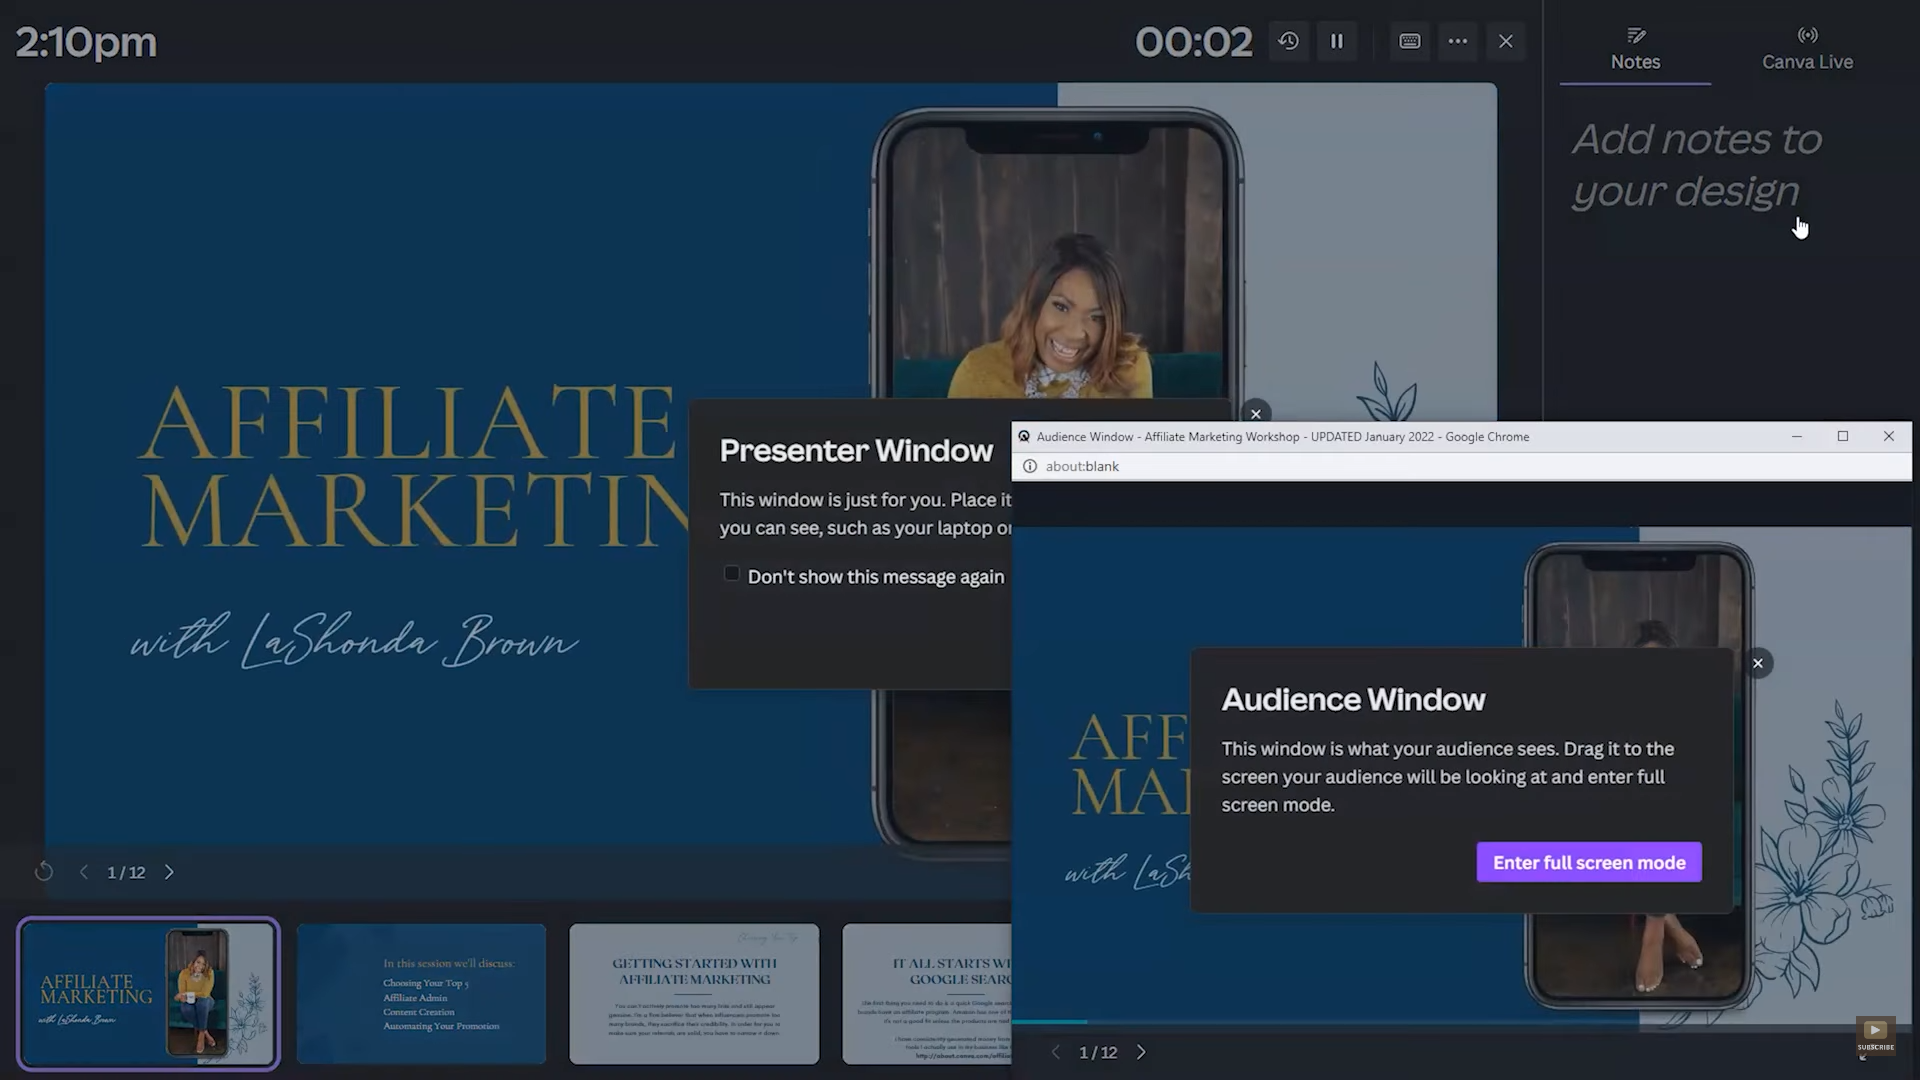
Now once you click on Presenter View, you're going to see a couple options. If you happen to have two screens, I would encourage you to actually drag the audience window on your secondary screen. If not, you can just minimize this or close it but ultimately the audience window shows you what your audience can see when you're presenting. So they cannot see your notes and they cannot see your upcoming sides. So feel free to use those to help you to stay on topic and to not get lost in your presentation.
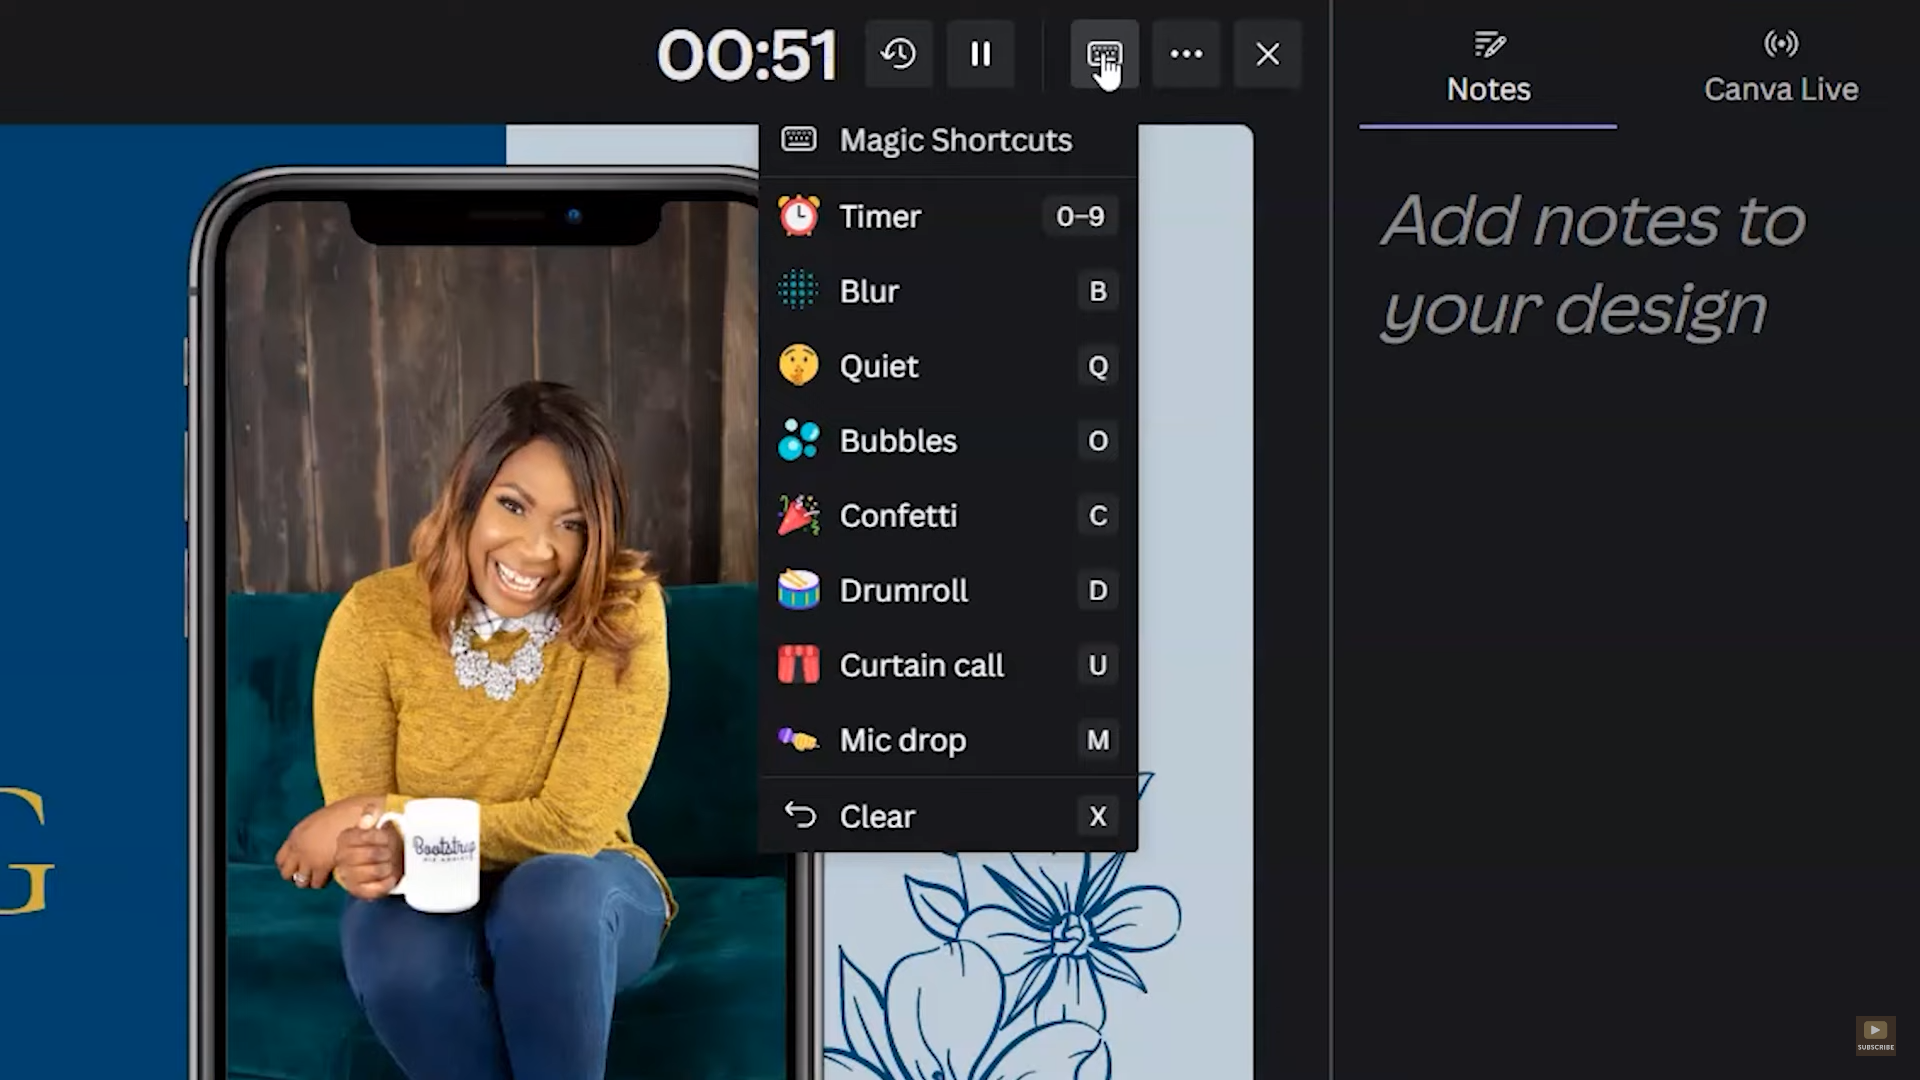
You also have a few options at the top when you're in Presenter View. You have the ability to use Magic Shortcuts which are so much fun. You can add a blur, you can add a quiet emoji, confetti, drumroll, curtain call, or mic drop. These are really fun ways to engage your audience and they can't see you doing this. You can also use the remote control to use some of these Magic Shortcuts. I will feature the remote control in another post. But if you click on those three dots, this is how you will access the share ability.
To get access to a 45-Day FREE trial of Canva Pro visit https://lashondabrown.com/canva45
This is the longest free trial available for Canva and was provided to me as a Canva Verified Expert. Use this affiliate link to claim your 45-Day trial and support the channel at no additional cost to you.
So if you are presenting in person and you want someone else to be progressing your slides or adding the little effects, all you need to do is click on those three buttons and share your remote control with the person helping you or with your own cell phone so that you can turn a cell phone into a clicker. So those are just some of the few options that are available if you are using Canva to present your presentation.
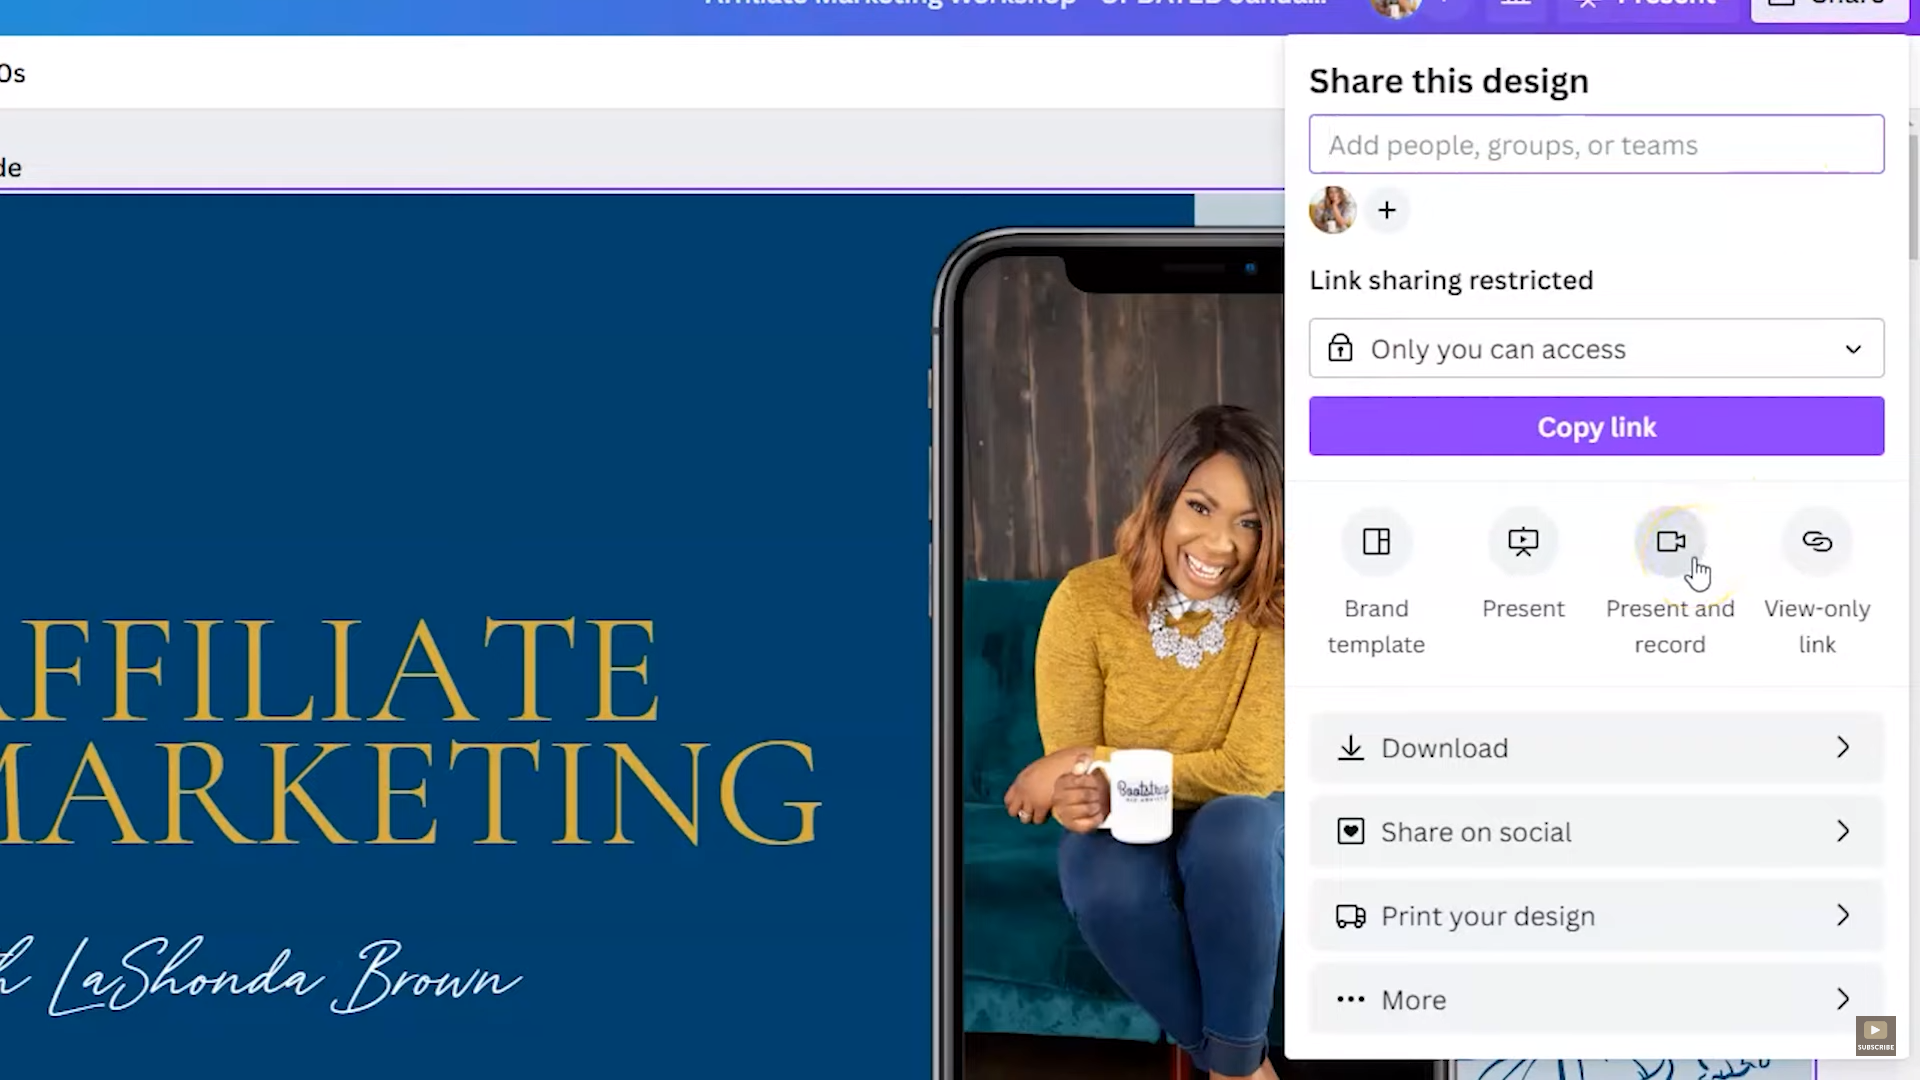
If you click on Share, I want you to notice something really special under the Copy Link button. You're going to see a little button that says present and record. So before we were just presenting our slides, but now we have the option to record and by clicking on present and record, it's going to send you to the Canva recording studio. Which looks a lot like Loom if you look carefully. We're going to click on Go to recording studio and you're going to see some options. First of all, you want to allow Canva to see your camera and to have access to your microphone, if that's something you want to do.
So for this one, I am going to just show you what it looks like on a really crappy webcam. The other camera that I have is currently set up for live streaming. But if you don't want to be seen at all, you don't have to allow your camera. So if you're just using Canva to simply record your voice as you're presenting your slides, that's an option. We're going to tell Canva you are allowed to see my camera and you are allowed to see to use my microphone.
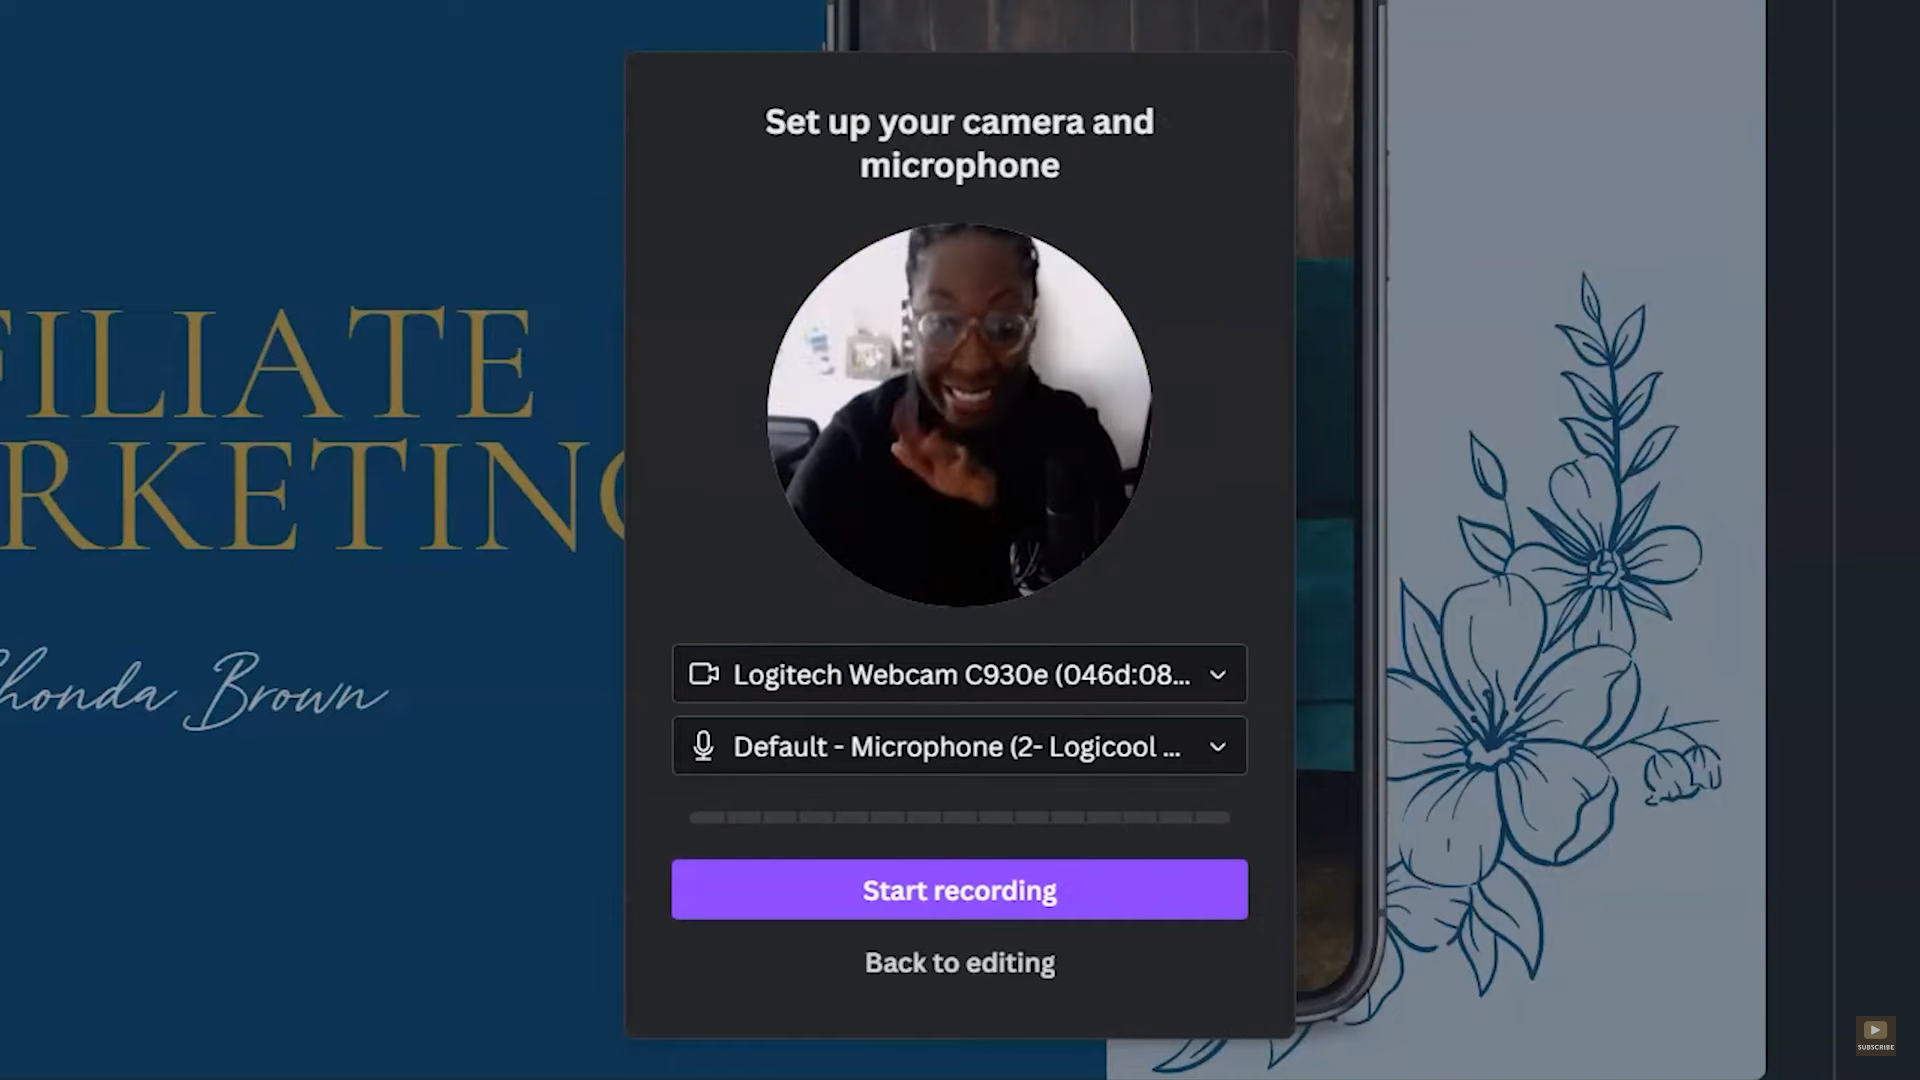
Okay, here we are. So trust me typically I would have a better video feed but this is just for the example. We're just using a very old Logitech webcam and I am going to switch the default microphone to my Rode microphone which is you know, my little podcaster mic that's on an arm and we're going to hit start recording. So it's going to count me down which is really nice for me to take a little breath and you can see down in the left-hand corner. It is recording me actually giving the presentation so I could say, “Hello and welcome to the Affiliate Marketing Webinar, where I teach you how to generate passive income by referring people to tools that you use in your business. In this session, we're going to discuss choosing your top five, affiliate admin, content creation, and automating your promotion”.
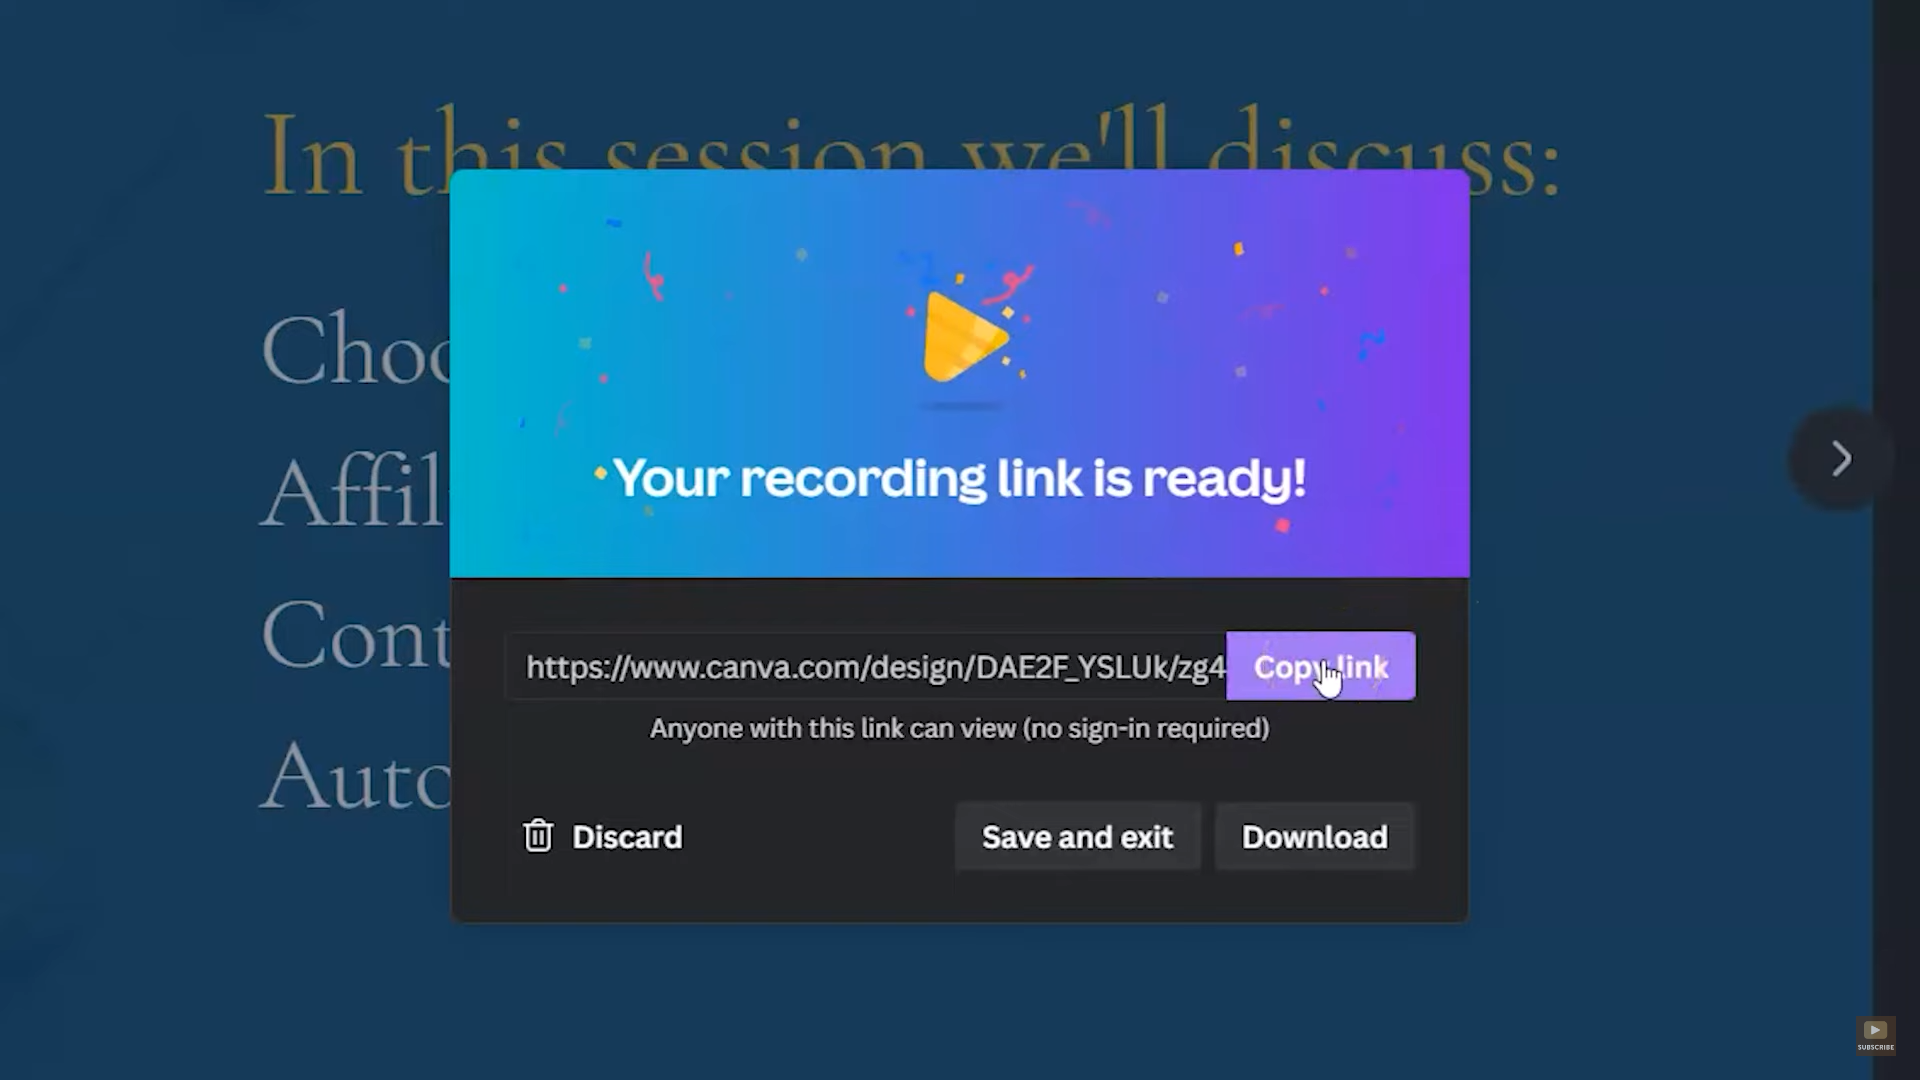
So say for instance, I go through all my slides and I am ready to end the recording. So at the top, I'm going to click end the recording and it's going to upload this to Canva . I wanted to keep it nice and short so you guys can see what happens. But look at that little message you want to keep the browser open while it is creating the recording. Once you do that, it will tell you your recording link is ready. And you have a few options here, you can copy the link so anyone can view without signing into Canva , you can discard this if this was not what you were hoping for, you can simply save the recording and exit, or you can download your recording.
What I love about this new feature within Canva is it allows you to not only create that presentation but to complete the whole process. If you are trying to make a recording of you presenting your session whether it is for a virtual conference, or if it's simply for your team. So like I said, this is going to allow you to potentially eliminate some subscriptions to other services if you were solely using them to record yourself giving a presentation. I love when Canva integrates features to help us to save money in the long run, you know, Bootstrap Biz Advice is all about trying to help you to grow a biz without breaking the bank. So what I find those little tricks within Canva I'm going to make sure you know about it. And I would encourage you to share this post with any fellow educator you know who may not be aware that this is an option within Canva .
Thanks so much for reading this post. I'm LaShonda Brown, Canva Verified Expert from Virginia. If you would like a Canva Pro free trial for 45 days, visit lashondabrown.com/canva45 . If you like this post, you'll want to watch my video about refreshing your old PowerPoints with Canva next. Until next time to tata for now.
Pin This Post
you might also like:

We explain and teach technology, solve tech problems and help you make gadget buying decisions.
How to Create Presentations in Canva
Canva recently introduced new tools to create docs, whiteboards, videos, websites, and presentations. As such, you no longer need to rely on traditional software solutions like Google Slides, PowerPoint, or Keynote to create an upcoming business presentation. You can easily create presentations in Canva using its familiar suite of editing tools.

Canva offers real-time collaboration, several export options, a present tool, AI add-ons, and much more to make a professional PPT. Canva also lets you make instant presentations with pre-filed slides. Without further ado, let’s get started.
Pick Up an Aspect Ratio and Template
Before you start, make sure to pick a relevant aspect ratio for your presentation. If it’s a traditional PPT, go with a 16:9 aspect ratio. If you plan to show your PPT on mobile, use the 9:16 aspect ratio.
Tablet users can start with a 4:3 aspect ratio. Canva also offers some ready-to-use templates to get started. We highly recommend starting with a template to save some time.

You can also filter templates via style, theme, feature, and color. For example, you can check company, marketing, corporate, marketing, school, and other templates. Most templates are free to use, while some may require a Canva Premium subscription.
Under templates, you also find an option to create instant presentations. You can enter a prompt and check Canva’s suggestions to get started.

Customize a Page With Editing Features
Once you pick up a template, you have the option to add all pages to your presentations. You can click ‘Apply all pages’ and check every slide at the bottom. You can always select a slide and hit delete to remove it from your presentation.

Canva lets you change every aspect of the template with different text styles, filters, and image editing tools. You can change color, tweak transparency, copy style, and more.

We suggest spending some time with editing tools to customize your Canva presentation and add some personal touches.
Add Graphics, Stickers, and Images
Your presentation will not seem as interesting without graphics, stickers, images, and videos. Unlike Google Slides or PowerPoint, you don’t need to import media files to Canva to complete your slides. You can easily add relevant elements from the sidebar.
Step 1: Open a slide in your Canva presentation.
Step 2: Select Elements from the sidebar. Add graphics, icons, stickers, tables, videos, and more.
Step 3: You can explore the AI image generator and turn your creative ideas into images and videos with a single click.

You can add simple descriptions and even turn generated images into videos. Canva also offers a long list of graphics packs in several categories. The possibilities are endless here. It’s up to you to make a compelling slide using useful tools.
Tweak Page Animation
Once you create a page, tweak its animation to make a smooth transition between pages.
Step 1: Select a slide in Canva.
Step 2: Click Animate at the top.
Step 3: Check basic, exaggerated, photo movement, and other animation types from the left sidebar.

You can also tweak the animation intensity, which is great.
Add Presenter Notes
Do you plan to present your Canva PPT on a video conference? You can add notes to each slide so they appear during the Presenter view (more on that later).
When you create a PPT, select a slide and hit Notes at the bottom. Enter your notes that you want to remember or talk about during a video meeting.

Collaborate and Edit in Real Time
Similar to Google Slides and Microsoft PowerPoint, Canva lets you share and edit a presentation in real time. You can take inputs from your colleagues and create a share-worthy presentation in no time.
Step 1: When you are done making changes to your presentation, click Share at the top.
Step 2: Enter people, groups, or your team. Expand the collaboration link menu and select Anyone with the link.
Step 3: Expand the permission menu and select Can edit.

You can also share a link with view or comment-only permission. Select the Copy link and share it with your co-workers.
Enable Presenter View
Presenter view is a thoughtful touch from Canva to give presentations over a Google Meet or Teams call.
You can open a presentation in Canva and select Present at the top. Click Presenter View and check two windows opening up on your computer.

One window shows your presentation with notes open on the sidebar. Another window displays the current slide you are sharing with others over a call.

Download and Share Your Presentation
As expected, Canva gives several options to share and export your presentation. When you complete your presentation, click Share in the top-right corner and expand Download.
You can convert a presentation to PDF, PPTX (Microsoft PowerPoint compatible), MP4, JPG, PNG and SVG formats. Check our dedicated post if you wish to print your Canva presentation .

Use Canva Like a Pro
Canva has done a solid job, granting users access to rich tools to create a convincing presentation. We can’t wait to see how the Australian startup enhances our PPT experience with AI features in the future. Speaking of which, we would love to see a feature similar to ‘Design Ideas from Microsoft PowerPoint’ on Canva. Do let us know if you use Canva for presentations in the comments below.
Was this helpful?
Last updated on 07 January, 2024
The above article may contain affiliate links which help support Guiding Tech. However, it does not affect our editorial integrity. The content remains unbiased and authentic.

The article above may contain affiliate links which help support Guiding Tech. The content remains unbiased and authentic and will never affect our editorial integrity.
DID YOU KNOW

Parth Shah is an evergreen freelance writer covering how-tos, app guides, comparisons, listicles, and troubleshooting guides on Android, iOS, Windows, Mac, and smart TV platforms. He has over five years of experience and has covered 1,500+ articles on GuidingTech and Android Police. In his free time, you will see him binge-watching Netflix shows, reading books, and traveling.
More in Internet and Social

How to Force Dark Mode on Google Chrome for All Websites

4 Best Offline Maps for Android and iPhone
Join the newsletter.
Get Guiding Tech articles delivered to your inbox.
How to Share Canva Templates: A Step-by-Step Canva Tutorial
Unlock seamless design collaboration with our step-by-step guide on how to share Canva templates. Ideal for designers, marketers, and educators, learn to distribute creative work and maintain brand consistency across your team with Canva's easy sharing features in a digital-first world.
Timur Köklü
Sharing your creative work efficiently and effectively is vital in today's collaborative and digital-first environment. Canva, a popular graphic design platform, enables its users to create and share their designs with ease. Whether you're a professional designer looking to streamline your workflow, a marketer sharing brand templates, or an educator providing resources, Canva's sharing options are designed to facilitate a seamless exchange of ideas and designs. Canva templates serve as a starting point for creating consistent graphics, ensuring that anyone on your team can produce on-brand content without starting from scratch every time.

Navigating through Canva's sharing capabilities is straightforward. With options to share for view-only access, as editable designs, or as a template for others to use, there are multiple layers of sharing that suit various needs. Canva also offers the ability to manage permissions, giving designers control over who can edit or comment on shared designs. This control helps maintain the integrity of the original template while still allowing for necessary collaboration and input.
Key Takeaways
- Canva templates allow for consistent brand and design work across teams.
- Multiple sharing options cater to different needs such as view-only or editable access.
- Permission management ensures control over the template editing process.
Understanding Canva Templates
Canva templates are pre-designed layouts that provide a foundation for users to create their own unique designs. These templates offer a range of design elements tailored for various purposes and can significantly streamline the creative process.
Canva's Template Features
Canva offers an extensive library of templates encompassing a vast array of themes and styles. One can find templates for social media posts, presentations, posters, and more. Each template includes customizable design elements such as images, fonts, and color schemes, enabling users to tailor their creations to specific needs or branding guidelines. Additionally, Canva's interface allows for easy editing and collaboration, which makes it possible to modify templates without any advanced design knowledge.

Importance of Template Sharing
Sharing Canva templates is crucial for efficient collaboration and consistency in branding or project development. When a user shares a template, they enable others to use that design as a starting point, preserving the original layout and style. This sharing promotes a cohesive visual identity across various media and allows teams to work together effectively even if they are geographically dispersed. The ability to share and use Canva templates can also empower educators and businesses to maintain a standard quality and appearance across all design materials.
How to Create and Save Your First Canva Template
Creating a template in Canva streamlines the design process and ensures consistency across various graphics. It is vital that one pays attention to the selection of elements and organization within Canva's platform to produce a reliable and reusable template.
Selecting the Right Design Elements
When embarking on template creation , it's crucial to select appropriate design elements that align with the intended message or brand identity. This includes choosing a suitable color scheme , font pairings , and adding images that resonate with the target audience. Begin by selecting a blank canvas or one of Canva's pre-designed layouts as a starting point. Next, incorporate elements that are not only aesthetically pleasing but also functional within the design's context.
- Color Palette : Choose a palette that reflects the brand or purpose of the design. Limit the palette to a few cohesive colors.
- Fonts : Select fonts that are readable and complement each other. Consider the fonts' impact on the design's tone.
- Images : Utilize relevant and high-quality images, which can be sourced from Canva's vast library or uploaded if custom imagery is needed.

Saving and Organizing in Folders
Once the template design meets satisfaction, it is important to save and categorize it for ease of future access. In Canva, saving a design as a template allows for easy reusability, and organizing templates into folders ensures efficient management of one's designs.
- Saving : Click on the 'Save' button frequently while designing to prevent any loss of work. To save the design as a template, click on 'File', then 'Save as Template'.
- Folders : To organize designs into folders, go to the Canva homepage, select 'All your designs', hover over the created template, click the '•••' (more) button , and choose the 'Move to folder' option. Here, either select an existing folder or create a new one.
Personalizing Templates
Personalizing a Canva template allows the user to tailor designs to their specific needs by changing elements like text and images and ensuring brand consistency with brand kits .
Customizing Text and Images
Users can customize text within Canva templates to fit their message by selecting the text element and typing in the new content. They can also adjust the font size, style, and color to match the desired aesthetic. For images , users have the option to replace default visuals with their own or choose from Canva’s extensive library. To edit images , one simply needs to click on the existing image and either upload a new one or select from available assets.

Using Brand Kits for Consistency
For those needing to adhere to brand standards, Canva’s brand kit feature is essential. It allows users to save their brand colors, fonts, and logos for consistent use across all designs. By applying a brand kit , all templates can instantly reflect a company’s brand identity, maintaining a cohesive look across various materials. Users can access the brand kit by navigating to the account settings and uploading their specific brand assets.
Collaborative Features in Canva
Canva's collaborative features empower users to work together efficiently on design projects. Whether it's real-time editing or sharing resources across a team, Canva provides tools to streamline the collaborative process.
Real-Time Collaboration
Canva enables real-time collaboration allowing multiple users to work on the same design simultaneously. When a user is editing, their changes appear instantly on the screens of all other collaborators. This feature enhances productivity as it allows for immediate feedback and alterations, ensuring that the creative process is a synchronous and dynamic experience.
Team Collaboration and Canva for Teams
Canva for Teams is designed for group projects and extended collaboration. Teams can create and share design folders, with the ability to set different access rights like 'view' or 'edit'. This fosters a well-organized workflow as responsibilities can be clearly divided among team members. In addition, Canva for Teams offers a centralized space for all design assets, which simplifies the process of managing and distributing brand-consistent materials.
Managing Template Permissions
When sharing designs on Canva, users have control over how their templates are handled by others. Proper management of permissions ensures that templates are edited and viewed by the right people.
Setting Edit and View Permissions
To set permissions, one must first open the design and click on Share . Within the People with access dropdown, the creator can adjust whether a user, team, or group has the ability to edit or just view the design. By clicking on the permissions icon next to a user’s name, options to change their level of access are presented. Granting Can edit permissions allows users to make changes and comments, while Can view only allows for viewing without the ability to alter the original template.

Understanding Canva Pro Permissions
Canva Pro users benefit from advanced permission settings, which allow for a more granular level of access control. For instance, a Canva Pro account enables the owner to restrict downloads and lock elements within a design, preventing unauthorized changes to sensitive components. Additionally, with Canva Pro, one can assign templates to specific team templates making them easily accessible to the entire team while still controlling who has edit access .
Managing template permissions is a straightforward process in Canva, with a clear distinction between edit and view roles, and additional benefits for Canva Pro subscribers to protect their creative work.
Sharing Canva Templates
When it comes to sharing Canva templates, users have two efficient methods: through shareable links or directly via email. Both approaches enable seamless collaboration and easy distribution of designs for beginners and advanced users alike.
Using Shareable Links
To share a Canva template via a shareable link , a user first needs to create a link in Canva. The steps are straightforward:
- Open the desired design in Canva.
- Select Share from the top menu bar on the right side.
- Select 'Template link' from the options.
- Click on Create template link .
- Copy the link provided and share it with the intended recipients.

A shareable link allows users to access the design as a template, giving them the capability to edit their own version without altering the original. For those looking to distribute their design widely, this method is particularly helpful, as the same link can be used by multiple people.
Sending Templates by Email
For sending a template directly to specific email addresses, the process involves a few additional steps:
- Open the template in Canva.
- Click on the Share button at the top of the page.
- Choose 'Email' to send the design directly.
- Enter the recipient's email addresses.
- Optionally, add a message if needed.
- Click Send .

Sending templates by email is ideal when users want to share their design with a select group of people or for a more personalized distribution. Each recipient receives an invite and can then work on their own copy of the template.
Advanced Sharing Options
When sharing Canva templates, users have advanced options that allow for seamless integration with social media platforms and efficient distribution to external clients. These features enable collaborative feedback and tailored viewing experiences through both public and private links.
Social Media Integration
Canva offers users the ability to directly share their designs on various social media platforms. One can generate a share link to watch , which allows followers and fans to view the design. This is particularly useful for social media managers and content creators who need to showcase their work promptly:
- Instagram & Facebook: Share a template with a link that viewers can watch and comment on.
- Twitter & LinkedIn: Distribute links that directly display the template in the post for immediate feedback.
Disclaimer: Users should always verify that their share settings are configured to public if they want the design to be accessible to all social media users or private if the content is meant for a select audience.
Sharing With External Clients
For those working with external clients , for example if you want to sell Canva templates or just connect with other people, the share options are crafted to simplify collaboration:
- Templates can be shared via a private link that clients can use to leave feedback without making the design publicly accessible.
- To maintain privacy, users should ensure the link settings restrict editing access, allowing clients to comment but not alter the original design.

- In cases where a broader audience viewing is required, e.g. for Etsy, designers can opt for a public link .
- Public links are ideal for clients who prefer to share designs with their teams or through their networks for wider commentary.
By utilizing these advanced sharing options, Canva enhances the user experience, making it more interactive and client-friendly. Who knows if this will be your next passive income alternative?
Best Practices for Canva Template Sharing
Sharing Canva templates effectively maximizes productivity and efficiency within a collaborative environment. Implementing an efficient workflow and utilizing Canva's robust features ensures smooth communication and the collection of actionable feedback.
Efficient Workflow Management
An efficient workflow is paramount when sharing Canva templates. They should use Canva's sharing option to maintain a streamlined process, ensuring that each member gets the correct version of the template. Utilizing collaborative folders significantly helps in organizing designs and templates relevant to different teams or projects. One can share a Canva design as a template such that recipients can make edits without affecting the original. It's valuable to standardize the protocol for naming files and versioning to prevent confusion among team members.
Leveraging Canva Features for Productivity
Canva offers a suite of features to amplify productivity. Teams should leverage the ability to share their design as a template link , allowing others to use the design without altering the source file. Additionally, setting permission levels is crucial for maintaining template integrity. For instance, choosing 'view only' can prevent unintended edits whereas providing 'edit access' invites collaboration. Encouraging team members to leave comments directly on the design facilitates clear communication and precise feedback , making the revision process more efficient.
Troubleshooting Common Issues
When sharing Canva templates, users sometimes encounter hiccups with link sharing and template access. This section addresses these issues and provides straightforward solutions to ensure seamless collaboration and editing.
Link Sharing Problems
Issue : The recipient cannot view the shared template link.
- Solution : Verify that the link is correct and that it hasn't been deleted . If necessary, regenerate the sharing link from the design page in Canva ( Learn how to share a design ).
Template Access and Editing Concerns
Issue : A user has the template link but cannot access it to view or edit .
- Confirm that the template hasn't been deleted .
- Ensure the user is logged into the correct Canva account that has permission to access the template.

Issue : The user can view the template but cannot make changes.
- Verify that the user has the correct permission level. Only those with 'Can edit' access can make changes to the template. Modify permissions through the 'Share' settings if necessary ( How to see shared templates in Canva ).
Frequently Asked Questions
This section addresses common inquiries regarding the creation, sharing, and troubleshooting of Canva templates. These answers provide straightforward guidance for optimizing collaboration within the Canva platform.
How can I create a template in Canva that others can edit?
To create an editable template in Canva, simply design your project as usual. Once finished, click on the 'Share' button and select 'Share a link to edit.' By doing so, others can make edits to the design, ensuring collaborative work.
What is the process for sharing a folder with a client in Canva?
When sharing a folder in Canva, click on the folder you want to share and select 'Share' from the options. Choose 'Invite members to folder,' you can enter your client's email to share access directly, allowing them to view and edit folder contents.
How do I enable link sharing for my Canva designs?
To enable link sharing, open the desired design, click on 'Share,' and then choose 'Share a link to use as a template.' This allows you to copy the link which you can then distribute to others, granting them access to use your design as a template.
Is it possible to share all of my Canva designs at once?
Currently, Canva does not offer a direct feature to share all designs at once. Users must share each design individually or group designs into a folder to share multiple designs together.
How can I access templates that have been shared with me on Canva?
Accessing shared templates in Canva is straightforward. You will receive a notification or an email with a link. Click on the link to access the template directly in Canva, where you can use it as intended.
What steps should I take if I'm experiencing issues with sharing on Canva?
If sharing issues arise, ensure you have the correct permissions and the user you're sharing with has a Canva account. If problems persist, contact Canva's Help Center for further assistance and troubleshooting advice.
How to Save Canva as PDF: Easy Step-by-Step Guide
Learn how to save your Canva designs as PDF with our simple guide. Whether for print or digital use, ensure the high quality of your projects with Canva's versatile saving options. Ideal for presentations or marketing materials, find out how to maintain your design's integrity across all devices.
How to Flip Text in Canva: Quick Tutorial for Perfect Mirroring
Discover how to flip text in Canva with our easy guide. Perfect for beginners, learn to add a unique touch to your designs, from social media to presentations, by mastering the art of flipping text horizontally or vertically on Canva's user-friendly platform
How to Change Stroke Size in Illustrator: A Step-by-Step Guide
Adobe Illustrator is a powerful tool for graphic design, known for its precision and versatility in vector art creation. One of the fundamental aspects of working with vector graphics is the ability to adjust stroke size. Strokes are the outlines of shapes and paths that can vary in width, and
How to Add Pages in Illustrator: A Step-by-Step Guide
Working with Adobe Illustrator, knowing how to manage and add pages—or artboards as they are known in the program—is crucial for an organized and efficient design process. Artboards in Illustrator are akin to individual pages within a document and can be utilized for creating multi-page documents, various versions
How to Draw in Canva While Presenting
Home » Blog » How to Draw in Canva While Presenting

Founder of CanvaTemplates.com & Professional Graphic Designer
Jake Tucker
Canva Templates is reader supported. When you buy through links on our site, we may earn an affiliate commission. Learn more
Canva is a popular graphic design tool that enables users to create stunning visuals, including presentations, posters, and infographics. Drawing in Canva is an excellent way to add a personal touch to your designs and make them more engaging. It is also a useful skill to have when presenting your work to others.
Drawing in Canva is a straightforward process that can be done while presenting. Users can choose from a range of drawing tools, including pens, markers, highlighters, and erasers, and customize their thickness, color, and transparency. To access the drawing options, users need to select the Draw tab from the editor side panel. Once they have chosen their preferred tool, they can start drawing directly on the canvas.
Incorporating drawing into presentations can help to break up the monotony of text-heavy slides and capture the audience’s attention. It can also be an effective way to illustrate complex ideas and concepts. With the right tools and techniques, anyone can learn how to draw in Canva while presenting and take their presentations to the next level.
Understanding Canva
Basics of canva.
Canva is a user-friendly graphic design platform that allows users to create a wide variety of designs such as social media graphics, posters, flyers, and presentations. Canva provides users with an extensive library of templates, images, and fonts that they can use to create their designs. Canva is a cloud-based platform, which means that users can access their designs from anywhere as long as they have an internet connection.
Canva offers both free and paid plans. The free plan provides users with access to a limited number of templates, images, and fonts. The paid plan, on the other hand, provides users with access to a larger library of templates, images, and fonts, as well as additional features such as the ability to resize designs, upload custom fonts, and create folders to organize designs.
Creating an Account
Creating an account on Canva is quick and easy. Users can sign up using their email address or their Google or Facebook account. Once they have created an account, they can start creating designs immediately. Canva also offers a mobile app that users can download on their iOS or Android device to create designs on the go.
To get started on Canva, users can choose from a variety of design types such as social media graphics, presentations, posters, and flyers. Once they have chosen a design type, they can select a template to use as a starting point for their design. Users can then customize the template by adding their own text, images, and other design elements.
Related Posts:
- How to Create a Background Gradient in Canva
- Canva Brand Review (Logo, Color Schemes, Digital Strategies in 2023)
- Canva Rulers, Guides, & Gridlines
- Canva Color Wheel
- How to Adjust Margins in Canva Designs
Drawing Tools in Canva
Canva offers a wide range of drawing tools to help you create visually appealing designs. Here are the three main categories of drawing tools in Canva:
Shapes and Lines
Canva provides a variety of shapes and lines that you can use to create your designs. You can find them in the “Elements” tab on the left-hand side of the editor. Once you have selected a shape or line, you can resize it, change its color, and adjust its transparency to fit your design. You can also add text to your shapes and lines by using the “Text” tool.
Freehand Drawing
The freehand drawing tool in Canva allows you to draw anything you want with your mouse or touchpad. You can find it in the “Draw” tab on the left-hand side of the editor. You can adjust the thickness, color, and transparency of your lines to create the perfect look for your design. You can also use the eraser tool to correct any mistakes you make.
Canva’s text tools allow you to add text to your designs in a variety of ways. You can choose from a selection of fonts, sizes, and colors to create the perfect look for your design. You can also adjust the spacing and alignment of your text to make it look just right. Canva also provides a variety of text effects, such as drop shadows and outlines, to help your text stand out.
- How to Paint in Canva: Digital Art Creation with Canva’s Paint Tool
- How to Draw a Curved Line in Canva
- How to Blend Photos in Canva
- How to Create a Strikethrough Effect in Canva
- How to Crop Freehand in Canva
Creating a Presentation in Canva
Canva is a powerful design tool that can be used to create stunning presentations. Whether you’re presenting to a small group or a large audience, Canva has everything you need to create a professional-looking presentation. In this section, we’ll cover the basics of creating a presentation in Canva, including choosing a template, adding slides, and using drawing tools in slides.
Choosing a Template
The first step in creating a presentation in Canva is to choose a template. Canva offers a wide variety of templates for different types of presentations, including business presentations, educational presentations, and more. To choose a template, simply click on the “Presentations” button on the Canva homepage and browse through the available templates. Once you’ve found a template you like, simply click on it to open it in the editor.
Adding Slides
Once you’ve chosen a template, the next step is to add slides to your presentation. To add a new slide, simply click on the “Add a new page” button in the left-hand sidebar. You can then choose from a variety of different slide layouts, including title slides, text slides, and image slides. To customize your slide, simply click on the element you want to edit and use the drawing tools in the toolbar to make your changes.
Using Drawing Tools in Slides
Canva offers a wide variety of drawing tools that you can use to customize your slides. These tools include shapes, lines, text boxes, and more. To use a drawing tool, simply select it from the toolbar and then click and drag on your slide to create the element. You can then customize the element by adjusting its size, color, and other properties using the toolbar.
- How to Replace an Image in Canva
- How to Import Canva Into Google Slides
- How to Easily Record Voice Over in Canva
- How to Make a GIF in Canva
- How to Use the Canva YouTube Video Editor
Sharing Your Presentation
Once you have created a presentation in Canva, you can easily share it with others. There are two main ways to share your presentation: exporting it as a file or presenting it live with Canva.
Exporting Your Presentation
To export your presentation as a file, click on the “Download” button in the top right corner of the editor. You can choose from a variety of file formats, including PDF, PNG, and PowerPoint. This is a great option if you want to share your presentation with someone who doesn’t have access to Canva or if you want to upload it to a website or other platform.
Presenting Live with Canva
Canva also offers a live presentation feature called Canva Live. This allows you to present your design in real-time to an audience. To use Canva Live, click on the “Present” button in the top right corner of the editor. From there, you can choose to present your design in full screen or presenter mode. You can also enable comments to allow your audience to ask questions or provide feedback during the presentation.
Canva Live is a great option if you want to engage with your audience in real-time and get immediate feedback on your presentation.
- Canva Live: What is it and How Can Presenters Use it?
Tips and Tricks for Drawing While Presenting
Drawing in Canva while presenting can be a fun and interactive way to engage your audience. Here are some tips and tricks to make the most out of your drawing experience:
Interactive Drawing
One way to make your presentation more interactive is by using Canva’s drawing tool to encourage audience participation. For example, you can ask your audience to draw something on their own device and then share it with the rest of the group. This can be a fun icebreaker activity or a way to get people thinking creatively.
Another way to use interactive drawing is by using Canva’s collaboration feature. This allows multiple people to work on the same drawing at the same time. You can use this feature to brainstorm ideas or create a group drawing that everyone can contribute to.
Using Shortcuts
Canva has a number of shortcuts that can make drawing while presenting much easier. Here are a few to keep in mind:
- Ctrl + Z : Undo your last action
- Ctrl + Shift + Z : Redo your last action
- Ctrl + C : Copy your selection
- Ctrl + V : Paste your selection
- Ctrl + X : Cut your selection
- Ctrl + D : Duplicate your selection
Using these shortcuts can save you time and help you work more efficiently.
- Are Canva Images Copyright Free?
- Canva Color Palette Generator
- Benefits of Using Canva Templates
- Why Is Canva Being So Slow? Tips to Improve Performance
- Best Canva Apps

- SUGGESTED TOPICS
- The Magazine
- Newsletters
- Managing Yourself
- Managing Teams
- Work-life Balance
- The Big Idea
- Data & Visuals
- Reading Lists
- Case Selections
- HBR Learning
- Topic Feeds
- Account Settings
- Email Preferences
How to Make a “Good” Presentation “Great”
- Guy Kawasaki

Remember: Less is more.
A strong presentation is so much more than information pasted onto a series of slides with fancy backgrounds. Whether you’re pitching an idea, reporting market research, or sharing something else, a great presentation can give you a competitive advantage, and be a powerful tool when aiming to persuade, educate, or inspire others. Here are some unique elements that make a presentation stand out.
- Fonts: Sans Serif fonts such as Helvetica or Arial are preferred for their clean lines, which make them easy to digest at various sizes and distances. Limit the number of font styles to two: one for headings and another for body text, to avoid visual confusion or distractions.
- Colors: Colors can evoke emotions and highlight critical points, but their overuse can lead to a cluttered and confusing presentation. A limited palette of two to three main colors, complemented by a simple background, can help you draw attention to key elements without overwhelming the audience.
- Pictures: Pictures can communicate complex ideas quickly and memorably but choosing the right images is key. Images or pictures should be big (perhaps 20-25% of the page), bold, and have a clear purpose that complements the slide’s text.
- Layout: Don’t overcrowd your slides with too much information. When in doubt, adhere to the principle of simplicity, and aim for a clean and uncluttered layout with plenty of white space around text and images. Think phrases and bullets, not sentences.
As an intern or early career professional, chances are that you’ll be tasked with making or giving a presentation in the near future. Whether you’re pitching an idea, reporting market research, or sharing something else, a great presentation can give you a competitive advantage, and be a powerful tool when aiming to persuade, educate, or inspire others.
- Guy Kawasaki is the chief evangelist at Canva and was the former chief evangelist at Apple. Guy is the author of 16 books including Think Remarkable : 9 Paths to Transform Your Life and Make a Difference.
Partner Center
Home / Free Canva Presentation Templates / Clean Minimal Meeting with Animated Icons
Meeting with Animated Icons Slides
- Share this template
Clean Minimal Meeting with Animated Icons
Hey business pros! Ready to jazz up your next team meeting or client presentation? This slide deck is your new best friend. With a sleek black and white theme and simple minimal style, it’s packed with animated icons to keep everyone engaged and not snoozing. Perfect for sales pitches, project updates, or any professional gathering where you want to make a lasting impression. Grab this slideshow template and get ready to make your points stick, all while keeping it stylish and straightforward. Let’s show ’em how it’s done!
Features of this template
- 21 ready-to-use 16:9 slides completely customizable to suit your needs
- Hundreds of charts, frames, lines and shapes to choose from
- Handy animation and transition features for each slides
- Easy downloading or sharing in a wide range of formats
- An easy drag-and-drop tool to help you add graphics
- Page animation features, emojis, color palettes and font sets
- Millions of professionally designed images and photos
- Pre-recorded Talking Presentation tools to help you practice
- A notes feature for adding talking points to your design
- Searchable videos, soundtracks and other audio clips
- Easy collaboration with friends, coworkers and family
People who find this template also visit
- Free PowerPoint Templates
- Free Google Slides Templates
- Customizable and Feature-Rich Canva Templates
- Editor's Choice of Best Presentation Templates
- Popular Presentation Templates
Related templates

Fun teacher about me Slides

Horror Strange Things Movie Slides
Green and white simple business korean style portfolio slides.

Pastel Doodle Fall Activities Binder Slides

Black and Blue Tech Theme for Career Day Technology Slides

Minimal Illustrated Travel Agency Brochure Slides
Supercharge your slides with canva..
Add dynamic GIF's, captivating videos, and stylish photo frames directly from Canva's royalty-free asset library effortlessly. Share or export anywhere, be it PPT or Google Slides.

Magic Write
Go from idea to your first draft *in seconds with Magic Write, our content generation tool powered by OpenAI.

Image generator
Dream it up, then add it to your design. Watch your words and phrases transform into beautiful images.

Background remover
Click to remove image backgrounds, perfect for product photos, headshots, or transparent PNGs.

Export your results to PPT and Google Slides
Canva allows you to export to a perfect PPT or Google Slide when you are done.
Learn how to export from Canva to other formats
Canva to PowerPoint Canva to Google Slides
- 1. Open the template in Canva .
- 2. In Canva click on "Share" at the top right-hand corner, then click "More"
- 3. Scroll down further and you will see "Google Drive" button.
- 4. Choose the "PPTX" or Powerpoint file type. Make sure to click "All Pages" on select pages.
- 5. Your template is exported to Google Slides!
- 1. Click on Canva button to open the design.
- 2. Once the Canva file is opened, click on "Share" at the top right hand corner, then click on "Download"
- 3. Once you clicked on "Download" , choose the "PPTX" or Powerpoint file type
- 4. Your template is now ready for use on Powerpoint!
Professional designs for your presentations
SlidesCarnival templates have all the elements you need to effectively communicate your message and impress your audience.
Suitable for PowerPoint and Google Slides
Download your presentation as a PowerPoint template or use it online as a Google Slides theme. 100% free, no registration or download limits.
- Google Slides
- Editor’s Choice
- All Templates
- Frequently Asked Questions
- Google Slides Help
- PowerPoint help
- Who makes SlidesCarnival?

View, manage, and install add-ins for Excel, PowerPoint, and Word
When you enable an add-in, it adds custom commands and new features to Microsoft 365 programs that help increase your productivity. Because add-ins can be used by attackers to do harm to your computer, you can use add-in security settings to help protect yourself.
Note: This article only applies to Microsoft 365 applications running on Windows.
View installed add-ins

You can directly install add-ins from this page or select More Add-ins to explore.
In the Office Add-ins dialog, select My Add-ins tab.
Select an add-in you want to view the details for and right-click to select Add-in details option.
Click a heading below for more information .
Add-in categories explained
Active Application Add-ins Add-ins registered and currently running on your Microsoft 365 program.
Inactive Application Add-ins These are present on your computer but not currently loaded. For example, XML schemas are active when the document that refers to them is open. Another example is the COM add-in: if a COM add-in is selected, the add-in is active. If the check box is cleared, the add-in is inactive.
Document Related Add-ins Template files referred to by open documents.
Disabled Application Add-ins These add-ins are automatically disabled because they are causing Microsoft 365 programs to crash.
Add-in The title of the add-in.
Publisher The software developer or organization responsible for creating the add-in.
Compatibility Look here for any compatibility issues.
Location This file path indicates where the add-in is installed on your computer.
Description This text explains the add-in function.
Note: Microsoft Outlook has one add-in option in the Trust Center: Apply macro security settings to installed add-ins . InfoPath has no security settings for add-ins.
Permanently disable or remove an add-in
To disable or remove an add-in follow these steps:
Select File > Get Add-ins . Alternatively, you can select Home > Add-ins .
In the Office Add-ins dialog, select My Add-ins tab.
Select an add-in you want to remove and right click to select Remove option.
View or change add-in settings
You can see and change add-in settings in the Trust Center, descriptions of which are in the following section. Add-in security settings may have been determined by your organization so not all options may be available to change.
Select File > Get Add-ins .
Select More Add-ins > Manage My Add-ins.
Select Trust Center > Trust Center Settings > Add-ins.
Check or uncheck the boxes you want.
Add-in settings explained
Require Application Add-ins to be signed by Trusted Publisher Check this box to have the Trust Center check that the add-in uses a publisher's trusted signature. If the publisher's signature hasn’t been trusted, the Microsoft 365 program doesn’t load the add-in, and the Trust Bar displays a notification that the add-in has been disabled.
Disable notification for unsigned add-ins (code will remain disabled) When you check the Require Application Extensions to be signed by Trusted Publisher box, this option is no longer grayed out. Add-ins signed by a trusted publisher are enabled, but unsigned add-ins are disabled.
Disable all Application Add-ins (may impair functionality) Check this box if you don't trust any add-ins. All add-ins are disabled without any notification, and the other add-in boxes are grayed out.
Note: This setting takes effect after you exit and restart your Microsoft 365 program.
While working with add-ins, you may need to learn more about digital signatures and certificates , which authenticate an add-in, and trusted publishers , the software developers who often create add-ins.
Manage and install add-ins
Use the following instruction to manage and install add-ins.
To install a new add-in:
You can directly install popular add-ins on the page or go to More Add-ins to explore.
Select the add-in and select Add . Or browse by selecting Store tab in the Office add-in dialog to find other add-ins to install and select Add for that add-in.
To manage your add-ins:
Select File > Get Add-ins and from the bottom, select More Add-ins. Or select Home > Add-ins > More add-ins.
In the Office dialog, select My Add-ins tab. If you are not able to see your add-ins, select Refresh to reload your add-ins.
Select Manage My Add-in to manage and select Upload to browse and add an add-in from your device.
How to cancel a purchased add-in
If you've subscribed to an add-in through the Microsoft 365 Store that you don't want to continue, you can cancel that subscription.
Open the Microsoft 365 application and go to the Home tab of the ribbon.
Select Add-ins and then select More Add-ins > My Add-ins tab to view your existing add-ins.
Select the app you want to cancel and select Manage My Add-ins .
Under the Payment and Billing section choose Cancel Subscription .
Select OK and then Continue .
Once that's complete you should see a message that says "You have cancelled your app subscription" in the comments field of your apps list.
Why is my add-in crashing?
Some add-ins might not be compatible with your organization's IT department policies. If that is the case with add-ins recently installed on your Microsoft 365 program, Data Execution Prevention (DEP) will disable the add-in and the program might crash.
Learn more about DEP
Get a Microsoft 365 Add-in for Outlook
Get a Microsoft 365 Add-in for Project
Taking linked notes
If you're looking for Help on linking notes in OneNote to a Word or PowerPoint document, see Take linked notes .
Excel Windows Add-ins
If you're looking for Help on specific Excel Add-ins, such as Solver or Inquire, see Help for Excel for Windows add-ins .
If you're looking for additional help with Excel add-ins using the COM Add-ins dialog box, see Add or remove add-ins in Excel .
Get a Microsoft 365 Add-in for Excel

Need more help?
Want more options.
Explore subscription benefits, browse training courses, learn how to secure your device, and more.

Microsoft 365 subscription benefits

Microsoft 365 training

Microsoft security

Accessibility center
Communities help you ask and answer questions, give feedback, and hear from experts with rich knowledge.

Ask the Microsoft Community

Microsoft Tech Community

Windows Insiders
Microsoft 365 Insiders
Find solutions to common problems or get help from a support agent.

Online support
Was this information helpful?
Thank you for your feedback.
- LPGA Newsletters
- LPGA Travel
- Women's Network
- LPGA Professionals
- Members Only
- Lesson Zone
- Membership Information
- Find A Teacher
- Professionals Job Board
- Events Calendar
- LPGA Amateurs
- Become A Member
- Member Login
- LPGA Foundation
- LEADERBOARD
- Changing The Face of Golf
- C-Me Action Plan
- Diversity Policy
- Diverse Supplier Opportunity
- Celebrating the Green
- All Access Series
- LIVE Featured Groups on ESPN+
- LIVE Featured Groups (Geo Restricted)
- Instruction
- Live Stream
- Award Winners
- Hall of Fame
- ROLEX FIRST TIME WINNERS
- ROLEX ANNIKA MAJOR AWARD
- 2024 Player Priority List (PDF)
- TOURNAMENTS
- Download Schedule
- Completed Tournaments
- Drive On Championship
- International Crown
- Solheim Cup
- CME Group Tour Championship
- LPGA Local Qualifying Rounds
- Hilton Grand Vacations TOC
- LPGA Senior Championship
- RACE TO CME GLOBE
- Season Standings
- Past Winners
- Explanation and Points Breakdown
- Projected Points Standing
- CME Group Cares Challenge - Score 1 for St. Jude
- Aon Risk Reward Challenge
- KPMG Performance Insights
Nelly Korda Wins Fifth Consecutive Title at The Chevron Championship
Tickets on sale for the 2024 fm global championship.
- chevron-championship
- Nelly Korda
- Tournament News

THE WOODLANDS, Texas — Nelly Korda collected her fifth straight LPGA Tour victory on Sunday at The Chevron Championship at The Club at Carlton Woods in The Woodlands, Texas in dominant fashion, winning by two shots over Maja Stark.
Korda finished the last seven holes of her third round on Sunday morning, parring in to post a 3-under 69 and sit in a tie for second alongside Brooke Henderson, one shot back of 54-hole leader Haeran Ryu.
Starting her final round just a couple of hours later, Korda parred the first two holes while her groupmates faltered, picking up a pair of back-to-back birdies on holes three and four to lead by two shots over 2024 LPGA Tour rookie Jin Hee Im at 12-under. The 25-year-old grabbed another birdie on the par-5 8th hole to get to 13-under overall, parring the ninth hole to turn in 33 with a three-shot advantage.
Korda made another birdie on the par-4 10th hole to move to 14-under overall before making her first bogey of the round on 11 to drop back to 13-under, the first shot Korda had given back to the field since she bogeyed the 7th hole on Friday.
Meanwhile, Lauren Coughlin was charging up the leaderboard, making birdies on holes 10 and 11 ahead of Korda to get within two shots of the lead. But she gave Korda a little breathing room after making bogeys on 16 and 17, and with just a handful of holes to play, Korda held a four-shot lead.
But the 12-time LPGA Tour winner stumbled again with a bogey on the par-5 15th hole, and after Coughlin made a bounce-back birdie on the par-5 18th hole to post at 10-under total, Korda held a two-shot lead with three holes to play at The Club at Carlton Woods.
After parring the 16th hole, Korda nearly dunked her tee shot on the par-3 17th hole for an ace, ultimately two-putting for par to lead by two shots with just 18 standing between her and the Dinah Shore Trophy.
But Stark wasn’t going to go quietly. After sitting at 9-under and pretty much out of the conversation for majority of the back nine, the Swede birdied the 17th hole and nearly pitched in for eagle on the par-5 18th hole, tapping in for birdie to post at 11-under, now just one shot back of Korda with one hole to play.
Korda wasn’t fazed though, piping her drive down the middle of the fairway and then putting her second shot on the back fringe, sitting within 30 feet of the hole for eagle. She ran her eagle try by just a couple of feet, handily making the nervy come backer for birdie to win her second major title and first since the 2021 KPMG Women’s PGA Championship with a four-day total of 13-under.
“It's just been a crazy, crazy, crazy couple of weeks, with some really solid golf. I can finally breathe,” said a shivering Korda in her winning press conference, still damp from her leap into the lake by 18. “I was really nervous on that back nine. I really, really wanted this win. It feels amazing to get it.
“My first-ever major, competing in a major, was at the U.S. Women's Open at Sebonack, and that was when I dreamt of winning major championships. To have two under my belt now is a dream come true.”
With her 13th career victory, Korda is now the 31st different American to earn 13 or more wins on the LPGA Tour and is the 52nd player ever to win two or more major titles, becoming the ninth player in LPGA Tour history to win at least both the KPMG Women’s PGA Championship and The Chevron Championship.
She joins Nancy Lopez and Annika Sorenstam as the only other player since 1978 to win five consecutive titles and will have a chance to top that pair next week as Korda is currently scheduled to play in the JM Eagle LA Championship presented by Plastpro.
But that’s a tomorrow Nelly concern. For now, she’s just going to soak in this moment, one for which she’s waited quite some time, and finally take a deep breath as her history is finally made.
“I'm going to enjoy this right now, and then I'll think about that,” smiled Korda. “It's been an amazing time. Hopefully, I’ll keep the streak alive. But I've been so grateful to compete week in and week out and get the five in a row.”
Related Articles
)
Nelly Korda Cannonballs Into LPGA History With Win at The Chevron Championship
)
Nelly Korda Takes Lead in Rolex ANNIKA Major Award Standings
)
Take a Look Back at Nelly Kordas Five Consecutive Victories

- Charitable Solicitation Disclosures
- Corporate Sponsors
- LPGA History
- LPGA International
- Sponsorship Opportunities
- Legends of the LPGA
Fan Feature
- LPGA Women's Network
- ADA Act Request
- Anti-Doping Information
- Feedback Form
- Gender Policy
- Integrity Program Information
- Media - Press Site
- Player Login
- Privacy Policy
- Professionals Member Login
- Terms and Conditions
- Ticket Terms and Conditions
Global Tour
- International TV Distribution
Mobile Apps
- Android App
- Top Stories
IMAGES
VIDEO
COMMENTS
Open the design that you want to share. Select Share from the menu bar above the editor. In the text field, enter the email addresses you'd like to share your design with. Separate them with commas (,). If you're in a team you can also search their name and add them directly. Use the dropdown to choose what type of permissions you want to ...
Step 2: Click on the "Share" Button. In the top right corner of the editing screen, you'll see a blue "Share" button. Go ahead and click on it to open up the sharing menu. This menu contains all the options for sharing your Canva presentation, from creating a simple view-only link to enabling real-time collaboration capabilities.
Learn how to share your Canva design with a simple link in this YouTube tutorial. Discover tips and tricks to create stunning graphics with ease.
On the Canva home page, select Presentations below the Search bar. Then, choose a slideshow size or Canva presentation template to get started. Note: If you're using Canva Docs, you can also convert your document to a presentation by selecting Convert at the top. Follow the prompts, and you'll see your presentation open in the Canva editor.
Let's look at how you can share your Canva Presentations with your colleagues. We show you all the options, including as a link, website, directly onto socia...
Share your designs with people, groups or your whole team to start collaborating in real-time.Option 1: From the editor, invite people, groups or your team t...
Canva makes it easy to collaborate with others on your presentations. You can share your Canva presentation with team members, clients, or stakeholders, allowing them to view and edit the design in real-time. This collaborative feature streamlines the feedback and approval process, making it seamless and efficient.
Let's dive in and master the art of presentation sharing on Canva! Share Your Presentation Using Email Invitations or Access Links Sharing via Links from Inside the Editor. When it comes to sharing your presentations in Canva, there are various methods to choose from, ensuring flexibility and ease of use. One of the most convenient ways is ...
By Sharing Presentation Link. Open the Canva app and go to the Projects tab. Now open the presentation and then select the Presentation menu (TV icon). If you are casting your mobile screen on a bigger screen, this will work beautifully. Using Phone as Remote to Give Presentations. This is one neat trick up Canva's sleeve.
Canvahas integrated recording into the editor so you can record your presentations and export audio files if necessary. I'll show you how to make that happen so you can simplify your virtual presentations in the future. Without further ado, let's hop in. CanvaPresentation is an incredible way for you to design powerful and engaging presentation ...
Once you create a page, tweak its animation to make a smooth transition between pages. Step 1: Select a slide in Canva. Step 2: Click Animate at the top. Step 3: Check basic, exaggerated, photo ...
For sending a template directly to specific email addresses, the process involves a few additional steps: Open the template in Canva. Click on the Share button at the top of the page. Choose 'Email' to send the design directly. Enter the recipient's email addresses.
- [Instructor] A Canva Design, such as the presentation that you see here, can be shared with others for viewing or editing. Start with the Canva Design and view that you want to share and then go ...
If you go to your presentation in canva, then in the top right, select Share, then from there you want to choose the Public View Link. This will let them view it like a presentation with animations etc. Let me know how you get on! 😊
Canva Presentations: How to Share Canva Presentations Online with Zoom // If you'd like to learn how to share your beautiful Canva presentations online like ...
How to Use the Canva YouTube Video Editor; Sharing Your Presentation. Once you have created a presentation in Canva, you can easily share it with others. There are two main ways to share your presentation: exporting it as a file or presenting it live with Canva. Exporting Your Presentation
When in doubt, adhere to the principle of simplicity, and aim for a clean and uncluttered layout with plenty of white space around text and images. Think phrases and bullets, not sentences. As an ...
This slideshow template brings your digital marketing plans to life, making every slide a vibrant journey through your ideas. Whether you're pitching a new campaign or sharing your latest analytics, this PPT template is your go-to for creating presentations that not only look great but keep your audience hooked from start to finish. Grab it ...
In this video learn how easy it is for you to share your Canva design as a presentation Using this feature you can share and present your work on either.1 o...
Check out our Pink-themed PowerPoint and Google Slides template, perfect for the modern corporate go-getter. Tailored specifically for business professionals, this slideshow template will ensure your presentation stands out, keeping your audience engaged and informed. Whether you're pitching a new idea, sharing quarterly results, or planning ...
Easy downloading or sharing in a wide range of formats; With Canva, you get even more creative freedom: An easy drag-and-drop tool to help you add graphics; Page animation features, emojis, color palettes and font sets; Millions of professionally designed images and photos; Pre-recorded Talking Presentation tools to help you practice
When you install and use an add-in, it adds custom commands and extends the features of your Microsoft 365 programs to help increase your productivity. Note: This article only applies to add-ins in Excel, PowerPoint, and Word. For guidance on how to view, install, and manage add-ins in Outlook, see Use add-ins in Outlook.
36 likes, 1 comments - plentydesignApril 22, 2024 on : "THE BEST WAY TO SHARE VIEW-ONLY DESIGNS in Canva Are you sharing presentations, reports, proposals, or even your lead magnets...". Camila Meyer | Canva + Branding + Web Design | THE BEST WAY TO SHARE VIEW-ONLY DESIGNS in Canva 💜 Are you sharing presentations, reports ...
0 Share on Facebook. 0. THE WOODLANDS, Texas — Nelly Korda collected her fifth straight LPGA Tour victory on Sunday at The Chevron Championship at The Club at Carlton Woods in The Woodlands ...