How-To Geek
How to assign a static ip address in windows 10 or windows 11.
When organizing your home network it's easier to assign each computer it's own IP address than using DHCP. Here we will take a look at doing it in XP,

Quick Links
What is a static ip address, assign static ip addresses via your router, how to set a static ip address in windows 11, how to set a static ip address in windows 10, how to set a static ip address in windows 7 or 8 using "network connections", set a static ip address in windows vista, set a static ip address in windows xp, key takeaways.
- To set a static IP address in Windows 10 or 11, open Settings -> Network & Internet and click Properties for your active network.
- Choose the "Edit" button next to IP assignment and change the type to Manual.
- Flip the IPv4 switch to "On", fill out your static IP details, and click Save.
Sometimes, it's better to assign a PC its own IP address rather than letting your router assign one automatically. Join us as we take a look at assigning a static IP address in Windows.
A static IP address is manually set to a permanent, fixed address rather than being assigned automatically by your router using a procotol known as Dynamic Host Configuration Protocol (DHCP). DHCP is a handy way for devices to connect to your network more easily, because you don't have to configure IP addressing for each new device yourself. The downside to automatic addressing is that it's possible for a device's IP address to change from time to time, which is why people choose static IPs for certain types of devices. For example:
- You have a device like a home media server that you want to be able to find using the same IP address or host name each time.
- You have certain apps that can only connect to network devices using their IP address. In particular, many older networking apps suffer this limitation.
- You forward ports through your router to devices on your network. Some routers play nice with port forwarding and dynamic IP addresses; others do not.
Whatever your reason, assigning static IP addresses to devices is not difficult, but you do have a choice to make---whether to do it from the router or on the device itself.
Related: How to Set a Static IP Address in Ubuntu
While this article covers assigning static IP addresses to PCs within Windows itself, there is another way to go about it. Many routers allow you to assign a pool of IP addresses that are handed out to specific devices (based on the device's physical, or MAC address). This method offers a couple of significant advantages:
- IP addresses are still managed by the router, meaning that you won't have to make (and keep up with) changes on each individual device.
- It's easier to assign addresses within the same IP address pool your router uses.
This article is about assigning static IP addresses directly to PCs running Windows. We've already got a great guide on How to Set Static IP Addresses On Your Router , so if that's the way you want to go, be sure to give it a read.
With all that in mind, though, let's take a look at how to assign static IP addresses within any version of Windows.
Related: How to Find Your Router's IP Address on Any Computer, Smartphone, or Tablet
To set a static IP address in Windows 11, you'll want to open Settings, go to Network & Internet, and then find the Properties for your network. Inside there you'll be able to click the Edit button for IP Assignment and then fill out the manual network details.
First, open up the Settings app and then find Network & Internet on the left-hand side. You'll be presented with a panel that shows your current network connection. You can click where it says "Properties" right underneath the network, or if you have multiple network connections you can drill down into the specific network to see the IP address details for each one . In this case it's called "Ethernet", but you will most likely see "Wi-Fi" as the option to choose.
Once you've drilled down into the network connection that you want to set a manual IP for, scroll down until you see "IP Assignment" and then click the Edit button to the right.
Once there, you'll flip the drop-down to "Manual" and switch the IPv4 switch to "On". At this point you can fill out your network details and click Save to finish.
You can also use the old-school Network Connections panel in Windows 11, so if you prefer to use that method, keep reading.
If you're interested in more advanced networking, you might need to set up a static TCP/IP route , reset the entire TCP/IP stack on Windows , check open TCP/IP ports , find your MAC address on Windows , or find your IP address from the Command Prompt . We've got you covered there too.
To set a static IP address in Windows 10, you'll need to open the Settings app and drill down to Network & Internet. From there you'll select Properties for your network, and then the Edit button next to IP Assignment where you can input a manual IP address.
First, open the Settings app and locate the Network & Internet button.
On the next screen you'll see your network status, which should show you your active network. Here you'll want to click the Properties button. If you have multiple different networks, you could select them from the left-hand menu---in our case you'll notice we have both Wi-Fi and Ethernet networks, so you'll want to pick the one that you are trying to set a manual IP address for. You'll notice this is the same method we use when we're trying to find an IP address on Windows 10 .
On the network properties screen, scroll down until you see "IP settings" and click the Edit button under "IP assignment".
In the resulting popup window, change the Edit IP settings dropdown to Manual and then flip the IPv4 switch to "On". Fill out the details, click Save, and you should be good to go.
You might need to reboot to get all of your applications to work properly, just because it's Windows.
It's worth noting that you can use the old Network Connections method to set an IP address in any version of Windows, so if you prefer that method, keep reading.
To change the computer's IP address in Windows 7, you'll need to open the "Network Connections" window. Hit Windows+R, type "ncpa.cpl" into the Run box, and then hit Enter.
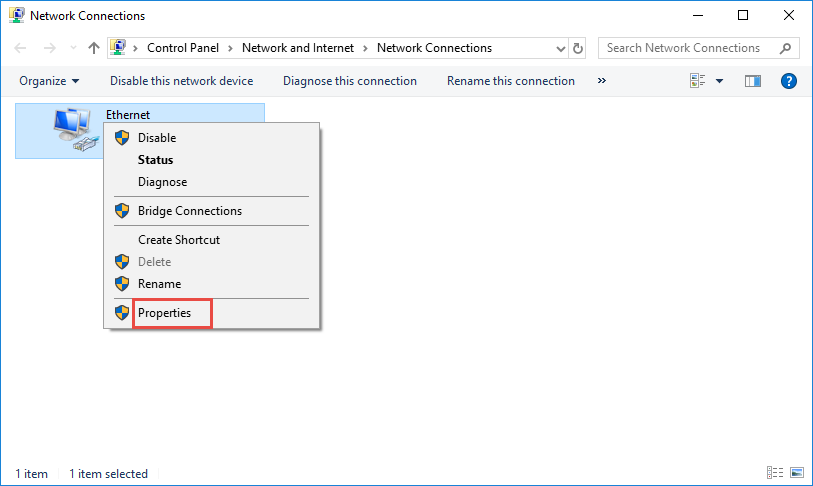
In the "Network Connections" window, right-click the adapter for which you want to set a static IP address, and then select the "Properties" command.
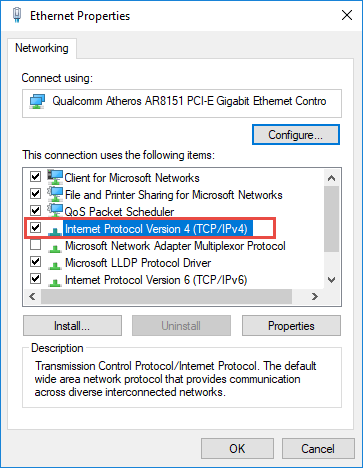
In the properties window for the adapter, select "Internet Protocol Version 4 (TCP/IPv4)" and then click the "Properties" button.
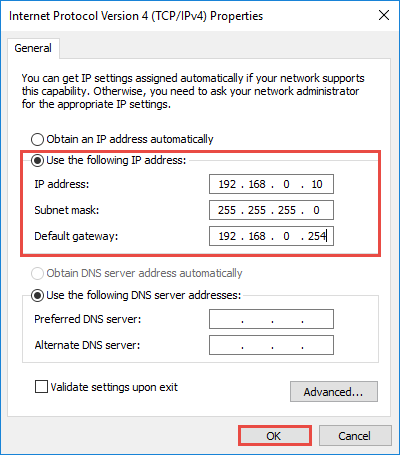
Select the "Use the following IP address" option, and then type in the IP address, subnet mask, and default gateway that corresponds with your network setup. Next, type in your preferred and alternate DNS server addresses. Finally, select the "Validate settings upon exit" option so that Windows immediately checks your new IP address and corresponding information to ensure that it works. When you're ready, click the "OK" button.
And then close out of the network adapter's properties window.
Windows automatically runs network diagnostics to verify that the connection is good. If there are problems, Windows will give you the option of running the Network troubleshooting wizard. However, if you do run into trouble, the wizard likely won't do you too much good. It's better to check that your settings are valid and try again.
Changing your IP from DHCP to a Static address in Vista is similar to other versions of Windows, but getting to the correct location is a bit different. Open the Start Menu, right-click on Network, and select Properties.
The Network and Sharing Center opens...click on Manage network connections.
Right-click on the network adapter you want to assign an IP address and click Properties.
Highlight Internet Protocol Version 4 (TCP/IPv4) then click the Properties button.
Now change the IP, Subnet mask, Default Gateway, and DNS Server Addresses. When you're finished click OK.
You'll need to close out of Local Area Connection Properties for the settings to go into effect.
Open the Command Prompt and use the
command to verify that the changes were successful.
To set a Static IP in Windows XP, right-click the "My Network Places" icon, and then select "Properties."
Right-click the adapter for which you want to set the IP, and then select "Properties" from the context menu.
Select the "Internet Protocol (TCP/IP)" entry, and then click the "Properties" button.
Select the "Use the following IP address" option. Type in the IP address, subnet mask, default gateway, and DNS server addresses you want to use. When you're finished, click the "OK" button.
You will need to close out of the adapter's properties window before the changes go into effect.
And you can verify your new settings by using the
command at the command prompt.
By and large, it's better to let most of your devices have their IP addresses assigned automatically by your router. Occasionally, though, you might want to set a static IP address for a particular device. While you can set static IP addresses directly on your devices (and this article has shown you how to do just that on Windows PCs), we still recommending setting up static IP addressing on your router if possible. It will just make life easier.
Related: How to Find Any Device's IP Address, MAC Address, and Other Network Connection Details
You are using an outdated browser. Please upgrade your browser to improve your experience.
Your browser does not support JavaScript. Please turn it on for the best experience.
- All Support
- Download Center
- Support Videos
TP-Link Community
- Contact Technical Support
- Online Stores
- Distribution Partners
- Reseller Partners
- Solution Partners
How to find and manually assign an IP address on Windows 10
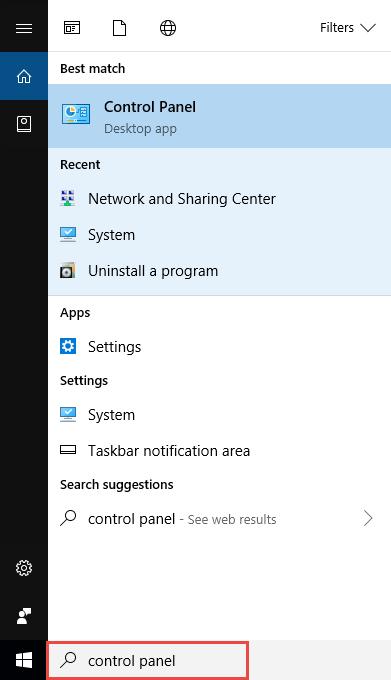
Step 1: Open the Control Panel

You can also type control panel in the search bar at the lower left of the screen and press Enter to open the control panel.
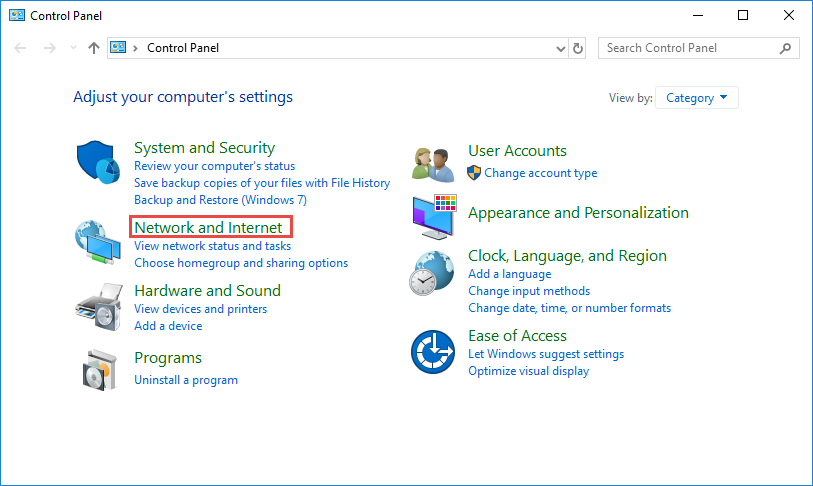
Step 2: Go to Network Connections
Go to Network and Internet > Network and Sharing Center .
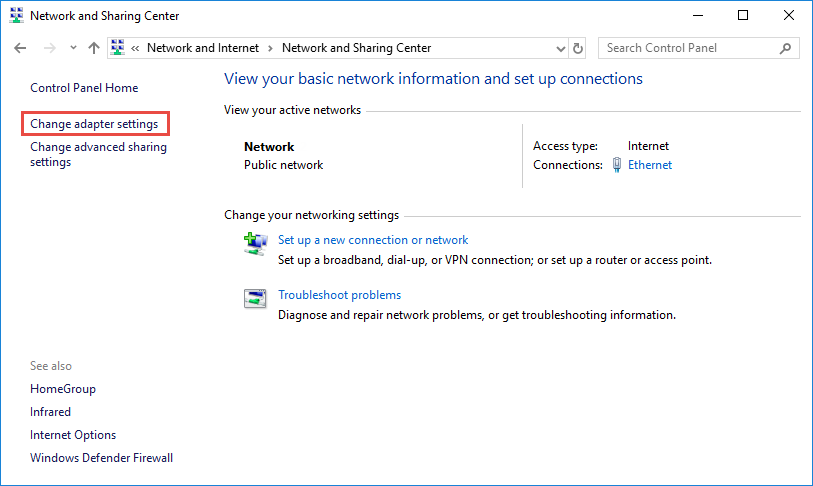
Select Change adapter settings on the left.
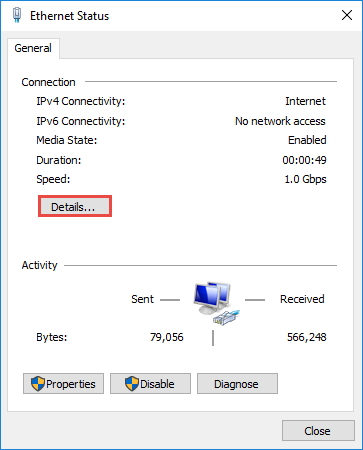
Step 3: Find the IP address
Right click the Ethernet icon and select Status from the context menu.

Then click Details... to view all detailed information of network connection.
Step 4: Set the IP address
Right Click Local Area Connection and select Properties .
Then double click Internet Protocol Version 4 (TCP/IPv4) .
Select Use the Following IP address: and type in the IP address , Subnet mask and Default gateway . Click OK to apply the settings.
Note : If you need to set a static DNS server, select Use the following DNS server address : and input the address of DNS server. By default, the computer obtains the address automatically.
Is this faq useful?
Your feedback helps improve this site.
What’s your concern with this article?
- Dissatisfied with product
- Too Complicated
- Confusing Title
- Does not apply to me
We'd love to get your feedback, please let us know how we can improve this content.
We appreciate your feedback. Click here to contact TP-Link technical support.
Still need help? Search for answers, ask questions, and get help from TP-Link experts and other users around the world.
Visit the Community >
We have updated our Policies. Read Privacy Policy and Terms of Use here. This website uses cookies to improve website navigation, analyze online activities and have the best possible user experience on our website. You can object to the use of cookies at any time. You can find more information in our privacy policy .
Basic Cookies
These cookies are necessary for the website to function and cannot be deactivated in your systems.
accepted_local_switcher, tp_privacy_base, tp_privacy_marketing, tp_smb-select-product_scence, tp_smb-select-product_scenceSimple, tp_smb-select-product_userChoice, tp_smb-select-product_userChoiceSimple, tp_smb-select-product_userInfo, tp_smb-select-product_userInfoSimple, tp_top-banner, tp_popup-bottom, tp_popup-center, tp_popup-right-middle, tp_popup-right-bottom, tp_productCategoryType
__livechat, __lc2_cid, __lc2_cst, __lc_cid, __lc_cst, CASID
id, VISITOR_INFO1_LIVE, LOGIN_INFO, SIDCC, SAPISID, APISID, SSID, SID, YSC, __Secure-1PSID, __Secure-1PAPISID, __Secure-1PSIDCC, __Secure-3PSID, __Secure-3PAPISID, __Secure-3PSIDCC, 1P_JAR, AEC, NID, OTZ
Analysis and Marketing Cookies
Analysis cookies enable us to analyze your activities on our website in order to improve and adapt the functionality of our website.
The marketing cookies can be set through our website by our advertising partners in order to create a profile of your interests and to show you relevant advertisements on other websites.
Google Analytics & Google Tag Manager
_gid, _ga_<container-id>, _ga, _gat_gtag_<container-id>
Google Ads & DoubleClick
test_cookie, _gcl_au
cebsp_, _ce.s, _ce.clock_data, _ce.clock_event, cebs
OptanonConsent, _sctr, _cs_s, _hjFirstSeen, _hjAbsoluteSessionInProgress, _hjSessionUser_14, _fbp, ajs_anonymous_id, _hjSessionUser_<hotjar-id>, _uetsid, _schn, _uetvid, NEXT_LOCALE, _hjSession_14, _hjid, _cs_c, _scid, _hjAbsoluteSessionInProgress, _cs_id, _gcl_au, _ga, _gid, _hjIncludedInPageviewSample, _hjSession_<hotjar-id>, _hjIncludedInSessionSample_<hotjar-id>
lidc, AnalyticsSyncHistory, UserMatchHistory, bcookie, li_sugr, ln_or
How to configure a static IP on Windows 10 or 11
Do you need to switch from a dynamic to a static IP address configuration on Windows 11 or 10? Here's how.

- Windows 11 static IP
- Windows 10 static IP
On Windows, the router's Dynamic Host Configuration Protocol (DHCP) server is (usually) responsible for assigning a dynamic Transmission Control Protocol/Internet Protocol (TCP/IP) configuration to every device in the network, including to your computer running Windows 11 or Windows 10.
Although a dynamic IP address is the recommended configuration for most situations, you may need to change to a static IP address if you're thinking about setting up a printer or file sharing, or you have to configure port forwarding on the router to your computer.
The reason is that a dynamic network configuration can change at any time after the lease from the DHCP expires and if the address changes, network resources you may have configured will stop working. Setting a static IP address will always stay the same on the computer, allowing a more reliable experience sharing resources in the network or forwarding ports.
Whatever the reason, on Windows 10 and 11, you have many ways to configure a static TCP/IP address, including using the Settings app and Command Prompt.
This guide will walk you through the different ways to configure a static network configuration on Windows 11 and 10.
How to set a static TCP/IP network configuration on Windows 11
On Windows 11, you can change your computer's dynamic IP configuration to static in at least two ways through the Settings app or commands.
Configure IP from Settings app
Get the Windows Central Newsletter
All the latest news, reviews, and guides for Windows and Xbox diehards.
To assign a permanent TCP/IP configuration on Windows 11, use these steps:
- Open Settings .
- Click on Network & internet .
- (Optional) Click on Advanced network settings .
- Under the "More settings" section, click on Hardware and connection properties.
- Note the current IPv4 , Subnet mask , Default Gateway , and DNS server addresses to determine the new configuration, as it has to be in the same network scope.
- Click the Ethernet or Wi-Fi page on the right side from the "Network & internet." page.

- Quick note: If you select the Wi-Fi page, you need to click on the connection properties to access the network settings.
- Click on the Edit button for the "IP assignment" setting.

- Select the Manual option from the drop-down menu.
- Turn on the IPv4 toggle switch.
- Confirm the IP address for the computer – for example, 10.1.4.90.
- Confirm the subnet mask for the configuration – for example, 255.255.255.0.
- Confirm the default gateway address (usually your router's IP) – for example, 10.1.4.1.
- Confirm the preferred DNS address – for example, 10.1.4.1.

- Quick note: In a home network, you may also be able to use the router's IP address for the DNS configuration. You can also use third-party DNS services like Google Public DNS, Cloudflare, Cisco's OpenDNS, and others.
- (Optional) Select the "On (automatic template)" option for the "DNS over HTTPS" setting and leave the "Fallback to plaintext" option disabled unless you want to encrypted as well as unencrypted traffic or you're troubleshooting connectivity.
- Quick note: DNS over HTTPS (DoH) is a feature that encrypts the DNS queries over the HTTPS protocol to improve security and privacy on the internet. You only want to enable this feature if the DNS server supports this feature.
- Confirm the alternate DNS address (if applicable).
- (Optional) Select the "On (automatic template)" option for the "DNS over HTTPS" setting and leave the "Fallback to plaintext" option disabled.
- Click the Save button.
Once you complete the steps, the computer will start using the static network configuration. If everything has been configured correctly, you should be able to open the web browser to access the internet.
If you entered an address (such as the DNS address) and then changed it, you probably won't be able to save the settings. If this is the case, cancel the configuration, start over, enter the correct configuration, and then try to save the settings.
Configure IP from Command Prompt
To set a static TCP/IP configuration on Windows 11, use these steps:
- Open Start .
- Search for Command Prompt , right-click the top result, and select the Run as administrator option.
- Type the following command to see your current networking configuration and press Enter : ipconfig /all
- Confirm the name of the adapter and the networking configuration, including the IPv4 , Subnet mask , Default Gateway , and DNS Servers .

- Type the following command to configure a static TCP/IP address and press Enter : netsh interface ip set address name= "ADAPTER-NAME" static IP-ADDRESS SUBNET-ADDRESS DEFAULT-GATEWAY-ADDRESS
In the above command, replace ADAPTER-NAME with the name of your network adapter. Change IP-ADDRESS SUBNET-ADDRESS DEFAULT-GATEWAY-ADDRESS with the device IP address, subnet mask, and default gateway addresses you want. For example, this command sets the 10.1.4.90, 255.255.255.0, 10.1.4.1 configuration: netsh interface ip set address name="Ethernet 10Gb" static 10.1.4.90 255.255.255.0 10.1.4.1

- Type the following command to set a DNS server address and press Enter : netsh interface ip set dns name="ADAPTER-NAME" static DNS-ADDRESS
In the command, change ADAPTER-NAME with your adapter's name and DNS-ADDRESS with the DNS server address of the network. For example, this command sets the local router as the DNS server: netsh interface ip set dns name="Ethernet 10Gb" static 10.1.4.1
- Type the following command to set an alternate DNS server address and press Enter : netsh interface ip add dns name="ADAPTER-NAME" DNS-ADDRESS index=2
In the command, change ADAPTER-NAME with the adapter's name and DNS-ADDRESS with an alternate DNS server address. For example, netsh interface ip add dns name="Ethernet 10Gb" 1.1.1.1 index=2
After you complete the steps, the commands will set a static network configuration on Windows 11.
How to set a static TCP/IP network configuration on Windows 10
On Windows 10, you can also use the Settings app and Command Prompt to set up a static IP network configuration.
To assign a permanent TCP/IP configuration on Windows 10, use these steps:
- Click on Ethernet or Wi-Fi .
- Click on the active connection on the right side.

- Click the Edit button for the "IP assignment" setting.

- Select the Manual option.
- Confirm the subnet prefix length (subnet mask) for the configuration – for example, 24 to specify the 255.255.255.0 subnet mask.

- Quick tip: It's important to use the number that represents the network instead of the subnet mask. Otherwise, the configuration won't save. If you don't know the subnet prefix length for your subnet mask, you can use any online subnet calculator to find out.
Once you complete the steps, Windows 10 will start using the static IP configuration. If you lose network connectivity, restart the computer to regain access to the local network and internet.
To change from dynamic to static IP address with commands on Windows 10, use these steps:
In the command, change ADAPTER-NAME with your adapter's name and DNS-ADDRESS with the DNS server address of the network. For example, this command sets the local router as the DNS server: netsh interface ip set dns name=" Ethernet 10Gb" static 10.1.4.1
In the command, change ADAPTER-NAME with the adapter's name and DNS-ADDRESS with an alternate DNS server address. For example, netsh interface ip add dns name="Ethernet0" 1.1.1.1 index=2
After you complete the steps, the network configuration will switch from dynamic to static on Windows 10.

Mauro Huculak is technical writer for WindowsCentral.com. His primary focus is to write comprehensive how-tos to help users get the most out of Windows 10 and its many related technologies. He has an IT background with professional certifications from Microsoft, Cisco, and CompTIA, and he's a recognized member of the Microsoft MVP community.
- 2 Minecraft's April Fools' joke was so good, people are angry that it isn't real content
- 3 Co-op horror game Content Warning launches on Steam for FREE (but only for 24 hours)
- 4 Helldivers 2 boss says devs may make a critically important Galactic War mechanic easier to understand: "We are talking about making this more clear"
- 5 Hollow Knight: Silksong FAQ — Xbox Game Pass, trailers, and everything you need to know
How to Assign Static IP Address to Your Devices
By default, your router assigns dynamic IP Address to every device that connects to it. This is called DHCP (short for Dynamic Host Control Protocol). But sometimes, we need our devices to have the same IP address (i.e. Static IP) every time it connects to the network. Reason being,
- Access your computer from the Internet.
- Share data between two devices on the same network.
- Quickly access your Network Printer or NAS.
- Use your computer as a media server.
- Or your work WiFi requires you to use Static IP address.

What IP address should you choose?
If two devices on the network have the same IP address, then there will be conflicts. The Internet won’t work on one of them or both, depending on your router. So, it’s important to assign a unique IP address to your computer. There are a couple of ways to pick an unused IP address.
For instance– first find your device’s IP address , say it’s 192.168.1.7 ; then keep the first three values (i.e. 192.168.1) as it’s and replace the last digit with some far number like 192.168.1.222 . Though make sure the last digit should be between a 0-255 range.
Assigning Static IP address to most devices is easy, just go to its network settings, look for DHCP option and turn it OFF. Once you do that, you’ll see a text area to enter Static IP address. Enter the new IP address there, save changes and that’s it.
So let’s see how to Assign Static IP address to various Operating Systems
1. Assign IP Address on Windows 10/8/7
You can do this quickly through the command line. You will need to first find your subnet mask, default gateway, and network adapter name. In my case, I’m on a Wi-Fi network, so the adapter name is Wi-Fi. To find yours just type the following command.
Once you get the output, find for the Network Adapter which has IP listed under it. The adapter name is a one-word name suffixed to the end of the Network Title. You will also need the Subnet mask and the Default Gateway Address.

Once you have the adapter name, Subnet Mask and Default Gateway, run the following command.
Wherein, Wi-Fi should be replaced by your adapter name and the IP, subnet mask and gateway address according to your configuration.

This will change your IP address from DHCP to manual with the static IP address you have specified.
In case you find it too confusing, you are not alone. You can do the same via GUI which is much more intuitive. You’ll need the Subnet Mask and Default Gateway Address . You can refer to the above step on how to find these details. Once you have noted down the address, click on Start Menu and type in Network and Sharing Center. Click once you see the Network and Sharing Center Icon.

Alternatively, if you are in Windows 10 then you can right-click on the Start menu and click on “ Network Connections “.

A new window will open, click on Change Adapter Options.

Right Click on your Current Network Adapter ( like WiFi) and choose Properties.

When the new window pops up, select Internet Protocol Version 4(TCP/IPv4) and click on Properties.

Once you get the pop-up window, select “ Enter the IP address you want ” and fil the IP Address, For Subnet Mask , and Default Gateway Address enter the values that you have noted down previously. Next, click on OK to save changes.

To switch to dynamic IP, click on Obtain the IP address automatically. Once this is enabled, your system will start picking an IP address dynamically from the router.
2. How to setup static IP on Ubuntu
On Ubuntu, you can set a static IP Address via the terminal or GUI. Firstly, let’s start with the command line. Right-click anywhere on the desktop to open the terminal.

Once the terminal window opens, we need to run a command. We need the subnet mask and network adapter name in order to set a static IP and to get that, run the following command on the terminal.
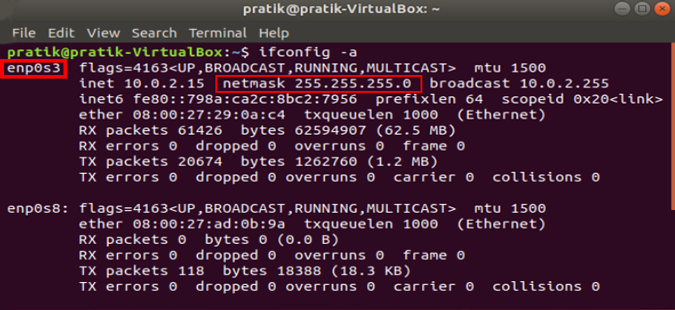
Once you have the subnet mask noted down, in my case, it’s 255.255.255.0, we can proceed further.
It is pretty simple and straight forward. We need to open the Network Adapter settings. To do that, click on the Network Icon at the top right corner of the desktop.

Now, navigate on the active network and click on the expand button for more options. Click on Wired Settings to open the Network menu.

Once you get the Wired Settings dialogue, make sure you are on the Network page. Click on the Settings icon beside the active network to open the adapter properties.
When you get the pop-up, navigate to the IPv4 tab to change the IP settings.

On the IPv4 tab, select the radio button which says “ Manual “. Some text fields will appear, you need to enter the IP address, Netmask and Gateway accordingly. Once it is validated, you can click on the Apply button to register the changes.

Again you need to restart the network for the changes to take effect. You can do it manually via command line or just switch off and switch on the Network adapter. Once done, run ifconfig on the terminal to check the IP address. It should be the same IP address which you have specified earlier.

3. How to setup static IP on Mac
If you are on macOS, setting static IP is quite similar to that of Ubuntu. But, here you don’t need the subnet mask or Default Gateway Address. Right click on the apple icon at the top left corner of the desktop. Click on System Preferences from the dropdown list.

Once the System Preferences dialogue box displays, navigate to Network and click on it to open the Network Settings

Alternatively, you can also hit Cmd+Space to trigger the Spotlight search. Type “ Network ” in the search bar and click on the icon once it appears. This will directly navigate you to the Network Settings.

From the pop-up window, select an active network interface. For example, I am connected to a WiFi network so my active network is Wi-Fi. Make sure you are on the active network tab and then click on Advanced .

A new window will open the configuration settings for that adapter. Move over to the IP settings by clicking on the TCP/IP tab .

From the Configure IPv4 menu, choose Using DHCP with manual address. Enter a static IP address in the IPv4 Address and leave the Subnet Mask and Router field as default. Click Ok to save the changes.

Now when you do an ifconfig, the system should be using the static IP you have defined in the previous times. If the IP’s have not changed, try restarting the Wi-Fi and it should fix it.
To switch back to dynamic IP, move back to “ Using DHCP ” from the Configure IPv4 menu.
4. How to setup static IP on Android

The network which you are connected to should be on top of the list. Tap on the settings icon beside the Wi-Fi network name.

Once the pop-up opens, you will see IP settings at the bottom of the menu. The default option is “DHCP”. Tap on it to change the IP configuration.

Select “ Static ” from the presented drop-down menu. Enter the desired IP address and leave the other options as default. Make sure that other devices are not using the same IP. You can see the IP address of the other devices in your network by using a small utility called Fing . For a detailed process, check our article on how to find the IP Address of any Device on your network . Once you have entered the IP, click on Save to register the change. Now, your Android phone should start using the desired IP Address.

In almost all the Android version, you get the option to set static IP Address. For some rare older Android versions, you can use a third-party app like WiFi Static . It’s free and it doesn’t require ROOT.
To switch back to dynamic IP, repeat the same procedure and select “DHCP” from the IP settings instead.
5. How to setup static IP on iPhone and iPad
If you are using an iPhone or iPad, then you can set static IP Address natively. You would need the Subnet Mask of your network. This can be obtained from the Wi-Fi settings and we would see to it in the further steps. To get started, click on the Settings icon in the dock to get to the Settings menu.

Now on the Settings menu page, tap on Wi-Fi to get to the Wi-Fi settings.

On the Wi-Fi page, you should see your connected Wi-Fi network at the top. Click on the “i” button beside it. This will open the Wi-Fi configuration window.

Once the Wi-Fi settings page appears, you will see an option called “ Configure IP “. By Default, this would be set to automatic. Just below this option, you will see “ Subnet Mask “, note it down as we will need it in the further steps. In order to set static IP, we need to change Configure IP it to Manual. Tap on it and it will open the IPv4 settings page.

There should be 3 options available on the “Configure IPv4” page. Select “ Manual ” from it. As soon as Manual IP is enabled, you will get extra text fields at the bottom to enter the IP Address, Subnet Mask, Router. We need to fill in the IP Address of our choice and Subnet Mask which we noted down in the previous step. Now, after you fill both the fields, the save button at the top right corner will be enabled. Click on it to save the static IP configuration.

Now, when you return to the Wi-Fi settings page, you will see your device is using the Static IP address. This should be the same IP address we have set in the IP configuration menu.

This static IP address will be applicable only to that particular Wi-Fi network. In case, you connect to some other Wi-Fi network the IP will change accordingly.
6. How to setup static IP to any Device from Router
Other network devices like your Wireless Printer, PS4, NAS, IP Camera, Raspberry Pi , etc. do not have an Interface. Hence, in order to configure the network, either you have to connect remotely or use the router. If you have access to the router, setting Static IP for network devices is the easiest and convenient way. I would recommend this method over any other.
So, to assign a Static IP Address to any network device, you need to login to the web portal of the router. The web portal address, username, and password are mostly printed behind the router. In case you don’t have physical access to the router, the web portal URL is mostly the PC’s gateway address. To find that, open command prompt and type the following command.
Once you have the web portal loaded, log in with the credentials. Now every router has a different web UI, but the overall structure is the same. Basically, you will have to link the IP Address to the Mac Address and Hostname of the device. So, we need to find the MAC address & Hostname of the network device. To do that, look for DHCP client list which should look something like the following screenshot.

You can get your MAC Address & Hostname under DHCP Client list. Once, you have the MAC address & Hostname noted down, we can proceed further. On most of the routers, you will have the option to set a Static IP under the section IP Mac binding or DHCP Static IP option. In case you are on a custom ROM like dd-wrt, head over to Services tab and you will have DHCP Server . Under DHCP Server, add an entry for Static Leases by clicking on the Add button.

Clicking on the Add button will create a new row. You have to enter the MAC Address, Hostname, desired Static IP and Lease time . Lease time is a unit in minutes after which your IP will be renewed. Since we are adding only 1 entry for the particular host the IP will be the same even after the renewal. Once, done click on Save changes .

Once you have configured successfully on the router, just restart the Wi-Fi on the device. When it connects it should start using the static IP. In case of issues, make sure that you have the correct MAC Address and Hostname. To check, just run the command ipconfig or look back again in the router’s DHCP client list.

These changes are written to the ROM so restarting the router won’t make changes to the static IP configuration. In order to get back to Dynamic IP, just remove the entry from the IP leases.
What’s next
Once you have started configuring the IPs on Router and network devices, you are good to go configure telnet and SSH. Have a look at our brief article on How to Enable Telnet Server in Windows 10 , Best SSH clients for iOS To Manages Remote Servers and 6 Best FTP Clients For Android . A word of caution would be to note down the static IPs assigned to devices as assigning the same IP to two network devices would render them useless.
Also Read: How To Change DNS on Windows|Mac|Android|iOS

Mrinal Saha
Mrinal is a tech geek who spends half of his day reading and writing about tech. While the nights are spent on shooting or editing YouTube videos. Feel free to geek out with him on-
You may also like
How to sign out of amazon on all..., how do i log out of my instagram..., 5 ways to remove background color from text..., why can’t i unsend a message on facebook..., how to stop certain ads on youtube, what happens when you deactivate tiktok account, 7 fixes for netflix picture-in-picture not working on..., how to create and share an outlook calendar, 9 fixes for tiktok not working on wi-fi, 7 fixes for spotify playing but no sound..., leave a comment cancel reply.
You must be logged in to post a comment.

Change TCP/IP settings
TCP/IP defines how your PC communicates with other PCs.
To make it easier to manage TCP/IP settings, we recommend using automated Dynamic Host Configuration Protocol (DHCP). DHCP automatically assigns Internet Protocol (IP) addresses to the computers on your network if your network supports it. If you use DHCP, then you don't have to change your TCP/IP settings if you move your PC to another location, and DHCP doesn't require you to manually configure TCP/IP settings, such as Domain Name System (DNS) and Windows Internet Name Service (WINS).
To enable DHCP or change other TCP/IP settings
Select Start , then type settings . Select Settings > Network & internet .
Do one of the following:
For a Wi-Fi network, select Wi-Fi > Manage known networks . Choose the network for which you want to change the settings.
For an Ethernet network, select Ethernet , then select the Ethernet network you’re connected to.
Next to IP assignment , select Edit .
Under Edit network IP settings or Edit IP settings , select Automatic (DHCP) or Manual .
To specify IPv4 settings manually
Under Edit network IP settings or Edit IP settings , choose Manual , then turn on IPv4 .
To specify an IP address, in the IP address, Subnet mask , and Gateway boxes, type the IP address settings.
To specify a DNS server address, in the Preferred DNS and Alternate DNS boxes, type the addresses of the primary and secondary DNS servers.
To specify if you want to use an encrypted (DNS over HTTPS) or unencrypted connection to the DNS server or servers you specify, for DNS over HTTPS , choose the setting you want:
Off : All DNS queries will be sent to the DNS server unencrypted in plaintext over HTTP.
On (automatic template) : DNS queries will be encrypted and sent to the DNS server over HTTPS. DNS queries will use the default settings for the automatic template or try to discover them automatically.
On (manual template) : DNS queries will be encrypted and sent to the DNS server over HTTPS. They’ll use the settings you enter in the DNS over HTTPS template box.
If you use DNS over HTTPS (automatic or manual template), turn Fallback to plaintext on or off:
When it’s turned on, a DNS query will be sent unencrypted if it can’t be sent over HTTPS.
When it’s turned off, a DNS query won’t be sent if it can’t be sent over HTTPS.
To specify IPv6 settings manually
Under Edit network IP settings or Edit IP settings , choose Manual , then turn on IPv6 .
To specify an IP address, in the IP address , Subnet prefix length , and Gateway boxes, type the IP address settings.
When you select Automatic (DHCP) , the IP address settings and DNS server address setting are set automatically by your router or other access point (recommended).
When you select Manual , you can manually set your IP address settings and DNS server address.
When you’re done, select Save .
Note: To install IPv4, run Command Prompt as an administrator, type netsh interface ipv4 install , and then press Enter .
Select Start , then select Settings > Network & Internet .
For a Wi-Fi network, select Wi-Fi > Manage known networks . Choose the network you want to change the settings for, then select Properties.
For an Ethernet network, select Ethernet , then select the Ethernet network you’re connected to.
Under IP assignment , select Edit .
Under Edit IP settings , select Automatic (DHCP) or Manual .
Under Edit IP settings , choose Manual , then turn on IPv4 .
To specify an IP address, in the IP address, Subnet prefix length , and Gateway boxes, type the IP address settings.
To specify a DNS server address, in the Preferred DNS and Alternate DNS boxes, type the addresses of the primary and secondary DNS servers.
Under Edit IP settings , choose Manual , then turn on IPv6 .
When you select Automatic (DHCP) , the IP address settings and DNS server address setting are set automatically by your router or other access point (recommended).
When you select Manual , you can manually set your IP address settings and DNS server address.
When you’re done, select Save .
In Windows 8.1, select the Start button, start typing View network connections , and then select View network connections in the list.
In Windows 7, open Network Connections by selecting the Start button, and then selecting Control Panel . In the search box, type adapter , and then, under Network and Sharing Center , select View network connections .
Right-click the connection that you want to change, and then select Properties . If you're prompted for an administrator password or confirmation, type the password or provide confirmation.
Select the Networking tab. Under This connection uses the following items , select either Internet Protocol Version 4 (TCP/IPv4) or Internet Protocol Version 6 (TCP/IPv6) , and then select Properties .
To specify IPv4 IP address settings, do one of the following:
To get IP settings automatically using DHCP, select Obtain an IP address automatically , and then select OK .
To specify an IP address, select Use the following IP address , and then, in the IP address, Subnet mask , and Default gateway boxes, type the IP address settings.
To specify IPv6 IP address settings, do one of the following:
To get IP settings automatically using DHCP, select Obtain an IPv6 address automatically , and then select OK .
To specify an IP address, select Use the following IPv6 address , and then, in the IPv6 address, Subnet prefix length , and Default gateway boxes, type the IP address settings.
To specify DNS server address settings, do one of the following:
To get a DNS server address automatically using DHCP, select Obtain DNS server address automatically , and then select OK .
To specify a DNS server address, select Use the following DNS server addresses , and then, in the Preferred DNS server and Alternate DNS server boxes, type the addresses of the primary and secondary DNS servers.
To change advanced DNS, WINS, and IP settings, select Advanced .

Need more help?
Want more options.
Explore subscription benefits, browse training courses, learn how to secure your device, and more.

Microsoft 365 subscription benefits

Microsoft 365 training

Microsoft security

Accessibility center
Communities help you ask and answer questions, give feedback, and hear from experts with rich knowledge.

Ask the Microsoft Community

Microsoft Tech Community

Windows Insiders
Microsoft 365 Insiders
Find solutions to common problems or get help from a support agent.

Online support
Was this information helpful?
Thank you for your feedback.
How to Assign a Static IP Address to a Windows 11/10 PC
Makes establishing a remote connection easier
Usually, your network router assigns a dynamic IP address to your devices, including your Windows 10 and 11 PCs. If you need a static IP address for your PC, you either need to configure your router or change a settings option on your computer.
The good thing is there are multiple ways to assign a static IP address to your Windows PC. Depending on what you feel comfortable with, you can choose a method and proceed with it to acquire a fixed IP address for your machine.

Why Use a Static IP Address?
There are many reasons you need a static IP address. It’s possible you use a remote connection to connect to your PC. In this case, having a permanent IP address makes establishing the remote connection easier.
Similarly, if you use your PC for network file sharing , a static IP address ensures the other devices on your network can connect to your PC without any reconfigurations.
Assign a Static IP to Your Windows 11/10 PC Using Your Router
One way to get a static IP for your PC is by configuring your router to allocate a specified IP address to your machine. Most routers offer this option but how you configure the router is different for each router model.
Generally, you’d follow the following steps to configure a static IP for your PC on your network router.
Find Your Network Adapter’s MAC Address
For your router to identify your PC and assign it a specific IP address, you need to enter your network adapter’s (which is in your PC) unique MAC address on your router’s settings page.
So, let’s first find your network adapter’s MAC address:
- Open the Start menu, search for Command Prompt , and select Command Prompt in the search results.

- Type the following command in the Command Prompt window and press Enter :
ipconfig /all

- Command Prompt will display various values on your screen. Find your network adapter here and look for the Physical Address field’s value. That’s your adapter’s unique MAC address. Make a note of this address.

Configure Your Router to Assign a Static IP to Your PC
You now need to access your router’s settings page. For most routers, you can do this by entering the 192.168.1.1 IP address in a web browser on your computer. If this doesn’t work for you, consult your router’s manual to find out how to access the settings page.
- Launch a web browser on your computer, type the following IP address, and press Enter .
192.168.1.1
- You’ll see your router’s login page. Enter your router’s username and password and continue. For most routers, you can use admin in both username and password fields.
- Select Network Settings at the top of your router’s settings page.

- Choose DHCP Client & Address Reservation from the sidebar on the left.
- Enter the static IP address you’d like to assign to your PC in the IP Address field on the right.

- Type your network adapter’s unique MAC address in the MAC Address field. Then, select Add and then select OK at the bottom of the page.
- Restart your router.
When your Windows 11 or 10 PC connects to your router, your router will assign the specified IP address to your PC. This will happen each time you connect your PC to your router.
Assign a Static IP to Your Windows 10 PC
If you don’t wish to configure your router’s settings, the other way to assign a static IP address to your Windows 10 PC is by using the Windows Settings app. You can configure your IP settings in this app to ensure your PC always gets a unique static IP.
However, there’s a slight issue with this method. If your router has already assigned the IP address that you want for your PC to another device, you’ll experience issues connecting your PC to your router .
To get around this, try to use an IP address far beyond the general IP addresses that your router assigns. For example, if your router usually gives IP addresses up to, say, 192.168.1.10, then use 192.168.1.20 as the static IP for your PC.
To proceed with this method:
- Open the Settings app on your PC by pressing Windows + I keys at the same time.
- Select Network & Internet on the Settings window.

- Scroll down the Status page that opens and choose Change adapter options .

- You’ll see a list of your network adapters. Right-click the adapter that you use with your network and select Properties from the menu.

- Choose Internet Protocol Version 4 (TCP/IPv4) in the list and select Properties .

- Enable the Use the following IP address option on the following window.

- Select the IP address field and type the static IP address you’d like to assign to your PC.
- Fill in the Subnet mask field, which is usually 255.255.255.0 . Type your router’s gateway, which is usually 192.168.1.1 , in the Default gateway field.
- For DNS servers, you can use Google’s Public DNS. To use these, select the Preferred DNS server field and type 8.8.8.8 . Select the Alternate DNS server field and type 8.8.4.4 . Then, choose OK .
- Close the Properties window by selecting Close .
Your Windows 10 PC will disconnect from your router, and it will then automatically reconnect. After this reconnection, your PC should now have the specified static IP address allocated to it.
Assign a Static IP to Your Windows 11 PC
Like with Windows 10, you can use the Windows Settings app to assign a static IP address to your Windows 11 PC.
- Press Windows + I keys simultaneously to open the Settings app.
- Select Network & internet from the sidebar on the left in Settings.

- Select Advanced network settings at the bottom of the Network & internet page.

- Find your network adapter in the list and select the adapter. Then, select View additional properties .

- Select Edit next to IP assignment .

- Choose Manual from the Edit IP settings dropdown menu. Then, toggle on the IPv4 option.

- Select the IP address field and type the static IP address to assign to your PC.

- Select the Subnet mask field and enter 255.255.255.0 . Enter your router’s IP address, which is usually 192.168.1.1 , in the Default gateway field.
- Enter 8.8.8.8 in the Preferred DNS field. Enter 8.8.4.4 in the Alternate DNS field.
- Select Save at the bottom.
And your Windows 11 PC now has a static IP address assigned to it. In the future, your PC will continue to acquire this static IP address from your router, provided there are no IP conflict issues with your router .

Mahesh has been obsessed with technology since he got his first gadget a decade or so ago. Over the last few years, he's written a number of tech articles on various online publications including but not limited to MakeTechEasier and Android AppStorm. Read Mahesh's Full Bio
Read More Posts:
Leave a Reply
Your email address will not be published. Required fields are marked *

How to set a static IP address using Settings app on Windows 10
You can assign a static IP address to an Ethernet or Wi-Fi connection using the Settings app, and in this guide, you'll learn how to do it.

Setting up a static IP address configuration on Windows 10 is essential in many scenarios. For instance, when sharing files across the network , sharing a printer with other users , or when setting up a port forwarding — just to name a few.
Although when you connect a computer to a network, the DHCP server (home router) will provide the necessary settings to connect to the network, they’re dynamic (automatic) settings that can change as soon as you restart your machine or the lease on the configuration expires. When this happens, services may stop working for network users. A statically assigned IP configuration never changes and reduces the chances of problems with network services.
On Windows 10, there are many ways to set a static IP address , but starting with version 1903, May 2019 Update , you can update the network settings for Ethernet as well as for Wi-Fi adapters using the Settings app.
In this guide , you’ll learn the steps to assign a static IP address (version 4) using nothing more than the Settings app on Windows 10 .
How to assign static IP address for Ethernet adapter using Settings
How to assign static ip address for wi-fi adapter using settings.
- How to check IP address is static or dynamic assignment using Settings
To set up a static IP address configuration for an Ethernet (wire) adapter using the Settings app, use these steps:
Open Settings .
Click on Network & Internet .
Click on Ethernet .
Select the connection that you want to configure.

Under the “IP settings” section, click the Edit button.

Use the drop-down menu and select the Manual option.
Turn on the toggle switch for the version of the IP protocol you want to configure using a static configuration. (Usually, you want to select the IPv4 option.)

In the “IP address” field, enter the static IP address for the device. For example, 192.168.1.101 .
In the “Subnet prefix length” field, enter the subnet mask length (not the subnet mask) for the network. For example, if your network uses a subnet mask of 255.255.255.0 , then you need to enter 24 .
In the “Gateway” field, enter the IP address of the router. For example, 192.168.1.1 .
In the “Preferred DNS” field, enter the IP address of the service that will translate domain names into IP addresses that your computer will understand. Usually, you need to enter the IP address of your router as this device will be able to forward request to the appropriate service. However, using the Settings app, you must specify the address of a DNS server.
In the “Alternate DNS” field, enter the second IP address for the DNS service.

Click the Save button.
Once you’ve completed the steps, your computer will start using the static TCP/IP configuration that you specified.
To set up a static IP address configuration for a Wi-Fi (wireless) adapter using the Settings app, use these steps:
Click on Wi-Fi .

In the “IP address” filed, enter the static IP address for the device. For example, 192.168.1.101 .
In the “Subnet prefix length” field, enter the subnet mask length (not the subnet mask) for the network. For example, if your network uses a “subnet mask” of 255.255.255.0 , then you need to enter 24 .

After completing the steps, the manual configuration will not change even if there’s a DHCP server leasing IP addresses in the network.
How to check if the IP address is static or dynamic assignment using Settings
To check if you configured the settings correctly, or to tell if your device is using static or dynamic settings, use these steps:
Click on Wi-Fi or Ethernet .
Select the network connection.
Under the “IP settings” section, you can check whether the device is using static (manual) or dynamic (automatic) IP address configuration.

Once you’ve completed the steps, you will know if your computer has been configured correctly.
Whatever you’re configuring, an Ethernet or Wi-Fi adapter, it’s recommended to assign an IP address within the network range and outside of the DHCP server scope to allow proper connectivity and avoid address conflicts, because if two devices share the same IP address neither of them will be able to connect to the internet.
If you don’t see the option to edit the networking settings, it’s likely because you’re not using the version of Windows 10 that supports this feature. The ability to set a static IP address configuration for Ethernet adapters is available starting with the May 2019 Update and later versions.

Mauro Huculak is a Windows How-To Expert who started Pureinfotech in 2010 as an independent online publication. He has also been a Windows Central contributor for nearly a decade. Mauro has over 14 years of experience writing comprehensive guides and creating professional videos about Windows and software, including Android and Linux. Before becoming a technology writer, he was an IT administrator for seven years. In total, Mauro has over 20 years of combined experience in technology. Throughout his career, he achieved different professional certifications from Microsoft (MSCA), Cisco (CCNP), VMware (VCP), and CompTIA (A+ and Network+), and he has been recognized as a Microsoft MVP for many years. You can follow him on X (Twitter) , YouTube , LinkedIn and About.me .
- Microsoft Edge based on Chromium will be a separate download on Windows 10
- Windows 10 build 18334 (19H1) releases new features
We hate spam as much as you! Unsubscribe any time Powered by follow.it ( Privacy ), our Privacy .
Giving the computer an IP address
A computer needs the following information to function properly on a computer network:
- Subnet Mask
- IP address of a Default Gateway (router)
- IP address of a DNS server
There are two ways that a computer can obtain those details. Either automatically, or via manual configuration.
DHCP – automatic assignment of IP addresses
In a home network, the router usually decides how the LAN should work. The router will forward traffic between the clients on the LAN and also between the LAN and the Internet.
With that in mind, it is only natural that the router also hands out IP addresses and other necessary information to the computers on the network. This is done via DHCP , which stands for Dynamic Host Configuration Protocol. In other words, it is a protocol to automatically hand out configuration to computers and other devices on the network.
Usually when you receive your home router it is already pre-configured with a DHCP server to hand out configuration to your computers and other devices. The router is also prepared so that the addresses that the router hands out via DHCP is on the same IP network as the router’s LAN IP address. This is necessary for the clients to be able to use the router as their Default Gateway.
When a computer connects to a network it will try to ask for an IP address. This is done by sending out a DHCP request where it asks if there are any available DHCP servers on the network. If any DHCP server responds then the computer will use DHCP to ask for an IP address and all the other necessary information it needs from the DHCP server.
So when your router sees this DHCP request it will hand out an available IP address from its pool of free IP addresses, together with the other details that the computer needs.
In the above example, the router’s DHCP server has a pool of available IP addresses starting with 192.168.1.2 and going all the way up to 192.168.1.254. The router will hand out the first available IP address from that pool and will mark the address as “ leased” so that it does not hand out the same IP address to any other client on the network.
All clients on the LAN will receive the same Subnet Mask, Default Gateway and DNS Server settings from the DHCP server since those details are common to all clients.
Manual configuration of an IP address
Instead of letting the computer obtain its IP address from the router via DHCP you can choose to manually configure the IP settings on the computer. Normally this is avoided since it can cause a few different problems unless it is handled properly by the administrator, which is you.
When and why would you need to manually configure an IP address on a client?
If a computer obtains its IP address automatically via DHCP then it is not certain that the computer will obtain the same IP address each and every time you start the computer. The DHCP server remembers which computer that has gotten which IP address, but only for a certain amount of time. If a computer is powered off for too long (often a day or two, depending on how the router is configured) then the DHCP server will forget which IP address that it handed out to the computer. Also, if the router is powered off for any reason then it will typically forget about any DHCP leases it has previously handed out.
In some special cases, this could lead to problems. One such example is if you have had to make a Port Forward (a subject which is discussed in further details in other parts of this guide). Port forwards often point to an internal LAN IP address of a computer. As long as the computer keeps the same IP address the Port Forward will work. But if the computer changes IP addresses every so often, then after each IP address change the Port Forward must be updated in the router configuration.
In that situation, it is often recommended to configure the computer that should receive the Port Forward manually with an IP address. That way the IP address will always stay the same and the Port Forward keeps working.
When you configure an IP address manually on a computer you need to configure the same settings that a computer normally receives via DHCP:
- An available IP address on the same IP network as the router
- The same Subnet Mask that the router is using
- Default Gateway, which should be set to the LAN IP address of the router
- DNS Server address – either the router LAN IP address or another DNS server on the Internet. You may use the same address that the router normally hands out via DHCP
IP address conflicts
If you choose to manually configure an IP address on a computer, then you also should make sure to exclude that IP address from the pool of DHCP addresses in your home router. Otherwise the router might hand out the same IP address to some other computer on the network.
Using the street address analogy again, if two houses on the same street for some reason had the exact same house number, then the confusion would be great. Some packages and letters would end up at the correct house whereas others would end up at the wrong place. It would very much be hit and miss with a big random element to it.
The same thing would happen on a computer network where two devices were configured to use the exact same IP address. You then have an IP address conflict on the network, and the result is basically that communication stops working for the involved clients. Network communication simply does not work if only approximately half of the traffic ends up in at the correct place.
In modern networks and with newer operating systems the computers will try to avoid IP address conflicts by checking first if the IP address seems to be taken already. But even then only the first computer that obtains the IP address will work correctly. The second computer that accidentally is given the same IP address as the first one will notice the IP address conflict and will then simply avoid talking on the network until it has been given another IP address.
Understanding IP Address Assignment: A Complete Guide

Introduction
In today's interconnected world, where almost every aspect of our lives relies on the internet, understanding IP address assignment is crucial for ensuring online security and efficient network management. An IP address serves as a unique identifier for devices connected to a network, allowing them to communicate with each other and access the vast resources available on the internet. Whether you're a technical professional, a network administrator, or simply an internet user, having a solid grasp of how IP addresses are assigned within the same network can greatly enhance your ability to troubleshoot connectivity issues and protect your data.
The Basics of IP Addresses
Before delving into the intricacies of IP address assignment in the same network, it's important to have a basic understanding of what an IP address is. In simple terms, an IP address is a numerical label assigned to each device connected to a computer network that uses the Internet Protocol for communication. It consists of four sets of numbers separated by periods (e.g., 192.168.0.1) and can be either IPv4 or IPv6 format.
IP Address Allocation Methods
There are several methods used for allocating IP addresses within a network. One commonly used method is Dynamic Host Configuration Protocol (DHCP). DHCP allows devices to obtain an IP address automatically from a central server, simplifying the process of managing large networks. Another method is static IP address assignment, where an administrator manually assigns specific addresses to devices within the network. This method provides more control but requires careful planning and documentation.
Considerations for Efficient IP Address Allocation
Efficient allocation of IP addresses is essential for optimizing network performance and avoiding conflicts. When assigning IP addresses, administrators need to consider factors such as subnetting, addressing schemes, and future scalability requirements. By carefully planning the allocation process and implementing best practices such as using private IP ranges and avoiding overlapping subnets, administrators can ensure smooth operation of their networks without running out of available addresses.
IP Address Assignment in the Same Network
When two routers are connected within the same network, they need to obtain unique IP addresses to communicate effectively. This can be achieved through various methods, such as using different subnets or configuring one router as a DHCP server and the other as a client. Understanding how IP address assignment works in this scenario is crucial for maintaining proper network functionality and avoiding conflicts.
Basics of IP Addresses
IP addresses are a fundamental aspect of computer networking that allows devices to communicate with each other over the internet. An IP address, short for Internet Protocol address, is a unique numerical label assigned to each device connected to a network. It serves as an identifier for both the source and destination of data packets transmitted across the network.
The structure of an IP address consists of four sets of numbers separated by periods (e.g., 192.168.0.1). Each set can range from 0 to 255, resulting in a total of approximately 4.3 billion possible unique combinations for IPv4 addresses. However, with the increasing number of devices connected to the internet, IPv6 addresses were introduced to provide a significantly larger pool of available addresses.
IPv4 addresses are still predominantly used today and are divided into different classes based on their range and purpose. Class A addresses have the first octet reserved for network identification, allowing for a large number of hosts within each network. Class B addresses reserve the first two octets for network identification and provide a balance between network size and number of hosts per network. Class C addresses allocate the first three octets for network identification and are commonly used in small networks.
With the depletion of available IPv4 addresses, IPv6 was developed to overcome this limitation by utilizing 128-bit addressing scheme, providing an enormous pool of potential IP addresses - approximately 3.4 x 10^38 unique combinations.
IPv6 addresses are represented in hexadecimal format separated by colons (e.g., 2001:0db8:85a3:0000:0000:8a2e:0370:7334). The longer length allows for more efficient routing and eliminates the need for Network Address Translation (NAT) due to its vast address space.
Understanding these basics is essential when it comes to assigning IP addresses in a network. Network administrators must consider various factors such as the number of devices, network topology, and security requirements when deciding on the IP address allocation method.
In the next section, we will explore different methods of IP address assignment, including Dynamic Host Configuration Protocol (DHCP) and static IP address assignment. These methods play a crucial role in efficiently managing IP addresses within a network and ensuring seamless communication between devices.
Methods of IP Address Assignment
IP address assignment is a crucial aspect of network management and plays a vital role in ensuring seamless connectivity and efficient data transfer. There are primarily two methods of assigning IP addresses in a network: dynamic IP address assignment using the Dynamic Host Configuration Protocol (DHCP) and static IP address assignment.
Dynamic IP Address Assignment using DHCP
Dynamic IP address assignment is the most commonly used method in modern networks. It involves the use of DHCP servers, which dynamically allocate IP addresses to devices on the network. When a device connects to the network, it sends a DHCP request to the DHCP server, which responds by assigning an available IP address from its pool.
One of the key benefits of dynamic IP address assignment is its simplicity and scalability. With dynamic allocation, network administrators don't have to manually configure each device's IP address. Instead, they can rely on the DHCP server to handle this task automatically. This significantly reduces administrative overhead and makes it easier to manage large networks with numerous devices.
Another advantage of dynamic allocation is that it allows for efficient utilization of available IP addresses. Since addresses are assigned on-demand, there is no wastage of unused addresses. This is particularly beneficial in scenarios where devices frequently connect and disconnect from the network, such as in public Wi-Fi hotspots or corporate environments with a high turnover rate.
However, dynamic allocation does have some drawbacks as well. One potential issue is that devices may receive different IP addresses each time they connect to the network. While this might not be an issue for most users, it can cause problems for certain applications or services that rely on consistent addressing.
Additionally, dynamic allocation introduces a dependency on the DHCP server. If the server goes down or becomes unreachable, devices will not be able to obtain an IP address and will be unable to connect to the network. To mitigate this risk, redundant DHCP servers can be deployed for high availability.
Static IP Address Assignment
Static IP address assignment involves manually configuring each device's IP address within the network. Unlike dynamic allocation, where addresses are assigned on-demand, static assignment requires administrators to assign a specific IP address to each device.
One of the main advantages of static IP address assignment is stability. Since devices have fixed addresses, there is no risk of them receiving different addresses each time they connect to the network. This can be beneficial for applications or services that require consistent addressing, such as servers hosting websites or databases.
Static assignment also provides greater control over network resources. Administrators can allocate specific IP addresses to devices based on their requirements or security considerations. For example, critical servers or network infrastructure devices can be assigned static addresses to ensure their availability and ease of management.
However, static IP address assignment has its limitations as well. It can be time-consuming and error-prone, especially in large networks with numerous devices. Any changes to the network topology or addition/removal of devices may require manual reconfiguration of IP addresses, which can be a tedious task.
Furthermore, static allocation can lead to inefficient utilization of available IP addresses. Each device is assigned a fixed address regardless of whether it is actively using the network or not. This can result in wastage of unused addresses and may pose challenges in scenarios where addressing space is limited.
In order to efficiently allocate IP addresses within a network, there are several important considerations that need to be taken into account. By carefully planning and managing the allocation process, network administrators can optimize their IP address usage and ensure smooth operation of their network.
One of the key factors to consider when assigning IP addresses is the size of the network. The number of devices that will be connected to the network determines the range of IP addresses that will be required. It is essential to accurately estimate the number of devices that will need an IP address in order to avoid running out of available addresses or wasting them unnecessarily.
Another consideration is the type of devices that will be connected to the network. Different devices have different requirements in terms of IP address assignment. For example, servers and other critical infrastructure typically require static IP addresses for stability and ease of access. On the other hand, client devices such as laptops and smartphones can often use dynamic IP addresses assigned by a DHCP server.
The physical layout of the network is also an important factor to consider. In larger networks with multiple subnets or VLANs, it may be necessary to segment IP address ranges accordingly. This allows for better organization and management of IP addresses, making it easier to troubleshoot issues and implement security measures.
Security is another crucial consideration when allocating IP addresses. Network administrators should implement measures such as firewalls and intrusion detection systems to protect against unauthorized access or malicious activities. Additionally, assigning unique IP addresses to each device enables better tracking and monitoring, facilitating quick identification and response in case of any security incidents.
Efficient utilization of IP address ranges can also be achieved through proper documentation and record-keeping. Maintaining an up-to-date inventory of all assigned IP addresses helps prevent conflicts or duplicate assignments. It also aids in identifying unused or underutilized portions of the address space, allowing for more efficient allocation in the future.
Furthermore, considering future growth and scalability is essential when allocating IP addresses. Network administrators should plan for potential expansion and allocate IP address ranges accordingly. This foresight ensures that there will be sufficient addresses available to accommodate new devices or additional network segments without disrupting the existing infrastructure.
In any network, the assignment of IP addresses is a crucial aspect that allows devices to communicate with each other effectively. When it comes to IP address assignment in the same network, there are specific considerations and methods to ensure efficient allocation. In this section, we will delve into how two routers in the same network obtain IP addresses and discuss subnetting and IP address range distribution.
To understand how two routers in the same network obtain IP addresses, it's essential to grasp the concept of subnetting. Subnetting involves dividing a larger network into smaller subnetworks or subnets. Each subnet has its own unique range of IP addresses that can be assigned to devices within that particular subnet. This division helps manage and organize large networks efficiently.
When it comes to assigning IP addresses within a subnet, there are various methods available. One common method is manual or static IP address assignment. In this approach, network administrators manually assign a specific IP address to each device within the network. Static IP addresses are typically used for devices that require consistent connectivity and need to be easily identifiable on the network.
Another widely used method for IP address assignment is Dynamic Host Configuration Protocol (DHCP). DHCP is a networking protocol that enables automatic allocation of IP addresses within a network. With DHCP, a server is responsible for assigning IP addresses dynamically as devices connect to the network. This dynamic allocation ensures efficient utilization of available IP addresses by temporarily assigning them to connected devices when needed.
When considering efficient allocation of IP addresses in the same network, several factors come into play. One important consideration is proper planning and design of subnets based on anticipated device count and future growth projections. By carefully analyzing these factors, administrators can allocate appropriate ranges of IP addresses for each subnet, minimizing wastage and ensuring scalability.
Additionally, implementing proper security measures is crucial when assigning IP addresses in the same network. Network administrators should consider implementing firewalls, access control lists (ACLs), and other security mechanisms to protect against unauthorized access and potential IP address conflicts.
Furthermore, monitoring and managing IP address usage is essential for efficient allocation. Regular audits can help identify any unused or underutilized IP addresses that can be reclaimed and allocated to devices as needed. This proactive approach ensures that IP addresses are utilized optimally within the network.
The proper assignment of IP addresses is crucial for maintaining network security and efficiency. Throughout this guide, we have covered the basics of IP addresses, explored different methods of IP address assignment, and discussed considerations for efficient allocation.
In conclusion, understanding IP address assignment in the same network is essential for network administrators and technical professionals. By following proper allocation methods such as DHCP or static IP assignment, organizations can ensure that each device on their network has a unique identifier. This not only enables effective communication and data transfer but also enhances network security by preventing unauthorized access.
Moreover, considering factors like subnetting, scalability, and future growth can help optimize IP address allocation within a network. Network administrators should carefully plan and allocate IP addresses to avoid conflicts or wastage of resources.
Overall, a well-managed IP address assignment process is vital for the smooth functioning of any network. It allows devices to connect seamlessly while ensuring security measures are in place. By adhering to best practices and staying updated with advancements in networking technology, organizations can effectively manage their IP address assignments.
In conclusion, this guide has provided a comprehensive overview of IP address assignment in the same network. We hope it has equipped you with the knowledge needed to make informed decisions regarding your network's IP address allocation. Remember that proper IP address assignment is not only important for connectivity but also plays a significant role in maintaining online security and optimizing network performance.
Enhance Online Security: The Ultimate Guide to Conceal Your IP Address
Alternative Methods to Conceal Your IP Address Without a VPN
Maintain Privacy: Learn How to Alter Your IP Address
The Significance of IP Address for Online Security and Privacy
Comprehensive Handbook on VPNs, IP Addresses, and Proxy Servers
How To Setup A Static IP

- How-To Guides
- Tech Setup & Troubleshooting

Introduction
Setting up a static IP address can provide numerous benefits for individuals and businesses alike. In this digital age, where constant connectivity is essential, having a stable and reliable internet connection is crucial. A static IP address allows you to have a fixed, permanent IP that remains the same each time you connect to the internet. Unlike dynamic IP addresses that change every time you restart your router or reconnect to the network, a static IP provides consistency and control over your online presence.
Whether you are a regular internet user or a small business owner, understanding how to set up a static IP address can elevate your online experience and streamline your operations. In the following sections, we will explore what a static IP address is and the benefits it offers. We will then dive into the step-by-step process of setting up a static IP, ensuring that you can easily configure your network to enjoy the advantages of a static IP address.
With a static IP address, you can take advantage of services that require a fixed IP, such as remote access, hosting websites or servers, and establishing virtual private network (VPN) connections. Additionally, a static IP allows you to have better control over network security and monitoring, simplifying tasks like port forwarding and remote management.
While setting up a static IP might seem daunting for those without technical expertise, rest assured that the process can be simplified through this step-by-step guide. By the end of this article, you will have the knowledge and confidence to set up a static IP address on your own, ensuring a seamless and reliable internet connection.
What is a Static IP?
A static IP (Internet Protocol) address is a fixed, unchanging address assigned to a device or network. Unlike dynamic IP addresses, which are assigned by the Internet Service Provider (ISP) and can change periodically, a static IP remains constant, allowing for consistent access and identification.
Every device connected to the internet is assigned an IP address, which serves as its unique identifier on the network. This address is used to route data traffic between different devices and networks. With a static IP, the assigned address is manually configured and remains the same over time, providing a predictable and consistent connection.
Static IP addresses are typically used for specific purposes, such as hosting websites, running servers, or remotely accessing devices or networks. They are especially useful for businesses that require constant connectivity and reliable access to their network resources from anywhere in the world.
One of the key characteristics of a static IP is that it does not change, regardless of network reboots or device restarts. This stability ensures that services running on the network are always accessible using a fixed address. Unlike dynamic IP addresses, which can cause frequent interruptions and require reconfiguration of services whenever an IP address changes, a static IP saves time and effort by eliminating the need for constant updating.
Furthermore, a static IP address lets you have greater control over your online presence and network security. By assigning a specific IP to your server or network device, you can easily manage and monitor incoming and outgoing traffic, set up firewall rules, and establish secure remote connections. This enhanced control is particularly beneficial for businesses that handle sensitive data or require secure external access to their systems.
While static IP addresses come with numerous advantages, it’s important to note that they may require additional costs from your internet service provider. Some ISPs charge a monthly fee for allocating static IP addresses, so it’s essential to check with your provider or review the pricing plans before deciding to go static.
Why Use a Static IP?
Using a static IP address offers a range of benefits and advantages for both individuals and businesses. Let’s explore some of the key reasons why you might consider using a static IP:
1. Remote Access:
A static IP address allows you to easily access your devices or network remotely. Whether you need to connect to your office computer while traveling or manage your home security system from afar, a static IP ensures consistent and reliable access to your devices or network resources.
2. Hosting Services:
For businesses or individuals hosting websites, servers, or other online services, a static IP is essential. With a fixed IP address, your website or server can be easily accessed by users, as the address remains the same regardless of network changes.
3. VPN Connectivity:
Setting up a virtual private network (VPN) is more seamless with a static IP address. A VPN allows secure and private communication between different networks or devices over the internet. A static IP ensures stable and uninterrupted VPN connections, enhancing security and privacy for remote workers or businesses with multiple locations.
4. Enhanced Security:
Using a static IP address provides better control over network security. With a known IP address, you can easily configure firewall rules, restrict access to specific IP ranges, and monitor incoming and outgoing traffic. This level of control helps in protecting your network from unauthorized access and potential security threats.
5. Simplifies Device Management:
A static IP simplifies device management by providing a consistent and predictable IP address for each device on the network. This makes it easier to configure port forwarding, manage device settings, and identify and troubleshoot connectivity issues.
While dynamic IP addresses are sufficient for most home users, utilizing a static IP address offers a higher level of control, stability, and convenience. It is particularly advantageous for businesses that rely on consistent connectivity, secure remote access, and efficient management of network resources.
Now that we understand the benefits of using a static IP, let’s explore the step-by-step process of setting up a static IP address for your network or devices.
Steps to Set Up a Static IP
Setting up a static IP address on your router or device may vary depending on your specific network equipment. However, the following steps provide a general overview of the process:
Step 1: Determine if your internet service provider allows static IP addresses
Check with your internet service provider (ISP) to see if they offer static IP addresses and if there are any additional fees associated with obtaining one. Some ISPs may offer static IPs as part of their business plans, while others may require an extra subscription.
Step 2: Log in to your router’s admin page
Open a web browser and enter your router’s IP address in the address bar. This IP address is usually printed on the router itself or mentioned in the router’s user manual. Enter the administrator credentials to log in to the router’s admin page.
Step 3: Find the WAN/Internet settings section
Navigate to the WAN or Internet settings section of your router’s admin page. The location may vary depending on the router model and firmware. Look for options related to IP address assignment or connection type.
Step 4: Change the IP address assignment type to manual/static
Once you have located the WAN/Internet settings section, look for the IP address assignment or connection type setting. Change the assignment type to manual or static, as opposed to dynamic or automatic.
Step 5: Enter the static IP address details
Enter the specific IP address, subnet mask, gateway, and DNS server details provided by your ISP. These details should be issued to you when obtaining a static IP. Make sure to enter the information accurately to ensure a successful connection.
Step 6: Save the settings and restart the router
After entering the static IP details, save the settings on your router’s admin page. Once saved, restart the router to apply the new settings. This will ensure that the router assigns and uses the static IP address for your network.
Step 7: Confirm the setup is successful
Once the router has restarted, check the network settings on your devices to verify the successful setup of the static IP address. Ensure that the entered IP address, subnet mask, gateway, and DNS server details are correctly reflected in the device’s network settings.
It is important to note that the specific steps may vary depending on the router brand, model, and firmware version. Refer to the router’s user manual or online documentation for detailed instructions tailored to your specific router.
By following these general steps, you can successfully set up a static IP address for your network or devices. Enjoy the benefits of a stable, predictable, and controllable internet connection.
Before diving into the process of setting up a static IP address, it’s crucial to determine whether your internet service provider (ISP) allows static IP addresses as part of their service offerings. Not all ISPs provide this option, and some may charge additional fees for static IP allocation.
Here are a few steps to help you confirm whether your ISP supports static IP addresses:
1. Check your ISP’s website:
Visit your ISP’s official website and navigate to their residential or business internet service pages. Look for any mentions of static IP addresses, additional features, or premium plans that offer static IP allocation. The website should provide details about the availability and cost of static IPs.
2. Contact your ISP directly:
If you can’t find specific information on the website, reach out to your ISP’s customer service or technical support team. Contact them via phone, email, or online chat and inquire about their policies regarding static IP addresses. They will be able to provide you with accurate information about the availability and any associated fees.
3. Review your ISP’s terms and conditions or contract:
Go through the terms and conditions or service agreement you received from your ISP when you signed up for their internet service. Look for any clauses or sections that mention static IP addresses. These documents may outline the availability, pricing, and limitations associated with static IP allocation.
4. Research online forums or communities:
Explore online forums, discussion boards, or communities where users share their experiences with various ISPs. Look for threads or discussions related to static IP addresses and see what other customers have encountered when trying to obtain a static IP from your ISP. This can give you additional insights into the policies and procedures of different ISPs.
By conducting these steps, you will gain a clear understanding of whether your ISP supports static IP addresses and how to proceed with obtaining one. Remember to inquire about any fees or additional requirements, as these may vary depending on the ISP’s policies.
Once you have confirmed that your ISP allows static IP addresses and have gathered the necessary information, you can proceed to the next steps in setting up a static IP address for your network or devices.
To set up a static IP address, you need to access your router’s administrative page. This web-based interface allows you to modify various settings on your router, including IP address configuration. Here’s how you can log in to your router’s admin page:
1. Identify your router’s IP address:
Most routers have a default IP address, such as 192.168.0.1 or 192.168.1.1, that you can use to access the admin page. Look for a label on the router itself or refer to the router’s user manual to find this information. Alternatively, you can check your computer’s network settings to find the default gateway IP address . This IP address usually corresponds to your router’s admin page.
2. Open a web browser:
Launch a web browser on a computer or device that is connected to the same network as your router. It can be a desktop computer, laptop, or even a smartphone or tablet.
3. Enter the router’s IP address:
Type the router’s IP address into the address bar of your browser. Make sure to enter the IP address accurately. For example, if your router’s IP address is 192.168.0.1, you would type “http://192.168.0.1” in the browser’s address bar.
4. Press Enter:
Press Enter or click the “Go” button to navigate to the router’s admin page. The browser will establish a connection to your router using the specified IP address.
5. Enter login credentials:
Depending on your router model and settings, you may be prompted to enter a username and password to log in. By default, many routers use “admin” as the username and “password” or a blank field as the password. However, it’s important to note that some routers may have different default login credentials, so refer to your router’s documentation or check with your ISP if you are unsure.
6. Access the admin page:
Once you have entered the correct login credentials, you will gain access to your router’s admin page. This page provides access to various settings and configurations that allow you to modify and customize your network settings.
Note that routers from different manufacturers may have slightly different interfaces and layouts for their admin pages. However, most routers have a similar structure and should allow you to access the necessary settings for configuring a static IP address.
By successfully logging in to your router’s admin page, you are now ready to proceed to the next steps and configure your network for a static IP address.
In order to set up a static IP address, you need to locate the WAN (Wide Area Network) or Internet settings section within your router’s administrative page. This section allows you to configure the network settings specifically related to your internet connection. Here’s how you can find the WAN/Internet settings section:
1. Navigate to the main settings menu:
Once you have logged in to your router’s admin page, look for the main settings menu. This menu is typically displayed on the homepage or in a navigation sidebar. The exact location and appearance may vary depending on your router’s firmware and interface.
2. Look for the WAN/Internet settings:
Within the main settings menu, locate the WAN or Internet settings option. This option is usually labeled accordingly and may be found under a section titled “Network Settings,” “Internet Setup,” or something similar. Some routers may include submenus or tabs for different types of Internet connections (Wired, Wireless, etc.). Choose the appropriate option for your specific connection type.
3. Access the WAN/Internet settings:
Click on the WAN or Internet settings option to access the corresponding configuration page. This page allows you to modify the settings related to your internet connection, such as IP address assignment, DNS server settings, and connection type.
4. Explore the available options:
Once you are on the WAN/Internet settings page, take a moment to explore the available options and settings. Look for options related to IP address assignment, connection type (static or dynamic), or DHCP (Dynamic Host Configuration Protocol) settings. These options will be essential for configuring a static IP address.
Remember that the specific layout and options within the WAN/Internet settings section may vary between different router brands and models. Refer to your router’s user manual or online documentation for more precise instructions tailored to your specific router.
By successfully finding and accessing the WAN/Internet settings section, you are now ready to proceed with the next steps and configure your router for a static IP address. In the following steps, you will learn how to change the IP address assignment type and enter the specific details for your static IP configuration .
To set up a static IP address, you need to change the IP address assignment type from dynamic to manual or static within the WAN/Internet settings section of your router’s admin page. This step ensures that your router assigns a fixed IP address to your network or device. Here’s how to change the IP address assignment type:
1. Locate the IP address assignment options:
Within the WAN/Internet settings page, look for the options related to IP address assignment. These options may be labeled as “IP address mode,” “Connection Type,” or similar terminology.
2. Select the manual/static IP address mode:
Once you have identified the IP address assignment options, choose the manual or static IP address mode. This ensures that your router assigns a fixed IP address instead of dynamically assigning one.
3. Disable DHCP (if required):
In some cases, you may need to disable DHCP (Dynamic Host Configuration Protocol) in order to manually assign a static IP address. DHCP automatically assigns IP addresses to devices on the network. If DHCP is enabled, you will need to disable it to proceed with the manual/static IP configuration. Refer to your router’s documentation for instructions on disabling DHCP if necessary.
4. Save the changes:
Once you have selected the manual/static IP address mode and made any additional required changes, save the settings. Look for a “Save,” “Apply,” or “OK” button within the WAN/Internet settings page, and click on it to save your changes.
5. Restart your router:
After saving the changes, it is recommended to restart your router to ensure that the new IP address assignment settings take effect. This can typically be done by going to the router’s main settings page and selecting the option to restart or reboot the device. Allow the router a few moments to restart fully.
By changing the IP address assignment type to manual/static, you have now configured your router to assign a fixed IP address to your network or device. In the next steps, you will learn how to enter the specific details for your static IP address, such as the IP address, subnet mask, gateway, and DNS server information.
Now that you have changed the IP address assignment type to manual/static, it’s time to enter the specific details for your static IP address within the WAN/Internet settings section of your router’s admin page. These details include the IP address, subnet mask, gateway, and DNS server information. Follow these steps to enter the static IP address details:
1. Locate the IP address configuration fields:
Within the WAN/Internet settings page, look for the fields to enter the IP address, subnet mask, gateway, and DNS server information. These fields may be labeled according to their respective terms.
2. Obtain the static IP address details:
Contact your internet service provider (ISP) to obtain the specific static IP address details they have assigned to you. These details typically include the IP address, subnet mask, gateway, and DNS server information. Make sure to accurately record the information provided by your ISP.
3. Enter the IP address:
In the corresponding field, enter the specific static IP address provided by your ISP. This is the unique address assigned to your network or device. Ensure that you enter the IP address correctly to avoid any connectivity issues.
4. Enter the subnet mask:
Next, enter the subnet mask associated with your static IP address. The subnet mask determines the size of the network and helps devices identify which parts of the IP address represent the network identifier and the host identifier. The most common subnet mask is 255.255.255.0, but your ISP may provide you with a different subnet mask.
5. Enter the gateway:
Enter the gateway address provided by your ISP. The gateway is the IP address of the router or networking device that connects your local network to the internet. It serves as the access point to external networks.
6. Enter the DNS server information:
Finally, enter the DNS (Domain Name System) server information. DNS servers translate domain names into IP addresses, allowing devices to locate and access websites and services on the internet. Your ISP should provide you with the IP addresses of their DNS servers. You may need to enter primary and secondary DNS server addresses.
7. Save the changes:
After entering all the necessary static IP address details, save the changes within the WAN/Internet settings page. Look for a “Save,” “Apply,” or “OK” button and click on it to save your settings.
By entering the static IP address details accurately, you have successfully configured your router to use a static IP address for your network or device. In the next step, you will learn how to restart your router to apply the new settings and ensure a seamless connection.
After entering the static IP address details in the WAN/Internet settings section of your router’s admin page, it is important to save the changes you made. Saving the settings ensures that your router will use the new static IP address configuration. To complete the setup process, you will also need to restart the router. Follow these steps to save the settings and restart your router:
1. Save the settings:
Look for a “Save,” “Apply,” or “OK” button within the WAN/Internet settings page of your router’s admin page. Click on this button to save the static IP address configuration. The router will apply the new settings and update the network configuration accordingly.
2. Restart the router:
To ensure that the new static IP address configuration takes effect, it is necessary to restart the router. Locate the option to restart or reboot the router within the admin page. This option is typically found in the main settings menu or on a separate system or maintenance page. Click on the restart option to initiate the restart process.
3. Allow the router to restart:
After clicking on the restart option, the router will undergo the restart process. It may take a few moments for the router to fully reboot and apply the new settings. During this time, it is normal for the router’s lights to flash or for it to temporarily lose internet connectivity.
4. Verify the new IP address configuration:
Once the router has restarted, double-check the IP address configuration on your network or device to confirm that the static IP address settings are successfully applied. Ensure that the entered IP address, subnet mask, gateway, and DNS server details match the information you provided to the router. Any discrepancies may indicate an issue with the configuration, requiring further troubleshooting.
By saving the settings and restarting the router, you have completed the process of configuring your network or device to use a static IP address. The router will now assign and utilize the specified static IP address for your network, providing stability and consistency for your internet connection.
After setting up a static IP address on your router, it’s important to confirm that the configuration was successful and that your network is now using the assigned static IP. Here are a few steps to help you verify the setup:
1. Check network settings on devices:
Access the network settings on your devices (computers, smartphones, etc.) that are connected to the router. Look for the network connection settings and check if the assigned IP address matches the static IP address you configured. Verify that the subnet mask, gateway, and DNS server information is also correctly displayed.
2. Test network connectivity:
Ensure that all devices connected to the network can access the internet and communicate with other devices as expected. Open web browsers, use online applications, and perform network-dependent tasks to confirm that the static IP address configuration has not disrupted network connectivity.
3. Perform a reboot test:
Restart your router and observe the behavior of the network after the reboot. Check if the devices reconnect to the network using the assigned static IP addresses without any issues. This test helps to confirm that the static IP configuration persists even after a router restart.
4. Test remote access or hosted services:
If you set up a static IP address for remote access or hosting services, test the functionality from external networks. Ensure that you can access the devices or services using the assigned static IP. For example, if you are hosting a website, check if it can be accessed using the domain name associated with the static IP address.
5. Consult the router logs:
Some routers maintain logs of network activities and events. Check the router’s administrative interface for any logs related to the allocation and usage of IP addresses. This can help confirm if the static IP address was successfully assigned to your network.
By following these steps to confirm the setup’s success, you can ensure that your network is now utilizing the static IP address you configured. If any issues are encountered, refer to your router’s documentation or consult with your internet service provider for further assistance.
Setting up a static IP address can greatly benefit individuals and businesses by providing stability, control, and enhanced connectivity for their network. A static IP allows for remote access, simplifies hosting services, enables secure VPN connections, enhances network security, and facilitates device management. By following the step-by-step process outlined in this guide, you can successfully configure a static IP address for your network or device.
Begin by determining if your internet service provider offers static IP addresses and if there are any associated fees. Then, log in to your router’s admin page, locate the WAN/Internet settings section and change the IP address assignment type to manual/static. Next, enter the specific static IP address details provided by your ISP, such as the IP address, subnet mask, gateway, and DNS server information. Save the settings and restart your router to apply the new configuration.
After completing the setup, confirm that the static IP address is successfully assigned to your network by checking the network settings, testing network connectivity, performing a reboot test, and validating remote access or hosted services. By ensuring the setup is successful, you can enjoy the benefits of a stable and predictable internet connection.
Remember to refer to your router’s documentation or contact your internet service provider if you encounter any issues or require further assistance during the setup process. With a static IP address, you can take control of your network, streamline your online activities, and unlock new possibilities for remote access and hosting services.
Leave a Reply Cancel reply
Your email address will not be published. Required fields are marked *
Save my name, email, and website in this browser for the next time I comment.
- Crowdfunding
- Cryptocurrency
- Digital Banking
- Digital Payments
- Investments
- Console Gaming
- Mobile Gaming
- VR/AR Gaming
- Gadget Usage
- Gaming Tips
- Online Safety
- Software Tutorials
- Tech Setup & Troubleshooting
- Buyer’s Guides
- Comparative Analysis
- Gadget Reviews
- Service Reviews
- Software Reviews
- Mobile Devices
- PCs & Laptops
- Smart Home Gadgets
- Content Creation Tools
- Digital Photography
- Video & Music Streaming
- Online Security
- Online Services
- Web Hosting
- WiFi & Ethernet
- Browsers & Extensions
- Communication Platforms
- Operating Systems
- Productivity Tools
- AI & Machine Learning
- Cybersecurity
- Emerging Tech
- IoT & Smart Devices
- Virtual & Augmented Reality
- Latest News
- AI Developments
- Fintech Updates
- Gaming News
- New Product Launches
New Step by Step Roadmap for Marijuana News
- Facts About Skycity Online Casino Nz 8211 100 Welcome Bonus Up To 100 Revealed
Related Post
The basic principles of online pokies real money nz ᐈ best slots to play (2024), top guidelines of play pokies online new zealand, related posts.

How To Get Static IP Address

How To Port Forward Ethernet

How To Set Static IP Windows 10

What Is An External IP Address

What Is A Dynamic IP Address

How To Open Ports On A Wireless Router

How To Assign A Static IP Address To A Workstation In Windows Server 2008 R2

How To Change IP Address Linux
Recent stories.

Facts About Skycity Online Casino Nz – 100% Welcome Bonus Up To $100 Revealed

How to Find the Best Midjourney Alternative in 2024: A Guide to AI Anime Generators

How to Know When it’s the Right Time to Buy Bitcoin
Unleashing Young Geniuses: How Lingokids Makes Learning a Blast!
- Privacy Overview
- Strictly Necessary Cookies
This website uses cookies so that we can provide you with the best user experience possible. Cookie information is stored in your browser and performs functions such as recognising you when you return to our website and helping our team to understand which sections of the website you find most interesting and useful.
Strictly Necessary Cookie should be enabled at all times so that we can save your preferences for cookie settings.
If you disable this cookie, we will not be able to save your preferences. This means that every time you visit this website you will need to enable or disable cookies again.
Experience the Network
How to assign manual IP address

What is an IP address ?
Before you know how to assign a manual IP address, you should have a brief idea of what an IP address is. An IP address is a 32-bit address used to identify a PC or device in a network. It is a logical address used to identify a device in a computer network. As per the assignment mechanism, we can classify them in Dynamic and Static or Manual IP address.
Dynamic IP is assigned by any DHCP server, for example – ADSL modem, WiFi router, A physical DHCP server in your network. Even the network devices like switch and routers can function as a DHCP server. Moreover, while you are using tethering from a mobile phone to your laptop, the mobile phone serves the purpose of the DHCP server. Moreover, we don’t generally assign dynamic IP to devices like Server, Printer, Network devices, etc. because the Dynamic IP may change at the next allocation.
Manual IP addresses are fixed IP addresses assigned permanently, hence it is called Static IP. The advantage of assigning manual IP is that it is secure than the dynamic one, and it does not change . The disadvantage is that you have to physically appear before each PC and devices to assign Ip address. A good practice is to make a list of IP addresses well in advance so that the problem of IP conflict does not arise.
To know about IP conflict refer to this blog Detect IP conflict.
How to assign Manual IP address ?
Here I will explain to you how to assign a manual IP to your PC, Laptop, etc.
For assigning IP, you have to go to the Adaptor setting, there may be more than one adaptor, like in Laptop or All in One PCs, you may get an Ethernet adaptor, WiFi adaptor, and Bluetooth adaptor. In Desktop PC generally, only one Ethernet adaptor is present, In High-End PCs/Servers, you may get more than one Ethernet adaptors.
Methods to access Network adapter setting
There are various ways to go to the Network adapter setting to set the IP address manually:
- From the bottom right (System tray), Right Click on the Network Icon and click on Network and Sharing Center.
If You don’t find the icon at the System Tray, there are other methods to reach an Adapter setting.
2. The second method is just Right-click to Network Icon at Desktop and Go to Properties.
3. The second method is you may type <ncpa.cpl> from the run and hit Enter.
4. You can also access Network and Sharing center from the Control panel> Network and Sharing center.
Once you access the Network Window, follow the following procedure.

The network and Sharing Center will open Like this :-

Here, Point Mouse to Ethernet and select Change Adaptor Setting. Now you will see the adapters in Network Connection Window.
There may be only One Ethernet adapter in the case of Desktop, or it may have Ethernet, WiFi, and Bluetooth, as shown in Figure.
Adapters that have no connectivity will have a Red Cross mark, you may note it in the following Picture.

Now Right Click on The adapter where you want to Set the IP address manually. Go to the properties now Ethernet Properties Windows will open as follows:-

Here Select Internet Protocol Version 4(TCP/IP) and click in Properties as shown in the above figure.
Now you will get Internet Protocol Version 4(TCP/IP) Properties window where you can set the IP address Manually.
The plethora of different fields in IP address
In this wizard, you can see 5 blank fields, that are: IP address, Subnet Mask, Default Gateway, Primary DNS, and Secondary DNS.
To know more about IP address, read IP address version 4 , Classless IP , and IPv6 .
The IP address is the unique 32-bit address provided to your PC. It’s like the name given to a person in a house. As the name of a person, it should also be unique and assigned to only one PC in a network. It looks like 192.168.1.5, four octets separated by a dot; each octet has decimal value 0 to 255.
Subnet mask
The subnet mask for the classful IP address will be assigned automatically by the computer. If you are using the classless IP, you have to provide a custom subnet mask. The above link of Classless IP address has details of the subnet mask.
Default Gateway
Default Gateway is the address of Router in Your network. In the case of home Internet, its the IP address of your Modem. The gateway IP will be in the same network as your PC. Most probably, the value of the last octet is 1. Suppose your PC has IP 192.168.1.5, then the gateway should be 192.168.1.1 in most of the cases.
Primary DNS is either provided by your ISP. Or it is the same as the IP address of the ADSL Modem, which is the same as the default gateway. The DNS server resolves the domain name to the IP address.
Secondary DNS is needed when Primary DNS fails to resolve the request. It is also provided by the ISP, or you may use universal DNS addresses like 8.8.8.8, or 8.8.4.4, etc.
Once You feed all the fields, You can Click OK as in following image .

Now, if you want to check the IP address, Right-click on the adapter. Then, go to Status. When the status window opens, click on “Details” to see the IP.
Here you can verify the IP address, subnet mask, and default gateway. The default gateway must be in the same network segment with the assigned IP. DNS server may be IP of the gateway itself or as provided by ISP. ISP also provides the alternate DNS IP. If not, you may assign global DNS like 8.8.8.8, or 8.8.4.4 on the Internet. In other private networks, the DNS servers are locally defined.
Check the IP connectivity
To check the connectivity, ping the gateway address from Run Command. Just Press Windows Logo+ R , type <ping 192.168.1.1> . The given IP is just for an example, different networks may have a different IP address of the gateway. If you get a response from your gateway, then it should work fine. To know more about ping command, read this post on Ping commands .
You can assign manual IP to any adapter in the same way. In case you have a WiFi adapter or Multiple Ethernet adapters. The process of assigning IP Addresses is the same.
Please share this article if you find it worth sharing.
Share this article.

Post navigation
Previous post.

What’s up Dear, are you truly visiting this site daily, if so after that you will absolutely obtain nice know-how.
I always emailed this weblog post page to all my contacts, for the reason that if like to read it afterward my links will too.
Great post. I used to be checking constantly this blog and I am impressed! Extremely helpful information specifically the ultimate phase 🙂 I handle such info a lot. I used to be seeking this particular info for a very lengthy time.
Thanks and best of luck.
Very nice article, exactly wһat I ѡanted to find.
Leave a Reply Cancel reply
Your email address will not be published. Required fields are marked *
Save my name, email, and website in this browser for the next time I comment.
Follow us on Facebook to stay updated.
[Wireless Router] How to manually assign IP around the DHCP list?
Send the page link to your email
Please enter your email
Scan QR code to open this page with your smart phone.
In general, the device connected to ASUS router will receive a dynamic private IP address from router DHCP server, like 192.168.1.3. However, if you want to share files in a computer to other devices, then you might need a manual assign IP function to set a static IP for the computer so you don't need to search and confirm the IP address of the computer every time when you want to access it.
To assign a fixed IP address for your devices, you may follow the steps below.
Method1 : You can assign a fixed IP address from your device's network card. (For how to configure the built-in network card of your device, please contact the device manufacturer.)
Method2: Set up a fixed IP for device via ASUS router DHCP server.
Step1 . Connect your computer to ASUS router via Wi-Fi or Ethernet cable.
Note : Wired connection is recommend to avoid setup interruptions due to unstable wireless network signals
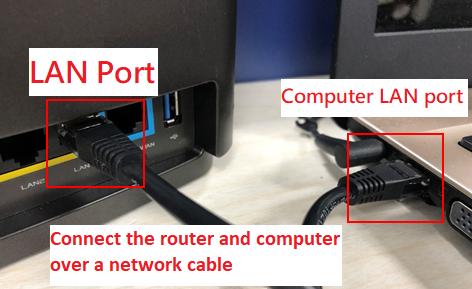
Step2: Open a web browser and navigate to Web GUI. http://www.asusrouter.com
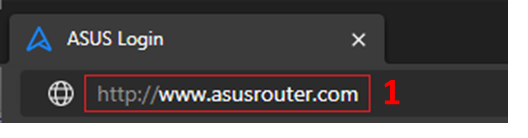
Step3: Enter your login username and password on the login page and then click [ Sign In ].
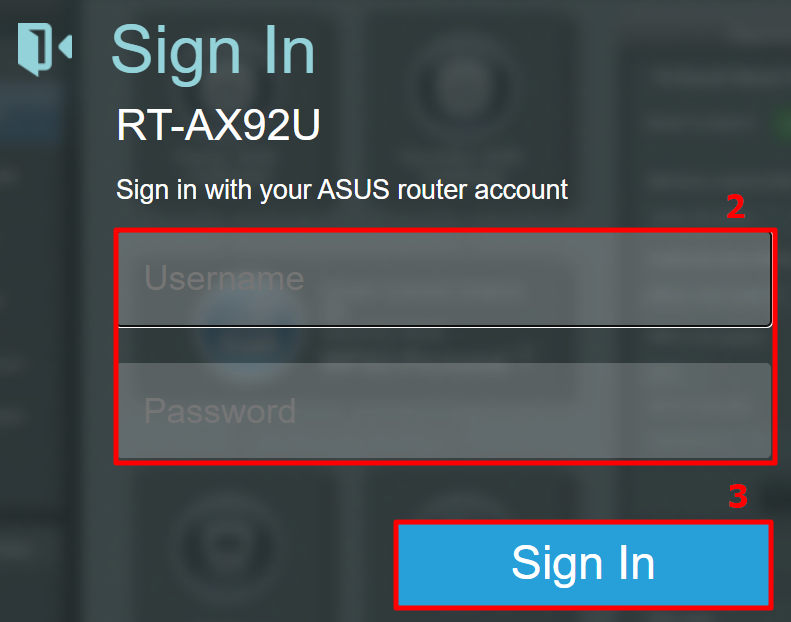
Note: If you forget the user name and/or password, please restore the router to the factory default status and setup. (The default username and password is admin/admin).
Please refer to [Wireless Router] How to reset the router to factory default setting? for how to restore the router to default status.
Step 4 : Go to [ Advanced Settings ] > [ LAN ] > [ DHCP server ], you can find the IP address range of RT-AX92U is 192.168.50.2 ~ 192.168.50.254.
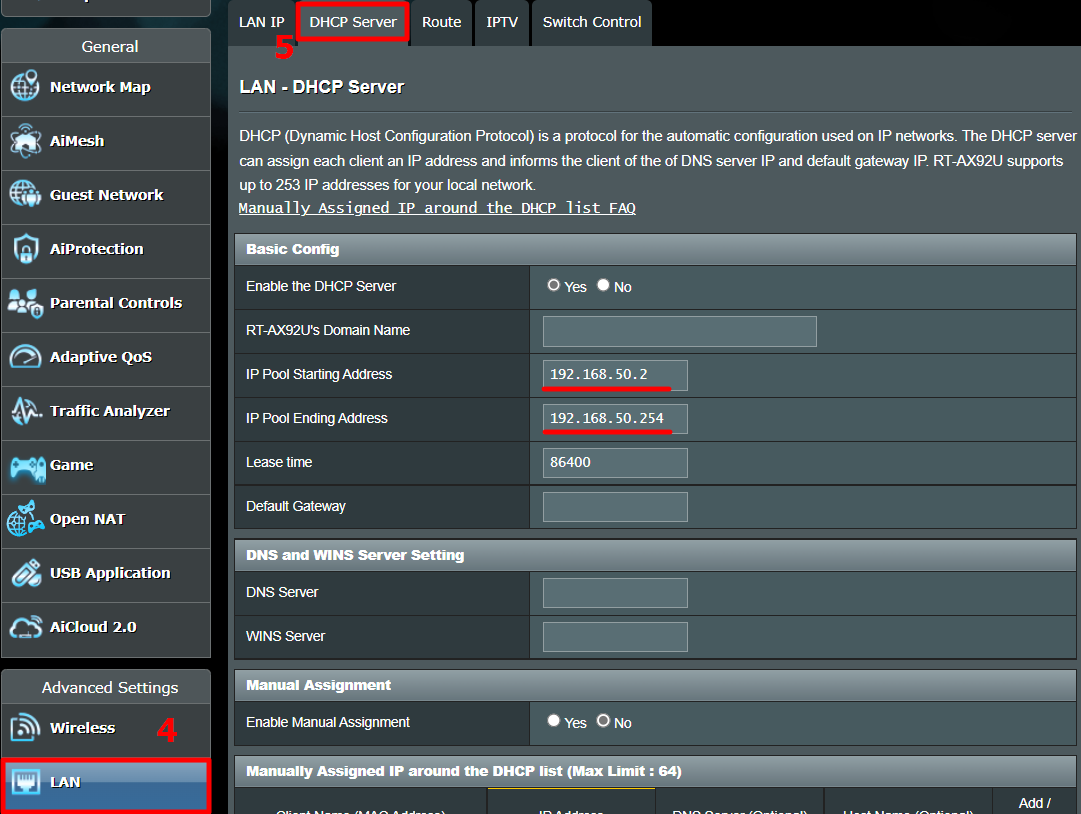
Step5: Find [Enable Manual Assignment] and click [Yes] to enable manual assign function.
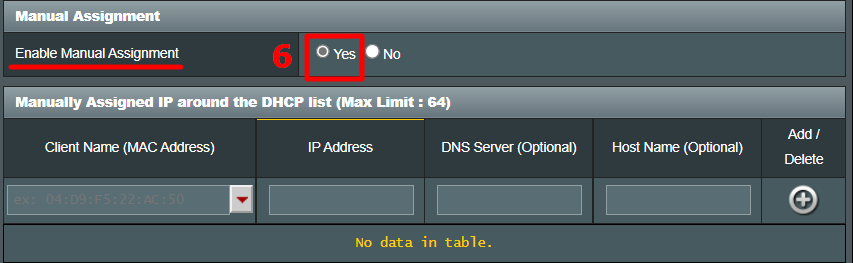
Step6: In Manually Assigned IP area, please fill in the device MAC address and the IP address binding to this device only.
Client Name (MAC Address) :Use the dropdown list to choose the device or manual enter the device's MAC address.
IP address :Enter the IP address that you want to bind to this device. Please make sure the IP address needs to be in the IP pool of your DHCP server.
For example, if the IP pool of your router’s DHCP server is 192.168.50.2~192.168.50.254, you should enter an IP address within this range, like 192.168.50.75.
DNS server (Optional) :Default is blank. You can enter the preferred DNS server if needed.
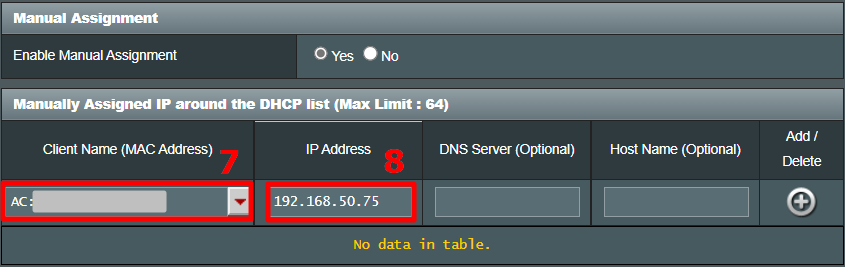
Step7: Click the "+" icon and the [Apply] button to complete the setting.
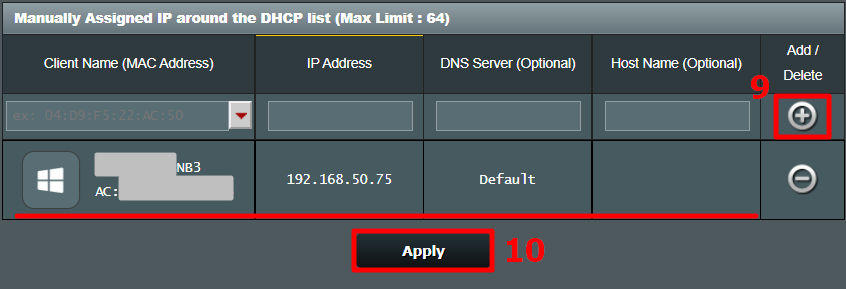
Step8: You will be direct to DHCP page if the setting is completed. Please make sure the rule you just set does show up in the manual assign IP list and MAC address/IP address are correct.
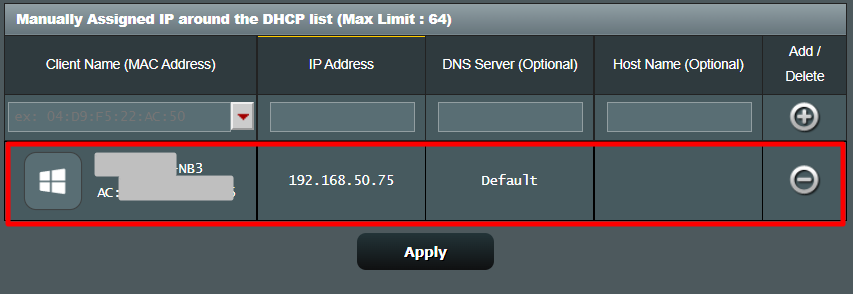
1. What is DHCP server?
A DHCP (Dynamic Host Configuration Protocol) server in ASUS router can provide user's devices a private IP address, Subnet mask, Default gateway, DNS server that user does not need to manual assign IP for devices.
2. Why can't I manual assign IP to my device successfully after following the steps?
a. Please make sure you've set and apply the rule successfully and you can see the rule show up in the manual assign IP list.
b. Please make sure the device MAC address is correct. c. Please make sure your device's network card is set to obtain IP automatically. d. Please upgrade your router to latest firmware and reset your router to default status and try again from Step1.
For how to do firmware upgrade, please refer to: [Wireless] How to update the firmware of your router to the latest version ?
For how to reset router, please refer to: [Wireless Router] How to reset the router to factory default setting?
3. Can I change to the IP address after rule is set?
No. If you want to assign a different IP address for same device, you need to click the delete button to remove this rule and apply the setting first then back to Step4 to set a new rule again.
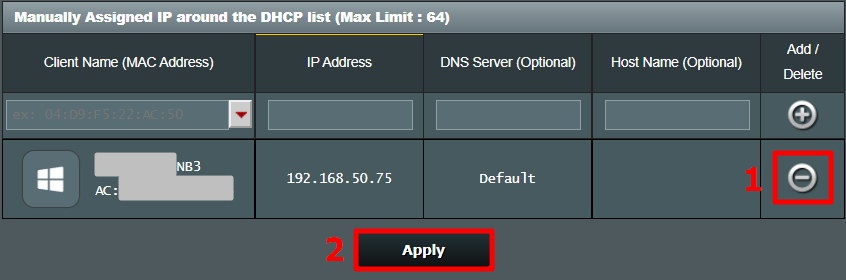
How to get the (Utility / Firmware)?
You can download the latest drivers, software, firmware and user manuals in the ASUS Download Center .
If you need more information about the ASUS Download Center , please refer this link .
Was this information helpful?
What we can do to improve the article?
- Above information might be partly or entirely quoted from exterior websites or sources. please refer to the information based on the source that we noted. Please directly contact or inquire the sources if there is any further question and note that ASUS is neither relevant nor responsible for its content/service
- This information may not suitable for all the products from the same category/series. Some of the screen shots and operations could be different from the software versions.
- ASUS provides the above information for reference only. If you have any questions about the content, please contact the above product vendor directly. Please note that ASUS is not responsible for the content or service provided by the above product vendor.
- Brand and product names mentioned are trademarks of their respective companies.
- Modem & Router
DHCP vs Static IP Addressing | What’s the Difference?
- January 12, 2024
- By Mounika D
In networking world, the choice between DHCP (Dynamic Host Configuration Protocol) and Static IP addressing is a fundamental consideration that shapes the efficiency, management, and reliability of a computer network. DHCP and Static IP represent two distinct approaches to assigning and managing IP addresses within a network, each with its own set of advantages and limitations. DHCP, as a dynamic and automated protocol, dynamically allocates IP addresses to devices as they connect to the network, streamlining the configuration process and enhancing scalability. In contrast, Static IP addressing involves the manual assignment of fixed IP addresses to devices, offering stability and control over network settings. This comparison between DHCP vs Static IP addressing is pivotal for network administrators and organizations, as it influences factors such as ease of management, security, and adaptability to network changes.
In this guide, we will look into the key differences, use cases, and many other things surrounding these two addressing methods.
Importance of IP Addressing in Computer Networks
IP addressing is a fundamental aspect of computer networks, serving as the backbone for communication between devices. Each device on a network requires a unique IP address to identify and differentiate itself from others. IP addresses are crucial for routing data packets across the network, ensuring that information reaches the intended destination accurately. They also play a pivotal role in defining the structure of a network by enabling devices to belong to specific subnets.
Proper IP addressing is essential for the efficient functioning of various network services, such as file sharing, printing, and internet connectivity. DHCP and static IP addressing represent two approaches to managing this critical aspect of network configuration, each with its own set of advantages and considerations based on the specific needs of the network and its devices.
Brief Overview of DHCP and Static IP Addressing
Dynamic Host Configuration Protocol, commonly known as DHCP, is a network protocol widely used for automated IP address configuration within a network. Its primary function is to dynamically assign IP addresses and other network configuration information to devices as they connect to the network. DHCP operates on a client-server model, where a central DHCP server manages a pool of IP addresses and leases them to devices for a specific duration.
This dynamic allocation of IP addresses helps streamline the network administration process by eliminating the need for manual configuration on individual devices. DHCP not only assigns IP addresses but also provides information like subnet mask, default gateway, and DNS server addresses, facilitating seamless communication within the network.
In contrast to DHCP, Static IP addresses are manually assigned to devices within a network. A static IP address remains fixed and does not change unless modified manually by the network administrator. When a device is configured with a static IP, it retains the same address every time it connects to the network. This method is particularly useful for devices that require a consistent and unchanging network presence, such as servers, routers, and network printers.
Unlike DHCP, where addresses are dynamically assigned, static IP addresses offer stability and predictability in network configurations. However, this approach demands more hands-on management, as each device needs individual attention for assigning and maintaining its static IP.
What is DHCP?
Dynamic Host Configuration Protocol (DHCP) is a networking protocol that plays a pivotal role in simplifying the process of assigning and managing IP addresses within a computer network. The primary purpose of DHCP is to automate the configuration of network devices by dynamically assigning IP addresses and providing essential network configuration information. This eliminates the need for manual intervention, making it a convenient and efficient solution for both small and large-scale networks.
Automatic IP Address Assignment
One of the key functionalities of DHCP is its ability to automatically assign IP addresses to devices when they join the network. When a device, known as a DHCP client, connects to the network, it sends a request to the DHCP server for an IP address. The DHCP server then dynamically allocates an available IP address from its predefined pool and leases it to the requesting device for a specific duration. This dynamic allocation ensures that IP addresses are utilized efficiently and avoids conflicts that may arise from manual assignment.
Dynamic Allocation of Network Configuration
Beyond IP address assignment, DHCP dynamically allocates additional network configuration parameters to the connected devices. These parameters include subnet masks, default gateways, and DNS server addresses. This dynamic allocation ensures that devices have the necessary information to communicate effectively within the network. It also enables flexibility in network configuration, allowing changes to be implemented centrally on the DHCP server and propagated to all connected devices without manual intervention.
Advantages of DHCP
Scalability.
DHCP provides a scalable solution for networks of varying sizes. As the network expands or contracts, DHCP can efficiently manage the allocation of IP addresses without requiring manual adjustments on each device. This scalability is particularly valuable in dynamic environments where the number of connected devices may change frequently.
Centralized Management
DHCP centralizes the management of IP addresses and network configurations, placing control in the hands of a designated DHCP server. This centralized approach streamlines administration tasks, reducing the complexity associated with individually configuring each device. Administrators can implement changes, updates, or modifications from a single point, ensuring consistency and accuracy across the network.
Simplified Network Administration
DHCP significantly simplifies network administration by automating the IP address assignment process. This automation reduces the risk of human errors associated with manual configurations, saving time and effort for administrators. Additionally, DHCP logs and records lease information, aiding in the monitoring and troubleshooting of network issues. Overall, the automated nature of DHCP contributes to a more efficient and manageable network infrastructure.
What is Static IP Addressing?
A Static IP (Internet Protocol) address is a fixed and unchanging numerical label assigned to a device within a computer network. Unlike Dynamic Host Configuration Protocol (DHCP), where IP addresses are automatically assigned by a server, static IP addresses are manually configured and remain constant over time. The purpose of using static IP addresses is to provide a stable and predictable identity for certain devices within the network, allowing for consistent communication and easier management of critical network components.
Manual Assignment of IP Addresses
In the case of static IP addresses, the assignment is done manually by a network administrator. Each device that requires a static IP is configured with a specific address, and this assignment is typically done through the device’s operating system settings or by configuring the network infrastructure, such as routers or switches. This manual approach allows for precise control over the IP address assignment, making it a suitable choice for devices that need to maintain a fixed network presence.
Fixed Network Configuration
Static IP addresses are associated with a fixed network configuration, meaning that the assigned IP does not change unless modified intentionally by the network administrator. This fixed nature ensures that the device always has the same address when connecting to the network, providing stability and predictability in network communication. Unlike DHCP, where IP addresses may change dynamically, static IP addresses are particularly advantageous for devices that require constant accessibility and consistent identification, such as servers or network appliances.
Advantages of Static IP
Control over ip address assignment.
One of the primary advantages of using static IP addresses is the control it affords network administrators. With manual assignment, administrators have precise control over which IP addresses are allocated to specific devices. This control is beneficial in situations where maintaining a consistent and known IP address for certain devices is crucial for operational requirements, security, or network configuration.
Stability and Predictability
Static IP addresses contribute to network stability and predictability. Since the assigned IP addresses do not change automatically, devices with static IPs maintain a constant network identity. This stability is particularly advantageous for servers, network printers, and other critical infrastructure components that require a reliable and unchanging network presence for seamless operation.
Better for Servers and Network Devices
Static IP addresses are often preferred for servers and network devices due to their unchanging nature. Servers, for example, need to be easily accessible for other devices on the network, and a static IP ensures consistent connectivity. Additionally, network devices such as routers, switches, and network-attached storage (NAS) devices benefit from static IPs as they play central roles in network operations and require a reliable and fixed network presence for effective communication.
DHCP vs Static IP Addressing Comparison
Configuration process.
DHCP has an automated and dynamic configuration process. When a device joins the network, it sends a request to the DHCP server, which dynamically assigns an available IP address and provides additional network configuration information. This automated process eliminates the need for manual intervention, making it efficient for large networks where managing individual device configurations manually would be impractical.
In contrast, static IP configuration involves a manual and fixed process. Each device on the network must be individually configured with a specific IP address. This manual assignment provides administrators with precise control over each device’s network settings but can be time-consuming and prone to human error, especially in larger networks with numerous devices.
Network Management
DHCP centralizes network management, placing control in the hands of the DHCP server. This centralized approach streamlines network administration by allowing changes and updates to be implemented from a single point. It ensures consistency across the network, simplifying the overall management process and reducing the potential for errors.
Static IP addressing requires individual configuration for each device, leading to a decentralized network management approach. While this provides granular control over each device’s settings, it can be more complex and time-consuming, especially in larger networks. Changes must be made on a per-device basis, making it challenging to maintain uniformity across the entire network.
DHCP is easily scalable for large networks. As the network expands or contracts, DHCP can efficiently manage the allocation of IP addresses without manual adjustments on each device. The dynamic nature of DHCP makes it adaptable to changes in the network size, making it a scalable solution for diverse and evolving network environments.
Static IP addressing can become complex and challenging to manage in large networks. As the number of devices increases, the manual assignment of IP addresses becomes more time-consuming and error-prone. Network administrators may find it difficult to maintain an organized and efficient address scheme, leading to potential issues in network scalability.
Network Security
While DHCP itself doesn’t introduce significant security risks, improperly configured DHCP servers can be vulnerable to attacks such as IP address spoofing or unauthorized DHCP server deployment. An attacker may attempt to distribute false configuration information, potentially leading to network disruptions or unauthorized access.
Static IP addressing is generally less vulnerable to certain types of attacks compared to DHCP. Since the IP addresses are manually assigned and do not change dynamically, there is a reduced risk of unauthorized devices gaining access through deceptive DHCP configurations. However, the security of static IP addresses still depends on proper configuration practices and network security measures.
Reliability
The reliability of DHCP is closely tied to the availability and stability of the DHCP server. In DHCP-dependent networks, if the DHCP server experiences downtime or becomes unavailable, devices may struggle to obtain or renew their IP addresses, potentially leading to network connectivity issues. While DHCP servers are typically redundant in larger setups to mitigate this risk, the reliance on server availability remains a consideration for the overall reliability of DHCP-based networks.
Static IP addressing offers a more consistent and less reliant solution in terms of reliability. Once manually assigned, static IP addresses remain constant unless intentionally modified by the administrator. This stability ensures that devices with static IPs maintain their network presence even if DHCP servers encounter issues. In critical environments where uninterrupted connectivity is paramount, such as for servers and essential network infrastructure, the reliability of static IP addresses becomes a compelling factor.
Flexibility
DHCP provides a high degree of flexibility, especially in dynamic network environments. It easily adapts to changes in network configuration, such as the addition or removal of devices. When network changes occur, DHCP automatically adjusts the IP address assignments, simplifying the process of accommodating new devices or reconfiguring existing ones. This flexibility is particularly advantageous in environments where the network landscape frequently evolves.
While static IP addressing offers stability, it lacks the same level of flexibility as DHCP. Manual updates are required whenever changes in network configuration, such as IP address modifications or device relocations, are necessary. This manual intervention can be time-consuming, especially in large networks where numerous devices may need adjustments. Despite the control it provides, the static approach might pose challenges in environments that demand rapid adaptability to changing network conditions.
DHCP vs Static IP Addressing Use Cases
Home networks.
DHCP is particularly well-suited for home networks where simplicity and ease of setup are essential. In a typical home network environment, users connect various devices such as smartphones, laptops, and smart appliances. DHCP eliminates the need for users to manually configure IP addresses on each device, providing seamless connectivity. It ensures that devices can easily join and leave the network without requiring intervention, making it an ideal choice for non-technical users in a residential setting.
Small to Medium-sized Businesses
DHCP is widely adopted in small to medium-sized business networks. These environments often have a moderate number of devices that require connectivity, including computers, printers, and networked peripherals. DHCP’s automated IP address assignment and centralized management simplify network administration, allowing IT personnel to focus on other critical tasks. It also facilitates flexibility in scaling the network as the business grows or changes in device configurations occur.
Guest Networks
DHCP is commonly employed in guest networks, where a dynamic and temporary allocation of IP addresses is preferred. Guest networks are designed to accommodate visitors and guests who may bring their own devices. DHCP streamlines the onboarding process, as guests can connect to the network without manual configuration. The temporary nature of DHCP leases ensures that addresses are efficiently utilized and released when guests disconnect, enhancing overall network efficiency.
Static IP addressing is extensively used for servers in both small and large-scale networks. Servers require a consistent and unchanging network identity for seamless accessibility. Static IPs provide this stability, ensuring that servers are reliably accessible through a fixed address. This is crucial for services such as web hosting, email servers, and database servers, where a predictable and constant connection is vital for efficient operation.
Network Devices with Specific Configurations
Certain network devices, such as routers, switches, and network-attached storage (NAS) devices, often benefit from static IP addressing. These devices play central roles in network infrastructure and configuration, requiring a reliable and fixed network presence. Static IPs allow administrators to precisely control the network settings of these devices, ensuring consistent communication and facilitating proper network functionality.
Critical Infrastructure
Static IP addresses are commonly utilized for critical infrastructure components within a network, including firewalls, security appliances, and monitoring systems. These components demand a high level of reliability and predictability in network communication. Static IPs provide a stable and unchanging identity, reducing the risk of disruptions and ensuring continuous operation of essential network services. In critical infrastructure scenarios, the manual configuration process associated with static IP addresses is justified by the heightened need for control and security.
Which to Choose: DHCP vs Static IP Addressing?
When deciding between DHCP and Static IP addressing, it is essential to consider the specific needs and characteristics of the network. In dynamic environments where adaptability to changes is paramount, DHCP proves to be a valuable choice. Networks that frequently experience additions or removals of devices, such as in small to medium-sized businesses or guest networks, benefit from the automated and scalable nature of DHCP.
Conversely, for scenarios demanding precise control, stability, and predictability, such as in critical infrastructure or server environments, Static IP addressing is the preferable choice. Considerations should include the size of the network, the nature of devices connected, security requirements, and the level of control desired by the administrators. Striking a balance between flexibility and reliability ensures that the chosen IP addressing approach aligns seamlessly with the network’s specific demands, ultimately optimizing its performance and functionality.
The key differences between DHCP and Static IP addressing lie in their configuration processes, network management approaches, scalability, and security considerations. DHCP automates the assignment of IP addresses dynamically, providing efficient scalability and centralized management. It is well-suited for home networks, small to medium-sized businesses, and guest networks due to its simplicity and adaptability.
On the other hand, Static IP addresses involve manual and fixed configuration, offering control, stability, and predictability. Static IPs are often preferred for servers, network devices with specific configurations, and critical infrastructure where a consistent and unchanging network presence is crucial. The choice between DHCP and Static IP depends on the specific requirements and characteristics of the network.
1. What is the primary difference between DHCP and Static IP addressing?
Answer: The main difference lies in the method of assigning IP addresses. DHCP (Dynamic Host Configuration Protocol) automatically assigns IP addresses to devices on the network, while Static IP addressing requires manual configuration, with each device having a fixed and unchanging IP address.
2. Which is more suitable for a home network, DHCP, or Static IP addressing?
Answer: DHCP is generally more suitable for home networks due to its ease of setup and management. It eliminates the need for manual configuration, making it user-friendly, especially for non-technical users. Static IP addressing may be overkill for the typical home network unless specific devices, like gaming consoles or network printers, require a consistent IP.
3. Are there security considerations when choosing between DHCP and Static IP?
Answer: Yes, security considerations vary. DHCP, if not properly configured, may pose security risks, such as IP address spoofing. Static IP addressing is generally less vulnerable to certain types of attacks since the IP addresses are manually assigned. However, both methods require proper security practices, such as securing DHCP servers and implementing firewalls.
4. In which scenarios is Static IP addressing preferred over DHCP?
Answer: Static IP addressing is preferred in scenarios where devices require a consistent and unchanging network presence. This is crucial for servers, network devices with specific configurations, and critical infrastructure. Static IPs offer stability and predictability, making them ideal for environments where control over IP address assignment is paramount.
5. Can DHCP be used in large networks?
Answer: DHCP is suitable for both small and large networks. Its automated and scalable nature makes it adaptable to changes in network size, making it efficient for large environments. In contrast, Static IP addressing can become complex and challenging to manage in large networks due to the manual assignment of addresses, making DHCP a more practical choice for scalability in extensive network setups.
Related Posts:
- How to Setup Static IP Address on Raspberry Pi?
- Is It Possible To Use a Wireless Router Without Internet?
- Wifi Doesn't Have A Valid IP Configuration
- Ethernet Doesn't Have A Valid IP Configuration
- No Internet Secured - How To Fix?
- How To Fix IO Netty Channel Abstract Channel…
Leave a Reply Cancel reply
Your email address will not be published. Required fields are marked *
Get our Latest Newletters
Get great content that you love. No ads or spams, we promise.
Tutorials Symbols Courses Calculator Deals
Electrical Electronics Embedded Power Robotics ARM IOT
Mini projects Microcontroller Arduino Solar Free circuits Home Automation Seminar Topics Electronics Questions
Capacitors Resistors Filters Diodes Transistors Amplifiers IO Devices Thyristors DC Circuits Number System
Your Privacy is important to us
Tutorials Symbols Courses Calculator
- Affiliate Disclosure
- Terms and Conditions
- Privacy Policy
Copyright © 2024 Electronicshub.org

- Trending Now
- Foundational Courses
- Data Science
- Practice Problem
- Machine Learning
- System Design
- DevOps Tutorial
- How to Set a Static IP Address On Your Device?
- Configuring RIP Route Metric Offset-Lists in Cisco
- What is IPv6 Address Planning?
- What is IP Nexthop-List?
- Method Use To Verify IP Parameters For Client OS
- Steps of Configuring NAT for IP Address Conservation
- How To Configure, Verify, and Troubleshoot RIPv2 for IPv4?
- How To Run SDM When There is Not Enough Flash Memory?
- Configuring RIP Interface Options in Cisco
- Host Routes in CCNA
- How To Troubleshoot Interface and Cable Issues?
- Network Functions Virtualization
- Compare In-Band and Out-of-Band Management Access
- Configuring OSPF Network Types in Cisco
- Criteria for Dividing a Local Network
- Ethernet Evolution in Computer Networks
- Single-Mode Optical Fiber
- LAN Division Function
- End Devices in Network Layer
Manual and Automatic Addressing
On a home network, the router typically determines how the LAN should function. The router will transport traffic between LAN clients as well as between the LAN and the Internet. The router in the network distributes IP addresses and other network-related information to the PCs. This was accomplished through the use of DHCP, which stands for Dynamic Host Configuration Protocol. In other terms, it is a protocol for automatically distributing configuration to PCs and other network devices.
- When you buy a home router, it is usually pre-configured with a DHCP server to distribute configuration to your PCs and other devices. The router is also configured so that the DHCP addresses it distributes are on the same IP network as the router’s LAN IP address. This is required so that the clients can utilize the router as their Default Gateway.
- When a computer joins a network, it attempts to obtain an IP address. This was accomplished by sending out a DHCP request that inquires about the availability of DHCP servers on the network. If a DHCP server answers, the machine will use DHCP to request an IP address and any other information it needs from the DHCP server. When your router receives this DHCP request, it will assign an available IP address from its pool of free IP addresses, along with the other information that the computer requires.
Manual Configuration of IP Addresses:
Instead of allowing the computer to acquire its IP address from the network via DHCP , you can specify the IP settings on the computer manually. Normally, this is discouraged since it can cause a variety of issues if not managed properly by the administrator.
Need to Configure the IP Address Manually:
If a computer acquires its IP address automatically through DHCP, it is not guaranteed that the computer will obtain the same IP address each time it is started. The DHCP server remembers which computer received which IP address, but only for a limited time. If a computer is turned off for an extended period of time (typically a day or two, depending on how the network is set up), the DHCP server will forget whatever IP address it assigned to the computer. Furthermore, if the router is turned down for whatever reason, it will often forget about any DHCP leases it has previously issued.
In rare cases, this can cause problems. For example, you may need to do port forwarding. Port forwarding typically refers to a computer’s internal LAN IP address. Port forwarding works as long as the PC keeps the same IP address. However, if your computer’s IP address changes frequently, you may need to adjust port forwarding in your router settings each time the IP address changes. In this case, normally manually configuring the computer to receive port forwarding using its IP address should be preferred. This way the IP address will always stay the same and port forwarding will still work.
The same configurations that a computer ordinarily receives via DHCP must be made when configuring an IP address manually on a computer:
- A working IP address on the router’s same IP network
- Default Gateway should be set to the router’s LAN IP address DNS Server address, which can either be the router’s LAN IP address or another DNS server on the Internet.
- The same Subnet Mask that the router is using should be used.
- You can utilize identical addresses that the router typically distributes via DHCP.
IP Address Conflicts:
Make sure to remove the IP address from the pool of DHCP addresses in your home network if you decide to manually establish an IP address on a PC. If not, the router can assign the same IP address to another network device. On a computer network, if two devices were set to share the exact same IP address, it leads to an IP address dispute on the network, which essentially prevents communication for the clients concerned. If just around half of the traffic arrives at the intended destination, network connectivity will not function. The computers will attempt to prevent IP address conflicts in more recent operating systems and contemporary networks by first determining if the IP address appears to be taken. However, only the initial machine to receive an IP address will function properly. When a second computer receives the same IP address as the first one inadvertently, it will become aware of the conflict and stop communicating on the network until a different IP address is assigned to it.
Please Login to comment...
- CCNA IP Addressing
- Technical Scripter 2022
- Technical Scripter
- 10 Best Free Social Media Management and Marketing Apps for Android - 2024
- 10 Best Customer Database Software of 2024
- How to Delete Whatsapp Business Account?
- Discord vs Zoom: Select The Efficienct One for Virtual Meetings?
- 30 OOPs Interview Questions and Answers (2024)
Improve your Coding Skills with Practice
What kind of Experience do you want to share?
Stack Exchange Network
Stack Exchange network consists of 183 Q&A communities including Stack Overflow , the largest, most trusted online community for developers to learn, share their knowledge, and build their careers.
Q&A for work
Connect and share knowledge within a single location that is structured and easy to search.
How do I assign IPv6 addresses manually?
So I'm still rather clueless with IPv6, but I wanted to try something with my network today. Currently, I assign IPv4 LAN addresses manually, so that my router is 192.168.0.1 , then my first computer is 192.168.0.2 , and so on.
So far, I haven't been able to figure out how to do this with IPv6. Or is the process completely different that this is not how it would work?
Router is an Archer C4000, and my main system runs Ubuntu 19.04
EDIT: To clarify with how I manually set network IP addresses, my router has a page where I can set an address of my choosing to a MAC address. No configuration is done outside of the router.
- Please edit question and indicate how you assign LAN addesses manually. (On the router only? On your first computer as well?) I suspect you just set a network range on the router, and then addresses are not assigned "manually", but by DHCP from the router. On IPv6 then your router needs to advertise a subnet. On Ubuntu, you can set both IPv4 and IPv6 address manually with ip addr add ... . – dirkt Sep 10, 2019 at 11:22
- Edited. I'm going to guess then that it is assigned from a range, but then I limit what can be assigned based on MAC addresses. If I'm setting the IP address manually on each device, is there any further configuration that needs to be done (apart from avoiding duplicates), or will the router just accept that device A is going to use its own configured address? – hiigaran Sep 10, 2019 at 12:00
- If there's a page where you can assign an IPv4 address based on a MAC address, then this is for static addresses assigned via DHCP from the router. IPv6 works differently. While there is DHCPv6, the normal way is to use SLAAC , and let each computer pick an IPv6 address based on the announced subnet prefix.So this page won't help you to assign IPv6 addresses... – dirkt Sep 10, 2019 at 12:05
2 Answers 2
To clarify with how I manually set network IP addresses, my router has a page where I can set an address of my choosing to a MAC address. No configuration is done outside of the router
This usually isn't called "manual configuration" to avoid confusion (from the LAN hosts' point of view, it is still automatic configuration). The usual terms are "static DHCP lease" or "DHCP reservation".
Overall, the process in IPv6 is usually completely different.
In IPv6 primary address auto-configuration mechanism (SLAAC) is completely stateless: the router does not issue individual addresses; it only periodically advertises the subnet address prefix and each host just combines it with its own chosen suffix. The router cannot limit hosts to just a specific sub-range; in fact the router does not receive any feedback about hosts' chosen address at all.
(Depending on each device's OS, the suffix might be a MAC address in traditional RFC4862 SLAAC; it might be a static hash value in RFC7217; it might be completely random in RFC4941 "Privacy Extensions"; and it might even be a user-provided value if the OS allows that.)
For example, the router advertises 2001:db8:123:456::/64 as the LAN address prefix; client A combines it with its own MAC address and begins using 2001:db8:123:456:6af2:68fe:ff7c:e25c .
That said, DHCP does exist in the IPv6 world and handles address leases in much the same way as IPv4 DHCP does. That means you can create DHCPv6 address pools, you can configure static address leases in DHCPv6, and so on. But not all clients support DHCPv6 at all (e.g. Android does not), so having SLAAC alongside is almost unavoidable.
So if you have a DHCPv6-capable client on a DHCPv6-capable network, chances are it'll have both a nice DHCPv6-assigned address and a longer SLAAC-autoconfigured address.
If I'm setting the IP address manually on each device, is there any further configuration that needs to be done (apart from avoiding duplicates), or will the router just accept that device A is going to use its own configured address?
As you can see above, that's how IPv6 address configuration works anyway .
Your router's manual is found in User Guide and contains for IPv6 only an option for entering a static IPv6 address for the router itself (as received from the ISP).
The section about specifying the IP addresses that the router assigns by MAC address does not say whether they are IPv4 or IPv6, but I think it is highly unlikely that this will work for IPv6. And here is why.
IPv6 is quite unlike IPv4 in the sense that the long IPv6 address is made up of two parts. The first (the prefix) is assigned by the ISP. The second is assigned locally by the router or by each computer and is usually a random value based on the MAC address.
This means that the router does not control the IPv6 prefix which the ISP can change whenever it likes. You can force your computer to use a static IPv6 address, but only if it agrees with the ISP. You may be able to ask the ISP for a static IPv6 address, but that is a bad idea.
The reason it's a bad idea, is that all your devices are visible to the entire Internet by their IPv6 address (unless the router intervenes). Therefore having a fixed IPv6 address just makes tracking you that much easier.
If you wish, you would in Windows set a computer's static IPv6 inside Start > Network > Network and Sharing Center > Change Adapter Setting , right-click on the Ethernet connection IPv6 and choose Properties, right-click "Internet Protocol Version 6 (TCP/IPv6)" and click on Properties, the set "Use the following IPv6 address".
But the fact you can does not mean you should. The only place that static IPv6 addresses makes sense is inside a local network which is not connected to the Internet.
- What about if I wanted to run a web server? I'm constantly traveling for work, and I would love to have access to one of the computers at home which runs 24/7. I'd need to set a static IPv6 for this to work, wouldn't I? – hiigaran Sep 10, 2019 at 19:23
- A general solution would require an IPv6 dynamic DNS provider. See for that the article dynv6.com: IPv6 dynamic DNS done right . – harrymc Sep 10, 2019 at 19:29
- @harrymc Help me understand your logic, why would a server in a data center have a static IP but a server at home a dynamic one? In what world does that make any sense? – Chazy Chaz Jul 29, 2022 at 12:40
- In a world where the ISP attributes to users dynamic IP addresses. – harrymc Jul 29, 2022 at 12:51
You must log in to answer this question.
Not the answer you're looking for browse other questions tagged networking router ipv6 ..
- The Overflow Blog
- Will antitrust suits benefit developers?
- Are long context windows the end of RAG?
- Featured on Meta
- New Focus Styles & Updated Styling for Button Groups
- Upcoming initiatives on Stack Overflow and across the Stack Exchange network
- Google Cloud will be Sponsoring Super User SE
Hot Network Questions
- Relationship between the squares of first n natural numbers and first n natural odd numbers.
- Does a direct flight emit more CO2 than a flight with a layover?
- What is the proper etiquette when my advisor asks me to add non-contributing authors to author list?
- Is it possible to have very different sea levels?
- German equivalent titles which use continuous conjugation of verb
- How to get random polygons with points ordered mathematical positive?
- Video game from the film “Murder Story” (1989)
- How does one "ride on the brake beam"?
- I filed my taxes not knowing I was being claimed as a dependent meaning that the Head of Household will have more deducted than before
- how could March 30th 2024. be followed by the 1st?
- Space shooter game using pygame
- Understanding algorithm of Quantum ESPRESSO from scratch
- Why is 3-SAT used for proving NP-Completeness so often?
- What type of geopolitical status quo can lead to perpetual warfare becoming the norm?
- What were the most common software distribution formats for MacOS Classic?
- SPSS R^2 for Negative Binomial
- Can the verb "be' be a dynamic verb?
- Flip counters in a grid so that they alternate in color
- If you have a group of levers, dials, knobs, buttons, &c, what do you call a specific 'snapshot' of the way they are set?
- How does energy become sound?
- Setting the value for \baselineskip with \setlength does not have any effect
- Wrong solution for Green function of 1D Poisson equation
- Circles crossing every cell of an 8x8 grid
- Nuclear attack followed by a ground invasion
Resolving virtual machine IP address conflict issues (1008177)
- The system has detected a conflict for IP address
- There is an IP address conflict with another system on the network
- The static IP address that was just configured is already in use on the network. Please reconfigure a different IP address
Resolving IP address conflicts
- For network environments with statically assigned IP addresses, ensure each local host is configured with a unique IP address. If your computer has a dynamically assigned address, releasing and renewing its IP address can workaround IP address conflicts.
- Clear the ARP table of the LAN switch
Assign a new IP address that has never been used if that option is available. First ping test the IP address before assigning it to confirm its availability.
Resolving TCP/IP stack issues on the virtual machine
To resolve TCP/IP stack issues on the virtual machine:
- Remove and reinstall your virtual network adapter driver.
Verify, using the vSphere/ VI Client, that the ethernet adapter is connected and powered:
Enable and disable the NIC and ping test.
Uninstall VMware Tools and ping test.
Connect to host using the vSphere/ VI Client.
Turn off the virtual machine.
Remove the ethernet adapter.
Turn on the virtual machine. TCP/IP is not loaded.
Turn off the virtual machine again.
Add the ethernet adapter – at this point either auto assign a MAC or manually assign one.
Assign a different IP address to eliminate the possibility of duplicate IP and do a ping test.
Reinstall VMware Tools and do a ping test.
For related information, see Verifying virtual network adapter is present and connected to the virtual machine (1003786) .
If there is a problems with assigning the IP address to the Virtual network adapter please see the following article Networking Error, IP Address Already Assigned to Another Adapter (1179) .
Como solucionar problemas de conflito de endereço IP em máquinas virtuais Resolución de problemas de conflictos de direcciones IP de máquinas virtuales 解决虚拟机 IP 地址冲突问题 仮想マシンの IP アドレスの競合問題を解決する
- VMware vSphere ESXi
- VMware VirtualCenter
- VMware vCenter Server
- VMware ESX Server
- VMware VirtualCenter 2.5.x
- VMware VirtualCenter 2.0.x
- VMware vCenter Server 4.1.x
- VMware vCenter Server 4.0.x
- VMware ESXi 4.1.x Installable
- VMware ESXi 4.1.x Embedded
- VMware ESXi 4.0.x Installable
- VMware ESXi 4.0.x Embedded
- VMware ESXi 3.5.x Installable
- VMware ESXi 3.5.x Embedded
- VMware ESX Server 3.5.x
- VMware ESX Server 3.0.x
- VMware ESX 4.1.x
- VMware ESX 4.0.x
- Find a Lawyer
- Ask a Lawyer
- Research the Law
- Law Schools
- Laws & Regs
- Newsletters
- Justia Connect
- Pro Membership
- Basic Membership
- Justia Lawyer Directory
- Platinum Placements
- Gold Placements
- Justia Elevate
- Justia Amplify
- PPC Management
- Google Business Profile
- Social Media
- Justia Onward Blog
This docket was last retrieved on March 28, 2024. A more recent docket listing may be available from PACER .
Use the links below to access additional information about this case on the US Court's PACER system. A subscription to PACER is required.
Access this case on the New York Eastern District Court's Electronic Court Filings (ECF) System
- Search for Party Aliases
- Associated Cases
- Case File Location
- Case Summary
- Docket Report
- History/Documents
- Related Transactions
- Check Status
Disclaimer: Justia Dockets & Filings provides public litigation records from the federal appellate and district courts. These filings and docket sheets should not be considered findings of fact or liability, nor do they necessarily reflect the view of Justia.
Why Is My Information Online?
Subscribe to Justia's Free Newsletters featuring summaries of federal and state court opinions .
- Bankruptcy Lawyers
- Business Lawyers
- Criminal Lawyers
- Employment Lawyers
- Estate Planning Lawyers
- Family Lawyers
- Personal Injury Lawyers
- Estate Planning
- Personal Injury
- Business Formation
- Business Operations
- Intellectual Property
- International Trade
- Real Estate
- Financial Aid
- Course Outlines
- Law Journals
- US Constitution
- Regulations
- Supreme Court
- Circuit Courts
- District Courts
- Dockets & Filings
- State Constitutions
- State Codes
- State Case Law
- Legal Blogs
- Business Forms
- Product Recalls
- Justia Connect Membership
- Justia Premium Placements
- Justia Elevate (SEO, Websites)
- Justia Amplify (PPC, GBP)
- Testimonials
IMAGES
VIDEO
COMMENTS
Key Takeaways. To set a static IP address in Windows 10 or 11, open Settings -> Network & Internet and click Properties for your active network. Choose the "Edit" button next to IP assignment and change the type to Manual. Flip the IPv4 switch to "On", fill out your static IP details, and click Save. Sometimes, it's better to assign a PC its ...
Step 2: Go to Network Connections. Go to Network and Internet > Network and Sharing Center. Select Change adapter settings on the left. Step 3: Find the IP address. Right click the Ethernet icon and select Status from the context menu. Then click Details... to view all detailed information of network connection. Step 4: Set the IP address.
To assign a static IP address on Windows 10, use these steps: Open Settings on Windows 10. Click on Network & Internet. Click on "Wi-Fi" or "Ethernet.". Click on the current network connection. Under the "IP settings" section, click the Edit button. Using the drop-down menu, select the Manual option. Turn on the "IPv4" toggle ...
10 minutes. TOOLS. Windows 10 or 11. Step 1: Open the Command Prompt. Your first step should be to track down your computer's current IP address, subnet mask, and default gateway. Do this by ...
Select the "Use the following IP address" option. Assign the static IP address - for example, 10.1.4.119. Specify a Subnet mask. Typically, on a home network, the subnet mask is 255.255.255.. Specify a Default gateway address - for example, 10.1.4.1 (Usually, your router's address).
To change from dynamic to static IP address with commands on Windows 10, use these steps: Open Start. Search for Command Prompt, right-click the top result, and select the Run as administrator ...
From the Configure IPv4 menu, choose Using DHCP with manual address. Enter a static IP address in the IPv4 Address and leave the Subnet Mask and Router field as default. Click Ok to save the changes. Now when you do an ifconfig, the system should be using the static IP you have defined in the previous times.
Select Start, then type settings. Select Settings > Network & internet. Do one of the following: For a Wi-Fi network, select Wi-Fi > Manage known networks. Choose the network for which you want to change the settings. For an Ethernet network, select Ethernet, then select the Ethernet network you're connected to. Next to IP assignment, select ...
Then, toggle on the IPv4 option. Select the IP address field and type the static IP address to assign to your PC. Select the Subnet mask field and enter 255.255.255.. Enter your router's IP address, which is usually 192.168.1.1, in the Default gateway field. Enter 8.8.8.8 in the Preferred DNS field.
To set up a static IP address configuration for a Wi-Fi (wireless) adapter using the Settings app, use these steps: Open Settings. Click on Network & Internet. Click on Wi-Fi. Select the connection that you want to configure. Wi-Fi connection settings on Windows 10. Under the "IP settings" section, click the Edit button.
Step 4: Copy and Paste the following command in the command prompt and hit the Enter key to view all the IP configurations on your system. Step 5: Next, Modify, Copy and then Paste the following command in the command prompt. Step 6: Press Enter key on your keyboard to execute the command to assign the static ip address.
When you configure an IP address manually on a computer you need to configure the same settings that a computer normally receives via DHCP: An available IP address on the same IP network as the router. The same Subnet Mask that the router is using. Default Gateway, which should be set to the LAN IP address of the router.
Manual IP address assignment is commonly used in situations where a specific device requires a static IP address, such as servers or network devices that need to maintain a consistent network identity. To manually assign an IP address, an administrator typically accesses the device's network settings or control panel and provides an IP ...
In simple terms, an IP address is a numerical label assigned to each device connected to a computer network that uses the Internet Protocol for communication. It consists of four sets of numbers separated by periods (e.g., 192.168..1) and can be either IPv4 or IPv6 format. IP Address Allocation Methods.
Right-click on your network adapter and select Properties. Click Internet Protocol Version 4 (TCP/IPv4). Click Properties. Select Use the Following IP Address and enter the IP Address, Subnet Mask ...
2. Use Control Panel to set a static IP in Windows 11. Hit the Windows key, type Control Panel in the search bar and click Open. Navigate to Network & Internet. Select Network and Sharing Center. On the left pane, select Change adapter settings. Right-click your network connection and click the Properties option.
Here's how to change the IP address assignment type: 1. Locate the IP address assignment options: Within the WAN/Internet settings page, look for the options related to IP address assignment. These options may be labeled as "IP address mode," "Connection Type," or similar terminology. 2. Select the manual/static IP address mode:
a specific IP address; full control over the address assignment; Since the Dynamic Host Configuration Protocol (DHCP) can take the Media Access Control (MAC) address into account when assigning the network-layer address, we might still automatically receive the same IP on each connection with that protocol.
Before you know how to assign a manual IP address, you should have a brief idea of what an IP address is. An IP address is a 32-bit address used to identify a PC or device in a network. It is a logical address used to identify a device in a computer network. As per the assignment mechanism, we can classify them in Dynamic and Static or Manual ...
Step4 : Go to [ Advanced Settings ] > [ LAN] > [ DHCP server ], you can find the IP address range of RT-AX92U is 192.168.50.2 ~ 192.168.50.254. Step5: Find [Enable Manual Assignment] and click [Yes] to enable manual assign function. Step6: In Manually Assigned IP area, please fill in the device MAC address and the IP address binding to this ...
Manual Assignment of IP Addresses. In the case of static IP addresses, the assignment is done manually by a network administrator. Each device that requires a static IP is configured with a specific address, and this assignment is typically done through the device's operating system settings or by configuring the network infrastructure, such ...
If a DHCP server answers, the machine will use DHCP to request an IP address and any other information it needs from the DHCP server. When your router receives this DHCP request, it will assign an available IP address from its pool of free IP addresses, along with the other information that the computer requires. Manual Configuration of IP ...
If there's a page where you can assign an IPv4 address based on a MAC address, then this is for static addresses assigned via DHCP from the router. IPv6 works differently. While there is DHCPv6, the normal way is to use SLAAC, and let each computer pick an IPv6 address based on the announced subnet prefix.So this page won't help you to assign ...
Assign a new IP address that has never been used if that option is available. First ping test the IP address before assigning it to confirm its availability. Resolving TCP/IP stack issues on the virtual machine. To resolve TCP/IP stack issues on the virtual machine: Remove and reinstall your virtual network adapter driver.
Filing 1 COMPLAINT against John Doe subscriber assigned IP address 24.228.123.81 filing fee $ 405, receipt number ANYEDC-17716334 Was the Disclosure Statement on Civil Cover Sheet completed -YES,, filed by Strike 3 Holdings, LLC. (Attachments: #1 Exhibit A, #2 Civil Cover Sheet) (Atkin, John) Access additional case information on PACER ...