- Site to Zone Assignment List
This policy setting allows you to manage a list of sites that you want to associate with a particular security zone. These zone numbers have associated security settings that apply to all of the sites in the zone.
Internet Explorer has 4 security zones, numbered 1-4, and these are used by this policy setting to associate sites to zones. They are: (1) Intranet zone, (2) Trusted Sites zone, (3) Internet zone, and (4) Restricted Sites zone. Security settings can be set for each of these zones through other policy settings, and their default settings are: Trusted Sites zone (Low template), Intranet zone (Medium-Low template), Internet zone (Medium template), and Restricted Sites zone (High template). (The Local Machine zone and its locked down equivalent have special security settings that protect your local computer.)
If you enable this policy setting, you can enter a list of sites and their related zone numbers. The association of a site with a zone will ensure that the security settings for the specified zone are applied to the site. For each entry that you add to the list, enter the following information:
Valuename – A host for an intranet site, or a fully qualified domain name for other sites. The valuename may also include a specific protocol. For example, if you enter http://www.contoso.com as the valuename, other protocols are not affected. If you enter just www.contoso.com, then all protocols are affected for that site, including http, https, ftp, and so on. The site may also be expressed as an IP address (e.g., 127.0.0.1) or range (e.g., 127.0.0.1-10). To avoid creating conflicting policies, do not include additional characters after the domain such as trailing slashes or URL path. For example, policy settings for www.contoso.com and www.contoso.com/mail would be treated as the same policy setting by Internet Explorer, and would therefore be in conflict.
Value - A number indicating the zone with which this site should be associated for security settings. The Internet Explorer zones described above are 1-4.
If you disable or do not configure this policy, users may choose their own site-to-zone assignments.

- Administrative Templates (Computers)
- Do not display the lock screen
- Force a specific background and accent color
- Force a specific default lock screen and logon image
- Force a specific Start background
- Prevent changing lock screen and logon image
- Prevent changing start menu background
- Prevent enabling lock screen camera
- Prevent enabling lock screen slide show
- Turn off automatic learning
- Allow users to enable online speech recognition services
- Block clean-up of unused language packs
- Force selected system UI language to overwrite the user UI language
- Restricts the UI language Windows uses for all logged users
- Apply the default user logon picture to all users
- Allow Online Tips
- Settings Page Visibility
- Allow BITS Peercaching
- Do not allow the BITS client to use Windows Branch Cache
- Do not allow the computer to act as a BITS Peercaching client
- Do not allow the computer to act as a BITS Peercaching server
- Limit the age of files in the BITS Peercache
- Limit the BITS Peercache size
- Limit the maximum BITS job download time
- Limit the maximum network bandwidth for BITS background transfers
- Limit the maximum network bandwidth used for Peercaching
- Limit the maximum number of BITS jobs for each user
- Limit the maximum number of BITS jobs for this computer
- Limit the maximum number of files allowed in a BITS job
- Limit the maximum number of ranges that can be added to the file in a BITS job
- Set default download behavior for BITS jobs on costed networks
- Set up a maintenance schedule to limit the maximum network bandwidth used for BITS background transfers
- Set up a work schedule to limit the maximum network bandwidth used for BITS background transfers
- Timeout for inactive BITS jobs
- Configure BranchCache for network files
- Configure Client BranchCache Version Support
- Configure Hosted Cache Servers
- Enable Automatic Hosted Cache Discovery by Service Connection Point
- Set age for segments in the data cache
- Set BranchCache Distributed Cache mode
- Set BranchCache Hosted Cache mode
- Set percentage of disk space used for client computer cache
- Turn on BranchCache
- Corporate Resources
- Custom Commands
- DirectAccess Passive Mode
- Friendly Name
- IPsec Tunnel Endpoints
- Prefer Local Names Allowed
- Support Email Address
- User Interface
- Allow DNS suffix appending to unqualified multi-label name queries
- Allow NetBT queries for fully qualified domain names
- Connection-specific DNS suffix
- DNS servers
- DNS suffix search list
- Dynamic update
- IDN mapping
- Prefer link local responses over DNS when received over a network with higher precedence
- Primary DNS suffix devolution level
- Primary DNS suffix devolution
- Primary DNS suffix
- Register DNS records with connection-specific DNS suffix
- Register PTR records
- Registration refresh interval
- Replace addresses in conflicts
- TTL value for A and PTR records
- Turn off IDN encoding
- Turn off multicast name resolution
- Turn off smart multi-homed name resolution
- Turn off smart protocol reordering
- Update security level
- Update top level domain zones
- Enable Font Providers
- Enable Hotspot Authentication
- Cipher suite order
- Hash Publication for BranchCache
- Hash Version support for BranchCache
- Honor cipher suite order
- Enable insecure guest logons
- Handle Caching on Continuous Availability Shares
- Offline Files Availability on Continuous Availability Shares
- Turn on Mapper I/O (LLTDIO) driver
- Turn on Responder (RSPNDR) driver
- Set PNRP cloud to resolve only
- Set the Seed Server
- Turn off Multicast Bootstrap
- Turn off PNRP cloud creation
- Disable password strength validation for Peer Grouping
- Turn off Microsoft Peer-to-Peer Networking Services
- Windows Defender Firewall: Allow ICMP exceptions
- Windows Defender Firewall: Allow inbound file and printer sharing exception
- Windows Defender Firewall: Allow inbound remote administration exception
- Windows Defender Firewall: Allow inbound Remote Desktop exceptions
- Windows Defender Firewall: Allow inbound UPnP framework exceptions
- Windows Defender Firewall: Allow local port exceptions
- Windows Defender Firewall: Allow local program exceptions
- Windows Defender Firewall: Allow logging
- Windows Defender Firewall: Define inbound port exceptions
- Windows Defender Firewall: Define inbound program exceptions
- Windows Defender Firewall: Do not allow exceptions
- Windows Defender Firewall: Prohibit notifications
- Windows Defender Firewall: Prohibit unicast response to multicast or broadcast requests
- Windows Defender Firewall: Protect all network connections
- Windows Defender Firewall: Allow authenticated IPsec bypass
- Do not show the "local access only" network icon
- Prohibit installation and configuration of Network Bridge on your DNS domain network
- Prohibit use of Internet Connection Firewall on your DNS domain network
- Prohibit use of Internet Connection Sharing on your DNS domain network
- Require domain users to elevate when setting a network's location
- Route all traffic through the internal network
- Specify corporate DNS probe host address
- Specify corporate DNS probe host name
- Specify corporate site prefix list
- Specify corporate Website probe URL
- Specify domain location determination URL
- Specify global DNS
- Specify passive polling
- Domains categorized as both work and personal
- Enterprise resource domains hosted in the cloud
- Internet proxy servers for apps
- Intranet proxy servers for apps
- Private network ranges for apps
- Proxy definitions are authoritative
- Subnet definitions are authoritative
- Hardened UNC Paths
- Action on server disconnect
- Allow or Disallow use of the Offline Files feature
- At logoff, delete local copy of user's offline files
- Configure Background Sync
- Configure slow-link mode
- Configure Slow link speed
- Default cache size
- Enable file screens
- Enable file synchronization on costed networks
- Enable Transparent Caching
- Encrypt the Offline Files cache
- Event logging level
- Files not cached
- Initial reminder balloon lifetime
- Limit disk space used by Offline Files
- Non-default server disconnect actions
- Prevent use of Offline Files folder
- Prohibit user configuration of Offline Files
- Reminder balloon frequency
- Reminder balloon lifetime
- Remove "Make Available Offline" command
- Remove "Make Available Offline" for these files and folders
- Remove "Work offline" command
- Specify administratively assigned Offline Files
- Subfolders always available offline
- Synchronize all offline files before logging off
- Synchronize all offline files when logging on
- Synchronize offline files before suspend
- Turn off reminder balloons
- Turn on economical application of administratively assigned Offline Files
- Best effort service type
- Controlled load service type
- Guaranteed service type
- Network control service type
- Qualitative service type
- Non-conforming packets
- Limit outstanding packets
- Limit reservable bandwidth
- Set timer resolution
- Communities
- Permitted Managers
- Traps for public community
- ECC Curve Order
- SSL Cipher Suite Order
- Set 6to4 Relay Name
- Set 6to4 Relay Name Resolution Interval
- Set 6to4 State
- Set IP-HTTPS State
- Set ISATAP Router Name
- Set ISATAP State
- Set Teredo Client Port
- Set Teredo Default Qualified
- Set Teredo Refresh Rate
- Set Teredo Server Name
- Set Teredo State
- Set IP Stateless Autoconfiguration Limits State
- Set Window Scaling Heuristics State
- Disable power management in connected standby mode
- Enable Windows to soft-disconnect a computer from a network
- Minimize the number of simultaneous connections to the Internet or a Windows Domain
- Prohibit connection to non-domain networks when connected to domain authenticated network
- Prohibit connection to roaming Mobile Broadband networks
- Configuration of wireless settings using Windows Connect Now
- Prohibit access of the Windows Connect Now wizards
- Prefer PIN pairing
- Require PIN pairing
- Allow Windows to automatically connect to suggested open hotspots, to networks shared by contacts, and to hotspots offering paid services
- Let Windows apps access cellular data
- Set 3G Cost
- Set 4G Cost
- Set Per-App Cellular Access UI Visibility
- Sets how often a DFS Client discovers DC's
- Activate Internet printing
- Add Printer wizard - Network scan page (Managed network)
- Add Printer wizard - Network scan page (Unmanaged network)
- Allow job name in event logs
- Allow printers to be published
- Allow Print Spooler to accept client connections
- Allow pruning of published printers
- Always rasterize content to be printed using a software rasterizer
- Always render print jobs on the server
- Automatically publish new printers in Active Directory
- Change Microsoft XPS Document Writer (MXDW) default output format to the legacy Microsoft XPS format (*.xps)
- Check published state
- Computer location
- Custom support URL in the Printers folder's left pane
- Directory pruning interval
- Directory pruning priority
- Directory pruning retry
- Disallow installation of printers using kernel-mode drivers
- Do not allow v4 printer drivers to show printer extensions
- Enable Device Control Printing Restrictions
- Execute print drivers in isolated processes
- Extend Point and Print connection to search Windows Update
- Isolate print drivers from applications
- Limits print driver installation to Administrators
- List of Approved USB-connected print devices
- Log directory pruning retry events
- Only use Package Point and print
- Override print driver execution compatibility setting reported by print driver
- Package Point and print - Approved servers
- Point and Print Restrictions
- Pre-populate printer search location text
- Printer browsing
- Prune printers that are not automatically republished
- Disable context menus in the Start Menu
- Pin Apps to Start when installed
- Remove "Recently added" list from Start Menu
- Remove and prevent access to the Shut Down, Restart, Sleep, and Hibernate commands
- Show or hide "Most used" list from Start menu
- Start Layout
- Customize message for Access Denied errors
- Enable access-denied assistance on client for all file types
- Microsoft Customer Experience Improvement Program (CEIP)
- Enable Migration Mode
- Integration Root Global
- Integration Root User
- Roaming File Exclusions
- Roaming Registry Exclusions
- Enable automatic cleanup of unused appv packages
- Enable background sync to server when on battery power
- Enable Publishing Refresh UX
- Publishing Server 1 Settings
- Publishing Server 2 Settings
- Publishing Server 3 Settings
- Publishing Server 4 Settings
- Publishing Server 5 Settings
- Reporting Server
- Enable Package Scripts
- Allow First Time Application Launches if on a High Cost Windows 8 Metered Connection
- Certificate Filter For Client SSL
- Enable Support for BranchCache
- Location Provider
- Package Installation Root
- Package Source Root
- Reestablishment Interval
- Reestablishment Retries
- Require Publish As Admin
- Shared Content Store (SCS) mode
- Specify what to load in background (aka AutoLoad)
- Verify certificate revocation list
- Enable Dynamic Virtualization
- Virtual Component Process Allow List
- Enable App-V Client
- Include command line in process creation events
- Allow delegating default credentials
- Allow delegating default credentials with NTLM-only server authentication
- Allow delegating fresh credentials
- Allow delegating fresh credentials with NTLM-only server authentication
- Allow delegating saved credentials
- Allow delegating saved credentials with NTLM-only server authentication
- Deny delegating default credentials
- Deny delegating fresh credentials
- Deny delegating saved credentials
- Encryption Oracle Remediation
- Remote host allows delegation of non-exportable credentials
- Restrict delegation of credentials to remote servers
- Deploy Windows Defender Application Control
- Turn On Virtualization Based Security
- Enable Device Health Attestation Monitoring and Reporting
- Allow administrators to override Device Installation Restriction policies
- Allow installation of devices that match any of these device IDs
- Allow installation of devices that match any of these device instance IDs
- Allow installation of devices using drivers that match these device setup classes
- Apply layered order of evaluation for Allow and Prevent device installation policies across all device match criteria
- Display a custom message title when device installation is prevented by a policy setting
- Display a custom message when installation is prevented by a policy setting
- Prevent installation of devices not described by other policy settings
- Prevent installation of devices that match any of these device IDs
- Prevent installation of devices that match any of these device instance IDs
- Prevent installation of devices using drivers that match these device setup classes
- Prevent installation of removable devices
- Time (in seconds) to force reboot when required for policy changes to take effect
- Allow remote access to the Plug and Play interface
- Configure device installation time-out
- Do not send a Windows error report when a generic driver is installed on a device
- Prevent creation of a system restore point during device activity that would normally prompt creation of a restore point
- Prevent device metadata retrieval from the Internet
- Prevent Windows from sending an error report when a device driver requests additional software during installation
- Prioritize all digitally signed drivers equally during the driver ranking and selection process
- Specify search order for device driver source locations
- Specify the search server for device driver updates
- Turn off "Found New Hardware" balloons during device installation
- Prevent redirection of devices that match any of these device Ids
- Prevent redirection of USB devices
- Turn Off Boot and Resume Optimizations
- Turn Off Cache Power Mode
- Turn Off Non Volatile Cache Feature
- Turn Off Solid State Mode
- Apply policy to removable media
- Default quota limit and warning level
- Enable disk quotas
- Enforce disk quota limit
- Log event when quota limit exceeded
- Log event when quota warning level exceeded
- Configure Per-Process System DPI settings
- Turn off GdiDPIScaling for applications
- Turn on GdiDPIScaling for applications
- Allow local activation security check exemptions
- Define Activation Security Check exemptions
- Allow non-administrators to install drivers for these device setup classes
- Turn off Windows Update device driver search prompt
- Boot-Start Driver Initialization Policy
- Allow only USB root hub connected Enhanced Storage devices
- Configure list of Enhanced Storage devices usable on your computer
- Configure list of IEEE 1667 silos usable on your computer
- Do not allow non-Enhanced Storage removable devices
- Do not allow password authentication of Enhanced Storage devices
- Do not allow Windows to activate Enhanced Storage devices
- Lock Enhanced Storage when the computer is locked
- File Classification Infrastructure: Display Classification tab in File Explorer
- File Classification Infrastructure: Specify classification properties list
- Configure maximum age of file server shadow copies
- Allow or Disallow use of encryption to protect the RPC protocol messages between File Share Shadow Copy Provider running on application server and File Share Shadow Copy Agent running on the file servers.
- Do not allow compression on all NTFS volumes
- Do not allow encryption on all NTFS volumes
- Enable / disable TXF deprecated features
- Enable NTFS pagefile encryption
- Short name creation options
- Disable delete notifications on all volumes
- Enable Win32 long paths
- Selectively allow the evaluation of a symbolic link
- Redirect folders on primary computers only
- Use localized subfolder names when redirecting Start Menu and My Documents
- Configure Applications preference logging and tracing
- Configure Data Sources preference logging and tracing
- Configure Devices preference logging and tracing
- Configure Drive Maps preference logging and tracing
- Configure Environment preference logging and tracing
- Configure Files preference logging and tracing
- Configure Folder Options preference logging and tracing
- Configure Folders preference logging and tracing
- Configure Ini Files preference logging and tracing
- Configure Internet Settings preference logging and tracing
- Configure Local Users and Groups preference logging and tracing
- Configure Network Options preference logging and tracing
- Configure Network Shares preference logging and tracing
- Configure Power Options preference logging and tracing
- Configure Printers preference logging and tracing
- Configure Regional Options preference logging and tracing
- Configure Registry preference logging and tracing
- Configure Scheduled Tasks preference logging and tracing
- Configure Services preference logging and tracing
- Configure Shortcuts preference logging and tracing
- Configure Start Menu preference logging and tracing
- Allow asynchronous user Group Policy processing when logging on through Remote Desktop Services
- Allow cross-forest user policy and roaming user profiles
- Always use local ADM files for Group Policy Object Editor
- Change Group Policy processing to run asynchronously when a slow network connection is detected.
- Configure Applications preference extension policy processing
- Configure Data Sources preference extension policy processing
- Configure Devices preference extension policy processing
- Configure Direct Access connections as a fast network connection
- Configure disk quota policy processing
- Configure Drive Maps preference extension policy processing
- Configure EFS recovery policy processing
- Configure Environment preference extension policy processing
- Configure Files preference extension policy processing
- Configure Folder Options preference extension policy processing
- Configure folder redirection policy processing
- Configure Folders preference extension policy processing
- Configure Group Policy Caching
- Configure Group Policy slow link detection
- Configure Ini Files preference extension policy processing
- Configure Internet Explorer Maintenance policy processing
- Configure Internet Settings preference extension policy processing
- Configure IP security policy processing
- Configure Local Users and Groups preference extension policy processing
- Configure Logon Script Delay
- Configure Network Options preference extension policy processing
- Configure Network Shares preference extension policy processing
- Configure Power Options preference extension policy processing
- Configure Printers preference extension policy processing
- Configure Regional Options preference extension policy processing
- Configure registry policy processing
- Configure Registry preference extension policy processing
- Configure Scheduled Tasks preference extension policy processing
- Configure scripts policy processing
- Configure security policy processing
- Configure Services preference extension policy processing
- Configure Shortcuts preference extension policy processing
- Configure software Installation policy processing
- Configure Start Menu preference extension policy processing
- Configure user Group Policy loopback processing mode
- Configure web-to-app linking with app URI handlers
- Configure wired policy processing
- Configure wireless policy processing
- Continue experiences on this device
- Determine if interactive users can generate Resultant Set of Policy data
- Enable AD/DFS domain controller synchronization during policy refresh
- Enable Group Policy Caching for Servers
- Phone-PC linking on this device
- Remove users' ability to invoke machine policy refresh
- Set Group Policy refresh interval for computers
- Set Group Policy refresh interval for domain controllers
- Specify startup policy processing wait time
- Specify workplace connectivity wait time for policy processing
- Turn off background refresh of Group Policy
- Turn off Group Policy Client Service AOAC optimization
- Turn off Local Group Policy Objects processing
- Turn off Resultant Set of Policy logging
- Turn off access to all Windows Update features
- Turn off access to the Store
- Turn off Automatic Root Certificates Update
- Turn off downloading of print drivers over HTTP
- Turn off Event Viewer "Events.asp" links
- Turn off handwriting personalization data sharing
- Turn off handwriting recognition error reporting
- Turn off Help and Support Center "Did you know?" content
- Turn off Help and Support Center Microsoft Knowledge Base search
- Turn off Internet Connection Wizard if URL connection is referring to Microsoft.com
- Turn off Internet download for Web publishing and online ordering wizards
- Turn off Internet File Association service
- Turn off printing over HTTP
- Turn off Registration if URL connection is referring to Microsoft.com
- Turn off Search Companion content file updates
- Turn off the "Order Prints" picture task
- Turn off the "Publish to Web" task for files and folders
- Turn off the Windows Messenger Customer Experience Improvement Program
- Turn off Windows Customer Experience Improvement Program
- Turn off Windows Error Reporting
- Turn off Windows Network Connectivity Status Indicator active tests
- Turn off Windows Update device driver searching
- Restrict Internet communication
- Do not allow additional session logins
- Do not allow changes to initiator iqn name
- Do not allow changes to initiator CHAP secret
- Do not allow connections without IPSec
- Do not allow sessions without mutual CHAP
- Do not allow sessions without one way CHAP
- Do not allow adding new targets via manual configuration
- Do not allow manual configuration of discovered targets
- Do not allow manual configuration of iSNS servers
- Do not allow manual configuration of target portals
- KDC support for claims, compound authentication and Kerberos armoring
- KDC support for PKInit Freshness Extension
- Provide information about previous logons to client computers
- Request compound authentication
- Use forest search order
- Warning for large Kerberos tickets
- Allow retrieving the cloud kerberos ticket during the logon
- Always send compound authentication first
- Define host name-to-Kerberos realm mappings
- Define interoperable Kerberos V5 realm settings
- Disable revocation checking for the SSL certificate of KDC proxy servers
- Fail authentication requests when Kerberos armoring is not available
- Kerberos client support for claims, compound authentication and Kerberos armoring
- Require strict KDC validation
- Require strict target SPN match on remote procedure calls
- Set maximum Kerberos SSPI context token buffer size
- Specify KDC proxy servers for Kerberos clients
- Support compound authentication
- Support device authentication using certificate
- Enumeration policy for external devices incompatible with Kernel DMA Protection
- Disallow changing of geographic location
- Disallow copying of user input methods to the system account for sign-in
- Disallow selection of Custom Locales
- Disallow user override of locale settings
- Restrict system locales
- Restrict user locales
- Allow users to select when a password is required when resuming from connected standby
- Always use classic logon
- Always use custom logon background
- Always wait for the network at computer startup and logon
- Assign a default credential provider
- Assign a default domain for logon
- Block user from showing account details on sign-in
- Configure Dynamic Lock
- Do not display network selection UI
- Do not display the Getting Started welcome screen at logon
- Do not enumerate connected users on domain-joined computers
- Do not process the legacy run list
- Do not process the run once list
- Enumerate local users on domain-joined computers
- Exclude credential providers
- Hide entry points for Fast User Switching
- Run these programs at user logon
- Show clear logon background
- Show first sign-in animation
- Turn off app notifications on the lock screen
- Turn off picture password sign-in
- Turn off Windows Startup sound
- Turn on convenience PIN sign-in
- Turn on security key sign-in
- Process Mitigation Options
- Untrusted Font Blocking
- Do not process incoming mailslot messages used for domain controller location based on NetBIOS domain names
- Do not use NetBIOS-based discovery for domain controller location when DNS-based discovery fails
- Force Rediscovery Interval
- Return domain controller address type
- Set Priority in the DC Locator DNS SRV records
- Set TTL in the DC Locator DNS Records
- Set Weight in the DC Locator DNS SRV records
- Specify address lookup behavior for DC locator ping
- Specify DC Locator DNS records not registered by the DCs
- Specify dynamic registration of the DC Locator DNS Records
- Specify Refresh Interval of the DC Locator DNS records
- Specify sites covered by the application directory partition DC Locator DNS SRV records
- Specify sites covered by the DC Locator DNS SRV records
- Specify sites covered by the GC Locator DNS SRV Records
- Try Next Closest Site
- Use automated site coverage by the DC Locator DNS SRV Records
- Use DNS name resolution when a single-label domain name is used, by appending different registered DNS suffixes, if the AllowSingleLabelDnsDomain setting is not enabled.
- Use DNS name resolution with a single-label domain name instead of NetBIOS name resolution to locate the DC
- Allow cryptography algorithms compatible with Windows NT 4.0
- Contact PDC on logon failure
- Set Netlogon share compatibility
- Set scavenge interval
- Set SYSVOL share compatibility
- Specify expected dial-up delay on logon
- Specify log file debug output level
- Specify maximum log file size
- Specify negative DC Discovery cache setting
- Specify positive periodic DC Cache refresh for non-background callers
- Specify site name
- Use final DC discovery retry setting for background callers
- Use initial DC discovery retry setting for background callers
- Use maximum DC discovery retry interval setting for background callers
- Use positive periodic DC cache refresh for background callers
- Use urgent mode when pinging domain controllers
- Allow Clipboard History
- Allow Clipboard synchronization across devices
- Allow publishing of User Activities
- Allow upload of User Activities
- Enables Activity Feed
- Select the lid switch action (on battery)
- Select the lid switch action (plugged in)
- Select the Power button action (on battery)
- Select the Power button action (plugged in)
- Select the Sleep button action (on battery)
- Select the Sleep button action (plugged in)
- Select the Start menu Power button action (on battery)
- Select the Start menu Power button action (plugged in)
- Energy Saver Battery Threshold (on battery)
- Energy Saver Battery Threshold (plugged in)
- Turn Off the hard disk (on battery)
- Turn Off the hard disk (plugged in)
- Critical battery notification action
- Critical battery notification level
- Low battery notification action
- Low battery notification level
- Reserve battery notification level
- Turn off low battery user notification
- Turn off Power Throttling
- Allow applications to prevent automatic sleep (on battery)
- Allow applications to prevent automatic sleep (plugged in)
- Allow automatic sleep with Open Network Files (on battery)
- Allow automatic sleep with Open Network Files (plugged in)
- Allow network connectivity during connected-standby (on battery)
- Allow network connectivity during connected-standby (plugged in)
- Allow standby states (S1-S3) when sleeping (on battery)
- Allow standby states (S1-S3) when sleeping (plugged in)
- Require a password when a computer wakes (on battery)
- Require a password when a computer wakes (plugged in)
- Specify the system hibernate timeout (on battery)
- Specify the system hibernate timeout (plugged in)
- Specify the system sleep timeout (on battery)
- Specify the system sleep timeout (plugged in)
- Specify the unattended sleep timeout (on battery)
- Specify the unattended sleep timeout (plugged in)
- Turn off hybrid sleep (on battery)
- Turn off hybrid sleep (plugged in)
- Turn on the ability for applications to prevent sleep transitions (on battery)
- Turn on the ability for applications to prevent sleep transitions (plugged in)
- Reduce display brightness (on battery)
- Reduce display brightness (plugged in)
- Specify the display dim brightness (on battery)
- Specify the display dim brightness (plugged in)
- Turn off adaptive display timeout (on battery)
- Turn off adaptive display timeout (plugged in)
- Turn off the display (on battery)
- Turn off the display (plugged in)
- Turn on desktop background slideshow (on battery)
- Turn on desktop background slideshow (plugged in)
- Select an active power plan
- Specify a custom active power plan
- Allow restore of system to default state
- Allow only Vista or later connections
- Customize Warning Messages
- Offer Remote Assistance
- Solicited Remote Assistance
- Turn on bandwidth optimization
- Turn on session logging
- Ignore Delegation Failure
- Minimum Idle Connection Timeout for RPC/HTTP connections
- Propagation of extended error information
- Restrictions for Unauthenticated RPC clients
- RPC Endpoint Mapper Client Authentication
- RPC Troubleshooting State Information
- All Removable Storage: Allow direct access in remote sessions
- All Removable Storage classes: Deny all access
- CD and DVD: Deny execute access
- CD and DVD: Deny read access
- CD and DVD: Deny write access
- Custom Classes: Deny read access
- Custom Classes: Deny write access
- Floppy Drives: Deny execute access
- Floppy Drives: Deny read access
- Floppy Drives: Deny write access
- Removable Disks: Deny execute access
- Removable Disks: Deny read access
- Removable Disks: Deny write access
- Tape Drives: Deny execute access
- Tape Drives: Deny read access
- Tape Drives: Deny write access
- Time (in seconds) to force reboot
- WPD Devices: Deny read access
- WPD Devices: Deny write access
- Allow logon scripts when NetBIOS or WINS is disabled
- Maximum wait time for Group Policy scripts
- Run logon scripts synchronously
- Run shutdown scripts visible
- Run startup scripts asynchronously
- Run startup scripts visible
- Run Windows PowerShell scripts first at computer startup, shutdown
- Run Windows PowerShell scripts first at user logon, logoff
- Configure the refresh interval for Server Manager
- Do not display Initial Configuration Tasks window automatically at logon
- Do not display Server Manager automatically at logon
- Enable svchost.exe mitigation options
- Require use of fast startup
- Turn off automatic termination of applications that block or cancel shutdown
- Allow downloading updates to the Disk Failure Prediction Model
- Allow Storage Sense
- Allow Storage Sense Temporary Files cleanup
- Configure Storage Sense cadence
- Configure Storage Sense Cloud Content dehydration threshold
- Configure Storage Sense Recycle Bin cleanup threshold
- Configure Storage Storage Downloads cleanup threshold
- Turn off Configuration
- Turn off System Restore
- Detect application failures caused by deprecated COM objects
- Detect application failures caused by deprecated Windows DLLs
- Detect application installers that need to be run as administrator
- Detect application install failures
- Detect applications unable to launch installers under UAC
- Detect compatibility issues for applications and drivers
- Notify blocked drivers
- Configure Corrupted File Recovery Behavior
- Disk Diagnostic: Configure custom alert text
- Disk Diagnostic: Configure execution level
- Configure Scenario Execution Level
- Microsoft Support Diagnostic Tool: Configure execution level
- Microsoft Support Diagnostic Tool: Restrict tool download
- Microsoft Support Diagnostic Tool: Turn on MSDT interactive communication with support provider
- Troubleshooting: Allow users to access recommended troubleshooting for known problems
- Configure MSI Corrupted File Recovery Behavior
- Configure Scheduled Maintenance Behavior
- Configure Security Policy for Scripted Diagnostics
- Troubleshooting: Allow users to access and run Troubleshooting Wizards
- Troubleshooting: Allow users to access online troubleshooting content on Microsoft servers from the Troubleshooting Control Panel (via the Windows Online Troubleshooting Service - WOTS)
- Enable/Disable PerfTrack
- Diagnostics: Configure scenario execution level
- Diagnostics: Configure scenario retention
- Configure the level of TPM owner authorization information available to the operating system
- Configure the list of blocked TPM commands
- Configure the system to clear the TPM if it is not in a ready state.
- Configure the system to use legacy Dictionary Attack Prevention Parameters setting for TPM 2.0.
- Ignore the default list of blocked TPM commands
- Ignore the local list of blocked TPM commands
- Standard User Individual Lockout Threshold
- Standard User Lockout Duration
- Standard User Total Lockout Threshold
- Turn on TPM backup to Active Directory Domain Services
- Add the Administrators security group to roaming user profiles
- Control slow network connection timeout for user profiles
- Delete cached copies of roaming profiles
- Delete user profiles older than a specified number of days on system restart
- Disable detection of slow network connections
- Do not check for user ownership of Roaming Profile Folders
- Do not forcefully unload the users registry at user logoff
- Do not log users on with temporary profiles
- Download roaming profiles on primary computers only
- Establish timeout value for dialog boxes
- Leave Windows Installer and Group Policy Software Installation Data
- Maximum retries to unload and update user profile
- Only allow local user profiles
- Prevent Roaming Profile changes from propagating to the server
- Prompt user when a slow network connection is detected
- Set maximum wait time for the network if a user has a roaming user profile or remote home directory
- Set roaming profile path for all users logging onto this computer
- Set the schedule for background upload of a roaming user profile's registry file while user is logged on
- Set user home folder
- Turn off the advertising ID
- User management of sharing user name, account picture, and domain information with apps (not desktop apps)
- Wait for remote user profile
- Hide the file scan progress window
- Limit Windows File Protection cache size
- Set Windows File Protection scanning
- Specify Windows File Protection cache location
- Configure Windows NTP Client
- Enable Windows NTP Client
- Enable Windows NTP Server
- Global Configuration Settings
- Activate Shutdown Event Tracker System State Data feature
- Allow Distributed Link Tracking clients to use domain resources
- Display highly detailed status messages
- Display Shutdown Event Tracker
- Do not automatically encrypt files moved to encrypted folders
- Do not display Manage Your Server page at logon
- Do not turn off system power after a Windows system shutdown has occurred.
- Download missing COM components
- Enable Persistent Time Stamp
- Remove Boot / Shutdown / Logon / Logoff status messages
- Restrict potentially unsafe HTML Help functions to specified folders
- Restrict these programs from being launched from Help
- Specify settings for optional component installation and component repair
- Specify Windows installation file location
- Specify Windows Service Pack installation file location
- Turn off Data Execution Prevention for HTML Help Executible
- ActiveX installation policy for sites in Trusted zones
- Approved Installation Sites for ActiveX Controls
- Prevent the wizard from running.
- Prevent access to 16-bit applications
- Remove Program Compatibility Property Page
- Turn off Application Compatibility Engine
- Turn off Application Telemetry
- Turn off Inventory Collector
- Turn off Program Compatibility Assistant
- Turn off Steps Recorder
- Turn off SwitchBack Compatibility Engine
- Allow all trusted apps to install
- Allow a Windows app to share application data between users
- Allow deployment operations in special profiles
- Allows development of Windows Store apps and installing them from an integrated development environment (IDE)
- Disable installing Windows apps on non-system volumes
- Prevent non-admin users from installing packaged Windows apps
- Prevent users' app data from being stored on non-system volumes
- Let Windows apps access account information
- Let Windows apps access an eye tracker device
- Let Windows apps access call history
- Let Windows apps access contacts
- Let Windows apps access diagnostic information about other apps
- Let Windows apps access email
- Let Windows apps access location
- Let Windows apps access messaging
- Let Windows apps access motion
- Let Windows apps access notifications
- Let Windows apps access Tasks
- Let Windows apps access the calendar
- Let Windows apps access the camera
- Let Windows apps access the microphone
- Let Windows apps access trusted devices
- Let Windows apps access user movements while running in the background
- Let Windows apps activate with voice
- Let Windows apps activate with voice while the system is locked
- Let Windows apps communicate with unpaired devices
- Let Windows apps control radios
- Let Windows apps make phone calls
- Let Windows apps run in the background
- Allow Microsoft accounts to be optional
- Block launching desktop apps associated with a file.
- Block launching desktop apps associated with a URI scheme
- Block launching Universal Windows apps with Windows Runtime API access from hosted content.
- Turn on dynamic Content URI Rules for Windows store apps
- Default behavior for AutoRun
- Don't set the always do this checkbox
- Turn off Autoplay for non-volume devices
- Turn off Autoplay
- Prevent backing up to local disks
- Prevent backing up to network location
- Prevent backing up to optical media (CD/DVD)
- Prevent the user from running the Backup Status and Configuration program
- Turn off restore functionality
- Turn off the ability to back up data files
- Turn off the ability to create a system image
- Allow only system backup
- Disallow locally attached storage as backup target
- Disallow network as backup target
- Disallow optical media as backup target
- Disallow run-once backups
- Configure enhanced anti-spoofing
- Allow domain users to log on using biometrics
- Allow the use of biometrics
- Allow users to log on using biometrics
- Specify timeout for fast user switching events
- Allow access to BitLocker-protected fixed data drives from earlier versions of Windows
- Choose how BitLocker-protected fixed drives can be recovered
- Configure use of hardware-based encryption for fixed data drives
- Configure use of passwords for fixed data drives
- Configure use of smart cards on fixed data drives
- Deny write access to fixed drives not protected by BitLocker
- Enforce drive encryption type on fixed data drives
- Allow devices compliant with InstantGo or HSTI to opt out of pre-boot PIN.
- Allow enhanced PINs for startup
- Allow network unlock at startup
- Allow Secure Boot for integrity validation
- Choose how BitLocker-protected operating system drives can be recovered
- Configure minimum PIN length for startup
- Configure pre-boot recovery message and URL
- Configure TPM platform validation profile (Windows Vista, Windows Server 2008, Windows 7, Windows Server 2008 R2)
- Configure TPM platform validation profile for BIOS-based firmware configurations
- Configure TPM platform validation profile for native UEFI firmware configurations
- Configure use of hardware-based encryption for operating system drives
- Configure use of passwords for operating system drives
- Disallow standard users from changing the PIN or password
- Enable use of BitLocker authentication requiring preboot keyboard input on slates
- Enforce drive encryption type on operating system drives
- Require additional authentication at startup (Windows Server 2008 and Windows Vista)
- Require additional authentication at startup
- Reset platform validation data after BitLocker recovery
- Use enhanced Boot Configuration Data validation profile
- Allow access to BitLocker-protected removable data drives from earlier versions of Windows
- Choose how BitLocker-protected removable drives can be recovered
- Configure use of hardware-based encryption for removable data drives
- Configure use of passwords for removable data drives
- Configure use of smart cards on removable data drives
- Control use of BitLocker on removable drives
- Deny write access to removable drives not protected by BitLocker
- Enforce drive encryption type on removable data drives
- Choose default folder for recovery password
- Choose drive encryption method and cipher strength (Windows 8, Windows Server 2012, Windows 8.1, Windows Server 2012 R2, Windows 10 [Version 1507])
- Choose drive encryption method and cipher strength (Windows 10 [Version 1511] and later)
- Choose drive encryption method and cipher strength (Windows Vista, Windows Server 2008, Windows 7, Windows Server 2008 R2)
- Choose how users can recover BitLocker-protected drives (Windows Server 2008 and Windows Vista)
- Disable new DMA devices when this computer is locked
- Prevent memory overwrite on restart
- Provide the unique identifiers for your organization
- Store BitLocker recovery information in Active Directory Domain Services (Windows Server 2008 and Windows Vista)
- Validate smart card certificate usage rule compliance
- Allow Use of Camera
- Do not show Windows tips
- Turn off cloud optimized content
- Turn off Microsoft consumer experiences
- Don't allow this PC to be projected to
- Require pin for pairing
- Do not display the password reveal button
- Enumerate administrator accounts on elevation
- Prevent the use of security questions for local accounts
- Require trusted path for credential entry
- Allow commercial data pipeline
- Allow Desktop Analytics Processing
- Allow device name to be sent in Windows diagnostic data
- Allow Telemetry
- Allow Update Compliance Processing
- Allow WUfB Cloud Processing
- Configure Authenticated Proxy usage for the Connected User Experience and Telemetry service
- Configure collection of browsing data for Desktop Analytics
- Configure Connected User Experiences and Telemetry
- Configure diagnostic data upload endpoint for Desktop Analytics
- Configure telemetry opt-in change notifications.
- Configure telemetry opt-in setting user interface.
- Configure the Commercial ID
- Disable deleting diagnostic data
- Disable diagnostic data viewer.
- Disable OneSettings Downloads
- Disable pre-release features or settings
- Do not show feedback notifications
- Enable OneSettings Auditing
- Limit Enhanced diagnostic data to the minimum required by Windows Analytics
- Toggle user control over Insider builds
- Absolute Max Cache Size (in GB)
- Allow uploads while the device is on battery while under set Battery level (percentage)
- Cache Server Hostname
- Cache Server Hostname Source
- Delay Background download Cache Server fallback (in seconds)
- Delay background download from http (in secs)
- Delay Foreground download Cache Server fallback (in seconds)
- Delay Foreground download from http (in secs)
- Download Mode
- Enable Peer Caching while the device connects via VPN
- Max Cache Age (in seconds)
- Max Cache Size (percentage)
- Maximum Background Download Bandwidth (in KB/s)
- Maximum Background Download Bandwidth (percentage)
- Maximum Download Bandwidth (in KB/s)
- Maximum Download Bandwidth (percentage)
- Maximum Foreground Download Bandwidth (in KB/s)
- Maximum Foreground Download Bandwidth (percentage)
- Max Upload Bandwidth (in KB/s)
- Minimum Background QoS (in KB/s)
- Minimum disk size allowed to use Peer Caching (in GB)
- Minimum Peer Caching Content File Size (in MB)
- Minimum RAM capacity (inclusive) required to enable use of Peer Caching (in GB)
- Modify Cache Drive
- Monthly Upload Data Cap (in GB)
- Select a method to restrict Peer Selection
- Select the source of Group IDs
- Set Business Hours to Limit Background Download Bandwidth
- Set Business Hours to Limit Foreground Download Bandwidth
- Restrict unpacking and installation of gadgets that are not digitally signed.
- Turn off desktop gadgets
- Turn Off user-installed desktop gadgets
- Do not allow color changes
- Specify a default color
- Do not allow Flip3D invocation
- Do not allow window animations
- Use solid color for Start background
- Device compatibility settings
- Driver compatibility settings
- Register domain joined computers as devices
- Do not allow Digital Locker to run
- Allow edge swipe
- Disable help tips
- Configure the server address, refresh interval, and issuer certificate authority of a target Subscription Manager
- ForwarderResourceUsage
- Enable Protected Event Logging
- Back up log automatically when full
- Configure log access (legacy)
- Configure log access
- Control Event Log behavior when the log file reaches its maximum size
- Control the location of the log file
- Specify the maximum log file size (KB)
- Turn on logging
- Events.asp program command line parameters
- Events.asp program
- Events.asp URL
- Hide previous versions list for local files
- Hide previous versions list for remote files
- Hide previous versions of files on backup location
- Prevent restoring local previous versions
- Prevent restoring previous versions from backups
- Prevent restoring remote previous versions
- Allow the use of remote paths in file shortcut icons
- Configure Windows Defender SmartScreen
- Disable binding directly to IPropertySetStorage without intermediate layers.
- Do not reinitialize a pre-existing roamed user profile when it is loaded on a machine for the first time
- Do not show the 'new application installed' notification
- Location where all default Library definition files for users/machines reside.
- Set a default associations configuration file
- Set a support web page link
- Show hibernate in the power options menu
- Show lock in the user tile menu
- Show sleep in the power options menu
- Start File Explorer with ribbon minimized
- Turn off Data Execution Prevention for Explorer
- Turn off heap termination on corruption
- Turn off numerical sorting in File Explorer
- Turn off shell protocol protected mode
- Verify old and new Folder Redirection targets point to the same share before redirecting
- Turn off File History
- Turn On/Off Find My Device
- Turn off downloading of game information
- Turn off game updates
- Turn off tracking of last play time of games in the Games folder
- Handwriting Panel Default Mode Docked
- Prevent the computer from joining a homegroup
- Add default Accelerators
- Add non-default Accelerators
- Restrict Accelerators to those deployed through Group Policy
- Turn off Accelerators
- Bypass prompting for Clipboard access for scripts running in any process
- Bypass prompting for Clipboard access for scripts running in the Internet Explorer process
- Define applications and processes that can access the Clipboard without prompting
- Turn off Print Menu
- Turn off the ability to launch report site problems using a menu option
- Include updated website lists from Microsoft
- Turn off Compatibility View button
- Turn off Compatibility View
- Turn on Internet Explorer 7 Standards Mode
- Turn on Internet Explorer Standards Mode for local intranet
- Use Policy List of Internet Explorer 7 sites
- Use Policy List of Quirks Mode sites
- Prevent specifying the code download path for each computer
- Allow deleting browsing history on exit
- Disable "Configuring History"
- Prevent access to Delete Browsing History
- Prevent deleting ActiveX Filtering, Tracking Protection, and Do Not Track data
- Prevent deleting cookies
- Prevent deleting download history
- Prevent deleting favorites site data
- Prevent deleting form data
- Prevent deleting InPrivate Filtering data
- Prevent deleting passwords
- Prevent deleting temporary Internet files
- Prevent deleting websites that the user has visited
- Prevent the deletion of temporary Internet files and cookies
- Allow active content from CDs to run on user machines
- Allow Install On Demand (except Internet Explorer)
- Allow Install On Demand (Internet Explorer)
- Allow Internet Explorer to use the HTTP2 network protocol
- Allow Internet Explorer to use the SPDY/3 network protocol
- Allow software to run or install even if the signature is invalid
- Allow third-party browser extensions
- Always send Do Not Track header
- Automatically check for Internet Explorer updates
- Check for server certificate revocation
- Check for signatures on downloaded programs
- Do not allow ActiveX controls to run in Protected Mode when Enhanced Protected Mode is enabled
- Do not allow resetting Internet Explorer settings
- Do not save encrypted pages to disk
- Empty Temporary Internet Files folder when browser is closed
- Play animations in web pages
- Play sounds in web pages
- Play videos in web pages
- Turn off ClearType
- Turn off encryption support
- Turn off loading websites and content in the background to optimize performance
- Turn off Profile Assistant
- Turn off sending UTF-8 query strings for URLs
- Turn off the flip ahead with page prediction feature
- Turn on 64-bit tab processes when running in Enhanced Protected Mode on 64-bit versions of Windows
- Turn on Caret Browsing support
- Turn on Enhanced Protected Mode
- Use HTTP 1.1 through proxy connections
- Use HTTP 1.1
- Show Content Advisor on Internet Options
- Allow websites to store application caches on client computers
- Allow websites to store indexed databases on client computers
- Set application caches expiration time limit for individual domains
- Set application cache storage limits for individual domains
- Set default storage limits for websites
- Set indexed database storage limits for individual domains
- Set maximum application cache individual resource size
- Set maximum application cache resource list size
- Set maximum application caches storage limit for all domains
- Set maximum indexed database storage limit for all domains
- Start Internet Explorer with tabs from last browsing session
- Access data sources across domains
- Allow active content over restricted protocols to access my computer
- Allow active scripting
- Allow binary and script behaviors
- Allow cut, copy or paste operations from the clipboard via script
- Allow drag and drop or copy and paste files
- Allow file downloads
- Allow font downloads
- Allow installation of desktop items
- Allow loading of XAML Browser Applications
- Allow loading of XAML files
- Allow loading of XPS files
- Allow META REFRESH
- Allow only approved domains to use ActiveX controls without prompt
- Allow only approved domains to use the TDC ActiveX control
- Allow OpenSearch queries in File Explorer
- Allow previewing and custom thumbnails of OpenSearch query results in File Explorer
- Allow script-initiated windows without size or position constraints
- Allow scripting of Internet Explorer WebBrowser controls
- Allow scriptlets
- Allow updates to status bar via script
- Allow VBScript to run in Internet Explorer
- Allow video and animation on a webpage that uses an older media player
- Allow websites to open windows without status bar or Address bar
- Allow websites to prompt for information by using scripted windows
- Automatic prompting for ActiveX controls
- Automatic prompting for file downloads
- Display mixed content
- Don't run antimalware programs against ActiveX controls
- Do not prompt for client certificate selection when no certificates or only one certificate exists.
- Download signed ActiveX controls
- Download unsigned ActiveX controls
- Enable dragging of content from different domains across windows
- Enable dragging of content from different domains within a window
- Enable MIME Sniffing
- Include local path when user is uploading files to a server
- Initialize and script ActiveX controls not marked as safe
- Java permissions
- Launching applications and files in an IFRAME
- Logon options
- Navigate windows and frames across different domains
- Render legacy filters
- Run .NET Framework-reliant components not signed with Authenticode
- Run .NET Framework-reliant components signed with Authenticode
- Run ActiveX controls and plugins
- Script ActiveX controls marked safe for scripting
- Scripting of Java applets
- Show security warning for potentially unsafe files
- Software channel permissions
- Submit non-encrypted form data
- Turn off .NET Framework Setup
- Turn off first-run prompt
- Turn on Cross-Site Scripting Filter
- Turn on Protected Mode
- Turn on SmartScreen Filter scan
- Use Pop-up Blocker
- Userdata persistence
- Web sites in less privileged Web content zones can navigate into this zone
- Internet Zone Template
- Intranet Sites: Include all local (intranet) sites not listed in other zones
- Intranet Sites: Include all network paths (UNCs)
- Intranet Sites: Include all sites that bypass the proxy server
- Intranet Zone Template
- Local Machine Zone Template
- Locked-Down Internet Zone Template
- Locked-Down Intranet Zone Template
- Locked-Down Local Machine Zone Template
- Locked-Down Restricted Sites Zone Template
- Locked-Down Trusted Sites Zone Template
- Restricted Sites Zone Template
- Trusted Sites Zone Template
- Turn on automatic detection of intranet
- Turn on certificate address mismatch warning
- Turn on Notification bar notification for intranet content
- Disable the Advanced page
- Disable the Connections page
- Disable the Content page
- Disable the General page
- Disable the Privacy page
- Disable the Programs page
- Disable the Security page
- Prevent ignoring certificate errors
- Send internationalized domain names
- Use UTF-8 for mailto links
- Go to an intranet site for a one-word entry in the Address bar
- Turn off phone number detection
- Allow Internet Explorer to play media files that use alternative codecs
- Prevent configuration of search on Address bar
- Prevent configuration of top-result search on Address bar
- Turn off URL Suggestions
- Turn off Windows Search AutoComplete
- Prevent specifying cipher strength update information URLs
- Prevent changing the URL for checking updates to Internet Explorer and Internet Tools
- Prevent specifying the update check interval (in days)
- Open Internet Explorer tiles on the desktop
- Set how links are opened in Internet Explorer
- Establish InPrivate Filtering threshold
- Establish Tracking Protection threshold
- Prevent the computer from loading toolbars and Browser Helper Objects when InPrivate Browsing starts
- Turn off collection of InPrivate Filtering data
- Turn off InPrivate Browsing
- Turn off InPrivate Filtering
- Turn off Tracking Protection
- Add-on List
- All Processes
- Deny all add-ons unless specifically allowed in the Add-on List
- Process List
- Remove "Run this time" button for outdated ActiveX controls in Internet Explorer
- Turn off Adobe Flash in Internet Explorer and prevent applications from using Internet Explorer technology to instantiate Flash objects
- Turn off blocking of outdated ActiveX controls for Internet Explorer
- Turn off blocking of outdated ActiveX controls for Internet Explorer on specific domains
- Turn on ActiveX control logging in Internet Explorer
- Allow native XMLHTTP support
- Change the maximum number of connections per host (HTTP 1.1)
- Maximum number of connections per server (HTTP 1.0)
- Set the maximum number of WebSocket connections per server
- Turn off cross-document messaging
- Turn off the WebSocket Object
- Turn off the XDomainRequest object
- Admin-approved behaviors
- Install binaries signed by MD2 and MD4 signing technologies
- Internet Explorer Processes
- Internet Zone Restricted Protocols
- Intranet Zone Restricted Protocols
- Local Machine Zone Restricted Protocols
- Restricted Sites Zone Restricted Protocols
- Trusted Sites Zone Restricted Protocols
- Allow fallback to SSL 3.0 (Internet Explorer)
- Do not display the reveal password button
- Turn off Data Execution Prevention
- Turn off Data URI support
- Customize command labels
- Display tabs on a separate row
- Hide the Command bar
- Hide the status bar
- Lock all toolbars
- Lock location of Stop and Refresh buttons
- Turn off Developer Tools
- Turn off toolbar upgrade tool
- Use large icons for command buttons
- Add a specific list of search providers to the user's list of search providers
- Allow "Save Target As" in Internet Explorer mode
- Allow Internet Explorer 8 shutdown behavior
- Allow Microsoft services to provide enhanced suggestions as the user types in the Address bar
- Automatically activate newly installed add-ons
- Configure which channel of Microsoft Edge to use for opening redirected sites
- Customize user agent string
- Disable Automatic Install of Internet Explorer components
- Disable changing Automatic Configuration settings
- Disable changing connection settings
- Disable changing secondary home page settings
- Disable Import/Export Settings wizard
- Disable Internet Explorer 11 as a standalone browser
- Disable Periodic Check for Internet Explorer software updates
- Disable showing the splash screen
- Disable software update shell notifications on program launch
- Do not allow users to enable or disable add-ons
- Enable extended hot keys in Internet Explorer mode
- Enable global window list in Internet Explorer mode
- Enforce full-screen mode
- Hide Internet Explorer 11 retirement notification
- Install new versions of Internet Explorer automatically
- Keep all intranet sites in Internet Explorer
- Let users turn on and use Enterprise Mode from the Tools menu
- Limit Site Discovery output by Domain
- Limit Site Discovery output by Zone
- Make proxy settings per-machine (rather than per-user)
- Pop-up allow list
- Prevent "Fix settings" functionality
- Prevent access to Internet Explorer Help
- Prevent bypassing SmartScreen Filter warnings about files that are not commonly downloaded from the Internet
- Prevent bypassing SmartScreen Filter warnings
- Prevent changing pop-up filter level
- Prevent changing proxy settings
- Prevent changing the default search provider
- Prevent configuration of how windows open
- Prevent configuration of new tab creation
- Prevent Internet Explorer Search box from appearing
- Prevent managing pop-up exception list
- Prevent managing SmartScreen Filter
- Prevent managing the phishing filter
- Prevent participation in the Customer Experience Improvement Program
- Prevent per-user installation of ActiveX controls
- Prevent running First Run wizard
- Reset zoom to default for HTML dialogs in Internet Explorer mode
- Restrict search providers to a specific list
- Security Zones: Do not allow users to add/delete sites
- Security Zones: Do not allow users to change policies
- Security Zones: Use only machine settings
- Send all sites not included in the Enterprise Mode Site List to Microsoft Edge.
- Set tab process growth
- Show message when opening sites in Microsoft Edge using Enterprise Mode
- Specify default behavior for a new tab
- Specify use of ActiveX Installer Service for installation of ActiveX controls
- Turn off ability to pin sites in Internet Explorer on the desktop
- Turn off ActiveX Opt-In prompt
- Turn off add-on performance notifications
- Turn off Automatic Crash Recovery
- Turn off browser geolocation
- Turn off configuration of pop-up windows in tabbed browsing
- Turn off Crash Detection
- Turn off Favorites bar
- Turn off Managing SmartScreen Filter for Internet Explorer 8
- Turn off page-zooming functionality
- Turn off pop-up management
- Turn off Quick Tabs functionality
- Turn off Reopen Last Browsing Session
- Turn off suggestions for all user-installed providers
- Turn off tabbed browsing
- Turn off the auto-complete feature for web addresses
- Turn off the quick pick menu
- Turn off the Security Settings Check feature
- Turn on ActiveX Filtering
- Turn on compatibility logging
- Turn on menu bar by default
- Turn on Site Discovery WMI output
- Turn on Site Discovery XML output
- Turn on Suggested Sites
- Use the Enterprise Mode IE website list
- Prevent IIS installation
- Turn off Windows Location Provider
- Turn off location
- Turn off location scripting
- Turn off sensors
- Automatic Maintenance Activation Boundary
- Automatic Maintenance Random Delay
- Automatic Maintenance WakeUp Policy
- Turn off Automatic Download and Update of Map Data
- Turn off unsolicited network traffic on the Offline Maps settings page
- Disable MDM Enrollment
- Enable automatic MDM enrollment using default Azure AD credentials
- Allow Message Service Cloud Sync
- Block all consumer Microsoft account user authentication
- Display additional text to clients when they need to perform an action
- Enable headless UI mode
- Suppress all notifications
- Suppresses reboot notifications
- Define device control policy groups
- Define device control policy rules
- Extension Exclusions
- Path Exclusions
- Process Exclusions
- Turn off Auto Exclusions
- Configure local setting override for reporting to Microsoft MAPS
- Configure the 'Block at First Sight' feature
- Join Microsoft MAPS
- Send file samples when further analysis is required
- Configure Attack Surface Reduction rules
- Exclude files and paths from Attack Surface Reduction Rules
- Configure allowed applications
- Configure Controlled folder access
- Configure protected folders
- Prevent users and apps from accessing dangerous websites
- Configure extended cloud check
- Enable file hash computation feature
- Select cloud protection level
- IP address range Exclusions
- Port number Exclusions
- Process Exclusions for outbound traffic
- Threat ID Exclusions
- Define the rate of detection events for logging
- Specify additional definition sets for network traffic inspection
- Turn on definition retirement
- Turn on protocol recognition
- Configure local setting override for the removal of items from Quarantine folder
- Configure removal of items from Quarantine folder
- Configure local setting override for monitoring file and program activity on your computer
- Configure local setting override for monitoring for incoming and outgoing file activity
- Configure local setting override for scanning all downloaded files and attachments
- Configure local setting override for turn on behavior monitoring
- Configure local setting override to turn off Intrusion Prevention System
- Configure local setting override to turn on real-time protection
- Configure monitoring for incoming and outgoing file and program activity
- Define the maximum size of downloaded files and attachments to be scanned
- Monitor file and program activity on your computer
- Scan all downloaded files and attachments
- Turn off real-time protection
- Turn on behavior monitoring
- Turn on Information Protection Control
- Turn on network protection against exploits of known vulnerabilities
- Turn on process scanning whenever real-time protection is enabled
- Turn on raw volume write notifications
- Configure local setting override for the time of day to run a scheduled full scan to complete remediation
- Specify the day of the week to run a scheduled full scan to complete remediation
- Specify the time of day to run a scheduled full scan to complete remediation
- Configure time out for detections in critically failed state
- Configure time out for detections in non-critical failed state
- Configure time out for detections in recently remediated state
- Configure time out for detections requiring additional action
- Configure Watson events
- Configure Windows software trace preprocessor components
- Configure WPP tracing level
- Turn off enhanced notifications
- Allow users to pause scan
- Check for the latest virus and spyware security intelligence before running a scheduled scan
- Configure local setting override for maximum percentage of CPU utilization
- Configure local setting override for scheduled quick scan time
- Configure local setting override for scheduled scan time
- Configure local setting override for schedule scan day
- Configure local setting override for the scan type to use for a scheduled scan
- Configure low CPU priority for scheduled scans
- Create a system restore point
- Define the number of days after which a catch-up scan is forced
- Run full scan on mapped network drives
- Scan archive files
- Scan network files
- Scan packed executables
- Scan removable drives
- Specify the day of the week to run a scheduled scan
- Specify the interval to run quick scans per day
- Specify the maximum depth to scan archive files
- Specify the maximum percentage of CPU utilization during a scan
- Specify the maximum size of archive files to be scanned
- Specify the scan type to use for a scheduled scan
- Specify the time for a daily quick scan
- Specify the time of day to run a scheduled scan
- Start the scheduled scan only when computer is on but not in use
- Turn on catch-up full scan
- Turn on catch-up quick scan
- Turn on e-mail scanning
- Turn on heuristics
- Turn on removal of items from scan history folder
- Turn on reparse point scanning
- Allow notifications to disable security intelligence based reports to Microsoft MAPS
- Allow real-time security intelligence updates based on reports to Microsoft MAPS
- Allow security intelligence updates from Microsoft Update
- Allow security intelligence updates when running on battery power
- Check for the latest virus and spyware security intelligence on startup
- Define file shares for downloading security intelligence updates
- Define security intelligence location for VDI clients.
- Define the number of days after which a catch-up security intelligence update is required
- Define the number of days before spyware security intelligence is considered out of date
- Define the number of days before virus security intelligence is considered out of date
- Define the order of sources for downloading security intelligence updates
- Initiate security intelligence update on startup
- Specify the day of the week to check for security intelligence updates
- Specify the interval to check for security intelligence updates
- Specify the time to check for security intelligence updates
- Turn on scan after security intelligence update
- Specify threat alert levels at which default action should not be taken when detected
- Specify threats upon which default action should not be taken when detected
- Allow antimalware service to remain running always
- Allow antimalware service to startup with normal priority
- Configure detection for potentially unwanted applications
- Configure local administrator merge behavior for lists
- Define addresses to bypass proxy server
- Define proxy auto-config (.pac) for connecting to the network
- Define proxy server for connecting to the network
- Randomize scheduled task times
- Turn off Microsoft Defender Antivirus
- Turn off routine remediation
- Allow auditing events in Microsoft Defender Application Guard
- Allow camera and microphone access in Microsoft Defender Application Guard
- Allow data persistence for Microsoft Defender Application Guard
- Allow files to download and save to the host operating system from Microsoft Defender Application Guard
- Allow hardware-accelerated rendering for Microsoft Defender Application Guard
- Allow Microsoft Defender Application Guard to use Root Certificate Authorities from the user's device
- Allow users to trust files that open in Windows Defender Application Guard
- Configure additional sources for untrusted files in Windows Defender Application Guard.
- Configure Microsoft Defender Application Guard clipboard settings
- Configure Microsoft Defender Application Guard print settings
- Prevent enterprise websites from loading non-enterprise content in Microsoft Edge and Internet Explorer
- Turn on Microsoft Defender Application Guard in Managed Mode
- Use a common set of exploit protection settings
- Allow Address bar drop-down list suggestions
- Allow Adobe Flash
- Allow a shared Books folder
- Allow clearing browsing data on exit
- Allow configuration updates for the Books Library
- Allow Developer Tools
- Allow extended telemetry for the Books tab
- Allow Extensions
- Allow FullScreen Mode
- Allow InPrivate browsing
- Allow Microsoft Compatibility List
- Allow Microsoft Edge to pre-launch at Windows startup, when the system is idle, and each time Microsoft Edge is closed
- Allow Microsoft Edge to start and load the Start and New Tab page at Windows startup and each time Microsoft Edge is closed
- Allow printing
- Allow Saving History
- Allow search engine customization
- Allow Sideloading of extension
- Allow web content on New Tab page
- Always show the Books Library in Microsoft Edge
- Configure additional search engines
- Configure Autofill
- Configure cookies
- Configure Do Not Track
- Configure Favorites Bar
- Configure Favorites
- Configure Home Button
- Configure kiosk mode
- Configure kiosk reset after idle timeout
- Configure Open Microsoft Edge With
- Configure Password Manager
- Configure Pop-up Blocker
- Configure search suggestions in Address bar
- Configure Start pages
- Configure the Adobe Flash Click-to-Run setting
- Configure the Enterprise Mode Site List
- Disable lockdown of Start pages
- For PDF files that have both landscape and portrait pages, print each in its own orientation.
- Keep favorites in sync between Internet Explorer and Microsoft Edge
- Prevent access to the about:flags page in Microsoft Edge
- Prevent bypassing Windows Defender SmartScreen prompts for files
- Prevent bypassing Windows Defender SmartScreen prompts for sites
- Prevent certificate error overrides
- Prevent changes to Favorites on Microsoft Edge
- Prevent Microsoft Edge from gathering Live Tile information when pinning a site to Start
- Prevent Microsoft Edge from starting and loading the Start and New Tab page at Windows startup and each time Microsoft Edge is closed
- Prevent the First Run webpage from opening on Microsoft Edge
- Prevent turning off required extensions
- Prevent using Localhost IP address for WebRTC
- Provision Favorites
- Send all intranet sites to Internet Explorer 11
- Set default search engine
- Set Home Button URL
- Set New Tab page URL
- Show message when opening sites in Internet Explorer
- Suppress the display of Edge Deprecation Notification
- Unlock Home Button
- Enable usage of FIDO devices to sign on
- Allow companion device for secondary authentication
- Access 2013 backup only
- Access 2016 backup only
- Common 2013 backup only
- Common 2016 backup only
- Excel 2013 backup only
- Excel 2016 backup only
- InfoPath 2013 backup only
- Internet Explorer 8
- Internet Explorer 9
- Internet Explorer 10
- Internet Explorer 11
- Internet Explorer Common Settings
- Lync 2013 backup only
- Lync 2016 backup only
- Microsoft Access 2010
- Microsoft Access 2013
- Microsoft Access 2016
- Microsoft Excel 2010
- Microsoft Excel 2013
- Microsoft Excel 2016
- Microsoft InfoPath 2010
- Microsoft InfoPath 2013
- Microsoft Lync 2010
- Microsoft Lync 2013
- Microsoft Lync 2016
- Microsoft Office 365 Access 2013
- Microsoft Office 365 Access 2016
- Microsoft Office 365 Common 2013
- Microsoft Office 365 Common 2016
- Microsoft Office 365 Excel 2013
- Microsoft Office 365 Excel 2016
- Microsoft Office 365 InfoPath 2013
- Microsoft Office 365 Lync 2013
- Microsoft Office 365 Lync 2016
- Microsoft Office 365 OneNote 2013
- Microsoft Office 365 OneNote 2016
- Microsoft Office 365 Outlook 2013
- Microsoft Office 365 Outlook 2016
- Microsoft Office 365 PowerPoint 2013
- Microsoft Office 365 PowerPoint 2016
- Microsoft Office 365 Project 2013
- Microsoft Office 365 Project 2016
- Microsoft Office 365 Publisher 2013
- Microsoft Office 365 Publisher 2016
- Microsoft Office 365 SharePoint Designer 2013
- Microsoft Office 365 Visio 2013
- Microsoft Office 365 Visio 2016
- Microsoft Office 365 Word 2013
- Microsoft Office 365 Word 2016
- Microsoft Office 2010 Common Settings
- Microsoft Office 2013 Common Settings
- Microsoft Office 2013 Upload Center
- Microsoft Office 2016 Common Settings
- Microsoft Office 2016 Upload Center
- Microsoft OneDrive for Business 2013
- Microsoft OneDrive for Business 2016
- Microsoft OneNote 2010
- Microsoft OneNote 2013
- Microsoft OneNote 2016
- Microsoft Outlook 2010
- Microsoft Outlook 2013
- Microsoft Outlook 2016
- Microsoft PowerPoint 2010
- Microsoft PowerPoint 2013
- Microsoft PowerPoint 2016
- Microsoft Project 2010
- Microsoft Project 2013
- Microsoft Project 2016
- Microsoft Publisher 2010
- Microsoft Publisher 2013
- Microsoft Publisher 2016
- Microsoft SharePoint Designer 2010
- Microsoft SharePoint Designer 2013
- Microsoft SharePoint Workspace 2010
- Microsoft Visio 2010
- Microsoft Visio 2013
- Microsoft Visio 2016
- Microsoft Word 2010
- Microsoft Word 2013
- Microsoft Word 2016
- OneNote 2013 backup only
- OneNote 2016 backup only
- Outlook 2013 backup only
- Outlook 2016 backup only
- PowerPoint 2013 backup only
- PowerPoint 2016 backup only
- Project 2013 backup only
- Project 2016 backup only
- Publisher 2013 backup only
- Publisher 2016 backup only
- SharePoint Designer 2013 backup only
- Visio 2013 backup only
- Visio 2016 backup only
- Word 2013 backup only
- Word 2016 backup only
- Configure Sync Method
- Contact IT Link Text
- Contact IT URL
- Do not synchronize Windows Apps
- First Use Notification
- Ping the settings storage location before sync
- Settings package size warning threshold
- Settings storage path
- Settings template catalog path
- Synchronization timeout
- Synchronize Windows settings
- Sync settings over metered connections even when roaming
- Sync settings over metered connections
- Sync Unlisted Windows Apps
- Use User Experience Virtualization (UE-V)
- VDI Configuration
- Disable remote Desktop Sharing
- Enable news and interests on the taskbar
- Prevent OneDrive files from syncing over metered connections
- Prevent OneDrive from generating network traffic until the user signs in to OneDrive
- Prevent the usage of OneDrive for file storage
- Prevent the usage of OneDrive for file storage on Windows 8.1
- Save documents to OneDrive by default
- Turn off Active Help
- Don't launch privacy settings experience on user logon
- Make Parental Controls control panel visible on a Domain
- Allow hibernate (S4) when starting from a Windows To Go workspace
- Disallow standby sleep states (S1-S3) when starting from a Windows to Go workspace
- Windows To Go Default Startup Options
- Turn off Windows presentation settings
- Turn off Push To Install service
- License server security group
- Prevent license upgrade
- Allow RDP redirection of other supported RemoteFX USB devices from this computer
- Allow .rdp files from unknown publishers
- Allow .rdp files from valid publishers and user's default .rdp settings
- Configure server authentication for client
- Do not allow hardware accelerated decoding
- Do not allow passwords to be saved
- Prompt for credentials on the client computer
- Specify SHA1 thumbprints of certificates representing trusted .rdp publishers
- Turn Off UDP On Client
- Do not use Remote Desktop Session Host server IP address when virtual IP address is not available
- Select the network adapter to be used for Remote Desktop IP Virtualization
- Turn off Windows Installer RDS Compatibility
- Turn on Remote Desktop IP Virtualization
- Allow remote start of unlisted programs
- Allow users to connect remotely by using Remote Desktop Services
- Automatic reconnection
- Configure keep-alive connection interval
- Deny logoff of an administrator logged in to the console session
- Limit number of connections
- Restrict Remote Desktop Services users to a single Remote Desktop Services session
- Select network detection on the server
- Select RDP transport protocols
- Set rules for remote control of Remote Desktop Services user sessions
- Suspend user sign-in to complete app registration
- Turn off Fair Share CPU Scheduling
- Allow audio and video playback redirection
- Allow audio recording redirection
- Allow time zone redirection
- Do not allow Clipboard redirection
- Do not allow COM port redirection
- Do not allow drive redirection
- Do not allow LPT port redirection
- Do not allow smart card device redirection
- Do not allow supported Plug and Play device redirection
- Do not allow video capture redirection
- Limit audio playback quality
- Hide notifications about RD Licensing problems that affect the RD Session Host server
- Set the Remote Desktop licensing mode
- Use the specified Remote Desktop license servers
- Do not allow client printer redirection
- Do not set default client printer to be default printer in a session
- Redirect only the default client printer
- Specify RD Session Host server fallback printer driver behavior
- Use Remote Desktop Easy Print printer driver first
- Limit the size of the entire roaming user profile cache
- Set path for Remote Desktop Services Roaming User Profile
- Set Remote Desktop Services User Home Directory
- Use mandatory profiles on the RD Session Host server
- Configure RD Connection Broker farm name
- Configure RD Connection Broker server name
- Join RD Connection Broker
- Use IP Address Redirection
- Use RD Connection Broker load balancing
- Configure RemoteFX
- Optimize visual experience for Remote Desktop Service Sessions
- Optimize visual experience when using RemoteFX
- Allow desktop composition for remote desktop sessions
- Always show desktop on connection
- Configure compression for RemoteFX data
- Configure H.264/AVC hardware encoding for Remote Desktop Connections
- Configure image quality for RemoteFX Adaptive Graphics
- Configure RemoteFX Adaptive Graphics
- Do not allow font smoothing
- Enable RemoteFX encoding for RemoteFX clients designed for Windows Server 2008 R2 SP1
- Enforce Removal of Remote Desktop Wallpaper
- Limit maximum color depth
- Limit maximum display resolution
- Limit number of monitors
- Prioritize H.264/AVC 444 graphics mode for Remote Desktop Connections
- Remove "Disconnect" option from Shut Down dialog
- Remove Windows Security item from Start menu
- Start a program on connection
- Use advanced RemoteFX graphics for RemoteApp
- Use hardware graphics adapters for all Remote Desktop Services sessions
- Use the hardware default graphics adapter for all Remote Desktop Services sessions
- Use WDDM graphics display driver for Remote Desktop Connections
- Always prompt for password upon connection
- Do not allow local administrators to customize permissions
- Require secure RPC communication
- Require use of specific security layer for remote (RDP) connections
- Require user authentication for remote connections by using Network Level Authentication
- Server authentication certificate template
- Set client connection encryption level
- End session when time limits are reached
- Set time limit for active but idle Remote Desktop Services sessions
- Set time limit for active Remote Desktop Services sessions
- Set time limit for disconnected sessions
- Set time limit for logoff of RemoteApp sessions
- Do not delete temp folders upon exit
- Do not use temporary folders per session
- Prevent access to feed list
- Prevent automatic discovery of feeds and Web Slices
- Prevent downloading of enclosures
- Prevent subscribing to or deleting a feed or a Web Slice
- Turn off background synchronization for feeds and Web Slices
- Turn on Basic feed authentication over HTTP
- Force TIFF IFilter to perform OCR for every page in a TIFF document
- Select OCR language from a code page
- Select OCR language
- Add primary intranet search location
- Add secondary intranet search locations
- Allow Cloud Search
- Allow Cortana above lock screen
- Allow Cortana
- Allow Cortana Page in OOBE on an AAD account
- Allow indexing of encrypted files
- Allow search and Cortana to use location
- Allow search highlights
- Allow use of diacritics
- Always use automatic language detection when indexing content and properties
- Control rich previews for attachments
- Default excluded paths
- Default indexed paths
- Disable indexer backoff
- Don't search the web or display web results in Search
- Don't search the web or display web results in Search over metered connections
- Do not allow locations on removable drives to be added to libraries
- Do not allow web search
- Enable indexing of online delegate mailboxes
- Enable indexing uncached Exchange folders
- Enable throttling for online mail indexing
- Indexer data location
- Prevent adding UNC locations to index from Control Panel
- Prevent adding user-specified locations to the All Locations menu
- Prevent automatically adding shared folders to the Windows Search index
- Prevent clients from querying the index remotely
- Prevent customization of indexed locations in Control Panel
- Prevent indexing certain paths
- Prevent indexing e-mail attachments
- Prevent indexing files in offline files cache
- Prevent indexing Microsoft Office Outlook
- Prevent indexing of certain file types
- Prevent indexing public folders
- Prevent indexing when running on battery power to conserve energy
- Prevent the display of advanced indexing options for Windows Search in the Control Panel
- Prevent unwanted iFilters and protocol handlers
- Preview pane location
- Set large or small icon view in desktop search results
- Set the SafeSearch setting for Search
- Set what information is shared in Search
- Stop indexing in the event of limited hard drive space
- Turn on Security Center (Domain PCs only)
- Timeout for hung logon sessions during shutdown
- Turn off legacy remote shutdown interface
- Allow certificates with no extended key usage certificate attribute
- Allow ECC certificates to be used for logon and authentication
- Allow Integrated Unblock screen to be displayed at the time of logon
- Allow signature keys valid for Logon
- Allow time invalid certificates
- Allow user name hint
- Configure root certificate clean up
- Display string when smart card is blocked
- Filter duplicate logon certificates
- Force the reading of all certificates from the smart card
- Notify user of successful smart card driver installation
- Prevent plaintext PINs from being returned by Credential Manager
- Reverse the subject name stored in a certificate when displaying
- Turn on certificate propagation from smart card
- Turn on root certificate propagation from smart card
- Turn on Smart Card Plug and Play service
- Control Device Reactivation for Retail devices
- Turn off KMS Client Online AVS Validation
- Do not allow Sound Recorder to run
- Allow Automatic Update of Speech Data
- Disable all apps from Microsoft Store
- Only display the private store within the Microsoft Store
- Turn off Automatic Download and Install of updates
- Turn off Automatic Download of updates on Win8 machines
- Turn off the offer to update to the latest version of Windows
- Turn off the Store application
- Do not sync app settings
- Do not sync Apps
- Do not sync browser settings
- Do not sync desktop personalization
- Do not sync
- Do not sync on metered connections
- Do not sync other Windows settings
- Do not sync passwords
- Do not sync personalize
- Do not sync start settings
- Do not allow Inkball to run
- Do not allow printing to Journal Note Writer
- Do not allow Snipping Tool to run
- Do not allow Windows Journal to be run
- Turn off pen feedback
- Prevent Back-ESC mapping
- Prevent launch an application
- Prevent press and hold
- Turn off hardware buttons
- Disable text prediction
- For tablet pen input, don't show the Input Panel icon
- For touch input, don't show the Input Panel icon
- Include rarely used Chinese, Kanji, or Hanja characters
- Prevent Input Panel tab from appearing
- Turn off AutoComplete integration with Input Panel
- Turn off password security in Input Panel
- Turn off tolerant and Z-shaped scratch-out gestures
- Prevent Flicks Learning Mode
- Prevent flicks
- Turn off Tablet PC Pen Training
- Turn off Tablet PC touch input
- Turn off Touch Panning
- Hide Advanced Properties Checkbox in Add Scheduled Task Wizard
- Hide Property Pages
- Prevent Task Run or End
- Prohibit Browse
- Prohibit Drag-and-Drop
- Prohibit New Task Creation
- Prohibit Task Deletion
- Cloud Policy Details
- Allow uninstallation of language features when a language is uninstalled
- Improve inking and typing recognition
- Turn off Windows Calendar
- Prohibit installing or uninstalling color profiles
- Allow Corporate redirection of Customer Experience Improvement uploads
- Tag Windows Customer Experience Improvement data with Study Identifier
- Configure App Install Control
- Configure Corporate Windows Error Reporting
- Configure Report Archive
- Configure Report Queue
- Default application reporting settings
- List of applications to always report errors for
- List of applications to be excluded
- List of applications to never report errors for
- Report operating system errors
- Report unplanned shutdown events
- Configure Default consent
- Customize consent settings
- Ignore custom consent settings
- Automatically send memory dumps for OS-generated error reports
- Configure Error Reporting
- Disable logging
- Disable Windows Error Reporting
- Display Error Notification
- Do not send additional data
- Do not throttle additional data
- Prevent display of the user interface for critical errors
- Send additional data when on battery power
- Send data when on connected to a restricted/costed network
- Enables or disables Windows Game Recording and Broadcasting
- Use phone sign-in
- Maximum PIN length
- Minimum PIN length
- Require digits
- Require lowercase letters
- Require special characters
- Require uppercase letters
- Allow enumeration of emulated smart card for all users
- Configure device unlock factors
- Configure dynamic lock factors
- Turn off smart card emulation
- Use a hardware security device
- Use biometrics
- Use certificate for on-premises authentication
- Use cloud trust for on-premises authentication
- Use PIN Recovery
- Use Windows Hello for Business certificates as smart card certificates
- Use Windows Hello for Business
- Allow suggested apps in Windows Ink Workspace
- Allow Windows Ink Workspace
- Allow user control over installs
- Allow users to browse for source while elevated
- Allow users to patch elevated products
- Allow users to use media source while elevated
- Always install with elevated privileges
- Control maximum size of baseline file cache
- Enforce upgrade component rules
- Prevent embedded UI
- Prevent Internet Explorer security prompt for Windows Installer scripts
- Prevent users from using Windows Installer to install updates and upgrades
- Prohibit flyweight patching
- Prohibit non-administrators from applying vendor signed updates
- Prohibit removal of updates
- Prohibit rollback
- Prohibit use of Restart Manager
- Prohibit User Installs
- Remove browse dialog box for new source
- Save copies of transform files in a secure location on workstation
- Specify the types of events Windows Installer records in its transaction log
- Turn off creation of System Restore checkpoints
- Turn off logging via package settings
- Turn off shared components
- Turn off Windows Installer
- Configure the mode of automatically signing in and locking last interactive user after a restart or cold boot
- Disable or enable software Secure Attention Sequence
- Display information about previous logons during user logon
- Report when logon server was not available during user logon
- Sign-in and lock last interactive user automatically after a restart
- Turn off the communities features
- Turn off Windows Mail application
- Do not allow Windows Media Center to run
- Prevent Windows Media DRM Internet Access
- Do Not Show First Use Dialog Boxes
- Prevent Automatic Updates
- Prevent Desktop Shortcut Creation
- Prevent Media Sharing
- Prevent Quick Launch Toolbar Shortcut Creation
- Prevent Video Smoothing
- Do not allow Windows Messenger to be run
- Do not automatically start Windows Messenger initially
- Turn off Windows Mobility Center
- Set the default source path for Update-Help
- Turn on Module Logging
- Turn on PowerShell Script Block Logging
- Turn on PowerShell Transcription
- Turn on Script Execution
- Configure Reliability WMI Providers
- Allow Basic authentication
- Allow CredSSP authentication
- Allow unencrypted traffic
- Disallow Digest authentication
- Disallow Kerberos authentication
- Disallow Negotiate authentication
- Trusted Hosts
- Allow remote server management through WinRM
- Disallow WinRM from storing RunAs credentials
- Specify channel binding token hardening level
- Turn On Compatibility HTTP Listener
- Turn On Compatibility HTTPS Listener
- Allow Remote Shell Access
- MaxConcurrentUsers
- Specify idle Timeout
- Specify maximum amount of memory in MB per Shell
- Specify maximum number of processes per Shell
- Specify maximum number of remote shells per user
- Specify Shell Timeout
- Hide the Account protection area
- Hide the App and browser protection area
- Prevent users from modifying settings
- Hide the Device performance and health area
- Disable the Clear TPM button
- Hide the Device security area
- Hide the Secure boot area
- Hide the Security processor (TPM) troubleshooter page
- Hide the TPM Firmware Update recommendation.
- Configure customized contact information
- Configure customized notifications
- Specify contact company name
- Specify contact email address or Email ID
- Specify contact phone number or Skype ID
- Specify contact website
- Hide the Family options area
- Hide the Firewall and network protection area
- Hide all notifications
- Hide non-critical notifications
- Hide Windows Security Systray
- Hide the Ransomware data recovery area
- Hide the Virus and threat protection area
- Disable safeguards for Feature Updates
- Manage preview builds
- Select the target Feature Update version
- Select when Preview Builds and Feature Updates are received
- Select when Quality Updates are received
- Allow Automatic Updates immediate installation
- Allow non-administrators to receive update notifications
- Allow signed updates from an intranet Microsoft update service location
- Allow updates to be downloaded automatically over metered connections
- Always automatically restart at the scheduled time
- Automatic Updates detection frequency
- Configure auto-restart reminder notifications for updates
- Configure auto-restart required notification for updates
- Configure auto-restart warning notifications schedule for updates
- Configure Automatic Updates
- Defer Upgrades and Updates
- Delay Restart for scheduled installations
- Display options for update notifications
- Do not adjust default option to 'Install Updates and Shut Down' in Shut Down Windows dialog box
- Do not allow update deferral policies to cause scans against Windows Update
- Do not connect to any Windows Update Internet locations
- Do not display 'Install Updates and Shut Down' option in Shut Down Windows dialog box
- Do not include drivers with Windows Updates
- Enable client-side targeting
- Enabling Windows Update Power Management to automatically wake up the system to install scheduled updates
- No auto-restart with logged on users for scheduled automatic updates installations
- Re-prompt for restart with scheduled installations
- Remove access to "Pause updates" feature
- Remove access to use all Windows Update features
- Reschedule Automatic Updates scheduled installations
- Specify active hours range for auto-restarts
- Specify deadline before auto-restart for update installation
- Specify deadlines for automatic updates and restarts
- Specify Engaged restart transition and notification schedule for updates
- Specify intranet Microsoft update service location
- Specify source service for specific classes of Windows Updates
- Turn off auto-restart for updates during active hours
- Turn off auto-restart notifications for update installations
- Turn on recommended updates via Automatic Updates
- Turn on Software Notifications
- Update Power Policy for Cart Restarts
- Force automatic setup for all users
- Administrative Templates (Users)
- User State Management Client Side Extension
- Go directly to Components Wizard
- Hide Add/Remove Windows Components page
- Hide Add New Programs page
- Hide Change or Remove Programs page
- Hide the "Add a program from CD-ROM or floppy disk" option
- Hide the "Add programs from Microsoft" option
- Hide the "Add programs from your network" option
- Hide the Set Program Access and Defaults page
- Remove Add or Remove Programs
- Remove Support Information
- Specify default category for Add New Programs
- Disable the Display Control Panel
- Hide Settings tab
- Enable screen saver
- Force a specific visual style file or force Windows Classic
- Force specific screen saver
- Load a specific theme
- Password protect the screen saver
- Prevent changing color and appearance
- Prevent changing color scheme
- Prevent changing desktop background
- Prevent changing desktop icons
- Prevent changing mouse pointers
- Prevent changing screen saver
- Prevent changing sounds
- Prevent changing theme
- Prevent changing visual style for windows and buttons
- Prohibit selection of visual style font size
- Screen saver timeout
- Browse a common web site to find printers
- Browse the network to find printers
- Default Active Directory path when searching for printers
- Prevent addition of printers
- Prevent deletion of printers
- Turn off Windows default printer management
- Hide "Get Programs" page
- Hide "Installed Updates" page
- Hide "Programs and Features" page
- Hide "Set Program Access and Computer Defaults" page
- Hide "Windows Features"
- Hide "Windows Marketplace"
- Hide the Programs Control Panel
- Hide Regional and Language Options administrative options
- Hide the geographic location option
- Hide the select language group options
- Hide user locale selection and customization options
- Restrict selection of Windows menus and dialogs language
- Restricts the UI languages Windows should use for the selected user
- Turn off autocorrect misspelled words
- Turn off highlight misspelled words
- Turn off insert a space after selecting a text prediction
- Turn off offer text predictions as I type
- Always open All Control Panel Items when opening Control Panel
- Hide specified Control Panel items
- Prohibit access to Control Panel and PC settings
- Show only specified Control Panel items
- Enable filter in Find dialog box
- Hide Active Directory folder
- Maximum size of Active Directory searches
- Add/Delete items
- Allow only bitmapped wallpaper
- Desktop Wallpaper
- Disable Active Desktop
- Disable all items
- Enable Active Desktop
- Prohibit adding items
- Prohibit changes
- Prohibit closing items
- Prohibit deleting items
- Prohibit editing items
- Don't save settings at exit
- Do not add shares of recently opened documents to Network Locations
- Hide and disable all items on the desktop
- Hide Internet Explorer icon on desktop
- Hide Network Locations icon on desktop
- Prevent adding, dragging, dropping and closing the Taskbar's toolbars
- Prohibit adjusting desktop toolbars
- Prohibit User from manually redirecting Profile Folders
- Remove Computer icon on the desktop
- Remove My Documents icon on the desktop
- Remove Properties from the Computer icon context menu
- Remove Properties from the Documents icon context menu
- Remove Properties from the Recycle Bin context menu
- Remove Recycle Bin icon from desktop
- Remove the Desktop Cleanup Wizard
- Turn off Aero Shake window minimizing mouse gesture
- Ability to change properties of an all user remote access connection
- Ability to delete all user remote access connections
- Ability to Enable/Disable a LAN connection
- Ability to rename all user remote access connections
- Ability to rename LAN connections
- Ability to rename LAN connections or remote access connections available to all users
- Enable Windows 2000 Network Connections settings for Administrators
- Prohibit access to properties of a LAN connection
- Prohibit access to properties of components of a LAN connection
- Prohibit access to properties of components of a remote access connection
- Prohibit access to the Advanced Settings item on the Advanced menu
- Prohibit access to the New Connection Wizard
- Prohibit access to the Remote Access Preferences item on the Advanced menu
- Prohibit adding and removing components for a LAN or remote access connection
- Prohibit changing properties of a private remote access connection
- Prohibit connecting and disconnecting a remote access connection
- Prohibit deletion of remote access connections
- Prohibit Enabling/Disabling components of a LAN connection
- Prohibit renaming private remote access connections
- Prohibit TCP/IP advanced configuration
- Prohibit viewing of status for an active connection
- Turn off notifications when a connection has only limited or no connectivity
- Allow DFS roots to be published
- Allow shared folders to be published
- Set the time Quiet Hours begins each day
- Set the time Quiet Hours ends each day
- Turn off calls during Quiet Hours
- Turn off notification mirroring
- Turn off notifications network usage
- Turn off Quiet Hours
- Turn off tile notifications
- Turn off toast notifications
- Turn off toast notifications on the lock screen
- Turn on multiple expanded toast notifications in action center
- Add "Run in Separate Memory Space" check box to Run dialog box
- Add Logoff to the Start Menu
- Add Search Internet link to Start Menu
- Add the Run command to the Start Menu
- Change Start Menu power button
- Clear history of recently opened documents on exit
- Clear the recent programs list for new users
- Clear tile notifications during log on
- Disable showing balloon notifications as toasts.
- Do not allow pinning items in Jump Lists
- Do not allow pinning programs to the Taskbar
- Do not allow pinning Store app to the Taskbar
- Do not allow taskbars on more than one display
- Do not display any custom toolbars in the taskbar
- Do not display or track items in Jump Lists from remote locations
- Do not keep history of recently opened documents
- Do not search communications
- Do not search for files
- Do not search Internet
- Do not search programs and Control Panel items
- Do not use the search-based method when resolving shell shortcuts
- Do not use the tracking-based method when resolving shell shortcuts
- Force classic Start Menu
- Force Start to be either full screen size or menu size
- Go to the desktop instead of Start when signing in
- Gray unavailable Windows Installer programs Start Menu shortcuts
- Hide the notification area
- List desktop apps first in the Apps view
- Lock all taskbar settings
- Lock the Taskbar
- Prevent changes to Taskbar and Start Menu Settings
- Prevent grouping of taskbar items
- Prevent users from adding or removing toolbars
- Prevent users from customizing their Start Screen
- Prevent users from moving taskbar to another screen dock location
- Prevent users from rearranging toolbars
- Prevent users from resizing the taskbar
- Prevent users from uninstalling applications from Start
- Remove access to the context menus for the taskbar
- Remove All Programs list from the Start menu
- Remove Balloon Tips on Start Menu items
- Remove Clock from the system notification area
- Remove common program groups from Start Menu
- Remove Default Programs link from the Start menu.
- Remove Documents icon from Start Menu
- Remove Downloads link from Start Menu
- Remove Favorites menu from Start Menu
- Remove frequent programs list from the Start Menu
- Remove Games link from Start Menu
- Remove Help menu from Start Menu
- Remove Homegroup link from Start Menu
- Remove links and access to Windows Update
- Remove Logoff on the Start Menu
- Remove Music icon from Start Menu
- Remove Network Connections from Start Menu
- Remove Network icon from Start Menu
- Remove Notifications and Action Center
- Remove Pictures icon from Start Menu
- Remove pinned programs from the Taskbar
- Remove pinned programs list from the Start Menu
- Remove programs on Settings menu
- Remove Recent Items menu from Start Menu
- Remove Recorded TV link from Start Menu
- Remove Run menu from Start Menu
- Remove Search Computer link
- Remove Search link from Start Menu
- Remove See More Results / Search Everywhere link
- Remove the "Undock PC" button from the Start Menu
- Remove the battery meter
- Remove the Meet Now icon
- Remove the networking icon
- Remove the People Bar from the taskbar
- Remove the Security and Maintenance icon
- Remove the volume control icon
- Remove user's folders from the Start Menu
- Remove user folder link from Start Menu
- Remove user name from Start Menu
- Remove Videos link from Start Menu
- Search just apps from the Apps view
- Show "Run as different user" command on Start
- Show additional calendar
- Show QuickLaunch on Taskbar
- Show Start on the display the user is using when they press the Windows logo key
- Show the Apps view automatically when the user goes to Start
- Show Windows Store apps on the taskbar
- Turn off all balloon notifications
- Turn off automatic promotion of notification icons to the taskbar
- Turn off feature advertisement balloon notifications
- Turn off notification area cleanup
- Turn off personalized menus
- Turn off taskbar thumbnails
- Turn off user tracking
- Remove Change Password
- Remove Lock Computer
- Remove Logoff
- Remove Task Manager
- Code signing for driver packages
- Configure driver search locations
- Do not automatically make all redirected folders available offline
- Do not automatically make specific redirected folders available offline
- Enable optimized move of contents in Offline Files cache on Folder Redirection server path change
- Configure Group Policy domain controller selection
- Create new Group Policy Object links disabled by default
- Enforce Show Policies Only
- Set default name for new Group Policy objects
- Set Group Policy refresh interval for users
- Turn off automatic update of ADM files
- Turn off Help Experience Improvement Program
- Turn off Help Ratings
- Turn off Windows Online
- Prompt for password on resume from hibernate/suspend
- Run legacy logon scripts hidden
- Run logoff scripts visible
- Run logon scripts visible
- Connect home directory to root of the share
- Exclude directories in roaming profile
- Limit profile size
- Specify network directories to sync at logon/logoff time only
- Century interpretation for Year 2000
- Custom User Interface
- Don't run specified Windows applications
- Prevent access to registry editing tools
- Prevent access to the command prompt
- Run only specified Windows applications
- Windows Automatic Updates
- Default risk level for file attachments
- Do not preserve zone information in file attachments
- Hide mechanisms to remove zone information
- Inclusion list for high risk file types
- Inclusion list for low file types
- Inclusion list for moderate risk file types
- Notify antivirus programs when opening attachments
- Trust logic for file attachments
- Allow Graphing Calculator
- Configure Windows spotlight on lock screen
- Do not suggest third-party content in Windows spotlight
- Do not use diagnostic data for tailored experiences
- Turn off all Windows spotlight features
- Turn off the Windows Welcome Experience
- Turn off Windows Spotlight on Action Center
- Turn off Windows Spotlight on Settings
- Do not show recent apps when the mouse is pointing to the upper-left corner of the screen
- Prevent users from replacing the Command Prompt with Windows PowerShell in the menu they see when they right-click the lower-left corner or press the Windows logo key+X
- Search, Share, Start, Devices, and Settings don't appear when the mouse is pointing to the upper-right corner of the screen
- Turn off switching between recent apps
- Turn off tracking of app usage
- Hide the common dialog back button
- Hide the common dialog places bar
- Hide the dropdown list of recent files
- Items displayed in Places Bar
- Turn off Preview Pane
- Turn on or off details pane
- Allow only per user or approved shell extensions
- Disable Known Folders
- Display confirmation dialog when deleting files
- Display the menu bar in File Explorer
- Do not allow Folder Options to be opened from the Options button on the View tab of the ribbon
- Do not display the Welcome Center at user logon
- Do not move deleted files to the Recycle Bin
- Do not request alternate credentials
- Do not track Shell shortcuts during roaming
- Hides the Manage item on the File Explorer context menu
- Hide these specified drives in My Computer
- Maximum allowed Recycle Bin size
- Maximum number of recent documents
- No Computers Near Me in Network Locations
- No Entire Network in Network Locations
- Pin Internet search sites to the "Search again" links and the Start menu
- Pin Libraries or Search Connectors to the "Search again" links and the Start menu
- Prevent access to drives from My Computer
- Prevent users from adding files to the root of their Users Files folder.
- Remove "Map Network Drive" and "Disconnect Network Drive"
- Remove CD Burning features
- Remove DFS tab
- Remove File Explorer's default context menu
- Remove File menu from File Explorer
- Remove Hardware tab
- Remove Search button from File Explorer
- Remove Security tab
- Remove Shared Documents from My Computer
- Remove the Search the Internet "Search again" link
- Remove UI to change keyboard navigation indicator setting
- Remove UI to change menu animation setting
- Request credentials for network installations
- Turn off caching of thumbnail pictures
- Turn off common control and window animations
- Turn off display of recent search entries in the File Explorer search box
- Turn off the caching of thumbnails in hidden thumbs.db files
- Turn off the display of snippets in Content view mode
- Turn off the display of thumbnails and only display icons.
- Turn off the display of thumbnails and only display icons on network folders
- Turn off Windows Key hotkeys
- Turn off Windows Libraries features that rely on indexed file data
- Turn on Classic Shell
- Allow Windows Runtime apps to revoke enterprise data
- Configure Japanese IME version
- Configure Simplified Chinese IME version
- Configure Traditional Chinese IME version
- Do not include Non-Publishing Standard Glyph in the candidate list
- Restrict character code range of conversion
- Turn off custom dictionary
- Turn off history-based predictive input
- Turn off Internet search integration
- Turn off Open Extended Dictionary
- Turn off saving auto-tuning data to file
- Turn on cloud candidate for CHS
- Turn on cloud candidate
- Turn on lexicon update
- Turn on Live Sticker
- Turn on misconversion logging for misconversion report
- Custom Instant Search Internet search provider
- Audio/Video Player
- DHTML Edit Control
- Menu Controls
- Microsoft Agent
- Microsoft Chat
- Microsoft Scriptlet Component
- Microsoft Survey Control
- NetShow File Transfer Control
- Shockwave Flash
- Disable Open in New Window menu option
- Disable Save this program to disk option
- File menu: Disable closing the browser and Explorer windows
- File menu: Disable New menu option
- File menu: Disable Open menu option
- File menu: Disable Save As... menu option
- File menu: Disable Save As Web Page Complete
- Help menu: Remove 'For Netscape Users' menu option
- Help menu: Remove 'Send Feedback' menu option
- Help menu: Remove 'Tip of the Day' menu option
- Help menu: Remove 'Tour' menu option
- Hide Favorites menu
- Tools menu: Disable Internet Options... menu option
- Turn off Shortcut Menu
- View menu: Disable Full Screen menu option
- View menu: Disable Source menu option
- Hide the button (next to the New Tab button) that opens Microsoft Edge
- Turn off configuring underline links
- Turn off details in messages about Internet connection problems
- Turn off page transitions
- Turn off smooth scrolling
- Turn on script debugging
- Turn on the display of script errors
- Start the Internet Connection Wizard automatically
- Allow the display of image download placeholders
- Turn off automatic image resizing
- Turn off image display
- Turn off smart image dithering
- Turn on printing of background colors and images
- Turn on automatic signup
- Turn off inline AutoComplete in File Explorer
- Turn on inline AutoComplete
- Prevent specifying background color
- Prevent specifying text color
- Prevent the use of Windows colors
- Prevent specifying the color of links that have already been clicked
- Prevent specifying the color of links that have not yet been clicked
- Prevent specifying the hover color
- Turn on the hover color option
- Prevent choosing default text size
- Turn off sending URL path as UTF-8
- Disable adding channels
- Disable adding schedules for offline pages
- Disable all scheduled offline pages
- Disable channel user interface completely
- Disable downloading of site subscription content
- Disable editing and creating of schedule groups
- Disable editing schedules for offline pages
- Disable offline page hit logging
- Disable removing channels
- Disable removing schedules for offline pages
- Subscription Limits
- File size limits for Internet zone
- File size limits for Intranet zone
- File size limits for Local Machine zone
- File size limits for Restricted Sites zone
- File size limits for Trusted Sites zone
- Turn off automatic download of the ActiveX VersionList
- Configure Toolbar Buttons
- Disable customizing browser toolbar buttons
- Disable customizing browser toolbars
- Configure Media Explorer Bar
- Configure Outlook Express
- Disable AutoComplete for forms
- Disable caching of Auto-Proxy scripts
- Disable changing accessibility settings
- Disable changing Advanced page settings
- Disable changing Calendar and Contact settings
- Disable changing certificate settings
- Disable changing color settings
- Disable changing default browser check
- Disable changing font settings
- Disable changing home page settings
- Disable changing language settings
- Disable changing link color settings
- Disable changing Messaging settings
- Disable changing Profile Assistant settings
- Disable changing ratings settings
- Disable changing Temporary Internet files settings
- Disable external branding of Internet Explorer
- Disable Internet Connection wizard
- Disable the Reset Web Settings feature
- Display error message on proxy script download failure
- Identity Manager: Prevent users from using Identities
- Notify users if Internet Explorer is not the default web browser
- Position the menu bar above the navigation bar
- Search: Disable Find Files via F3 within the browser
- Search: Disable Search Customization
- Turn off Tab Grouping
- Turn on the auto-complete feature for user names and passwords on forms
- Use Automatic Detection for dial-up connections
- AppleTalk Routing
- Authorization Manager
- Certification Authority Policy Settings
- Connection Sharing (NAT)
- DCOM Configuration Extension
- Device Manager
- DFS Management Extension
- DHCP Relay Management
- Disk Management Extension
- Event Viewer (Windows Vista)
- Event Viewer
- Extended View (Web View)
- File Server Resource Manager Extension
- IAS Logging
- IGMP Routing
- IPX RIP Routing
- IPX Routing
- IPX SAP Routing
- Logical and Mapped Drives
- OSPF Routing
- Public Key Policies
- RAS Dialin - User Node
- Remote Access
- Removable Storage
- RIP Routing
- Send Console Message
- Service Dependencies
- Share and Storage Management Extension
- Shared Folders Ext
- SMTP Protocol
- Storage Manager for SANS Extension
- System Properties
- Folder Redirection
- Internet Explorer Maintenance
- IP Security Policy Management
- NAP Client Configuration
- Remote Installation Services
- Scripts (Logon/Logoff)
- Scripts (Startup/Shutdown)
- Security Settings
- Software Installation (Computers)
- Software Installation (Users)
- Windows Firewall with Advanced Security
- Wired Network (IEEE 802.3) Policies
- Wireless Network (IEEE 802.11) Policies
- Permit use of Application snap-ins
- Permit use of Applications preference extension
- Permit use of Control Panel Settings (Computers)
- Permit use of Control Panel Settings (Users)
- Permit use of Data Sources preference extension
- Permit use of Devices preference extension
- Permit use of Drive Maps preference extension
- Permit use of Environment preference extension
- Permit use of Files preference extension
- Permit use of Folder Options preference extension
- Permit use of Folders preference extension
- Permit use of Ini Files preference extension
- Permit use of Internet Settings preference extension
- Permit use of Local Users and Groups preference extension
- Permit use of Network Options preference extension
- Permit use of Network Shares preference extension
- Permit use of Power Options preference extension
- Permit use of Preferences tab
- Permit use of Printers preference extension
- Permit use of Regional Options preference extension
- Permit use of Registry preference extension
- Permit use of Scheduled Tasks preference extension
- Permit use of Services preference extension
- Permit use of Shortcuts preference extension
- Permit use of Start Menu preference extension
- Group Policy Management Editor
- Group Policy Management
- Group Policy Object Editor
- Group Policy Starter GPO Editor
- Group Policy tab for Active Directory Tools
- Resultant Set of Policy snap-in
- .Net Framework Configuration
- Active Directory Domains and Trusts
- Active Directory Sites and Services
- Active Directory Users and Computers
- ActiveX Control
- Certificates
- Certificate Templates
- Certification Authority
- Component Services
- Computer Management
- DFS Management
- Disk Defragmenter
- Disk Management
- Distributed File System
- Enterprise PKI
- Failover Clusters Manager
- FAX Service
- File Server Resource Manager
- FrontPage Server Extensions
- Health Registration Authority (HRA)
- Indexing Service
- Internet Authentication Service (IAS)
- Internet Information Services
- IP Security Monitor
- Link to Web Address
- Local Users and Groups
- Network Policy Server (NPS)
- Online Responder
- Performance Logs and Alerts
- QoS Admission Control
- Remote Desktop Services Configuration
- Remote Desktops
- Removable Storage Management
- Routing and Remote Access
- Security Configuration and Analysis
- Security Templates
- Server Manager
- Share and Storage Management
- Shared Folders
- Storage Manager for SANs
- System Information
- TPM Management
- Wireless Monitor
- WMI Control
- Restrict the user from entering author mode
- Restrict users to the explicitly permitted list of snap-ins
- Configure the inclusion of Microsoft Edge tabs into Alt-Tab
- Disable application Sharing
- Prevent Application Sharing in true color
- Prevent Control
- Prevent Desktop Sharing
- Prevent Sharing Command Prompts
- Prevent Sharing Explorer windows
- Prevent Sharing
- Disable Audio
- Disable full duplex Audio
- Limit the bandwidth of Audio and Video
- Prevent changing DirectSound Audio setting
- Prevent receiving Video
- Prevent sending Video
- Disable the Advanced Calling button
- Hide the Audio page
- Hide the General page
- Hide the Security page
- Hide the Video page
- Allow persisting automatic acceptance of Calls
- Disable Chat
- Disable Directory services
- Disable NetMeeting 2.x Whiteboard
- Disable Whiteboard
- Enable Automatic Configuration
- Limit the size of sent files
- Prevent adding Directory servers
- Prevent automatic acceptance of Calls
- Prevent changing Call placement method
- Prevent receiving files
- Prevent sending files
- Prevent viewing Web directory
- Set Call Security options
- Set the intranet support Web page
- Prevent users from sharing files within their profile.
- Enable connection through RD Gateway
- Set RD Gateway authentication method
- Set RD Gateway server address
- Specify default connection URL
- Remove remote desktop wallpaper
- Turn off storage and display of search history
- Prevent removable media source for any installation
- Specify the order in which Windows Installer searches for installation files
- Remove logon hours expiration warnings
- Set action to take when logon hours expire
- Configure HTTP Proxy
- Configure MMS Proxy
- Configure Network Buffering
- Configure RTSP Proxy
- Hide Network Tab
- Streaming Media Protocols
- Allow Screen Saver
- Prevent Codec Download
- Do Not Show Anchor
- Hide Privacy Tab
- Hide Security Tab
- Set and Lock Skin
- Prevent CD and DVD Media Information Retrieval
- Prevent Music File Media Information Retrieval
- Prevent Radio Station Preset Retrieval
- Enables the use of Token Broker for AD FS authentication
- Specify Work Folders settings
- Enable auto-subscription

an endpoint admin's journal
- Recent Posts
- Popular Posts
- Recent Comments


Deploy Trusted sites zone assignment using Intune
November 6, 2023

Zoom Desktop Client – Download older build versions from Zoom
October 31, 2023

Uninstall Teams chat app using remediation script and a configuration profile in Intune
October 30, 2023

Intune Last Check-in date not updating for Windows device
October 25, 2023

How to use Event Viewer to check cause of Blue screen of Death (BSOD)
October 23, 2023

5 Quick Mac OS Terminal commands to make a Mac user life easier

Powershell : Find disabled users and computers in AD

- Active Directory (1)
- Windows (7)
- November 2023
- October 2023
Deploy a set of trusted sites overriding users’ ability to add trusted sites themselves. To acheive this, an Intune configuration profile Trusted site zone assignment can be deployed to devices/users group as required.
Login to Intune Portal and navigate to: Devices > Windows > Configuration Profiles .
Hit the Create button and Select New policy

From the Create a profile menu, select Windows 10 and later for Platform , Templates for Profile type. Select Administrative templates and click Create .

Give the profile desired name and click Next .

In Configurations settings, select Computer Configuration and search for keyword “ Site to Zone “, Site to Zone Assignment List setting will be listed under search results. Go ahead click on it to Select it.

Once selected, a Site to Zone Assignment List page will appear on right side explaining different zones and values required for these zone for setup. Since this profile is being used for trusted sites, we will use the Value “2” . Go ahead and select Enabled button and start entering the trusted sites as required. please ensure to set each value to “2” . See example below:
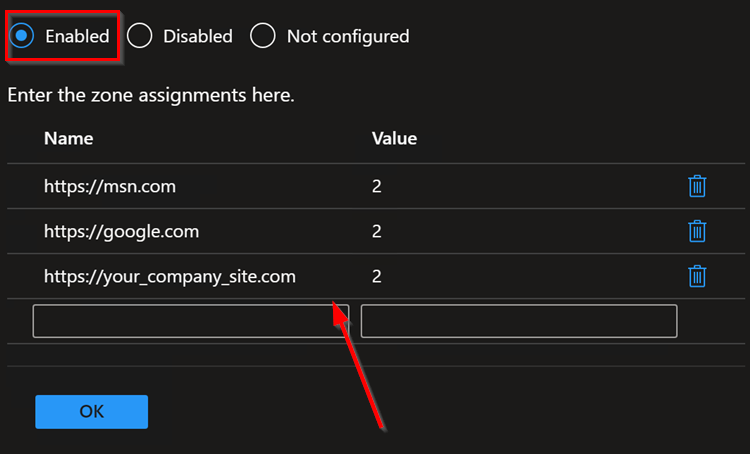
Once done adding the list of sites, click OK to close it and Hit Next on Configuration settings page.
Add Scope tags if needed.
Under Assignments , Click Add groups to target the policy deployment to specific group of devices/users. You can also select Add all users / All all devices .
Hit Next . Then Hit Review + Save button to save.
Tags: Intune Windows
You may also like...

Set your laptop screen’s brightness level to desired percentage every time you logon
- Previous Zoom Desktop Client – Download older build versions from Zoom

thanks! I was just looking for this exact solution!
techlauve.com – a knowledge base for IT professionals.
Inhale problems, exhale solutions..
- Nick’s Blog
- Active Directory
- Privacy Policy
« Outlook: “Sending and Receiving reported error (OX80040600)”
Terminal Server Does Not Accept Enough Client Connections »
Adding Sites to Internet Security Zones Using Group Policy
Sometimes it is useful to leverage the power of Group Policy in Active Directory to add sites to certain security zones in Internet Explorer. This can save the network admin the trouble of managing the security zone lists for each computer (or user) separately. In the following example, each user on the network needs to have a specific site added to the Trusted Sites list.
This tutorial assumes that group policy is in good working order on the domain and that all client users and computers can access the directory.
- Open the Group Policy Management MMC console.
- Right-click the organization unit (OU) that the policy should apply to, taking special care to consider whether the policy should apply to computers or users on this particular network.
- Select “Create and Link a GPO Here…” to create a new group policy object.
- In the “New GPO” window, enter a good, descriptive name for this new policy and click “OK”. (ex. “Trusted Sites Zone – Users” or something even more descriptive)
- Locate the newly created GPO in the left-side navigation pane, right-click it and select “Edit…”
- Expand “Administrative Templates” under either “Computer Configuration” or “User Configuration” depending on which type of OU the new policy was linked to in step 2.
- The path to the settings that this example will be using is: Administrative Templates -- Windows Components -- Internet Explorer -- Internet Control Panel -- Security Page
- In the right-hand pane, double-click “Site to Zone Assignment List”.
- Enable the policy and click the “Show…” button next to “Enter the zone assignments here.” This will pop up the “Show Contents” window.
- Click the “Add…” button. This will pop up the “Add Item” window.
- In the first box, labeled “Enter the name of the item to be added:”, enter the URL to the site. (ex. https://secure.ourimportantwebapp.com) . Keep in mind that wildcards can be used. (ex. https://*.ourimportantdomain.com) . Leave off any trailing slashes or sub-folders unless that type of specific control is called for.
- 1 – Intranet Zone
- 2 – Trusted Sites Zone
- 3 – Internet Zone
- 4 – Restricted Sites Zone
- Once the zone assignment has been entered, click “OK”. This will once again show the “Show Contents” window and the new entry should be present.
- Click “OK” and “OK” again to get back to the Group Policy Management Console.
The new policy will take effect at the next group policy refresh interval, which is usually 15 minutes. To test immediately, run a gpupdate /force on a user/computer that falls into the scope of the new policy and go to “Tools -> Internet Options -> Security -> Trusted Sites -> Sites”. The site(s) added should be in the list. If the sites do not show up, check the event logs for any group policy processing errors.
Related content:
- How To: Time Sync Across Windows Network
- Group Policy Not Applied To Remote VPN Users
- QuickBooks Payroll Opens/Saves the Wrong W2 Form
- Microsoft Virtual Server Web Console Constantly Asks For Password
- Group Policy: Applying Different User Policies to the Same User for Workstations and Terminal Server
No comment yet
Juicer breville says:.
November 26, 2012 at 12:11 am (UTC -5)
Hurrah, that’s what I was looking for, what a information! existing here at this web site, thanks admin of this web page.
Leave a Reply Cancel reply
Your email address will not be published.
You may use these HTML tags and attributes: <a href="" title=""> <abbr title=""> <acronym title=""> <b> <blockquote cite=""> <cite> <code> <del datetime=""> <em> <i> <q cite=""> <s> <strike> <strong>
Submit Comment
This site uses Akismet to reduce spam. Learn how your comment data is processed .
Remember Me
Connect With Us
Connect with us.
Social Connect by NewsPress
Not finding the answer that you're looking for? Need more help with a problem that is addressed in one of our articles?
techlauve.com is affiliated with Rent-A-Nerd, Inc. in New Orleans, LA.
- DFS Replication (1)
- Group Policy (1)
- Microsoft Exhange (3)
- Microsoft Outlook (11)
- Copiers (1)
- Multi Function Devices (1)
- Printers (2)
- Scanners (1)
- Blackberry (1)
- Firewalls (2)
- Wireless (2)
- Hard Drives (1)
- SAN Systems (1)
- Hyper-V (3)
- Virtual Server (1)
- WordPress (1)
- Security (7)
- QuickBooks (2)
- Quicken (1)
- Antivirus/Antimalware (4)
- Backup Exec (2)
- Internet Explorer (5)
- Microsoft SQL (1)
- Licensing (2)
- Steinberg Nuendo (1)
- Mac OS X (1)
- Server 2003 (12)
- Server 2008 (14)
- Small Business Server 2003 (7)
- Terminal Server (6)
- Updates (2)
- Windows 7 (9)
- Windows XP (11)
- Reviews (1)
- Rent-A-Nerd, Inc.
Except where otherwise noted, content on this site is licensed under a Creative Commons Licence .
Valid XHTML 1.0 Strict Valid CSS Level 2.1
techlauve.com - a knowledge base for IT professionals. uses Graphene theme by Syahir Hakim.

How To Add Sites to Internet Explorer Restricted Zone

In this post we will see the steps on how to add sites to Internet Explorer restricted zone.
To configure Internet Explorer security zones there are multiple ways to do it, in this post we will configure a group policy for the users and use Site to Zone assignment list policy setting to add the websites or URL to the restricted site zone.
This policy setting allows you to manage a list of sites that you want to associate with a particular security zone. Internet Explorer has 4 security zones, numbered 1-4, and these are used by this policy setting to associate sites to zones.
- Intranet zone
- Trusted Sites zone
- Internet zone
- Restricted Sites zone
The zone numbers have associated security settings that apply to all of the sites in the zone. Using the Site to Zone assignment list policy setting we will see how to add sites to the Internet Explorer restricted zone.
Please note that Site to Zone Assignment List policy setting is available for both Computer Configuration and User Configuration.
Launch the Group Policy Management Tool, right click on the domain and create a new group policy. Right the policy and click Edit .

In the Group Policy Management Editor navigate to User Configuration > Administrative Templates > Windows Components > Internet Explorer > Internet Control Panel > Security Page.
If you want to apply the group policy for the computers then navigate to – Computer Configuration > Administrative Templates > Windows Components > Internet Explore r > Internet Control Panel > Security Page.
On the right hand side, right click the policy setting Site to Zone Assignment List and click Edit .

Click Enabled first and then under the Options click Show . You need to enter the zone assignments. As stated earlier in this post Internet Explorer has 4 security zones and the zone numbers have associated security settings that apply to all of the sites in the zone.
We will be adding a URL to the Restricted Sites Zone . So enter the value name as the site URL that to Restricted Sites zone and enter the value as 4 . Click OK and close the Group Policy Management Editor.

We will be applying the group policy to a group that consists of users. In the Security Filtering section, click Add and select the group .

Login to the client computer and launch the Internet Explorer . Click on Tools > Internet Options > Security Tab > Restricted Sites > Click Sites .
Notice that the URL is added to the Restricted Sites zone and user cannot remove it from the list.

Sign Up For Newsletter
Join our newsletter to stay updated and receive all the top articles published on the site get the latest articles delivered straight to your inbox..
Good article Prajwal .Detailed Explanation on how to add sites to internet explorer restricted zone .Keep it up .I seen your videos also in YouTube its really great.Thanks for sharing this info.
Hi Prajwal, Thank you for your article. Is there any way to block sites in all browsers.
Block all sites ?. Why would you do that ?.
I think you misunderstood the user’s question. The user was asking if there was a way to block any particular website in ALL browsers. Not just Internet Explorer.
Leave a Reply Cancel reply
Your email address will not be published. Required fields are marked *
Save my name, email, and website in this browser for the next time I comment.
PatchMyPC Sponsored AD

Recast Sponsored AD

Popular Articles

SCCM 2012 R2 Step by Step Guide

How To Deploy Software Updates Using SCCM ConfigMgr

How to Install WSUS for SCCM | SUP Role | ConfigMgr

Fix Skype for Business Recording Shows Pending Status
Recent articles.

3 Ways to Remove OneDrive from File Explorer in Windows 11

Step-by-Step Guide to Deploy Bitwarden using SCCM

8 Ways to Fix Windows Update Error 0x80070643

Hotfix Rollup KB25858444 for SCCM 2309: 8 Critical Fixes

Subscribe Newsletter
Subscribe to our newsletter to get our newest articles instantly!
- Password Tools For Windows Password Genius Windows Password Genius Windows 10 Password Genius Windows 7 Password Genius RAR Password Genius ZIP Password Genius SQL Password Genius Chrome Password Genius WiFi Password Genius For Office Office Password Genius Word Password Genius Excel Password Genius PowerPoint Password Genius Access Password Genius Outlook Password Genius Outlook Email Password Genius PDF Password Genius For Removing Office Password Remover Word Password Remover Excel Password Remover Workbook Unprotect Genius PowerPoint Unprotect Genius Word Unprotect Genius
- More Utilities Data Recovery BitGenius Word Repair Genius Excel Repair Genius PowerPoint Repair Genius Office Repair Genius Photo Data Genius Android Data Genius BitLocker Tools BitLocker Genius for Mac BitLocker Genius for Windows More Tools Product Key Finder SafeUSB Genius ISO Genius All Products
- Support Support Center FAQ & Contact Resource Center How-to Articles Blog Blog, News & Guides
Adding Trusted Site to Group Policy in Windows 10
By Sophia | Last Updated January 03, 2024
In some cases, such as enterprise, have to add trusted site to group policy manually before visiting the website. Today, we'll show you how to solve this issue. Although you are new to use group policy, worry not, this tutorial is easy for you to understand.
Note: Windows 10 Home edition doesn't support group policy.
How to Add Trusted Site to Group Policy Windows 10
Step 1: Press Windows + R key combination to invoke Run dialog. Input gpedit.msc to the box and click on OK .

Step 2: In the left pane, navigate to Computer Configuration > Administrative Templates > Windows Components > Internet Explorer > Internet Control Panel > Security page . Double-click on Site to Zone Assignment List in the right pane.

Step 3: In the Site to Zone Assignment List window, select Enabled then tap on Show button under Options .

Step 4: In the column under Value name , input the website. Then Type 2 in the box next to it.
Tips: Internet Explorer includes four safe zones, respectively, one to four. To add trusted site to group policy, we have to select number 2.
1: Intranet zone
2: Trusted Sites zone
3: Internet zone
4: Restricted Sites zone

Step 5: Go back to Site to Zone Assignment List window, tap on Apply then OK .
Step 6: When you finished the steps above, go to the desktop and check whether added successfully or not. Click on Search box then input Internet Explorer . Hit Enter , it will be opened at once.

Step 7: Click the gear icon in the top-right corner then select Internet options .

Step 8: Click on Security tab, tap on Trusted sites and click on Sites button.

Step 9: In the Trusted sites dialog, you will see the trusted site that added to group policy.

Related Articles :
- Solutions of Screen upside down Windows 10
- Change the Color of Taskbar and Window Border in Windows 10
- 2 Ways to Enable/Disable Fast User Switching Windows 10
- Allow BitLocker without a Compatible TPM Windows 10
- Show Context Menu on Left or Right in Windows 10

iSunshare is dedicated to providing the best service for Windows, Mac, Android users who are in demand for password recovery and data recovery.
Copyright © 2024 iSunshare Studio All Rights Reserved.

a blog by Sander Berkouwer
- The things that are better left unspoken
HOWTO: Add the required Hybrid Identity URLs to the Trusted Sites list of Internet Explorer and Edge

Most Microsoft-based Hybrid Identity implementations use Active Directory Federation Services (AD FS) Servers, Web Application Proxies and Azure AD Connect installations. In this series, labeled Hardening Hybrid Identity , we’re looking at hardening these implementations, using recommended practices.
In this part of the series, we’ll look at the required Hybrid Identity URLs that you want to add to the Trusted Sites list in Internet Explorer.
Note: This is the second part for adding Microsoft Cloud URLs to Internet Explorer’s zone. In this part we look at the Trusted Sites zone. In the previous part we looked at the Local Intranet zone .
Note: Adding URLs to the Trusted Sites zone for Internet Explorer, also applies to Microsoft Edge.
Why look at the Trusted Sites?
Hybrid Identity enables functionality for people using on-premises user accounts, leveraging Azure Active Directory as an additional identity platform. By default, Azure AD is the identity platform for Microsoft Cloud services, like Exchange Online, SharePoint Online and Azure.
By adding the URLs for these services to the Trusted Sites list, we enable a seamless user experience without browser prompts or hick-ups to these services.
Internet Explorer offers built-in zones. Per zone, Internet Explorer is allowed specific functionality. Restricted Sites is the most restricted zone and Internet Explorer deploys the maximum safeguards and fewer secure features (like Windows Integrated Authentication) are enabled.
The Trusted Sites zone, by default, offers a medium level of security.
Possible negative impact (What could go wrong?)
Internet Explorer’s zones are defined with specific default settings to lower the security features for websites added to these zones.
When you use a Group Policy object to add websites that don’t need the functionality of the Trusted Sites zone to the zone, the systems in scope for the Group Policy object are opened up to these websites. This may result in unwanted behavior of the browser such as browser hijacks, identity theft and remote code executions, for example when you mistype the URLs or when DNS is compromised.
While this does not represent a clear and immediate danger, it is a situation to avoid.
Getting ready
The best way to manage Internet Explorer zones is to use Group Policy.
To create a Group Policy object, manage settings for the Group Policy object and link it to an Organizational Unit, Active Directory site and/or Active Directory domain, log into a system with the Group Policy Management Console (GPMC) installed with an account that is either:
- A member of the Domain Admins group, or;
- The current owner of the Group Policy Object, and have the Link GPOs permission on the Organizational Unit(s), Site(s) and/or Domain(s) where the Group Policy Object is to be linked, or;
- Delegated the Edit Settings or Edit settings, delete and modify security permission on the GPO, and have the Link GPOs permission on the Organizational Unit(s), Site(s) and/or Domain(s) where the Group Policy Object is to be linked.
The URLs to add
You’ll want to add the following URLs to the Trusted Sites zone, depending on the way you’ve setup your Hybrid Identity implementation:
*.microsoft.com
*.microsoftonline.com, *.windows.net, ajax.aspnetcdn.com, microsoft.com, microsoftline.com, microsoftonline-p.net, onmicrosoft.com.
The above URLs are used in Hybrid Identity environments. While they overlap with some of the URLs for the Local Intranet Zone, these URLs allow side services to work properly, too.
*.msappproxy.net
Web applications that you integrate with Azure Active Directory through the Azure AD Application Proxy are published using https://*.msappproxy.net URLs. Add the above wildcard URL to the Trusted Sites list, when you’ve deployed or are planning to deploy Azure AD App Proxy. If you use vanity names for Azure AD App Proxied applications, add these to the Trusted Sites list, as well.
Other Office 365 services
Most Hybrid Identity implementations are used to allow access to Office 365 only. Last year, 65% of Hybrid Identity implementations are used to unlock access to one or more Office 365 services, like Exchange Online, SharePoint Online, OneDrive for Business and Teams, only. This blogpost focuses on the Hybrid Identity URLs, but you might want to add more Office 365 URLs and IP address ranges to the Trusted Sites list as you deploy, roll out and use Office 365 services. You can use this (mostly outdated) Windows PowerShell script to perform that action , if you need.
How to add the URLs to the Trusted Sites zone
To add the URLs to the Trusted Sites zone, perform these steps:
- Log into a system with the Group Policy Management Console (GPMC) installed.
- Open the Group Policy Management Console ( gpmc.msc )
- In the left pane, navigate to the Group Policy objects node.
- Locate the Group Policy Object that you want to use and select it, or right-click the Group Policy Objects node and select New from the menu.
- Right-click the Group Policy object and select Edit… from the menu. The Group Policy Management Editor window appears.
- In the main pane of the Group Policy Management Editor window, expand the Computer Configuration node, then Policies , Administrative Templates , Windows Components , Internet Explorer , Internet Control Panel and then the Security Page node.
![SiteToZoneAssignmentListSettingGPO_thumb[3]](https://dirteam.com/sander/wp-content/uploads/sites/2/2019/10/SiteToZoneAssignmentListSettingGPO_thumb3_thumb.jpg "SiteToZoneAssignmentListSettingGPO_thumb[3]")
- In the main pane, double-click the Sites to Zone Assignment List setting.
- Enable the Group Policy setting by selecting the Enabled option in the top pane.
- Click the Show… button in the left pane. The Show Contents window appears.
- Add the above URLs to the Trusted Sites zone by entering the URL in the Value name column and the number 2 in the Value column for each of the URLs.
- Click OK when done.
- Close the Group Policy Editor window.
- In the left navigation pane of the Group Policy Management Console, navigate to the Organization Unit (OU) where you want to link the Group Policy object.
- Right-click the OU and select Link an existing GPO… from the menu.
- In the Select GPO window, select the GPO.
- Click OK to link the GPO.
Repeat the last three steps to link the GPO to all OUs that require it. Take Block Inheritance into account for OUs by linking the GPO specifically to include all people in scope.
To enable functionality in a Hybrid Identity implementation, we need to open up the web browser to allow functionality for specific web addresses. By enabling the right URLs we minimize our efforts in enabling the functionality and also minimize the negative effect on browser security.
There is no need to add all the URLs to specific Internet Explorer zones, when you don’t need to functionality. However, do not forget to add the specific URLs when you enable specific functionality like the Azure AD Application Proxy and remove specific URLs when you move away from specific functionality.
Further reading
Office 365 URLs and IP address ranges Group Policy – Internet Explorer Security Zones Add Site to Local Intranet Zone Group Policy
Posted on October 17, 2019 by Sander Berkouwer in Active Directory , Entra ID , Security
2 Responses to HOWTO: Add the required Hybrid Identity URLs to the Trusted Sites list of Internet Explorer and Edge
Great Post! Thank you so much for teaching us on how to add hybrid identity urls to the trusted list of sites on browsers like internet explorer and Microsoft edge.
I want to block all websites on edge and only give access to 2 sites but using group policy can someone help on this?
leave your comment cancel
This site uses Akismet to reduce spam. Learn how your comment data is processed .
Advertisement

Search this site
Dirteam.com / activedir.org blogs.
- Strategy and Stuff
- Dave Stork's IMHO
- The way I did it
- Sergio's Shack
- Things I do
- Tomek's DS World
Microsoft MVP (2009-2024)
Veeam vanguard (2016-2024), vmware vexpert (2019-2022).

Xcitium Security MVP (2023)

Recent Posts
- Pictures of the Dutch Workplace Ninja's meetup at Pink Elephant
- I'm presenting at the Veeam User Group Netherlands meetup
- On-premises Identity-related updates and fixes for February 2024
- What's New in Entra ID for February 2024
- I'm a 2024 Veeam Vanguard
Recent Comments
- Andy on Ten things you need to be aware of before using the Protected Users Group
- Cédric on Ten things you need to be aware of before using the Protected Users Group
- Sander Berkouwer on Ten things you should know about Azure AD Connect and Azure AD Sync
- Thanny Lopez on Ten things you should know about Azure AD Connect and Azure AD Sync
- Bill on TODO: Move from the ‘Allow users to remember multi-factor authentication on devices they trust’ option to Conditional Access
The information on this website is provided for informational purposes only and the authors make no warranties, either express or implied. Information in these documents, including URL and other Internet Web site references, is subject to change without notice. The entire risk of the use or the results from the use of this document remains with the user. Active Directory, Microsoft, MS-DOS, Windows, Windows NT, and Windows Server are either registered trademarks or trademarks of Microsoft Corporation in the United States and/or other countries. All other trademarks are property of their respective owners.

Windows security encyclopedia
#microsoft #windows #security
Search form
Site to zone assignment list.
This policy setting allows you to manage a list of sites that you want to associate with a particular security zone. These zone numbers have associated security settings that apply to all of the sites in the zone.Internet Explorer has 4 security zones numbered 1-4 and these are used by this policy setting to associate sites to zones. They are: (1) Intranet zone (2) Trusted Sites zone (3) Internet zone and (4) Restricted Sites zone. Security settings can be set for each of these zones through other policy settings and their default settings are: Trusted Sites zone (Low template) Intranet zone (Medium-Low template) Internet zone (Medium template) and Restricted Sites zone (High template). (The Local Machine zone and its locked down equivalent have special security settings that protect your local computer.)If you enable this policy setting you can enter a list of sites and their related zone numbers. The association of a site with a zone will ensure that the security settings for the specified zone are applied to the site. For each entry that you add to the list enter the following information:Valuename – A host for an intranet site or a fully qualified domain name for other sites. The valuename may also include a specific protocol. For example if you enter http://www.contoso.com as the valuename other protocols are not affected. If you enter just www.contoso.com then all protocols are affected for that site including http https ftp and so on. The site may also be expressed as an IP address (e.g. 127.0.0.1) or range (e.g. 127.0.0.1-10). To avoid creating conflicting policies do not include additional characters after the domain such as trailing slashes or URL path. For example policy settings for www.contoso.com and www.contoso.com/mail would be treated as the same policy setting by Internet Explorer and would therefore be in conflict.Value - A number indicating the zone with which this site should be associated for security settings. The Internet Explorer zones described above are 1-4.If you disable or do not configure this policy users may choose their own site-to-zone assignments.
Policy path:
Scope: , supported on: , registry settings: , filename: , related content.
- ManageEngine Products
Securing zone levels in Internet Explorer
Managing and configuring Internet Explorer can be complicated. This is especially true when users meddle with the numerous settings it houses. Users may even unknowingly enable the execution of malicious codes. This highlights the importance of securing Internet Explorer.
In this blog, we’ll talk about restricting users from changing security settings, setting trusted sites, preventing them from changing security zone policies, adding or deleting sites from security zones, and removing the Security tab altogether to ensure that users have a secure environment when using their browser.
Restricting users from changing security settings
A security zone is a list of websites at the same security level. These zones can be thought of as invisible boundaries that prevent certain web-based applications from performing unauthorized actions. These zones easily provide the appropriate level of security for the various types of web content that users are likely to encounter. Usually, sites are added or removed from a zone depending on the functionality available to users on that particular site.
To set trusted sites via GPO
- Open the Group Policy Management Editor .
- Go to User Configuration > Policies > Administrative Templates > Windows Components > Internet Explorer > Internet Control Panel > Security Page .
- Select the Site to Zone Assignment List .
- Select Enabled and click Show to edit the list. Refer to Figure 1 below. The zone values are as follows: 1 — intranet, 2 — trusted sites, 3 — internet zone, 4 — restricted sites.
- Click Apply and OK .
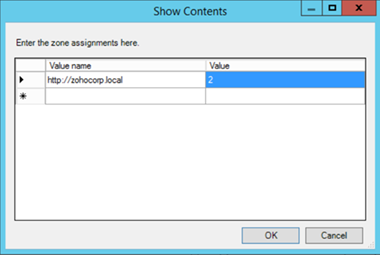
Figure 1. Assigning sites to the Trusted Sites zone.
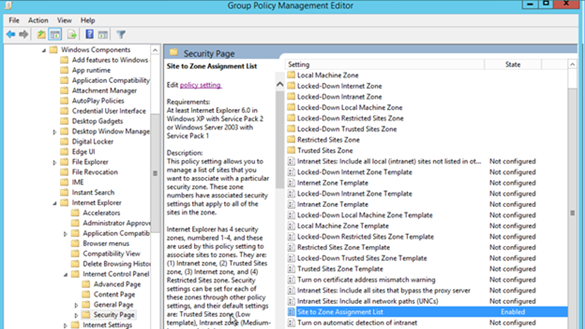
Figure 2. Enabling the Site to Zone Assignment List policy.
By enabling this policy setting, you can manage a list of sites that you want to associate with a particular security zone. See Figure 2.
Restricting users from changing security zone policies
- Go to Computer Configuration > Administrative Templates > Windows Components > Internet Explorer .
- Double-click Security Zones: Do not allow users to change policies .
- Select Enabled .
This prevents users from changing the security zone settings set by the administrator. Once enabled, this policy disables the Custom Level button and the security-level slider on the Security tab in the Internet Options dialog box. See Figure 3.
Restricting users from adding/deleting sites from security zones
- Double-click Security Zones: Do not allow users to add/delete sites .
This disables the site management settings for security zones, and prevents users from changing site management settings for security zones established by the administrator. Users won’t be able to add or remove websites from the Trusted Sites and Restricted Sites zones or alter settings for the Local Intranet zone. See Figure 3.
Figure 3. Enabling Security Zones: Do not allow users to change policies and Security Zones: Do not allow users to add/delete sites .
Removing the Security tab
The Security tab in Internet Explorer’s options controls access to websites by applying security settings to various download and browsing options, including defining security levels for respective security zones. By removing this tab, users will no longer be able to see or change the settings established by the administrator.
- Go to User Configuration > Policies > Administrative Templates > Windows Components > Internet Explorer > Internet Control Panel .
- Double-click Disable the Security page .
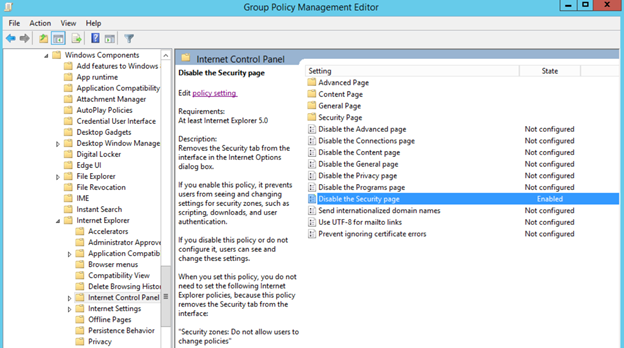
Figure 4. Enabling the Disable the Security page policy. Enabling this policy prevents users from seeing and changing settings for security zones such as scripting, downloads, and user authentication. See Figure 4.
There’s no denying the importance of securing Internet Explorer for any enterprise. By setting security levels, restricting users from changing security zone policies, preventing them from adding or deleting sites from security zones, and removing the Security tab, users will not be able to change any security settings in Microsoft Internet Explorer that have been established by the administrator. This helps you gain more control over Internet Explorer’s settings in your environment.
Derek Melber
Cancel reply.

Is there a way to enable Site to Zone assignment list and still let the user enter their own sites to the trusted list?
Hi Joe. You need to disable the below setting to achieve the requirement.

Note: Even if the policy is not configured, users can add their own sites. Only when the policy is enabled, users can’t add their own sites to trusted sites.

Thanks a lot.
Related Posts
Backup basics: ensuring data security in an uncertain world.
RecoveryManager Plus 2 min read Read

MEM – Deploying Trusted Sites
In this post, we will demonstrate how to deploy IE trusted sites via Microsoft Endpoint Manager (aka Intune), we will demonstrate two methods, one for complete control which will lock down the trusted sites location within Internet Settings and the other to maintain user choice, by simply adding an additional trusted sites to end users existing configuration.
- Force standard list of trusted sites and prevent end users from editing (Full Control)
- Add additional trusted sites to existing setup and allow end users to edit (One-time entry)
Full Control Method
As mentioned above, this the full control method is so administrators can control which sites are to be added to the trusted sites list, end users will not be able to add, edit or delete the entries, to get started, log into the MEM portal with your administrative account and browse to Devices , then Configuration Profiles and select Create Profile :
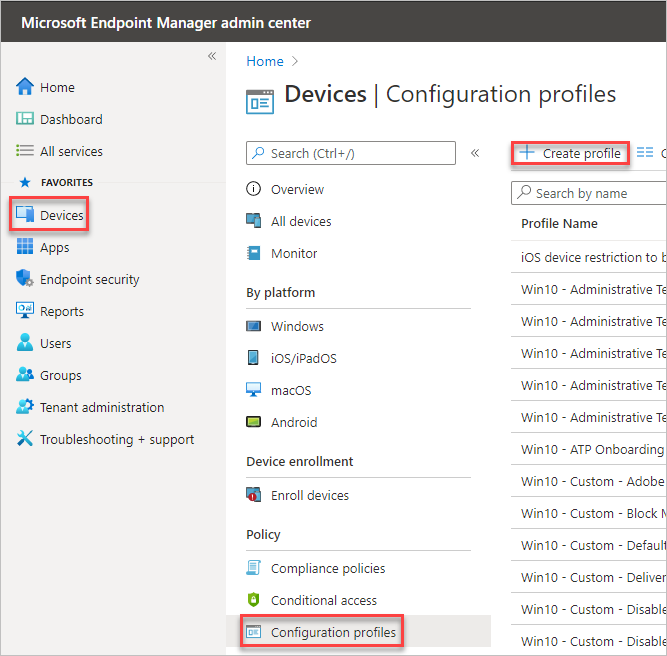
Select the platform to Windows 10 and later and profile to Administrative Templates :
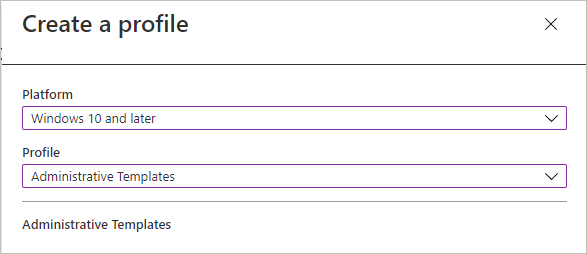
Name and create the profile description :
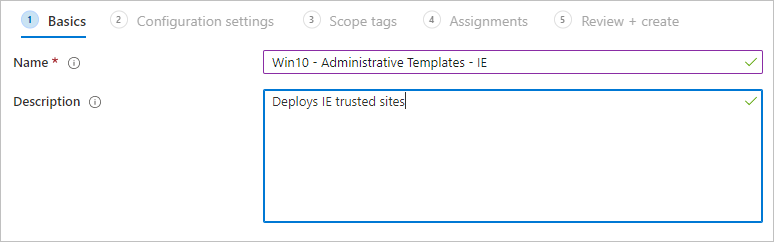
In the next section, decide if this is going to be a Computer or User settings, in my case, I’m going to chose computer, browse to Computer Configuration, then Windows Components , Internet Explorer , Internet Control Panel and finally Security Page . From here select the Site to Zone Assignment List setting:
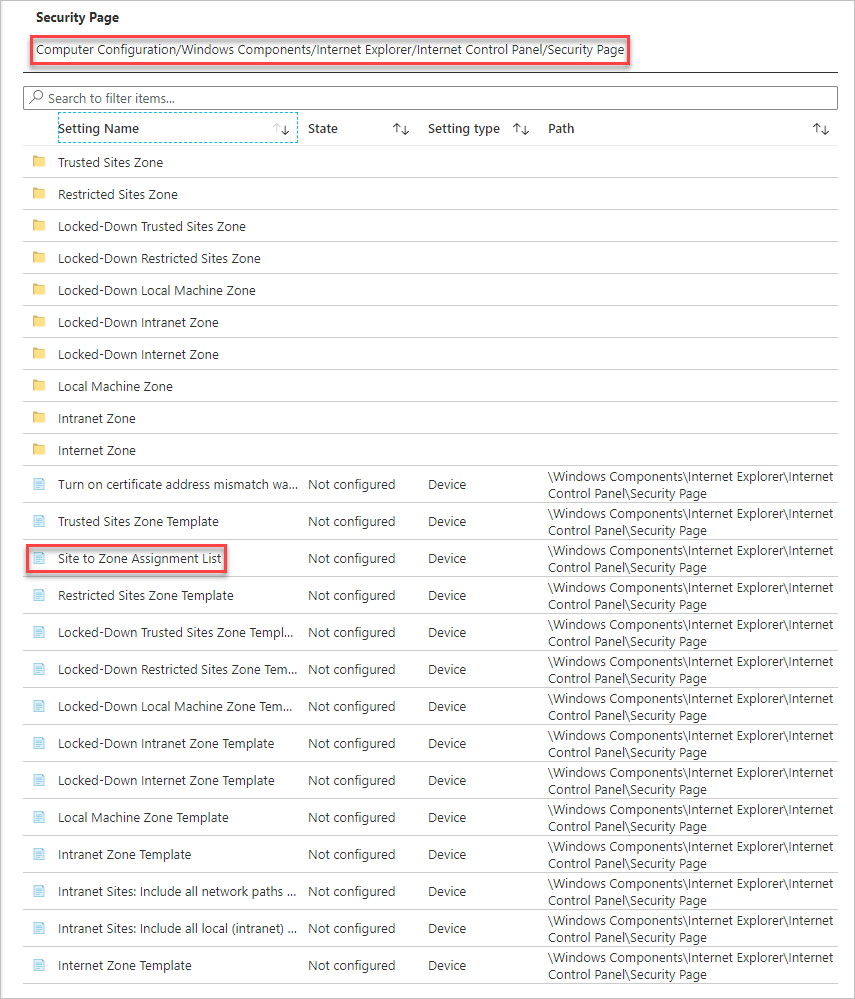
Within the setting, select Enabled and enter in the domains that you wish to add to the zone, in my case, I am going to add in https://letsconfigmgr.com/ and select a value of 2 :
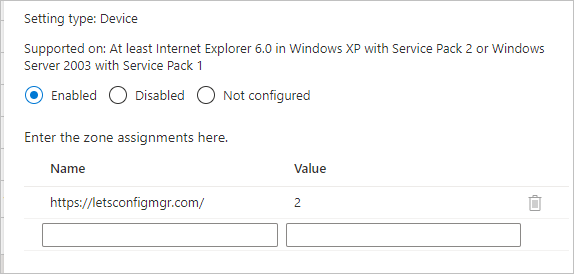
The available values are as follows:
- 1 = Intranet
- 2 = Trusted Sites
- 3 = Internet Zone
- 4 = Restricted Sites
Deploy the configuration profile to a test computer group and verify the results on the device, by going to Control Panel, Internet Settings , Security , Trusted Sites and confirm that the desired sites are listed, note that you cannot add \ edit \ remove configurations:
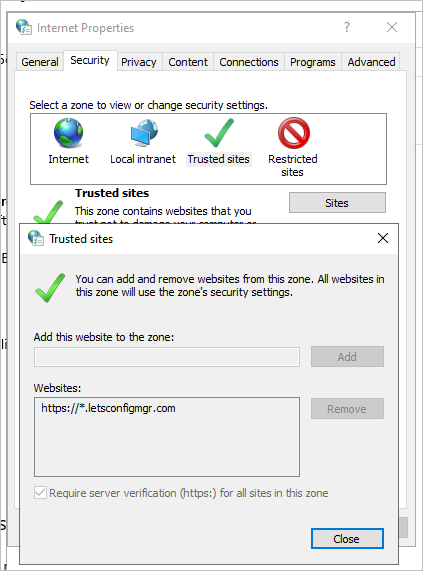
One-Time Entry Method
Some administrators may want to allow end users to control the trusted sites list, a great way to allow this via MEM and still add entries is to deploy a PowerShell script, to do this within the MEM portal , go to Devices, Scripts and select Add :
Select Windows 10 , name and set a description:
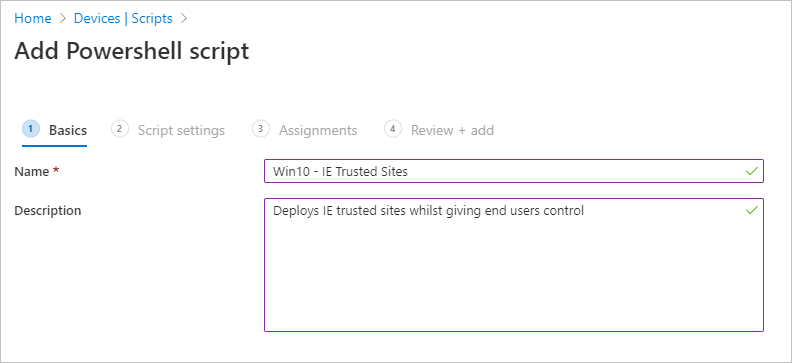
Copy the below code and save as a .ps1 file, edit lines 1, 5 and 7 to the domain that you wish to add to zones, for an example, I have added letsconfigmgr.com, note the value of 2 on the 7th line, which reflects adding the site to the trusted sites zone, the options are:
Within script settings, upload your script and select Run this script using the logged on credentials :
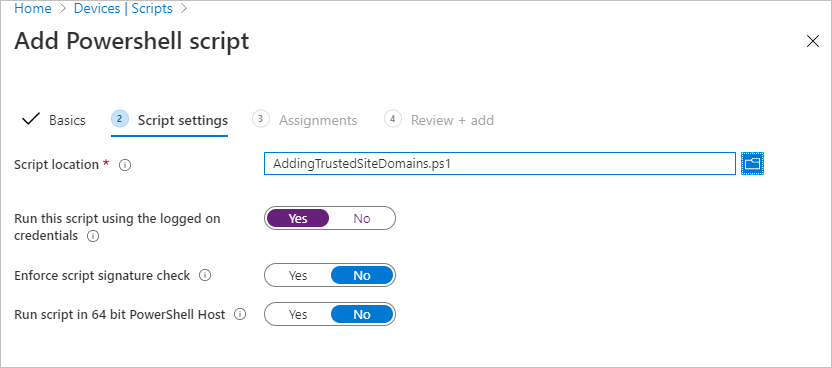
Once completed, assign the script to your test device and verify the results, by going to Control Panel, Internet Settings , Security , Trusted Sites and confirm that the desired sites are listed, note that you can add \ edit \ remove configurations:

A quick note on PowerShell scripts, once the scripts have run successfully, they won’t execute again, so be aware of this if an end-user removes an entry, the only way to execute the script again, if successful previously, is to edit the existing script and re-upload or create a new script with the same contents and redeploy.
Additionally, if you’re also using security baselines within MEM, I have discovered that the Windows 10 MDM baseline for May 2019 will block the ability for end-users to add \ edit \ remove \ view trusted sites with the default settings applied, if you wish for this ability then the following settings need to be edited within the baseline to allow this:
- Internet Explorer security zones use only machine settings = Disabled
- Internet Explorer users adding sites = Enabled
- Internet Explorer users changing policies = Enabled
Be sure to check the above settings with your security team to ensure that there are no security concerns before making changes to the security baselines and ensure that all settings have been tested fully prior to rolling out to production clients.
- Deploying Adobe Reader DC via ConfigMgr and Intune.
- MEM – Removing MS Teams Desktop Shortcuts
You May Also Like
Using Filters to selectively target Intune Apps and Configs

Enrolment Notifications via Microsoft Intune

Deploy Firefox Bookmarks using MSIntune

Remove Chat from Taskbar on Windows 11 using Intune.
Stack Exchange Network
Stack Exchange network consists of 183 Q&A communities including Stack Overflow , the largest, most trusted online community for developers to learn, share their knowledge, and build their careers.
Q&A for work
Connect and share knowledge within a single location that is structured and easy to search.
IE11: How to check into which zone a URL falls?
I have applied several internet explorer settings via group policy. Especially a long list of URLs in the "site to zone assignment" setting. However it seems that one URL still falls into the "internet zone" even when assigned to the "trusted zone".
In earlier versions of internet explorer one could easily determine from the status bar into which zone an URL falls. How can this be done via IE11? Am I overlooking something obvious?
- group-policy
- internet-explorer
- I also agree with Matze. Even though, Microsoft provide the information in File-Properties. but it not easy to debug. If possible I would like to ask Microsoft return this feature back or give some option to selectable. – user255256 Nov 22, 2014 at 11:13
3 Answers 3
In the menu bar, if you go to File->Properties. The properties dialog shows the zone for that page.
- Just found it out by myself. Thanks for replying. support.microsoft.com/kb/2689449 – Matthias Güntert Jul 16, 2014 at 9:13
- 3 Press Alt + F + R key – Ivan Chau Jan 16, 2017 at 1:48
- 2 You can also right-click and go to properties. – davidtbernal Jul 12, 2018 at 21:32
This Microsoft created software will allow you to enter a URL and display not only the zone that falls into (including the local computer zone - there are actually four IE zones) but it will show the specific IE settings that would be applied. It's a great tool for diagnosing policy issues:
https://blogs.technet.microsoft.com/fdcc/2011/09/22/iezoneanalyzer-v3-5-with-zone-map-viewer/
You can check the zone via powershell:
Documentation for System.Security.Policy.Zone.CreateFromUrl: https://docs.microsoft.com/en-us/dotnet/api/system.security.policy.zone.createfromurl
You must log in to answer this question.
Not the answer you're looking for browse other questions tagged group-policy internet-explorer ..
- The Overflow Blog
- How Stack Overflow is partnering with Google to encourage socially...
- Your whole repo fits in the context window
- Featured on Meta
- Our partnership with Google and commitment to socially responsible AI
- Shifting the data dump schedule: A proposal
Hot Network Questions
- Can third parties object to false assertions made in a book about dead persons?
- Can the Avatar of Death be circumvented if the player dies without his intervention?
- The sensory problem of panpsychism
- Export trained model offline to be used by an application
- Does every single ground wire in a box have to connect to every other ground wire within the confines of that same box on one branch circuit?
- Water pressure at the bottom of a box changes drastically depending on whether a water column above is connected or not?
- PTIJ: Are we allowed to eat talking animals?
- Original proof of Hilbert Irreducibility Theorem
- Argument of a complex number (Cops)
- Is it possible to see what of my content received awards?
- Why was the National Popular Vote Interstate Compact written not to take effect until it has an absolute majority of electoral votes?
- Is it possible to know which lines in the Gameboy Color cartridge connection is missing by looking at the glitched Nintendo logo?
- Verb "sehen" to use with possessive adjective
- Are galaxies growing, shrinking or stable?
- Online short story or novella about an astronaut returning to earth and finding only immortal children
- Do statements always have the same truth value, and that truth value is just revealed, or can they have different truth values at different times?
- Copying keyframes to complete walk cycle
- Using IF statement in Field Calculator to write values into new field based on another field
- Generic multithreading solution for improving the performance of slow tasks
- What is the difference between "pretty" and "handsome" in this context?
- How did Lightning not realise that he was going in the wrong direction?
- Labour-Intensive staple crop
- When can legions of knights on an infinite chessboard checkmate a lone king?
- Basins of attraction using Newton-Raphson method for nonlinear system
This browser is no longer supported.
Upgrade to Microsoft Edge to take advantage of the latest features, security updates, and technical support.
Troubleshoot "Internet Explorer Zonemapping" failures when processing Group Policy
- 3 contributors
When you execute GPUpdate /force , you may see the following output:
When you run GPRESULT /H GPReport.html and examine the report, you see the following information under Component Status :
The System event log contains an event ID 1085 that indicates a Group Policy processing error related to "Internet Explorer ZoneMapping," like the following one:
This event can occur if you enter an invalid entry within the Site To Zone Assignment List policy in the following paths:
Computer Configuration\Administrative Templates\Windows Components\Internet Explorer\Internet Control Panel\Security Page
User Configuration\Administrative Templates\Windows Components\Internet Explorer\Internet Control Panel\Security Page
The "Site To Zone Assignment List" policy
The format of the Site To Zone Assignment List policy is described within the policy. This policy setting allows you to manage a list of sites that you want to associate with a particular security zone. These zone numbers have associated security settings that apply to all sites in the zone.
Internet Explorer has four security zones, which are used by this policy setting to associate sites with zones. They're numbered 1 to 4 and defined in descending order of most to least trusted:
- Local Intranet zone
- Trusted Sites zone
- Internet zone
- Restricted Sites zone
The security settings can be set for each of these zones through other policy settings, and their default settings are:
- Trusted Sites zone (Low template)
- Intranet zone (Medium-Low template)
- Internet zone (Medium template)
- Restricted Sites zone (High template)
The Local Machine zone and its locked-down equivalent have special security settings that protect your local computer.
If you enable this policy setting, you can enter a list of sites and their related zone numbers. The association of a site with a zone ensures that the security settings for the specified zone are applied to that site. For each entry that you add to the list, enter the following information:
Valuename : It's used to specify a host for an intranet site, or a fully qualified domain name for other sites. The valuename may also include a specific protocol. For example, if you enter https://www.contoso.com as the valuename , other protocols aren't affected. If you just enter www.contoso.com , all protocols for that site are affected, including http, https, ftp, and so on. The site may also be expressed as an IP address (such as 127.0.0.1) or a range (such as 127.0.0.1-10). To avoid creating conflicting policies, don't include other characters after the domain, such as a trailing slash or URL path. For example, the policy settings for www.contoso.com and www.contoso.com/mail would be treated as the same policy setting by Internet Explorer, and therefore, conflict.
Value : It's the number of the zone you want to associate the site with security settings. The Value of the above Internet Explorer zones is 1 to 4 .
When you enter data in the Group Policy Editor, there's no syntax or logical error checking available. This error checking is performed on the client when the Internet Explorer Zonemapping Group Policy Extension converts the registry into the format used by Internet Explorer. During that conversion, the same methods are implemented when you manually add a site to a specific security zone. If an entry is rejected when you add it manually, the conversion also fails if the Group Policy is used and the event 1085 is issued. For example, when you try to add a wildcard entry to a top-level domain (TLD) (like *.com or *.co.uk ) while adding a site, the wildcard entry is rejected. Now, the question is, which entries are treated as TLDs; by default, the following schemes are treated as TLDs in Internet Explorer:
- Flat domains (such as .com ).
- Two-letter domains in a two-letter TLD (such as .co.uk ).
The following blog post includes a granular explanation of domains:
Understanding Domain Names in Internet Explorer
To identify incorrect entries in the policy, download and run the IEDigest tool. After creating a report and opening it in your web browser, you'll see a Warnings section where incorrect entries are named. These entries need to be removed (or corrected) in the Group Policy. Here's an example of how it looks like when trying to add *.com to a zone:
Warnings Description Key Name Value Invalid entry in Site to Zone Assignment List. Click here for more info HKCU\Software\Policies\Microsoft\Windows\CurrentVersion\Internet Settings\ZoneMapKey *.com is invalid
More information
- Intranet site is identified as an Internet site when you use an FQDN or an IP address
- Security Zones in Microsoft Edge
Third-party contact disclaimer
Microsoft provides third-party contact information to help you find additional information about this topic. This contact information may change without notice. Microsoft does not guarantee the accuracy of third-party contact information.
Was this page helpful?
Coming soon: Throughout 2024 we will be phasing out GitHub Issues as the feedback mechanism for content and replacing it with a new feedback system. For more information see: https://aka.ms/ContentUserFeedback .
Submit and view feedback for
Additional resources
Stack Exchange Network
Stack Exchange network consists of 183 Q&A communities including Stack Overflow , the largest, most trusted online community for developers to learn, share their knowledge, and build their careers.
Q&A for work
Connect and share knowledge within a single location that is structured and easy to search.
How to view all IE Trusted Sites when security settings are managed?
If the Security Zones for Internet Explorer are managed by my system administrator, the list of Trusted Sites is disabled and I cannot scroll through the list. Is there a way I can view the full list of Trusted Sites?

- internet-explorer
- security-policy
11 Answers 11
In the registry , perform a search for a URL that is known to be trusted. This should get you to the relevant key where you can see all of the others.
On my Windows 7 installation, the path appears to be HKEY_CURRENT_USER\Software\Policies\Microsoft\Windows\CurrentVersion\Internet Settings\ZoneMapKey , which is slightly different from this answer .
The key should contain several string values with a name indicating the URL and numeric data indicating the zone, one of the following by default.
- 0 = My Computer
- 1 = Local Intranet Zone
- 2 = Trusted sites Zone
- 3 = Internet Zone
- 4 = Restricted Sites Zone
- 8 Mine are all under HKEY_LOCAL_MACHINE – Richard Collette Sep 26, 2014 at 18:03
Depends upon your firm whether the list is under HKLM or HKCU. Here's a quick Powershell command to get the list
- 3 +1: This is the only solution which worked for me! Thanks! – Kidburla Mar 18, 2015 at 15:41
- 3 Remove the ".property" on the end of each line to see which zone the site is configured for: 1 = Local Intranet, 2 = Trusted Sites, 3 = Restricted Sites – BateTech Jul 10, 2019 at 12:25
From powershell:
- 1 Can you explain this answer/flesh it out a bit more for those who don't know PS as well? – studiohack Feb 10, 2015 at 16:13
- Start -> type gpedit.msc -> hit Enter
- navigate to Computer Configuration -> Administrative Templates -> Windows Components -> Internet Explorer -> Internet Control Panel -> Security Page
- in the right-hand panel, double-click on the Site to Zone Assignment List option, then click Show...
- trusted sites are the ones with 2 in the Value column (1 = Intranet, 3 = Internet, 4 = Restricted)
If that doesn't work (that option is set to "Not Configured" or the list is empty), try the same, except instead of Computer Configuration, start with User Configuration.
- 3 Both of these settings are "Not Configured" and the lists are empty. – JustinStolle Apr 18, 2012 at 22:33
- "You do not have permission to perform this action" - gpedit also locked down – LJT Apr 13, 2016 at 0:10
I came up with the following solution, I hope others will find it useful as well.
I have limited rights, only local, not enough to open and view GPEDIT on AD level.
So, what I did, and works, is to open a command prompt (as Admin) and run the command:
C:\WINDOWS\system32>GPResult /V /SCOPE Computer /H c:\temp\stuff.txt
Then perform a search e.g. for the "ZoneMapKey"
C:\WINDOWS\system32>find "ZoneMapKey" c:\temp\stuff.txt >> c:\temp\sites.txt
Keep in mind there are other keys that might require your attention, like the "approvedactivexinstalsites"...
You will have an output like:
KeyName: Software\Policies\Microsoft\Windows\CurrentVersion\Internet Settings\ZoneMapKey\https://www.wesayso.com
Clean it up (I use Excel, use the \ as seperator and be done with it) and you will have a great list.
- 4 I tried this but got an error "ERROR: Invalid Syntax. Options /U, /P, /R, /V, /Z cannot be specified along with /X, /H." – Kidburla Mar 18, 2015 at 15:39
- C:\WINDOWS\system32>GPResult /V /SCOPE COMPUTER >> c:\temp\stuff.txt generate the file for me. "COMPUTER" in caps per the help file. Use >> to write to file instead of /H – MrChrister Feb 4, 2019 at 22:58
This one works on my Windows 7 machine. It was set by my company's domain controller.
Here is an enhanced version of the script that translates the zone type number in the registry to its name as seen in the IE explorer settings dialog box.
Above we see how to gather the registry value names in a registry key and then get the data of each of those values. As each enter separates the value name and the value data with a comma, it could be further enhanced to output to a file with the csv extension and then opened in Excel. Many more possibilities if you want an actual report. But if just need to know what is the site list this will show most of them.
on windows 10 The URL are saved in Computer\HKEY_LOCAL_MACHINE\SOFTWARE\Policies\Microsoft\Windows\CurrentVersion\Internet Settings\ZoneMapKey
to get the values you can brows to the above key or via PowerShell
My key was located here (in HKEY_LOCAL_MACHINE, not HKEY_CURRENT_USER)
I could right-click "ZoneMapKey" and choose "Export"
This .reg file can be opened in Notepad to view (and search) the text contents.
This PowerShell script provides a list from both registry keys if they are populated and uses the out-gridview cmdlet to provide a search capability using the out-gridview filter field.
Stick this in Powershell for a list of the trusted sites:
1 = Intranet zone – sites on your local network. 2 = Trusted Sites zone – sites that have been added to your trusted sites. 3 = Internet zone – sites that are on the Internet. 4 = Restricted Sites zone – sites that have been specifically added to your restricted sites.
Answer taken from: https://blogs.sulross.edu/gfreidline/2017/06/20/show-ie-trusted-sites-from-powershell/
You must log in to answer this question.
Not the answer you're looking for browse other questions tagged internet-explorer security-policy managed ..
- The Overflow Blog
- How Stack Overflow is partnering with Google to encourage socially...
- Your whole repo fits in the context window
- Featured on Meta
- Our partnership with Google and commitment to socially responsible AI
- Shifting the data dump schedule: A proposal
Hot Network Questions
- Control scheme for a dragon
- Argument of a complex number (Robbers)
- How is this circuit generating a voltage seemingly from nothing?
- What is the formula for the matrix representation of a general controlled gate?
- Two remote full time jobs? -- What should I do?
- Online short story or novella about an astronaut returning to earth and finding only immortal children
- Copying keyframes to complete walk cycle
- I want to realize a bridge zigzag rope with geometry nodes
- How is data generated when using an improper prior
- What goes wrong with the Brauer construction for a module over a complete DVR?
- Do initial email exchanges between an attorney and potential client constitute "client-attorney relationship"?
- Can ferrite beads turn high frequency noise into heat?
- Do Vampires have to make an attack roll in order to bite a willing target?
- Are galaxies growing, shrinking or stable?
- US citizen driving his car with a Mexican license
- Which expression is larger?
- Ice-cream chords- where does the name come from?
- Why was the National Popular Vote Interstate Compact written not to take effect until it has an absolute majority of electoral votes?
- Whether the pure implicational fragment of intuitionistic propositional logic is a finitely-many valued logic
- How to set the indent of the first line to 2 times width of current font (character)?
- PTIJ: Biden and the towel
- Is there a "quick and dirty" method to approximate how many calories should be added to a dish from oils used in cooking?
- What is the doctor saying in this sentence? Neither subtitles nor my ear can get it correct :(
- Can stonebows fire alchemical sling bullets and alchemist's bullets?
IMAGES
VIDEO
COMMENTS
Site to Zone Assignment List. This policy setting allows you to manage a list of sites that you want to associate with a particular security zone. These zone numbers have associated security settings that apply to all of the sites in the zone. Internet Explorer has 4 security zones, numbered 1-4, and these are used by this policy setting to ...
To set trusted sites via GPO -Open the Group Policy Management Editor. -Go to User Configuration > Policies > Administrative Templates > Windows Components > Internet Explorer > Internet Control Panel > Security Page. -Select the Site to Zone Assignment List. -Select Enabled and click Show to edit the list.
Open Group Policy Management Console. Navigate to the desired GPO or create a new one. Expand User Configuration or Computer Configuration and go to Preferences -> Windows Settings -> Registry. Right-click and select New -> Registry Item. Configure the Registry Item to delete the specified entries under the ZoneMap registry key.
Users can use the Internet Control Panel to assign specific sites to Zones and to configure the permission results for each zone. In managed environments, administrators can use Group Policy to assign specific sites to Zones (via "Site to Zone Assignment List" policy) and specify the settings for URLActions on a per-zone basis.
Policies Administrative Templates Windows Components Internet Explorer Internet Control Panel Security Page Site to Zone Assignment List Here, I've added host1.mydomain.org and host2.mydomain.org to zone 1 (intranet), and the network shares from these hosts are correctly treated as trusted intranet sites.
Sites in the Local intranet zone may launch applications and unsafe files; Sites in the Local intranet zone may navigate windows and frames across different domains; ... In the main pane, double-click the Sites to Zone Assignment List setting. Enable the Group Policy setting by selecting the Enabled option in the top pane. Click the Show ...
Value = 1 (Intranet zone) Intranet Zone. Show security warning for potentially unsafe files > Enabled > Enable. If you enable this policy setting and set the drop-down box to Enable, these files open without a security warning. If you set the drop-down box to Prompt, a security warning appears before the files open. Share.
To acheive this, an Intune configuration profile Trusted site zone assignment can be deployed to devices/users group as required. Login to Intune Portal and navigate to: Devices > Windows > Configuration Profiles. Hit the Create button and Select New policy. From the Create a profile menu, select Windows 10 and later for Platform , Templates ...
In the right-hand pane, double-click "Site to Zone Assignment List". Enable the policy and click the "Show…" button next to "Enter the zone assignments here." This will pop up the "Show Contents" window. Click the "Add…" button. This will pop up the "Add Item" window.
On the right hand side, right click the policy setting Site to Zone Assignment List and click Edit. Click Enabled first and then under the Options click Show. You need to enter the zone assignments. As stated earlier in this post Internet Explorer has 4 security zones and the zone numbers have associated security settings that apply to all of ...
Double-click on Site to Zone Assignment List in the right pane. Step 3: In the Site to Zone Assignment List window, select Enabled then tap on Show button under Options. Step 4: In the column under Value name, input the website. Then Type 2 in the box next to it. Tips: Internet Explorer includes four safe zones, respectively, one to four. To ...
In this part of the series, we'll look at the required Hybrid Identity URLs that you want to add to the Trusted Sites list in Internet Explorer. Note: This is the second part for adding Microsoft Cloud URLs to Internet Explorer's zone. In this part we look at the Trusted Sites zone. In the previous part we looked at the Local Intranet zone ...
There is a GPO which gathers information about all PCes, this GPO also sets the following in the "Site to Zone Assignment List, Local Intranet":-Both domaincontrollers-The fileserver. ... Adding the file server to the Local Intranet zone makes it easier for users to run active content (like macros) from shared folders and this can be really ...
Site to Zone Assignment List. This policy setting allows you to manage a list of sites that you want to associate with a particular security zone. These zone numbers have associated security settings that apply to all of the sites in the zone.Internet Explorer has 4 security zones numbered 1-4 and these are used by this policy setting to ...
Select the Site to Zone Assignment List. Select Enabled and click Show to edit the list. Refer to Figure 1 below. The zone values are as follows: 1 — intranet, 2 — trusted sites, 3 — internet zone, 4 — restricted sites. Click OK. Click Apply and OK. Figure 1. Assigning sites to the Trusted Sites zone. Figure 2.
By default, these files are blocked in the Restricted zone, enabled in the Intranet and Local Computer zones, and set to prompt in the Internet and Trusted zones. Description framework properties. Add, Delete, Get, Replace. This is an ADMX-backed policy and requires SyncML format for configuration.
Copy the below code and save as a .ps1 file, edit lines 1, 5 and 7 to the domain that you wish to add to zones, for an example, I have added letsconfigmgr.com, note the value of 2 on the 7th line, which reflects adding the site to the trusted sites zone, the options are: 1 = Intranet; 2 = Trusted Sites; 3 = Internet Zone; 4 = Restricted Sites
Especially a long list of URLs in the "site to zone assignment" setting. However it seems that one URL still falls into the "internet zone" even when assigned to the "trusted zone". In earlier versions of internet explorer one could easily determine from the status bar into which zone an URL falls.
Go to User Configuration > Policies > Administrative Templates > Windows Components > Internet Explorer > Internet Control Panel > Security Page. Select the Site to Zone Assignment List. Select Enabled and click Show to edit the list. Refer to Figure 1 below. The zone values are as follows: 1 — intranet, 2 — trusted sites, 3 — internet ...
Click the Show button. In the Value name field, enter the server name in the following format: "file://servername" (replace "servername" with the actual name of the server). In the Value field, enter the corresponding zone number for the zone that you want to add the server to: 1 for Intranet zone. 2 for Trusted Sites zone.
The "Site To Zone Assignment List" policy. The format of the Site To Zone Assignment List policy is described within the policy. This policy setting allows you to manage a list of sites that you want to associate with a particular security zone. These zone numbers have associated security settings that apply to all sites in the zone.
User Configuration → Policies → Administrative Templates → Windows Components → Internet Explorer → Internet Control Panel → Security Page. Enable "Intranet Zone Template" with the Low option. Then enable "Site to Zone Assignment List" and use the Show button to add your "sites" (servername, servername.domain, ipaddress ...
In the registry, perform a search for a URL that is known to be trusted.This should get you to the relevant key where you can see all of the others. On my Windows 7 installation, the path appears to be HKEY_CURRENT_USER\Software\Policies\Microsoft\Windows\CurrentVersion\Internet Settings\ZoneMapKey, which is slightly different from this answer.. The key should contain several string values ...
[.WATCH.]full— THE ZONE OF INTEREST (2023) FuLLMovie Free Online On ...