- Center for Innovative Teaching and Learning
- Instructional Guide

Teaching with PowerPoint
When effectively planned and used, PowerPoint (or similar tools, like Google Slides) can enhance instruction. People are divided on the effectiveness of this ubiquitous presentation program—some say that PowerPoint is wonderful while others bemoan its pervasiveness. No matter which side you take, PowerPoint does offer effective ways to enhance instruction when used and designed appropriately.
PowerPoint can be an effective tool to present material in the classroom and encourage student learning. You can use PowerPoint to project visuals that would otherwise be difficult to bring to class. For example, in an anthropology class, a single PowerPoint presentation could project images of an anthropological dig from a remote area, questions asking students about the topic, a chart of related statistics, and a mini quiz about what was just discussed that provides students with information that is visual, challenging, and engaging.
PowerPoint can be an effective tool to present material in the classroom and encourage student learning.
This section is organized in three major segments: Part I will help faculty identify and use basic but important design elements, Part II will cover ways to enhance teaching and learning with PowerPoint, and Part III will list ways to engage students with PowerPoint.
PART I: Designing the PowerPoint Presentation
Accessibility.
- Student accessibility—students with visual or hearing impairments may not be able to fully access a PowerPoint presentation, especially those with graphics, images, and sound.
- Use an accessible layout. Built-in slide template layouts were designed to be accessible: “the reading order is the same for people with vision and for people who use assistive technology such as screen readers” (University of Washington, n.d.). If you want to alter the layout of a theme, use the Slide Master; this will ensure your slides will retain accessibility.
- Use unique and specific slide titles so students can access the material they need.
- Consider how you display hyperlinks. Since screen readers read what is on the page, you may want to consider creating a hyperlink using a descriptive title instead of displaying the URL.
- All visuals and tables should include alt text. Alt text should describe the visual or table in detail so that students with visual impairments can “read” the images with their screen readers. Avoid using too many decorative visuals.
- All video and audio content should be captioned for students with hearing impairments. Transcripts can also be useful as an additional resource, but captioning ensures students can follow along with what is on the screen in real-time.
- Simplify your tables. If you use tables on your slides, ensure they are not overly complex and do not include blank cells. Screen readers may have difficulty providing information about the table if there are too many columns and rows, and they may “think” the table is complete if they come to a blank cell.
- Set a reading order for text on your slides. The order that text appears on the slide may not be the reading order of the text. Check that your reading order is correct by using the Selection Pane (organized bottom-up).
- Use Microsoft’s Accessibility Checker to identify potential accessibility issues in your completed PowerPoint. Use the feedback to improve your PowerPoint’s accessibility. You could also send your file to the Disability Resource Center to have them assess its accessibility (send it far in advance of when you will need to use it).
- Save your PowerPoint presentation as a PDF file to distribute to students with visual impairments.
Preparing for the presentation
- Consider time and effort in preparing a PowerPoint presentation; give yourself plenty of lead time for design and development.
- PowerPoint is especially useful when providing course material online. Consider student technology compatibility with PowerPoint material put on the web; ensure images and graphics have been compressed for access by computers using dial-up connection.
PowerPoint is especially useful when providing course material online.
- Be aware of copyright law when displaying course materials, and properly cite source material. This is especially important when using visuals obtained from the internet or other sources. This also models proper citation for your students.
- Think about message interpretation for PowerPoint use online: will students be able to understand material in a PowerPoint presentation outside of the classroom? Will you need to provide notes and/or other material to help students understand complex information, data, or graphics?
- If you will be using your own laptop, make sure the classroom is equipped with the proper cables, drivers, and other means to display your presentation the way you have intended.
Slide content
- Avoid text-dense slides. It’s better to have more slides than trying to place too much text on one slide. Use brief points instead of long sentences or paragraphs and outline key points rather than transcribing your lecture. Use PowerPoint to cue and guide the presentation.
- Use the Notes feature to add content to your presentation that the audience will not see. You can access the Notes section for each slide by sliding the bottom of the slide window up to reveal the notes section or by clicking “View” and choosing “Notes Page” from the Presentation Views options.
- Relate PowerPoint material to course objectives to reinforce their purpose for students.
Number of slides
- As a rule of thumb, plan to show one slide per minute to account for discussion and time and for students to absorb the material.
- Reduce redundant or text-heavy sentences or bullets to ensure a more professional appearance.
- Incorporate active learning throughout the presentation to hold students’ interest and reinforce learning.
Emphasizing content
- Use italics, bold, and color for emphasizing content.
- Use of a light background (white, beige, yellow) with dark typeface or a dark background (blue, purple, brown) with a light typeface is easy to read in a large room.
- Avoid using too many colors or shifting colors too many times within the presentation, which can be distracting to students.
- Avoid using underlines for emphasis; underlining typically signifies hypertext in digital media.
Use of a light background with dark typeface or a dark background with a light typeface is easy to read in a large room.
- Limit the number of typeface styles to no more than two per slide. Try to keep typeface consistent throughout your presentation so it does not become a distraction.
- Avoid overly ornate or specialty fonts that may be harder for students to read. Stick to basic fonts so as not to distract students from the content.
- Ensure the typeface is large enough to read from anywhere in the room: titles and headings should be no less than 36-40-point font. The subtext should be no less than 32-point font.
Clip art and graphics
- Use clip art and graphics sparingly. Research shows that it’s best to use graphics only when they support the content. Irrelevant graphics and images have been proven to hinder student learning.
- Photographs can be used to add realism. Again, only use photographs that are relevant to the content and serve a pedagogical purpose. Images for decorative purposes are distracting.
- Size and place graphics appropriately on the slide—consider wrapping text around a graphic.
- Use two-dimensional pie and bar graphs rather than 3D styles which can interfere with the intended message.
Use clip art and graphics sparingly. Research shows that it’s best to use graphics only when they support the content.
Animation and sound
- Add motion, sound, or music only when necessary. When in doubt, do without.
- Avoid distracting animations and transitions. Excessive movement within or between slides can interfere with the message and students find them distracting. Avoid them or use only simple screen transitions.
Final check
- Check for spelling, correct word usage, flow of material, and overall appearance of the presentation.
- Colleagues can be helpful to check your presentation for accuracy and appeal. Note: Errors are more obvious when they are projected.
- Schedule at least one practice session to check for timing and flow.
- PowerPoint’s Slide Sorter View is especially helpful to check slides for proper sequencing as well as information gaps and redundancy. You can also use the preview pane on the left of the screen when you are editing the PowerPoint in “Normal” view.
- Prepare for plan “B” in case you have trouble with the technology in the classroom: how will you provide material located on your flash drive or computer? Have an alternate method of instruction ready (printing a copy of your PowerPoint with notes is one idea).
PowerPoint’s Slide Sorter View is especially helpful to check slides for proper sequencing and information gaps and redundancy.
PowerPoint Handouts
PowerPoint provides multiple options for print-based handouts that can be distributed at various points in the class.
Before class: students might like having materials available to help them prepare and formulate questions before the class period.
During class: you could distribute a handout with three slides and lines for notes to encourage students to take notes on the details of your lecture so they have notes alongside the slide material (and aren’t just taking notes on the slide content).
After class: some instructors wait to make the presentation available after the class period so that students concentrate on the presentation rather than reading ahead on the handout.
Never: Some instructors do not distribute the PowerPoint to students so that students don’t rely on access to the presentation and neglect to pay attention in class as a result.
- PowerPoint slides can be printed in the form of handouts—with one, two, three, four, six, or nine slides on a page—that can be given to students for reference during and after the presentation. The three-slides-per-page handout includes lined space to assist in note-taking.
- Notes Pages. Detailed notes can be printed and used during the presentation, or if they are notes intended for students, they can be distributed before the presentation.
- Outline View. PowerPoint presentations can be printed as an outline, which provides all the text from each slide. Outlines offer a welcome alternative to slide handouts and can be modified from the original presentation to provide more or less information than the projected presentation.
The Presentation
Alley, Schreiber, Ramsdell, and Muffo (2006) suggest that PowerPoint slide headline design “affects audience retention,” and they conclude that “succinct sentence headlines are more effective” in information recall than headlines of short phrases or single words (p. 233). In other words, create slide titles with as much information as is used for newspapers and journals to help students better understand the content of the slide.
- PowerPoint should provide key words, concepts, and images to enhance your presentation (but PowerPoint should not replace you as the presenter).
- Avoid reading from the slide—reading the material can be perceived as though you don’t know the material. If you must read the material, provide it in a handout instead of a projected PowerPoint slide.
- Avoid moving a laser pointer across the slide rapidly. If using a laser pointer, use one with a dot large enough to be seen from all areas of the room and move it slowly and intentionally.
Avoid reading from the slide—reading the material can be perceived as though you don’t know the material.
- Use a blank screen to allow students to reflect on what has just been discussed or to gain their attention (Press B for a black screen or W for a white screen while delivering your slide show; press these keys again to return to the live presentation). This pause can also be used for a break period or when transitioning to new content.
- Stand to one side of the screen and face the audience while presenting. Using Presenter View will display your slide notes to you on the computer monitor while projecting only the slides to students on the projector screen.
- Leave classroom lights on and turn off lights directly over the projection screen if possible. A completely dark or dim classroom will impede notetaking (and may encourage nap-taking).
- Learn to use PowerPoint efficiently and have a back-up plan in case of technical failure.
- Give yourself enough time to finish the presentation. Trying to rush through slides can give the impression of an unorganized presentation and may be difficult for students to follow or learn.
PART II: Enhancing Teaching and Learning with PowerPoint
Class preparation.
PowerPoint can be used to prepare lectures and presentations by helping instructors refine their material to salient points and content. Class lectures can be typed in outline format, which can then be refined as slides. Lecture notes can be printed as notes pages (notes pages: Printed pages that display author notes beneath the slide that the notes accompany.) and could also be given as handouts to accompany the presentation.
Multimodal Learning
Using PowerPoint can help you present information in multiple ways (a multimodal approach) through the projection of color, images, and video for the visual mode; sound and music for the auditory mode; text and writing prompts for the reading/writing mode; and interactive slides that ask students to do something, e.g. a group or class activity in which students practice concepts, for the kinesthetic mode (see Part III: Engaging Students with PowerPoint for more details). Providing information in multiple modalities helps improve comprehension and recall for all students.
Providing information in multiple modalities helps improve comprehension and recall for all students.
Type-on Live Slides
PowerPoint allows users to type directly during the slide show, which provides another form of interaction. These write-on slides can be used to project students’ comments and ideas for the entire class to see. When the presentation is over, the new material can be saved to the original file and posted electronically. This feature requires advanced preparation in the PowerPoint file while creating your presentation. For instructions on how to set up your type-on slide text box, visit this tutorial from AddictiveTips .
Write or Highlight on Slides
PowerPoint also allows users to use tools to highlight or write directly onto a presentation while it is live. When you are presenting your PowerPoint, move your cursor over the slide to reveal tools in the lower-left corner. One of the tools is a pen icon. Click this icon to choose either a laser pointer, pen, or highlighter. You can use your cursor for these options, or you can use the stylus for your smart podium computer monitor or touch-screen laptop monitor (if applicable).
Just-In-Time Course Material
You can make your PowerPoint slides, outline, and/or notes pages available online 24/7 through Blackboard, OneDrive, other websites. Students can review the material before class, bring printouts to class, and better prepare themselves for listening rather than taking a lot of notes during the class period. They can also come to class prepared with questions about the material so you can address their comprehension of the concepts.
PART III: Engaging Students with PowerPoint
The following techniques can be incorporated into PowerPoint presentations to increase interactivity and engagement between students and between students and the instructor. Each technique can be projected as a separate PowerPoint slide.
Running Slide Show as Students Arrive in the Classroom
This technique provides visual interest and can include a series of questions for students to answer as they sit waiting for class to begin. These questions could be on future texts or quizzes.
- Opening Question : project an opening question, e.g. “Take a moment to reflect on ___.”
- Think of what you know about ___.
- Turn to a partner and share your knowledge about ___.
- Share with the class what you have discussed with your partner.
- Focused Listing helps with recall of pertinent information, e.g. “list as many characteristics of ___, or write down as many words related to ___ as you can think of.”
- Brainstorming stretches the mind and promotes deep thinking and recall of prior knowledge, e.g. “What do you know about ___? Start with your clearest thoughts and then move on to those what are kind of ‘out there.’”
- Questions : ask students if they have any questions roughly every 15 minutes. This technique provides time for students to reflect and is also a good time for a scheduled break or for the instructor to interact with students.
- Note Check : ask students to “take a few minutes to compare notes with a partner,” or “…summarize the most important information,” or “…identify and clarify any sticking points,” etc.
- Questions and Answer Pairs : have students “take a minute to come with one question then see if you can stump your partner!”
- The Two-Minute Paper allows the instructor to check the class progress, e.g. “summarize the most important points of today’s lecture.” Have students submit the paper at the end of class.
- “If You Could Ask One Last Question—What Would It Be?” This technique allows for students to think more deeply about the topic and apply what they have learned in a question format.
- A Classroom Opinion Poll provides a sense of where students stand on certain topics, e.g. “do you believe in ___,” or “what are your thoughts on ___?”
- Muddiest Point allows anonymous feedback to inform the instructor if changes and or additions need to be made to the class, e.g. “What parts of today’s material still confuse you?”
- Most Useful Point can tell the instructor where the course is on track, e.g. “What is the most useful point in today’s material, and how can you illustrate its use in a practical setting?”
Positive Features of PowerPoint
- PowerPoint saves time and energy—once the presentation has been created, it is easy to update or modify for other courses.
- PowerPoint is portable and can be shared easily with students and colleagues.
- PowerPoint supports multimedia, such as video, audio, images, and
PowerPoint supports multimedia, such as video, audio, images, and animation.
Potential Drawbacks of PowerPoint
- PowerPoint could reduce the opportunity for classroom interaction by being the primary method of information dissemination or designed without built-in opportunities for interaction.
- PowerPoint could lead to information overload, especially with the inclusion of long sentences and paragraphs or lecture-heavy presentations with little opportunity for practical application or active learning.
- PowerPoint could “drive” the instruction and minimize the opportunity for spontaneity and creative teaching unless the instructor incorporates the potential for ingenuity into the presentation.
As with any technology, the way PowerPoint is used will determine its pedagogical effectiveness. By strategically using the points described above, PowerPoint can be used to enhance instruction and engage students.
Alley, M., Schreiber, M., Ramsdell, K., & Muffo, J. (2006). How the design of headlines in presentation slides affects audience retention. Technical Communication, 53 (2), 225-234. Retrieved from https://www.jstor.org/stable/43090718
University of Washington, Accessible Technology. (n.d.). Creating accessible presentations in Microsoft PowerPoint. Retrieved from https://www.washington.edu/accessibility/documents/powerpoint/
Selected Resources
Brill, F. (2016). PowerPoint for teachers: Creating interactive lessons. LinkedIn Learning . Retrieved from https://www.lynda.com/PowerPoint-tutorials/PowerPoint-Teachers-Create-Interactive-Lessons/472427-2.html
Huston, S. (2011). Active learning with PowerPoint [PDF file]. DE Oracle @ UMUC . Retrieved from http://contentdm.umuc.edu/digital/api/collection/p16240coll5/id/78/download
Microsoft Office Support. (n.d.). Make your PowerPoint presentations accessible to people with disabilities. Retrieved from https://support.office.com/en-us/article/make-your-powerpoint-presentations-accessible-to-people-with-disabilities-6f7772b2-2f33-4bd2-8ca7-ae3b2b3ef25
Tufte, E. R. (2006). The cognitive style of PowerPoint: Pitching out corrupts within. Cheshire, CT: Graphics Press LLC.
University of Nebraska Medical Center, College of Medicine. (n.d.). Active Learning with a PowerPoint. Retrieved from https://www.unmc.edu/com/_documents/active-learning-ppt.pdf
University of Washington, Department of English. (n.d.). Teaching with PowerPoint. Retrieved from https://english.washington.edu/teaching/teaching-powerpoint
Vanderbilt University, Center for Teaching. (n.d.). Making better PowerPoint presentations. Retrieved from https://cft.vanderbilt.edu/guides-sub-pages/making-better-powerpoint-presentations/

Suggested citation
Northern Illinois University Center for Innovative Teaching and Learning. (2020). Teaching with PowerPoint. In Instructional guide for university faculty and teaching assistants. Retrieved from https://www.niu.edu/citl/resources/guides/instructional-guide
Phone: 815-753-0595 Email: [email protected]
Connect with us on
Facebook page Twitter page YouTube page Instagram page LinkedIn page
Center for Teaching
Making better powerpoint presentations.
Print Version
Baddeley and Hitch’s model of working memory.
Research about student preferences for powerpoint, resources for making better powerpoint presentations, bibliography.
We have all experienced the pain of a bad PowerPoint presentation. And even though we promise ourselves never to make the same mistakes, we can still fall prey to common design pitfalls. The good news is that your PowerPoint presentation doesn’t have to be ordinary. By keeping in mind a few guidelines, your classroom presentations can stand above the crowd!
“It is easy to dismiss design – to relegate it to mere ornament, the prettifying of places and objects to disguise their banality. But that is a serious misunderstanding of what design is and why it matters.” Daniel Pink
One framework that can be useful when making design decisions about your PowerPoint slide design is Baddeley and Hitch’s model of working memory .
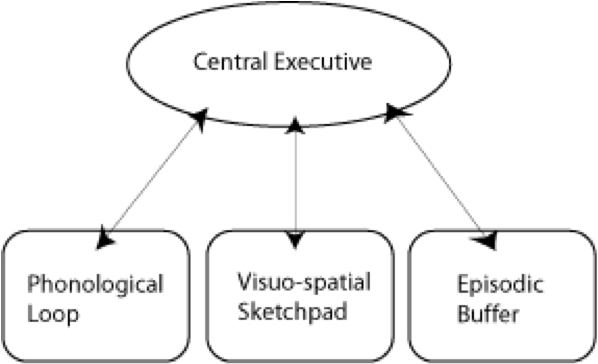
As illustrated in the diagram above, the Central Executive coordinates the work of three systems by organizing the information we hear, see, and store into working memory.
The Phonological Loop deals with any auditory information. Students in a classroom are potentially listening to a variety of things: the instructor, questions from their peers, sound effects or audio from the PowerPoint presentation, and their own “inner voice.”
The Visuo-Spatial Sketchpad deals with information we see. This involves such aspects as form, color, size, space between objects, and their movement. For students this would include: the size and color of fonts, the relationship between images and text on the screen, the motion path of text animation and slide transitions, as well as any hand gestures, facial expressions, or classroom demonstrations made by the instructor.
The Episodic Buffer integrates the information across these sensory domains and communicates with long-term memory. All of these elements are being deposited into a holding tank called the “episodic buffer.” This buffer has a limited capacity and can become “overloaded” thereby, setting limits on how much information students can take in at once.
Laura Edelman and Kathleen Harring from Muhlenberg College , Allentown, Pennsylvania have developed an approach to PowerPoint design using Baddeley and Hitch’s model. During the course of their work, they conducted a survey of students at the college asking what they liked and didn’t like about their professor’s PowerPoint presentations. They discovered the following:
Characteristics students don’t like about professors’ PowerPoint slides
- Too many words on a slide
- Movement (slide transitions or word animations)
- Templates with too many colors
Characteristics students like like about professors’ PowerPoint slides
- Graphs increase understanding of content
- Bulleted lists help them organize ideas
- PowerPoint can help to structure lectures
- Verbal explanations of pictures/graphs help more than written clarifications
According to Edelman and Harring, some conclusions from the research at Muhlenberg are that students learn more when:
- material is presented in short phrases rather than full paragraphs.
- the professor talks about the information on the slide rather than having students read it on their own.
- relevant pictures are used. Irrelevant pictures decrease learning compared to PowerPoint slides with no picture
- they take notes (if the professor is not talking). But if the professor is lecturing, note-taking and listening decreased learning.
- they are given the PowerPoint slides before the class.
Advice from Edelman and Harring on leveraging the working memory with PowerPoint:
- Leverage the working memory by dividing the information between the visual and auditory modality. Doing this reduces the likelihood of one system becoming overloaded. For instance, spoken words with pictures are better than pictures with text, as integrating an image and narration takes less cognitive effort than integrating an image and text.
- Minimize the opportunity for distraction by removing any irrelevant material such as music, sound effects, animations, and background images.
- Use simple cues to direct learners to important points or content. Using text size, bolding, italics, or placing content in a highlighted or shaded text box is all that is required to convey the significance of key ideas in your presentation.
- Don’t put every word you intend to speak on your PowerPoint slide. Instead, keep information displayed in short chunks that are easily read and comprehended.
- One of the mostly widely accessed websites about PowerPoint design is Garr Reynolds’ blog, Presentation Zen . In his blog entry: “ What is Good PowerPoint Design? ” Reynolds explains how to keep the slide design simple, yet not simplistic, and includes a few slide examples that he has ‘made-over’ to demonstrate how to improve its readability and effectiveness. He also includes sample slides from his own presentation about PowerPoint slide design.
- Another presentation guru, David Paradi, author of “ The Visual Slide Revolution: Transforming Overloaded Text Slides into Persuasive Presentations ” maintains a video podcast series called “ Think Outside the Slide ” where he also demonstrates PowerPoint slide makeovers. Examples on this site are typically from the corporate perspective, but the process by which content decisions are made is still relevant for higher education. Paradi has also developed a five step method, called KWICK , that can be used as a simple guide when designing PowerPoint presentations.
- In the video clip below, Comedian Don McMillan talks about some of the common misuses of PowerPoint in his routine called “Life After Death by PowerPoint.”
- This article from The Chronicle of Higher Education highlights a blog moderated by Microsoft’s Doug Thomas that compiles practical PowerPoint advice gathered from presentation masters like Seth Godin , Guy Kawasaki , and Garr Reynolds .
Presenting to Win: The Art of Telling Your Story , by Jerry Weissman, Prentice Hall, 2006
Presentation Zen: Simple Ideas on Presentation Design and Delivery , by Garr Reynolds, New Riders Press, 2008
Solving the PowerPoint Predicament: using digital media for effective communication , by Tom Bunzel , Que, 2006
The Cognitive Style of Power Point , by Edward R. Tufte, Graphics Pr, 2003
The Visual Slide Revolution: Transforming Overloaded Text Slides into Persuasive Presentations , by Dave Paradi, Communications Skills Press, 2000
Why Most PowerPoint Presentations Suck: And How You Can Make Them Better , by Rick Altman, Harvest Books, 2007

Teaching Guides
- Online Course Development Resources
- Principles & Frameworks
- Pedagogies & Strategies
- Reflecting & Assessing
- Challenges & Opportunities
- Populations & Contexts
Quick Links
- Services for Departments and Schools
- Examples of Online Instructional Modules
Number of items in cart: 0
- Your cart is empty.
- Total: $0.00
What Are the Key Benefits of Using PowerPoint in Teaching and Learning?

Table of Contents
The Importance of PowerPoint Presentation in Teaching
An education-based PowerPoint presentation templates have become an integral part of teaching in today’s classrooms. They provide educators with a versatile tool for delivering engaging and interactive lessons. PPT presentations also offer numerous benefits for students, including the ability to improve concentration and comprehension levels.
Additionally, by using PowerPoint slides in conjunction with other instructional materials, such as textbooks and handouts, teachers can ensure that all students are able to access the information being presented in class. PowerPoint presentations can be a powerful tool for teaching and learning when used effectively.
The main reason behind this is that PowerPoint presentations enable you to interact with your audience psychologically. So, here we’re going to discuss the power of PowerPoint in education.
In most cases, presentations are designed for businesses and applied very commonly in business areas. Moreover, presentation slides are likewise used in the education sector and can make your educational or research content compelling.
Let’s get started. Scroll now to read the key benefits of using PowerPoint in teaching and learning .
Why PowerPoint Templates Are the Best Tool for Teaching?

PowerPoint templates are an excellent tool for teaching. They provide a consistent and professional look to your presentations and help keep your ideas organized. Presentation templates also make updating and changing your slides easy, so you can always keep your presentations fresh and up-to-date.
When teaching a subject like biology, getting your audience interested in what you have to say is essential. PowerPoint templates can help you set the tone for your presentation and reinforce the type of content you will discuss. There are various templates out there, so you can find one that will let you teach your subject efficiently and keep things neat and organized.
In addition, PPT slides can be easily shared with other teachers so that you can collaborate on projects and assignments. Overall, PowerPoint templates are a versatile and valuable tool for any teacher. With their help, you can create engaging and informative presentations to help your students learn and succeed.
How PowerPoint Templates Let You Engage Your Students or Audience?

At present, it’s more important than ever to be able to engage your audience. Whether you’re giving a PPT presentation to a group of students or speaking to a potential client, you need to be able to capture their attention and keep them engaged.
One way to do this is by using PowerPoint templates. With templates, you can create visually appealing and informative presentations. By using engaging visuals and helpful content, you can ensure that your audience stays interested in what you’re saying.
In addition, templates can help you save time when creating presentations. All you need to do with everything already laid out for you is add your content. Accordingly, templates can help you create professional and effective presentations.
Although presentation skills are essential for everyone, they are particularly important for educators. After all, a large part of a teacher’s job is to present information to students engagingly and effectively. Fortunately, there are some simple tips that can help to improve any presentation.
- First, it is important to be well prepared. This means clearly understanding the material that will be covered and knowing how to effectively communicate it to the audience.
- It is also significant to be aware of the audience’s level of knowledge and adjust the presentation accordingly.
- Finally, it is significant to be confident and keep the presentation interesting using various techniques such as humor, stories, or multimedia elements.
By following these tips, any teacher can deliver a successful presentation.
How to Create an Educational Presentation Quickly?

PowerPoint templates are a great way to teach your students detailed data. For your lessons to be practical, you need your students to focus and pay attention, so having templates allows them the tools they need to learn more effectively.
It’s a wise way of helping children in school hone their PowerPoint skills. Many children feel overwhelmed when they have to start creating presentations from scratch-templates give them a structure they can follow and tweak to make their own.
Additionally, templates can be reused multiple times, which saves you time in the long run. With so many benefits, it’s no wonder that PowerPoint templates are becoming increasingly popular in educational settings.
If you’re finding a way to help, your students learn more effectively, consider using PowerPoint templates in your next lesson.
However, you can create an informative and engaging presentation with some preparation and organization. Here are a few tips to help you get started:
- Choose a subject that is interesting and relevant to your audience.
- Gather information and resources on the topic.
- Outline your presentation content.
- Create visuals or slides to accompany your presentation content.
- Practice giving your presentation.
- Time yourself so you can keep it within the desired time frame.
Let’s walk through the best practices to create a unique educational PPT presentation.
Choose a Subject That Is Interesting and Relevant to Your Audience
When creating an educational PowerPoint, choosing a subject that is interesting and relevant to your audience is essential.
This will help engage the audience and ensure that they learn from the presentation.
Also, choosing a relevant topic will help keep the audience’s attention focused on the PowerPoint. There are a few different ways to determine what subject would be most exciting and pertinent to your audience. One way is to consider the age range of the audience.
Another way is to think about what type of information would be most helpful to them. Additionally, you can research the interests of the audience ahead of time. Considering these factors, you can choose a subject for your PowerPoint that will be both interesting and relevant to your audience.
Gather Information and Resources on the Topic
If you want to create an educational PPT presentation, it’s essential to gather information and resources on your topic first. This will ensure that the PowerPoint is informative and accurate.
There are a few different ways to go about gathering information. One option is to do some online research. Another option is to visit a library and look for books or articles on the topic.
Once you have brought together all the necessary information, you can start putting together your PowerPoint presentation. Remember to include only appropriate information and to present it in an organized and visually appealing way.
If a little effort is put into creating a PowerPoint, you can come up with an educational presentation that you will like.
Outline Your Presentation Content
You will need to describe your content thoroughly when creating educational PowerPoint slides. This will be useful to organize your thoughts and ensure that your presentation is cohesive and informative. Begin by brainstorming the main points that you want to cover.
Then, create an introductory presentation outline, including an introduction, body, and conclusion. Once you have a general overview of your content, you can begin to flesh out the details. In the body of your presentation, include supporting evidence for each point you make.
In conclusion, summarize the key points of your presentation and leave your audience with something to think about. By wisely and efficiently editing and structuring your content, you can create a captivating and interactive PowerPoint lesson that is both informative and interesting.
Create Visuals or Slides to Accompany Your Presentation Content
You must include visual components to reveal information in an instructional PowerPoint presentation. It will help to engage the audience and provide them with a more immersive experience.
Additionally, visuals can help clarify and strengthen the key points you are trying to communicate. If used effectively, they can also help to add interest and excitement to your presentation.
When choosing visuals, be sure to select ones that are high quality and relevant to your topic. Avoid using too many visuals, as this can overwhelm your audience.
Instead, focus on choosing a few useful visuals to support your presentation and help your audience understand your message better.
Practice Giving Your Presentation
Whether you are allowed to give a speech, practice builds expertise. By practicing your presentation, you can ensure that you are delivering your material in the most effective way possible.
Being careful with your delivery, body language, and overall clarity is essential when practicing. Remember that eye contact is key and that you want to project confidence in your ability to speak on the topic at hand.
It can also be helpful to tape-record yourself so that you can listen back and identify areas that may need improvement. With a bit of practice, you will be capable of giving an educative and memorable presentation.
Time Yourself So You Can Keep It Within the Desired Time Frame
If you’re planning for an educational presentation, it’s important to time yourself stay within the desired time frame. This can be exceptionally important if you’re giving a presentation to a group of students who have a limited attention span.
You can ensure that your presentation stays on track and doesn’t run over by timing yourself. There are a few different ways to time yourself. One option is to use a stopwatch or timer.
Another option for keeping track of where you are in your presentation is periodically checking the clock.
Whichever method you choose, ensure you give yourself enough time to practice to stay within the desired time frame when giving your presentation.
How an Educational PowerPoint Presentation Skyrocket Your Success

A well-designed PowerPoint slide can be the key to success in any educational setting. A PowerPoint presentation can help students grasp complex concepts and remember key points by organizing visually appealing and easy-to-understand information.
Additionally, a PPT presentation can add excitement and interest to a dull lecture or dry text. When used effectively, a PowerPoint presentation can engage students and encourage them to participate actively in learning.
As a result, an investment in a professional educational PowerPoint presentation can pay off handsomely in terms of student success.
PowerPoint templates are must-haves for both inexperienced and veteran educators. One of the top reasons is that it saves hours of manual work and struggles.
For instance, if you’ve picked a premium customizable education PPT template, it only requires a couple of minutes to edit and craft your presentation layout. It means you can develop professional PPT presentation infographics within half an hour.
There are countless templates that educators can use for a wide variety of subjects, including maths, science, humanities studies like literature and history, and many more.
It allows your children to have a hands-on, experiment-based curriculum where they can visualize key concepts while paying attention to multimedia elements tools provided by PowerPoint templates along the way.
Now, let’s walk through the top tips to present an impactful educational PPT presentation that will comprehensively drive knowledge to your potential audience.
- Arrange your presentation objective in a way that attracts your audience and familiarizes the area of discussion in seconds. You can use animated PPT templates or other visual aids to make it attractive and appealing.
- Try to insert at least one brief one-liner highlighting the relevance and benefits of learning that particular topic.
- Include self-image or videos to personalize your presentation content.
- Add animations and slide transitions to explain the key learning steps.
- Include charts, maps, infographics , images, and graphs that illustrate your topic at hand. A well-organized chart could be vital to driving your point home. Regarding corporate PowerPoint presentations , adding Gantt Charts and other business-related details is better.
- Avoid having several ideas on one single slide. It may overwhelm your viewers.
- Leave a little more white space around each element in your PPT slide.
- No need to add every sentence you intend to speak on your PowerPoint slide. Instead, add sharp points that are easily read and comprehended. Then, explain it.
It is not surprising that technology has fundamentally changed education. In former times, the only way to learn about a topic was to hear a lecture from a professor in a classroom. Today, virtual presentations have become an essential tool for educators. There are many reasons why online presentations are so valuable in education. So, learn how to create virtual presentations that capture your audience’s attention .
Advantages of Purchasing Fully Editable PowerPoint Presentation Templates for Teaching
As we discussed above, PowerPoint templates are a great teaching tool for many reasons. They allow the presentation to maintain a uniform look and feel, which is key for understanding the message. Moreover, it can quickly add sense to your teaching.
It is the only wise choice to purchase a fully-editable premium PowerPoint presentation layout for teaching purposes. Then, you can professionally teach your audience the way you want to educate them.
Here are the top reasons why one should turn to fully editable premium education PPT infographics:
- Fully editable PPT themes for education will let you overcome the stress of starting with a blank slate each time.
- All premium education PowerPoint layouts are made with plenty of ideas and unique designs to effectively present your education or research topic.
- When you have a fully editable PPT theme, you will easily add videos, images, and your brand logo.
- You can edit and customize anything in the layout without losing quality in minutes. There is no need to have any design skills to edit and customize them.
- These editable PowerPoint presentation templates will help you save hours of manual work and confusion.
Top Points to Keep in Mind While Preparing a PowerPoint for Teaching

Characteristics that your students like about education PowerPoint slides are:
- Graphs, charts, and maps can increase the understanding of content.
- Bulleted lists that let them focus on the top ideas.
- Animations and slide transitions are the best visual aids.
- Cliparts and creative layouts.
- Present your ideas in short phrases rather than lengthy paragraphs.
- Spoken words with images are better than pictures with text.
Note: Cliparts are the perfect choice to get your audience’s attention in seconds. It is helpful in education PowerPoint presentations for small children and students. However, try to avoid Cliparts if your presentation is for technical students or medical students.
Characteristics that your students don’t like about education PowerPoint slides are:
- Too many ideas on a single slide.
- Templates with too many colors.
- Irrelevant images and WordArts decrease understanding and learning compared to presentation layouts with no picture or animation.
Find the Best Education PowerPoint Presentation Slides for Teaching
PowerPoint presentations have a great power to share your ideas comprehensively, especially for educational purposes. Therefore, picking the suitable PowerPoint presentation template that fits well will help you significantly convey your presentation.
Moreover, choosing the appropriate theme or design is the base part of the entire PPT presentation.
There may be several PPTs available in the free source, but always remember that they may not assure you the quality and features needed for a powerful PowerPoint template.
Therefore, it will be wise to pick a premium PPT template designed by professionals . Selecting an ideal template for creating an attention-grabbing educational presentation is crucial if you wish to make your presentation’s tone professional. Thus, say goodbye to typical, boring PowerPoint templates that ruin your presentation.
Explore the top highlights of our exclusive educational PowerPoint presentation template below:
- 100% Fully editable PowerPoint slides & design elements.
- 2 Aspect ratio (4:3 & 16:9).
- One-time purchase (Free download for life).
- Unlimited downloads (Come back anytime to download the files again).
- Lifetime free updates (We update by adding more slides regularly).
- Lifetime free customer care support.
There you can view the best-in-quality education or research topic presentation themes designed by our expert graphic designers.
You can find a selection of creative, unique PPT themes here at FlySlides , in addition to education PowerPoint templates or research presentation PPT slides. All our premium PowerPoint templates are fully customizable and come with unlimited download and update options.
Besides our PPT templates, we also have a tremendous selection of fully customizable Keynote presentation templates and Google Slides themes . So it’s up to you to select your preference. With FlySlides, you can quickly create your education presentations on PowerPoint, Keynote, and Google Slides.
You can also refer to:
- Tips to Develop a Powerful Business Presentation .
- 10 Proven Tips to Make a Great Sales Presentation .
What’s more, Look into our library and take a look at our templates. They’re available in as many presentations as you want and skyrocket your success as a PowerPoint presenter. Why waste your precious time? Just explore our top selection of PowerPoint presentation layouts for education and find the best templates for your next presentation .
Written by FlySlides Editorial Team
FlySlides is one of the leading and high-quality Free and Premium PowerPoint, Google Slides & Keynotes Templates providers on the internet.
FlySlides is one of the leading and high-quality premium PowerPoint, Google Slides & Keynotes Templates provider on the internet
Subscribe To Our Newsletter
Subscribe to our newsletter, and receive updates, free templates, and amazing special offers
Follow Us On Social Media
Follow us for instant notification and updates
Recent Blog Posts
Recently published blog posts

How to Create Virtual Presentations That Wow Your Audience

How to Create a Visual Brand Identity That People Love?

10 Tips on How to Make a Perfect Sales Presentation

12 Essential Tips to Create a Powerful Business Presentation

13 Important Tips for Finding the Perfect PowerPoint Presentation Template
Recent templates.
Check out some of the latest presentation templates

Timeline Bundle Infographic Diagrams Keynote Template

Unsorted Timelines Infographic Diagrams Keynote Template

Timeline Bundle Infographic Diagrams Google Slides Template (Theme)

Unsorted Timelines Infographic Diagrams Google Slides Template (Theme)

Timeline Bundle Infographic Diagrams PowerPoint (PPT) Template

Unsorted Timelines Infographic Diagrams PowerPoint (PPT) Template
Read more interesting posts.

- [email protected]
Teaching with PowerPoint Presentations
Introduction
PowerPoint presentations are used in many different fields due to their ability to organize and structure information, create a consistent format, and provide the audience with visuals. Educators often use this type of presentation in their classrooms in order to guide the class through a lecture. The effectiveness of PowerPoint presentations is often debated, but most agree that when created in the right way, these presentations have many benefits for students of all ages. The amount of information on each slide, the type of transition between slides, the color of the background, and the number of slides are all factors to consider when teaching with PowerPoint Presentations, and there are many resources out there that will help guide you when you begin creating your own presentation.
Nowadays, technology is being used in the classroom more often than not as a tool to aid educators in teaching their students course content. PowerPoint presentations are often utilized by educators during lectures, which is why there are many resources available online to provide them with the best strategies to create and present these presentations in their classes.
Lesson Plans
- The 4 Best PowerPoint Lesson Plans for Middle School : Applied Educational Systems has put together four of the best lesson plan ideas to teach middle schoolers how to use PowerPoint. Each of the lesson plans (An Introduction to Microsoft PowerPoint, the Basics of Building a PowerPoint Presentation, More Features in Powerpoint, and the Do’s and Don’ts of Effective Presentations) includes a brief introduction and an activity for students to practice the skills that they have learned. By the end of these lessons, students will be able to create a new presentation, practice working with text and images, make their presentations interesting, and apply the principles of effective presentations to their own.
- PowerPoint Lesson Plan for Elementary Students : Perkins provides a class project which requires students to create “All About Me” PowerPoints while learning how to add text, pictures, sound effects, videos, and other features to their presentations. Directions call for students to be split into groups to put together multiple slides that will eventually be combined for a whole class presentation. Topics for each slide include students’ names, families, pets, favorite foods, favorite colors, favorite subjects, etc. This lesson plan gives educators a fun way to have younger students learn how to create PowerPoint presentations for their own use or future educational purposes.
- How Can I Use PowerPoint More Effectively? : In this article, David Forrest discusses strategies educators can utilize to make their PowerPoints more effective in the classroom. Forrest first recommends deciding on the role of your PowerPoint, which could be a lecture outline, note-taking aid (fill-in-the blank slides), visual aid, timed quizzes, or others. He also talks about the appearance of each slide because less is more in this situation, as the last thing any educator wants is for their students to become distracted from content by their presentation. Lastly, the author goes over how educators should prepare for technological failure or anything else going wrong during their PowerPoint presentation. This piece is a good one for educators to read before creating their own presentations!
- PowerPoint in the Classroom : NCBI provides a few different articles on whether PowerPoints are necessary or pointless in the classroom. Ultimately, despite the fact that some of the authors of these articles see PowerPoint presentations as unnecessary, their points of view give insight on what not to do when creating your own presentation, such as adding too much information per slide. Taking all of the arguments given in the articles into consideration will help you decide the best way to begin using PowerPoint presentations in your classroom.
- PowerPoint in Education : This brief article goes over the ways in which you can present your PowerPoint presentation most effectively in order to help students retain the most information. There are proper ways to use various technologies in the classroom, and in the case of PowerPoints, this author believes that the “intelligent use” of Powerpoint presentations is when the information presented is in the form of complicated graphs or figures and alphanumeric information. However, in cases where students are expected to retain certain information and concepts, traditional presentations would be best.
Informational Sites
- NIU – Teaching with PowerPoint : NIU runs through the ways to design effective PowerPoint presentations and the best practices when using this online software. First, the author describes how educators should design their presentation, including how to prepare for the presentation, slide content, the number of slides, emphasis on content, clip art, and a final check of the PowerPoint. Next, the use of PowerPoint handouts and tips for the actual presentation itself are detailed. Lastly, NIU explains how to enhance teaching and learning with PowerPoint and suggests ways to engage students with the presentation.
- Making Better PowerPoint Presentations : Vanderbilt University has put together a page on Baddeley and Hitch’s model of working memory (which relates to how students retain information received through different sensory domains), student preferences for PowerPoint (characteristics they like or don’t like and when students learn more), and resources for making better PowerPoint presentations.
- UW – Teaching with Powerpoint : UW provides educators with information on when and how to use a PowerPoint, which ultimately depends upon each individual’s teaching style, and the options for using PowerPoints (illustrated lectures, instructions, paper proposals, discussion prompts, test or quiz answers, grammar exercises, and student projects). At the end of the piece, a few additional resources, including a video, online tutorial, and essay, are given to help educators learn how to teach with PowerPoints in the best way.
PowerPoint presentations have many different purposes, but in the classroom, their main purpose is to help direct the lesson or lecture, while also giving students the opportunity to follow along and better understand the material. Presentations can also be a great resource for students to study off of before an assessment or use as a note-taking aid during class. Overall, the resources provided above will be useful when you are putting together PowerPoint presentations for your curriculum material. Take all of these tops into consideration, but remember to make it your own!
Additional Resources
- The Impact of Using PowerPoint Presentations on Students’ Learning and Motivation in Secondary Schools : ScienceDirect published an informational article on the impact of using PowerPoint presentations on students’ learning and motivation in secondary schools. In this article, the results of a study which investigated the effectiveness of PowerPoint presentations in teaching English and whether students prefer this learning process over traditional teaching styles are provided. The results support the notion that PowerPoint presentations can be used as an effective tool in the classroom. Taking a look at this piece may cause you to consider using these presentations in your classroom!
Sign up to receive our monthly newsletter!
- Academy 4SC
- Educators 4SC
- Leaders 4SC
- Students 4SC
- Research 4SC
Accountability

11 Designing Instructional Materials
Introduction.
Often, our lessons will be accompanied by instructional materials such as slide decks, videos, handouts, and worksheets. Used well, these materials are integral to the session, and to be effective, they need the same careful level of planning and design as the rest of our lesson. While creating high-quality materials takes time, the good news is you do not need to be a graphic-design expert to make materials that are clear, user friendly, and accessible to all audiences. This chapter outlines strategies for creating effective instructional materials. It begins with some background on the cognitive processes that impact use and understanding of instructional materials and then outlines general best practices. The chapter concludes with design suggestions for a variety of materials. Specific attention is given to universal design principles and accessibility of all materials.
Theoretical Background and Best Practices
Instructional materials typically provide a physical and/or visual supplement to a session in the form of slides, handouts, and images. Because these materials often combine both visual and textual elements and often supplement an audio delivery such as a lecture, learners are asked to interact with both aural and visual information; therefore, some background on the cognitive processes that this experience entails can inform the design of materials. Perhaps the most important thing to consider when delivering information in multiple formats simultaneously is cognitive load, or the strain on learners as they try to hold information in memory while also trying to process new information. Cognitive load “is a theory about learning built on the premise that since the brain can only do so many things at once, we should be intentional about what we ask it to do” (Heick, 2019). Clark and Mayer (2016, p. 35) identify three issues that impact cognitive load:
- Dual Channels: Different parts of the brain are used to process visual and auditory information. When video and audio reinforce each other, as when images or text on a slide reinforce a speaker’s point, learning is enhanced. However, if video and audio are misaligned, such as when slide text is different from the audio narration, the brain has to work harder, and learning can be negatively impacted. This is not to suggest that instruction should be delivered only in one format, but that we make informed decisions about how we structure and present the information in different formats, as explained in more detail below. While the theory of dual channels is primarily applied to audiovisual materials like voice-over videos and tutorials, the concept is relevant when we are using textual and visual materials to support a live lecture or demonstration as well.
- Limited Capacity: Individuals can process a limited amount of information in each channel at one time. As such, instructors must carefully select pieces of information to include and make intentional decisions about how to present that information.
- Active Processing: Learning happens when people can identify and access the important information in a lesson, process that information, and relate it to their prior knowledge. Good design can facilitate active processing.
The brain’s limited capacity impacts its ability to engage in active processing and, hence, to learn. We can avoid cognitive overload and facilitate active processing by reducing or eliminating extraneous information from our instructional materials. Clark and Mayer (2016) provide tips for lightening the cognitive load and maximizing active processing, organized around nine major principles. These principles are geared toward multimedia learning and are discussed in more depth in Chapter 16, but several principles apply to textual materials and visual aids:
- Coherence Principle: Omit unneeded words, sounds, and graphics.
- Contiguity Principle: Place printed words next to the corresponding part of a graphic (see Figure 11.1 and Figure 11.2 for examples).
- Redundancy Principle: Do not duplicate audio and on-screen text.
These principles emphasize the importance of minimizing extraneous content and streamlining presentation, which reduce cognitive load for learners. Managing the amount and presentation of information facilitates active processing and makes content more accessible. Cognitive load theory and the accompanying design principles draw on broader cognitive science learning theories introduced in Chapter 3, and some of the ideas probably sound familiar from other discussions in this textbook.
Figure 11.1: Example of Poor Contiguity in a Graphic
Figure 11.2: Example of Appropriate Contiguity in a Graphic
Written Materials
Librarians produce many types of written materials, including brochures, pamphlets, reading lists, flyers, fact sheets, and informational guides. Written materials can be shared in hard copy, such as handouts or worksheets to accompany a workshop, or they can be posted online to be read or printed out at the reader’s convenience. This section focuses primarily on written materials in hard copy but will also address considerations for online materials.
Since printed materials, unlike their online counterparts, cannot be manipulated by the reader or read aloud by a screen reader, we need to follow best practices to increase their accessibility and readability. Choosing an appropriate font is the first step, and the focus should be on a clean, clear font with adequate spacing between letters (Kitchel, 2011/2019). The main choices for font are between serif and sans serif. The characters in serif script have an extra line or decorative stroke on the edges. Popular examples include Times New Roman and Courier. Sans-serif characters are made up of straight lines. Examples of sans-serif fonts include Arial and Calibri.
Although there is little research to suggest that font style substantially impacts reading speed or comprehension for most readers, people tend to express a preference for serif fonts, which are often recommended for long blocks of text such as textbooks (dos Santos Lonsdale, 2014). However, sans-serif fonts are recommended for people with visual and other disabilities (Kitchel, 2011/2019), and research suggests these fonts might increase comprehension as well as readability for people with certain disabilities (Wilson & Read, 2016). As such, sans-serif fonts are best for the written materials we are likely to use in our instruction.
We should avoid the use of fonts with unusual features or ones that might distort when printed or copied. These include fonts with fine lines or a mix of thick and thin lines; those with small internal spaces, such as the openings in a lowercase “b” or “d,” as these might fill in when printed or photocopied; and condensed fonts, or those in which individual letters touch each other (dos Santos Lonsdale, 2014). In general, we should avoid any decorative font that is meant just to “dazzle” and which “calls attention to itself rather than to the text” (dos Santos Lonsdale, 2014, p. 33). Figure 11.3 summarizes the considerations for font choice and provides some examples of different types of font.
Figure 11.3: Font Examples and Use

In addition to choosing an appropriate font, the American Printing House for the Blind (Kitchel, 2011/2019) recommends several other best practices for accessible print materials for all readers:
The general recommendation is for 12-point font; 18-point font is considered large type and might be suitable for older adults and people with certain visual disabilities. Different fonts present differently, so we should experiment to find the appropriate size for our chosen font.
Adequate White Space
Substantial amounts of white space around text and graphics make printed materials easier to read. To avoid dense, crowded handouts, use at least one-inch margins and blocked paragraphs with space between each block, rather than continuous paragraphs with indents.
Minimal Text
Avoid dense blocks of text whenever possible. Keep language simple and straightforward and eliminate unnecessary information. Use lists and bullet points to break up text and increase white space. When appropriate, use graphics in place of text. For instance, rather than describing a display screen, include a screen shot.
Headings and Subheadings
Headings and subheadings help break up the text and increase white space. They also act as a navigational guide for the reader, providing an outline of the topic and its main points.
Highlighting Text
If we need to highlight or emphasize text within a block, we should use bold or underline, as italics are harder to read. Colored text is also problematic. Lighter colors do not provide enough contrast against the background, making the text harder to read. Also, some readers cannot distinguish color, so we should never use color to convey meaning. While bold and underlining are recommended, they should be used sparingly as they can distract the reader and interrupt the flow of the text.
Charts, Graphs, and Visual Elements
The best practices highlighted here apply to charts, graphs, figures, and other supplements, including the legends or captions that accompany them. These elements should be presented in the same size font as the main text, with adequate white space. The figure or chart itself should be of adequate size to be easily read and interpreted. It is better to move a chart or figure to a new page than to reduce the size to fit it on an existing page. Visual elements are addressed in more detail later in this chapter in the section on visual aids.
White Paper, Black Text
Materials should be printed on white paper with black text, as the high contrast makes for easier reading. If you must use colored paper, select a light color, such as pale yellow.
Accessibility of Written Materials Posted Online
We might post some of our instructional materials online to make them available after the session ends and to learners unable to attend sessions. In some ways, written materials are more accessible online than in print because learners can manipulate the document to increase text size and brightness or use screen readers. Best practices for printed materials generally apply equally well to written materials posted online. However, there are a few additional considerations for making online materials accessible.
Headings and subheadings are very important to online documents. Without these headings, a screen reader will read the page as one continuous narrative. However, with online materials, we cannot rely on using bold lettering and different size fonts to signal headings and subheadings, as we might with printed materials. Instead, we must use the headings function built into most word-processing programs. This technique will allow screen readers to recognize headers and subheaders, thus aiding in document navigation. In addition, these functions usually add some additional white space around the header, improving the overall appearance and readability of the document even when printed (Accessible U, 2019a). Similarly, we should use the word processor’s built-in functions for bullets and numbered lists.
If the document includes hyperlinks, the links should be embedded into the document, rather than giving the URL in the text (Accessible U, 2019b). Screen readers will read every character in the link, frustrating the listener and breaking up the flow of the text. Even in print, including the URL breaks up the text and interrupts the flow. Most word processors will have an option to embed a hyperlink into the text so when the document goes online, users can click the text to follow the link. Since users cannot follow the link in printed materials, you can include a list of URLs in a reference section at the end of the document. We should also avoid using phrases like “click here” as a link, but instead include some descriptive text with the link, so readers know what they will find if they decide to follow it. Following are examples of appropriate treatment of links in written materials.
Poor Practice:
- Why We Fall for Fake News ( https://www.cits.ucsb.edu/fake-news/why-we-fall ) explains cognitive bias.
- Fake news often preys on people’s cognitive biases. Click here to learn more.
Better Practice:
- Fake news often preys on people’s cognitive biases. The article Why We Fall for Fake News , from the Center for Information Technology at UC Santa Barbara, explains different types of cognitive biases and how they influence our thinking.
Visual Aids
Visual aids are instructional materials that include elements such as images and graphics. More than just a supplement to written learning materials, when used well, visual aids can lead to better learning. As Clark and Mayer (2016, p. 77) explain, “people learn more deeply from words and pictures than from words alone.” Meaningful graphics often can replace some text, further reducing cognitive overload. However, not all visual elements are equal, and when they are not used properly, they can detract from learning. We might think that adding some pictures or clip art to a handout or a slide will make the materials more engaging for the learner. But if the visuals are only included to make the materials “pretty,” the learner will waste cognitive energy processing the visual material without gaining new information or meaning. So, how do we use visual elements to increase learning?
Meaningful visual elements show relationships among concepts, depict processes, organize information, and interpret information (Clark & Mayer, 2016). For instance, a visual aid could label elements of a figure, such as search fields in a catalog or the parts of a citation. Graphs and charts can condense complex quantitative and relational information into clear visuals. Flowcharts can illustrate processes, and organizational charts can show relationships among different entities. In each case, the visuals are conveying information, often using minimal text. Figure 11.4 and Figure 11.5 show two examples of instructional materials. Both describe the peer review process, but they are not equally effective.
Figure 11.4: Example of a Poorly Designed Visual Aid
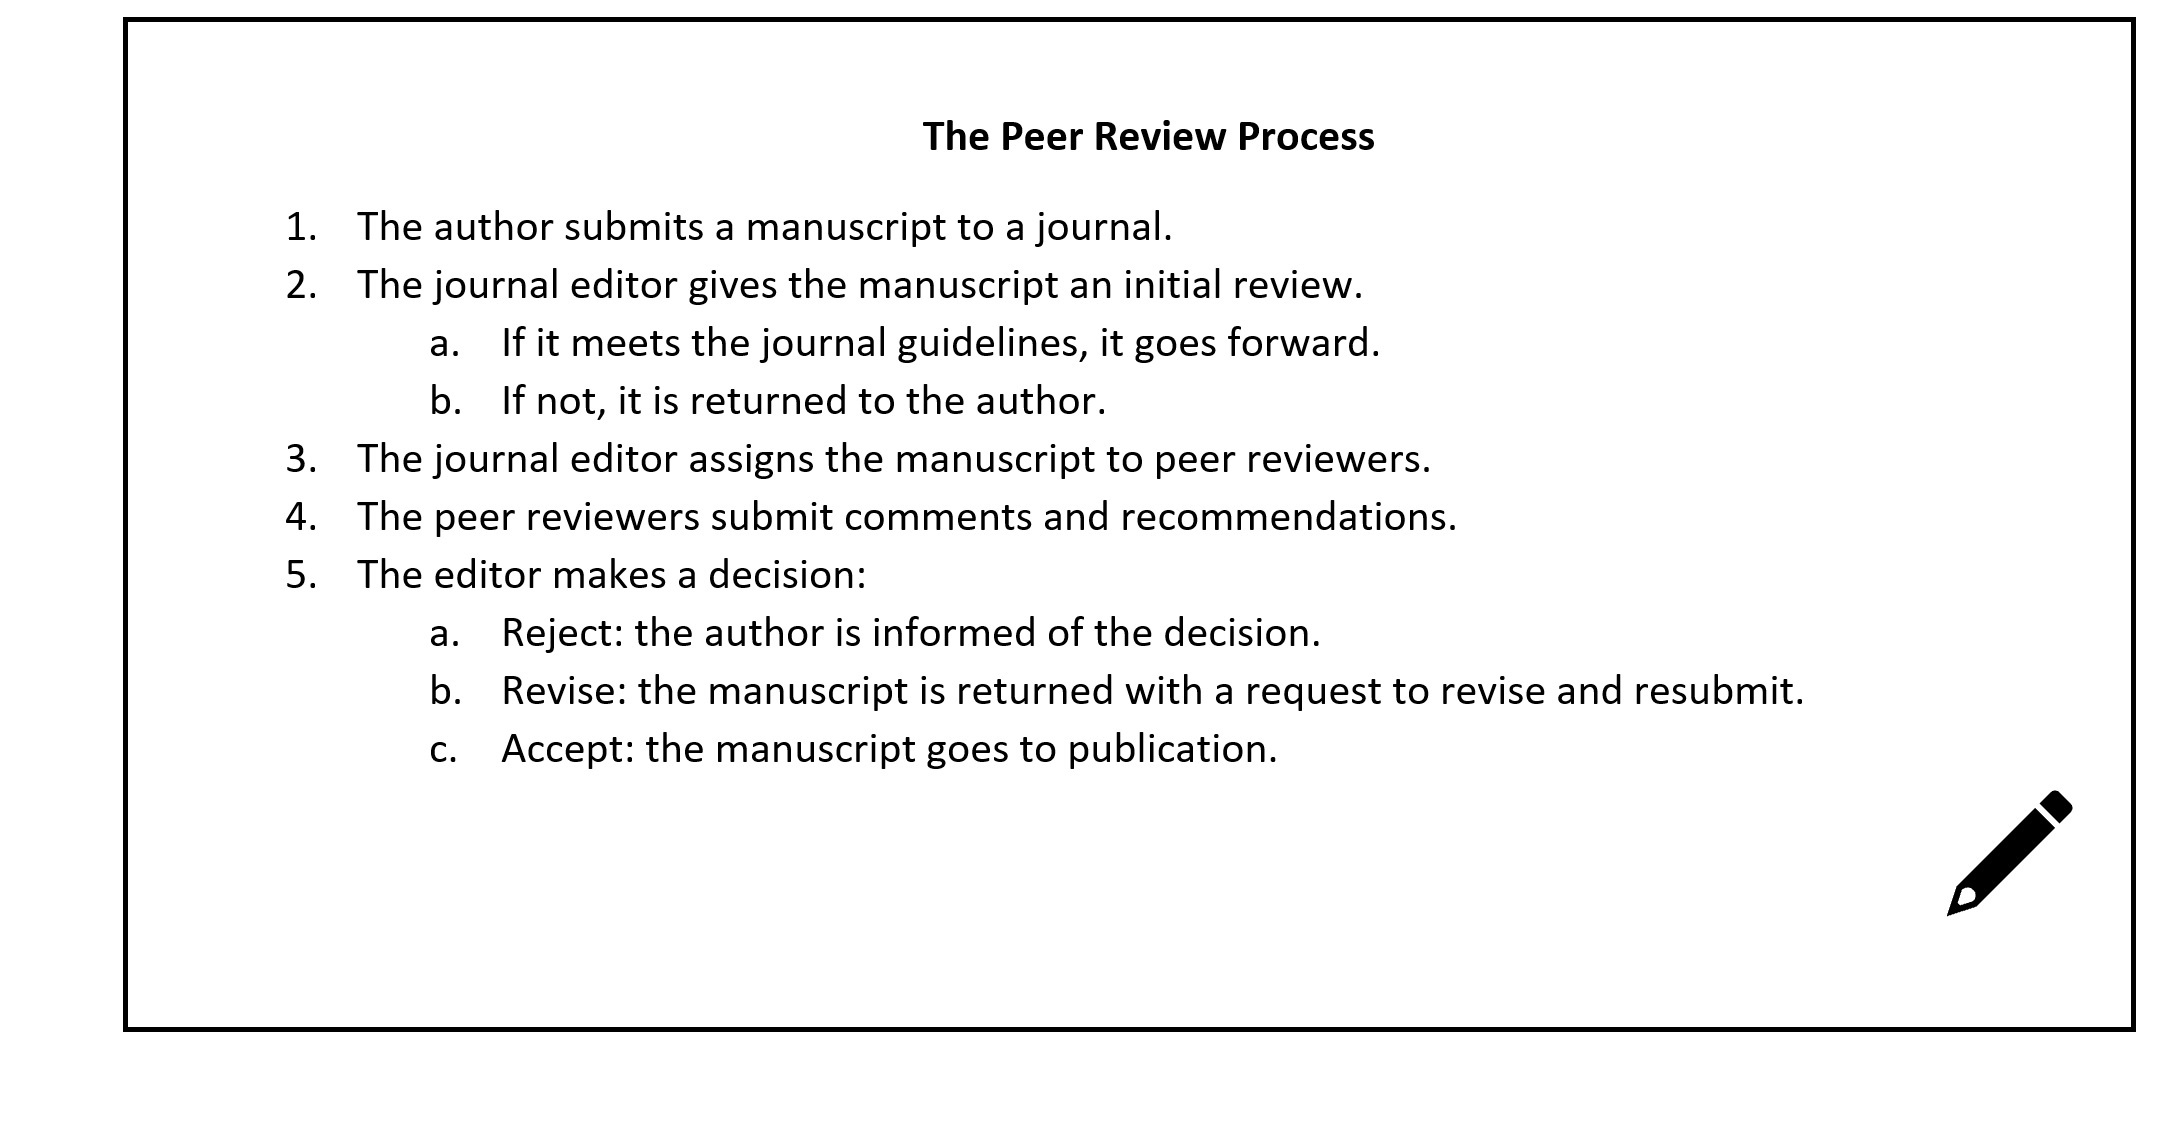
Figure 11.5 Example of a Properly Designed Visual Aid

High contrast between the background and the graphic are important (Association of Registered Graphic Designers of Ontario, 2010). Black-and-white graphics with bold lines are best, but if you use color, choose highly contrasting colors, such as dark lines against a light background. In general, avoid grayscale and light colors. Again, colors should not be used to convey meaning because that meaning would be lost to people who are using screen readers or who are unable to differentiate colors. In keeping with the contiguity principle mentioned earlier in this chapter, when visual aids combine text and graphics, the text should be placed next to the relevant part of the graphic to reduce the effort needed to connect the concepts.
Commonly available word-processing tools such as Microsoft’s Word or Google Docs usually are sufficient for creating basic handouts, and Word’s Illustrations function offers some options for creating simple graphics to depict workflows, hierarchies, and other relationships. However, both Word and Google Docs have limited capabilities for creating and integrating more complex visuals and offer minimal control over the formatting and placement of elements within a figure. Several free and low-cost options exist for more complex and visually appealing figures. For example, the flowchart depicted in Figure 11.5 was created in Draw.io , an open-source software for creating diagrams. Canva is a popular publishing and graphic-design tool that offers a free option and can be used to create slick handouts, brochures, and flyers. Other tools include Inkscape , TechSmith Capture (formerly Jing) , Stencil , and PicMonkey . See Activity 11.1 for a brief exercise related to creating written materials.
Activity 11.1: Creating Written Instructional Materials
Imagine you are developing an information packet to be shared with new patrons at your library. Choose one of the examples below and develop a brief guide to be included in the packet. Consider using one of the free design tools mentioned in this chapter ( Canva , Draw.io , Inkscape , etc.).
- Submitting an interlibrary loan request
- Creating an email account in a free service like Gmail
- Downloading a book on Overdrive
- Searching the library catalog or a library database
If possible, exchange materials with a partner and critique each other’s work.
Questions for Reflection and Discussion:
- Do you see examples of the best practices from this chapter?
- Are visuals used to their best effect?
- Do the font type and size seem appropriate?
- Could you offer any suggestions for improvement?
Charts, Graphs, and Tables
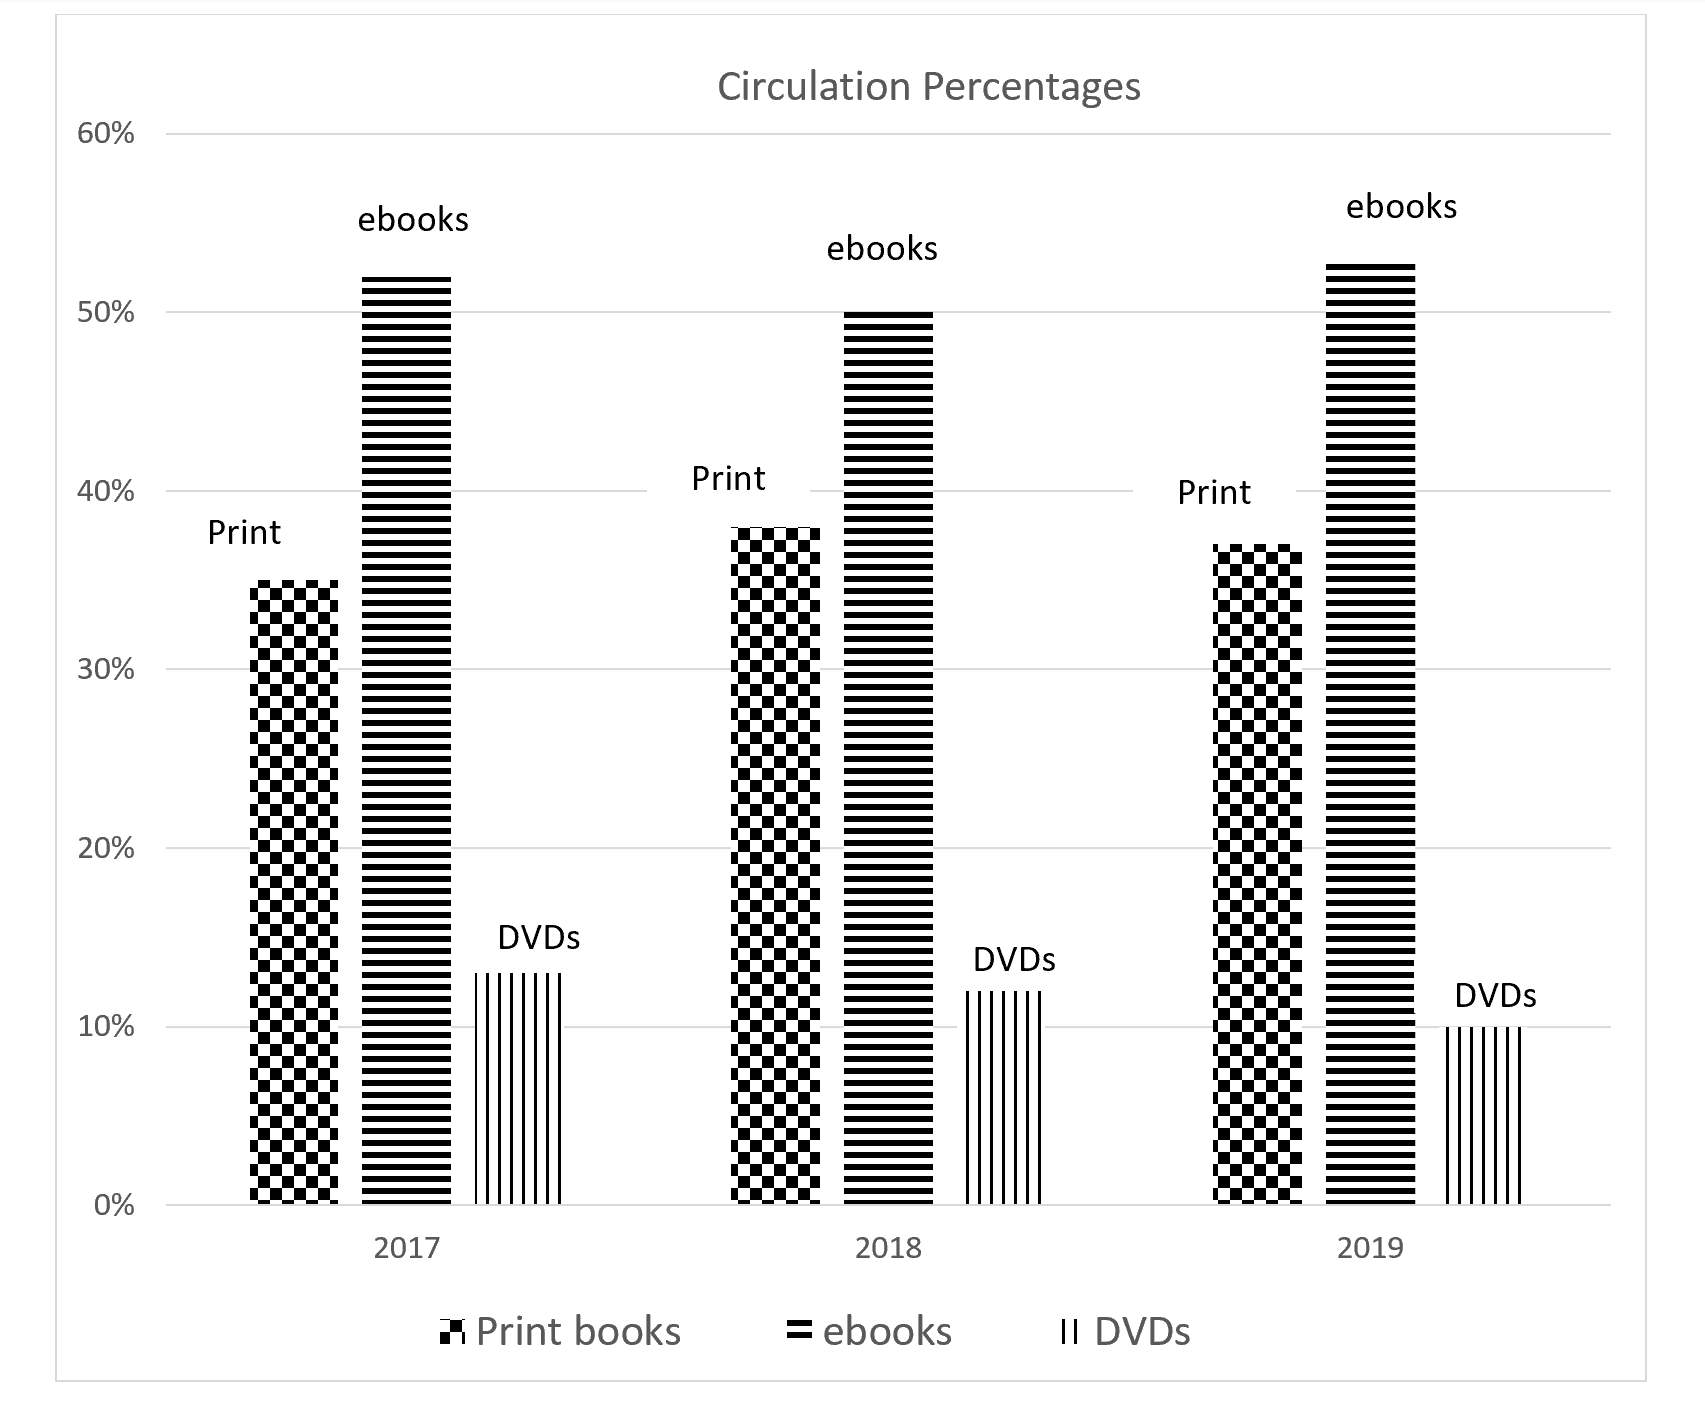
Charts, graphs, and tables are excellent ways of organizing and presenting data. Charts and graphs, in particular, can make complex information more comprehensible than it would be in raw-data form, and can make relationships among variables more readily apparent. However, these visuals also require some special considerations. Charts and graphs often use color to convey meaning. We tend to use color-coded lines or bars on graphs to correspond to different variables, or shade regions of a map to represent information, such as population density. To make these materials accessible, we can use patterns—such as dots of varying size and stripes of varying density and direction—rather than colors to differentiate variables. Another option is to use one color and vary the shade, rather than using different colors. Often, different colors have similar levels of brightness and will appear almost identical when rendered in grayscale or viewed by color-blind readers. Using a single color but highly varied levels of brightness will make the figures readable even if the reader cannot distinguish the color. However we decide to render the figures, labeling relevant parts of the graphic reduces the need to rely on colors and a legend to understand the figure (IT Accessibility Group, 2019a). See Figure 11.6, Figure 11.7, and Figure 11.8 for examples of inaccessible and accessible figures, based on circulation rates of materials at a public library.
Figure 11.6: Chart Using Color to Convey Meaning
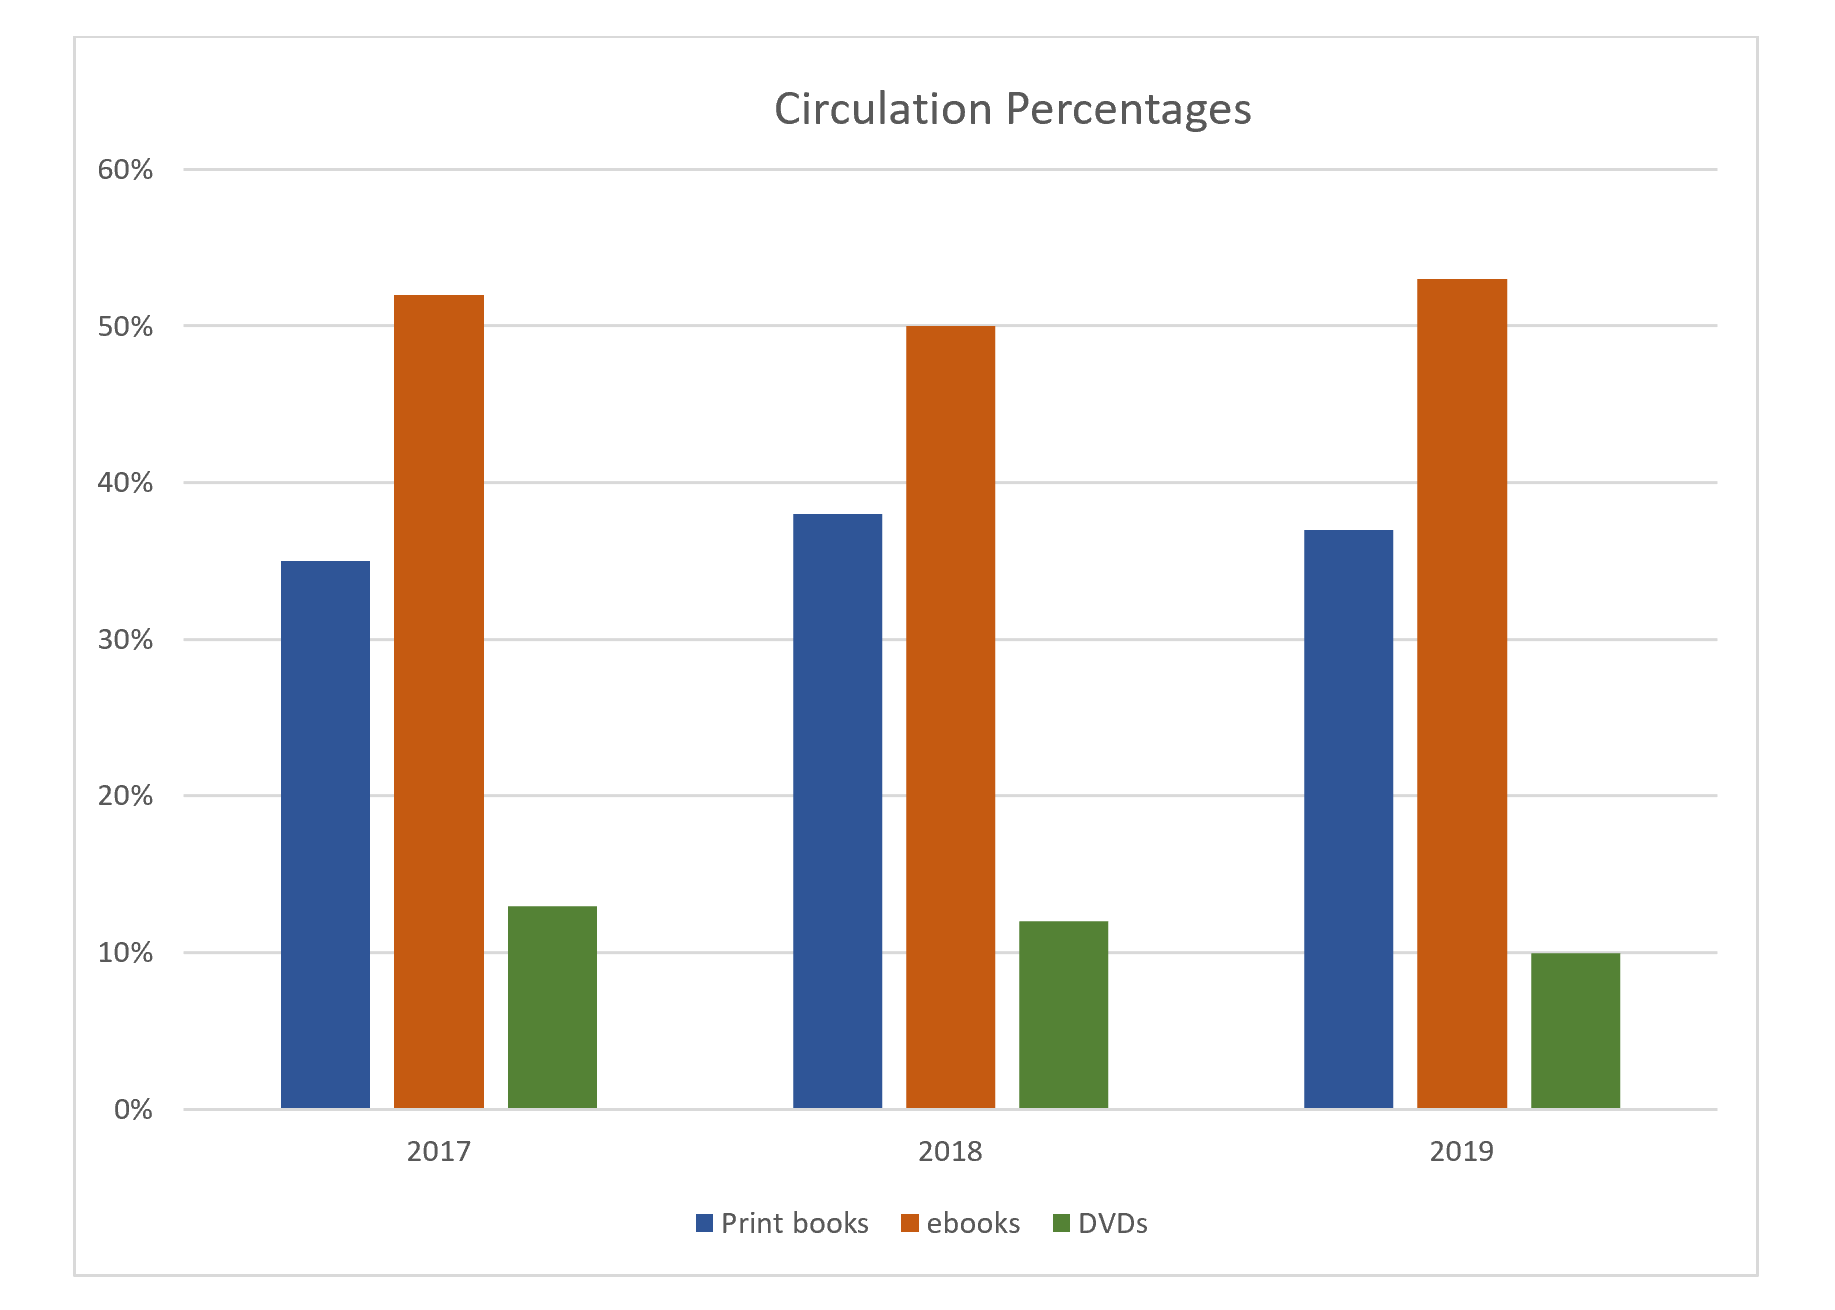
Figure 11.7: Chart Using Different Shades of the Same Color to Convey Meaning

Figure 11.8: Chart Using Patterns to Convey Meaning
Tables can also present some difficulty for users with disabilities and those using screen readers. Gridlines, meant to help organize table elements, can be distracting to the eye. Using a softer gray color for the gridlines and black for the table elements can help the data stand out while still providing a visual guide for the eye. Similarly, we can alternate table rows with gray background fill and no fill, but in this case, we need to choose a very soft shade of gray to ensure enough contrast for the text to be readable (Agency for Healthcare Research and Quality, 2019). We should also designate header columns and rows, so screen readers can distinguish between column and row labels and the data in the rest of the row or column (WebAIM, 2017).
Images and Photographs
Like other visual aids, images or photographs should be clear, bright, and of adequate size. If possible, crop large images to include only the relevant parts. Cropping reduces extraneous information, and you may be able to enlarge the cropped image for easier viewing. But be aware that resizing images can impact their quality and accessibility. If the image becomes too small, details might be lost; however, some images will pixelate and lose clarity when enlarged.
While written material is often more accessible online, where readers can enlarge fonts or use screen readers, visual materials can present challenges: images might not load; screen readers cannot always interpret the content of visuals, especially images; and some viewers who can see well otherwise might not tolerate certain visuals, such as animations (Accessibility at Yale, 2019). To ensure accessibility, images and photographs posted online should be accompanied by brief, explanatory notes known as alt text. Alt text should describe the image and the content it is meant to convey within the context of the instruction, with a focus on salient points. Alt text is meant to be brief, and, ideally, should be no more than 125 words. In keeping with the coherence principle, we should avoid images and graphics that are purely decorative, but if such images are used, then the alt text tag can be entered as “null.” If a visual is complex and requires a lengthy description, experts suggest embedding that description in the text and using the alt text tag to direct the reader to that description (IT Accessibility Group, 2019b). Chapter 16 covers alt text in more depth.
Slide Decks
Slide presentations, such as those created in PowerPoint and Google Slides , remain popular in both face to face and online instruction. In addition to slides helping instructors stay organized and on topic, some research suggests that access to lecture slides before a lesson can improve learning (Marsh & Sink, 2010; Motagi & Dharwadkar, 2018). Learners also express a preference for handouts accompanying lectures (Stacy & Cain, 2015). By providing some of the main content, these handouts might reduce the need to take as many notes, thus freeing students to listen more closely to the lecture. In fact, Marsh and Sink (2010) found that learners who had access to lecture slides took fewer, but higher quality, notes. Several best practices apply to slide decks:
- Use highly contrasting colors for the background, text, or graphics, and keep the background design plain.
- Use the predefined slide layouts, as these are usually designed to work with screen readers (Accessible U, 2019c).
- Use clean, easy-to-read fonts, and make sure the font size is large enough to be seen by people in the back of the room.
- Use clear graphics and images, and make sure graphics are large enough to be seen by people in the back of the room. As noted above, be sure to include alt text for images and graphics.
- When possible, crop images to show only relevant areas. As necessary, use arrows or boxes to draw attention to relevant parts of the graphic.
- Keep animations and slide transitions to a minimum (TED Staff, 2014).
- In keeping with the coherence principle mentioned earlier, do not include any unnecessary words or images on the slides (Clark & Mayer, 2016).
- A few key words to reinforce concepts and ideas
- When terms are technical, unfamiliar, lengthy, and/or needed for future reference, such as a mathematical formula, or steps in a procedure
- If you include labels for graphics, place the words next to the relevant part of the graphic.
See Activity 11. 2 for a brief activity on slide decks.
Activity 11.2: Creating Effective Slide Decks
The presentation Quite Possibly the World’s Worst PowerPoint Presentation Ever consists of a series of paired slides. The first slide in a pair illustrates at least one example of bad design, while the second slide identifies the design issue and how to fix it. As you look at each pair of slides:
- See if you can identify what is wrong with each “problem” slide before advancing to the answer.
- Suggest ways you could fix each slide to reflect better design principles.
- Do you notice any issues not addressed in the answer slide?
Videos are a popular instructional tool and are discussed at length in Chapter 16. As such, this section will provide only a brief overview.
Videos should be clear, accessible, and engaging, but they do not need to be fancy and full of complicated or high-tech add-ons. In fact, as with most instructional materials, less is usually more. We do not necessarily need expensive equipment to create effective instructional videos. Just a computer, webcam, and headset with a microphone will suffice. If necessary, we can use a computer’s built-in audio system to record, but a separate microphone usually provides clearer audio, while a headset helps to reduce background noise.
Following the coherence principle, eliminate any extraneous spoken or written words or images. Focus on audio narration with images for support, rather than on-screen text. When text and graphics are used together, the text should align with the relevant portions of the graphic (Clark & Mayer, 2016).
Closed captioning is crucial to make videos accessible to learners with hearing disabilities and, as with all universal design techniques, can improve accessibility for all learners. Some students might not have access to devices with audio equipment or might need to view the videos in noisy areas, like on a train. These learners will also appreciate closed captioning. The captions should appear on screen and in sync with the video. Some video software packages offer auto-captioning, but the accuracy of the automatically generated text rarely meets requirements for accessibility, so we should be prepared to edit.
Finding Existing Instructional Materials
Most of this chapter assumes that we will be creating our own instructional materials, and homegrown materials have the advantage of being completely customizable. However, creating materials from scratch is not always necessary and, at times, may not be feasible. Complex images and sophisticated multimedia tutorials can be engaging, but they also require time, knowledge, and equipment to create. Rather than developing these materials on our own, we might search online repositories for existing materials. The ACRL Framework for Information Literacy Sandbox provides access to a wide variety of materials on information-literacy topics, including slide decks, worksheets, and multimedia tutorials. Many libraries post freely accessible tutorials on their websites. YouTube provides access to videos on an immense range of topics, including TED Talks on a number of relevant education topics. We can also search repositories like Flickr , Google Images , and Pixabay for photographs and images. Some information settings will also have access to subscription sources of videos and tutorials. For instance, LinkedIn Learning offers tutorials on a wide range of technology and business topics.
Whenever we use instructional materials created by someone else, we must be sure we are following all relevant copyright guidelines. Copyright protection means that, in general, we cannot use other people’s work without their permission. Currently in the United States, creative works are subject to 96 years of copyright protection; thus, as of 2020, works created after 1925 are covered by copyright. After 96 years, works enter the public domain, and they are free to use without restriction. While reuse of copyrighted materials for noncommercial, educational purposes is often protected by fair use, such protection is not guaranteed, and there are limits to fair use. Four factors are usually used to determine whether fair use exceptions apply to a specific circumstance (Copyright.gov, 2019):
- Purpose and character of the use. Generally, nonprofit, educational use of copyrighted materials is covered by fair use while commercial use or use of the material that will result in a profit for the user, is not. The government warns that not all educational or nonprofit use will be covered by fair use, nor will all commercial use necessarily be exempt from fair use, but instead, “courts will balance the purpose and character of the use against the other factors” (Copyright.gov, 2019). Transformative use, or use that adds something new to the work for a different purpose, is more likely to be considered fair use than use that is not transformative.
- Nature of the copyrighted work. Technical and factual materials are more likely to fall under fair use than creative materials such as poems, songs, and artwork.
- Amount and substantiality of the portion used in relation to the copyrighted work as a whole. In determining fair use, courts consider the quantity and quality of the material used. Larger excerpts or excerpts that represent the “heart” of the work are less likely to be covered by fair use.
- Effect of the use upon the potential market for or value of the copyrighted work. Part of the purpose of copyright is to protect the creator’s right to profit from their work. If reuse of the material will hurt the market for the original work, it is less likely to fall under fair use.
If we decide to reuse existing materials, we must apply all four factors to determine if we are protected by fair use. When in doubt, it is always best to request permission.
We should also be sure to check the licensing agreement for any material we use. Some creators choose to share their copyrighted materials by using less restrictive forms of licensing, which allow for more opportunity and flexibility for reuse by others. Creative Commons enables creators to choose from several different licenses. The least restrictive requires only that the user attribute the material to the creator. Other licenses allow reuse for noncommercial purposes, limit derivative works, require users to share any derivative work they create through a similar open license agreement, or some combination of these options. If the work we wish to use has a Creative Commons license, we can generally reuse it without permission, provided we follow the licensing restrictions and requirements. If we do not see a Creative Commons license, we should assume the material is protected by traditional copyright restrictions.
Instructional materials, both written and visual, are an integral part of teaching and, when used appropriately, can engage learners and deepen learning. Creating effective instructional materials takes time and perhaps some practice, but it does not require expensive equipment nor expertise in graphic design or multimedia tools. The major best practices and takeaways from this chapter are as follows:
- Our brains process visual and auditory materials through two different channels. Integrating visual materials so that they support, rather than compete with, our lectures and demonstrations reduces cognitive load and can increase learning.
- In general, the best materials are simple, clean, and straightforward. We should reduce any extraneous words and images from our instructional materials.
- We should always ensure our instructional materials are accessible to all learners, including providing alt text for images and closed captions for videos.
- When reusing existing materials, we must be sure to adhere to appropriate copyright restrictions.
See Activity 11.3 for a brief exercise on instructional materials.
Activity 11.3: Critiquing Instructional Materials
Search online to find examples of instructional materials from the type of information setting in which you would like to work and take a moment to review them.
- Can you find examples of the principles and best practices discussed in this chapter?
- Can you find any room for improvement related to those principles and best practices?
Canva . https://www.canva.com/
Draw.io. https://www.draw.io/
Flickr. https://www.flickr.com/
Google Docs. https://drive.google.com/
Google Images. https://www.google.com/imghp?hl=en
Google Slides . https://www.google.com/slides/about/
Inkscape . https://inkscape.org/
LinkedIn Learning . https://www.linkedin.com/learning
PicMonkey. https://www.picmonkey.com/
Pixabay. https://pixabay.com/
PowerPoint . https://www.microsoft.com/en-us/microsoft-365/powerpoint
Stencil. https://getstencil.com/
TechSmith Capture . https://www.techsmith.com/jing-tool.html
Word. https://www.microsoft.com/en-us/microsoft-365/word
YouTube . https://www.youtube.com/
Suggested Readings
Accessible U. (2019). Start small, start now . University of Minnesota Office of Disability Resources. https://accessibility.umn.edu/start-small-start-now
The Office of Disability Resources at the University of Minnesota offers a number of guides on creating accessible materials. Each guide is brief, clear, and easy to understand. Whenever possible, the office includes step-by-step instructions for specific software packages, such as YouTube or Google Slides . Some guides are supplemented by videos and multimedia tutorials.
Association of Graphic Designers of Ontario. (2010). Access ability: A practical handbook on accessible graphic design . https://www.rgd.ca/database/files/library/RGD_AccessAbility_Handbook2010_.pdf
This concise handbook offers practical advice for creating accessible print and web materials. A third section focuses on accessibility of physical spaces. Each section is supplemented by an interesting case study.
Clark, R. C., & Mayer, R. E. (2016). e-Learning and the science of instruction (4th ed.). John Wiley & Sons.
Experts in the area of elearning, the authors provide an overview of how people learn through audio and visual channels, lay out the nine principles of best practice for instructional design, and devote a chapter to applying each principle. Additional chapters explore collaborative learning and gaming. Each chapter is grounded in research but also offers plenty of practical advice and examples.
Inman, J., & Myers, S. (2018). Now streaming: Strategies that improve video lectures. IDEA Paper #68 . Idea Center, Inc.(ED588350). ERIC. https://eric.ed.gov/?id=ED588350
This brief report offers clear and straightforward advice for creating effective and accessible videos.
Stony Brook University Libraries. (2019, September 18). Copyright, Fair Use, & the Creative Commons: Home [LibGuide]. https://guides.library.stonybrook.edu/copyright/home
This LibGuide gives a thorough yet concise overview of copyright concerns, including an introduction to fair use guidelines and Creative Commons licenses. The guide includes tools for helping to determine fair use, a list of tutorials on copyright, and additional information on related topics such as the TEACH Act, open access, and orphan works.
Accessibility at Yale. (2019). Images . Usability & Web Accessibility. https://usability.yale.edu/web-accessibility/articles/images
Accessible U. (2019a). Headings . University of Minnesota Office of Disability Resources. https://accessibility.umn.edu/core-skills/headings
Accessible U. (2019b). Hyperlinks . University of Minnesota Office of Disability Resources. https://accessibility.umn.edu/core-skills/hyperlinks
Accessible U. (2019c). Google slides . http://accessibility.dl.umn.edu/presentations/google-slides
Agency for Healthcare Research and Quality. (2019). Six tips for making a quality report appealing and easy to skim . https://www.ahrq.gov/talkingquality/resources/design/general-tips/index.html
Association of Registered Graphic Designers of Ontario. (2010). Access ability: A practical handbook on accessible graphic design . https://www.rgd.ca/database/files/library/RGD_AccessAbility_Handbook2010_.pdf
Clark, R. C., & Mayer, R. E. (2016). e -Learning and the science of instruction: Proven guidelines for consumers and designers of multimedia learning (4th ed.). John Wiley & Sons.
Copyright.gov. (2019). More information on fair use . https://www.copyright.gov/fair-use/more-info.html
dos Santos Lonsdale, M. (2014). Typographic features of text: Outcomes from research and practice. Visible Language, 48 (3), 29-67.
Heick, T. (2019, November 7). What is cognitive load theory? A definition for teachers. Teach Thought . https://www.teachthought.com/learning/cognitive-load-theory-definition-teachers/
Kitchel, J. E. (2019, September 11). APH guidelines for print document design. American Printing House for the Blind . (Original work published August 2011) https://www.aph.org/aph-guidelines-for-print-document-design/
Marsh, E. J., & Sink, H. E. (2010). Access to handouts of presentation slides during lecture: Consequences for learning. Applied Cognitive Psychology, 24 (5), 691-706. https://doi.org/10.1002/acp.1579
Motagi, M. V., & Dharwadkar, K. (2018). Evaluation of the effectiveness of providing PowerPoint slide handouts before the class. International Journal of Medical Science and Public Health, 7 (9), 739-741. https://doi.org/10.5455/ijmsph.2018.0205413062018
IT Accessibility Group. (2019a). Charts & accessibility . Accessibility and Usability at Penn State. https://accessibility.psu.edu/images/charts/
IT Accessibility Group. (2019b). Image alt text . Accessibility and Usability at Penn State. https://accessibility.psu.edu/images/alttext/#caption
Stacy, E. M., & Cain, J. (2015). Note-taking and handouts in the digital age. American Journal of Pharmaceutical Education, 79 (7), 107. https://doi.org/10.5688/ajpe797107
TED Staff. (2014, July 15). 10 tips on how to make slides that communicate your ideas, from TED’s in-house expert. TED Blog. https://blog.ted.com/10-tips-for-better-slide-decks/
WebAIM. (2017, September 18). Creating accessible tables . https://webaim.org/techniques/tables/data
Wilson, L., & Read, J. (2016). Do particular design features assist people with aphasia to comprehend text? An exploratory study. International Journal of Language & Communication Disorders, 51 (3), 346-354. http://doi.org/10.1111/1460-6984.12206
Instruction in Libraries and Information Centers Copyright © 2020 by Laura Saunders and Melissa A. Wong is licensed under a Creative Commons Attribution-NonCommercial-NoDerivatives 4.0 International License , except where otherwise noted.
Share This Book
- Make a Gift
- Directories
Search form
You are here.
- Teaching Resources
Teaching with Powerpoint
Pedagogical considerations for powerpoint.
PowerPoint is a presentation program. It automatically creates a sense of formality in a classroom. Many students respond to PowerPoint the same way they respond to a lecture. They tend to be quieter, more inclined to listen than to talk, and even may take notes. If you desire a more relaxed classroom atmosphere, some of the options described later in this chapter offer suggestions for reducing the formality of PowerPoint.
Bridging with PowerPoint
Using PowerPoint when you are in the seminar style classroom can create a sense of technological continuation between the classrooms. You might want to incorporate some of the material produced in the LAN into a PowerPoint presentation.
When and How to Use PowerPoint
How much you use PowerPoint will vary based on your particular teaching style. The next section provides a list of suggestions for incorporating PowerPoint into daily instruction. Keep in mind that using PowerPoint requires planning; you need to prepare your presentation in advance.
You will find detailed instructions on how to use PowerPoint in the CIC Student Guide portion of this manual.
Options for Using Power Point
Option 1: illustrated lectures.
When giving a lecture or mini-lecture, you can use PowerPoint to highlight key points in your presentation. The visual format of PowerPoint allows you to easily project timelines, and images. You can also use PowerPoint to provide an outline of your talk, without writing on the board.

Option 2: Instructions
You can use PowerPoint to present instructions for a paper assignment or class activity. The sequential order of the slides lends itself to providing step-by-step instructions.
Option 3: Paper Proposals
Students can present their paper proposals or outlines to the class via PowerPoint. For example, a student could present his or her claim on one slide, following by an outline for the paper on another. Or the student could combine the table feature to present two possible outlines for the paper side by side.
SAMPLE ASSIGNMENT (Kimberlee Gillis-Bridges)
This assignment gives students the option of using PowerPoint.
The proposal assignment allows you to develop a tentative thesis, pose arguments related to this thesis, identify potential evidence and consider organizational strategies for your comparison/contrast essay. You may submit the proposal in a word-processed format, or you may use PowerPoint. You may also integrate images into the proposal, particularly as you discuss shots and scenes you will analyze in the essay. In completing the proposal, you will produce a roadmap to guide your drafting process.
Although the proposal can take a variety of formats, it should include the following components:
- A tentative title for the essay.
- The names of the films you will compare/contrast.
- The theme you plan to address and an indication of how you plan to narrow the theme.
- A tentative thesis that addresses the significance of the films’ similarities and differences.
- An overview of the similarities and differences you will address in the essay.
- A description of the shots or scenes you plan to analyze, with notes on the arguments you plan to make about these shots and scenes.
- An indication of the order in which you plan to make your points. You may do this in the form of a list, a descriptive outline, or any other format that works for you.
- A list of any questions you have regarding the assignment or your ideas-in-progress.
While I have listed the elements you should include, you can address them in an order you wish. For example, you may integrate the overview of similarities and differences and the listing of shots/scenes into the outline of points. You may also incorporate anything else that will help you draft the essay (excerpts from your electronic responses; quotations from lecture, readings, or others’ electronic responses; notes taken during in-class presentations, etc.).
Option 4: Discussion Prompts
You can use PowerPoint to project a discussion prompt to the class. This technique is particularly suited to a short writing exercise. Since the prompt is already legibly written on the slide, students can refer back to it easily as they complete a writing activity prior to discussion. You can then use PowerPoint to project bulletin board or other class materials relevant to the prompt and/or follow up questions.
Note : projecting a quote from a Bulletin Board discussion followed by a discussion question is a simple and effective way to bridge discussions when moving between rooms.

Option 5: Test or Quiz Answers
PowerPoint gives you the ability to project a test or quiz question, discuss it with the class, and then project the answer below or alongside the question. You can also use PowerPoint to project student responses to questions.

Option 6: Grammar Exercises
You can use PowerPoint to grammatical instructions, samples from student papers, and revised sentences, among other possibilities. The ability to reveal the text on the screen a section at a time allows students to clearly see the editing process.
Option 7: Student Projects
Most of the options described above are also suited to student presentations. You can require students to use PowerPoint for individual or group presentations or you can give students the option of using PowerPoint. You may be surprised how many students will take the option.
SAMPLE EXERCISE: USING POWERPOINT FOR STUDENT-LED GROUP DISCUSSION OF TEXTS (Laurie George)
An excellent pedagogical means of keeping class discussion lively, the discussant pool diverse, and the selected texts intellectually engaging is to assign a pair or a group of students to lead a discussion on a given text. The exercise can include close reading exclusively, or it can include the researching, summarizing, and presenting of one or two critical articles on that text.
The technique works particularly well if presenters are required to quote short passages from the articles on PowerPoint slides and to provide summaries of whatever quoted—a requirement that reinforces in each class session the practice of never allowing a secondary quoted source to stand alone without critical interpretation.
The technique also works well if portions of class sessions are set aside to allow students to research articles (on campus, via the UW Libraries English Research Guide as well as to allow adequate preparation time for presenters to confer and design their PowerPoint drafts—best to set limits on these, say, five or eight slides, as presenters rarely gauge time accurately and always have more to say during the discussion than they initially anticipate.
Also helpful is to require that the last PowerPoint screen include at least two but no more than four questions about the textual subject under discussion/ and or the textual relevance of the articles summarized.
Here’s an example from a senior seminar discussion of Ali Smith’s novel Hotel World :

Below is an explanation I included within my syllabus about using PowerPoint as an aid to discussion leading; the course was a senior seminar that focused on variations of voice in literary texts:
For Group or Solo Presentation (Discussion Leading) Projects
Everyone in class needs to take responsibility for leading a class discussion about a particular aspect of voice used in our course texts.
A short PowerPoint slide show is required for all presentations, and we’ll use class time to prepare at least skeletal drafts of the PowerPoints.
Here’s how to prepare:
- Coordinate with me and other presenters before the actual presentation to ensure variety rather than redundancy in topic matter that centers on style and voice in your assigned text.
- Rehearse your presentation, and if it bores you at any point or doesn’t reveal something interesting about a writer’s voice as conveyed in style, revise the presentation so that it does engage and interest.
- Produce and rely on a brief (3- 5 PowerPoint screens) to cover the points that you are explaining. Quote short textual passages on these screens and mark them so as to make them largely visible and to keep people’s attention on the screen and your voice.
- Use another audio/visual aid (besides your own voice and not just the print book you’re working with) in your presentation to give your presentation pizzazz—and don’t hesitate to employ words like pizzazz in your PowerPoint script, as this is a class about literary voice! Item 1
Additional Resources
- YouTube Comedy Video on How NOT to Use Powerpoint This 4 minute video is a low-key way to introduce students to some of the more extreme abuses of PowerPoint.
- Bedford St. Martins Tutorial on Preparing Presentation Slides This is an online tutorial with some solid nuts and bolts guidelines for building audience-friendly slides. It can also be used as a point of discussion for how "rules of thumb" can cause problems in presenting complex material.
- Excerpt from Edward Tufte's The Cognitive Style of Powerpoint This essay is a classic for critiquing how Powerpoint can reduce the analytical complexity of data and conclusions, in some cases leading to bad and even dangerous decisions in technical environments.
- Newsletter
- My presentations
Auth with social network:
Download presentation
We think you have liked this presentation. If you wish to download it, please recommend it to your friends in any social system. Share buttons are a little bit lower. Thank you!
Presentation is loading. Please wait.
To view this video please enable JavaScript, and consider upgrading to a web browser that supports HTML5 video
Selection and Preparation of Instructional Materials
Published by Victor Shields Modified over 8 years ago
Similar presentations
Presentation on theme: "Selection and Preparation of Instructional Materials"— Presentation transcript:

The chalkboard and other display materials

How does learning take place?

Approach, Methods, Techniques

Um Alkhair Primary School Mrs.LAtifah. Teaching aids ?! Teaching aids are helpful tools for teaching in a classroom or with individual learners. Teachers.

Audio, Visual, and Digital Technologies in Teaching

The Role of the Teacher in Purposeful Learning. Clarifying Objectives n Setting realistic goals n Identification and clarification of associated objectives:

Audio and Visual Technologies

Visual Aids in Learning

Creating and Using Presentational Aids Presentational Aids: Visual, audio, or audiovisual aids that help you express ideas in your speech.

Instructional Media and Materials

Instructional Media as Teaching Aids

Created by: Britney Murphy Visual Literacy Britney Murphy.

TEACHING WITH CONTRIVED EXPERIENCE

AUDIO VISUAL AIDS DEFINITION.

DEMONSTRATION IN TEACHING

Teaching and Learning with Technology Click to edit Master title style Allyn and Bacon 2002 Teaching and Learning with Technology Click to edit Master.

EFFECTIVE CLASS MANAGEMENT: A PRACTICAL APPROACH units Mary Underwood.

Introduction to Primary Science APP. What do the AFs look like? AF1 – Thinking Scientifically AF2- Understanding the applications & implications of science.

© 2011 Cengage Learning. All Rights Reserved. CHAPTER 9 Presentation Aids 9.1Presentation Aids 9.2 Create Presentation Aids 9.3Display and Use Presentation.

Agenda Welcome Session Objectives
About project
© 2024 SlidePlayer.com Inc. All rights reserved.

Using and Evaluating Instructional Materials
Nov 04, 2014
380 likes | 3.08k Views
Using and Evaluating Instructional Materials. “ You should have a good idea of your destination, both in the over-all purposes of education and in the everyday work of your teaching. If you do not know where you are going, you cannot properly choose a way to get there.”. Questions:
Share Presentation
- instructional materials
- instructional objective
- evaluating instructional materials
- materials contribute meaningful content

Presentation Transcript
“ You should have a good idea of your destination, both in the over-all purposes of education and in the everyday work of your teaching. If you do not know where you are going, you cannot properly choose a way to get there.”
Questions: 1.From the conversation, Linus said: “It was real field, and we saw it ……we saw the field. What senses were at work in the field trip? 2. Did the field trip accomplish something specific for Linus? Why do you say so?
FIELD TRIP • One of the instructional materials used to attain instructional objectives • It is not enough to bring the class out for a field trip and make them observe anything or everything or use other instructional materials for no preparations and clear reason at all.
For an effective use of instructional materials such as fieldtrip, there are guidelines that ought to be observed • SELECTION • THEIR USE
SELECTION OF MATERIALS • Do the materials give a true picture of the ideas they present? • Do the materials contribute meaningful content to the topic understudy? Does the material help you achieve the instructional objective? • Is the material appropriate for the age , intelligence , and experience of the learner?
Is the physical condition of the material satisfactory? • Is there a teacher’s guide to provide a briefing for effective use? • Can the materials in question help to make students better thinkers and develop their critical faculties? • Is the material worth the time , expense and effort involved?
The Proper Use of Materials Hayden Smith & Thomas Nagel • book authors on Instructional Media • the one who give the acronym PPPF
P=repare yourself P=repare your student P=resent the material F=ollow up
Prepare yourself : You know your lesson objectives and what you expect from the class after the session and why you have selected such particular instructional materials. Prepare your students : Set class expectations and learning goals.
Present the materials : under the best possible conditions. Many teachers are guilty of the R.O.G. Syndrome. This means “running out of gas’ which usually results from poor planning. Follow up : remember that you use instructional materials to achieve an objective , not to kill time nor to give yourself a break , neither to merely entertain the class.
- More by User

Authoring Instructional Materials (AIM)
Authoring Instructional Materials (AIM). December 2008. Jake Aplanalp AIM/CPM Program Manager NAWCTSD Orlando 407.380.4685 [email protected]. Focus of Presentation. AIM Background & History AIM & Current Navy Standards AIM Software Status AIM & Future Navy Standards Questions.
409 views • 19 slides

Chapter 12 Instructional Materials
Chapter 12 Instructional Materials. Instructional Materials Print and Nonprint Media. Definition: the tangible substances and real objects used to help communicate information necessary for learning Purposes: to help the nurse educator deliver a message creatively and clearly.
2.85k views • 35 slides

Instructional Materials Accessibility
Instructional Materials Accessibility. ATI Technical Assistance Workshop October 30, 2006. Welcome. Introductions Mark Turner, Director, CSU Center for Accessible Media, CSU Office of the Chancellor Jeff Senge, Coordinator, Information and Computer Access Program, CSU Fullerton Logistics
470 views • 18 slides

Instructional Materials and Their Modification
Instructional Materials and Their Modification. How to select programs and materials to meet the special needs of your students. Types of Math Programs. Developmental Basals Specific-Skill Programs Programs for Low-Performing Students. Developmental Basals. Advantage
350 views • 16 slides

Evaluating the Conceptual Coherence and Rigor of Instructional Materials
Evaluating the Conceptual Coherence and Rigor of Instructional Materials. Florida Association of Science Supervisors 5 May 2005 Jody Bintz, BSCS Center for Professional Development. Think of a district science team working together to select or recommend instructional materials…
543 views • 34 slides

Instructional Materials Packet
Instructional Materials Packet. Eng 484/584 Prof. Krase. Duman, Mast, Meisch. (2010). . Primary Theories and Concepts. Building Upon Previous Knowledge Using Schema Theory Engaging Students in the Learning Process by Using Collaboration
231 views • 9 slides

Making instructional materials
Making instructional materials. By: Jopet Norven A. Japzon. S I ZE. C O L O R. DURABILITY. ECONOMY. EASY TO HANDLE. RELEVANCE. NOVELTY. REFERENCES.
605 views • 10 slides

Instructional Materials Overview
Instructional Materials Overview. David Sikes, Deputy Chief, Bureau of Curriculum and Instruction Florida Department of Education. Instructional Materials Adoption. Instructional Materials Adoption Process All Electronic Review Process Two-Phased Review Process Expert Reviewers on Content
298 views • 8 slides

EVALUATING CURRICULUM AND INSTRUCTIONAL MATERIALS
EVALUATING CURRICULUM AND INSTRUCTIONAL MATERIALS. Joseph Krajcik Michigan State University NGSS Annual Meeting for State Leadership Teams and National Partners Georgia Aquarium Atlanta, Georgia February 18-19, 2014.
291 views • 13 slides

Accessible Instructional Materials Basics
Accessible Instructional Materials Basics. Instructional Materials. Instructional Materials. Textbooks and related core materials published with the texts Required by the Florida Dept. of Education or the school district Described by FDOE as “major instructional tools”
353 views • 15 slides

Evaluating & Choosing Instructional Software
Evaluating & Choosing Instructional Software. Edited by: Sandra Lebrón-Lozada, M. Ed. May, 2006. Introduction Objectives and Expectations. Workshop Objectives. By the end of this workshop you should: Know the distinctions among software applications used in instruction.
671 views • 55 slides

Finding Instructional Materials
Finding Instructional Materials. Log on to Power School and go to Schoolnet. Mouse over Classrooms and select Instructional Materials. Select subject by checking appropriate box. Select appropriate grade level(s).
222 views • 10 slides

Authoring Instructional Materials (AIM). Implementing AIM at Your Activity – A General Approach Based on Lessons Learned. December 2008. Jake Aplanalp AIM/CPM Program Manager NAWCTSD Orlando 407.380.4685 [email protected]. Objective of Presentation.
265 views • 11 slides

Criteria in Evaluating Instructional Material
Criteria in Evaluating Instructional Material. By: Lezeil Mae E. Enriquez. 1. Size. Invention and Discoveries. 2 . Color. 3. Durability. 4. Economy. 5. Easy to handle. 6. Relevance. Educational Technology class. 7. Novelty. Plasma Ball. References:.
258 views • 10 slides

Authoring Instructional Materials (AIM). Implementing AIM at Your Activity – A General Approach Based on Lessons Learned. March 2012. Tiffany Dombrowski AIM/CPM Program Manager NAWCTSD Orlando 407-380-4431 [email protected]. Objective of Presentation.
238 views • 12 slides

Instructional Development (EDER675) Evaluating Instruction
Instructional Development (EDER675) Evaluating Instruction. Agenda for tonight. Review of Instructional Strategies Instructional Materials New: Evaluation Program Evaluation Case: Sam Gonzales (Jeremy).
191 views • 3 slides

Instructional Materials:
Instructional Materials:. The Future is Here. What is Happening Nationally?. SMARTER Balanced Assessment Consortium (SBAC). Smarter Balanced Assessment Consortium. Assessment Design. The Consortium will provide the following by the 2014-15 school year: 3. Formative tools and resources
467 views • 21 slides

Design and Development of Instructional Materials
Design and Development of Instructional Materials. Graduate Institute of Library and Information Studies National Taiwan Normal University 邱銘心 Ming-Hsin Phoebe Chiu [email protected]. Agenda. Getting to know you & me Course syllabus What is instructional design? ADDIE preview/review.
463 views • 12 slides

143 views • 13 slides

Chapter 12 Instructional Materials. IS THERE A DIFFERENCE BETWEEN INSTRUCTIONAL METHODS AND INSTRUCTIONAL MATERIALS. INSTRUCTIONAL METHODS. INSTRUCTIONAL MATERIALS. Instructional Methods and Material are NOT the same and a clear distinction should be made between them .
909 views • 56 slides
- Create an email message
- Suggested recipients
- Use @mentions
- Create a signature
- Add attachments
- Check spelling
- Add a reaction
- Out of office replies
- Delay or schedule
- Recall a message
- Automatic forwarding
- Read receipt
- Save a file or draft
- Change display name
- Create a folder
- Use inbox rules
- Conditional formatting
- Use Favorites
- Custom views
- Message font size
- Message list view
- Focused Inbox
- View as conversations
- Filter and sort messages
- Number of messages
- Chat with recipients
- Share an email
- Status in Outlook
- Phishing and suspicious behavior
- Blocked senders
- Protected messages
- Open a protected message
- More to explore

Create and add an email signature in Outlook
In Outlook, you can create one or more personalized signatures for your email messages. Your signature can include text, links, pictures, and images (such as your handwritten signature or a logo).
Note: If the steps under this New Outlook tab don't work, you may not be using new Outlook for Windows yet. Select Classic Outlook and follow those steps instead.
Create and add an email signature
On the View tab, select View Settings .
Select Accounts > Signatures .
Select New signature , then give it a distinct name.
In the editing box below the new name, type your signature, then format it with the font, color, and styles to get the appearance you want.
Select Save when you're done.
With your new signature selected from the list above the editing box, go to Select default signatures and choose whether to apply the signature to new messages and to replies and forwards.
Select Save again.
Note: If you have a Microsoft account, and you use Outlook and Outlook on the web or Outlook on the web for business, you need to create a signature in both products.
Create your signature and choose when Outlook adds a signature to your messages
If you want to watch how it's done, you can go directly to the video below .
Open a new email message.

Under Select signature to edit , choose New , and in the New Signature dialog box, type a name for the signature.
Under Edit signature , compose your signature. You can change fonts, font colors, and sizes, as well as text alignment. If you want to create a more robust signature with bullets, tables, or borders, use Word to create and format your signature text, then copy and paste it into the Edit signature box. You can also use a pre-designed template to create your signature. Download the templates in Word, customize with your personal information, and then copy and paste into the Edit signature box.

You can add links and images to your email signature, change fonts and colors, and justify the text using the mini formatting bar under Edit signature .
You can also add social media icons and links in your signature or customize one of our pre-designed temlates. For more information, see Create a signature from a template .
To add images to your signature, see Add a logo or image to your signature .
Under Choose default signature , set the following options.
In the E-mail account drop-down box, choose an email account to associate with the signature. You can have different signatures for each email account.
You can have a signature automatically added to all new messages. Go to in the New messages drop-down box and select one of your signatures. If you don't want to automatically add a signature to new messages, choose (none). This option does not add a signature to any messages you reply to or forward.
You can select to have your signature automatically appear in reply and forward messages. In the Replies/forwards drop-down, select one of your signatures. Otherwise, accept the default option of (none).
Choose OK to save your new signature and return to your message. Outlook doesn't add your new signature to the message you opened in Step 1, even if you chose to apply the signature to all new messages. You'll have to add the signature manually to this one message. All future messages will have the signature added automatically. To add the signature manually, select Signature from the Message menu and then pick the signature you just created.
Add a logo or image to your signature
If you have a company logo or an image to add to your signature, use the following steps.
Open a new message and then select Signature > Signatures .
In the Select signature to edit box, choose the signature you want to add a logo or image to.

To resize your image, right-click the image, then choose Picture . Select the Size tab and use the options to resize your image. To keep the image proportions, make sure to keep the Lock aspect ratio checkbox checked.
When you're done, select OK , then select OK again to save the changes to your signature.
Insert a signature manually
If you don't choose to insert a signature for all new messages or replies and forwards, you can still insert a signature manually.
In your email message, on the Message tab, select Signature .
Choose your signature from the fly-out menu that appears. If you have more than one signature, you can select any of the signatures you've created.
See how it's done

Top of page
Note: Outlook on the web is the web version of Outlook for business users with a work or school account.
Automatically add a signature to a message
You can create an email signature that you can add automatically to all outgoing messages or add manually to specific ones.
Select Settings at the top of the page.
Select Mail > Compose and reply .
Under Email signature , type your signature and use the available formatting options to change its appearance.
Select the default signature for new messages and replies.
Manually add your signature to a new message
If you've created a signature but didn't choose to automatically add it to all outgoing messages, you can add it later when you write an email message.
In a new message or reply, type your message.

If you created multiple signatures, choose the signature you want to use for your new message or reply.
When your email message is ready, choose Send .
Note: Outlook.com is the web version of Outlook for users signing in with a personal Microsoft account such as an Outlook.com or Hotmail.com account.
Related articles
Create and add an email signature in Outlook for Mac
Create an email signature from a template

Need more help?
Want more options.
Explore subscription benefits, browse training courses, learn how to secure your device, and more.

Microsoft 365 subscription benefits

Microsoft 365 training

Microsoft security

Accessibility center
Communities help you ask and answer questions, give feedback, and hear from experts with rich knowledge.

Ask the Microsoft Community

Microsoft Tech Community

Windows Insiders
Microsoft 365 Insiders
Find solutions to common problems or get help from a support agent.

Online support
Was this information helpful?
Thank you for your feedback.
IMAGES
VIDEO
COMMENTS
When effectively planned and used, PowerPoint (or similar tools, like Google Slides) can enhance instruction. People are divided on the effectiveness of this ubiquitous presentation program—some say that PowerPoint is wonderful while others bemoan its pervasiveness.
Abstract. Nowadays , PowerPoint is an educational tool for teaching and delivering materials in classes. It was basically developed for. presentation and not essentially for teaching and learnin g ...
Abstract. Nowadays, PowerPoint is an educational tool for teaching and delivering materials in classes. It was basically developed for presentation and not essentially for teaching and learning in a classroom. Its applications in teaching and learning settings should provide better means of communicating information to the students.
Advice from Edelman and Harring on leveraging the working memory with PowerPoint: Leverage the working memory by dividing the information between the visual and auditory modality. Doing this reduces the likelihood of one system becoming overloaded. For instance, spoken words with pictures are better than pictures with text, as integrating an ...
Additionally, by using PowerPoint slides in conjunction with other instructional materials, such as textbooks and handouts, teachers can ensure that all students are able to access the information being presented in class. PowerPoint presentations can be a powerful tool for teaching and learning when used effectively.
PowerPoint presentations are used in many different fields due to their ability to organize and structure information, create a consistent format, and provide the audience with visuals. Educators often use this type of presentation in their classrooms in order to guide the class through a lecture. The effectiveness of PowerPoint presentations ...
Developing Interactive Instructional Materials using Powerpoint PresentationGuest Facilitator, Eschnaseth Maceda, Master Teacher II from F.G. Calderon High S...
Activity 11.1: Creating Written Instructional Materials. Imagine you are developing an information packet to be shared with new patrons at your library. Choose one of the examples below and develop a brief guide to be included in the packet. ... The presentation Quite Possibly the World's Worst PowerPoint Presentation Ever consists of a ...
ISSN: 2243-7703. Online ISSN: 2243-7711. OPEN ACCESS. Abstract. PowerPoint Presentation (PPT) is a common instructional software or program used by. teachers in I CT-rich classrooms. However, many ...
Option 1: Illustrated Lectures. When giving a lecture or mini-lecture, you can use PowerPoint to highlight key points in your presentation. The visual format of PowerPoint allows you to easily project timelines, and images. You can also use PowerPoint to provide an outline of your talk, without writing on the board.
Accounting for curriculum and instructional strategies, the device presents all components of language with production and receptive tasks. ... The efficacy of using power point presentations to ...
Thank you guys for watching!Don't forget to LIKE, SHARE and SUBSCRIBE.Follow me on:Facebook:https://www.facebook.com/michael.tattao.5Instagram:https://www.in...
dEVELOPMENT OF Instructional materials and media. May 30, 2019 • Download as PPTX, PDF •. 12 likes • 6,750 views. MARIA KATRINA MACAPAZ. Follow. dEVELOPMENT OF Instructional materials and media. Education. 1 of 44. Download now.
16 likes • 2,362 views. M. MichelleDela. This presentation provides an information about preparation of Instructional Materials which includes its definition, roles, types, and basic principles. Education. 1 of 24. Download now. Presentation on preparation of instructional materials - Download as a PDF or view online for free.
2. • (wikianswer.com) these are materials that are use to aid in the transference of information from one to another. • These instructional materials could include power point presentations (visual aids), books, articles, materials for project development. • content that conveys the essential knowledge and skills of a subject in the school curriculum through a medium or a combination of ...
The media used is powerpoint which is powerpoint is very helpful for teachers to prepare teaching materials and can help attract students' interest and attention so students can learn well ...
Characteristics of the Task Learning domain Complexity of behavior. 12 Three Major Components of Instructional Materials. Delivery System Definition : both the software (physical form) and the hardware used to present materials Examples Software (physical form) : Power Point slides , DVDs Hardware : computer, DVD players. 13 COMPONENTS (CONT ...
4 Values and Importance of Instructional Materials. 1. To help clarify important concepts. 2. To arouse and sustain student's interests. 3. To give all students in a class the opportunity to share experiences necessary for new learning. 4. To help make learning more permanent.
Preparation for Instructional Materials (powerpoint) Sep 3, 2014 • Download as PPTX, PDF •. 12 likes • 12,180 views. Manilyn Cabayao. I.Ms. Education. 1 of 13. Download now. Preparation for Instructional Materials (powerpoint) - Download as a PDF or view online for free.
Making instructional materials. An Image/Link below is provided (as is) to download presentation Download Policy: Content on the Website is provided to you AS IS for your information and personal use and may not be sold / licensed / shared on other websites without getting consent from its author. Download presentation by click this link.
Prepare yourself : You know your lesson objectives and what you expect from the class after the session and why you have selected such particular instructional materials. Prepare your students : Set class expectations and learning goals. Present the materials : under the best possible conditions. Many teachers are guilty of the R.O.G. Syndrome.
Jul 11, 2013 • Download as PPTX, PDF •. 118 likes • 122,782 views. Draizelle Sexon. Education Technology. 1 of 36. Download now. Instructional materials - Download as a PDF or view online for free.
On the View tab, select View Settings . Select Accounts > Signatures. Select New signature, then give it a distinct name. In the editing box below the new name, type your signature, then format it with the font, color, and styles to get the appearance you want. Select Save when you're done. With your new signature selected from the list above ...
Instructional material. For instance, the American Heart Association produces many fine booklets on cardiac and stroke education for patients and families that cost 50 cents or less when bought in bulk. An educator would need to spend hours researching, writing, and copying materials to create information packets of equal quality. The American ...