

Written by Casey Botticello
Disclosure : Some of the links below are affiliate links, meaning that at no additional cost to you, I will receive a commission if you click through and make a purchase. For more information, read our full affiliate disclosure here .
Great graphic design is the secret super power behind many content creators. However, for many content creators, graphic design is either too time consuming to tackle or too expensive when outsourced to professional designers. Luckily, Canva has made creating your own custom designs much easier. In this tutorial, our team of design experts will cover how to turn a presentation into a video, in Canva. This has many useful applications. Content creators can turn ordinary presentations into courses, webinars, or narrated educational material.
How to Turn a Presentation into a Video in Canva
1. click on presentation option on canva’s homepage.

Go to the Canva homepage and search for ‘Presentation’. This will allow you to see so many ready-to-use templates. Some of the templates are free while others are for ‘Pro’ users only. You can use this link to get a free 30 day trial of Canva Pro!
2. Edit Slides
Let’s say we are making for an aesthetic mood board for your traveling photography business. All you need to do is select the appropriate mood board template for it. You can also choose any of the templates and customize them according to your requirements.
")
3. Add Presentation Notes
Once you are happy with your presentation, you can also add notes at the bottom of the page. You can add important bullet points or the script in the notes. It will help you to remember the important things while presenting it.
")
4. Use Present and Record Feature
After adding the notes, your presentation is ready to record. So all you need to do is go to the three dots menu and select ‘Present & Record’.
")
5. Activate Webcam or Microphone
You can also ‘Pause’ and ‘Resume’ your recording in case you want to move from the WebCam. This will record your screen and yourself in the circular webcam at the bottom of the page.
")
6. Share Link or Download Video
After recording, you can use the ‘Copy Link’ option to get a sharable link. You can also download the recorded presentation. You can use a shareable link in emails or directly send the downloaded recording.
")
7. View Final Product (with You Face Appearing in the Circular Cam)
The results will look as shown below. You can see yourself in the circular cam at the bottom corner of the page.
")
Canva is an amazing graphic design tool, and I hope you found this tutorial covering how to turn a presentation into a video in Canva, useful! Click here to read our comprehensive Canva Guide. If you haven’t tried CanvaPro, click here to try it for free for 30 days through our exclusive offer! Below are several related Canva tutorials that you might find useful.
Related Articles
Latest Posts
- Mediavine vs. Raptive
- March 2024 Niche Site Report
- How to Configure Your Mediavine Ad Settings to Optimize RPM
- Why Was My Blog Rejected by Mediavine?
- February 2024 Niche Site Report
- Presentation Design
Creating a Presentation Video with Canva
- By: Amy Boone
Dynamic animation and videos are a hot trend in presentation design these days. But what if you’ve never created a presentation video before?
Today we’re going to show you how to create a customized Canva video in 5 simple steps. Then, on our next blog, we’ll show you how to embed that video into your PowerPoint presentation. Let’s get started.
Step 1: Gather The Elements for Your Presentation Video
Let’s say you are asked to give a presentation at your company’s end of the month meeting. Your boss asks you to include a short video congratulating the two recent college graduates on your team. The first thing you need to do is gather the elements you want to use in your video. That includes digital picture or video files from the graduates.
Step 2: Log Into Canva
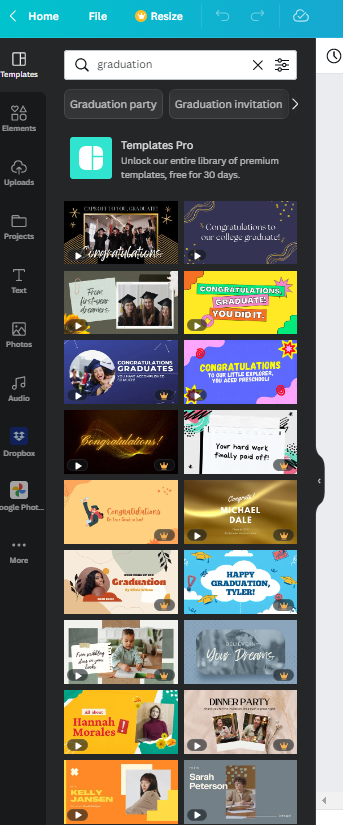
Once you have the pictures and video files you want to use, log into Canva (it’s free!), and click on the video icon at the top of the page near the center. Once you click on videos, you can enter “graduation” in the search bar on the left to pull up graduation video templates.
Step 3: Customize Your Presentation Video
In this step, you’ll make the video your own, changing the elements you don’t like and incorporating the ones you gathered in the first step. For example, I want to change the template font with one that is easier to read. And I want to switch up the wording a bit. These are easy changes to make since Canva’s workspace is pretty user-friendly.
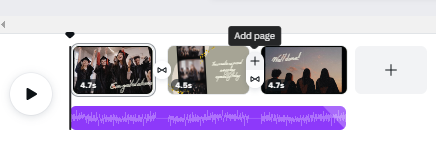
Next, I need to add the two pictures of the company graduates. In my video timeline at the bottom of the screen, I’ll click on the circle in between the pages and select “add page.” I’ll do this twice to create two separate pages, one for each graduate.
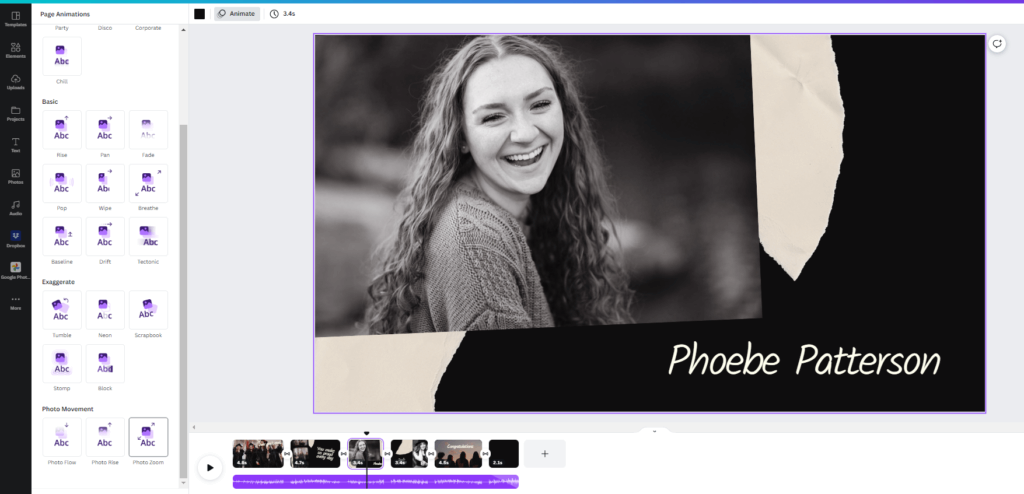
From here, I copied some of the background elements that were used in the template (the shapes that look like ripped paper) and I simply inserted the pictures in front of those. I chose to animate the photos with the “photo zoom” function in the animate menu so that there is slight movement when the pictures appear.
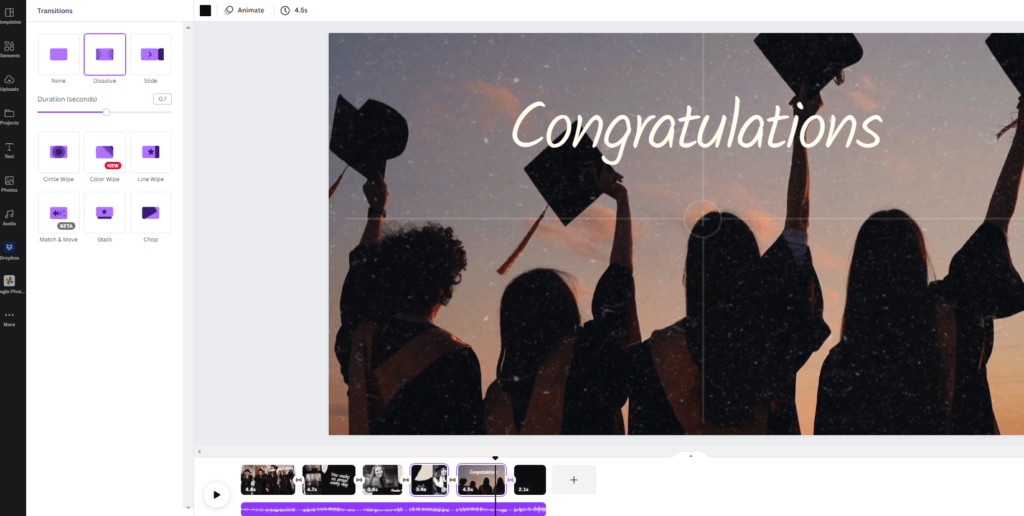
Step 4: Add Transitions
Once you have all of the pages and elements of your video in place, it’s time to make the video flow smoothly. You’ll find the transition options right below the “add page” button in between the pages. There’s no one right transition. It really depends on the template you’ve chosen and the elements you’ve used in the video. Just keep in mind that the best transitions are the ones that don’t draw too much attention to themselves. For this video, I chose the dissolve transition.
Step 5: Add Music
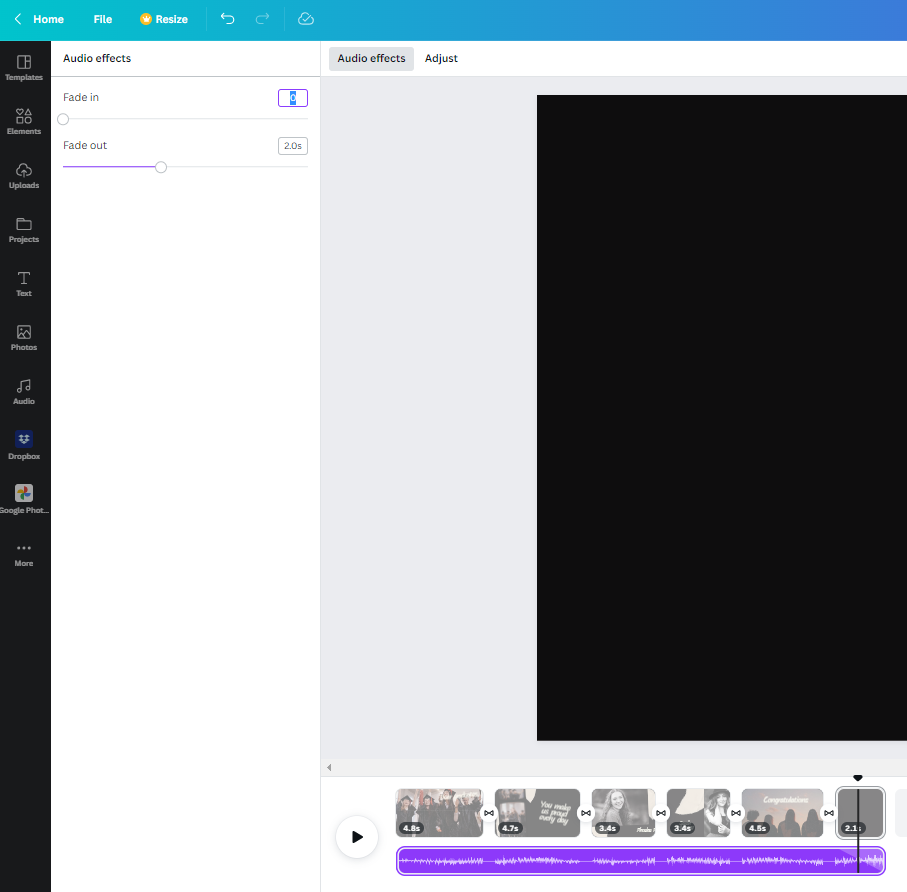
Finally, it’s time to add music. Most Canva video templates will come with audio already attached. However, it’s easy to change your audio track. You can use some of the royalty-free audio already in Canva’s library by clicking on the audio link in the left menu bar. Or you can upload free tunes from a website like Bensound.com. If your video requires you do voiceover work, you can record yourself and upload the audio file just like you did the photo files. Canva gives you the option to have multiple audio tracks, so you can include both music and voiceover narration.
The last thing you’ll want to do in this step is to drag your audio file a little bit into the blank, black slide and set it to fade out. You do this by clicking on the purple audio bar under the video timeline and then clicking “audio effects.”
You’ve now created a customized presentation video using both stock and personal files with Canva video (watch out Cannes film festival!). And hang tight, because on our next blog, we’re going to show you how to embed your newly created video into your PowerPoint presentation. Stay tuned.
We are passionate about dynamic presentation design. Ready to learn more?

Join our newsletter today!
© 2006-2024 Ethos3 – An Award Winning Presentation Design and Training Company ALL RIGHTS RESERVED
- Terms & Conditions
- Privacy Policy
- Diversity and Inclusion
We explain and teach technology, solve tech problems and help you make gadget buying decisions.
How to Create Presentations in Canva

Parth Shah is an evergreen freelance writer covering how-tos, app guides, comparisons, listicles, and troubleshooting guides on Android, iOS, Windows, Mac, and smart TV platforms. He has over five years of experience and has covered 1,500+ articles on GuidingTech and Android Police. In his free time, you will see him binge-watching Netflix shows, reading books, and traveling.
Canva recently introduced new tools to create docs, whiteboards, videos, websites, and presentations. As such, you no longer need to rely on traditional software solutions like Google Slides, PowerPoint, or Keynote to create an upcoming business presentation. You can easily create presentations in Canva using its familiar suite of editing tools.

Canva offers real-time collaboration, several export options, a present tool, AI add-ons, and much more to make a professional PPT. Canva also lets you make instant presentations with pre-filed slides. Without further ado, let’s get started.
Pick Up an Aspect Ratio and Template
Before you start, make sure to pick a relevant aspect ratio for your presentation. If it’s a traditional PPT, go with a 16:9 aspect ratio. If you plan to show your PPT on mobile, use the 9:16 aspect ratio.
Tablet users can start with a 4:3 aspect ratio. Canva also offers some ready-to-use templates to get started. We highly recommend starting with a template to save some time.

You can also filter templates via style, theme, feature, and color. For example, you can check company, marketing, corporate, marketing, school, and other templates. Most templates are free to use, while some may require a Canva Premium subscription.
Under templates, you also find an option to create instant presentations. You can enter a prompt and check Canva’s suggestions to get started.

Customize a Page With Editing Features
Once you pick up a template, you have the option to add all pages to your presentations. You can click ‘Apply all pages’ and check every slide at the bottom. You can always select a slide and hit delete to remove it from your presentation.

Canva lets you change every aspect of the template with different text styles, filters, and image editing tools. You can change color, tweak transparency, copy style, and more.

We suggest spending some time with editing tools to customize your Canva presentation and add some personal touches.
Add Graphics, Stickers, and Images
Your presentation will not seem as interesting without graphics, stickers, images, and videos. Unlike Google Slides or PowerPoint, you don’t need to import media files to Canva to complete your slides. You can easily add relevant elements from the sidebar.
Step 1: Open a slide in your Canva presentation.
Step 2: Select Elements from the sidebar. Add graphics, icons, stickers, tables, videos, and more.
Step 3: You can explore the AI image generator and turn your creative ideas into images and videos with a single click.

You can add simple descriptions and even turn generated images into videos. Canva also offers a long list of graphics packs in several categories. The possibilities are endless here. It’s up to you to make a compelling slide using useful tools.
Tweak Page Animation
Once you create a page, tweak its animation to make a smooth transition between pages.
Step 1: Select a slide in Canva.
Step 2: Click Animate at the top.
Step 3: Check basic, exaggerated, photo movement, and other animation types from the left sidebar.

You can also tweak the animation intensity, which is great.
Add Presenter Notes
Do you plan to present your Canva PPT on a video conference? You can add notes to each slide so they appear during the Presenter view (more on that later).
When you create a PPT, select a slide and hit Notes at the bottom. Enter your notes that you want to remember or talk about during a video meeting.

Collaborate and Edit in Real Time
Similar to Google Slides and Microsoft PowerPoint, Canva lets you share and edit a presentation in real time. You can take inputs from your colleagues and create a share-worthy presentation in no time.
Step 1: When you are done making changes to your presentation, click Share at the top.
Step 2: Enter people, groups, or your team. Expand the collaboration link menu and select Anyone with the link.
Step 3: Expand the permission menu and select Can edit.

You can also share a link with view or comment-only permission. Select the Copy link and share it with your co-workers.
Enable Presenter View
Presenter view is a thoughtful touch from Canva to give presentations over a Google Meet or Teams call.
You can open a presentation in Canva and select Present at the top. Click Presenter View and check two windows opening up on your computer.

One window shows your presentation with notes open on the sidebar. Another window displays the current slide you are sharing with others over a call.

Download and Share Your Presentation
As expected, Canva gives several options to share and export your presentation. When you complete your presentation, click Share in the top-right corner and expand Download.
You can convert a presentation to PDF, PPTX (Microsoft PowerPoint compatible), MP4, JPG, PNG and SVG formats. Check our dedicated post if you wish to print your Canva presentation .

Use Canva Like a Pro
Canva has done a solid job, granting users access to rich tools to create a convincing presentation. We can’t wait to see how the Australian startup enhances our PPT experience with AI features in the future. Speaking of which, we would love to see a feature similar to ‘Design Ideas from Microsoft PowerPoint’ on Canva. Do let us know if you use Canva for presentations in the comments below.
Was this helpful?
Last updated on 07 January, 2024
The above article may contain affiliate links which help support Guiding Tech. However, it does not affect our editorial integrity. The content remains unbiased and authentic.

The article above may contain affiliate links which help support Guiding Tech. The content remains unbiased and authentic and will never affect our editorial integrity.
DID YOU KNOW

More in Internet and Social

How to Get Gemini Advanced (Free and Paid)

How to Edit or Cancel a Scheduled Email in Gmail
Join the newsletter.
Get Guiding Tech articles delivered to your inbox.
How Do You Put a Video in a Canva Presentation?

Are you looking to add a video to your Canva presentation? Adding multimedia elements like videos can greatly enhance your presentations and make them more engaging for your audience. In this tutorial, we will guide you through the process of adding a video to your Canva presentation with ease.
Step 1: Upload Your Video
The first step is to upload the video that you want to include in your Canva presentation. To do this, follow these simple steps:
- Step 1: Open Canva and log in to your account.
- Step 2: Click on the "Uploads" tab located on the left sidebar.
- Step 3: Click on the "Upload an image or video" button.
- Step 4: Select the video file from your computer and click "Open".
Step 2: Add Video to Your Presentation
Once you have uploaded your video, you can easily add it to your Canva presentation using the following steps:
- Step 1: Open the Canva presentation where you want to insert the video.
- Step 2: Click on the "Elements" tab located on the left sidebar.
- Step 3: Scroll down and click on the "Videos" section.
- Step 4: You will see a list of pre-made video templates. Choose one that suits your needs or click on "Uploads" if you want to use your own uploaded video.
- Step 5: Drag and drop the selected video template onto your presentation slide.
Step 3: Customize the Video
Now that you have added the video to your Canva presentation, you can customize it to fit your requirements. Here are some customization options:
- Option 1: Resize the video: Click on the video element and drag the corners to resize it.
- Option 2: Change the video duration: Click on the video element and adjust the duration using the settings panel on the right side.
- Option 3: Add captions or subtitles: Click on the video element and click on "Captions" in the settings panel. You can either upload a .srt file or manually add captions.
Step 4: Preview and Present Your Video
You're almost done! Before presenting your Canva presentation with the added video, make sure to preview it to ensure everything is in order. To preview your presentation, follow these steps:
- Step 1: Click on the "Present" button located at the top right corner of Canva.
- Step 2: Navigate through your slides by using arrow keys or clicking on them.
Congratulations! You have successfully learned how to add a video to your Canva presentation. Now you can create stunning presentations that incorporate multimedia elements effortlessly. With Canva's user-friendly interface and powerful features, your presentations are bound to leave a lasting impression on your audience!
The availability of certain features may vary based on your Canva subscription plan. Make sure to check the feature availability before proceeding.

About the author:

Related posts
How Do I Put a YouTube Video Into a Canva Presentation? Have you ever wondered how to add a YouTube video to your Canva presentation? Well, you're in luck! In this tutorial, we will guide you through the... October 4, 2023 canva -->
How Do You Make a Canva Presentation? Creating visually appealing presentations is essential for grabbing your audience's attention and effectively conveying your message. One popular... October 4, 2023 canva -->
How Do You Insert a Table in Canva Presentation? What is a table? Tables are a powerful visual tool used in presentations to display data in an organized and structured manner. They consist of... April 10, 2023 canva -->
How Do You Present a Canva Presentation? Creating visually appealing and engaging presentations is crucial in today's digital age. With the rise of remote work and virtual meetings, having... September 24, 2023 canva -->
How Do I Embed a YouTube Video in Canva Presentation? Embedding a YouTube video into a Canva presentation is easier than you may think! Canva has prioritized making their platform easy to use and that... January 17, 2023 canva -->
How Do You Add Audio to Canva Presentation? Adding audio to your Canva presentation can enhance the overall experience for your audience. Whether you want to include background music,... October 4, 2023 canva -->
How Do You Make a Canva Video Presentation? Are you looking to create a captivating video presentation? Look no further than Canva! With its user-friendly interface and extensive library of... October 4, 2023 canva -->
How Do You Edit a Video in Canva News? How Do You Edit a Video in Canva News? Canva News is a powerful online tool that allows you to create and edit videos with ease. Whether you're a... October 4, 2023 canva -->
How Do You Use Canva for a Presentation? Canva is a powerful graphic design tool that can be used for various purposes, including creating stunning presentations. With its user-friendly... October 2, 2023 canva -->
How Do I Edit a Video in Canva Studio? Are you looking to edit a video in Canva Studio? You've come to the right place! Canva Studio is a powerful online design tool that allows you to... October 2, 2023 canva -->
You haven't yet saved any bookmarks. To bookmark a post, just click .
How Do I Turn a Video Into a Canva Slideshow?
Last updated on April 14, 2023 @ 5:06 am
There is one simple way that you can turn a video into a Canva slideshow. That is to download your video as a presentation. This is a great option if you want to quickly and easily convert your video into a slideshow.
To get started, simply upload your video file to Canva and open it.
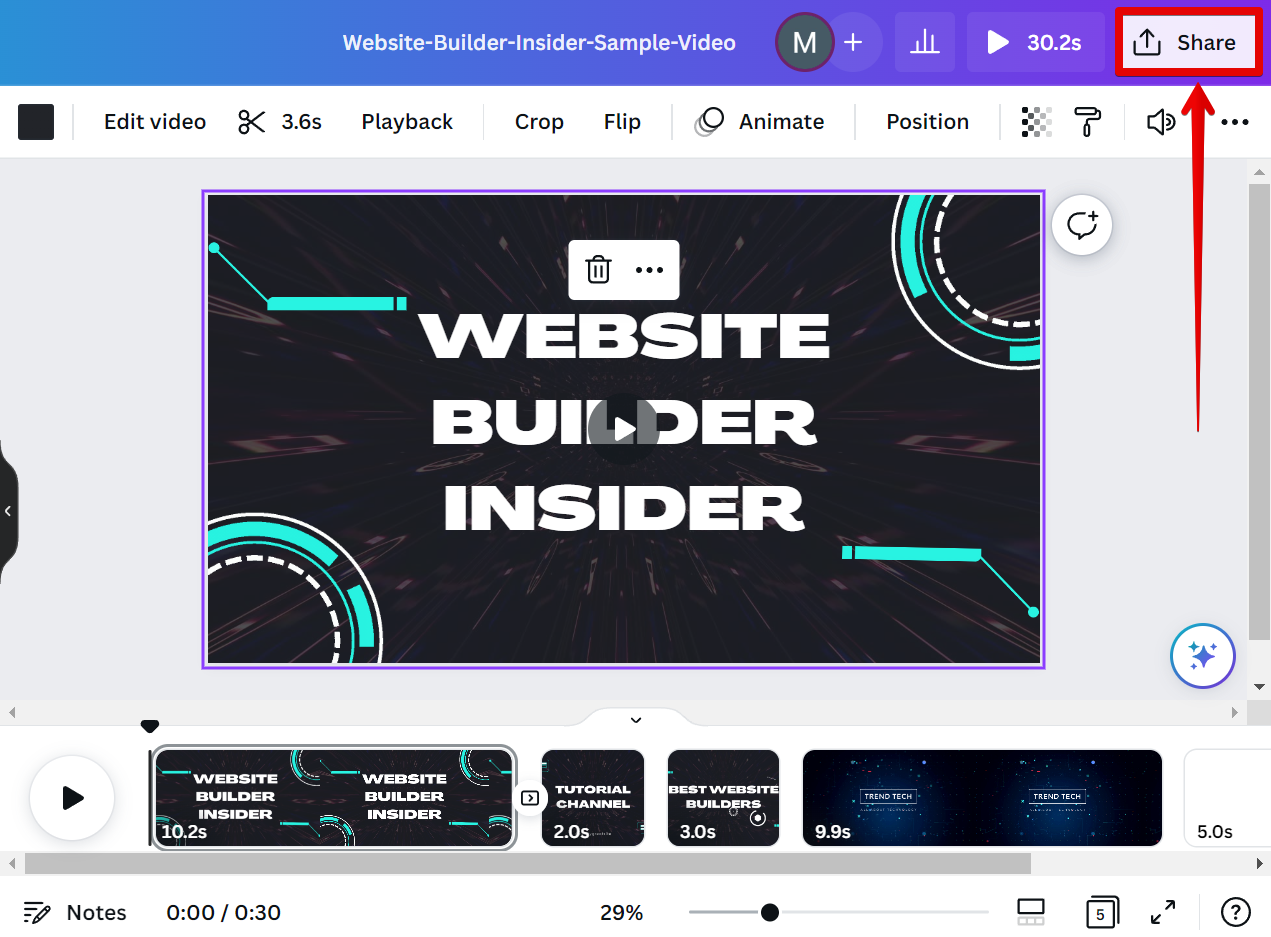
From there, go to the top menu and select the “ Share ” button.
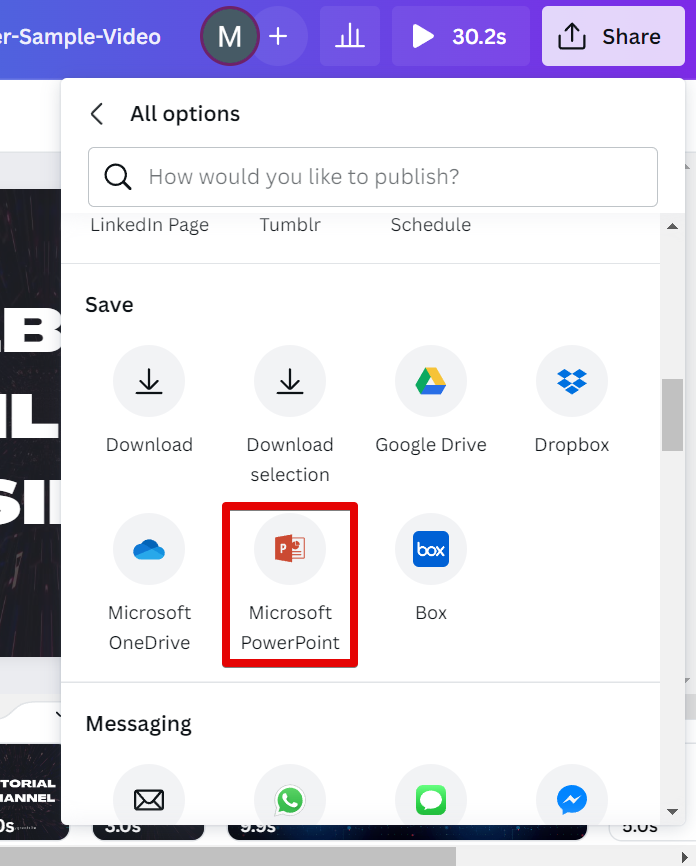
In the Share menu, scroll down and select the “ More ” option at the bottom to open the “ All options ” window.
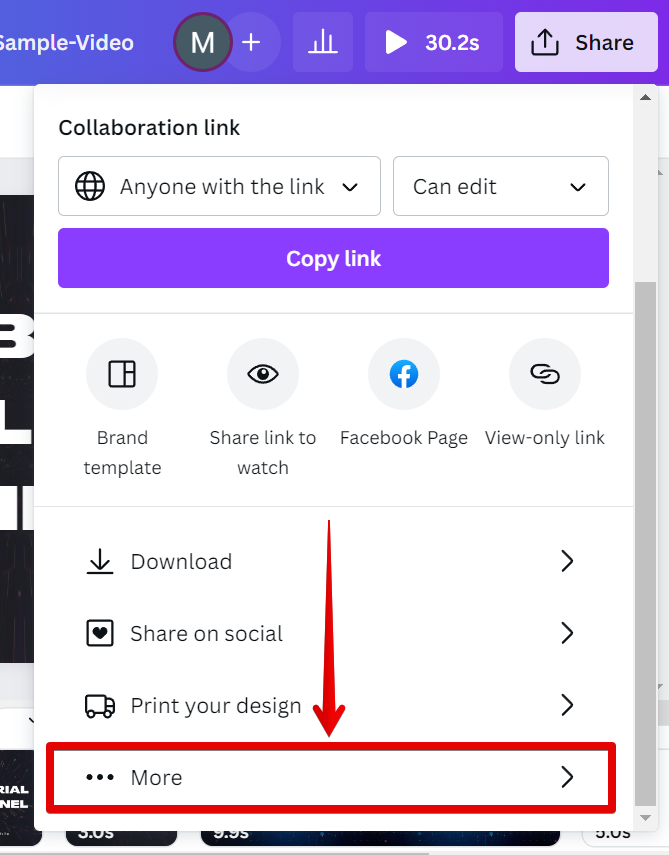
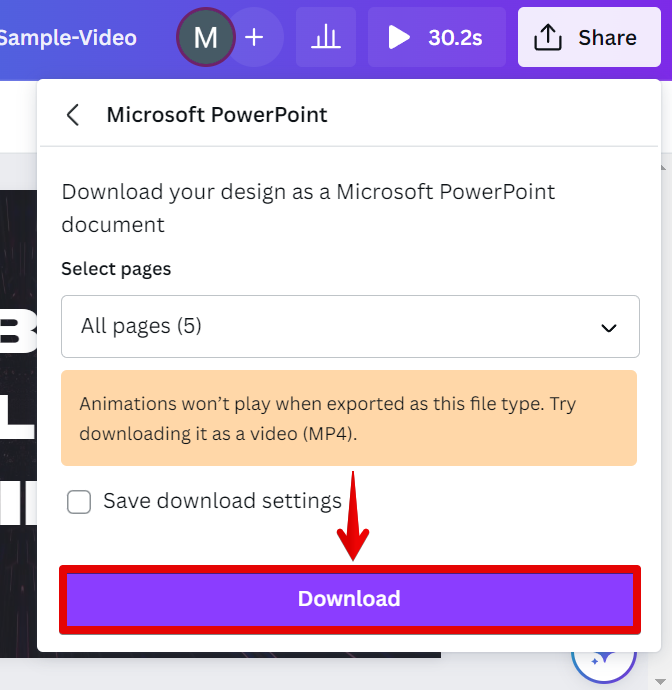
In the All options window, scroll down to the Save section and select the “ Microsoft PowerPoint ” option to save your video as a presentation.
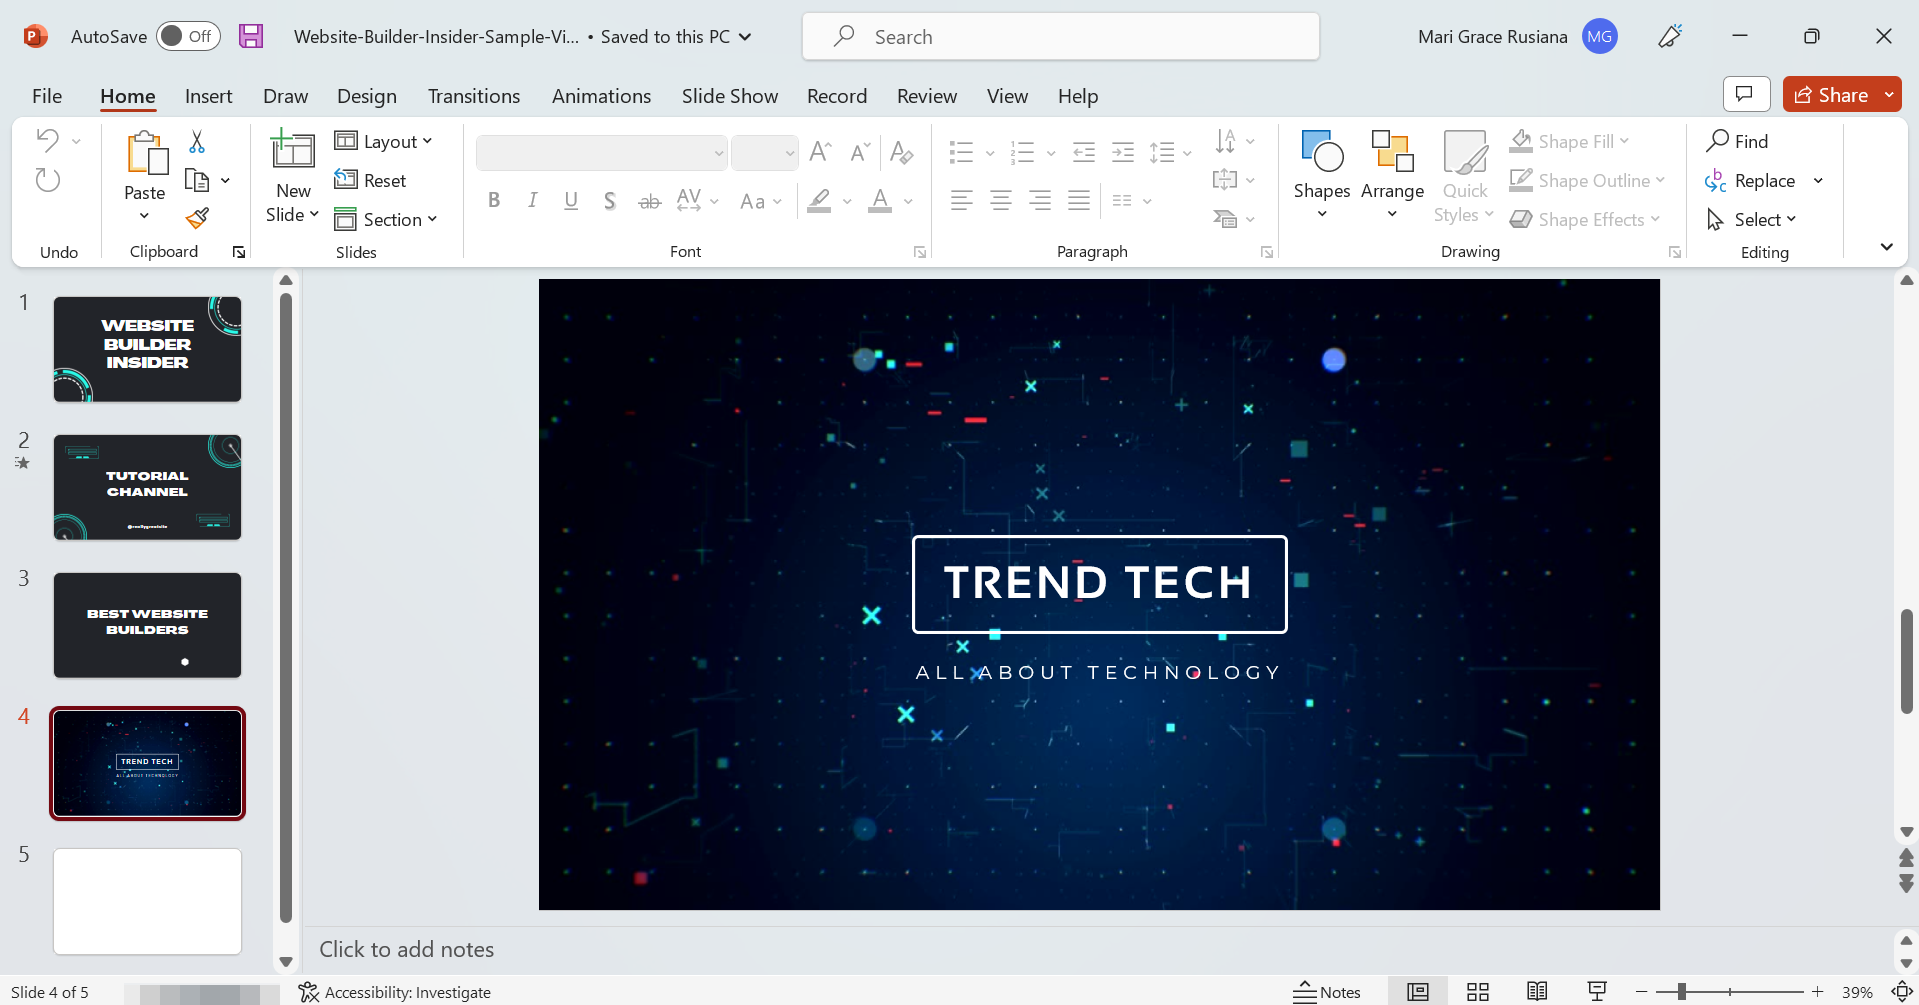
The next step is to click on the “ Download ” button to download the video as a slideshow.
And there you have it! Your video in Canva is now turned into a slideshow! If you want this presentation to be available in Canva, simply import the PowerPoint presentation file back into Canva.
Conclusion:
In conclusion, there is one simple way that you can turn a video into a Canva slideshow. That is to download your video as a presentation in Canva. To do this, simply import the video file in Canva and open it. From there, go to the Share menu and download your video as a Microsoft PowerPoint presentation. With this, you will be able to turn your video into a slideshow. If you want the presentation to be available in Canva, simply upload the PowerPoint presentation file back into Canva.
6 Related Question Answers Found
How do i embed a video into a canva presentation, how do you put a video in canva presentation, how do i add a video to my canva slideshow, can you make a video slideshow on canva, how do i turn a canva design into a video, how do you make a slideshow on canva.

Dale Leydon
Sysadmin turned Javascript developer. Owner of 20+ apps graveyard, and a couple of successful ones.
IMAGES
VIDEO
COMMENTS
Head on to the recording studio. Access the "Present and record" option on the editor's top-right side or click on the three-dot menu to select it among recommended actions. Select "Go to recording studio" and set up your camera and microphone. Start recording with your notes in Presenter's View and have the options to pause and ...
How to Turn a Presentation into a Video in Canva. 1. Click on Presentation Option on Canva's Homepage. Go to the Canva homepage and search for 'Presentation'. This will allow you to see so many ready-to-use templates. Some of the templates are free while others are for 'Pro' users only. You can use this link to get a free 30 day trial ...
️Try Canva with my affiliate link: https://partner.canva.com/c/2078063/619765/10068 Learn how to make a video presentation in Canva quickly and easily. It's...
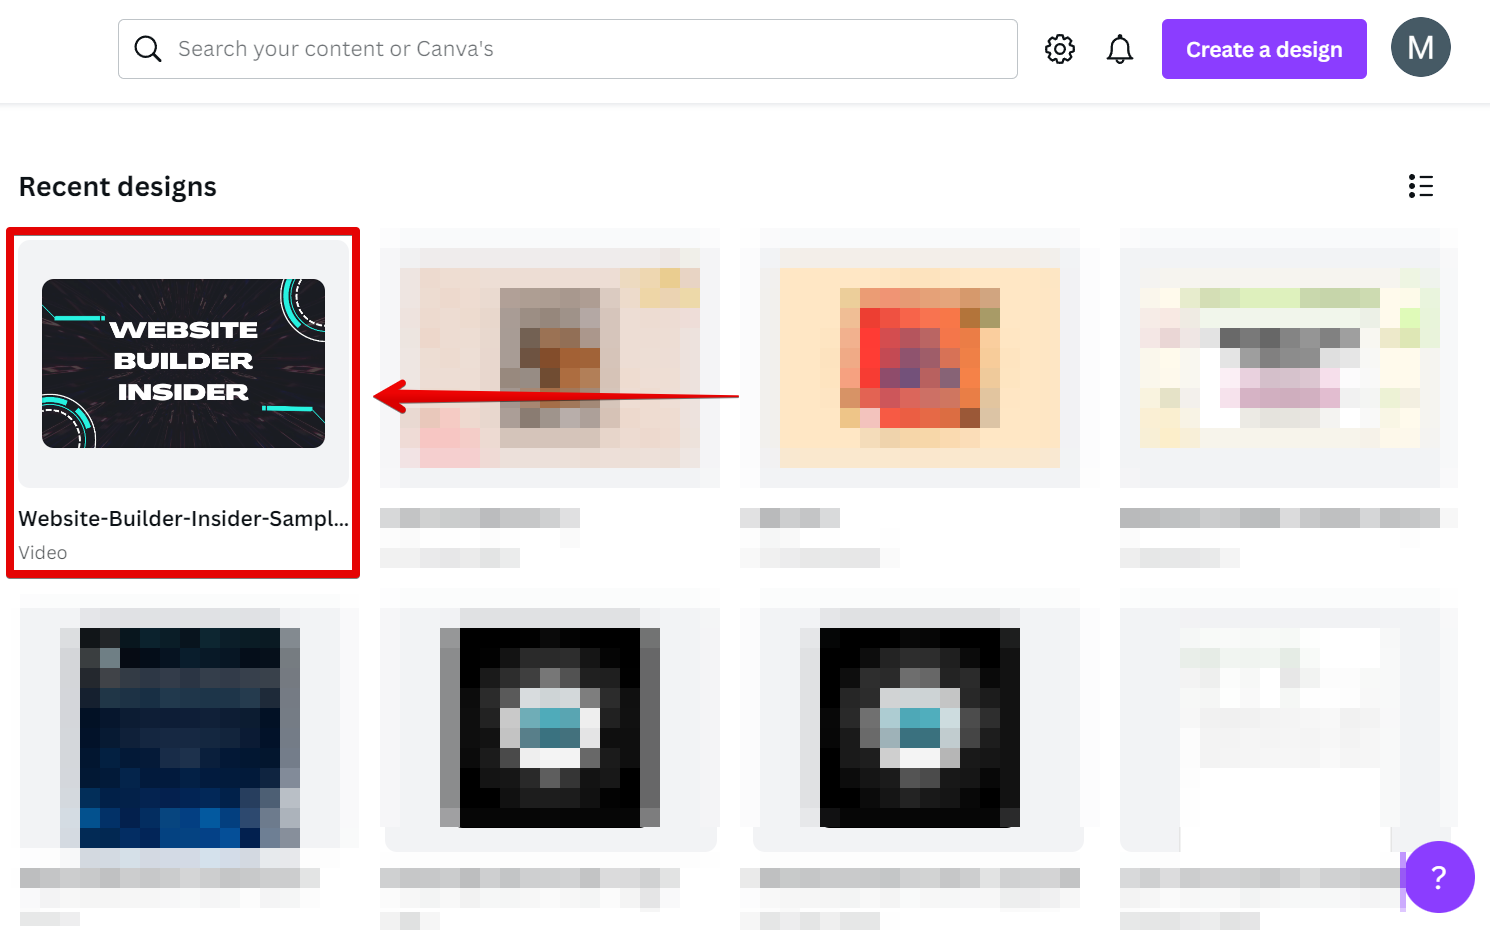
To do this, simply open Canva and select the presentation design that you would like to convert into a video from the Recent designs section. Once the presentation is open, click on the " Share " button in the top right-hand corner of the screen. From there, click on the " Download " option from the menu. In the Download options page ...
Follow this simple step to turn your slideshows into videos in Canva. Watch to the end of the video to learn how to get Canva Pro for free!Here's a video on ...
Ready to take your Canva presentations to the next level? In this step-by-step tutorial, we'll show you how to seamlessly incorporate videos into your Canva ...
Step 2: Importing Images into Video Editing Software. Now that you have exported your Canva presentation as an image, let's move on to importing them into a video editing software. Follow these steps: Open your preferred video editing software (such as Adobe Premiere Pro or iMovie). Create a new project and set up the project settings according ...
via GIPHY. First, go to Canva and create a new design and select "Presentation". Select a template to begin designing your presentation, or create your own from scratch. Once you're done, click on Present and Record. Once you click on "Present and Record", you will see a window asking if you'd like to head to the "recording studio".
Step 2: Log Into Canva. Once you have the pictures and video files you want to use, log into Canva (it's free!), and click on the video icon at the top of the page near the center. Once you click on videos, you can enter "graduation" in the search bar on the left to pull up graduation video templates.
WATCH 2024 UPDATE HERE: https://youtu.be/Mb8ZyMQQPpsHere's everything you need to know in order to create videos in Canva: how to start, where to find free c...
Step 1: Open a slide in your Canva presentation. Step 2: Select Elements from the sidebar. Add graphics, icons, stickers, tables, videos, and more. Step 3: You can explore the AI image generator ...
Step 2: Add Video to Your Presentation. Once you have uploaded your video, you can easily add it to your Canva presentation using the following steps: Step 1: Open the Canva presentation where you want to insert the video. Step 2: Click on the "Elements" tab located on the left sidebar. Step 3: Scroll down and click on the "Videos" section.
To do this, simply import the video file in Canva and open it. From there, go to the Share menu and download your video as a Microsoft PowerPoint presentation. With this, you will be able to turn your video into a slideshow. If you want the presentation to be available in Canva, simply upload the PowerPoint presentation file back into Canva.
1. Open the Canva editor and select the design you want to add the video too. 2. Click on the "Elements" tab on the left-hand panel and search for any keyword related to the video you want, eg. I have searched for "Nature". 3. Now switch to the "Videos" section and browse through different videos. 4.
In this episode, learn how to create Canva Talking Presentations™ Simply start inspired with a Presentation Template, set up the recording studio, start reco...
With Canva, you get even more creative freedom: An easy drag-and-drop tool to help you add graphics; Page animation features, emojis, color palettes and font sets; Millions of professionally designed images and photos; Pre-recorded Talking Presentation tools to help you practice; A notes feature for adding talking points to your design
Supercharge your slides with Canva. Add dynamic GIF's, captivating videos, and stylish photo frames directly from Canva's royalty-free asset library effortlessly. Share or export anywhere, be it PPT or Google Slides. ... Export your results to PPT and Google Slides . Canva allows you to export to a perfect PPT or Google Slide when you are done.
Unlock your potential to create stunning visuals in this comprehensive guide to Canva Presentations. This tutorial will walk you through all the key features...
Supercharge your slides with Canva. Add dynamic GIF's, captivating videos, and stylish photo frames directly from Canva's royalty-free asset library effortlessly. Share or export anywhere, be it PPT or Google Slides. Start editing for free
I've made the switch! Presentations on Canva are SUPER EASY and convenient to put together. In this Canva tutorial video, I'll show you how to put a great lo...
Supercharge your slides with Canva. Add dynamic GIF's, captivating videos, and stylish photo frames directly from Canva's royalty-free asset library effortlessly. Share or export anywhere, be it PPT or Google Slides. ... Export your results to PPT and Google Slides . Canva allows you to export to a perfect PPT or Google Slide when you are done.