
View Options in PowerPoint – A Complete Beginner’s Guide!
By: Author Shrot Katewa

There are many different types of presentations view available in PowerPoint including Normal View, Outline View, Presenter View, and Slide Show View to name a few. All these views serve different purposes and it is important to know how to use them appropriately to get the most out of PowerPoint!
In this article, we will talk about what each type of view does in PowerPoint and how to access them so that you can choose the best for your needs! So, let’s get started!
[ A Quick Note Before We Begin – for this article, I will be using one of the presentation templates from Envato Elements . With Envato Elements, you get access to thousands of presentation designs with unlimited downloads so you never run out of options again. Plus, you get free previews so you know exactly what you’re getting before buying! It is also very affordable. Check out their pricing here ]
1. What are the Different Type of View Options Available in PowerPoint?
Microsoft PowerPoint is equipped with a variety of Slide View options that can be used for different purposes.
These are the different view options available in PowerPoint –
- Normal View
- Slide Sorter View
- Notes Page View
- Reading View
- Outline View
- Slide Show View
- Presenter View
- Slide Master View
2. How to Access the Different View Modes in PowerPoint?
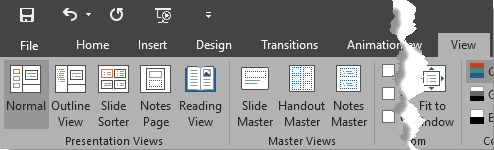
To access the different view modes in PowerPoint, you have to click on the ‘View’ tab in the ribbon. The 2-step process is described below.
Step-1: Click on the ‘View’ tab
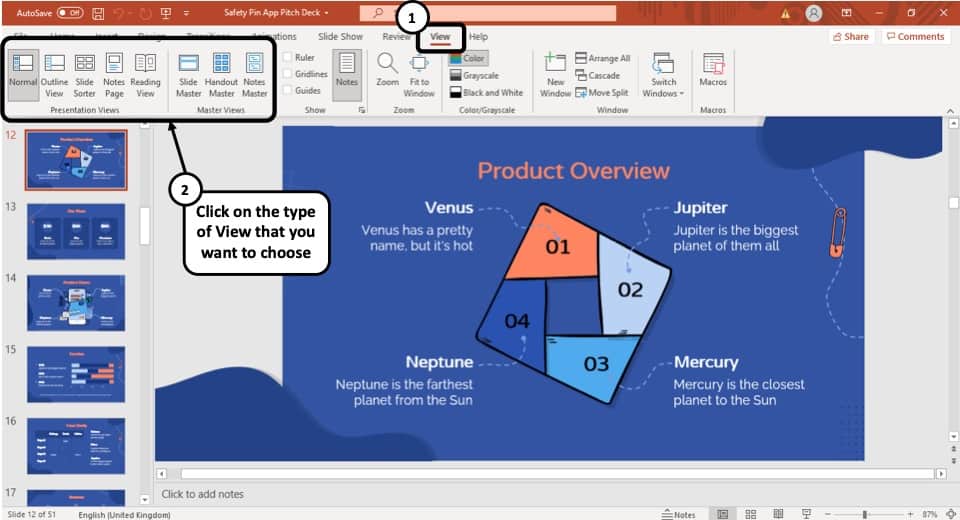
At first, select the ‘View’ tab, which is the second to last tab in the ribbon section of your PowerPoint Window.
Step-2: Select your preferred ‘View Mode’
Once you have access to the ‘View’ tab, you can select your preferred view mode such as the Outline View , Slide Sorter view, Slide Master view, etc. from the Presentation View section or the Master View section. (as shown in the image in step 1)
3. What is the Purpose of Various View Modes in PowerPoint?
Each view mode in PowerPoint has its own purpose. Let’s go through the purposes of the different slide view options one by one below –
1. Normal View
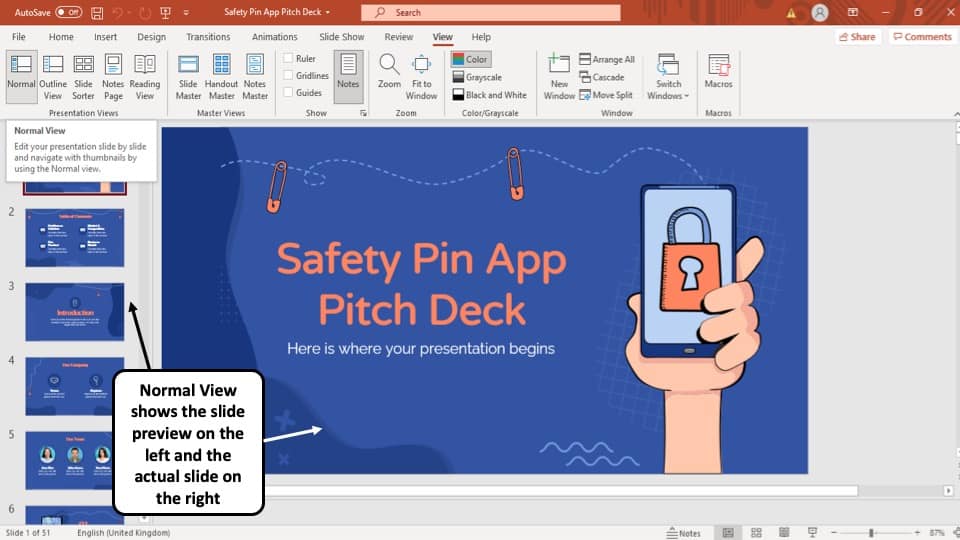
The ‘Normal View’ option is the first option in the ‘Presentation Views’ section of the ‘View’ tab. It is the most commonly used viewing option and is also the default slide view for PowerPoint.
The slides appear on the left of the PowerPoint window in the ‘Slide Navigation’ bar. Thumbnails of the slide are represented as boxes in the ‘Slide Navigation’ bar with its consecutive serial number to the left of it.
The main function of normal view mode in PowerPoint is to navigate through slides in a vertical grid while allowing you to add, design, or edit the slides while getting a preview of the slides on the left.
2. Slide Sorter View
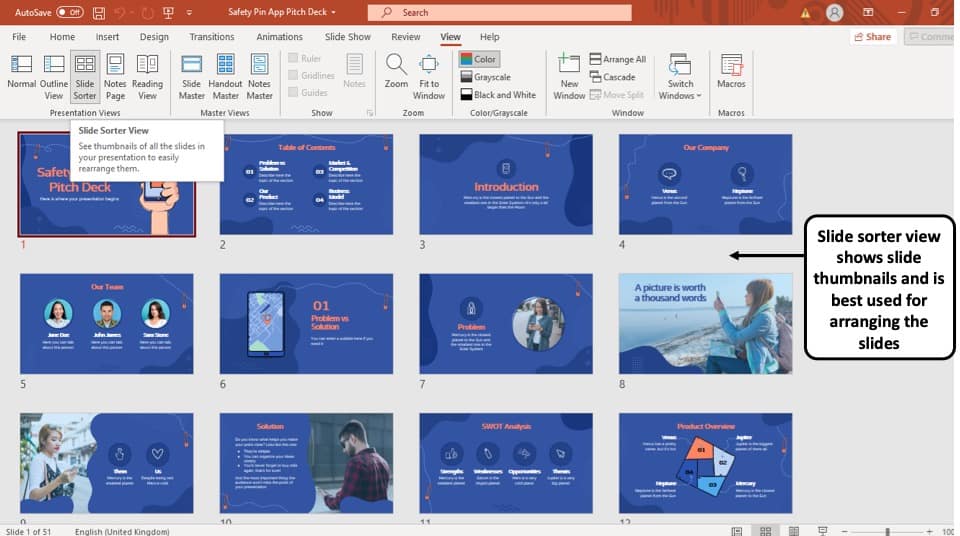
The ‘Slide Sorter’ option gives you an overview of all the slides in your PowerPoint presentation.
The slides are represented as thumbnails as a grid of boxes arranged side by side. The serial number of the slide is given on the bottom left corner of the slide thumbnail.
This option serves the purpose of viewing the slides together in one window making it easier to rearrange and organize them in a quick fashion.
3. Notes Page View

The ‘Notes Page View’ option gives you the view of each slide and its speaker notes in one page.
In this view, the slides appear at the top and the speaker notes are given on the bottom of the two sections. The serial number of the slide is not shown in this view. You can also edit speaker notes from here.
The main purpose of the notes page view in PowerPoint is to preview what each page will look like before you print the slides with speaker notes.
4. Reading View:
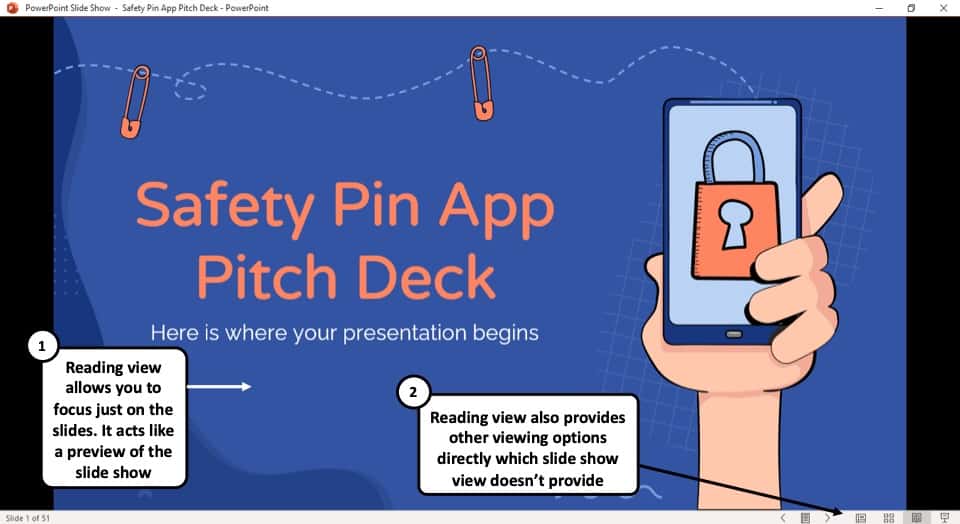
The Reading View option allows you to view your PowerPoint presentation without going into Full Screen mode. All the transitions and animations can be seen in this view. The serial number of the slide is given at the bottom right corner of the window.
It is used to preview the slide and review the slides with full focus. This mode also makes other view options easily accessible, which is not the case in ‘Slide Show’ mode where the presentation is shown in the full screen, and the options are not visible on screen.
The reading mode is actually more useful for word documents, as it allows the reader to focus just on the text. In my opinion, it adds little value to a PowerPoint presentation.
5. Outline View:
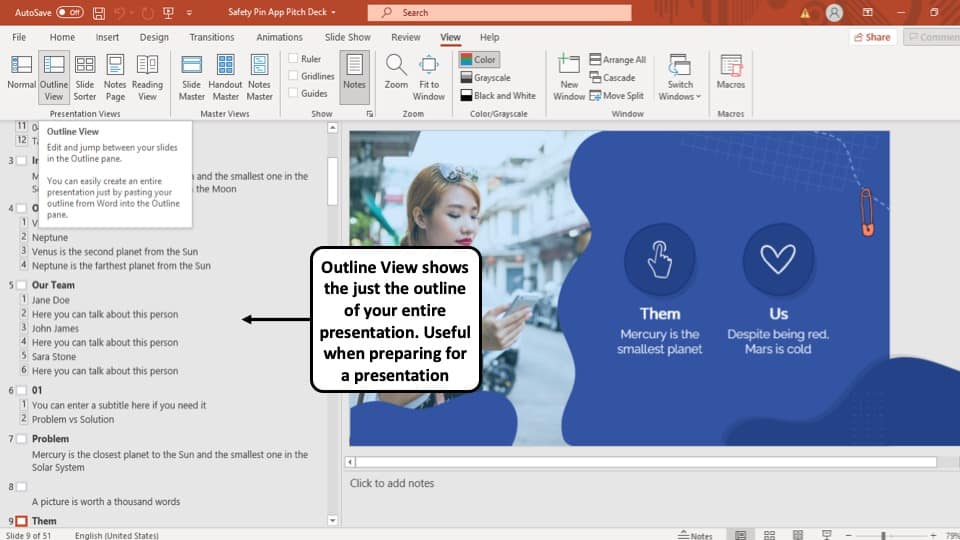
The ‘Outline View’ shows you the entire outline of your PowerPoint presentation in the ‘Slide Navigation’ bar.
In this view, there is no thumbnail of the presentation. Instead, there is an outline of all the data present in that slide. The serial number of the slide is at the left followed by a small white box that represents a slide and then the outline of that slide.
You can also create an entire slide in the pane of this view by copy and pasting data from Microsoft Word. However, you will have to design the slide separately once the data has been added to each slide.
6. Slide Show View:
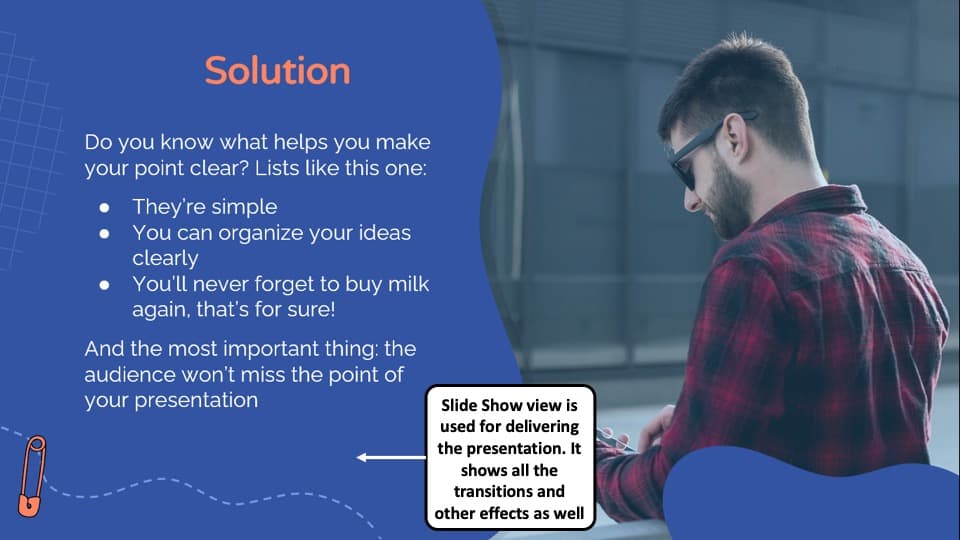
The Slide Show View is the view that your audiences are going to see. This view shows each slide of your PowerPoint presentation in full screen.
All the transitions, animation, and multimedia files in your PowerPoint presentation are played here. Consecutive slides can be accessed using the direction keys on your keyboard or by clicking once on the slide.
7. Presenter View:
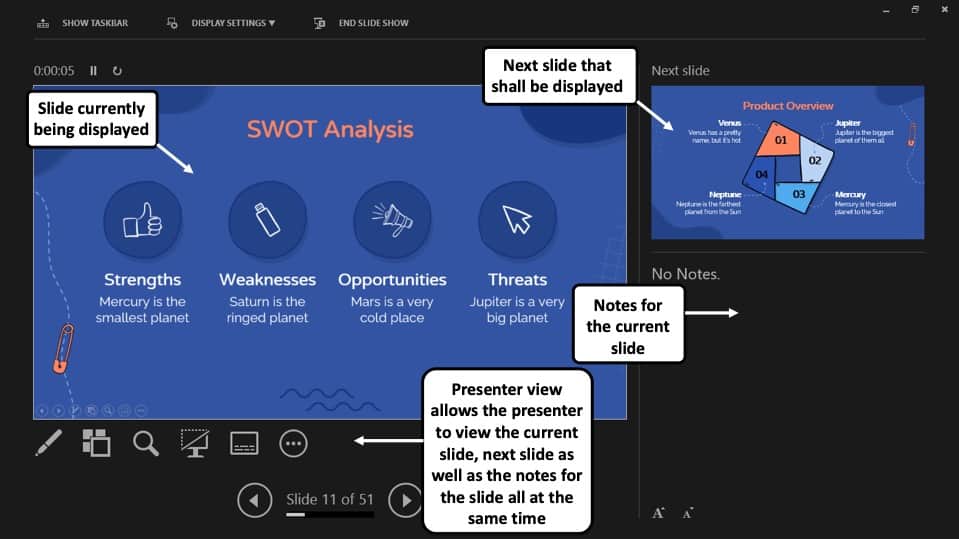
This is the view that you as a presenter are going to see while the audience is seeing the ‘Slide Show’ view.
Although you can give a presentation even in the slide show view, but it is always recommend to deliver the presentation using the “Presenter View” mode in PowerPoint as it provides you with additional features and benefits!
This view mode in PowerPoint will split the screen in multiple windows. The window on the left represents the current slide that is being displayed (the one that is visible to your audience).
The window in the top right section indicates the next slide in the queue. Whereas, the notes section displays the notes or key points made by each slide. Both, the notes section as well as the next slides window are only visible to the presenter and not to the audience!
The purpose of the “ Presenter View ” is to give the presenter all the aids to be prepared for the next slide and highlight the key points to be made on the current slide while delivering the presentation.
8. Slide Master View:
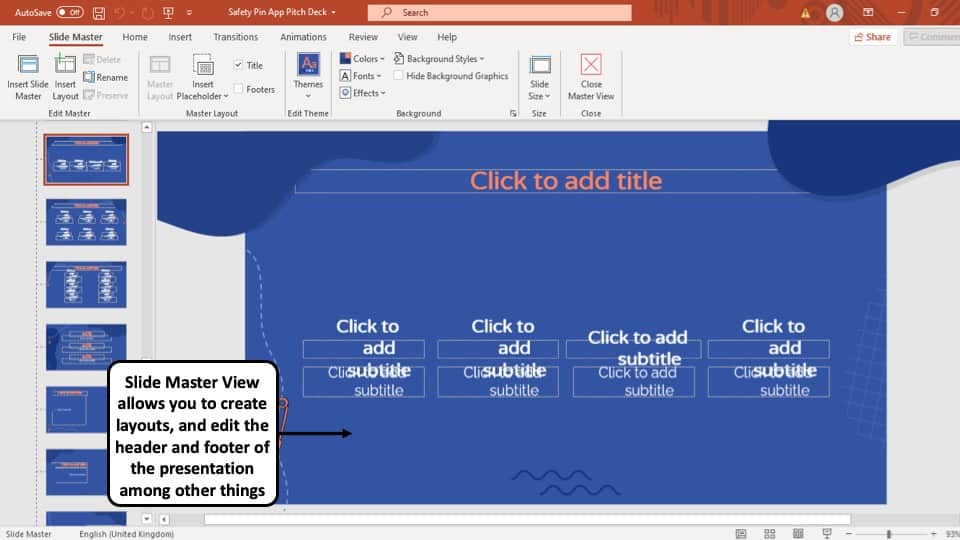
This view gives you a view of all the layouts used on the slides of your PowerPoint presentation.
The ‘ Slide Master View ’ option allows you to edit all the aspects of the layouts in your presentation such as fonts, background, color, and pretty much everything you can think of.
You can edit all the slide layouts of the presentation. Furthermore, you can also edit the header and footer of the presentation using the “ Slide Master View ” in PowerPoint.
4. How to Open the Presenter View in PowerPoint?
There are 2 different ways you can enter into Presenter View in PowerPoint –
- Using Slide Show View
- Using the short cut key i.e. Alt+F5
If you are using the Office 365 version of PowerPoint , you can actually directly access the “Presenter View” in the View section. Simply click on “View”. Then, click on “Presenter View”
Let’s look at both the methods quickly –
Method 1 – Using the Slide Show View
Step-1: Click on the ‘Slide Show’ button at the bottom right corner of the screen
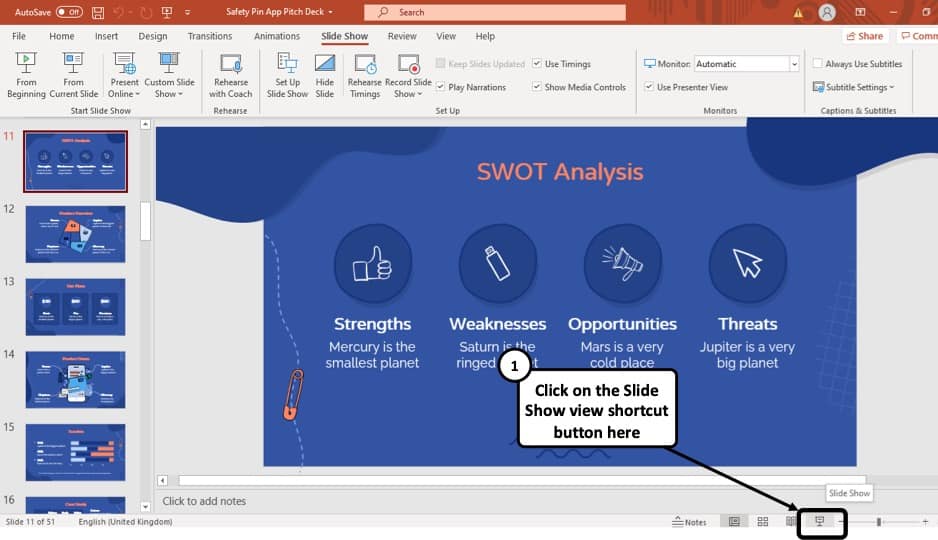
At first, you have to click on the ‘Slide Show’ button that looks like a projector screen which is located at the bottom right corner of your PowerPoint window. (as indicated in the image above)
Step-2: Right-click and choose “Show Presenter View”
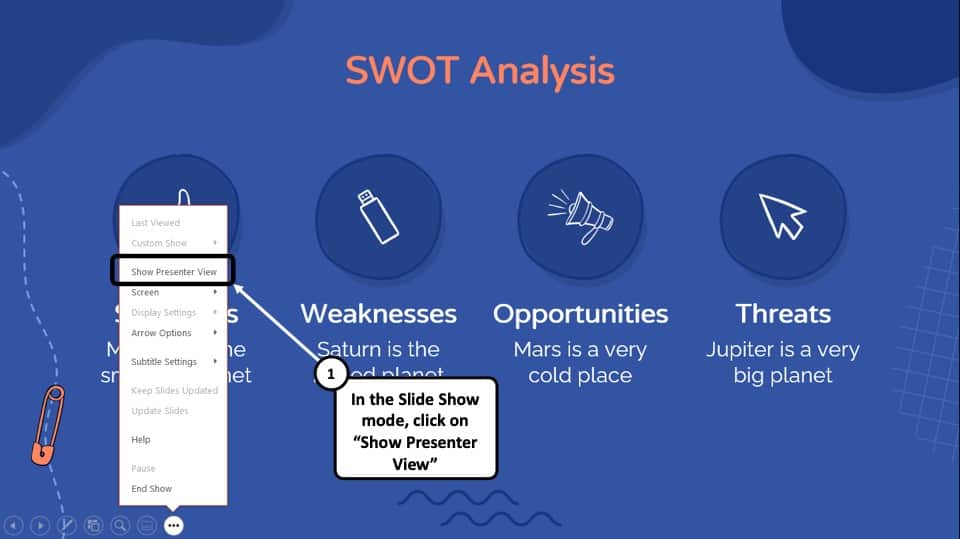
Once you are in the ‘Slide Show’ mode, using your mouse right-click anywhere on the screen. From the menu that appears, choose the “ Show Presenter View ” option
Method 2 – Using the Keyboard Shortcut
Alternatively, you can press ‘ Alt + F5 ’ on your keyboard and that will immediately open the ‘Presenter View’ mode.
The keyboard shortcut to open the “Presenter View” in PowerPoint on Mac is “Option+Enter” key.
5. How to Change PowerPoint Back to Normal View?
To change your PowerPoint back to ‘Normal View’ from ‘Slide Show’ mode, ‘Presenter View’ option or the ‘Reading View’ option, all you have to do is simply press the ‘ESC’ button on the keyboard of your computer. This will take you back to Normal View.
If you are using any other view apart from these 3 view modes in PowerPoint, you need to do the following –
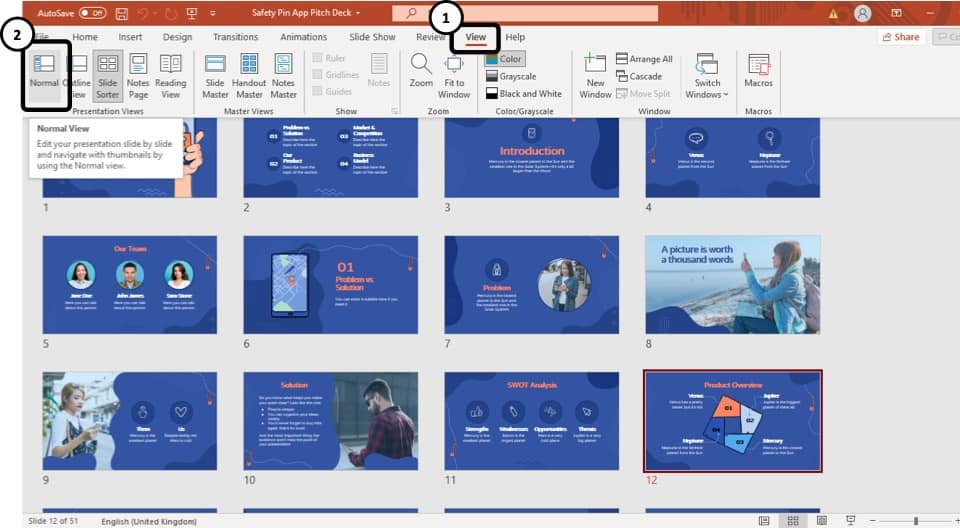
If you are in a different viewing option, such as ‘Slide Sorter’ option, or the ‘Reading View’ option then you have to select the ‘Normal View’ option from the ‘View’ tab instead of the ‘Slide Sorter’ option or the different slide view option you are currently on.
More PowerPoint Related Topics
- How to Crop a Picture in PowerPoint? [Complete Step-by-Step Tutorial!]
- How to Give a Presentation on Zoom? A Helpful Resource!
- What is a Presentation Clicker? [And How to Use it!]
- How to Convert a PowerPoint to PDF? [A Simple Guide!]
- PowerPoint vs Google Slides: Which is Better? [ULTIMATE Test!]
- How to Change Bullet Style in PowerPoint? A Complete Guide
Credit to Pressahotkey (via Freepik) for the featured image of this article
Understanding Presenter View in PowerPoint: A Deep Dive Guide

Origin and Evolution of Presenter View
Why presenter view is a game-changer for professionals, activating and customizing presenter view in powerpoint, in-depth features of the presenter view, common mistakes and how to avoid them, advanced tips for a power presentation, final tips for enhancing your presentation game, introduction to presenter view.
Have you ever found yourself awkwardly toggling between slides and speaker notes during a presentation? Or wished you could preview the next slide without your audience seeing? Enter Presenter View in PowerPoint, a feature designed to make presenting smoother and more professional.
In essence, Presenter View is a special mode in PowerPoint that allows the presenter to see their speaker notes on one screen, while the audience views the note-free presentation on another screen. This dual-screen setup means you can have your notes, upcoming slides, and timer conveniently on one screen while your audience remains blissfully unaware.
“Presenter View is the unseen ally behind many successful PowerPoint presentations.”
Microsoft’s PowerPoint, with its roots tracing back to the late 1980s, has undergone several metamorphoses. Over the years, as technology improved and presentation dynamics changed, Microsoft introduced new features to make the software more user-friendly and versatile. One such innovation is the Presenter View.
Back in the early days of PowerPoint, presenters had to rely on printouts or separate documents for their speaker notes. The advent of Presenter View in the early 2000s was a game-changer. It allowed presenters to merge their slides and speaker notes into one cohesive presentation experience.
The beauty of Presenter View lies not just in its conception but in its evolution. Over different versions of PowerPoint:
- 2003 : Introduction of a basic Presenter View with slides and notes.
- 2007 : Enhanced screen setup with better dual-monitor support.
- 2010 : Introduction of slide zoom and laser pointer features.
- 2013 & Beyond : Integration with touch features, improved UI, and annotations.
Each version brought refinements, making it more intuitive and packed with features, tailoring to the evolving needs of presenters globally.
Fun Fact : Presenter View wasn’t initially as popular as it is today. It took a few iterations and user feedback loops for Microsoft to perfect the balance between utility and user experience.
The Core Components of Presenter View
Presenter View in PowerPoint is like the cockpit for pilots: it’s where all the essential controls and information are at the presenter’s fingertips. Whether you’re a newbie to PowerPoint or a seasoned professional, understanding these components can transform your presentation experience.
- This provides a glance at your current, previous, and upcoming slides. It ensures you’re always prepared for what’s coming next and can seamlessly transition between points.
- The soul of your presentation, speaker notes, are discreetly placed at the bottom or side, only visible to you. These notes can be elaborate explanations, quick pointers, or even personal reminders. They’re like your secret cheat sheet!
- Ever worried about running over time? This feature shows the elapsed time since you began the presentation and, in some versions, allows you to set a countdown. Stay on track and manage your pace efficiently.
- Interactive features that allow you to draw on slides or use a virtual laser pointer. These are especially helpful when you want to emphasize or explain specific points visually.
- Navigate between slides effortlessly and zoom into specific parts of a slide to draw attention or elaborate on details.
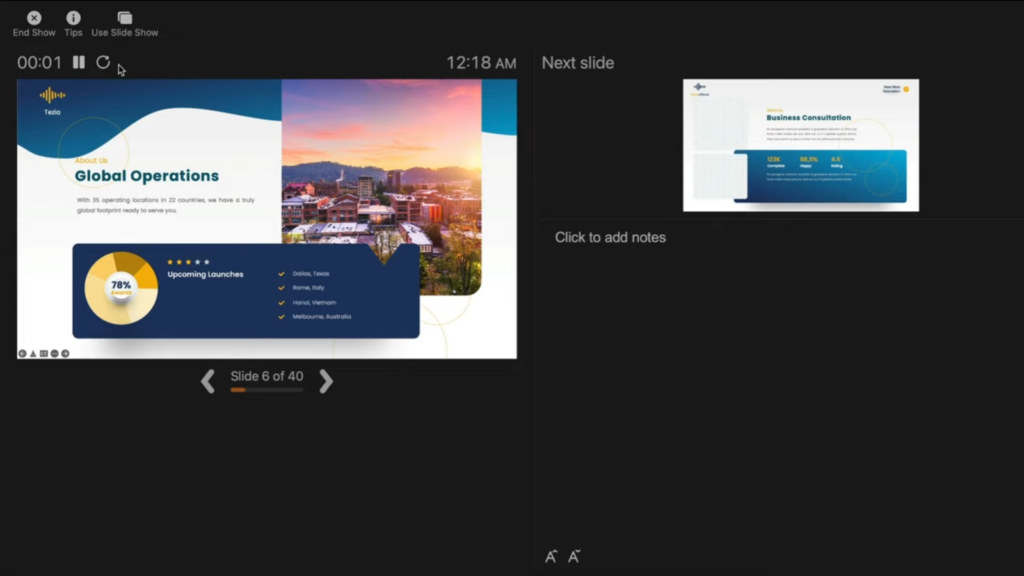
Table: Core Components Overview
Quote : “Presenter View is to a presenter what a dashboard is to a driver. It empowers, directs, and enhances the journey of your narrative.” – Jane Harris, Lead PowerPoint Expert – Powerbacks team
Understanding these components is one thing, but leveraging them effectively during a presentation can make a significant difference. Let’s delve into the ‘why’ behind the significance of Presenter View.
Stepping onto the stage or presenting in a boardroom can often be an overwhelming experience. The constant juggle between capturing the audience’s attention and keeping track of your slides can lead to nervousness. But what if there was a way to have everything you need right in front of you, ensuring smooth sailing through your presentation? Enter Presenter View.
- Having a preview of the upcoming slides and personal notes right in front of you can be a massive boost to confidence. You’re always one step ahead, knowing exactly what’s coming next.
- Instead of turning back to view the screen repeatedly, Presenter View lets you face your audience directly. This creates a more engaging and personal interaction.
- Gone are the days when you’d hold a bunch of cue cards or sheets of paper. With digital speaker notes, you have a cleaner, more organized setup.
- Using the annotation tools and laser pointer, you can make your presentation more interactive, leading to better retention and engagement from your audience.
- There’s no denying that seamlessly transitioning between slides, using interactive tools, and having no physical notes gives a more polished and professional look.
Table: Benefits of Using Presenter View
Quote : “Embracing the Presenter View is not just about leveraging a tool; it’s about amplifying your message and connecting more profoundly with your audience.”
It’s evident that the Presenter View has undeniable advantages for professionals. But how do you activate it and customize it to suit your needs? Let’s walk through the steps.
Starting with PowerPoint 2013, Microsoft enhanced the Presenter View to ensure that it’s both intuitive and user-friendly. Activating it and making it work for you is simple, as outlined in the following steps:
Step-by-Step Guide to Activate Presenter View :
- Start by opening your PowerPoint presentation. This will be the one you intend to deliver.
- At the top, you’ll notice several tabs. Click on the one labeled ‘Slide Show’.
- Within the Slide Show tab, you’ll spot a checkbox labeled ‘Use Presenter View’. Ensure that it’s ticked. If it’s not, simply click on it.
- If you’re using an external projector or display, make sure it’s connected. PowerPoint will automatically detect it and use the Presenter View on your primary display, showing the main presentation on the external one.
- Start your presentation by either pressing F5 on your keyboard or clicking on ‘From Beginning’ in the Slide Show tab.
- Next Slide Preview : Gives a preview of what’s coming next.
- Speaker Notes : Displays your notes for the current slide.
- Slide Navigation : Use this to jump to a specific slide.
- Annotation Tools : Highlight or draw on your slides in real-time.
- Timer : Keeps track of how long you’ve been presenting.
- You can move around the different elements, increase font size of your notes for better readability, or even hide specific components if they’re not required.
Table: Quick Access Tools in Presenter View
Quote : “The beauty of PowerPoint’s Presenter View is the control and flexibility it offers. It’s like having a personal assistant during your presentations.” – Linda Green, Presentation Expert
Now that we know how to activate and customize the Presenter View let’s delve deeper into its features and tools for maximum efficiency during presentations. Shall we proceed?
PowerPoint’s Presenter View is not just a simple “next slide” preview; it’s a hub of tools and functionalities designed to make the presenter’s job easier and the presentation more engaging.
H3: Slide Preview This is arguably the most straightforward feature but also the most helpful. At a glance, you can see what’s coming up, ensuring that you’re always prepared for the next topic or section.
- Smooth Transitions : Eliminates awkward pauses between slides.
- Improved Pacing : Know when to speed up or slow down based on upcoming content.
- Reduced Anxiety : No unpleasant surprises during your presentation.
H3: Speaker Notes For those who don’t rely on pure memory, speaker notes are a lifesaver. They’re your secret weapon, visible only to you, that provides additional context or reminders about what to say.
- Bold the crucial points to ensure they stand out.
- Use concise bullet points for easier and quicker reading.
- Add time cues if you’re aiming to cover specific points within certain timeframes.
H3: Slide Navigation While it’s always best to move sequentially through your slides, there might be instances when you need to skip ahead or return to a previous point. With the slide navigation tool, you can effortlessly hop around your presentation.
- Case Study : During a corporate presentation, John, a sales manager, was posed with a sudden question about Q2 performance. Thanks to slide navigation, he quickly reverted to the relevant slide, addressed the query, and resumed without any hiccups.
H3: Annotation Tools Engage your audience by turning your presentation into an interactive canvas. Whether you’re highlighting an essential statistic or drawing a quick graph, these tools can make a significant impact.
- Use contrasting colors to ensure visibility.
- Don’t overdo it; the aim is to emphasize, not to overwhelm.
- Practice beforehand to ensure you’re comfortable with these tools during the presentation.
H3: Timer It’s easy to lose track of time during a presentation. With Presenter View’s timer, you can keep tabs on the elapsed time, helping you manage the pace and duration of your talk.
- Tip : Always allocate a buffer period. If you’re presenting for 30 minutes, aim to finish in 25. This allows for Q&A or any unexpected delays.
Quote : “PowerPoint’s Presenter View is like a dashboard for presenters. It provides every tool one might need, all within arm’s reach, ensuring a seamless and interactive presentation experience.” – Michael Roberts, Tech Analyst
Understanding the features of the Presenter View is the key to unlocking its potential. With practice and familiarity, it becomes an extension of the presenter, leading to more confident and impactful presentations.
Making the Most of Presenter View
If you’ve ever wanted to feel like a presentation Jedi, mastering the Presenter View is your path to the force. But having the tool isn’t enough – it’s about leveraging its features optimally. Here’s a detailed guide on maximizing the benefits of the Presenter View:
H3: Setup and Access Before harnessing its power, you need to ensure you can access Presenter View without hitches.
- Connect your computer to the projector or external display.
- Launch PowerPoint and open your presentation.
- Go to the Slide Show tab and select Set Up Slide Show .
- In the pop-up, ensure Browsed by an individual (window) is selected.
- Start the slide show. Presenter View should appear on your computer, while the audience sees only the slides.
H3: Customize the Display Remember, it’s your dashboard; make it as comfortable and efficient for you as possible.
- Within Presenter View, hover over the bottom to reveal the toolbar.
- Click on the gear icon to adjust settings.
- Reorder tools based on your preference or hide those you don’t need.
H3: Practice, Practice, Practice The tool’s efficiency relies heavily on your familiarity with it. Do dry runs to ensure you know where everything is and how each feature works.
- Pro Tip : Mimic the presentation environment during practice. If you’re presenting in a large hall, practice with the same setup.
H3: Seamlessly Integrate Other Media If your presentation includes videos, animations, or other media, ensure they play seamlessly in Presenter View.
- Deep Dive : Always embed media within the presentation. Relying on external links or files can disrupt the Presenter View experience.
H3: Engage the Audience Use the tools not just to aid your presentation but to engage your audience. Pose questions, use the pen tool to sketch quick diagrams based on audience inputs, and make it interactive.
- Table of Engagement Techniques :
H3: Master the Art of Transitions Smooth transitions are key to maintaining audience attention. With a preview of the next slide, prepare your narrative to flow seamlessly.
Even with the most powerful tools, human error can play a spoilsport. The Presenter View, as intuitive as it may be, has its quirks. Here’s a list of common pitfalls users face and ways to steer clear of them:
H3: Not Checking Hardware Setup Before you even start the presentation, ensure your hardware is correctly set up. This includes checking the display connection, ensuring the projector or external monitor is detected, and setting up the correct display settings.
- Pro Tip : Always keep a spare HDMI or VGA cable. Technical glitches often come from the most unexpected sources.
H3: Overlooking Speaker Notes Having made the effort of adding speaker notes to your slides, it would be a shame not to use them. They serve as a discreet prompt, ensuring you don’t miss any critical points.
- Fact : According to a study, presenters who actively used speaker notes were 25% more consistent in delivering their core messages.
H3: Ignoring the Timer Time management is crucial. If you have a fixed time slot, exceeding it can inconvenience others and may appear unprofessional. Conversely, finishing too early can leave your audience unsatisfied.
- Actionable Advice : Always have a buffer. If your slot is 30 minutes, aim for a 25-minute presentation, leaving room for Q&A or unexpected delays.
H3: Relying Exclusively on Presenter View Despite its usefulness, never be wholly dependent on Presenter View. Technical glitches happen, and the ability to continue smoothly without it showcases professionalism.
- Case Study : At a major tech conference in 2018, a renowned speaker’s Presenter View malfunctioned. Instead of panicking, he smoothly transitioned to the standard view, using his printed notes as a backup. The audience lauded his adaptability, and his message wasn’t overshadowed by the hiccup.
H3: Not Adapting to Audience Feedback The tools in Presenter View, like slide navigation, are meant to enhance adaptability. If you sense your audience resonating more with a particular topic, don’t be afraid to dwell on it a bit longer or even revisit slides.
By sidestepping these common mistakes, you not only harness the full potential of Presenter View but also project confidence and control. Next, we’ll explore some advanced features to elevate your presentation game even further.
Mastering Presenter View basics can tremendously improve your presentation skills. But if you’re looking to elevate your game and leave a lasting impression, dive into these advanced features:
H3: Seamless Transition Between Slides The art of a great presentation lies not just in the content but also in the delivery. A choppy slide transition can disrupt the flow. PowerPoint offers a plethora of transition effects — from subtle fades to dynamic 3D effects.
- Go to the Transitions tab.
- Browse and select your preferred effect.
- Adjust the transition duration if needed.
- Click Apply To All to maintain uniformity.
H3: Use Zoom to Focus on Details Occasionally, you might want to draw attention to specific details on a slide. Instead of making your audience squint, use the in-built Zoom feature.
- Tip : Combine zoom with a laser pointer or pen tool for emphasis.
H3: Ink Annotations Annotating directly on your slides can be beneficial for interactive sessions or workshops. PowerPoint’s “Ink” feature allows you to do just that.
- Did You Know? : Ink annotations made during a presentation can be saved for future reference!
H3: Embed Multimedia for a Rich Experience Modern presentations often go beyond static slides. Consider embedding videos, audio clips, or even live web content to keep your audience engaged.
- Navigate to the Insert tab.
- Choose Video or Audio and select your file.
- Adjust playback settings under the Playback tab.
H3: Custom Slide Show Sometimes, different segments of your audience require varied content. Instead of having multiple PPT files, create a custom slideshow within the same presentation.
PowerPoint’s Presenter View is akin to a secret weapon, waiting in the wings, ready to empower speakers, educators, and presenters globally. Whether you’re a novice taking your first steps into the world of presentations or a seasoned speaker aiming to refine your skills, the Presenter View, along with the myriad features PowerPoint offers, ensures your content shines in the best light.
Remember, a successful presentation doesn’t merely rely on flashy slides or multimedia elements. It’s the seamless blend of content, delivery, and engagement. And with tools like Presenter View, you’re equipped to handle the technical aspects, allowing you to focus on what truly matters – connecting with your audience.
As Bill Gates once said:
“If you think the PowerPoint presentation is there for you as the presenter, you’re wrong. It’s there for the audience.”
So, the next time you’re gearing up for that crucial pitch, workshop, or lecture, take a moment to familiarize yourself with Presenter View. Your audience — and your confidence — will thank you for it.
Happy presenting!
Save my name, email, and website in this browser for the next time I comment.
- Skill Assessments
- AI Course Builder
- Free Courses
- PowerPoint 2019 Basic
Presenter View in PowerPoint

Start Free Trial
Or log in with:
How to Use Presenter View in PowerPoint

- You can use thumbnails to select slides out of sequence and create a customized presentation for your audience.
- Preview text shows you what your next click will add to the screen, such as a new slide or the next bullet in a list.
- Speaker’s notes are shown in large, clear type so that you can use them as a script for your presentation.
- You can temporarily black out the screen during a presentation and then resume where you left off. This can come in handy during breaks or question and answer periods.
Start Presenter View
- Click the Options button.

The Presenter view fills the screen. The same presentation tools are available below the slide, and it also shows the current time and a thumbnail of the upcoming slide. At the bottom of the screen, use the arrows to move forward or backward in the presentation.
Command Buttons
At the top of the Presenter view, there are command buttons.
- Show Taskbar : Show or hide the Windows taskbar.
- Display Settings : When projecting, swap which display shows the presenter view or duplicate the slide show on both screens.
- End the Slide Show : Return to Normal view.

The timer is located at the top-left corner of the current slide. It keeps track of how long Presenter view has been running.
- Click the Pause button to temporarily stop the timer.

The Notes pane gives you a large look at any notes added to the slide. In Presenter view, you have the flexibility to change the display size.

End Presenter View
You can close Presenter view without ending the presentation entirely.
- Click the Options menu.

You return to the regular slide show view.
To close Presenter View and end the presentation, just press Esc .

FREE Quick Reference
Free to distribute with our compliments; we hope you will consider our paid training.
- LinkedIn-ready certificate
- Skill assessments
- Bite-sized, interactive lessons
- Saved progress
- MS Powerpoint 2010 Basics
- PPT - Getting Started
- PPT - Explore Windows
- PPT - Backstage View
- PPT - Create Presentation
- PPT - Add New Slides
- PPT - Adding Text in Boxes
- PPT - Adding New Text Boxes
- PPT - Deleting Existing Slide
- PPT - Rearranging Slides
- PPT - Adding Slide Notes
- PPT - Managing Sections
- PPT - Working with Outlines
- PPT - Powerpoint Sidebar
- PPT - Presentation Views
- PPT - Setting Backgrounds
- PPT - Slide Orientations
- PPT - Saving Presentation
- PPT - Review Presentation
- PPT - Adding Slide Numbers
- PPT - Adding Header & Footer
- PPT - Running Slide Show
- PPT - Keyboard Shortcuts
- PPT - Get Context Help
- Editing Presentation
- PPT - Copy & Paste Content
- PPT - Find & Replace Content
- PPT - Undo Edited Changes
- PPT - Spelling Check
- PPT - Content Translation
- PPT - Setting Language Type
- PPT - Duplicating Content
- PPT - Special Characters
- PPT - Slides Zoom In-Out
- PPT - Special Symbols
- Formatting Presentation
- PPT - Font Management
- PPT - Setting Text Fonts
- PPT - Text Decoration
- PPT - Change Text Case
- PPT - Change Text Size
- PPT - Change Text Color
- PPT - Text Alignments
- PPT - Indent Paragraphs
- PPT - Set Line Spacing
- Borders and Shades
- PPT - Apply Formatting
- PPT - Using Slide Master
- PPT - Save Design Template
- Working with Multimedia
- PPT - Add Pictures to Slide
- PPT - Editing Added Pictures
- PPT - Format Added Pictures
- PPT - Inserting a Screenshot
- PPT - Adding Shapes to Slide
- PPT - Editing Added Shapes
- PPT - Format Added Shapes
- PPT - Adding Text to Shapes
- PPT - Arrange Shapes/Images
- PPT - Group/Ungroup Objects
- PPT - Adding Audio & Video
- PPT - Add & Format Tables
- PPT - Add & Format Charts
- PPT - Add & Format SmartArt
- PPT - Add & Preview Animations
- PPT - Add & Preview Transitions
- Sharing Presentation
- PPT - Create a PDF File
- PPT - Create a Video File
- PPT - Create Image File
- PPT - Printing Presentation
- PPT - Broadcast Slide Show
- PPT - Packaging Presentation
- PPT - Setting Document Password
- PPT - Email Slide Show
- MS Powerpoint Useful Resources
- PPT - Quick Guide
- PPT - Useful Resources
- PPT - Discussion
- Selected Reading
- UPSC IAS Exams Notes
- Developer's Best Practices
- Questions and Answers
- Effective Resume Writing
- HR Interview Questions
- Computer Glossary
Presentation Views in Powerpoint 2010
PowerPoint supports multiple views to allow users to gain the maximum from the features available in the program. Each view supports a different set of functions and is designed accordingly.
PowerPoint views can be accessed from two locations.
Views can be accessed quickly from the bottom bar just to the left of the zoom settings.

Views can also be accessed from the Presentation Views section in the View ribbon

Here is a short description of the various views and their features.
Normal View
This is the default view in PowerPoint and this is primarily used to create and edit slides. You can create/ delete/ edit/ rearrange slides, add/ remove/ modify content and manipulate sections from this view.

Slide Sorter View
This view is primarily used to sort slides and rearrange them. This view is also ideal to add or remove sections as it presents the slides in a more compact manner making it easier to rearrange them.

Reading View
This view is new to PowerPoint 2010 and it was created mainly to review the slideshow without losing access to rest of the Windows applications. Typically, when you run the slideshow, the presentation takes up the entire screen so other applications cannot be accessed from the taskbar. In the reading view the taskbar is still available while viewing the slideshow which is convenient. You cannot make any modifications when on this view.

This is the traditional slideshow view available in all the earlier versions of PowerPoint. This view is used to run the slideshow during presentation.

Welcome Back!
It looks like you already have created an account in GreatLearning with email . Would you like to link your Google account?
1000+ Courses for Free
Forgot password.
If an account with this email id exists, you will receive instructions to reset your password.
PPT - Presentation Views
< PPT - PowerPoint Sidebar
PPT - Setting Backgrounds >
Multiple views are supported in PowerPoint, allowing users to get the most out of the program's functionality. Each view has its own set of features and is developed accordingly.
There are two ways to get PowerPoint views.
The bottom bar, immediately to the left of the zoom settings, has a quick access to views.
The Presentation Views portion of the View ribbon can also be used to access views.
Here's a quick rundown of the various views and their characteristics.
Normal View
This is PowerPoint's default view, and it's where you'll mostly create and edit slides. You can use this application to create, delete, edit, and rearrange slides, as well as add, remove, and adjust content and manipulate sections.
Slide Sorter View
This view is mostly used to organize and sort slides. This view is particularly useful for adding or removing portions because the slides are presented in a more compact format, making it easier to rearrange them.
Reading Room View
This view is new to PowerPoint 2010, and it was designed to allow you to review your slideshow without losing access to the rest of your Windows apps. When you run a slideshow, it usually takes up the full screen, making it impossible to access other programs from the taskbar. The taskbar is still visible while viewing the slideshow in the reading format, which is convenient. When you're in this view, you can't make any changes.
Slides Show
This is the classic slideshow view included in all previous versions of PowerPoint. During a presentation, this view is used to run the slideshow.
Get free access to
1000+ courses with certificates
Live sessions from industry experts
Industry salary insights and benchmarks
Have an account?
By signing up/logging in, you agree to our Terms and condition • Privacy Policy
We've sent an OTP to CHANGE
Setting up your account...
- Skip to primary navigation
- Skip to main content
- Skip to primary sidebar
Intellisoft Training: WSQ Funded IT Training in Singapore
Upgrade Skills With WSQ & SkillsFuture Funding from Singapore Government
- Intellisoft Tutorials - WSQ Funded Courses
Presentation Views: Which Suite Your Presentation Better?

You can view your PowerPoint file in a variety of ways, depending on the task at hand. Some presentation views are helpful when you are creating your presentation, and some are most helpful for delivering your presentation.
Where to find Views in Your Microsoft PowerPoint?
You can find the different PowerPoint view options on the View tab, as shown below.
Note: You can also find the most frequently used views on the task bar at the bottom right of the slide window, as shown below.
Microsoft PowerPoint Presentation views, accessible from the View tab of the Ribbon are:
Normal View
- the default and most often used view
- displays one slide at a time in the Slide Area, and is used mainly for editing and creating slides, and shows PowerPoint’s typical tri-pane interface.
Tip: Here are some keyboard shortcuts that will help you navigate Normal view:
- F6 : Move clockwise among panes in Normal view
- Shift+F6: Move counter clockwise among panes in Normal view
- Ctrl+Shift+Tab : Switch between Normal and Outline views
Outline view
- provides access to your presentation’s text outline through the alternating Slides and Outline panes on the left side of the PowerPoint interface
- displays all the text contained within the title and text placeholders of your slides
Tip: You can use the Ctrl + Shift + Tab shortcut key to switch between Normal view and Outline view.
Slide Sorter View
- let you work with whole slides
- Any edits made will influence one or more slides , depending on your selection.
- see thumbnail sized representations of all slides in your presentation
- select multiple slides; you can quickly reorder, delete, or duplicate your slides
Notes Page View
- shows you how your printed notes pages will appear
- shows the speaker notes that you add to the Notes pane for each slide
Reading view
- is similar to Slide Show view in some ways because, in both views, the slide is shown in full-screen mode
- helps you in quickly navigating through slides , and also allows easy access to the Windows taskbar at the same time to switch to other available open programs or windows
Tip: you can press the Esc key to go back to the view you were using before you changed to Reading view.
Slide Master View
- make any changes or edits within this view, these modifications will influence all slides within your presentation
Handout Master view
- Changes you make in this view influence the look and layout of printed Handouts
In Conclusion, Presentation Views create great impact while editing your slides when preparing for a presentation. Not only you can focus more on what really matters in your presentation, but also this saves your time, effort & energy in making your presentation.
Aside from Presentation Views, there’s so much more you can learn & apply in using Microsoft PowerPoint. Check out our 2 Days Basic-Intermediate PowerPoint Training Today! Upcoming Schedules are below:
Moreover, having a Sophisticated Slide is not enough to Ace your Presentation, a good communication skill can lock your audience attention resulting to a more engaging presentation. Learn & Maximize this skill in our 2-Day Communicate with Confidence Training.

Leave a Reply
Recent posts.

5 Ways Businesses Can Use Power Apps & Power Automate

Training For Occupational Progressive Wages for Administrators & Other Roles

How To Organize A Presentation

Are You Making These Presentation Mistakes?

Frequently Asked Questions About Microsoft Excel
Use the rectangular marquee tool in photoshop.
- Adobe Photoshop
- Cloud Computing
- Communication Skills
- Computer Basics
- Digital Marketing
- Employee Training
- Intellisoft Tutorials – WSQ Funded Courses
- Microsoft Excel
- Microsoft Office Training
- Microsoft Power Platform
- Presentation Techniques
- Python Training
- Soft Skills
- Web Design Training
Weekly Tutorial
Sign up for our newsletter.
We’ll send you some tips & tutorials, plus Training News & Updates to your email periodically.
Start Saving Today
Get the 8 Tips to Start Saving on Your Website Design PDF Guide emailed to you now.

Browse through various articles and courses for Free at DeveloperPublish.com
- What is My IP Address?
Presentation Views in Microsoft PowerPoint
This post covers various Presentation Views in Microsoft PowerPoint and different use cases when you use them.
What are the different Presentation Views in Microsoft PowerPoint?
Various PowerPoint views that are supported in Microsoft Office includes.
Normal View
Slide sorter view, notes page view.
- Slides Show View
Master Views
How to choose the presentation view in microsoft powerpoint.
To choose the PowerPoint view, select the View tab in PowerPoint and then select the Presentation view that you wish your slide to use.

Alternatively, you can switch between different presentation views by selecting them from the Taskbar at the screen’s bottom.

The Normal View is the preferred presentation view in case you want to create and edit your slide.
The Slide Sorter View is ideal if you want to see the thumbnails of all your slide decks. It lets you to easily re-order them.
The Notes Page View is ideal if you want to view your speaker notes.
Slide Show View
The Slide Show View is ideal for the users who wish to present their slide on the projector. You can also use the Use Presenter View option in PowerPoint to display the current slide, next slide, and speaker notes.
If you want to make a change to all the slides within your presentation, Master Views might be an ideal one.
Leave a Reply Cancel reply
You may also like.

Content Placeholders in PowerPoint
- May 5, 2022

How to Create Text Boxes Manually in PowerPoint?

Rearranging Slides in PowerPoint
- May 2, 2022
Login with your site account
Remember Me

Cloud Storage

Custom Business Email

Video and voice conferencing

Shared Calendars

Word Processing

Spreadsheets
Presentation Builder

Survey builder

Google Workspace
An integrated suit of secure, cloud-native collaboration and productivity apps powered by Google AI.
Tell impactful stories, with Google Slides
Create, present, and collaborate on online presentations in real-time and from any device.
- For my personal use
- For work or my business

Jeffery Clark
T h i s c h a r t h e l p s b r i d g i n g t h e s t o r y !

E s t i m a t e d b u d g e t

Make beautiful presentations, together
Stay in sync in your slides, with easy sharing and real-time editing. Use comments and assign action items to build your ideas together.

Present slideshows with confidence
With easy-to-use presenter view, speaker notes, and live captions, Slides makes presenting your ideas a breeze. You can even present to Google Meet video calls directly from Slides.

Seamlessly connect to your other Google apps
Slides is thoughtfully connected to other Google apps you love, saving you time. Embed charts from Google Sheets or reply to comments directly from Gmail. You can even search the web and Google Drive for relevant content and images directly from Slides.

Extend collaboration and intelligence to PowerPoint files
Easily edit Microsoft PowerPoint presentations online without converting them, and layer on Slides’ enhanced collaborative and assistive features like comments, action items, and Smart Compose.

Work on fresh content
With Slides, everyone’s working on the latest version of a presentation. And with edits automatically saved in version history, it’s easy to track or undo changes.

Make slides faster, with built-in intelligence
Assistive features like Smart Compose and autocorrect help you build slides faster with fewer errors.

Stay productive, even offline
You can access, create, and edit Slides even without an internet connection, helping you stay productive from anywhere.
Security, compliance, and privacy

Secure by default
We use industry-leading security measures to keep your data safe, including advanced malware protections. Slides is also cloud-native, eliminating the need for local files and minimizing risk to your devices.
Encryption in transit and at rest
All files uploaded to Google Drive or created in Slides are encrypted in transit and at rest.
Compliance to support regulatory requirements
Our products, including Slides, regularly undergo independent verification of their security, privacy, and compliance controls .
Private by design
Slides adheres to the same robust privacy commitments and data protections as the rest of Google Cloud’s enterprise services .

You control your data.
We never use your slides content for ad purposes., we never sell your personal information to third parties., find the plan that’s right for you, google slides is a part of google workspace.
Every plan includes

Collaborate from anywhere, on any device
Access, create, and edit your presentations wherever you are — from any mobile device, tablet, or computer — even when offline.

Get a head start with templates
Choose from a variety of presentations, reports, and other professionally-designed templates to kick things off quickly..

Photo Album

Book Report

Visit the Slides Template Gallery for more.
Ready to get started?
- Slides Apps
Online PowerPoint Viewer App
View powerpoint online. ppt, pptx., powered by aspose.com and aspose.cloud ., * by uploading your files or using our service you agree with our terms of service and privacy policy ..
Send the download link to
Press Ctrl + D to store it in your bookmarks in order not to search it again
We've already processed ??? files with total size of ??? Mbytes.

How to open a presentation using Aspose Viewer
- Click Drop or upload your files .
- Select the presentation you want to open and view on your device.
- Wait for Aspose Viewer to process and open the file.
After uploading and opening your presentation, you can perform these tasks:
- Zoom : zoom-in and zoom-out.
- Navigate through its slides.
- Use different modes : full-screen mode, slideshow mode, etc.
- Download the file as a PowerPoint file, image, PDF, or in other formats.
Note: We delete all files from our servers after 24 hours. If you get a download link to share your presentation, the link will stop working after 24 hours.
Aspose Viewer App is a free and easy-to-use online presentation viewer or reader. You get to open your presentation from any computer (Windows, macOS) or smartphone (Android, iOS). Simply upload your file and view it. No software installation is needed.
You can use the Viewer app to present your slides (or demonstrate a presentation) to people. If necessary, you can also share a temporary presentation (or slide) link with people. The Viewer app shows each slide of the presentation as an image, which is a convenient format that protects against editing and copying.
The Viewer App’s intuitive interface allows you to perform these basic tasks: navigate through slide pages, zoom into presentation slides, observe presentation slides in the navigation menu, download a full presentation in its original format or download presentation slides as images.
Other Aspose Apps you may want to try: Collage web app for making collages and merging JPG photos; Video web app for converting presentations to videos. Read an article on opening or viewing presentations: How to Open and View Presentations Without PowerPoint or Office

Aspose.Slides PowerPoint Viewer
- PowerPoint Reader, PowerPoint Viewer, and PowerPoint Player in a single Aspose.Slides app.
- Open any PowerPoint and OpenOffice presentation format: PPT , PPTX , ODP .
- Use the free PowerPoint Web Viewer to open PPT, PPTX online and view PPS , ODP files.
- Powerful PowerPoint Viewer is an alternative for Windows 10 PCs, Android smartphones, iPhones, and other devices.
- PowerPoint Viewer for 64 bit or 32 bit systems.
- App includes PowerPoint Viewer for all recent Microsoft PowerPoint editions: PowerPoint Viewer 2010, 2013, 2016, and 2019.
- Use PowerPoint Player to demonstrate presentations at business meetings, public conferences, daily standups, online meetings, etc.
- How do I open a presentation online without PowerPoint? With Aspose’s free Presentation Viewer, you can open and view any presentation from any device or OS: Windows, macOS, Android, iOS, etc.
- Can I open my PowerPoint online? Yes. With this Viewer app, you can open all the widely-used PowerPoint files (PPT, PPTX, ODP, and others) online.
- What operations are available in the online Viewer? You can do many operations: Go into full-screen mode, use slides overview, specify an autoplay timer, and so on.
- Is the Presentation Viewer easy to use? Yes, the app is very easy to use. All you have to do is upload your presentation file to open or view it. You can then switch to full-screen mode, for example.
- Can I open my PowerPoint in my browser? Yes, you can. On the Aspose’ Viewer page, you just have to upload your presentation to open and see its contents.
Fast and Easy-To-Use Viewer
Support for All Platforms
Viewer Quality
Other supported viewers.
We provide viewers used to open many other file formats. Please, go through the list below.
- PDF Viewer (View PDF document)
- ODP Viewer (OpenDocument Presentation File Format)
- OTP Viewer (Origin Graph Template)
- POTM Viewer (Microsoft PowerPoint Template)
- POTX Viewer (Microsoft PowerPoint Open XML Template)
- PowerPoint Viewer (PowerPoint Open XML Presentation)
- PPS Viewer (Microsoft PowerPoint Slide Show)
- PPSM Viewer (Microsoft PowerPoint Slide Show)
- PPSX Viewer (PowerPoint Open XML Slide Show)
- PPT Viewer (PowerPoint Presentation)
- PPTM Viewer (Microsoft PowerPoint Presentation)
- PPTX Viewer (PowerPoint Open XML Presentation)
10 Must-See Presentations from the 2024 SGO Annual Meeting
The latest developments across the field of gynecologic oncology were presented at the 2024 Society for Gynecologic Oncology Annual Meeting on Women’s Cancer in San Diego, California, from March 16-18, 2024.

The 2024 Society for Gynecologic Oncology (SGO) Annual Meeting on Women’s Cancer took place in San Diego, California, from March 16 to 18, 2024, where experts in the field of gynecologic oncology met to learn and share results of the latest research.
The latest findings across ovarian, cervical, and endometrial cancers took center stage, including compelling data from the phase 3 KEYNOTE-868 trial (NCT03914612) investigating pembrolizumab (Keytruda) plus chemotherapy in endometrial cancer.
One of the most exciting presentations came from the phase 3 RUBY trial (NCT03981796), where “unprecedented” survival for patients with endometrial cancer was observed with the combination of dostarlimab-gxly (Jemperli) plus chemotherapy.
Treatment of perivascular epithelioid sarcoma (PEComa) with nab-Sirolimus (Fyarro; ABI-009) also was anticipated as the topic of multiple presentations at the meeting.
Here is a look back at the SGO Annual Meeting:
Identifying a link between cervical cancer and social determinants of health.
Social determinants of health—poverty, race, ethnicity, and treatment access—play a critical role in occurrence rates cervical cancer across the United States.
Pembro Combo Betters Survival in Endometrial Cancer
The combination of pembrolizumab plus chemotherapy conferred a positive overall survival (OS) outcome for patients with endometrial cancer, according to findings from the phase 3 NRG-GY018/KEYNOTE-868 trial.
Unprecedented Benefit With Dostarlimab/Chemo in Endometrial Cancer
Dostarlimab and carboplatin/paclitaxel chemotherapy delivered a 31% improvement in OS vs placebo/chemotherapy in patients with primary advanced or recurrent endometrial cancer, regardless of microsatellite instability (MSI) status, according to findings from a second interim analysis of part 1 of the ENGOT-EN6-NSGO/GOG-3031/RUBY trial.
Olaparib/Cediranib Combo Misses the Mark in Ovarian Cancer
Olaparib (Lynparza) plus cediranib did not appear to deliver a statistically significant improvement in progression-free survival (PFS) and OS vs standard-of-care chemotherapy among patients with platinum-resistant or -refractory epithelial ovarian cancer.
PROs Strengthen Case for Mirvetuximab Soravtansine as SOC in FRα+ Ovarian Cancer
Patient-reported outcomes (PROs) from the phase 3 MIRASOL trial (NCT04209855) showed that patients with folate receptor-alpha positive, platinum-resistant ovarian cancer treated with mirvetuximab soravtansine (Elahere) had a better health-related quality of life compared with the investigator’s choice of chemotherapy.
Tislelizumab Plus Chemotherapy Shows Encouraging Responses, Antitumor Activity in Locally Advanced Cervical Cancer
In locally advanced cervical cancer, the combination of neoadjuvant tislelizumab (Tevimbra) plus chemotherapy was shown to be safe with encouraging antitumor activity based on a pathologic complete response in 60.9% and an optimal pathologic response in 73.9% of patients.
Study Investigates Nab-Sirolimus Plus Letrozole in Advanced Endometrial Cancer
A phase 2 study (NCT05997017) investigating the combination of nab-Sirolimus plus letrozole (Femara) in patients with advanced or recurrent endometrial cancer began enrollment in December 2023.
Nab-Sirolimus Delivers Durable Responses in PEComa Subgroups
Nab-Sirolimus delivered rapid and durable responses in patients with PEComa, according to a subgroup analysis of the phase 2 AMPECT study (NCT02494570).
In Endometrial Cancer Treament, Racial Disparities Persist
Disparities in clinical characteristics and outcomes were noted between Black and White women with endometrioid endometrial cancer, particularly with Black patients experiencing an increased risk of death, according to findings from a retrospective study of patients in real-world registries and GOG/NRG randomized phase 3 trials.
ChatGPT Offers New Outlook on Genetic Counseling for Gynecologic Cancers
Using ChatGPT as a tool to pose genetic counseling questions delivered accurate responses for patients with gynecologic cancers.

Advancing the Treatment of Cervical and Endometrial Cancers
In season 2, episode 6 of Targeted Talks, Alexander B. Olawaiye, MD leads a discussion with Haider S. Mahdi, MD, about the modern approaches to treating cervical and endometrial cancers.
First-Line Durvalumab Betters Survival in Advanced Endometrial Cancer
Findings from the DUO-E study support potential new durvalumab-based treatment options for patients with advanced or recurrent endometrial cancer.

Precision Medicine Guiding Ovarian Cancer Treatment
Sarah M. Temkin, MD leads discussion with Daphne B. Stewart, MD, around targeted therapies in ovarian cancer, whether offered in the academic or community setting.
The use of ChatGPT may help to improve genetic counseling for patients with gynecologic cancer.
An increased risk of death and lower enrollment in clinical trials have been observed between Black and White patients with endometrial cancer.
2 Commerce Drive Cranbury, NJ 08512
609-716-7777

- Search for: Toggle Search
NVIDIA GTC 2024: A Glimpse Into the Future of AI With Jensen Huang
NVIDIA’s GTC 2024 AI conference will set the stage for another leap forward in AI.
At the heart of this highly anticipated event: the opening keynote by Jensen Huang , NVIDIA’s visionary founder and CEO, who speaks on Monday, March 18, at 1 p.m. Pacific, at the SAP Center in San Jose, Calif.
Planning Your GTC Experience
There are two ways to watch.
Register to attend GTC in person to secure a spot for an immersive experience at the SAP Center. The center is a short walk from the San Jose Convention Center, where the rest of the conference takes place. Doors open at 11 a.m., and badge pickup starts at 10:30 a.m.
The keynote will also be livestreamed at www.nvidia.com/gtc/keynote/ .
Whether attending in person or virtually, commit to joining us all week. GTC is more than just a conference. It’s a gateway to the next wave of AI innovations.
- Transforming AI: Hear more from Huang as he discusses the origins and impact of transformer neural network architecture with its creators and industry pioneers. He’ll host a panel with all eight authors of the legendary 2017 paper that introduced the concept of transformers: Ashish Vaswani, Noam Shazeer, Niki Parmar, Jakob Uszkoreit, Llion Jones, Aidan N. Gomez, Lukasz Kaiser, and Illia Polosukhin.Wed., March 20, 11-11:50 a.m. Pacific.
- Join Visionaries Transforming Our World: Hear from leaders such as xAI cofounder Igor Babuschkin ; Microsoft Vice President of GenAI Sebastian Bubeck , Stanford University’s Fei-Fei Li , Meta Vice President of AI Research Joelle Pineau ; OpenAI Chief Operating Officer Brad LightCap ; Adept AI founder and CEO David Luan ; Waabi f ounder and CEO Raquel Urtasun ; Mistral CEO Arthur Mensch ; and many others at the forefront of AI across various industries.
- Be Part of What Comes Next: Engage from March 17-21 in workshops and peer networking and connect with the experts. This year’s session catalog is packed with topics covering everything from robotics to generative AI, showcasing real-world applications and the latest in AI innovation.
- Stay Connected: Tune in online to engage with the event and fellow attendees using #GTC24 on social media.
With visionary speakers and a comprehensive program covering the essentials of AI and computing, GTC promises to be an enlightening experience for all.
Don’t miss your chance to be at the forefront of AI’s evolution. Register now .
NVIDIA websites use cookies to deliver and improve the website experience. See our cookie policy for further details on how we use cookies and how to change your cookie settings.
Share on Mastodon
Advertisement
A new Holocaust exhibit in Boston confronts a painful history
- Arielle Gray

Nearly 80 years ago, World War II was finally coming to an end. In January of 1945, the largest Nazi concentration camp, Auschwitz, was liberated by the Soviet army — around 7,000 people were freed, though many would later die due to malnutrition and other medical complications.
And liberation came too late for the 1.1 million people whose lives were claimed by Auschwitz in the years it operated.
For the first time, hundreds of Holocaust artifacts are in Boston as a part of the international exhibition, “ Auschwitz. Not Long Ago. Not Far Away .”
Running through Sept. 2 at Saunders Castle at Park Plaza, the exhibit explores the painful legacy of one of history’s darkest chapters.
Created by Spanish company Musealia in collaboration with Auschwitz-Birkenau Memorial, “Auschwitz. Not Long Ago. Not Far Away” comes at a time when religious and racial tensions are high. This is the first traveling exhibition on Auschwitz.

“An exhibition this substantial and comprehensive on Auschwitz ... is unlikely to ever be assembled again,” said Luis Ferreiro, director of Musealia.
Seven years ago, he was inspired to explore the idea of an exhibit after reading "Man's Search for Meaning," a book that chronicles author Viktor Frankl's time spent in Nazi concentration camps. Frankl and his family were sent to Auschwitz.
“Listening to their stories and understanding how these events could happen is the best action we, as citizens of the world, can take against the reoccurrence of such a horrific event,” Ferreiro said.
This is the first time a collection of this size has been brought together to tell the story of the Holocaust — the exhibit features 700 artifacts from the Auschwitz-Birkenau Memorial and over 20 other museums. Objects include materials and suitcases packed by Auschwitz deportees, a gas mask and even large portions of an original prisoner’s barrack.
“These artifacts call upon guests to prevent the dehumanization of others by building a future free from antisemitism, racism and all ideologies of hatred,” said Piotr Cywinski, director of the Auschwitz-Birkenau Memorial.
Upon entering "Auschwitz. Not Long Ago. Not Far Away," visitors are guided chronologically through the exhibit via an audio-tour device, starting with an exploration of how so many people bought into genocidal, anti-Semitic, racist political rhetoric.
Founded in 1919, the National Socialist German Workers’ Party, or the Nazi party, helmed by Adolf Hitler, would go on to kill an estimated six million Jewish people under the guise of restoring the German nation to its former glory. The total number of people killed throughout the Holocaust, including other minority groups and prisoners of war, is closer to 11 million.
Auschwitz was the largest of the many concentration camps established by the Nazis after the beginning of World War II. It received its first detainees in 1940 and operated for five years until 1945.
Before Soviet forces liberated Auschwitz in January, nearly 60,000 prisoners were forced on death marches. Around 15,000 people died on those marches. The war would eventually end months later in May when German forces surrendered in Berlin.

Divided into four parts, co-curator Paul Salmons says this exhibition "will show objects related to the perpetrators themselves... it shows the personal items of the victims and tells the stories of the individual people, the families that were torn apart, the communities that were devastated."
Items, like a bright red woman's shoe and a child's doll, bring detail to the lives of those killed at Auschwitz. They help concretize and contextualize a history that many have only experienced through history books. Other objects, like the barracks and operating table, underscore the dehumanization necessary to commit such atrocities like the ones that happened at Nazi concentration camps.
John Norman, the president of World Heritage Exhibitions who is presenting the exhibit locally, points out that “Auschwitz. Not Long Ago. Not Far Away" will help viewers confront the sobering reality of humanity's past. This confrontation is what raises awareness and with awareness comes the ability to choose differently in the future.
"Within the echoes of history's shadows, lies a vital truth; to remember, to learn and to honor," he said.
This is the exhibit’s New England premiere, and Boston will likely be the only East Coast stop during its 14-city tour.

" Auschwitz. Not Long Ago. Not Far Away " is on view at the Castle at Park Plaza through Sept. 2.

Arielle Gray Reporter Arielle Gray is a reporter for WBUR.
More from WBUR
- Use Presenter view Video
- Set up your presentation Video
- Deliver your presentation Video

Use Presenter view

With Presenter view, the audience views your slides on a main screen, while you control the show on another screen that only you can see.
View your speaker notes as you deliver your slide show
Draw on or highlight slides during a presentation
Turn your mouse into a laser pointer
Add speaker notes to each slide in a presentation
PowerPoint is all about helping you give great presentations; and the Presenter view is all about helping you use PowerPoint.
Traditionally, the audience faces a screen showing your PowerPoint slides, and you stand in between the audience and screen, and change slides on a computer.
Unless you are a professional presenter, you may also have to juggle paper notes, or attempt to wing it by reading off your slides.
Presenter view lets you take advantage of the dual monitor capability of a computer to separate what the audience sees from the mechanics of running a slideshow.
The audience views your slides on the main screen, while you control the show with the Presenter view on another screen that only you can see.
The Presenter view is like a dashboard that contains in one window everything that you need to run your show.
You have your notes over here.
This monitor shows you what the audience sees minus transitions, effects, and videos.
And this monitor shows you what is coming up next.
You have all your tools here, which you can select out of view of the audience.
And you click here to move forward or back.
There is even a timer that starts when you begin your presentation, and a clock.
By running the Presenter view on a laptop, just below eye level, you can face the audience and never have to look back at the screen.
You can do things like select a Laser Pointer or drawing tool, or use the Slide Navigator to select a different slide.
And only you can see all this behind-the-scenes stuff, so the audience can stay focused on your message.
Presenter view also helps you stay focused.
All the controls are easy to get to in one window with big icons, and a simple design.
So, if you are interested, let's give the Presenter view a try.
In the next video, we'll set up a presentation.

Need more help?
Want more options.
Explore subscription benefits, browse training courses, learn how to secure your device, and more.

Microsoft 365 subscription benefits

Microsoft 365 training

Microsoft security

Accessibility center
Communities help you ask and answer questions, give feedback, and hear from experts with rich knowledge.

Ask the Microsoft Community

Microsoft Tech Community

Windows Insiders
Microsoft 365 Insiders
Was this information helpful?
Thank you for your feedback.
- Building Semantic Models in Oracle Analytics Server
- Before You Begin
- Plan a Semantic Model
Plan the Presentation Layer
The presentation layer is where you set up the user view of the business model. After you deploy the semantic model, the presentation layer is displayed as subject areas.
The names of folders and columns in the presentation layer can appear in localized language translations. The presentation layer is the appropriate layer in which to set user permissions.
In this layer, you can do the following:
You can show fewer columns than exist in the logical layer. For example, you can exclude the key columns because they have no business meaning.
You can organize columns using a different structure from the table structure in the logical layer.
You can display column names that are different from the column names in the logical layer.
You can set permissions to grant or deny users access to individual subject areas, tables, and columns.
You can export logical keys to ODBC-based query and reporting tools.
You can create multiple subject areas for a single business model.
You can create a list of alternative names for presentation objects that are used in Logical SQL queries. Alternative names allows you to change presentation column names without breaking existing reports.
The following is a list of tips to use when designing the presentation layer:
Because there isn't an automatic way to synchronize all changes between the logical layer and the presentation layer, it's best to wait until the logical layer is relatively stable before adding customizations in the presentation layer.
There are many ways to create subject areas, such as dragging and dropping the entire business model, dragging and dropping incremental pieces of the model, or automatically creating subject areas based on logical stars or snowflakes. Dragging and dropping incrementally works well if certain parts of your business model are still changing.
For better maintainability, it's a best practice to rename objects in the logical layer rather than the presentation layer Assigning user-friendly names to logical objects rather than presentation objects ensures that you can use the names in multiple subject areas. Also, it ensures that the names persist even when you need to delete and re-create subject areas to incorporate changes to your business model.
Members in a presentation hierarchy aren't visible in the presentation layer. You can see hierarchy members in the Workbook editor or in the Analysis editor.
When setting up data access security for a large number of objects, consider setting object permissions by role rather than setting permissions for individual columns.
Clinical Research: FDA Issues Draft Guidance on Informed Consent

The U.S. Food and Drug Administration (FDA), in collaboration other agencies, recently published draft guidance (Guidance) on effectively presenting key information regarding informed consent in FDA-regulated clinical investigations of medical products and Department of Health and Human Services (HHS) supported human subjects research. The Guidance aims to assist sponsors, investigators, and institutional review boards (stakeholders) involved in or tasked with overseeing human subject research. In particular, the Guidance provides an overview on how to effectively present key information, offering recommendations for the content, structure, and delivery of informed consent.
FDA regulations in 21 C.F.R. parts 50 and 56 are designed to protect human subjects participating in FDA-regulated clinical investigations, ensuring their rights, safety, and welfare. Following revisions announced by HHS on January 19, 2017 ( Revised Common Rule ), efforts have been made to enhance protection for human subjects and streamline research processes. Section 3023 of the Cures Act mandates the alignment of differences between HHS and FDA regulations, prompting a proposed rule to amend the aforementioned 21 C.F.R. sections for “harmonization.” FDA further plans to incorporate parts of the Revised Common Rule into 21 C.F.R. § 50.20(e) in support of its ongoing efforts to ensure consistency in regulations governing human subject protection.
Informed Consent Criteria
The Revised Common Rule dictates that consent information is to:
Begin with a concise and focused presentation of the key information that is most likely to assist a prospective study subject or legally authorized representative in understanding the reasons why one might or might not want to participate in the research. See 45 C.F.R. § 46.116(a)(5)(i)) .
The FDA, therefore, recommends that stakeholders carefully identify key information when obtaining informed consent to ensure a participant’s understanding of the research risks, benefits, and procedures, thereby promoting their ability to make informed decisions about participation.
Identification of Key Information
The FDA recommends starting the key information section of the consent form with an introductory statement to guide prospective study subjects. It is unnecessary for this section to include every element of informed consent; instead, stakeholders should prioritize including the most essential elements for a particular study, considering what would be important information to study participants. To aid stakeholders, FDA proposes the following content to include as part of the presentation of key information.
Voluntary Participation and Right to Discontinue Participation
The FDA recommends stating in the key information section that participation in the research is voluntary, with no penalties or loss of benefits for declining or withdrawing from participation in the study. Additionally, stakeholders should reassure prospective study subjects that their decision regarding study participation will not affect their relationship with health care providers or their medical care.
Purpose of the Research, Expected Duration, and Procedures to be Followed
The key information section of the consent form should effectively communicate essential details to prospective study subjects, facilitating their understanding of the study’s purpose and protocol, such as its design and inclusion criteria. Key details may include the expected duration of participation, procedures involved, the status of investigational products, and any experimental procedures. Additionally, stakeholders should consider including information on placebo use, randomization, post-study options, and how participation compares to standard care.
Reasonably Foreseeable Risks and Discomforts
The FDA recommends providing information upfront about the most common and serious risks associated with participation in the study to assist prospective study subjects when making informed decisions about participation. Key risks should be prioritized and clearly distinguished from other research interventions and may encompass details on risk monitoring and mitigation strategies to ensure prospective study subjects are thoroughly informed.
Reasonably Expected Benefits
The key information section should emphasize any potential benefits of research participation, as these may influence prospective study subjects’ decisions. However, it is important to ensure that prospective study subjects understand the distinction between research and clinical care, and any potential benefits should be presented in a clear and realistic manner without conveying overly optimistic expectations.
Appropriate Alternative Procedures
Incorporating a clear and concise description of alternative procedures or treatments, if applicable, is essential in the key information section to inform prospective study subjects’ decision-making regarding participation in the study. It is recommended to provide information about the care prospective study participants would receive outside the study first, followed by details on how the care provided in the context of the study differs, emphasizing awareness of alternatives tailored to individual values and preferences.
Compensation and Medical Treatments for Research-Related Injuries
For research involving more than minimal risk, it is recommended to include details about available medical treatments and compensation for prospective study subjects in case of injury as key information, particularly if there are no plans for compensating for treatment costs related to research-related injuries.
Costs Related to Subject Participation
Interested parties should consider including information about potential costs incurred by prospective study subjects, including whether health insurance may be charged and if reimbursement for study-related expenses will be provided. Additionally, incentives and payments for time, inconvenience, and discomfort should also be addressed as key information, as these issues can impact prospective study subjects’ decisions to participate.
Supplemental Information
Supplemental information beyond basic consent elements can be added to the key information section if it’s important to the prospective study subject’s decision about research participation. HHS Secretary’s Advisory Committee on Human Research Protections suggests considering various aspects, such as the novelty of the research and impacts on subjects outside of the study, to identify relevant information to include.
Presentation of Key Information
The Revised Common Rule also requires that:
Informed consent as a whole must present information in sufficient detail relating to the research and be organized and presented in a way that does not merely provide lists of isolated facts, but rather facilitates the prospective study subject’s or legally authorized representative’s understanding of the reasons why one might or might not want to participate. 45 C.F.R. § 46.116(a)(5)(ii)
Stakeholders are advised to prioritize presenting key information concisely at the outset of the informed consent process. The FDA emphasizes the need for clear and well-organized consent forms across various presentation formats, including written, oral, or electronic mediums. To enhance comprehension, stakeholders are encouraged to explore innovative methods like utilizing illustrations or tablet devices. Additionally, consent documents should adhere to plain language principles, prioritize essential information, and adopting a tiered structure, presenting key details first and additional information as needed. Customizing information to match the audience’s language proficiency, education, and cognitive abilities is critical for facilitating understanding and informed decision-making regarding participation in a study.
The FDA’s Guidance offers recommendations for effectively presenting key information in FDA-regulated clinical investigations and HHS-supported human subject research. The Guidance aligns with efforts to enhance protection for human subjects and streamline research processes. By prioritizing concise presentation and innovative methods, stakeholders can promote informed decision-making among prospective study participants, ensuring consistency and clarity in regulations governing human subject protection. Foley & Lardner will continue to monitor the development of this proposed rule to provide timely updates and insights to our readers.
Foley is here to help you address the short- and long-term impacts in the wake of regulatory changes. We have the resources to help you navigate these and other important legal considerations related to business operations and industry-specific issues. Please reach out to the authors, your Foley relationship partner, our Health Care & Life Sector , or to our Health Care Practice Group with any questions.

Jordan H. Smiley

Kyle Y. Faget
Related insights, clinical trials: fda issues finalized charging guidance for investigational drug use , cancer drugs: antibody drug conjugates (adcs) keep growing, “let’s talk compliance”: medicare advantage: compliance issues and enforcement.
IMAGES
VIDEO
COMMENTS
Learn how to use different views in PowerPoint to edit, organize, and show your slides. Compare Normal, Slide Sorter, Notes Page, Outline, Master, Slide Show, Presenter, and Reading views.
Presenter view lets you view your presentation with your speaker notes on one computer (your laptop, for example), while the audience views the notes-free presentation on a different monitor. Note: PowerPoint only supports the use of two monitors for a presentation. However, you can configure to run a presentation on three or more monitors that ...
Learn how to use Presenter View to see your current slide, next slide, and speaker notes while presenting in PowerPoint. Find out how to adjust the slide timer, annotations, laser pointer, and more in Presenter View.
Learn how to use different view options in PowerPoint to create, edit and present your slides. Compare and choose from Normal, Outline, Slide Sorter, Notes Page, Reading, Slide Show, Presenter and Slide Master views.
Learn how to use different views in PowerPoint to create, edit, and review your presentations. Find out how to switch between Normal, Outline, Slide Sorter, Reading, and Notes Page views.
In Presenter View, you'll have your own private screen with tools like a next slide preview, timekeeper, and drawing tools.. This is a view that you'll see on your own screen while giving a presentation using PowerPoint. While the audience will see the presentation on the projector or big screen, you'll have your own private view on a second monitor.
To see the full course that this video came from, go here: ️https://www.simonsezit.com/courses/microsoft/powerpoint-2021-online-course/In this Microsoft Pow...
Enter Presenter View in PowerPoint, a feature designed to make presenting smoother and more professional. In essence, Presenter View is a special mode in PowerPoint that allows the presenter to see their speaker notes on one screen, while the audience views the note-free presentation on another screen.
In this tutorial you will learn the Presentation Views in PowerPoint. There are five views: Normal, Outline, Slide Sorter, Notes Page, and Reading View. S...
Start Presenter View. Click the Options button. Select Show Presenter View . The Presenter view fills the screen. The same presentation tools are available below the slide, and it also shows the current time and a thumbnail of the upcoming slide. At the bottom of the screen, use the arrows to move forward or backward in the presentation.
Presentation Views in Powerpoint 2010. PowerPoint supports multiple views to allow users to gain the maximum from the features available in the program. Each view supports a different set of functions and is designed accordingly. PowerPoint views can be accessed from two locations. Views can be accessed quickly from the bottom bar just to the ...
The bottom bar, immediately to the left of the zoom settings, has a quick access to views. The Presentation Views portion of the View ribbon can also be used to access views. Here's a quick rundown of the various views and their characteristics. Normal View. This is PowerPoint's default view, and it's where you'll mostly create and edit slides.
Presentation views are different ways of displaying a PowerPoint presentation on your computer screen or a projector. They allow you to edit, rehearse, and p...
Microsoft PowerPoint Presentation views, accessible from the View tab of the Ribbon are:. Normal View. the default and most often used view; displays one slide at a time in the Slide Area, and is used mainly for editing and creating slides, and shows PowerPoint's typical tri-pane interface.; Tip: Here are some keyboard shortcuts that will help you navigate Normal view:
Presentation skills are the abilities and qualities necessary for creating and delivering a compelling presentation that effectively communicates information and ideas. They encompass what you say, how you structure it, and the materials you include to support what you say, such as slides, videos, or images. You'll make presentations at various ...
Step 1: Set Up Dual Monitors. To use Presenter View effectively, you need two monitors - one for yourself as the presenter and one for the audience ( [2]). Most modern computers support connecting two monitors. Here's how to set up dual monitors: For desktop PCs, ensure your graphics card has multiple video outputs (HDMI, DVI, VGA etc.).
For every view the first step is common: Click on the 'View' tab in the top pane in your PPT window. Further, here is a comprehensive list of different views and the uses of each. List of PowerPoint Presentation Views: 1. PowerPoint Normal view: This is the view that your presentation opens up in as soon as you create a new presentation.
Start presenting. On the Slide Show tab, in the Start Slide Show group, select From Beginning. Now, if you are working with PowerPoint on a single monitor and you want to display Presenter view, in Slide Show view, on the control bar at the bottom left, select , and then Show Presenter View.
Alternatively, you can switch between different presentation views by selecting them from the Taskbar at the screen's bottom. Normal View. The Normal View is the preferred presentation view in case you want to create and edit your slide. Slide Sorter View. The Slide Sorter View is ideal if you want to see the thumbnails of all your slide decks.
Present slideshows with confidence. With easy-to-use presenter view, speaker notes, and live captions, Slides makes presenting your ideas a breeze. You can even present to Google Meet video calls ...
Open any PowerPoint and OpenOffice presentation format: PPT, PPTX, ODP. Use the free PowerPoint Web Viewer to open PPT, PPTX online and view PPS, ODP files. Powerful PowerPoint Viewer is an alternative for Windows 10 PCs, Android smartphones, iPhones, and other devices. PowerPoint Viewer for 64 bit or 32 bit systems.
Treatment of perivascular epithelioid sarcoma (PEComa) with nab-Sirolimus (Fyarro; ABI-009) also was anticipated as the topic of multiple presentations at the meeting. Here is a look back at the SGO Annual Meeting: Identifying a Link Between Cervical Cancer and Social Determinants of Health
NVIDIA's GTC 2024 AI conference will set the stage for another leap forward in AI.. At the heart of this highly anticipated event: the opening keynote by Jensen Huang, NVIDIA's visionary founder and CEO, who speaks on Monday, March 18, at 1 p.m. Pacific, at the SAP Center in San Jose, Calif.
A visitor looks at a sign from Auschwitz. (Courtesy Musealia) Nearly 80 years ago, World War II was finally coming to an end. In January of 1945, the largest Nazi concentration camp, Auschwitz ...
With Presenter view, the audience views your slides on a main screen, while you control the show on another screen that only you can see. Want more? View your speaker notes as you deliver your slide show. Draw on or highlight slides during a presentation. Turn your mouse into a laser pointer. Add speaker notes to each slide in a presentation
The presentation layer is where you set up the user view of the business model. After you deploy the semantic model, the presentation layer is displayed as subject areas. The names of folders and columns in the presentation layer can appear in localized language translations.
The U.S. Food and Drug Administration (FDA), in collaboration other agencies, recently published draft guidance (Guidance) on effectively presenting key information regarding informed consent in FDA-regulated clinical investigations of medical products and Department of Health and Human Services (HHS) supported human subjects research. The Guidance aims to assist sponsors, investigators, and ...
Ferrari kept the F1 launch season rolling on Tuesday by showing off their eagerly anticipated new challenger in an online presentation. Following swiftly in the footsteps of Aston Martin, the famous Italian marque virtually unveiled their SF-24 - which continues Ferrari's recent naming tradition - via a special video and series of images. READ MORE: 'The hardest decision I've ever ...
Students work in self-organized diverse teams of 1-4 students in weeks 1-8, with a final presentation of the work on Friday May 31. The teams will spend the first few weeks designing their specific team problem/scope/goals under one or more of the three primary areas of focus. ... View map. This event is open to: Students - Undergraduates ...
Former President Donald Trump told the Supreme Court on Tuesday that future presidents could be vulnerable to "de facto blackmail and extortion while in office" if the justices did not accept ...