- Slidesgo School
- PowerPoint Tutorials

How to Use the Presentation Modes and the Screen Recording Features in PowerPoint

After designing all the slides for your presentation, the next and last step is presenting in front of your audience. In this new Slidesgo School tutorial, you’ll see how the presenter view works and how you can record your presentation .
Presentation Modes
Presentation modes — set up slide show, presentation modes — record slide show.
- There are different presentation modes in PowerPoint, besides the one you can find at the bottom of the screen.
- To access the presentation modes, go to the Slide Show tab.
- The first two options allow you to start the presentation from the beginning or from the currently selected slide.

- If you choose Present Online, an URL will be generated, which you can then share with your potential online viewers. After clicking this button, a new window will open, displaying info about the Microsoft Office online presentation service and a checkbox to enable remote download for your online audience. To enjoy this service, you need an Office 365 account. When you’re ready, click Connect to generate the URL.
- If you choose Custom Slide Show, you can select which slides to display in your presentation. First, create a new custom slide show and select the slides that you want to display. Then, click Add, enter the name of the presentation and click OK. This new custom presentation will appear on the list. Select it and click Show to begin the presentation.
- In the Set Up group you’ll find options to set up the presentation, hide slides, rehearse your presentation and even record it.
- Click Set Up Slide Show to adjust several settings regarding your presentation. You’ll find more information in the next section of this tutorial .
- If you click Hide Slide, the selected slide won’t show up during your presentation. Hidden slides will appear faded out on the list and their numbers will be crossed out.
- If you click Record Slide Show, you’ll be able to record your presentation from the beginning or from the current slide. We’ll go into detail in the last section of this tutorial.
- There are several checkboxes regarding whether to play narrations, use timings and show media controls.

- In the Monitors group you can choose which screen to display your presentation.
- The last group, Captions & Subtitles, is only available in Office 365. You’ll find options to enable subtitles, which will be generated out of your speech (so you’ll need to have a mic). There are settings to change the language and the position of the subtitles.
- Open your presentation in PowerPoint.
- Go to the Slide Show tab.
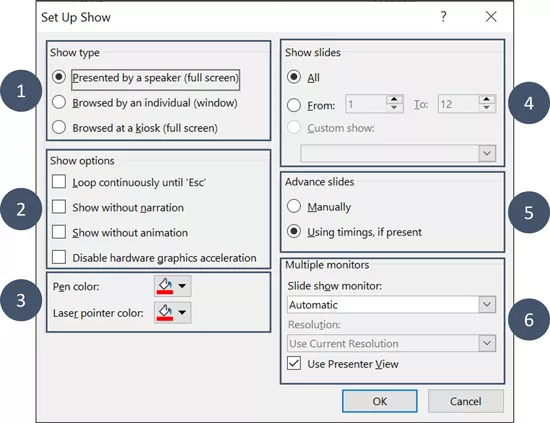
- In the Set Up group, click Set Up Slide Show. A new window will open, where you’ll find several options.
- In the top-left corner, under “Show type”, you can choose whether the presentation will be in fullscreen with speaker notes, windowed, or in fullscreen without speaker notes or the menu bar.

- Under “Show options” you can choose whether to show the presentation without narration or animations, or disable the hardware graphics acceleration (for better performance). You can also set the pen and laser pointer color.

- Under “Show slides”, you can choose which slides to show in your presentation. You can select all of them, a specific range or a custom slideshow.
- There are other settings to determine how to advance slides (manually or using timings), what the resolution will be and whether to use the presenter view.
- Click Record Slide Show. From the drop-down menu, select From the Current Slide or From the Beginning.
- A new window will open, along with the presentation in fullscreen mode. At the top-left you’ll find a button to start recording.
Do you find this article useful?
Related tutorials.

How to Use the Presenter View in Google Slides
Google Slides, like PowerPoint, has different presentation modes that can come in handy when you’re presenting and you want your slideshow to look smooth. Whether you’re looking for slides only, speaker notes or the Q&A feature, in this new Google Slides tutorial, you’ll learn about these and their respective settings. Ready? Then let’s explore the presenter view!

How to Download Google Slides Templates
When preparing a presentation, many people start panicking because they realize how much time it will take to edit each and every slide. Creating them from scratch, filling them in, looking for pictures, moving the elements...How stressful! But there is a solution that saves you a lot of time. We're sure that you've browsed the internet for templates, or basically, pre-established designs and elements, that can be downloaded for free and can be edited to your liking. Are we right? Then, we have some good news for you!

Discover our collection of printable templates
With the advance of technology, printing has become something that is no longer a necessity. Smartphones have made the paper format less and less frequent, but there are still certain cases in which having physical resources is much more convenient. Whether it's for taking notes, handing out assignments, making worksheets or handing out business cards or invitations, it's necessary to print your customized designs.From now on, in every Slidesgo printable presentation that you download, you will find the instructions for printing on the third slide. Depending on the style, colors or format of each presentation, we will tell you if you can...

How to Add Superscript and Subscript in Google Slides
Let’s take the most famous formula: E=mc^2, Einstein’s relativity equation. It wouldn’t be the same if it was E=mc2, right? Okay, yes, some people write it like that because it’s very famous and it won’t be misunderstood. But technically… It can! This is where the sophistication of superscript or subscript enters the room! Do you know how to write them in equations, copyright brands or even footnotes in your presentations? Let’s figure out how.
Home Blog PowerPoint Tutorials How to Work with Presenter View in PowerPoint
How to Work with Presenter View in PowerPoint

Not all presenters have excellent memory recall or the ability to speak flawlessly to the audience without any cues. However, many of them are good at hiding it by using Presenter View in PowerPoint. It is a presentation mode that enables the presenter to hide speaker notes and presentation controls from the audience while leveraging the various handy features offered by PowerPoint.
How to Use Presenter View in PowerPoint
To start using Presenter View, ensure it’s enabled before you begin your slideshow. If you are new to this feature, we recommend using this option to familiarize yourself with the various navigation options for this presentation mode. This might also be helpful if the PowerPoint templates you are accustomed to using might have animations that you might want to preview in this mode to understand when to give the next visual cue.
How to Enable Presenter View in PowerPoint
To enable PowerPoint presenter view, go to the SlideShow tab and make sure the Use Presenter View option is enabled. This will ensure that you can access Presenter View when you switch your slides to SlideShow mode.

Adjust Display Settings
You can swap between the presenter view and slideshow mode or duplicate the slideshow to exit the Presenter View from the Display Settings menu from the top toolbar.

Navigate Slides in Presenter View
Like any standard PowerPoint presentation in SlideShow mode, you can navigate between slides by using the arrow keys or with a presentation remote. Presenter View also provides slide navigation buttons to move the slides back and forth.

View Taskbar in Presenter View
The Show Taskbar option at the top enables viewing the taskbar. This can be helpful if you require using the taskbar, such as to view your battery charge, see the time, enable or disable another app from the taskbar menu, etc.

Reset or Pause the Timer
Once you start your presentation in Presenter View, a timer starts showing how much time you have spent in slideshow mode. This is an excellent way to understand how much time you have consumed for your session and to keep an eye out for good timekeeping. You can also hit Pause or reset the timer anytime.

Change the Size of the Speaker Notes
How to view notes in PowerPoint while presenting? If you have any speaker notes added to your slides, they will appear in Presenter View on your screen. You can increase or reduce the size of the text via the two options at the bottom of the speaker notes pane.

Using Annotation Tools in Presenter View
PowerPoint annotation tools can be accessed from the bottom toolbar in Presenter View. The Pen and Laser Pointer Tools button gives you access to the pen, ink colors, laser pointer, and eraser and also allows you to show or hide the mouse pointer via Arrow Options .

View All Slides in Presenter View
If you need to go back and forth to find a relevant slide for an ongoing discussion or query during your presentation, you can view all slides in Presenter View via the See all slides option.

Zoom Slides using Presenter View
PowerPoint’s Zoom feature lets presenters quickly pick a portion of the slide to zoom into. Presenter View allows you to leverage this feature by instantly selecting a portion of the slide to enlarge it after selecting Zoom into the slide option. To exit the Zoom mode or hit the Esc key.

Black or Unblack SlideShow
Sometimes, you might want to turn the screen blank for a while, such as during a mid-presentation break. The Black or Unblack SlideShow option blanks the slides for your audience while continuing to show you all navigation options via Presenter View.

Toggle Subtitles in Presenter View
One of the most revolutionary features introduced by Microsoft for PowerPoint over the past decade has been Live captions. This feature enables subtitles by converting speech to text as you present. You can toggle Live subtitles on or off while in presenter view to help your audience read what you speak.

Toggle Camera in Presenter View
Like subtitles, you can also toggle the camera on or off in Presenter View.

End Slideshow in Presenter View
There are different ways to end or exit a SlideShow from Presenter View. You can hit the Esc key or click End Slide Show . Similarly, you can click the three dots at the bottom and select End Show .

More Slideshow Options
Other than the various visibility prominent menus available to navigate, annotate, and present your slides, you can also find a few additional options via More slideshow options , which are accessible via the three dots at the bottom toolbar. These include adjusting the position of the subtitles, turning your screen white or black, ending the slideshow, etc.

How to Use Presenter View on a Single Screen
While Presenter View can be enabled to work with dual monitors, you can also use Presenter View on a single monitor with remote meeting apps like Zoom. A simple method for switching to Presenter View on a single monitor is to click the three dots ( More slideshow options ) at the bottom in SlideShow mode and select Show Presenter View .

You can also switch to Presenter View on a single monitor anytime using the ALT+F5 hotkey.

The presenter can easily manage a PPT in presentation mode, with the utility to view speaker notes, annotate or zoom slides, toggle subtitles or camera on or off, and keep your audience engaged via better slideshow management. However, if you’re new to this presentation mode, a bit of practice might help you avoid confusion when presenting before an audience in Presenter View for the first few times.

Like this article? Please share
PowerPoint Tools, Presentation Skills Filed under PowerPoint Tutorials
Related Articles

Filed under PowerPoint Tutorials • March 15th, 2024
How to Group in PowerPoint
Organize your slides’ content efficiently by mastering how to group in PowerPoint. 3 different approaches to grouping and ungrouping elements.

Filed under PowerPoint Tutorials • March 5th, 2024
How to Add Bullet Points in PowerPoint
Become a master of summarizing presentation’s key points by learning how to add bullet points in PowerPoint

Filed under PowerPoint Tutorials • March 1st, 2024
How to Insert a Video into PowerPoint
Make your presentations more engaging by inserting a video into PowerPoint. Step-by-step tutorial using different video sources.
Leave a Reply
Present Better with PowerPoint Presenter View: Tips & Tricks
The PowerPoint presenter view is the ideal tool for your presentation. The PowerPoint presenter view is the ideal tool for your presentation. It allows you to display your speaker notes and slides on your computer while presenting. Meanwhile, your audience will see the presentation without your notes on another screen or projector.
What is PowerPoint presenter view?
The PowerPoint presenter view is a presentation mode that allows presenters to see a preview of the next slides as well as their speaker notes. The advantage of this mode is that your audience will only see the current slide and nothing else.
PowerPoint presenter view: advantages

Presenter view offers a number of features that can help you streamline and improve the flow of your presentations:
1. You can add notes to each slide. This gives you more freedom and you won’t have to struggle with clumsy index cards. You can individually design the notes for each slide and, when you switch slides, you’ll see that slide’s notes as well.
2. You always see the current slide number (e.g., slide 5 of 13). That way, you can begin preparing for the next slide. You receive an overview of the entire presentation throughout.
3. A preview image on the side of your presentation always shows you the next slide.
4. A timer notifies you of how much time has elapsed. This is especially helpful if you have a limited amount of time to present.
5. You can use the pen tools to mark, highlight and augment your slide content . These freehand markups can even be saved afterwards.
6. You can view a thumbnail overview of all your presentation slides. This lets you choose slides freely and jump from slide to slide.
7. You can use the magnifying glass to enlarge individual sections of the current slide. The virtual laser pointer allows you to highlight specific points .
8. During breaks and discussions, you can fade to a black screen and don’t have to turn off the projector. This allows you to restart the presentation in less time.
How to set up PowerPoint presenter view with a projector
PowerPoint presenter view requires two separate monitors. This often includes a projector. Here’s how to properly set up a projector:
1. Connect your laptop to the projector. Make sure the laptop isn’t switched on.
2. When you turn on the laptop, the projector will recognize it as a second screen.
3. When you start Microsoft PowerPoint, you should see the same image on both screens.
4. Now press the Windows + P key combination and then select Extend . Click on the check mark to the right of Presenter View in the Slide Show tab.

5. You’ll now see the different views on your two monitors. As the presenter, you’ll see the presenter view while your audience will see the current slide.
6. Normally, presenter view is automatically displayed on the correct monitor (namely, yours). If it still appears on the audience screen, set it to Primary Monitor in the Monitor drop-down menu. Presenter view should now run on your monitor.

How to disable PowerPoint presenter view
To disable presenter view during your presentation, simply uncheck the Presenter View box in the Slide Show tab.
Tips for optimal use of the PowerPoint speaker view
1. practicing the presentation in advance.
If you want to use this tool effectively, you should be confident in using it . Therefore, test it extensively beforehand to be able to confidently operate the tool when it matters. In addition, also go through your presentation whilst projecting the speaker view. This way you can guarantee a more fluent presentation and fill in missing or insufficient notes.
2. Designing effective presentation notes
To ensure your notes are effective, keep them concise and to the point so you can access them quickly and easily during the presentation. Avoid long paragraphs and instead focus on bullet points that summarize the main ideas and important details .
By highlighting key terms or using abbreviations , you can make your notes easier to read. Your notes should also be large enough. To adjust the size of notes and previews, simply drag the edges of the relevant elements until they reach the desired size.
Be sure to structure your notes well to support the flow of your presentation and ensure a smooth transition between slides.
3. Managing time and breaks during the presentation
The integrated timeline allows you to always keep track of time during the presentation. To make the best use of your time, it is important to plan your presentation carefully and include breaks, if necessary, to give your audience time to process the information.
Be sure to use pauses deliberately, for example, to answer questions or emphasize important points. Also use the time display to keep track of your presentation speed so you don’t speak too fast or too slow to keep your audience’s attention.
This way, you guarantee a well-structured and engaging presentation that is both informative and enjoyable for your audience.
4. Integration of interactive elements
It’s no secret that interactivity in presentations helps keep the audience’s attention . Speaker View in PowerPoint offers the possibility to insert media and interactive elements into your presentation to make it more visually appealing and interesting.
For example, you can integrate videos, audio clips, animations, and interactive polls . Use the Speaker View to control the flow of media playback and make sure everything works smoothly.
For more ideas on how to make your presentations interactive, see the article “ Interactive presentations “.
5. Updating slides
PowerPoint presenter view allows you to update slides during your presentation. Dies This is really useful if you’ re in a team working on your presentation and changes are still being made, possibly right up to the last minute. To activate this setting, go to Set Up Slide Show from the Slide Show tab and select Keep slides updated .

Pro tip: Use shortcuts during your presentation
Shortcuts are keyboard combinations that allow you to quickly access certain PowerPoint functions. Here are five useful shortcuts which can simplify your presentations, especially in presenter view:
- Fade to the next slide by pressing the Enter key or the right or down arrow keys .
- To go back to the previous slide, press either the up or left arrow key .
- To jump to the last slide of your presentation, press the End key .
- If you want to skip slides during your presentation, press the slide number on your keyboard + Enter .
- To make your screen appear white or black, select either W or the comma key for a white screen and B or the period key for a black screen . These functions can be especially helpful when you want to make sure that the audience’s entire attention is on you and not the screen.
For more useful shortcuts to make working with PowerPoint easier, feel free to check out our blog .
Use PowerPoint presenter view for better presentations
Presenter view makes it much easier for you to present and navigate your presentation. Thanks to many useful features, you can make your presentation more fluid and hold your audience’s attention.
Feel free to contact us at [email protected] with any questions about presenter view and PowerPoint in general. We’ll help you out.
Are you looking for visually supportive and professionally designed slide templates? Feel free to have a look around our store. Here we have numerous slides prepared for you to download on a wide variety of (business) topics. Take a look today! ► To the store
Share this post
- share
- save

Design Thinking: Problem Solving with a Difference

Why Corporate Mission Statements Are So Important

7 Tips & Learnings from the Apple Keynote
- Domain Names
- Domain Name Search
- Free Domain Transfer
- .com Domain
- 1 Dollar Domain
- Cheap Domain
- Free Domain
- Buy SSL Certificate
- Website Builder
- Website Platforms
- Website Templates
- Web Design Services
- eCommerce Website Builder
- Local Business Listing
- Web Hosting
- WordPress Hosting
- 1 Dollar Hosting
- Windows Hosting
- Free Website Hosting
- Create Business Email
- HiDrive Cloud Storage
- Microsoft 365 Business
- Cloud Server
- VPS Hosting
- Dedicated Servers
- Rent a Server
- IONOS Cloud
- Business Name Generator
- Logo Creator
- Favicon Generator
- Whois Lookup
- Website Checker
- SSL Checker
- IP Address Check
- Online sales

PowerPoint Presenter view: here’s how to present properly
PowerPoint has become an important tool as part of the modern office environment. The Microsoft software now supports a wide variety of presentations worldwide. But it can be useful for more than showing one slide after another. PowerPoint’s presentation mode includes the option to select Presenter view which provides the presenter with additional information during a speech. Find out all about Presenter view and how to use it in this article.
What is the PowerPoint presentation mode?
Here’s how to set up presenter view, elements of presenter view, using powerpoint presenter view correctly.
The PowerPoint Presenter view is an expanded view to make giving presentations easier. The view allows orators to see their own notes and a preview of the next slide . This additional information is only visible to the presenter but not the audience. This makes it easier to give talks and allows you to focus on what’s important.
PowerPoint is part of the Microsoft Office Suite and one of the most used presentation tools globally. IONOS provides exclusive deals for Microsoft 365 , including regular software updates and individual support and tips through the IONOS Support team.
The PowerPoint Presenter view can be activated via the “Slide Show” tab, by ticking the “Use Presenter View” box.

To use PowerPoint in Presenter view, you will need a second monitor. During official presentations this may take the form of a beamer or a second screen. The following steps ensure that the screen is being detected by your computer:
- Switch on the second monitor.
- Connect the second monitor via HDMI or another cable to your computer.
- Switch on your computer.
- Log in and launch PowerPoint.
- By pressing the Windows key + P you will gain access to the monitor control settings. Select “Expand.” On Mac devices, launch System Preferences, click on “Displays,” select the relevant monitor, and drag it into place as main or side display.
- Activate PowerPoint Presenter view.
- Within Presenter view, click on the display settings option and select “Swap Displays” for the audience to view the presentation.
PowerPoint with Microsoft 365 Business and IONOS!
Use Powepoint to create presentations that stand out using modern designs - included in all Microsoft 365 packages!

Presenter view is structured as follows:
- Menu : The menu pane includes the option to “Show taskbar,” “Display settings,” and “End slide show.” Showing the taskbar can be useful if you need to swap between applications during a presentation.
- Timer & time : The timer shows you how long you have been presenting for. It can be paused and reset. The clock is shown on the right side of the window.
- Current slide : View the currently shown slide here.
- Mark pointer & slides : The pointer lets you point at elements in a slide. You can also mark slides in this way.
- Show all slides : This function allows you to view all sorted slides to jump to the right one quickly.
- Magnify : Use the magnifier to enlarge parts of a slide.
- Black-out screen : This button lets you pause a projection on the second monitor, which is blacked out as a consequence.
- Other options : You can set additional options such as “white screen” (an alternative to the black screen).
- Next slide : In this field, you can view the next slide.
- PowerPoint Notes : PowerPoint provides the option to add individual notes to each slide which help you with your presentation.
- Font : Change the font size of your notes.
Your presentation depends on your preparation . The day before a presentation, you should ensure that the technologies you’re using are working correctly. Always bring along your PowerPoint presentation on a USB stick as a backup.
Save your presentation as a .ppsx file for enhanced compatibility. This ensures that the presentation is automatically launched in presentation mode. For enhanced security, save your presentation as a .pdf file . That is how you can ensure that the layout remains the same and you have guaranteed access to all of your slides. However, effects will be no longer viewable and the audience will see the full slide.
Be careful that you can locate a file quickly and clean up your USB stick and desktop . Sometimes you may need to locate a file during a presentation or need to restart PowerPoint. If you do not blackout or deactivate your screen during this, the audience will get a full view of your PC dashboard.
Other great tools for setting up a presentation include PowerPoint outline view and PowerPoint table of contents .
Related articles

Creating a table of contents in PowerPoint in just a few clicks
Using the popular presentation software Microsoft PowerPoint, you can create professional presentations with a wealth of features. However, as of version 2007, the PowerPoint table of contents, one of the basic elements of a presentation, has only been accessible via indirect means. We will show you how to create one in just a few steps.

The PowerPoint Slide Master in detail
The PowerPoint “Slide Master” view allows you to create what is known as a master slide. This master slide then acts as a template for all the other slides in the presentation. The advantage of this is that all of the items in the template are automatically transferred to all of the other slides, so you don’t need to copy images, logos, designs or font formats onto each slide one by one.

PowerPoint macros: How to automate your everyday work with PowerPoint
PowerPoint is many people’s first choice when preparing a presentation and creating slides. PowerPoint macros can make work considerably easier for anyone who uses the Microsoft application regularly. We will tell you what a PowerPoint macro actually is and also show you what you can create yourself using these mini-programs after a little practice.
The best PowerPoint shortcuts
PowerPoint shortcuts provide the option of viewing features, adding links and utilizing different types of formatting. Keyboard shortcuts are great computer hacks that can make your workflow more efficient. We’ll show you the most important PowerPoint keyboard shortcuts and how they are applied.

PowerPoint Outline View: how to structure your presentations
Microsoft PowerPoint is one of the most popular programs out there for creating presentations. The software offers plenty of useful functions, many of which remain unused. One of these is PowerPoint’s Outline View, which lets users review and optimize the structure of their presentations. In our step-by-step guide, we’ll explain how the outline pane in PowerPoint works.
Build or host a website, launch a server, or store your data and more with our most popular products for less.

How to Present a PowerPoint Slideshow (w/ Shortcuts)
- PowerPoint Tutorials
- Shortcuts & Hacks
- May 11, 2019
There are a variety of ways to start a PowerPoint presention, depending on:
- Where you start your presentation (from beginning or from current)
- Which PowerPoint view you prefer to present in (Slide Show view or Presenter view)
- How comfortable you are with keyboard shortcuts
Why would Microsoft include so many ways to present a presentation? My guess is that everyone learns PowerPoint differently, and has personal presentation styles. The more options you have, the easier your life will be as there will always be a way to start your presentation the way you want to (or jump back into it when you need to).
See all the options below and find the method that works best for you and let the slide show begin !
NOTE: If you are running two presentations side-by-side, each presentation needs to be started as it’s own slide show. To see how to set up two PowerPoint presentations to run side-by-side like this before you start your slide show, read my guide here .
Table of Contents
Start slide show from beginning.

To start a slideshow from the beginning of your presentation using the ribbon, simply.
- Navigate to the Slide Show tab
- Select From Beginning
Selecting From Beginning starts your presentation from the very first non-hidden slide in your presentation, regardless of which slide you are currently inside of your deck.

You can also start your slide from the beginning of your presentation by hitting the Slideshow From Beginning keyboard shortcut, F5 .
Regardless of which method you use, this is the classic way to start your presentation in full screen from your first title slide (regardless of where you are in your slide deck).
Let the slide show begin!
NOTE: To expand your knowledge and learn how to use PowerPoint’s FREE and HIDDEN built-in laser pointer to point things out during your presentation, read my guide here .
Take your PPT skills to the next level
Start slide show from current.

To begin your slide show from the slide you are currently on using the ribbon, simply
- Navigate to the Slide Show tab
- Select From Current Slide
Selecting From Current Slide starts your slide show from whatever slide you are currently on, even if the slide is hidden.

You can also start your slide from the current slide you are on by hitting the Shift+F5 keyboard shortcut.
Because it’s often easiest to catch errors when building your slides in this full screen mode, I highly recommend learning the Shift+F5 shortcut and using it frequently as you build your slides to spot them for errors.

If you don’t want to bother learning the From Current Slide shortcut, you can also start your slideshow by clicking the Slide Show icon at the bottom of your screen.
This is a fantastic way to spot check your slides as you are building them. On top of that, it’s a fast and uncomplicated way to re-start your presentation from where you left off after demoing something on screen.
Start a mini-slide show in PowerPoint
You can also use the following hidden PowerPoint shortcut to run a mini slide show over the top of your current deck.

To run a mini slide show, simply:
- Hold down the Alt key on your keyboard
- With your mouse, click the Slide Show icon
Doing so starts a small slide show of your presentation that you can see below, from the current slide you are on.

Presenter View
The Presenter View is an alternate way to run your presentation in PowerPoint. In this view, your slides are projected on screen, and the details of your presentation are displayed on your computer as pictured below.

The presenter view includes your next (non-hidden) slides that is coming up, your current slide projected on screen, how long you’ve been talking and your speaker notes.

To launch the Presenter View from the beginning of your presentation using your Ribbon, simply:
- Navigate to the Slide Show tab
- Hold down the Alt key on your keyboard
- Click From Beginning
Holding down the Alt key and clicking From Beginning , the Presenter View will launch from the very first (non-hidden) slide in your presentation.

You can also launch the presenter view from the beginning of your presentation at any time by clicking Alt + F5 on your keyboard.
Start Presenter View in PowerPoint From Current Slide

Did you know that you can access different views in PowerPoint by adding keys as you click commands in the PowerPoint ribbon?
To start the Presenter view from your current slide using your Ribbon, simply:
- Hold down the Alt key on your keyboard
- Click From Current Slide
Holding the Alt key and clicking From Current Slide launches the Presenter View from your current slide. So, this is another way you can quickly practice your presentation, see your speaker notes and see what’s coming up next.
You can also launch the Presenter View from the beginning of your presentation at any time by hitting Alt+F5 on your keyboard.
Showing and Hiding Presenter View
Regardless of which view you start your PowerPoint slide show; you can switch between the two different slide show views without exiting presentation.

To switch between the two slideshow views (while giving your presentation), simply:
- Right-click your slide in whichever presentation view you are currently in
- Select either Show Presenter View or Hide Presenter View
When would you use a feature like this during a presentation? One example is if you want to view your notes without leaving the slide show mode.
NOTE: The letter r for both Show Presenter View and Hide Presenter View is underlined. This means that it is a keyboard shortcut. So, if you want to quickly flip between these two presentation views, you can simply right-click your slide and hit the letter r on your keyboard. Doing so automatically switches the view you are in.
Controlling how your presentation runs
Another way to control how your presentation runs (including the default laser pointer and pen color), is the Set Up Slide Show dialog box.

To open the Set Up Slide Show dialog box, simply:
- Select the Set Up Slide Show command
Doing so, opens all your PowerPoint slide show settings and options as pictured below.
Inside the slide show settings dialog box, you can select:
- How your presentation runs (full screen, window or in kiosk mode).
- Your default pen and laser pointer color options ( see our laser pointer article here ).
- Which slide you want start from, or which slides you want to show. You can also setup a custom show here.
- How your slides progress (manually or using slide timings).
- Which of your computer monitors (or screens) your slide show runs on.
The Set Up Slide Show dialog box is also the secret to running multiple presentations at the same time in PowerPoint. To expand your knowledge and learn how to set this up, read our guide here .
Setup Slide Show SECRET Shortcut

To use the SECRET shortcut to open the Set Up Slide Show dialog box, simply:
- Hold down the Shift key on your keyboard
- With your mouse, click the Reading View icon at the bottom of your screen
This is useful when you need to quickly cycle through lots of PowerPoint presentations and change how those presentations run. Instead of wasting time clicking through the Ribbon, simply hold the Shift key and click the Reading View icon. This is also a friendly conversation starter with a fellow PowerPoint enthusiast at Happy Hour.
NOTE: The color of your Reading View icon might be different than in the picture above, as it is dependent on the Office Theme you selected for PowerPoint.
How to exit a PowerPoint presentation early?

Regardless of how you start your full screen presentation, you can end your presentation at any time by hitting the Esc key on your keyboard.
Hitting Esc immediately takes you out of the PowerPoint presentation mode and back to the normal editing view of your slides, on whatever slide you were last presenting.
Here is how you can use a combination of all the different keyboard shortcuts to spot check and practice your presentation in full screen before you finalize your presentation.
- Hit F5 on your keyboard to start your presentation in full screen from the very first slide in your presentation. You can then use your arrow keys to advance, spot checking your slides for errors.
- When you find an error, simply hit Esc key to return to the normal PowerPoint editing view to fix your slide.
- When you are done, hit Shift + F5 to return the full screen presentation mode from the slide you just updated. You can then continue spot checking your presentation (without having to start over from the beginning).
In this way you can quickly work your way through your slides and practice your presentation, fixing and adjusting your content as you go.
Understanding how to run your presentations is CRITICAL to the success of your presentation. Not only in presenting them live, but also in knowing how to spot check your slides as you build them.
I personally find it easiest to spot check your slides and quickly fix errors by running your presentation in slide show mode (or full screen). The last place you want to discover an error is during your presentation.
Using the commands and shortcuts above, you can quickly start, exit and step back into your slide show. Once you have these commands and features down, you will also look like a whiz during your presentations.
If you enjoyed the depth of this article, you will love our other PowerPoint training courses and free resources. To learn more, visit us here .
🔒 Unlock the PowerPoint Shortcuts Trusted by Industry Leaders KKR, American Express, HSBC, and More!
Join over 114,880 professionals from diverse fields including consulting, investment banking, advertising, marketing, sales, and business development who have supercharged their PowerPoint game with our proven methods.
✅ Customize compelling presentations effortlessly.
✅ Master time-saving techniques for faster deck creation.
✅ Boost your career prospects with top-notch PowerPoint skills.
Get FREE access to the Critical PowerPoint Shortcuts module of our premium training course by entering your name and email below.
DISCLAIMER: PC Users Only!
We respect your privacy and will keep your info safe and confidential.
Related Articles
About the author.

Popular Tutorials
- How to Strikethrough Text (l̶i̶k̶e̶ ̶t̶h̶i̶s̶) in Word, Excel & PowerPoint
- How to Make Animated Fireworks in PowerPoint (Step-by-Step)
- Strikethrough Shortcut (l̶i̶k̶e̶ ̶t̶h̶i̶s̶) for Word, Excel & PowerPoint
- How to Create a Flash Card Memory Game in PowerPoint (Like Jeopardy)
- Keyboard Shortcuts Not Working: Solved
PowerPoint Tutorial Categories
- Strategies & Opinions
- Presentation Design
- Pictures, Icons, Videos, Etc.
- New Features
- Miscellaneous
- Charts & Data Viz
We help busy professionals save hours and gain peace of mind, with corporate workshops, self-paced courses and tutorials for PowerPoint and Word.
Work With Us
- Corporate Training
- Presentation & Template Design
- Courses & Downloads
- PowerPoint Articles
- Word Articles
- Productivity Resources
Find a Tutorial
- Free Training
- For Businesses
We help busy office workers save hours and gain peace of mind, with tips, training and tutorials for Microsoft PowerPoint and Word.
Master Critical PowerPoint Shortcuts – Secure Your FREE Training Module and Save Valuable Time!
⌛ Master time-saving expert techniques.
🔥 Create powerful presentations.
🚀 Propel your career to new heights.
We value your privacy – we keep your info safe.
Discover PowerPoint Hacks Loved by Industry Giants - KKR, AmEx, HSBC!
Over 114,880 professionals in finance, marketing and sales have revolutionized their PPT skills with our proven methods.
Gain FREE access to a full module of our premium PowerPoint training program – Get started today!
We hate spam too and promise to keep your information safe.

Share control of a powerpoint presentation anywhere in the world, instantly.
Nextslide will be available for select customers soon, which best describes you, professional, i’m interested in the free tier.
- Unlimited Presenters
- Password Protection
- Presenter View w/Slide Notes
- Clicker Mode
I’m interested in the standard tier
- No Watermark
I’m interested in the professional tier
Full ppt support, presenter control, confidence monitor mode, slide notes, video support, and so much more...
Say hello: [email protected]
- Tom Arbuthnot
- Microsoft Teams Podcast
- Tom’s Email Update
No more “next slide please” with Microsoft Teams PowerPoint Live Presenter Mode
One of the great meeting features of Microsoft Teams is PowerPoint Live Presenter mode. For me, the killer feature is that anyone can “Take control” of presenting the deck seamlessly.
In my opinion, it really breaks the flow of a presentation for the presenter to keep prompting someone with “next slide please”. It became a running joke with the UK Government updates that they were constantly prompting for “next slide please”

PowerPoint Live Presenter Mode won’t be suitable for every meeting type, as you may not want everyone in the meeting to have the power to “take control” but for internal “All Hands” type meetings, where multiple presenters have a couple of slides each to present, each presenter can just “take control” in turn and drive the slides.
Using PowerPoint Live Presenter Mode

Firstly someone uploads the PowerPoint deck. Teams will show recent decks that the user has edited to make it easy to find the right deck to upload, but you can also browse OneDrive or the local computer.
The person uploading will be the initial “deck presenter”; they will initially have control to move the deck forward for everyone in the meeting
Presenter Options in PowerPoint Live Presenter Mode

The presenter gets a nice view of the overall deck and the current slide you are presenting. You will also see slide notes. This is so useful if you are presenting from a single screen. You can also see all the chat while presenting. This tight integration with PowerPoint is something that steps Microsoft Teams apart from other online meeting platforms.
You can also use the new “standout” mode (not sure about that name, I prefer “weatherman mode”) to appear over the slides which can help promote engagement. Note, standout mode person overlaid on the slides won’t come through on a recording, The recording will show normal bottom right video.

PowerPoint Live Attendee Features
Attendees can even personally move forwards and backwards in the deck, this is useful if they want to see what is coming up

the presenter can turn off this feature if they prefer

Attendees can also personally put the slides into “high contrast mode” for improved accessibility. This only affects their view of the slides.

“Take Control” – the “next slide please” killer
Often in meetings with multiple presenters, before PowerPoint Live, one person presents the deck for the whole meetings, probably via screen sharing, and as the current talker asks that person to move the slides forward; “Next slide please”. Saving the pain of one person screens sharing, then another, then another.
With PowerPoint Live, In the meeting, everyone other than the current person presenting the slides will see the slide the presenter is presenting, but they also have a “Take Control” button.

The person that presses that button then gets the presenter view and control, and the original presenter gets prompted that someone has taken over. They can see who took over as the current presenter is shown in the bottom left.
This allows seamless transfer of presenters with no interruption for the “viewers” of the presentation for a much slicker meeting.

See the banner prompt notifying the previous presenter that someone has taken over presenting and in the bottom left I can see it’s Tom Morgan now presenting
Note, PowerPoint Live won’t work well for meetings where presenters need to “screen share” outside of a single PowerPoint deck. If someone does drop the presentation to share their screen, or for any other reason, when the original deck uploader shares the deck again, it prompts them with the option to resume at the same point in the deck.

About the author

A Microsoft MVP and Microsoft Certified Master, Tom Arbuthnot is Founder and Principal at Empowering.Cloud as well as a Solutions Director at Pure IP.
Tom stays up to date with industry developments and shares news and his opinions on his Tomtalks.blog, UC Today Microsoft Teams Podcast and email list. He is a regular speaker at events around the world.
Leave a Reply Cancel reply
This site uses Akismet to reduce spam. Learn how your comment data is processed .
So they have finally caught up to WebEx and Adobe Connect
Not bad. Would definitely need to be able to share other things like videos outside of PowerPoint. Also, other online meeting tools have this feature but if the original presenter tries to use their own screen, it overrides what the remote user is doing. Does this happen in Teams Live as well?
The original presenter can press take control, like the others.
[…] No more “next slide please” with Microsoft Teams PowerPoint Live Presenter Mode. One of the great meeting features of Microsoft Teams is PowerPoint Live Presenter mode. The killer feature is that anyone can “Take control” of presenting the deck seamlessly. […]
Can you stop selected participants from taking control as well as moving forwards?
Yes, in the meeting settings
can you please give us more details how to do so?
thank you in advance!
Do you know of any way to make the Powerpoint slides bigger for the participants? The full screen command does not really go full screen anymore and all the zoom shortcuts zoom in on the controls, not the presentation – help!? I can’t find this anywhere – the old key commands that used to work now do not in Powerpoint Live. We are on laptops btw – not bigger monitors – hence the problem.
Stack Exchange Network
Stack Exchange network consists of 183 Q&A communities including Stack Overflow , the largest, most trusted online community for developers to learn, share their knowledge, and build their careers.
Q&A for work
Connect and share knowledge within a single location that is structured and easy to search.
Powerpoint, Disable click to next slide but not animations
I'm working on a presentation, I have a standard slide where you click to bring up bullet points on by one, however after all the bullet points have appeared I want the presenter to click one of two buttons to go to certain slides and do not want the next click to progress to the next slide.
I have tried disabling mouse click to advance on the transition options but that also disables triggering the animations.
- microsoft-powerpoint
- microsoft-powerpoint-2010
- microsoft-powerpoint-2007
5 Answers 5
First, set the presentation to Kiosk Mode (Slide Show | Set Up Show)
Next, add a rectangle that fills the slide, send it to back, format it to match the background or give it a 99% transparent fill so it disappears.
Select the text that's set to appear line by line and use the animation settings to have it Trigger on click of the rectangle you just inserted and sent to back.
Now when you click the slide (actually the rectangle), your text will appear, line by line. Kiosk mode will prevent the slide from advancing due to any random clicks, and your action button can advance to the next slide.
The only hitch I see to this is that repeated clicking will reveal all of the text lines then cycle back to none showing, then one then two etc.
using Powerpoint 2016, i was able to accomplish what you're asking by selecting the transition tab at the top, and deselecting "On Mouse Click" in the Advance Slide pane...
now if you accidentally click on the screen (not one of the buttons) it will not jump to the next slide.
- Did you succeed in still having other elements appear on the slide, click by click? – leokhorn Oct 2, 2019 at 12:59
This may not answer your question fully however its too long for a comment...
You need to create Action Buttons (draw a box, click on it and go to Insert on Ribbon).
In this section you can select hyperlink to... Slide... and select what slide the button should go to..
Does that help?
- That part is already setup. its if the user clicks elsewhere instead of the button that is a problem – User3694032 Aug 20, 2014 at 9:04
- 1 Oh I see, so if you go the slide with the buttons on. Click outside of any object so just on the white space and go to transitions > Advance Slide > Untick 'On Mouse Click'... that seems to work here... – CharlesH Aug 20, 2014 at 9:07
- Sorry just read your question it disbables the animations... – CharlesH Aug 20, 2014 at 9:08
- So what slide is the animation on the slide your going too or the slide the buttons are on? – CharlesH Aug 20, 2014 at 9:08
- Animations seem to work ok for me with buttons setup this way... – CharlesH Aug 20, 2014 at 9:10
I ended up using a "no-fill" shape the size of the slide. I brought it to the front and hyperlinked it back to the same slide. Next, I brought the buttons for the forwarding to the front. So far the only downside I have found is that the cursor is always displaying the Pointing Hand.
I always display a small curved arrow to indicate that I have to click in order to advance to the next animation.
I gave to each arrow of the same slide the name "anim_01", "anim_02" etc.
I link each animation, apart the first one, to each "anim_0x".
The only problem I find is that I am forced to click on the arrow and not in any place.
You must log in to answer this question.
Not the answer you're looking for browse other questions tagged microsoft-powerpoint microsoft-powerpoint-2010 microsoft-powerpoint-2007 ..
- The Overflow Blog
- Your whole repo fits in the context window
- Featured on Meta
- Our partnership with Google and commitment to socially responsible AI
- Shifting the data dump schedule: A proposal
Hot Network Questions
- Who demonstrated that phage lamba is integrated into the host chromosome?
- Why do we write “cum marito eius” (cum + abl+ gen.) and not “cum marito ei” (cum + abl+ abl.)?
- If all persons of the Trinity have the same/a united will what does Jesus mean in John 6:38?
- IRF630N MOSFET burns after a couple of times in use
- Does the game check how many creatures you have before a boardwide effect changes those creatures toughness? (MTG)
- Where in a star are the spectral absorption lines formed?
- Avoiding Loops!
- Do Schengen entry points now use automated kiosks on non-EU travellers as of 2023-2024?
- Paul Klee's Notebooks: Loops Around Control Points
- For one atom, what is the correct point group?
- Teacher telling 4th grade student "I hate you"
- How to convert Agda's with statement to a helper function?
- How do I avoid repeating a sequence of events that occurs multiple times?
- How does energy stay conserved if the force is time dependent and doesn't depend on location?
- PTIJ: How did the chickens get involved?
- What is the behind the declension "obrovskýma" in the phrase "obrovskýma očima" in Czech?
- Will publishing on Kindle, or making Audio Books, hurt my profits in the long run?
- Two remote full time jobs? -- What should I do?
- Make Framed expressions fill Grid cells
- Starship IFT-3: Plasma appears, then disappears
- I want to realize a bridge zigzag rope with geometry nodes
- Help me understand how transformers work
- How to know if there are real solutions or not?
- US Embassy in Nigeria told me to pay them for my flight when applying for visa, however my visa was denied. Will they refund me my flight money back?

Contribute to the Microsoft 365 and Office forum! Click HERE to learn more 💡
March 14, 2024
Contribute to the Microsoft 365 and Office forum!
Click HERE to learn more 💡
Top Contributors in PowerPoint: Steve Rindsberg - Jim_ Gordon - John Korchok ✅
March 11, 2024
Top Contributors in PowerPoint:
Steve Rindsberg - Jim_ Gordon - John Korchok ✅
- Search the community and support articles
- Microsoft 365 and Office
- Search Community member
Ask a new question
How to stop Powerpoint from jumping to next/previous slide when editing.
I have searched for an answer to this, but all I can find are questions about slide show behaviour, transitions etc, so apologies if I didn't hit on the right search term.
I often work at high magnification levels when creating PP slides, and it is extremely frustrating when it jumps to the previous or next slide if I scroll up or down just a little bit too far. What I'd like to be able to do is to lock the current slide so that using the scroll bar or mouse wheel only navigates around the slide, and Page Up/Down is needed to move to different slides in the presentation. I'm sure everyone's familiar with the concept from using Adobe Acrobat.
Is there any way to do this in PowerPoint? I'd be surprised if I'm the only person ever to be annoyed by the default behaviour, but I can't find any evidence of the question ever having been asked.
I'm using 2003, if that's relevant.
Report abuse
Replies (11) .
* Please try a lower page number.
* Please enter only numbers.
I share your frustration but have not yet found a solution. So I can only answer your rhetorical question at this point - no you are not the only person to be annoyed by this behavior.
23 people found this reply helpful
Was this reply helpful? Yes No
Sorry this didn't help.
Great! Thanks for your feedback.
How satisfied are you with this reply?
Thanks for your feedback, it helps us improve the site.
Thanks for your feedback.
3 people found this reply helpful
29 people found this reply helpful
1 person found this reply helpful
35 people found this reply helpful
32 people found this reply helpful
2 people found this reply helpful
5 people found this reply helpful
Here is a slight addition to the very functional "workaround" already noted in this thread;
Open your PowerPoint presentation's default Slide Master Template. Zoom out to about 33% of the first slide. Place a small (1 inch), "no fill, no border" square shape about 1 page length away from the page slide at the top and the bottom of the slide. Repeat the process for every slide in the Template.
TIP: you may have to select the shape placed at the lower/upper edge of the Slide and move it using your cursor keys, otherwise it will probably "jump" to the next/previous slide - which, as we know, is exactly what you are trying to avoid! This can be frustrating but, once you've placed 2 shapes (top and bottom) on every slide in the Slide Master Template - and you use only that Template for new Presentations - it will always work!
Screenshot:

39 people found this reply helpful
- Article Author |
- Volunteer Moderator
Nicely done!
And as a reminder, once you've placed the two squares on one slide, you only have to select them both, press Ctrl+C then for each of the remaining slides:
Press PageDown
Press Ctrl+V
15 people found this reply helpful
Question Info
- Norsk Bokmål
- Ελληνικά
- Русский
- עברית
- العربية
- ไทย
- 한국어
- 中文(简体)
- 中文(繁體)
- 日本語
- Office Products
- Office Electronics
- Presentation Products
- Presentation Remotes
Enjoy fast, free delivery, exclusive deals, and award-winning movies & TV shows with Prime Try Prime and start saving today with fast, free delivery
Amazon Prime includes:
Fast, FREE Delivery is available to Prime members. To join, select "Try Amazon Prime and start saving today with Fast, FREE Delivery" below the Add to Cart button.
- Cardmembers earn 5% Back at Amazon.com with a Prime Credit Card.
- Unlimited Free Two-Day Delivery
- Streaming of thousands of movies and TV shows with limited ads on Prime Video.
- A Kindle book to borrow for free each month - with no due dates
- Listen to over 2 million songs and hundreds of playlists
- Unlimited photo storage with anywhere access
Important: Your credit card will NOT be charged when you start your free trial or if you cancel during the trial period. If you're happy with Amazon Prime, do nothing. At the end of the free trial, your membership will automatically upgrade to a monthly membership.
Return this item for free
Free returns are available for the shipping address you chose. You can return the item for any reason in new and unused condition: no shipping charges
- Go to your orders and start the return
- Select the return method

Image Unavailable

- To view this video download Flash Player
Rechargeable Presentation Clicker Stylus Pen for Touch Screen, Wireless Presenter Remote USB PowerPoint Clicker Slide Advancer with Hyperlink Volume Control for Mac/Computer
Purchase options and add-ons, about this item.
- Stylus Design-The body of this clicker is made of aluminum alloy material with fine workmanship and durability, stylish and unique metallic blue/green color makes it more attractive and premium.Whether you're using a laptop,tablet, electronic whiteboard, or any other touch screen device, stylus design can be achieved smooth writing without stuttering or delay, no harm for touch screens (Note: The annotation/erasure function is only applicable to ppt full screen usage on Windows systems.)
- Versatile Functionality&Effortless Operation-Experience the power of multi-functionality with the clicker for powerpoint presentations . With features like previous/next page, full /black screen, open hyperlinks, window switching, and even stylus for touch screens etc., the slide clicker offers an array of functions to enhance your presentation. Its user-friendly design ensures that you can effortlessly utilize these features, allowing you to focus on delivering a efficient presentation.
- Integrated Design&Plug and Play-The laser pointer for presentations with RF 2.4ghz USB receiver supports plug and play,the usb receiver is magnetically stored at the pen tip part to avoid loss after daily use.The remote clicker for presentations is designed for schools teaching, business meetings and other presenting scenarios, as well as offering compatibility with more touch screen devices.
- Long Control Range&Universial Compatibility-Featuring a red light with a distance of 600ft, you can point out key information and highlight details from any corner of the room.Clicker for teachers offers a wireless control range of 365ft, giving you the freedom to move around the room.Presentation remote is compatible with multiple systems including Windows 7/8/10 or higher, Mac IOS 3 or higher, Linux and Android 4.3 or higher. It works with software such as PowerPoint,Keynote, Prezi, and etc.
- Long-Lasting Battery Life-Experience uninterrupted presentations with the presentation remote's built-in 300Ah lithium battery. Fully charged with the provided Usb-C cable in just approximately 2 hours, the battery provides long-lasting performance for your convenience. With a standby time of over 2 weeks, you can confidently carry our lightweight and portable remote wherever you go, knowing that it will be ready to use
Consider a similar item

Buy it with

Similar items that may ship from close to you

Important information
To report an issue with this product or seller, click here .
Compare with similar items
Product description.

INNOVATIVE STYLUS DESIGN
The stylus tip of the wireless presentation clicker can be used on touch screen devices, no harm to the touch screen, single-click to call up the brush tool, double-click to call up the eraser tool, and long-press to erase the ink annotations with one click. (Note: only applicable to ppt full-screen use on Windows systems.)

From the brand

Capture your audience's attention and look cool with the AXYBCOOL Presentation Clicker!

AXYBCOOL has its own factory and strong supply chain, committed to providing customers with higher quality and professional powerpoint clicker.
Say goodbye to boring and non-interactive presentations and make your presentation more vivid, interesting and modern.
You don't need to worry about after-sales, we are always ready to provide you with customer support. Thank you for choosing AXYBCOOL!

wireless presenter

laser pointer usb c

promethean board stylus
Videos for this product.

Click to play video

Rechargeable Presentation Clicker Stylus Pen for Touch

Stylus presentation clicker for Touch Screen
Looking for specific info, product information, warranty & support, customer reviews.
Customer Reviews, including Product Star Ratings help customers to learn more about the product and decide whether it is the right product for them.
To calculate the overall star rating and percentage breakdown by star, we don’t use a simple average. Instead, our system considers things like how recent a review is and if the reviewer bought the item on Amazon. It also analyzed reviews to verify trustworthiness.
Reviews with images

- Sort reviews by Top reviews Most recent Top reviews
Top reviews from the United States
There was a problem filtering reviews right now. please try again later..

- Amazon Newsletter
- About Amazon
- Accessibility
- Sustainability
- Press Center
- Investor Relations
- Amazon Devices
- Amazon Science
- Start Selling with Amazon
- Sell apps on Amazon
- Supply to Amazon
- Protect & Build Your Brand
- Become an Affiliate
- Become a Delivery Driver
- Start a Package Delivery Business
- Advertise Your Products
- Self-Publish with Us
- Host an Amazon Hub
- › See More Ways to Make Money
- Amazon Visa
- Amazon Store Card
- Amazon Secured Card
- Amazon Business Card
- Shop with Points
- Credit Card Marketplace
- Reload Your Balance
- Amazon Currency Converter
- Your Account
- Your Orders
- Shipping Rates & Policies
- Amazon Prime
- Returns & Replacements
- Manage Your Content and Devices
- Recalls and Product Safety Alerts
- Conditions of Use
- Privacy Notice
- Your Ads Privacy Choices

How To Get Free Access To Microsoft PowerPoint
E very time you need to present an overview of a plan or a report to a whole room of people, chances are you turn to Microsoft PowerPoint. And who doesn't? It's popular for its wide array of features that make creating effective presentations a walk in the park. PowerPoint comes with a host of keyboard shortcuts for easy navigation, subtitles and video recordings for your audience's benefit, and a variety of transitions, animations, and designs for better engagement.
But with these nifty features comes a hefty price tag. At the moment, the personal plan — which includes other Office apps — is at $69.99 a year. This might be the most budget-friendly option, especially if you plan to use the other Microsoft Office apps, too. Unfortunately, you can't buy PowerPoint alone, but there are a few workarounds you can use to get access to PowerPoint at no cost to you at all.
Read more: The 20 Best Mac Apps That Will Improve Your Apple Experience
Method #1: Sign Up For A Free Microsoft Account On The Office Website
Microsoft offers a web-based version of PowerPoint completely free of charge to all users. Here's how you can access it:
- Visit the Microsoft 365 page .
- If you already have a free account with Microsoft, click Sign in. Otherwise, press "Sign up for the free version of Microsoft 365" to create a new account at no cost.
- On the Office home page, select PowerPoint from the side panel on the left.
- Click on "Blank presentation" to create your presentation from scratch, or pick your preferred free PowerPoint template from the options at the top (there's also a host of editable templates you can find on the Microsoft 365 Create site ).
- Create your presentation as normal. Your edits will be saved automatically to your Microsoft OneDrive as long as you're connected to the internet.
It's important to keep in mind, though, that while you're free to use this web version of PowerPoint to create your slides and edit templates, there are certain features it doesn't have that you can find on the paid version. For instance, you can access only a handful of font styles and stock elements like images, videos, icons, and stickers. Designer is also available for use on up to three presentations per month only (it's unlimited for premium subscribers). When presenting, you won't find the Present Live and Always Use Subtitles options present in the paid plans. The biggest caveat of the free version is that it won't get any newly released features, unlike its premium counterparts.
Method #2: Install Microsoft 365 (Office) To Your Windows
Don't fancy working on your presentation in a browser? If you have a Windows computer with the Office 365 apps pre-installed or downloaded from a previous Office 365 trial, you can use the Microsoft 365 (Office) app instead. Unlike the individual Microsoft apps that you need to buy from the Microsoft Store, this one is free to download and use. Here's how to get free PowerPoint on the Microsoft 365 (Office) app:
- Search for Microsoft 365 (Office) on the Microsoft Store app.
- Install and open it.
- Sign in with your Microsoft account. Alternatively, press "Create free account" if you don't have one yet.
- Click on Create on the left side panel.
- Select Presentation.
- In the PowerPoint window that opens, log in using your account.
- Press Accept on the "Free 5-day pass" section. This lets you use PowerPoint (and Word and Excel) for five days — free of charge and without having to input any payment information.
- Create your presentation as usual. As you're using the desktop version, you can access the full features of PowerPoint, including the ability to present in Teams, export the presentation as a video file, translate the slides' content to a different language, and even work offline.
The only downside of this method is the time limit. Once the five days are up, you can no longer open the PowerPoint desktop app. However, all your files will still be accessible to you. If you saved them to OneDrive, you can continue editing them on the web app. If you saved them to your computer, you can upload them to OneDrive and edit them from there.
Method #3: Download The Microsoft PowerPoint App On Your Android Or iOS Device
If you're always on the move and need the flexibility of creating and editing presentations on your Android or iOS device, you'll be glad to know that PowerPoint is free and available for offline use on your mobile phones. But — of course, there's a but — you can only access the free version if your device is under 10.1 inches. Anything bigger than that requires a premium subscription. If your phone fits the bill, then follow these steps to get free PowerPoint on your device:
- Install Microsoft PowerPoint from the App Store or Google Play Store .
- Log in using your existing Microsoft email or enter a new email address to create one if you don't already have an account.
- On the "Get Microsoft 365 Personal Plan" screen, press Skip For Now.
- If you're offered a free trial, select Try later (or enjoy the free 30-day trial if you're interested).
- To make a new presentation, tap the plus sign in the upper right corner.
- Change the "Create in" option from OneDrive - Personal to a folder on your device. This allows you to save the presentation to your local storage and make offline edits.
- Press "Set as default" to set your local folder as the default file storage location.
- Choose your template from the selection or use a blank presentation.
- Edit your presentation as needed.
Do note that PowerPoint mobile comes with some restrictions. There's no option to insert stock elements, change the slide size to a custom size, use the Designer feature, or display the presentation in Immersive Reader mode. However, you can use font styles considered premium on the web app.
Method #4: Use Your School Email Address
Office 365 Education is free for students and teachers, provided they have an email address from an eligible school. To check for your eligibility, here's what you need to do:
- Go to the Office 365 Education page .
- Type in your school email address in the empty text field.
- Press "Get Started."
- On the next screen, verify your eligibility. If you're eligible, you'll be asked to select whether you're a student or a teacher. If your school isn't recognized, however, you'll get a message telling you so.
- For those who are eligible, proceed with creating your Office 365 Education account. Make sure your school email can receive external mail, as Microsoft will send you a verification code for your account.
- Once you're done filling out the form, press "Start." This will open your Office 365 account page.
You can then start making your PowerPoint presentation using the web app. If your school's plan supports it, you can also install the Office 365 apps to your computer by clicking the "Install Office" button on your Office 365 account page and running the downloaded installation file. What sets the Office 365 Education account apart from the regular free account is that you have unlimited personal cloud storage and access to other Office apps like Word, Excel, and Outlook.
Read the original article on SlashGear .

Go to a slide when delivering your presentation
As you deliver your presentation, here is how to move from one slide to the next, move to a previous slide, or move to a specific slide anywhere in the presentation. For information about moving slides or changing the order of slides in your presentation, see the article Add, rearrange, duplicate, and delete slides in PowerPoint .
Go to the next slide
Press the Right arrow key.
Mouse: Click once anywhere on a slide to move to the next one.
Note: If you have a custom animation effect on your slide, clicking the slide starts the animation effect, rather than moving to the next slide. Use Go to a specific slide below to move to a specific slide and avoid triggering the animation effect.
Go to the previous slide
Press the Left arrow key.
Mouse: Right-click a slide, and then click Previous on the shortcut menu.
Go to a specific slide
Type the slide number, then press Enter.
Mouse (version 2013 or newer ): Right-click a slide, select See All Slides or Go to Slide , and then click the slide you want to display to the audience. (The name of the option depends on the Show type option selected in the Set Up Slide Show dialog.)
Mouse (versions 2010, 2007 ): Right-click a slide, point to Go to Slide , and then click the slide you want to display to the audience.
Go to the beginning of a presentation
Press the Home key on the keyboard.
Mouse (version 2013 or newer ): Right-click a slide, select See All Slides or Go to Slide , and then click the first slide in the set.
Mouse (versions 2010, 2007 ): Right-click a slide, point to Go to Slide , and then click the first slide in the list.
Go to the end of a presentation
Press the End key on the keyboard.
Mouse (version 2013 or newer ): Right-click a slide, select See All Slides or Go to Slide , and then click the last slide in the set.
Mouse (versions 2010, 2007 ): Right-click a slide, point to Go to Slide , and then click the last slide in the list.
Auto-advance by using slide timings
See Rehearse and time the delivery of a presentation for details.
Use links to navigate in a presentation
Read these other articles for instructions on making hyperlinks:
Add a hyperlink to a slide
If you're a Microsoft 365 subscriber, you can use Zoom for PowerPoint to create a table of contents or to create visual links to a section or to individual slides . See Zoom for PowerPoint for more information.
Keyboard navigation
For a detailed list of keyboard shortcuts you can use when delivering your presentation, see the article Use keyboard shortcuts to deliver your presentation .
Press N, Right arrow, Down arrow, or Spacebar.
Press P, Left arrow, Up arrow, or Delete.
Note: If you have a custom animation effect on your slide, right-clicking the slide starts the animation effect, rather than moving to the previous slide. Use Go to a specific slide below to move to a specific slide and avoid triggering the animation effect.
Type the slide number, then press Return.
Mouse: Right-click a slide, point to By Title on the shortcut menu, and then select a slide by title or slide number.
Type 1, then press Return.
Type the number of the last slide, then press Return.
Mouse: Right-click a slide, point to By Title on the shortcut menu, and then select the last slide in the list.
For instructions on adding hyperlinks to your slides, see Add a hyperlink to a slide .
Note: If you have a custom animation effect on your slide, clicking the slide starts the animation effect, rather than moving to the previous slide. Use Go to a specific slide below to move to a specific slide and avoid triggering the animation effect.

Mouse: Right-click a slide, point to Go to Slide on the shortcut menu, and then click the first slide in the list.
Mouse: Right-click a slide, point to Go to Slide on the shortcut menu, and then click the last slide in the list.

Need more help?
Want more options.
Explore subscription benefits, browse training courses, learn how to secure your device, and more.

Microsoft 365 subscription benefits

Microsoft 365 training

Microsoft security

Accessibility center
Communities help you ask and answer questions, give feedback, and hear from experts with rich knowledge.

Ask the Microsoft Community

Microsoft Tech Community

Windows Insiders
Microsoft 365 Insiders
Was this information helpful?
Thank you for your feedback.
IMAGES
VIDEO
COMMENTS
Select the Slide Show tab. Select the Use Presenter View checkbox. Select which monitor to display Presenter View on. Select From Beginning or press F5. In Presenter View, you can: See your current slide, next slide, and speaker notes. Select the arrows next to the slide number to go between slides. Select the pause button or reset button to ...
In Presenter View, you'll have your own private screen with tools like a next slide preview, timekeeper, and drawing tools.. This is a view that you'll see on your own screen while giving a presentation using PowerPoint. While the audience will see the presentation on the projector or big screen, you'll have your own private view on a second monitor.
Start presenting. On the Slide Show tab, in the Start Slide Show group, select From Beginning. Now, if you are working with PowerPoint on a single monitor and you want to display Presenter view, in Slide Show view, on the control bar at the bottom left, select , and then Show Presenter View.
These navigation buttons will help you move from the previous slide to the next slide. End Presenter View; With the Presenter view, you don't have to finish the presentation if you no longer need it. You can close the window. Select the Options menu. Click Hide Presenter View. PowerPoint will re-open the standard slideshow view. See all slides
First, create a new custom slide show and select the slides that you want to display. Then, click Add, enter the name of the presentation and click OK. This new custom presentation will appear on the list. Select it and click Show to begin the presentation. Defining a custom slide show.
A simple method for switching to Presenter View on a single monitor is to click the three dots ( More slideshow options) at the bottom in SlideShow mode and select Show Presenter View. You can also switch to Presenter View on a single monitor anytime using the ALT+F5 hotkey. The presenter can easily manage a PPT in presentation mode, with the ...
3. When you start Microsoft PowerPoint, you should see the same image on both screens. 4. Now press the Windows + P key combination and then select Extend. Click on the check mark to the right of Presenter View in the Slide Show tab. 5. You'll now see the different views on your two monitors.
Take advantage of the PowerPoint Presenter View to practice and present your PowerPoint speaker notes. This view also helps you as a presenter by showing you...
PowerPoint's presentation mode includes the option to select Presenter view which provides the presenter with additional information during a speech. Find out all about Presenter view and how to use it in this article. ... Next slide: In this field, you can view the next slide. PowerPoint Notes: PowerPoint provides the option to add ...
Click From Beginning. Holding down the Alt key and clicking From Beginning, the Presenter View will launch from the very first (non-hidden) slide in your presentation. You can also launch the presenter view from the beginning of your presentation at any time by clicking Alt + F5 on your keyboard.
You can tell PowerPoint which screen you want the slide show on so that you can have the Presenter View on the screen that has your webcam. On the Slide Show ribbon, in the Monitors section, check the checkbox to use Presenter View and use the drop-down list to select the monitor PowerPoint should use for the slide show.
Select the Slide Show tab. Select the Use Presenter View checkbox. Select which monitor to display Presenter View on. Select From Beginning or press F5. In Presenter View, you can: See your current slide, next slide, and speaker notes. Select the arrows next to the slide number to go between slides. Select the pause button or reset button to ...
Here is Microsoft's page about this feature: Start the presentation and see your notes in Presenter view. Author of "OOXML Hacking - Unlocking Microsoft Office's Secrets", ebook now out. John Korchok, Production Manager. [email protected]. 1 person found this reply helpful.
When in normal view I can see all the element and content but when I put it into slideshow (which I need to do to listen to the audio) I can't move to the next slide. No right click, no enter, no arrow key - I've tried everything. I haven't seen this before and have had a look at transistions but there's nothing I can see that's stopping it moving.
Add speaker notes to each slide in a presentation PowerPoint is all about helping you give great presentations; and the Presenter view is all about helping you use PowerPoint. Traditionally, the audience faces a screen showing your PowerPoint slides, and you stand in between the audience and screen, and change slides on a computer.
Share control of a powerpoint presentation anywhere in the world, instantly. Play Video. ... Things like Confidence Monitor mode, Video support, Presenter Control, etc intrigue me. ... Set uploaded videos to loop or go to next slide when complete. And So Much More.. Hide/Delete slides, Custom Views, and much more will be available soon after ...
Using PowerPoint Live Presenter Mode. Firstly someone uploads the PowerPoint deck. Teams will show recent decks that the user has edited to make it easy to find the right deck to upload, but you can also browse OneDrive or the local computer. The person uploading will be the initial "deck presenter"; they will initially have control to move ...
3. First, set the presentation to Kiosk Mode (Slide Show | Set Up Show) Next, add a rectangle that fills the slide, send it to back, format it to match the background or give it a 99% transparent fill so it disappears. Select the text that's set to appear line by line and use the animation settings to have it Trigger on click of the rectangle ...
Go to the next slide, if the next slide is hidden. H. Return to the first slide. Function+Left arrow key. Go to the last slide. Function+Right arrow key. Display the shortcut menu. Control+Mouse click. Go to the next hotspot on the current slide. (Hotspots include hyperlinks, animation triggers, audio objects, and video objects.) Tab key
Then, click on From Beginning to start the presentation. How to loop slides in PowerPoint . If you want to learn how to loop your slides in PowerPoint, follow these steps: Go to the Slide Show tab and select Set Up Slide Show. When the Set Up Show window appears, go to the Show options group and tick the Loop continuously until 'Esc' option ...
Open your PowerPoint presentation's default Slide Master Template. Zoom out to about 33% of the first slide. Place a small (1 inch), "no fill, no border" square shape about 1 page length away from the page slide at the top and the bottom of the slide. Repeat the process for every slide in the Template.
If you are presenting with multiple screen or with a projector and your PowerPoint is in Presenter Mode (the screen on your view shows your current slide, next slide, and notes for the slide and the other screen shows just the current slide), you have to be cautious which screen your presentation clicker is on.
On the Office home page, select PowerPoint from the side panel on the left. Click on "Blank presentation" to create your presentation from scratch, or pick your preferred free PowerPoint template ...
Go to the end of a presentation. Press the End key on the keyboard. Mouse (version 2013 or newer ): Right-click a slide, select See All Slides or Go to Slide, and then click the last slide in the set. Mouse (versions 2010, 2007 ): Right-click a slide, point to Go to Slide, and then click the last slide in the list.