Random Connections
A collection of photography and exploration focusing on Upstate South Carolina and beyond.

Adding Google Earth to PowerPoint – Another Method
I recently received a request for help from one of my readers regarding Google Earth and PowerPoint. The reader wanted to know how to put a Google Earth tour into PowerPoint. This website gets lots of hits from folks wanting to learn how to embed Google Earth into their presentations, but Google hasn’t made it easy. Therefore, I’ve put together a tutorial for one method, but first it might be helpful to clear up a few things.
- Google Earth Tours – Yes, you can create and save tours. However, the files that are created are KMZ files that can only be opened in Google Earth. These are NOT video files, and they cannot be easily imported into another program.
- Embedding Google Earth – Right now there is no good way to get Google Earth to play in a PowerPoint slide. You could create a link on your slide that opens a KMZ file outside of PowerPoint in Google Earth itself. You could also embed a web page that has the Google Earth plug-in for web enabled, but that get’s to be more complicated than it’s worth.
I’ve already demonstrated how it’s possible to add PowerPoint slides to Google Earth . However, I still get inquiries for the other way around – adding Google Earth to PowerPoint, even though the two points above make it difficult, if not impossible. Well, there are a couple of ways, but they’re not perfect. The first involves just exporting static images from Google Earth and putting those images into your slides. The other involves video screen capture. Here’s how it’s done… First, you need some sort of screen capture program that will save your work as a standard video file. Jing is great, but the free version only saves as a Flash SWF file, which won’t work with PowerPoint. I recommend the free CamStudio , which is a simple, lightweight screen capture program.
Using screen capture you don’t even need to create a Google Earth tour. You simply start the capture program recording, then visit the sites you want in Google Earth. Once you’re done, save the screen capture as an AVI file, which can be imported into PowerPoint. Here is a video demonstration…(Note – the tutorial starts as soon as you click the link)
If you would like to see a larger version of the tutorial you can do so here at this link .
The video on the tutorial is a bit jerky because I was running both Adobe Captivate and Camstudio. Trust me, though. The final product is very smooth and works very well. If you would like to see the actual video that I recorded in this session it’s available on YouTube here…
One of the other benefits of this method is that it will work without an Internet connection. Everything is self-contained to your PowerPoint presentation.
Of course, you could eliminate the screen capture step by subscribing to Google Earth Professional. It has a way of exporting AVI files directly from the program. However, it’s pricey – nearly $500 per year for subscription. This method will probably work just as well unless you want broadcast quality.
Related Posts:
- Adding Google Earth to PowerPoint
- Google Earth Plus PowerPoint Mash-up
3 thoughts on “ Adding Google Earth to PowerPoint – Another Method ”
Someone is copying your articles: http://powerpointfan.blogspot.com/2010/04/add-google-earth-to-powerpoint.html
Interesting…looks like they copied all of my PowerPoint articles wholesale. Even the internal reference links have been copied. Unfortunately, commenting is disabled on that site. If they are going to steal my content so unabashedly, I doubt they would respond to a comment or an e-mail.
Thanks for bringing it to my attention, though.
Thanks a lot for the tutorial! It helped a lot 🙂
Leave a Reply Cancel reply
Your email address will not be published. Required fields are marked *
Notify me of follow-up comments by email.
Notify me of new posts by email.
This site uses Akismet to reduce spam. Learn how your comment data is processed .
How to Use Google Earth Web as a Presentation Tool
Besides as a map, you can use Google Earth Web as a visual aid for presentations that feature real-life locations. Here's how you can do so.
Google Earth isn’t just a cool navigation tool. You can also use it for presentations that involve real-life locations. The app already has a built-in feature just for that purpose.
Let’s say you’re a travel journalist and you want to be able to demonstrate where you’ve been around the world when pitching to new clients. Here’s a step-by-step guide on how to create such presentations on Google Earth.
1. Get Google Earth and Drive
You can now use Google Earth on any browser , not just Chrome. If you’ve never tried the app before, you can find out more about it by visiting the Google Earth website. From there, hit the Launch Earth button to log in with your Google account.
Also, the app mainly uses Google Drive to store the projects you create, so it’s a good idea to set up an account before making your first presentation.
2. Launch Google Earth and Find the Projects Tool
Once you’ve signed in to Google Earth, our digital planet will appear on your screen with several features on the left sidebar, such as map styles and Google’s tool for measuring area and distance .
Select the Projects icon and, assuming you don’t already have a presentation, click Create and then choose whether you want to store the new project on Google Drive or as a KML file—it stands for Keyhole Markup Language, an XML file that contains geographic information.
As the easiest method, go for the Google Drive option and wait for Google Earth to link up to your account. Once you create a project, click its Pin to Earth icon to make sure you can always find it when logging in.
3. Give Your Project a Title and Description
Take the time to name and describe your new presentation by filling in the two available fields. If nothing else, they can help you remember the purpose or details of each project.
On your dashboard, you have a few more options above your title and description. You can share, reload, or delete the project, as well as copy it, download it as a KML file, or report it for inappropriate content, the last being more useful to visitors.
4. Add Places to Your Google Earth Presentation
Under your project’s title and description is the New feature button, which opens a menu of many more tools. To pin locations of interest, you can either use Search to add place or Add placemark . The latter is especially good if the location you want is too obscure for Google to find.
A location you searched for will already display some details provided by Google, which you can change by clicking Replace . Your own placemarks are blank from the start.
A third option is to zoom in on a location, enter Street View , and click Capture this view . You can then add the place to your project after editing its details. Use this to get Google Earth’s satellite view of your house or a landmark from your travels worth sharing.
All three methods let you edit the locations you choose. This includes:
- Naming and describing them
- Editing the typeface
- Adding images and videos
- Personalizing your placemark’s icon and color
- Choosing the size of your info box
- Previewing the location’s display
When happy, just click the Back arrow—Google automatically saves your project. Every location you add to your presentation joins its list of markers, which you can easily select and edit as necessary.
5. Connect Places With Lines
As a travel journalist, you may want to demonstrate the number of flights you took from your home base in the last year or the stops you made during a long road trip. You can use Google Earth’s lines tool for this.
To do so, select Draw line or shape from the New feature menu. Click the places you want to mark, and lines will automatically appear between them.
Hit Enter to save the shape you made and access its editor. If you close your shape into a square or triangle, for example, you can customize its filling as well as its outline.
Another tool to make your project interesting is the Tilt the view button, which shifts your angle between 2D and 3D. While in a place’s editor, choose the best viewpoint and click Capture this view —that’s what you’ll get when you jump to the location in your presentation.
6. Add Slides to Your Presentation
If you take pictures on your travels, you can add them to your Google Earth presentation to share the people and scenery you encounter and create stories from your travel writing.
In the New feature menu, select Fullscreen slide . Upload your image or video, add whatever text you want, choose a background color, and preview the slide.
Add several of these visuals throughout the presentation to enrich the experience. This is especially useful for more creative projects on Google Earth , like teaching or planning a book.
7. Move Your Presentation’s Features Around
When you have all the places, lines, and slides you need for your project, hold and move each item up or down the list to adjust its order.
The presentation will play from the top to the bottom, so how you lay out all your items affects the impact and flow of your presentation.
If you want to skip an item when presenting, click the Hide feature icon next to it. To bring it back, use the same icon.
Note that you can also create folders through the New feature menu, but they interfere with the presentation, so you’re better off using them to store unused items instead of hiding them individually.
8. Present Your Project
With everything in order, hit the Present button. Unfortunately, Google Earth isn’t PowerPoint, so you can’t automate or speed up transitions, animate text and images, and so on. There are also limits to how often Google Earth is updated .
However, you still end up with a very cool presentation that flies from place to place around the globe, occasionally broken up by slides that could contain photos or even graphs, depending on what you’re presenting as a travel journalist.
Keep in mind that jumping between locations can be dizzying, so choose your presentation’s items carefully, as well as how much detail you add to them and what view you capture for each place.
Take Projects to the Next Level With Google Earth’s Presentation Tool
While there are many better options when it comes to presentation design software, Google Earth is one of the best tools for visualizing geographic themes.
Whether your interest is travel, ecology, history, or culture, keep learning how Google’s advanced map features can deliver the most engaging experience possible.

How to Use Google Earth to Enhance Your Presentations
I’m a frequent user of Google Earth to help enrich my presentations in front of large and demanding audiences. When introducing a new and exotic location, I find nothing beats an attractive and useful map or satellite image.
Google Earth is an invaluable tool for providing your audiences with geographic context and added interest in your presentations. Google has added a lot of tools and enhancements over the past few months to make it even easier to add content. Here’s a quick overview.
How many times have you watched a travel video wishing they’d included a map to provide some idea of location? — especially in these days of exploding numbers of YouTube travel vloggers!
Well, there really is no excuse as far as I’m concerned, now that these excellent tools are so readily available. (BTW, Google Earth provides tools that we could have only dreamed of when I first started giving slide presentations – back then a dissolve unit between two slide projectors was a BIG deal!)
How Can You Provide Geographic Context in Presentations?
Television news studios have been doing this for ages, and now you have the tools to do it yourself. What do I mean?
How many times have you seen a news story where the camera appears to zoom towards a particular location on earth as an intro shot? In the old days, this would have been nearly impossible for an individual at home with their own computer.
Of course, Google Earth has changed all that.
Here’s a quick example of the type of geographic context I like to provide in my own travel videos .
Google Earth provides Excellent Tutorial Videos
Introducing satellite fly-overs in your presentations can be daunting at first. Once you begin to experiment with the tools available, I think you’ll begin to see that it is time well spent. I would say that you could produce your first Google Earth fly over in a couple of hours.
It took me days of experimenting when I first began to use Google Earth Pro, but I didn’t have the benefit of the excellent video tutorials that Google provides today.
Google Earth Tutorial: Intro to Creation Tools
Here’s a short tutorial intro to an excellent series of videos on a simple approach to incorporating satellite images into your own presentations:
In my work, I frequently use Google Earth Pro to produce video flyovers. I really enjoy the fact that I can zoom into any location on earth and, if the resolution of the image is good enough, I can take my audience on a quick tour by following a particular geographic feature such as a shoreline or river, circling a mountain peak, or hopping from one island to the next. Pro is a free stand alone program that you can download onto your system.
Here’s one of my own short videos as an example. I’ve used Google Earth Pro to provide visual context to each location in the area surrounding Cape Town, South Africa. This is one of our favorite cities in the entire world with its stunning scenery and lovely climate.
You might also want to check out my 360 degree video of Table Mountain , including the exciting cable car ride and stunning scenery from the easy paths along the cliff edge.
If you don’t want to set up Google Earth Pro on your computer, you have an easy solution: Google Earth Studio.
Google Earth Studio is Quick and Easy
Google has added a user-friendly way of producing animated fly-overs using google earth studio, which works directly in the chrome browser. .
Here’s a quick video introduction, the first of a series on using Google Earth Studio.
Tips on Using Google Earth Studio
I’ve used Google Earth Studio for several presentations and find that I can get great results more quickly than I could in my early days with Google Earth Pro. The learning curve is not as steep with the Studio version, and it still provides powerful tools for creating a stunning video tour.
Tip #1 – my number one tip for Google Earth Studio:
I’ve discovered that rendering a short video from Studio will create a zip file with hundreds of individual JPG images. Yes, hundreds and even thousands of individual images to produce one video clip!
In order to use them, you have to take all those hundreds of images and import them into your video editing program.
Once in my editing program (I use PowerDirector), I find that the duration for each jpeg has to be extremely short if you want to have a properly paced video that doesn’t drag along at slow speed.
I have found the best duration for each individual image is only 0.01 seconds !
My second tip – watch some good tutorial videos before going whole hog on your own production!
You can literally save yourself hours and hours of experimenting by learning from the pros.
Believe me when I say that just diving straight into Studio can yield some frustrating results – I know, I’ve been there! It can be a simple program to use, but there are lots of short cuts available and the best way to learn is by watching proficient users at work.
Cinematic Affects using Google Earth Studio
Here’s a great intro from TMS Productions on using Google Earth Studio in films and presentations. In this case TMS imports the images into Adobe After Effects, but you could do the same using any video editing software (I use Cyberlink Power Director – powerful yet user friendly).
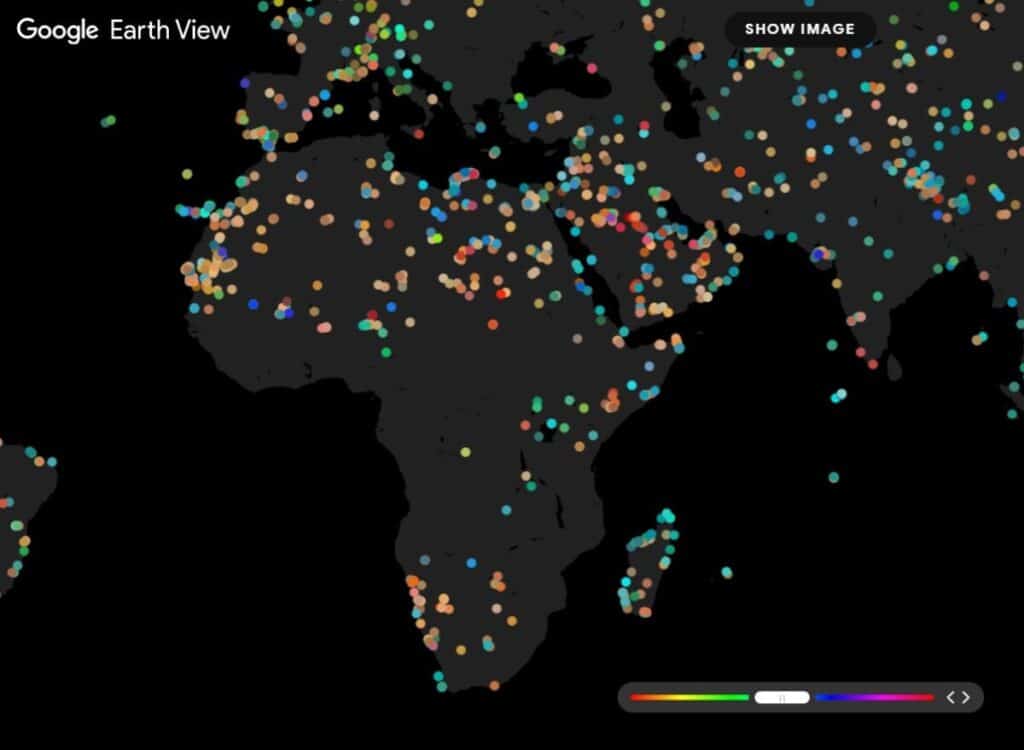
Google Earth View Provides Thousands of Stunning Images
Here’s another great site from Google. For the simple joy of exploration from your easy chair it is hard to beat Google Earth View.
For a quick intro check out this video:
Many of these images have an other worldly quality to them – with amazing colors, textures, and shapes that verge on the abstract. For adding visual interest to your presentations they are hard to beat!
Google Earth View provides an excellent source for stunning images, with over 2,000 images to choose from. Not only do these satellite images make great wallpaper for your computer screen, they can make great full frame slides to use in your presentations!
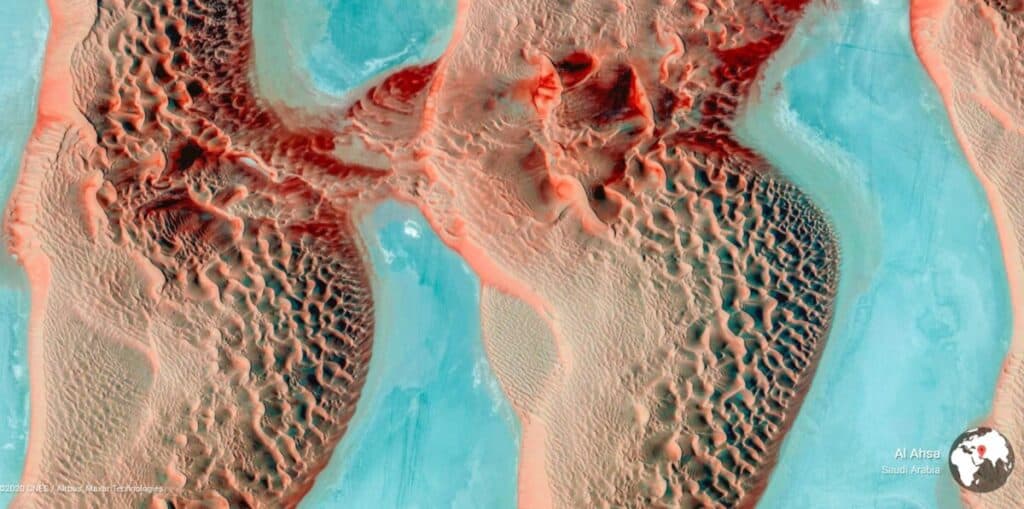
As you can see there are thousands of locations available throughout the the world, and half the fun is clicking on these dots to see what comes up. Don’t be surprised if you get totally distracted!
Best of luck with producing your own images and videos using these exciting tools to provide geographic context and stunning visuals in your own presentations.
The featured image at the top of this post shows Mili Atoll, Marshall Islands. Credit Google Earth View.

Contribute to the Microsoft 365 and Office forum! Click here to learn more 💡
April 9, 2024
Contribute to the Microsoft 365 and Office forum!
Click here to learn more 💡
- Search the community and support articles
- Microsoft 365 and Office
- Search Community member
Ask a new question
how do you imbed google earth in a power point presentation
Report abuse, replies (2) .
You may use a screen capture program to record the Google earth tour. Save the captured file in .avi format.
Open PowerPoint presentation, Click on Insert < Video < Video from file . Browse to the location where you have saved the video file and click Ok and check if it helps.
Note: You may have to search for 3rd party screen capturing application on the internet and save it as video as there are no Microsoft products to capture screen action.
Was this reply helpful? Yes No
Sorry this didn't help.
Great! Thanks for your feedback.
How satisfied are you with this reply?
Thanks for your feedback, it helps us improve the site.
Thanks for your feedback.
The easiest option would be to record a tour in Google Earth, http://www.google.com/intl/en/earth/learn/advanced.html#recording-a-tour , and play it back with Google Earth's own player, without involving PowerPoint. That will give you the best quality, without running into license problems.
If you want to integrate the tour in PowerPoint, you might need to record it as a video. Make sure you read their EULA for restriction. But as AVI files tend to be very large, I would recommend using WMV, which works well with PowerPoint 2007. (In PowerPoint 2010, MP4 would be a good alternative.)
3 people found this reply helpful
Question Info
- Norsk Bokmål
- Ελληνικά
- Русский
- עברית
- العربية
- ไทย
- 한국어
- 中文(简体)
- 中文(繁體)
- 日本語
Home Collections Nature Background PowerPoint Google Earth
Earth Google Slides & PowerPoint Presentation Templates

New PowerPoint Google Earth template
Try out this PowerPoint Google Earth template for your compelling presentation. The templates are given with blue background that looks professional. The template is given with a globe design that shows the awareness about energy production. The template is given a text area that you can use for professional NGO programs. The template is added with vibrant colors to make sure that audience will gain knowledge regarding the presentation. The template is user-friendly and can make the best outcome. The template is fully customized, so editing and downloading this template is much easier. Make sure to download this creative template and gain the effect. Try now!.
Features of this template
- This template is 100% editable.
- 100% Customizable (shape color, size & text)
- It supports an aspect ratio of 16:9.
- Easily readable and acceptable template.
- Creative design with vibrant colors.
- Single node with text area.
- Earth Background
- Earth Wallpaper
- Earth Background Image
- Simple Background
- Earth Background Design
- Modern Background
- Google Slides

25+ Templates

267+ Templates

127+ Templates

Agriculture
57+ Templates

50+ Templates

13+ Templates

Renewable Energy
61+ Templates

70+ Templates

55+ Templates

30+ Templates
You May Also Like These PowerPoint Templates

Got any suggestions?
We want to hear from you! Send us a message and help improve Slidesgo
Top searches
Trending searches

solar eclipse
25 templates

12 templates

north korea

7 templates

21 templates

48 templates
Exploring the Hydrosphere: Earth's Water
Exploring the hydrosphere: earth's water presentation, free google slides theme and powerpoint template.
Water, the lifeblood of our planet, is something that no one can ignore. It's what brings all living things together, and without it, life would cease to exist. With nearly 70% of our planet covered by water, it's no surprise that we call it the hydrosphere. Our multi-purpose, simple, gray template is here to help you talk about this topic. It's full of interesting illustrations that'll captivate your audience's attention and keep them engaged. With mockups, a diagram, Q&As, and so much more, you'll have everything you need to give the perfect presentation about water and the environment.
Features of this template
- 100% editable and easy to modify
- 35 different slides to impress your audience
- Contains easy-to-edit graphics such as graphs, maps, tables, timelines and mockups
- Includes 500+ icons and Flaticon’s extension for customizing your slides
- Designed to be used in Google Slides and Microsoft PowerPoint
- 16:9 widescreen format suitable for all types of screens
- Includes information about fonts, colors, and credits of the resources used
How can I use the template?
Am I free to use the templates?
How to attribute?
Attribution required If you are a free user, you must attribute Slidesgo by keeping the slide where the credits appear. How to attribute?
Related posts on our blog.

How to Add, Duplicate, Move, Delete or Hide Slides in Google Slides

How to Change Layouts in PowerPoint

How to Change the Slide Size in Google Slides
Related presentations.

Premium template
Unlock this template and gain unlimited access

Register for free and start editing online

Cloud Storage

Custom Business Email

Video and voice conferencing

Shared Calendars

Word Processing

Spreadsheets
Presentation Builder

Survey builder

Google Workspace
An integrated suit of secure, cloud-native collaboration and productivity apps powered by Google AI.
Tell impactful stories, with Google Slides
Create, present, and collaborate on online presentations in real-time and from any device.
- For my personal use
- For work or my business

Jeffery Clark
T h i s c h a r t h e l p s b r i d g i n g t h e s t o r y !

E s t i m a t e d b u d g e t

Make beautiful presentations, together
Stay in sync in your slides, with easy sharing and real-time editing. Use comments and assign action items to build your ideas together.

Present slideshows with confidence
With easy-to-use presenter view, speaker notes, and live captions, Slides makes presenting your ideas a breeze. You can even present to Google Meet video calls directly from Slides.

Seamlessly connect to your other Google apps
Slides is thoughtfully connected to other Google apps you love, saving you time. Embed charts from Google Sheets or reply to comments directly from Gmail. You can even search the web and Google Drive for relevant content and images directly from Slides.

Extend collaboration and intelligence to PowerPoint files
Easily edit Microsoft PowerPoint presentations online without converting them, and layer on Slides’ enhanced collaborative and assistive features like comments, action items, and Smart Compose.

Work on fresh content
With Slides, everyone’s working on the latest version of a presentation. And with edits automatically saved in version history, it’s easy to track or undo changes.

Make slides faster, with built-in intelligence
Assistive features like Smart Compose and autocorrect help you build slides faster with fewer errors.

Stay productive, even offline
You can access, create, and edit Slides even without an internet connection, helping you stay productive from anywhere.
Security, compliance, and privacy

Secure by default
We use industry-leading security measures to keep your data safe, including advanced malware protections. Slides is also cloud-native, eliminating the need for local files and minimizing risk to your devices.
Encryption in transit and at rest
All files uploaded to Google Drive or created in Slides are encrypted in transit and at rest.
Compliance to support regulatory requirements
Our products, including Slides, regularly undergo independent verification of their security, privacy, and compliance controls .
Private by design
Slides adheres to the same robust privacy commitments and data protections as the rest of Google Cloud’s enterprise services .

You control your data.
We never use your slides content for ad purposes., we never sell your personal information to third parties., find the plan that’s right for you, google slides is a part of google workspace.
Every plan includes

Collaborate from anywhere, on any device
Access, create, and edit your presentations wherever you are — from any mobile device, tablet, or computer — even when offline.

Get a head start with templates
Choose from a variety of presentations, reports, and other professionally-designed templates to kick things off quickly..

Photo Album

Book Report

Visit the Slides Template Gallery for more.
Ready to get started?
IMAGES
VIDEO
COMMENTS
This website gets lots of hits from folks wanting to learn how to embed Google Earth into their presentations, but Google hasn't made it easy. Therefore, I've put together a tutorial for one method, but first it might be helpful to clear up a few things. Google Earth Tours - Yes, you can create and save tours. However, the files that are ...
From there, hit the Launch Earth button to log in with your Google account. Also, the app mainly uses Google Drive to store the projects you create, so it's a good idea to set up an account before making your first presentation. 2. Launch Google Earth and Find the Projects Tool.
Download the International Mother Earth Day presentation for PowerPoint or Google Slides and start impressing your audience with a creative and original design. Slidesgo templates like this one here offer the possibility to convey a concept, idea or topic in a clear, concise and visual way, by using different graphic...
How to export your screen to PowerPoint.#googleearth #kml #kmz #mapyourworld #googleearthguru
Google Earth Studio is an incredible animation tool that helps us to bring geospatial footage to life. In this tutorial, you will learn how to use Google Ear...
Download your presentation as a PowerPoint template or use it online as a Google Slides theme. 100% free, no registration or download limits. Use these earth templates to create captivating presentations that promote environmental awareness. No Download Limits Free for Any Use No Signups.
How to use Google Earth in PowerPoint
Tip #1 - my number one tip for Google Earth Studio: I've discovered that rendering a short video from Studio will create a zip file with hundreds of individual JPG images. Yes, hundreds and even thousands of individual images to produce one video clip! In order to use them, you have to take all those hundreds of images and import them into ...
Premium Google Slides theme and PowerPoint template. Rather than listening to a long-winded lecture, how about you make the lesson more interesting for your students? Then edit our free template, whose minimalist style and the topographic lines on the backgrounds make it suitable for teaching geography.
Free Google Slides theme and PowerPoint template. There are several fields of study that focuses on our own planet, Earth, its constitution and the living organisms on it. They fall under the name of Earth science, and it looks like a great degree to study, right? Use this template to introduce it to potential students! It comes with several ...
Click on the Google Earth menu button and select Map Style. Change your Map Style to Exploration so that you can see place names on the globe. In the Save to project box, click into the Title ...
Mantle - earth's thickest layer between the outer core and crust made of magma. This is made of silicate rocks. Lithosphere - the layer of earth made of the crust and the rigid rock of the upper mantle which is broken into tectonic plates. Crust - the top layer of earth made of a thin layer of cool rock. Asthenosphere - the layer in ...
You may use a screen capture program to record the Google earth tour. Save the captured file in .avi format. Open PowerPoint presentation, Click on Insert< Video< Video from file. Browse to the location where you have saved the video file and click Ok and check if it helps. Note: You may have to search for 3rd party screen capturing application ...
This presentation illustrates advanced data presentation techniques for Google Earth users including how to make maps, how to position and orient photographs...
Download Google Earth in Apple App Store Download Google Earth in Google Play Store Launch Earth. ... Collaborate with others like a Google Doc and share your story as a presentation.
Earth's Atmosphere. Protects Earth from Space Debris, Keeps Heat In. Protects Us from Dangerous Radiation from Space. Keeps Water and Key Elements in to create a DYNAMIC planet. Water Cycle. Carbon Dioxide for plants. Oxygen for living organisms.
Thickest layer of the Earth (making up 70% of the Earth's mass) The hot material (magma) in the mantle rises to the top of the mantle, cools, then sinks, reheats, and rises again. These convection currents cause changes in the Earth's surface.
These templates can be used in Powerpoint, Google Slides, and Canva, so you can work in the platform you're most comfortable with. Whether you're planning a lesson, a workshop, or a rally, these templates will help you deliver your Earth Day message in style. Make your Earth Day presentation stand out with these templates.
Free Google Slides theme and PowerPoint template. More than 70% of Earth's surface is water-covered. Try to think of all the continents, put them together and now think of how large and expanse land is. The surface covered in water is more than two times larger than that of all the continents together. Gasp! If you used to play with Earth ...
New PowerPoint Google Earth template. Try out this PowerPoint Google Earth template for your compelling presentation. The templates are given with blue background that looks professional. The template is given with a globe design that shows the awareness about energy production. The template is given a text area that you can use for professional NGO programs.
Free Google Slides theme and PowerPoint template. Water, the lifeblood of our planet, is something that no one can ignore. It's what brings all living things together, and without it, life would cease to exist. With nearly 70% of our planet covered by water, it's no surprise that we call it the hydrosphere. Our multi-purpose, simple, gray ...
Use Google Slides to create online slideshows. Make beautiful presentations together with secure sharing in real-time and from any device.