
- Search the community and support articles
- Microsoft 365 and Office
- Search Community member
Ask a new question

Can I show a PPT presentation as LOOPING video on a TV using USB stick?
I have a PowerPoint 2013 presentation that I want to show continuously on a TV.
I can export as jpeg images to a USB memory stick, and the TV will display them continuously. But every slide is shown for the same fixed time, with no transitions.
I can export as a movie (.MP4) and the TV does show the movie with transitions but it plays only once. (PPT also seems to force a single duration per slide, independent of any per-slide times set in PPT Transitions ribbon).
I tried Kiosk mode which looked as if it might make a looping movie, but that made no difference.
Is there a setting in PowerPoint that I am missing? Or do I need to modify the movie in 3rd party software? Or is Kiosk mode already specifying a looping movie, which means that I've run into a limitation of the TV?
Just re-checked the user manual for the TV (Samsung UN28H4000) and discovered that it supports .wmv as well as .mp4. PPT can export either. I will try that next time I have access to the TV, but any hints anyone can offer will be most welcome.
Report abuse
Replies (5) .
11 people found this reply helpful
Was this reply helpful? Yes No
Sorry this didn't help.
Great! Thanks for your feedback.
How satisfied are you with this reply?
Thanks for your feedback, it helps us improve the site.
Thanks for your feedback.
- Volunteer Moderator |
- Article Author
Some video editing software allows you to create video loops, then burn them to a DVD folder on a USB drive. Windows DVD Maker can do this, though it costs $29.95 to register. Here's a link to a download, in case you want to evaluate it: Windows DVD Maker Download
6 people found this reply helpful
Thanks.
I have not been able to find any TV setting to make it loop. For pictures, if you "Play Folder" it repeats by default.
I actually have some good video editing software, but on my home machine which does not have a current version of PPT. The machine that does have PPT has no editing software. But I will see what I can do. If I can create a video file that definitely loops on a computer, there is a chance that the TV will loop it as well.
2 people found this reply helpful
Your reasoning is sound, if the video loops on a computer without assistance from a hosting piece of software, it will also loop on the TV.
I just noticed you're from Ottawa, I lived there as a child on MacKay St., near the Governor-General's residence. Beautiful city (in the summer)!
13 people found this reply helpful
I am looping a .MP4 video on a Samsung TV in my lobby.
Here's how I made it work on my particular model:
1. Start the video
2. While it is playing, press the "INFO" button on the remote
3. You will see player controls at the top of the screen along with a gear icon to access settings
4. Click the gear icon and you will see settings for "REPEAT"
I have it loop all day and set a timer to turn off the TV every day at 5pm.
Hope this works with your model.
56 people found this reply helpful
Question Info
- Norsk Bokmål
- Ελληνικά
- Русский
- עברית
- العربية
- ไทย
- 한국어
- 中文(简体)
- 中文(繁體)
- 日本語
Home Blog PowerPoint Tutorials How to Play a PowerPoint Slideshow on TV
How to Play a PowerPoint Slideshow on TV
PowerPoint presentations are often presented via projectors, where an individual can copy files to a computer which is connected to the projector in the hall. However, sometimes the projector is replaced with a large monitor or TV. There are many ways by which you can connect your computer or mobile device to a TV for presenting your slides. Here are a few simple methods which can be used to answer the age old question that many PowerPoint newbies ask; i.e. how to play a PowerPoint Slideshow on TV.
1. Connect Your Laptop or Mobile Device Using an HDMI Cable
This is the easiest way by which you can play a PowerPoint presentation on TV. In the old days the legacy VGA cable was used for this purpose, which is still usable with even the most modern TVs. However, an HDMI cable gives better quality playback and is easier to use.
In this demo we will show you how to connect a laptop with an LED TV using an HDMI cable. However, there are different mobile devices (e.g. Android and iPad tablets) which also support HDMI to TV connectivity.
Step 1: Plug in your HDMI cable into your laptop’s HDMI Port (as shown below).

Step 2: Connect the other end of the cable to your TV’s HDMI port. Usually, there are two HDMI ports, one located on the side and the other behind the TV.

Step 3: Switch to ‘HDMI’ from your TV’s Remote. Usually, this option is available from the remote’s Menu button. You might have options like ‘HDMI 1’ and ‘HDMI 2’ appearing on-screen. This is because one of the menu options connects to your first port and the other to the second. The image below shows connectivity with my TV’s second HDMI port. The port numbers might be labeled differently depending upon your TV’s model.
The below image shows the Organizational Charts PowerPoint Template running on an LED TV connected to a laptop via HDMI cable.

2. Play Slides as Image Slideshow or Video from a USB
This is another fine method for playing a PowerPoint slideshow on a TV. However, you will require converting your PowerPoint presentation to a supported format. For example, many TV’s support image formats like JPEG or Video formats like MP4. You can convert your presentation to a video format or export your slides as images and run them as a slideshow on your TV.
To learn how to convert your PowerPoint presentations to image or video format, see our guide about:
How To Save a PowerPoint Slide As a Picture and How To Convert a PowerPoint 2013 Presentation to a HD Video .
3. Convert and Play Your Slides from a DVD Player
You can also convert your PowerPoint files to DVD video format, write it on a DVD and play it using a good old DVD player. While this method is more laborious than the aforementioned, it is a pretty functional method. To get the video format right, follow the instructions given below.
Step 1: Save your PowerPoint to video format. You can refer to our tutorial mentioned above or simply go to File –> Save As –> and save your video to either MP4 or WMV. Unlike older versions, PowerPoint supports both formats.

Step 2: Open Windows DVD Maker, and select Choose Photos and Videos .

Step 3: Click Add Items and select the converted video file (file converted from PowerPoint to video format). Once the video with your video slides is picked, click Next .

Step 4: Now, customize menus for your DVD according to need, insert a blank DVD to your computer and click Burn .
Note: This process can be used to burn videos and photos to create DVD slideshows using Windows DVD Maker. You can also use another third-party DVD authoring tool for this purpose.

4. Connect to Your TV Using Wi-Fi or Wired Network
There are various TV models and devices which enable connecting to the Internet. The most common example of this can be found in the form of Smart TVs and Smart TV devices. Depending upon your TV model or the supported digital box you might be using, you can play a video slideshow by converting your PowerPoint presentation to a video format supported by your TV.
The below image shows connectivity settings for a Samsung Smart TV.

Recommended reading: How to embed video in PowerPoint
5. Use a Video Streaming Device
Last but not least, you can use a video streaming device like Roku 3, Apple TV or Google Chromecast to play a slideshow (e.g. one that has been converted to video format). The below image shows connectivity options for Apple TV. The various connectivity options in a video streaming device such as HDMI, USB and Wi-Fi / Ethernet provide ample scope for streaming various file types to your TV. This makes it possible to run an image, video or PPT/PPTX slideshow of your presentation slides (depending upon the mode of connectivity).

Do you know that using a high-quality PowerPoint Template with a connected TV can give you an excellent playback experience? Instead of using templates with dull backgrounds and hazy designs, you can download these Premium PowerPoint Templates to get the best output on your high definition TV or monitor.

Like this article? Please share
HDMI, Microsoft PowerPoint, PowerPoint 2013, PowerPoint 2016, PowerPoint Tips, Presentation Videos, Presentations, Slideshow, TV, Videos, View Presentation Filed under PowerPoint Tutorials
Related Articles

Filed under PowerPoint Tutorials • April 2nd, 2024
How to Round Corners in PowerPoint
Learn how to add rounded corners to shapes and images in PowerPoint. Elevate your presentations with sleek designs. Expert tips and step-by-step guides.

Filed under PowerPoint Tutorials • March 26th, 2024
How to Translate in PowerPoint
Unlock the experience of PowerPoint translation! Learn methods, tools, and expert tips for smooth Spanish conversions. Make your presentations global.

Filed under PowerPoint Tutorials • March 19th, 2024
How to Change Line Spacing in PowerPoint
Adjust text formatting by learning how to change line spacing in PowerPoint. Instructions for paragraph indenting included.
16 Responses to “How to Play a PowerPoint Slideshow on TV”
Useful article with great options for projecting presentations on TVs. It seems to happen more often than not, that you come across a TVs in meeting rooms at e.g. customer sites. One suggestion is to add the Microsoft Wireless Display Adapter as another option under pt. 5 for Wireless video streaming.
Awesome! Thanks for clearing this up.
I’m still curious if a wireless option exists. PowerPoint From computer to Smart TV via Bluetooth maybe?
Very useful article, i dont ave a laptop at home and was wondering how i could study the power-point presentations using the tv. thanks for the simplicity of the article too, very easy to apply.
So if I have a load of PowerPoint presentations with images, text and links to short film clips which if I plug into a pc at work they play on the interactive whiteboard perfectly. How do I use the same USB stick to play these in my other place of work on the Apple TV monitor?? Can I?
Your interactive whiteboard has probably a computer built-in, possibly even running some form of Windows, that can natively display PPTs as a regular presentation. But a standard monitor can only display a video signal it gets through an input, but cannot process any presentation or other files. And most, if not all, smart TVs, cannot handle PPTs, just like they cannot open Word Docs etc. Only media files file images, and videos.
Been searching for an answer for a while now, how can I play a ppt file on a tv without converting to an mp4 or jpegs?? and without connecting laptop to tv??
I have a Toshiba 50L5200U, and want to play a PowerPoint as a slideshow from a USB on the back of the TV. Is this possible on this model (if I convert the PPT to another format-if so, which one?), and if not, would a Firestick work, to enable me to transmit the powerpoint/slideshow wirelessly?
Thanks in advance!
Hi David. That model of Toshiba TV supports JPG images. You’d try to export the PowerPoint slides to JPG and then save them to the memory stick. It would be possible you need to rename the images to play in order or choose the appropriate sort by filter. This method depends purely on the TV, but if you have a Firestick or Chromecast, you can play the PowerPoint remotely from your computer.
I figured it out! If you export the slides from PPT as jpegs and change the dimensions to 1920×1080 (my laptop automatically made the second part 1081), it will be high-res and full screen when it displays on the TV from your USB. Originally, mine was 1280×720 and I had the same zoom issue, but when I tried to change the ratio in design (on power point), it messed up my formatting and some background colors. By changing the size of the jpegs when saving, there was no distortion and I was able to navigate the slides perfectly.
Hi @Tatyana. Glad to know you could figure it.
WE BOUGHT A HISENSE TV, USING A USB FOR SLIDE SHOWS (UPCOMING EVENTS) NEED TO SET THE TIME FOR THE SLIDE SHOW TO DISPLAY ON THE SCREEN FOR AT LEAST A MINUTE BEFORE THE NEXT SLIDE SHOW?
Please contact [email protected] with your question. Thanks.
Hi i am looking to show a “what’s on’s” at our social club using powerpoint with repeat function on an ordinary flat screen(not smart)tv.can you explain the easiest & cheapest way,i.e. memory stick,chromecast,media box etc.as i need to export images from a laptop. Thanks in advance
Hello, please contact [email protected] . For sure we will be able to help you.
Hello, I need to set up several tv monitors in a building that will loop through powerpoint slides. There is currently no wifi in the building. Can I just export the powerpoints into a movie format (wmv) and play it right from the usb to the monitor?
We’ve done this in the past, just simply exporting the presentation as a “video”. Using the feature File>Export>Create a Video. You can select the appropriate resolution, and generate the video. The video is generated as MP4 which is generally supported by TV’s. We uploaded the file to a pendive and use it in the screen.
Leave a Reply

How to Loop a PowerPoint Slide Show to Repeat Automatically

Set up a PowerPoint Presentation That Loops or Repeats Continuously
by Avantix Learning Team | Updated November 12, 2021
Applies to: Microsoft ® PowerPoint ® 2013, 2016, 2019 and 365 (Windows)
You can set up a PowerPoint slide show to loop or repeat automatically. A looping presentation can be used at events, trade shows or even in a reception area in an office. The easiest way to set up a slide show to loop or replay continuously is to apply automatic transitions and then configure Slide Show settings.
Recommended article: 5 PowerPoint Keyboard Shortcuts to Run a Slide Show
Do you want to learn more about PowerPoint? Check out our virtual classroom or in-person PowerPoint courses >
Screenshots in this article are from PowerPoint 365 but are similar in older versions of PowerPoint.
Step 1: Apply transitions to automatically advance slides during a slide show
Transitions occur between slides when you run a slide show.
To apply transitions to automatically advance slides during a slide show:
- In Normal View or Slide Sorter View, display or select a slide.
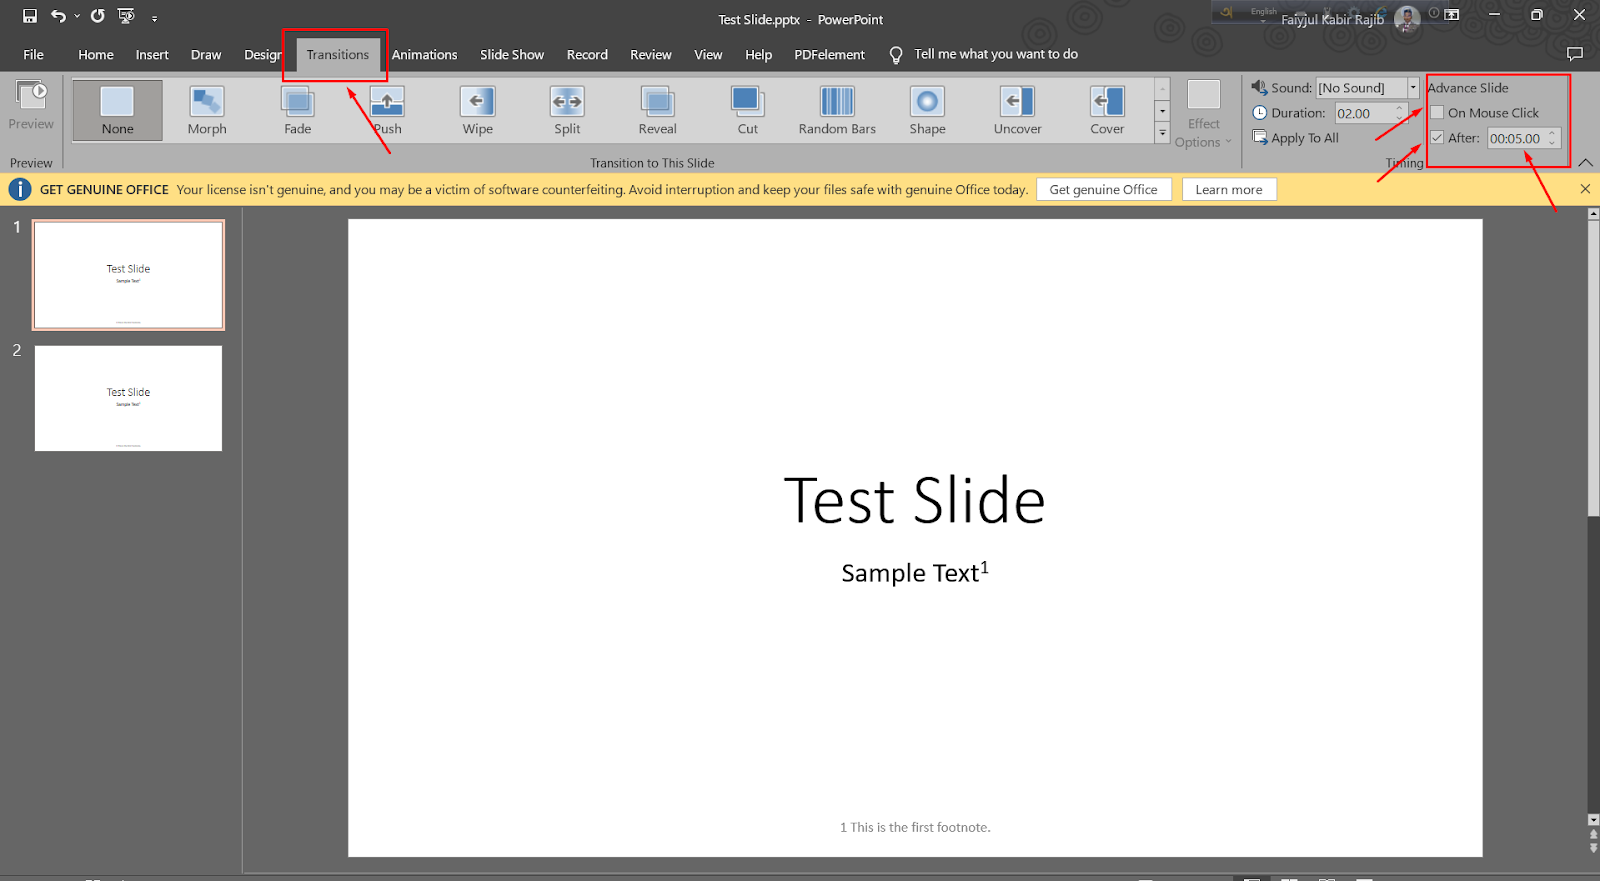
- Click the Transitions tab in the Ribbon.
- Select a transition in the Transitions gallery (such as Fade).
- Click Effect Options and choose the desired option. Effect Options change depending on the transition you selected.
- In the Timing group, click the arrows beside Duration to set the timing you want (in seconds) for the transition. You may also type a duration.
- In the Timing group, under Advance Slides, deselect or uncheck On mouse click and beside After, select or click the up and down arrows to set the timing to transition to the next slide. You may also type a duration.
- In the Timing group, click Apply to All.
In the Transitions tab in PowerPoint, you can select the type of transition (such as Fade) as well as timing options:

Step 2: Set up a presentation to loop during a slide show
To set up a PowerPoint presentation to loop during a slide show:
- Click the Slide Show tab in the Ribbon and then click Set Up Slide Show. A dialog box appears.
- Under Show type, if you select Presented by a speaker (full screen), the speaker or those watching the slide show will have control over when they advance slides. This is the default setting for slide shows. If you select Browsed by an individual (window), those watching the slide show do NOT have control over when slides advance. If you select Browsed at kiosk (full screen), those watching the slide show do NOT have control over when slides advance and the presentation automatically loops until those watching press Escape (Esc).
- Under Show options, select Loop continuously until 'Esc'. You will be able to select this option if you selected one of the first two options under Show type.
Below is the Set Up Show dialog box with Presented by speaker selected and looping enabled:

If you want to set specific timings for slides to advance or to add narration, check out the article How to Run a PowerPoint Slide Show Automatically (Set Up a Self-Running Presentation) . If you have audio or video in the presentation, you'll need to set the media to play automatically (on the Playback tab in the Ribbon) and animations will also need to be set to run automatically.
Subscribe to get more articles like this one
Did you find this article helpful? If you would like to receive new articles, JOIN our email list.
More resources
How to Embed a YouTube Video in PowerPoint
How to Hide and Unhide Slides in PowerPoint (with Shortcuts)
How to Insert Video in PowerPoint (from a File on Your PC or a Shared Drive)
PowerPoint Keyboard Shortcuts to Play and Control Video During a Slide Show
How to Add Animation in PowerPoint (Animate Images, Text and Other Objects)
Related courses
Microsoft PowerPoint: Intermediate / Advanced
Microsoft PowerPoint: Design for Non-Designers
Microsoft PowerPoint: Animations Bootcamp
Microsoft Excel: Intermediate / Advanced
VIEW MORE COURSES >
Our instructor-led courses are delivered in virtual classroom format or at our downtown Toronto location at 18 King Street East, Suite 1400, Toronto, Ontario, Canada (some in-person classroom courses may also be delivered at an alternate downtown Toronto location). Contact us at [email protected] if you'd like to arrange custom instructor-led virtual classroom or onsite training on a date that's convenient for you.
Copyright 2024 Avantix ® Learning
You may also like

How to Insert or Type E with an Accent Mark in PowerPoint (È, É, Ê, Ë, è, é, ê, or ë)
You can insert or type e with an accent mark in PowerPoint using built-in tools or keyboard shortcuts (including Alt code shortcuts). The letter e can be inserted with an accent in both upper or lower case in text boxes or placeholders on slides, the slide master or layouts. The following are common accents in upper or lower case – È, É, Ê, Ë, è, é, ê, or ë.

How to Fade a Picture or Part of a Picture in PowerPoint (Using a Gradient)
You can fade a picture in PowerPoint by drawing a rectangle shape on top of the picture and then filling the rectangle with a gradient from opaque to transparent. This technique is often used to fade an image into the background of a slide. Since the rectangle is placed on top of the image and then text may be placed on top of the rectangle, you may need to reorder the objects.

How to Lock an Image, Shape or Other Object in PowerPoint
You can now lock an image, shape or other object in PowerPoint. Objects can be locked in Normal View or Slide Master View. Only PowerPoint 365 users can lock objects to prevent moving and resizing. This is helpful if you want to select and move other objects on the slide or prevent others from moving or resizing an object. You can lock items using the context menu or the Selection Pane.
Microsoft, the Microsoft logo, Microsoft Office and related Microsoft applications and logos are registered trademarks of Microsoft Corporation in Canada, US and other countries. All other trademarks are the property of the registered owners.
Avantix Learning |18 King Street East, Suite 1400, Toronto, Ontario, Canada M5C 1C4 | Contact us at [email protected]
Our Courses
Avantix Learning courses are offered online in virtual classroom format or as in-person classroom training. Our hands-on, instructor-led courses are available both as public scheduled courses or on demand as a custom training solution.
All Avantix Learning courses include a comprehensive course manual including tips, tricks and shortcuts as well as sample and exercise files.
VIEW COURSES >
Contact us at [email protected] for more information about any of our courses or to arrange custom training.
Privacy Overview
Pin it on pinterest.
- Print Friendly
- All Templates
- Infographics
How to Play a PowerPoint on a TV? 3 Easy Methods!
- February 19, 2024
PowerPoint presentations are always better when presented on a large screen. TVs are becoming more popular for displaying presentations than your computer or laptop. To ensure an interrupted presentation, you need to tweak a few settings.
So, how do you play PowerPoint on a TV? You can connect your laptop or computer to a TV using an HDMI cable. Then, start the slideshow on the computer, and it will be displayed on the TV. Alternatively, you can convert the presentation into image or video files and use a USB device to play the presentation on a TV. You can also use a Chromecast device for this purpose.
In this guide, I will show you the detailed steps with visual instructions. Let’s get started.
How to Play a PowerPoint on a TV?
I have three methods for playing a PowerPoint presentation on a TV. Here are the detailed steps.
Method 1: Playing a PowerPoint Through HDMI
If you have the latest TV, it will probably have one or more HDMI ports. Your desktop or laptop should also have one or more HDMI ports, as well. See the steps below on how to use HDMI to connect your desktop or laptop to the TVs.
- Step 1: Connecting the Computer to the TV
Take an HDMI cable and insert one end into your computer. Then, insert the other end into the HDMI port of your TV. If your TV has two HDMI ports, they should be labeled as HDMI1 and HDMI2. Remember the port label that you are using.
Now, from the TV remote, select the menu and then select the HDMI port number.
- Step 2: Start the Presentation
Once these devices are connected, open PowerPoint. Then, click the Slide Show menu . On the top left corner of the screen, click on From Beginning . It will start the slideshow.
Remember, you need to click the left mouse button or the rightward arrow on your keyboard to go to the next slide. If you want the slide to advance automatically, go to the next step.

- Step 3: Automate Slideshow
If you are presenting something at a kiosk or slides need to advance at a set interval, click the Transitions menu. The Advance Slide option is at the top right corner of the window.
From there, uncheck the On Mouse Click checkbox so that you don’t need to click the mouse for the next slide. Also, set a time interval for each slide below by checking the After checkbox.
Method 2: Playing a PowerPoint on a TV Using a USB Stick
This method is a bit tricky. So, I suggest you follow the steps carefully.
- Step 1: Converting PowerPoint Presentations into Image or Video Files
PowerPoint presentations have the .pptx format. But TVs can’t read this format. So, you can’t directly play a presentation on TV. To do this, you have to convert the files first. Converting PowerPoint Presentations into Image or Video Files.
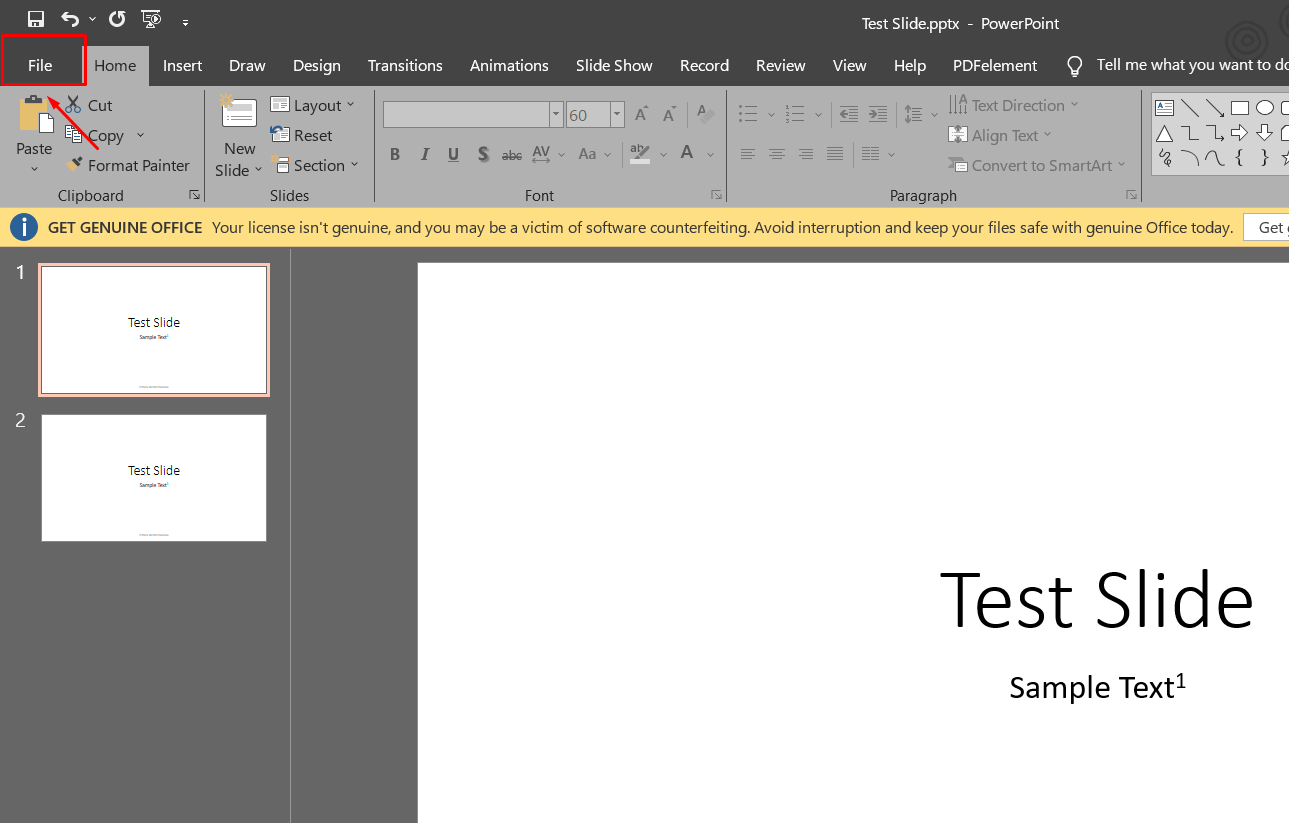
- Step 2: Go to the File Menu
Open your presentation file. Then, click File at the top left corner of the window.
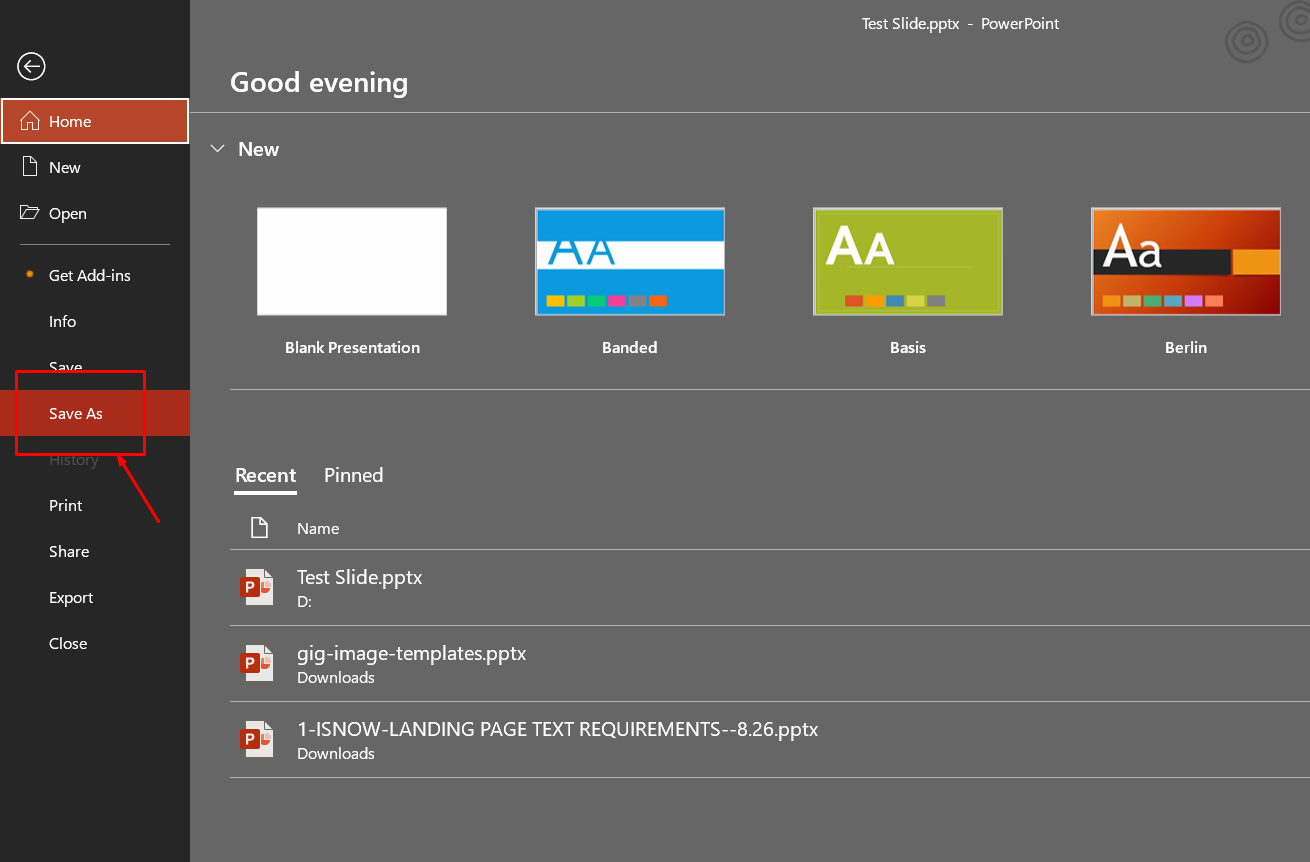
- Step 3: Select Save As
From the File menu, click on Save As to save the PowerPoint file into your desired format.
- Step 4: Select Save As Type
After you have browsed the target location for the file, you will see a dialog box. Give the file a new name if you want. I have kept the name the same as before.
From the next drop-down menu, select the Save as type . It is better if you choose the .mp4 format because all TVs support this format.

- Step 5: Move the File to the USB Device
It will take a few seconds to convert the presentation file into a video file. Check the target folder for the new video file.
Now, insert a USB stick into your computer or laptop. Go to the folder where you have saved the presentation in a video file. Click once on the file to select it. Then, press Ctrl + C on your keyboard to copy the file.
Go to the USB directory. Then, press Ctrl + V on your keyboard to paste the video file. It might take a few seconds.
After the file is copied to the USB device, click the upward arrow at the right side of the taskbar. Then, click the Eject USB Device option to safely remove the USB stick.
- Step 6: Plug the USB into the TV
Modern TVs come with USB ports. Insert the USB device into the USB port of your TV. The port should be on the sides of the TV.
- Step 7: Select the USB as the Input
Press the Menu button on your TV remote. Then, select the USB device as the input device. From there, select the video file you have created and play it. The presentation will now start and loop until you close the option.
Remember, selecting the input device and accessing its content can be different in various TV or remote models.
Method 3: Play a PowerPoint on a TV Using Chromecast
This is a more expensive method because you need a Chromecast device here. See how this method works.
- Step 1: Plug the Chromecast Device into the TV
The Chromecast Device will use the HDMI port of your TV. After plugging the device in, select the right channel for the source.
- Step 2: Casting Your Screen to the TV
Open the presentation on your computer or laptop. Then, go to the Chrome browser and click the menu icon at the top right corner. It looks like three vertical dots. From there, select the Cast option.
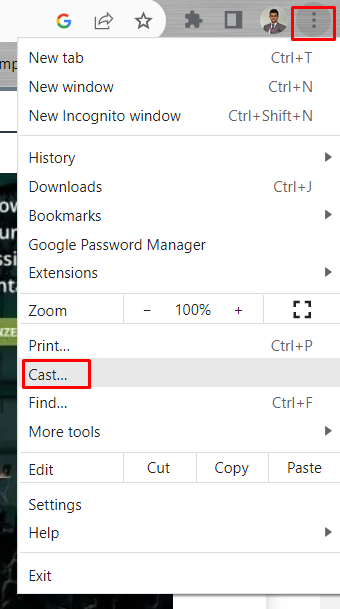
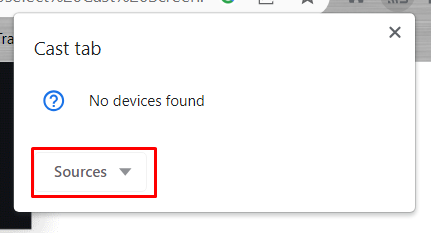
- Step 3: Select the Chromecast Device
It might take a few moments to find the available Chromecast device. Select your TV name from the list. Then, click the Sources drop-down menu and select Cast Screen from there. Now you can play PowerPoint on a TV.
PowerPoint presentations may contain critical information in smaller fonts that are easy to see on a large screen, such as a TV. But if you don’t know the right method, you can’t play the slideshow on a TV screen.
So, I showed how to play PowerPoint on a TV using three different methods . The first method is traditional, which uses an HDMI connection. But the next two methods are more advanced, where you don’t need to carry an HDMI cable around. Use your preferred method to play a PowerPoint on a TV.
Leave a Reply Cancel reply
Your email address will not be published. Required fields are marked *
Save my name, email, and website in this browser for the next time I comment.

- Login / Register
Username or email address *
Password *
Lost your password? Remember me
No account yet?
How to Loop a Powerpoint Presentation: Step-by-Step Guide
Looping a PowerPoint presentation is an easy way to keep your slides on repeat for an audience or a display. It’s perfect for trade shows, informational kiosks, and even personal use when you don’t want to manually control the presentation. In just a few clicks, you can automate your PowerPoint to loop continuously until you decide to stop it.
Step by Step Tutorial on How to Loop a PowerPoint Presentation
Before we dive into the nitty-gritty of looping your presentation, let’s understand what we’re about to do. By following these steps, we’ll set your PowerPoint to play over and over without any manual intervention. It’s like putting your favorite song on repeat, but with slides!
Step 1: Open your PowerPoint presentation
Open the PowerPoint presentation you want to loop.
When you open your presentation, make sure you’re on the slideshow tab. This is where all the magic happens for presentation playback.
Step 2: Select ‘Set Up Slide Show’
Click on the ‘Slide Show’ tab and then select ‘Set Up Slide Show’.
This is where you can tweak the settings for how your presentation is displayed. It’s like the control center for your slideshow.
Step 3: Choose ‘Loop continuously until ‘Esc”
In the ‘Set Up Show’ options, check the box for ‘Loop continuously until ‘Esc”.
By checking this option, you’re telling PowerPoint to keep cycling through your slides until you press the Escape key to stop it.
Step 4: Set the slides to advance automatically
Under ‘Advance slides’, select ‘Using timings, if present’ or set the ‘After’ option to the number of seconds you want each slide to be displayed.
This step is crucial if you want your presentation to move through slides without you clicking anything. It’s like setting an automatic timer for each slide.
Step 5: Save your settings and test the presentation
Click ‘Ok’ to save your settings and start your presentation to test the loop.
After you’ve saved your settings, give your looped presentation a dry run to make sure everything flows smoothly. If it does, you’re all set!
After completing these steps, your PowerPoint presentation will loop continuously. Whether you’re away from your computer or engaged with an audience, your presentation will keep running in the background, providing a seamless flow of information.
Tips for Looping a PowerPoint Presentation
- Make sure your slides are self-explanatory since you might not be there to explain each one.
- Keep an eye on the timings if your slides have animations or transitions.
- Use high-quality images and readable text to ensure your presentation looks good on repeat.
- Consider adding background music to keep the loop engaging.
- Always do a full run-through to check for any glitches that might disrupt the loop.
Frequently Asked Questions
How do i loop a powerpoint presentation with sound.
To loop a PowerPoint presentation with sound, embed the audio file in your presentation and set it to play across slides. Then, follow the steps above to loop the presentation itself.
Can I loop a PowerPoint presentation on a TV or monitor?
Yes, you can loop a PowerPoint presentation on a TV or monitor by connecting your computer and setting up the presentation to loop as instructed above.
Is it possible to loop only specific slides in a presentation?
To loop specific slides, you can create a custom slide show within PowerPoint that includes only the slides you want to loop, and then set that custom show to loop.
Can I loop a PowerPoint presentation on a loop without using PowerPoint?
To loop a presentation without PowerPoint, you can convert it to a video format that supports looping, such as MP4, and use a media player to loop it.
How can I stop a looped PowerPoint presentation?
To stop a looped PowerPoint presentation, simply press the ‘Esc’ key on your keyboard, and it will return to normal view.
- Open your PowerPoint presentation.
- Select ‘Set Up Slide Show’.
- Choose ‘Loop continuously until ‘Esc”.
- Set the slides to advance automatically.
- Save your settings and test the presentation.
Looping a PowerPoint presentation can be incredibly useful in various situations, from professional trade shows to casual photo slideshows. With the simple steps outlined above, anyone can set up their presentation to run on a continuous loop, freeing up time and ensuring the information is always on display. Remember to check your timings, especially if you have animations or transitions, and test your loop thoroughly to avoid any hiccups. Now, you’re ready to create smooth, endlessly looping presentations that can captivate and inform your audience without a hitch. Keep experimenting with PowerPoint’s features to make your presentations even more powerful, and always look for ways to improve and streamline your work. Happy presenting!

Matt Jacobs has been working as an IT consultant for small businesses since receiving his Master’s degree in 2003. While he still does some consulting work, his primary focus now is on creating technology support content for SupportYourTech.com.
His work can be found on many websites and focuses on topics such as Microsoft Office, Apple devices, Android devices, Photoshop, and more.
Share this:
- Click to share on Twitter (Opens in new window)
- Click to share on Facebook (Opens in new window)
Related Posts
- How to Loop a Slideshow on Powerpoint 2013: Step-by-Step Guide
- How to Loop a Powerpoint Office 365 Slideshow
- How to Download a Google Slides Presentation as a Powerpoint File
- How to Rotate a Powerpoint Slide Presentation
- How to Do a Powerpoint Google Slides Presentation Conversion
- How to End Powerpoint on Last Slide in Powerpoint 2010: A Step-by-Step Guide
- How to Make Google Slides Vertical (5 Quick Steps)
- How to Delete a Slide in Powerpoint 2010: Step-by-Step Guide
- How to Hide a Slide in Powerpoint 2010: A Step-by-Step Guide
- How to Insert Slides from Another Presentation: Powerpoint 2024 Guide
- How to Add a New Slide in Google Slides: A Step-by-Step Guide
- How to Delete Multiple Slides in Google Slides: A Step-by-Step Guide
- How to Make a Powerpoint Slide Vertical in Powerpoint 2013: A Step-by-Step Guide
- How to Convert Powerpoint to Google Slides: A Tech Solution
- How to Duplicate a Slide in Powerpoint: A Step-by-Step Guide
- How to Merge Files in Powerpoint: A Step-by-Step Guide
- How to Remove Slide Numbers in Powerpoint 2019: Easy Steps
- How to Add a Hyperlink on Google Slides
- How to Change Slide Size in Powerpoint 2016
- Determining the Size of a PowerPoint Slide in Pixels: A Guide
Get Our Free Newsletter
How-to guides and tech deals
You may opt out at any time. Read our Privacy Policy
How-To Geek
How to loop a powerpoint presentation.
If you're showing off a lot of photos at a special event, set your presentation to progress at a continuous, automatic loop. Here's how.
Quick Links
Set up your slideshow to be looped, apply automatic slide transitions.
Slideshows are sometimes used to display images at events, such as weddings or trade shows. Whatever the occasion might be, you’ll want to loop your PowerPoint presentation so your guests aren’t staring at a blank screen. Here’s how it’s done.
First, open your PowerPoint presentation in which you would like to loop. Once open, navigate to the “Set Up” group of the “Slide Show” tab and then select the “Set Up Slide Show” button.
The “Set Up Show” window will appear. In the “Show options” group, check the box next to “Loop Continuously until Esc.” Once selected, click “OK” in the bottom-right corner of the window.
Now, when you play your slideshow, it will end only when you press the “Esc” key instead of when you've finished the last slide.
Related: How to Make YouTube Videos Loop Continuously
One caveat: With the way we currently have it set up, the slideshow will proceed only when someone clicks the mouse button. That’s fine if there will be a speaker present at all times. Otherwise, you’ll need to set up automatic slide transitions.
Head back to the “Set Up Show” window by selecting “Set Up Slide Show” in the “Set Up” group of the “Slide Show” tab.
There are a couple of options you need to select, but one important note is that you must first select “Using Timings, If Present” under the “Advance Slides” group.
The next option we select will lock a few things in place (which is why you need to select “Using Timings, If Present” first).
Under the “Show Type” group, select “Browsed at a Kiosk (Full Screen)." The “Loop Continuously until Esc” option will be enabled automatically if you haven’t already turned it on, and the option you’ve selected under “Advance Slides” will remain unchanged.
Select “OK” when ready to proceed.
Without the “Browsed at a Kiosk” option enabled, the automatic slide progressions would be disabled if someone were to press the Back key. With it enabled, the Forward and Back keys are locked, allowing the slideshow to automatically progress unattended without fear of someone breaking it.
Now it’s time to set the timings of the slides. Head over to the “Transitions” tab. In the “Timing” group, check the box next to “After” and set the timing at which you’d like each slide to progress. Note that it doesn’t matter if the box next to “On Mouse Click” is checked or not---it won’t work.
After that, select the “Apply to All” option in the same group.
Now, when you play your slideshow, it will continuously loop without interruption. To exit the slideshow, press the “Esc” button.
- 0 Shopping Cart $ 0.00 -->
How to Play PowerPoint on TV
PowerPoint® is a fantastic tool for creating professional multimedia presentations. PowerPoint makes it easy to display presentations on Windows (and Mac) PC screens. However, there’s often a need to display a self-running PowerPoint presentation on a standard TV screen. So how to play PowerPoint on TV? This is not easy since TVs don’t have the ability to display native PowerPoint presentation files.
Requirements
There are actually two requirements to play PowerPoint on TV. First you must make your PowerPoint presentation self-running. This means your presentation runs in a continuous loop with any user keyboard actions. Second, you need a digital signage media player that can display PowerPoint files on your TV.
PowerPlayer – PowerPoint TV Player
To satisfy the second requirement we will introduce PowerPlayer™ , our low-cost PowerPoint digital signage player that was designed to display PowerPoint presentations on any standard TV.
Making Your Presentation Self-running
By default PowerPoint requires a mouse click or keyboard press to advance to the next slide in a presentation. And when the last slide is reached the presentation automatically ends. To make the presentation auto-advance without user input select Transitions from the PowerPoint ribbon menu.

On the far right of the sub-menu, uncheck On Mouse Click and check After and enter the number of seconds you want the selected slide to be displayed. Repeat these steps for each slide in the presentation; or click Apply To All to apply the entered display time for all slides in the presentations (in the example shown above, each slide will be displayed for 8 seconds).
The next step is to setup kiosk mode . This will cause your presentation to display in full screen and loop to the beginning when the last slide is reached. To setup kiosk mode select Slide Show from the PowerPoint ribbon menu then click Set Up Slide Show from the sub-menu.

The Set Up Show dialog box will be displayed. Click Browsed at a kiosk (full screen) and then click OK .

After performing these two steps your PowerPoint presentation will display each slide for the specified time. And when the last slide is displayed the presentation will automatically loop back to the first slide and continue.
Displaying the Proper Fonts
To properly display your presentation, the PC running your presentation must have the correct fonts installed. Otherwise your presentation may not look as intended. To remedy this potential problem simply embed the presentation’s fonts in the saved PowerPoint file.
To embed fonts select File on the PowerPoint ribbon menu and then click Options . From the PowerPoint Options menu click Save . At the bottom of the Save menu check Embed fonts in the file and then click OK .

For more information please take a look at our PowerPoint to Digital Signage Guide .
PowerPlayer – A PowerPoint TV Player
Once your presentation is self-running you will need a media player that can display PowerPoint files on your TV screen. Our PowerPlayer product is an example of a low-cost digital signage player that supports native PowerPoint file formats. PowerPlayer is a pocket-sized Windows 10 PC stick that plugs into your TV’s HDMI source input.
PowerPlayer is bundled with PowerSignage™, our cloud-based content management service (CMS). PowerSignage CMS makes it easy to upload, schedule and display PowerPoint presentations on your TV.
With PowerPlayer you play PowerPoint on TV in three (3) simple steps:
- Create your presentation with PowerPoint
- Upload your presentation to PowerSignage CMS
- Plug PowerPlayer into your TV’s HDMI
PowerPlayer automatically downloads PowerPoint presentations from the CMS and displays them on the TV screen.

So, how to play PowerPoint on TV? First make your presentation self-running, as described earlier. Second, use PowerPlayer to display your PowerPoint presentations on any TV with HDMI. Take advantage of our cloud-based content management to upload, assign and display PowerPoint presentations to your TV points.
For more information take a look at our PowerPlayer product brochure or visit our website at www.powerdigitalsignage.com.

- PC & Mobile
- Microsoft Powerpoint
How To Loop a PowerPoint Presentation
Lee Stanton Lee Stanton is a versatile writer with a concentration on the software landscape, covering both mobile and desktop applications as well as online technologies. Read more August 29, 2022
A visually striking PowerPoint presentation can go a long way toward grabbing and keeping people’s attention, whether they’re guests at a wedding or visitors at a museum exhibition. It doesn’t matter whether you want to help the audience retain information or build an emotional connection. Playing the presentation repeatedly in the background can significantly benefit your goal.

If you’re unsure how to keep the presentation going without having to restart it manually, you’ve come to the right place. Keep reading to learn how to loop a PowerPoint presentation.
How to Loop a PowerPoint Presentation on a PC
After designing the perfect Microsoft PowerPoint presentation for your event, you can easily tweak the settings to make it loop instead of ending after a single viewing.
- Open the presentation you want to loop in PowerPoint.

If you were to leave it at that, the presentation would loop after finishing, but you would still have to click between the slides to keep it going. So, this option only works if a speaker is present at all times, which is highly unlikely and inconvenient.
Let’s set up an automatic slide transition so the presentation does all the work from beginning to end.

The next step is to deal with the “If present” portion of the checkbox. Follow these steps to set up timing for the automatic slide transition.

The duration of the slides depends on the content of your presentation. You can move it along a bit faster if it’s an all-picture display. That way, the audience won’t have to stare at a static screen for too long. Otherwise, make sure to leave enough time for people to read the text on each slide, especially if your goal is to inform them about a service or product.
With everything set up, the presentation will reach the last slide on its own. From there, it will automatically loop back to the beginning.
If the presentation is set up where it can’t be monitored at all times, visitors might get impatient and switch the slides manually. Such interference would disable the automatic slide progression. To avoid this, you should change one more setting in your presentation.

The Forward and Back keys will be locked with this show type enabled. No one will be able to disrupt the presentation’s progress. You can hit the Esc button to exit the slideshow when the event has finished.
Before your presentation has its big day, you should ensure everything is set up correctly. To preview your presentation, do the following.

Sit through your presentation and check that it repeats from the beginning once it reaches the final slide. When you’re confident the looping is enabled, press the Esc key and save your work.
How to Loop a PowerPoint Presentation on a TV
While this process is pretty simple, it will only work if your TV supports the PPT format and thus can play a PowerPoint presentation. Not all TVs have this option.
You can use some methods to loop a PowerPoint presentation on a TV that doesn’t support this format.
Connect a Laptop
The simplest solution to your problem is connecting a laptop to your TV using an HDMI cable.

Now you can play the looped presentation on your laptop, which will keep going on your TV until you manually stop it.
Use a PowerPoint TV Player
You’ll need an alternative solution if you can’t leave your laptop connected to the TV for a prolonged period. Another great way to play a self-running presentation on your TV is to use a PowerPoint player called PowerPlayer . This product supports the native PNG format; you can simply plug it into any TV you’d like.
Can You Loop a PowerPoint Presentation on an iPad? Not Directly
Although available on iPad, the PowerPoint app doesn’t offer the same auto-play functionality as the PC version. You can always loop your presentation on a computer and play it on your iPad. However, if you’d like to loop the presentation directly on the device, you’ll have to open it using Apple’s native presentation app, Keynote .

Now that your presentation is set to advance automatically, the only thing left is to arrange the looping.

Keep Everyone in the Loop
After spending a lot of time making your PowerPoint presentation informative and aesthetically pleasing, you’ll want to display it proudly for the world to see. Playing it once is certainly not enough, so you’ll want to loop your presentation and ensure everyone gets the chance to see it. While creating the perfect presentation can be time-consuming, looping it is a simple process that will take you no more than a few minutes.
Related Posts

Disclaimer: Some pages on this site may include an affiliate link. This does not effect our editorial in any way.

Lee Stanton February 9, 2024

Lee Stanton September 13, 2023

Lee Stanton July 21, 2023
Send To Someone
Missing device.
Please enable JavaScript to submit this form.
How to loop a PowerPoint slideshow so that it automatically starts over as soon as it ends
- To loop a PowerPoint slideshow, you'll need to enable looping in the "Set Up Slide Show" menu.
- Once you set your PowerPoint to loop, it'll start over from the beginning automatically after playing the last slide.
- Visit Business Insider's Tech Reference library for more stories .
If you've designed a Microsoft PowerPoint presentation that's meant to be viewed repeatedly, such as on a kiosk or in a museum installation, you can adjust the settings in PowerPoint so that your slideshow "loops" instead of ending after one viewing.
Getting a PowerPoint to loop is easy. Read on to find out how, using PowerPoint for both Mac and PC.
Check out the products mentioned in this article:
Microsoft office (from $149.99 at best buy), apple macbook pro (from $1,299.00 at apple), acer chromebook 15 (from $179.99 at walmart), how to loop a powerpoint presentation.
1. Open the Microsoft PowerPoint presentation that you want to loop.
2. With your PowerPoint presentation open, click on the "Slide Show" tab, then click on "Set Up Slide Show."
3. In the pop-up window that appears, click on the box next to "Loop continuously until 'Esc'" so that a small checkmark appears inside the box. Feel free to adjust any other settings in this menu as well. Click "OK" when you're finished.
4. To test whether your PowerPoint can loop successfully, click on the "From Beginning" or "Play From Start" button in the Slide Show tab. Click through the slideshow until you reach the end. When your PowerPoint reaches its final slide, it should start over from the beginning automatically. When you're confident that looping is enabled, and you're ready to close the slide show, press the Esc key.
Related coverage from Tech Reference :
How to add a border to slides in powerpoint, and give your slideshow a sleek design, how to embed a youtube video into your microsoft powerpoint presentations using a mac or pc, how to convert google slides to a powerpoint presentation in 4 easy steps, how to create a custom powerpoint template to use or share with others, how to copy or duplicate a powerpoint slide and put it anywhere in your slideshow.
Insider Inc. receives a commission when you buy through our links.
Watch: We compared the $1,200 MacBook Air with the $500 Surface Go, and the results were a mess
- Main content
- Customer Help
- X (Twitter)
How to Loop a PowerPoint Presentation: A Simple Step-by-Step Guide
Looping a PowerPoint presentation so it repeats continuously can be very useful for trade shows, lobbies, or other situations where you want your presentation to play on recur. The process is relatively simple and only takes a few steps. In this article, we’ll walk through how to set up a Microsoft PowerPoint presentation to loop automatically. First we’ll discuss why you may want a looping presentation. Then we’ll cover the steps to configure the loop in PowerPoint.
How to Loop a PowerPoint Presentation
Follow these easy steps to set up a looping PowerPoint slideshow in Microsoft PowerPoint 2022 or 365:

- It will repeat, moving from the first slide to the last slide and back to the beginning until you press “Esc”.
With a few mouse clicks, you can easily set up continuous looping for your PowerPoint slide – perfect for unattended presenting.
Tips for How to Loop Slides in PowerPoint
When creating a looping PowerPoint slideshow, keep these tips in mind:
- Time your slides appropriately – 10-20 seconds per slide is ideal. Don’t make them too short or long.
- Use transitions like fades and wipes. Avoid distracting transitions that could disrupt the flow.
- Focus on visuals more than heavy text, which viewers won’t fully read.
- Create a narrative flow from beginning to end, even if it loops.
- Check audio levels if using sound to ensure proper volume.
- Consider adding interactive elements like hyperlinks.
- Preview and test thoroughly to polish schedule and flow.
- Adjust slide timing in the “Set Up Slide Show” menu if needed.
Properly schedule and planning your looping PowerPoint ppt helps create a professional, seamless presentation. See Microsoft’s guide for more tips on perfecting your looping slideshow.
Alternatives to Looping a PowerPoint Presentation
If you want more flexibility than simply looping your PowerPoint slideshow, consider these other approaches:
- Export as a video – Convert your PowerPoint to an MP4 video file that can play on replay on a TV or monitor. This gives you more options for transitions and schedule plan.
- Use presentation software like ProShow Producer to create self-running shows with advanced options for automatically displaying slides.
- Make a self-running PowerPoint using animations and slide timers to move from one slide to the next automatically without needing to loop it.
- Use digital signage platforms like BrightSign to remotely publish and manage your looping presentation.
- Connect your computer to a TV or large monitor and use a media player to display your Presentation on recur.
- Have a presenter show the PowerPoint live if available during your event, rather than pre-recording it.
Consider your specific display needs and venue setup to pick the best approach for looping your content.
In summary, looping your PowerPoint slideshow is an easy way to create a repeating, unattended presentation. Using the “Set Up Slide Show options” in PowerPoint, you can set it to endlessly loop for a certain number of times.
When creating your looping PowerPoint, properly schedule your slides, use transitions wisely, and follow best practices for a professional, polished look. With the right settings, your looping slideshow can run smoothly at events without supervision.
While PowerPoint makes looping easy, you can also export to video or use other software for more advanced presentation options. In the end, looping gives an effortless way to display your slides on continuous repeat.
We encourage you to try looping your next PowerPoint. By following this guide, you’ll be ready to create a seamless, professional replay slideshow for your event.
You must be logged in to post a comment.
- Business articles (22)
- Google Slides (57)
- Keynote (27)
- PowerPoint (83)
- Support (2)
3 Ways to Play and Present Your Own PowerPoint on TV
October 18, 2017 / Blog, PowerPoint Tutorial powepoint on tv, Powerpoint, presentation, Rick Enrico, SlideGenius, video
There are multiple mediums to show your PowerPoint presentation in. The program’s accessibility allows you to display your deck from your laptop to the Web, on mobile, on a traditional projector and screen, and even on a TV.
The latter is especially recommended for informal settings where you want to present a slideshow of your photo album. It can also work for more formal occasions like classroom or boardroom presentations.
High Quality, Fast, PowerPoint Design Get a FREE Design Quote Now!
Here’s how you can play your PowerPoint on TV:
1. Connect from Your PC

Need a Presentation Designed? Click Here To View Our Amazing Portfolio!
This is one of the most common methods of showing your deck on a screen. Most television sets these days come with an HDMI port to connect your laptop via cable. Simply locate your TV and PC’s HDMI ports and plug in the two ends of the cable. Make sure you’ve pressed the AV button on your television remote control to select the correct HDMI output.
Once you’ve connected the two devices, your laptop screen should automatically show on your TV.
Control the flow of your presentation from your PC like a standard PowerPoint but project it on a bigger screen. This lets you engage your audience by putting your visuals on a widescreen while having complete control of your deck
2. Save It as a Video

Need a Pitch Deck Designed? Click Here To View Our Amazing Portfolio!
If you want to free your hands entirely as you present, save your PowerPoint as a video instead, as suggested in Microsoft Office’s guides.
This is an option available on PowerPoint 2010 onward. On the File menu, click Save & Send , then select Create a Video.
You can still play your deck on a TV in this format by saving your video to a USB flash drive or burning it on a DVD. Most flat-screen televisions have USB ports to attach your flash drive and open video files.
On the other hand, those without a flash drive can burn their video presentation into a CD or DVD. A self-presenting deck in this form aids your presentation while letting you focus on content and delivery.
3. View It on Apple TV

Enterprise Presentation Design at Scale… Click Here To View Our Amazing Portfolio!
Apple TV is a micro-console that uses a Wi-Fi connection or local network to stream media to your television screen. Apple developed it to bring the innovation of apps to TV . To use Apple TV for your PowerPoint, you’ll still need to save it as a video file.
Make sure that the file format is compatible with Apple TV. If you’re not sure what to save your presentation as the usual file format is .MP4. You can also upload your video presentation on iTunes and sync it with Apple TV.
From there, you can watch and present your video hands-free as well. However, since this option needs the macro-console around the television, you may need to reserve it for intimate family gatherings or occasions where there’s no pressure to set up quickly.
Bonus Tip: Two Different Screens

Have an Upcoming Conference? Click Here To View Our Amazing Portfolio!
Although PowerPoint was initially meant to be projected from a computer screen to a bigger one, the two screens don’t have to show the same thing.
For example, if you have helpful comments attached to your slides, you’ll be able to view them using the Presenter View feature without projecting your notes to the audience. Seeing your original screen can give you more than just a guide to follow during your pitch.
Your notes act as prompts when you encounter mental blocks. You don’t have to read directly from them, but specific keywords may help trigger a thought you plan to expound on. However, remember to move away behind your laptop and engage the audience with your body language.
If there aren’t any helpful notes on your slides, you can either have someone click on the next slide for you or use a remote control to move across slides according to your pace. Either way, the purpose of having two screens is to interact with the audience without being glued to your PowerPoint.
Remember that your deck is only there to support your presence, not replace you completely. No matter where you decide to project your slides, you’re still obliged to connect with the audience emotionally and physically. This ensures you leave a memorable impression on your listeners during and after your speech.
The Wider, the Better
We service the globe… click here to view our amazing portfolio.
You can play your PowerPoint anywhere—from the small screen of a mobile device to the wide screen of a TV. If you’re aiming for the latter, connect directly from your TV to your PC through an HDMI cable. Go through your presentation slide by slide by controlling your TV deck as you would on your computer.
You can also save your presentation as a video and copy it in a USB, burn it to a DVD, or stream it through Apple TV. This leaves your hands free enough to engage your audience with hand gestures and appropriate body language. The last option can take some time setting up, so you might not be able to use it all the time.
Television has evolved to far more uses than viewing shows. Use it to showcase your deck to family and friends in the confines of your living room, or use it in a corporate setting.
If you’re having trouble with your presentation needs, our SlideGenius experts are here to lend an ear. Contact us today for a free quote !
“Apple – Apple TV.” Apple . www.apple.com/tv/ “Turn Your Presentation into a Video.” Office Blogs . www.support.office.com/en-us/article/Turn-your-presentation-into-a-video-c140551f-cb37-4818-b5d4-3e30815c3e83
Popular Posts
Save your deck: methods to recover an unsaved powerpoint file.

Twitter: Lessons from Social Media

Oscar Speech Sounds A Lot Like…..

Olympians Can Teach Presenters a Thing or Two

Overcoming a Public Speaking Disaster: A Lesson from Michael Bay

The Similarities Between Presentations and Advertisments : Super Bowl Edition
- Insider Reviews
- Tech Buying Guides
- Personal Finance
- Insider Explainers
- Sustainability
- United States
- International
- Deutschland & Österreich
- South Africa

- Home ›
- tech ›
- how-to »
How to loop a PowerPoint slideshow so that it automatically starts over as soon as it ends

- To loop a PowerPoint slideshow, you'll need to enable looping in the "Set Up Slide Show" menu.
- Once you set your PowerPoint to loop, it'll start over from the beginning automatically after playing the last slide.
If you've designed a Microsoft PowerPoint presentation that's meant to be viewed repeatedly, such as on a kiosk or in a museum installation, you can adjust the settings in PowerPoint so that your slideshow "loops" instead of ending after one viewing.
Getting a PowerPoint to loop is easy. Read on to find out how, using PowerPoint for both Mac and PC.

Check out the products mentioned in this article:
Microsoft office (from $149.99 at best buy), apple macbook pro (from $1,299.00 at apple), acer chromebook 15 (from $179.99 at walmart), how to loop a powerpoint presentation.
1. Open the Microsoft PowerPoint presentation that you want to loop.
2. With your PowerPoint presentation open, click on the "Slide Show" tab, then click on "Set Up Slide Show."

4. To test whether your PowerPoint can loop successfully, click on the "From Beginning" or "Play From Start" button in the Slide Show tab. Click through the slideshow until you reach the end. When your PowerPoint reaches its final slide, it should start over from the beginning automatically. When you're confident that looping is enabled, and you're ready to close the slide show, press the Esc key.
Related coverage from Tech Reference :
How to add a border to slides in powerpoint, and give your slideshow a sleek design, how to embed a youtube video into your microsoft powerpoint presentations using a mac or pc, how to convert google slides to a powerpoint presentation in 4 easy steps, how to create a custom powerpoint template to use or share with others, how to copy or duplicate a powerpoint slide and put it anywhere in your slideshow.

- Current Location in Google
- Hide Whatsapp Messages
- Phone is hacked or not
- Whatsapp Deleted Messages
- Download photos from Whatsapp
- Instagram Messages
- How to lock facebook profile
- Unfollowed on Instagram
- Best printers for Home
- Best Mixer Grinder
- Best wired Earphones
- Best 43 Inch TV in India
- Best Wi Fi Routers
- Best Vacuum Cleaner
- Best Home Theatre in India
- Smart Watch under 5000
- Best Laptops for Education
- Best Laptop for Students

- Advertising
- Write for Us
- Privacy Policy
- Policy News
- Personal Finance News
- Mobile News
- Business News
- Ecommerce News
- Startups News
- Stock Market News
- Finance News
- Entertainment News
- Economy News
- Careers News
- International News
- Politics News
- Education News
- Advertising News
- Health News
- Science News
- Retail News
- Sports News
- Personalities News
- Corporates News
- Environment News
- Top 10 Richest people
- Cibil Score vs Cibil Report
- Top 10 Largest Economies
- Lucky Color for 2023
- How to check pan and Aadhaar
- Deleted Whatsapp Messages
- How to restore deleted messages
- 10 types of Drinks
- Instagram Sad Face Filter
- Unlimited Wifi Plans
- Recover Whatsapp Messages
- Google Meet
- Check Balance in SBI
- How to check Vodafone Balance
- Transfer Whatsapp Message
- NSE Bank Holidays
- Dual Whatsapp on Single phone
- Phone is hacked or Not
- How to Port Airtel to Jio
- Window 10 Screenshot
Copyright © 2024 . Times Internet Limited. All rights reserved.For reprint rights. Times Syndication Service.
- PowerPoint Themes
- Latest PowerPoint Templates
- Best PowerPoint Templates
- Free PowerPoint Templates
- Simple PowerPoint Templates
- PowerPoint Backgrounds
- Project Charter
- Project Timeline
- Project Team
- Project Status
- Market Analysis
- Marketing Funnel
- Market Segmentation
- Target Customer
- Marketing Mix
- Digital Marketing Strategy
- Resource Planning
- Recruitment
- Employee Onboarding
- Company Profile
- Mission Vision
- Meet The Team
- Problem & Solution
- Business Model
- Business Case
- Business Strategy
- Business Review
- Leadership Team
- Balance Sheet
- Income Statement
- Cash Flow Statement
- Executive Summary
- 30 60 90 Day Plan
- SWOT Analysis
- Flow Charts
- Gantt Charts
- Text Tables
- Infographics
- Google Slides Templates
- Presentation Services
- Ask Us To Make Slides
- Data Visualization Services
- Business Presentation Tips
- PowerPoint Tutorials
- Google Slides Tutorials
- Presentation Resources
How To Loop A PowerPoint Slideshow? Detailed Guide
This Blog explains the methods to loop your presentation slideshows in detail. It covers all the techniques to create slideshow loops for PowerPoint as well as Google Slides presentations. We have also included tips to enhance your presentation slideshows.

Microsoft PowerPoint is a popular application for creating and delivering presentations. PowerPoint has numerous options for adding flair and taking your presentations a notch higher, such as the ability to incorporate YouTube videos, GIFs, etc. If you loop your PowerPoint, every slide will display for a predetermined duration. After the presentation, it will automatically resume from the beginning.
But the question is, can you use the looping function effectively? When used correctly, this feature eliminates the need for presenters to click a mouse or computer key to transition between slides. This feature is easy to set up and customize.

Today’s guide will teach us how to loop a PowerPoint slideshow and various tips and tricks for effective looping.
Why You Need to Loop Your Slideshow in PowerPoint?
Before learning how to loop a PowerPoint slideshow, let’s see under what scenarios one needs to loop their slideshow:
One helpful tool in PowerPoint that helps to guarantee a smooth and continuous presentation experience is the ability to loop your slideshow. The constant playback draws and maintains audience attention whether you present information in automated presentations, build interactive kiosks, or show information in exhibitions. Looping makes it possible to communicate information effectively and reinforce essential points for audience members who might join the presentation at different times.
How to Make a PowerPoint Loop?
You can learn how to make a PowerPoint loop through the instructions below. You can use the loop for various events, such as trade exhibitions, information displays, or kiosks.
- Open the PowerPoint presentation that you wish to loop first.
- Go to the Slide Show Tab: The PowerPoint window has several tabs at the top. To access choices relating to presenting your slides, select the “Slide Show” tab.
- Access Setup Show: Several commands and choices are under the “Slide Show” tab. Search for the “Set Up Slide Show” button or menu item in the group labeled “Start Slide Show.” Click on it.
- Display Type: Select “Presented by a speaker (full screen).”
- Preview slides: If you want the slides to play automatically, select “Manually” or enter the desired duration for each slide’s PowerPoint presentation loop timing.
- Enable your presentation to loop indefinitely unless you manually end it by hitting the Escape (‘Esc’) key by enabling this option.
- Click OK: After adjusting these settings to store your options, click the “OK” button.
- Begin Your Loop: Your slides will be set to loop unless you manually stop it by pressing the ‘Esc’ key. To stop it, click “From Beginning” or “From Current Slide” under the “Slide Show” tab to begin your presentation.
How to Loop a PowerPoint SlideShow from Selected Slides
You can choose which slides you want to loop around in PowerPoint. Eliminating manual intervention and maintaining audience interaction can be achieved by carefully choosing which slides to show throughout the presentation. Follow these steps to learn how to loop a PowerPoint slideshow from selected slides:
- Select the “Slide Show” option to start a loop for a particular set of slides. To initiate the loop, click the first slide in the thumbnail pane on the left.
- Click the final slide you wish to add to the loop while holding your keyboard’s “Shift” key. Next, select “Setup Show” and turn on the looping feature.
- Choose the “Custom Show” option and give it a name in the “Set Up Show” dialogue box. Navigate to the “Slide Show” menu and select “Custom Slide Show” to begin your looping presentation from the selected slides.
How to Set Up Auto-Loop for Continuous Playback
Now you know how to loop a slideshow in PowerPoint from selected slides, let us see how you can set up auto-loop for continuous playback:
- Select the Slide Show tab.
- Press the Set Up Slide Show button. You’ll see an options window appear.
- Keep clicking Loop till you reach “Esc.”
Note: Under Show Type, select Presented by a speaker or Browsed by an individual if you want the speaker or individual to continue controlling the presentation and clicking between slides. Clicking “Browsed” at a kiosk checks the Loop until the “Esc” box appears continuously. Moreover, auto-looping may annoy your viewers if your presentation is very repetitive. Use it with discretion and only when it makes sense for your writing subject.
How to Loop A PowerPoint SlideShow Using 2007 Version (older versions).
Use these detailed instructions to loop your slides if you’re using an older version of Microsoft PowerPoint:
- Open your PowerPoint presentation on your 2007 Microsoft PowerPoint .
- Select the tab labeled Slide Show. Select the “Set Up Slide Show” option from the “Set Up” menu.
- Go to the “Show options” section and select “Loop continuously until ‘Esc'” from the dialogue box that appears. Click Ok.
- Select your initial slide from the “Slides” preview side panel. To select your final slide, press and hold Shift.
- Select the tab labeled “Animations.” Turn off “On Mouse Click” and check the “Automatically After” box.
- The “After” box in the “Timing” panel has up and down arrows that you can use to change the time each slide appears. It will automatically loop back to the first slide when your slideshow reaches the last one.
How to Stop or Pause your Slideshow loop at any point.
Learning how to make a PowerPoint loop is of no use if you don’t know how to stop or pause your slideshow loop at any point:
You can use simple keyboard commands to pause or stop your slideshow loop at any time during a PowerPoint presentation. You can manually stop the looping slideshow by hitting the “Esc” key (also known as the Escape key) on your keyboard. It gives presenters a simple and quick option to stop the continuous playback so they can answer queries, have conversations, or go to particular slides that are not playing continuously.
Advanced Techniques for Creating a Seamless Loop in PowerPoint
One of the techniques used for creating a seamless loop in PowerPoint is incorporating videos and GIFs. PowerPoint’s animations, transitions, and triggers can create seamless looping. Here is how:
- Select the video you imported and added to a slide.
- Open the “Animations” tab from the main menu.
- Choose “Play” from the animation gallery’s “Media” section after clicking the “ Add Animation ” button.
- On the right side of the screen, click the “Animation Pane” to open it.
- Right-click the “Play” button and choose “Timing” in the “Animation Pane.”
- Choose “Until End of Slide” or “Until Next Click” as the “Repeat” option in the “Timing” tab.
- Use Triggers to adjust the start and stop times of the video.
Tips and Tricks for Effective Slideshow Looping in PowerPoint
As you can see, creating a PowerPoint loop video couldn’t be easier. It only takes three easy steps to complete. Nonetheless, there are always specific tips you may apply to improve the appeal and attention-grabbingness of your videos.

1. Selecting the Right Video
The length and content of the video are the primary considerations when discussing the “right” video. Therefore, consider the duration of your video when creating a continuous loop.
Yes, longer videos can be more captivating, but they may add to the presentation’s file size and degrade performance. Shorter video clips, however, are less likely to affect performance and can loop more naturally. Regarding the video’s substance, make sure it supports the main idea of your presentation and is pertinent to the subject of your talk. The video aims to increase viewer comprehension and engagement without becoming overbearing or intrusive.
2. Compressing Video Files
Large videos can detract from the overall image of your presentation by making it excessively slow and challenging to share. Therefore, consider using a specialized video compression tool or the built-in PowerPoint compression feature to optimize your presentation by compressing the files. It doesn’t always imply that your presentation will look grainy. Still, it can cause a noticeable quality loss, so keep that in mind when creating the presentation in the first place.
3. Examining the Presentation
Make sure the video loops accurately and smoothly by testing it before you deliver your presentation. Go over the entire presentation, looking for any inconsistent or problematic playback. If you complete your testing on time, you can safely make all the required changes and retest it until the loop video functions as planned.
4. Looping Videos to Create Ambience and Background
You can also use videos that loop to set the mood for your presentation. For instance, a natural setting or a soft animation can produce an aesthetically pleasing and captivating ambiance. Nevertheless, the presentation’s general subject and the background clip are complementary rather than distracting.
To sum up, looping your PowerPoint slideshow is simple. PowerPoint’s “Set Up Slide Show options” allow you to program it to loop indefinitely for a predetermined number of times.
Use transitions carefully, arrange your slides in the correct order, and adhere to best practices while making your looping PowerPoint to give it a polished, professional appearance. Your looping slideshow can operate flawlessly at events without supervision with the correct settings.
How to Loop Slideshow In Powerpoint?
To loop a slideshow in PowerPoint, go to the “Slide Show” tab, select “Set Up Slide Show,” check “Loop continuously until ‘Esc’,” and click “OK.”
Can I loop specific slides within my PowerPoint presentation?
Yes, PowerPoint allows you to loop specific slides.
How do I stop or pause a looped slideshow in PowerPoint?
To interrupt a looped slideshow at any point, simply press the “Esc” key on your keyboard.
Can I customize the duration of each slide in a looped PowerPoint presentation?
Yes, you can control the timing of each slide by adjusting the slide transition settings, allowing for a tailored and dynamic looping experience.
Can SlideUpLift templates be used in looped presentations?
Yes, SlideUpLift provides PowerPoint templates that are compatible with looped presentations. These professionally designed templates can enhance the visual appeal of your slides, making your looped presentation more engaging and impactful.
Table Of Content
Related presentations.

Business Review PowerPoint Template

Business Case PowerPoint Deck Template

Project Status Review Deck Template
Related blogs.

10 Bad PowerPoint Slides Examples to Avoid

10 Best Animated PowerPoint Templates

10 Best Business PowerPoint Templates for Presentations

10 Best Free PowerPoint Templates
Tags and categories, privacy overview.
Necessary cookies are absolutely essential for the website to function properly. This category only includes cookies that ensures basic functionalities and security features of the website. These cookies do not store any personal information
Any cookies that may not be particularly necessary for the website to function and is used specifically to collect user personal data via ads, other embedded contents are termed as non-necessary cookies. It is mandatory to procure user consent prior to running these cookies on your website.
- Get Great Eclipse Photos with Your Phone
- The Best Noise-Canceling Headphones to Buy
Loop a PowerPoint Slide Show
- Brock University
What to Know
- In PowerPoint, go to Slide Show > Set Up Slide Show > Browsed at a Kiosk (Full Screen ) > OK .
- Set the time each slide appears on the screen by selecting Slide Show > Rehearse Timings on the first slide.
- Use Next to move to the next slide and Pause to pause recording, or type a length of time in the Slide Time box.
This article explains how to loop a PowerPoint slideshow in PowerPoint 2019, PowerPoint 2016, PowerPoint 2013, PowerPoint 2010, PowerPoint for Microsoft 365, PowerPoint 2019 for Mac, PowerPoint 2016 for Mac, and PowerPoint for Mac 2011.
How to Create a Self-Running PowerPoint Slideshow
PowerPoint slideshows are not always used by a live presenter. Slideshows set to loop continuously can run unattended in a booth or kiosk. You can even save a slideshow as a video to share.
To create a continuously looping presentation, you need to set it up and record slide timings.
To run the slideshow unattended, set timings for slide transitions and animations to run automatically.
How to Set Up the Presentation
Open the PowerPoint presentation you want to loop continuously.
Go to Slide Show .
Select Set Up Slide Show . The Set Up Show dialog box opens.
Select Browsed at a Kiosk (Full Screen) . This enables the presentation to loop continuously until the viewer presses Esc .
Select OK .
How to Rehearse and Record Timings
To ensure that your automated presentation is the right length, record timings to set the amount of time each slide appears on the screen.
PowerPoint for Mac does not have the rehearsal option. Instead, go to Transitions , choose the transition you want to use, set the duration you want, and select Apply to All .
Go to the first slide of the presentation.
Select Rehearse Timings . The slideshow starts and records the time spent on the slide. The time appears in the Slide Time box on the Recording toolbar.
Select Next on the Recording toolbar when you want to move to the next slide.
Select Pause any time you want to pause or resume recording.
Type a length of time in the Slide Time box if you want to display a slide for a specific amount of time.
Select Repeat if you want to restart the recording time for the current slide only.
Select Close when you're done recording.
You'll be asked if you want to save the new slide timings. Select Yes to save the slide timings at the end of the presentation.
If you have a microphone (built-in or external), record a voiceover on your PowerPoint presentation that plays as the slideshow loops continuously.
Get the Latest Tech News Delivered Every Day
- How to Make a Slideshow on PowerPoint
- Add Hyperlinks to PowerPoint Presentations
- Tips for Memorial PowerPoint Presentations
- Create a Wedding PowerPoint Presentation
- How to Do a Voiceover on PowerPoint
- How to Add Music to PowerPoint
- Adding Sounds, Music or Narration to PowerPoint Slide Shows
- How to Use Speaker Notes in PowerPoint
- How to Add Audio to PowerPoint
- Different Ways to View Slides in PowerPoint
- Resuming Your PowerPoint Show After a Pause
- Use Keyboard Shortcuts to Speed up PowerPoint Presentations
- How to Change a Black-and-White Picture to Color in PowerPoint
- Add, Delete or Change the Order of PowerPoint Slides
- Make the Most of PowerPoint's Slide Transition Options
- How to Print PowerPoint Slides
How to Loop a PowerPoint Presentation
Just like an animated GIF or video clip, you can loop a slideshow in Microsoft PowerPoint. This is ideal if you set the presentation to automatically play because it starts at the beginning each time it ends to create an infinite loop.
Here’s how to loop a PowerPoint presentation on Windows and Mac. Currently, PowerPoint on the web doesn’t offer a Loop feature.
Set the Timing to Advance the Slides
Before you set your PowerPoint presentation to loop, you may want to adjust the timing to advance through the slides. You can use the same time for each slide or display particular slides for a longer amount of time.
- Open your presentation in PowerPoint on Windows or Mac and go to the Transitions tab.
- In the Timing section of the ribbon, check the box for After and enter the time in seconds to the right. You can also use the arrows to move the time up or down in small increments.

- To set different times for slides, select the next slide and use the above step to choose the After timing. Continue this process for the remaining slides.
- To set the same timing for all slides in the presentation, select Apply To All in the Timing section.

- If you only want continuous play to advance the slides, you can uncheck the box directly above for On Mouse Click . However, if you want the ability to advance the slides with a mouse click and after a certain amount of time, you can leave the box checked.

Once you have the timings set to advance the slides, you can turn on the Loop setting.
- Go to the Slide Show tab and select Set Up Slide Show in the Set Up section.

- Under Show type , choose an option to play your presentation.
- If you plan to present the slideshow or have an individual view the show, choose one of the first two options. Then, check the box for Loop continuously until ‘Esc’ in the section beneath.
Confirm that the Using timings, if present setting is marked under Advance Slides.

- If you want the slideshow to play automatically , choose the third option, Browsed at a kiosk . You’ll then see the Loop continuously until ‘Esc’ and Using timings, if present settings are automatically marked and disabled for changing.

- Adjust any other options per your preference and use the OK button to save the settings.
When you’re ready to begin the slideshow and let it play, check out our how-to for starting the PowerPoint presentation as well as navigating it if needed.
Just Let It Play
By looping a PowerPoint presentation, you don’t have to lift a finger to advance through the slides. You can display it at a kiosk, in a waiting room, or at a convention booth and just let it play over and over.
For more, look at how to add narration for an engaging PowerPoint presentation .

Sandy Writtenhouse is a freelance technology writer and former Project, Department, and Program Manager. She turned her education, job experience, and love of technology into a full-time writing career. With all sorts of gadgets in her home and her hands, she seeks to help others make life easier through technology. Read Sandy's Full Bio
Read More Posts:

Leave a Reply
Your email address will not be published. Required fields are marked *
IMAGES
VIDEO
COMMENTS
1. Start the video. 2. While it is playing, press the "INFO" button on the remote. 3. You will see player controls at the top of the screen along with a gear icon to access settings. 4. Click the gear icon and you will see settings for "REPEAT". I have it loop all day and set a timer to turn off the TV every day at 5pm.
Step 1: Plug in your HDMI cable into your laptop's HDMI Port (as shown below). Step 2: Connect the other end of the cable to your TV's HDMI port. Usually, there are two HDMI ports, one located on the side and the other behind the TV. Step 3: Switch to 'HDMI' from your TV's Remote.
In the Transitions tab in PowerPoint, you can select the type of transition (such as Fade) as well as timing options: Step 2: Set up a presentation to loop during a slide show. To set up a PowerPoint presentation to loop during a slide show: Click the Slide Show tab in the Ribbon and then click Set Up Slide Show. A dialog box appears.
See how this method works. Step 1: Plug the Chromecast Device into the TV. The Chromecast Device will use the HDMI port of your TV. After plugging the device in, select the right channel for the source. Step 2: Casting Your Screen to the TV. Open the presentation on your computer or laptop.
Step 3: Choose 'Loop continuously until 'Esc". In the 'Set Up Show' options, check the box for 'Loop continuously until 'Esc". By checking this option, you're telling PowerPoint to keep cycling through your slides until you press the Escape key to stop it.
First, open your PowerPoint presentation in which you would like to loop. Once open, navigate to the "Set Up" group of the "Slide Show" tab and then select the "Set Up Slide Show" button. The "Set Up Show" window will appear. In the "Show options" group, check the box next to "Loop Continuously until Esc.".
With PowerPlayer you play PowerPoint on TV in three (3) simple steps: Create your presentation with PowerPoint. Upload your presentation to PowerSignage CMS. Plug PowerPlayer into your TV's HDMI. PowerPlayer automatically downloads PowerPoint presentations from the CMS and displays them on the TV screen.
Open the presentation you want to loop in PowerPoint. Click on the "Slide Show" tab at the top of your screen. Press the "Set Up Slide Show" button. Navigate to the "Show options ...
How to loop a PowerPoint presentation. 1. Open the Microsoft PowerPoint presentation that you want to loop. 2. With your PowerPoint presentation open, click on the "Slide Show" tab, then click on ...
🔄 Learn how to loop your PowerPoint slideshow seamlessly with our detailed guide! Whether you're presenting at a conference or setting up an interactive kio...
Open your PowerPoint presentation and click the "Slide Show" tab. Click the "Set Up Slide Show" button. A pop-up window will appear. Under "Show Type", select "Loop continuously until 'Esc'" to make it loop endlessly. To customize slide schedule, check "Automatically advance", then use the arrow key to adjust the display ...
Luckily, learning how to loop a PowerPoint is very easy! Just follow these 3 steps: 1. Open your presentation and go to the Slide Show tab. 2. Select the Set Up Slide Show option for the Set-Up Options window to appear. 3. In this window, go to the "Show options group" and tick the Loop continuously until 'Esc' (the first option).
In this Microsoft PowerPoint tutorial we are going to teach you how to loop a PowerPoint Presentation so your PowerPoint Slideshow will run again and again ...
Then, click on From Beginning to start the presentation. How to loop slides in PowerPoint . If you want to learn how to loop your slides in PowerPoint, follow these steps: Go to the Slide Show tab and select Set Up Slide Show. When the Set Up Show window appears, go to the Show options group and tick the Loop continuously until 'Esc' option ...
Simply locate your TV and PC's HDMI ports and plug in the two ends of the cable. Make sure you've pressed the AV button on your television remote control to select the correct HDMI output. Once you've connected the two devices, your laptop screen should automatically show on your TV. Control the flow of your presentation from your PC like ...
Open the Microsoft PowerPoint presentation that you want to loop. 2. With your PowerPoint presentation open, click on the "Slide Show" tab, then click on "Set Up Slide Show."
Select the "Slide Show" option to start a loop for a particular set of slides. To initiate the loop, click the first slide in the thumbnail pane on the left. Click the final slide you wish to add to the loop while holding your keyboard's "Shift" key. Next, select "Setup Show" and turn on the looping feature.
How to Set Up the Presentation. Open the PowerPoint presentation you want to loop continuously. Go to Slide Show . Select Set Up Slide Show. The Set Up Show dialog box opens. Select Browsed at a Kiosk (Full Screen). This enables the presentation to loop continuously until the viewer presses Esc . Select OK .
Go to the Slide Show tab and select Set Up Slide Show in the Set Up section. Under Show type, choose an option to play your presentation. If you plan to present the slideshow or have an individual view the show, choose one of the first two options. Then, check the box for Loop continuously until 'Esc' in the section beneath.
In this video I will show you how to loop your Powerpoint presentation so it will automatically go back to the beginning once it reaches the end until you hi...
Or you could add an Amazon Fire Stick and run SignageTube on that. For a Windows solution, you could use a player like the Intel Compute Stick or another stick PC to run the PowerPoint and loop it. check out https://cast-hub.com. they have apps for several smart tvs where you can remotely add a presentation and have it play on the tv.