How to Save PowerPoint Presentation on a USB Drive: Step-by-Step Guide
Are you looking to easily transport your powerpoint presentations and share them with others saving your powerpoint presentation on a usb drive can provide a convenient way to do just that. in this step-by-step guide, we will walk you through the process of saving your presentation on a usb drive..


Step 1: Insert the USB drive
The first step is to insert your USB drive into one of the available USB ports on your computer. Ensure that the USB drive is properly connected and recognized by your computer.
Step 2: Open your PowerPoint presentation
Open the PowerPoint presentation that you wish to save on the USB drive. Simply double-click the PowerPoint file or open PowerPoint and navigate to “Open” to locate and open your presentation.
Step 3: Click on “File” in the menu bar
Once your presentation is open, click on the “File” tab located in the top-left corner of the PowerPoint window. This will open a drop-down menu with various options.
Step 4: Select “Save As”
In the “File” drop-down menu, click on the “Save As” option. This will open a new window allowing you to choose the saving location and format for your presentation.
Step 5: Choose the USB drive as the saving location
In the “Save As” window, navigate to the left-hand side and select the USB drive under the “Save As” options. You may need to locate the USB drive by its name or drive letter, which is usually displayed next to its icon.
Step 6: Specify the file name
Once you have selected the USB drive as the saving location, you can specify the file name for your presentation. Type a suitable name for your file in the “File name” field.
Step 7: Choose the file format
In the same “Save As” window, you can choose the file format for your presentation. PowerPoint gives you various options, such as the default .pptx format or older formats like .ppt or .pps. Select the format that best suits your needs.
Step 8: Click on “Save”
After selecting the saving location, specifying the file name, and choosing the file format, click on the “Save” button located at the bottom-right corner of the “Save As” window. PowerPoint will now save your presentation on the USB drive.
Step 9: Safely remove the USB drive
Once the saving process is complete, make sure to safely remove the USB drive from your computer. Right-click on the USB drive icon in the system tray or navigate to “Safely Remove Hardware” in the taskbar, and follow the prompts to safely eject the USB drive.
Now you have successfully saved your PowerPoint presentation on a USB drive! You can now carry your presentation anywhere and easily share it with others by simply plugging in the USB drive.
- Pro tip: It’s always a good practice to keep an extra copy of your PowerPoint presentations on multiple storage devices or backup platforms to ensure their security and availability.
- Compatibility note: When sharing your presentation with others, make sure to consider the compatibility of the file format you have chosen. Older versions of PowerPoint may not be able to open presentations saved in the latest .pptx format.
We hope this step-by-step guide has been helpful to you. Saving your PowerPoint presentation on a USB drive is a simple and effective way to transport and share your work. If you have any further questions, feel free to leave a comment below.
How helpful was this article?
- PRO Courses Guides New Tech Help Pro Expert Videos About wikiHow Pro Upgrade Sign In
- EDIT Edit this Article
- EXPLORE Tech Help Pro About Us Random Article Quizzes Request a New Article Community Dashboard This Or That Game Popular Categories Arts and Entertainment Artwork Books Movies Computers and Electronics Computers Phone Skills Technology Hacks Health Men's Health Mental Health Women's Health Relationships Dating Love Relationship Issues Hobbies and Crafts Crafts Drawing Games Education & Communication Communication Skills Personal Development Studying Personal Care and Style Fashion Hair Care Personal Hygiene Youth Personal Care School Stuff Dating All Categories Arts and Entertainment Finance and Business Home and Garden Relationship Quizzes Cars & Other Vehicles Food and Entertaining Personal Care and Style Sports and Fitness Computers and Electronics Health Pets and Animals Travel Education & Communication Hobbies and Crafts Philosophy and Religion Work World Family Life Holidays and Traditions Relationships Youth
- Browse Articles
- Learn Something New
- Quizzes Hot
- This Or That Game New
- Train Your Brain
- Explore More
- Support wikiHow
- About wikiHow
- Log in / Sign up
- Computers and Electronics
- Presentation Software
- PowerPoint Presentations
How to Save a PowerPoint Presentation on a Thumbdrive
Last Updated: June 11, 2023
wikiHow is a “wiki,” similar to Wikipedia, which means that many of our articles are co-written by multiple authors. To create this article, 13 people, some anonymous, worked to edit and improve it over time. This article has been viewed 180,669 times. Learn more...
Saving a PowerPoint presentation to a thumb drive/data-stick is easy. All you need to do is open it up and save it as if you were saving it to your computer. But you need to make sure that you safely remove the thumb drive as well, or else you could corrupt the file. This wikiHow article will teach you how to save a PowerPoint presentation to a thumb drive.

Community Q&A
You Might Also Like

About This Article
- Send fan mail to authors
Is this article up to date?

Featured Articles

Trending Articles

Watch Articles

- Terms of Use
- Privacy Policy
- Do Not Sell or Share My Info
- Not Selling Info
wikiHow Tech Help Pro:
Level up your tech skills and stay ahead of the curve

Package a presentation for CD or USB flash drive
You can create a package for your presentation and save it to a CD or USB drive so that other people can watch your presentation on most any computer. Making a package ensures that all external elements of the presentation, such as fonts and linked files, are transferred to the disk or flash drive. This is also called "publishing a presentation to a file."
Save your package to a CD
Insert a blank recordable CD (CD-R), a blank rewritable CD (CD-RW), or a CD-RW (that contains existing content that can be overwritten) in the disk drive.
In PowerPoint, click File , click Export , click Package Presentation for CD , and then click Package for CD .
In the Package for CD dialog box, type a name for your CD in the Name the CD box.
To add one or more presentations to package together, click Add , select the presentation, and then click Add . Repeat this step for each presentation that you want to add.
Tip: If you add more than one presentation, they'll play in the order in which they are listed in the Files to be copied list. Use the arrow buttons on the left side of the dialog box to re-order the list of presentations.
To include supplementary files such as TrueType fonts or linked files, click Options .

Under Include these files , select the applicable check boxes:
To inspect your presentation for hidden data and personal information, select the Inspect presentation for inappropriate or private information check box.

Click OK to close the Options dialog box.
In the Package for CD dialog box, click Copy to CD .
Save your package to a USB flash drive
Insert a USB flash drive in a USB slot in your computer.
In the Package for CD dialog box, click Copy to Folder .
In the Copy to Folder dialog box, select Browse .
In the Choose Location dialog box, navigate to your USB flash drive, select it or a subfolder in it, and then click Select .
The folder and path you chose are added to the Location box in the Copy to Folder dialog box.
PowerPoint asks you a question regarding linked files. It is best to answer Yes to ensure that all necessary files for the presentation are included in the package that is saved to the USB flash drive.
PowerPoint begins copying files, and when it is done it opens a window showing the complete package on the USB flash drive.
PowerPoint for macOS doesn't offer a "package presentation for CD" feature.
In PowerPoint for macOS, all content is embedded by default. So if you insert a sound, picture, or video, a copy of that media file is included within the PowerPoint file. The "Package for CD" feature is unnecessary, since you already have the content in the PowerPoint file.
PowerPoint for the web doesn't support this "packaging" feature, but it has other ways for you to share a finished presentation with others:
Save a PowerPoint presentation as a PDF file
Save a local copy of your presentation with PowerPoint for the web
Embed a presentation in a web page or blog

Need more help?
Want more options.
Explore subscription benefits, browse training courses, learn how to secure your device, and more.

Microsoft 365 subscription benefits

Microsoft 365 training

Microsoft security

Accessibility center
Communities help you ask and answer questions, give feedback, and hear from experts with rich knowledge.

Ask the Microsoft Community

Microsoft Tech Community

Windows Insiders
Microsoft 365 Insiders
Was this information helpful?
Thank you for your feedback.
How to Transfer From PowerPoint to Flash Drives: A Step-by-Step Guide
Transferring a PowerPoint presentation to a flash drive is a straightforward process. Simply plug in your flash drive, open the PowerPoint file, click on ‘File’, then ‘Save As’, and choose your flash drive as the location. Save the file, and you’re done! It’s that simple, and now your presentation is portable and ready to go wherever you do.
After you complete the action, your PowerPoint presentation will be stored safely on your flash drive. This allows you to easily transport the file and use it on different computers without the need for internet access or email attachments.
Introduction
Ever been in a situation where you needed to present your ideas, but technology failed you? Maybe the email with your PowerPoint didn’t go through, or the internet was down, and you couldn’t access your cloud storage. In moments like these, having a physical copy of your presentation on a flash drive can be a lifesaver. In today’s fast-paced digital world, the ability to quickly and efficiently move files from one device to another is crucial, especially for professionals who often present in various locations.
Whether you’re a student, an educator, a business professional, or just someone who likes to be prepared, knowing how to transfer your PowerPoint presentation to a flash drive is an essential skill. So let’s dive in and learn how to ensure your presentation is always ready to roll, no matter what technological hurdles you may face.
Step by Step Tutorial: Transferring PowerPoint to Flash Drives
The following steps will help you transfer your PowerPoint presentation to a flash drive, ensuring you have a portable and accessible copy of your important files.
Step 1: Insert Flash Drive
- Insert your flash drive into a USB port on your computer.
Once you have inserted the flash drive, wait for your computer to recognize it. This will typically be indicated by a notification or a new drive appearing in ‘My Computer’ or ‘This PC’.
Step 2: Open PowerPoint File
- Open the PowerPoint presentation you wish to transfer.
Make sure that you have saved all the latest changes to your presentation before proceeding to transfer it to the flash drive.
Step 3: Click ‘File’
In PowerPoint, click on the ‘File’ tab at the top-left corner of the screen.
The ‘File’ tab is where you can find various options for managing your PowerPoint documents, including saving and exporting files.
Step 4: Select ‘Save As’
From the menu, select ‘Save As’ to choose where you want to save your presentation.
‘Save As’ allows you to choose a specific location for your file, which is necessary when transferring files to external storage devices.
Step 5: Choose Flash Drive Location
In the ‘Save As’ dialog box, choose your flash drive from the list of available locations.
Make sure you select the correct drive letter that corresponds to your flash drive to avoid saving the file in the wrong location.
Step 6: Save File
- Click ‘Save’ to transfer the presentation to your flash drive.
After clicking ‘Save’, the transfer will begin, and a progress bar may appear depending on the file size. Once completed, your PowerPoint is now on your flash drive, ready to go.
Additional Information
When transferring your PowerPoint presentation to a flash drive, there are a few more things to keep in mind. Firstly, ensure that your flash drive has enough free space for the file. PowerPoint presentations, especially those with a lot of images or videos, can be quite large. If your flash drive is nearly full, you might need to delete some files or use a drive with a larger capacity.
Also, consider formatting your flash drive to the appropriate file system. Most come pre-formatted with the FAT32 file system, which is widely compatible but has a file size limit of 4GB. For larger files, you may need to format your drive to NTFS or exFAT. Remember, formatting will erase all data on the drive, so back up any important files first. Always safely eject your flash drive after the transfer to avoid data corruption.
- Click on the ‘File’ tab in PowerPoint.
- Select ‘Save As’ from the menu.
- Choose your flash drive from the list of available locations.
Frequently Asked Questions
What if my computer doesn’t recognize my flash drive.
First, try inserting the flash drive into a different USB port. If it’s still not recognized, check if the flash drive appears in ‘Disk Management’. If it does, it may need to be assigned a drive letter or formatted.
Can I transfer multiple PowerPoint presentations to the same flash drive?
Yes, as long as your flash drive has enough storage space, you can transfer multiple presentations. Just ensure that they are clearly labeled to avoid confusion when accessing them.
Will my PowerPoint animations and transitions work on another computer?
Animations and transitions should work on another computer, provided that it has a compatible version of PowerPoint installed. However, custom fonts or media files might not transfer, so it’s a good idea to embed them in the presentation.
Can I edit the PowerPoint presentation directly from the flash drive?
Yes, you can open and edit the presentation directly from the flash drive. However, to avoid potential data loss, it’s recommended to copy the file to the local computer before editing.
How can I ensure my presentation is compatible with older versions of PowerPoint?
When saving your presentation, you can choose to save it in a compatibility mode for older versions of PowerPoint, such as .ppt instead of .pptx. This helps to ensure it can be opened on computers with earlier versions.
Transferring your PowerPoint presentation to a flash drive is a smart move that can save you from many potential headaches. It’s a simple process that anyone can master with just a few clicks. Whether you’re a professional preparing for a big pitch or a student gearing up for a class presentation, having a backup on a flash drive ensures you’re ready to impress, no matter where you are.
So go ahead, take the plunge, and make your presentations as portable and safe as possible. Who knows, this skill might just be your ticket to a flawless performance next time you’re up to present!

Matthew Burleigh has been writing tech tutorials since 2008. His writing has appeared on dozens of different websites and been read over 50 million times.
After receiving his Bachelor’s and Master’s degrees in Computer Science he spent several years working in IT management for small businesses. However, he now works full time writing content online and creating websites.
His main writing topics include iPhones, Microsoft Office, Google Apps, Android, and Photoshop, but he has also written about many other tech topics as well.
Read his full bio here.
Share this:
Join our free newsletter.
Featured guides and deals
You may opt out at any time. Read our Privacy Policy
Related posts:
- How to Save Powerpoint as PDF with Notes
- How to Turn Off Flash Notification on iPhone (2024 Guide)
- How to Change the Name of a Flash Drive in Windows 7
- Can I Convert My Powerpoint to Google Slides?
- How to Get an Adobe Flash-Compatible Browser on iPhone: A Guide
- How to Put Files on a Flash Drive
- How to Email a PowerPoint Slideshow: A Step-by-Step Guide
- How to Convert PowerPoint Presentations to HTML: A Step-by-Step Guide
- How to Make a Powerpoint Slide Vertical in Powerpoint 2013
- How to Loop a Slideshow on Powerpoint 2013
- What is the Flash Notification on the iPhone?
- How to Save on a Flash Drive in Microsoft Word 2010
- How to Change Hyperlink Color in Powerpoint 2010 (An Easy 5 Step Guide)
- Can You Save a Powerpoint as a Video in Powerpoint 2013?
- iOS 17 – How to Stop Flash Notifications on iPhone
- How to Select Multiple Files in Google Drive
- How to Copy a PowerPoint to a New PowerPoint: A Step-by-Step Guide
- How to Make All Columns the Same Width in Excel 2013
- How to Drag Slides From One PowerPoint to Another: A Step-by-Step Guide
- How to Delete Files on a Flash Drive

USB Drivers
Apr 04, 2019
1.09k likes | 1.44k Views
USB Drivers. Michael Mitchell COP 5641 / CIS 4930. USB Device Basics. Universal Serial Bus (USB) connects between a computer and peripheral devices Created to replace various slow buses (parallel, serial, and keyboard connections) USB 2.0: up to 480Mb/s (35 MB/s)
Share Presentation
- interface audio interface audio
- controller driver
- struct usb endpoint descriptor
- struct usb device

Presentation Transcript
USB Drivers Michael Mitchell COP 5641 / CIS 4930
USB Device Basics • Universal Serial Bus (USB) connects between a computer and peripheral devices • Created to replace various slow buses (parallel, serial, and keyboard connections) • USB 2.0: up to 480Mb/s (35 MB/s) • USB 3.0: up to 6Gb/s (625 MB/s)
USB Device Basics • A USB device can never start sending data without first being asked by the host controller • Single-master implementation • Host polls various devices • A device can request a fixed bandwidth (for audio and video I/O) • Universal Serial Bus is a misnomer… • Actually a tree built out of point-to-point links • Links are four-wire cables (ground, power, and two signal wires)
USB Device Basics – The Protocol • USB protocol defines a set of standards that any device can follow • No need to write a driver for a device that is in a predefined class and follows that standard, • Predefined classes: storage devices, keyboards, mice, joysticks, network devices, and modems • No defined standard for video devices and USB-to-serial devices • A driver is needed for every device
USB Device Basics – Driver Types • Linux supports two types of USB drivers • Drivers on a host system • Control the USB devices that are plugged into it • Drivers on a device (USB gadget drivers) • Control how that single device looks to the host computer as a USB device • Some hardware devices can actually be both • Called USB OTG (On The Go), • E.g. Android 3.0+, some printers
Different kernel subsystems An interface for USB drivers to access HW USB Device Basics
USB Device Basics USB drivers bind to interfaces, not the device
USB Overview • A USB device has one or more configurations • E.g., power and bandwidth requirements • A configuration has one or more interfaces • E.g., audio data, knobs for speakers • An interface has one or more settings • Different quality of services • E.g., different frame sizes for digital cameras • Also zero or more endpoints • E.g., bulk, interrupt endpoints.
Endpoints • The most basic form of USB communication is through an endpoint • Unidirectional: Carries data in one direction • From the host to device (OUT endpoint) • From the device to the host (IN endpoint)
Endpoints • Four endpoint types • CONTROL • INTERRUPT • BULK • ISOCHRONOUS
Endpoints • CONTROL • Used for configuring the device, retrieving information and status about the device, or sending commands to the device • Every device has a control endpoint called endpoint 0 • Used by USB core to configure the device at insertion time • Transfers are guaranteed with reserved bandwidth
Endpoints • INTERRUPT • Transfer small amounts of data at a fixed rate • For USB keyboards and mice • Also used to control the device • Not for large transfers • Guaranteed reserved bandwidth
Endpoints • BULK • Transfer large amounts of data • No data loss • Not time guaranteed • A BULK packet might be split up across multiple transfers • Used for printers, storage, and network devices
Endpoints • ISOCHRONOUS • Transfer large amount of data • For real-time data collections, A/V devices • Unlike bulk endpoints, no guarantees (potential data loss) • Control and bulk endpoints are used for asynchronous data transfers • Interrupt and isochronous endpoints are periodic with reserved bandwidth
Endpoints • Endpoint information is in struct usb_endpoint_descriptor • embedded in struct usb_host_endpoint • Note: defined by the USB standard, so not Linux looking • Some important fields • bEndpointAddress (8-bit) • Use USB_DIR_OUT and USB_DIR_IN bit masks to determine the direction of data flow
Endpoints • bmAttributes • Type of the endpoint • & USB_ENDPOINT_XFERTYPE_MASK to determine if the endpoint is of type USB_ENDPOINT_XFER_ISOC, USB_ENDPOINT_XFER_BULK, or USB_ENDPOINT_XFER_INT • wMaxPacketSize • Maximum bytes that an endpoint can handle • Larger transfers will be split into multiple transfers
Endpoints • bInterval • For interrupt endpoints, this value specifies the milliseconds between interrupt requests for the endpoint
Interfaces • USB endpoints are bundled into interfaces • A interface handles only one type of logical connection (E.g., a mouse) • Some devices have multiple interfaces • E.g., a speaker • One interface for buttons and one for audio stream • USB interface may have alternate settings • E.g., different settings to reserve different amounts of bandwidth for the device
Interfaces • Described via struct usb_interface • Passed from USB core to USB drivers • Some important fields • struct usb_host_interface *altsetting • An array of settings for this interface • unsigned num_altsetting • Number of alternative settings
Interfaces • struct usb_host_interface *cur_altsetting • A pointer into the altsetting array, denoting the current setting • int minor • Minor number assigned by the USB core to the interface • Valid after a successful call to usb_register_dev
Configurations • USB interfaces are bundled into configurations • A USB device can have multiple configurations • Only one can be active at a time • Can switch between them • Described in struct usb_host_config • embedded in struct usb_device
endpointcontrol endpointinput endpointcontrol endpointinput Interface Audio Interface Audio endpointcontrol endpointinput endpointcontrol endpointinput Interface Video Interface Video USB Webcam Device Example Configuration Active Configuration Configuration Standby Configuration DeviceUSB webcam
USB and Sysfs • Both USB devices and its interfaces are shown in sysfs as individual devices • A USB mouse device can be represented as /sys/devices/pci0000:00/0000:00:09.0/usb2/2-1 • The interface of the USB mouse device driver is represented as /sys/devices/pci0000:00/0000:00:09.0/usb2/2-1/2-1:1.0 root_hub-hub_port:configuration.interface
USB and Sysfs • For a two-level USB connection, the device name is in the following format root_hub-hub_port-hub_port:configuration.interface • In the sysfs directory, all USB information is available • E.g., idVendor, idProduct, bMaxPower • bConfigurationValue can be written to change the active configuration
USB and Sysfs • More information is available in /proc/bus/usb directory • User-space programs can directly communicate with USB devices via the directory
USB Urbs (USB Request Block) • Communication between the host and device is done asynchronously using USB Request Blocks (URBs). • Similar to packets in network communications. • Every endpoint can handle a queue of URBs. • Every URB has a completion handler. • Flexible: A driver may allocate many URBs for a single endpoint, or reuse the same URB for different endpoints. • See Documentation/usb/URB.txt in kernel sources.
USB Urbs (USB Request Block) • struct urb • Used to send and receive data between endpoints • Asynchronous • Dynamically created • Contains reference count for garbage collection • Designed to achieve high throughput • Defined in <include/linux/usb.h> • Must be created with the usb_alloc_urb() function. Shouldn't be allocated statically or with kmalloc(). • Must be deleted with usb_free_urb().
USB Urbs (USB Request Block) • A typical lifecycle of an Urb • A USB device driver creates an Urb • Assigns it to a specific endpoint of a device • Submits it to the USB core • The USB core submits the Urb to specific USB host controller driver • The USB host controller driver processes the Urb and transfers it to the device • Notifies the USB device driver when the Urb is done
USB Urbs (USB Request Block) • An Urb can be cancelled by the driver or the USB core if the device is removed from the system
Life Cycle of an Urb Creation USB core(controllerdriver) Devicedriver Assignedto an endpoint Submittedto the USB core Transferedto the device yes can bereused? Notification attransfer completion no Deletion
struct urb • Important fields /* destination USB device */ /* must be initialized by the USB driver before the urb can be sent to the USB core */ struct usb_device *dev; /* end point type information */ /* set to the return value from one of the usb send and receive pipe functions */ /* must be initialized by the USB driver before the urb can be sent to the USB core */ unsigned int pipe;
struct urb /* assigned to one of the transfer flags */ unsigned int transfer_flags; void *transfer_buffer; /* points to a kmalloced buffer */ dma_addr_t transfer_dma; /* buffer for DMA transfers */ /* buffer length for either the transfer_buffer or the transfer_dma variable, 0 if neither buffers are used */ int transfer_buffer_length; /* pointer to a setup packet for a control urb */ /* transferred before the data in the transfer buffer */ unsigned char *setup_packet; /* DMA buffer for the setup packet for a control urb */ dma_addr_t setup_dma;
struct urb /* pointer to the completion handler called by USB core */ usb_complete_t complete; /* pointer to a data blob that can be set by the USB driver */ void *context; /* actual length of data sent/received by the urb */ int actual_length; /* accessed in the completion handler */ /* see status values */ int status; /* the initial frame number for isochronous transfers */ int start_frame;
struct urb /* polling interval for the urb */ /* valid only for interrupt or isochronous urbs */ /* for slow devices, the unit is in frames or milliseconds */ /* for other devices, the unit is in 1/8 milliseconds */ int interval; /* the number of isochronous transfer buffers handled by this urb */ /* must be set by the USB driver before the urb is sent to the USB core */ int number_of_packets; /* number of isochronous transfers with errors */ int error_count;
struct urb /* allows a single urb to define a number of isochronous transfers at once */ struct usb_iso_packet_descriptor iso_frame_desc[0]; struct usb_iso_packet_descriptor { unsigned int offset; /* byte into the transfer buffer */ unsigned int length; /* length of the transfer buffer */ /* length of data received into the transfer buffer */ unsigned int actual_length; unsigned int status; /* see status values */ };
USB send and receive pipe functions /* specifies a control OUT endpoint for the specified USB device with the specified endpoint number */ unsigned int usb_sndctrlpipe(struct usb_device *dev, unsigned int endpoint); /* specifies a control IN endpoint for the specified USB device with the specified endpoint number */ unsigned int usb_rcvctrlpipe(struct usb_device *dev, unsigned int endpoint); /* specifies a bulk OUT endpoint for the specified USB device with the specified endpoint number */ unsigned int usb_sndbulkpipe(struct usb_device *dev, unsigned int endpoint);
USB send and receive pipe functions /* specifies a bulk IN endpoint for the specified USB device with the specified endpoint number */ unsigned int usb_rcvbulkpipe(struct usb_device *dev, unsigned int endpoint); /* specifies a interrupt OUT endpoint for the specified USB device with the specified endpoint number */ unsigned int usb_sndintpipe(struct usb_device *dev, unsigned int endpoint); /* specifies a interrupt IN endpoint for the specified USB device with the specified endpoint number */ unsigned int usb_rcvintpipe(struct usb_device *dev, unsigned int endpoint);
USB send and receive pipe functions /* specifies a isochronous OUT endpoint for the specified USB device with the specified endpoint number */ unsigned int usb_sndisocpipe(struct usb_device *dev, unsigned int endpoint); /* specifies a isochronous IN endpoint for the specified USB device with the specified endpoint number */ unsigned int usb_rcvisocpipe(struct usb_device *dev, unsigned int endpoint);
URB Transfer flags • URB_SHORT_NOT_OK • Partial read should be treated as an error by the USB core • URB_ISO_ASAP • If the driver wants the isochronous urb to be scheduled as soon as bandwidth allows • Set the start_frame variable
URB Transfer flags • URB_NO_TRANSFER_DMA_MAP • Set when the urb contains a DMA buffer to be transferred • Tells the USB core to use the buffer pointed by the transfer_dma pointer, not the transfer_buffer pointer
URB Transfer flags • URB_NO_SETUP_DMA_MAP • Used for control urbs with DMA buffer already set up • Tells the USB core to use the buffer pointed by the setup_dma pointer instead of the setup_packet pointer • URB_ASYNC_UNLINK • Tells usb_unlink_urb() to return immediate and unlink the urb in the background
URB Transfer flags • URB_NO_FSBR • For UHCI USB host controller • Generally not used • URB_ZERO_PACKET • Tells a bulk out urb finishes by sending an empty packet when the data is aligned to an endpoint packet boundary
URB Transfer flags • URB_NO_INTERRUPT • Indicates that the HW may not generate an interrupt when the urb is finished • Used when queuing multiple urbs to the same endpoint • Used by USB core to perform DMA transfers
URB Status Values • 0 • The urb transfer was successful • For isochronous urbs, only indicates whether the urb has been unlinked • Detailed status in iso_frame_desc • -ENOENT • Urb stopped by usb_kill_urb • -ECONNRESET • Urb was unlinked by usb_unlink_urb • transfer_flags set to URB_ASYNC_UNLINK
URB Status Values • -EINPROGRESS • Urb still being processed by the USB host controller • A bug if seen at the driver level • -EPROTO (a HW problem) • A bitstuff error happened during the transfer • No response packet was received • -EILSEQ (a HW problem) • CRC mismatch
URB Status Values • -EPIPE • The endpoint is now stalled • If not a control endpoint, can clear this error with usb_clear_halt • -ECOMM • Data received faster than it could be written to system memory • -ENOSR • Data cannot be retrieved from the system memory during the transfer fast enough to keep up with the requested USB data rate
URB Status Values • -EOVERFLOW (a HW problem) • When the endpoint receives more data than the specified max • -EREMOTEIO • Full amount of data was not received • Occurs when the URB_SHORT_NOT_OK is set • -ENODEV • The USB device is gone from the system
URB Status Values • -ESHUTDOWN • Host controller driver has been disabled or disconnected • Urb was submitted after the device was removed • Configuration change while the urb was submitted
URB Status Values • -EXDEV • Only for a isochronous urb • Transfer was partially completed • -EINVAL • ISO madness, if this happens: Log off and go home • Incorrect function parameter
Creating and Destroying Urbs • All URBs need to be created dynamically • Or the reference count would not work • To create a URB, call struct urb *usb_alloc_urb(int iso_packets, gfp_t mem_flags); • Returns pointer to the URB or NULL on failure • iso_packets: number of isochronous packets this urb should contain • mem_flags: same as kmalloc flags • To destroy a urb, call void usb_free_urb(struct urb *urb);
- More by User

USB. Universal Serial Bus. Most popular Serial Peripheral bus WWW.USB.ORG. SERIAL. Bit after bit after bit instead of several bits at once Referenced as M b ps (why?). Universal SERIAL Bus. Anything to do with serial transmission was traditionally difficult to set up
1.18k views • 53 slides

USB. USB = Universal Serial Bus Industry-led open standard USB Implementers Forum USB-IF Intel, Microsoft, HP, Compaq… Evolution USB 1.0 (1996) USB 1.1 (1998) USB 2.0 (2000). Why USB?. Shortcomings of existing PC IO: Scarcity of PC HW resources (IRQ and DMA channels, IO space)
914 views • 48 slides

Installation of USB Printer Drivers for XP
Installation of USB Printer Drivers for XP. Overview. SATO produces Windows drivers for all of the printer range which also incorporate printer installation routines. These are available on the LG CD-ROM or the Technicians CD-ROM and also from the SATO websites.
232 views • 10 slides

USB Drivers. Ted Baker Andy Wang COP 5641 / CIS 4930. USB Device Basics. Universal Serial Bus (USB) is a connection between a host computer and a number of peripheral devices Created to replace a wide range of slow buses (parallel, serial, and keyboard connections)
876 views • 87 slides

Logic battery. Wifi dongle. Videocamera. Servomotor. USB. PWM. USB. 5V Voltage Regulator. FoxBoard G20. Ultrasonic 1. PWM. Ultrasonic 2. Motors battery. Ultrasonic 3. Motor Board. 12V. Ultrasonic 4. Ultrasonic 5. Motor 1. Motor 2. Motor 3. Ultrasonic 6. Sensor 1.
285 views • 1 slides

Static Class. USB. GetHostControllers(). int Index string DevicePath string DriverKey string Name. USBController. GetRootHub(). int PortCount string DevicePath string DriverKey string Name bool IsBusPowered bool IsRootHub. USBHub. GetPorts(). GetHub(). string HubDevicePath
163 views • 1 slides

http://www.cheapjp.com/small-scale-usb-green-laser.html HTPOW 超小型 緑レーザーポインター USB充電ケーブル付き 100mwレーザーポインターusb接続 小型軽量 きれいな6色 手触りが良い リチウム充電池 USB充電ケーブル
143 views • 7 slides

USB Device Drivers
USB Device Drivers. Michael Mitchell. USB Device Basics. Universal Serial Bus (USB) connects between a computer and peripheral devices Created to replace various slow buses (parallel, serial, and keyboard connections) USB 2.0: up to 480Mb/s (35 MB/s) USB 3.0: up to 6Gb/s (625 MB/s).
772 views • 75 slides
How to use a USB flash drive for PowerPoint presentations
Wondering how to use a USB flash drive for PowerPoint presentations? If you need to make a presentation, it’s a good idea to bring along a USB flash drive, available from stores like Amazon (aff). Whether it’s your main way of connecting to the presentation or a backup plan, having a one of these inexpensive devices can reduce stress.
Many presenters like to bring their own computer and simply plug it into the existing projector when they meet with a client, speak at an event or give a lecture. But you may arrive only to find out that you need a special cord, that the promised cord isn’t working or that no one knows quite how to change the custom setup. Some organizations may have rules about who can touch the equipment.
For good measure, you may want to email yourself and the client copies of the presentation. With cloud-based email, you can simply log in and retrieve the presentation if neither your computer nor your USB flash drive turn out to work.
In any case, figuring out how to use a USB flash drive for your presentation in PowerPoint or other applications makes sense. You don’t want to be scrambling at the last minute if you’re asked to speak or present. After all, speaking can help build your expert status .
Here’s how to use a USB flash drive for PowerPoint presentations….
Step by step guide to how to use a USB flash drive for PowerPoint presentations
- Prepare your presentation files . If you know for sure that PowerPoint or your presentation software will be available on the other computer, you can just bring along the raw files. However, because of version problems or even potential problems with transferring the file, it’s probably best to save your presentation as a .exe file, so that it can run on its own, without any external software.
- Insert the USB drive into your computer, using the USB port.
- Transfer the PowerPoint or other presentation to your USB flash drive. It should show up as one of your available drives. You can either transfer the file by copying it or you can open the presentation and “save as” to your flash drive. If you’re using an .exe file, be sure to include everything you need.
- Open the USB drive using your file management software (e.g. Windows Explorer). Make sure the file is on the drive. Open it and make sure it works properly.
- Eject the USB drive . If you are using Windows, you should see an icon on the bottom of your screen. On a Mac, drag the drive to the trash.
- At the client site, insert the USB drive and open the file.
- For stability, you may wish to transfer the file to the client’s computer . USB drives run more slowly and may be less stable. However, many people run presentations right from the drive.
- When you’re done, don’t forget to eject the USB drive and take the file home with you. If you transferred a file to the client’s computer, you may also wish to delete it.
- If your files are sensitive, you may wish to encrypt them with a password .
Any tips to share? Learning how to prepare your flash drive for a presentation the first time may take a little patience, but you should get the hang of it and be able to do it with ease in future. Presenting helps build your credibility and feeling confident with tech will help.
Build credibility with a solid plan for your consulting fees. Order my book, Consulting Fees: A Guide for Independent Consultant s.
Leave a Reply
Your email address will not be published. Required fields are marked *
Save my name, email, and website in this browser for the next time I comment.
How to Save Google Slides on a USB Flash Drive? [EASY WAY]
By: Author Shrot Katewa
![How to Save Google Slides on a USB Flash Drive? [EASY WAY]](https://artofpresentations.com/wp-content/uploads/2020/10/Featured-Image-How-to-Save-Google-Slides-on-a-USB-Flash-Drive.jpg "presentation on usb")
One of the most convenient features of Google Slides is its ability to automatically save the presentation in the cloud server allowing you access to your presentation anytime from anywhere. But, there are times when you want to also save your Google Slides presentation to a USB Flash Drive! So, how does one do that?
In order to save your Google Slides presentation to your USB flash drive, first, insert the flash drive in the USB slot. Then, on your Google Slides presentation, click on File, Download, and choose your preferred file format. Once the file is downloaded, transfer it to your USB flash drive.
That’s just a short explanation of the process. However, if you want a full step by step explanation on how to save the Google Slides on a USB flash drive, keep reading!
How to Save Google Slides to a USB Flash Drive? (Step by Step Process)
A presentation that is edited or created in Google Slides is saved directly in the Google Drive cloud server. Since it is always available online, it can feel challenging at first to know how to put it to a USB flash drive.
The key to transferring your Google Slides presentation to a USB flash drive is to know how to first download it to your computer.
Saving the Google Slides file on your computer is actually quite an easy process. You can save your file in multiple formats. Here’s a list of file formats in which you can currently download your Google Slides presentation –
- JPEG image (.jpeg)
- ODP document (.odp)
- PDF document (.pdf)
- Microsoft PowerPoint (.pptx)
- Plain text (.txt)
- PNG image (.png)
- Scalable Vector Graphics (.svg)
How to Download Google Slides to Your Computer?
As mentioned above, the process of downloading a Google Slides presentation is quite simple. Nevertheless, if you are doing this for the first time, you may need some help.
You can easily follow the steps mentioned below and download your Google Slides presentation.
Step 1 – Open and Download Your Google Slides Presentation
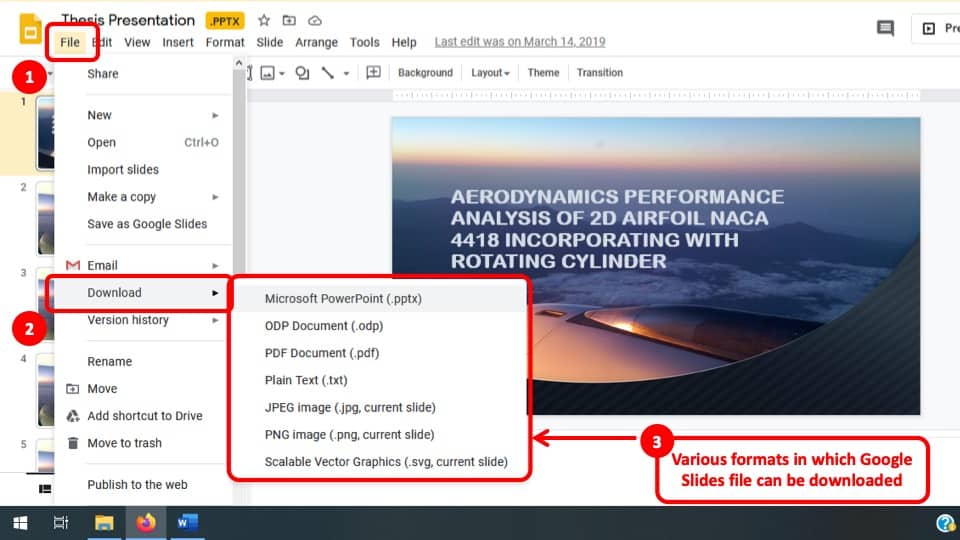
First, simply open the Google Slides presentation that you wish to download.
Then, as indicated in the image, first click on “ File “. A dropdown menu will appear.
Click on “ Download ” from the dropdown menu. A side menu will pop-up. Choose the format type of the file that you wish to download. I would recommend using either a “ .pptx ” or “ .pdf ” file type.
Step 2 – Select the Folder in where you Wish to Download the File
If you are using a Chrome browser, the presentation will get downloaded by default in the “Downloads” folder of your computer.
You can then open the downloads folder, and move it to any specific location on your computer.
That’s the hard part for most people.
How to Save Google Slides to a USB Flash Drive?
Once you have downloaded the Google Slides file to your computer, the rest is easy. I am going to guide you step by step about how you can transfer the Google Slide file from your computer to your USB flash drive in Microsoft Windows, macOS, and Ubuntu operating systems.
Saving to USB flash Drive on Windows
Once you have downloaded the Google Slides presentation, there are few different methods in which you can move it to your USB Flash drive.
Method 1 – Drag & Drop
Step 1: Connect the USB flash drive to your computer’s USB port.
Step 2: Find the saved Google Slides file on your computer.
Step 3: Open File Explorer and double click on the USB flash drive that you connected.
Step 4: Now drag the Google Slides file using the mouse courser to the USB flash drive folder that was opened in the File Explorer and drop the file here.
Step 5: Wait for the file to complete the transfer from your computer to your USB drive.
Method 2 – Copy & Paste
Step 1: First, connect the USB flash drive to your computer’s USB port.
Step 2: Find and select the Google Slides file on your computer.
Step 3: Under the “Home” tab situated at the top left corner of the File Explorer Click on “Copy to”.
Step 4: Click on “Choose location” from the dropdown menu.
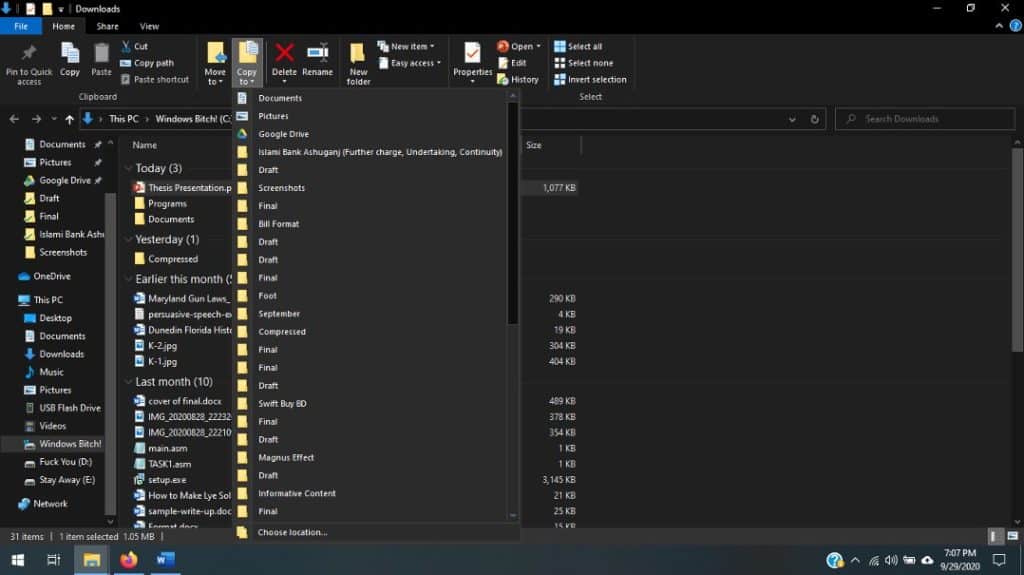
Step 5: Now find the USB flash drive and click on “Copy” to transfer your file.
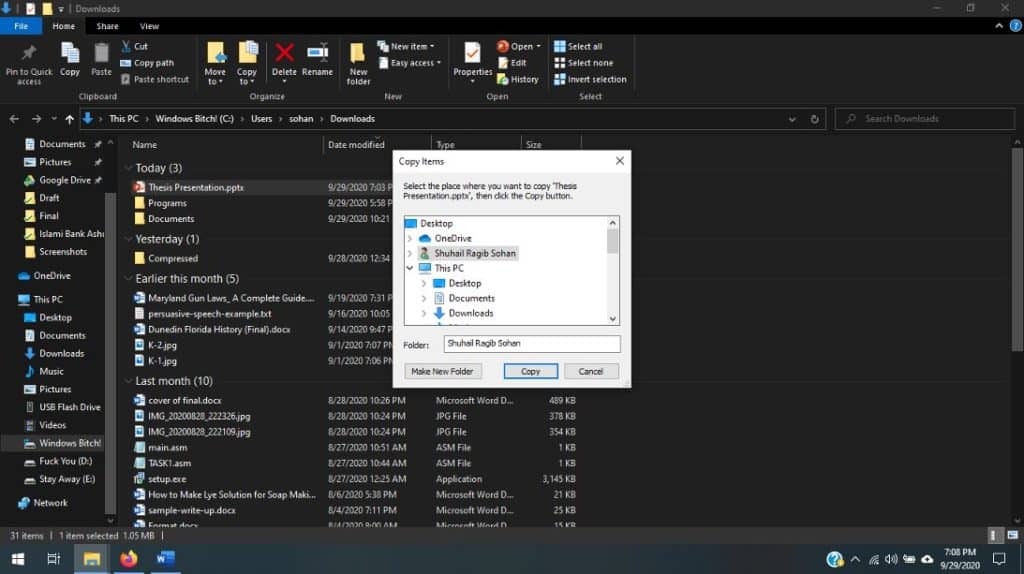
Step 6: Wait for the transfer to finish.
Method 3 – Open the Presentation and use “Save As”
Step 1: As always, first connect the USB flash drive.
Step 2: Find the Google Slide file and double click to open it.
Step 3: After opening the file, click on “Files> Save As” in the application .
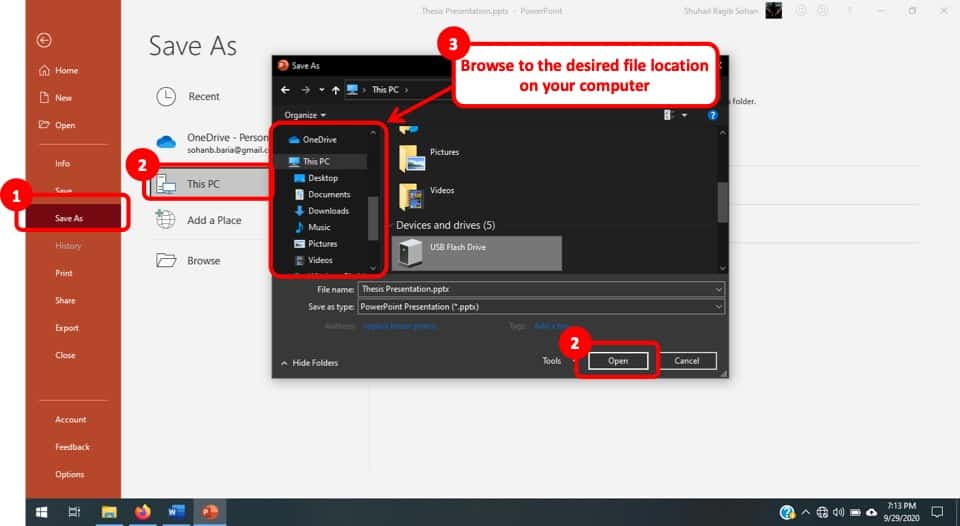
Step 4: Browse the file explorer andselect the USB flash drive to save the file .
Step 5: Wait for the file transfer bar to reach 100%.
Note: “Save as” method can only be used when the Google Slide file is opened in an application. Make sure your computer has the right software installed to open the file.
How to Download Google Slides directly to USB Flash Drive?
You can also download Google Slides Files directly to a USB flash drive. You can do that in two ways. The first one is to change the download path in the Chrome web browser settings.
To do that, first, connect the USB flash drive to your computer. Then open the Chrome browser and go to settings. From there go to the “Advanced” tab. There, select “Downloads” from the dropdown menu. You will find the download location option there. Turn on “Ask where to save each file before downloading” and save settings. Now if you download the file, it will ask where to be saved. You can select the USB flash device folder here.
The next method is to use a third-party downloader. Google Slides files are automatically saved to Google Drive cloud. Go to Google Drive and locate the file to download. Connect the USB flash device. Now right-click on the file and select “Download”. A pop-up window will open where you can select the download location. Select the USB flash device location and start the download. The file will be downloaded to the flash drive.
Caveat to Downloading Google Slides directly to a USB Flash Drive
A USB flash drive is an external device that you can connect to your computer and other devices. It is prone to damage easily. When you download a file directly to USB, if the device gets unplugged in the midway of the transfer, the file will be corrupted and you will not be able to open it. You will need to download the file again. This is annoying if the file is very large.
That’s why directly downloading to USB devices is not recommended.
Should you Play a Presentation directly from a USB Flash Drive?
USB flash devices are plug and play devices. To play a presentation directly from USB, plug it to your computer’s USB port and click on the file to open it. Make sure you have the right software installed to open the file.
JPEG and PNG file formats are suitable for playing presentation slides through monitor or TV USB ports as most of the TVs and monitors support these file formats. You can also use a portable USB Media Player to run your PowerPoint slides on the TV or monitor.
However, although most USB flash drives offer the plug and play feature, I would recommend you to try and download the presentation from your USB drive to your computer. That way, even if the flash drive were to get disconnected, your presentation will still be open.
Furthermore, if you are operating a heavy presentation file (upwards of 50 MB), opening it directly on a Flash Drive will make it slower for you to operate the presentation file.
Why Should You Download Google Slides to a USB Flash Drive?
Google Slides is a web-based application that is frequently used for making presentation slides for work or school and saves the file in the cloud servers. It grants you easy access to your files any time anywhere, all you need is an internet connection.
However, sometimes to transfer the files from one device to another, you need to download your files to a USB flash drive. Or, if you need to work on some slides but there is no internet connection, you can transfer them to a USB drive and edit them while you are offline (although Google now provides an option to work and edit Google Slides presentation offline as well.)
By now, you’ve learned all the things that you need to know about how to save Google Slides on a USB flash drive. Thank you for having the patience to go through the entire article. Hope this was of some help to you to find what you seek. Have a great day!
How To Play A Slideshow On A Tv Using Usb
Introduction.
If you want to show off your photos or videos on a larger screen, you can easily do so by playing a slideshow on your TV using a USB drive. This is a great way to share your memories with family and friends, or to show off your work to a larger audience. In this guide, we will show you how to play a slideshow on a TV using a USB drive. We will cover the steps for both Windows and Mac computers, as well as how to customize the slideshow for the best viewing experience.
Step-by-Step Guide to Playing a Slideshow on a TV Using a USB
1. Connect the USB drive to the TV. Depending on the model of your TV, you may need to use an adapter to connect the USB drive.
2. Turn on the TV and press the “Source” button on the remote control. Select the USB drive from the list of available sources.
3. Select the folder containing the images you want to display.
4. Select the first image in the folder.
5. Press the “Play” button on the remote control. The slideshow will begin playing.
6. Adjust the settings of the slideshow as desired. You can change the speed of the slideshow, the transition effects, and the order of the images.
7. To pause the slideshow, press the “Pause” button on the remote control. To resume the slideshow, press the “Play” button.
8. To end the slideshow, press the “Stop” button on the remote control. The TV will return to the folder containing the images.
How to Choose the Best File Format for Playing a Slideshow on a TV Using a USB
When playing a slideshow on a TV using a USB, it is important to choose the best file format for the best viewing experience. The most common file formats for playing a slideshow on a TV are JPEG, PNG, and MP4.
JPEG is the most widely used file format for digital images. It is a lossy compression format, meaning that some of the image data is lost when the file is compressed. JPEG files are usually smaller in size than other image formats, making them ideal for sharing and displaying on a TV.
PNG is a lossless compression format, meaning that no image data is lost when the file is compressed. PNG files are usually larger in size than JPEG files, but they offer higher image quality. This makes them ideal for displaying high-resolution images on a TV.
MP4 is a video file format that is commonly used for playing videos on a TV. MP4 files are usually larger in size than JPEG and PNG files, but they offer higher video quality. This makes them ideal for displaying videos on a TV.
When choosing the best file format for playing a slideshow on a TV using a USB, it is important to consider the size of the file, the image or video quality, and the type of content being displayed. JPEG and PNG are best for displaying still images, while MP4 is best for displaying videos.
Tips for Optimizing Your Slideshow for TV Viewing Using a USB
1. Choose the Right File Format: When optimizing your slideshow for TV viewing, it is important to choose the right file format. The most common file formats for TV viewing are .mp4, .mov, and .avi.
2. Adjust the Resolution: To ensure that your slideshow looks its best on a TV, you should adjust the resolution to match the size of the TV. The higher the resolution, the better the quality of the image.
3. Use a High-Quality USB: To ensure that your slideshow looks its best on a TV, you should use a high-quality USB. A USB with a high transfer rate will ensure that your slideshow plays smoothly and without any lag.
4. Check the Aspect Ratio: To ensure that your slideshow looks its best on a TV, you should check the aspect ratio. The aspect ratio should match the size of the TV.
5. Use a Compression Tool: To reduce the file size of your slideshow, you should use a compression tool. This will help to reduce the amount of time it takes to transfer the file to the TV.
6. Test the Slideshow: Before transferring the slideshow to the TV, it is important to test it on a computer. This will help to ensure that the slideshow looks its best on the TV.
7. Transfer the Slideshow: Once you have tested the slideshow and adjusted the resolution and aspect ratio, you can transfer the file to the TV using the USB. Make sure to follow the instructions provided by the TV manufacturer.
Troubleshooting Common Issues When Playing a Slideshow on a TV Using a USB
When playing a slideshow on a TV using a USB, there are a few common issues that may arise. To ensure a smooth experience, it is important to troubleshoot these issues as soon as they arise.
The first issue that may occur is that the TV may not recognize the USB device. This can be caused by a number of factors, such as an outdated USB driver, a faulty USB port, or an incompatible USB device. To resolve this issue, make sure that the USB device is compatible with the TV, and that the USB driver is up to date. If the issue persists, try using a different USB port or a different USB device.
Another issue that may arise is that the slideshow may not play correctly. This can be caused by an incompatible file format, or by a corrupted file. To resolve this issue, make sure that the file format is compatible with the TV, and that the file is not corrupted. If the issue persists, try converting the file to a different format or downloading a new version of the file.
Finally, the slideshow may not display correctly on the TV. This can be caused by an incorrect resolution setting, or by an outdated video driver. To resolve this issue, make sure that the resolution setting is correct, and that the video driver is up to date. If the issue persists, try using a different resolution setting or updating the video driver.
By troubleshooting these common issues, you can ensure a smooth experience when playing a slideshow on a TV using a USB.
How to Create a Professional-Looking Slideshow for TV Viewing Using a USB
Creating a professional-looking slideshow for TV viewing using a USB is a relatively straightforward process. To begin, you will need a USB drive with enough storage capacity to hold the images and videos you wish to include in your slideshow. Once you have the USB drive, you will need to transfer the images and videos to the drive. This can be done by connecting the USB drive to your computer and dragging and dropping the files onto the drive.
Once the files have been transferred to the USB drive, you will need to create the slideshow. This can be done using a variety of software programs, such as Adobe Photoshop or Microsoft PowerPoint. The software will allow you to arrange the images and videos in the order you wish them to appear in the slideshow. You can also add text, transitions, and other effects to enhance the presentation.
Once the slideshow is complete, you will need to transfer it to the USB drive. This can be done by connecting the USB drive to your computer and dragging and dropping the slideshow file onto the drive.
Finally, you will need to connect the USB drive to your TV. Depending on the type of TV you have, this can be done using a USB port or an HDMI cable. Once the USB drive is connected, you can select the slideshow file and view it on your TV.
By following these steps, you can easily create a professional-looking slideshow for TV viewing using a USB drive. With the right software and a bit of creativity, you can create a stunning presentation that will impress your viewers.
The Benefits of Playing a Slideshow on a TV Using a USB
Playing a slideshow on a television using a USB is a great way to share photos and videos with family and friends. This method of displaying media offers several advantages over other methods.
First, playing a slideshow on a television using a USB is convenient. All that is needed is a USB drive and a television with a USB port. This eliminates the need for additional hardware or software, making it easy to set up and use.
Second, playing a slideshow on a television using a USB is cost-effective. There is no need to purchase additional hardware or software, and the USB drive can be reused for other purposes.
Third, playing a slideshow on a television using a USB is versatile. The USB drive can be used to store photos, videos, music, and other types of media. This makes it easy to create a slideshow with a variety of content.
Finally, playing a slideshow on a television using a USB is a great way to share memories with family and friends. It is a fun and interactive way to show off photos and videos, and it can be enjoyed by everyone in the room.
In conclusion, playing a slideshow on a television using a USB is a convenient, cost-effective, and versatile way to share photos and videos with family and friends. It is a great way to create lasting memories and enjoy them together.

- Previous How To Play Rocket League With Pc And Ps4
- Next How To Test My Ping For League Of Legends

Xbox One Your Network is Behind a Port Preserving Port Symmetric Nat
How To Allocate More Ram To Minecraft 1.9
How to Use Formula Extraer En Ingles En Excel to Extract Text from Cells
Your email address will not be published. Required fields are marked *
- About JOE TECH
- Privacy Policy
- Popular Categories
Powerpoint Templates
Icon Bundle
Kpi Dashboard
Professional
Business Plans
Swot Analysis
Gantt Chart
Business Proposal
Marketing Plan
Project Management
Business Case
Business Model
Cyber Security
Business PPT
Digital Marketing
Digital Transformation
Human Resources
Product Management
Artificial Intelligence
Company Profile
Acknowledgement PPT
PPT Presentation
Reports Brochures
One Page Pitch
Interview PPT
All Categories
Powerpoint Templates and Google slides for Usb
Save your time and attract your audience with our fully editable ppt templates and slides..
Item 1 to 60 of 96 total items
- You're currently reading page 1
Engage buyer personas and boost brand awareness by pitching yourself using this prefabricated set. This Usb Icon Powerpoint Ppt Template Bundles is a great tool to connect with your audience as it contains high-quality content and graphics. This helps in conveying your thoughts in a well-structured manner. It also helps you attain a competitive advantage because of its unique design and aesthetics. In addition to this, you can use this PPT design to portray information and educate your audience on various topics. With twalve slides, this is a great design to use for your upcoming presentations. Not only is it cost-effective but also easily pliable depending on your needs and requirements. As such color, font, or any other design component can be altered. It is also available for immediate download in different formats such as PNG, JPG, etc. So, without any further ado, download it now.
This Wireless Mouse is the perfect companion for your laptop or desktop. It features a comfortable ergonomic design, a reliable 2.4GHz connection, and a vibrant colour to add a touch of style to your workspace. Enjoy smooth and precise cursor control with this high-quality wireless mouse.
This monotone powerpoint icon is a perfect representation of a wireless mouse. Its sleek design and modern look make it the perfect addition to any presentation. Its easy to use and perfect for any professional or home office.
This Wireless Charger has a sleek, coloured design and is compatible with most phones. It is fast and efficient, providing a convenient way to charge your device without the need for cables. It is lightweight and portable, perfect for travel.
This monotone powerpoint icon is perfect for presentations on wireless chargers. It features a simple, modern design that will add a professional touch to your slides. It is ideal for highlighting the convenience of wireless charging and its increasing popularity.
This coloured PowerPoint icon on Business Pendrive is a great way to store and share your important documents and presentations. It is a high-speed, reliable, and secure storage device with a sleek and modern design. It is compatible with both Mac and Windows operating systems and offers great value for money.
This Monotone powerpoint icon on Business Pendrive is a perfect storage device for business professionals. It is designed with a sleek and modern look, and is equipped with a high-speed USB 3.0 interface for fast data transfer. It is also shockproof and waterproof, making it ideal for everyday use.
This colourful PowerPoint icon features a mobile charger, perfect for presentations on technology, devices, and charging solutions. The bright colours and sleek design make it eye-catching and easy to incorporate into your slides. Use it to add a modern touch to your presentations and impress your audience.
This Monotone powerpoint icon is a must-have for anyone who frequently uses their mobile devices on-the-go. Designed to be compact and lightweight, this mobile charger is perfect for travel and daily use. With its sleek and modern design, it will easily blend in with any tech setup.
We are proud to present our 1114 icons of floppy drive usb power supply bluetooth headset mobile phone ppt slide. This Power Point template slide has been designed with graphic of different icons of floppy drive, usb and power supply. We have also used graphic of Bluetooth ,headset and mobile phone. All these icons are example of latest technology. Display computer and mobile technology related topics with this creative PPT slide.

We are proud to present our 0914 usb thumbdrive flash memory storage clip art 4 gb ppt slide. This image slide displays icon of usb universal serial bus. This image slide has been designed with graphic of usb icon with text space. You may change color, size and orientation of any icon to your liking. Use this image slide, in your presentations to express views on storage, backup, communication and technology. This image slide will enhance the quality of your presentations.
We are proud to present our 0814 icon of a usb device with data storage ppt slides. To explain the concept of data transfer and storage, we have designed this innovative Powerpoint image slide. This PPT slide contains the graphic of USB device, which is used for data storage as well as for transfer. Define its usage and importance in data storage an sharing technology by using this exclusive PPT slide in your presentations.
Give your next presentation a sophisticated, yet modern look with this 100 percent editable Usb pen drive colored icon in powerpoint pptx png and editable eps format. Choose from a variety of customizable formats such as PPTx, png, eps. You can use these icons for your presentations, banners, templates, One-pagers that suit your business needs.
Make your presentation profoundly eye-catching leveraging our easily customizable Usb pen drive monotone icon in powerpoint pptx png and editable eps format. It is designed to draw the attention of your audience. Available in all editable formats, including PPTx, png, and eps, you can tweak it to deliver your message with ease.
This colourful PowerPoint icon is perfect for adding a touch of fun to your presentation. It features a dongle design in a variety of colours, making it a great choice for any project.
This Monotone PowerPoint Icon on Dongle is a simple yet powerful tool for creating presentations. It features a sleek design and intuitive controls, making it easy to create professional looking presentations quickly and easily. Its perfect for any business or personal presentation.
This coloured powerpoint icon is perfect for presentations on Quick Charging technology. It features a lightning bolt icon with a bright and vibrant colour palette that will draw attention to your presentation. Quick charge your presentations with this eye-catching icon.
This monotone PowerPoint icon is perfect for presentations on quick charging. It features a lightning bolt with a plug, conveying the message of fast charging. Use this icon to bring your presentation to life.
This coloured PowerPoint icon on Pen Drive is a great way to store and transport your important documents and presentations. It is available in a variety of colours and is a reliable and secure way to store your data.
This Monotone PowerPoint icon on Pen Drive is a sleek and stylish way to store and transport your presentations. It is a lightweight and durable drive with a large capacity of up to 32GB. It is compatible with both Windows and Mac systems.
This coloured powerpoint icon depicts a battery being charged, perfect for presentations on charging time. It is a high-quality vector image with bright, vibrant colours that will make your presentation stand out.
This Monotone Powerpoint Icon is a modern and stylish design that is perfect for presentations on charging time. It is a high-quality vector image that is easy to customize and use in any project. It is a great way to visually represent the concept of charging time.
This Wireless Mouse is perfect for any computer setup. It features a comfortable ergonomic design and is available in a range of vibrant colours to suit any style. The wireless connection ensures a smooth and reliable performance, making it ideal for work or gaming.
This Monotone powerpoint icon is a perfect representation of a Wireless Mouse. It is a sleek, modern design that is suitable for any presentation. It is a great way to show your audience the importance of wireless technology in todays world.
This coloured powerpoint icon depicts a charging port, perfect for any presentation. It features a vibrant colour palette and a sleek design, making it an ideal visual aid for any project. Its an essential addition to any presentation, and will help to make it stand out from the crowd.
This Monotone Powerpoint Icon on Charging Port is a simple and elegant graphic that is perfect for presentations, websites, and other digital projects. It is a vector graphic that is easy to resize and customize to fit any project. It is a great way to add a professional touch to any project.
This RJ Cable Icon is a vibrant and eye-catching colour that will make your presentation stand out. It is perfect for any presentation or document that needs to be visually appealing. It is easy to download and use and will add a professional touch to your work.
This monotone powerpoint icon on RJ cable is perfect for presentations, documents, and websites. It is easy to use and customize, and is a great way to add a professional touch to any project. It is a vector based design, so it can be scaled to any size without losing quality.
This high-quality coloured icon depicts a broken cable, perfect for conveying a message of disruption or malfunction. It is a great visual aid for presentations, documents and websites.
This monotone powerpoint icon features a broken cable with frayed ends. It is perfect for illustrating a broken connection or a failed attempt at communication. It is a simple yet powerful visual metaphor for a wide range of topics.
This Wifi USB Adapter is a perfect solution for connecting your laptop or desktop to a wireless network. It is small and lightweight, and comes in a range of vibrant colours to suit your style. It is easy to install and provides reliable, high speed internet access.
This Monotone powerpoint icon is perfect for presentations on wifi USB adapters. It is a simple, yet effective visual representation of the device and provides a great visual aid to any presentation. It is easy to use and will help to make your presentation stand out.
Presenting usb security shield and tools for data safety ppt slides. This is a usb security shield and tools for data safety ppt slides. This is a two stage process. The stages in this process are security.
Presenting this set of slides with name - Cable Icon Showing Wire Of Usb With Port On Each Face. This is a three stage process. The stages in this process are Cable Icon, Rope Icon, Cord Icon.

Presenting this set of slides with name - Disconnect Showing Cross Sign In Usb. This is a one stage process. The stages in this process are Disconnect, Detach, Unlink.
We are proud to present our 0914 icons of 2 5 inch floppy drive cd usb storage media ppt slide. This image slide displays storage icons. This image slide has been designed with graphic of floppy, disk, usb and storage card icons on grey background. Use this image slide, in your presentations to express views on storage, communication and technology. You may change color, size and orientation of any icon to your liking. This image slide will enhance the quality of your presentations.

Presenting this set of slides with name - Electronic Device Connection Error Of No Usb Connected. This is a three stage process. The stages in this process are Error, Business, Marketing.

Presenting this set of slides with name Disk Storage Device As USB Flash Drive. This is a one stage process. The stages in this process are Disk Storage, Technology, Storage Device. This is a completely editable PowerPoint presentation and is available for immediate download. Download now and impress your audience.

How to Put Google Slides To a Flash Drive (USB) Step by Step
In an age of convenience, knowing “How to Put Google Slides To a Flash Drive” adds versatility to your presentation toolkit. This step-by-step guide simplifies the process, ensuring your slides are accessible anytime, anywhere. Let’s explore the seamless method of transferring Google Slides to a USB flash drive.
Table of Contents
How to Put Google Slides To a Flash Drive Step by Step
Master the art of portability by transferring your Google Slides to a USB flash drive with these simple steps. Whether for a presentation on-the-go or backup purposes, this process ensures your slides are readily available.
Step 1: Open Your Google Slides Presentation
Begin by opening the Google Slides presentation you wish to transfer to the flash drive. Ensure you have the necessary editing permissions and access to the file.
Step 2: Download the Presentation
Navigate to the “File” menu and select “Download.” Choose the file format that suits your needs; typically, downloading as a PowerPoint presentation (.pptx) works well for compatibility.
Step 3: Insert USB Flash Drive
Connect your USB flash drive to an available USB port on your computer . Ensure the flash drive is recognized and appears as a removable device.
Step 4: Copy the Downloaded File to the Flash Drive
Locate the downloaded presentation file on your computer. Right-click on the file, select “Copy,” and then navigate to the connected USB flash drive. Right-click within the flash drive and choose “Paste” to copy the presentation onto the flash drive.
Step 5: Safely Eject the Flash Drive
Once the copying process is complete, safely eject the USB flash drive from your computer. This ensures that no data is lost during the removal process.
How do I insert a Google slide into a USB?
Inserting a Google slide into a USB involves a straightforward process that ensures your presentation is readily available for portable use.
Downloading the Presentation
To insert a Google slide into a USB, start by opening the desired presentation on Google Slides. Download the presentation file by navigating to the “File” menu and selecting “Download.” Choose the appropriate file format, such as .pptx, for compatibility.
Copying to the USB Flash Drive
Connect your USB flash drive to your computer and ensure it is recognized. Copy the downloaded presentation file and paste it into the USB flash drive. This simple process ensures that your Google slide is now stored on the flash drive for easy access and portability.
How do I move a file from Google Drive to a flash drive?
Moving a file from Google Drive to a flash drive involves a few simple steps, providing you with a copy of your file for offline use.
Downloading the File from Google Drive
Access Google Drive and locate the file you want to move to the flash drive. Right-click on the file, select “Download,” and save the file to your computer. This step ensures you have a local copy of the file on your device.
Connect your USB flash drive to your computer. Locate the downloaded file and copy it by right-clicking and selecting “Copy.” Navigate to the USB flash drive and paste the file by right-clicking within the flash drive and choosing “Paste.” This process duplicates the file onto the flash drive, making it accessible offline.
In conclusion, mastering “How to Put Google Slides To a Flash Drive” enhances the portability of your presentations. The step-by-step guide ensures a seamless transfer process, allowing you to have your Google Slides readily available on a USB flash drive. Whether for presentations on different devices or as a backup solution, this method provides convenience and accessibility. Explore the possibilities of taking your Google Slides anywhere with this straightforward and effective process.
Leave a Comment Cancel reply
Save my name, email, and website in this browser for the next time I comment.

How To Save PowerPoint To Usb Flash Drive?
To save a PowerPoint presentation to a USB flash drive, open the file and click “File” in the top-left corner. Choose “Save As,” select your USB drive as the location, and click “Save.” Safely eject the USB drive when done to ensure your presentation is portable and accessible.
Learn the simple steps to save it to a USB flash drive effortlessly. Want to ensure your PowerPoint presentation is portable? With just a few clicks, you can carry your presentation wherever you go, ready to impress your audience anytime.
Save your PowerPoint presentation to a USB flash drive in three simple steps. Click ‘File,’ select ‘Save As,’ choose your USB drive, and hit ‘Save.’ Now, your presentation is portable and ready to impress anywhere.
Table of Contents
Putting a Presentation PowerPoint to USB Flash Drive
When it comes to making your PowerPoint presentation portable, transferring it to a USB flash drive is a straightforward process. Begin by opening your PowerPoint file and navigating to the ‘File’ tab. Click on ‘Save As,’ then choose your USB flash drive as the destination. After clicking ‘Save,’ your presentation is now securely stored on the USB flash drive.
This ensures convenient access and easy sharing of your PowerPoint masterpiece. To retrieve the file later, simply plug in the USB flash drive and open the presentation directly. With the simplicity of transferring PowerPoint to a USB flash drive, your presentations become effortlessly transportable and ready for any occasion. Don’t forget to safely eject your USB flash drive to ensure your data stays intact and accessible whenever you need it.
Create the PowerPoint Presentation
To begin, craft your engaging PowerPoint presentation with impactful visuals and informative content. Once satisfied, click on the ‘File’ tab and select Save As. opt for your PowerPoint USB flash drive as the storage location, then click Save. This seamless process ensures your dynamic presentation is ready to be transferred from PowerPoint to USB flash drive, ready to impress on any compatible device.
Connect the Flash Drive
To finalize the process of transferring your PowerPoint presentation to a USB flash drive, connect the flash drive to your computer. Insert it into an available USB port, ensuring a secure connection.
This step is crucial for successfully saving your PowerPoint file onto the USB flash drive. Once connected, proceed to save your presentation using the ‘Save As’ option, selecting the USB flash drive as the destination.
Copy the PowerPoint Presentation to the Flash Drive

Copying your PowerPoint presentation to a USB flash drive is a breeze. Open your file, click ‘Save As,’ and select your USB flash drive as the destination. This simple process ensures that your PowerPoint to USB flash drive transfer is quick and efficient. Now, your presentation is conveniently portable for sharing and presenting on the go.
Eject the Flash Drive
- Save your work: Before ejecting the flash drive, ensure all files and documents are saved to avoid any data loss.
- Close open files: Close any files or applications that might be using the flash drive, as active processes can interfere with the ejection process.
- Locate the drive icon: On your computer, find the icon representing the flash drive. This is typically found in the file explorer or on the desktop.
- Right-click the drive icon: Right-click on the flash drive icon. A contextual menu will appear with various options.
- Select “Eject” or “Safely Remove: Choose the “Eject” or “Safely Remove” option from the menu. This action signals the operating system to prepare the flash drive for removal.
- Wait for confirmation : After selecting “Eject,” wait for the system to confirm that it is safe to remove the flash drive. This confirmation may appear as a notification or a pop-up message.
- Physically eject the drive: Once you receive confirmation, physically eject the flash drive from the USB port. Some computers may have an eject button, or you can gently pull it out.
- Check for the green light (if applicable): Some flash drives have an indicator light that turns green when it is safe to remove. Ensure this light is no longer active before completely removing the drive to avoid potential data corruption.
Saving PowerPoint Presentation to a Flash Drive
Saving your presentation PowerPoint to USB flash drive is a crucial step for portability and easy sharing. Begin by opening your PowerPoint file and navigating to the ‘File’ tab. Click on ‘Save As,’ and choose your USB flash drive as the designated location for your presentation.
Ensure a seamless PowerPoint to USB flash drive transfer by clicking ‘Save.’ Now, your carefully crafted presentation is securely stored on the PowerPoint to USB flash drive, ready to be accessed and shared anytime, anywhere.
The simplicity of transferring PowerPoint to USB flash drive enhances the versatility of your presentations, making them easily transportable for various occasions. Don’t forget to safely eject your USB flash drive, ensuring the integrity of your data and making your PowerPoint to USB flash drive experience smooth and efficient.
Preparing to Save Your Presentation
Top of Form
Saving the Presentation
Saving your PowerPoint presentation is a breeze. Simply open your file, click on ‘File,’ and choose ‘Save As.’ Opt for your USB flash drive as the destination, and click ‘Save.’ This ensures a secure PowerPoint to USB flash drive transfer, making your presentation easily accessible on the go.
Taking Precautions to Keep Your Presentation Secure

- Password Protection: Secure your PowerPoint presentation by adding a password before transferring it to a USB flash drive.
- Encrypt Files: Use encryption tools to safeguard your files during the PowerPoint to USB flash drive transfer.
- Regular Backups: Keep backups of your presentation files on multiple devices, including the USB flash drive.
- Update Security Software: Ensure your computer has updated antivirus and anti-malware software to prevent any threats during the PowerPoint to USB flash drive process.
- Choose a Reliable USB Drive: Select a reputable and reliable USB flash drive for storing your PowerPoint presentations securely.
- Avoid Public Computers: Refrain from using public computers for PowerPoint to USB flash drive transfers to minimize security risks.
- Check USB for Malware: Scan your USB flash drive for malware regularly to maintain a secure environment for your presentations.
- Use a Dedicated USB Drive: Designate a specific USB flash drive solely for PowerPoint presentations to reduce the risk of contamination.
- Be Mindful of File Locations: Save and transfer your PowerPoint files only to trusted and secure locations on the USB flash drive.
- Educate Users: If sharing the USB flash drive, educate users about the importance of PowerPoint to USB flash drive security practices.
- Enable Auto-Lock: Set up your computer to automatically lock when idle, adding an extra layer of security during PowerPoint to USB flash drive transfers.
- Regularly Update Passwords: Change passwords for both your computer and USB flash drive regularly to enhance security.
- Physically Secure USB Drive: Keep your USB flash drive in a secure location when not in use to prevent unauthorized access.
- Review Permissions: Check and limit access permissions for your PowerPoint files on the USB flash drive to control who can view or edit them.
- Monitor USB Activity: Be vigilant about USB activities on your computer and set up alerts for any suspicious PowerPoint to USB flash drive transfers.
Naming Your Presentation File
Naming your presentation file is simple and essential. Choose a clear and descriptive name that reflects the content. Avoid using special characters or spaces to ensure compatibility. This makes organizing and finding your PowerPoint file on the USB flash drive quick and effortless.
Verifying the Saving Location
After saving your PowerPoint presentation to a USB flash drive, it is essential to verify the saving location. Double-check that the file is stored where you intended, ensuring easy access later.
This quick confirmation adds an extra layer of assurance, preventing any potential confusion or misplacement. Taking a moment to verify the saving location ensures that your presentation is readily available when needed.
How do I save a PowerPoint presentation to a USB flash drive?
Open your presentation, click on ‘File,’ choose ‘Save As,’ select your USB flash drive as the destination, and click ‘Save.’
Can I use any USB flash drive to save my PowerPoint presentation?
Yes, you can use any USB flash drive, but it is recommended to choose a reliable and reputable one for secure storage.
Do I need to eject the USB flash drive after saving my presentation?
Yes, it is important to safely eject the USB flash drive to ensure your data is stored securely and prevent potential data corruption.
Can I password-protect my PowerPoint presentation on the USB flash drive?
Yes, you can enhance security by adding a password to your presentation before saving it to the USB flash drive.
What should I do if I can’t find my saved presentation on the USB flash drive?
Double-check the saving location, ensure the USB drive is properly connected, and verify that the file was not accidentally saved elsewhere. If issues persist, consider saving the presentation again.
In conclusion, saving your PowerPoint presentation to a USB flash drive is a straightforward process that enhances portability and accessibility. By navigating through the “File” tab and selecting “Save As,” you can effortlessly transfer your PowerPoint to a USB flash drive, ensuring your presentation is readily available for any occasion. This simple yet essential practice not only safeguards your work but also allows you to share and showcase your “PowerPoint to USB flash drive” versatility wherever you go.
Remember, the convenience of this process lies in the seamless steps of opening your file, choosing the USB flash drive as the destination, and clicking “Save.” With the power to password-protect your presentations and the flexibility to use any USB flash drive, this method offers a secure and efficient way to transport your creative work. Embrace the simplicity of saving your “PowerPoint to USB flash drive,” making your presentations not only impressive but also easily shareable and accessible on the go.
Leave a Comment Cancel reply
Save my name, email, and website in this browser for the next time I comment.
Recent Posts

Veestrit: A Unique App to Customize Your Charging Screen

MyFlexBot Review: Enhancing Your Amazon Flex Experience

Rajkotupdates.news Watchgpt App Apple Watch Users

Snapchat Planets: A Guide to Snapchat’s Friend’s Solar System

How To Use iGanony? Download Instagram Story Easily

What is Qxefv?: A Complete Guide for Beginners

AIOTechnical.com Computer Future of Computational Technology

Unveiling the Allure of 101Desires.com internet: Exploring the Depths of Internet Enchantment
We're thrilled to have you here. Whether you're exploring our services, seeking information, or just passing by, consider yourself part of the techplces.com family.
Privacy Policy
Terms of Services
Latest Post

April 8, 2024

April 6, 2024

April 3, 2024
- Artificial Intelligence
- Generative AI
- Cloud Computing
- Computers and Peripherals
- Data Center
- Emerging Technology
- Augmented Reality
- Enterprise Applications
- IT Leadership
- IT Management
- Remote Work
- IT Operations
- Operating Systems
- Productivity Software
- Collaboration Software
- Office Suites
- Vendors and Providers
- Enterprise Buyer’s Guides
- United States
- Netherlands
- United Kingdom
- New Zealand
- Newsletters
- Foundry Careers
- Terms of Service
- Privacy Policy
- Cookie Policy
- Copyright Notice
- Member Preferences
- About AdChoices
- E-commerce Affiliate Relationships
- Your California Privacy Rights
Our Network
- Network World

USB-C explained: How to get the most from it (and why it keeps on getting better)
Usb-c and other high-speed protocols can push data to warp speeds. here’s how to make the most of the current standards and what lies ahead..

Now that you’re used to seeing co-workers, family, and strangers at coffee shops, offices, and planes using the oblong USB-C connector, it’s time to see just what this promising standard can do today and tomorrow. As we approach its 10th birthday, the USB-C plug is now part and parcel of just about every new laptop, phone, and tablet made. Even MacBooks, iPads, iPhones, and Chromebooks now have USB-C ports, at least living up to the first part of its full name: Universal Serial Bus.
In other words, the older rectangular USB Type-A plugs we are so used to are slowly going the way of the dinosaur. This evolution is happening faster in some arenas than others. For example, the latest Mac Pro desktop has no fewer than eight USB-C ports for anything from sending video to a display to charging a phone.

The USB-C port (second from left) is replacing older USB-A ports (third and fourth from left) on laptops and other devices.
What is USB-C?
Without a doubt, USB Type-C, commonly referred to as USB-C, is becoming the standard connector for moving data and power to and from a wide variety of computing devices. Its symmetrical design means it can be inserted either way — up or down — eliminating many of the frustrations of earlier USB ports.
This alone makes it a hit for me. No more fumbling with plugs that always seem to be upside down.
Because it is a connector specification and not a data transfer protocol, USB-C has been a constant as the underlying technology for moving data and powering devices has evolved. It’s closely linked to several powerful new technologies, including Thunderbolt and Power Delivery, that have the potential to change how we think about our gear and how we work in the office, on the road, and at home.
It’s when we start talking about protocols that things get messy. The five main USB protocols in use today are confusing, to say the least, creating an alphabet soup of standards that could muddle the most technical among us.
Here is a breakdown of the USB specifications, where it’s best to concentrate on the data flow levels:
- Today, the most popular USB spec is the USB 3.2 Gen 1 protocol that allows a maximum throughput of 5Gbps to travel over a single lane of data and can use an old-school Type-A rectangular plug or the oblong USB-C connector.
- The next step up has two alternatives: the use of double speed lanes of data that abide by the 5Gbps speed limit ( USB 3.2 Gen 1×2 ) as well as a single-lane variant that operates at twice the speed ( USB 3.2 Gen 2×1 ). Generally compatible with each other, the result is 10Gbps peak throughput.
- The USB 3.2 Gen 2×2 protocol uses two lanes of double-speed data traffic to top out at 20Gbps.
- USB4 (no space between “USB” and “4”) is the newest protocol and incorporates the Thunderbolt 4 spec. Within USB4, there are several variants that provide 5, 10, 20 and 40Gbps of peak flow.
What’s in a name? USB specs and speeds
The final contemplated step up is USB4 v2 , which takes data transfer speeds to new heights by using PAM-3 pulse amplitude modulation technology. Derived from 10Gbps Ethernet wired networking, PAM-3 tops out at 80Gbps in symmetric mode and gets to the spec’s top speed of 120Gbps in asymmetric mode. Unfortunately, these speed upgrades are off in the future.
Next up: Thunderbolt 5
Using USB4 v2 as a starting point, the next stage of USB-C’s development will incorporate Thunderbolt 5 , which was debuted by Intel last fall. Under normal circumstances, it can move a maximum of 80Gbps, double the rate of Thunderbolt 4 and USB4. This will help with everything from moving data onto and off flash drives to running backups of company data and multipurpose docking stations.
But if more throughput is needed — such as for 8K video, which can require 50Gbps — it uses a clever technique known as Bandwidth Boost. This pushes its speed limit to 120Gbps when needed. It can also be useful for feeding video to a screen at a refresh rate of up to 544Hz, which might find a home with a company’s CAD designers, traders, or video editors.
It’s another case of hurry up and wait. With Thunderbolt 4 gear just coming to market, expect to see computers with TB5 in 2024 and the first round of accessories in 2025. At the moment, there is no corresponding USB5 spec.
Gear up for new USB-C capabilities
Despite the confusing name-game, older devices continue to work with the newer specs. In other words, that two-year-old USB-C flash storage key will work with your newest laptop, although not always at top speed.
To take full advantage of USB-C today, though, you’ll need to get some new gear. Be careful, because not all USB-C devices on the market support all the latest USB specs. For instance, just about every USB-C flash drive sold today supports the earlier USB 3.2 Gen 1 protocol, and some tablets and phones don’t support Alt Mode video (more on that in a moment). It’s best to read the spec sheet carefully so you know what you’re getting before you buy.
I tried out some newer USB-C accessories to see the latest capabilities for myself. Here’s what to expect.
Docking station
In the here and now, the first USB4 devices flooding the market are docking stations that can make a laptop feel right at home on a desktop, moving data while charging the system. The $290 Plugable TBT4-UDX1 dock is connection central, with 11 ports and the ability to stream up to 96 watts to charge a laptop. It includes four USB Gen 2 Type A ports capable of 10Gbps, two USB-C connections that can push 40Gbps, and a 2.5Gbps networking port. There are also more mundane amenities like an SD card slot, a headphone jack, and HDMI for video.

The Plugable TBT4-UDX1 docking station.
By using a combination of the USB-C and HDMI ports, the UDX1 can drive up to two 4K monitors or a single 8K screen — that is, if you have the right cables and adapters.
Getting it set up on my desk was a snap, because it didn’t require any extra software. I plugged in the dock’s power adapter, connected it with the included Thunderbolt 4 cable to my Acer Swift Edge 16 notebook, and it immediately started charging my system as fast as its included AC adapter. The dock worked smoothly with my keyboard, mouse, and wired Ethernet connection, as well as an Epson PowerLite L260F projector and my Logitech game controller, because 9 to 5 only lasts until 5PM.
Fast data storage
The UDX1 came into its own with the Kingston XS2000 USB 3.2 2X2 flash drive plugged in and connected to the Acer Swift Edge 16 laptop. Somewhat larger and heavier than the typical flash drive, the XS2000 measures 2.7 x 1.3 x 0.5 inches and weighs 1 ounce. It fits into a pocket but requires a USB-C cable to connect.

The Kingston XS2000 external SSD.
The XS2000 read data at 7.90Gbps, as measured by the CrystalDiskMark benchmark software — that’s less than half the spec’s 20Gbps speed limit but a huge increase from the 1.23Gbps that I got using a SanDisk USB 3.1 flash drive. Kingston sells XS2000 drives for $86 (500GB), $140 (1TB), $246 (2TB) and $450 (4TB).
Unfortunately, USB4 is so new that there weren’t any external drives available for my tests. So, I made one myself. Using the $120 Satechi USB4 NVMe SSD Pro drive enclosure, I plugged in a Crucial P3 Plus 500GB SSD module. It upped the data reading rate to an exceptional 29.5Gbps, about three-quarters of the 40Gbps spec and one of the fastest drives available anywhere. Stay tuned: I’ll show you how to make the drive later in the story.
Power Delivery
While a USB 2.0 port could deliver just 2.5 watts of power, about enough to slowly charge a phone, USB 3.1 upped this to about 4.5 watts, and the initial uses of USB-C topped out at 15 watts of power. Today, a single USB-C cable can handle both video and power using USB’s Power Delivery spec.
Happily, USB4 increases this output to 100 watts for the base protocol and as much as 240 watts with the Extended Power Range specification. For practical reasons, most devices limit this to between 96 and 100 watts. Still, this opens up a brave new world of laptop-powered projectors based on USB-C.
Today, though, Power Delivery is being used mostly for chargers, external battery packs, and small displays such as Ricoh’s Portable Monitor 150 . Built around a 15.6-inch OLED screen, the $575 monitor not only shows 1920 x 1080 resolution but adds the convenience of 10-point touch control and can be powered by a laptop or phone via the same USB-C cable that delivers video. It weighs just 1.2 pounds, has a fold-out stand, and comes with a slipcase; Ricoh sells an $80 stylus as well.

The Ricoh Portable Monitor 150.
It displayed everything from web pages and emails to memos and Word documents from a Windows 11 notebook, but it really came into its own with a Samsung Galaxy Note 20 phone, allowing me to leave the laptop behind for a day trip. When it was time to present, I plugged the PM 150 into a USB adapter and to my phone with USB-C cables and pointed the display at the small group. The monitor mirrored my phone’s content, allowing me to give the full presentation while maintaining eye contact with the audience. Later, we huddled over the touchscreen to modify a design using our fingers.
Alt Mode displays
The newest USB-C cables are capable of delivering video using USB-C’s Alternate Mode , or “ Alt Mode .” At the moment, a Thunderbolt 4/USB4 cable can push 8K video or supply several 4K displays. This breakthrough can neaten a desk by getting rid of at least one cable.
For instance, Samsung’s 43-inch M70B display can use a USB-C cable to not only send video from a laptop to the screen but also send power the other way to charge the system. The $430 model I looked at has a resolution of 3840 x 2160 pixels and was able to charge my Acer Swift Edge 16 and my Google Pixel 7 phone.

Samsung’s 43-inch M70B display uses USB-C to receive video from and charge my laptop.
To get the most out of the new specs and the gear, you’ll need the right cables. Happily, after a proliferation of cable types, there’s a convergence going on. All Thunderbolt 4 cables will get the most out of USB4 devices, as well as all the specs that came before it. In fact, it’s so much of a no-brainer that all I buy these days are TB4 cables. They work well for anything from moving data off my phone to feeding video to a display or backing up data to a drive.
The reason they work with all specs is that each USB cable has an identification chip inside that senses the hardware’s capability and sets the speed and power abilities accordingly. Called e-marker, the integrated circuit is at both ends of the cable so that the USB device can query the cable’s capabilities and adjust the top speed to suit it. Older USB-C cables will generally work, just not always at top speed and might not work with the newest equipment.

Apple Thunderbolt 4 Pro Cable.
Most of these cables are available in up to 2-meter lengths (about 6.6 feet), which is more than twice the standard 0.8-meter (31-inch) length of earlier USB-C cables. That said, there are also one-meter cables from Satechi and Plugable for $30 and $29. By contrast, Apple pushes Thunderbolt 4 cabling to 3 meters (9.8 feet), but its Thunderbolt 4 Pro cable is pricey at $159.
One of my favorite USB-C cables is the Baseus Free2Draw Mini Retractable USB-C Cable 100W . Inside the Free2Draw’s small circular cable winder is a 3.3-foot USB 2.0 cable that can be spooled out at 1.1-, 1.9-, 2.7- or 3.3-foot lengths without getting tangled. Capable of delivering 100 watts to charge a phone, tablet, or laptop, it tops out at only 480Mbps of data.
Next page: USB-C tools, tips, projects, and troubleshooting advice →
Making USB-C work for you
To get the most out of these new specs, I’ve had to make some changes and buy some accessories. My older USB flash drives, keyboards and mice still work, though, even if they can’t take advantage of the new speeds.
Here are some tools, tips, and DIY projects that will help make USB-C work for you.
Make a USB-C travel kit
The good news is that USB-C ports can be used with older USB 2.0, 3.0, and 3.1 accessories. The bad news is that you’ll need a drawer full of adapters and cables. So far, I haven’t seen anything close to a complete ready-made kit. So, I’ve made my own USB-C survival kit with key cables and adapters that fits into an old Dopp bag.
Here’s what’s inside:
- A small male USB-C to female USB Type-A and a male USB Type A to female USB-C adapter.
- Short and long adapter cables with a USB Type-A male plug on one end and a male USB-C on the other.
- A USB-C AC adapter that’s capable of delivering 30 watts.
- A Thunderbolt 4 cable with USB-C male plugs at each end for using accessories.
- A USB-C Ethernet adapter and short Ethernet jumper cable for when a wired connection is available.
- One HDMI cable.
- A small microfiber cloth for screen cleaning.
The center of attention is Satechi’s Thunderbolt 4 Slim Hub , which squeezes lots of connections into a small and light device. It delivers three 40Gbps Thunderbolt 4/USB4 connections as well as a 10Gbps USB 3.2 Gen 2 port, while supplying up to 15 watts of power to charge my phone. It can run an 8K screen or a pair of 4K ones but needs a fairly large and heavy 20-volt AC adapter that makes it a tight fit.

The essential travel companion: my homemade USB-C adapter kit.
There’s one additional adapter I’ve found essential on the road because, sadly, many phones and tablets now lack a headphone jack. I have USB-C earbuds but usually can’t find them when I need them. When that happens, I use a headphone jack adapter so I can use any inexpensive wired headphones with my Pixel 7 phone. They cost about $10 each.
Make an inexpensive (and fast) homemade SSD drive

The Satechi USB4 NVME SSD Pro Enclosure.
USB4 may yield fast data speeds, but flash drives that support the spec have been slow to market. Using Satechi’s USB4 NVMe SSD Pro Enclosure , I made my own. It tops out at 40Gbps and is compatible with all the older USB-C and Thunderbolt specs, although at 4.4 x 2.7 x 1.0 inches and 7 ounces, it is larger and heavier than the typical flash drive.
The Satechi enclosure can be used with a B or B+M NVMe storage card up to 4TB. In addition to the $120 enclosure, I used a 500GB Crucial P3 Plus module that cost me $30.
The best part is that it doesn’t require tools to put together.
I started by sliding the enclosure’s lock open, freeing the lid.

Next, I slid the NVMe module into the connector and locked it in place with the soft silicon plug; it allows the use of three different-sized cards.

I finished by applying the included thermal pad and replacing the lid.

I snapped the case shut and was done.

It was worth the effort, because after I plugged it into the Plugable dock, it was able to move nearly 30Gbps. Not bad for a few minutes of work.
Be a power traveler

The Anker Nano Power Bank can juice up my phone anywhere.
I travel a lot for work and pleasure, and it always seems as though my phone’s battery is at 20%. My latest trick to keep from being cut off from the world is the $30 Anker Nano Power Bank . It’s small, only adds 3.5 ounces to the weight of the phone, and has a unique swiveling USB-C connector that has worked with every phone I’ve tried. There’s also a port on the side for charging it and as an alternate way to charge a device.
Available in five colors, the Nano Power Bank’s 5,000 miliamp-hour battery can put out 18 watts — about what the typical AC adapter delivers. Able to provide hours of extra juice, the five-dot LED charge gauge shows how much power is left.
There’s one more USB-C power trick I use every day with my Android work tablet that makes connecting and disconnecting much easier. The iSkey Magnetic USB C Adapter is a knock-off of Apple’s MagSafe design, where one part plugs into the tablet and the other into a USB cable. Inside, these two parts have powerful magnets that snap together to make a physical and electrical connection when they’re within a couple inches of each other. Later, when it’s time to move around the office, I pull the two apart. The best part is that it costs about $20.

iSkey’s Magnetic USB C Adapter imitates Apple’s MagSafe connector.
Troubleshooting USB-C
The fact that there isn’t much to adjust or configure with USB (C or otherwise) is a testament to its technological success. New or old, in almost all cases, it just works. That is, until it doesn’t. At that point, there are several angles of attack for troubleshooting.
My first step is to take a look at what the cable is doing, or not . For instance, I was having problems with my MacBook Air not reliably charging. To see what was going on with the USB-C charging, I inserted Plugable’s USBC-METER3-1MF diagnostic cable ($20) between the AC adapter and the notebook.
The cable meets the USB 3.1 Gen 2 10Gbps spec and can handle up to 240 watts of power; its built-in OLED screen shows how much electricity is flowing. In my case, it was 1 or 2 watts, not the 20 watts it should be. After jiggling the cord to see the power flow jump to a more normal level, I concluded that the charging cable had an intermittent short. Replacing it did the trick and I haven’t had any problems since.

The Plugable USB-C cable with multimeter tester.
My second step is to use Windows’ built-in USB tools . In addition to notifying me of a problem, the Settings screen in Windows 10 and 11 has a way to bring unresponsive USB devices back to life. If you’re having USB problems on a Windows 10 or 11 device, try these tips:
- Go to the Device Manager by right-clicking on This PC in File Explorer and then clicking Properties . Under “Related settings,” click Device Manager near the bottom to bring up a list of devices. In the Device Manager, double-click Universal Serial Bus controllers in the list to reveal the actual controller. It should read something like “USB 3.0 eXtensible Host Controller.” Give that a right-click, then choose Properties . In the Power Management tab, uncheck the box next to Allow the computer to turn off this device to save power to keep the port powered up. But be warned: your battery might drain faster because of this change.

Keep the USB port powered up by unchecking the box.
- While there, updating the USB drivers couldn’t hurt. You can do this by choosing the USB device that’s not working, right-clicking, and choosing Update driver from the drop-down list.
- Finally, check the specs of the computer, device, and cable to make sure they all match.
With Thunderbolt the underlying transfer technology for USB4, the Thunderbolt Control Center can provide insight . The app, which generally appears in the Windows Start menu apps list (and can also be downloaded from the Microsoft Store ), interrogates the system’s Thunderbolt controller chip to maximize throughput and shows what Thunderbolt devices are online. At the bottom are details on whether it’s connected and how it’s powered. Click on the About section on the left to see a deeper level of detail. This includes the Thunderbolt version the controller supports.

Get details about connected Thunderbolt devices via the Thunderbolt Control Center.
Finally, when all else fails, try cleaning the physical USB-C port , because dust, dirt, and debris might be preventing an electrical connection. Try using compressed air to blow out the loose stuff and then gently clean the port with a soft plastic toothpick. I use the Oral-B Expert Interdental Brushes , which are the perfect size for extricating everything from pet hair to pocket lint. At $3 for 20, you can’t go wrong.

Give a malfunctioning USB-C port a good spring (or winter) cleaning.
You’d be surprised at what comes out. Hopefully you now have a clean machine, ready for work.
This article was originally published in August 2014 and most recently updated in December 2023.
Related content
18 ways to speed up windows 10, google adds a premium option for chrome enterprise, jamf brings powerful new compliance tools to apple it, google workspace gets new genai pricing options, vids app, from our editors straight to your inbox.
Brian Nadel is a contributing writer for TechHive and Computerworld and is the former editor-in-chief of Mobile Computing & Communications magazine.
More from this author
Head to head: apple macbook air vs. microsoft surface laptop 2 for business, the wireless road warrior’s essential guide, review: 5 digital whiteboard displays for business collaboration, review: asus vivobook w202 with windows 10 s, most popular authors.
- Howard Wen Contributing Writer

Show me more
The ai talent shortage — can companies close the skills gap.

Enterprise buyer's guide: How to choose the right UEM platform

What everyone's getting wrong about Google's Chrome incognito saga

Voice cloning, song creation via AI gets even scarier

The link between smartphones and social media addiction

Sam Bankman-Fried gets 25 years in prison

How To Play Powerpoint Presentation On Samsung Smart TV

- How-To Guides
- Tech Setup & Troubleshooting

Introduction
Welcome to the world of digital presentations! If you have a Samsung Smart TV and want to showcase your stunning PowerPoint presentations on a bigger screen, you’ve come to the right place. In this article, we will guide you through the process of connecting your Samsung Smart TV to your computer and playing PowerPoint presentations seamlessly.
Imagine the impact of showcasing your visually appealing slideshows on a large high-definition television screen, captivating your audience with every slide transition and vibrant color. With the advancement in technology, it’s easier than ever to bring your presentations to life on your Samsung Smart TV, creating a truly immersive experience.
Whether you’re a business professional looking to make a compelling sales pitch, an educator wanting to deliver engaging lessons, or simply someone who loves to share your creativity through presentations, this guide will help you unlock the full potential of your Samsung Smart TV.
In the following sections, we will explore different methods to connect your Samsung Smart TV to your computer, transfer PowerPoint presentations, and play them seamlessly on the big screen. From using HDMI cables to wireless options like Chromecast, AllShare Cast, and the Smart View app, we will cover it all.
We’ll also provide you with some valuable tips and tricks to enhance your viewing experience and troubleshoot any potential issues that may arise. So, let’s dive in and unleash the power of your PowerPoint presentations on your Samsung Smart TV!
Connecting Samsung Smart TV to Computer
In order to play PowerPoint presentations on your Samsung Smart TV, the first step is to establish a connection between your computer and the TV. Let’s explore the various methods you can use to achieve this:
- Wired Connection: The most straightforward method is to use an HDMI cable to connect your computer to the HDMI port on your Samsung Smart TV. Simply plug one end of the HDMI cable into your computer’s HDMI output port and the other end into the HDMI input port of your TV. Once connected, your TV will mirror your computer’s display.
- Wireless Connection: If you prefer a wireless setup, there are a few options available. One of the easiest ways is to use Chromecast , a device that plugs into your TV’s HDMI port and allows you to stream content wirelessly from your computer. To set it up, install the Chromecast app on your computer, connect the device to your TV, and follow the on-screen instructions to establish a connection between your computer and the TV.
- AllShare Cast (Samsung devices only): If you have a Samsung smartphone , tablet, or laptop, you can use the AllShare Cast feature to wirelessly mirror your device’s screen onto your Samsung Smart TV. Simply enable AllShare Cast on your Samsung device and search for available devices on your TV. Once connected, you can navigate to your PowerPoint presentation and play it directly on your TV.
- Smart View App (Samsung devices only): Another option for Samsung users is to utilize the Smart View app . This app allows you to stream content wirelessly from your Samsung device to your Samsung Smart TV. Install the Smart View app on your device, connect it to your TV using the same Wi-Fi network, and select the PowerPoint presentation you wish to play on your TV.
By following one of these methods, you will establish a connection between your computer and Samsung Smart TV, making it possible to transfer and play PowerPoint presentations seamlessly. Now that you’ve successfully connected your devices, let’s move on to the next step: transferring your PowerPoint presentation to your Samsung Smart TV.
Transferring PowerPoint Presentation to Samsung Smart TV
Now that you have established a connection between your computer and your Samsung Smart TV, it’s time to transfer your PowerPoint presentation to the TV. There are a few different methods you can use to accomplish this:
- USB Drive: One of the most straightforward ways to transfer your PowerPoint presentation is by using a USB drive. Simply save your presentation file onto a USB drive, plug it into the USB port on your Samsung Smart TV, and navigate to the file using the TV’s file explorer. From there, you can open and play the presentation directly on your TV.
- Network Sharing: If your computer and Samsung Smart TV are connected to the same Wi-Fi network, you can take advantage of network sharing to transfer your PowerPoint presentation. Locate the presentation file on your computer, right-click on it, and select the option to share it on the network. On your Smart TV, navigate to the network shares or media server section and access the shared presentation file.
- Cloud Storage: Another convenient method for transferring your PowerPoint presentation is to store it in a cloud storage service like Google Drive, Dropbox, or OneDrive. Upload the presentation file to your cloud storage account and install the corresponding app on your Samsung Smart TV. Open the app on your TV, sign in to your account, and access the presentation file to play it on the big screen.
- Remote Access: If you have remote access software installed on your computer, such as TeamViewer or AnyDesk, you can remotely control your computer from your Samsung Smart TV. Install the remote access app on your TV, establish a connection with your computer, and navigate to your PowerPoint presentation to display it on the TV.
Choose the method that is most convenient for you based on the available resources and your personal preference. Once the PowerPoint presentation is successfully transferred to your Samsung Smart TV, you’re now ready to enjoy your slideshows on the big screen. In the next section, we will explore different ways to play your PowerPoint presentation on your Samsung Smart TV using the connection you’ve established.
Using HDMI Cable to Play PowerPoint Presentation on Samsung Smart TV
If you prefer a reliable and direct method to play your PowerPoint presentation on your Samsung Smart TV, using an HDMI cable is a great option. This method ensures a stable connection and guarantees high-quality video output. Follow these steps to play your presentation using an HDMI cable:
- Connect one end of the HDMI cable to the HDMI output port on your computer. Make sure to remember which HDMI port you have connected to.
- Connect the other end of the HDMI cable to one of the HDMI input ports on your Samsung Smart TV. Again, remember the HDMI port you have used.
- On your Samsung Smart TV, use the remote control to navigate to the source menu and select the corresponding HDMI input that you connected the cable to.
- Ensure that your computer is set to duplicate or extend the display to the Samsung Smart TV. This can be done through the display settings on your computer. Refer to your computer’s instruction manual or the operating system’s documentation for detailed instructions.
- Once the HDMI connection is established and the display is properly extended or duplicated, open your PowerPoint presentation on your computer.
- Go into slideshow mode in PowerPoint and play your presentation as you normally would. The presentation will now be mirrored or extended onto your Samsung Smart TV.
- Use the remote control for your Smart TV to control the slideshow navigation, or have a wireless keyboard or mouse connected to your computer for more convenience.
Using an HDMI cable is a simple and reliable method to play your PowerPoint presentation on your Samsung Smart TV. The cable provides a direct connection between your computer and TV, ensuring smooth playback and minimal latency. Enjoy the impressive visuals and immersive experience as your presentation comes to life on the big screen of your Samsung Smart TV.
Next, we will explore another wireless option using Chromecast to play your PowerPoint presentation on your Samsung Smart TV.
Using Chromecast to Play PowerPoint Presentation on Samsung Smart TV
If you prefer a wireless option to play your PowerPoint presentation on your Samsung Smart TV, using Chromecast is an excellent choice. Chromecast allows you to stream content from your computer directly to your TV through a Wi-Fi network. Follow these steps to use Chromecast:
- Ensure that your Samsung Smart TV and your computer are connected to the same Wi-Fi network.
- Plug the Chromecast device into the HDMI port of your Samsung Smart TV.
- On your computer, install the Google Chrome browser if you haven’t already.
- Open Google Chrome and install the Google Cast extension from the Chrome Web Store.
- Once installed, click on the Google Cast extension icon in the Chrome toolbar .
- Select your Chromecast device from the available list of devices.
- After connecting to Chromecast, open your PowerPoint presentation in the Google Slides web app.
- In the Google Slides web app, go into fullscreen mode and start the slideshow.
- Your PowerPoint presentation will now be displayed on your Samsung Smart TV via Chromecast.
- Use your computer or mobile device as a remote control to navigate through the slides.
Using Chromecast provides you with the convenience of wirelessly streaming your PowerPoint presentation to your Samsung Smart TV. You can easily control the presentation from your computer or mobile device, allowing you to move around and interact with your audience seamlessly.
With Chromecast, you can enjoy the flexibility of casting not only from your computer but also from other devices, such as smartphones or tablets, making it a versatile solution for playing your PowerPoint presentations on your Samsung Smart TV.
Next, let’s explore another option specifically designed for Samsung devices – using AllShare Cast to play your PowerPoint presentation on your Samsung Smart TV.
Using AllShare Cast to Play PowerPoint Presentation on Samsung Smart TV
If you own a Samsung smartphone, tablet, or laptop, you can take advantage of the AllShare Cast feature to wirelessly display your PowerPoint presentation on your Samsung Smart TV. AllShare Cast allows you to mirror your device’s screen onto the TV, providing a seamless viewing experience. Follow these steps to use AllShare Cast:
- Ensure that both your Samsung device and your Samsung Smart TV are connected to the same Wi-Fi network.
- On your Samsung device, go to the “Settings” menu and select “Screen Mirroring” or “Smart View.”
- The device will start searching for available devices to connect to. Select your Samsung Smart TV from the list.
- Your Samsung device’s screen will now be mirrored on your Samsung Smart TV.
- Open your PowerPoint presentation on your Samsung device.
- Enter slideshow mode to start the presentation.
- Your PowerPoint presentation will be displayed on your Samsung Smart TV through AllShare Cast.
- You can control the presentation using your Samsung device’s touchscreen or optional peripherals, such as a stylus or Bluetooth keyboard.
Using AllShare Cast provides you with the convenience of wirelessly mirroring your Samsung device’s screen onto your Samsung Smart TV. This feature is particularly useful if you have your PowerPoint presentation saved on your Samsung device and want to present it directly without the need for additional transfers or connections.
With AllShare Cast, you can showcase your PowerPoint presentation with ease, utilizing the full capabilities of your Samsung device and enjoying the immersive visuals on your Samsung Smart TV.
Now that you’ve learned about using AllShare Cast, let’s explore another wireless option specifically designed for Samsung devices – using the Smart View app to play your PowerPoint presentation on your Samsung Smart TV.
Using Smart View App to Play PowerPoint Presentation on Samsung Smart TV
If you are a Samsung device user, you can utilize the Smart View app to wirelessly display your PowerPoint presentation on your Samsung Smart TV. The Smart View app provides a seamless connection between your Samsung device and TV, allowing you to navigate and present your slides with ease. Follow these steps to use the Smart View app:
- On your Samsung device, download and install the Smart View app from the Google Play Store (for Android devices) or the App Store (for iOS devices).
- Open the Smart View app on your Samsung device and select your Samsung Smart TV from the list of available devices.
- The app will establish a connection between your Samsung device and your TV.
- Your PowerPoint presentation will be displayed on your Samsung Smart TV through the Smart View app.
- You can control the presentation using your Samsung device by tapping or swiping on the screen.
Using the Smart View app provides you with a convenient and intuitive way to present your PowerPoint slides on your Samsung Smart TV. With the ability to control the presentation directly from your Samsung device, you can freely move around and engage with your audience while delivering a dynamic and captivating presentation.
The Smart View app offers a seamless connection between your Samsung device and TV, allowing you to fully utilize the features of your Samsung device and enjoy a high-quality presentation on your Samsung Smart TV.
Now that you’ve explored various wireless options, as well as using an HDMI cable, let’s move on to the next section, where we’ll provide you with some valuable tips and tricks for playing PowerPoint presentations on your Samsung Smart TV.
Tips and Tricks for Playing PowerPoint Presentation on Samsung Smart TV
Here are some tips and tricks to enhance your experience when playing PowerPoint presentations on your Samsung Smart TV:
- Optimize your presentation: Before transferring your PowerPoint presentation to your Samsung Smart TV, optimize it by reducing the file size, compressing images, and ensuring compatibility with the TV. This will help improve the loading time and ensure smoother playback.
- Choose the right display mode: When playing your PowerPoint presentation on your Samsung Smart TV, choose the appropriate display mode that suits your needs. You can opt for duplicating the screen, extending it, or selecting the “Presenter View” if you’re using a device that supports it.
- Use a wireless presenter: To have better control over your presentation while standing in front of your Samsung Smart TV, consider using a wireless presenter or a Bluetooth-enabled device that allows you to navigate through slides without needing to be close to your computer or device.
- Utilize presentation remotes: Smart TVs often have smartphone/tablet apps or dedicated remotes that can act as presentation remotes. Take advantage of these features to control your presentations more conveniently.
- Practice and rehearse: Before presenting on your Samsung Smart TV, practice and rehearse your PowerPoint presentation to ensure smooth transitions, proper timing, and familiarity with the content. This will help you deliver a polished and confident presentation.
- Consider using animations and transitions: To make your presentation visually engaging on the big screen, utilize animations and transitions in your PowerPoint slides. However, ensure you use them judiciously and avoid going overboard, as excessive animations may distract or overwhelm your audience.
- Test compatibility and formatting: Before the actual presentation, test your PowerPoint presentation on your Samsung Smart TV to ensure that all formatting, fonts, and media are displayed correctly. Make any necessary adjustments to ensure the best possible viewing experience.
- Use a high-quality display source: If possible, ensure that the source material for your PowerPoint presentation (such as images or videos) is of high quality. This will enhance the visual experience on your Samsung Smart TV and captivate your audience.
- Engage your audience: Take advantage of the dynamic and immersive nature of your Samsung Smart TV to engage your audience. Move around the room, make eye contact, and use gestures to amplify your message and create a memorable experience.
By following these tips and tricks, you can elevate your PowerPoint presentations on your Samsung Smart TV and leave a lasting impression on your audience. With proper planning and utilization of the TV’s features, you can deliver an impactful and visually stunning presentation.
Now that you’re equipped with these tips, it’s time to put them into practice and make the most out of your PowerPoint presentations on your Samsung Smart TV.
Playing PowerPoint presentations on your Samsung Smart TV opens up a whole new world of possibilities for sharing your ideas and captivating your audience. Whether you choose to connect via HDMI cable, utilize wireless options like Chromecast, AllShare Cast, or the Smart View app, the process of showcasing your presentations on the big screen is easier than ever.
In this guide, we explored different methods to connect your Samsung Smart TV to your computer, transfer your PowerPoint presentations, and play them seamlessly. We discussed the reliability of using an HDMI cable, the convenience of wireless options like Chromecast and AllShare Cast for Samsung devices, and the versatility of the Smart View app.
To enhance your experience, we provided valuable tips and tricks, such as optimizing your presentation, choosing the right display mode, using wireless presenters or smartphone apps as remotes, and practicing your delivery. These tips will help you make the most out of your PowerPoint presentations and engage your audience effectively.
Now that you have the knowledge and tools to play your PowerPoint presentations on your Samsung Smart TV, it’s time to unleash your creativity, captivate your audience, and deliver impactful presentations on the big screen. Whether you’re in a business meeting, classroom, or simply sharing your ideas with friends and family, the impressive visuals and immersive viewing experience offered by your Samsung Smart TV will leave a lasting impression.
So, connect your devices, transfer your presentations, choose the right method for your needs, and embrace the power of sharing your PowerPoint presentations on your Samsung Smart TV. Enjoy the seamless connectivity, brilliant display, and dynamic presentation capabilities that this setup offers.
Now it’s your turn. Start exploring the possibilities and share your ideas with the world on your Samsung Smart TV!
Leave a Reply Cancel reply
Your email address will not be published. Required fields are marked *
Save my name, email, and website in this browser for the next time I comment.
- Crowdfunding
- Cryptocurrency
- Digital Banking
- Digital Payments
- Investments
- Console Gaming
- Mobile Gaming
- VR/AR Gaming
- Gadget Usage
- Gaming Tips
- Online Safety
- Software Tutorials
- Tech Setup & Troubleshooting
- Buyer’s Guides
- Comparative Analysis
- Gadget Reviews
- Service Reviews
- Software Reviews
- Mobile Devices
- PCs & Laptops
- Smart Home Gadgets
- Content Creation Tools
- Digital Photography
- Video & Music Streaming
- Online Security
- Online Services
- Web Hosting
- WiFi & Ethernet
- Browsers & Extensions
- Communication Platforms
- Operating Systems
- Productivity Tools
- AI & Machine Learning
- Cybersecurity
- Emerging Tech
- IoT & Smart Devices
- Virtual & Augmented Reality
- Latest News
- AI Developments
- Fintech Updates
- Gaming News
- New Product Launches
- AI Writing How Its Changing the Way We Create Content
- How to Find the Best Midjourney Alternative in 2024 A Guide to AI Anime Generators
Related Post
Ai writing: how it’s changing the way we create content, unleashing young geniuses: how lingokids makes learning a blast, 10 best ai math solvers for instant homework solutions, 10 best ai homework helper tools to get instant homework help, 10 best ai humanizers to humanize ai text with ease, sla network: benefits, advantages, satisfaction of both parties to the contract, related posts.

What Files Can Samsung Smart TV Play

15 Amazing Logitech Presentation Remote for 2024

How To Screen Mirror On A Vizio Smart TV

Which Tablet Has Microsoft Office

11 Amazing Pc Remote for 2024

What Tablet Should I Buy For College

13 Best Logitech Clicker for 2024

How To Download Google Slides With Audio To Powerpoint
Recent stories.

How to Find the Best Midjourney Alternative in 2024: A Guide to AI Anime Generators

How to Know When it’s the Right Time to Buy Bitcoin

How to Sell Counter-Strike 2 Skins Instantly? A Comprehensive Guide

10 Proven Ways For Online Gamers To Avoid Cyber Attacks And Scams

- Privacy Overview
- Strictly Necessary Cookies
This website uses cookies so that we can provide you with the best user experience possible. Cookie information is stored in your browser and performs functions such as recognising you when you return to our website and helping our team to understand which sections of the website you find most interesting and useful.
Strictly Necessary Cookie should be enabled at all times so that we can save your preferences for cookie settings.
If you disable this cookie, we will not be able to save your preferences. This means that every time you visit this website you will need to enable or disable cookies again.
Contribute to the Microsoft 365 and Office forum! Click here to learn more 💡
April 9, 2024
Contribute to the Microsoft 365 and Office forum!
Click here to learn more 💡
- Search the community and support articles
- Microsoft 365 and Office
- Search Community member
Ask a new question
Can I show a PPT presentation as LOOPING video on a TV using USB stick?
I have a PowerPoint 2013 presentation that I want to show continuously on a TV.
I can export as jpeg images to a USB memory stick, and the TV will display them continuously. But every slide is shown for the same fixed time, with no transitions.
I can export as a movie (.MP4) and the TV does show the movie with transitions but it plays only once. (PPT also seems to force a single duration per slide, independent of any per-slide times set in PPT Transitions ribbon).
I tried Kiosk mode which looked as if it might make a looping movie, but that made no difference.
Is there a setting in PowerPoint that I am missing? Or do I need to modify the movie in 3rd party software? Or is Kiosk mode already specifying a looping movie, which means that I've run into a limitation of the TV?
Just re-checked the user manual for the TV (Samsung UN28H4000) and discovered that it supports .wmv as well as .mp4. PPT can export either. I will try that next time I have access to the TV, but any hints anyone can offer will be most welcome.
Report abuse
Replies (5) .
11 people found this reply helpful
Was this reply helpful? Yes No
Sorry this didn't help.
Great! Thanks for your feedback.
How satisfied are you with this reply?
Thanks for your feedback, it helps us improve the site.
Thanks for your feedback.
- Volunteer Moderator |
- Article Author
Some video editing software allows you to create video loops, then burn them to a DVD folder on a USB drive. Windows DVD Maker can do this, though it costs $29.95 to register. Here's a link to a download, in case you want to evaluate it: Windows DVD Maker Download
6 people found this reply helpful
Thanks.
I have not been able to find any TV setting to make it loop. For pictures, if you "Play Folder" it repeats by default.
I actually have some good video editing software, but on my home machine which does not have a current version of PPT. The machine that does have PPT has no editing software. But I will see what I can do. If I can create a video file that definitely loops on a computer, there is a chance that the TV will loop it as well.
2 people found this reply helpful
Your reasoning is sound, if the video loops on a computer without assistance from a hosting piece of software, it will also loop on the TV.
I just noticed you're from Ottawa, I lived there as a child on MacKay St., near the Governor-General's residence. Beautiful city (in the summer)!
13 people found this reply helpful
I am looping a .MP4 video on a Samsung TV in my lobby.
Here's how I made it work on my particular model:
1. Start the video
2. While it is playing, press the "INFO" button on the remote
3. You will see player controls at the top of the screen along with a gear icon to access settings
4. Click the gear icon and you will see settings for "REPEAT"
I have it loop all day and set a timer to turn off the TV every day at 5pm.
Hope this works with your model.
56 people found this reply helpful
Question Info
- Norsk Bokmål
- Ελληνικά
- Русский
- עברית
- العربية
- ไทย
- 한국어
- 中文(简体)
- 中文(繁體)
- 日本語
- Office Products
- Office Electronics
- Presentation Products
- Presentation Remotes
Enjoy fast, free delivery, exclusive deals, and award-winning movies & TV shows with Prime Try Prime and start saving today with fast, free delivery
Amazon Prime includes:
Fast, FREE Delivery is available to Prime members. To join, select "Try Amazon Prime and start saving today with Fast, FREE Delivery" below the Add to Cart button.
- Cardmembers earn 5% Back at Amazon.com with a Prime Credit Card.
- Unlimited Free Two-Day Delivery
- Streaming of thousands of movies and TV shows with limited ads on Prime Video.
- A Kindle book to borrow for free each month - with no due dates
- Listen to over 2 million songs and hundreds of playlists
- Unlimited photo storage with anywhere access
Important: Your credit card will NOT be charged when you start your free trial or if you cancel during the trial period. If you're happy with Amazon Prime, do nothing. At the end of the free trial, your membership will automatically upgrade to a monthly membership.
Return this item for free
Free returns are available for the shipping address you chose. You can return the item for any reason in new and unused condition: no shipping charges
- Go to your orders and start the return
- Select the return method

Image Unavailable

- To view this video download Flash Player
Physical and Digital Pointer Presentation Clicker for Powerpoint Presentations,2 in 1 USB A and USB C Wireless Presenter Remote with Highlighting Magnifier for LED LCD Screen
Air Mouse Version
Classic Version
Digital&Physical Laser
Green Laser
Purchase options and add-ons
About this item.
- 【Physical and Digital Laser Pointer for Presentations】The presentation presenter combines physical and digital laser pointer in one clicker,it can clearly present on a traditional projection screen or LCD/TV screen.
- 【USB A and Type C in One Presentation Remote】 USB A & Type C receiver combine in a presenter remote, you can freely switch between different port devices such as Mac, laoptop and pc, one for multiple computers.The receiver placed inside the back of the clicker, conveniently to store when not in use. (Powered by 2pcs AAA Battery are not included).
- 【Multi-function Remote Clicker for Presentations】①Basic funstions of the slide advancer meet your daily presentations:Physical Laser,Page forward/ backward,Black/Full screen/Volume Control;②More advanced functions make rich content interaction during your presentations: Digital Laser,Highlight, Magnify,E-Mark/Eraser,etc.
- 【Wide Compatibility & Easy to Carry】The remote slide advancer supports systems: Windows 8/10 or later version,Mac OS 10.10 0r later version.Lightweight and compact design is easy to fit into the pocket.
Consider a similar item

Buy it with

Similar items that may ship from close to you

Compare with similar items
Product description.

Looking for specific info?
Product information, warranty & support, customer reviews.
Customer Reviews, including Product Star Ratings help customers to learn more about the product and decide whether it is the right product for them.
To calculate the overall star rating and percentage breakdown by star, we don’t use a simple average. Instead, our system considers things like how recent a review is and if the reviewer bought the item on Amazon. It also analyzed reviews to verify trustworthiness.
Customers say
Customers like the quality, performance, value, and ease of use of the remote control. For example, they mention it works well as a presentation pointer and as an air mouse, it's built much better with fewer moving parts, and it works seamlessly on their Mac. That said, some appreciate the ease of setup and the fact that it'll just plug and play.
AI-generated from the text of customer reviews
Customers like the performance of the remote control. For example, they say it works well, seamlessly on their Mac, and with PowerPoint. Some mention it has handy functions and allows movement in the area without missing the action. Overall, most are happy with the product's performance and recommend it for classroom use.
"...Fantastic for the price point. Good range, solid connection, no issues ." Read more
" Great product does the work perfectly and affordable price." Read more
"I use this every week and every week it works great . The laser is bright. No delay when advancing slides...." Read more
"This has a good range and works with M1 iMacs ...." Read more
Customers like the ease of use of the remote control. They mention that it has an easy interface and setup, it just plugs and plays, and that it saves them so much time. They also appreciate the compartment making it easy to keep track of.
"If you're looking for a basic slides remote, this one is great. no setup required , good weight and feel in your hand...." Read more
"... Easy to use so far . The air mouse could definitely be better. Finding out that slow movement is key...." Read more
"The item is not as easy to use as expected but much better than others I ordered and tried. It is a keeper because it does the basics I need...." Read more
"...It is easy to set up and easy to use. I took one star off because my laser pointer feature stopped working after only 2 weeks...." Read more
Customers are satisfied with the quality of the remote control. They mention that it works well as a presentation pointer and as an air mouse. The laser pointer is a nice touch and works well for basic functions. The mouse is hard to learn but works well to select URL links in a PowerPoint presentation.
"...This model is built much better as there are fewer "moving" parts...." Read more
"I use this every week and every week it works great. The laser is bright . No delay when advancing slides...." Read more
"This works well as a presentation pointer (clicker) and as an air mouse so I don’t have to go to the laptop to click on links during a presentation...." Read more
"Works well for basic functions, laser pointer is a nice touch , usb adapter fits inside battery compartment making it easy to keep track of, air..." Read more
Customers appreciate the value of the remote control. They say it's a simple, affordable slide advancer.
"... Fantastic for the price point . Good range, solid connection, no issues." Read more
"Great product does the work perfectly and affordable price ." Read more
"... Not bad for the price ." Read more
"It’s a simple affordable slide advancer ...." Read more
Customers like the comfort of the remote control. They mention it has a good weight and feel in their hand, and is ergonomically designed.
"...no setup required, good weight and feel in your hand . Only a 4 because the extra functionality isn't quite intuitive...." Read more
"Very easy to use. Good size, ergonomically . Good value for the $$...." Read more
"Great looking and feeling . Great price. I bought 8 for a training and no issues with any of them" Read more
Reviews with images

- Sort reviews by Top reviews Most recent Top reviews
Top reviews from the United States
There was a problem filtering reviews right now. please try again later..

- Amazon Newsletter
- About Amazon
- Accessibility
- Sustainability
- Press Center
- Investor Relations
- Amazon Devices
- Amazon Science
- Start Selling with Amazon
- Sell apps on Amazon
- Supply to Amazon
- Protect & Build Your Brand
- Become an Affiliate
- Become a Delivery Driver
- Start a Package Delivery Business
- Advertise Your Products
- Self-Publish with Us
- Host an Amazon Hub
- › See More Ways to Make Money
- Amazon Visa
- Amazon Store Card
- Amazon Secured Card
- Amazon Business Card
- Shop with Points
- Credit Card Marketplace
- Reload Your Balance
- Amazon Currency Converter
- Your Account
- Your Orders
- Shipping Rates & Policies
- Amazon Prime
- Returns & Replacements
- Manage Your Content and Devices
- Recalls and Product Safety Alerts
- Conditions of Use
- Privacy Notice
- Consumer Health Data Privacy Disclosure
- Your Ads Privacy Choices
IMAGES
VIDEO
COMMENTS
Step 8: Click on "Save". After selecting the saving location, specifying the file name, and choosing the file format, click on the "Save" button located at the bottom-right corner of the "Save As" window. PowerPoint will now save your presentation on the USB drive.
Scope of Presentation This presentation describe the basics of USB device and Host side i.e. descriptors, endpoints, device controller, root hub etc. It covers USB architecture in Linux. It does not cover protocol level details of USB. Introduction • USB stands for UNIVERSAL SERIAL BUS. • USB is host controlled.
In this weeks video we revisit how to play media using the USB input that exists on most modern monitors. It is important to know that you can't simply plug ...
Saving a PowerPoint presentation to a thumb drive/data-stick is easy. All you need to do is open it up and save it as if you were saving it to your computer. But you need to make sure that you safely remove the thumb drive as well, or else you could corrupt the file. ... Make sure your thumb drive/data-stick is already in the USB port. 2. Open ...
Insert a USB flash drive in a USB slot in your computer. In PowerPoint, click File, click Export, click Package Presentation for CD, and then click Package for CD. In the Package for CD dialog box, type a name for your CD in the Name the CD box. To add one or more presentations to package together, click Add, select the presentation, and then ...
Summary. Insert your flash drive into a USB port on your computer. Open the PowerPoint presentation you wish to transfer. Click on the 'File' tab in PowerPoint. Select 'Save As' from the menu. Choose your flash drive from the list of available locations. Click 'Save' to transfer the presentation to your flash drive.
Presentation on Usb 3.0 - Free download as Powerpoint Presentation (.ppt), PDF File (.pdf), Text File (.txt) or view presentation slides online. Features of USB 3.0
USB Drivers. Michael Mitchell COP 5641 / CIS 4930. USB Device Basics. Universal Serial Bus (USB) connects between a computer and peripheral devices Created to replace various slow buses (parallel, serial, and keyboard connections) USB 2.0: up to 480Mb/s (35 MB/s) Download Presentation. interface audio interface audio.
Open the USB drive using your file management software (e.g. Windows Explorer). Make sure the file is on the drive. Open it and make sure it works properly. Eject the USB drive. If you are using Windows, you should see an icon on the bottom of your screen. On a Mac, drag the drive to the trash. At the client site, insert the USB drive and open ...
Method 3 - Open the Presentation and use "Save As". Step 1: As always, first connect the USB flash drive. Step 2: Find the Google Slide file and double click to open it. Step 3: After opening the file, click on "Files> Save As" in the application. Step 4: Browse the file explorer andselect the USB flash drive to save the file.
Step-by-Step Guide to Playing a Slideshow on a TV Using a USB. 1. Connect the USB drive to the TV. Depending on the model of your TV, you may need to use an adapter to connect the USB drive. 2. Turn on the TV and press the "Source" button on the remote control. Select the USB drive from the list of available sources. 3.
Give your next presentation a sophisticated, yet modern look with this 100 percent editable Usb pen drive colored icon in powerpoint pptx png and editable eps format. Choose from a variety of customizable formats such as PPTx, png, eps. You can use these icons for your presentations, banners, templates, One-pagers that suit your business needs.
This would require copying your presentation to a portable storage device, such as a USB drive, or burning it to a CD or sending it to yourself in an email. Then, you could copy it over to the ...
Step 4: Copy the Downloaded File to the Flash Drive. Locate the downloaded presentation file on your computer. Right-click on the file, select "Copy," and then navigate to the connected USB flash drive. Right-click within the flash drive and choose "Paste" to copy the presentation onto the flash drive. See also Types of Projector Cables ...
January 21, 2024 by admin. To save a PowerPoint presentation to a USB flash drive, open the file and click "File" in the top-left corner. Choose "Save As," select your USB drive as the location, and click "Save.". Safely eject the USB drive when done to ensure your presentation is portable and accessible. Learn the simple steps to ...
While a USB 2.0 port could deliver just 2.5 watts of power, about enough to slowly charge a phone, USB 3.1 upped this to about 4.5 watts, and the initial uses of USB-C topped out at 15 watts of ...
Hi All! When working in PowerPoint, it is always important to Package the presentation once you are done to ensure that the Presentation is saved with all of...
USB Drive: One of the most straightforward ways to transfer your PowerPoint presentation is by using a USB drive. Simply save your presentation file onto a USB drive, plug it into the USB port on your Samsung Smart TV, and navigate to the file using the TV's file explorer. From there, you can open and play the presentation directly on your TV.
1. Start the video. 2. While it is playing, press the "INFO" button on the remote. 3. You will see player controls at the top of the screen along with a gear icon to access settings. 4. Click the gear icon and you will see settings for "REPEAT". I have it loop all day and set a timer to turn off the TV every day at 5pm.
【USB A and Type C in One Presentation Remote】 USB A & Type C receiver combine in a presenter remote, you can freely switch between different port devices such as Mac, laoptop and pc, one for multiple computers.The receiver placed inside the back of the clicker, conveniently to store when not in use.