

How to Record a PowerPoint Presentation with Narration
Can be helpful in creating a dramatic narrative
Microsoft PowerPoint has a built-in recording tool that allows you to narrate your presentations using recorded audio. You can export and share recorded presentations as video files.
This tutorial covers everything about recording PowerPoint presentations on Windows and Mac computers.

Record PowerPoint Presentation with Narration
Open the PowerPoint file/presentation you want to record and follow the steps below.
Record PowerPoint Presentation on Windows
- Select the slide you want to start recording from on the slide thumbnail pane.
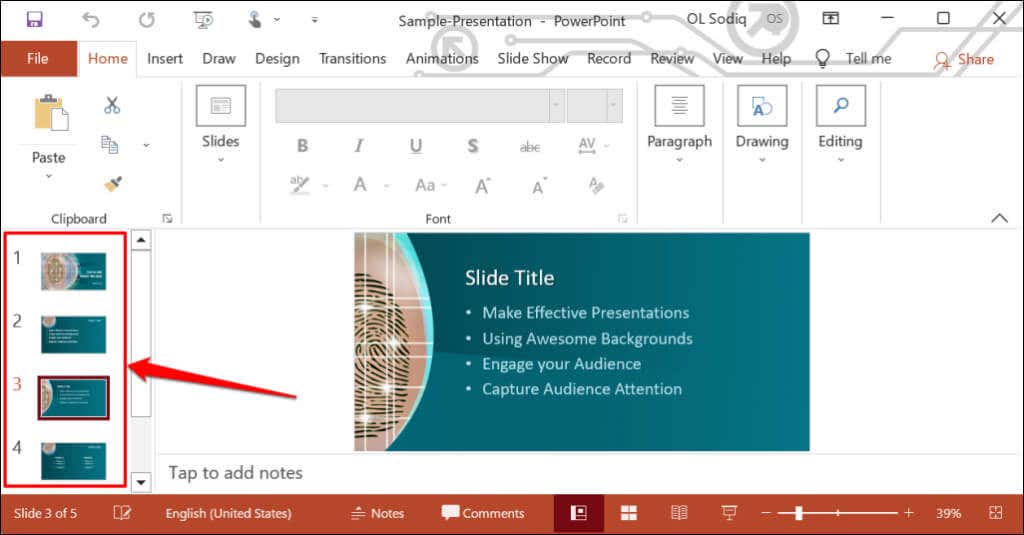
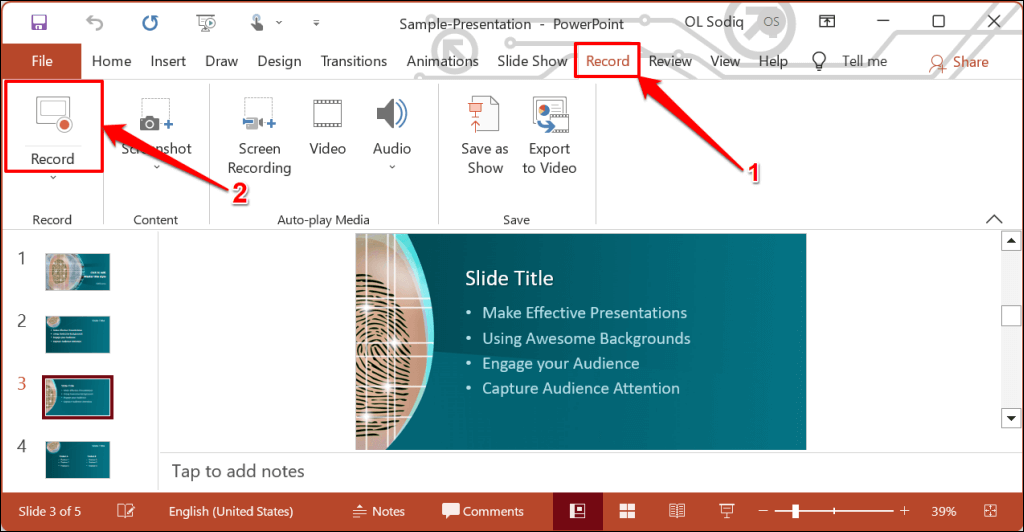
- Head to the Record tab on the ribbon and select the Record button to start recording from the current/selected slide.
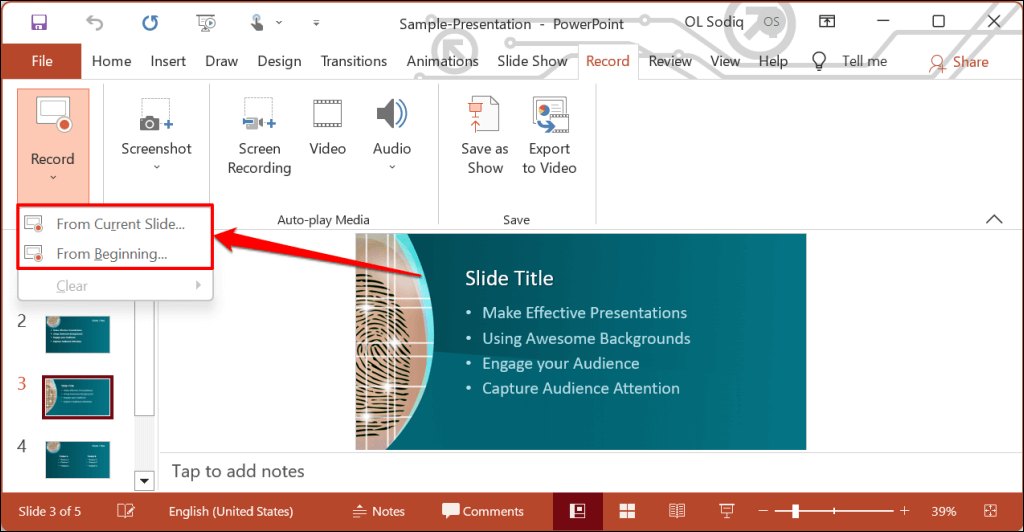
To record from the first slide, select the down-facing arrow icon below the Record button and select From Beginning .
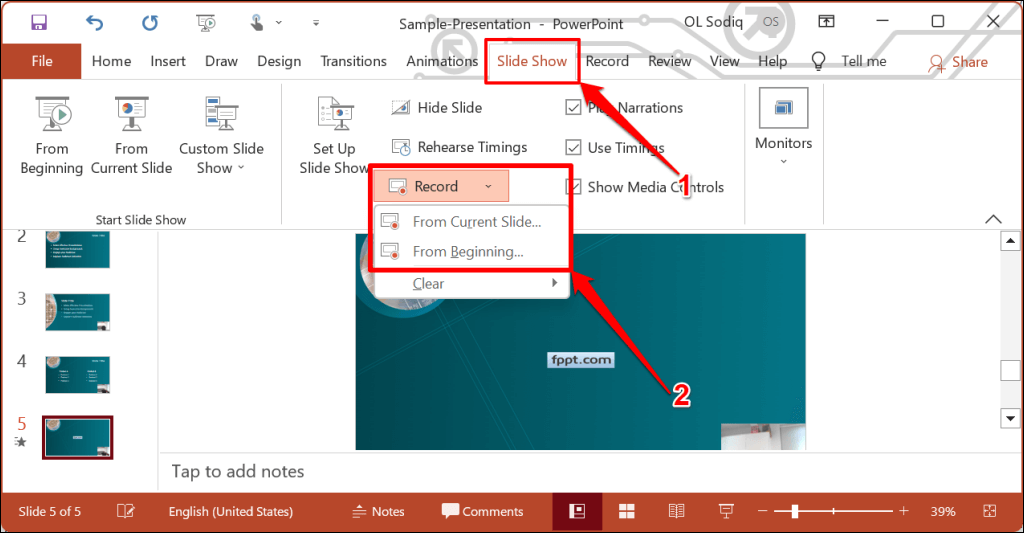
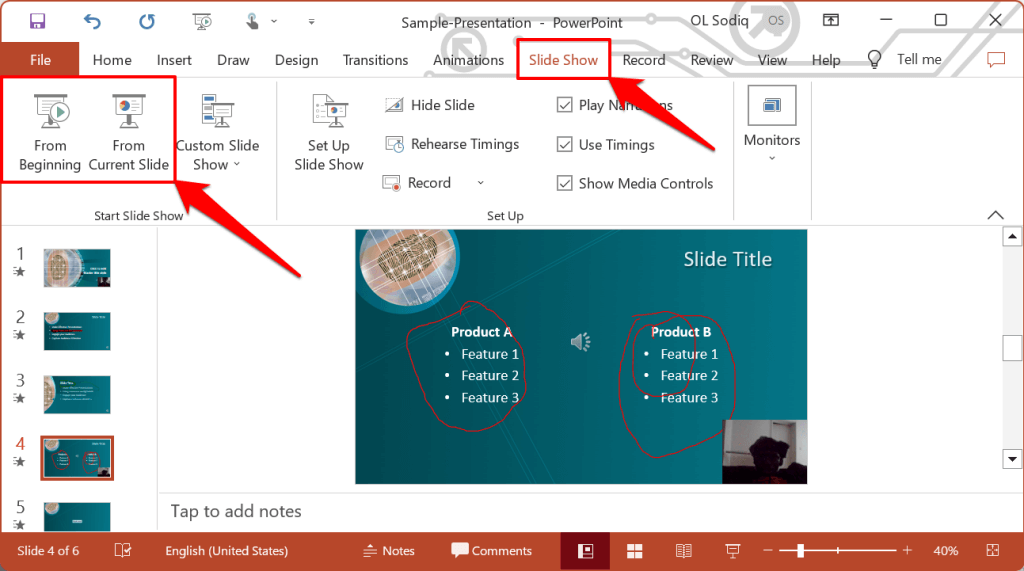
You can also record a presentation from the Slide Show tab. Select Slide Show on the ribbon and select Record , From Current Slide , or From Beginning .
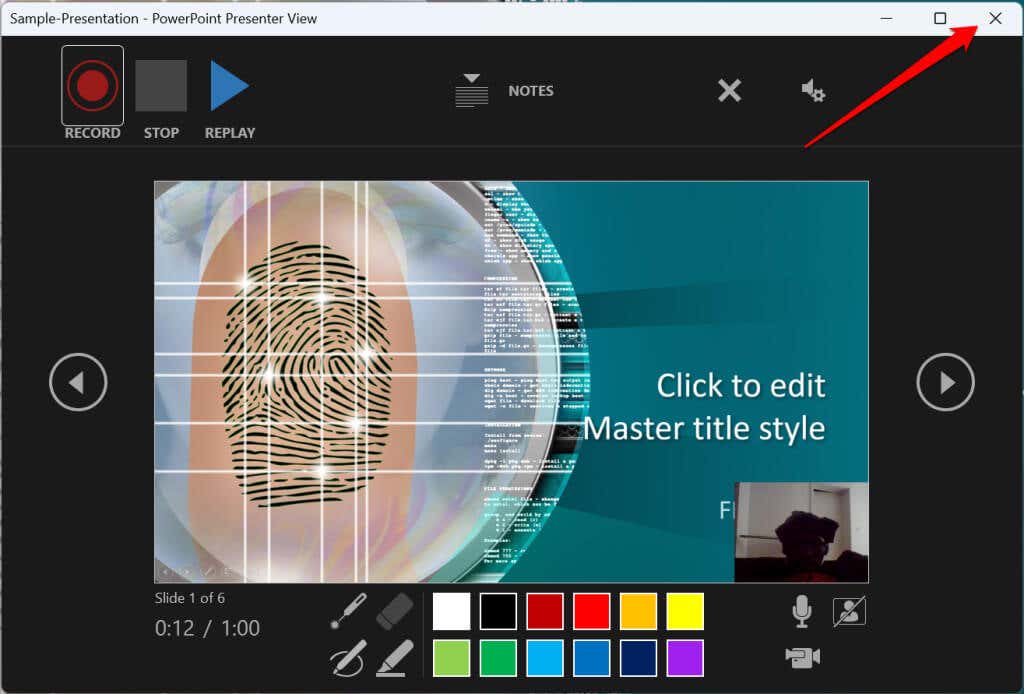
That’ll open PowerPoint’s presentation recorder in a fullscreen window.
- Select the Record icon and start speaking after the three seconds countdown.
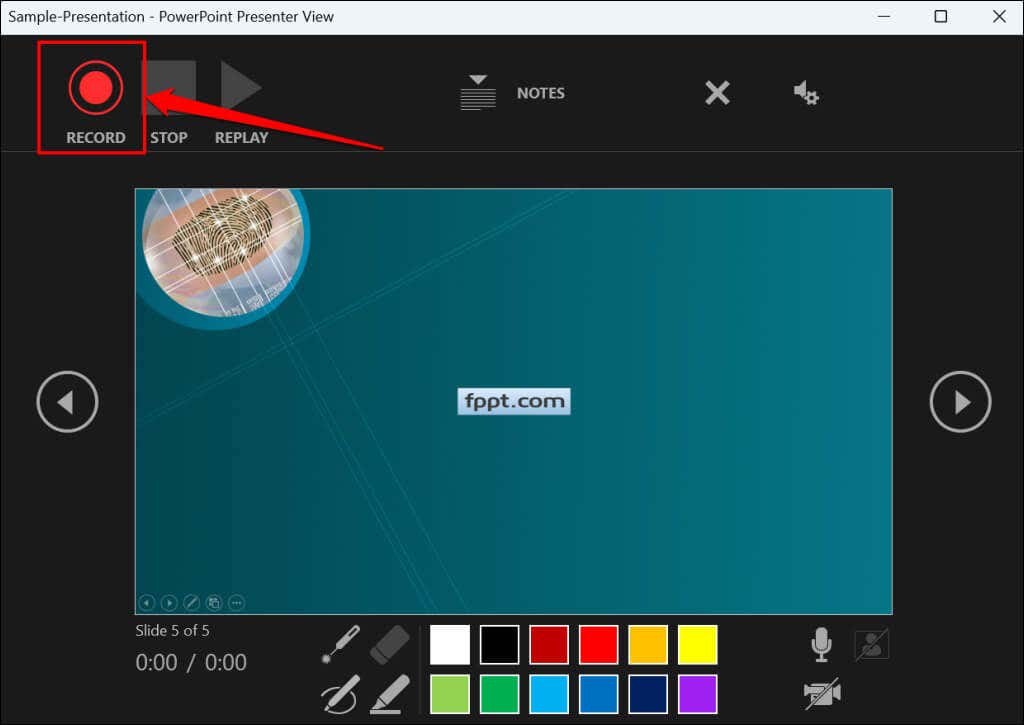
PowerPoint records the presentation window and captures your voice and webcam feed as you navigate the slides. Select the left-facing and right-facing arrows to move to the previous and next slides in the presentation.
Record PowerPoint Presentation in macOS
- Open the Slide Show tab and select Record Slide Show .
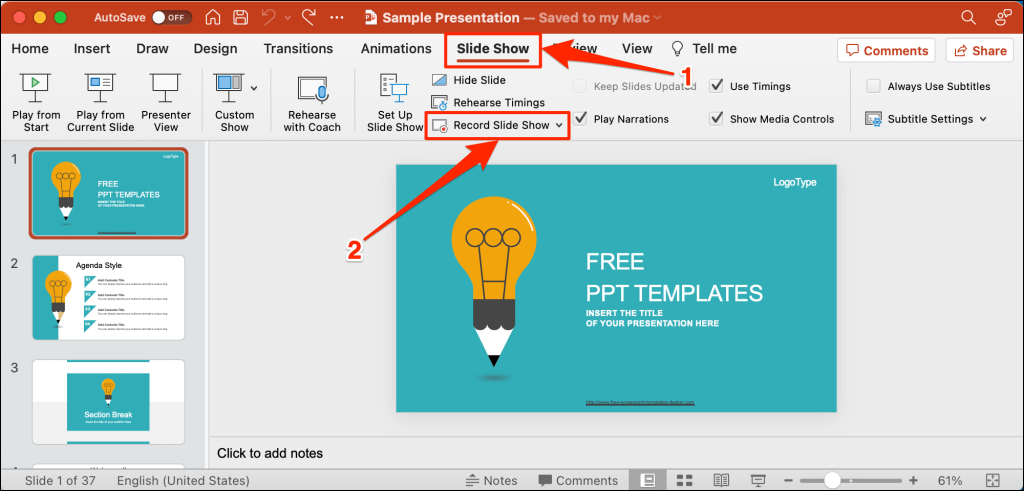
- Select the Record button on the toolbar to start recording your narration.
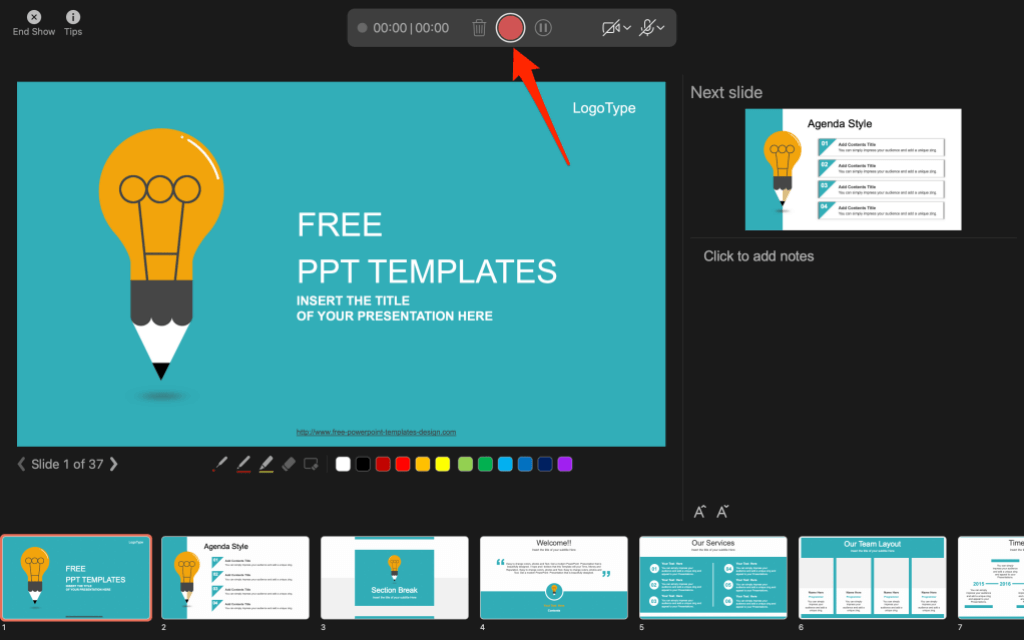
Use your keyboard arrow keys to move back and forth between slides. Press N or Space Bar to move to the next slide or animation in the presentation. Press P or Backspace to return to the previous slide or animation.
Select Tips in the top-left corner for more keyboard shortcuts and other presentation tips .
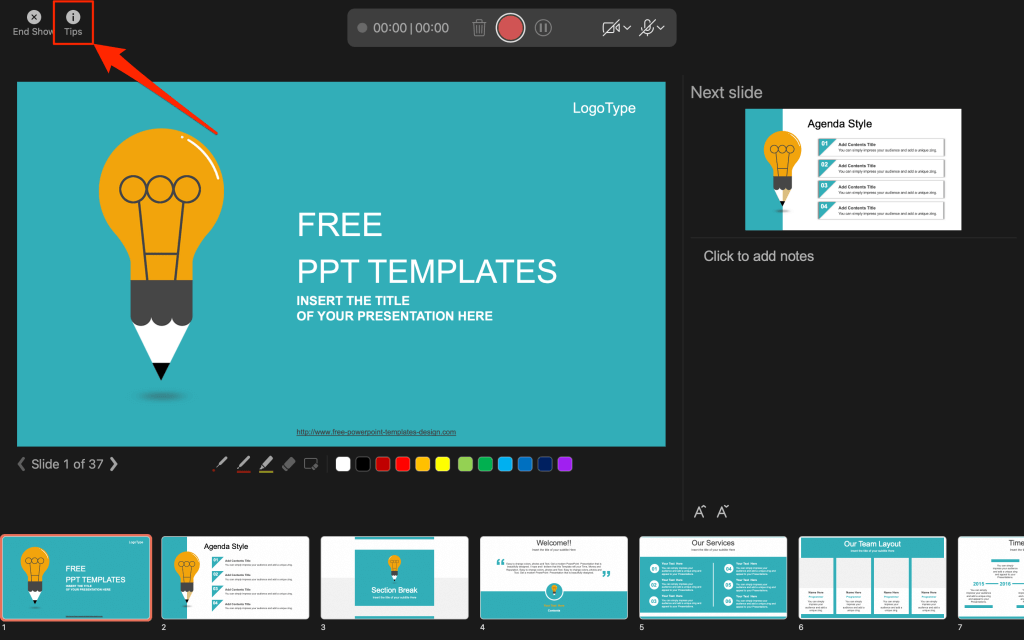
Note: The narration tool doesn’t record slide transitions. When moving between slides, wait for the destination slide to appear on the screen before speaking.
PowerPoint Recorder Control/Settings
You’ll find a handful of controls and options on the recording tool. We’ll show you how to use these controls to include voiceovers or audio recordings in your presentation.

Using Presentation Pointer Tools
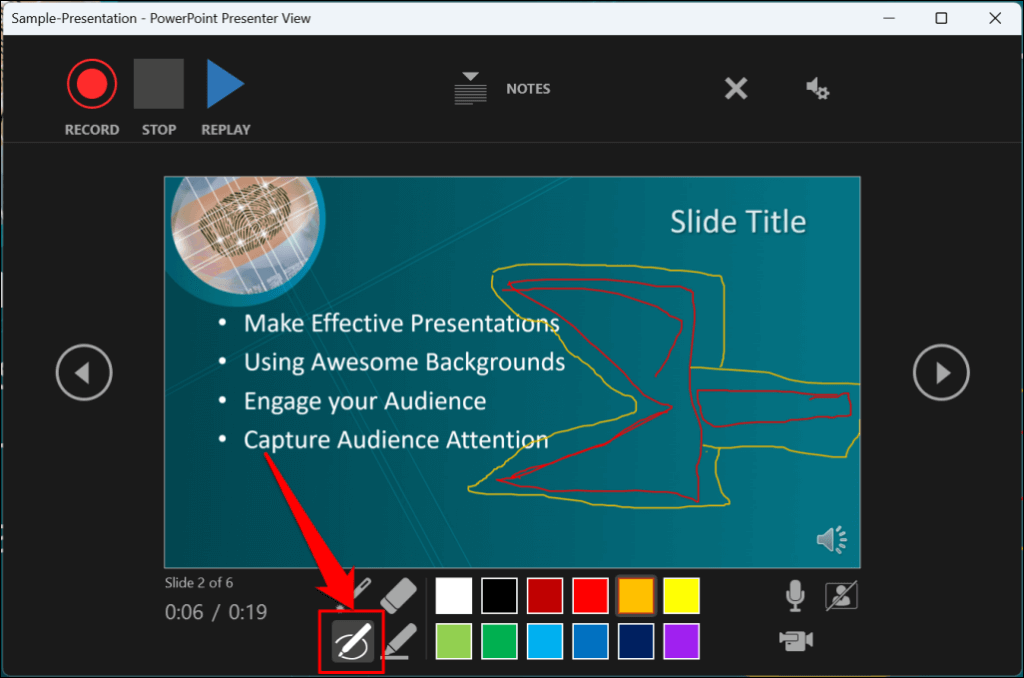
PowerPoint provides several tools to mark up your slides when narrating your presentation. There’s a pen tool, eraser, laser pointer, and highlighter.
With the Pen tool, you can draw on slides during narration/recording. Press Ctrl + P (Windows) or Command + P (Mac) to use the pen tool. You can also select the Pen icon to convert the pointer to a pen.
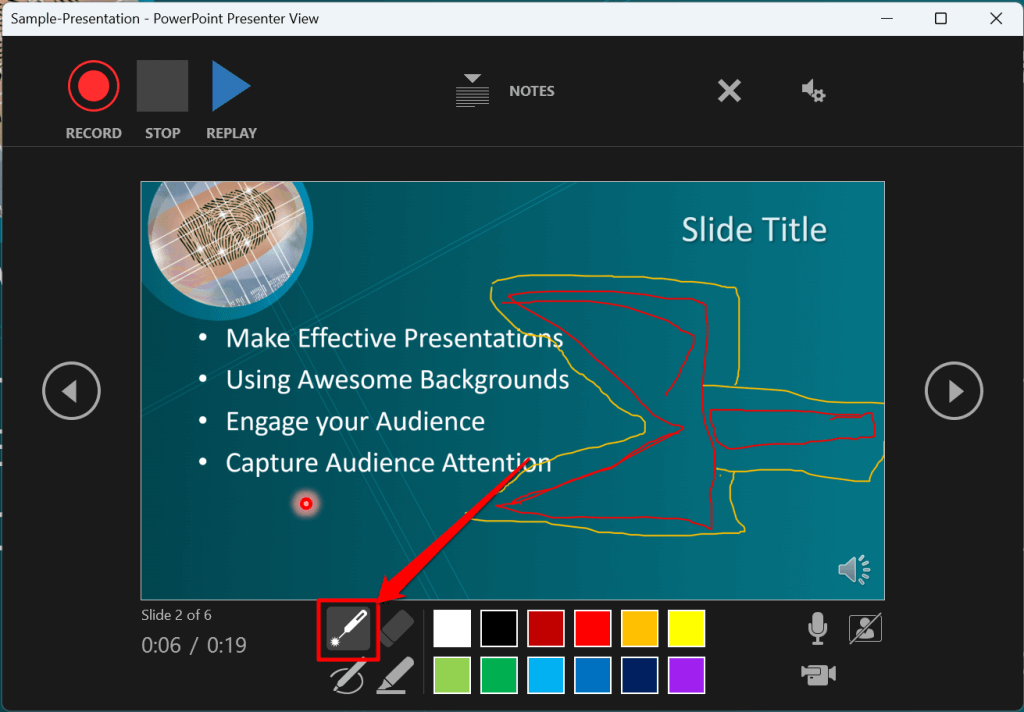
The Laser pointer tool converts your cursor to an onscreen laser. Use the laser pointer to draw attention to something on a slide/presentation.
Press Ctrl + L (Windows) or Command + L (Mac) to use the laser pointer. There’s also a Laser pointer icon on the toolbar.
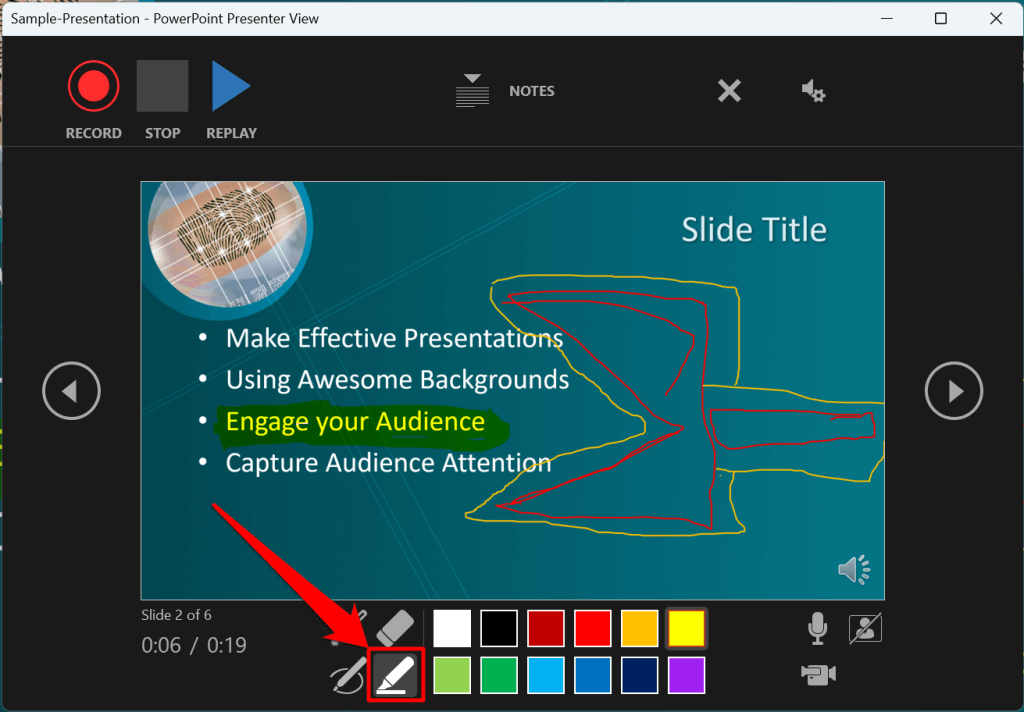
Pressing Ctrl + I (or selecting the Highlighter tool ) converts your cursor to a highlighter.
Use the Eraser tool to remove inks and highlight from slides. Select the Eraser icon or press Ctrl + E and select the ink to erase.
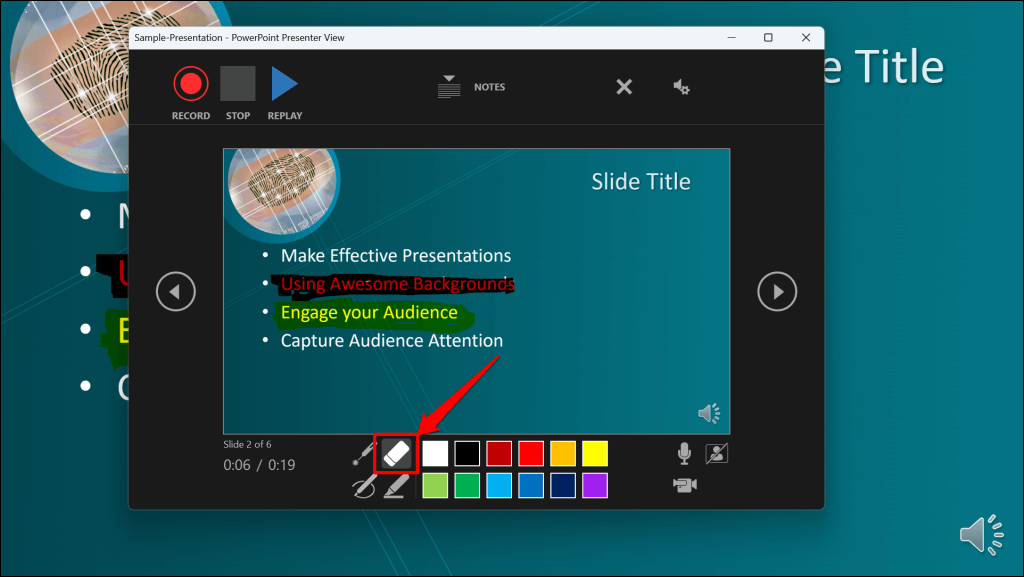
On macOS, select the Erase Pen icon (or press E ) to erase all drawings and highlights on the slide.
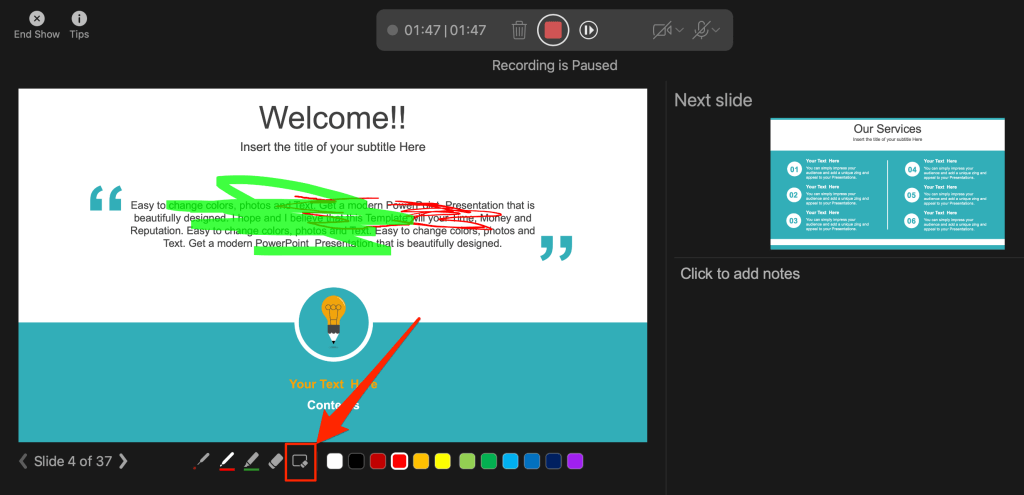
You can change the pointer tools ink from the color selection boxes. However, one major limitation is that you can’t change the size of these pointer tools.
Pause and Resume Your Recording
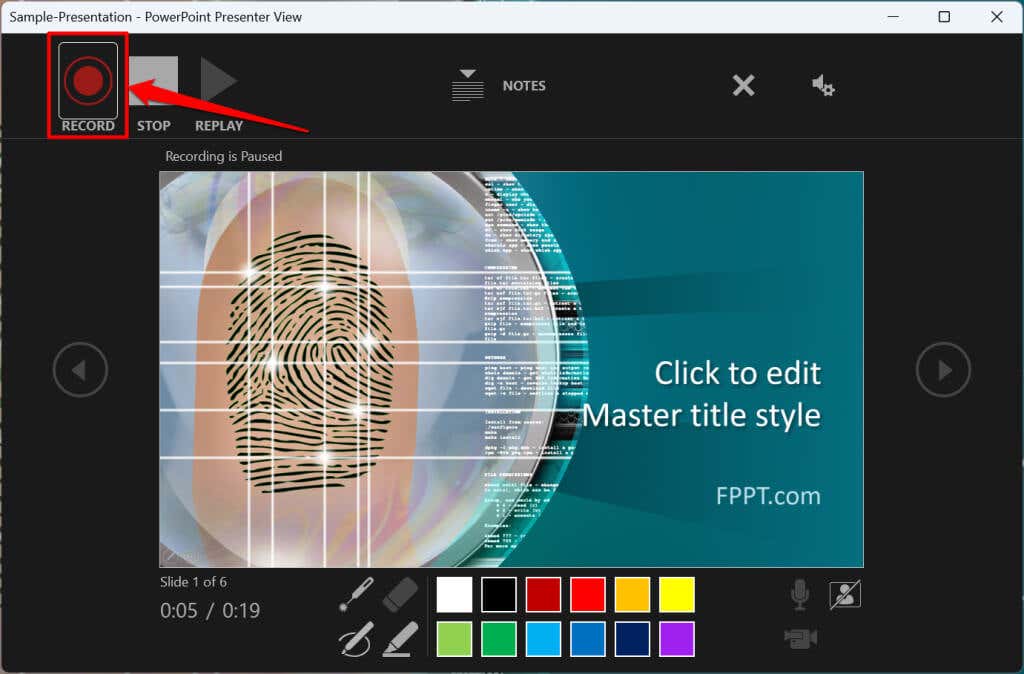
In Windows, press I on your keyboard or select the Pause button in the top-left corner to pause your recording.
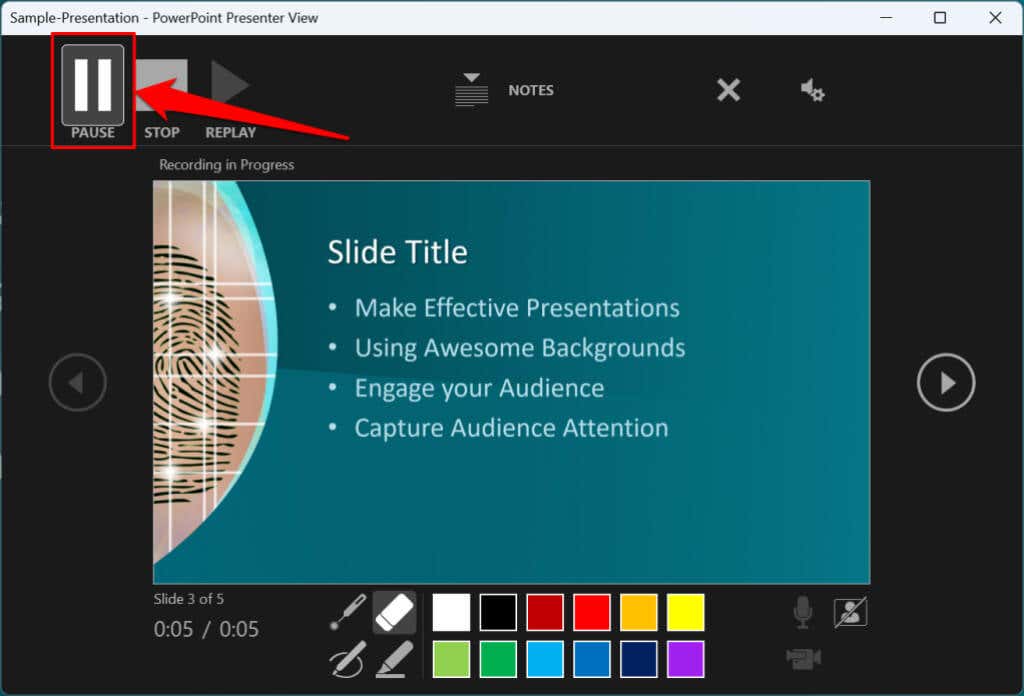
Press I again or select the Record icon to resume the recording.
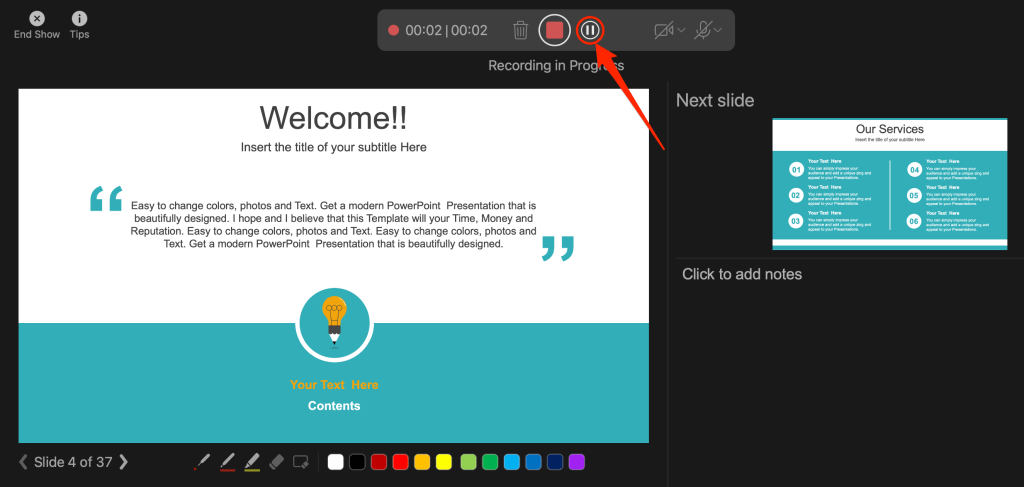
If you use a Mac, select the Pause icon in the top toolbar to pause the recording.
Unmute or Mute Microphone
Check that your microphone is unmuted before recording. Select the microphone icon in the bottom-right corner to mute or unmute your mic.
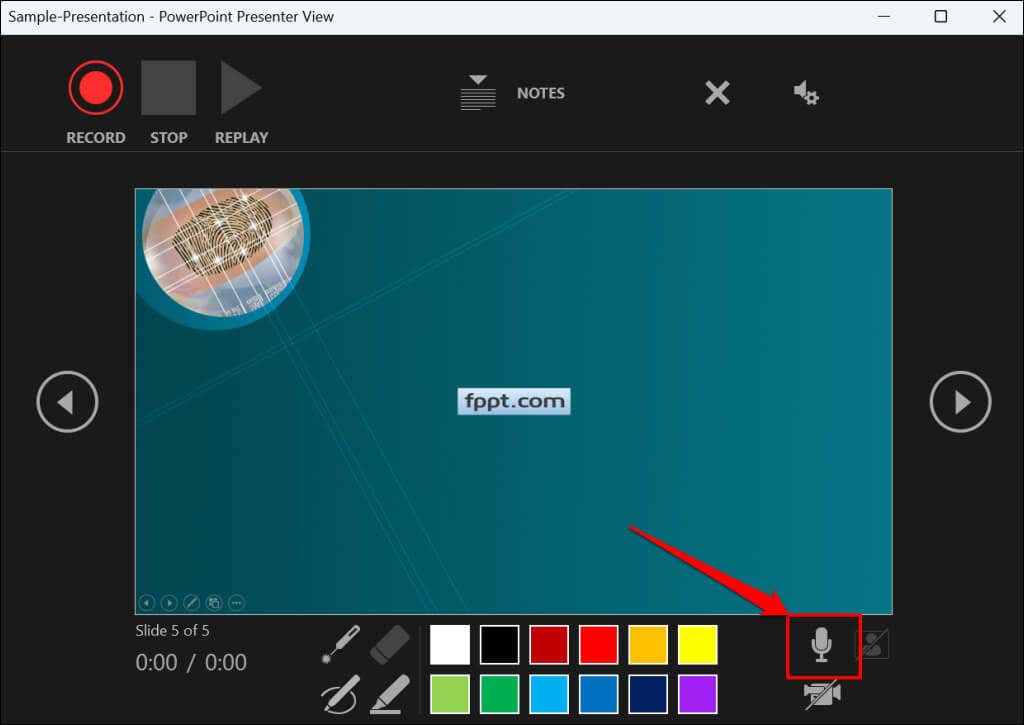
PowerPoint for Windows allows you to mute and unmute your microphone in real time while recording video/audio narrations. The macOS version of PowerPoint only lets you configure your camera and microphone settings before recording.
Switch Microphone or Camera
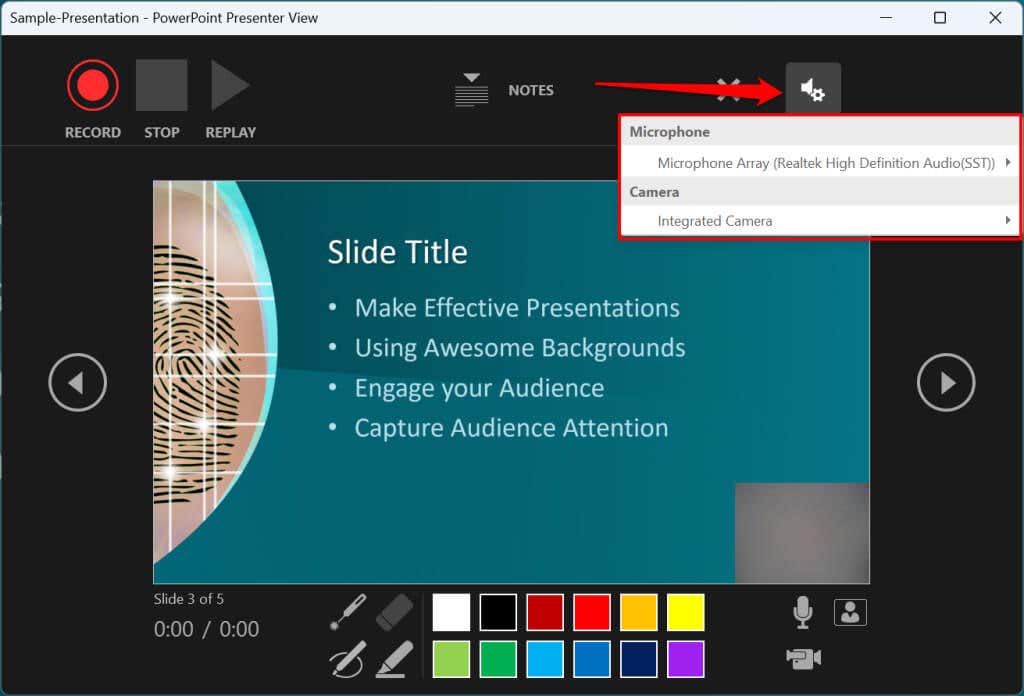
Want to record your presentation with an external microphone or camera? Press Ctrl + M or select the audio/camera settings icon in the top-right corner and choose your preferred microphone/camera.
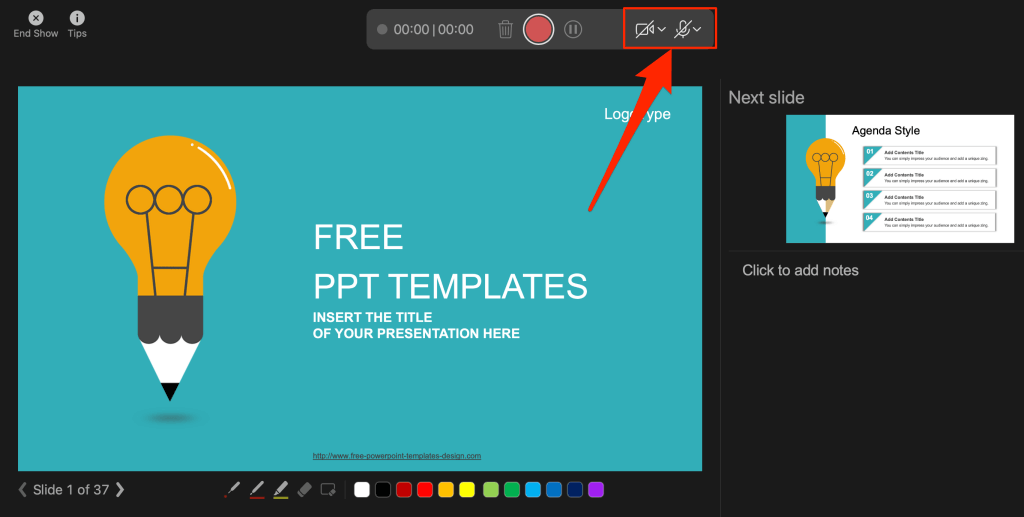
In macOS, select the microphone icon to mute or unmute your microphone. Select the arrow-down icon next to the microphone or camcorder icons to switch input devices.
Enable and Disable Camera
The recorder displays your camera or webcam feed in the bottom-right corner of the presentation slides.
Select the camcorder icon to remove your webcam feed from the recording. Select the icon again to display your webcam feed in the presentation.
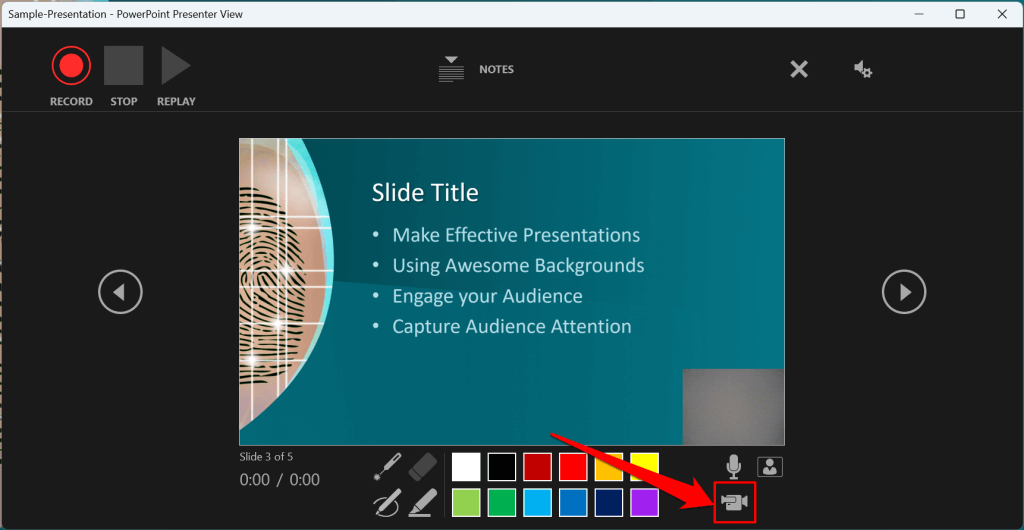
You can also use the Ctrl + K keyboard shortcut on Windows computers to enable or disable your camera.
On Mac computers, you’ll find the video control icon on the top toolbar.
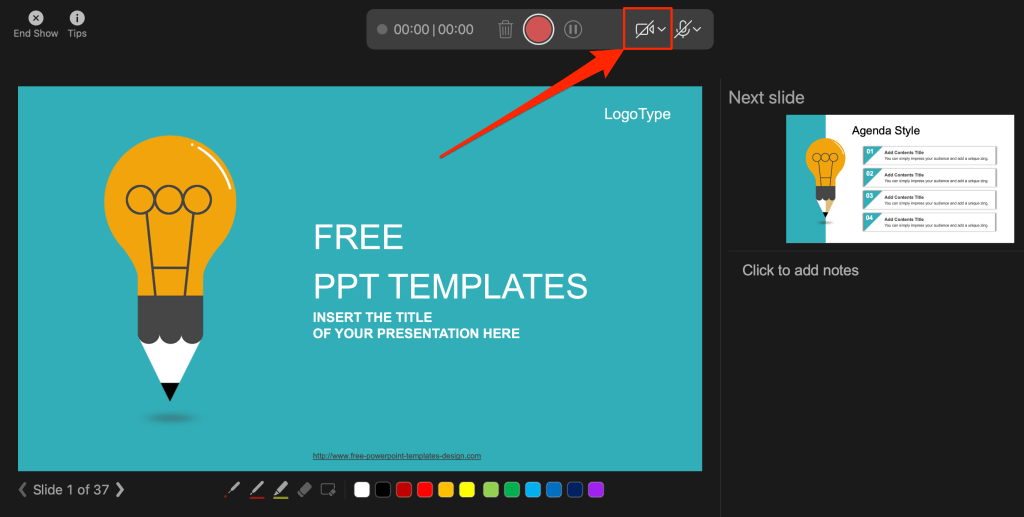
Note: The recording tool greys out the camcorder icon if your microphone is turned off.
Enable or Disable Camera Preview
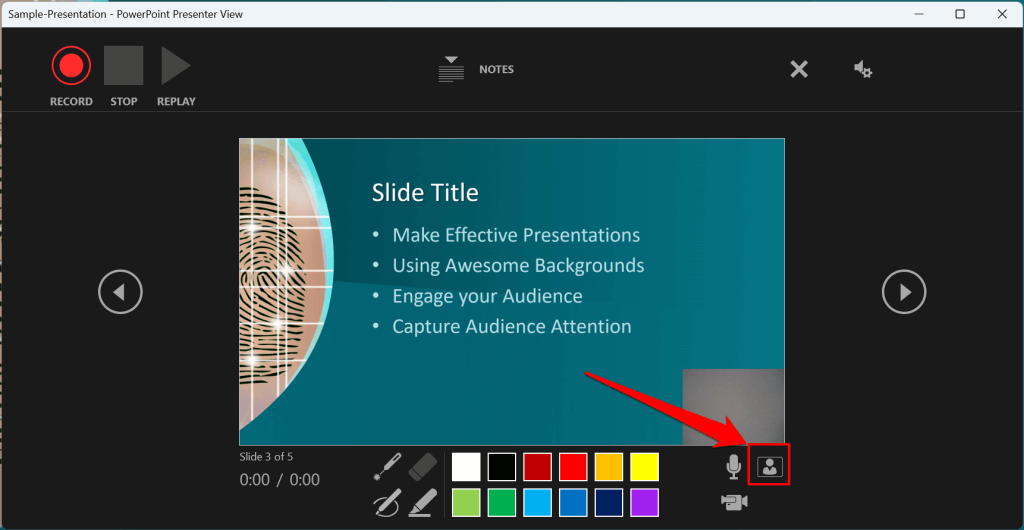
PowerPoint allows you to disable the camera preview without turning off your camera or webcam.
Press Ctrl + J (Windows) or select the Camera Preview icon in the bottom-right corner to disable or enable the camera preview.
End a Recording
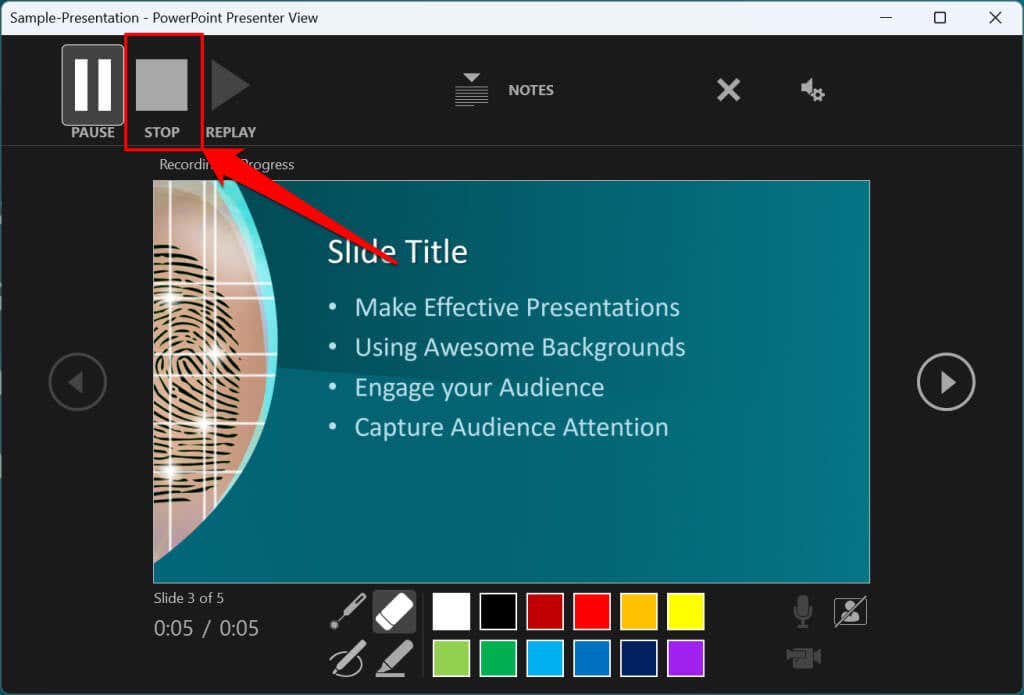
Press S on your Windows keyboard or select the Stop icon to end the recording.
Replay or Preview Your Recording
When you end a narration, press V on your keyboard or select Replay to preview or watch the recording.
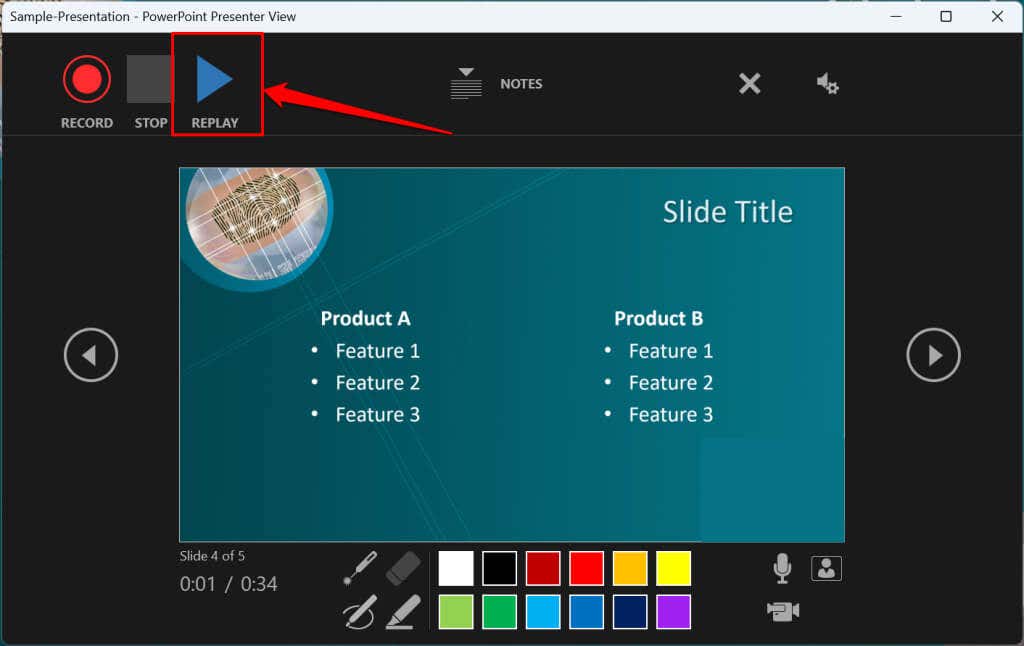
The recorded narration will include all pen inks, highlights, and laser pointer gestures made during the presentation.
You can also preview/replay the narration outside the recording tool. Open the Slide Show tab and choose to watch the playback From Beginning or From Current Slide .
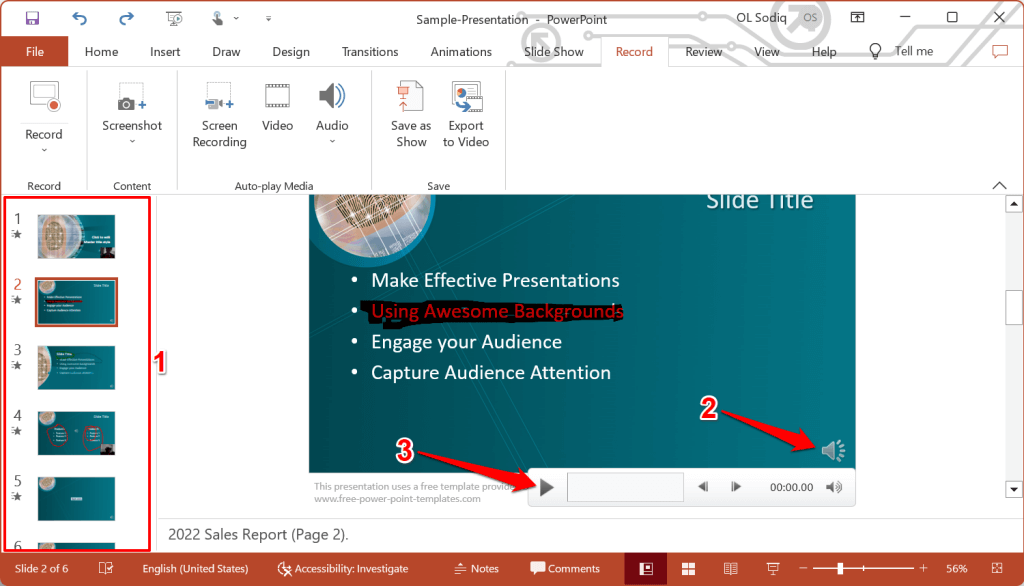
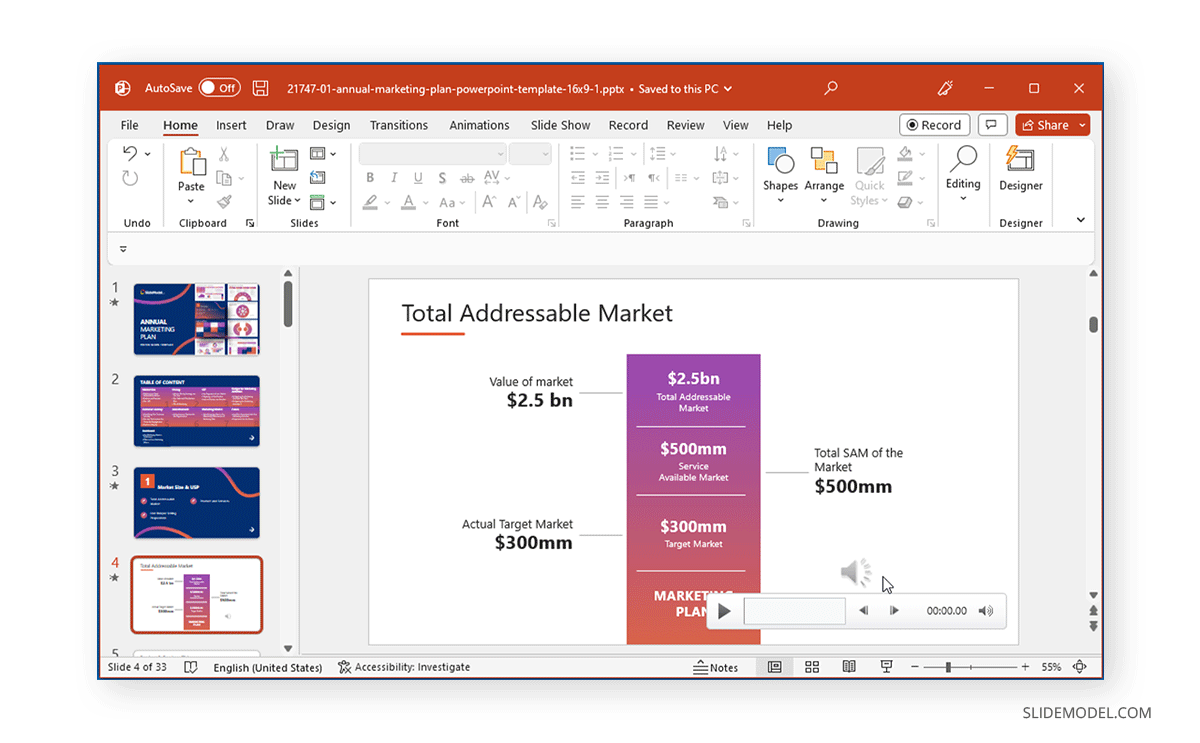
PowerPoint allows you to preview the playback on individual slides. A speaker/audio icon appears in the bottom-right of PowerPoint slides with narrations.
Choose the slide you want to preview, hover your cursor on the speaker icon in the bottom-right corner, and select Play .
Delete Current Narration/Recording
Did you spot an error when previewing your presentation? Want to delete the current narration and start from scratch?
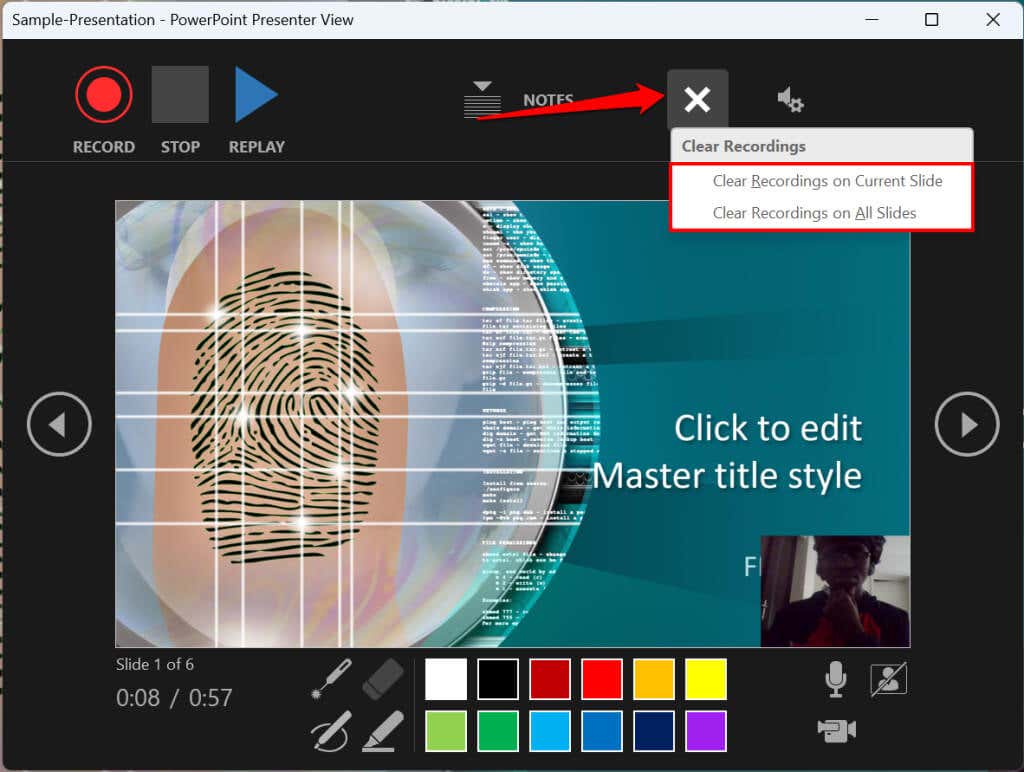
Select the Clear existing recordings icon and choose whether to Clear Recordings on Current Slide or Clear Recordings on All Slides .
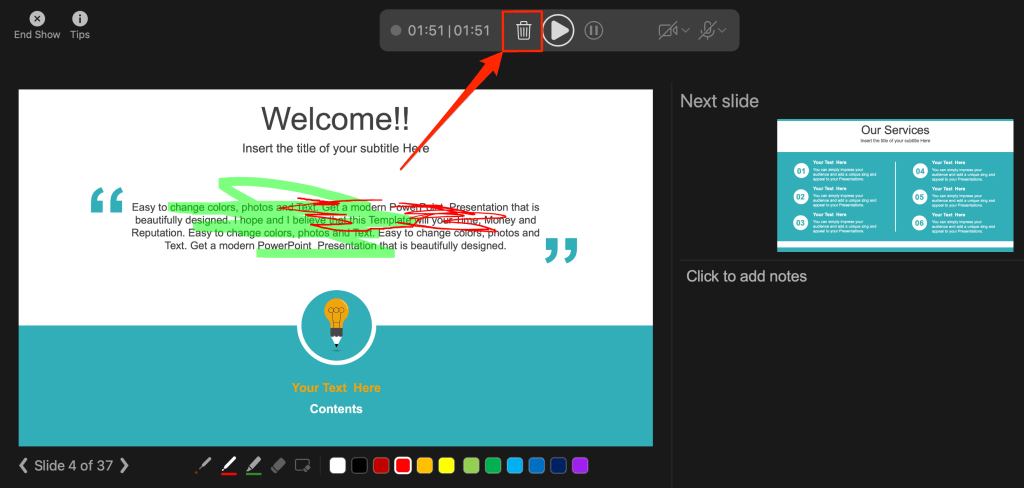
On Mac, select the Bin icon to delete the entire narration/recording.
Close the Narration Tool
Select the X icon on the title bar to close the presentation narration tool and return to Powerpoint.
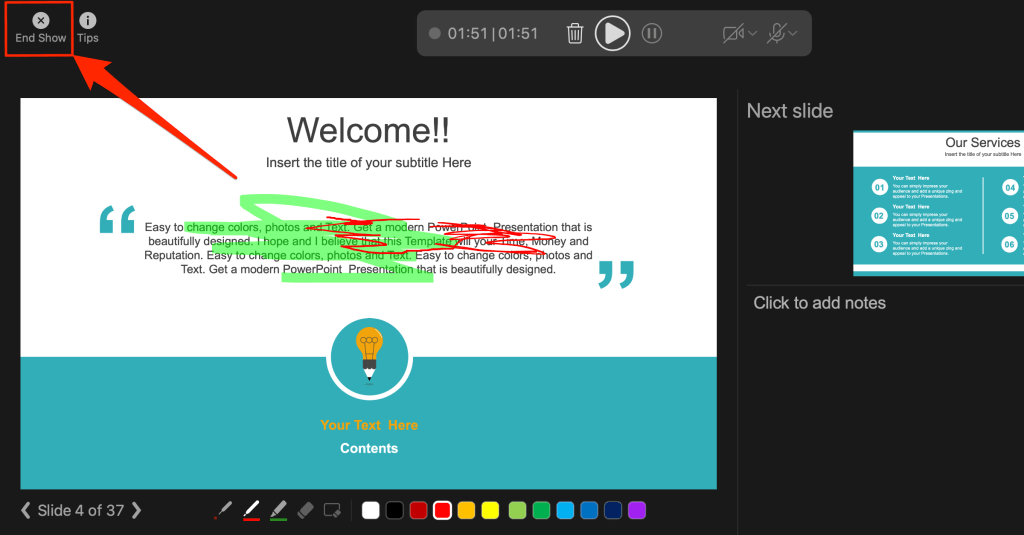
Select End Show in the top-left corner to close the recording tool on a Mac computer.
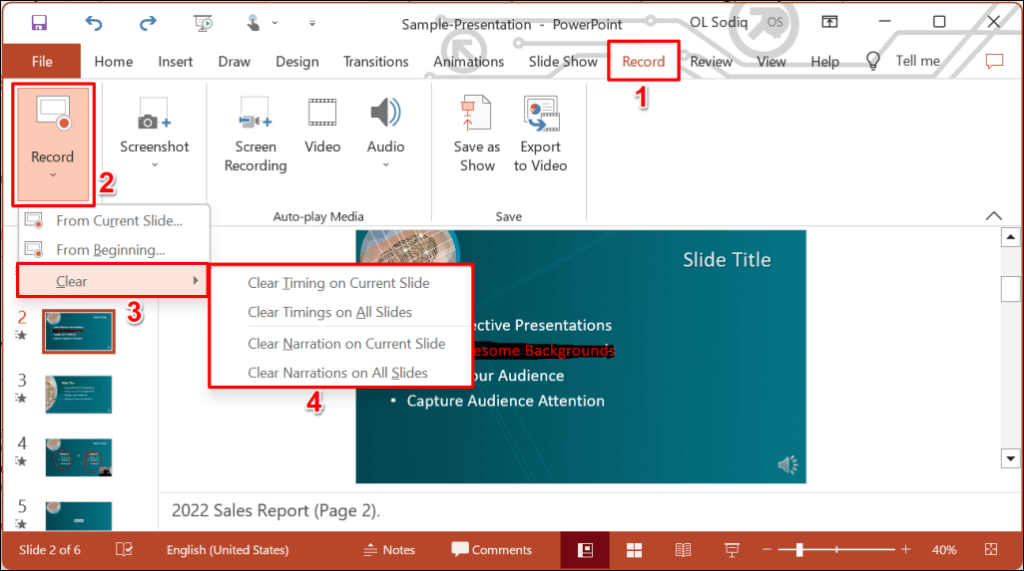
Delete Narrations from Slides
Want to delete the narration or timing on an individual slide or the entire presentation? Select the slide with the narration you want to delete and follow the steps below.
- Open the Record tab and select the down-facing arrow below the Record icon.
- Select Clear and choose to clear timing or narration on current or all slides.
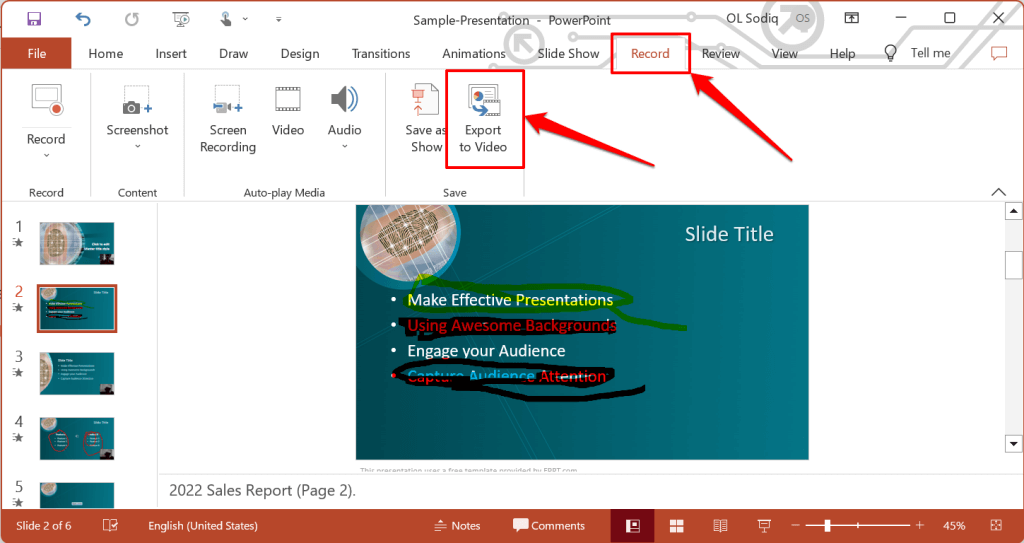
Export Recorded or Narrated Presentation
You can export a narrated PowerPoint presentation as a video file. The video output includes ink strokes, recorded audio/video, laser pointer gestures, and webcam/camera recording.
- Open the Record tab and select Export to Video .
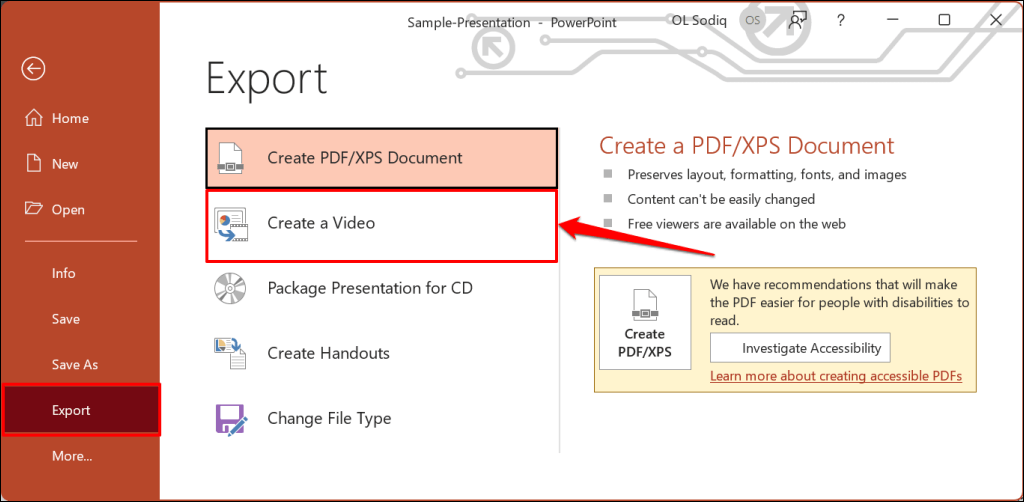
Alternatively, open the File menu, select Export on the sidebar, and select Create a Video .
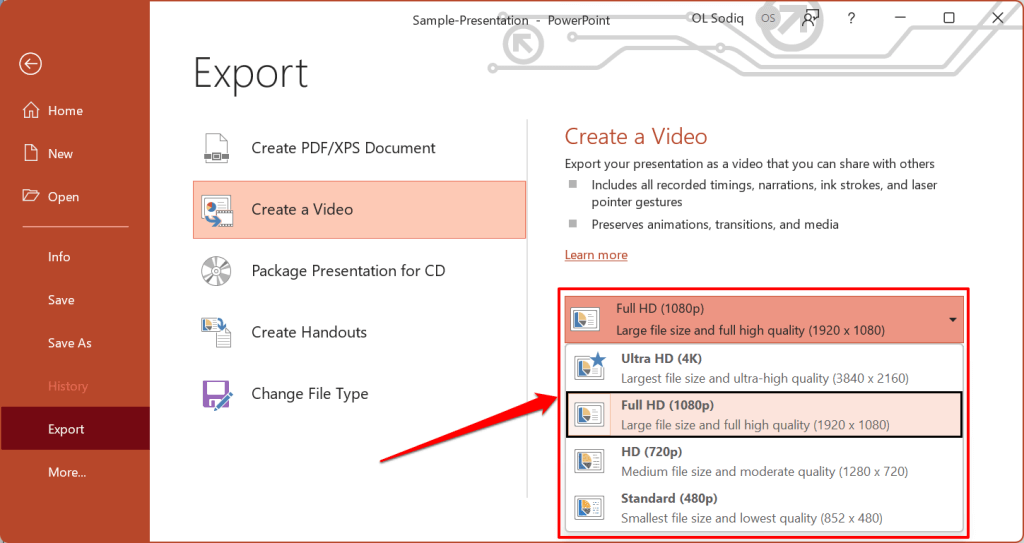
- Choose the quality of the video export in the first drop-down box—Ultra HD (4K), Full HD (1080p), HD (720p), Standard (480p).
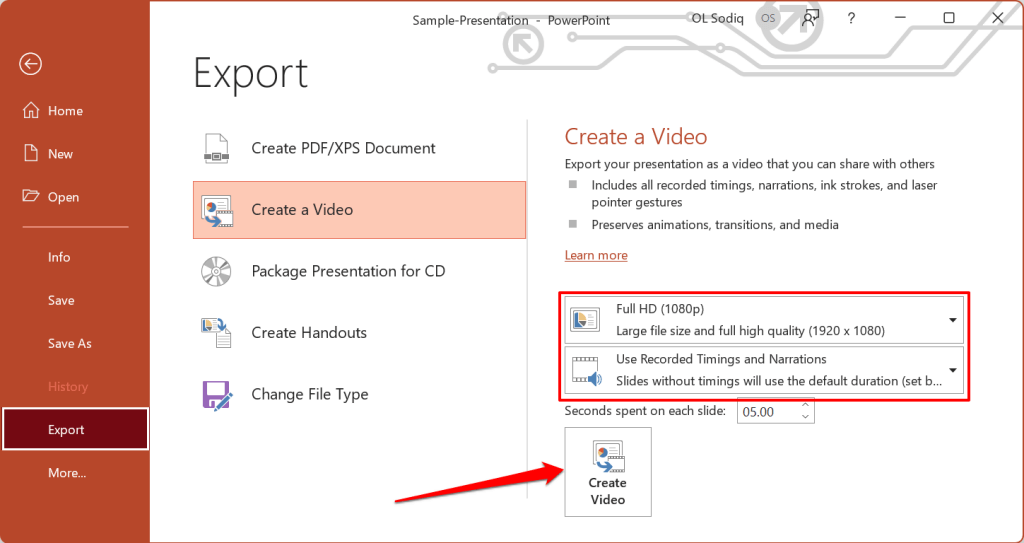
- Choose Use Recorded Timings and Narrations in the next drop-down box and select Create Video .
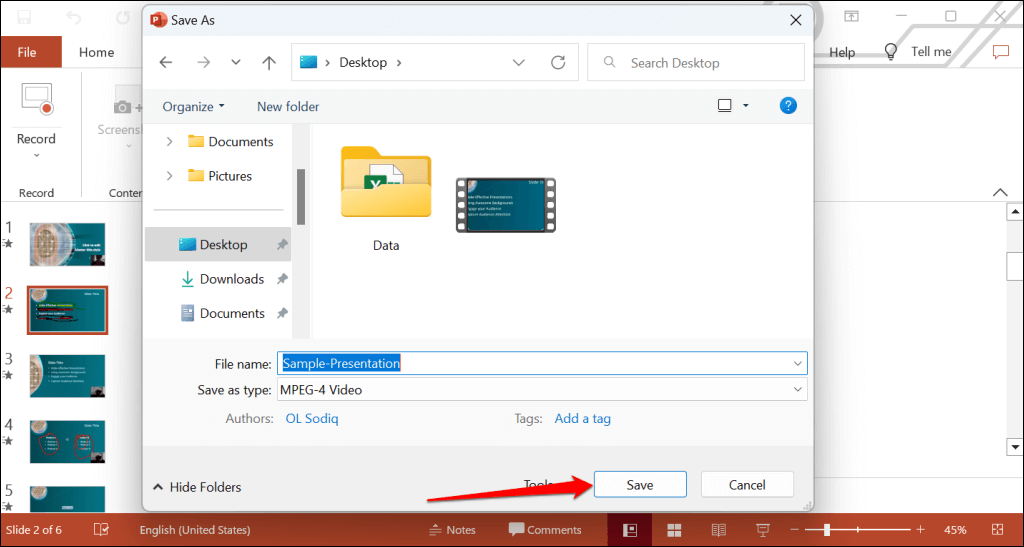
- Give the recorded presentation a file name and select Save .
Narrate Your PowerPoint Presentations
The Microsoft PowerPoint web app doesn’t have a recording tool. As a result, you can only record presentations with narrations using PowerPoint for Windows or Mac.
You might meet issues recording a slide show if you use an outdated version of PowerPoint. Also, the recording tool on older versions of PowerPoint has a different interface and lacks some controls. Update PowerPoint and restart your computer if you cannot record a slide show.
Sodiq has written thousands of tutorials, guides, and explainers over the past 4 years to help people solve problems with Android, iOS, Mac, and Windows devices. He also enjoys reviewing consumer tech products (smartphones, smart home devices, accessories, etc.) and binge-watching comedy series in his spare time. Read Sodiq's Full Bio
Read More Posts:

- Add, change, or remove transitions between slides Article
- Animate text or objects Article
- Use the Morph transition in PowerPoint Article
- Insert a video from YouTube or another site Article
- Add or delete audio in your PowerPoint presentation Article
- Record your screen in PowerPoint Article

Record your screen in PowerPoint
You can record your computer screen and related audio, and then embed it in your PowerPoint slide—or you can save it as a separate file.

Open the slide that you want to put the screen recording on.
On the Insert tab of the ribbon, select Screen Recording .

Tip: PowerPoint automatically records the audio and the mouse pointer, so by default those options are selected on the control dock. To turn them off, deselect Audio and Record Pointer.
Select Record . Use Pause as needed and Stop when you're done.
Note: Unless you pin the Control Dock to the screen, it will slide up into the margin while you record. To make the unpinned Control Dock reappear, point the mouse cursor at the top of the screen.
Your video is added to the slide. Right-click the video frame, select the Start icon and pick how you want your video to start: In Click Sequence , Automatically , or When Clicked On .
You can change the look of the video by right-clicking the video frame, select the Style icon, and pick another shape.
Save your screen recording as a separate file
Right-click the video frame and select Save Media as .
In the Save Media as box, choose a folder, and in the File name box, type a name.
Select Save.
Trim your video
Right-click the video frame and select Trim .
To determine where you want to trim your video footage, in the Trim Video box, select Play .
When you reach the point where you want to make the cut, select Pause . Use the Next Frame and Previous Frame buttons to specify precise timing.
Do one or more of the following:
To trim the beginning of the clip, select the start point (shown in the image below as a green marker). When you see the two-headed arrow, drag the arrow to the desired starting position for the video.

To trim the end of the clip, click the end point (shown in the image above as a red marker). When you see the two-headed arrow, drag the arrow to the desired ending position for the video.
Select OK .

Need more help?
Want more options.
Explore subscription benefits, browse training courses, learn how to secure your device, and more.

Microsoft 365 subscription benefits

Microsoft 365 training

Microsoft security

Accessibility center
Communities help you ask and answer questions, give feedback, and hear from experts with rich knowledge.

Ask the Microsoft Community

Microsoft Tech Community

Windows Insiders
Microsoft 365 Insiders
Was this information helpful?
Thank you for your feedback.
Home Blog PowerPoint Tutorials How to Record a Presentation in PowerPoint
How to Record a Presentation in PowerPoint
Recording PowerPoint presentations can have several benefits. They can serve as recordings of a session that can be uploaded online, shared with participants who might not be able to attend a presentation session, or used as tutorials for passing on instructions.
How to Record a PowerPoint Presentation
PowerPoint provides multiple options for initiating recording for a presentation. You can also choose to record audio and yourself presenting the slides using your camera. When recording your presentations, you can choose PowerPoint templates or something minimalist made by you to record the session. Just be mindful of the graphics to ensure the video does not appear overpowering to the viewer.
How do I Record a PowerPoint Presentation as a Video?
You can start recording your presentation using the following method.
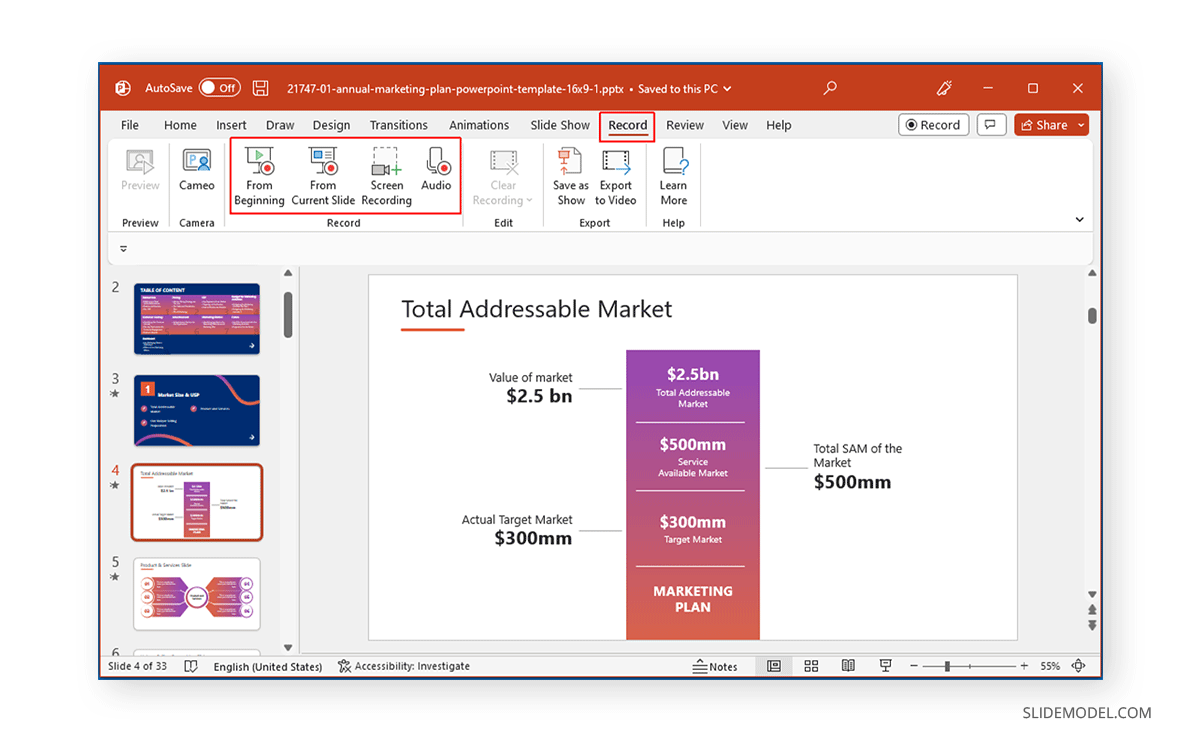
- Record Tab: To record a PowerPoint presentation, go to the Record tab and select whether you wish to record from the beginning, from the current slide, a specific area on the screen, or record audio.
- Slide Show Tab: you can also initiate recording a PPT via Slide Show -> Record to initiate recording from the current slide or the beginning of your presentation.
Record Button: If you’re using the latest version of PowerPoint, you can start Recording your presentation from the current slide via the Record button in the top right corner.
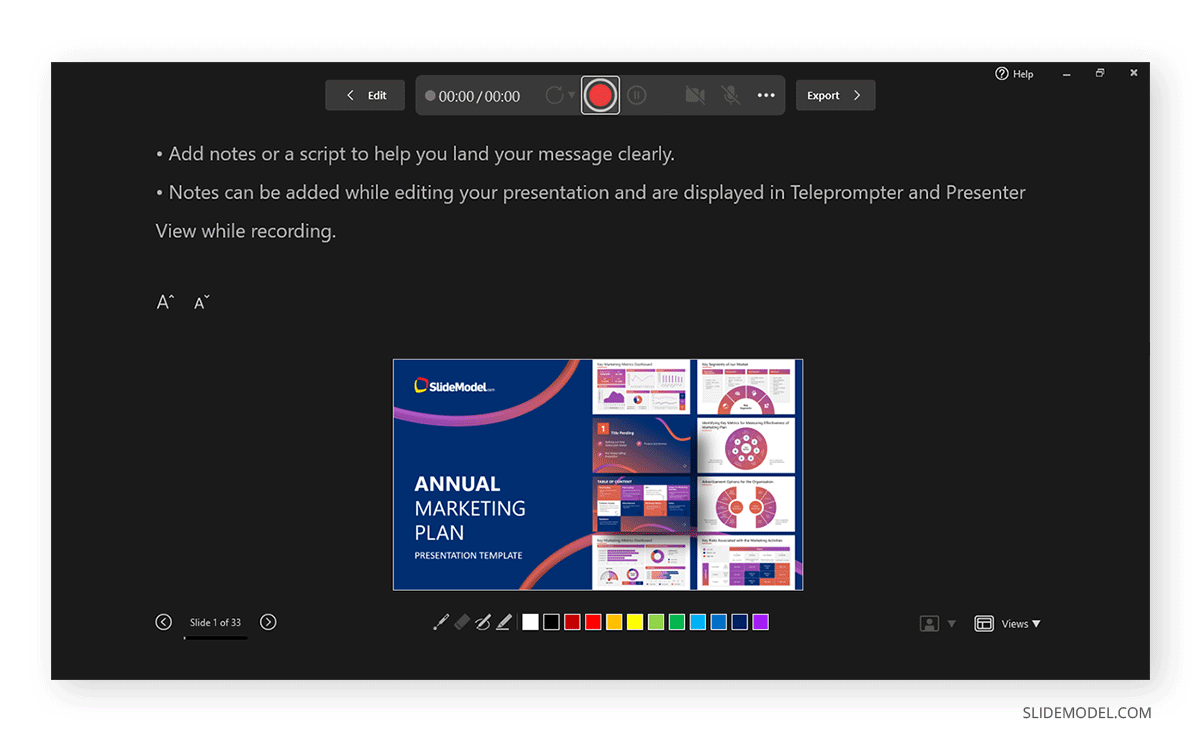
Record from the Current Slide or Beginning of the Presentation
Starting your recording from the beginning of the current slide will open your presentation in recording mode. Hit Record to start the recording.
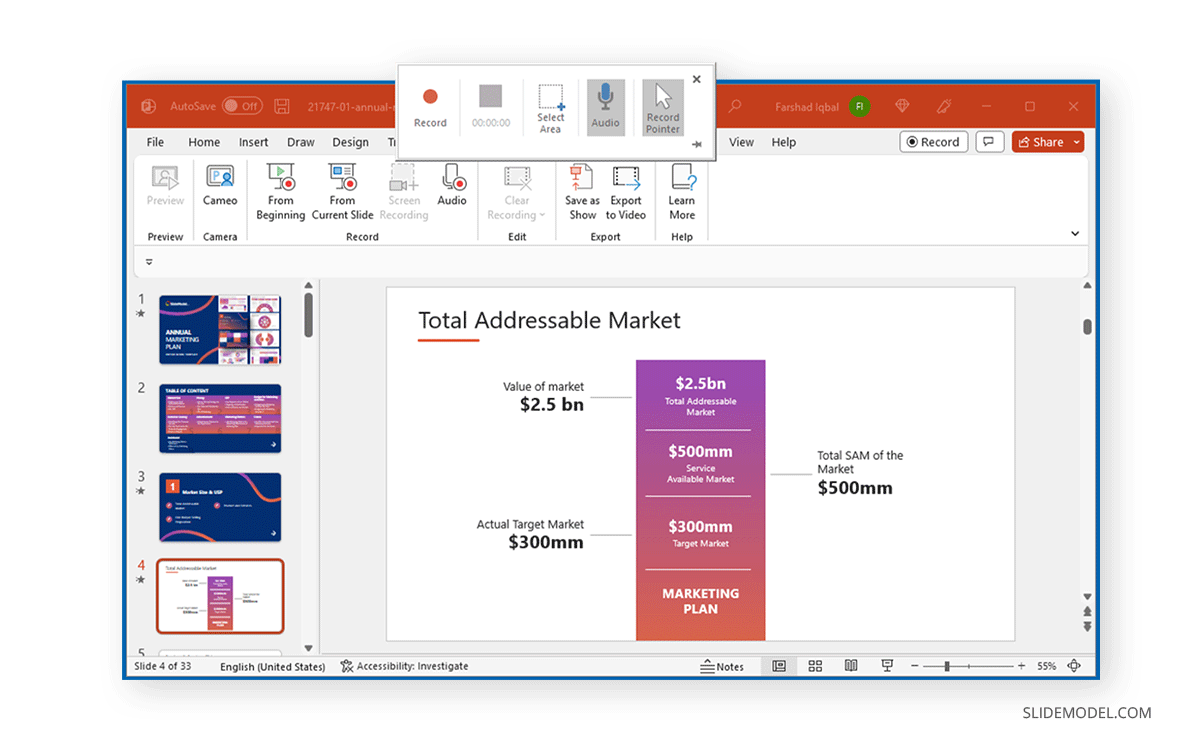
Screen Recording in PowerPoint
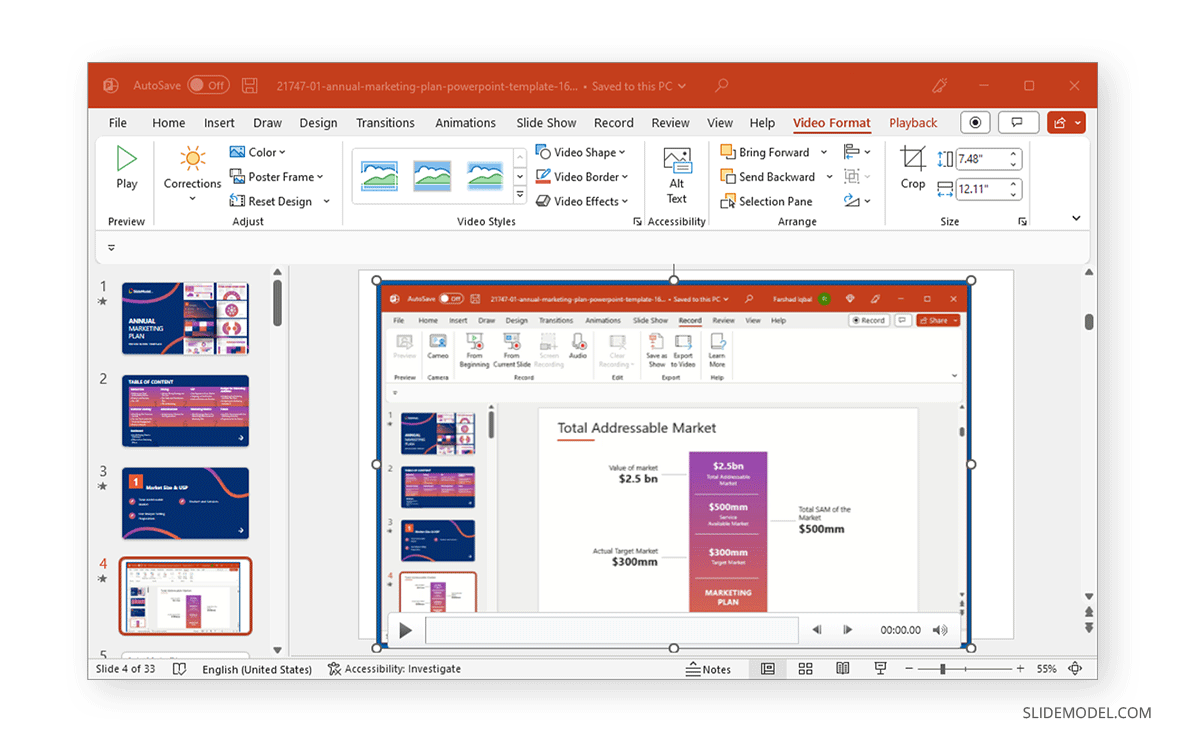
If you initiate screen recording in PowerPoint, you can start recording a screencast by selecting the area you wish to record. This is similar to recording a PowerPoint presentation as a video, with the added advantage of recording other parts of your desktop. This method can also be used for recording a screencast, even if you’re not using a PowerPoint presentation in your video recording.
To start the recording, click Record or use the Windows+SHIFT+R hotkey. To stop the screen recording, click Pause to temporarily halt the recording to resume later or Stop or the Windows+SHIFT+Q hotkey to end the recording session.
The recorded video will be instantly added to your slide once you click Stop .
Record Audio
Another option in the Record tab in PowerPoint is to record audio narrations for your PowerPoint presentation. Simply click Record to start, Pause to temporarily halt, and Stop to stop the recording process.
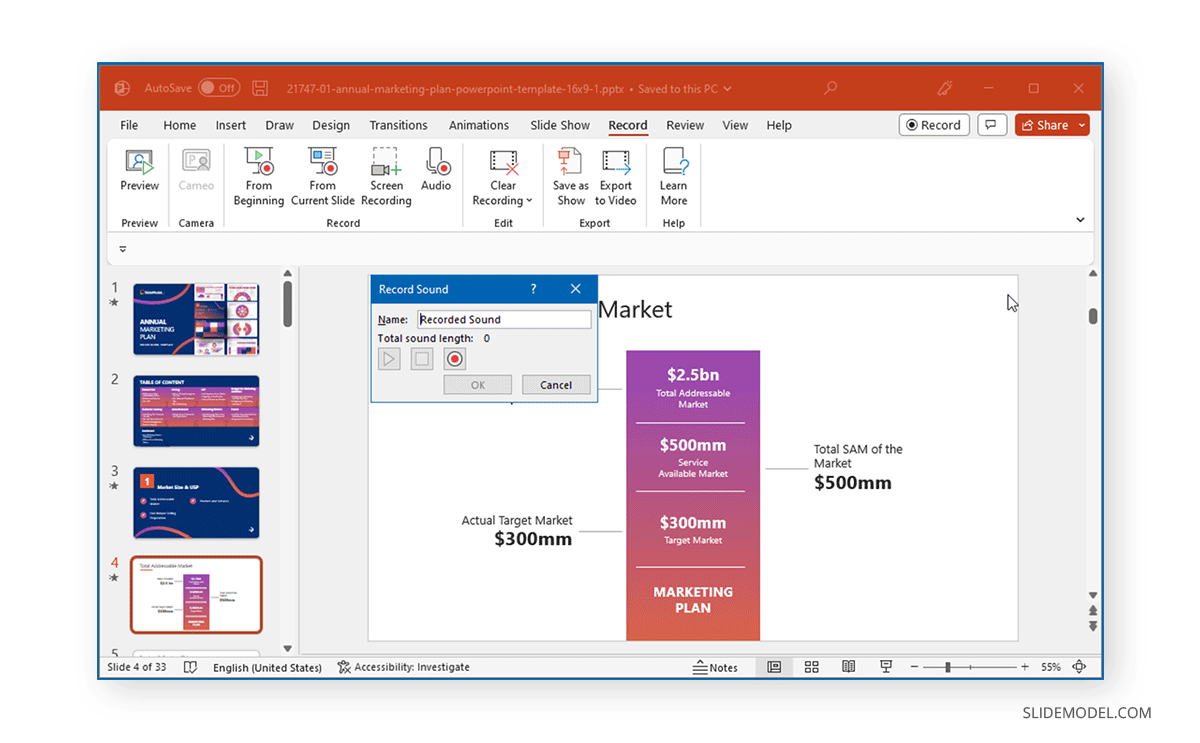
Once the recording stops, the audio will be added to your PowerPoint presentation.
How can I Annotate Slides in PowerPoint During a Recording?
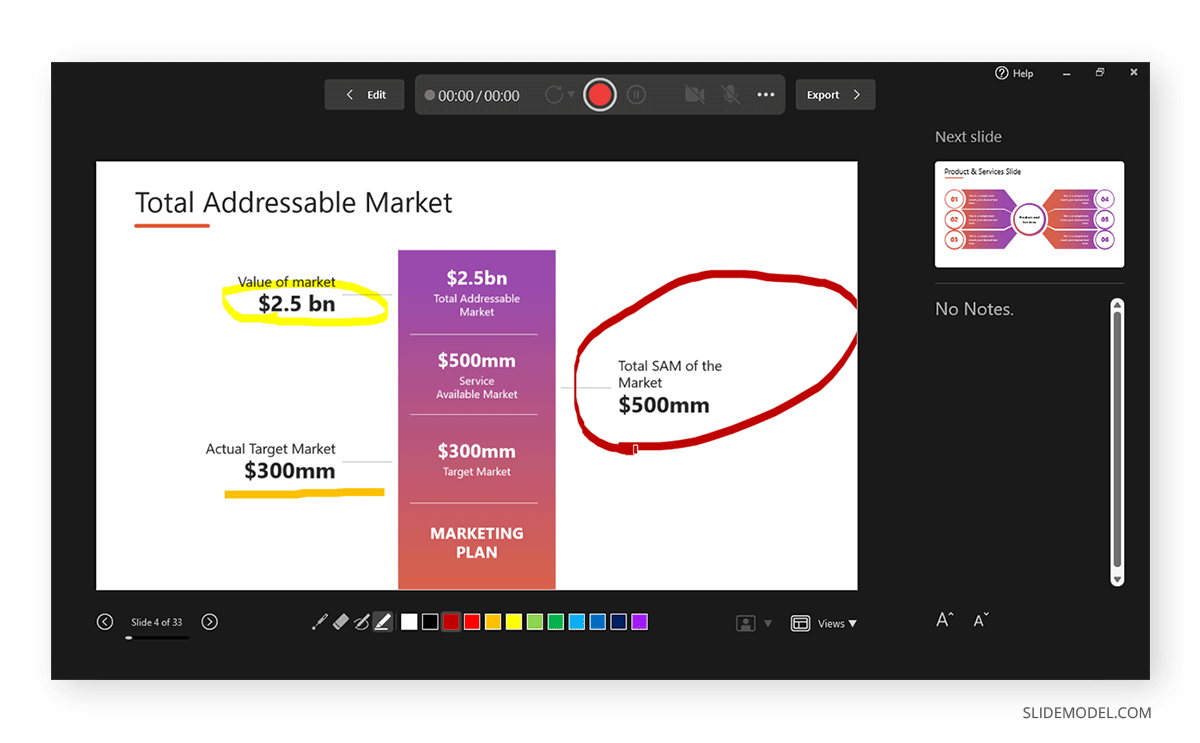
Once you enter recording mode, you can start annotating your slides using the Pen or Highlighter tool. Other tools in the menu include a Laser pointer and Eraser.
How can I Record a PowerPoint Presentation with Audio?
To enable audio for your Powerpoint recording, unmute the mic from the audio icon on top, CTRL+M hotkey, or click the three dots ( More options for recording menu), followed by the Microphone to select the audio device for recording. You can only record audio if an audio device is connected to your computer. This is a fairly simple process, unlike other presentation platforms. For example, in an earlier article, we showed you how to do a voiceover on Google Slides , which entails a slightly more elaborate process.
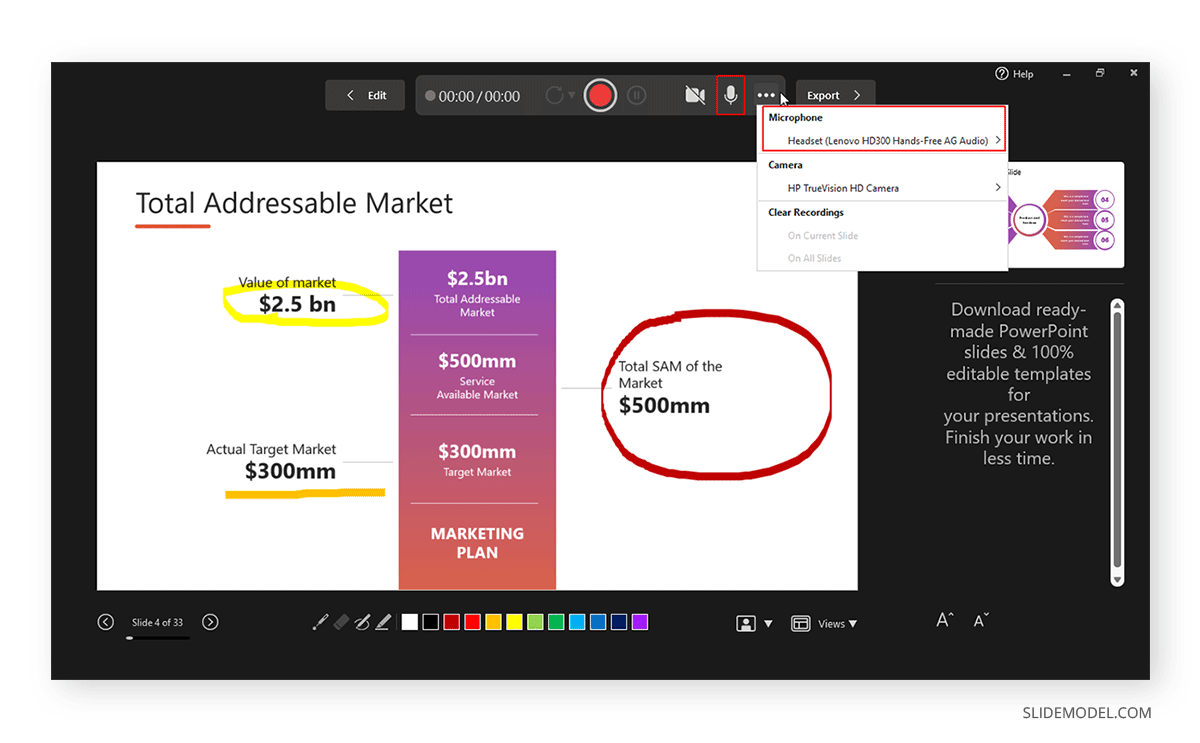
How to Record Yourself Presenting a PowerPoint?
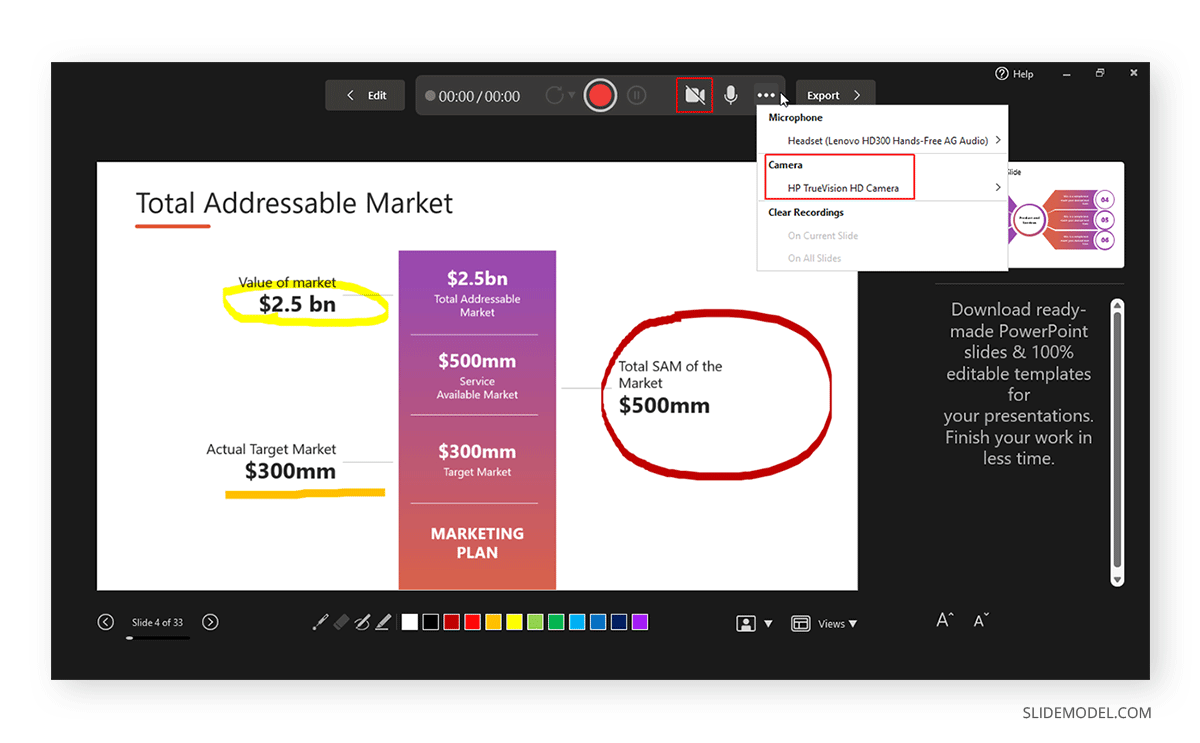
Enable the camera during a recording session.
Like turning on audio, you can toggle the camera on or off using the icon on top. The camera input device can also be selected via the Camera option or CTRL+K hotkey, which can be revealed via the three dots from the top menu.
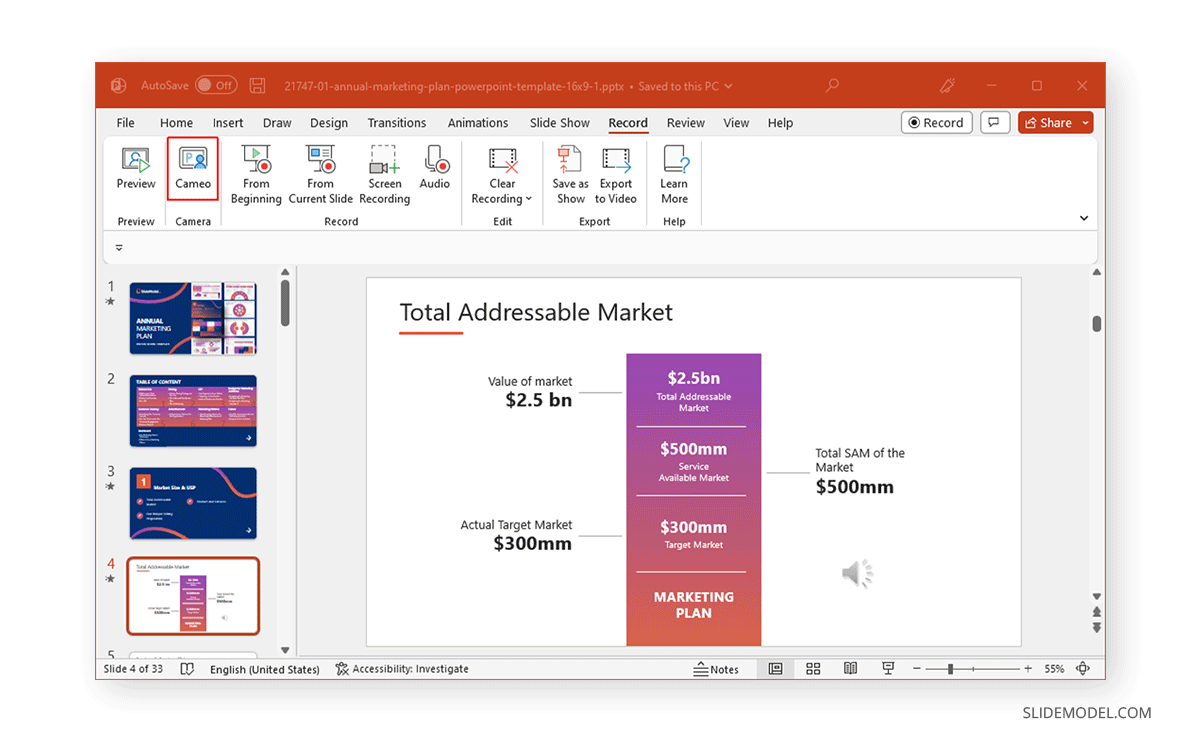
Insert Video Recording in a Slide using Cameo
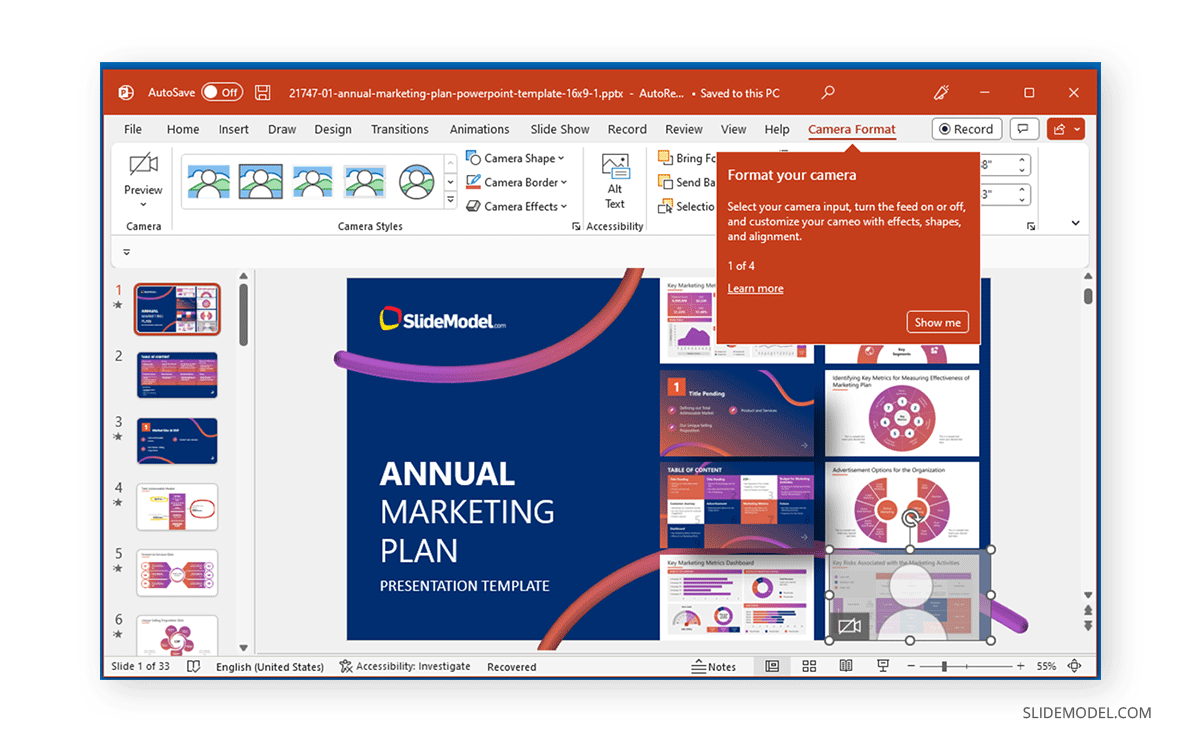
PowerPoint’s Cameo feature enables recording a video to insert in a slide. You can use the feature to quickly insert a video message in your slides that can be played during a presentation session. This option might also be relevant if you intend to convert PowerPoint to video . If you are looking how to video record yourself presenting a PowerPoint, then follow the steps below.
Once Cameo is turned on, you can also choose to stylize the camera shape, style, border, and add effects. Cameo is quite a unique feature in PowerPoint that currently does not have alternatives in rival presentation apps. For example, you cannot use a similar feature if you wish to convert Google Slides to video .
How to Save Recording for a PowerPoint Presentation?
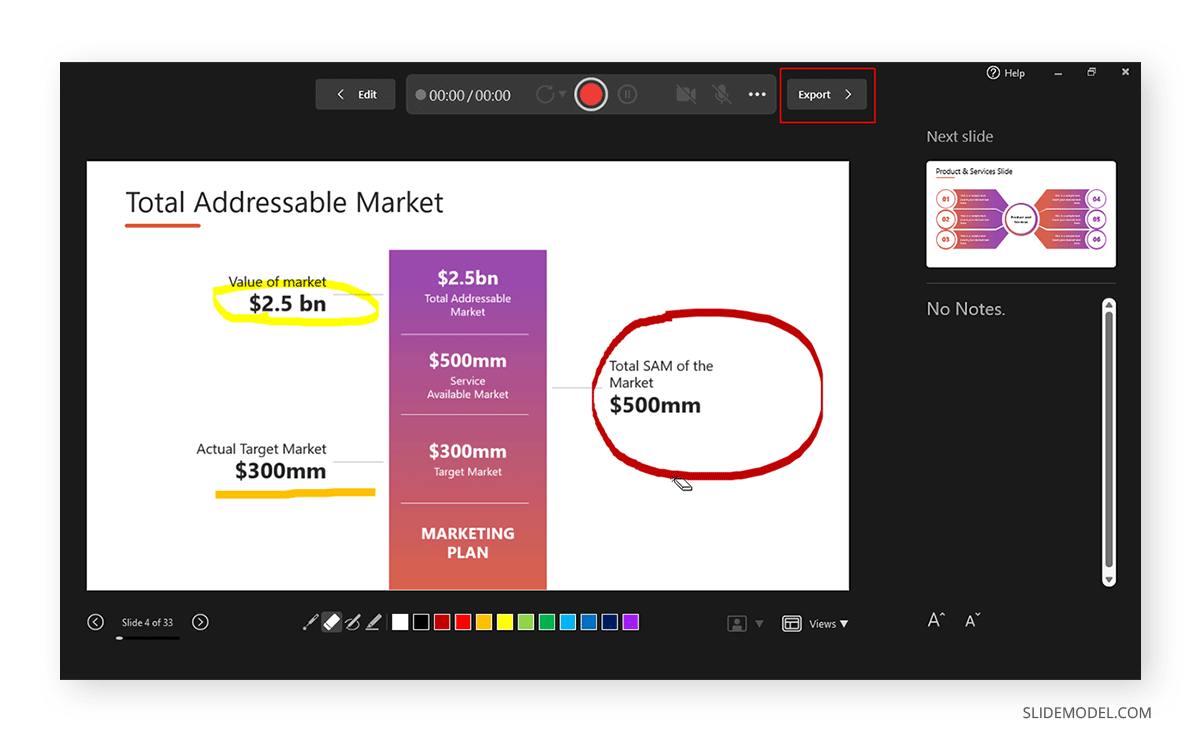
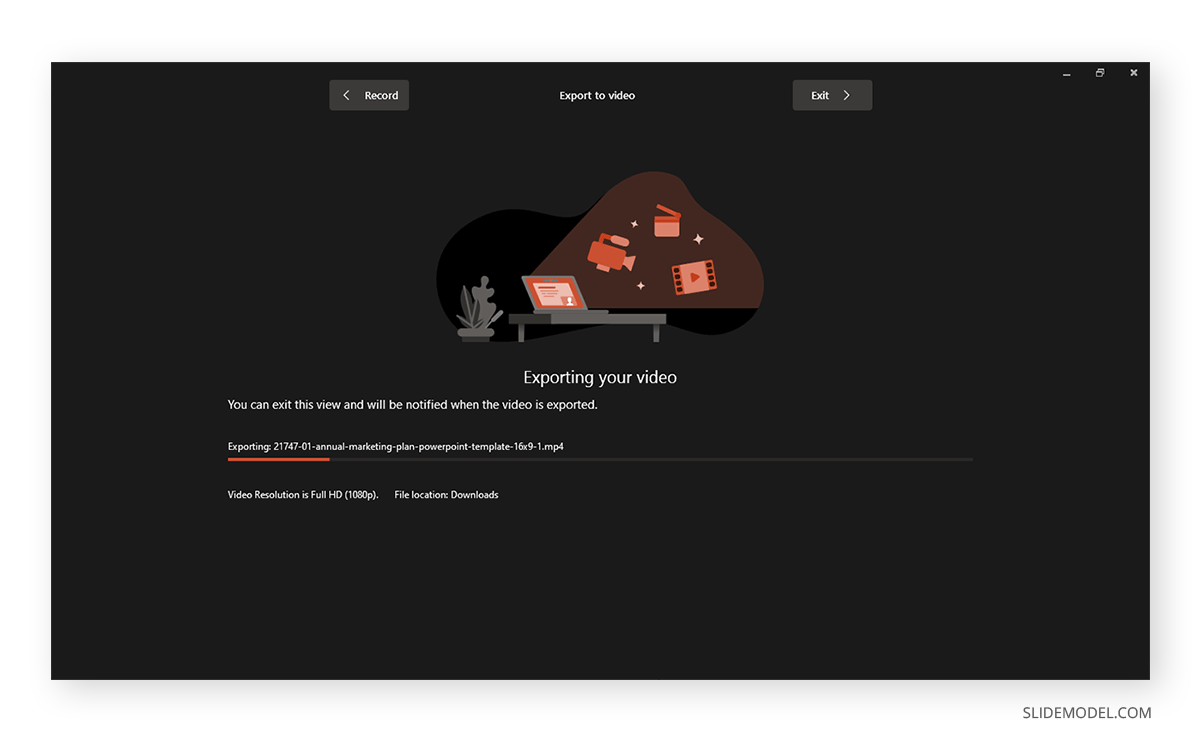
After you have completed your recording, click Export to save the presentation recording.
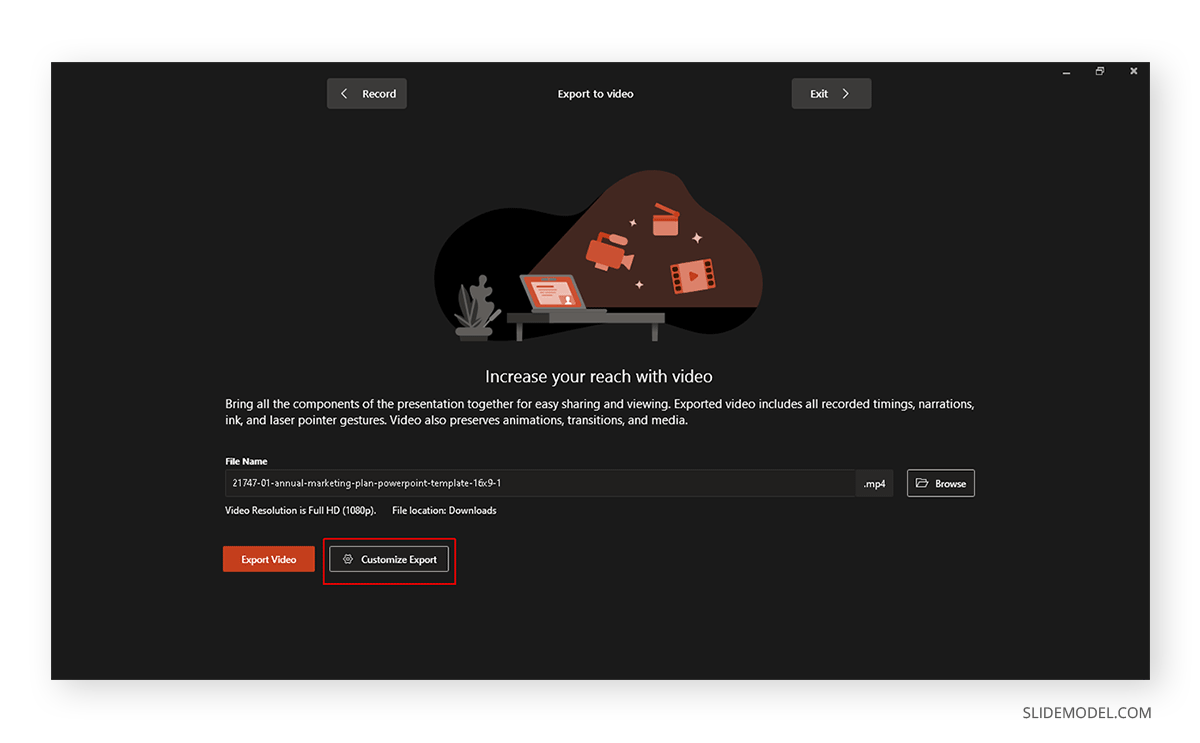
You can customize your recording settings via Customize Export or continue the process via Export Video .
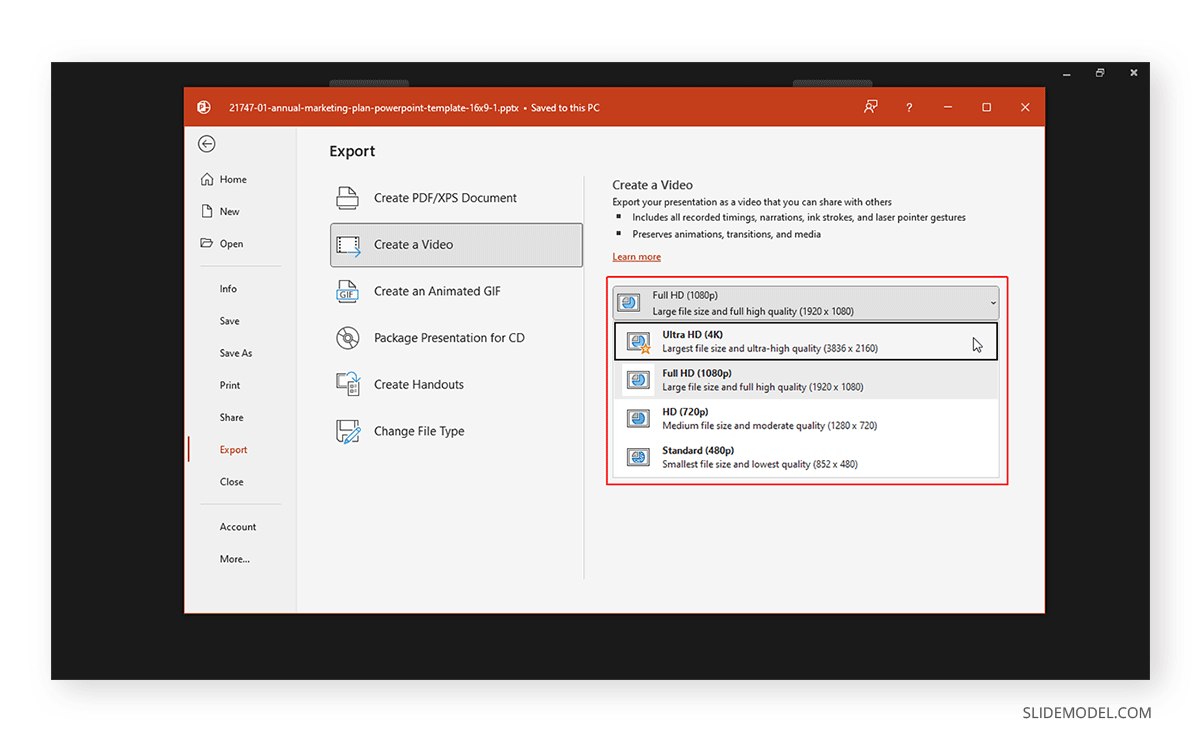
Using the Customize Export option, you can choose between a desired output quality for your video, including Ultra HD (4K), Full HD (1080p), HD (720p), and Standard (480p).
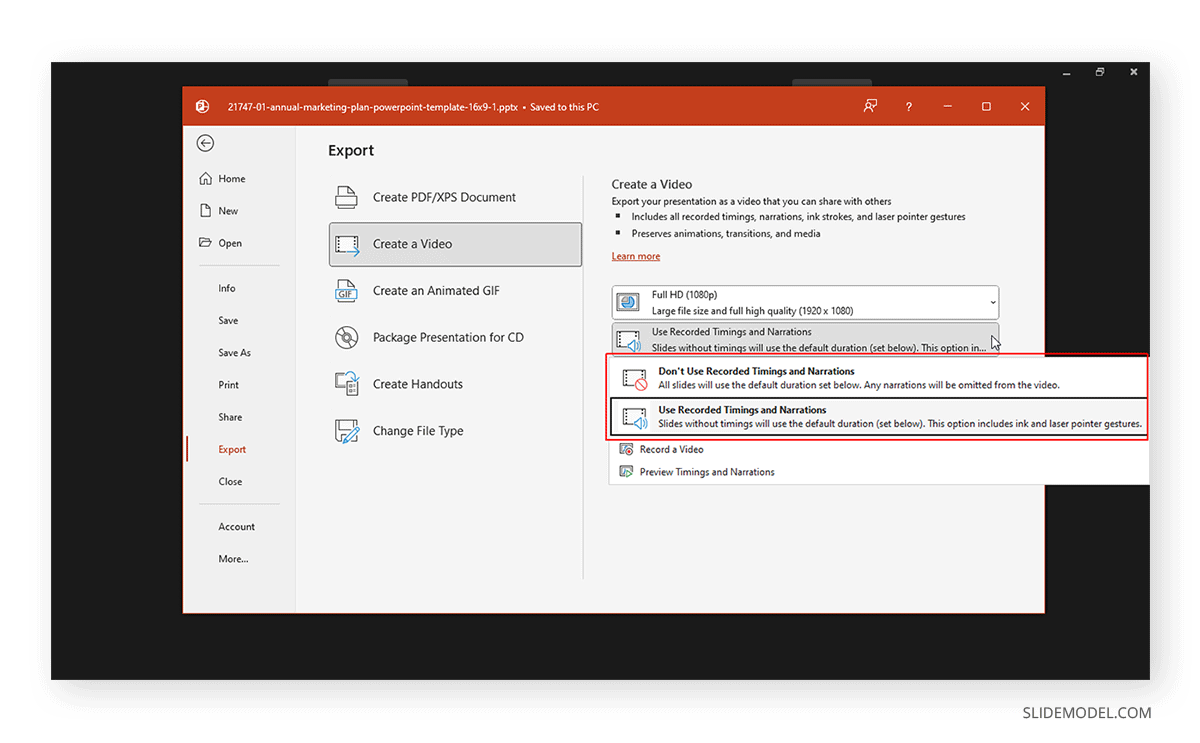
Other options in the menu include the ability to choose and preview timings and narrations.
After you are satisfied with your recording settings, you can export your presentation to video.
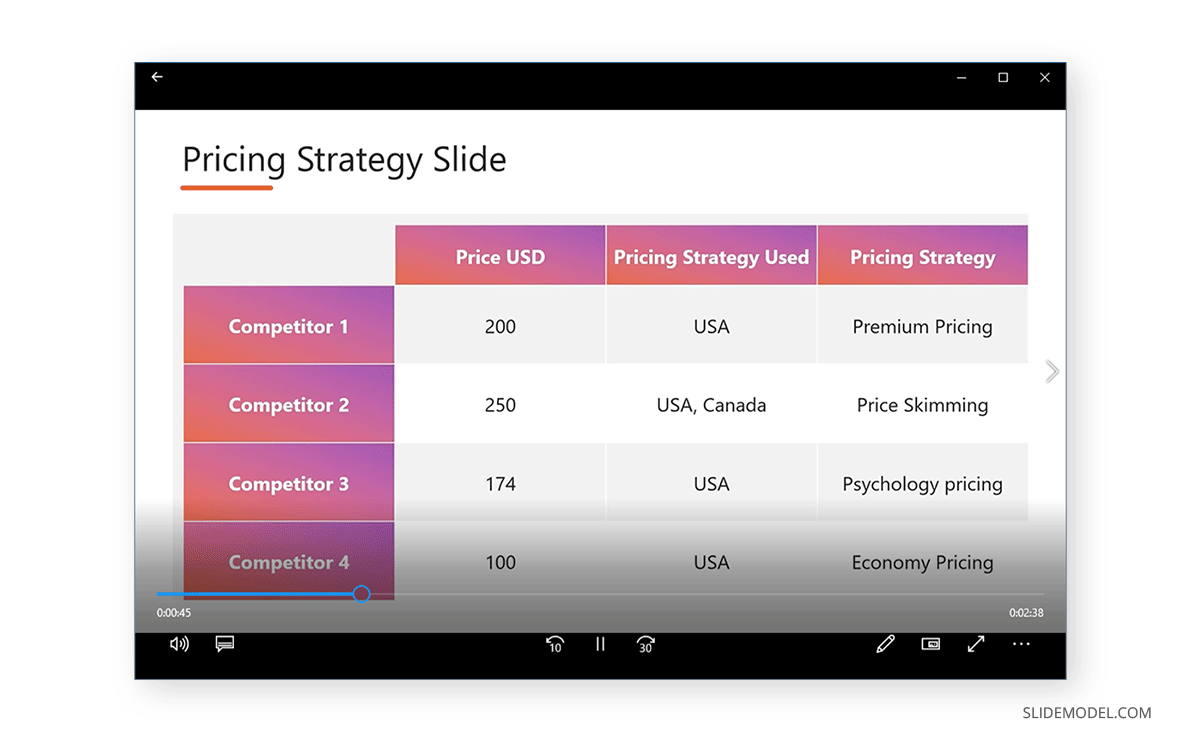
The video recording of your PowerPoint presentation can be played using any standard video player. The video can also be embedded in PowerPoint slides, uploaded online, such as to a YouTube channel, or shared via cloud storage apps like Dropbox, Box, OneDrive, etc.
Final Words
Recording a PowerPoint presentation can provide a record of a session that might be required for further sharing. The best way to record a presentation is to ensure that your slides aren’t visually overpowering, your audio is clear and audible, and if using a camera, the cam input isn’t hazy, grainy, or too dark.
Once you are familiar with how to record a presentation on PowerPoint, it might take a bit of practice to make your video recording look professional and crisp. It’s best to practice your sessions before recording them until you can seamlessly record presentation decks.
Like this article? Please share
PowerPoint Addins, PowerPoint Tips, Presentation Tips, Presentations, Screencasts Filed under PowerPoint Tutorials
Related Articles

Filed under Business • April 10th, 2024
Discovering Coaching Presentation Tools
Discover the best PPT templates to use as coaching presentation tools with this article. Tools explained + examples.

Filed under PowerPoint Tutorials • March 26th, 2024
How to Translate in PowerPoint
Unlock the experience of PowerPoint translation! Learn methods, tools, and expert tips for smooth Spanish conversions. Make your presentations global.
Filed under Google Slides Tutorials • March 22nd, 2024
How to Share a Google Slides Presentation
Optimize your presentation delivery as we explore how to share a Google Slides presentation. A must-read for traveling presenters.
One Response to “How to Record a Presentation in PowerPoint”
How do I generate webcam option in PowerPoint 2016 ?
Leave a Reply
How to Record A PowerPoint Presentation [2022 User Guide]
- Share on Facebook
- Share on Twitter
By Nikolay Kaloyanov
in How-To Tutorials
2 years ago
Viewed 587 times
Spread the word about this article:
If knowing how to record a PowerPoint presentation wasn’t necessary a decade ago, this isn’t how things stand today. The pandemic taught us a valuable lesson – if we don’t catch up with technology, we will fall short.
Fortunately, Microsoft’s app is the global leader in presentation software and provides you with all the required tools to create an excellent presentation you can show in front of your audience. But how to record a presentation on PowerPoint, and is it easy to do so?
Article overview: 1. What are the benefits of recording PowerPoint presentations? 2. How to record a PowerPoint presentation? 3. How to live stream a PowerPoint presentation? 4. Frequently asked questions
1. What are the benefits of recording PowerPoint presentations?
I am are pretty sure that if recording presentations weren’t helpful, PowerPoint wouldn’t offer it to its users. Well, we all know that’s not the case. Recording your PowerPoint slides can bring a ton of benefits. Let’s see which they are:
- Save time – regardless if you’re a lecturer or present in front of colleagues, having a video of your recording will save you many hours. Imagine speaking in front of your marketing team, but 2 members are on summer holidays. It’s fine. They’ll catch up later when they watch your PowerPoint recording.
- Focus on the presentation – usually, if you’re presenting in front of an audience, it’s typical to get asked many questions that you need to answer promptly. But that is a good reason to get distracted from your core information. Thus, it makes sense to record your presentation beforehand.
- Practice before presenting – the best way to carry out a great presentation is to spend some time at home, focusing on key details. When you record your PowerPoint slides, you can find areas of improvement and work on them.
2. How to record a PowerPoint presentation?
There are many tools that you can use to record a PowerPoint presentation. From Loom and Panopto, and even Apple’s basic Quicktime and Windows’ own recording tool. But here we will discuss none of the other options. Why? The answer is simple: PowerPoint has its own in-built, robust recording tool.
Unlike other options, PowerPoint’s recording feature enables you to record slide by slide. This effectively means you can create as many recordings as you like, until you like the playback version, and move on to the next slide.
Pro tip : PowerPoint doesn’t record slide transitions. You need to start recording each slide when it is opened and finish the recording before you move on to the next one.
Let’s see how to record a PowerPoint presentation with video and audio in just a few steps.
Step #1: Open your PowerPoint presentation
The first step is to open the PowerPoint presentation you wish to record. Ensure you have all the necessary slides and information on them. While this seems logical, there aren’t one or two cases when presenters have recorded wrong or unfinished slides, which leads to a disappointing outcome.
Step #2: Prepare your video and audio devices
Before you start the recording, you should check your camera and microphone. Try to make a sound check and see if your camera works properly.
Step #3: Select the slides you wish to record
PowerPoint gives you the option to record a presentation right from the beginning, or from a specifically selected slide.
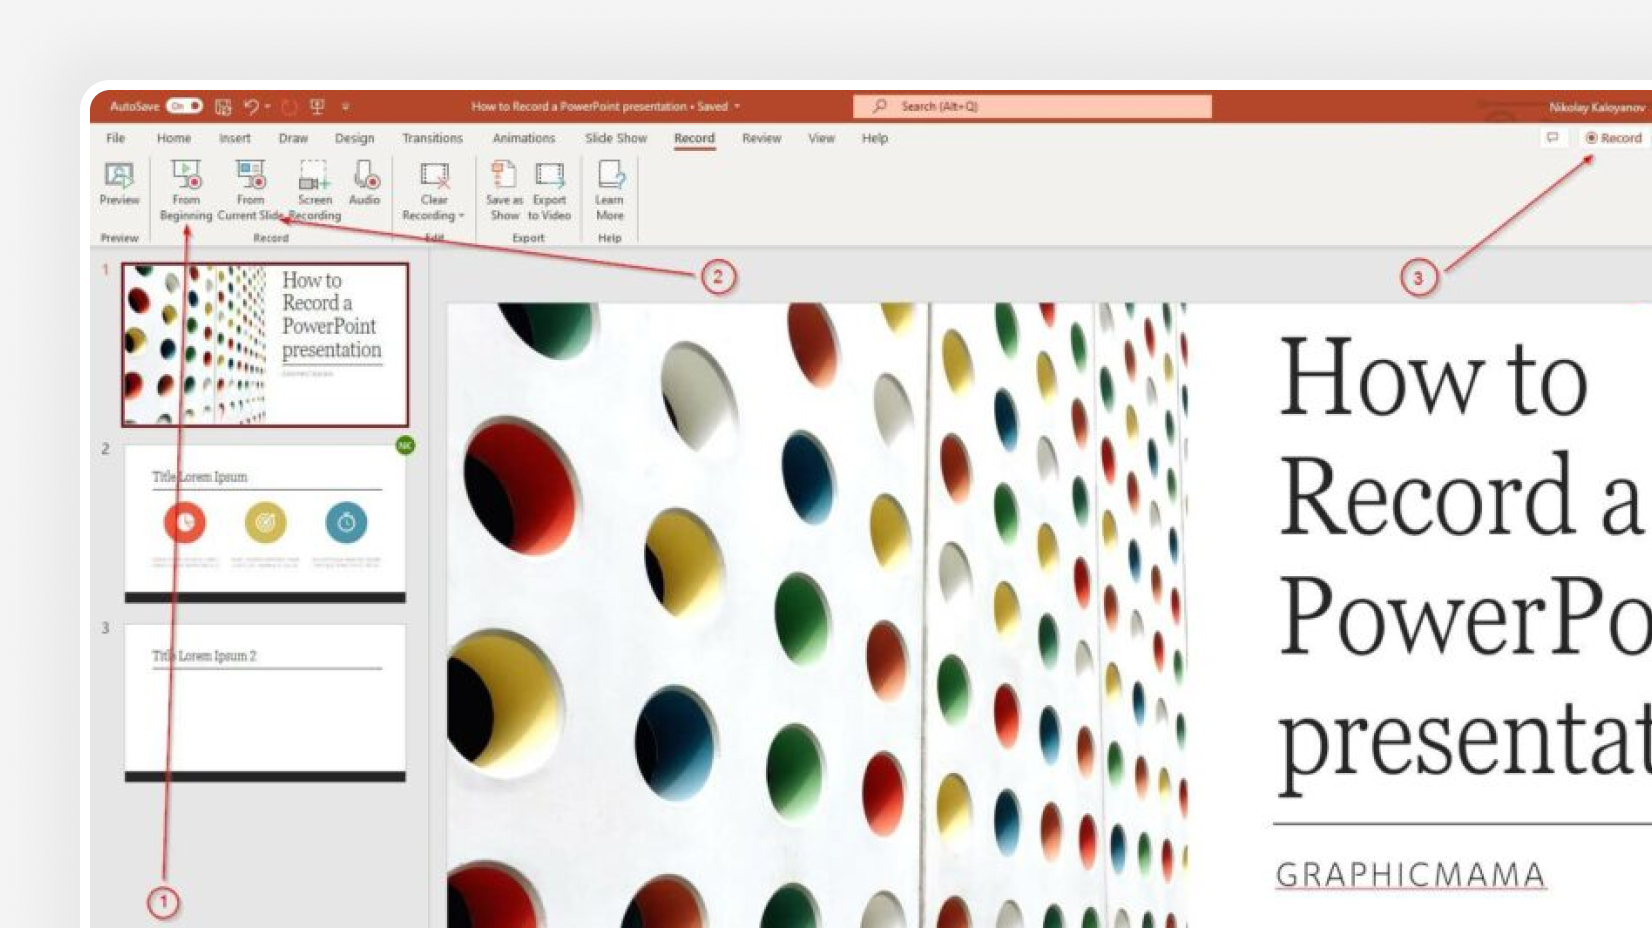
- Pick “ From Beginning ” (1) from the Record tab of the Ribbon if you wish to start from the first slide.
- Pick “ From Current Slide ” (2) from the same tab in case you would like to start from a selected slide (which isn’t the first one).
- Click the Record button (3) which is positioned in the top right corner, between the Comments and Share buttons. It starts the recording from the slide you have currently selected.
Step #4: Start the recording
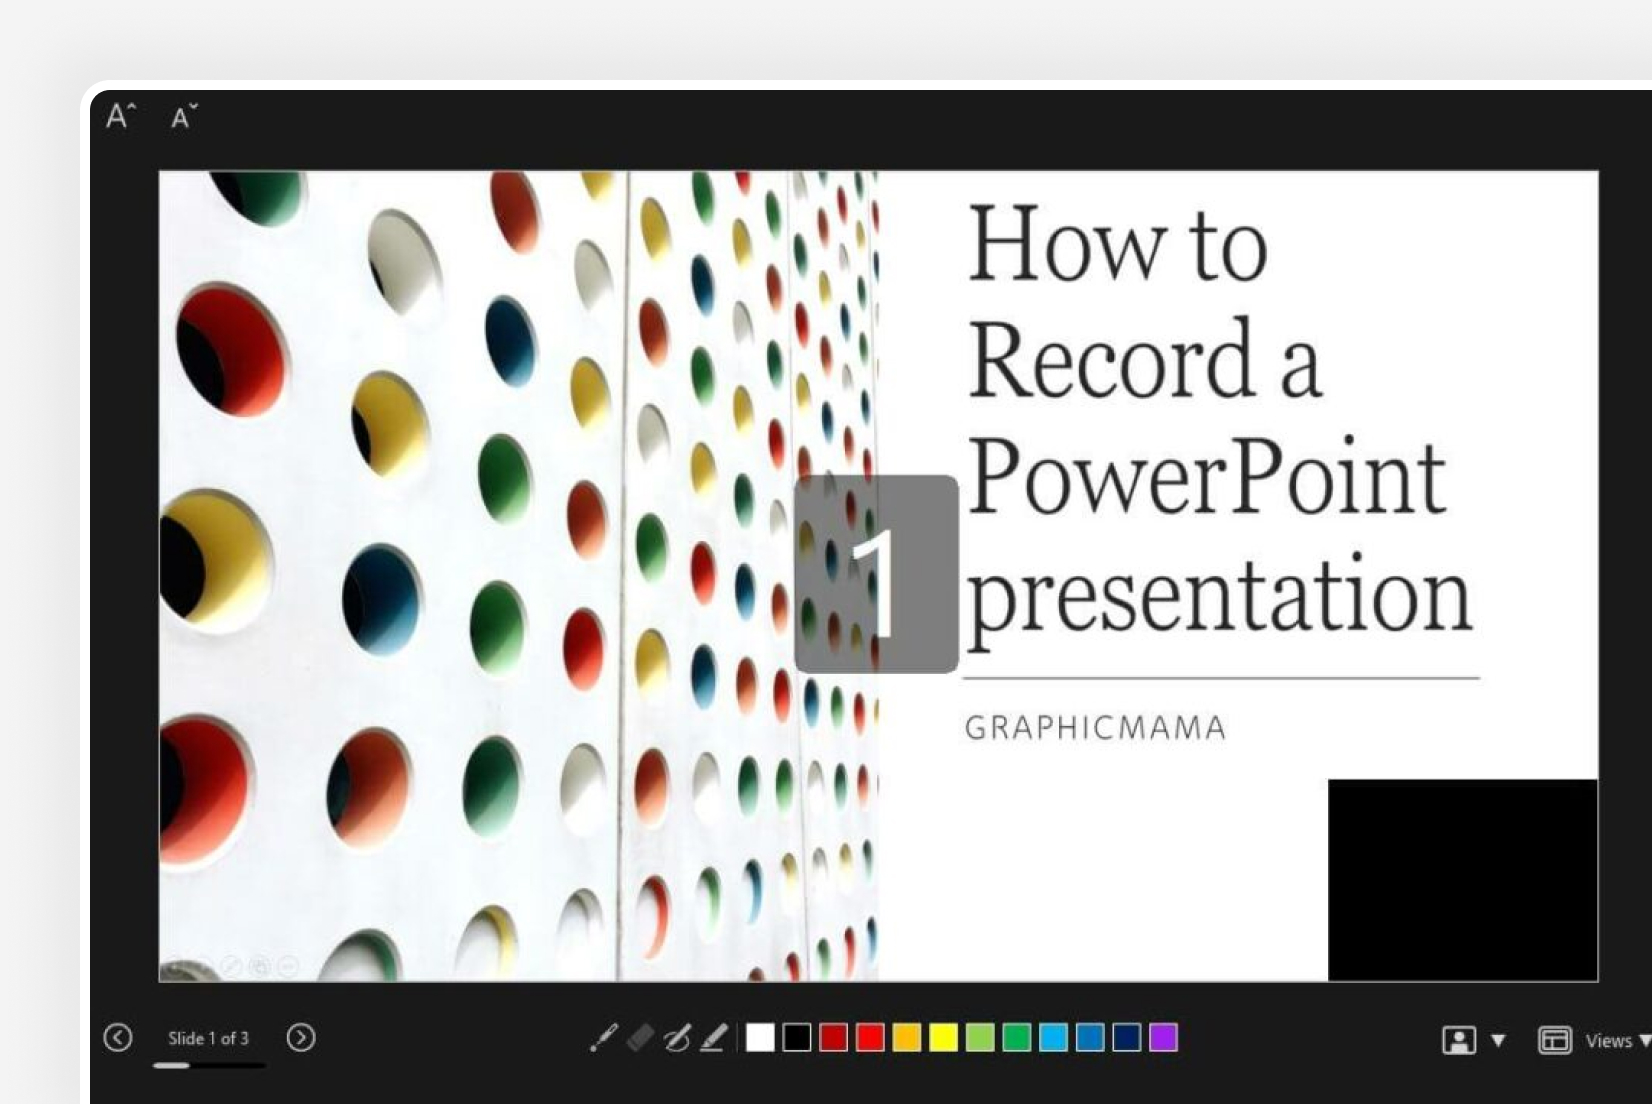
Once you click on one of the options, you are ready to start narrating your PowerPoint presentation. You will see a countdown timer, after which you can start narrating slides.
Step #5: Manage your PowerPoint recording
You have probably seen a couple of other options aside from the recording one. Let’s see which they are:
- Timer with a grey/red light – if you are recording your narration, you will see a timer and a small circle with a red light that indicates you are recording. If you pause, the small circle indicator will become grey again and the timer will stop counting.
- Refresh icon – right next to the timer there is a refresh-like icon but it serves a different purpose – to re-take the recording. You have the option to record again the current slide or all slides.
- Start/Stop button – the big red button serves as a start/stop button for your recordings. Only stop the recording when you want to move on to the next slide.
- Pause button – if you would like to stop the slide recording, in order to drink some water or read your speaker notes, you can use the Pause button, and then resume the recording. Bear in mind you cannot pause and move to the next slide. You have to stop the recording, to indicate you have finished with the current slide.
- Camera button – clicking the camera button will work as a toggle on/off.
- Microphone Button – clicking the microphone button will work as a toggle on/off.
- Ellipsis – this is the place where you can select camera and microphone settings, as well as erase recordings from the current slide or all slides.

Step #6: Export your PowerPoint video recording
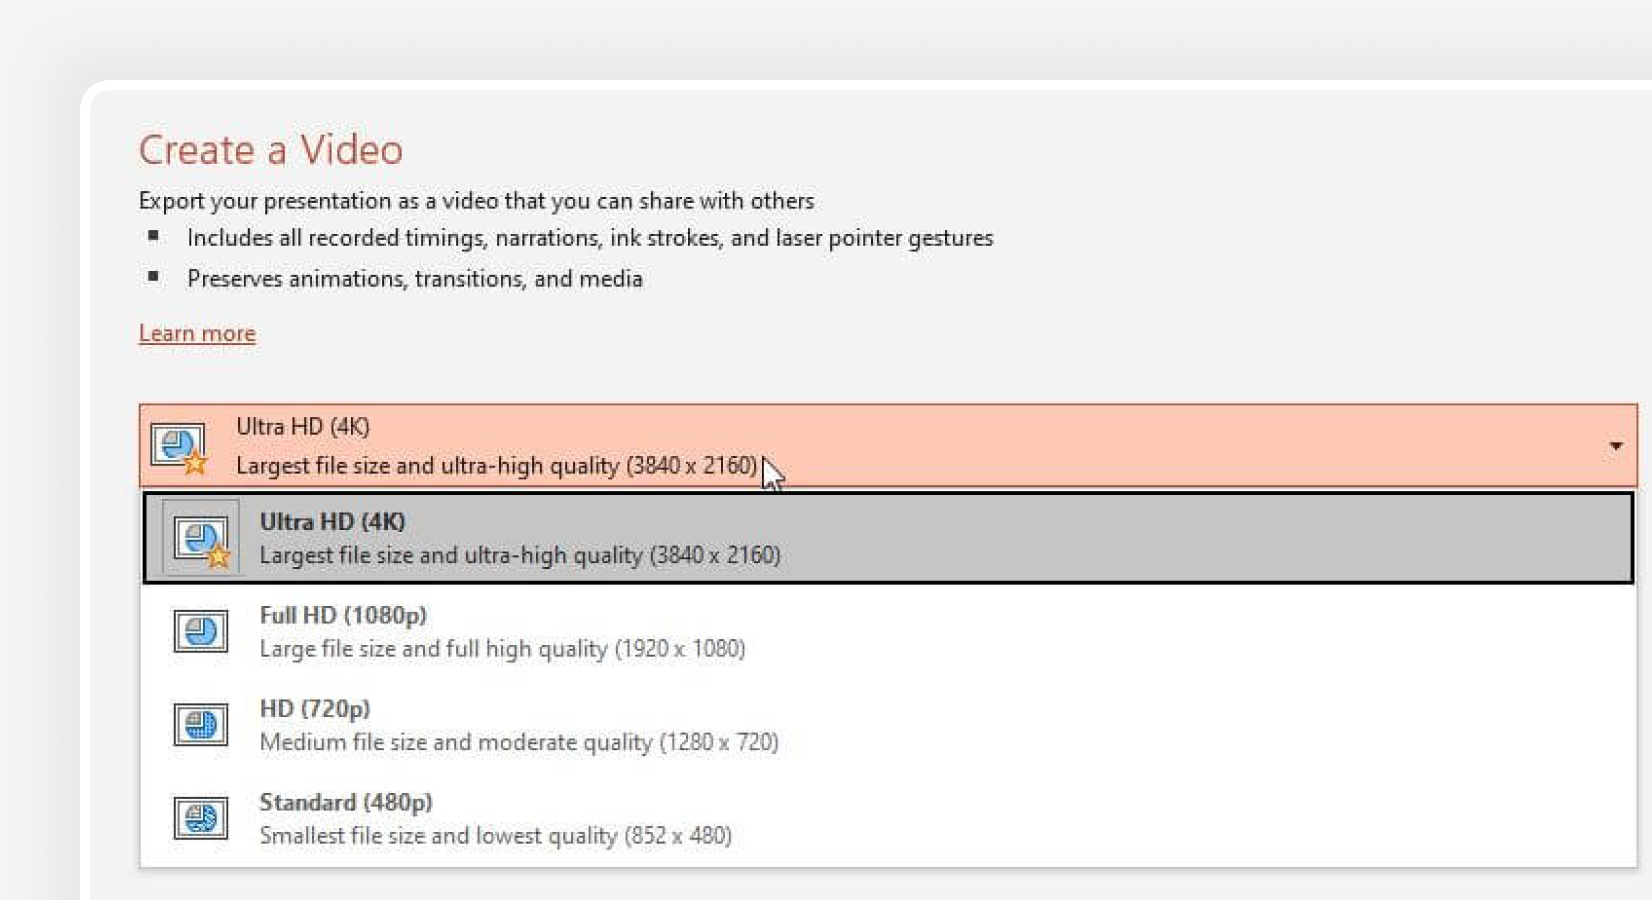
The last button from the menu is the Export setting. You can export your narration as an mp4 file in Full HD size by default. However, you can customize your export and get your narration in 4 sizes – 480p, 720p (HD), 1080p (Full HD – standard), and 4K. We don’t recommend Ultra HD exports.
Pro Tip : Exporting 4K PowerPoint presentation recordings doesn’t necessarily mean you will get better quality (unless you have 4K resources within your presentation) but it does guarantee a significantly larger file size – up to 4 times more than on standard Full HD recordings.
3. How to live stream a PowerPoint presentation?
If you have already honed your skills and would like to stream your PowerPoint slides directly to your audience, there are many ways to do so. We are going to cover two of them.
3.1. How to stream a PowerPoint presentation from OneDrive?
Microsoft has invested a lot of resources to make OneDrive a powerful cloud service, and so far they have been quite successful. Let’s see how to record a PowerPoint presentation in front of live audiences.
Step 1 – save your PowerPoint presentation in OneDrive.
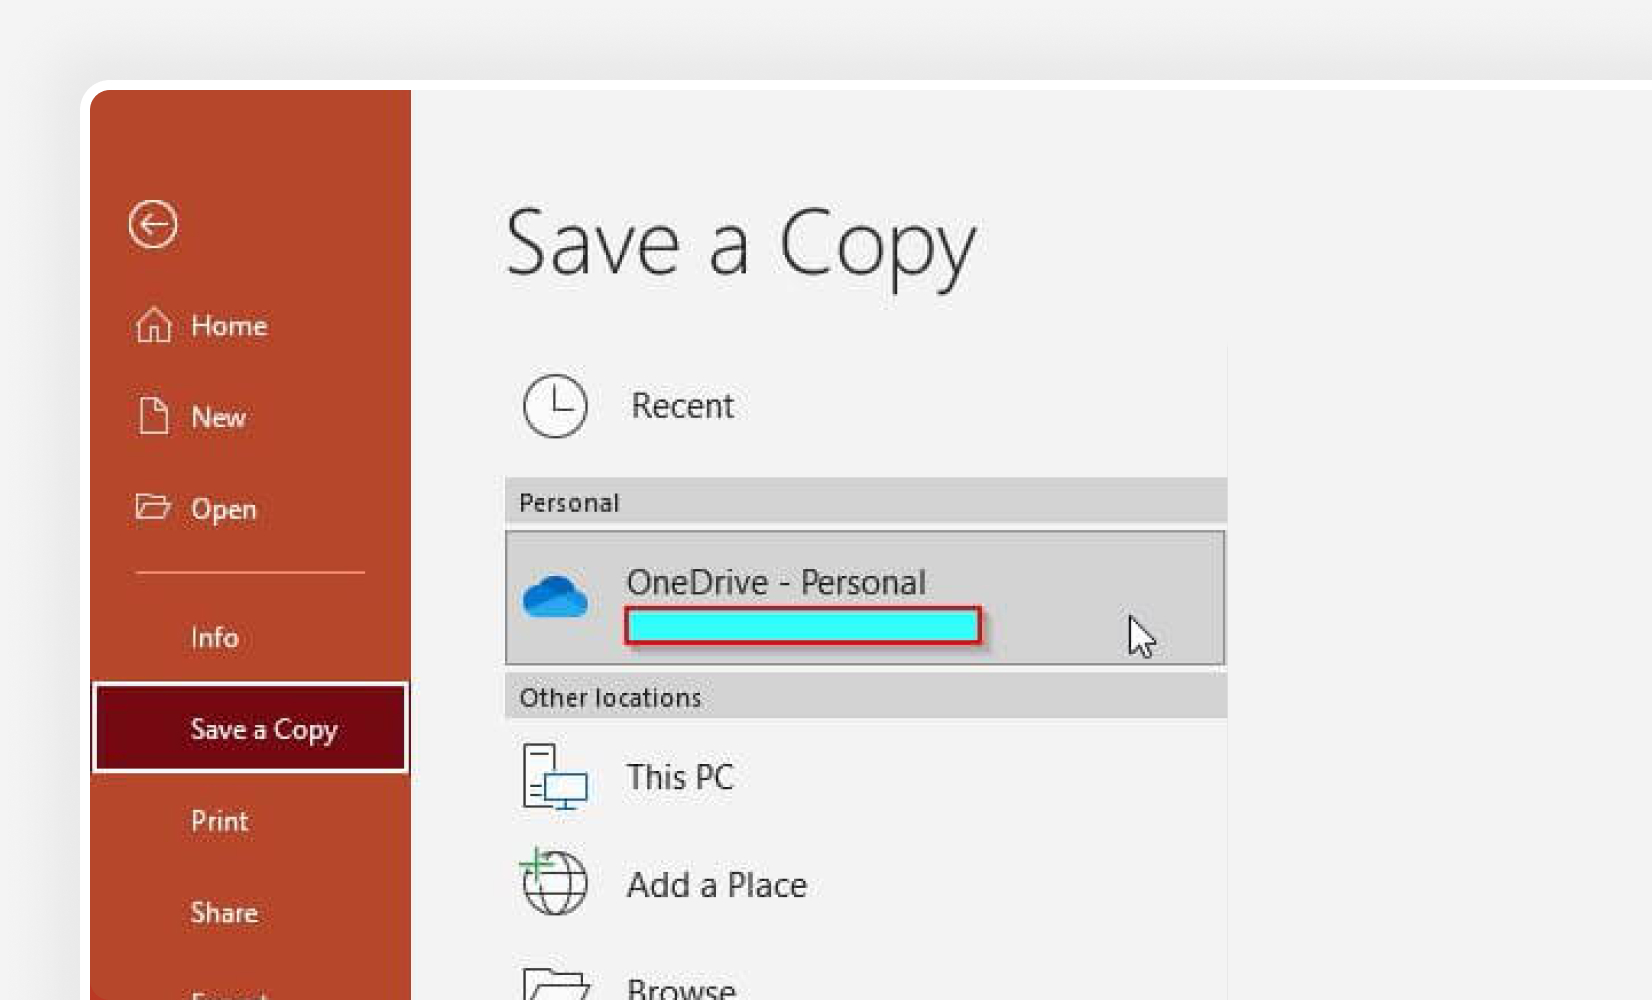
Step 2 – open your PowerPoint slides from PowerPoint online.
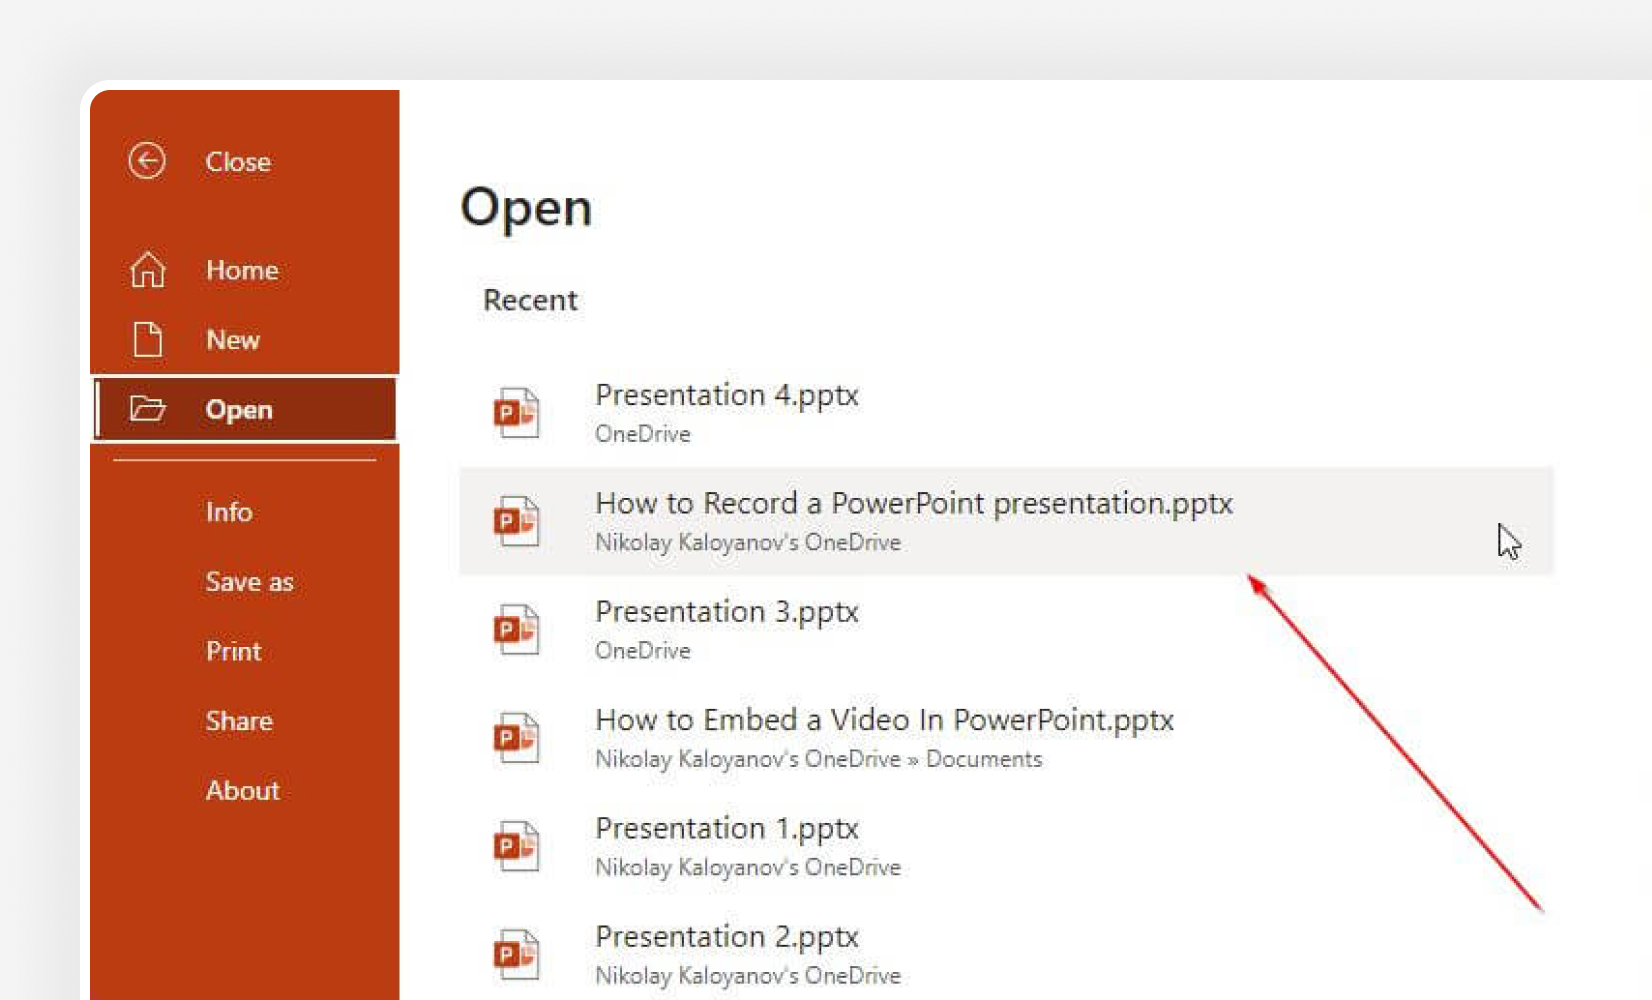
Step 3 – go to Present Live from the Slideshow Ribbon tab.

Step 4 – share a live link with your audience.

3.2. Stream your PowerPoint presentation in Zoom
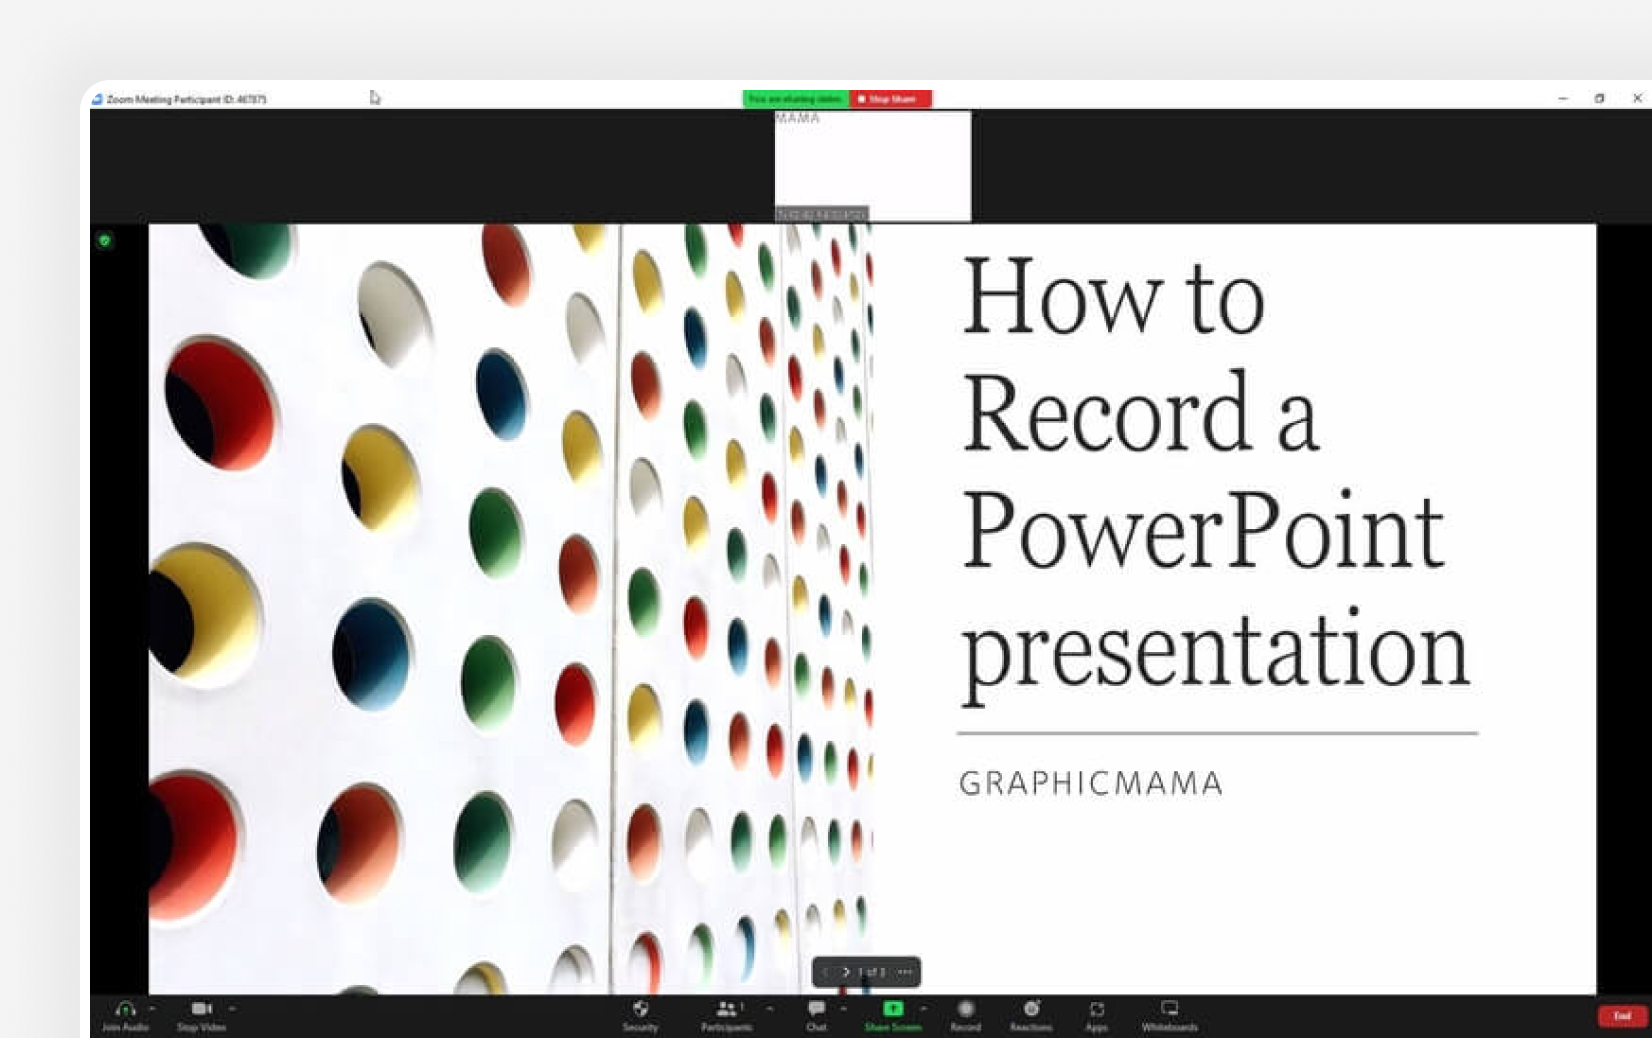
Zoom is one of the most popular conference call apps which has plenty of tools, including live streaming presentations. Since PowerPoint is the leading presentation program in the world, Zoom developers have created some amazing things, like PowerPoint presentation recording with a web camera on a transparent background. If you’re interested, you can check our guide on how to record a Zoom presentation .
Does PowerPoint have a screen recording?
PowerPoint has a screen recording window and you can select the area you would like to be recorded. Go to Record (from the Ribbon), then select Screen Recording , choose the area and start recording.
Can I view speaker notes while recording narration?
You are able to access your speaker notes if you have created them beforehand. To insert speaker notes, you have to go to View -> Notes Page and you will have a text box that you can utilize for speaker notes.
What format does PowerPoint use for video?
PowerPoint records videos in mp4 format. The default resolution is 1080p (Full HD).
Recording your PowerPoint presentations can make the difference between a successful and smooth speech and a bad narration. Being able to record each slide means you can get the best narration possible for your whole presentation.
And if you would like to stream your presentation live, there are more than enough options to do so – both via the online version of PowerPoint or via third-party apps like Zoom.
If you found this article helpful, you can also check some of our other PowerPoint tutorials:
- Add Audio to PowerPoint: The Quick Step-by-Step Guide
- Insert GIFs into PowerPoint – a 2022 Pocket Guide
- How to Convert Your PowerPoint Presentation into Google Slides ?

Add some character to your visuals
Cartoon Characters, Design Bundles, Illustrations, Backgrounds and more...
Like us on Facebook
Subscribe to our newsletter
Be the first to know what’s new in the world of graphic design and illustrations.
- [email protected]
Browse High Quality Vector Graphics
E.g.: businessman, lion, girl…
Related Articles
11 seo and keyword tips for your best google ranking, 25+ wonderful cartoon character design tutorials, how to make an infographic in powerpoint: the beginners’ guide, the 25 absolute best adobe xd tutorials in 2022, how to turn yourself into animated cartoon in zoom.us, enjoyed this article.
Don’t forget to share!
- Comments (0)
Nikolay Kaloyanov
Nikolay is a copywriter with vast experience in Technology, Marketing, and Design. When he isn't playing with words and crafting texts, he watches sports and asks questions. He is a funny person...until you put him on a diet.

Thousands of vector graphics for your projects.
Hey! You made it all the way to the bottom!
Here are some other articles we think you may like:
How-To Tutorials
Character animator tutorials part 3: basic puppet in photoshop.
by Slavena Simeonova

Free Vectors
Simple vector robot character in illustrator (tutorial + freebie).
by Bilyana Nikolaeva

21 InDesign Tutorials To Become a Great Publisher in 2022
by Nikolay Kaloyanov
Looking for Design Bundles or Cartoon Characters?
A source of high-quality vector graphics offering a huge variety of premade character designs, graphic design bundles, Adobe Character Animator puppets, and more.

How to Record in a PowerPoint presentation Audio & Video.
Recording audio and video in a PowerPoint presentation can improve the overall effectiveness and impact of your presentation because it can make it more interesting and keep your audience engaged.
Microsoft PowerPoint 2013 and later versions allow you to record your presentation with audio and video, so you can enhance your slides with voice narration or by recording yourself during the narration via the camera.
In this guide we show, how you can record your voice or yourself while presenting a Microsoft PowerPoint Presentation and how to insert an audio or video file to a Presentation. You will also learn how to save the presentation as a video file or as a PowerPoint Show after you have finished recording audio/video.
How to Record or Insert Audio or Video in a PowerPoint Presentation.
There are two ways to include audio and video in your PowerPoint presentation: record a slide show with audio from your microphone and video from your camera, or add external audio and video to your presentation from a file.
* Note: As mentioned above, to add sound and video to a PowerPoint presentation you should have Microsoft PowerPoint 2013, 2016, 2019 or PowerPoint for Office 365.
1. Record your Audio & Video to PowerPoint.
2. Insert External Audio or Video files to PowerPoint.
Method 1. Record your Sound and Video to a PowerPoint Presentation.
To record your voice narration and/or yourself while presenting the slides in a presentation:
Step 1. Configure Microphone & Camera Settings.
Before recording your audio/video to a PowerPoint presentation, make sure that your microphone and camera settings are properly configured.
To adjust your microphone and camera settings for optimal quality:
1. Press Windows + I keys to open Windows Settings.
2 . Go to System > Sound and under Input Settings select your microphone device and make sure the input volume is set to at least 80%

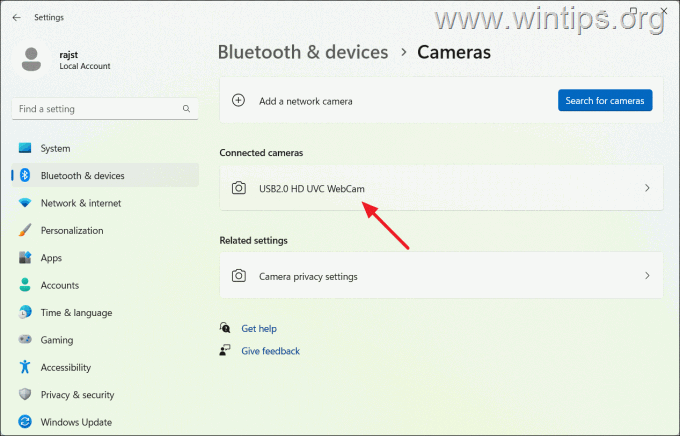
3. When done, go to Bluetooth & devices > Cameras > Connected Cameras and ensure that your camera is recognized by the system.
Step 2. Record Audio and Video to PowerPoint Slideshow.
Before you start recording audio/video in a presentation, it's important to know that audio cannot be recorded during animations and slide transitions. So, to avoid interruptions of your speech during the presentation, remember to leave a brief pause of 1-2 seconds in your narration at the beginning and end of each slide.
1. Open the PowerPoint presentation in which you want to record audio and video.
2. From the Slide Show tab (or the Recording tab), click the Record Slide Show button and choose either Record from Current slide or Record from Beginning, depending on which point you want to add audio/video.
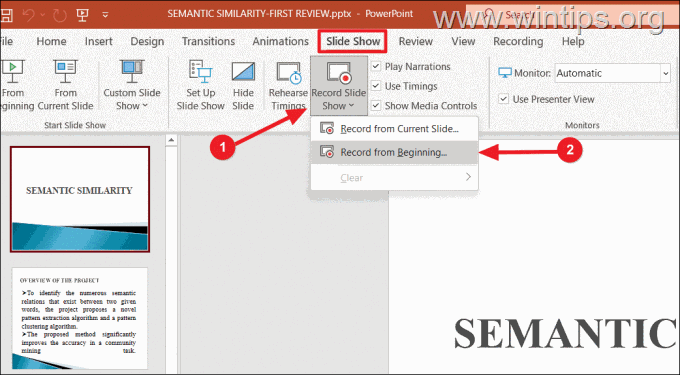
3. The presentation will open in a recording window in full-screen mode.

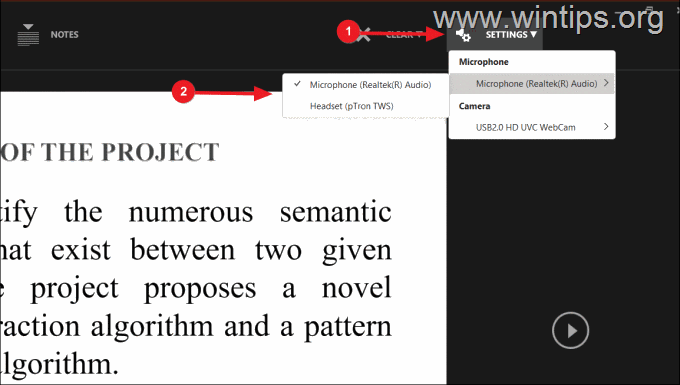
4. Click the SETTINGS button at the top-right corner and ensure the correct microphone and camera devices are selected.
5. Use the Microsoft and Camera icons in the bottom right corner of the screen to turn off the input of the Microphone or Camera device if it is not needed during the presentation.
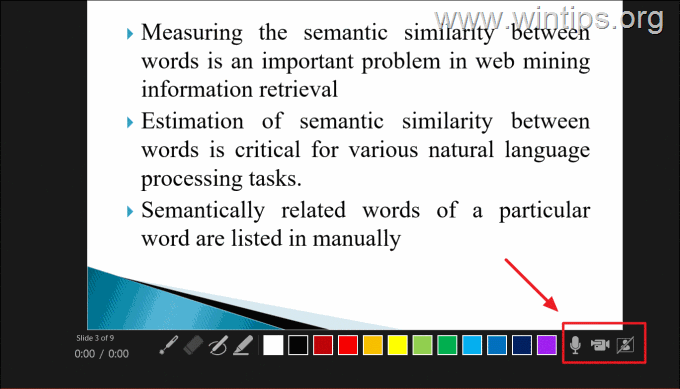
6. When you are ready, click the RECORD button to start recording your voice and/or camera input and present your slides.

7. Use the arrow keys to navigate through slides (forward only). Remember that you cannot go back or forward to a slide that already has a recording. This is to prevent accidentally recording over an existing recording.

8. If there are videos in your slides, click on them to start or stop the playback.

9. Use the Pen , Highlighter , or Laser icons from the bottom right corner to annotate your slides.
![clip_image026[3] clip_image026[3]](https://www.wintips.org/wp-content/uploads/2023/06/clip_image0263_thumb.png)
10. Look at the bottom left corner to find out the time counts for the current slide and the entire presentation.
![clip_image028[3] clip_image028[3]](https://www.wintips.org/wp-content/uploads/2023/06/clip_image0283_thumb.png)
11. If a slide already contains a recording, you will see a video preview or a speaker icon displayed at the bottom right corner.
- To re-record audio/video to a slide, click CLEAR and select Clear Recording on Current Slides .
- To delete all recordings, click CLEAR and select Clear Recordings on All Slides .
![clip_image030[3] clip_image030[3]](https://www.wintips.org/wp-content/uploads/2023/06/clip_image0303_thumb.png)
12. To pause or stop recording using the Pause and Stop buttons.
![clip_image032[3] clip_image032[3]](https://www.wintips.org/wp-content/uploads/2023/06/clip_image0323_thumb.png)
13. When finished Close the recording window (or right-click and select End Show ).
![clip_image034[3] clip_image034[3]](https://www.wintips.org/wp-content/uploads/2023/06/clip_image0343_thumb.png)
Step 3. Preview your Recordings on the Presentation.
After completing the recording, it is crucial to review the recordings of each slide before exporting the file as a PowerPoint show or video. To preview your recordings in your PowerPoint presentation:
1. Go to the Slide Show tab and click either From Beginning or From Current Slide to start playback.
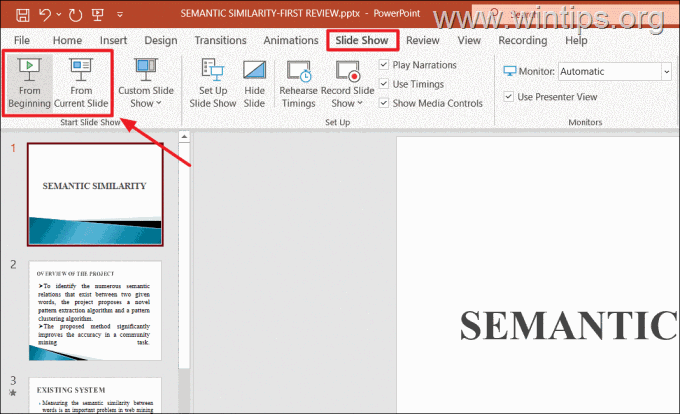
2. Make sure each slide has a record and timing by changing the View to Slide Sorter .
![clip_image038[3] clip_image038[3]](https://www.wintips.org/wp-content/uploads/2023/06/clip_image0383_thumb.png)
3. On each slide where audio has been recorded you will see an audio icon along with the time/duration of the recording.

4. When you are satisfied with your recordings, you can move on to the next steps and export the entire presentation, including your audio and videos, either as a PowerPoint Show as a video file.
Step 4. Save the Presentation as a PowerPoint Show.
If you want to export your Presentation as a PowerPoint Show (.ppsx), which is useful if you want your presentation to be viewed even on computers that don't have the Microsoft PowerPoint app installed, do the following:
1. Click on File and select Save As .
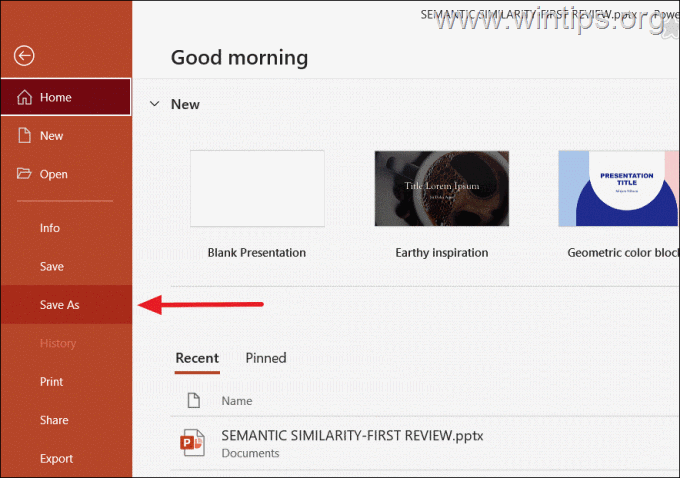
2. Choose the location where you want to save the file and select PowerPoint Show (*.ppsx) format from the Save as type drop-down menu.
![clip_image044[3] clip_image044[3]](https://www.wintips.org/wp-content/uploads/2023/06/clip_image0443_thumb.png)
3. Then, click Save to save the file as a PowerPoint Show.
![clip_image046[3] clip_image046[3]](https://www.wintips.org/wp-content/uploads/2023/06/clip_image0463_thumb.png)
Step 5. Save Presentation to Video.
If you prefer to export your PowerPoint SlideShow as a video file, follow these steps:
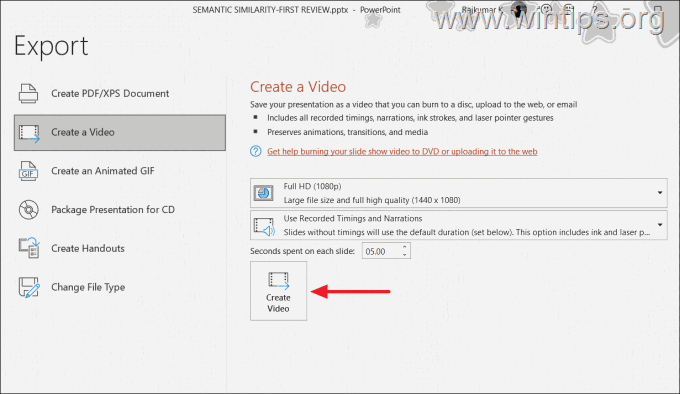
1. Click on File and select Export .

2. Then Click the Create a Video option and select the preferred video quality from the first drop-down menu (e.g., Full HD 1080p ).
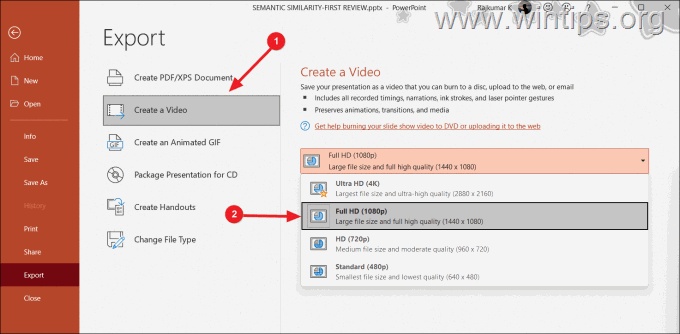
3. Then select the Use Recorded Timings and Narrations option in the next drop-down menu.
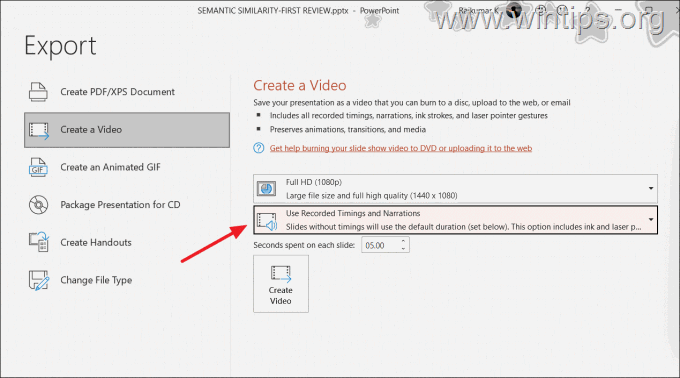
4. Then adjust the Seconds spent on each slide for the slides without recordings.
![clip_image054[3] clip_image054[3]](https://www.wintips.org/wp-content/uploads/2023/06/clip_image0543_thumb.png)
5. Finally, click the Create Video button and select the location to save the video.
6. Now wait for the PowerPoint to finish creating the video, as it may take some time depending on the performance of your computer.
7. Once the video is created, you can play it using any video player of your choice.
Method 2. Add External Audio and/or Video to a PowerPoint Presentation.
Instead of directly capturing audio and video within PowerPoint, you can insert an external audio or video file in your presentation.
Step 1. Adding an audio archive to a PowerPoint presentation.
To insert an audio file from your computer (such as pre-recorded narration, background music), to a slide:
1. Open your PowerPoint presentation and navigate to the specific slide where you want to add the audio.
2. Then, go to the Recording tab, click on the Audio button, and select the Audio on My PC option.
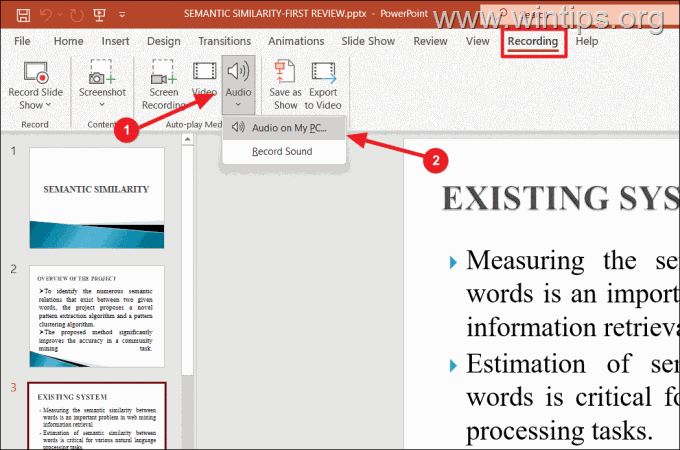
3. Then, choose the desired audio file from your device and click Insert .
![clip_image060[3] Insert Audio file to Powerpoint](https://www.wintips.org/wp-content/uploads/2023/06/clip_image0603_thumb.png)
4. The added audio file will appear as a small speaker icon in your presentation.
![clip_image062[3] clip_image062[3]](https://www.wintips.org/wp-content/uploads/2023/06/clip_image0623_thumb.png)
5. When you click on the speaker icon, the Playback tab will appear in the Ribbon. Move to the Playback tab and click the Play in Background option if you want the audio to play across all slides.
![clip_image064[3] clip_image064[3]](https://www.wintips.org/wp-content/uploads/2023/06/clip_image0643_thumb.png)
Step 2. Adding a Video file to a PowerPoint Presentation.
If you want to insert a video file from your PC, inside a Presentation.
1. Open the presentation and navigate to the specific slide where you want to add the audio.
2. Switch to the Recording tab and click on the Video button.
![clip_image066[3] clip_image066[3]](https://www.wintips.org/wp-content/uploads/2023/06/clip_image0663_thumb.png)
3. Then, select the video file that you want to add in the slide and click Insert .
![clip_image068[3] clip_image068[3]](https://www.wintips.org/wp-content/uploads/2023/06/clip_image0683_thumb.png)
4. Resize the video window as needed, and then customize the Playback settings from the Playback tab.
![clip_image070[3] clip_image070[3]](https://www.wintips.org/wp-content/uploads/2023/06/clip_image0703_thumb.png)
Step 3. Exporting or Saving the Presentation.
Once the audio and video files are inserted, you can export the presentation to a video file or save it as a PowerPoint show. To do that:
1. Select the Recording tab:
- Select Save as Show to save the file as a PowerPoint show, or…
- Export to Video to export the file as a video.
![clip_image072[3] clip_image072[3]](https://www.wintips.org/wp-content/uploads/2023/06/clip_image0723_thumb.png)
That's it! Let me know if this guide has helped you by leaving your comment about your experience. Please like and share this guide to help others.
We're hiring
We're looking for part-time or full-time technical writers to join our team! It's about a remote position that qualified tech writers from anywhere in the world can apply. Click here for more details.
- Recent Posts
- How to Disable Device Encryption in Windows 11. - April 17, 2024
- How to View Permissions on Shared Folders on Windows 10/11. - April 15, 2024
- FIX 0x80070643 error in KB5034441 update (Solved) - April 10, 2024
Konstantinos Tsoukalas
Related posts.
How to , Windows , Windows 10 , Windows 11
How to Disable Device Encryption in Windows 11.
How to , Tutotial , Windows , Windows 10 , Windows 11
How to View Permissions on Shared Folders on Windows 10/11.
How to , Tutotial , Windows , Windows 10
FIX 0x80070643 error in KB5034441 update (Solved)
Leave a reply cancel reply.
Your email address will not be published. Required fields are marked *

- Outlook & Office 365 Help
How to Record My PowerPoint Presentation (and save it as MP4)?
I’m taking a class through the local junior college and my professor requires us to record our presentations and submit them as .mp4 movies. We’re also supposed to be on camera in an inset! How can I do that in PowerPoint on my PC?
There are actually a number of ways you can record yourself delivering a speech or presentation on your PC with an inset video from your Webcam. One straightforward option: Zoom . Open up a Zoom meeting in the Zoom app, share your presentation, press ‘record’ within Zoom, and you’re ready to go. Third-party apps like Loom offer similar functionality if you want to go that route too. But it turns out that Microsoft PowerPoint also has the ability for you to record a narrated slide show and can also record you on video and then export the resultant file as an mp4 video!
There are some caveats, however. Your computer needs a working webcam and microphone, and for best results, I recommend you position yourself in front of a blank wall or similar so you look good on camera. Light your face too, so you aren’t a dark silhouette (as too many people end up being on camera). Don’t worry, you can practice, test things out, record, and then re-record until you’re comfortable with this feature.
HOW TO RECORD YOUR POWERPOINT PRESENTATION
Let’s start by looking at how to find and prepare the presentation recording tools in Microsoft PowerPoint. I’m using the latest standalone app on a Gateway laptop running Windows 10. I’ve created just the first few slides of a presentation on Clubhouse, and want to practice recording my narration…
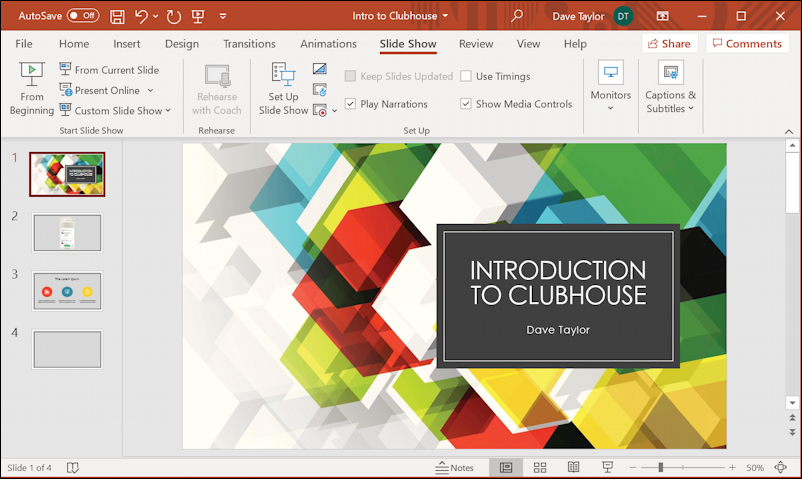
Your presentation probably looks similar. Along the top, just below the orange window frame, are the main categories of “ribbon”: choose “ Slide Show “, as shown. But where is the record presentation feature? If the window were only just a little bit wider, it’d be much more obvious:

The tiny square with the even smaller red dot is Record Slide Show , as you can now see. Click on the downward facing “V” adjacent to that button and you can set up some basic configuration:
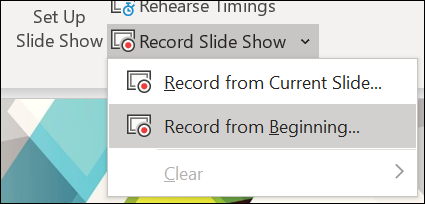
Odds are good you want to record a full presentation starting with the first slide, so choose “ Record from Beginning… ” and PowerPoint rather dramatically takes over the entire screen. Here’s what you’ll see:
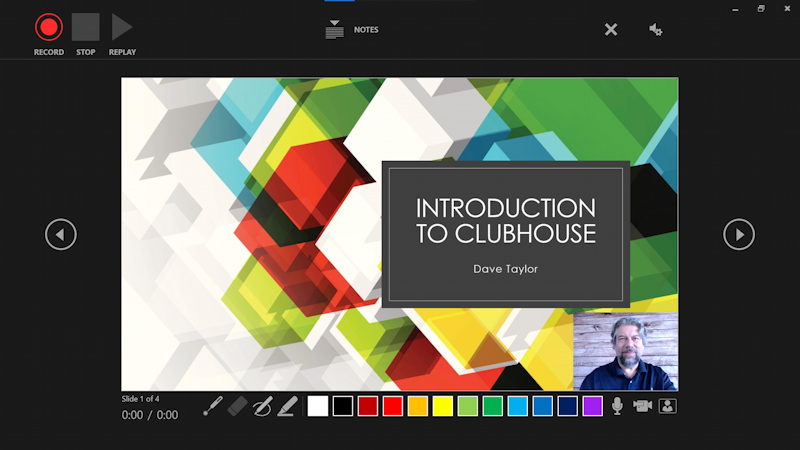
Notice along the top the standard record / stop / replay buttons, and that in the center you can choose to view your presentation notes (they won’t be part of the recording. PowerPoint is really smart about that!) and, on the right side of the top toolbar, the close “X” and audio/visual settings button. On the left is previous slide, the right is next slide and the bottom includes a running timer showing overall presentation time and time on this particular slide, followed by a long strip of annotation tools and colors. Finally, a mic, a video camera, and a tiny user icon. Want to record audio but not be on camera? Click on the user icon on the lower right corner and you can disable the camera, for example.
Start by making sure the camera and microphone are set correctly. That’s done by clicking on the A/V settings icon on the top right…
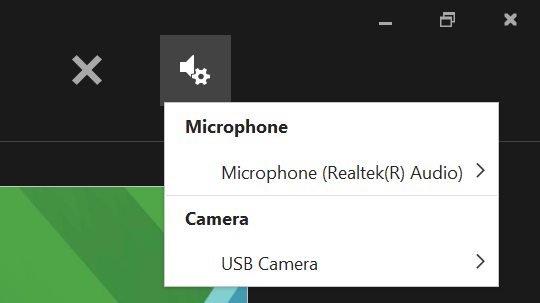
Looks good to me. Let’s do this!
RECORDING YOUR POWERPOINT SLIDE SHOW
To actually record yourself delivering the presentation in PowerPoint, take a deep breath, make sure you look good on camera in the little window, then press the red RECORD button on the top left. It’ll give you a 3… 2… 1… countdown and you’ll be recording!
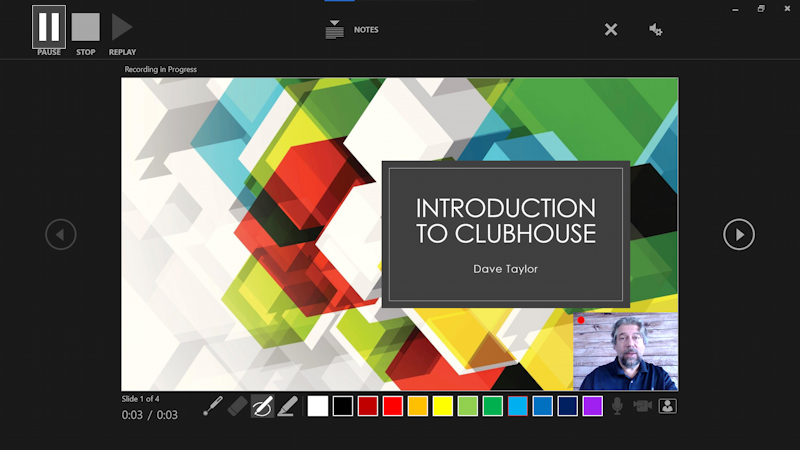
A few things to notice on the above image: The RECORD button has become a PAUSE button, the timers on the lower left are both now tracking time, and there’s a tiny red dot on the top left of the video inset window. Now, you’ll need to say something smart about your first slide and when you’re ready, click on the “>” on the right side to move to the second slide. Keep talking, it’s still recording!
Done recording? Click on the STOP button on the top left and those buttons will change to reflect that there’s a recording saved:

Press REPLAY and watch. You’ll see exactly how it all works, hear the potentially loud CLICK of you moving to the next slide, and generally get a good sense of whether your presentation is engaging and lively or showing instead that you’re distracted. Try re-recording until you’re happy with the results, and don’t be discouraged if it takes a few times through to get a good slide show.
Once recorded, click on the “X” on the top right and you’ll go back to the main PowerPoint window:
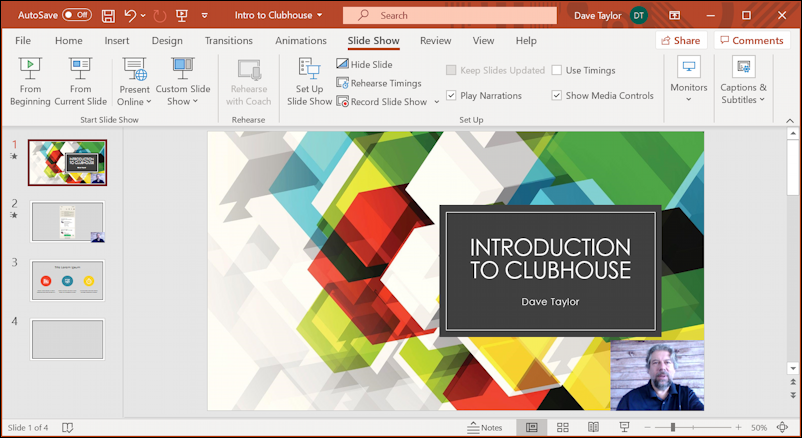
Notice now that the slide has the video inset on the lower right and that the ribbon includes some slightly different options, including “Present Online”. You can click on the “From Beginning” if you want to watch your slides show again, and why not? You did a great job!
SAVE YOUR POWERPOINT SLIDE SHOW PRESENTATION
Now that you’ve recorded your presentation, it’s time to save it. I recommend you first save the presentation as a PPTX presentation, so you can open it later and edit it as needed. That’s done by going to File along the very top and choosing “ Save As… ” on the left side:
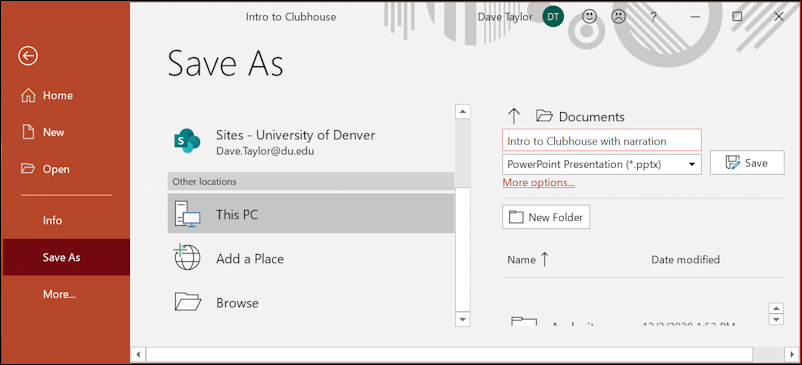
Notice that the filetype is still PPTX, the same as it would be with a regular presentation. This is confusing, but we’ll solve the problem by saving it as an MP4 movie a bit later…
I strongly encourage you to add “narrated” or “recording” or similar to the filename so you can know immediately which presentation is just the slides and which includes your narration recording. You can see at a glance the video and audio definitely adds to the file size:
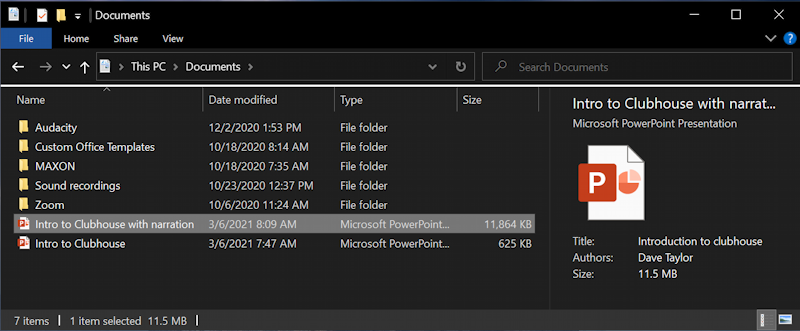
My slide show is a modest 625K, but once I narrate it, the new version explodes up to 11.5MB. Surprisingly, the MP4 will prove to be smaller than the PPTX that includes the narration.
EXPORT YOUR NARRATED SLIDE SHOW AS MP4 MOVIE
To export your recorded slide show as an MP4 movie, go back to the FILE menu, but this time choose EXPORT, as shown:
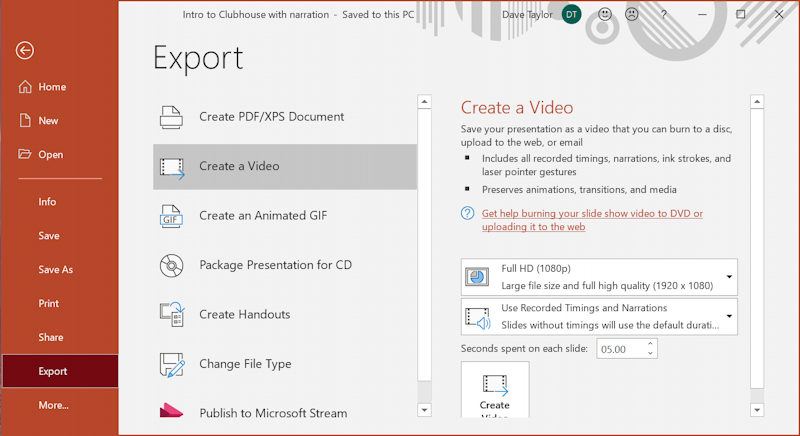
Notice that I’ve chosen File > Export > Create a Video. On the right side are two critical settings before you proceed: Video size and presentation timing. Let’s start with output resolution, which defaults to “ Full HD “. Click and there are a lot of choices:
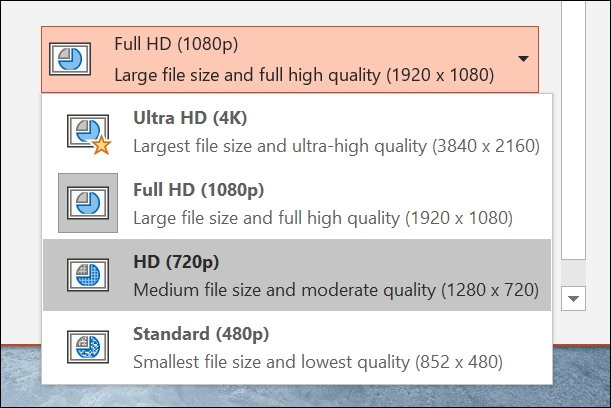
Unless you’ve been given explicit instructions to save as Full HD or Ultra HD by your professor, I strongly recommend you save in 720p. It’s good enough resolution it looks great full screen (or even on a TV or projected) but the file size is still modest. I recommend to my own students that they choose HD 720p for their presentations.
The second option to check relates to the timing of the presentation:
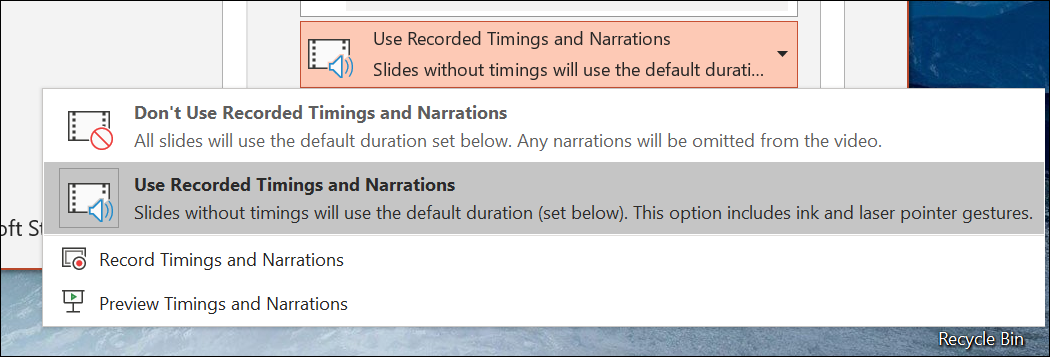
Rather long-winded options, but I definitely encourage you to choose “ Use Recorded Timings and Narrations ” to ensure that the recording you just made is the basis of the movie!
Once you’ve specified exactly what you want, choose “ Create Video “, the button on the bottom of the screen. You’ll be prompted for a file name, as usual:
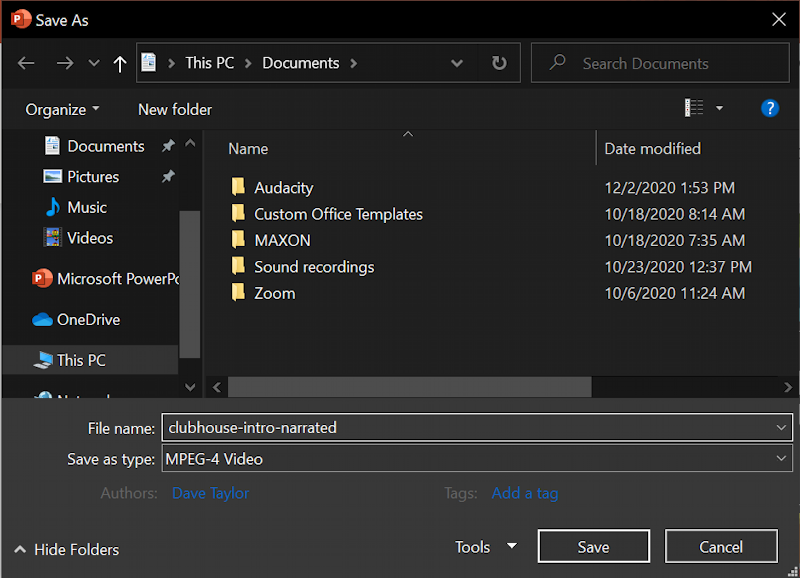
Notice that the format is MPEG-4 Video, the long, fancy name for “MP4”. Pay attention to where you’re saving it and click “ Save ” to proceed. Now you’ll see a progress bar along the bottom as PowerPoint does its thing:
Depending on how long your presentation is, this could take upwards of a minute or two. Patience!
Finally, you’ll have the .mp4 file that your professor requires:
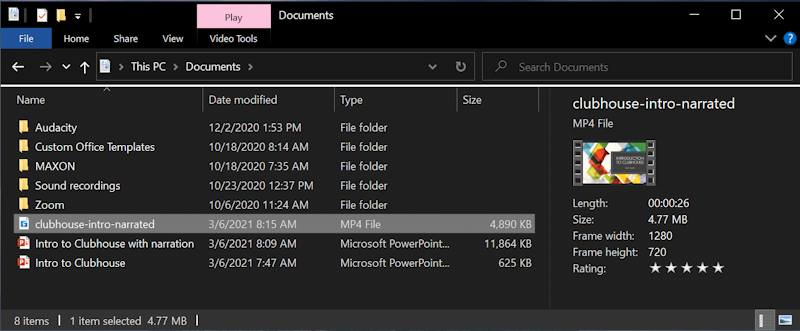
Notice that the original slides only file is 625KB, the saved PowerPoint presentation with narration is 11.5MB, but the MP4 movie is only 4.8MB. As I said earlier, it ends up being surprisingly smaller than the full PPTX file (if you choose 720p. Choose Ultra HD 4K and it’ll be quite a bit bigger!)
That’s it. Now you know how to record your presentation and turn it into a movie. Want to see the very beginning of my presentation? Here’s an excerpt of my Intro to Clubhouse:
(Don’t panic when I stop talking mid-sentence. I did that to keep the files small and easy to work with). Good luck with your class.
Pro Tip: I’ve been using and writing about Microsoft’s Office Suite for many years. Please check out my PowerPoint help library for plenty of useful tutorials, as well as additional Office help pages ! Thanks.
Leave a Reply Cancel reply
Your email address will not be published. Required fields are marked *
How-To Geek
How to record voiceover narration in powerpoint.
If you're not able to physically present your slideshow, record a voiceover narration to make sure no points are missed.

Quick Links
Preparation, record a voiceover for your presentation.
If you’re sending out your presentation instead of giving it in front of an audience, but you feel adding a vocal explanation would better help to deliver the message, record a voiceover narration. Here’s how to do it.
Before you begin your PowerPoint narration, you’ll need to make sure you’ve made the proper preparations.
Set Up Your Mic
First, you’ll need a microphone. Most modern computers have a built-in microphone that gets the job done, but investing in a USB microphone will increase the audio quality of the narration by quite a bit.
The built-in microphone will be set as your input device by default, so if you plan on using it for the PowerPoint narration, you don’t need to take any additional steps in setting it up. However, if you plan to use a USB microphone for the narration, be sure to set it as the input device.
To do this on Windows, right-click the volume icon found on the right of the taskbar. In the menu that appears, select “Open Sound Settings.”
The “Sound Settings” window will appear. Here, scroll down to the “Input” section and click the box under “Choose your input device.”
If you’re using a USB microphone, it will appear here. Select it to set it as the input device.
The steps for Mac users are extremely similar. The only difference is you should go to "System Settings" and select "Sound" instead of right-clicking the volume icon like on Windows. From there, the steps are the same.
Take Notes and Rehearse
With your mic set up, you’re ready to start recording, right? Well, not quite. While you may not be physically standing in front of the audience delivering this presentation, you still need to treat it as though you are. This means going through the basics---taking notes and rehearsing your delivery.
One thing you can do to help you record a successful narration is to write out a script. As with a live presentation, though, you don’t want to sound like you’re reading straight from your notecards. Practice reading through the script a few times so that it sounds natural and fluid.
Once you’re confident in your delivery, it’s time to start recording.
Open the PowerPoint presentation in which you would like to record a voiceover narration. Head over to the “Slide Show” tab and, in the “Set Up” group, select “Record Slide Show.” Once selected, a drop-down menu will appear. Here, you can choose to start the narration from the beginning or from the current slide. If you choose to start recording from the current slide, make sure that you’re on the slide you’d like to start recording from.
Related: How to Record Your Screen with Microsoft PowerPoint
In this example, we’ll choose “Record from Beginning.”
Now, you’ll be in full-screen mode. You’ll notice a few extra tools appear, including a record button at the top-left corner of the screen. When you’re ready to start recording, click this button.
When you select the record button, a countdown timer will appear, giving you a three-second delay between clicking the button and starting your recording.
You can now start recording your voiceover narration! Continue through the presentation by clicking the right arrow to go to the next slide.
You can pause the recording at any time by pressing the pause button in the top-left corner of the window. The recording will automatically end when you make it to the last slide. Alternatively, you can press the stop button, also located at the top-left corner of the screen.
If you want to play your narration back, you can select the replay button.
A speaker icon will appear at the bottom-right corner of each slide that has a recorded narration. You can also play your narration back on each slide by hovering over the icon and pressing the play button.
If you’re not satisfied with the narration, simply repeat these steps to re-record.
How to Record a PowerPoint Presentation
By Jeff Cobb . Last Updated on July 10, 2022

Need to record a PowerPoint presentation? Whether for an online course , a virtual conference session, or as an element of a broader content marketing strategy, most edupreneurs and expertise-based businesses will need to record presentations at some point. And while a growing number turn to alternatives like Google Slides or Keynote, Microsoft PowerPoint is still the most common choice.
It’s hard to believe (at least for me) that PowerPoint has been a mainstay of educators and public speakers for over 30 years. Even more surprising, its market share has held steady at 95% since the late 1990s. Clearly, it’s going nowhere, in spite of the complaints about “ death by PowerPoint ” that have been around for nearly as long.
The problem, of course, is that most presenters have never learned to use PowerPoint effectively, resulting in dull, tired presentations that quickly turn learners off. That problem is usually even worse when you record a PowerPoint presentation because you lose the ability to respond, adjust, and interact with your audience on the fly.
So, in this post, we’ll take a look at how to video record yourself presenting a PowerPoint using the tools in PowerPoint (and a few compatible video editing programs) and also review the basics of creating an effective, compelling presentation.
- For a more in-depth look at how to make your content as seamless as your slides, check out 7 steps to record a successful virtual presentation .
- For more on using PowerPoint to create online courses, see Optimizing PowerPoint for E- learning .
How Microsoft PowerPoint Works
You’d have to be living under a rock to have never heard of PowerPoint before, but to understand how it works, it’s important to know why it was first designed.
The original PowerPoint program was written to create overhead transparencies, a favored medium of many educators before video projectors and interactive whiteboards became the norm! This explains PowerPoint’s “slide” feature, as originally each presentation was delivered on a series of individual sheets.
Today the slides created in PowerPoint are usually displayed as a complete video or slide show. This ability opened the door for more interactive elements, such as animated transitions between slides, and embedded video and audio. These features can help make your PowerPoint presentation more engaging, but too many interactive elements can increase the learners’ cognitive load and ultimately make presentations less effective.
How to Create a PowerPoint Presentation
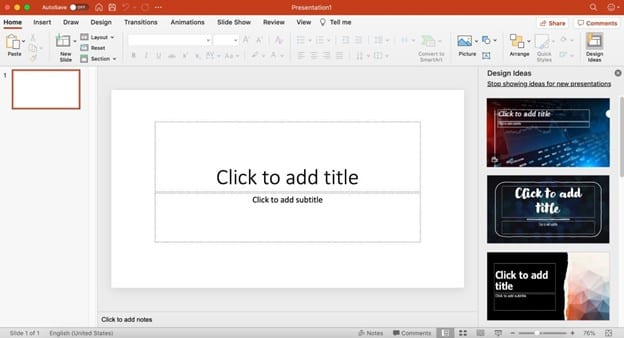
Every presentation starts with the same basic template. These options are fully customizable, or you can select from pre-made templates to speed up the process of designing your slides. To make a simple presentation, you only have to add text, bullet points, and images. Use the preset layouts or select content boxes from the top ribbon and click to insert them into your post.
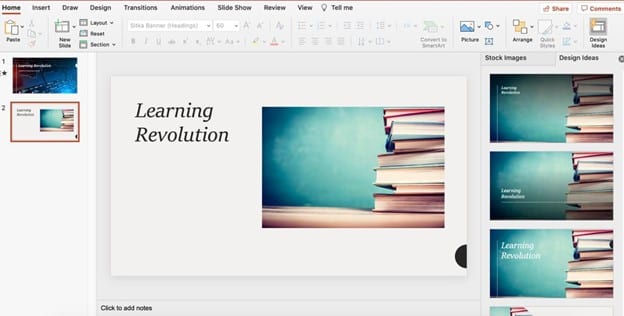
The latest versions of PowerPoint include a stock image library, and the program will suggest design ideas based on your layout to make each slide look more professional. This is an excellent feature if you’re not particularly design-minded and don’t want to spend a long time adjusting the appearance of your slides.
Pro Tip : If you need to edit your images, check out Pixlr , a simple, but powerful Web- based photo editor.
Once you’re happy with the content and general appearance of your PowerPoint presentation, it’s time to add your audio or video content. The entire slide show can then be exported as a video presentation or virtual lesson, and uploaded to your website, newsletter, or content delivery system of choice.
PowerPoint will export to video (mp4 or wmv) in full or ultra HD (1080p/4K). This is important if you intend to embed your presentation in a website or use it as part of an online course. It also removes compatibility issues for users who either don’t have access to PowerPoint, or are using PowerPoint for the web, which doesn’t support all the functionality of the full program.
How to Record Audio on PowerPoint
The most fundamental question in recording your presentation is how to record voice on PowerPoint. To add voice recordings to your presentation, simply select the Slide Show tab from the top ribbon.

Before completing the entire recording, I recommend using the Rehearse Timings feature to review how your script fits your slides. This opens a test screen that will play your slide show and record how long you spend on each page.
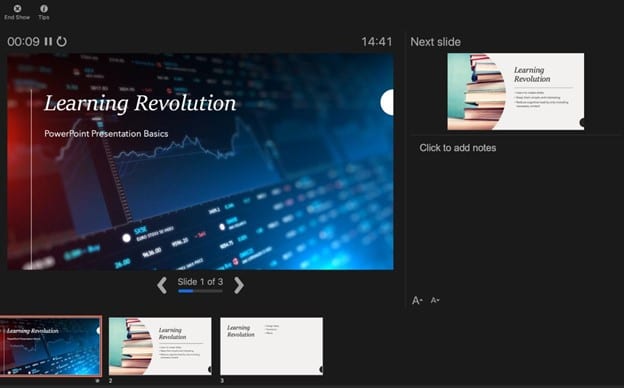
Use the Pause and Reset buttons as you make adjustments and use the Notes section to document any changes you need to make to your script (you do have a script, right?). If timing is an issue, use an online speech calculator to calculate your word count.
When you’re ready to record, select the Record Slide Show option from the top ribbon. Toggle video and/or audio on or off using the options at the top of the record screen.

While you can record audio using a built-in microphone, investing in a good quality shotgun mic will improve the quality of your recording.
By default, PowerPoint enables you to record the full slide show presentation in a single take. Click through the slides to trigger animations or progress through the presentation. When you’re
done, you can review the recording. The recording is saved on a slide-by-slide basis, so you don’t have to re-record the entire presentation to correct any errors.
A word of caution : Because the audio is saved on a per-slide basis, no audio is recorded during slide transitions. Always ensure you have finished speaking before triggering the next slide to avoid cutting off the end of each section.
How to Video Record Yourself Presenting
If you want to include yourself in your PowerPoint, toggle the video option on from the Record Slide Show screen. By default, your camera input will appear at the bottom right of your presentation during the recording.
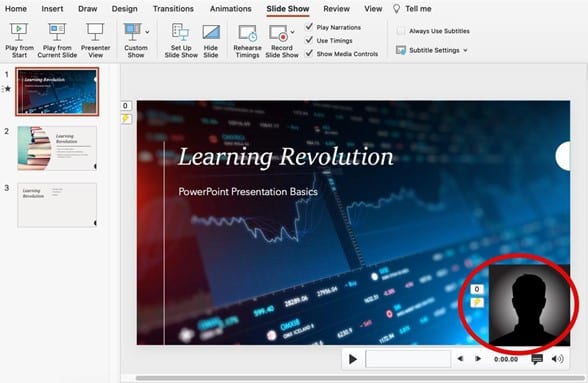
Once you’ve finished recording your video, return to the editing screen. Your recording will appear in the bottom right. From here it can be dragged anywhere on the slide to reposition it. You can also resize the video frame or remove the recording by selecting and deleting it.
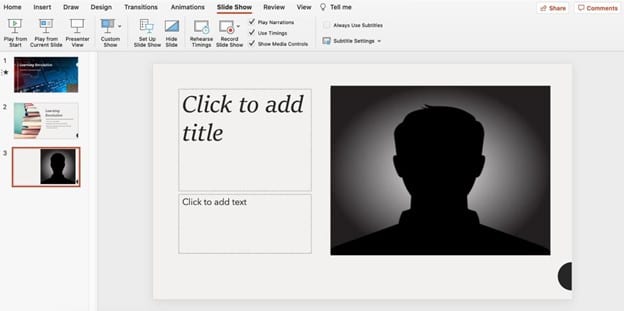
As with audio recording, PowerPoint doesn’t save video during transitions. And while you can use a built-in webcam to record your presentation, if you want it to look more professional, you’re better investing in an external camera such as the Mevo Plus .
Related: How to create a simple home video studio
Record with a Screen Recorder
While you can get a perfectly good recording using the native capabilities in PowerPoint, there are powerful third-party tools that can help you take your recorded presentation to a more professional level – increasingly important if you want to stand out in the market for online courses and/or virtual event presentations.
Specialized screen recording or screencasting software offers more post-production options, including professional transitions, closed captioning, the ability to add interactive elements, and direct publishing to content distributors such as Vimeo and YouTube, and additional video file formats, including mov, avi, and mpeg-2.
In this section, we’ll take a quick look at three of the most popular choices:
- Screencast-O-matic
Each of these is compatible with PowerPoint and offers extra features to make your presentation stand out from the crowd. (You can also find more information about screen recording software here as well as in this review of Camtasia alternatives .)
Recording a PowerPoint Presentation with Camtasia
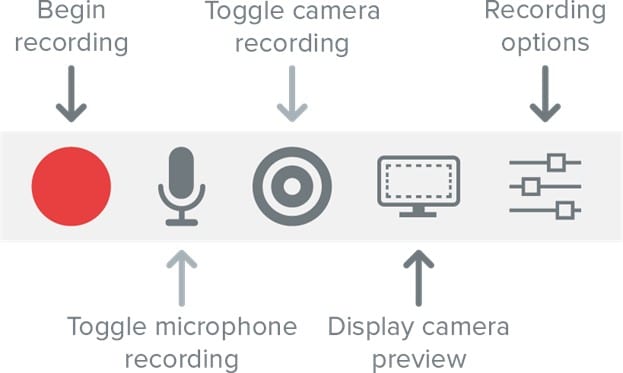
Since its initial release in October 2002, Camtasia has grown to become an industry leader in screen recording and video editing. Using Camtasia you can capture personal videos via your web camera, record sections of your screen, load sound effects from Camtasia’s royalty-free music library, capture stuff from your iPhone, throw in pre-made animations, set up custom video themes, apply device themes, and more.
Camtasia is compatible with both macOS and Windows PCs – it can run on Microsoft Windows 10 or later versions as well as on macOS 10.13 or later.
If you have Camtasia and PowerPoint installed on your computer, you’ll find the Camtasia record features in the Add In tab on the toolbar in PowerPoint. From there you can access additional features Camtasia offers, such as setting custom hot keys or frame rate.
You can also import your PowerPoint slides into Camtasia and edit them in Camtasia’s software instead. Click the Import Media option and select your PowerPoint file. This will convert your slides into PNG image files. While this will limit your ability to edit the slide itself, it gives you much more control over the final output, as you can adjust your slides to fit your audio and video overlay.
If you plan to record a PowerPoint presentation for use as part of an online course, one of the big advantages of using Camtasia is that you can export your finished recording as a SCORM package, meaning it can be imported into any SCORM-compliant learning management system (LMS) and the LMS will be able to track learning activity (e.g., time in course, quiz scores). This is not possible when relying only PowerPoint’s native recording capabilities. (More on SCORM here.)

Recording a PowerPoint Presentation with ScreenFlow
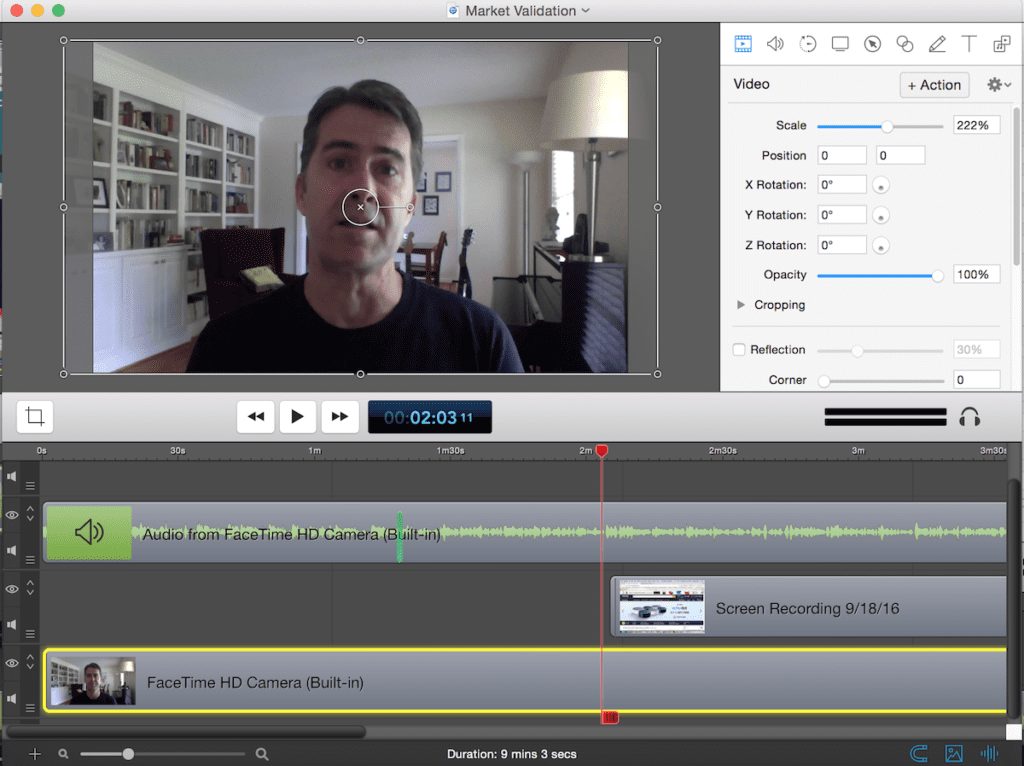
Available only for Mac, ScreenFlow is software that allows you to simultaneously record from your screen, camera, and microphone. You can record everything in a single take by navigating through your slide show on your screen while delivering your audio and/or video presentation, or you can record each element separately and stitch them together. While a little more time consuming, this second method works best if you need to edit, cut, or retake a section of your delivery.
Like Camtasia, ScreenFlow includes a suite of audio and video editing tools to customize your presentation, and it enables you to continue speaking during slide transitions. This can eliminate long pauses and deliver a seamless narration.
In general, Screenflow is very similar to Camtasia in its overall feature set. One major difference is that it cannot export content as a SCORM package, which may make it somewhat less attractive for course creators. On the other hand, if you are a Mac user, it’s lower price tag makes it an attractive option for bring more power to recording your PowerPoint presentations.

Recording a Presentation with Screencast-O-Matic

Screencast-O-Matic screencasting software – compatible with both Mac and PC – boasts a powerful suite of video editing tools. Even the Premier version only costs an extremely reasonable $4/month. As with other software, you can record video or audio as well as your screen and edit the final presentation with post-production tools.
Open PowerPoint and navigate through your slides while Screencast-O-Matic records all or part of your screen. You can hide or show the webcam video at any point during the presentation, and use video editing tools to add effects, captions, and filters.
While somewhat less feature rich than Camtasia – particularly in the free version – Screencast-O-Matic does have the advantage of a very user-friendly interface. If you are new to creating recorded presentations, it will enable you to get up and running in no time and at little to no extra cost.

Final Thoughts
PowerPoint has come a long way from mundane bullet point slides and gimmicky transitions. Now a host of impressive design and editing tools allow you to create engaging, informative
video presentations for your online courses , webinars, and lecture series. And native tools make it possible to record a PowerPoint presentation so that it can be access and played according to the specific schedules of your audience members.
Getting skilled at recording your presentations is more important than ever. The COVID-19 pandemic demonstrated the value of virtual learning across multiple fields and industries, and there’s every reason to believe that more and more conferences, courses, and events will continue to make video learning a core part of their strategy in the future.
As recorded presentations grow in popularity, though, event planners, attendees, training purchasers, and learners will demand higher quality content. So, it’s more important than ever to produce professional, quality videos that captivate your audience and demonstrate the value of your expertise . PowerPoint and accompanying video editing programs now make creating beautiful presentations easier than ever before.
- Camtasia Review
- Camtasia Alternatives
- Optimizing PowerPoint for E-learning
- 7 Steps to Record a Successful Virtual Presentation
Table of Contents
Related Posts

Leave a Comment Cancel Reply
Your email address will not be published. Required fields are marked *
This site uses Akismet to reduce spam. Learn how your comment data is processed .
- Link to facebook
- Link to linkedin
- Link to twitter
- Link to youtube
- Writing Tips
How to Record a PowerPoint Presentation

5-minute read
- 16th November 2022
If you’re a professional , chances are you’re familiar with giving presentations or will have to give one at some point. Recording presentations is a great tool, whether it’s to share the videos with remote colleagues or to watch the videos to see where you can improve as a presenter.
Fortunately, you can record your next presentation in a few simple steps, either with Microsoft PowerPoint’s built-in tool or by using a third-party screen recording tool. Check out our guide below to find out more!
Microsoft PowerPoint offers a user-friendly tool that allows you to record, markup, and export a presentation. Here’s how:
1. Present Slide Show
Once you’ve put together a great presentation , navigate to the Slide Show option in the ribbon toolbar at the top of your screen and select Record Slide Show.
If you’re using a Windows computer, you’ll either start recording from the start of the presentation or from your current slide. If you’re on a Mac, you’ll want to open the slide you want to start recording from before selecting the record button.
2. Utilize Recording Tools
The recording toolbar will then appear at the top of the next screen.
The tool options may differ slightly depending on your operating system, but they include options to start and stop recording, pause or delete the recording, and select whether you’d like to use a camera to record yourself during the presentation and/or a microphone to add narration.
3. Record Presentation
Once you click start, you’ll get a three-second countdown before the recording begins.
You’ll see the Presenter View during recording, which includes speaker notes on the right side of your screen and markup tools, including a laser pointer and highlighter, under the slide currently being presented:
You can progress through your presentation using the arrows on the screen or those on your keyboard. It’s important to note that narration won’t record over slide transitions, so you should pause speaking until transitions have completed.
4. Save and Export
Once you’ve reached the end of your presentation, you should click Stop on the toolbar and then End Show on the left side at the top of your screen.
Next, navigate to the File menu option to save and export your video:
Once you’ve selected your desired file format, you can choose video quality and timing settings before exporting:
5. Watch and Share Your Presentation
Find this useful?
Subscribe to our newsletter and get writing tips from our editors straight to your inbox.
After the export has completed, you’ll have a complete recording of your presentation, including all narration and markup!
If you’re looking for another tool for recording presentations, Loom is a third-party screen recorder that you can use in a web browser or on your desktop. You’ll first need to sign up for free and then download the desktop app to use it with PowerPoint.
1. Setup Recording Tools
When you first open Loom, you’ll see a toolbox with camera, microphone, and screen recording options:
You can choose to record your entire screen or just one app, like PowerPoint, and you can also create speaker notes that will only be visible to you.
2. Record Presentation
Once you click Start recording, like PowerPoint’s tool, you’ll be given a three-second countdown, and then you can navigate to play your slideshow in your desired view (i.e., standard or presented).
Note that although PowerPoint can create a video of only the slide show and none of the presenter’s view, Loom creates a recording of your screen exactly as you see it.
When the recording begins, a toolbar will be added to the left side of your screen with similar options to start, stop, pause, delete, and markup:
3. Save and Edit
Once you’ve reached the end of your presentation, you should click Stop on the toolbar. Loom will then automatically save a copy of the recording and redirect you to your library on their website.
From here, you can use the settings menu on the right side of the video to make any necessary edits, such as trimming the recording.
4. Download and Share
Next, you can click on the three dots above the video to either download the recording or copy a link to it, which you can share with anyone you want to send your presentation to:
Proofreading and Editing
Before recording and sharing your presentation, don’t forget to proofread it, as spelling and punctuation errors can come across as unprofessional. Our expert editors can help ensure your presentations are clear, concise, and error-free, and we can work in over 15 document formats ! Learn more by submitting a free trial document today.
And if you want more help with Microsoft Office, check out our MS Word series on YouTube, where we’ll add videos with helpful tips, like how to create a list of abbreviations in Word on a Mac.
Share this article:
Post A New Comment
Got content that needs a quick turnaround? Let us polish your work. Explore our editorial business services.
2-minute read
How to Cite the CDC in APA
If you’re writing about health issues, you might need to reference the Centers for Disease...
Six Product Description Generator Tools for Your Product Copy
Introduction If you’re involved with ecommerce, you’re likely familiar with the often painstaking process of...
3-minute read
What Is a Content Editor?
Are you interested in learning more about the role of a content editor and the...
4-minute read
The Benefits of Using an Online Proofreading Service
Proofreading is important to ensure your writing is clear and concise for your readers. Whether...
6 Online AI Presentation Maker Tools
Creating presentations can be time-consuming and frustrating. Trying to construct a visually appealing and informative...
What Is Market Research?
No matter your industry, conducting market research helps you keep up to date with shifting...

Make sure your writing is the best it can be with our expert English proofreading and editing.

How to make a slide show
Learn how to make a slide show with photos, videos, music, and custom settings using a slide show maker.
Learn how to make a slide show with PowerPoint
Discover how to make a slide show with photos, videos, music, and custom settings using a slide show app like PowerPoint.
What is a slide show maker?
To create a slide show, you’ll want to use a slide show maker—or slide show app—which is a software program or online service that enables you create digital slide shows with text, photos, videos, music, and other special effects. The full range of slide show features and functionality varies from program to program.
Once you’ve created a slide show, it can be published on the internet or shared with others as a video file. Additionally, you can use slide shows to create dynamic, interactive content on websites.
Slide show software can be used for a variety of purposes, such as creating presentations for work, school, and even your personal life. For instance, slide shows are often used to:

Display photos during an event
Slide shows are a great way to share photos and videos with guests at a wedding, birthday, or other special event.
Create a digital photo album
Some slide shows are created for personal reasons, such as sharing important memories with family or friends.

Highlight products or services
Businesses can use slide shows to showcase their products, promote special offers and sales, or pitch their services to potential clients.
Enhance teaching, training, and public speaking
Slide shows can also provide helpful visuals in educational settings, classroom presentations, and public speaking forums.
What you need to make a slide show
When it comes to creating a slide show, there are a few things you'll need to get started. First and foremost, you'll need a device equipped with presentation software or access to an online slide show app. Secondly, you’ll need a way to display your slide show, which usually means connecting your device to a projector or big screen TV. Beyond that, you’ll need some visual aids and other media to bring your slide show to life.
Explore each of these slide show requirements in more detail:
Devices and equipment —To create a slide show, you’ll use a computer or other device—such as a tablet or mobile phone—with PowerPoint or a similar program installed. You will also need a way to project the slides onto a screen or wall. This can be done with a projector, but if you don't have one available, you can use your TV or computer monitor. Simply connect your device to the TV or monitor using an HDMI cable and select the correct input. Your slides will now be projected onto the screen.
Media —Of course, creating a slide show requires media that adds visual and even audio elements to your presentation. This can be anything from photos and videos to music and text. You can use search engines to find copyright-free media to use in your slide show.
Another option is to purchase royalty-free stock footage, images, and audio files from online media libraries. This could be a bit more expensive, but it guarantees that you have the legal right to use the media in your presentation.
Finally, you can also use your own videos, images, and even music. While this can be a time-consuming process, it does allow you to create custom content specifically for your slide show.
Slide show creator —To bring your slide show together, you’ll need a slide show creator. The slide show software you choose will depend on your presentation requirements and preferences. There are many slide show makers on the market, with Microsoft PowerPoint being one of the most popular and widely used programs globally.
How to choose a slide show maker
When choosing slide show software, it's important to consider the features and specifications that are most important to you. Some of the questions you might ask when choosing a slide show maker include:
- How easy is the software to use?
- Is the software Mac or PC compatible?
- Can I access and edit my slide show on the cloud?
- What kind of slide shows can be created with the software?
- How many photos and/or videos can be included in a slide show?
- Can text and other elements be added to slide shows?
- Are transitions and effects available for slide shows?
- Is music accompaniment an option?
- What are the options for saving and sharing your slide show?
Building a slide show doesn't have to be difficult. With the right software, you can create an engaging presentation in no time.
Six steps for creating a slide show

1. Plan your slide show
Before getting too deep into your slide show project, it’s a good idea to select and save the photos and videos you want to use. This helps you create a slide show more efficiently and purposefully, ensuring a better outcome.
4. Import media
Start adding photos, videos, and other desired media to your slides. You can upload these from your device or online media libraries. If you planned your slide show in advance, you should have all your media saved in one place.

2. Launch your slide show app
Once you’ve decided on a slide show maker, you’ll want to launch the app from whatever device you’ll be using to create your presentation.
5. Add text, music, and transitions
After you’ve arranged the visuals in your slide show, you can provide additional information and communicate sentiment using custom text, music, and timed slide transitions.

3. Choose your theme
Most slide show software offers a variety of pre-set themes, colors, and designs. You can choose one that best suits your slide show or create a custom theme using the program’s various tools and features.
6. Record, save, and share your slide show
Now you’re ready to record your slide show, which can include a voiceover or Cameo . Once your slide show is complete, you can save it as a video to your device or to the cloud, such as OneDrive . You can access your saved slide show at any time to display at events, use in meetings, share online, or send directly to other people.
How to make a slide show with photos
Adding photos to your slide show is a great way to enliven your presentation and make it more visually interesting. Here are a few different ways you can add photos to your slide show in PowerPoint.

Add photos from your device
Whether you’re using a computer, tablet, phone, or other device, you can use photos that are saved to your device to create your slide show. In PowerPoint, simply select “Insert” then “Pictures” from the program menu, then choose “This Device.” This will open your photo library and allow you to find the photos you want to use. Once you’ve selected the photos that you want to import, just click on the "Insert" button and they will be added to your slide show. If you’re using a pre-made theme, you can also right-click the image in the slide show and select “Change Picture.” Again, you will choose “This Device” to access your photo library. After inserting your photo, you can reposition it on your slide or resize it however you like.

Use stock photos
Another way to add photos in PowerPoint is to follow the same process you would when adding photos from your device, but when prompted to choose your photo source, select “From Stock Images” instead of “This Device.” This will display a library of photos that you can use in your slide show without worrying about copyright infringement. There are thousands of stock images available in most slide show maker programs. Once the library is open, you can explore existing photo categories or use keywords to search for photos that fit your needs.

Explore online photo sources
Online photos are images you can insert into a PowerPoint slide show directly from the internet, as opposed to using those you have saved on your device. This is a convenient option if you don't have photos already prepared for your slide show, or if you can’t find the right kind of photo in the stock image library. However, there are some potential risks associated with using online photos, namely that you must be careful to use royalty-free images so not to infringe on any copyrights. In PowerPoint, there is a filtering option to ensure your search results only show royalty-free photos. Inserting photos from online sources follows the same process as the previous two methods, but this time, you’ll select “From Online Sources.”
How to add videos, music, and text

How to add videos to PowerPoint slide shows
Adding videos to your slide show involves accessing videos from your device, a stock video library, or online video sources—just as you would when adding photos. In this case, however, you’ll navigate to the menu in PowerPoint and select “Insert,” followed by “Media,” then “Video.” Once your video appears on your slide, you can resize or reposition it to fit your presentation needs. You can also set your video to play automatically in the slide show by selecting “Playback” on the menu and choosing “Start Automatically.”

How to add music to PowerPoint slide shows
Much like adding videos, you can add music to individual slides in PowerPoint by navigating to “Insert” on the menu, then “Media,” and finally “Audio.” You can then import music from your device, or you can record your own audio directly in PowerPoint. However, if you want your audio to play across multiple slides in your presentation—for example, as background music for a slide show—you’ll have to take a couple of extra steps. Once you’ve imported your audio file, select “Playback” from the menu and choose the “Play in Background” option. Your music will now play across all slides. You can set one song to loop for the duration of the slide show, or you can add more songs to play continuously throughout the slide show.
How to add text to PowerPoint slide shows
Premade themes in PowerPoint make adding text slide shows easy. On slides that already have templated content, you can simply click on the text and begin editing. In addition to changing what the text says, you can resize, recolor, reposition, and add special effects to the text. Of course, you can also change the font—or style—of the text. Most of this can be done from the “Home” tab on the menu while certain effects, such as shadows, can be found on the “Shape Format” tab. If you’re designing your presentation slides from scratch, or want to create additional text, find “Insert” on the menu, then choose “Text Box” or “Word Art,” depending on your desired text effect.
Discover custom slide show settings
Add even more effects to your PowerPoint slide show with custom settings like timing, transitions, and looping.

Set slide show timing
Adding timing to your slide show is a great way to control the pacing and flow of your presentation. To add timing in PowerPoint, go to the "Transitions" tab on the menu and find the "Advance Slide" area. Make sure the box next to “After:” is checked, then input the amount of time you’d like each slide to appear on-screen. The slides will automatically advance, creating a movie-like effect that’s great for events and special occasions.

Create slide show transitions
Now that you’ve added automatic timing to your slide show, you can make it more visually appealing by creating slide transitions. Transitions are special effects that allow you to animate the way your slides change from one to the next, and there are a variety of different transitions in PowerPoint that you can choose from. You can add these transitions to your slide show from the "Transitions” tab. From there, you’ll select the transition you want to add. To preview the transition, simply click on it. You can click “Apply To All” to automatically add the same transition to every slide in your slide show, or you can manually add different transitions to different slides.
Loop your slide show
If you want your slide show to play continuously until you choose to turn it off, you can set your PowerPoint presentation to loop. This will ensure your slide show automatically starts over from the beginning once it reaches the end. To get started, navigate to the “Slide Show” tab on the menu and select “Set Up Slide Show.” When the settings window opens, check the box next to “Loop continuously until ‘ESC’” and then click “OK.” When you’re ready to turn your slide show off, simply press the Esc key on your keyboard.
Slide show template and theme tips
Search themes and templates online.
With numerous slide show themes and templates available, it’s easy to find one that fits your needs.
Customize your design
If you can’t find the perfect theme or template, you can change things like colors and fonts.
Build a custom template
If you want a blueprint to use with future slide shows, you can create your own template.
Add new slides
If you need more slides, you can choose a specific layout and your theme will be carried over.
Edit your slide layouts
Even when using a theme or template, you can rearrange slide content to highlight key information.
Add photos, videos, and text
Themes and templates make adding media easy since most slides have designated content areas.
Change or resize your fonts
If your theme’s font is too small, you can resize it or choose a new font to make it easy to read.
Reorder your slide show
Some themes and templates have a predefined sequence, but you can reorder slides to meet your needs.
Create your own slide show
Slide shows are a great way to engage your audience and present important information. Whether you're creating a slide show for personal or professional reasons, slide shows are an essential tool for anyone who wants to share information in a visually appealing manner.
Discover more ways to improve your slide show
What options are available to create a slide show?
Slide show makers come in many forms. Some slide show software can only be used on specific devices, while other slide show creators can be accessed via the cloud from any device at any time.
It’s a good idea to evaluate a variety of slide show makers to ensure that you find one with all the features you need. For instance, some slide show software skews toward business use cases and others toward personal.
Microsoft PowerPoint is a popular slide show app that allows you to save presentations to your device or the cloud, and is widely used for personal, professional, and educational purposes.
Frequently asked questions
What are slide show apps and software.
Slide show apps and software are used to create and share slide shows. Slide show programs are typically used to communicate information, diagrams, plans, or processes. They can also be used to display photos and videos at events or retail stores. Usually, slide show makers have a range of built-in features and layouts, making them easy to use, regardless of technical skill levels.
What should a slide show include?
An effective slide show should be engaging, visually appealing, and informative. To achieve this, you'll want to make sure to include the following elements:
- A catchy headline or title. This will help grab your audience's attention and set the tone for the rest of your presentation.
- A variety of images. Don't just rely on text—incorporate photos, illustrations, or even video to maximize viewership.
- Bullet points or short blocks of text. Keep your slide content concise and easy to digest; too much information will only overwhelm your viewers.
How do I make a picture slide show?
There are a few different ways to make picture slide shows. You can use online programs, or you can create a slide show directly on your computer, phone, tablet, or other device using slide show software. Some programs, such as Microsoft PowerPoint, can be accessed on your personal device and on the cloud.
How long should a slide show be?
The length of your slide show will depend on several factors, such as the topic of your presentation, the audience you're presenting to, and the amount of time you have. That said, slide shows are generally between five and ten minutes long.
How can I make a slide show better?
Here are a few tips to make your slide show more engaging:
- Add images, videos, and music to bring your slide show to life.
- Use a font that is easy to read from a distance.
- Try not to use too many words on each slide.
- Use custom transitions and timing to make your slide show flow.
- Ensure a cohesive slide show by using a theme or template.
- For live presentations, practice with the Speaker Coach feature .
Follow Microsoft 365

How to Record Customized Camera Feeds With Cameo in PowerPoint
T he widespread adoption of remote work and virtual meetings has led many people and organizations to realize they don't have to be physically present in the same conference room to make presentations. In fact, you don't even need to conduct them live.
However, recording your PowerPoint slides with your face on them requires technical know-how and third-party apps like OBS. This makes recording presentations a bit difficult and discourages people from doing it.
Thankfully, Microsoft has addressed this issue in PowerPoint 365 with the Cameo feature. Here's what it is and how to use it.
What Is Cameo in PowerPoint?
Cameo is a PowerPoint feature that lets you add your webcam or any other camera feed into your presentation. This makes it easier to present virtually, as your audience can see you from within your slides.
Previously, you needed a third-party app like OBS to overlay yourself on your presentation. You can also use a green screen overlay in Capcut or other similar apps to achieve the same effect. However, this takes a lot of effort and know-how.
But with this feature, you can do it from inside PowerPoint with just a few clicks. Here's how to insert a cameo into your slides.
- Go to Insert > Cameo .
- After clicking on Cameo, PowerPoint will insert a placeholder object on your current slide and open the Camera Format tab.
- You can edit the object as you wish, much like any other shape on PowerPoint. You can also click on the options in the Designer pane on the right side of the screen to help you work faster.
- Once you're happy with its placement on your slide, click on the Preview button to see your live video.
With that, you can start presenting your PowerPoint slides via screen sharing while still keeping yourself on the screen.
How to Record Your PowerPoint Presentation With Cameo
You can also insert a cameo from Record > Cameo . Clicking on this will bring you to the same menu tab and insert a placeholder object for your video. However, even if you didn't set up Cameo beforehand, you can insert it directly while recording your presentation. Here's how:
- Go to Record > From Beginning or Record > From Current Slide .
- In the recording screen, click on the Camera icon at the top. This will insert a round object containing your video in your slides' lower-right-hand section.
- Click on the Red icon to start recording your presentation.
- Go through your presentation as usual. For more information, check out our guide on turning your presentations into videos .
- Once you've finished, click the Red icon again to stop recording.
- Click Export to go to the Export to video screen .
- Change the File Name as needed, then click Browse to select the location where you will save your recorded video.
- Once done, click Export Video .
With that, you don't have to spend much effort to add your video feed to your PowerPoint presentation recording. However, the app only places your video at one location across every slide; it might cover some of your content. That's why it's better to use the Cameo feature when you're building or editing your PowerPoint presentation.
If you're unhappy with your recording, press the Retake Video on the left of the record icon. You can pick between On Current Slide or On All Slides .
What You Need to Record Customized Camera Feeds
You need a webcam and a Microsoft 365 account to record your customized camera feed. Furthermore, you cannot use Cameo or record presentations in the PowerPoint web app. You need to download and install it on your computer to use these features.
The Cameo feature is already available on Microsoft PowerPoint 365 in Windows and Mac. However, recording your presentation with Cameo is only available on Windows. As of the time of writing, this feature isn't available for the main PowerPoint 365 for Mac version.
If you're running macOS, you must be a Microsoft 365 Insider to get this feature. However, since the Cameo recording feature is already announced in the Microsoft 365 Insider blog , we hope it will be available in the mainstream PowerPoint for Mac version in a few months.
Recording Your Presentations Is Now Much Easier
The Cameo feature has made presenting PowerPoint slides in video calls easier. And with the recording function, you no longer need a third-party app to put your video over your presentation.
You can integrate it into each slide, allowing you to control where you are on your screen. And you also save a lot of time and effort, as you can record and save your presentation as a video from within Microsoft PowerPoint.


Contribute to the Microsoft 365 and Office forum! Click here to learn more 💡
April 9, 2024
Contribute to the Microsoft 365 and Office forum!
Click here to learn more 💡
PowerPoint Top Forum Contributors: Steve Rindsberg - John Korchok 👍✅
April 17, 2024
PowerPoint Top Forum Contributors:
Steve Rindsberg - John Korchok 👍✅
- Search the community and support articles
- Microsoft 365 and Office
- Search Community member
Ask a new question
Powerpoint Teleprompter help!
Just a few months ago, PowerPoint had a teleprompter feature that was useful for recording narrations. However, after an update it seems to have disappeared, and I can't find it anymore. I need to use the teleprompter to record a narration for a PowerPoint presentation. Could someone help me locate this feature?
- Subscribe to RSS feed
Report abuse
Replies (1) .
- Microsoft Agent |
Dear Mike_C.1985,
Welcome to Microsoft Community.
We understand that you need to use the teleprompter feature in PowerPoint.
According to your description, we have tested it and we are very sorry that we have not fully restored your problem. After adding the narration at the bottom of the presentation, click on Record and click on "Record" in the upper right corner to display the corresponding prompter information, and the text of the prompter can be displayed at the top of the recording.
To further help you identify the cause of the problem, please share more information with us:
1. What version of office are you using? You can open any office component, click on the top left file, click on the bottom of the account, check the right product information, the specific display of what product
2. Does your PowerPoint display the appropriate information under "Recording"?
3. Is your office information and account enrolled in the Preview Experience Program?
4. If you have corresponding error page tips, you can share them with us.
Since this feature is primarily available in Microsoft 365 licensed products, if you are unable to do so, you can try the following to see if it works:
Make sure you are looking for the feature in the right place before:
You can click on Record and click on "Record" in the upper right corner to check if there is any corresponding button or function information:

1. Make sure there is product information under the account
You can sign in to the Microsoft Dashboard: sign in to your Microsoft account, Microsoft account | Sign In or Create Your Account Today – Microsoft Click on " Services & Subscriptions " to see if product information is available under your account
2. Registry reset office
Press Windows + R , type in: regedit in the run box that opens and press enter.
Rename the Office folder by locating the following key (right-click on it and select Rename, e.g. rename Office to Officeold)
HKEY_CURRENT_USER\Software\Microsoft\Office
Then reopen the word document to try the effect.
Disclaimer: Generally, modifying registry subkeys or work group is intended for advanced users, administrators, and IT Professionals. It can help fix some problems, however, serious problems might occur if you modify the registry incorrectly. Therefore, make sure that you follow these steps carefully. For further protection, back up the registry before you modify it. Then, you can restore the registry if a problem occurs. For more information about how to back up and restore the registry, click How to back up and restore the registry in Windows - Microsoft Support to view the article.
You indicated that this feature disappeared after the update, you can try reinstalling your office product information to confirm:
Uninstall the previous installer first and reinstall it:
1)Control Panel Uninstallation: You can select "Programs" - "Programs and Features" - Uninstall, select Microsoft 365 program to uninstall.
2)If you are worried that the uninstallation is not complete, you can try to uninstall office manually through the detailed steps in the following link, manual uninstallation of office requires you to try to directly through the prompted path to find the appropriate folder to delete:
Manually uninstall Office - Microsoft Support
3. Install and activate Microsoft 365
After making sure that the uninstallation is complete, you can reinstall the Microsoft 365 program, and after the installation is complete, make sure that you only have the Microsoft 365 program installer on your system, and log back into your account to activate your office.
After activation, you will reopen the office program as Microsoft 365.
Since manual uninstallation involves all the application installation packages and office registration information in your system, if you are worried that you will make mistakes or you will not be able to do the operation, you can try to contact our online chat department for confirmation:
<--Contact Microsoft Chat Support-->
1.Go to the following Web site: Contact - Microsoft Support .
2.Select Contact Support (sign in to your personal Microsoft account).
3.Under Products and services, select options related to your product.
4.Under Category, select Manage my subscription.
5.Go to Confirm.
6.Select Chat with a support representative or request a callback.
Please note that chat support has fixed working hours, if the last window prompt is not available, please try to open it again tomorrow
We hope this helps, and you can always get back to us if you have any other questions or updates.
Thanks for your patience and understanding.
Best Regards,
Zenobia-MSFT | Microsoft Community Support Specialist
Was this reply helpful? Yes No
Sorry this didn't help.
Great! Thanks for your feedback.
How satisfied are you with this reply?
Thanks for your feedback, it helps us improve the site.
Thanks for your feedback.
Question Info
- Norsk Bokmål
- Ελληνικά
- Русский
- עברית
- العربية
- ไทย
- 한국어
- 中文(简体)
- 中文(繁體)
- 日本語
- Create a presentation Article
- Add and format Article
- Design a presentation Article
- Share and collaborate Article
- Give a presentation Article
- Set up your mobile apps Article
- Learn more Article

Create a presentation
Create a presentation in powerpoint for the web.

With PowerPoint for the web running in your web browser, you can:
Create presentations that include images, videos, transitions, and animations.
Get to your presentations from your computer, tablet, or phone.
Share and work with others, wherever they are.
If you're using the desktop version of PowerPoint on a Windows PC, see the PowerPoint Quick Start .
If you're using the desktop version of PowerPoint on a Mac, see Office for Mac Quick Start Guides and PowerPoint for Mac Help .
Create, open, and name a presentation
Go to powerpoint.office.com .

Select New blank presentation , open a Recent file, select one of the themes , or start with a presentation template .
To name the presentation, select the title at the top and type a name.
If you need to rename the presentation, select the title and retype the name.

Add a slide
Select the slide you want your new slide to follow.
Select Home > New Slide .
Select Layout and the you type want from the drop-down.

When working in PowerPoint for the web, your work is saved every few seconds. You can select File > Save a Copy to create a duplicate copy in another location.
Or choose File > Download As to save a copy to your device.

When you're online, AutoSave is always on and saves your changes as you work. If at any time you lose your Internet connection or turn it off, any pending changes will sync as soon as you’re back online.
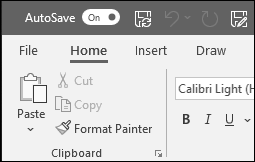
Need more help?
Want more options.
Explore subscription benefits, browse training courses, learn how to secure your device, and more.

Microsoft 365 subscription benefits

Microsoft 365 training

Microsoft security

Accessibility center
Communities help you ask and answer questions, give feedback, and hear from experts with rich knowledge.

Ask the Microsoft Community

Microsoft Tech Community

Windows Insiders
Microsoft 365 Insiders
Was this information helpful?
Thank you for your feedback.

IMAGES
VIDEO
COMMENTS
Open the slide you want to start recording from. Near the upper right corner of the PowerPoint window, select Record. When you're ready, select the round, red Record button, wait for the countdown, then start speaking. To record from a specific slide, go to it, and then select Record. Note: Narration isn't recorded while the transition between ...
Record narration and timings for your presentation in Microsoft PowerPoint to give it a professional and polished feel. Record narration and timings:1. Selec...
Learn how to record a PowerPoint Presentation with audio and video simply by using the build-in PowerPoint functionalities and tools. You will learn how to...
In this video tutorial from Microsoft, you will learn how to record your PowerPoint presentation.You can record your PowerPoint presentation—or a single slid...
Select the Record button on the toolbar to start recording your narration. Use your keyboard arrow keys to move back and forth between slides. Press N or Space Bar to move to the next slide or animation in the presentation. Press P or Backspace to return to the previous slide or animation.
When you are finished recording, save your presentation: File > Save.The recording is now embedded on the slide you selected in step 1. To save the recording itself as a separate file on your computer, right-click the picture on the slide that represents the recording, and select Save Media as.In the Save Media As dialog box, specify a file name and folder location, then click Save.
This method can also be used for recording a screencast, even if you're not using a PowerPoint presentation in your video recording. To start the recording, click Record or use the Windows+SHIFT+R hotkey. To stop the screen recording, click Pause to temporarily halt the recording to resume later or Stop or the Windows+SHIFT+Q hotkey to end ...
Let's see how to record a PowerPoint presentation in front of live audiences. Step 1 - save your PowerPoint presentation in OneDrive. Step 2 - open your PowerPoint slides from PowerPoint online. Step 3 - go to Present Live from the Slideshow Ribbon tab. Step 4 - share a live link with your audience.
First, open PowerPoint, head to the "Insert" tab, and then click "Screen Recording.". PowerPoint will minimize, and the screen recording dock will appear at the top of your screen. Here's where the "simplicity" of PowerPoint's screen recording feature comes in—you only have five options. By default, PowerPoint will record ...
1. Open the PowerPoint presentation in which you want to record audio and video. 2. From the Slide Show tab (or the Recording tab), click the Record Slide Show button and choose either Record from Current slide or Record from Beginning, depending on which point you want to add audio/video. 3.
EXPORT YOUR NARRATED SLIDE SHOW AS MP4 MOVIE. To export your recorded slide show as an MP4 movie, go back to the FILE menu, but this time choose EXPORT, as shown: Notice that I've chosen File > Export > Create a Video. On the right side are two critical settings before you proceed: Video size and presentation timing.
Open the PowerPoint presentation in which you would like to record a voiceover narration. Head over to the "Slide Show" tab and, in the "Set Up" group, select "Record Slide Show.". Once selected, a drop-down menu will appear. Here, you can choose to start the narration from the beginning or from the current slide.
By default, PowerPoint enables you to record the full slide show presentation in a single take. Click through the slides to trigger animations or progress through the presentation. When you're. done, you can review the recording. The recording is saved on a slide-by-slide basis, so you don't have to re-record the entire presentation to ...
In this Microsoft PowerPoint 2021/365 tutorial video, learn how to record and narrate a PowerPoint presentation.To see the full course that this video came f...
Go to the Recording tab, click the Audio button select Audio on My PC…. You could also select the Record Sound option to record your narration to add it to the slide. Then, select the audio file from your device and then click Insert. The added audio will appear as a smaller speaker icon in your presentation. 2.
Microsoft PowerPoint offers a user-friendly tool that allows you to record, markup, and export a presentation. Here's how: 1. Present Slide Show. Once you've put together a great presentation, navigate to the Slide Show option in the ribbon toolbar at the top of your screen and select Record Slide Show. If you're using a Windows computer ...
Six steps for creating a slide show. 1. Plan your slide show. Before getting too deep into your slide show project, it's a good idea to select and save the photos and videos you want to use. This helps you create a slide show more efficiently and purposefully, ensuring a better outcome. 4.
If you can't see Record slide show button under Slide show tab, we would like to suggest you check whether you can see this option after checking Recording tab. On the File tab of the ribbon, click Options. In the Options dialog box, click the Customize Ribbon tab on the left. Then, in the right-hand box that lists the available ribbon tabs ...
Record narration and timings for your presentation to give it a professional and polished feel.Record narration and timings:1. Select Slide Show -- Record Sl...
Go to Record > From Beginning or Record > From Current Slide.; In the recording screen, click on the Camera icon at the top. This will insert a round object containing your video in your slides ...
Just a few months ago, PowerPoint had a teleprompter feature that was useful for recording narrations. However, after an update it seems to have disappeared, and I can't find it anymore. I need to use the teleprompter to record a narration for a PowerPoint presentation.
Select New blank presentation, open a Recent file, select one of the themes, or start with a presentation template. To name the presentation, select the title at the top and type a name. If you need to rename the presentation, select the title and retype the name.