Formatting Requirements
Page layout, margins and numbering.
Your scholarly approach may call for a different presentational method. These are the requirements and recommendations for text-based theses.
For a text-based thesis, or the text portions of a thesis, the page size must be 8.5" x 11", and the text must be in a single, page-wide column. Do not use two or more columns in your thesis.
The text of the thesis is written in paragraph form.
- the first line of each paragraph should be indented, OR
- there should be a larger space between paragraphs than there is between lines.
Each chapter should generally start at the top of a new page.
Left: 1.25 inches (32 mm) is recommended if you intend to bind copies of your thesis; 1 inch minimum.
Right, top, and bottom: 1 inch recommended; 0.75 inches (19 mm) minimum

Page Numbering
Preliminary pages:.
- must be numbered in lower case Roman numerals (ii, iii, iv, etc.)
- the title page is "i" but this number must not appear on the page
- numbering begins at "ii" on the committee page
- the first page of the abstract is page iii
Body of thesis:
- must be numbered in Arabic numerals (1, 2, 3, etc.)
- the first page of the text is "1"
- subsequent pages are numbered continuously throughout, including pages with tables and figures, bibliographies, appendices, and index
Whole thesis:
- every page except the title page must have a number on it
- there must be no blank pages in the thesis.
Page numberS:
- must be placed at least .5 inches (12 mm) from the edge of the page
- may be either in the lower centre or on the top or lower right of the page, when the page is viewed in portrait view. Lower right is preferred.
Landscape Pages
Landscape pages must be orientated in your PDF so that they are readable without rotation. You do not need to change the location or orientation of the page number, but may if you wish.
Facing Pages
Facing pages are not acceptable; you must use one-sided layout and pagination. If the caption for a figure, table, etc., cannot appear on the same page as its accompanying illustration, place the illustration on a separate page after the caption.
- Why Grad School at UBC?
- Graduate Degree Programs
- Application & Admission
- Info Sessions
- Research Supervisors
- Research Projects
- Indigenous Students
- International Students
- Tuition, Fees & Cost of Living
- Newly Admitted
- Student Status & Classification
- Student Responsibilities
- Supervision & Advising
- Managing your Program
- Health, Wellbeing and Safety
- Professional Development
- Final Doctoral Exam
- Final Dissertation & Thesis Submission
- Life in Vancouver
- Vancouver Campus
- Graduate Student Spaces
- Graduate Life Centre
- Life as a Grad Student
- Graduate Student Ambassadors
- Meet our Students
- Award Opportunities
- Award Guidelines
- Minimum Funding Policy for PhD Students
- Killam Awards & Fellowships
- Policies & Procedures
- Information for Supervisors
- Dean's Message
- Leadership Team
- Strategic Plan & Priorities
- Vision & Mission
- Equity, Diversity & Inclusion
- Initiatives, Plans & Reports
- Graduate Education Analysis & Research
- Media Enquiries
- Newsletters
- Giving to Graduate Studies
Strategic Priorities
- Strategic Plan 2019-2024
- Improving Student Funding
- Promoting Excellence in Graduate Programs
- Enhancing Graduate Supervision
- Advancing Indigenous Inclusion
- Supporting Student Development and Success
- Reimagining Graduate Education
- Enriching the Student Experience
Initiatives
- Public Scholars Initiative
- 3 Minute Thesis (3MT)
- PhD Career Outcomes
- Great Supervisor Week
Want to create or adapt books like this? Learn more about how Pressbooks supports open publishing practices.
13.1 Formatting a Research Paper
Learning objectives.
- Identify the major components of a research paper written using American Psychological Association (APA) style.
- Apply general APA style and formatting conventions in a research paper.
In this chapter, you will learn how to use APA style , the documentation and formatting style followed by the American Psychological Association, as well as MLA style , from the Modern Language Association. There are a few major formatting styles used in academic texts, including AMA, Chicago, and Turabian:
- AMA (American Medical Association) for medicine, health, and biological sciences
- APA (American Psychological Association) for education, psychology, and the social sciences
- Chicago—a common style used in everyday publications like magazines, newspapers, and books
- MLA (Modern Language Association) for English, literature, arts, and humanities
- Turabian—another common style designed for its universal application across all subjects and disciplines
While all the formatting and citation styles have their own use and applications, in this chapter we focus our attention on the two styles you are most likely to use in your academic studies: APA and MLA.
If you find that the rules of proper source documentation are difficult to keep straight, you are not alone. Writing a good research paper is, in and of itself, a major intellectual challenge. Having to follow detailed citation and formatting guidelines as well may seem like just one more task to add to an already-too-long list of requirements.
Following these guidelines, however, serves several important purposes. First, it signals to your readers that your paper should be taken seriously as a student’s contribution to a given academic or professional field; it is the literary equivalent of wearing a tailored suit to a job interview. Second, it shows that you respect other people’s work enough to give them proper credit for it. Finally, it helps your reader find additional materials if he or she wishes to learn more about your topic.
Furthermore, producing a letter-perfect APA-style paper need not be burdensome. Yes, it requires careful attention to detail. However, you can simplify the process if you keep these broad guidelines in mind:
- Work ahead whenever you can. Chapter 11 “Writing from Research: What Will I Learn?” includes tips for keeping track of your sources early in the research process, which will save time later on.
- Get it right the first time. Apply APA guidelines as you write, so you will not have much to correct during the editing stage. Again, putting in a little extra time early on can save time later.
- Use the resources available to you. In addition to the guidelines provided in this chapter, you may wish to consult the APA website at http://www.apa.org or the Purdue University Online Writing lab at http://owl.english.purdue.edu , which regularly updates its online style guidelines.
General Formatting Guidelines
This chapter provides detailed guidelines for using the citation and formatting conventions developed by the American Psychological Association, or APA. Writers in disciplines as diverse as astrophysics, biology, psychology, and education follow APA style. The major components of a paper written in APA style are listed in the following box.
These are the major components of an APA-style paper:
Body, which includes the following:
- Headings and, if necessary, subheadings to organize the content
- In-text citations of research sources
- References page
All these components must be saved in one document, not as separate documents.
The title page of your paper includes the following information:
- Title of the paper
- Author’s name
- Name of the institution with which the author is affiliated
- Header at the top of the page with the paper title (in capital letters) and the page number (If the title is lengthy, you may use a shortened form of it in the header.)
List the first three elements in the order given in the previous list, centered about one third of the way down from the top of the page. Use the headers and footers tool of your word-processing program to add the header, with the title text at the left and the page number in the upper-right corner. Your title page should look like the following example.

The next page of your paper provides an abstract , or brief summary of your findings. An abstract does not need to be provided in every paper, but an abstract should be used in papers that include a hypothesis. A good abstract is concise—about one hundred fifty to two hundred fifty words—and is written in an objective, impersonal style. Your writing voice will not be as apparent here as in the body of your paper. When writing the abstract, take a just-the-facts approach, and summarize your research question and your findings in a few sentences.
In Chapter 12 “Writing a Research Paper” , you read a paper written by a student named Jorge, who researched the effectiveness of low-carbohydrate diets. Read Jorge’s abstract. Note how it sums up the major ideas in his paper without going into excessive detail.

Write an abstract summarizing your paper. Briefly introduce the topic, state your findings, and sum up what conclusions you can draw from your research. Use the word count feature of your word-processing program to make sure your abstract does not exceed one hundred fifty words.
Depending on your field of study, you may sometimes write research papers that present extensive primary research, such as your own experiment or survey. In your abstract, summarize your research question and your findings, and briefly indicate how your study relates to prior research in the field.
Margins, Pagination, and Headings
APA style requirements also address specific formatting concerns, such as margins, pagination, and heading styles, within the body of the paper. Review the following APA guidelines.
Use these general guidelines to format the paper:
- Set the top, bottom, and side margins of your paper at 1 inch.
- Use double-spaced text throughout your paper.
- Use a standard font, such as Times New Roman or Arial, in a legible size (10- to 12-point).
- Use continuous pagination throughout the paper, including the title page and the references section. Page numbers appear flush right within your header.
- Section headings and subsection headings within the body of your paper use different types of formatting depending on the level of information you are presenting. Additional details from Jorge’s paper are provided.

Begin formatting the final draft of your paper according to APA guidelines. You may work with an existing document or set up a new document if you choose. Include the following:
- Your title page
- The abstract you created in Note 13.8 “Exercise 1”
- Correct headers and page numbers for your title page and abstract
APA style uses section headings to organize information, making it easy for the reader to follow the writer’s train of thought and to know immediately what major topics are covered. Depending on the length and complexity of the paper, its major sections may also be divided into subsections, sub-subsections, and so on. These smaller sections, in turn, use different heading styles to indicate different levels of information. In essence, you are using headings to create a hierarchy of information.
The following heading styles used in APA formatting are listed in order of greatest to least importance:
- Section headings use centered, boldface type. Headings use title case, with important words in the heading capitalized.
- Subsection headings use left-aligned, boldface type. Headings use title case.
- The third level uses left-aligned, indented, boldface type. Headings use a capital letter only for the first word, and they end in a period.
- The fourth level follows the same style used for the previous level, but the headings are boldfaced and italicized.
- The fifth level follows the same style used for the previous level, but the headings are italicized and not boldfaced.
Visually, the hierarchy of information is organized as indicated in Table 13.1 “Section Headings” .
Table 13.1 Section Headings
A college research paper may not use all the heading levels shown in Table 13.1 “Section Headings” , but you are likely to encounter them in academic journal articles that use APA style. For a brief paper, you may find that level 1 headings suffice. Longer or more complex papers may need level 2 headings or other lower-level headings to organize information clearly. Use your outline to craft your major section headings and determine whether any subtopics are substantial enough to require additional levels of headings.
Working with the document you developed in Note 13.11 “Exercise 2” , begin setting up the heading structure of the final draft of your research paper according to APA guidelines. Include your title and at least two to three major section headings, and follow the formatting guidelines provided above. If your major sections should be broken into subsections, add those headings as well. Use your outline to help you.
Because Jorge used only level 1 headings, his Exercise 3 would look like the following:
Citation Guidelines
In-text citations.
Throughout the body of your paper, include a citation whenever you quote or paraphrase material from your research sources. As you learned in Chapter 11 “Writing from Research: What Will I Learn?” , the purpose of citations is twofold: to give credit to others for their ideas and to allow your reader to follow up and learn more about the topic if desired. Your in-text citations provide basic information about your source; each source you cite will have a longer entry in the references section that provides more detailed information.
In-text citations must provide the name of the author or authors and the year the source was published. (When a given source does not list an individual author, you may provide the source title or the name of the organization that published the material instead.) When directly quoting a source, it is also required that you include the page number where the quote appears in your citation.
This information may be included within the sentence or in a parenthetical reference at the end of the sentence, as in these examples.
Epstein (2010) points out that “junk food cannot be considered addictive in the same way that we think of psychoactive drugs as addictive” (p. 137).
Here, the writer names the source author when introducing the quote and provides the publication date in parentheses after the author’s name. The page number appears in parentheses after the closing quotation marks and before the period that ends the sentence.
Addiction researchers caution that “junk food cannot be considered addictive in the same way that we think of psychoactive drugs as addictive” (Epstein, 2010, p. 137).
Here, the writer provides a parenthetical citation at the end of the sentence that includes the author’s name, the year of publication, and the page number separated by commas. Again, the parenthetical citation is placed after the closing quotation marks and before the period at the end of the sentence.
As noted in the book Junk Food, Junk Science (Epstein, 2010, p. 137), “junk food cannot be considered addictive in the same way that we think of psychoactive drugs as addictive.”
Here, the writer chose to mention the source title in the sentence (an optional piece of information to include) and followed the title with a parenthetical citation. Note that the parenthetical citation is placed before the comma that signals the end of the introductory phrase.
David Epstein’s book Junk Food, Junk Science (2010) pointed out that “junk food cannot be considered addictive in the same way that we think of psychoactive drugs as addictive” (p. 137).
Another variation is to introduce the author and the source title in your sentence and include the publication date and page number in parentheses within the sentence or at the end of the sentence. As long as you have included the essential information, you can choose the option that works best for that particular sentence and source.
Citing a book with a single author is usually a straightforward task. Of course, your research may require that you cite many other types of sources, such as books or articles with more than one author or sources with no individual author listed. You may also need to cite sources available in both print and online and nonprint sources, such as websites and personal interviews. Chapter 13 “APA and MLA Documentation and Formatting” , Section 13.2 “Citing and Referencing Techniques” and Section 13.3 “Creating a References Section” provide extensive guidelines for citing a variety of source types.
Writing at Work
APA is just one of several different styles with its own guidelines for documentation, formatting, and language usage. Depending on your field of interest, you may be exposed to additional styles, such as the following:
- MLA style. Determined by the Modern Languages Association and used for papers in literature, languages, and other disciplines in the humanities.
- Chicago style. Outlined in the Chicago Manual of Style and sometimes used for papers in the humanities and the sciences; many professional organizations use this style for publications as well.
- Associated Press (AP) style. Used by professional journalists.
References List
The brief citations included in the body of your paper correspond to the more detailed citations provided at the end of the paper in the references section. In-text citations provide basic information—the author’s name, the publication date, and the page number if necessary—while the references section provides more extensive bibliographical information. Again, this information allows your reader to follow up on the sources you cited and do additional reading about the topic if desired.
The specific format of entries in the list of references varies slightly for different source types, but the entries generally include the following information:
- The name(s) of the author(s) or institution that wrote the source
- The year of publication and, where applicable, the exact date of publication
- The full title of the source
- For books, the city of publication
- For articles or essays, the name of the periodical or book in which the article or essay appears
- For magazine and journal articles, the volume number, issue number, and pages where the article appears
- For sources on the web, the URL where the source is located
The references page is double spaced and lists entries in alphabetical order by the author’s last name. If an entry continues for more than one line, the second line and each subsequent line are indented five spaces. Review the following example. ( Chapter 13 “APA and MLA Documentation and Formatting” , Section 13.3 “Creating a References Section” provides extensive guidelines for formatting reference entries for different types of sources.)

In APA style, book and article titles are formatted in sentence case, not title case. Sentence case means that only the first word is capitalized, along with any proper nouns.
Key Takeaways
- Following proper citation and formatting guidelines helps writers ensure that their work will be taken seriously, give proper credit to other authors for their work, and provide valuable information to readers.
- Working ahead and taking care to cite sources correctly the first time are ways writers can save time during the editing stage of writing a research paper.
- APA papers usually include an abstract that concisely summarizes the paper.
- APA papers use a specific headings structure to provide a clear hierarchy of information.
- In APA papers, in-text citations usually include the name(s) of the author(s) and the year of publication.
- In-text citations correspond to entries in the references section, which provide detailed bibliographical information about a source.
Writing for Success Copyright © 2015 by University of Minnesota is licensed under a Creative Commons Attribution-NonCommercial-ShareAlike 4.0 International License , except where otherwise noted.
Pasco-Hernando State College
APA Page Format
- Finding and Evaluating Sources (Critical Analysis)
- Synthesizing Information from Sources
- MLA Documentation
- APA In-Text Citations
- Writing a Research Paper
- APA Handout
- Acceptable fonts and sizes: Size 12-point Times New Roman;11-point Arial, Calibri, and Georgia; or 10-point Lucida.
- Body of paper is aligned left
- Running head (by instructor preference) in header, left aligned
- Page number in header right aligned
- Line Spacing – double throughout
- Tab in the first line of a paragraph ½” or .5
- Title is bolded, centered with proper capitalization
- Level 1 heading on 2nd page of paper, centered and bolded and is usually the title of the paper, never the word Introduction.
- References is the last page of the paper
- 1” margins – top, bottom, left, right.
- Word margins are set in Layout or in File/Page Setup/Margins.
- Acceptable fonts and sizes: Size 12-point Times New Roman; 11-point Arial, Calibri, and Georgia;10-point Lucida; or other legible font as approved by instructor.
- Font and font size are important for readability.
- Do not use bold except for section headings if section headings are used.
- Do not use all caps except for the title of the paper in the Header or an acronym (NATO, AIDS).
- Do not use italics or underlining unless there is a rule that says to use them.
- Left align – this is the usual default setting.
- Do not block or justify where the right margin is uneven.
- Alignment can be set in the Paragraph box if the icon is not visible.
Line Spacing
- Double space –throughout the entire document.
- Check default settings in the Paragraph box and reset per instructions under Paragraph setting (see below).
Paragraph Settings
Some programs such as Word 2007 and later have defaults in the Paragraph box which interferes with proper double spacing. The settings in the Paragraph dialogue box should be as follows to have proper double spacing.
- Indentation (on top) should be set at 0 left and 0 right.
- Spacing (on the lower left) should be set to 0 Before and 0 After.
- Line Spacing (on the lower right) should be set to double.
- Check the box that says “Don’t add space between paragraphs of the same style.”
- Click Default (at the bottom) and select Yes to change defaults.
In Google docs , you can change Paragraph settings under Spacing to 0 next to Before and 0 next to After by going into the double spacing tool and clicking Custom Settings. You will have to select (highlight) the entire paper including the heading in the upper left before making the change once the paper is typed.
In Pages , you can change the Paragraph settings by clicking on Format on the top navigation bar and then Paragraph. Remember that you have to highlight (select) the entire paper including the heading in the upper left before making change in Paragraph once the paper is typed.
First Line of a Paragraph
- Indent the first word of a paragraph 1/2” or .5 from the left margin.
- The Tab default is usually at this setting. If not, reset defaults.
Spacing after a Period or Other End Punctuation
In the 7th edition of APA, only one space is used after the end of a sentence.
Page Number and Running Head
- In Word, click on the Insert tab and then click on Page Number in the menu bar. It will give you the option of where to insert the page number.
- Choose to insert the page number at the top of the page, right aligned.
- The page number appears on every page of the document, including the title page.
- Place the cursor left of the number and type in the running head.
- Total length of the running head is 50 characters and spaces.
- The running head is in all caps.
- After you typed click tab until the running head is left aligned in the header.
- Use a plain header format.
- Do not use bold, underlining, quotation marks, or a different font or color for the title.
- Do not use the word page or any abbreviation of the word page such as pg. or p. between the running head and the actual page number.
Heading Levels
There are five possible heading levels in APA style.
- Level 1 headings are used for top-level or main sections – they are bolded and in the center of the page.
- Level 2 and Level 3 headings are subsections of Level 1 – they are also bolded, but they are left aligned.
- Levels 4 and 5 headings are bolded, italicized, indented, and followed by a period.
APA does not use the word Introduction. The Level 1 heading at the beginning of an APA paper is the bolded and centered title of the paper, typed on the first page of the paper after the title page.
See pages 47 - 49 in the APA Publication Manual for more detailed information.
The student paper must include a title page. The following items are included on the student title page unless otherwise indicated by the instructor:
- The running head is an abbreviation of the title, written in all-caps, left aligned in the header up to 50 character and spaces long (if less than 50 character and spaces long then the entire title can be in the header)
- Page number is right aligned in the header
- The running head and page numbers appear on every page of the paper.
- All the text on the title page is centered and double spaced with proper capitalization (except for the header)
- Title is a maximum of three to four spaces below the header
- Directly below the title is the student author’s first and last name
- On the next line is the college/institution’s name, fully spelled out with proper capitalization
- Below the institution name is the course number and course name, ex: COU 1234: Introduction to APA Usage
- On the next line is the instructor name, ex: Prof. I. Knowalot
- On the last line is the assignment due date, ex: February 29, 2028
If you are asked to prepare an abstract for your research paper, click Insert/Page Break to get to the top of a new page, and center the word Abstract in bold on the first line. Abstracts are typically no more than 250 words. They are usually a single paragraph with no indentation at the start of the paragraph. Otherwise, they follow the same formatting rules including double spacing.
Reference Page
- After the last section of your paper insert a page break.
- Type the word References, bolded, centered with proper capitalization
- The References page is double spaced.
- Each reference entry is left-aligned and formatted with a hanging indent.
- To create the hanging indent, highlight the reference entries and go into the Paragraph box.
- Under Special, select Hanging from the drop down menu. Once selected, the default under By should be .5’.
- Remember that your list has to be alphabetized by author. If there is no author or group author, use the title.
- There are no extra spaces in between entries.
- Printer-friendly version


APA 7th ed. Style Guide
- Formatting Your Paper
- In-text Citations
- Textual Works
- Data Sets, Software, Tests
- Audiovisual Media
- Online Media
Formatting guidelines and sample papers are found in chapter 2 of the APA 7th edition Publication Manual
Sample papers.
You can find sample papers from Purdue OWL's website, APA 7th edition Publication Manual, or APA style website.
- APA Style Student Paper with Annotations in the Comments A Word Document featuring an APA 7th edition Style Student Paper that includes annotations as comments.
- APA Style Professional Paper with Annotations in Comments A Word Document featuring an APA 7th edition Style Professional Paper that includes annotations as comments.
- Purdue OWL Sample Papers
General Formatting Guidelines
Follow these guidelines throughout your paper:
- Double space text
- Header for student and professional papers includes the page number in the upper right hand corner
- Single space after ending punctuation
- Font size and style: Times New Roman 12 pt, Arial 11 pt, Calibri 11 pt, or Georgia 11 pt
- Use the same font type and size throughout the paper (exceptions for figure images, computer code, and footnotes - see 2.19 in APA Manual)
- Margins: 1 inch on all sides
- Left align paragraphs and leave ragged (uneven) margins on the right
- Indention: use 0.5 inch indention for the first line of every paragraph (use tab key for consistency)
Formatting Title Page
The 7th edition Publication Manual for APA introduced the student and professional papers. The major difference between these two types of papers is found on the title page. Please, see the guidelines below for formatting the title page of your document. Also note, follow your professors' guidelines for formatting the title page.
General Title Page Guidelines:
- Double space
- The title should summarize the main idea and be focused/succinct (avoid unnecessary words)
- Title written in title case (the first letter of each word is capitalized), bold, centered, and positioned in the upper half of the title page
- Use the author(s) first name, middle initial, and last name as the author's byline
Student Papers:
- title of the paper
- name of the author(s)
- author affiliation (department and institution name)
- course number and name
- instructor name
- assignment due date (i.e. November 4, 2020)
- page number (in the header)
Professional Papers:
- author affiliation
- author note
- running head (abbreviated title) - Flush with left margin and written in all capital letters
Formatting Headings

Follow this format for headings (see 2.27 of the Publication Manual for additional details):
Level 1 headings are written in bold title case and aligned to the center. The text begins as a new paragraph.
Level 2 headings are written in bold title case and aligned flush to the left. The text begins as a new paragraph.
Level 3 headings are written in bold, italicized title case, and aligned flush to the left. The text begins as a new paragraph.
Level 4 headings are written in bold title case, indented from the left, and end with a period. The text begins after the period and continues like a regular paragraph.
Level 5 headings are written in bold, italicized title case, indented from the left, and end with a period. The text begins after the period and continues like a regular paragraph.
Formatting Reference List
The following are guidelines for formatting your reference list:
- Start on a new page after the last page of text
- Label the page Reference(s) with a capitalized R, written in bold and centered
- Double space all entries
- Use hanging indent for reference entries (first line of the reference is flush with left margin, subsequent lines are indented 0.5 inches)
- Order alphabetically (see chapter 9 section 44-49 for additional instructions on entry order)
- << Previous: Home
- Next: In-text Citations >>
- Last Updated: Mar 20, 2024 11:48 AM
- URL: https://guides.uu.edu/APA7

- Langson Library
- Science Library
- Grunigen Medical Library
- Law Library
- Connect From Off-Campus
- Accessibility
- Gateway Study Center
Email this link
Thesis / dissertation formatting manual (2024).
- Filing Fees and Student Status
- Submission Process Overview
- Electronic Thesis Submission
- Paper Thesis Submission
- Formatting Overview
- Fonts/Typeface
- Pagination, Margins, Spacing
- Paper Thesis Formatting
- Preliminary Pages Overview
- Copyright Page
- Dedication Page
- Table of Contents
- List of Figures (etc.)
- Acknowledgements
- Text and References Overview
- Figures and Illustrations
- Using Your Own Previously Published Materials
- Using Copyrighted Materials by Another Author
- Open Access and Embargoes
- Copyright and Creative Commons
- Ordering Print (Bound) Copies
- Tutorials and Assistance
- FAQ This link opens in a new window
Every page in your manuscript (except the Title and Copyright pages) must be numbered.
All page numbers should be centered at the bottom of each manuscript page.
See specific Pagination guidelines for the Preliminary Pages and the Text and Reference (Body) Pages .
Page Size and Margins
The final version of your thesis/dissertation must be on an 8.5" x 11" (letter size) page.
All manuscript text, excluding manuscript page numbers, must fit within these specified margin requirements:
Minimum 1-inch margins from the top, left, right, and bottom edges of each page
Tables, figures, graphs, photographs, and appendices are also included in these margin requirements. Materials may be reduced or enlarged, if necessary, to fit within the required margins. Pages may be rotated to landscape orientation to accommodate tables or illustrations .
Your manuscript must be double-spaced, with the exception of footnotes/endnotes, bibliographic entries, long quotations, data in lists and tables, lists in appendices and figure/table captions, all of which should be single-spaced.
- << Previous: Fonts/Typeface
- Next: Paper Thesis Formatting >>
- Last Updated: Feb 20, 2024 2:09 PM
- URL: https://guides.lib.uci.edu/gradmanual
Off-campus? Please use the Software VPN and choose the group UCIFull to access licensed content. For more information, please Click here
Software VPN is not available for guests, so they may not have access to some content when connecting from off-campus.

- ‹ Prev
- Next ›
- Text Formatting
1.1–1.2: Margins and Text Formatting
- Published: 2022
- Split-Screen
- Search Site
"Margins and Text Formatting", MLA Handbook
Download citation file:
- Ris (Zotero)
- Reference Manager
1.1 Margins
Leave margins of one inch at the top and bottom and on both sides of the text. If you use Microsoft Word , one-inch margins may be the default setting for new documents, but you can verify the margins setting by clicking the Layout tab and then the Margins button in your document. See section 1.4, fig. 1.3 , for margins used with a running head.
1.2 Text Formatting
Always choose an easily readable typeface (Times New Roman is just one example) in which the regular type style contrasts clearly with the italic, and set it to anywhere between 11 and 13 points, unless your instructor specifies a different font size. Generally use the same typeface and type size throughout the paper (however, see 7.3 on the formatting of note numbers, which most word processing programs automatically apply styles to). Do not justify the lines of text at the right margin, and turn off the automatic hyphenation feature in your word processing program. It is unnecessary to divide words at the ends of lines in a manuscript. (When checking word breaks in a professionally typeset text, consult your dictionary about where words should break.) Double-space the entire research paper, including quotations, notes, and the list of works cited. Indent the first line of a paragraph half an inch from the left margin. Indent block quotations half an inch as well. Leave one space after a period or other concluding punctuation mark, unless your instructor prefers two spaces.
Block quotations: 6.35 , 6.38 .
Book Contents

Stay in the Loop!
Sign up now, so you don’t miss out on important announcements regarding future demos, webinars, and more.
Quick Links
- MLA Handbook
- Administering Your Institutional Account
- Accessibility
- Terms of Use
- Promote Your Access to MLA Handbook Plus
- 85 Broad Street New York, NY 10004 646 576-5000
- Contact Information
- © Copyright 2021 MLA
This Feature Is Available To Subscribers Only
Sign In or Create an Account
Speech Communication
- Faculty & Staff Directory
- B.A. Degree Plan: 4 Year Graduation Guarantee
- B.S. Degree Plan: 4 year Graduation Guarantee
- Graduate Studies
- Speech Communication Minor
- Academic Advising
- Lambda Pi Eta Honor Society
- Forensics Team
- Scholarships
- COMM Internship Requirements (COMM 410)
- Alumni and Friends
- Mind Work/Brainstorming
- Constructing a Thesis
- Writing an Introduction
- Supporting a Thesis
- Developing Arguments
- Writing a Conclusion
- Punctuation
- Style and Organization
- What's the purpose of a style manual? How do I choose a style manual for my paper?
- How do I get started planning a research paper? How do I select a topic?
- How does research fit into my writing plan?
- When I write a research paper, what resources should I have on hand?
- Bibliographic Information
- Citation Information
Title Pages, Headings, Margins, Pagination, and Fonts
- Internet Links/Resources
- OSU Writing Center
- Communication Journals
- Tips on In-Class Writing
- Sample of a Professor's Remarks on a Student Paper
You are here
On this site, you will find general information about MLA and APA format styles with specific requirements regarding title pages, headings, margins, and pagination. Regardless of the style manual you follow, use only standard fonts for your paper. Do not enlarge the font to make your paper appear longer; do not make the font smaller so you can fit your paper into the prescribed number of pages. Do not use a cursive or decorative font.
This site offers only examples of the more common citations students use. For a wider range of topics, you need to consult the MLA Handbook for Writers of Research Papers or the Publication Manual of the American Psychological Association. Both style books are available in the bookstore and at the library.
MLA Formats:
General format and title page: Your research paper needs to be typed and double-spaced on standard-sized paper (8.5 X 11 inches). Use one-inch margins on all four sides of each page. Unless your professor specifically calls for one, a title page is unnecessary. In place of a title page, MLA style requires a heading on the first page of your paper. The heading appears in the top, left corner of the first page, double-spaced. The heading includes your name, your professor's name, the course you are taking, and the date. Center your title one line below the heading. Double-space the title if it extends past the first line. Write your title in capital and lower-case letters. Do not underline your title or put it in quotation marks. The page number preceded by your last name should appear in the upper right corner one-half inch from the top. Do not use a hyphen, period, or any other punctuation with the page number. Use this example as a guide:
Headings: If your paper is long you may divide it into sections (for example, "Literature Review," "Research Method and Results," and "Discussion"). In some cases, you may divide one or more of those sections into other sections (for example, you might divide the second section listed above into "Participants," "Interview Protocol," and "Caveats"). Your purpose would be to improve clarity. Divisions might help a reader better follow a discussion that extends for twenty-five written pages. Consistently using the same style of heading for each level informs the reader whether the upcoming topic is a subtopic of the previous discussion or another central issue. Select a form for each level of division (for example, you might write Level 1 centered, caps and lower case; Level 2 flush left, lower case only, etc.); use the same form for the same level your paper. Regardless of the system you choose, the title on the title page should conform to MLA standards.
Margins and spacing: All margins should measure one inch. Page numbers will appear within the top margin, but no other text should extend past the one-inch margins. Indent five spaces to begin paragraphs. Double-space the text of your paper.
Pagination: Number all pages of your paper in the upper right corner, one-half inch from the top. Do not write -2- or p. 2. The number should appear by itself with no punctuation.
APA Formats
General format and title page: Your research paper needs to be typed, double-spaced on standard-sized paper (8.5 X 11 inches). Use one to one-and-a-half inch margins on all four sides of each page. APA (American Psychological Association) calls for a title page. A running head on this page is not necessary unless you are submitting your paper for publication. At the top of your title page, flush right and one-half inch from the top edge of the paper (inside your top margin), you will write what is called a "manuscript header." A manuscript header consists of one or two key words from you title followed by the page number (see example). Your title will appear centered on this page, written in capital and lower-case letters. If your title extends past one line, double-space between lines. Your name will appear centered and in capital and lower-case letters one double-spaced line below your title. Your university name (Oregon State University) will be placed one double-spaced line below your name. If you are a communication major, you also will include below the institution's name the title of your department. For example:
The pages of your manuscript should be numbered consecutively, beginning with the title page, as part of the manuscript header in the upper right corner of each page. Your references should begin on a separate page from the text of the paper under the label "References" (with no quotation marks, underlining, etc.), centered at the top of the page. Appendices and notes should be formatted similarly.
Headings: APA style prescribes five heading levels, but they vary according to the length of your paper. If you are writing a formal piece to be submitted to an undergraduate conference, closely consult the APA style book. For class papers, ask for your professor's preference. If no preference is given, follow the suggestions written in this section under MLA.
Margins and spacing: Leave margins of at least one inch on all sides of your paper. Page numbers will appear within the top margin, but no other text should extend into the margins. Indent five to seven spaces to begin paragraphs. Double-space the text of your paper.
Pagination: Page numbers should be placed in the top margin one inch from the right side of the paper. The number should appear by itself with no punctuation.
Contact Info
Email: [email protected]
College of Liberal Arts Student Services 214 Bexell Hall 541-737-0561
Deans Office 200 Bexell Hall 541-737-4582
Corvallis, OR 97331-8600
liberalartsosu liberalartsosu liberalartsosu liberalartsosu CLA LinkedIn
School of Communication
E-Mail: School of Communication Contact Form Phone: 541-737-6592 Hours of Operation: 8 a.m. - 5 p.m. Monday - Friday
Margin (Composition Format) Definition
- An Introduction to Punctuation
- Ph.D., Rhetoric and English, University of Georgia
- M.A., Modern English and American Literature, University of Leicester
- B.A., English, State University of New York
The part of a page that's outside the main body of text is a margin . Word processors let us set margins so that they're either aligned ( justified ) or ragged ( unjustified ). For most school or college writing assignments (including articles , essays , and reports ), only the left-hand margin should be justified. (This glossary entry, for instance, is left justified only.)
As a general rule, margins of at least one inch should appear on all four sides of a hard copy. The specific guidelines below have been drawn from the most commonly used style guides . Also, see:
- Block Quotation
- Indentation
- Justification
From the Latin, "border"
- APA Guidelines on Margins "Leave uniform margins of at least 1 in. (2.54 cm) at the top, bottom, left, and right of every page. Combined with a uniform typeface and font size, uniform margins enhance readability and provide a consistent gauge for estimating article length." ( Publication Manual of the American Psychological Association , 6th ed. APA. 2010)
- MLA Guidelines on Margins "Except for page numbers, leave margins of one inch at the top and bottom and on both sides of the text. . . . If you lack 8½-by-11-inch paper and use a larger size, do not print the text in an area greater than 6½ by 9 inches. Indent the first word of a paragraph one-half inch from the left margin. Indent set-off quotations one inch from the left margin." ( MLA Handbook for Writers of Research Papers , 7th ed. The Modern Language Association of America, 2009)
- Turabian's Chicago-Style Guidelines on Margins "Nearly all papers in the United States are produced on standard pages of 8½ x 11 inches. Leave a margin of at least one inch on all four edges of the page. For a thesis or dissertation intended to be bound, you may need to leave a bigger margin on the left side--usually 1½ inches. "Be sure that any material placed in headers or footers, including page numbers and other identifiers . . ., falls within the margins specified in your local guidelines." (Kate L. Turabian et al., A Manual for Writers of Research Papers, Theses, and Dissertations: Chicago Style for Students and Researchers , 8th ed. University of Chicago Press, 2013)
- Guidelines on Margins in Business Letters and Reports "Use a 2-inch top margin for the first page of a business letter printed on letterhead stationery. Any second and succeeding pages of a business letter have 1-inch top margins. Use left justification. "Select the side margins according to the number of words in the letter and the size of the font used to prepare the letter. Set the margins after keying the letter and using the word count feature of your word processing program. . . . " Reports and manuscripts may be prepared with either 1.25-inch left and right margins or 1-inch left and right margins, depending upon the preference of the originator. If the report or manuscript is to be bound on the left, allow an additional 0.25 inch for the left margin. "The first page of major parts (title page, table of contents, bibliography, etc.) and the opening page of sections or chapters require a 2-inch top margin, 2.25 inches for top-bound documents." (James L. Clark and Lyn R. Clark, How 10: A Handbook for Office Workers , 10th ed. Thomson/South-Western, 2003)
- The New Typography "In the New Typography margins often almost entirely disappear. Of course, type cannot in most cases be set right up to the edge of the paper, which would hinder legibility. In small items of printed matter, 12 to 24 points are the minimum margin required; in posters 48 points. On the other hand, borders of solid red or black can be taken right up to the edge, since unlike type they do not require a white margin to achieve their best effect." (Jan Tschichold, "The Principles of the New Typography," in Texts on Type: Critical Writings on Typography , ed. by Steven Heller and Philip B. Meggs. Allworth Communications, 2001)
Pronunciation: MAR-jen
- Justification (Typesetting and Composition)
- How to Use Block Quotations in Writing
- What Is Justification in Page Layout and Typography?
- Formatting Papers in Chicago Style
- MLA Sample Pages
- 140 Key Copyediting Terms and What They Mean
- Title Page Examples and Formats
- Using Links to Create Vertical Navigation Menus
- What is a Printer-Friendly Web Page?
- Trim Area and Live Area in Page Layout
- Definition of Appendix in a Book or Written Work
- What Is a Style Guide and Which One Do You Need?
- What Is an Indentation?
- What Is a Citation?
- Page Layout Measurements in Points and Picas
- Forced Justification for Aligning Text
- Privacy Policy
Buy Me a Coffee
Home » Research Paper Format – Types, Examples and Templates
Research Paper Format – Types, Examples and Templates
Table of Contents

Research paper format is an essential aspect of academic writing that plays a crucial role in the communication of research findings . The format of a research paper depends on various factors such as the discipline, style guide, and purpose of the research. It includes guidelines for the structure, citation style, referencing , and other elements of the paper that contribute to its overall presentation and coherence. Adhering to the appropriate research paper format is vital for ensuring that the research is accurately and effectively communicated to the intended audience. In this era of information, it is essential to understand the different research paper formats and their guidelines to communicate research effectively, accurately, and with the required level of detail. This post aims to provide an overview of some of the common research paper formats used in academic writing.
Research Paper Formats
Research Paper Formats are as follows:
- APA (American Psychological Association) format
- MLA (Modern Language Association) format
- Chicago/Turabian style
- IEEE (Institute of Electrical and Electronics Engineers) format
- AMA (American Medical Association) style
- Harvard style
- Vancouver style
- ACS (American Chemical Society) style
- ASA (American Sociological Association) style
- APSA (American Political Science Association) style
APA (American Psychological Association) Format
Here is a general APA format for a research paper:
- Title Page: The title page should include the title of your paper, your name, and your institutional affiliation. It should also include a running head, which is a shortened version of the title, and a page number in the upper right-hand corner.
- Abstract : The abstract is a brief summary of your paper, typically 150-250 words. It should include the purpose of your research, the main findings, and any implications or conclusions that can be drawn.
- Introduction: The introduction should provide background information on your topic, state the purpose of your research, and present your research question or hypothesis. It should also include a brief literature review that discusses previous research on your topic.
- Methods: The methods section should describe the procedures you used to collect and analyze your data. It should include information on the participants, the materials and instruments used, and the statistical analyses performed.
- Results: The results section should present the findings of your research in a clear and concise manner. Use tables and figures to help illustrate your results.
- Discussion : The discussion section should interpret your results and relate them back to your research question or hypothesis. It should also discuss the implications of your findings and any limitations of your study.
- References : The references section should include a list of all sources cited in your paper. Follow APA formatting guidelines for your citations and references.
Some additional tips for formatting your APA research paper:
- Use 12-point Times New Roman font throughout the paper.
- Double-space all text, including the references.
- Use 1-inch margins on all sides of the page.
- Indent the first line of each paragraph by 0.5 inches.
- Use a hanging indent for the references (the first line should be flush with the left margin, and all subsequent lines should be indented).
- Number all pages, including the title page and references page, in the upper right-hand corner.
APA Research Paper Format Template
APA Research Paper Format Template is as follows:
Title Page:
- Title of the paper
- Author’s name
- Institutional affiliation
- A brief summary of the main points of the paper, including the research question, methods, findings, and conclusions. The abstract should be no more than 250 words.
Introduction:
- Background information on the topic of the research paper
- Research question or hypothesis
- Significance of the study
- Overview of the research methods and design
- Brief summary of the main findings
- Participants: description of the sample population, including the number of participants and their characteristics (age, gender, ethnicity, etc.)
- Materials: description of any materials used in the study (e.g., survey questions, experimental apparatus)
- Procedure: detailed description of the steps taken to conduct the study
- Presentation of the findings of the study, including statistical analyses if applicable
- Tables and figures may be included to illustrate the results
Discussion:
- Interpretation of the results in light of the research question and hypothesis
- Implications of the study for the field
- Limitations of the study
- Suggestions for future research
References:
- A list of all sources cited in the paper, in APA format
Formatting guidelines:
- Double-spaced
- 12-point font (Times New Roman or Arial)
- 1-inch margins on all sides
- Page numbers in the top right corner
- Headings and subheadings should be used to organize the paper
- The first line of each paragraph should be indented
- Quotations of 40 or more words should be set off in a block quote with no quotation marks
- In-text citations should include the author’s last name and year of publication (e.g., Smith, 2019)
APA Research Paper Format Example
APA Research Paper Format Example is as follows:
The Effects of Social Media on Mental Health
University of XYZ
This study examines the relationship between social media use and mental health among college students. Data was collected through a survey of 500 students at the University of XYZ. Results suggest that social media use is significantly related to symptoms of depression and anxiety, and that the negative effects of social media are greater among frequent users.
Social media has become an increasingly important aspect of modern life, especially among young adults. While social media can have many positive effects, such as connecting people across distances and sharing information, there is growing concern about its impact on mental health. This study aims to examine the relationship between social media use and mental health among college students.
Participants: Participants were 500 college students at the University of XYZ, recruited through online advertisements and flyers posted on campus. Participants ranged in age from 18 to 25, with a mean age of 20.5 years. The sample was 60% female, 40% male, and 5% identified as non-binary or gender non-conforming.
Data was collected through an online survey administered through Qualtrics. The survey consisted of several measures, including the Patient Health Questionnaire-9 (PHQ-9) for depression symptoms, the Generalized Anxiety Disorder-7 (GAD-7) for anxiety symptoms, and questions about social media use.
Procedure :
Participants were asked to complete the online survey at their convenience. The survey took approximately 20-30 minutes to complete. Data was analyzed using descriptive statistics, correlations, and multiple regression analysis.
Results indicated that social media use was significantly related to symptoms of depression (r = .32, p < .001) and anxiety (r = .29, p < .001). Regression analysis indicated that frequency of social media use was a significant predictor of both depression symptoms (β = .24, p < .001) and anxiety symptoms (β = .20, p < .001), even when controlling for age, gender, and other relevant factors.
The results of this study suggest that social media use is associated with symptoms of depression and anxiety among college students. The negative effects of social media are greater among frequent users. These findings have important implications for mental health professionals and educators, who should consider addressing the potential negative effects of social media use in their work with young adults.
References :
References should be listed in alphabetical order according to the author’s last name. For example:
- Chou, H. T. G., & Edge, N. (2012). “They are happier and having better lives than I am”: The impact of using Facebook on perceptions of others’ lives. Cyberpsychology, Behavior, and Social Networking, 15(2), 117-121.
- Twenge, J. M., Joiner, T. E., Rogers, M. L., & Martin, G. N. (2018). Increases in depressive symptoms, suicide-related outcomes, and suicide rates among U.S. adolescents after 2010 and links to increased new media screen time. Clinical Psychological Science, 6(1), 3-17.
Note: This is just a sample Example do not use this in your assignment.
MLA (Modern Language Association) Format
MLA (Modern Language Association) Format is as follows:
- Page Layout : Use 8.5 x 11-inch white paper, with 1-inch margins on all sides. The font should be 12-point Times New Roman or a similar serif font.
- Heading and Title : The first page of your research paper should include a heading and a title. The heading should include your name, your instructor’s name, the course title, and the date. The title should be centered and in title case (capitalizing the first letter of each important word).
- In-Text Citations : Use parenthetical citations to indicate the source of your information. The citation should include the author’s last name and the page number(s) of the source. For example: (Smith 23).
- Works Cited Page : At the end of your paper, include a Works Cited page that lists all the sources you used in your research. Each entry should include the author’s name, the title of the work, the publication information, and the medium of publication.
- Formatting Quotations : Use double quotation marks for short quotations and block quotations for longer quotations. Indent the entire quotation five spaces from the left margin.
- Formatting the Body : Use a clear and readable font and double-space your text throughout. The first line of each paragraph should be indented one-half inch from the left margin.
MLA Research Paper Template
MLA Research Paper Format Template is as follows:
- Use 8.5 x 11 inch white paper.
- Use a 12-point font, such as Times New Roman.
- Use double-spacing throughout the entire paper, including the title page and works cited page.
- Set the margins to 1 inch on all sides.
- Use page numbers in the upper right corner, beginning with the first page of text.
- Include a centered title for the research paper, using title case (capitalizing the first letter of each important word).
- Include your name, instructor’s name, course name, and date in the upper left corner, double-spaced.
In-Text Citations
- When quoting or paraphrasing information from sources, include an in-text citation within the text of your paper.
- Use the author’s last name and the page number in parentheses at the end of the sentence, before the punctuation mark.
- If the author’s name is mentioned in the sentence, only include the page number in parentheses.
Works Cited Page
- List all sources cited in alphabetical order by the author’s last name.
- Each entry should include the author’s name, title of the work, publication information, and medium of publication.
- Use italics for book and journal titles, and quotation marks for article and chapter titles.
- For online sources, include the date of access and the URL.
Here is an example of how the first page of a research paper in MLA format should look:
Headings and Subheadings
- Use headings and subheadings to organize your paper and make it easier to read.
- Use numerals to number your headings and subheadings (e.g. 1, 2, 3), and capitalize the first letter of each word.
- The main heading should be centered and in boldface type, while subheadings should be left-aligned and in italics.
- Use only one space after each period or punctuation mark.
- Use quotation marks to indicate direct quotes from a source.
- If the quote is more than four lines, format it as a block quote, indented one inch from the left margin and without quotation marks.
- Use ellipses (…) to indicate omitted words from a quote, and brackets ([…]) to indicate added words.
Works Cited Examples
- Book: Last Name, First Name. Title of Book. Publisher, Publication Year.
- Journal Article: Last Name, First Name. “Title of Article.” Title of Journal, volume number, issue number, publication date, page numbers.
- Website: Last Name, First Name. “Title of Webpage.” Title of Website, publication date, URL. Accessed date.
Here is an example of how a works cited entry for a book should look:
Smith, John. The Art of Writing Research Papers. Penguin, 2021.
MLA Research Paper Example
MLA Research Paper Format Example is as follows:
Your Professor’s Name
Course Name and Number
Date (in Day Month Year format)
Word Count (not including title page or Works Cited)
Title: The Impact of Video Games on Aggression Levels
Video games have become a popular form of entertainment among people of all ages. However, the impact of video games on aggression levels has been a subject of debate among scholars and researchers. While some argue that video games promote aggression and violent behavior, others argue that there is no clear link between video games and aggression levels. This research paper aims to explore the impact of video games on aggression levels among young adults.
Background:
The debate on the impact of video games on aggression levels has been ongoing for several years. According to the American Psychological Association, exposure to violent media, including video games, can increase aggression levels in children and adolescents. However, some researchers argue that there is no clear evidence to support this claim. Several studies have been conducted to examine the impact of video games on aggression levels, but the results have been mixed.
Methodology:
This research paper used a quantitative research approach to examine the impact of video games on aggression levels among young adults. A sample of 100 young adults between the ages of 18 and 25 was selected for the study. The participants were asked to complete a questionnaire that measured their aggression levels and their video game habits.
The results of the study showed that there was a significant correlation between video game habits and aggression levels among young adults. The participants who reported playing violent video games for more than 5 hours per week had higher aggression levels than those who played less than 5 hours per week. The study also found that male participants were more likely to play violent video games and had higher aggression levels than female participants.
The findings of this study support the claim that video games can increase aggression levels among young adults. However, it is important to note that the study only examined the impact of video games on aggression levels and did not take into account other factors that may contribute to aggressive behavior. It is also important to note that not all video games promote violence and aggression, and some games may have a positive impact on cognitive and social skills.
Conclusion :
In conclusion, this research paper provides evidence to support the claim that video games can increase aggression levels among young adults. However, it is important to conduct further research to examine the impact of video games on other aspects of behavior and to explore the potential benefits of video games. Parents and educators should be aware of the potential impact of video games on aggression levels and should encourage young adults to engage in a variety of activities that promote cognitive and social skills.
Works Cited:
- American Psychological Association. (2017). Violent Video Games: Myths, Facts, and Unanswered Questions. Retrieved from https://www.apa.org/news/press/releases/2017/08/violent-video-games
- Ferguson, C. J. (2015). Do Angry Birds make for angry children? A meta-analysis of video game influences on children’s and adolescents’ aggression, mental health, prosocial behavior, and academic performance. Perspectives on Psychological Science, 10(5), 646-666.
- Gentile, D. A., Swing, E. L., Lim, C. G., & Khoo, A. (2012). Video game playing, attention problems, and impulsiveness: Evidence of bidirectional causality. Psychology of Popular Media Culture, 1(1), 62-70.
- Greitemeyer, T. (2014). Effects of prosocial video games on prosocial behavior. Journal of Personality and Social Psychology, 106(4), 530-548.
Chicago/Turabian Style
Chicago/Turabian Formate is as follows:
- Margins : Use 1-inch margins on all sides of the paper.
- Font : Use a readable font such as Times New Roman or Arial, and use a 12-point font size.
- Page numbering : Number all pages in the upper right-hand corner, beginning with the first page of text. Use Arabic numerals.
- Title page: Include a title page with the title of the paper, your name, course title and number, instructor’s name, and the date. The title should be centered on the page and in title case (capitalize the first letter of each word).
- Headings: Use headings to organize your paper. The first level of headings should be centered and in boldface or italics. The second level of headings should be left-aligned and in boldface or italics. Use as many levels of headings as necessary to organize your paper.
- In-text citations : Use footnotes or endnotes to cite sources within the text of your paper. The first citation for each source should be a full citation, and subsequent citations can be shortened. Use superscript numbers to indicate footnotes or endnotes.
- Bibliography : Include a bibliography at the end of your paper, listing all sources cited in your paper. The bibliography should be in alphabetical order by the author’s last name, and each entry should include the author’s name, title of the work, publication information, and date of publication.
- Formatting of quotations: Use block quotations for quotations that are longer than four lines. Indent the entire quotation one inch from the left margin, and do not use quotation marks. Single-space the quotation, and double-space between paragraphs.
- Tables and figures: Use tables and figures to present data and illustrations. Number each table and figure sequentially, and provide a brief title for each. Place tables and figures as close as possible to the text that refers to them.
- Spelling and grammar : Use correct spelling and grammar throughout your paper. Proofread carefully for errors.
Chicago/Turabian Research Paper Template
Chicago/Turabian Research Paper Template is as folows:
Title of Paper
Name of Student
Professor’s Name
I. Introduction
A. Background Information
B. Research Question
C. Thesis Statement
II. Literature Review
A. Overview of Existing Literature
B. Analysis of Key Literature
C. Identification of Gaps in Literature
III. Methodology
A. Research Design
B. Data Collection
C. Data Analysis
IV. Results
A. Presentation of Findings
B. Analysis of Findings
C. Discussion of Implications
V. Conclusion
A. Summary of Findings
B. Implications for Future Research
C. Conclusion
VI. References
A. Bibliography
B. In-Text Citations
VII. Appendices (if necessary)
A. Data Tables
C. Additional Supporting Materials
Chicago/Turabian Research Paper Example
Title: The Impact of Social Media on Political Engagement
Name: John Smith
Class: POLS 101
Professor: Dr. Jane Doe
Date: April 8, 2023
I. Introduction:
Social media has become an integral part of our daily lives. People use social media platforms like Facebook, Twitter, and Instagram to connect with friends and family, share their opinions, and stay informed about current events. With the rise of social media, there has been a growing interest in understanding its impact on various aspects of society, including political engagement. In this paper, I will examine the relationship between social media use and political engagement, specifically focusing on how social media influences political participation and political attitudes.
II. Literature Review:
There is a growing body of literature on the impact of social media on political engagement. Some scholars argue that social media has a positive effect on political participation by providing new channels for political communication and mobilization (Delli Carpini & Keeter, 1996; Putnam, 2000). Others, however, suggest that social media can have a negative impact on political engagement by creating filter bubbles that reinforce existing beliefs and discourage political dialogue (Pariser, 2011; Sunstein, 2001).
III. Methodology:
To examine the relationship between social media use and political engagement, I conducted a survey of 500 college students. The survey included questions about social media use, political participation, and political attitudes. The data was analyzed using descriptive statistics and regression analysis.
Iv. Results:
The results of the survey indicate that social media use is positively associated with political participation. Specifically, respondents who reported using social media to discuss politics were more likely to have participated in a political campaign, attended a political rally, or contacted a political representative. Additionally, social media use was found to be associated with more positive attitudes towards political engagement, such as increased trust in government and belief in the effectiveness of political action.
V. Conclusion:
The findings of this study suggest that social media has a positive impact on political engagement, by providing new opportunities for political communication and mobilization. However, there is also a need for caution, as social media can also create filter bubbles that reinforce existing beliefs and discourage political dialogue. Future research should continue to explore the complex relationship between social media and political engagement, and develop strategies to harness the potential benefits of social media while mitigating its potential negative effects.
Vii. References:
- Delli Carpini, M. X., & Keeter, S. (1996). What Americans know about politics and why it matters. Yale University Press.
- Pariser, E. (2011). The filter bubble: What the Internet is hiding from you. Penguin.
- Putnam, R. D. (2000). Bowling alone: The collapse and revival of American community. Simon & Schuster.
- Sunstein, C. R. (2001). Republic.com. Princeton University Press.
IEEE (Institute of Electrical and Electronics Engineers) Format
IEEE (Institute of Electrical and Electronics Engineers) Research Paper Format is as follows:
- Title : A concise and informative title that accurately reflects the content of the paper.
- Abstract : A brief summary of the paper, typically no more than 250 words, that includes the purpose of the study, the methods used, the key findings, and the main conclusions.
- Introduction : An overview of the background, context, and motivation for the research, including a clear statement of the problem being addressed and the objectives of the study.
- Literature review: A critical analysis of the relevant research and scholarship on the topic, including a discussion of any gaps or limitations in the existing literature.
- Methodology : A detailed description of the methods used to collect and analyze data, including any experiments or simulations, data collection instruments or procedures, and statistical analyses.
- Results : A clear and concise presentation of the findings, including any relevant tables, graphs, or figures.
- Discussion : A detailed interpretation of the results, including a comparison of the findings with previous research, a discussion of the implications of the results, and any recommendations for future research.
- Conclusion : A summary of the key findings and main conclusions of the study.
- References : A list of all sources cited in the paper, formatted according to IEEE guidelines.
In addition to these elements, an IEEE research paper should also follow certain formatting guidelines, including using 12-point font, double-spaced text, and numbered headings and subheadings. Additionally, any tables, figures, or equations should be clearly labeled and referenced in the text.
AMA (American Medical Association) Style
AMA (American Medical Association) Style Research Paper Format:
- Title Page: This page includes the title of the paper, the author’s name, institutional affiliation, and any acknowledgments or disclaimers.
- Abstract: The abstract is a brief summary of the paper that outlines the purpose, methods, results, and conclusions of the study. It is typically limited to 250 words or less.
- Introduction: The introduction provides a background of the research problem, defines the research question, and outlines the objectives and hypotheses of the study.
- Methods: The methods section describes the research design, participants, procedures, and instruments used to collect and analyze data.
- Results: The results section presents the findings of the study in a clear and concise manner, using graphs, tables, and charts where appropriate.
- Discussion: The discussion section interprets the results, explains their significance, and relates them to previous research in the field.
- Conclusion: The conclusion summarizes the main points of the paper, discusses the implications of the findings, and suggests future research directions.
- References: The reference list includes all sources cited in the paper, listed in alphabetical order by author’s last name.
In addition to these sections, the AMA format requires that authors follow specific guidelines for citing sources in the text and formatting their references. The AMA style uses a superscript number system for in-text citations and provides specific formats for different types of sources, such as books, journal articles, and websites.
Harvard Style
Harvard Style Research Paper format is as follows:
- Title page: This should include the title of your paper, your name, the name of your institution, and the date of submission.
- Abstract : This is a brief summary of your paper, usually no more than 250 words. It should outline the main points of your research and highlight your findings.
- Introduction : This section should introduce your research topic, provide background information, and outline your research question or thesis statement.
- Literature review: This section should review the relevant literature on your topic, including previous research studies, academic articles, and other sources.
- Methodology : This section should describe the methods you used to conduct your research, including any data collection methods, research instruments, and sampling techniques.
- Results : This section should present your findings in a clear and concise manner, using tables, graphs, and other visual aids if necessary.
- Discussion : This section should interpret your findings and relate them to the broader research question or thesis statement. You should also discuss the implications of your research and suggest areas for future study.
- Conclusion : This section should summarize your main findings and provide a final statement on the significance of your research.
- References : This is a list of all the sources you cited in your paper, presented in alphabetical order by author name. Each citation should include the author’s name, the title of the source, the publication date, and other relevant information.
In addition to these sections, a Harvard Style research paper may also include a table of contents, appendices, and other supplementary materials as needed. It is important to follow the specific formatting guidelines provided by your instructor or academic institution when preparing your research paper in Harvard Style.
Vancouver Style
Vancouver Style Research Paper format is as follows:
The Vancouver citation style is commonly used in the biomedical sciences and is known for its use of numbered references. Here is a basic format for a research paper using the Vancouver citation style:
- Title page: Include the title of your paper, your name, the name of your institution, and the date.
- Abstract : This is a brief summary of your research paper, usually no more than 250 words.
- Introduction : Provide some background information on your topic and state the purpose of your research.
- Methods : Describe the methods you used to conduct your research, including the study design, data collection, and statistical analysis.
- Results : Present your findings in a clear and concise manner, using tables and figures as needed.
- Discussion : Interpret your results and explain their significance. Also, discuss any limitations of your study and suggest directions for future research.
- References : List all of the sources you cited in your paper in numerical order. Each reference should include the author’s name, the title of the article or book, the name of the journal or publisher, the year of publication, and the page numbers.
ACS (American Chemical Society) Style
ACS (American Chemical Society) Style Research Paper format is as follows:
The American Chemical Society (ACS) Style is a citation style commonly used in chemistry and related fields. When formatting a research paper in ACS Style, here are some guidelines to follow:
- Paper Size and Margins : Use standard 8.5″ x 11″ paper with 1-inch margins on all sides.
- Font: Use a 12-point serif font (such as Times New Roman) for the main text. The title should be in bold and a larger font size.
- Title Page : The title page should include the title of the paper, the authors’ names and affiliations, and the date of submission. The title should be centered on the page and written in bold font. The authors’ names should be centered below the title, followed by their affiliations and the date.
- Abstract : The abstract should be a brief summary of the paper, no more than 250 words. It should be on a separate page and include the title of the paper, the authors’ names and affiliations, and the text of the abstract.
- Main Text : The main text should be organized into sections with headings that clearly indicate the content of each section. The introduction should provide background information and state the research question or hypothesis. The methods section should describe the procedures used in the study. The results section should present the findings of the study, and the discussion section should interpret the results and provide conclusions.
- References: Use the ACS Style guide to format the references cited in the paper. In-text citations should be numbered sequentially throughout the text and listed in numerical order at the end of the paper.
- Figures and Tables: Figures and tables should be numbered sequentially and referenced in the text. Each should have a descriptive caption that explains its content. Figures should be submitted in a high-quality electronic format.
- Supporting Information: Additional information such as data, graphs, and videos may be included as supporting information. This should be included in a separate file and referenced in the main text.
- Acknowledgments : Acknowledge any funding sources or individuals who contributed to the research.
ASA (American Sociological Association) Style
ASA (American Sociological Association) Style Research Paper format is as follows:
- Title Page: The title page of an ASA style research paper should include the title of the paper, the author’s name, and the institutional affiliation. The title should be centered and should be in title case (the first letter of each major word should be capitalized).
- Abstract: An abstract is a brief summary of the paper that should appear on a separate page immediately following the title page. The abstract should be no more than 200 words in length and should summarize the main points of the paper.
- Main Body: The main body of the paper should begin on a new page following the abstract page. The paper should be double-spaced, with 1-inch margins on all sides, and should be written in 12-point Times New Roman font. The main body of the paper should include an introduction, a literature review, a methodology section, results, and a discussion.
- References : The reference section should appear on a separate page at the end of the paper. All sources cited in the paper should be listed in alphabetical order by the author’s last name. Each reference should include the author’s name, the title of the work, the publication information, and the date of publication.
- Appendices : Appendices are optional and should only be included if they contain information that is relevant to the study but too lengthy to be included in the main body of the paper. If you include appendices, each one should be labeled with a letter (e.g., Appendix A, Appendix B, etc.) and should be referenced in the main body of the paper.
APSA (American Political Science Association) Style
APSA (American Political Science Association) Style Research Paper format is as follows:
- Title Page: The title page should include the title of the paper, the author’s name, the name of the course or instructor, and the date.
- Abstract : An abstract is typically not required in APSA style papers, but if one is included, it should be brief and summarize the main points of the paper.
- Introduction : The introduction should provide an overview of the research topic, the research question, and the main argument or thesis of the paper.
- Literature Review : The literature review should summarize the existing research on the topic and provide a context for the research question.
- Methods : The methods section should describe the research methods used in the paper, including data collection and analysis.
- Results : The results section should present the findings of the research.
- Discussion : The discussion section should interpret the results and connect them back to the research question and argument.
- Conclusion : The conclusion should summarize the main findings and implications of the research.
- References : The reference list should include all sources cited in the paper, formatted according to APSA style guidelines.
In-text citations in APSA style use parenthetical citation, which includes the author’s last name, publication year, and page number(s) if applicable. For example, (Smith 2010, 25).
About the author

Muhammad Hassan
Researcher, Academic Writer, Web developer
You may also like

How to Cite Research Paper – All Formats and...

Delimitations in Research – Types, Examples and...

Research Design – Types, Methods and Examples

Research Paper Title – Writing Guide and Example

Research Paper Introduction – Writing Guide and...

Research Paper Conclusion – Writing Guide and...
- Mission & Vision
- Academic Calendar
- Doctoral Exam Schedule
- Graduate Programs
- Financial Support
- Priority Deadlines
- New Graduate Student Orientation
- Signature Events
- Degree Planning
- Embedded Counseling
- International Students
- Electronic Theses and Dissertations (ETD)
- Graduate Peer Mentoring
- Responsible Conduct of Research (RCR)
- Catalog and Handbook
- Graduate Assistantships Overview
- Graduate Student Support Plan
- Tuition, Fees and Other Resources
- Fellowships and Grants
- Goodnight Doctoral Fellowship
- Professional Development
- Five Competencies
- Teaching Programs
- Wellness Program
- Career Readiness Program for Non-Academic Careers
- Writing Program
- Leadership Program
- Office of Postdoctoral Affairs (OPA)
- Faculty & Staff
- Forms and Data
- GSC Resources
- ABGS Resources
- Resources for Student Funding
- Curriculum Development
- Program Assessment
- Recruiting Resources
- Alliances for Graduate Education and the Professoriate (AGEP)
- Give Now
Headers, Page Margins, and Spacing
These three elements of formatting are all intertwined and crucial for presenting your work in an organized, easy-to-read manner.
Required Headers
- Headers for all required pages must be consistently formatted; they should be the same size, font, and style, and located in the same position on each page, in the center of the page. They must start at the very top of the page, on the first line below the 1-inch margin.
- Headers for all required pages should be bold, all caps, and black.
Chapter Headers
- Chapter headers are the only headers that can start lower on the page and be stylized in any manner, as long as they are consistent on each chapter title page.
Section Headers
- It is common for a chapter to have multiple levels of section headers. These can be formatted differently than required or chapter headers, as long as there is a consistent style from chapter to chapter.
Running Headers
- Your document should not have a running header that appears at the top of each page.
Page Margins
Page margins should be consistent throughout the text.
Required Margins:
- The top, bottom, and right margins are required to be 1 inch, but the left margin can either be 1 inch or 1.25 inches.
- All body text, tables, figures, appendices content, and any copies of published chapters must fit within the required 1-inch margins on all sides. Tables or images may have to be re-sized to fit within the margin. See the Tables and Figures page for more info.
Throughout your ETD, all text must start at the very top of the page . It is common for students to have trouble maintaining this consistency — often thanks to difficulty with Microsoft Word. The below instructions should help to specify the relevant settings in Microsoft Word and offer some helpful tips to maintaining consistency throughout your document.
- Check that your top margin is set to 1 inch.
- Check the page margin layout settings . On the “Layout” tab, in the “Margins” menu (found on the far left of the navigation bar), click “Custom Margins.” A “Page Setup” menu will appear. Under the “Layout” tab of this pop-up menu, make sure “Vertical alignment” is set to “Top.”
- Make sure you don’t have extra space in the header . Double-click on the header and hit the down arrow. If there are extra lines in the header , below the page number, delete them.
- Make sure there isn’t extra space between your text and the top of the page. All text must start on the first line at the very top of the page, just after the 1 inch margin line.
To more easily identify spacing inconsistencies as you scan your document, enable the “Gridlines” view :

If you are having trouble moving your text to the top of the page, check the “ Header from Top” and “Footer from Bottom” settings.
- Double-click within the header or footer to edit them.
- Click the “Design” tab.
- See the below screenshot:
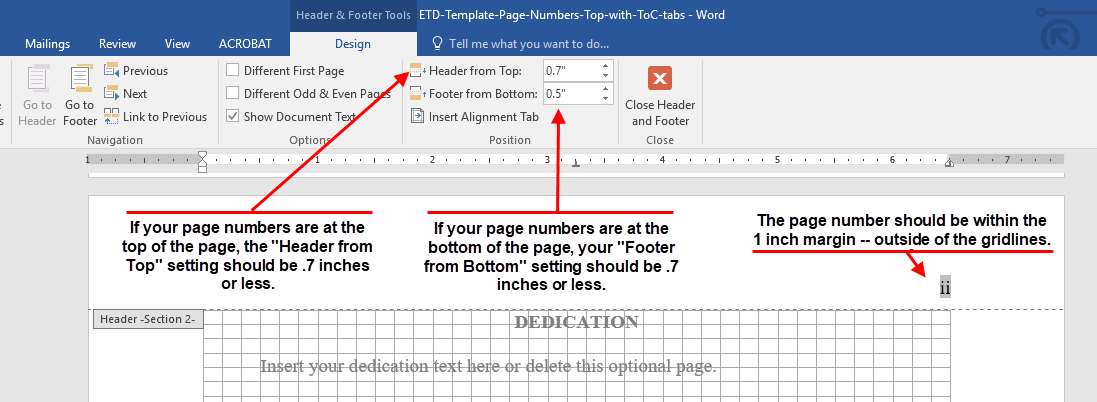
Spacing and Indentation
Spacing must be consistent throughout the document. This includes:
- The amount of space between headers and body text.
- Line spacing of your body text (starting on your abstract page).
- Regardless of your text spacing, you should at least have a space between each entry on your table of contents, list of tables, list of figures, list of abbreviations, and reference pages.
- There should be a minimum amount of space separating body text from tables and figures.
- Indents should be set to .05 inches throughout entire document.

Turabian Style
- Cite: Why? When?
- Books or Ebooks
- Theses and Manuscripts
- Reference and Sacred Works
- Audio/Visual
- Government Documents
- Music Resources
- Artificial Intelligence (AI) Tools
Format Your Paper
- Shortened Notes
Turabian Paper Examples
- Turabian Paper Example
- Turabian Annotated Bibliography Example
- Chicago Paper Example (Purdue Owl)
Formatting Guidelines
Margins (a.1.1).
- Paper size - 8 1/2 x 11 inches
- 1 inch at top, bottom, and both sides
Font (A.1.2)
- Use easy to read font, such as Times New Roman
- 12-point font size
Spacing and Indentation (A.1.3)
- Block quotations
- Table elements (titles and captions)
- Lists in appendixes
- Footnotes/endnotes and bibliography lists are single-spaced but with a blank line between items.
Pagination (A.1.4)
- Do not number the title page
- Page numbers start on the first page of the text using arabic numbers
- Can be placed in the center or right side of top or bottom of the paper
Title Page (A.1.5)
- Center all elements on the page
- Font size can increase slightly for the title.
- Preferred format is boldface for title
- Title placed approximately 1/3 down page.
- Two-thirds down page place name, class title, and date
Text (A.2.2)
- Align the text to the left with a 1/2-inch left indent
- Double-space
- Include sections: introduction, chapters/sections , and conclusion
- Spell out long organization names and add the abbreviation in parenthesis, then just use the abbreviation
- Write out numbers up to nine and use a number for 10 or more
- Use a number for units of measurement, in tables, to represent statistical or math functions, and dates or times
- Capitalize major words in the titles of books and articles
Bibliography (A.2.3.5)
Begins on a new page following the text of your paper and includes complete citations for the resources you've used in your writing.
- Center "Bibliography" at the top of the new page, leaving two spaces between title and first entry
- Single-space and use hanging indents (where the first line is on the left margin and the following lines are indented a half inch from the left)
- List authors' last name first followed by the first and middle initials (ex. Skinner, B.F.) t
- Alphabetize the list by the first author's last name of of each citation, hen alphabetically by title if you list multiple works by one author.
- Add full-sentence annotations on a new line indented from the left margin.
- << Previous: Artificial Intelligence (AI) Tools
- Next: Shortened Notes >>
- Last Updated: Apr 18, 2024 8:43 AM
- URL: https://libguides.uww.edu/turabian

Formatting a Research Paper in Word: Home
- Resources for Visually Impaired
This page will help you set up a Microsoft Word document to write an MLA or APA research paper. It includes keystroke commands where possible.
Keyboard shortcuts from Microsoft
Header for MLA Style
Insert header.
(ALT + N, H spacebar)
- To create the header, click on the Insert tab on the toolbar.
Page number
(Alt+N, N, U) , T (selects top of page from menu options), Enter , Right align (Ctrl+R), Type Last name and a space
- Click page number in the Header & Footer box. Choose Top of Page in the drop down menu, and select Plain Number 3.
- While your cursor is still on the page number, type your last name and a space.
Format Font to Times New Roman, size 12
Alt+A to select all font, Ctrl+D to open font dialog box, type Times, tab twice to get to size box, type 12, then Enter to close box and header.
- Highlight all text if needed, then on the Home tab, in the Font section, select Times New Roman, size 12.
To Close Header
(Alt+J, H, C)
- Click on Close Header & Footer or double-click on the body of the document
To Edit Header
(Alt+N, H, Alt+E)
- Open header & footer box or double click in header space
Header for APA Style
Running head.
In all caps, enter your running head, which is a short version of your title.
Page Set up
Format font to times new roman, size 12, double space lines.
Alt+K, arrow down to 2.0, enter
- On Home Tab, in the Paragraph section, choose 2.0 or Double for line spacing.
Paragraph Spacing
Alt+P, S, A, type the number zero, enter
- On Home Tab, in the Paragraph section, enter 0 (zero) for space before and after paragraphs.
Set Margins to 1 inch
Alt+P opens Page Layout, Alt+M online Margins, use arrows to select Normal Template. Enter.
- Under Layout Tab, open Margins and select Normal.
To Save this Format as the Default
Your information and title of paper, left align text (this should be the default).
- Under Home tab, in the Paragraph box, click Left Align icon
Your Information:
- Your first and last name <Enter>
- Your Instructor's name <Enter>
- Class name and course number <Enter>
- Date in format day, month, year <Enter>
Title of Paper
Center Align Text using Ctrl+C
Type the title of your paper, capitalizing the first letter of the of the first word and then the first letter of every word except conjunctions, prepositions, and articles. <Enter>
Note: You will need to left align text (Ctrl+L) before beginning body of the paper.
Body of Text
Make sure you have already completed the Page Set up.
If your preceding line was center justified, left align the text with Ctrl+L or using the Left Align icon on the toolbar.
Indent first line of paragraphs
You can tab to indent the first line of the paragraphs OR
Alt+O, P to open paragraph dialogue box, Alt+S to chose Special indentation. From dropdown, select First Line. Enter.
- On Home Tab, in the Paragraph section, under Indentation, in Special, use dropdown to select First Line.
Indenting block quotations
- (Alt+P, I, L) type .5 to indent by 1/2 inch. <enter> Or, with text highlighted, click the Increase indent button in the Paragraph settings section of the Home or Layout tab.
- Type your block quotation.
- To cancel indenting the block quotation, change the indent back to 0 using (Alt+P, I, L), 0. <enter> OR click the decrease indent to return back to the left margin.
Works Cited or References List
Start a new page.
- On the Insert tab, in the Pages section, slick on the Page Break icon
Center the title of the section
Ctrl+E, type "Works Cited" for MLA or "References" for APA, <enter> (return to Left alignment with Ctrl+L)
- On the Home Tab, in the Paragraph section, click the Center Align icon
- Type Works Cited for MLA or References for APA
- Return to Left Alignment using the Left Align icon
Format page for hanging indent
Alt+H, P, G opens paragraph dialog box, Tab to Special Indent, Arrow down to Hanging indent, <enter>
- On Home Tab, in the Paragraph section, under Indentation, in Special, use dropdown to select Hanging Indent <OK>
Alphabetize your Works Cited
This feature enables you to quickly alphabetize your works cited section. However, be aware that it does not ignore citations starting with A, An, or The, as you should according to MLA and APA style. Therefore, if any of your citations start with these words, you will need to manually move them into place.
- Select the text you want to sort.
- On the Home tab, in the Paragraph section, click the Alphabetize icon.
Preformatted Word Documents
- MLA Document Formatted This Word document is formatted in MLA style. Download this document then replace the text with your own text.
- APA Document Formatted Word document in APA format, including a cover page, was adapted from a document from Evergreen Valley College. Download this paper and replace the text with your own.
- Next: Resources for Visually Impaired >>
- Last Updated: Jul 14, 2023 9:56 AM
- URL: https://research.library.gsu.edu/format
All Formats
Table of Contents
Research paper sizes standard, research paper sizes for print, research paper sizes for ms word, research paper sizes for apple pages, research paper sizes for google docs, research paper sizes faqs, research paper sizes.
A number of learning institutions are quite particular with their requirements regarding research paper sizes and formats. This is to ensure uniformity and consistency not just in its content but writers should also use the right orientation, margin size, and layout.

Letter Size

What paper size should a research paper be?
What is the structure of a research paper, what is the layout of a research paper, what is the average length of a research paper, what are the dimensions of a research paper, what is the proper margin for a research paper, what font size is used for a research paper, how long is a mini-research paper, what is the spacing for a research paper, what font style is best for a research paper, what is the minimum page of a research paper, how many pages should a research paper have, what is an apa format, how long should the introduction section be in a research paper, more in documents, orientation speech template by teacher, quantitative research checklist template, research essay outline template, school essay template, reflective essay template, college paper template, interview essay in apa documentation style template, job interview essay report with introduction template, professional student interview essay template, biography essay template.
- How To Create a Schedule in Microsoft Word [Template + Example]
- How To Create a Schedule in Google Docs [Template + Example]
- How To Create a Quotation in Google Docs [Template + Example]
- How To Create a Quotation in Microsoft Word [Template + Example]
- How To Make a Plan in Google Docs [Template + Example]
- How To Make a Plan in Microsoft Word [Template + Example]
- How To Make/Create an Inventory in Google Docs [Templates + Examples]
- How To Create Meeting Minutes in Microsoft Word [Template + Example]
- How To Create Meeting Minutes in Google Docs [Template + Example]
- How To Make/Create an Estimate in Microsoft Word [Templates + Examples] 2023
- How To Make/Create an Estimate in Google Docs [Templates + Examples] 2023
- How To Make/Create a Manual in Google Docs [Templates + Examples] 2023
- How To Make/Create a Manual in Microsoft Word [Templates + Examples] 2023
- How To Make/Create a Statement in Google Docs [Templates + Examples] 2023
- How To Make/Create a Statement in Microsoft Word [Templates + Examples] 2023
File Formats
Word templates, google docs templates, excel templates, powerpoint templates, google sheets templates, google slides templates, pdf templates, publisher templates, psd templates, indesign templates, illustrator templates, pages templates, keynote templates, numbers templates, outlook templates.

An official website of the United States government
The .gov means it’s official. Federal government websites often end in .gov or .mil. Before sharing sensitive information, make sure you’re on a federal government site.
The site is secure. The https:// ensures that you are connecting to the official website and that any information you provide is encrypted and transmitted securely.
- Publications
- Account settings
Preview improvements coming to the PMC website in October 2024. Learn More or Try it out now .
- Advanced Search
- Journal List
- Biochem Med (Zagreb)
- v.31(1); 2021 Feb 15
Sample size, power and effect size revisited: simplified and practical approaches in pre-clinical, clinical and laboratory studies
Ceyhan ceran serdar.
1 Medical Biology and Genetics, Faculty of Medicine, Ankara Medipol University, Ankara, Turkey
Murat Cihan
2 Ordu University Training and Research Hospital, Ordu, Turkey
Doğan Yücel
3 Department of Medical Biochemistry, Lokman Hekim University School of Medicine, Ankara, Turkey
Muhittin A Serdar
4 Department of Medical Biochemistry, Acibadem Mehmet Ali Aydinlar University, Istanbul, Turkey
Calculating the sample size in scientific studies is one of the critical issues as regards the scientific contribution of the study. The sample size critically affects the hypothesis and the study design, and there is no straightforward way of calculating the effective sample size for reaching an accurate conclusion. Use of a statistically incorrect sample size may lead to inadequate results in both clinical and laboratory studies as well as resulting in time loss, cost, and ethical problems. This review holds two main aims. The first aim is to explain the importance of sample size and its relationship to effect size (ES) and statistical significance. The second aim is to assist researchers planning to perform sample size estimations by suggesting and elucidating available alternative software, guidelines and references that will serve different scientific purposes.
Introduction
Statistical analysis is a crucial part of a research. A scientific study must include statistical tools in the study, beginning from the planning stage. Developed in the last 20-30 years, information technology, along with evidence-based medicine, increased the spread and applicability of statistical science. Although scientists have understood the importance of statistical analysis for researchers, a significant number of researchers admit that they lack adequate knowledge about statistical concepts and principles ( 1 ). In a study by West and Ficalora, more than two-thirds of the clinicians emphasized that “the level of biostatistics education that is provided to the medical students is not sufficient” ( 2 ). As a result, it was suggested that statistical concepts were either poorly understood or not understood at all ( 3 , 4 ). Additionally, intentionally or not, researchers tend to draw conclusions that cannot be supported by the actual study data, often due to the misuse of statistics tools ( 5 ). As a result, a large number of statistical errors occur affecting the research results.
Although there are a variety of potential statistical errors that might occur in any kind of scientific research, it has been observed that the sources of error have changed due to the use of dedicated software that facilitates statistics in recent years. A summary of main statistical errors frequently encountered in scientific studies is provided below ( 6 - 13 ):
- Flawed and inadequate hypothesis;
- Improper study design;
- Lack of adequate control condition/group;
- Spectrum bias;
- Overstatement of the analysis results;
- Spurious correlations;
- Inadequate sample size;
- Circular analysis (creating bias by selecting the properties of the data retrospectively);
- Utilization of inappropriate statistical studies and fallacious bending of the analyses;
- p-hacking ( i.e. addition of new covariates post hoc to make P values significant);
- Excessive interpretation of limited or insignificant results (subjectivism);
- Confusion (intentionally or not) of correlations, relationships, and causations;
- Faulty multiple regression models;
- Confusion between P value and clinical significance; and
- Inappropriate presentation of the results and effects (erroneous tables, graphics, and figures).
Relationship among sample size, power, P value and effect size
In this review, we will concentrate on the problems associated with the relationships among sample size, power, P value, and effect size (ES). Practical suggestions will be provided whenever possible. In order to understand and interpret the sample size, power analysis, effect size, and P value, it is necessary to know how the hypothesis of the study was formed. It is best to evaluate a study for Type I and Type II errors ( Figure 1 ) through consideration of the study results in the context of its hypotheses ( 14 - 16 ).

Illustration of Type I and Type II errors.
A statistical hypothesis is the researcher’s best guess as to what the result of the experiment will show. It states, in a testable form the proposition the researcher plans to examine in a sample to be able to find out if the proposition is correct in the relevant population. There are two commonly used types of hypotheses in statistics. These are the null hypothesis (H0) and the alternative (H1) hypothesis. Essentially, the H1 is the researcher’s prediction of what will be the situation of the experimental group after the experimental treatment is applied. The H0 expresses the notion that there will be no effect from the experimental treatment.
Prior to the study, in addition to stating the hypothesis, the researcher must also select the alpha (α) level at which the hypothesis will be declared “supported”. The α represents how much risk the researcher is willing to take that the study will conclude H1 is correct when (in the full population) it is not correct (and thus, the null hypothesis is really true). In other words, alpha represents the probability of rejecting H0 when it actually is true. (Thus, the researcher has made an error by reporting that the experimental treatment makes a difference, when in fact, in the full population, that treatment has no effect.)
The most common α level chosen is 0.05, meaning the researcher is willing to take a 5% chance that a result supporting the hypothesis will be untrue in the full population. However, other alpha levels may also be appropriate in some circumstances. For pilot studies, α is often set at 0.10 or 0.20. In studies where it is especially important to avoid concluding a treatment is effective when it actually is not, the alpha may be set at a much lower value; it might be set at 0.001 or even lower. Drug studies are examples for studies that often set the alpha at 0.001 or lower because the consequences of releasing an ineffective drug can be extremely dangerous for patients.
Another probability value is called “the P value”. The P value is simply the obtained statistical probability of incorrectly accepting the alternate hypothesis. The P value is compared to the alpha value to determine if the result is “statistically significant”, meaning that with high probability the result found in the sample will also be true in the full population. If the P value is at or lower than alpha, H1 is accepted. If it is higher than alpha, the H1 is rejected and H0 is accepted instead.
There are actually two types of errors: the error of accepting H1 when it is not true in the population; this is called a Type I error; and is a false positive. The alpha defines the probability of a Type I error. Type I errors can happen for many reasons, from poor sampling that results in an experimental sample quite different from the population, to other mistakes occurring in the design stage or implementation of the research procedures. It is also possible to make an erroneous decision in the opposite direction; by incorrectly rejecting H1 and thus wrongly accepting H0. This is called a Type II error (or a false negative). The β defines the probability of a Type II error. The most common reason for this type of error is small sample size, especially when combined with moderately low or low effect sizes. Both small sample sizes and low effect sizes reduce the power in the study.
Power, which is the probability of rejecting a false null hypothesis, is calculated as 1-β (also expressed as “1 - Type II error probability”). For a Type II error of 0.15, the power is 0.85. Since reduction in the probability of committing a Type II error increases the risk of committing a Type I error (and vice versa ), a delicate balance should be established between the minimum allowed levels for Type I and Type II errors. The ideal power of a study is considered to be 0.8 (which can also be specified as 80%) ( 17 ). Sufficient sample size should be maintained to obtain a Type I error as low as 0.05 or 0.01 and a power as high as 0.8 or 0.9.
However, when power value falls below < 0.8, one cannot immediately conclude that the study is totally worthless. In parallel with this, the concept of “cost-effective sample size” has gained importance in recent years ( 18 ).
Additionally, the traditionally chosen alpha and beta error limits are generally arbitrary and are being used as a convention rather than being based on any scientific validity. Another key issue for a study is the determination, presentation and discussion of the effect size of the study, as will be discussed below in detail.
Although increasing the sample size is suggested to decrease the Type II errors, it will increase the cost of the project and delay the completion of the research activities in a foreseen period of time. In addition, it should not be forgotten that redundant samples may cause ethical problems ( 19 , 20 ).
Therefore, determination of the effective sample size is crucial to enable an efficient study with high significance, increasing the impact of the outcome. Unfortunately, information regarding sample size calculations are not often provided by clinical investigators in most diagnostic studies ( 21 , 22 ).
Calculation of the sample size
Different methods can be utilized before the onset of the study to calculate the most suitable sample size for the specific research. In addition to manual calculation, various nomograms or software can be used. The Figure 2 illustrates one of the most commonly used nomograms for sample size estimation using effect size and power ( 23 ).

Nomogram for sample size and power, for comparing two groups of equal size. Gaussian distributions assumed. Standardized difference (effect size) and aimed power values are initially selected on the nomogram. The line connecting these values cross the significance level region of the nomogram. The intercept at the appropriate significance value presents the required sample size for the study. In the above example, for effect size = 1, power = 0.8 and alpha value = 0.05, the sample size is found to be 30. (Adapted from reference 16 ).
Although manual calculation is preferred by the experts of the subject, it is a bit complicated and difficult for the researchers that are not statistics experts. In addition, considering the variety of the research types and characteristics, it should be noted that a great number of calculations will be required with too many variables ( Table 1 ) ( 16 , 24 - 30 ).
In recent years, numerous software and websites have been developed which can successfully calculate sample size in various study types. Some of the important software and websites are listed in Table 2 and are evaluated based both on the remarks stated in the literature and on our own experience, with respect to the content, ease of use, and cost ( 31 , 32 ). G-Power, R, and Piface stand out among the listed software in terms of being free-to use. G-Power is a free-to use tool that be used to calculate statistical power for many different t-tests, F-tests, χ 2 tests, z-tests and some exact tests. R is an open source programming language which can be tailored to meet individual statistical needs, by adding specific program modules called packages onto a specific base program. Piface is a java application specifically designed for sample size estimation and post-hoc power analysis. The most professional software is PASS (Power Analysis and Sample Size). With PASS, it is possible to analyse sample size and power for approximately 200 different study types. In addition, many websites provide substantial aid in calculating power and sample size, basing their methodology on scientific literature.
The sample size or the power of the study is directly related to the ES of the study. What is this important ES? The ES provides important information on how well the independent variable or variables predict the dependent variable. Low ES means that, independent variables don’t predict well because they are only slightly related to the dependent variable. Strong ES means that, independent variables are very good predictors of the dependent variable. Thus, ES is clinically important for evaluating how efficiently the clinicians can predict outcomes from the independent variables.
The scale of the ES values for different types of statistical tests conducted in different study types are presented in Table 3 .
In order to evaluate the effect of the study and indicate its clinical significance, it is very important to evaluate the effect size along with statistical significance. P value is important in the statistical evaluation of the research. While it provides information on presence/absence of an effect, it will not account for the size of the effect. For comprehensive presentation and interpretation of the studies, both effect size and statistical significance (P value) should be provided and considered.
It would be much easier to understand ES through an example. For example, assume that independent sample t-test is used to compare total cholesterol levels for two groups having normal distribution. Where X, SD and N stands for mean, standard deviation and sample size, respectively. Cohen’s d ES can be calculated as follows:
Mean (X), mmol/L Standard deviation (SD) Sample size (N)
Group 1 6.5 0.5 30
Group 2 5.2 0.8 30
Cohen d ES results represents: 0.8 large, 0.5 medium, 0.2 small effects). The result of 1.94 indicates a very large effect. Means of the two groups are remarkably different.
In the example above, the means of the two groups are largely different in a statistically significant manner. Yet, clinical importance of the effect (whether this effect is important for the patient, clinical condition, therapy type, outcome, etc .) needs to be specifically evaluated by the experts of the topic.
Power, alpha values, sample size, and ES are closely related with each other. Let us try to explain this relationship through different situations that we created using G-Power ( 33 , 34 ).
The Figure 3 shows the change of sample size depending on the ES changes (0.2, 1 and 2.5, respectively) provided that the power remains constant at 0.8. Arguably, case 3 is particularly common in pre-clinical studies, cell culture, and animal studies (usually 5-10 samples in animal studies or 3-12 samples in cell culture studies), while case 2 is more common in clinical studies. In clinical, epidemiological or meta-analysis studies, where the sample size is very large; case 1, which emphasizes the importance of smaller effects, is more commonly observed ( 33 ).

Relationship between effect size and sample size. P – power. ES - effect size. SS - sample size. The required sample size increases as the effect size decreases. In all cases, P value is set to 0.8. The sample sizes (SS) when ES is 0.2, 1, or 2.5; are 788, 34 and 8, respectively. The graphs at the bottom represent the influence of change in the sample size on the power.
In Figure 4 , case 4 exemplifies the change in power and ES values when the sample size is kept constant ( i.e. as low as 8). As can be seen here, in studies with low ES, working with few samples will mean waste of time, redundant processing, or unnecessary use of laboratory animals.

Relationship between effect size and power. Two different cases are schematized where the sample size is kept constant either at 8 or at 30. When the sample size is kept constant, the power of the study decreases as the effect size decreases. When the effect size is 2.5, even 8 samples are sufficient to obtain power = ~0.8. When the effect size is 1, increasing sample size from 8 to 30 significantly increases the power of the study. Yet, even 30 samples are not sufficient to reach a significant power value if effect size is as low as 0.2.
Likewise, case 5 exemplifies the situation where the sample size is kept constant at 30. In this case, it is important to note that when ES is 1, the power of the study will be around 0.8. Some statisticians arbitrarily regard 30 as a critical sample size. However, case 5 clearly demonstrates that it is essential not to underestimate the importance of ES, while deciding on the sample size.
Especially in recent years, where clinical significance or effectiveness of the results has outstripped the statistical significance; understanding the effect size and power has gained tremendous importance ( 35 – 38 ).
Preliminary information about the hypothesis is eminently important to calculate the sample size at intended power. Usually, this is accomplished by determining the effect size from the results of a previous study or a preliminary study. There are software available which can calculate sample size using the effect size
We now want to focus on sample size and power analysis in some of the most common research areas.
Determination of sample size in pre-clinical studies
Animal studies are the most critical studies in terms of sample size. Especially due to ethical concerns, it is vital to keep the sample size at the lowest sufficient level. It should be noted that, animal studies are radically different from human studies because many animal studies use inbred animals having extremely similar genetic background. Thus, far fewer animals are needed in the research because genetic differences that could affect the study results are kept to a minimum ( 39 , 40 ).
Consequently, alternative sample size estimation methodologies were suggested for each study type ( 41 - 44 ). If the effect size is to be determined using the results from previous or preliminary studies, sample size estimation may be performed using G-Power. In addition, Table 4 may also be used for easy estimation of the sample size ( 40 ).
In addition to sample size estimations that may be computed according to Table 4 , formulas stated in Table 1 and the websites mentioned in Table 2 may also be utilized to estimate sample size in animal studies. Relying on previous studies pose certain limitations since it may not always be possible to acquire reliable “pooled standard deviation” and “group mean” values.
Arifin et al. proposed simpler formulas ( Table 5 ) to calculate sample size in animal studies ( 45 ). In group comparison studies, it is possible to calculate the sample size as follows: N = (DF/k)+1 (Eq. 4).
Based on acceptable range of the degrees of freedom (DF), the DF in formulas are replaced with the minimum ( 10 ) and maximum ( 20 ). For example, in an experimental animal study where the use of 3 investigational drugs are tested minimum number of animals that will be required: N = (10/3)+1 = 4.3; rounded up to 5 animals / group, total sample size = 5 x 3 = 15 animals. Maximum number of animals that will be required: N = (20/3)+1 = 7.7; rounded down to 7 animals / group, total sample size = 7 x 3 = 21 animals.
In conclusion, for the recommended study, 5 to 7 animals per group will be required. In other words, a total of 15 to 21 animals will be required to keep the DF within the range of 10 to 20.
In a compilation where Ricci et al. reviewed 15 studies involving animal models, it was noted that the sample size used was 10 in average (between 6 and 18), however, no formal power analysis was reported by any of the groups. It was striking that, all studies included in the review have used parametric analysis without prior normality testing ( i.e. Shapiro-Wilk) to justify their statistical methodology ( 46 ).
It is noteworthy that, unnecessary animal use could be prevented by keeping the power at 0.8 and selecting one-tailed analysis over two-tailed analysis with an accepted 5% risk of making type I error as performed in some pharmacological studies, reducing the number of required animals by 14% ( 47 ).
Neumann et al. proposed a group-sequential design to minimize animal use without a decrease in statistical power. In this strategy, researchers started the experiments with only 30% of the animals that were initially planned to be included in the study. After an interim analysis of the results obtained with 30% of the animals, if sufficient power is not reached, another 30% is included in the study. If results from this initial 60% of the animals provide sufficient statistical power, then the rest of the animals are excused from the study. If not, the remaining animals are also included in the study. This approach was reported to save 20% of the animals in average, without leading to a decrease in statistical power ( 48 ).
Alternative sample size estimation strategies are implemented for animal testing in different countries. As an example, a local authority in southwestern Germany recommended that, in the absence of a formal sample size estimation, less than 7 animals per experimental group should be included in pilot studies and the total number of experimental animals should not exceed 100 ( 48 ).
On the other hand, it should be noted that, for a sample size of 8 to 10 animals per group, statistical significance will not be accomplished unless a large or very large ES (> 2) is expected ( 45 , 46 ). This problem remains as an important limitation for animal studies. Software like G-Power can be used for sample size estimation. In this case, results obtained from a previous or a preliminary study will be required to be used in the calculations. However, even when a previous study is available in literature, using its data for a sample size estimation will still pose an uncertainty risk unless a clearly detailed study design and data is provided in the publication. Although researchers suggested that reliability analyses could be performed by methods such as Markov Chain Monte Carlo, further research is needed in this regard ( 49 ).
The output of the joint workshop held by The National Institutes of Health (NIH), Nature Publishing Group and Science; “Principles and Guidelines for Reporting Preclinical Research” that was published in 2014, has since been acknowledged by many organizations and journals. This guide has shed significant light on studies using biological materials, involving animal studies, and handling image-based data ( 50 ).
Another important point regarding animal studies is the use of technical repetition (pseudo replication) instead of biological repetition. Technical repetition is a specific type of repetition where the same sample is measured multiple times, aiming to probe the noise associated with the measurement method or the device. Here, no matter how many times the same sample is measured, the actual sample size will remain the same. Let us assume a research group is investigating the effect of a therapeutic drug on blood glucose level. If the researchers measure the blood glucose level of 3 mice receiving the actual treatment and 3 mice receiving placebo, this would be a biological repetition. On the other hand, if the blood glucose level of a single mouse receiving the actual treatment and the blood glucose level of a single mouse receiving placebo are each measured 3 times, this would be technical repetition. Both designs will provide 6 data points to calculate P value, yet the P value obtained from the second design would be meaningless since each treatment group will only have one member ( Figure 5 ). Multiple measurements on single mice are pseudo replication; therefore do not contribute to N. No matter how ingenious, no statistical analysis method can fix incorrectly selected replicates at the post-experimental stage; replicate types should be selected accurately at the design stage. This problem is a critical limitation, especially in pre-clinical studies that conduct cell culture experiments. It is very important for critical assessment and evaluation of the published research results ( 51 ). This issue is mostly underestimated, concealed or ignored. It is striking that in some publications, the actual sample size is found to be as low as one. Experiments comparing drug treatments in a patient-derived stem cell line are specific examples for this situation. Although there may be many technical replications for such experiments and the experiment can be repeated several times, the original patient is a single biological entity. Similarly, when six metatarsals are harvested from the front paws of a single mouse and cultured as six individual cultures, another pseudo replication is practiced where the sample size is actually 1, instead of 6 ( 52 ). Lazic et al . suggested that almost half of the studies (46%) had mistaken pseudo replication (technical repeat) for genuine replication, while 32% did not provide sufficient information to enable evaluation of appropriateness of the sample size ( 53 , 54 ).

Technical vs biological repeat.
In studies providing qualitative data (such as electrophoresis, histology, chromatography, electron microscopy), the number of replications (“number of repeats” or “sample size”) should explicitly be stated.
Especially in pre-clinical studies, standard error of the mean (SEM) is frequently used instead of SD in some situations and by certain journals. The SEM is calculated by dividing the SD by the square root of the sample size (N). The SEM will indicate how variable the mean will be if the whole study is repeated many times. Whereas the SD is a measure of how scattered the scores within a set of data are. Since SD is usually higher than SEM, researchers tend to use SEM. While SEM is not a distribution criterion; there is a relation between SEM and 95% confidence interval (CI). For example, when N = 3, 95% CI is almost equal to mean ± 4 SEM, but when N ≥ 10; 95% CI equals to mean ± 2 SEM. Standard deviation and 95% CI can be used to report the statistical analysis results such as variation and precision on the same plot to demonstrate the differences between test groups ( 52 , 55 ).
Given the attrition and unexpected death risk of the laboratory animals during the study, the researchers are generally recommended to increase the sample size by 10% ( 56 ).
Sample size calculation for some genetic studies
Sample size is important for genetic studies as well. In genetic studies, calculation of allele frequencies, calculation of homozygous and heterozygous frequencies based on Hardy-Weinberg principle, natural selection, mutation, genetic drift, association, linkage, segregation, haplotype analysis are carried out by means of probability and statistical models ( 57 - 62 ). While G-Power is useful for basic statistics, substantial amount of analyses can be conducted using genetic power calculator ( http://zzz.bwh.harvard.edu/gpc/ ) ( 61 , 62 ). This calculator, which provides automated power analysis for variance components (VC) quantitative trait locus (QTL) linkage and association tests in sibships, and other common tests, is significantly effective especially for genetics studies analysing complex diseases.
Case-control association studies for single nucleotide polymorphisms (SNPs) may be facilitated using OSSE web site ( http://osse.bii.a-star.edu.sg/ ). As an example, let us assume the minor allele frequencies of an SNP in cases and controls are approximately 15% and 7% respectively. To have a power of 0.8 with 0.05 significance, the study is required to include 239 samples both for cases and controls, adding up to 578 samples in total ( Figure 6 ).

Interface of Online Sample Size Estimator (OSSE) Tool. (Available at: http://osse.bii.a-star.edu.sg/ ).
Hong and Park have proposed tables and graphics in their article for facilitating sample size estimation ( 57 ). With the assumption of 5% disease prevalence, 5% minor allele frequency and complete linkage disequilibrium (D’ = 1), the sample size in a case-control study with a single SNP marker, 1:1 case-to-control ratio, 0.8 statistical power, and 5% type I error rate can be calculated according to the genetic models of inheritance (allelic, additive, dominant, recessive, and co-dominant models) and the odd ratios of heterozygotes/rare homozygotes ( Table 6 ). As demonstrated by Hong and Park among all other types of inheritance, dominant inheritance requires the lowest sample size to achieve 0.8 statistical power. Whereas, testing a single SNP in a recessive inheritance model requires a very large sample size even with a high homozygote ratio, that is practically challenging with a limited budget ( 57 ). The Table 6 illustrates the difficulty in detecting a disease allele following a recessive mode of inheritance with moderate sample size.
Sample size and power analyses in clinical studies
In clinical research, sample size is calculated in line with the hypothesis and study design. The cross-over study design and parallel study design apply different approaches for sample size estimation. Unlike pre-clinical studies, a significant number of clinical journals necessitate sample size estimation for clinical studies.
The basic rules for sample size estimation in clinical trials are as follows ( 63 , 64 ):
- Error level (alpha): It is generally set as < 0.05. The sample size should be increased to compensate for the decrease in the effect size.
- Power must be > 0.8: The sample size should be increased to increase the power of the study. The higher the power, the lower the risk of missing an actual effect.

The relationship among clinical significance, statistical significance, power and effect size. In the example above, in order to provide a clinically significant effect, a treatment is required to trigger at least 0.5 mmol/L decreases in cholesterol levels. Four different scenarios are given for a candidate treatment, each having different mean total cholesterol change and 95% confidence interval. ES - effect size. N – number of participant. Adapted from reference 65 .
- Similarity and equivalence: The sample size required demonstrating similarity and equivalence is very low.
Sample size estimation can be performed manually using the formulas in Table 1 as well as software and websites in Table 2 (especially by G-Power). However, all of these calculations require preliminary results or previous study outputs regarding the hypothesis of interest. Sample size estimations are difficult in complex or mixed study designs. In addition: a) unplanned interim analysis, b) planned interim analysis and
- adjustments for common variables may be required for sample size estimation.
In addition, post-hoc power analysis (possible with G-Power, PASS) following the study significantly facilitates the evaluation of the results in clinical studies.
A number of high-quality journals emphasize that the statistical significance is not sufficient on its own. In fact, they would require evaluation of the results in terms of effect size and clinical effect as well as statistical significance.
In order to fully comprehend the effect size, it would be useful to know the study design in detail and evaluate the effect size with respect to the type of the statistical tests conducted as provided in Table 3 .
Hence, the sample size is one of the critical steps in planning clinical trials, and any negligence or shortcomings in its estimate may lead to rejection of an effective drug, process, or marker. Since statistical concepts have crucial roles in calculating the sample size, sufficient statistical expertise is of paramount importance for these vital studies.
Sample size, effect size and power calculation in laboratory studies
In clinical laboratories, software such as G-Power, Medcalc, Minitab, and Stata can be used for group comparisons (such as t-tests, Mann Whitney U, Wilcoxon, ANOVA, Friedman, Chi-square, etc. ), correlation analyses (Pearson, Spearman, etc .) and regression analyses.
Effect size that can be calculated according to the methods mentioned in Table 3 is important in clinical laboratories as well. However, there are additional important criteria that must be considered while investigating differences or relationships. Especially the guidelines (such as CLSI, RiliBÄK, CLIA, ISO documents) that were established according to many years of experience, and results obtained from biological variation studies provide us with essential information and critical values primarily on effect size and sometimes on sample size.
Furthermore, in addition to the statistical significance (P value interpretation), different evaluation criteria are also important for the assessment of the effect size. These include precision, accuracy, coefficient of variation (CV), standard deviation, total allowable error, bias, biological variation, and standard deviation index, etc . as recommended and elaborated by various guidelines and reference literature ( 66 - 70 ).
In this section, we will assess sample size, effect size, and power for some analysis types used in clinical laboratories.
Sample size in method and device comparisons
Sample size is a critical determinant for Linear, Passing Bablok, and Deming regression studies that are predominantly being used in method comparison studies. Sample size estimations for the Passing-Bablok and Deming method comparison studies are exemplified in Table 7 and Table 8 respectively. As seen in these tables, sample size estimations are based on slope, analytical precision (% CV), and range ratio (c) value ( 66 , 67 ). These tables might seem quite complicated for some researchers that are not familiar with statistics. Therefore, in order to further simplify sample size estimation; reference documents and guidelines have been prepared and published. As stated in CLSI EP09-A3 guideline, the general recommendation for the minimum sample size for validation studies to be conducted by the manufacturer is 100; while the minimum sample size for user-conducted verification is 40 ( 68 ). In addition, these documents clearly explain the requirements that should be considered while collecting the samples for method/device comparison studies. For instance, samples should be homogeneously dispersed covering the whole detection range. Hence, it should be kept in mind that randomly selected 40-100 sample will not be sufficient for impeccable method comparison ( 68 ).
Additionally, comparison studies might be carried out in clinical laboratories for other purposes; such as inter-device, where usage of relatively few samples is suggested to be sufficient. For method comparison studies to be conducted using patient samples; sample size estimation, and power analysis methodologies, in addition to the required number of replicates are defined in CLSI document EP31-A-IR. The critical point here is to know the values of constant difference, within-run standard deviation, and total sample standard deviation ( 69 ). While studies that compare devices having high analytical performance would suffice lower sample size; studies comparing devices with lower analytical performance would require higher sample size.
Lu et al. used maximum allowed differences for calculating sample sizes that would be required in Bland Altman comparison studies. This type of sample size estimation, which is critically important in laboratory medicine, can easily be performed using Medcalc software ( 70 ).
Sample size in lot to lot variation studies
It is acknowledged that lot-to-lot variation may influence the test results. In line with this, method comparison is also recommended to monitor the performance of the kit in use, between lot changes. To aid in the sample size estimation of these studies; CLSI has prepared the EP26-A guideline “User evaluation of between-reagent lot variation; approved guideline”, which provides a methodology like EP31-A-IR ( 71 , 72 ).
The Table 9 presents sample size and power values of a lot-to-lot variation study comparing glucose measurements at 3 different concentrations. In this example, if the difference in the glucose values measured by different lots is > 0.2 mmol/L, > 0.58 mmol/L and > 1.16 mmol/L at analyte concentrations of 2.77 mmol/L, 8.32 mmol/L and 16.65 mmol/L respectively, lots would be confirmed to be different. In a scenario where one sample is used for each concentration; if the lot-to-lot variation results obtained from each of the three different concentrations are lower than the rejection limits (meaning that the precision values for the tested lots are within the acceptance limits), then the lot variation is accepted to lie within the acceptance range. While the example for glucose measurements presented in the guideline suggests that “1 sample” would be sufficient at each analyte concentration, it should be noted that sample size might vary according to the number to devices to be tested, analytical performance results of the devices ( i.e. precision), total allowable error, etc. For different analytes and scenarios ( i.e. for occasions where one sample/concentration is not sufficient), researchers need to refer CLSI EP26-A ( 71 ).
Some researchers find CLSI EP26-A and CLSI EP31 rather complicated for estimating the sample size in lot-to-lot variation and method comparison studies (which are similar to a certain extent). They instead prefer to use the sample size (number of replicates) suggested by Mayo Laboratories. Mayo Laboratories decided that lot-to-lot variation studies may be conducted using 20 human samples where the data are analysed by Passing-Bablok regression and accepted according to the following criteria: a) slope of the regression line will lie between 0.9 and 1.1; b) R2 coefficient of determination will be > 0.95; c) the Y-intercept of the regression line will be < 50% of the lowest reportable concentration, d) difference of the means between reagent lots will be < 10% ( 73 ).
Sample size in verification studies
Acceptance limits should be defined before the verification and validation studies. These could be determined according to clinical cut-off values, biological variation, CLIA criteria, RiliBÄK criteria, criteria defined by the manufacturer, or state of the art criteria. In verification studies, the “sample size” and the “minimum proportion of the observed samples required to lie within the CI limits” are proportional. For instance, for a 50-sample study, 90% of the samples are required to lie within the CI limits for approval of the verification; while for a 200-sample study, 93% is required ( Table 10 ). In an example study whose total allowable error (TAE) is specified as 15%; 50 samples were measured. Results of the 46 samples (92% of all samples) lied within the TAE limit of 15%. Since the proportion of the samples having results within the 15% TAE limit (92% of the samples) exceeds the minimum proportion required to lie within the TAE limits (90% of the samples), the method is verified ( 74 ).
Especially in recent years, researchers tend to use CLSI EP15-A3 or alternative strategies relying on EP15-A3, for verification analyses. While the alternative strategies diverge from each other in many ways, most of them necessitate a sample size of at least 20 ( 75 - 78 ). Yet, for bias studies, especially for the ones involving External Quality Control materials, even lower sample sizes ( i.e. 10) may be observed ( 79 ). Verification still remains to be one of the critical problems for clinical laboratories. It is not possible to find a single criteria and a single verification method that fits all test methods ( i.e. immunological, chemical, chromatographical, etc. ).
While sample size for qualitative laboratory tests may vary according to the reference literature and the experimental context, CLSI EP12 recommends at least 50 positive and 50 negative samples, where 20% of the samples from each group are required to fall within cut-off value +/- 20% ( 80 , 81 ). According to the clinical microbiology validation/verification guideline Cumitech 31A, the minimum number of the samples in positive and negative groups is 100/each group for validation studies, and 10/each group for verification studies ( 82 ).
Sample size in diagnostic and prognostic studies
ROC analysis is the most important statistical analysis in diagnostic and prognostic studies. Although sample size estimation for ROC analyses might be slightly complicated; Medcalc, PASS, and Stata may be used to facilitate the estimation process. Before the actual size estimations, it is a prerequisite for the researcher to calculate potential area under the curve (AUC) using data from previous or preliminary studies. In addition, size estimation may also be calculated manually according to Table 1 , or using sensitivity (or TPF) and 1-specificity (FPF) values according to Table 11 which is adapted from CLSI EP24-A2 ( 83 , 84 ).
As is known, X-axis of the ROC curve is FPF, and Y-axis is TPF. While TPF represents sensitivity, FPF represents 1-specificity. Utilizing Table 11 , for a 0.85 sensitivity, 0.90 specificity and a maximum allowable error of 5% (L = 0.05), 196 positive and 139 negative samples are required. For the scenarios not included in this table, reader should refer to the formulas given under “diagnostic prognostic studies” subsection of Table 1 .
Standards for reporting of diagnostic accuracy studies (STARD) checklist may be followed for diagnostic studies. It is a powerful checklist whose application is explained in detail by Cohen et al. and Flaubaut et al. ( 85 , 86 ). This document suggests that, readers demand to understand the anticipated precision and power of the study and whether authors were successful in recruiting the sufficient number of participants; therefore it is critical for the authors to explain the intended sample size of their study and how it was determined. For this reason, in diagnostic and prognostic studies, sample size and power should clearly be stated.
As can be seen here, the critical parameters for sample size estimation are AUC, specificity and sensitivity, and their 95% CI values. The table 12 demonstrates the relationship of sample size with sensitivity, specificity, negative predictive value (NPV) and positive predictive value (PPV); the lower the sample size, the higher is the 95% CI values, leading to increase in type II errors ( 87 ). As can be seen here, confidence interval is narrowed as the sample size increases, leading to a decrease in type II errors.
Like all sample size calculations, preliminary information is required for sample size estimations in diagnostic and prognostic studies. Yet, variation occurs among sample size estimates that are calculated according to different reference literature or guidelines. This variation is especially prominent depending on the specific requirements of different countries and local authorities.
While sample size calculations for ROC analyses may easily be performed via Medcalc, the method explained by Hanley et al. and Delong et al. may be utilized to calculate sample size in studies comparing different ROC curves ( 88 , 89 ).
Sample size for reference interval determination
Both IFCC working groups and the CLSI guideline C28-A3c offer suggestions regarding sample size estimations in reference interval studies ( 90 - 93 ). These references mainly suggest at least 120 samples should be included for each study sub-group ( i.e., age-group, gender, race, etc. ). In addition, the guideline also states that, at least 20 samples should be studied for verification of the determined reference intervals.
Since extremes of the observed values may under/over-represent the actual percentile values of a population in nonparametric studies, care should be taken not to rely solely on the extreme values while determining the nonparametric 95% reference interval. Reed et al. suggested a minimum sample size of 120 to be used for 90% CI, 146 for 95% CI, and 210 for 99% CI (93). Linnet proposed that up to 700 samples should be obtained for results having highly skewed distributions ( 94 ). The IFCC Committee on Reference Intervals and Decision Limits working group recommends a minimum of 120 reference subjects for nonparametric methods, to obtain results within 90% CI limits ( 90 ).
Due to the inconvenience of the direct method, in addition to the challenges encountered using paediatric and geriatric samples as well as the samples obtained from complex biological fluids ( i.e. cerebrospinal fluid); indirect sample size estimations using patient results has gained significant importance in recent years. Hoffmann method, Bhattacharya method or their modified versions may be used for indirect determination of the reference intervals ( 95 - 101 ). While a specific sample size is not established, sample size between 1000 and 10.000 is recommended for each sub-group. For samples that cannot be easily acquired ( i.e. paediatric and geriatric samples, and complex biological fluids), sample sizes as low as 400 may be used for each sub-group ( 92 , 100 ).
Sample size in survey studies
The formulations given on Table 1 and the websites mentioned on Table 2 will be particularly useful for sample size estimations in survey studies which are dependent primarily on the population size ( 101 ).
Three critical aspects should be determined for sample size determination in survey studies:
- Population size
- Confidence Interval (CI) of 95% means that, when the study is repeated, with 95% probability, the same results will be obtained. Depending on the hypothesis and the study aim, confidence interval may lie between 90% and 99%. Confidence interval below 90% is not recommended.
For a given CI, sample size and ME is inversely proportional; sample size should be increased in order to obtain a narrower ME. On the contrary, for a fixed ME, CI and sample size is directly proportional; in order to obtain a higher CI, the sample size should be increased. In addition, sample size is directly proportional to the population size; higher sample size should be used for a larger population. A variation in ME causes a more drastic change in sample size than a variation in CI. As exemplified in Table 13 , for a population of 10,000 people, a survey with a 95% CI and 5% ME would require at least 370 samples. When CI is changed from 95% to 90% or 99%, the sample size which was 370 initially would change into 264 or 623 respectively. Whereas, when ME is changed from 5% to 10% or 1%; the sample size which was initially 370 would change into 96 or 4900 respectively. For other ME and CI levels, the researcher should refer to the equations and software provided on Table 1 and Table 2 .
The situation is slightly different for the survey studies to be conducted for problem detection. It would be most appropriate to perform a preliminary survey with a small sample size, followed by a power analysis, and completion of the study using the appropriate number of samples estimated based on the power analysis. While 30 is suggested as a minimum sample size for the preliminary studies, the optimal sample size can be determined using the formula suggested in Table 14 which is based on the prevalence value ( 103 ). It is unlikely to reach a sufficient power for revealing of uncommon problems (prevalence 0.02) at small sample sizes. As can be seen on the table, in the case of 0.02 prevalence, a sample size of 30 would yield a power of 0.45. In contrast, frequent problems ( i.e. prevalence 0.30) were discovered with higher power (0.83) even when the sample size was as low as 5. For situations where power and prevalence are known, effective sample size can easily be estimated using the formula in Table 1 .
Does big sample size always increase the impact of a study?
While larger sample size may provide researchers with great opportunities, it may create problems in interpretation of statistical significance and clinical impact. Especially in studies with big sample sizes, it is critically important for the researchers not to rely only on the magnitude of the regression (or correlation) coefficient, and the P value. The study results should be evaluated together with the effect size, study efficiencies ( i.e. basic research, clinical laboratory, and clinical studies) and confidence interval levels. Monte Carlo simulations could be utilized for statistical evaluations of the big data results ( 18 , 104 ).
As a result, sample size estimation is a critical step for scientific studies and may show significant differences according to research types. It is important that sample size estimation is planned ahead of the study, and may be performed through various routes:
- If a similar previous study is available, or preliminary results of the current study are present, their results may be used for sample size estimations via the websites and software mentioned in Table 1 and Table 2 . Some of these software may also be used to calculate effect size and power.
- If the magnitude of the measurand variation that is required for a substantial clinical effect is available ( i.e. significant change is 0.51 mmol/L for cholesterol, 26.5 mmol/L for creatinine, etc. ), it may be used for sample size estimation ( Figure 7 ). Presence of Total Allowable Error, constant and critical differences, biological variations, reference change value (RCV), etc. will further aid in sample size estimation process. Free software (especially G-Power) and web sites presented on Table 2 will facilitate calculations.
- If effect size can be calculated by a preliminary study, sample size estimations may be performed using the effect size ( via G-Power, Table 4 , etc. )
- In the absence of a previous study, if a preliminary study cannot be performed, an effect size may be initially estimated and be used for sample size estimations
- If none of the above is available or possible, relevant literature may be used for sample size estimation.
- For clinical laboratories, especially CLSI documents and guidelines may prove useful for sample size estimation ( Table 9,11 9,11 ).
Sample size estimations may be rather complex, requiring advanced knowledge and experience. In order to properly appreciate the concept and perform precise size estimation, one should comprehend properties of different study techniques and relevant statistics to certain extend. To assist researchers in different fields, we aimed to compile useful guidelines, references and practical software for calculating sample size and effect size in various study types. Sample size estimation and the relationship between P value and effect size are key points for comprehension and evaluation of biological studies. Evaluation of statistical significance together with the effect size is critical for both basic science, and clinical and laboratory studies. Therefore, effect size and confidence intervals should definitely be provided and its impact on the laboratory/clinical results should be discussed thoroughly.
Potential conflict of interest
None declared.
IMAGES
VIDEO
COMMENTS
On every page, in the upper right margin, 1/2" from the top and flush with the right margin put your last name followed by the page number. On every page (except Figures), in the upper right margin, 1/2" from the top and flush with the right margin, two or three words of the paper title (this is called the running head) appear five spaces to ...
Margins. Use 1-inch margins on every side of the page for an APA Style paper. However, if you are writing a dissertation or thesis, your advisor or institution may specify different margins (e.g., a 1.5-inch left margin to accommodate binding). Publication Manual Concise Guide.
Do not use a period after your title or after any heading in the paper (e.g., Works Cited). Begin your text on a new, double-spaced line after the title, indenting the first line of the paragraph half an inch from the left margin. Fig. 1. The top of the first page of a research paper.
Your scholarly approach may call for a different presentational method. These are the requirements and recommendations for text-based theses. Page Size For a text-based thesis, or the text portions of a thesis, the page size must be 8.5" x 11", and the text must be in a single, page-wide column. Do not use two or more columns in your thesis. Paragraphs The text of the thesis is written in ...
Set the top, bottom, and side margins of your paper at 1 inch. Use double-spaced text throughout your paper. Use a standard font, such as Times New Roman or Arial, in a legible size (10- to 12-point). Use continuous pagination throughout the paper, including the title page and the references section.
Indent the first line of every paragraph of text 0.5 in. using the tab key or the paragraph-formatting function of your word-processing program. Page numbers: Put a page number in the top right corner of every page, including the title page or cover page, which is page 1. Student papers do not require a running head on any page.
References is the last page of the paper; Margins. 1" margins - top, bottom, left, right. Word margins are set in Layout or in File/Page Setup/Margins. Font. Acceptable fonts and sizes: Size 12-point Times New Roman; 11-point Arial, Calibri, and Georgia;10-point Lucida; or other legible font as approved by instructor.
The main guidelines for formatting a paper in APA Style are as follows: Use a standard font like 12 pt Times New Roman or 11 pt Arial. Set 1 inch page margins. Apply double line spacing. If submitting for publication, insert a APA running head on every page. Indent every new paragraph ½ inch.
Use the same font type and size throughout the paper (exceptions for figure images, computer code, and footnotes - see 2.19 in APA Manual) Margins: 1 inch on all sides. Left align paragraphs and leave ragged (uneven) margins on the right. Indention: use 0.5 inch indention for the first line of every paragraph (use tab key for consistency)
The final version of your thesis/dissertation must be on an 8.5" x 11" (letter size) page. All manuscript text, excluding manuscript page numbers, must fit within these specified margin requirements: Minimum 1-inch margins from the top, left, right, and bottom edges of each page
Paper Size, Margins, & Page Numbers. Use letter-sized (8.5 x 11 inch) paper. 1-inch margins at the top, bottom, and both sides. Indent first line of each paragraph 1/2 inch from left margin. In the upper right-hand corner of the margin, insert page numbers and add your last name (ex. Smith 1).
Indent the first line of a paragraph half an inch from the left margin. Indent block quotations half an inch as well. Leave one space after a period or other concluding punctuation mark, unless your instructor prefers two spaces. Block quotations: 6.35, 6.38. Leave margins of one inch at the top and bottom and on both sides of the text.
General format and title page: Your research paper needs to be typed and double-spaced on standard-sized paper (8.5 X 11 inches). Use one-inch margins on all four sides of each page. Unless your professor specifically calls for one, a title page is unnecessary. In place of a title page, MLA style requires a heading on the first page of your paper.
Start by applying these MLA format guidelines to your document: Times New Roman 12. 1″ page margins. Double line spacing. ½" indent for new paragraphs. Title case capitalization for headings. For accurate citations, you can use our free MLA Citation Generator. Download Word template Open Google Docs template.
If you lack 8½-by-11-inch paper and use a larger size, do not print the text in an area greater than 6½ by 9 inches. Indent the first word of a paragraph one-half inch from the left margin. Indent set-off quotations one inch from the left margin." (MLA Handbook for Writers of Research Papers, 7th ed. The Modern Language Association of America ...
The first line of each paragraph should be indented one-half inch from the left margin. MLA Research Paper Template. MLA Research Paper Format Template is as follows: Page Setup. Use 8.5 x 11 inch white paper. ... Paper Size and Margins: Use standard 8.5″ x 11″ paper with 1-inch margins on all sides. Font: Use a 12-point serif font (such as ...
Headers. Required Headers. Headers for all required pages must be consistently formatted; they should be the same size, font, and style, and located in the same position on each page, in the center of the page. They must start at the very top of the page, on the first line below the 1-inch margin. Headers for all required pages should be bold, all caps, and black.
Margins (A.1.1) Paper size - 8 1/2 x 11 inches; 1 inch at top, bottom, and both sides; Font (A.1.2) Use easy to read font, such as Times New Roman; 12-point font size; Spacing and Indentation (A.1.3) Double-space all text except the following, which should be single-spaced: Block quotations; Table elements (titles and captions) Lists in appendixes
General formatting. Chicago doesn't require a specific font or font size, but recommends using something simple and readable (e.g., 12 pt. Times New Roman). Use margins of at least 1 inch on all sides of the page. The main text should be double-spaced, and each new paragraph should begin with a ½ inch indent.
Format Font to Times New Roman, Size 12. Alt+A to select all font, Ctrl+D to open font dialog box, type Times, tab twice to get to size box, type 12, then Enter to close box and header. Highlight all text if needed, then on the Home tab, in the Font section, select Times New Roman, size 12.
IEEE Allowed paper sizes with margins, columns width, length and space between them Also indication on space not to be used, in order to allow printing in different paper size and labeling A4 Letter 12.925 mm = 0.509" 12.925 mm = 0.509" 0.625" = 15.875 mm 0.625" = 15.875 mm 1.69" = 43 mm
The dimensions of a research paper are 8.5 × 11 inches (Letter Paper Size), 8.5 × 14 inches (Legal Paper Size), and 8.27 × 11.69 (A4 Paper Size). What is the proper margin for a research paper? APA format is ideal when constructing academic documents such as research papers, that said the margins should be set at 1 inch from the top, bottom ...
In clinical research, sample size is calculated in line with the hypothesis and study design. ... acceptance range. (The actual table provided in the guideline (CSLI EP26A) is of 3 pages. Since the primary aim of this paper is to familiarize the reader with sample size estimation methodologies in different study types; for simplification, only ...