Improve your practice.
Enhance your soft skills with a range of award-winning courses.

How to Structure your Presentation, with Examples
August 3, 2018 - Dom Barnard
For many people the thought of delivering a presentation is a daunting task and brings about a great deal of nerves . However, if you take some time to understand how effective presentations are structured and then apply this structure to your own presentation, you’ll appear much more confident and relaxed.
Here is our complete guide for structuring your presentation, with examples at the end of the article to demonstrate these points.
Why is structuring a presentation so important?
If you’ve ever sat through a great presentation, you’ll have left feeling either inspired or informed on a given topic. This isn’t because the speaker was the most knowledgeable or motivating person in the world. Instead, it’s because they know how to structure presentations – they have crafted their message in a logical and simple way that has allowed the audience can keep up with them and take away key messages.
Research has supported this, with studies showing that audiences retain structured information 40% more accurately than unstructured information.
In fact, not only is structuring a presentation important for the benefit of the audience’s understanding, it’s also important for you as the speaker. A good structure helps you remain calm, stay on topic, and avoid any awkward silences.
What will affect your presentation structure?
Generally speaking, there is a natural flow that any decent presentation will follow which we will go into shortly. However, you should be aware that all presentation structures will be different in their own unique way and this will be due to a number of factors, including:
- Whether you need to deliver any demonstrations
- How knowledgeable the audience already is on the given subject
- How much interaction you want from the audience
- Any time constraints there are for your talk
- What setting you are in
- Your ability to use any kinds of visual assistance
Before choosing the presentation’s structure answer these questions first:
- What is your presentation’s aim?
- Who are the audience?
- What are the main points your audience should remember afterwards?
When reading the points below, think critically about what things may cause your presentation structure to be slightly different. You can add in certain elements and add more focus to certain moments if that works better for your speech.

What is the typical presentation structure?
This is the usual flow of a presentation, which covers all the vital sections and is a good starting point for yours. It allows your audience to easily follow along and sets out a solid structure you can add your content to.
1. Greet the audience and introduce yourself
Before you start delivering your talk, introduce yourself to the audience and clarify who you are and your relevant expertise. This does not need to be long or incredibly detailed, but will help build an immediate relationship between you and the audience. It gives you the chance to briefly clarify your expertise and why you are worth listening to. This will help establish your ethos so the audience will trust you more and think you’re credible.
Read our tips on How to Start a Presentation Effectively
2. Introduction
In the introduction you need to explain the subject and purpose of your presentation whilst gaining the audience’s interest and confidence. It’s sometimes helpful to think of your introduction as funnel-shaped to help filter down your topic:
- Introduce your general topic
- Explain your topic area
- State the issues/challenges in this area you will be exploring
- State your presentation’s purpose – this is the basis of your presentation so ensure that you provide a statement explaining how the topic will be treated, for example, “I will argue that…” or maybe you will “compare”, “analyse”, “evaluate”, “describe” etc.
- Provide a statement of what you’re hoping the outcome of the presentation will be, for example, “I’m hoping this will be provide you with…”
- Show a preview of the organisation of your presentation
In this section also explain:
- The length of the talk.
- Signal whether you want audience interaction – some presenters prefer the audience to ask questions throughout whereas others allocate a specific section for this.
- If it applies, inform the audience whether to take notes or whether you will be providing handouts.
The way you structure your introduction can depend on the amount of time you have been given to present: a sales pitch may consist of a quick presentation so you may begin with your conclusion and then provide the evidence. Conversely, a speaker presenting their idea for change in the world would be better suited to start with the evidence and then conclude what this means for the audience.
Keep in mind that the main aim of the introduction is to grab the audience’s attention and connect with them.
3. The main body of your talk
The main body of your talk needs to meet the promises you made in the introduction. Depending on the nature of your presentation, clearly segment the different topics you will be discussing, and then work your way through them one at a time – it’s important for everything to be organised logically for the audience to fully understand. There are many different ways to organise your main points, such as, by priority, theme, chronologically etc.
- Main points should be addressed one by one with supporting evidence and examples.
- Before moving on to the next point you should provide a mini-summary.
- Links should be clearly stated between ideas and you must make it clear when you’re moving onto the next point.
- Allow time for people to take relevant notes and stick to the topics you have prepared beforehand rather than straying too far off topic.
When planning your presentation write a list of main points you want to make and ask yourself “What I am telling the audience? What should they understand from this?” refining your answers this way will help you produce clear messages.
4. Conclusion
In presentations the conclusion is frequently underdeveloped and lacks purpose which is a shame as it’s the best place to reinforce your messages. Typically, your presentation has a specific goal – that could be to convert a number of the audience members into customers, lead to a certain number of enquiries to make people knowledgeable on specific key points, or to motivate them towards a shared goal.
Regardless of what that goal is, be sure to summarise your main points and their implications. This clarifies the overall purpose of your talk and reinforces your reason for being there.
Follow these steps:
- Signal that it’s nearly the end of your presentation, for example, “As we wrap up/as we wind down the talk…”
- Restate the topic and purpose of your presentation – “In this speech I wanted to compare…”
- Summarise the main points, including their implications and conclusions
- Indicate what is next/a call to action/a thought-provoking takeaway
- Move on to the last section
5. Thank the audience and invite questions
Conclude your talk by thanking the audience for their time and invite them to ask any questions they may have. As mentioned earlier, personal circumstances will affect the structure of your presentation.
Many presenters prefer to make the Q&A session the key part of their talk and try to speed through the main body of the presentation. This is totally fine, but it is still best to focus on delivering some sort of initial presentation to set the tone and topics for discussion in the Q&A.

Other common presentation structures
The above was a description of a basic presentation, here are some more specific presentation layouts:
Demonstration
Use the demonstration structure when you have something useful to show. This is usually used when you want to show how a product works. Steve Jobs frequently used this technique in his presentations.
- Explain why the product is valuable.
- Describe why the product is necessary.
- Explain what problems it can solve for the audience.
- Demonstrate the product to support what you’ve been saying.
- Make suggestions of other things it can do to make the audience curious.
Problem-solution
This structure is particularly useful in persuading the audience.
- Briefly frame the issue.
- Go into the issue in detail showing why it ‘s such a problem. Use logos and pathos for this – the logical and emotional appeals.
- Provide the solution and explain why this would also help the audience.
- Call to action – something you want the audience to do which is straightforward and pertinent to the solution.
Storytelling
As well as incorporating stories in your presentation , you can organise your whole presentation as a story. There are lots of different type of story structures you can use – a popular choice is the monomyth – the hero’s journey. In a monomyth, a hero goes on a difficult journey or takes on a challenge – they move from the familiar into the unknown. After facing obstacles and ultimately succeeding the hero returns home, transformed and with newfound wisdom.
Storytelling for Business Success webinar , where well-know storyteller Javier Bernad shares strategies for crafting compelling narratives.
Another popular choice for using a story to structure your presentation is in media ras (in the middle of thing). In this type of story you launch right into the action by providing a snippet/teaser of what’s happening and then you start explaining the events that led to that event. This is engaging because you’re starting your story at the most exciting part which will make the audience curious – they’ll want to know how you got there.
- Great storytelling: Examples from Alibaba Founder, Jack Ma
Remaining method
The remaining method structure is good for situations where you’re presenting your perspective on a controversial topic which has split people’s opinions.
- Go into the issue in detail showing why it’s such a problem – use logos and pathos.
- Rebut your opponents’ solutions – explain why their solutions could be useful because the audience will see this as fair and will therefore think you’re trustworthy, and then explain why you think these solutions are not valid.
- After you’ve presented all the alternatives provide your solution, the remaining solution. This is very persuasive because it looks like the winning idea, especially with the audience believing that you’re fair and trustworthy.
Transitions
When delivering presentations it’s important for your words and ideas to flow so your audience can understand how everything links together and why it’s all relevant. This can be done using speech transitions which are words and phrases that allow you to smoothly move from one point to another so that your speech flows and your presentation is unified.
Transitions can be one word, a phrase or a full sentence – there are many different forms, here are some examples:
Moving from the introduction to the first point
Signify to the audience that you will now begin discussing the first main point:
- Now that you’re aware of the overview, let’s begin with…
- First, let’s begin with…
- I will first cover…
- My first point covers…
- To get started, let’s look at…
Shifting between similar points
Move from one point to a similar one:
- In the same way…
- Likewise…
- Equally…
- This is similar to…
- Similarly…
Internal summaries
Internal summarising consists of summarising before moving on to the next point. You must inform the audience:
- What part of the presentation you covered – “In the first part of this speech we’ve covered…”
- What the key points were – “Precisely how…”
- How this links in with the overall presentation – “So that’s the context…”
- What you’re moving on to – “Now I’d like to move on to the second part of presentation which looks at…”
Physical movement
You can move your body and your standing location when you transition to another point. The audience find it easier to follow your presentation and movement will increase their interest.
A common technique for incorporating movement into your presentation is to:
- Start your introduction by standing in the centre of the stage.
- For your first point you stand on the left side of the stage.
- You discuss your second point from the centre again.
- You stand on the right side of the stage for your third point.
- The conclusion occurs in the centre.
Key slides for your presentation
Slides are a useful tool for most presentations: they can greatly assist in the delivery of your message and help the audience follow along with what you are saying. Key slides include:
- An intro slide outlining your ideas
- A summary slide with core points to remember
- High quality image slides to supplement what you are saying
There are some presenters who choose not to use slides at all, though this is more of a rarity. Slides can be a powerful tool if used properly, but the problem is that many fail to do just that. Here are some golden rules to follow when using slides in a presentation:
- Don’t over fill them – your slides are there to assist your speech, rather than be the focal point. They should have as little information as possible, to avoid distracting people from your talk.
- A picture says a thousand words – instead of filling a slide with text, instead, focus on one or two images or diagrams to help support and explain the point you are discussing at that time.
- Make them readable – depending on the size of your audience, some may not be able to see small text or images, so make everything large enough to fill the space.
- Don’t rush through slides – give the audience enough time to digest each slide.
Guy Kawasaki, an entrepreneur and author, suggests that slideshows should follow a 10-20-30 rule :
- There should be a maximum of 10 slides – people rarely remember more than one concept afterwards so there’s no point overwhelming them with unnecessary information.
- The presentation should last no longer than 20 minutes as this will leave time for questions and discussion.
- The font size should be a minimum of 30pt because the audience reads faster than you talk so less information on the slides means that there is less chance of the audience being distracted.
Here are some additional resources for slide design:
- 7 design tips for effective, beautiful PowerPoint presentations
- 11 design tips for beautiful presentations
- 10 tips on how to make slides that communicate your idea
Group Presentations
Group presentations are structured in the same way as presentations with one speaker but usually require more rehearsal and practices. Clean transitioning between speakers is very important in producing a presentation that flows well. One way of doing this consists of:
- Briefly recap on what you covered in your section: “So that was a brief introduction on what health anxiety is and how it can affect somebody”
- Introduce the next speaker in the team and explain what they will discuss: “Now Elnaz will talk about the prevalence of health anxiety.”
- Then end by looking at the next speaker, gesturing towards them and saying their name: “Elnaz”.
- The next speaker should acknowledge this with a quick: “Thank you Joe.”
From this example you can see how the different sections of the presentations link which makes it easier for the audience to follow and remain engaged.
Example of great presentation structure and delivery
Having examples of great presentations will help inspire your own structures, here are a few such examples, each unique and inspiring in their own way.
How Google Works – by Eric Schmidt
This presentation by ex-Google CEO Eric Schmidt demonstrates some of the most important lessons he and his team have learnt with regards to working with some of the most talented individuals they hired. The simplistic yet cohesive style of all of the slides is something to be appreciated. They are relatively straightforward, yet add power and clarity to the narrative of the presentation.
Start with why – by Simon Sinek
Since being released in 2009, this presentation has been viewed almost four million times all around the world. The message itself is very powerful, however, it’s not an idea that hasn’t been heard before. What makes this presentation so powerful is the simple message he is getting across, and the straightforward and understandable manner in which he delivers it. Also note that he doesn’t use any slides, just a whiteboard where he creates a simple diagram of his opinion.
The Wisdom of a Third Grade Dropout – by Rick Rigsby
Here’s an example of a presentation given by a relatively unknown individual looking to inspire the next generation of graduates. Rick’s presentation is unique in many ways compared to the two above. Notably, he uses no visual prompts and includes a great deal of humour.
However, what is similar is the structure he uses. He first introduces his message that the wisest man he knew was a third-grade dropout. He then proceeds to deliver his main body of argument, and in the end, concludes with his message. This powerful speech keeps the viewer engaged throughout, through a mixture of heart-warming sentiment, powerful life advice and engaging humour.
As you can see from the examples above, and as it has been expressed throughout, a great presentation structure means analysing the core message of your presentation. Decide on a key message you want to impart the audience with, and then craft an engaging way of delivering it.
By preparing a solid structure, and practising your talk beforehand, you can walk into the presentation with confidence and deliver a meaningful message to an interested audience.
It’s important for a presentation to be well-structured so it can have the most impact on your audience. An unstructured presentation can be difficult to follow and even frustrating to listen to. The heart of your speech are your main points supported by evidence and your transitions should assist the movement between points and clarify how everything is linked.
Research suggests that the audience remember the first and last things you say so your introduction and conclusion are vital for reinforcing your points. Essentially, ensure you spend the time structuring your presentation and addressing all of the sections.
Blog > How to structure a good PowerPoint Presentation
How to structure a good PowerPoint Presentation
08.09.21 • #powerpoint #tips.
When creating presentations, it is particularly important that they are well organized and have a consistent structure.
A logical structure helps the audience to follow you and to remember the core information as best as possible. It is also important for the presenter, as a good presentation structure helps to keep calm, to stay on the topic and to avoid awkward pauses.
But what does such a structure actually look like? Here we show you how to best organize your presentation and what a good structure looks like.
Plan your presentation
Before you start creating your presentation, you should always brainstorm. Think about the topic and write all your ideas down. Then think about the message you want to communicate, what your goal is and what you want your audience to remember at the end.
Think about who your audience is so that you can address them in the best possible way. One possibility is to start your presentation with a few polls to get to know your audience better. Based on the results, you can then adapt your presentation a little. Use the poll function of SlideLizard and have all the answers at a glance. SlideLizard makes it possible to integrate the polls directly into your PowerPoint presentation which helps you to avoid annoying switching between presentation and interaction tool. You can keep an eye on the results while the votes come in and then decide whether you want to share them or not.

- an informative
- an entertaining
- an inspiring
- or a persuasive presentation?
Typical Presentation Structure
The basic structure of a presentation is actually always the same and should consist of:
Introduction

Make sure that the structure of your presentation is not too complicated. The simpler it is, the better the audience can follow.
Personal Introduction
It is best to start your presentation by briefly introducing yourself which helps to build a connection with your audience right away.
Introduce the topic
Then introduce the topic, state the purpose of the presentation and provide a brief outline of the main points you will be addressing.
Mention the length
In the introduction, mention the approximate length of the talk and then also make sure you stick to it.
The introduction should be no longer than two slides and provide a good overview of the topic.
Icebreaker Polls
According to studies, people in the audience only have an average attention span of 10 minutes, which is why it is important to increase their attention right at the beginning and to arouse the audience's interest. You could make a good start with a few icebreaker polls for example. They lighten the mood right at the beginning and you can secure your audience's attention from the start.
For example, you could use SlideLizard to have all the answers at a glance and share them with your audience. In addition, the audience can try out how the polls work and already know how it works if you include more polls in the main part.

Get to know your audience
As mentioned earlier, it is always useful to think about who your audience actually is. Ask them questions at the beginning about how well they already know the topic of your presentation. Use SlideLizard for this so that you have a clear overview about the answers. You can use both single- and multiple-choice questions or also open questions and display their results as a WordCloud in your presentation, for example.
Include a quote
To make the beginning (or the end) of your presentation more exciting, it is always a good idea to include a quote. We have selected some powerful quotes for PowerPoint presentations for you.
Present your topic
The main part of a presentation should explain the topic well, state facts, justify them and give examples. Keep all the promises you made earlier in the introduction.
Length and Structure
The main part should make up about 70% of the presentation and also include a clear structure. Explain your ideas in detail and build them up logically. It should be organized chronologically, by priority or by topic. There should be a smooth transition between the individual issues. However, it is also important to use phrases that make it clear that a new topic is starting. We have listed some useful phrases for presentations here.
Visualize data and statistics and show pictures to underline facts. If you are still looking for good images, we have selected 5 sources of free images for you here.
Focus on the essentials
Focus on what is most important and summarize a bit. You don't have to say everything about a topic because your audience won’t remember everything either. Avoid complicated sentence structure, because if the audience does not understand something, they will not be able to read it again.
Make your presentation interactive
Make your presentation interactive to keep the attention of your audience. Use SlideLizard to include polls in your presentation, where your audience can vote directly from their smartphone and discuss the answers as soon as you received all votes. Here you can also find more tips for increasing audience engagement.

Repeat the main points
The conclusion should contain a summary of the most important key points. Repeat the main points you have made, summarize what the audience should have learned and explain how the new information can help in the future.
Include a Q&A part
Include a Q&A part at the end to make sure you don't leave any questions open. It's a good idea to use tools like SlideLizard for it. Your audience can ask anonymous questions and if there is not enough time, you can give them the answers afterwards. You can read more about the right way to do a question slide in PowerPoint here.
Get Feedback
It is also important to get feedback on your presentation at the end to keep improving. With SlideLizard you can ask your audience for anonymous feedback through star ratings, number ratings or open texts directly after your presentation. You can then export the responses and analyse them later in Excel.

Presentation style
Depending on the type of presentation you give, the structure will always be slightly different. We have selected a few different presentation styles and their structure for you.
Short Presentation

If you are one of many presenters on the day, you will only have a very limited time to present your idea and to convince your audience. It is very important to stand out with your presentation.
So you need to summarize your ideas as briefly as possible and probably should not need more than 3-5 slides.
Problem Solving Presentation

Start your presentation by explaining a problem and giving a short overview of it.
Then go into the problem a little more, providing both intellectual and emotional arguments for the seriousness of the problem. You should spend about the first 25% of your presentation on the problem.
After that, you should spend about 50% of your presentation proposing a solution and explaining it in detail.
In the last 25%, describe what benefits this solution will bring to your audience and ask them to take a simple but relevant action that relates to the problem being discussed.
Tell a Story

A great way to build an emotional connection with the audience is to structure a presentation like a story.
In the introduction, introduce a character who has to deal with a conflict. In the main part, tell how he tries to solve his problem but fails again and again. In the end, he manages to find a solution and wins.
Stories have the power to win customers, align colleagues and motivate employees. They’re the most compelling platform we have for managing imaginations. - Nancy Duarte / HBR Guide to Persuasive Presentations
Make a demonstration

Use the demonstration structure to show how a product works. First talk about a need or a problem that has to be solved.
Then explain how the product will help solve the problem and try to convince your audience of the need for your product.
Spend the end clarifying where and when the product can be purchased.
Chronological structure

When you have something historical to tell, it is always good to use a chronological structure. You always have to ask yourself what happens next.
To make it more interesting and exciting, it is a good idea to start by telling the end of something and after that you explain how you got there. This way you make the audience curious and you can gain their attention faster.
Nancy Duarte TED Talk
Nancy Duarte is a speaker and presentation design expert. She gives speeches all over the world, trying to improve the power of public presentations.
In her famous TED Talk "The Secret Structure of Great Talks" she dissects famous speeches such as Steve Jobs' iPhone launch speech and Martin Luther King's "I have a dream" speech. In doing so, she found out that each presentation is made up of 4 parts:
- What could be
- A moment to remember
- Promise of “New Bliss”
Related articles
About the author.

Helena Reitinger
Helena supports the SlideLizard team in marketing and design. She loves to express her creativity in texts and graphics.

Get 1 Month for free!
Do you want to make your presentations more interactive.
With SlideLizard you can engage your audience with live polls, questions and feedback . Directly within your PowerPoint Presentation. Learn more
Top blog articles More posts

6 Tips to turn your boring slides into stunning presentations

The History and Evolution of PowerPoint

Get started with Live Polls, Q&A and slides
for your PowerPoint Presentations
The big SlideLizard presentation glossary
Process questions.
Process questions are similar to recall questions but they need some deeper thoughts and maybe also analysis.
An e-lecture is a lecture that is held online. Many schools and universities offer e-lectures as technical opportunities improve.
Internal Communication
Internal communication is particularly important for corporate communication. It communicates important information from leadership to staff so that they can do their jobs in the best possible way and work processes run well.
Glossophobia
Glossophobia means the strong fear of public speaking.
Be the first to know!
The latest SlideLizard news, articles, and resources, sent straight to your inbox.
- or follow us on -
We use cookies to personalize content and analyze traffic to our website. You can choose to accept only cookies that are necessary for the website to function or to also allow tracking cookies. For more information, please see our privacy policy .
Cookie Settings
Necessary cookies are required for the proper functioning of the website. These cookies ensure basic functionalities and security features of the website.
Analytical cookies are used to understand how visitors interact with the website. These cookies help provide information about the number of visitors, etc.

How to make a slide show
Learn how to make a slide show with photos, videos, music, and custom settings using a slide show maker.
Learn how to make a slide show with PowerPoint
Discover how to make a slide show with photos, videos, music, and custom settings using a slide show app like PowerPoint.
What is a slide show maker?
To create a slide show, you’ll want to use a slide show maker—or slide show app—which is a software program or online service that enables you create digital slide shows with text, photos, videos, music, and other special effects. The full range of slide show features and functionality varies from program to program.
Once you’ve created a slide show, it can be published on the internet or shared with others as a video file. Additionally, you can use slide shows to create dynamic, interactive content on websites.
Slide show software can be used for a variety of purposes, such as creating presentations for work, school, and even your personal life. For instance, slide shows are often used to:

Display photos during an event
Slide shows are a great way to share photos and videos with guests at a wedding, birthday, or other special event.
Create a digital photo album
Some slide shows are created for personal reasons, such as sharing important memories with family or friends.

Highlight products or services
Businesses can use slide shows to showcase their products, promote special offers and sales, or pitch their services to potential clients.
Enhance teaching, training, and public speaking
Slide shows can also provide helpful visuals in educational settings, classroom presentations, and public speaking forums.
What you need to make a slide show
When it comes to creating a slide show, there are a few things you'll need to get started. First and foremost, you'll need a device equipped with presentation software or access to an online slide show app. Secondly, you’ll need a way to display your slide show, which usually means connecting your device to a projector or big screen TV. Beyond that, you’ll need some visual aids and other media to bring your slide show to life.
Explore each of these slide show requirements in more detail:
Devices and equipment —To create a slide show, you’ll use a computer or other device—such as a tablet or mobile phone—with PowerPoint or a similar program installed. You will also need a way to project the slides onto a screen or wall. This can be done with a projector, but if you don't have one available, you can use your TV or computer monitor. Simply connect your device to the TV or monitor using an HDMI cable and select the correct input. Your slides will now be projected onto the screen.
Media —Of course, creating a slide show requires media that adds visual and even audio elements to your presentation. This can be anything from photos and videos to music and text. You can use search engines to find copyright-free media to use in your slide show.
Another option is to purchase royalty-free stock footage, images, and audio files from online media libraries. This could be a bit more expensive, but it guarantees that you have the legal right to use the media in your presentation.
Finally, you can also use your own videos, images, and even music. While this can be a time-consuming process, it does allow you to create custom content specifically for your slide show.
Slide show creator —To bring your slide show together, you’ll need a slide show creator. The slide show software you choose will depend on your presentation requirements and preferences. There are many slide show makers on the market, with Microsoft PowerPoint being one of the most popular and widely used programs globally.
How to choose a slide show maker
When choosing slide show software, it's important to consider the features and specifications that are most important to you. Some of the questions you might ask when choosing a slide show maker include:
- How easy is the software to use?
- Is the software Mac or PC compatible?
- Can I access and edit my slide show on the cloud?
- What kind of slide shows can be created with the software?
- How many photos and/or videos can be included in a slide show?
- Can text and other elements be added to slide shows?
- Are transitions and effects available for slide shows?
- Is music accompaniment an option?
- What are the options for saving and sharing your slide show?
Building a slide show doesn't have to be difficult. With the right software, you can create an engaging presentation in no time.
Six steps for creating a slide show

1. Plan your slide show
Before getting too deep into your slide show project, it’s a good idea to select and save the photos and videos you want to use. This helps you create a slide show more efficiently and purposefully, ensuring a better outcome.
4. Import media
Start adding photos, videos, and other desired media to your slides. You can upload these from your device or online media libraries. If you planned your slide show in advance, you should have all your media saved in one place.

2. Launch your slide show app
Once you’ve decided on a slide show maker, you’ll want to launch the app from whatever device you’ll be using to create your presentation.
5. Add text, music, and transitions
After you’ve arranged the visuals in your slide show, you can provide additional information and communicate sentiment using custom text, music, and timed slide transitions.

3. Choose your theme
Most slide show software offers a variety of pre-set themes, colors, and designs. You can choose one that best suits your slide show or create a custom theme using the program’s various tools and features.
6. Record, save, and share your slide show
Now you’re ready to record your slide show, which can include a voiceover or Cameo . Once your slide show is complete, you can save it as a video to your device or to the cloud, such as OneDrive . You can access your saved slide show at any time to display at events, use in meetings, share online, or send directly to other people.
How to make a slide show with photos
Adding photos to your slide show is a great way to enliven your presentation and make it more visually interesting. Here are a few different ways you can add photos to your slide show in PowerPoint.

Add photos from your device
Whether you’re using a computer, tablet, phone, or other device, you can use photos that are saved to your device to create your slide show. In PowerPoint, simply select “Insert” then “Pictures” from the program menu, then choose “This Device.” This will open your photo library and allow you to find the photos you want to use. Once you’ve selected the photos that you want to import, just click on the "Insert" button and they will be added to your slide show. If you’re using a pre-made theme, you can also right-click the image in the slide show and select “Change Picture.” Again, you will choose “This Device” to access your photo library. After inserting your photo, you can reposition it on your slide or resize it however you like.

Use stock photos
Another way to add photos in PowerPoint is to follow the same process you would when adding photos from your device, but when prompted to choose your photo source, select “From Stock Images” instead of “This Device.” This will display a library of photos that you can use in your slide show without worrying about copyright infringement. There are thousands of stock images available in most slide show maker programs. Once the library is open, you can explore existing photo categories or use keywords to search for photos that fit your needs.

Explore online photo sources
Online photos are images you can insert into a PowerPoint slide show directly from the internet, as opposed to using those you have saved on your device. This is a convenient option if you don't have photos already prepared for your slide show, or if you can’t find the right kind of photo in the stock image library. However, there are some potential risks associated with using online photos, namely that you must be careful to use royalty-free images so not to infringe on any copyrights. In PowerPoint, there is a filtering option to ensure your search results only show royalty-free photos. Inserting photos from online sources follows the same process as the previous two methods, but this time, you’ll select “From Online Sources.”
How to add videos, music, and text

How to add videos to PowerPoint slide shows
Adding videos to your slide show involves accessing videos from your device, a stock video library, or online video sources—just as you would when adding photos. In this case, however, you’ll navigate to the menu in PowerPoint and select “Insert,” followed by “Media,” then “Video.” Once your video appears on your slide, you can resize or reposition it to fit your presentation needs. You can also set your video to play automatically in the slide show by selecting “Playback” on the menu and choosing “Start Automatically.”

How to add music to PowerPoint slide shows
Much like adding videos, you can add music to individual slides in PowerPoint by navigating to “Insert” on the menu, then “Media,” and finally “Audio.” You can then import music from your device, or you can record your own audio directly in PowerPoint. However, if you want your audio to play across multiple slides in your presentation—for example, as background music for a slide show—you’ll have to take a couple of extra steps. Once you’ve imported your audio file, select “Playback” from the menu and choose the “Play in Background” option. Your music will now play across all slides. You can set one song to loop for the duration of the slide show, or you can add more songs to play continuously throughout the slide show.

How to add text to PowerPoint slide shows
Premade themes in PowerPoint make adding text slide shows easy. On slides that already have templated content, you can simply click on the text and begin editing. In addition to changing what the text says, you can resize, recolor, reposition, and add special effects to the text. Of course, you can also change the font—or style—of the text. Most of this can be done from the “Home” tab on the menu while certain effects, such as shadows, can be found on the “Shape Format” tab. If you’re designing your presentation slides from scratch, or want to create additional text, find “Insert” on the menu, then choose “Text Box” or “Word Art,” depending on your desired text effect.
Discover custom slide show settings
Add even more effects to your PowerPoint slide show with custom settings like timing, transitions, and looping.

Set slide show timing
Adding timing to your slide show is a great way to control the pacing and flow of your presentation. To add timing in PowerPoint, go to the "Transitions" tab on the menu and find the "Advance Slide" area. Make sure the box next to “After:” is checked, then input the amount of time you’d like each slide to appear on-screen. The slides will automatically advance, creating a movie-like effect that’s great for events and special occasions.

Create slide show transitions
Now that you’ve added automatic timing to your slide show, you can make it more visually appealing by creating slide transitions. Transitions are special effects that allow you to animate the way your slides change from one to the next, and there are a variety of different transitions in PowerPoint that you can choose from. You can add these transitions to your slide show from the "Transitions” tab. From there, you’ll select the transition you want to add. To preview the transition, simply click on it. You can click “Apply To All” to automatically add the same transition to every slide in your slide show, or you can manually add different transitions to different slides.

Loop your slide show
If you want your slide show to play continuously until you choose to turn it off, you can set your PowerPoint presentation to loop. This will ensure your slide show automatically starts over from the beginning once it reaches the end. To get started, navigate to the “Slide Show” tab on the menu and select “Set Up Slide Show.” When the settings window opens, check the box next to “Loop continuously until ‘ESC’” and then click “OK.” When you’re ready to turn your slide show off, simply press the Esc key on your keyboard.
Slide show template and theme tips
Search themes and templates online.
With numerous slide show themes and templates available, it’s easy to find one that fits your needs.
Customize your design
If you can’t find the perfect theme or template, you can change things like colors and fonts.
Build a custom template
If you want a blueprint to use with future slide shows, you can create your own template.
Add new slides
If you need more slides, you can choose a specific layout and your theme will be carried over.
Edit your slide layouts
Even when using a theme or template, you can rearrange slide content to highlight key information.
Add photos, videos, and text
Themes and templates make adding media easy since most slides have designated content areas.
Change or resize your fonts
If your theme’s font is too small, you can resize it or choose a new font to make it easy to read.
Reorder your slide show
Some themes and templates have a predefined sequence, but you can reorder slides to meet your needs.
Create your own slide show
Slide shows are a great way to engage your audience and present important information. Whether you're creating a slide show for personal or professional reasons, slide shows are an essential tool for anyone who wants to share information in a visually appealing manner.
Discover more ways to improve your slide show
What options are available to create a slide show?
Slide show makers come in many forms. Some slide show software can only be used on specific devices, while other slide show creators can be accessed via the cloud from any device at any time.
It’s a good idea to evaluate a variety of slide show makers to ensure that you find one with all the features you need. For instance, some slide show software skews toward business use cases and others toward personal.
Microsoft PowerPoint is a popular slide show app that allows you to save presentations to your device or the cloud, and is widely used for personal, professional, and educational purposes.
Frequently asked questions
What are slide show apps and software.
Slide show apps and software are used to create and share slide shows. Slide show programs are typically used to communicate information, diagrams, plans, or processes. They can also be used to display photos and videos at events or retail stores. Usually, slide show makers have a range of built-in features and layouts, making them easy to use, regardless of technical skill levels.
What should a slide show include?
An effective slide show should be engaging, visually appealing, and informative. To achieve this, you'll want to make sure to include the following elements:
- A catchy headline or title. This will help grab your audience's attention and set the tone for the rest of your presentation.
- A variety of images. Don't just rely on text—incorporate photos, illustrations, or even video to maximize viewership.
- Bullet points or short blocks of text. Keep your slide content concise and easy to digest; too much information will only overwhelm your viewers.
How do I make a picture slide show?
There are a few different ways to make picture slide shows. You can use online programs, or you can create a slide show directly on your computer, phone, tablet, or other device using slide show software. Some programs, such as Microsoft PowerPoint, can be accessed on your personal device and on the cloud.
How long should a slide show be?
The length of your slide show will depend on several factors, such as the topic of your presentation, the audience you're presenting to, and the amount of time you have. That said, slide shows are generally between five and ten minutes long.
How can I make a slide show better?
Here are a few tips to make your slide show more engaging:
- Add images, videos, and music to bring your slide show to life.
- Use a font that is easy to read from a distance.
- Try not to use too many words on each slide.
- Use custom transitions and timing to make your slide show flow.
- Ensure a cohesive slide show by using a theme or template.
- For live presentations, practice with the Speaker Coach feature .
Follow Microsoft 365
You’re using an older browser version. Update to the latest version of Google Chrome , Safari , Mozilla Firefox , or Microsoft Edge for the best site experience.
- eLearning Blog
- eLearning Basics
- Instructional Design
- Corporate Training
- Course Selling
- Manufacturing
- Products iSpring Suite iSpring Learn
- Use Cases Onboarding Compliance Training Induction Training Product Training Channel Partner Training Sales Training Microlearning Mobile Learning
- Company About Us Case Studies Customers Partnership Course Development Contact Us
- Knowledge Hub Academy Blog Webinars Guides Experts on iSpring
- Language EN English Français Deutsch Español Italiano Nederlands Português Polski 中文 日本語 العربية Indonesia
- Shopping Cart
Free Online eLearning Conference | May 2nd–3rd
iSPRING DAYS 2024
Seize the human-centric future of learning
How to Structure a PowerPoint Presentation

Table of Contents

This is the main part of your presentation, which should keep the promises you made in the introduction. This is where you explain your topic and present all your information.
Depending on the nature of your presentation, divide it into segments/points. Arrange your points in a logical order and then provide information to support each of them. There are many different ways to organize your key points, for example:
- Number your points according to their priority (1, 2, 3, …)
- Place the points in a time frame (past, present, future)
- Use narration (tell a story from beginning to end)
- Present the points with a problem-solution dynamic (state a problem, describe its impact, offer ways to solve the issue)
A good conclusion summarizes the key points you made or highlights what the audience should have learned. It clarifies the general purpose of your presentation and reinforces the reason for viewing it. Here are the slides you may want to include:
- Summary. List what goals your audience have achieved, what knowledge they got, and how this information can help them in the future.
- Conclusion. Here you can thank your audience for viewing the presentation.
Tips for Structuring a Presentation in PowerPoint
Now that you know which parts a typical presentation should consist of, let’s see how to structure it in PowerPoint.
1. Combine slides into sections
When working with a large PowerPoint presentation (PPT), you can create sections that can be collapsed and expanded. This will help you keep presentation slides organized and facilitate navigation in editing mode. To do that, follow these steps:

- To shift a section, right-click on its name and use the Move Section Up and Move Section Down options.
- To collapse or expand a certain section, click on the collapse icon to the left of the section name. You can also minimize and maximize all sections at once by right-clicking on the section name and choosing Collapse All or Expand All .
As well, you can access these settings by choosing Slide Sorter under the VIEW tab.

This kind of segmentation is a great way to overview the logical flow of your slides all at once and see if there are any changes required. For example, you may decide to break one slide into two or three, or the other way around.
2. Use the Outline View
One other way to structure a PowerPoint presentation in the editing mode is to use Outline View . You can choose it from the VIEW tab.

This view doesn’t display sections, but it shows the title and main text of each slide, which can give you a quick overview of the presentation contents. Here you can go through the entire text and edit it instantly. You can also work with text (on the left) and slides (on the right) simultaneously, as the latter is shown on the right side of your screen.
Note that, to be displayed in an outline, text needs to be typed in a text placeholder, not a text box . A text placeholder is a box with the words “Click to add text” or “Click to add title”, and it appears when you choose a standard layout.
You can also use Outline View to promote bullet text to titles and the other way around. To do that, right-click on a relevant title or text and select the Promote or Demote options.

Be attentive about demoting a title, as this will delete the original slide and move its title and text to the adjacent slide.
PowerPoint only allows users to promote and demote text, not entire slides. Therefore, there’s no possibility to change the hierarchical order of slides.
3. Create a table of contents
All the aforementioned tips help you organize a presentation when formatting it. However, it’s crucial that your viewers can easily navigate through entire presentation too. One sure way to provide them with this opportunity is to create an interactive and structured table of contents.
Though there’s no native automatic outline in PowerPoint, it can be created manually:

- Press Ctrl+A to select all the names, and Ctrl+C to copy them.
- Then Press Ctrl+V to paste the copied titles on the desired slide. In case there are too many titles and they don’t fit onto a single page, you can divide the table of contents into two columns or place it on two slides.

You’ll need to repeat this procedure to link all the chapters to corresponding slides. For more information, read this step-by-step guide on how to add a hyperlink in PowerPoint .
Now all the chapters can be accessed from a single table of contents, which is very convenient. However, you will also need to link them back to that unifying page. You can do this by inserting an Action Button on every slide of your presentation in Slide Master mode:

Now there is a single page from which all the other pages can be easily accessed. As well, it’s possible to go back to the table of contents at any time with the intuitive Home button.
Depending on the size of your presentation, the time it takes to create an interactive outline may vary, as you will need to add hyperlinks to every chapter manually. Be aware that if you rename a slide or simply delete it, these changes will not be automatically registered in the table of contents. For example, if you delete a slide, its title will still be displayed in the table of contents, but clicking on it won’t lead the viewer to another point in the presentation.
This is what our sample presentation looks like:

A Better Way to Structure a PowerPoint Presentation
Creating a table of contents manually might be fine for a small presentation, but if you have 122 slides, it would require too much time and energy to do so. That’s why, instead of manually creating a table of contents, we took advantage of iSpring Suite and simply enabled the automatic outline.
iSpring Suite
Fully-stocked eLearning authoring toolkit for PowerPoint. No training required to start!

Note: iSpring Suite turns slides into HTML5 format, so your audience can view them online, right in their browsers.

As you can see, the new presentation has a pop-up outline and a navigation panel, which make it possible to move to any slide at any time without leaving the slide show mode.
How to set up navigation
To create navigation in your presentation, follow these simple steps:
- Get a free trial of iSpring Suite.

- When you’ve configured the Slide Properties settings, click on Save & Close in the upper-left corner.
How to configure an outline
Whereas PowerPoint requires the outline to be designed manually, iSpring Suite has already prepared it for you. At the same time, you don’t have to stick with the standard outline template, as you can easily customize the player’s final look and feel:

We recommend leaving Enable Search marked, as this will allow viewers to search for any content at any time, including the texts on the slides. This is especially useful for large presentations with a lot of text.
If you have previously arranged slides into multiple levels in the Slide Properties, then leave Multilevel outline marked. That way, the outline will display the nesting structure of the presentation, facilitating navigation. You can learn more about the other outline options here .

- When you have finished configuring the player, click on Apply & Close in the upper-left corner.
- Now you can publish your enhanced presentation either to HTML5, to make it easily accessible via browser on any device, or MP4 video format. If you’re going to upload your presentation to an LMS, you can publish it to any eLearning format: SCORM, AICC, Tin Can, or cmi5.
While a standard PowerPoint slideshow is straightforward and limited, iSpring Suite saves viewers from having to follow a strict slide order. An interactive and searchable outline allows non-linear navigation, where any information can be accessed at any time at a glance.
Also read : → How to Convert PowerPoint to MP4 Video
Also read : → How To Record Presentations With Audio
Another perk
iSpring Suite comes with Content Library , which provides a great collection of presentation templates and allows you to create professional-looking presentations in a matter of minutes. Each template includes basic course elements: a title slide, a table of contents, chapters, a timeline, and info slides. Organize them in the order you prefer, populate them with your texts and images, and your presentation is ready to go.

We hope this article will help you develop an ideal structure for your PowerPoint presentation and do this quickly and easily. Captivate your audience with a powerful and persuasive presentation!
Do you have any other insights on how to simplify PowerPoint slides design? Please share them in the comment section. We’d like to hear from you.
Fast course authoring toolkit
Create online courses and assessments in record time.

Content creator:
Helen Colman
She enjoys combining in-depth research with expert knowledge of the industry. If you have eLearning insights that you’d like to share, please get in touch .
You might also like this

Subscribe to our blog
Stay tuned to get our latest eLearning tips and tricks!
By clicking “Subscribe”, you agree to our Privacy Policy . All emails include an unsubscribe link, so that you can opt-out at any time.
We use cookies to give you the best possible experience on our website and also for analytics and marketing purposes. You can enable or disable optional cookies as desired. See our Cookie Policy for more details.
Manage your cookies
Essential cookies are always on. You can turn off other cookies if you wish.
Essential cookies
Analytics cookies
Social media cookies
- Get One: Tornado Alert Apps
- The Best Tech Gifts Under $100
How to Make a Slideshow on PowerPoint
Whether for work or private, use slideshows to get your message across
:max_bytes(150000):strip_icc():format(webp)/ColettaTeske-af57404a91b342578a97252b7dbd720f.jpg "which part of this presentation does this slide show")
- Central Washington University
In This Article
Jump to a Section
Before You Begin
- Step-by-Step: Make a Slideshow on PowerPoint
- Play Music During the Slideshow
- Set up the Slideshow
- Add Timings to Each Slide
- Edit Timings on a Slide
- Create a Video Slideshow
- Save a Slideshow to a CD or Other Removeable Media
When you're ready to present your PowerPoint slides to others, look no further than PowerPoint's slideshow feature. Use this tool for all kinds of slides, but those containing photos work best for most viewers.
Instructions in this article apply to PowerPoint for Microsoft 365 , PowerPoint 2019, PowerPoint 2016, PowerPoint 2013, PowerPoint 2010, and PowerPoint for Mac.
Before you create slides for your slideshow presentation, decide how long to make the slideshow, how it should flow, and the pictures you’ll use.
- Length : A slideshow can be as long or as short as you need. The length of the slideshow should be appropriate for the topic and for your audience’s attention span.
- Outline : It’s always smart to start with an outline; it helps you visualize your slideshow. An outline can be as simple as the list of topics you want to cover.
- Pictures : Choose photos that are clear and tell a story.
With PowerPoint's Photo Album , select the pictures and PowerPoint creates the basic slideshow. Fill your slides with informative text and harmonizing background music, then turn your collection of slides into a self-running photo slideshow with music that can play as a video or be stored on a CD.
When you’re ready to make a photo slideshow with music, PowerPoint gets you up and running quickly. To get started, select Insert > Photo Album > New Photo Album .
Here’s how to add and format pictures for the slideshow using the Photo Album:
Add pictures
Select File/Disk and select the images you want in the picture slideshow.
Enhance photos
Place a checkmark next to the picture you want to enhance and change the orientation, contrast, and brightness. You’ll see the changes in the Preview window.
Add text boxes
To add a slide for text, select the image in the album list you want the text to follow and select New Text Box .
Rearrange slides
Place a checkmark next to the picture you want to move and select the Move Up or Move Down arrows.
Choose a picture layout
Select the Picture layout down arrow and choose how you want the pictures to appear in the slideshow.
Frame the pictures
Select the Frame shape down arrow and choose a frame style. You’ll see a preview in the Album Layout area. This option will not be selectable if the picture layout Fit to slide is enabled.
Select Create when you’re finished.
Your photo slideshow is created in a new file. Add text to the slides and change the look of each slide.
How to Play Music During the Slideshow
Play music in the background during your slideshow to offer an audio counterpoint to all the visuals. The background music starts automatically with the slideshow and plays during all the slides.
To add background music to your presentation, select Insert > Audio > Audio on My PC , choose a music file, then select OK .
The audio icon appears in the middle of the current slide. To move it, drag it to a different place on the slide. When the audio icon is selected, the Playback tab appears. Select Play in Background and make changes to the audio file . Here are some suggestions.
- Preview the music : Select Play to hear what the music will sound like during your slideshow.
- Shorten the duration : Select Trim Audio to remove parts of the beginning and end of the music file.
- Adjust the volume : Select Volume to make the background music louder or softer.
How to Set up the Slideshow
Once your slides are finished, it’s time to set up the slideshow. Start by deciding whether to show the slideshow in a window or full screen.
To set up the slideshow, select Slide Show > Set Up Slide Show and choose one of the following:
- Browsed by an individual (window) : Run the slideshow automatically and inside a window. This option works best when you save the slideshow to a CD.
- Browsed at a kiosk (full screen) : Run the slideshow automatically and at full-screen size. This option works best when you convert the slideshow to a video.
Select OK when you’re finished.
How to Add Timings to Each Slide in the Slideshow
Now it’s time to decide how long each slide will appear in the slideshow. To begin, select Slide Show > Rehearse Timings . The slideshow displays in full screen with a Recording toolbar and a timer.
While timing your presentation, use the Recording toolbar to advance through the presentation.
Select Next (arrow pointing to the right) to go to the next slide when the desired timing has been reached.
Select Pause to start and stop the timing.
Select Repeat to restart recording the time for the selected slide.
When you’re finished and have set the time for the last slide, close the Recording toolbar.
Select Yes to keep the recorded slide timings.
How to Edit Timings on a Slide
If you need to increase or decrease the time for your slideshow, change how long slides appear during the slideshow.
To change the timing for a slide:
Select View > Slide Sorter .
Select Transitions .
Select a slide.
In the Advance Slide After text box, enter how long the slide should appear in the slideshow before proceeding to the next slide, then press Enter .
The new timing applies to the slide.
How to Create a PowerPoint Video Slideshow
The easiest way to distribute and play your slideshow is in video format. This way, anyone can view your slideshow no matter what computer or device they use.
To convert a slideshow into a video:
Save the file.
Select File > Export .
Select Create a Video .
To force a smaller file size, select the Full HD drop-down list and choose a lower quality.
Select Create Video .
Select the destination folder and give the video a descriptive file name.
Select Save . It may take a few minutes to process the file and create the video.
How to Save a Slideshow to a CD or Other Removeable Media
To create a presentation that can be watched on any computer and can be stored on a CD or other removable media:
Select Package Presentation for CD > Package for CD .
Type a name for the CD.
Select Copy to Folder or Copy to CD and follow the on-screen directions.
When you’re finished, select Close .
Get the Latest Tech News Delivered Every Day
- How to Use Copilot in Powerpoint
- Tips for Memorial PowerPoint Presentations
- The 8 Best Slideshow Apps of 2024
- How to Create Digital Photo Albums in PowerPoint
- How to Do a Voiceover on PowerPoint
- How to Add Music to PowerPoint
- Loop a PowerPoint Slide Show
- Adding Sounds, Music or Narration to PowerPoint Slide Shows
- How to Change a Black-and-White Picture to Color in PowerPoint
- How to Add Audio to PowerPoint
- How to Use Speaker Notes in PowerPoint
- How to Print PowerPoint Slides
- How to Hide and Unhide a Slide in PowerPoint
- Edit Music, Sound, or Other Audio Settings in PowerPoint
- Create a Wedding PowerPoint Presentation
- How to Make a PowerPoint Presentation

- Get started with computers
- Learn Microsoft Office
- Apply for a job
- Improve my work skills
- Design nice-looking docs
- Getting Started
- Smartphones & Tablets
- Typing Tutorial
- Online Learning
- Basic Internet Skills
- Online Safety
- Social Media
- Zoom Basics
- Google Docs
- Google Sheets
- Career Planning
- Resume Writing
- Cover Letters
- Job Search and Networking
- Business Communication
- Entrepreneurship 101
- Careers without College
- Job Hunt for Today
- 3D Printing
- Freelancing 101
- Personal Finance
- Sharing Economy
- Decision-Making
- Graphic Design
- Photography
- Image Editing
- Learning WordPress
- Language Learning
- Critical Thinking
- For Educators
- Translations
- Staff Picks
- English expand_more expand_less
PowerPoint 2016 - Presenting Your Slide Show
Powerpoint 2016 -, presenting your slide show, powerpoint 2016 presenting your slide show.

PowerPoint 2016: Presenting Your Slide Show
Lesson 12: presenting your slide show.
/en/powerpoint2016/printing/content/
Introduction
Once your slide show is complete, you'll need to learn how to present it to an audience. PowerPoint offers several tools and features to help make your presentation smooth, engaging, and professional.
Optional: Download our practice presentation .
Watch the video below to learn more about presenting your slide show.
Presenting a slide show
Before you present your slide show, you'll need to think about the type of equipment that will be available for your presentation. Many presenters use projectors during presentations, so you might want to consider using one as well. This allows you to control and preview slides on one monitor while presenting them to an audience on another screen.
To start a slide show:
There are several ways you can begin your presentation:

To advance and reverse slides:
You can advance to the next slide by clicking your mouse or pressing the spacebar on your keyboard. Alternatively, you can use or arrow keys on your keyboard to move forward or backward through the presentation.
You can also hover your mouse over the bottom-left and click the arrows to move forward or backward.

To stop a slide show:
You can exit presentation mode by pressing the Esc key on your keyboard. Alternatively, you can click the Slide Show Options button in the bottom-left and select End Show .

The presentation will also end after the last slide . You can click the mouse or press the spacebar to return to Normal view.

Presentation tools and features
PowerPoint provides convenient tools you can use while presenting your slide show. For example, you can change your mouse pointer to a pen or highlighter to draw attention to items in your slides. In addition, you can jump around to slides in your presentation or access other programs from your taskbar if needed.
To show the taskbar:
Sometimes you may need to access the Internet or other files and programs on your computer during your presentation. PowerPoint allows you to access your taskbar without ending the presentation.
- Locate and select the Slide Options button in the bottom-left corner.

Slide options
You can also access any of the menu items above by right-clicking anywhere on the screen during your slide show.

To skip to a nonadjacent slide:
You can jump to slides out of order if needed.

- The selected slide will appear.
To access drawing tools:
Your mouse pointer can act as pen or highlighter to draw attention to items in your slides.
- Locate and select the Pen Tools button in the bottom-left corner.

You can also use the laser pointer feature to draw attention to certain parts of your slide. Unlike the pen and highlighter, the laser pointer will not leave markings on your slides. To use the laser pointer, select it from Pen Tools, or press and hold the Ctrl key and the left mouse button.

To erase ink markings:

When you end a slide show, you'll also have the option to Keep or Discard any ink annotations made during your presentation. If you keep ink markings, they'll appear as objects on your slides in Normal view.

Presenter view
If you're presenting your slide show with a second display—like a projector—you can use Presenter view . Presenter view gives you access to a special set of controls on your screen that the audience won't see, allowing you to easily reference slide notes , preview the upcoming slide , and much more.
To access Presenter view:
Start your slide show as you normally would, then click the Slide Options button and select Presenter View . Alternatively, you can press Alt+F5 on your keyboard to start the slide show in Presenter view.

Click the buttons in the interactive below to learn more about using Presenter view.

End Slide Show
Click here to end the presentation.
Display Settings
From here, you can customize your d isplay settings , including the option to duplicate—or mirror—the slide show on two screens and swap the monitors if Presenter view is appearing on the wrong screen.
Show Taskbar
Click here to show the taskbar and access other programs without closing the presentation.
Here, you can see how long you've been giving the presentation. You can also pause and restart the timer if necessary.
Current Slide
This is the current slide being shown to the audience.
Slide Options
Here, you can access the same slide options you would find in normal presentation mode, including the Pen Tools and See All Slides buttons.
Advance and Reverse Slides
Use the arrows to move forward and backward through your presentation.
Here, you'll see any speaker notes for the current slide. You can use the Increase and Decrease buttons below to make the notes larger or smaller.
Here, you can preview the next slide that will appear in the presentation.
Slide show setup options
PowerPoint has various options for setting up and playing a slide show. For example, you can set up an unattended presentation that can be displayed at a kiosk and make your slide show repeat with continuous looping.
To access slide show setup options:

- The Set Up Show dialog box will appear. From here, you can select the desired options for your presentation.
Click the buttons in the interactive below to learn about various options for setting up and playing a slide show.

Here, you can choose a show type .
Show Options
Here, you choose playback settings and disable certain features if desired.
Show Slides
Here, you can choose which slides you want to show during the presentation. All is selected by default, but you can choose to show only certain slides or use any custom shows you have created from your original presentation.
Advance Slides
If you have set timings in your slide show, they will play automatically. However, if you want to disable the timings and control the slides yourself, select Manually .
Multiple Monitors
If you have more than one monitor, you can choose which one to display the slide show on. It's usually best to leave this setting on Automatic .
To advance slides automatically, you'll need to customize the slide timing on the Transitions tab. Review our lesson on Applying Transitions to learn how.

- Open our practice presentation .
- In the Set Up Slide Show options, change the pen color to purple.
- Start your slideshow, then access Presenter view .
- Advance to slide 8.
- Use the pen tool to circle the fundraising amounts for the 2015-2016 school year. These are the amounts over the green bars.

/en/powerpoint2016/lists/content/
Critical PowerPoint Shortcuts – Claim Your FREE Training Module and Get Your Time Back!
How to Present a PowerPoint Slideshow (w/ Shortcuts)
- PowerPoint Tutorials
- Shortcuts & Hacks
- May 11, 2019
There are a variety of ways to start a PowerPoint presention, depending on:
- Where you start your presentation (from beginning or from current)
- Which PowerPoint view you prefer to present in (Slide Show view or Presenter view)
- How comfortable you are with keyboard shortcuts
Why would Microsoft include so many ways to present a presentation? My guess is that everyone learns PowerPoint differently, and has personal presentation styles. The more options you have, the easier your life will be as there will always be a way to start your presentation the way you want to (or jump back into it when you need to).
See all the options below and find the method that works best for you and let the slide show begin !
NOTE: If you are running two presentations side-by-side, each presentation needs to be started as it’s own slide show. To see how to set up two PowerPoint presentations to run side-by-side like this before you start your slide show, read my guide here .
Table of Contents
Start slide show from beginning.

To start a slideshow from the beginning of your presentation using the ribbon, simply.
- Navigate to the Slide Show tab
- Select From Beginning
Selecting From Beginning starts your presentation from the very first non-hidden slide in your presentation, regardless of which slide you are currently inside of your deck.

You can also start your slide from the beginning of your presentation by hitting the Slideshow From Beginning keyboard shortcut, F5 .
Regardless of which method you use, this is the classic way to start your presentation in full screen from your first title slide (regardless of where you are in your slide deck).
Let the slide show begin!
NOTE: To expand your knowledge and learn how to use PowerPoint’s FREE and HIDDEN built-in laser pointer to point things out during your presentation, read my guide here .
Take your PPT skills to the next level
Start slide show from current.

To begin your slide show from the slide you are currently on using the ribbon, simply
- Navigate to the Slide Show tab
- Select From Current Slide
Selecting From Current Slide starts your slide show from whatever slide you are currently on, even if the slide is hidden.

You can also start your slide from the current slide you are on by hitting the Shift+F5 keyboard shortcut.
Because it’s often easiest to catch errors when building your slides in this full screen mode, I highly recommend learning the Shift+F5 shortcut and using it frequently as you build your slides to spot them for errors.

If you don’t want to bother learning the From Current Slide shortcut, you can also start your slideshow by clicking the Slide Show icon at the bottom of your screen.
This is a fantastic way to spot check your slides as you are building them. On top of that, it’s a fast and uncomplicated way to re-start your presentation from where you left off after demoing something on screen.
Start a mini-slide show in PowerPoint
You can also use the following hidden PowerPoint shortcut to run a mini slide show over the top of your current deck.

To run a mini slide show, simply:
- Hold down the Alt key on your keyboard
- With your mouse, click the Slide Show icon
Doing so starts a small slide show of your presentation that you can see below, from the current slide you are on.

Presenter View
The Presenter View is an alternate way to run your presentation in PowerPoint. In this view, your slides are projected on screen, and the details of your presentation are displayed on your computer as pictured below.

The presenter view includes your next (non-hidden) slides that is coming up, your current slide projected on screen, how long you’ve been talking and your speaker notes.

To launch the Presenter View from the beginning of your presentation using your Ribbon, simply:
- Navigate to the Slide Show tab
- Hold down the Alt key on your keyboard
- Click From Beginning
Holding down the Alt key and clicking From Beginning , the Presenter View will launch from the very first (non-hidden) slide in your presentation.

You can also launch the presenter view from the beginning of your presentation at any time by clicking Alt + F5 on your keyboard.
Start Presenter View in PowerPoint From Current Slide

Did you know that you can access different views in PowerPoint by adding keys as you click commands in the PowerPoint ribbon?
To start the Presenter view from your current slide using your Ribbon, simply:
- Hold down the Alt key on your keyboard
- Click From Current Slide
Holding the Alt key and clicking From Current Slide launches the Presenter View from your current slide. So, this is another way you can quickly practice your presentation, see your speaker notes and see what’s coming up next.
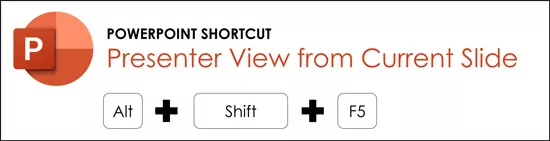
You can also launch the Presenter View from the beginning of your presentation at any time by hitting Alt+F5 on your keyboard.
Showing and Hiding Presenter View
Regardless of which view you start your PowerPoint slide show; you can switch between the two different slide show views without exiting presentation.

To switch between the two slideshow views (while giving your presentation), simply:
- Right-click your slide in whichever presentation view you are currently in
- Select either Show Presenter View or Hide Presenter View
When would you use a feature like this during a presentation? One example is if you want to view your notes without leaving the slide show mode.
NOTE: The letter r for both Show Presenter View and Hide Presenter View is underlined. This means that it is a keyboard shortcut. So, if you want to quickly flip between these two presentation views, you can simply right-click your slide and hit the letter r on your keyboard. Doing so automatically switches the view you are in.
Controlling how your presentation runs
Another way to control how your presentation runs (including the default laser pointer and pen color), is the Set Up Slide Show dialog box.

To open the Set Up Slide Show dialog box, simply:
- Select the Set Up Slide Show command
Doing so, opens all your PowerPoint slide show settings and options as pictured below.
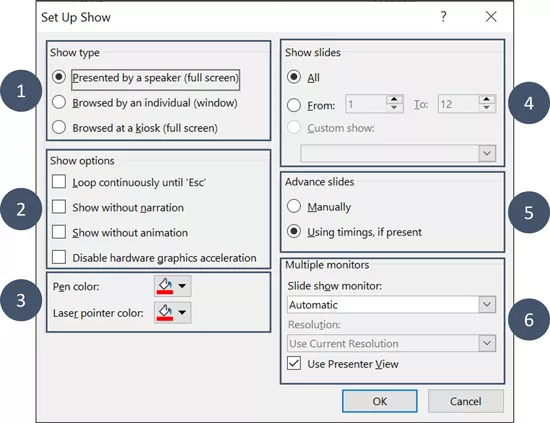
Inside the slide show settings dialog box, you can select:
- How your presentation runs (full screen, window or in kiosk mode).
- Your default pen and laser pointer color options ( see our laser pointer article here ).
- Which slide you want start from, or which slides you want to show. You can also setup a custom show here.
- How your slides progress (manually or using slide timings).
- Which of your computer monitors (or screens) your slide show runs on.
The Set Up Slide Show dialog box is also the secret to running multiple presentations at the same time in PowerPoint. To expand your knowledge and learn how to set this up, read our guide here .
Setup Slide Show SECRET Shortcut

To use the SECRET shortcut to open the Set Up Slide Show dialog box, simply:
- Hold down the Shift key on your keyboard
- With your mouse, click the Reading View icon at the bottom of your screen
This is useful when you need to quickly cycle through lots of PowerPoint presentations and change how those presentations run. Instead of wasting time clicking through the Ribbon, simply hold the Shift key and click the Reading View icon. This is also a friendly conversation starter with a fellow PowerPoint enthusiast at Happy Hour.
NOTE: The color of your Reading View icon might be different than in the picture above, as it is dependent on the Office Theme you selected for PowerPoint.
How to exit a PowerPoint presentation early?

Regardless of how you start your full screen presentation, you can end your presentation at any time by hitting the Esc key on your keyboard.
Hitting Esc immediately takes you out of the PowerPoint presentation mode and back to the normal editing view of your slides, on whatever slide you were last presenting.
Here is how you can use a combination of all the different keyboard shortcuts to spot check and practice your presentation in full screen before you finalize your presentation.
- Hit F5 on your keyboard to start your presentation in full screen from the very first slide in your presentation. You can then use your arrow keys to advance, spot checking your slides for errors.
- When you find an error, simply hit Esc key to return to the normal PowerPoint editing view to fix your slide.
- When you are done, hit Shift + F5 to return the full screen presentation mode from the slide you just updated. You can then continue spot checking your presentation (without having to start over from the beginning).
In this way you can quickly work your way through your slides and practice your presentation, fixing and adjusting your content as you go.
Understanding how to run your presentations is CRITICAL to the success of your presentation. Not only in presenting them live, but also in knowing how to spot check your slides as you build them.
I personally find it easiest to spot check your slides and quickly fix errors by running your presentation in slide show mode (or full screen). The last place you want to discover an error is during your presentation.
Using the commands and shortcuts above, you can quickly start, exit and step back into your slide show. Once you have these commands and features down, you will also look like a whiz during your presentations.
If you enjoyed the depth of this article, you will love our other PowerPoint training courses and free resources. To learn more, visit us here .
🔒 Unlock the PowerPoint Shortcuts Trusted by Industry Leaders KKR, American Express, HSBC, and More!
Join over 114,880 professionals from diverse fields including consulting, investment banking, advertising, marketing, sales, and business development who have supercharged their PowerPoint game with our proven methods.
✅ Customize compelling presentations effortlessly.
✅ Master time-saving techniques for faster deck creation.
✅ Boost your career prospects with top-notch PowerPoint skills.
Get FREE access to the Critical PowerPoint Shortcuts module of our premium training course by entering your name and email below.
DISCLAIMER: PC Users Only!
We respect your privacy and will keep your info safe and confidential.
Related Articles
About the author.

Popular Tutorials
- How to Strikethrough Text (l̶i̶k̶e̶ ̶t̶h̶i̶s̶) in Word, Excel & PowerPoint
- How to Make Animated Fireworks in PowerPoint (Step-by-Step)
- Strikethrough Shortcut (l̶i̶k̶e̶ ̶t̶h̶i̶s̶) for Word, Excel & PowerPoint
- How to Create a Flash Card Memory Game in PowerPoint (Like Jeopardy)
- Keyboard Shortcuts Not Working: Solved
PowerPoint Tutorial Categories
- Strategies & Opinions
- Presentation Design
- Pictures, Icons, Videos, Etc.
- New Features
- Miscellaneous
- Charts & Data Viz
We help busy professionals save hours and gain peace of mind, with corporate workshops, self-paced courses and tutorials for PowerPoint and Word.
Work With Us
- Corporate Training
- Presentation & Template Design
- Courses & Downloads
- PowerPoint Articles
- Word Articles
- Productivity Resources
Find a Tutorial
- Free Training
- For Businesses
We help busy office workers save hours and gain peace of mind, with tips, training and tutorials for Microsoft PowerPoint and Word.
Master Critical PowerPoint Shortcuts – Secure Your FREE Training Module and Save Valuable Time!
⌛ Master time-saving expert techniques.
🔥 Create powerful presentations.
🚀 Propel your career to new heights.
We value your privacy – we keep your info safe.
Discover PowerPoint Hacks Loved by Industry Giants - KKR, AmEx, HSBC!
Over 114,880 professionals in finance, marketing and sales have revolutionized their PPT skills with our proven methods.
Gain FREE access to a full module of our premium PowerPoint training program – Get started today!
We hate spam too and promise to keep your information safe.
You are currently viewing a placeholder content from Facebook . To access the actual content, click the button below. Please note that doing so will share data with third-party providers.

Cloud Storage

Custom Business Email

Video and voice conferencing

Shared Calendars

Word Processing

Spreadsheets
Presentation Builder

Survey builder

Google Workspace
An integrated suit of secure, cloud-native collaboration and productivity apps powered by Google AI.
Tell impactful stories, with Google Slides
Create, present, and collaborate on online presentations in real-time and from any device.
- For my personal use
- For work or my business

Jeffery Clark
T h i s c h a r t h e l p s b r i d g i n g t h e s t o r y !

E s t i m a t e d b u d g e t

Make beautiful presentations, together
Stay in sync in your slides, with easy sharing and real-time editing. Use comments and assign action items to build your ideas together.

Present slideshows with confidence
With easy-to-use presenter view, speaker notes, and live captions, Slides makes presenting your ideas a breeze. You can even present to Google Meet video calls directly from Slides.

Seamlessly connect to your other Google apps
Slides is thoughtfully connected to other Google apps you love, saving you time. Embed charts from Google Sheets or reply to comments directly from Gmail. You can even search the web and Google Drive for relevant content and images directly from Slides.

Extend collaboration and intelligence to PowerPoint files
Easily edit Microsoft PowerPoint presentations online without converting them, and layer on Slides’ enhanced collaborative and assistive features like comments, action items, and Smart Compose.

Work on fresh content
With Slides, everyone’s working on the latest version of a presentation. And with edits automatically saved in version history, it’s easy to track or undo changes.

Make slides faster, with built-in intelligence
Assistive features like Smart Compose and autocorrect help you build slides faster with fewer errors.

Stay productive, even offline
You can access, create, and edit Slides even without an internet connection, helping you stay productive from anywhere.
Security, compliance, and privacy

Secure by default
We use industry-leading security measures to keep your data safe, including advanced malware protections. Slides is also cloud-native, eliminating the need for local files and minimizing risk to your devices.
Encryption in transit and at rest
All files uploaded to Google Drive or created in Slides are encrypted in transit and at rest.
Compliance to support regulatory requirements
Our products, including Slides, regularly undergo independent verification of their security, privacy, and compliance controls .
Private by design
Slides adheres to the same robust privacy commitments and data protections as the rest of Google Cloud’s enterprise services .

You control your data.
We never use your slides content for ad purposes., we never sell your personal information to third parties., find the plan that’s right for you, google slides is a part of google workspace.
Every plan includes

Collaborate from anywhere, on any device
Access, create, and edit your presentations wherever you are — from any mobile device, tablet, or computer — even when offline.

Get a head start with templates
Choose from a variety of presentations, reports, and other professionally-designed templates to kick things off quickly..

Photo Album

Book Report

Visit the Slides Template Gallery for more.
Ready to get started?
How-To Geek
The beginner's guide to google slides.
Want to learn the basics about Google Slides? This beginner's guide walks you through everything from importing your PowerPoint files to sharing presentations online.
Quick Links
What is google slides, how to sign up for an account, how to create a blank presentation, how to import a microsoft powerpoint presentation, how to check your spelling in google slides, how to collaborate on presentations, how to see all recent changes to a presentation, how to link to a specific slide, how to insert special characters into a slide, how to use google slides offline.
If you’re just getting started with Google Slides, its extensive features and add-ons can be a little overwhelming. Here are some tips to help you get going with this powerful alternative to Microsoft PowerPoint.
If you’ve heard of Google Slides before, feel free to skip ahead; if you haven't, here’s a crash course on what you need to know. We’ll go over the basics and get you brushed up on what Google Slides is and how you can get started right away.
Slides is a free, web-based presentation program designed to compete with Microsoft Office PowerPoint. It's part of G Suite---Google's complete office suite (though some people refer to it all as Google Docs). The other main services included in the cloud-based suite are Sheets (Excel) and Docs (Word).
Related: What is Google Workspace, Anyway?
Google Slides is available on all devices and platforms; all you need is an internet connection and a web browser (or, in the case of mobile, the Android and iOS apps ). Google does the rest and handles the brunt of the heavy lifting, while it runs the software in the cloud.
Slides supports several file types, including .ppt, .pptx , .odp, .jpg, .svg, and .pdf. This makes it easy to view or convert Microsoft Office files directly from Google Drive or insert images directly into a slide.
Related: What Is a PPTX File (and How Do I Open One)?
And since Slides is an online presentation program, you can share and collaborate with multiple people on the same file, and track revisions, changes, and suggestions, all in real-time.
Have you heard enough? Let’s get started.
Before you can use Google Slides, you have to sign up for a Google account (an @gmail account). If you already have one, feel free to move on to the next section. If not, we’ll go over the simplest way to create a Google account and get you set up with Slides.
Head over to accounts.google.com , click "Create Account," and then click "For Myself."
On the next page, you provide some information---first and last name, username, and password---to create your account.
Also, you have to verify your phone number, so Google can make sure you’re not a bot.
After you verify your phone number, the subsequent pages require you to provide a recovery email address and your date of birth and gender. You must also agree to the privacy statement and terms of service. After that, you’re the proud new owner of a Google account.
Now that you have a Google account, it’s time to create your first presentation. Head over to Google Slides and place the cursor on the multicolored "+" icon in the bottom-right corner.
The + turns into a black pencil icon; click it.
Pro Tip: Type
into the address bar from any browser and hit Enter to automatically create and open a new blank document.
Even if you’re new to Google Slides, you might already have a collection of Microsoft PowerPoint files you’d like to be able to use. If that’s the case, then you have to upload all your presentations before you can view them. While it might not support some of the more advanced features and effects of some PowerPoint presentations, it works pretty well.
When you import a PowerPoint presentation, you can use either Google Slides or Drive to upload your files. Both methods let you drag and drop a file from your computer directly into the web browser for easy uploads. Your Drive houses all of your uploaded files, but---for the sake of convenience---when you go to the Slides homepage, it only shows you presentation-type files.
From the Slides homepage, click the folder icon in the top right, and then click the "Upload" tab. Now, drag and drop any files you want to upload directly into this window.
Once the file uploads, Slides opens it automatically, and it's ready for you to edit, share, or collaborate.
To open a PowerPoint presentation that you want to edit, click the filename with the "P" next to it from your Google Slides homepage.
Click to either view the PowerPoint file or edit it in Slides.
After you’ve finished editing your file, you can download and export your presentation back into a Microsoft PowerPoint format. Just go to File > Download As, and then click the "Microsoft PowerPoint" option.
If you’d rather download your presentation as a PDF, ODP, JPEG, TXT, etc., you can do that here, as well.
Related: How to Import a PowerPoint Presentation into Google Slides
Now that you have a few presentations, it’s time to make sure your spelling and grammar are correct . Slides is equipped with a spellchecker. If you misspell something, it underlines the error with a squiggly line and prompts you to make a change.
This should be on by default, but you can make sure in Tools > Spelling > Underline Errors.
To see spelling corrections and suggestions, right-click the word with the line underneath. Alternatively, press Ctrl+Alt+X (Windows) or Command+Alt+X (Mac) to open the Spell Check and Grammar tool.
Along with a spellchecker, Google Slides comes loaded with a built-in dictionary and thesaurus. To use them, highlight a word, right-click it, and then click "Define [word]."
While this should get you started, we have a deeper dive into Google’s spelling and grammar checker if you want more info.
Related: How to Check Your Spelling in Google Docs
One of the best features of Google Slides is its ability to generate a shareable link. Anyone you share the link with can view, suggest edits to, or directly edit the presentation. This eliminates the hassle of sending a file back and forth between collaborators. Each person has her own text entry cursor to use on her computer.
To do this, click the orange "Share" button in the file you want to share. Next, choose how and with whom you want to send a link to the file. You can type email addresses or click "Get Shareable Link" in the top corner to hand out the invitation yourself.
From the drop-down menu, you can select one of these options for what other users can do:
- Off: Sharing is disabled. If you’ve previously shared a link with others, it will no longer work and revokes any permissions they once had.
- Anyone with the link can edit: Gives the shared users full read/write access. They still can’t delete it from your Drive, though---this is just for the contents of the file.
- Anyone with the link can comment: Allows shared users to leave comments which is handy for team projects.
- Anyone with the link can view : Shared users can view the file, but can’t edit it in any way. This is the default action when you share a file, and it's the best option if you’re trying to share a file for download.
You can do a lot more with these shareable links, as they also work with other Drive files and on mobile. For a deeper look at how links work and how to generate them, check out our post .
Related: How to Create Shareable Download Links for Files on Google Drive
When you share documents with others, it’s difficult to keep track of all the small changes that happen if you’re not present. For that, there’s revision history . Google keeps track of all the changes that occur in a document and groups them into periods to reduce clutter. You can even revert a file to any of the previous versions listed in the history with a click of your mouse.
You can view a list of all recent changes by clicking File > Version History > See Version History. Alternatively, you can press Ctrl+Alt+Shift+H (Command+Option+Shift+H on Mac).
Related: How to See Recent Changes to Your Google Docs, Sheets, or Slides File
You can also share a link to a specific slide in your presentation with a friend or coworker, without having to mention which one you're referencing. When someone clicks the link and the presentation loads, it jumps directly to the slide you're referencing. You do have to enable file sharing before you can link to a specific slide in your presentation, though.
Because each slide has a unique URL, all you have to do to link to one is click it in the left pane, and then copy the URL from the address bar.
Google Slides also has a character insertion tool. This allows you to insert special characters into your presentation without having to remember any Alt-codes. There are tons of symbols, characters, languages, and so much more. So, whether you want an arrow, different language scripts, or if you just want a few silly emojis to spruce up your presentation, Google Slides makes it easy to include them.
To open the character insertion tool, click "Insert," and then click "Special Characters."
From here, you can manually search for specific characters with the drop-down menus.
Use the search bar to find a specific character or emoji.
You can also use your drawing skills to search.
Related: How to Insert Symbols into Google Docs and Slides
What happens if you need to access Google Slides but don’t have an internet connection? Although Slides is a web-based product, that doesn’t mean you can’t use it offline . Any changes you make to the file offline will update the next time you connect to the internet. First, download the extension for Chrome.
To enable a presentation for offline use, go to the Google Slides’ homepage and, in the top-left corner, click the Hamburger menu > Settings. Once here, toggle "Offline" to the On position, and then click "OK."
To save storage space on your local machine, Google only downloads and makes the most recently accessed files available offline. To manually enable a file, click the three dots icon, and then toggle "Available Offline" to On.
Related: How to Use Google Docs Offline
Google Slides is a powerful, feature-rich alternative to Microsoft Office's PowerPoint. It's also completely free to use with an internet connection and a Google Account, making it a legitimate competitor for Microsoft.
Slide Transitions in PowerPoint [A Beginner’s Guide!]
By: Author Shrot Katewa
![Slide Transitions in PowerPoint [A Beginner’s Guide!]](https://artofpresentations.com/wp-content/uploads/2021/09/Featured-Image-Slide-Transitions-in-PowerPoint.jpg "which part of this presentation does this slide show")
PowerPoint presentations can sometimes be boring looking especially if you simply have a lot of text on your slides. You may need to add some pizzazz to it! And, the best way to jazz it up without being obtrusive is to use slide transitions in PowerPoint!
Slide transition in PowerPoint is the visual effect applied to an individual slide. The effect is visible when one slide changes or transitions into another. PowerPoint allows you to customize and control speed, sound, and other effects for certain transitions using the “Transitions” ribbon.
In this article, we will understand more about transitions and their types. Then, we shall also learn more about how to apply transitions in PowerPoint.
Plus, I’ll also show you some advanced techniques such as applying delay or changing the duration of slide transition. That, and much more! So, let’s get started!
1. What are Slide Transitions in PowerPoint?
Let’s start with the basics – what are slide transitions in PowerPoint?
As described before, transitions are basically animation-type visual effects that are applied to slides (instead of the elements on the slides) in PowerPoint. Using slide transition can make a subtle but huge impact in making your presentation feel engaging.
There are different types of slide transitions (we shall learn more about them in the next section). Additionally, you can further control certain aspects of the slide transition.
You can also add sound during the transition of slides although I highly advise against doing so. But, I’m sharing this just to show the level of customization of transitions offered by PowerPoint!
In the subsequent sections, we will learn more about the types of transitions and how to apply and customize them in PowerPoint!
2. Different Types of Transitions in PowerPoint?
In PowerPoint, slide transitions are divided into 3 categories. These categories are divided according to the type of transitions that are contained in each section.
The effects in each category are divided in a way that they are similar to each other in terms of visual intensity. The difference between the three categories is how much the transitions affect the overall tone of the presentation on a visual level while changing the slides.
The three categories of the slide transitions are –
1. Subtle: The effects in this category are, as the name suggests, very subtle. The transitions are minimal in effect and require very little time to transition from one slide to the next. These transitions are best used for simple effects. There are a total of 12 effects in this category.
2. Exciting: This category contains effects that are a bit more flashy than the effects in the “ Subtle ” category. The effects in this category are more visually prominent and are fairly noticeable. This category has the highest number of effects with a total of 29 different options.
3. Dynamic Content: This category contains strong transitions. These effects are even more vibrant than the effects in the “ Exciting ” category. This category has the least number of effects with a total of 7 different options.
2b. List of Transition Effects in PowerPoint
A list of the 48 different effects that are divided into 3 categories, provided in PowerPoint, is given below.
- Random Bars
- Checkerboard
- Honeycomb
- Ferris Wheel
- Fly Through
3. How to Apply Slide Transitions in PowerPoint?
Here’s how to add a slide transition in PowerPoint –
- Select the slide from the slide thumbnail view on the left.
- Click on the “Transitions” tab.
- Choose a transition as per your preference.
- Use the “Transition Effects” option to customize (if necessary)
- Preview the transition.
I’ve described the complete process in a step-by-step manner with visual aids below –
Step-1: Select the slide and go to the “Transitions” tab
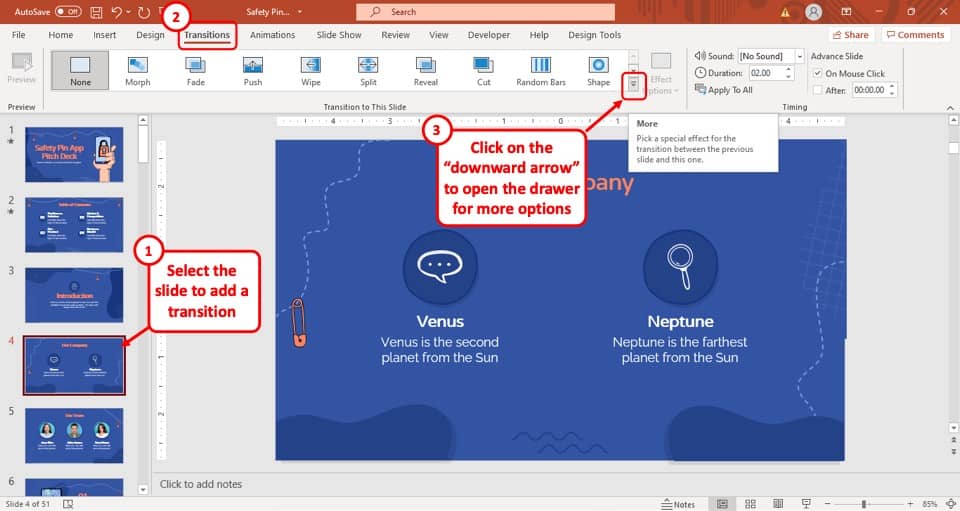
The first step of the process is to select the slide that you want to add the transition to. You can do so by clicking on the slide in the slide thumbnail view on the left part of the screen.
Then, go to the “ Transitions ” tab in the ribbon of your PowerPoint presentation. It is the 5 th tab in the ribbon section.
Step-2: Click on the “More” button
After you click on the “ Transitions ” tab, click on the tiny arrow button pointing downwards. It is the “ More ” button of the “ Transition to this slide ” section (as shown in the image in step 1).
This will open a drawer with multiple transition effect options.
Step-3: Select your preferred transition effect
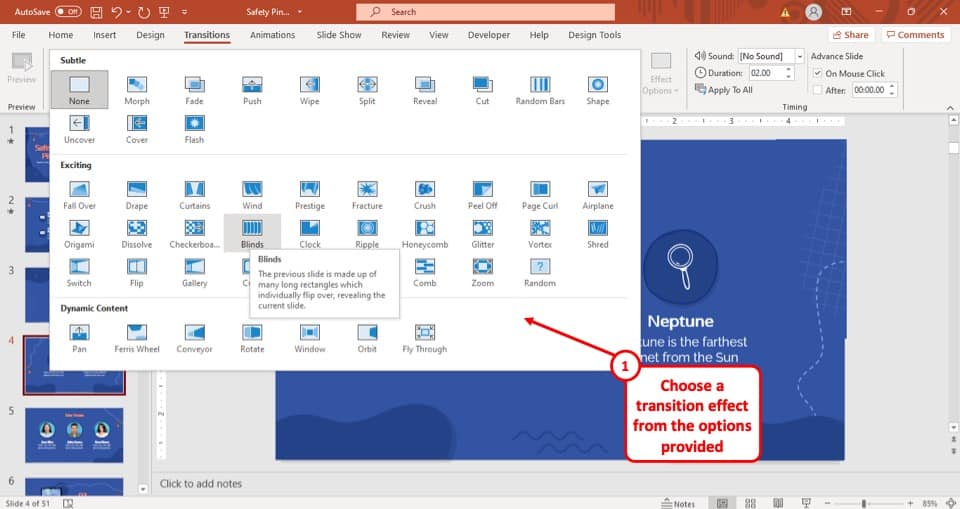
After you have clicked on the “ More ” button, a drop-down menu will appear on the screen where different slide transitions effects are displayed.
Simply click on your preferred transition effect and the slide transition will be applied to that slide immediately.
4. How to Preview a Slide Transition?
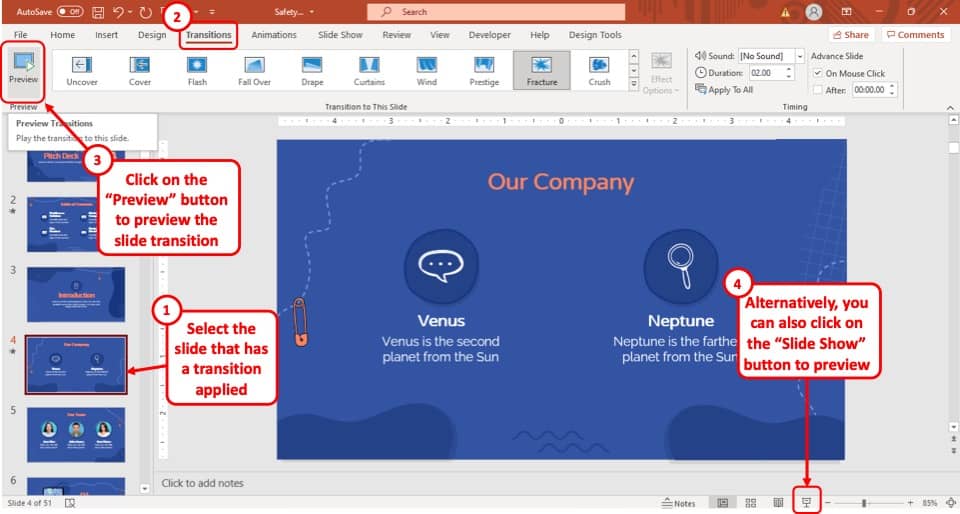
To preview a slide transition in your PowerPoint presentation, you have to click on the “ Preview ” button.
In the “ Transitions ” tab, after you select a slide transition effect, simply click on the “ Preview ” button at the left-most part of the options present on the “ Transitions ” ribbon.
The transition effect will be played on the slide to give you a preview when you click on the button.
Another alternative is to enter into the “ slide show mode ” using the current slide. Don’t forget to use the “ Esc ” key to exit the slide show mode in PowerPoint.
5. How to Modify Slide Transitions?
In Microsoft PowerPoint, there are different options that you can use to modify and edit a slide transition effect to better fit the style of your presentation.
You can modify the slide transition using the “ Effect Options ” button, or edit the duration, or add sounds to the slide transition.
In the following section, I will discuss the three mentioned options available for you to modify your slide transitions, and how to use them.
5a. Modify Transitions using Effect Options in PowerPoint
The “ Effect Options ” in Microsoft PowerPoint allows you to modify the direction and intensity of the transition effects.
Follow the steps given below to modify the slide transitions in your PowerPoint presentation using the “ Effect Options ”
Step-1: Click on the “Effect Option” button
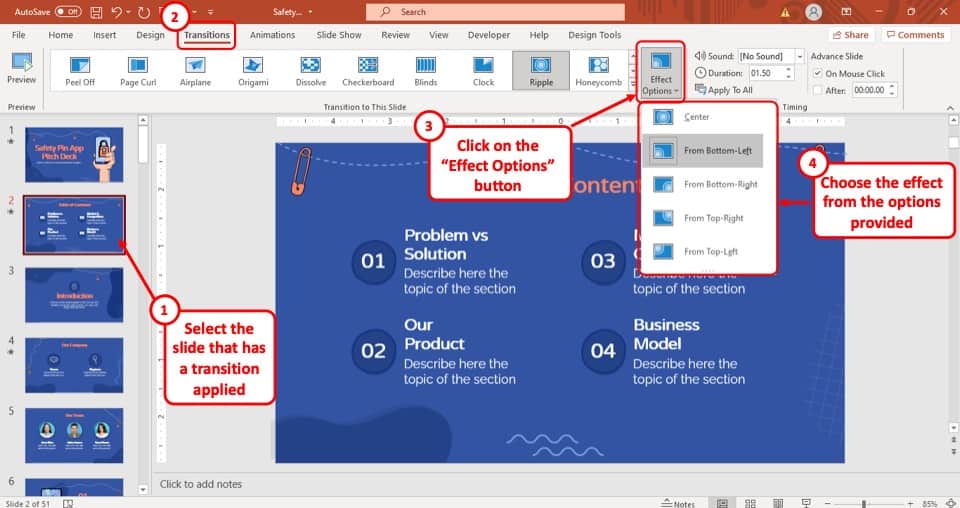
The first step of the process is to select the “ Effect Options ” button which is located at the right-most part of the “ Transitions in this Slide ” section. This will open a drop-down menu.
Step-2: Select your preferred modifications
After you have clicked on the “ Effect Options ” button, a drop-down menu will appear on your screen (as shown in the image in step 1).
The drop-down menu will provide you with all the possible modifications that you can make to the slide transition in your PowerPoint presentation.
All you have to do now is to select your preferred modification from the drop-down menu and it will be added to the slide in your PowerPoint presentation immediately.
It is important to note that these effect options vary from one type of transition to the other. Furthermore, some transitions may not even have an effect option available.
5b. How to Add Sound to Slide Transition in PowerPoint?
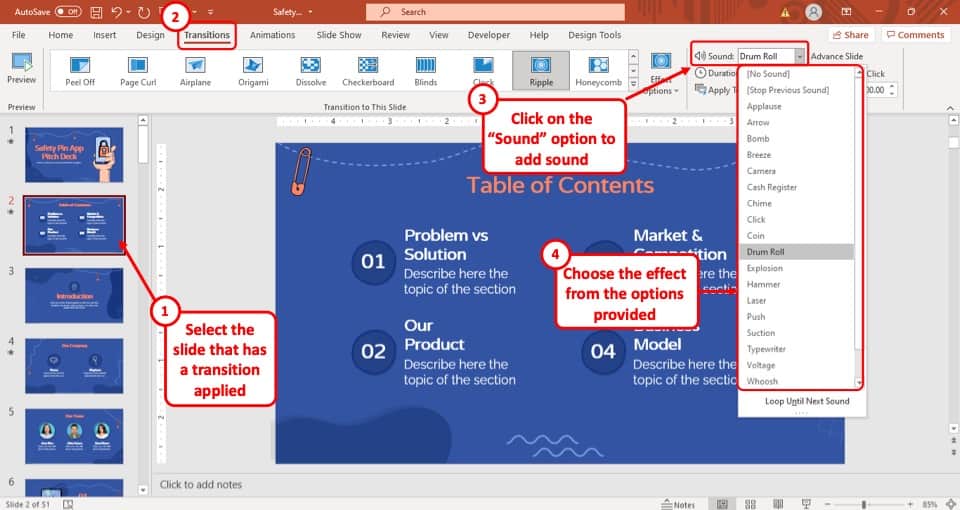
If you want to add a sound to the slide transition in your PowerPoint presentation, at first you have to select the slide.
Then click on your preferred sound effect from the “ Sound ” option in the “ Timing ” section of the “ Transitions ” tab. The sound effect will be added immediately after you select the sound.
5c. How to Control the Duration of the Slide Transition in PowerPoint?
In PowerPoint, you can also control how long you want the transition to be visible. You can speed up or slow down the transition effect itself!
Here’s how to control the duration of the slide transition –
Step-1: Go to the “Transitions” tab
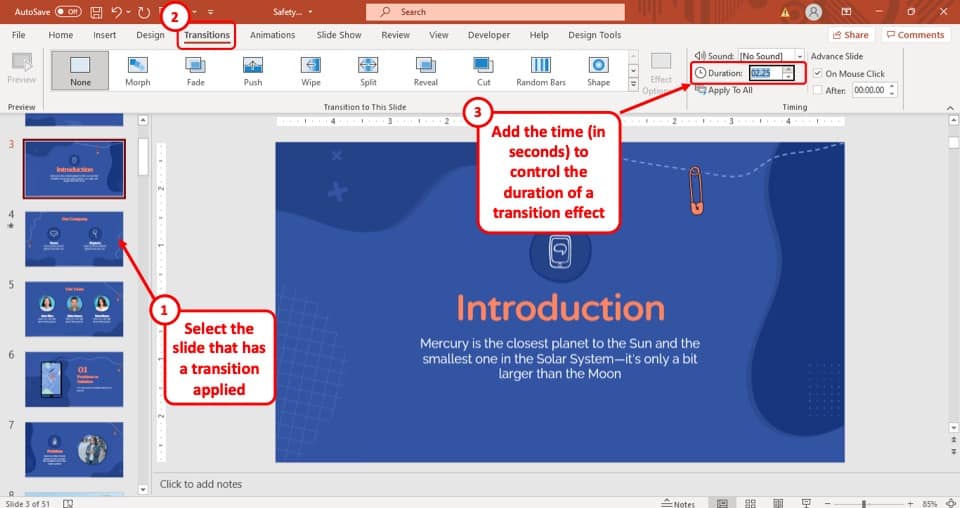
The first step is to select the slide that has a transition added and head over to the “transitions” tab.
Step-2: Change the “Duration” of the slide transition
After you have entered the “ Transition ” tab, simply type in the time duration you want the transition to take in the “ Duration ” box.
The “ Duration ” box is located under the “ Timing ” section of the “ Transitions ” tab (as shown in the image in step 1). Once the duration has been added, the transition effect will either be slow or faster based on the time added.
6. How to Apply Transitions to All Slides in PowerPoint?
If you have several slides in a presentation and you want to apply a particular type of transition on all slides, it would be quite a cumbersome process to select each slide and repeat the process over and over again.
Fortunately, PowerPoint allows you to apply the same transition to all slides with a click of a button! Here’s how to do it –
Step-1: Apply a Slide Transition for a Slide
The first step is to apply a slide transition to any one of the slides in your presentation. Follow the detailed process described earlier in the presentation to apply the slide transition.
Step-2: Click on the “Apply To All” option
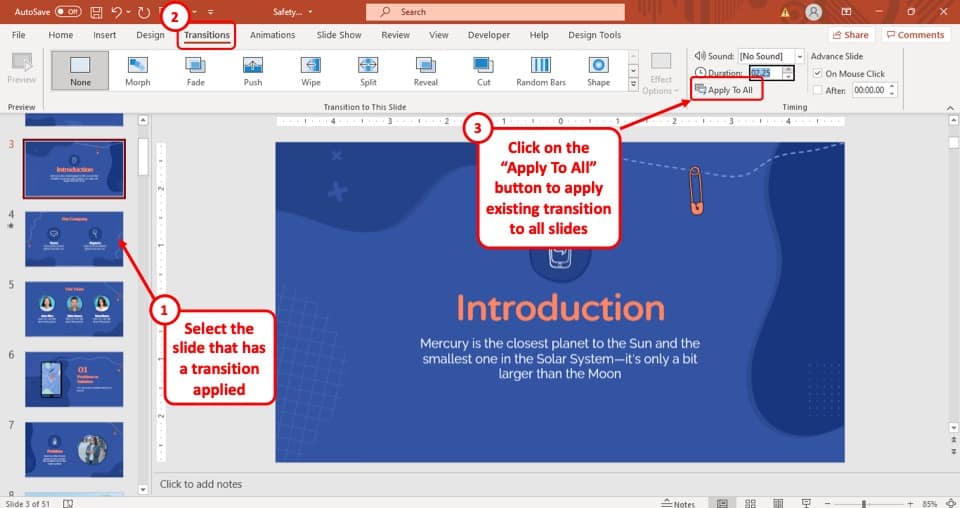
The next step is to simply click on the “ Apply to All ” option under the transitions tab.
This will apply the transition present on the selected slide to all the slides in your presentation! Just make sure that you haven’t used a different transition for a particular slide as using this button will override any pre-existing slide transitions applied to other slides!
7. How to Remove Transition from a Slide in PowerPoint?
To understand the process of removing a slide transition effect from your PowerPoint presentation, follow the 2 easy steps described below.
Step-1: Select the Slide with an Existing Transition
The first step of the process is to select the slide with a transition that you want to remove. After that, head over to the “ Transitions ” tab.
Step-2: Select the “None” option from the “Transitions” tab
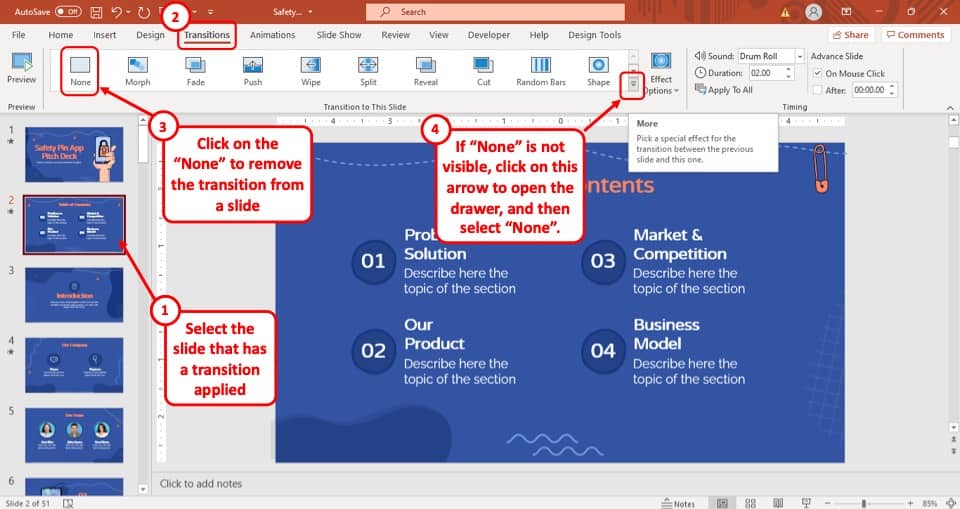
Simply click on the “ None ” option from the “Transitions to this slide” section. If this option is not visible, click on the “ More ” button of the “ Transition in the Slide ” section as described earlier, to open a drop-down menu
After you open the drop-down menu by clicking on the “ More ” button, select the “ None ” option located in the top left corner of the drop-down menu. It is the first option in the “Subtle” category of slide transitions.
After you click on the “ None ” option, all the slide transition effects on that slide will be removed from your PowerPoint presentation.
8. How to Set Automatic Slide Transition in PowerPoint?
To set your slide transitions to automatically change to the next slide, you have to set a timer on the slide transition using the “ Advance slide ” option in the “ Timing ” section of the “ Transitions ” tab.
Here’s how to automatically advance slides in PowerPoint –
Step-1: Select the slide to add the effect
The first step is to select the slide that you want to modify or add the effect to.
Step-2: Locate the “Advance slide” option
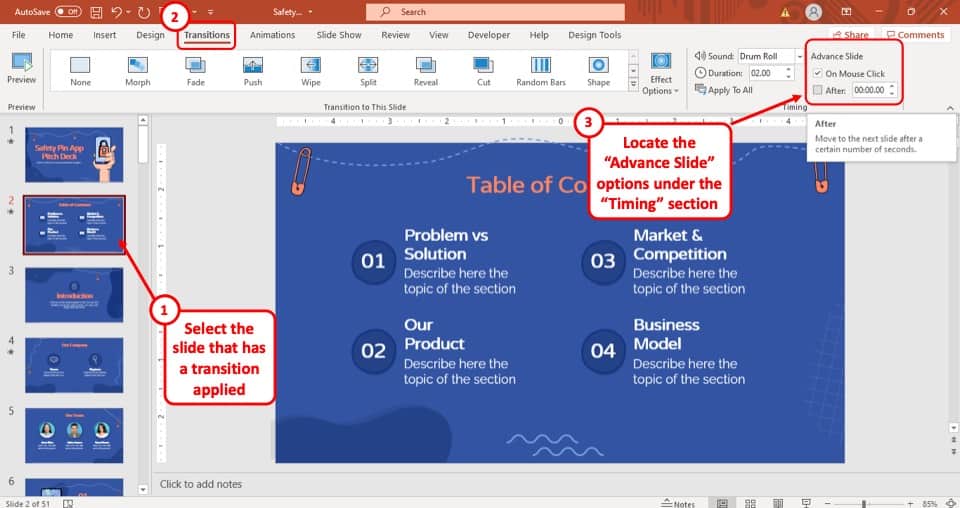
Next, click on the “ Transitions ” tab and locate the “ Advance Slide ” options. You should be able to spot it on the top-right part of the ribbon under the “Timing ” section.
Step-3: Remove Checkmark from the “On Mouse Click” option

Next, make sure that you uncheck the “ On Mouse Click ” option.
This option is usually used to enable the mouse click as a trigger for the slide to transition. However, since in this case, we want the slide to transition automatically, we shall disable this option.
Step-4: Select the “After” check box
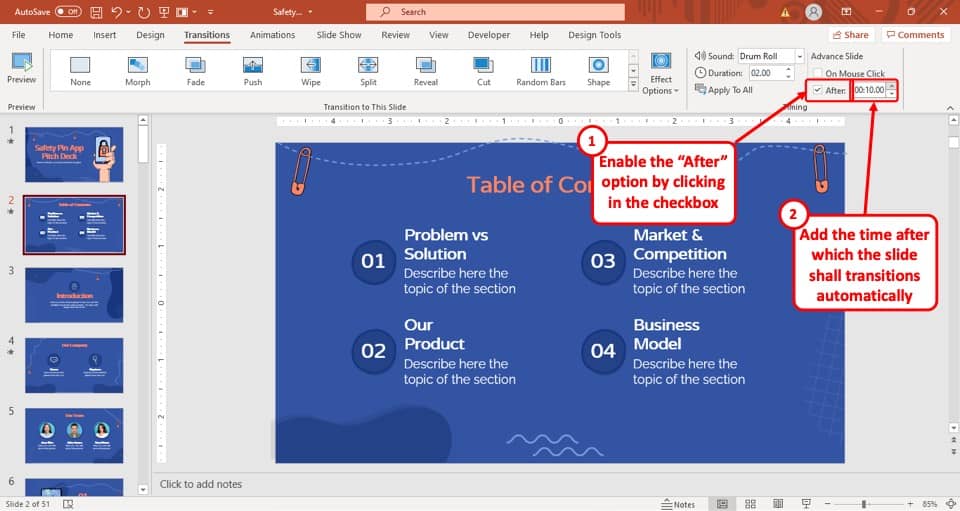
Now, enable the “After” option by making a checkmark before the option. This will allow you to set a timer for the slide to change.
Step-5: Adjust the interval
After you add the checkmark for the “ After ” option, set the interval after which you want the slide to change automatically (as shown in the image in step 4)
Simply type in the duration in the box to the right of the “ After ” option and the slide will change automatically after that interval while in presentation mode.
Step-6: Choose the “Apply to All” option

The last step is to choose the “Apply to All” option as described in the article before. This will create a seamless transition effect on all slides and make them transition automatically.
9. Can You Add Multiple Transitions to the Same Slide?
You can’t add multiple transitions to the same slide in your PowerPoint presentation.
However, you can use the Animations feature of PowerPoint and add effects to the objects, texts, shapes, and images in your slide.
You can add multiple animations on the same slide while also adding a transition to it. We have an entire article dedicated to this, which explains the use of animations in more detail. Click here to read the article.
10. How to Fix “Slide Won’t Transition” Error?
Usually, when users face the issue of a slide not transitioning, there are two main issues that you need to check.
You either have a “ Custom Slide Show ” selected or the “ On mouse click ” option is not turned on for your presentation.
Both of these issues and their easy fixes are explained below.
Issue-1: Check your custom slide show feature
Sometimes, users set up their custom slide show feature but only add the first slide and close the process before selecting the rest of the slides.
This may cause your presentation to only display the selected slide and not the rest of the presentation while in presentation mode. Follow the steps described below to get around this issue.
Step-1: Select the Custom Shows option
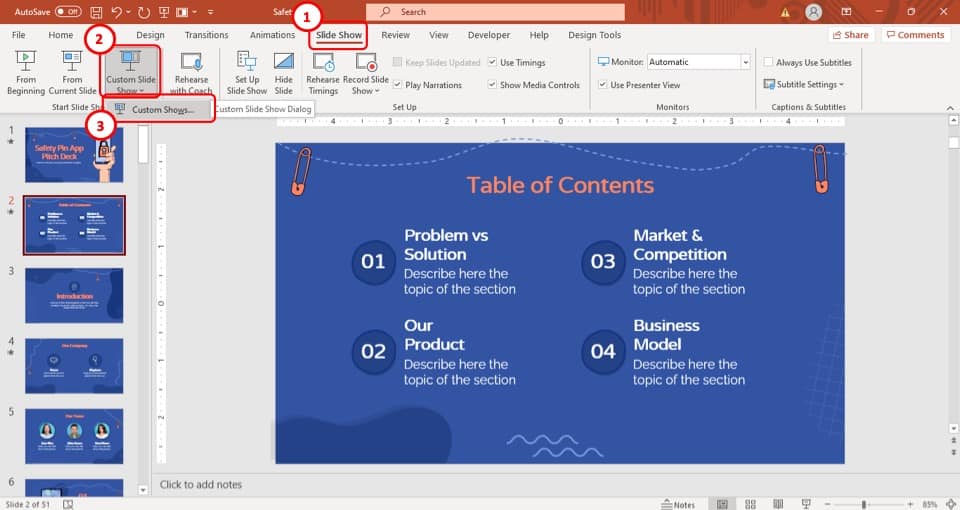
After you have entered the “ Slide Show ” tab from the ribbon of your PowerPoint presentation, click on the “ Custom Shows ” option.
The “ Custom Shows ” option is located in the drop-down menu of the “ Start Slide Show ” button in the “ Slide Show ” tab of your PowerPoint presentation.
Step-2: Make sure the right slides are in the pop-up window
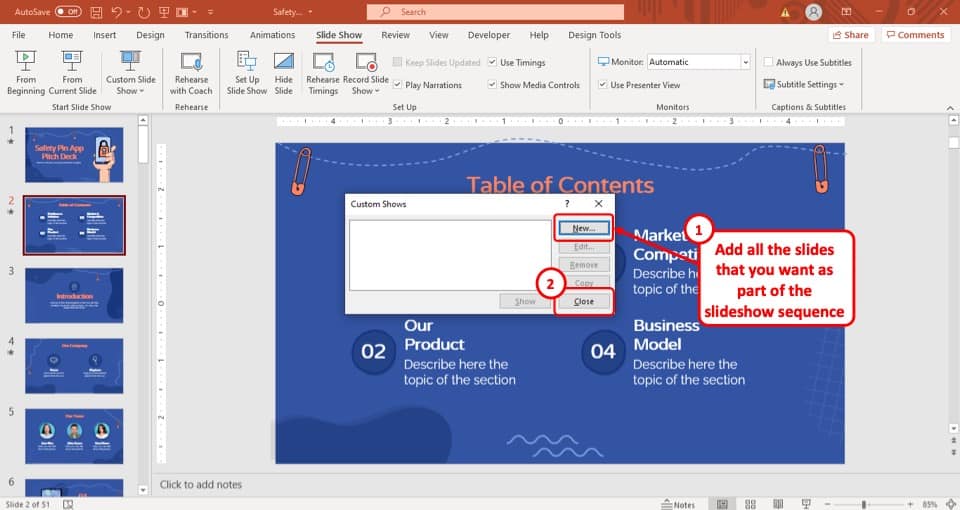
After you click on the “ Custom Show ” button a pop-up window will appear on your screen. If you don’t want to use the “ Custom Slide Show ” feature, then make sure to remove all the slides in the pop-up window.
However, to use this feature, you have to add all the slides that you want to include in the presentation and not just one slide. After that, your slides will transition accordingly.
Issue-2: The “On Mouse Click” feature is turned off
Sometimes, the reason why users are unable to transition from one slide to another is that the feature which allows users to change slides using the mouse is turned off.
The whole process of fixing this issue is given below.
To get started on fixing the issue, at first you have to select any slide from your PowerPoint presentation and go to the “ Transitions ” tab from the ribbon section as described earlier in this article.
Step-2: Checkmark the “On Mouse Click” option
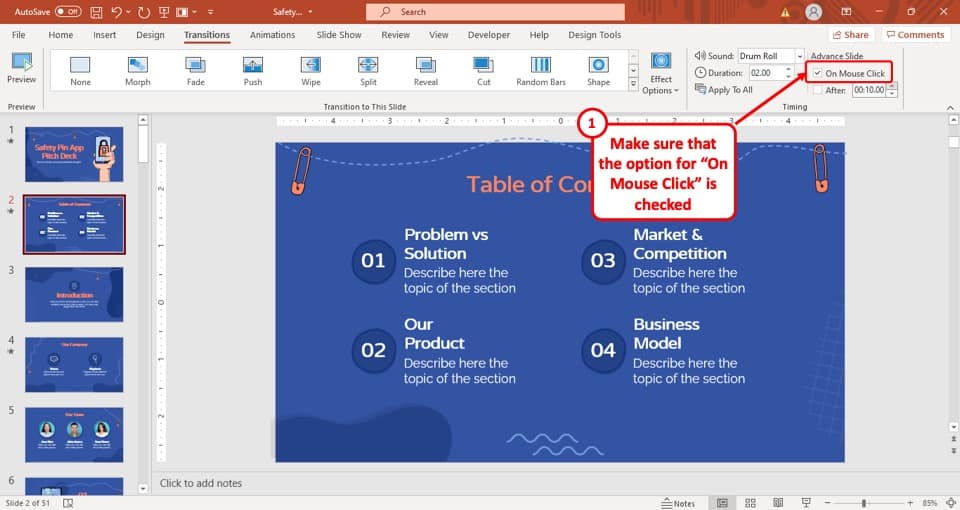
The first step of fixing this issue is to go to the “ Transitions ” tab from the ribbon and then clicking on the check box located right before the “ On Mouse Click ” option in the “ Advance Slide ” feature of the “ Timing ” section.
Step-3: Click on the “Apply to all” button
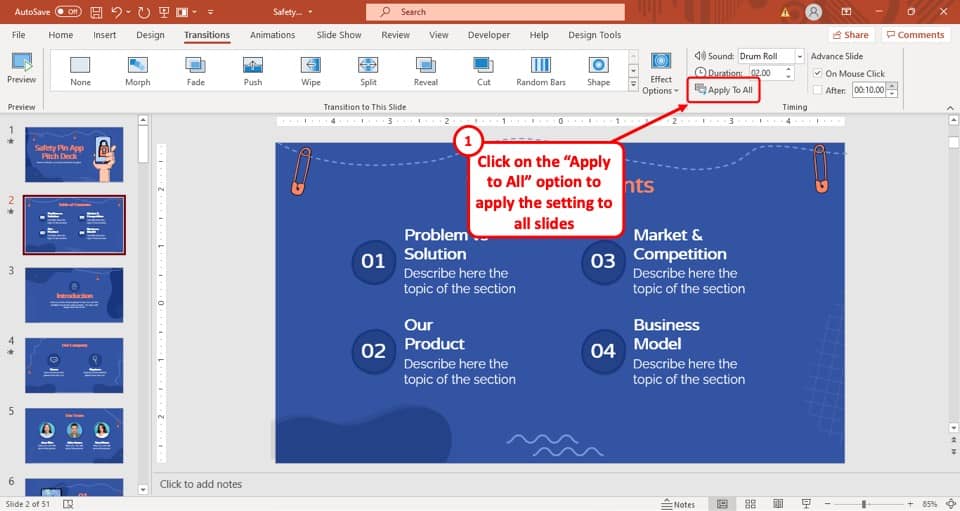
After you have turned on the “ On Mouse Click ” option, simply click on the “ Apply to all ” button, which is located at the bottom left corner of the “ Timing ” section in the “ Transitions ” tab.
This will turn on the “ On Mouse Click ” feature for all the slides in your PowerPoint presentation. After that, you will be able to transition from one slide to another normally.
credit to cookie_studio (on Freepik) for the featured image of this article (further edited)
Home Blog PowerPoint Tutorials PowerPoint Animations: Animate Text, Objects, and Slides in Your Presentations
PowerPoint Animations: Animate Text, Objects, and Slides in Your Presentations

Working with graphic assets can bring a degree of expectancy when delivering a presentation, such as in the case of PowerPoint animations. They can help add emphasis to slide content and reveal parts of the slide gradually to help presenters discuss topics sequentially.
As a presenting software, PowerPoint provides all kinds of animations for emphasis, entrance, exit, and to create a set motion. Join us today to learn all about animations in PowerPoint and unleash your creative potential.
Table of Contents
How PowerPoint Animations Can Benefit Presentation Design
Understanding powerpoint animation basics, types of animations in powerpoint, how to animate text on powerpoint, animating objects for visual impact, crafting seamless slide transitions in powerpoint, mastering advanced animation techniques in powerpoint, dos and don’ts of powerpoint animations, real-world use cases of animated presentation slides, recommended animated powerpoint templates, enhanced engagement and understanding through animations.
Dynamic presentations can have many benefits. The importance of such animations is often only realized by people familiar with PowerPoint. As we’ve seen in our guide on visual communication , graphical elements can make concepts more understandable. In the case of animations, we can use the transitions between slides or elements to split concepts and make them clearer.
Audience engagement is another factor, as eye-catching slides often include surprise elements hidden behind animations. These elements attract the audience’s interest and increase retention rate. In this case, animations serve as powerful presentation aids for the speaker.
Capturing Audience Attention
PowerPoint animations are more likely to capture the audience’s attention than static slides. The moving objects on-screen are the type of visuals people are likely to find attention-grabbing instead of trying to read through static slides or looking at static images. On this behalf, storytelling techniques boost their efficacy in connecting with the audience by implementing animations and transitions rather than sticking to static slides.
Emphasizing Relationships Between Elements
Whenever we work with contrasting values, like pros and cons slides , animations help the presenter highlight areas of interest or disclose the opposite values section by section. This, in turn, structures the speech for real-time interaction with the graphical assets rather than having the audience read the slide and lose focus on the speech.
Interactive Presentations
As mentioned before, presenters can craft compelling stories through the careful use of animations in PPT. What is often overlooked is the link between interactive presentations and animations. For instance, a speaker can deliver different outcomes of the presentation by selecting one path whose outcome is revealed through an animation. This “wow” factor induces surprise and creatively presents case scenarios.
Another option is when introducing your team in presentations. Rather than using static slides, incorporating animations gives more rhythm to the presentation and invites the public to interact with the speaker.
Getting Started with Animation in PowerPoint
To start with animations in PowerPoint, select an object you wish to animate and go to the Animations tab to choose an animation to add to the slide element. When adding animations to multiple objects in a slide, you should consider the sequence you wish to use to animate objects.

Accessing Animation Features
When accessing animation features, you will come across various animation types. By expanding the Animations menu, you can select animations for entrance, exit, emphasis, and motion paths to create a path for your animated sequence. You can also click to instantly preview an animation for the selected object or switch to slideshow mode to see how the animation will appear.

Adding Animations to Text and Objects
Once an animation is added to a text or object, a number is assigned. This number shows the sequence in which the object will be presented. For example, the object will be the first to be animated on screen, followed by two, three, and so on.

You can adjust the sequence of animations, triggers, and other settings from the Animation Pane in PowerPoint.

Timing and Sequence in Animations
The Timing menu in the Animations pane provides options to set the duration of the animation, the time to delay the animation on the screen (if necessary), and to assess if the animation starts on click, with the previous or after the last animation. How you select these animations will help you adjust the time and sequence of the animations. For example, you can use ‘ with previous’ option to show two animated objects simultaneously.

Entrance, Exit, and Emphasis Animations
Some of the most commonly used animation types fall under three categories: entrance, exit, and emphasis animations.
Entrance Animations
The Entrance Animations are meant to start or introduce objects. You can explore all entrance-related animations by going to Animations -> Animation (menu) -> More Entrance Effects . This will reveal all entrance animations you can click to preview for a selected object. These often consist of basic animations with effects like appear, fly-in, float-in, strips, wheel, circle, box, dissolve-in, split, wedge, wipe, plus, diamond, checkerboard, blinds, etc. The animations can be divided into three categories: basic, subtle, and moderate. These categories help identify the type of effects in each category according to how prominent they might be on screen.

Exit Animations
The Exit Animations are meant to help exit a slide or animated sequence to close a topic or subtopic, or to conclude the on-screen animations for a slide. These animations are similar to the Entrance Animations with the same effects. You can use these animation types for an exit sequence using effects like blinds, circles, checkerboard, box, plus, split, wedge, wipe, diamond, dissolve out, contract, swivel, fade, zoom, basic zoom, collapse, float up, etc.
Like the Entrance Animations, you can go to Animations -> Animation (menu) -> More Exit Effects to preview the animations and to see the three categories for basic, subtle, or moderate animations.

Emphasis Animations
Other than basic, subtle, and moderate, the Emphasis Animations come with an additional category, ‘exciting.’ Emphasis animations in PowerPoint provide visual aids for emphasizing content within slides. The effects for these animation types in PowerPoint are also quite different from the entrance and exit-themed effects. Effects like fill color, grow/shrink, transparency, line color, teeter, color pulse, object color, desaturate, darken, lighten, blink, wave, and others can help emphasize an object within a slide to make it pop out before the audience.

Exploring Motion Path Animations
If primary effects aren’t what you want, it’s time to switch to Motion Paths . These are animated effects in PowerPoint that showcase objects across a specific path. In other words, these are elaborate animations that drag objects on the screen based on a particular shape or path, such as a 4,5, 6, or 8-point star, crescent moon, circle, diamond, football, heart, octagon, pentagon, square, trapezoid, teardrop, right triangle, arc (down, right, left, up), curvy right, bounce right, etc.
Motion Paths are divided into four categories. The basic effects consist of shapes, whereas, Line Curves provide lines and curves to animated objects. Similarly, the special category contains more elaborate effects such as inverted square, loop de loop, peanut, bean, curved square, etc.

Choosing Appropriate Animation Styles
When choosing animation styles, picking a style that best resonates with your presentation slides is important. The animations’ names and categories can help you identify what might work for you. Furthermore, after adding an animation, you can go to Effect Options to view the various directions and options used to refine the animation to build your sequence further. Depending on the animation type, you can pick variations of the animation, directions, colors, transparency, points to edit or lock, or other options for selected effects. The image below shows the variations for the Wheel animation in PowerPoint via Effect Options .

Similarly, if you select Transparency from Emphasis Effects, you can choose how transparent the object will appear on the screen. Likewise, many color-themed effects enable picking a custom color to animate an object.

Since Motion Paths are unique, you will get options to edit points, lock paths, reverse the direction of the default animated sequence, etc.

Now that you know how to animate in PowerPoint, it’s time to explore making written content more interesting using animations.
Start by opening a blank PPT file and adding a placeholder text. The idea is to learn how text interacts with animation effects without working with complex graphic layouts.

Select the text and switch to the Animations tab. In there, pick an animation effect of your preference. You will get a preview of the effect applied – which will show the number of the animation order once completed.

Animations for text, like any other animation, can be controlled in terms of behavior by accessing the panel at the right-most section of the Ribbon.

Additionally, we can expand the animations panel to select from the different effects offered by PowerPoint.

Animating Text Elements on PPT Templates
Animating text elements to highlight key aspects of your slides can be a great way to create engaging presentations. The Animated 3D 4 Steps & Core PowerPoint Template shown below are among the Animated PowerPoint templates at SlideModel that animate objects and text elements for emphasis while retaining a clear layout.
As visible from the animated sequence from the Animation Pane in the image below, the slide deck uses animated text boxes with a mix of other slide elements to create a sequence where a four-step diagram is highlighted with supported text to help elaborate each part of the diagram in an animated sequence. We can add, remove, or modify the included effects via the Animation Pane.

Balancing Text Animations for Impact
By balancing text animations, you can have maximum impact when highlighting content for your slides. The animations can be triggered to start simultaneously to reveal all the text after a sequence of objects, before objects appear, or one by one to reveal the diagram contents gradually.

Animating Images, Shapes, and Charts
When animating shapes and images, you can use a variety of animation types for entrance, exit, and emphasis, and to make the content pop out. However, charts require subtle animations, and it’s best to use basic effects to reveal charts, such as Appear and Disappear .
The Animated Network Diagram PowerPoint Template is an example of how to animate shapes.

The template’s title slide reveals shapes and icons in the form of a diagram in an animated sequence.
You can also include images in such a template to customize the given diagram and animate it to reveal the image simultaneously or after a set of objects has already been revealed.

If you are including a chart in your slide that is to be animated, make sure the animation corresponds to other elements that might also be animated. For example, you can trigger the chart to be revealed after the slide title with a simple Appear effect. In such a case, the chart can be displayed altogether or gradually, in animated form.

Applying Object Animations Strategically
When placing slide objects, you must apply the animations strategically to avoid revealing information out of sequence. Furthermore, it is also worth considering how your effects appear. For example, in the image of the diagram below, would you prefer the diagram to appear floating upward or downward? Such considerations and other vital elements, such as your branding needs, are important to ponder when setting your animated sequence.

Enhancing Presentation Flow with Transitions
While Animations for PowerPoint are one way of making your slides engaging, PowerPoint Transitions is another. You can access them via the Transitions tab in PowerPoint and apply transitions between slides.

While many legacy transitions provide basic effects when switching between slides, some of the more recent additions to this menu, such as Morph Transition , enable the creation of elaborate animations by using Transitions to animate your slides. The below example shows a slide with the Morph transition, giving an animated effect to the diagram.

Maintaining Coherence Between Slides
When applying Transitions, it is essential to maintain coherence between slides by ensuring they don’t overlap with any added Animations. To do this, you should preview your slide deck to see how it might appear once all the animated effects have been included in your slides. Like PowerPoint Animations, you can also use Effect Options for Transitions to set a sequence or direction that best suits your needs.

Layering for Complex Animation Effects
Using layers of multiple objects and slides can easily create advanced animation effects. This can be done using not only PowerPoint animations but also transitions. The Animated Pendulum Swing PowerPoint Templates from the SlideModel archive of animated templates use Transitions like Morph to create animated sequences. The below example shows a swinging pendulum created using Morph.

Combining and Triggering Animations
Depending on the number of elements within a slide and the animations used, you can use triggers to customize and set sequences for slide elements to animate. The example below shows the selected pendulum’s various linking options for the on-click trigger. By placing your slide objects to be connected and triggered with different parts of your slide, you can create and customize animated sequences that can be pretty attention-grabbing.

PowerPoint Animation Painter
If you thought you had to start from scratch to animate each slide of your presentation, you are sorely mistaken. Much like the Format Painter option in PowerPoint, we can find Animation Painter , which is accessible via the Ribbon under the Advanced Animation control options.

This tool helps us duplicate animations between elements of the same slide or copy animation effects from one slide to another. As a format copying tool, it requires at least one animation effect to be placed otherwise the option is grayed out.
Creative Experimentation
Experimenting with Animations in PowerPoint can be pretty helpful to avoid making monotonous presentations. Experimentation does not necessarily require making slides from scratch, but you can also use ready-made templates such as the 3D animation PowerPoint Templates at SlideModel. Alternatively, some slide deck templates offer a considerable range of animation effects intended for maximum audience engagement, which users can quickly customize by editing placeholder areas for text, images, and logos.
Below is a list of do’s and don’ts of PowerPoint Animations for making presentations that best use animated effects.
Maintain Animation Moderation
It is essential to maintain moderation when using animations, as the use of too many animations on a single slide or presentation can make the content confusing.
Use of Appropriate Animations
Try to use appropriate animations for slide objects. The animation should suitably show if the object is to enter, exit, be emphasized, or be highlighted using a motion path.
Avoid Animation Overload
Avoid flashy animated sequences unless your presentation is meant for an audience that might find engaging, such as children in a classroom session.
Subtle can be Just as Engaging
Sometimes, subtle animations can be just as engaging as an animation with an elaborate effect. This can, in fact, be a better option than using animations that might be visually overpowering or difficult to follow due to elaborate effects.
Ensure Visual Consistency
As discussed earlier, it is vital to maintain consistency in using animated effects. Be it Animations or Transitions, using flashy effects or too many diverse effects can hurt how the audience perceives your content, as it might become confusing, visually overpowering, or unprofessional. In such a case, the audience might quickly lose interest in the presentation, leading to Death by PowerPoint.
Less is More
The design language of visual designs over the past decade or more has been intended to use fewer effects and graphical elements with ample space to make the interface look clean. Be it Modern UI or Material design apps, this design language has been evident across desktop and mobile UIs. Using the same concept, you can design your slides with fewer animations and graphical elements to make your content more visually appealing.
Turning PowerPoints into Millions
Courtney Allen, a professional PowerPoint designer who came out of a BFA in graphic design from Boise State University, had all but PowerPoint as a part of her portfolio. She started her freelancing career via Upwork, making over a thousand PowerPoints for clients, bringing in as many as $2 million. She suggests using simple designs and animations to make the most out of PowerPoint presentations.
Guy Kawasaki Pitch Deck
Guy Kawasaki, a former Apple employee, whose famous 10-slide pitch deck has inspired a variety of PowerPoint templates. This rule was designed for startups and business presentations, focusing on pitching a concept to investors. While this isn’t directly related to using animations in presentations, it is an example of making the best use of minimalist content in a few slides. You can learn more about the Guy Kawasaki pitch deck from our article about the 10/20/30 rule for PowerPoint presentations .
How not to use an Animated PowerPoint Presentation in Court!
Presentations with animations aren’t always a great idea. In 2014, a court in the United States criticized a PowerPoint presentation by the prosecutor, which led to the court throwing the case out. The presentation was made with sound effects and animations, with flashy elements like the bullseye. Some of the significant mistakes made by the prosecutor included ‘visual advocacy,’ where the defendant was marked with the word ‘guilt’ in the slide deck. Not to mention, the animated presentation seemed to be aimed at influencing the court using visual aids. Something that did not sit well with the court.
Use of PowerPoint by the US Military
The US Military has often been accused of Death by PowerPoint for preparing what some call the worst PowerPoint slides ever created. The issue became so profound that in 2011, it was revealed that an executive communications manager at Microsoft, Dave Karle, was tasked with ensuring that the US military could finally start using the software properly. After discussions with top military officials, an updated military presentation method was created, consisting of a number of presentation templates, tips, and graphics and more than 6000 map symbols.
In this section, you can check some ready-made templates that can be easily customized for your presentation’s purposes. All these templates feature professionally made animation effects with native PowerPoint tools.
1. Multi-Purpose Animated PowerPoint Slide Deck

Those looking for how to animate in PowerPoint now have a ready-made solution to create mind-blowing presentations in a couple of minutes. This slide deck contains 26 slides in a broad selection of topics. We can present facts, introduce our team, our company, display charts with animated effects, and so much more. Check it out now!
Use This Template
2. Animated 8-Step Social Media Carousel PowerPoint Template

Bring dynamism to your social media posts by implementing this vivid social media carousel template. With eye-catching animated effects, this template emulates the typical carousel posts we can find on platforms like LinkedIn or Instagram.
3. Problem Solving Animated PowerPoint Template

Bring professional graphics to troubleshooting sessions with your team. This template, filled with PowerPoint animations, offers a user-friendly approach to conventional problem-solving situations in which the team has to observe the Issue Matrix, suggest possible solutions, and prepare an implementation plan and its corresponding process flow diagram. Thanks to its high-quality animation effects, the speaker can introduce the facts individually, without diverting attention from the speech.
4. Animated Company Profile Presentation Template for PowerPoint

We’ve seen this template as one of the examples of animations for PowerPoint. It is a 21-slide solution offering all the tools required for a corporate-styled company profile presentation, specifically tailored for service businesses.
5. Corporate Company Profile Animated PowerPoint Template

An alternative option for company profile presentations, featuring a minimalistic graphic layout with a broad variety of animation effects. Check these 12 slides and customize them with information relevant to your organization – we bring complex animation effects in a ready-made format. Colors and placeholder images can also be replaced.
6. Animated Roadmap PowerPoint Template

Bring more action to any planning meeting using this animated PowerPoint roadmap template. After a clear path overview, each milestone slide contains animation effects to introduce relevant information to the topic. It is a new take on traditional roadmap presentations that allows the speaker to pace themselves regarding how to disclose the information about the strategy to embark on.
7. Animated Pros & Cons Comparison Slide Template for PowerPoint

We mentioned the advantages of using PowerPoint animations to discuss contrasting values of a situation. Well, this animated Pros & Cons slide is the ideal tool for that purpose, offering a generalist view, then two accompanying slides for Pros & Cons, respectively, with animated effects to introduce additional information per point.
Using animations to make visually appealing and engaging presentations requires ensuring that your content corresponds with your added animated effects. It is always best to use animations in moderation and to keep your slides minimalist while unleashing your creativity as a presenter. Using ready-made PowerPoint templates can also help give you a good starting point to begin experimenting with animations and effects. This can also be useful for people new to PowerPoint Animations to explore what is doable with an animated slide deck, using animated sequences tailored for customization.
Whether you’re using an animated template or making one from scratch, a preview in slideshow mode can save you a lot of trouble with potential issues tied to animated effects. Last but not least, using animations in PowerPoint isn’t always necessary, and you can even go for a simple slide deck with a handful of slides. What matters is that you should be aware of the information being presented, and the visual aids should be just to aid your slides and not meant to be the whole package on their own.

Like this article? Please share
Animations, Microsoft PowerPoint, PowerPoint Tools Filed under PowerPoint Tutorials
Related Articles

Filed under Google Slides Tutorials , PowerPoint Tutorials • April 17th, 2024
Google Slides vs. PowerPoint: A Detailed Comparison
Contrast and pick with presentation software suits your best. Check our guide on how the Google Slides vs. PowerPoint eternal debate.

Filed under PowerPoint Tutorials • April 16th, 2024
How to Insert an Equation in PowerPoint
Learn how to create easy-to-understand science slides by mastering how to insert an equation in PowerPoint. Step-by-step guide.

Filed under PowerPoint Tutorials • April 9th, 2024
How to Remove Notes from PowerPoint
Make alternative versions of your presentation files by learning how to remove notes from PowerPoint. Step-by-step guide with screeshots.
Leave a Reply
How to use PowerPoint transitions to improve presentations
Your slide show presentation already contains compelling information. However, the finishing touch, the added flair, is the use of transitions.

Even the most confident communicator needs a little help sometimes. PowerPoint is the program to use in order to capture details in a presentation format. Taking advantage of the slide transition options in PowerPoint will develop a flow that helps to keep your audience engaged without distraction. Here's how to get started with transitions.
- Managing slide transitions
Morph transitions
Managing powerpoint slide transitions.
Some may confuse transition and animation effects in PowerPoint. Animation effects in PowerPoint are only applied to objects within the slide whereas transitions are applied to the slide itself. This means that you can have one slide transition effect while the slide can contain multiple animation effects.
How to add a slide transition
To add a PowerPoint transition:
- Click on the slide that is the endpoint of the transition process.
- Click on the Transitions tab in the navigation ribbon.
- In the Transition gallery, click on the More (...) button to view the entire gallery.
- Click on a transition to preview the animation effect.
You will notice that a star icon has been placed next to the slide thumbnail on the left side of the window. This indicates that a transition has been applied. Next to the Transitions gallery, you will also see an Effects Icon command.

If you choose to display all transitions in the gallery, you will see that they are grouped into one of three categories:
- Subtle: This group contains the simplest transition effects. They typically make use of basic motion or animation.
- Exciting: The transitions in this group are more involved than in Subtle. The animations within are typically longer and more complex in nature.
- Dynamic Content: This group provides transitions of a different manner. The animation is applied to the content of the slide, not the background. By using the same background, you can visually link content. Dynamic transitions also work in reverse, if you need to switch back to the previous slide.

How to remove a PowerPoint transition
To delete a transition:
- Click on the slide marked with a star.
- Click on the Transitions tab in the ribbon.
- Select None from the Transitions gallery.
If you want to remove transitions from all slide simultaneously, all slides must be selected before selecting None from the transitions gallery. The easiest way to do this is to use the CTRL + A keyboard shortcut to select all.
Get the Windows Central Newsletter
All the latest news, reviews, and guides for Windows and Xbox diehards.
How to modify a PowerPoint transition

To edit transitions:
- Select a transition from the gallery.
- Locate the Timing group.
- Select a sound clip from the Sound drop-down list.
- Specify the duration of the transition animation. Choose between 0.01 and 59 seconds. (Values increase in 0.25-second increments.)
- Choose to advance to the next slide manually (by mouse) or after a specific time has elapsed. This can be increased or decreased in one-second intervals.
- Select Apply To All to create a uniform transition pattern for all slides in the presentation.
Depending on the transitions style that you have chosen, you can also modify the direction in which they move to and from.
If you have an Office 365 account, your organization may have another transition option for you to try. While Morph may seem like an animation nestled within a presentation, it is, in fact, a transition that could increase fluidity between slides. Essentially, you want to make sure that the two slides involved in the transition have at least one comment element, be it an image, title or graph.
How to apply PowerPoint Morph transitions
To add a Morph transition:
- Access the Transition gallery in the Transition tab.
- Select Morph from the Transition Effects group.
- Click the Effect Options next to the Transition Gallery.
- Select the elements you want to work with. (Choose from Objects , Words or Characters .)
- Click Preview to review the Morph transition.
Morph is a handy feature for providing clean animated transitions without having to dip into potentially complex animation components themselves. Here are some examples of what you can accomplish with the Morph command.
How to apply animation-style PowerPoint effects to words
To apply animated word transitions:
- Enter text on a slide.
- Duplicate the slide and text onto another slide.
- Click and hold on the text box of the duplicate slide.
- Use your mouse or trackpad to move the text to its end position.
- Apply any additional alterations to the text such as font size, color or style.
- Click the Transitions tab in the ribbon.
- Select Morph from the Transition gallery.
- Click Effect Options .
- Select Words from the drop-down list.
- Click Preview to review the results.
How to apply animated PowerPoint transitions to images
To add an animated image transition:
- Insert an image onto a slide.
- Duplicate the slide and its contents onto the next slide.
- Apply changes to the image on the duplicate slide. You can drag the corners of the picture to resize, alter the shape or move to another position on the slide.
- Click on the Transitions tab.
- Select Morph from the transitions gallery.
- Click Preview to review.
If you are sharing a presentation containing geographical data, you could use Morph to zoom in on specific locations on a map. Combine this with text transitions and you can create a powerful message without having to use the Animations tab.
How to view transitions in a PowerPoint slideshow
Once your transitions have been applied to the slideshow, you may want to run the presentation to get a sense of the audience experience. You can set up the Slide Show to play at the optimal pace. Your best bet would be to set up the Slide Show to progress automatically.
To change the Slide Show settings:
- Click on Slide Show on the navigation ribbon
- Click Set Up Slide Show in the Set Up group.
- Locate the Advance Slide section.
- Select the Using timings, if present option.
If you set up specific times under Transitions > Timing , you can then sit back and analyze your slide show to see how effective your transitions are. It is important to point out that transitions should compliment the content you are presenting, not distract from it. For a more professional presentation, you should stick with Subtle or Dynamic transitions, as Exciting offers a more fun and casual approach to transitions.
Wrapping up
Content will always be the key component of a fantastic PowerPoint presentation. Transitions are an elegant way to help you and your audience move from slide to slide, without an abrupt visual interruption.
Do you use transitions with your slides? Do you ever use Exciting transitions? Let us know in the comments.
Microsoft Office 101: Help, how-tos and tutorials

- 2 Bill Gates continues to 'backstage' manage Microsoft despite official departure, as Satya Nadella relies on his advice for Microsoft's transformative AI initiative
- 3 Xbox and Jackbox Games embrace the risqué in upcoming party pack
- 4 Amazon just put the coveted Fallout soundtrack vinyl up for pre-order, but act fast
- 5 One of 2024's best games has been an absolute life-changer for its solo developer — and you need to make sure you've played it
Magnify a slide in Slide Show view
While delivering your PowerPoint presentation using Presenter view, you can magnify slide content on the screen.
Note: The process steps below replace the previous zoom method which used the magnifying glass cursor and bright rectangle selection. Additionally, zooming out does not open the see-all-slides view. To see all slides, use the shortcut 'G'.
In the lower-right corner of your screen select Slide Show view.

In the lower-left corner of the screen, select the magnifying glass icon. Note that your slide has been centrally zoomed by 200% and the cursor is now a magnifying glass.
Move the magnification rectangle to the area of the slide you want to focus on, then click to magnify.
The cursor becomes a hand symbol, indicating that you can click and drag to move to another part of the enlarged slide.
To exit zoom mode and return to standard view, press Esc , or re-click the magnifying glass icon located at the lower left margin of the screen.

Need more help?
Want more options.
Explore subscription benefits, browse training courses, learn how to secure your device, and more.

Microsoft 365 subscription benefits

Microsoft 365 training

Microsoft security

Accessibility center
Communities help you ask and answer questions, give feedback, and hear from experts with rich knowledge.

Ask the Microsoft Community

Microsoft Tech Community

Windows Insiders
Microsoft 365 Insiders
Was this information helpful?
Thank you for your feedback.
IMAGES
VIDEO
COMMENTS
This clarifies the overall purpose of your talk and reinforces your reason for being there. Follow these steps: Signal that it's nearly the end of your presentation, for example, "As we wrap up/as we wind down the talk…". Restate the topic and purpose of your presentation - "In this speech I wanted to compare…". 5.
Check all that apply. (A) the steps Yasmin took to convince the council to pass the ordinance. (B) What information Yasmin presented to change the council's mind. (D) Yasmin's purpose in attending the town hall meetings. Look at the slide from the presentation about the impact of playing team sports in high school.
Length and Structure. The main part should make up about 70% of the presentation and also include a clear structure. Explain your ideas in detail and build them up logically. It should be organized chronologically, by priority or by topic. There should be a smooth transition between the individual issues.
Six steps for creating a slide show. 1. Plan your slide show. Before getting too deep into your slide show project, it's a good idea to select and save the photos and videos you want to use. This helps you create a slide show more efficiently and purposefully, ensuring a better outcome. 4.
2. Use the Outline View. One other way to structure a PowerPoint presentation in the editing mode is to use Outline View. You can choose it from the VIEW tab. This view doesn't display sections, but it shows the title and main text of each slide, which can give you a quick overview of the presentation contents.
Slide Sorter view. You can get to Slide Sorter view from the task bar at the bottom of the slide window, or from the View tab on the ribbon. Slide Sorter view (below) displays all the slides in your presentation in horizontally sequenced, thumbnails. Slide show view is helpful if you need to reorganize your slides—you can just click and drag ...
Start by deciding whether to show the slideshow in a window or full screen. To set up the slideshow, select Slide Show > Set Up Slide Show and choose one of the following: Browsed by an individual (window): Run the slideshow automatically and inside a window. This option works best when you save the slideshow to a CD.
Hook, Meat and Payoff. This presentation structure, like The Drama, is deeply founded in the art of storytelling. While the Hero's Journey is more of a literary technique, Hook, Meat and Payoff is more like a spoken-word progression. Source. Create your own graphics with this drag-and-drop tool.
The Google Slides interface. When you create a new presentation in Google Slides, the interface for Slides will appear. This interface displays the toolbar, along with the main view of your presentation. It allows you to create and modify slides, choose a theme, and share the presentation with others.. Click the buttons in the interactive below to learn about the interface for Google Slides.
Slide show setup options. PowerPoint has various options for setting up and playing a slide show. For example, you can set up an unattended presentation that can be displayed at a kiosk and make your slide show repeat with continuous looping. To access slide show setup options: Select the Slide Show tab, then click the Set Up Slide Show command.
Create a Section. To create a section, select the View tab and choose "Slide Sorter" at the top. Then, right-click the first slide you want in the section and choose "Add Section" from the shortcut menu. When the section appears, replace "Untitled Section" with the name you want, and press Enter or Return.
Click From Beginning. Holding down the Alt key and clicking From Beginning, the Presenter View will launch from the very first (non-hidden) slide in your presentation. You can also launch the presenter view from the beginning of your presentation at any time by clicking Alt + F5 on your keyboard.
Present slideshows with confidence. With easy-to-use presenter view, speaker notes, and live captions, Slides makes presenting your ideas a breeze. You can even present to Google Meet video calls ...
How to create an engaging introduction. Consider using the tips below to engage your audience before your next presentation: 1. Tell your audience who you are. Introduce yourself, and then once your audience knows your name, tell them why they should listen to you. Example: "Good morning. My name is Miranda Booker, and I'm here today to ...
How to Create a Blank Presentation. Now that you have a Google account, it's time to create your first presentation. Head over to Google Slides and place the cursor on the multicolored "+" icon in the bottom-right corner. The + turns into a black pencil icon; click it. Pro Tip: Type.
Here's how to automatically advance slides in PowerPoint -. Step-1: Select the slide to add the effect. The first step is to select the slide that you want to modify or add the effect to. Step-2: Locate the "Advance slide" option. Next, click on the " Transitions " tab and locate the " Advance Slide " options.
The example below shows the selected pendulum's various linking options for the on-click trigger. By placing your slide objects to be connected and triggered with different parts of your slide, you can create and customize animated sequences that can be pretty attention-grabbing. Triggering Animations in PowerPoint PowerPoint Animation Painter
Take a pause after you ask a question or make a strong statement. Spare your audience a moment to think, reflect, and ponder. Or leave a gap of silence right before you present something exciting to build suspense and anticipation. No one expects you to go on talking for 10-15 minutes without a pause.
Check all that apply. delete two of the three quotations. make the title shorter. highlight key words in the text. Study with Quizlet and memorize flashcards containing terms like During Domenica's oral presentation about the history of horror movies, she read from her notes often. She also showed clips from three films, commented on each one ...
To change the Slide Show settings: Click on Slide Show on the navigation ribbon; Click Set Up Slide Show in the Set Up group. Locate the Advance Slide section. Select the Using timings, if present ...
While delivering your PowerPoint presentation using Presenter view, you can magnify slide content on the screen. Note: The process steps below replace the previous zoom method which used the magnifying glass cursor and bright rectangle selection. Additionally, zooming out does not open the see-all-slides view. To see all slides, use the ...
The seven options are: Share your entire screen/desktop. Share the Slide Show window. Share the editing window with a clean look. Run the Slide Show in a window and share that window. Use the PowerPoint sharing option in Teams. Use Presenter View to show the audience your slides while you see Presenter View. Present with your video beside your ...
Study with Quizlet and memorize flashcards containing terms like he following is an excerpt from a slide in a presentation. Today, we will address • inverse operations • solving equations using inverse operations • solving inequalities using inverse operations From which part of the presentation does this slide most likely come?, What is a series of slides used in a presentation?, Which ...