- Slidesgo School
- Google Slides Tutorials

How to Use the Presenter View in Google Slides

Google Slides, like PowerPoint, has different presentation modes that can come in handy when you’re presenting and you want your slideshow to look smooth. Whether you’re looking for slides only, speaker notes or the Q&A feature, in this new Google Slides tutorial, you’ll learn about these and their respective settings. Ready? Then let’s explore the presenter view!
Types of presentation modes in Google Slides
Presenter view, start from beginning, present on another screen.
There are three presentation modes in Google Slides.
If you click the “Slideshow” button or press Ctrl/Cmd + F5, your presentation will start directly without any speaker notes. This is the most widely used and the simplest option.
Next to the “Slideshow” button, there’s a drop-down arrow. Click on it to see the different presentation modes:
In this mode, you’ll be able to see the speaker notes, check the timer and adjust other settings, such as questions from the audience. For more information about the speaker notes, please refer to this Google Slides tutorial .
To view the different tools, after clicking “Presenter View”, move your mouse to the lower left-hand corner of the screen. You’ll see the slide number, previous and next slide arrows and three dots. Click on the dots and here are your options:
Open speaker notes
This enables the speaker notes and makes them visible. If you click this button, you might exit fullscreen mode. To go back to fullscreen, press Ctrl/Cmd + Shift + F or click the “Fullscreen” button. For more information, please refer to this Google Slides tutorial .
Turn on the laser pointer
You’ll see a red dot on the screen, which you can move around to point out any element from your presentation.
Full screen
Click this button (or press Ctrl+Shift+F) to enter or exit fullscreen mode.
Click this button to finish the presentation or just press Esc.
If you click on “Auto-play,” more options will appear: Click “Play” and the slides will advance automatically (by default, every two seconds, but there are other options available. You can also choose to play the slideshow on a loop).
Captions preferences
If you have a mic set up, you can enable captions. Click the drop-down arrow to adjust the size of the text and its position on the screen.
If you click on “more”, you can enable the Audience Q&A panel by clicking on the first option that appears. For more information, please refer to this Google Slides tutorial .
More: Downloads, printing, info and options
Under the “More” tab, you can also choose different download formats for your slideshow or print it out. This tab also contains a handy list of keyboard shortcuts (if you prefer handling keys to using your mouse) and the possibility to report problems.
Your presentation will begin from the first slide (Ctrl/Cmd + Shift + F5).
Your presentation will be shown on a different screen via a media display device, such as Chromecast. This option will be available only if there’s another screen available.

Now you’ve mastered the presenter view in Google Slides, which, with a bit of practice, will be a game-changer! Not only will it make you look like a presentation pro, but it will also streamline the process of nailing those crucial talking points. So go out there and strut your stuff – with presenter view on your side, you are unstoppable! And if you’ve found this tutorial helpful, check out more of them on our blog !
Do you find this article useful?
Related tutorials.

Top 10 tips and tricks for creating a business presentation!
Slidesgo is back with a new post! We want your presentations and oral expositions to never be the same again, but to go to the next level of presentations. Success comes from a combination of two main ingredients: a presentation template suitable for the topic and a correct development of the spoken part. For templates, just take a look at the Slidesgo website, where you are sure to find your ideal design. For tips and tricks on how to make a presentation, our blog contains a lot of information, for example, this post. We have focused these tips on business presentations, so that, no matter what type of company or...

How to present survey results in PowerPoint or Google Slides
A survey is a technique that is applied by conducting a questionnaire to a significant sample of a group of people. When we carry out the survey, we start from a hypothesis and it is this survey activity that will allow us to confirm the hypothesis or to see where the problem and solution of what we are investigating lies.We know: fieldwork is hard work. Many hours collecting data, analyzing and organizing it until we have our survey results.Well, we don't want to discourage you (at Slidesgo we stand for positivism) but this is only 50% of the survey work....

Best 10 tips for webinar presentations
During the last couple of years, the popularity of webinars has skyrocketed. Thousands of people have taken advantage of the shift to online learning and have prepared their own webinars where they have both taught and learned new skills while getting to know more people from their fields. Thanks to online resources like Google Meet and Slidesgo, now you can also prepare your own webinar. Here are 10 webinar presentation tips that will make your speech stand out!

How to create the best presentation for an onboarding process
Slidesgo was once a small project with a handful of people working on it. We’re not making this up! But our passion and effort has brought us to where we are today. In the process, our staff has also grown, and let us tell you: it has grown a lot!Do you remember that time when you were the newly-hired employee? You went to the office and thought that everything was too much for you to handle. Lots of faces you’ve never seen before. Lots of tasks that are suddenly your responsibility. Nearly as much new information as a library could...
Home Blog Google Slides Tutorials How to Share a Google Slides Presentation
How to Share a Google Slides Presentation

Google Slides provides various methods to share your presentation with different levels of privileges. You can share your Google Slides templates and presentations online, which helps lessen the need to carry your PC around to deliver a presentation.
In this article, we will present different methods for sharing Google Slides in different formats: viewers and editing modes. Please keep in mind that this procedure can also be used for any PowerPoint templates you might have uploaded to Google Slides.
How to Share via Google Slides
Google Slides has a Share button that provides sharing options to set the access level, generate a sharing link, and email the slide deck to recipients.

Once you click the button, a dialog box will appear. You can enter the email addresses of people you want to share the slide deck with select editing privileges (Viewer, Commenter, or Editor). To directly email someone the slide deck with a selected level of access, simply enter their email address with optionally a message and click Send . Alternatively, copy the link with your selected level of access to share with others via different mediums such as WhatsApp, Facebook Messenger, Microsoft Teams, email, etc.

By default, Google Slides has restricted access; however, you can make it available to anyone with a specific link to make the slide deck unrestricted.

This unrestricted link can be sent by entering an email or by copying the link and sharing it with the recipient(s).

To refine the access, go to the cog icon ( Settings ) via the Share menu to see the access level information and adjust the settings. From here, you can disable change and sharing permissions by Editors and turn off download, print, and copy for Viewers .

You can also publish your presentation via File -> Share -> Publish on the web .

Publishing your presentation online via a link or embed code can be shared and embedded on a website for others to see.

Final Words
While you can share Google Slides in normal mode, if you’re wondering how to share Google Slides in presentation mode, it can’t be done directly. You can download the document as a PowerPoint or PDF file in presentation mode that can be shared later. However, you can’t directly generate a link or email the presentation until you exit presentation mode.
Alternatively, you can publish your slides on the web and share the link with your audience. However, it’s best to share the link with the audience beforehand if you wish to allow them to view the slide deck as you present your slides.

Like this article? Please share
Google Slides, Presentation Tips Filed under Google Slides Tutorials
Related Articles

Filed under Education , Presentation Ideas • January 1st, 2024
How to Create Presentations with AI using ChatGPT
We tested ChatGPT for helping us create better presentations. Join us in this article to know a first-hand experience on AI content generators and their potential role for presenters.

Filed under Presentation Ideas • December 21st, 2023
Presentation Aids: A Guide for Better Slide Design
Learn how we can elevate the quality of our speech by introducing presentation aids. A detailed guide explaining each type, tactics and more.

Filed under Google Slides Tutorials • December 20th, 2023
How to Convert PDF to Google Slides
Tired of piling up PDF presentations without any future use? Why not learning how to convert those PDFs into Google Slides format. Follow this tutorial for detailed instructions in this process.
Leave a Reply

- Get started with computers
- Learn Microsoft Office
- Apply for a job
- Improve my work skills
- Design nice-looking docs
- Getting Started
- Smartphones & Tablets
- Typing Tutorial
- Online Learning
- Basic Internet Skills
- Online Safety
- Social Media
- Zoom Basics
- Google Docs
- Google Sheets
- Career Planning
- Resume Writing
- Cover Letters
- Job Search and Networking
- Business Communication
- Entrepreneurship 101
- Careers without College
- Job Hunt for Today
- 3D Printing
- Freelancing 101
- Personal Finance
- Sharing Economy
- Decision-Making
- Graphic Design
- Photography
- Image Editing
- Learning WordPress
- Language Learning
- Critical Thinking
- For Educators
- Translations
- Staff Picks
- English expand_more expand_less
Google Slides - Sharing and Collaborating
Google slides -, sharing and collaborating, google slides sharing and collaborating.

Google Slides: Sharing and Collaborating
Lesson 6: sharing and collaborating.
/en/googleslides/managing-your-files/content/
Sharing and collaborating on files
Google Drive makes sharing your files simple. It also allows multiple people to edit the same file, allowing for real-time collaboration . Watch the video below to learn more about these features.
Sharing files
Whenever you share a file from your Google Drive, you can let others view and even edit that same file. While you can share any file stored on your Google Drive, it's important to note that you can only use the collaboration features for files created within your Drive.
Let's look at the example of Olenna, an art teacher who uses her Google Drive to organize letters, lesson plans, and more. Olenna's files include:
- Files she keeps private , like her spreadsheet with classroom expenses
- Files she lets others edit , like the lesson-planning documents she creates with her co-teacher
- Files she shares publicly and doesn't let others edit , like the newsletters and announcements she shares with her students and their parents
- Files others share with her , including ones she can edit, like her co-teacher's supply inventory; and ones she can't, like a schedule sent to her by the principal
As you can tell, no single sharing setting would be right for all of Olenna's files. The settings you choose for each of your shared files will probably depend on why you're sharing it in the first place.
When you share a file with a limited group of people, your collaborators must sign in with a Google account to view or edit the file. However, when you share with a larger group or make the file public , your collaborators will not need a Google account to access the file.
To share a file with a limited group of people:

- A dialog box will appear. In the People box, type the email addresses of the people you'd like to share the file with. If you want, you can add a message that will be emailed to the people you share the file with.

For more control over your files, you can click the drop-down arrow to decide whether people can edit, comment on, or simply view the file.

Sharing with a link
You can easily share a file with a larger group of people by providing a link to any file in your Google Drive. A link is basically a URL or web address for any file you want to share. This can be especially helpful for files that would be too large to send as an email attachment, like music or video files. You can also share a file by posting the link to a public webpage. Anyone who clicks the link will be redirected to the file.
To share a link:

Files shared with you
People can also choose to share files with you. These files will appear in your Shared with Me folder. However, if you'd prefer to access a file from your Google Drive without switching to this view, you can move it. To do this, navigate to your Shared with Me folder, hover the mouse over the desired file, then select Add to My Drive .

Collaboration tools
Whenever you share a file in a Google Drive format, you'll have the option to allow your co-editors to change and edit the file. Google Drive offers several tools that enhance collaboration by making it easier to communicate with your co-editors and to see which changes have been made and by whom.
Click the buttons in the interactive below to learn about the collaboration features in Google Drive.

Additional Sharing Options
Click File to view additional sharing options. Download as downloads your file in a different format like a Word document, PDF file, or HTML text. Publish to Web creates a simple webpage of your document. Email collaborators allows you to send an email that includes a link to your file. Email as attachment allows you to send your file as an email attachment.
Revision History
Click File and then select See revision history to view older versions of the file. You can see changes that have been made over time and revert to an older version if you want.
Comments Button
Click the Comments button to view a thread containing all comments related to the file, sorted chronologically. You can also add new comments and reply to old ones.
Share Button
Hover over the Share button to see a description on the file's current visibility settings . Click the Share button to edit the file's sharing settings . You can share your file with others, modify visibility, or create a link to the file.
Currently Viewing and Chat
Click here to chat with others who are currently viewing the file. Note that chats are not saved in Comments.
When a collaborator is modifying the file, a cursor will appear in a bright color at whatever point he or she is editing. Any changes the person makes will appear in real time.
Adding Comments
Comments allow you to attach a brief note to a certain section of a file. Your collaborators can see and reply to any comment you create. To add a comment , select the text you want to comment on, then right-click and select Comment from the drop-down menu. Your collaborators can choose to either Reply or Resolve the comment.
Suggesting mode
Google Drive also has a feature called Suggesting mode , which is similar to the Track Changes feature in Microsoft Office. This allows each collaborator to make changes, while giving the other collaborators a chance to review the changes before making them permanent. This page has more information about how to make suggested edits and accept or reject other people's changes.
- Open our example file . Make sure you're signed in to Google, then click File > Make a copy .
- Change to suggesting mode .
- Select the first three lines of the letter and center align them.
- Select the name Melissa Vaughn and add a comment that says Double check the spelling .

- Optional: Try sharing your document with someone.
/en/googleslides/converting-and-printing-docs/content/
AppsThatDeliver
How-Tos, B2B Software Ratings & Reviews
How to Make Google Slides View Only

Do you want to learn how to make Google Slides view-only?
When creating a presentation on Google Slides, you can share it with other users to collaborate with them.
However, there may be times when you want to make the slides view-only so that those with whom you’ve shared the presentation cannot edit the slides, but only view them.
Is it possible to do this in Google Slides?
Absolutely!
In this article, you’ll learn how to make your Google Slides view-only.
Also read: (opens in new tab) How to Track Changes in Google Slides How to Time Google Slides for 20 Seconds How to Lock an Image in Google Slides How to Select Multiple Slides on Google Slides How to Add Your Bitmoji to Google Slides
How to Make Google Slides View Only?
Step 1: click the “share” button.

To get started, open the presentation you want to share.
Once you have the slide open, you’ll see the “Share” button located in the top right corner of the page.
Click on the “Share” button and proceed to the next step.
Step 2: Under General access, select “Anyone with the link”

You will now see a pop-up with sharing settings.
You can either create a link and share it, or you can manually enter each user’s email address, select their role, and then share the slides.
Personally, I prefer creating a link and sharing that.
Under the “General access” settings, click the drop-down menu and select “Anyone with the link”.
Google Slides will create a link that you can share with others, but first, we need to edit the role of the user(s) who will access the slides.
Step 3: Set the role to “Viewer”

To select the role menu in Google Slides, first, locate it next to the “Anyone with the link” menu.
You will see three roles: Viewer, Commenter, and Editor. If you want users to only view the slides, select the “Viewer” role.
Alternatively, you can select the “Commenter” role. With the “Commenter” role, users can view the slides and suggest edits by right-clicking on any element on the slide and selecting the “Comment” option.
The comments will only be visible to the commenter and the owner of the slides.
If you want users to edit the slides, select the “Editor” role.
Did you know that you can create a link that will directly present the slides to anyone who accesses it?
They will only see the slides and not the toolbar and other features that an owner can see.
For more information, read this guide: How to Share Google Slides in Presentation Mode
Step 4: Click “Copy link” and share it with others

Finally, click the “Copy link” button and share the link with the people you want to access the slides.
Users will only be able to view the slides and won’t be able to edit them.
If you want to allow users to edit the slides, go back to step 3 and select the “Editor” role.
Yes, you can share Google Slides as view-only. In order to do so, you need to select the “Viewer” role under the sharing settings for the presentation. Once you’ve created a link to share the slides, users will only be able to view them and won’t be able to edit them.
To change a Google Slide from view-only to edit, you need to select the “Editor” role under the sharing settings for the presentation. Once you’ve done this and shared the slides with others, they will be able to edit the slides.
You have been granted the “Viewer” role by the owner. To edit the slides, click “View only,” then select “Request edit access.” Once the owner grants edit access, you will be able to edit the slides.
To lock a Google slide so it cannot be edited, select the “Viewer” role under the sharing settings for the presentation.
Making your Google Slides view-only is easy! Here are the steps to follow:
- Click the “Share” button.
- Under General access, select “Anyone with the link”.
- Set the role to “Viewer”.
- Click “Copy link” and share it with others.
Now you know how to make your Google Slides view-only.
If you want to allow users to edit the slides, simply go back to step 3 and select the “Editor” role.
Author: Shubham Calmblay
Shubham Calmblay, founder of appsthatdeliver.com, has a decade of experience with various Google products. He has authored 1,000+ guides for ATD, published on prestigious tech blogs. His work has garnered recognition from Protocol.com, Leadsbridge.com, MadMobile.com, and numerous other leading publications and corporations.
All Posts by Shubham Calmblay

Contribute to the Microsoft 365 and Office forum! Click HERE to learn more 💡
March 14, 2024
Contribute to the Microsoft 365 and Office forum!
Click HERE to learn more 💡
Top Contributors in PowerPoint: Steve Rindsberg - Jim_ Gordon - John Korchok ✅
March 11, 2024
Top Contributors in PowerPoint:
Steve Rindsberg - Jim_ Gordon - John Korchok ✅
- Search the community and support articles
- Microsoft 365 and Office
- Search Community member
Ask a new question
How can I share a PowerPoint so that it opens automatically in presentation mode?
Report abuse.
- Microsoft Agent |
Hi A teacher in Wa,
Thank you for querying in this forum.
According to your description, it seems that you want to share a presentation with students via Microsoft Teams and you also want your students to immediately watch your presentation as a slide show instead of seeing the slides in edit mode.
May I know if my understanding is right? If so, we’d suggest you save presentation file as .ppsx type file, if you are using PowerPoint in Windows, we’d suggest you go to PowerPoint File > Save as > Click More Options > select PowerPoint Show under Save as type, the file is saved as a .ppsx file. When the file is double-clicked, it opens as a slide show.
For more details, you can refer to this article: Start a presentation automatically with a PowerPoint Show .
Then you can go to Microsoft Teams and find the team > click Files tab > upload this file. And we have tested it on our side, if we saved it as .ppsx file and uploaded to Teams, when we clicked it, it will show as a slide show, as shown below:

If the scenario above is not consistent with yours, you can also post back and provide more details about your requirement.
Best Regards,
1 person found this reply helpful
Was this reply helpful? Yes No
Sorry this didn't help.
Great! Thanks for your feedback.
How satisfied are you with this reply?
Thanks for your feedback, it helps us improve the site.
Thanks for your feedback.
Replies (1)
Question info.
- Norsk Bokmål
- Ελληνικά
- Русский
- עברית
- العربية
- ไทย
- 한국어
- 中文(简体)
- 中文(繁體)
- 日本語
How to use Presenter view in Google Slides
- Written by: Emma Trantham
- Categories: Google Slides , Presentation skills
- Comments: 5

The past couple of years have seen a shift in most industries from in-person to digitally delivered presentations. For seasoned presenters and newbies alike, this move comes with the joint complications of presenting to an online audience and getting used to unfamiliar tech. Talk about spinning plates! This blog post covers how to use Presenter view in Google Slides, so that you can be more professional and feel more confident when presenting online.
For tips on how to improve your online presentation skills more broadly, check out our handy guide to moving presentations online .
How to resize and move the Presenter view window in Google Slides
How to time slides in google slides.
How to present in Google Slides Presenter View
How to use Google Slides Q&A
How to present google slides with notes.
Presenter view displays your slides to your audience in one window, and shows you your speaker notes in a separate window. This feature really only works if you have two screens. Without a second screen, the Presenter view window obstructs the view of your slides, so make sure to check that your audience can only see the presentation itself and not your personal speaker notes before you begin presenting!

Here’s how to get Presenter view up and running:
- Click the drop-down arrow next to the Present button in the top-right of your screen.
- Select Presenter view .
- The Presenter view window opens and your presentation will start to play.
To resize the Presenter view window in Google Slides, hover your cursor over any of its corners or sides and wait for the double-sided white arrow to appear. Then click and drag to alter the window to your preferred size and shape. To move the window across your screen, click and hold the very top of the window. To maximize the window to fill your screen, click the maximize button – this sits between the minimize button and the close window button.

Once you’re happy with the size and position of your window, you’re ready to start presenting.
On the left-hand side of the Presenter view window, you’ll see a timer that automatically starts ticking the moment you begin presenting. Press Pause to stop the timer, and Reset to restart it.
The timer button can be especially useful for rehearsing your presentation, or if you need to keep an eye on the clock to make sure that you’re not running out of time during your presentation.
How to present in Google Slides Presenter view
Below the timer, there’s a drop-down bar and a preview window showing the slide you’re currently on. If you click on the bar, you get a list of all your slides and can jump to any place in the deck. To advance from one slide to the next, just click the Previous or Next buttons below. These buttons also provide a visual preview of the previous and next slides, so you always know what’s coming up as you’re delivering your slides, helping you give a seamless presentation.
Presenter view also has a great interactive feature called Q&A that lets audience members ask questions without interrupting your flow. Q&A can be accessed via the Audience tools button on the right-hand side of the Presenter view window.

To begin a Q&A , follow these steps:
- Click Start new to begin a new Q&A session or, if you’ve already started a Q&A session, resume by selecting Continue recent .
- Under the bar Accepting questions from… , there’s an on/off switch. When the switch is on, the bar will turn blue to let your audience know that you’re accepting questions.
- Click this switch again to turn questions off .

A URL appears at the top of the blue bar in your presenter window and across the top of your presentation when Q&A is on. The audience can use this link to submit their questions at any point in the presentation, as long as Q&A mode is on.
This URL takes the audience to a separate tab on their browser where they can ask questions either publicly or anonymously.
Top tip: Send a copy of the link via email or paste it into the chat function of your online call to save your audience from having to type out the URL themselves.
Once someone has submitted their question, it appears in your Presenter view window under the Audience tools tab.

Hitting the Present button interrupts your presentation, and the question will appear on the screen for the audience to see. To return to your slides, press Hide .
Audience members can also up or down vote questions by clicking on the thumb icons. This allows your audience to interact with each other, and lets you know which questions are the most common.
Presenter view shows you your speaker notes on the left-hand side by clicking the button at the right-hand side of the window next to Audience tools .
If you’re struggling to read the text clearly, you can use the plus and minus buttons to adjust your font size.
Now you know how to use Presenter view . Your fingers can dance across the keyboard as you present with panache! To find out about other ways to present your Google Slides deck, such as Present on another screen , or how to download your deck in an alternative format, why not check out our Ultimate Guide to Google Slides . Or, if you need to present on a non-standard sized screen, our How to change slide size in Google Slides post might have the answers you’re searching for!

Emma Trantham
Principal consultant, related articles, how to present in google slides with present mode toolbar.
- Google Slides / Presentation skills
It takes time to create engaging, visual slides, so why undermine all your effort at the crunch point? Delivering a presentation properly really isn’t that tricky! With Google Slides’ Present mode toolbar, it’s super easy to present in Google Slides navigating your presentation effortlessly.

How to share your Google Slides presentation
- Google Slides
- Comments: 4
Wondering how to share a Google Slides presentation? Good news! It’s a pretty simple process. As Google Slides exists completely online, sharing your presentation with others isn't limited to an email attachment. This post will show you how to share Google Slides presentations in five ways, there’s definitely something here for you!

Creating and delivering the perfect job interview presentation
- Presentation skills / Visual communication
You’ve applied to what feels like (and may literally be) 101 different companies and you’ve finally landed that all important interview. Great! The only problem is, they’ve asked you to give a presentation about why they should hire you… What makes a killer presentation? What will separate you from…

Excellent job explaining. Thanks for your help and time.
When I am using Presenter View, my animations work but my fade transitions do not. How do I fix that?
I’m not sure we’ve ever come across this problem before. Have you tried toggling the fade transitions off and back on again? Hope that helps!
There may be noticeably a bundle to find out about this. I assume you made certain nice factors in options also.
Outstanding post, you have pointed out some superb points, I also believe this s a very superb website.
Leave a Reply Cancel reply
Save my name and email in this browser for the next time I comment.
Join the BrightCarbon mailing list for monthly invites and resources
You guys are amazing! Looks awesome, and works great. Perfect! Mila Johnson InComm

How-To Geek
How to autoplay and loop a google slides presentation.
Play your presentation without touching a thing.
Quick Links
Set up autoplay and loop when presenting, set up autoplay and loop when publishing to the web.
If you don't want to worry about clicking through your slideshow, you can set up Google Slides to play your presentation automatically. Plus, you can have the slideshow loop, so it starts over at the beginning when it ends.
You might be playing your slideshow at a kiosk, during a conference, or publishing it to the web. These are the ideal times to use AutoPlay and Loop in Google Slides . You can automatically present the show and choose the timing between slides. Then, restart the presentation at the beginning each time it ends.
If you plan to start the slideshow and then let it play, you can set up AutoPlay and Loop , or simply one or the other.
Related: How to Loop a PowerPoint Presentation
Start the presentation by clicking "Slideshow" at the top of Google Slides. You can also use the arrow to pick either "Presenter View" or "Start From Beginning" per your preference.
When the slideshow opens, display the Presenter Toolbar by hovering your cursor over the bottom left corner of the presentation.
Click the three dots on the right of the Presenter Toolbar, then move to AutoPlay. You'll see a pop-out menu that lets you select the advance timing for the slides. You can pick from every second up to every minute.
If you also want to loop the slideshow, select "Loop" at the bottom of the pop-out menu.
When you finish, click "Play" to automatically play your presentation.
To stop the slideshow, simply click on a slide. You can then resume AutoPlay from the Presenter Toolbar by selecting "Play" again.
Maybe you plan to publish your slideshow to the web or embed it on a website rather than play it locally. You can set up AutoPlay and Loop as part of the publish settings.
Related: How to Share a Google Docs, Sheets, or Slides File as a Web Page
Go to File > Publish to the Web in the menu.
Choose either "Link" or "Embed" per your intent. Then use the Auto-Advance Slides drop-down box to choose the timing for the slides. Here again, you can pick from every second up to every minute.
To loop the slideshow, check the box for Restart the Slideshow After the Last Slide.
You can then mark the checkbox for Start Slideshow as Soon as the Player loads if you like, so that the viewer doesn't have to take any action to begin the presentation.
When you finish, click "Publish" and confirm to obtain the link or embed code for the slideshow.
To share a Google Slides presentation that doesn't require you to walk viewers through it, remember these steps to automatically play and loop the slideshow.
Google Slides
How to Turn Google Slides into a Video?

Table of Contents
Using slides for presentations is a popular choice. However, if you don’t plan on giving the presentation live more than once, converting it into a video might be a better option. This way, you can add your voice to the presentation, and viewers won’t have to manually click through each slide.
Videos are easier to share and don’t run into compatibility issues like slideshows might. While Google Sheets and Excel can work together, they’re not always perfectly compatible. Videos, on the other hand, can be played on almost any modern video player or platform, including YouTube.
Although Google doesn’t have this feature built-in, there are free add-ons available in Google Workplace that can do the job. In this guide, we’ll show you how to use one of these add-ons, along with a few more methods, to convert your presentations into videos effortlessly.
How to Convert Google Slides to Video?
Looking to take your Google Slides presentations to the next level? Converting them to videos allows you to share them more easily and create engaging content. Here are several methods to achieve this:
1. Make Use of Add-ons:
Creator Studio is a handy tool you can add to Google from the Google Workspace Marketplace. It changes Google Slides into GIF images and MP4 video files. You can also add an MP3 audio file or record your voice to narrate your presentation. When your presentation becomes a video, it will include the background sound you added. If you want to know more, take a look at the step-by-step instructions below:
Step 1 – Install: Go to Extensions > Add-ons > Get add-ons . Search for “ Creator Studio ” and install it.
Step 2 – Open: Go to Extensions > Creator Studio > Create Video .
Step 3 – Customize: Set Output width and Interval between slides . Choose Video File (MP4) or Video with Audio (if adding narration).
Step 4 – Convert: Click Go and wait for the video to render.

2. Using PowerPoint
If you have access to Microsoft PowerPoint, you can export your Google Slides presentation as a PPTX file and then use PowerPoint’s built-in “Create a Video” feature. This method offers advanced control over video quality and resolution, making it suitable for professional presentations.
Step 1 – Download: Go to File > Download as > Microsoft PowerPoint (.pptx) .

Step 2 – Open in PowerPoint: Launch PowerPoint and open the downloaded file.
Step 3 – Export to Video: Go to File > Export . Choose Create a Video .
Step 4 – Customize: Select the desired video quality and resolution .
Step 5 – Record Narration (Optional): Click Record Narration to add your voiceover.
Step 6 – Save: Click Create Video and choose your preferred saving location.
3. Using Canva
Canva, a popular design platform, allows you to import your Google Slides presentation and convert it into a video. With its user-friendly interface and pre-designed templates, Canva is a great option for creating visually appealing video presentations without extensive editing skills. To convert your slides using Canva follow these steps:
Step 1 – Import Slides: Go to Canva and click Create a Design . Choose Presentations and select Import from Google Slides .
Step 2 – Edit (Optional): Make any desired edits using Canva’s editing tools.
Step 3 – Convert to Video: Click the Share button and choose Download as MP4 .
4. Using a Recording App
For a quick and straightforward solution, consider using a screen recording app. While this method doesn’t offer the same level of customization as the other options, it can be effective for basic presentations where narrating your slides is sufficient. Have a look at the steps below to see how it’s done:
Step 1 – Choose an App: Select a screen recording app like Loom or Screencastify.

Step 2 – Set Up Recording: Choose the recording area (entire screen or specific window).
Step 3 – Record: Start recording your presentation while narrating or adding annotations (if the app allows).
Step 4 – Stop Recording: End the recording and edit the video (optional) using the app’s features.
Step 5 – Save: Download the final video in your preferred format.
What are the Benefits of Converting Google Slides into a Video?
1. easy to watch and share.
When making presentations, people often use formats that anyone can easily see. Videos are one such format because they work on phones, TVs, computers, and tablets. This makes them accessible even for those who aren’t familiar with Google Slides. People can share videos on platforms like YouTube, TikTok, Facebook, or others without needing special software.
Plus, videos don’t need any special programs to watch or share files. Unlike Google Slides, which needs a Google account to see and send files.
2. Engaging Content Everywhere
Videos work well on different platforms, reaching a wide audience. They get lots of likes and comments on social media. You can also put videos on websites for tutorials and demos, making your site more exciting and keeping people’s attention longer.
If you add a video to emails, people are more likely to click and watch. It’s a way to keep people interested using modern techniques like email marketing.
3. Better Storytelling
In business, presentations can be really important. Sometimes Google Slides might not be enough to explain ideas to investors. Using videos can make storytelling better by mixing text with pictures and effects. Adding voiceovers and narrations can make presentations more personal.
Videos can create strong emotional connections with music and animations. When explaining hard stuff, videos can make it easier for people to understand ideas.
4. Easy Offline Viewing
Change Google Slides into a video and get a file with all the pictures and stuff. You can save this file on your device or share it with others. Unlike Google Slides, you don’t need the internet to see the file. You can download videos and watch them later, even if you’re not online. Also, you can record conferences to remember what was said later.
Frequently Asked Questions
How do i convert google slides to powerpoint.
You can change your Google Slides into PowerPoint. Just download your Google Slides file as a PowerPoint file. To do this, go to the top bar, click on “File,” and then select “Download.”
How to Convert Google Slides to PowerPoint with Audio?
Unfortunately, you can’t directly convert Google Slides to PowerPoint with audio. You’ll need to export the Slides as a PPT file. After downloading it, open the file in Microsoft PowerPoint and then add the audio manually.
Will my slide animations work in the video?
Sometimes, depending on the method you choose.
How long does it take to convert Google Slides to video?
It depends on the length of your presentation and the tool you use.
Save Time and Effortlessly Create Presentations with SlidesAI


Google Slides: How to add GIFs and stickers to your presentation
G oogle Slides helps you make impressive presentations with its diverse template library, collaboration options, and seamless integration with Google apps. You can use it on your Android phone, iPhone, desktop PC, laptop, or affordable Chromebook . Your audience might lose interest if your slides appear uninspired. Break the monotony by including an occasional GIF or sticker. This tutorial shows you how to add GIFs and stickers to Google Slides.
When to add GIFs and stickers to Google Slides
A GIF (Graphics Interchange Format) is an image file that uses a series of pictures to create an animated sequence. It's like a video without sound and is typically used to express reactions or make memes.
If you think your presentation might cause audience members to nod off to sleep, add a GIF or two to your Google Slides. There's a time and place for humor, so use it sparingly. For instance, a funny Star Wars GIF or sticker will attract your classmates' attention. But it might not fly during a board meeting presentation.
How to autoplay your Google Slides presentation
How to get gifs and stickers for your presentation.
If you can't find a particular GIF or sticker online, go to Giphy or Tenor.com and enter your search term. You can also explore the trending section to find popular GIFs. If you're using a phone, download the Giphy app from the Google Play Store or Apple App Store. You'll also find other third-party apps for Android and iOS.
How to add GIFs and stickers on desktop
We walk you through three ways of adding GIFs and stickers to Google Slides. The first method adds them from the web, the second accesses GIFs downloaded to your desktop PC, and the third uses a web link.
How to add GIFs and stickers from the web
- Open Google Slides .
- Click Insert from the toolbar.
- Select Image .
- Choose GIFs and stickers .
- Enter your search term.
- Select the GIF or sticker you want to add.
- Click Insert .
- To resize the image, click and drag any corner.
How to add GIFs and stickers saved on your computer
Adding GIFs and stickers from your computer is the easiest way to include them in your slideshow. You must download them to your PC before following these steps.
- Click Upload from computer .
How to add GIFs and stickers via URLs
First, keep your GIF or sticker's URL handy.
- Choose By URL .
- Paste the link.
- Click Insert image .
How to add GIFs and stickers on mobile
The Google Slides mobile app isn't as feature-rich as the desktop version. However, it will do in a pinch. First, download the GIFs or stickers you want on your phone. You can't add them to your presentation via URL.
The following steps work on Android and iOS. We use an Android smartphone in this tutorial, but iPhone users can follow along.
- Open the Google Slides app.
- Tap the plus icon in the upper-right corner.
- Select Image . Close
- Tap From photos .
- Choose a GIF or sticker from your gallery. Close
Why can't I add a GIF or sticker to Google Slides?
There are many reasons why your GIF or sticker might not load correctly despite following the steps listed above.
- Older versions of Google Slides might have issues with GIF playback, so get the latest update.
- GIFs and stickers may not appear as intended if you have poor internet connectivity. To avoid issues, download and add them to your slides instead of using URLs.
- Large GIF files may not work well with Slides. Compress the images or replace them with smaller files.
The best Google Slides templates for work, school, and home
How to edit gifs and stickers in google slides.
You can customize GIFs to match the theme of your presentation. You can add a border, crop, resize, and recolor images.
How to crop an image
- Double-click the GIF or sticker.
- Drag the black tabs until the image gets cropped to your preference.
- When you're happy with the final image, press Enter . If you aren't, type Ctrl + Z to undo the changes.
How to use formatting options
Use Google Slides' formatting options to change your GIF or sticker's orientation, size, color, opacity, and brightness.
- Select your GIF or sticker by clicking it.
- Select Format from the toolbar.
- Click Format options .
- Adjust the orientation or size from the Size and Rotation section.
- Change the tone of the image from the Recolor section.
- Customize your image's opacity, brightness, or contrast from the Adjustments section.
How to add a border
- Click the GIF or sticker.
- Select the pencil icon from the menu bar.
- Choose a border color.
- Click the border weight icon to adjust the thickness.
Get your point across with GIFs and stickers
If a picture is worth a thousand words, animated GIFS are worth even more. Pique your audience's interest by adding GIFs and stickers in Google Slides. If you want to make custom GIFs on Android, we have a guide for creating GIFs from stop-motion photos .

How To Add Video or Audio to Google Slides and Microsoft PowerPoint
Google Slides offers an excellent platform to infuse style and vibrancy into your routine workplace presentations. Moreover, it serves as a versatile tool for educational settings, seamlessly adaptable for students across different age groups. Brimming with an array of graphics, animation tools, and immersive features, Google Slides empowers users to enhance their presentations. Additionally, the capability to incorporate personal audio and video content further enriches the slideshow experience. ( Via )
Microsoft PowerPoint, Google Slides, and the Benefits of Adding Videos or Audio to your Presentations
Microsoft PowerPoint, like Google Slides, is a powerful tool for creating engaging presentations. One notable advantage of PowerPoint is its widespread use in business environments, offering compatibility with the Microsoft Office suite and seamless integration with other applications. Additionally, PowerPoint provides a wide range of design options, including templates, themes, and customization features, allowing users to create visually appealing presentations tailored to their needs.
Incorporating videos or audio into your PowerPoint or Google Slides presentations can significantly enhance their effectiveness and audience engagement. Videos and audio serve as dynamic multimedia elements that can convey information more effectively than text or static images alone. They help break the monotony of slideshows. They are extra ways to capture the audience’s attention and create a more immersive and memorable experience.
Furthermore, adding videos or audio allows presenters to demonstrate concepts, provide examples, or share testimonials more compellingly and persuasively. Whether it’s showcasing product features, explaining complex processes, or sharing customer testimonials, multimedia elements can add depth and credibility to your presentation.
Users can embed video or audio files directly into their slides or link to external sources for playback. Additionally, PowerPoint provides options for customizing playback settings, such as autoplay, looping, and timing, to ensure a seamless and synchronized presentation.
How To Add Audio in Google Slides
If you’re eager to enhance your Google Sheets presentations with captivating audio and visuals, this guide is tailored just for you. Here’s how to seamlessly incorporate these attention-grabbing elements:
Adding audio to Google Slides:
- Ensure that the audio file you intend to use is stored in your Google Drive under the same Google account. Google Slides supports MP3 and WAV audio formats.
- Open Google Slides and sign in to your account. Access the presentation where you wish to include the audio and navigate to the specific slide where you want it placed.
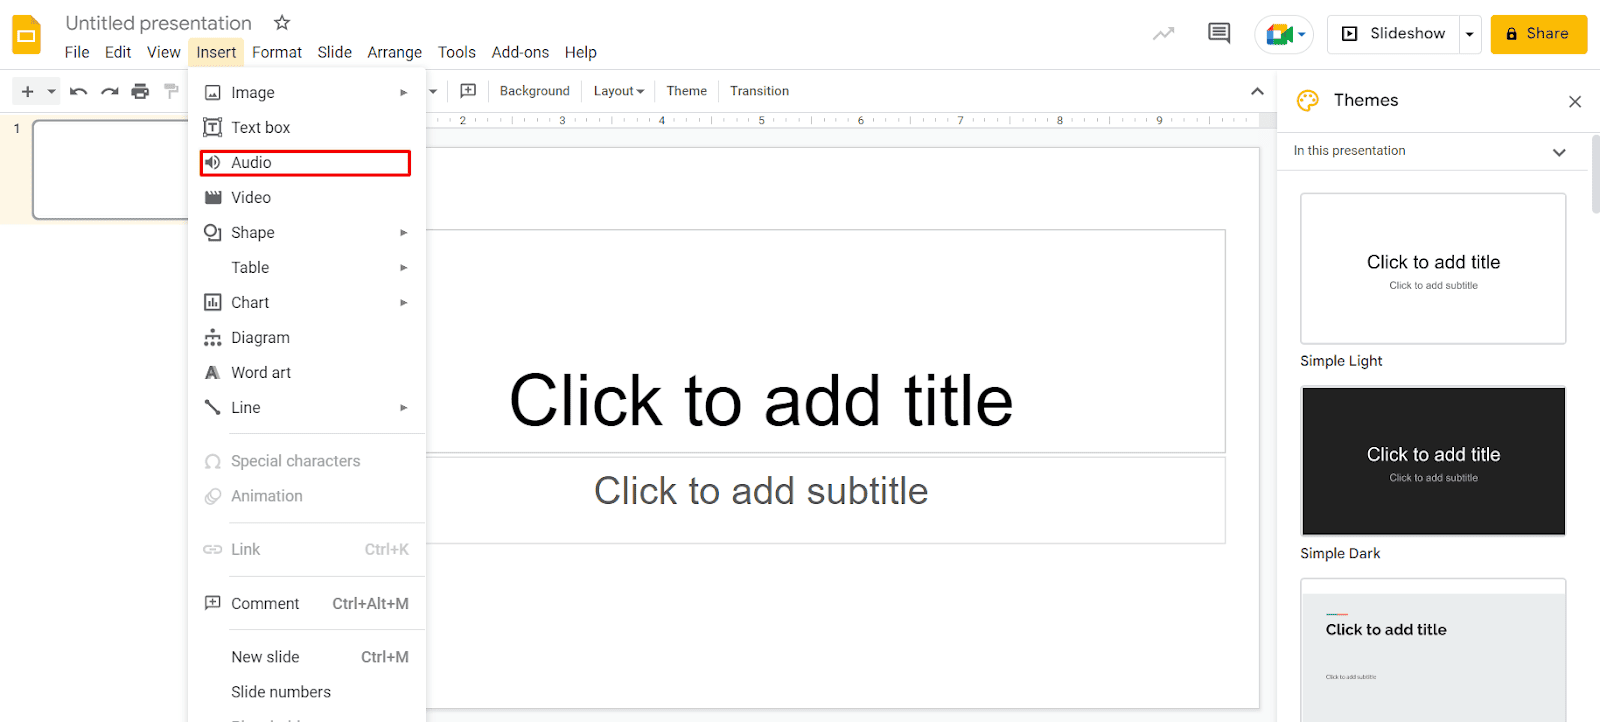
- Select “Insert” from the menu and then choose “Audio.”
These simple steps enable you to effortlessly integrate audio files into your Google Slides presentations, enriching them with engaging auditory elements.
- Once you’ve located the desired audio file, simply select it and click on the “Select” button located at the bottom of the window. This action confirms your choice and inserts the audio file into your Google Slides presentation.
- Once inserted, the audio file will be visible on your slide. You have the flexibility to select and drag it to any desired location within the slide.
- Upon insertion, the Format Options sidebar will automatically open. In the “Audio Playback” section, customize the playback settings according to your preferences.
– Start Playing: Choose between “On Click” or “Automatically” to determine when the audio playback should commence.
– Options: Adjust the volume using the slider. Additionally, utilize the checkboxes to enable optional settings such as hiding the playback icon (applicable for automatic playback only), enabling loop playback, and halting playback upon slide advancement.
Once you’ve finalized the playback settings for your audio, you can close the Format Options sidebar. To access the sidebar again later, you can follow any of these methods:
- Right-click on the audio icon and select “Format Options.”
- Click on the audio icon and choose “Format Options” from the top toolbar.
- Select the audio icon and navigate to “Format” > “Format options” in the menu.
Unlike Microsoft PowerPoint, Google Slides currently lacks an audio recording feature. However, you can still incorporate audio narration by creating the narration externally and uploading it as described above.
How to Add Video in Google Slides

To add a video to your Google Slides presentation, you have several options available. Whether it’s a YouTube video, a URL link, or a video stored in your Google Drive, here’s how you can incorporate it seamlessly:
- Step 1: Sign in to Google Slides and navigate to the specific slide in your presentation where you intend to insert the video.
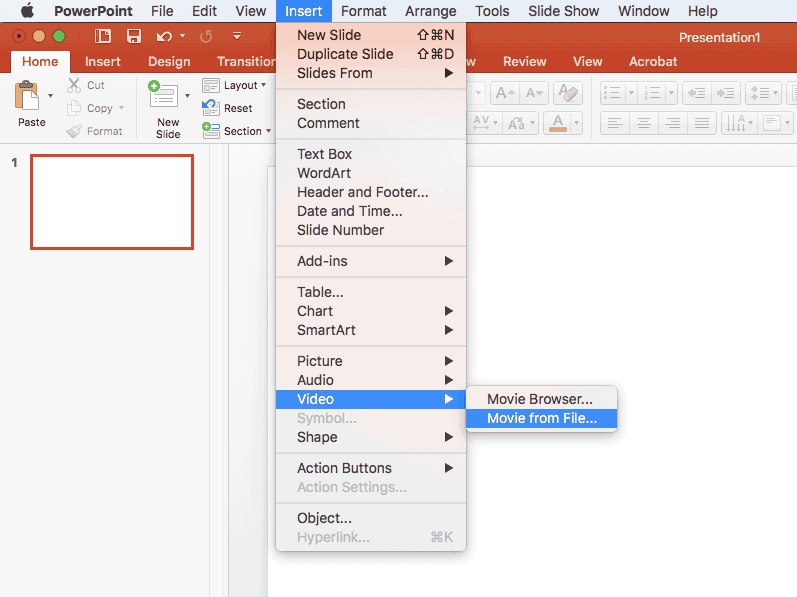
- Step 2: From the menu, click on “Insert” and then select “Video.”
- Step 3: In the pop-up window, located at the top, select the desired location for your video file: either by searching on YouTube, entering a URL, or choosing from Google Drive.
Once you’ve found the video you wish to use, simply select it and click the “Select” button to proceed.
- Step 4: Once inserted, the video will appear on your slide, allowing you to freely drag it to any desired location. Additionally, you can resize the video by dragging any of its corners or edges.
- Step 5: Upon insertion, the Format Options sidebar will open, enabling you to customize the video playback settings.
– Play: Choose between “On Click,” “Automatically,” or “Manually” to determine the starting point for video playback.
– Start At and End At: Specify the specific segments of the video you wish to play by entering the start and end times or using the “Use Current Time” option.
– Mute Audio: If you prefer not to play the video’s audio, simply check the box labeled “Mute Audio.”
- Step 6: After completing the customization of your video’s playback settings, simply close the Format Options sidebar. To access the sidebar again at a later time, you can follow these steps:
- 1. Right-click on the video and select “Format Options.” 2. Click on the video and choose “Format Options” from the top toolbar. 3. Select the video and navigate to “Format” > “Format options” in the menu.
Unlike documents in Google Docs, Google Slides offers the flexibility to incorporate audio and video elements into your presentations. If these multimedia components enhance your slideshow, don’t hesitate to include them for a more engaging and dynamic presentation!
Gizchina News of the week
How to add audio on microsoft powerpoint.

To add audio to your Microsoft PowerPoint presentation, follow these detailed steps:
- Before you begin, ensure that your audio file is in a compatible format such as MP3 or WAV.
- Make sure the audio file is saved in a location where it can be easily accessed.
- Launch Microsoft PowerPoint and open the presentation to which you want to add audio.
- Go to the slide where you want to insert the audio.
- Click on the “Insert” tab at the top of the PowerPoint window.
- In the “Media” group, select “Audio.”
- Choose “Audio on My PC” if the audio file is stored locally, or select “Online Audio” to insert audio from an online source such as OneDrive or YouTube.
- Navigate to the location where your audio file is saved.
- Select the audio file and click “Insert.”
- Once the audio is inserted, a speaker icon will appear on the slide.
- Click on the speaker icon to select it.
- Go to the “Playback” tab that appears on the PowerPoint ribbon.
- Set the playback options such as “Start” and “Stop” to control when the audio should begin and end.
- Choose whether the audio should play automatically or on click.
- Adjust volume settings and other playback options as needed.
- Preview the slide to ensure the audio plays as intended.
- Test the presentation in slideshow mode to verify that the audio syncs correctly with the slide content.
- Once you are satisfied with the audio placement and settings, save your PowerPoint presentation.
- Share your presentation with others, ensuring that they have access to the audio file if necessary.
- Keep in mind any copyright restrictions if using audio from third-party sources.
By following these steps, you can effectively add audio to your Microsoft PowerPoint presentation, enhancing the overall experience for your audience.
How to Add Video in Microsoft PowerPoint
Adding video to your Microsoft PowerPoint presentation can elevate your slides to new heights by engaging your audience with multimedia content. Here’s a comprehensive guide on how to seamlessly integrate video into your PowerPoint slides:
- Prepare Your Video: Before adding the video to your presentation, ensure that it’s in a compatible format. PowerPoint supports various video file formats such as .mp4, .mov, and .avi. Also, consider trimming or editing the video to fit the desired length and content.
- Open Your PowerPoint Presentation: Launch Microsoft PowerPoint and open the presentation in which you want to add the video.
- Navigate to the Slide: Go to the slide where you want to insert the video. Click on the slide in the slide thumbnail view on the left side of the screen.
- Insert Video: Click on the “Insert” tab in the PowerPoint ribbon at the top of the screen.
- Online Video: Insert a video from an online source such as YouTube. Enter the video’s URL in the dialog box and click “Insert.”
- Video on My PC: Insert a video saved on your computer. Navigate to the location of the video file, select it, and click “Insert.”
- Adjust Video Size and Position: After inserting the video, you can resize and reposition it on the slide as needed. Click and drag the corners or edges of the video to resize it. To move the video, click and drag it to the desired location on the slide.
- Start Automatically: Set the video to play automatically when the slide appears.
- Loop until Stopped: Configure the video to loop continuously until manually stopped.
- Rewind After Playing: Automatically rewind the video to the beginning after it finishes playing.
- Preview and Test: Once you’ve inserted the video and adjusted its settings, preview the slide to ensure that the video plays correctly. Click the “Slide Show” button in the bottom-right corner to enter presentation mode and test the video playback.
- Save Your Presentation: After adding the video, save your PowerPoint presentation to preserve the changes. Click on the “File” tab in the PowerPoint ribbon and select “Save” or “Save As” to save the file to your desired location.
By following these steps, you can seamlessly integrate video into your Microsoft PowerPoint presentation, enhancing its visual appeal and engaging your audience with multimedia content. Experiment with different video formats, playback options, and slide designs to create dynamic and impactful presentations.
In conclusion, both Microsoft PowerPoint and Google Slides offer powerful tools for incorporating audio and video elements into your presentations, enhancing engagement, and conveying your message effectively.
With Microsoft PowerPoint, you can seamlessly integrate audio files and video clips, allowing for dynamic presentations that capture your audience’s attention. By following the step-by-step guides provided, you can customize playback options and ensure smooth integration of multimedia content into your slides.
Similarly, Google Slides provides users with the ability to add audio and video, offering flexibility and creativity in presentation design. Whether you’re delivering a business pitch, educational seminar, or creative project, Google Slides allows you to enhance your slides with immersive multimedia elements.
By leveraging the capabilities of both platforms, presenters can create engaging and impactful presentations that leave a lasting impression on their audience. Whether you choose Microsoft PowerPoint or Google Slides, incorporating audio and video elements can elevate your presentations and effectively communicate your ideas.
Previous Apple adds a new iPhone and iPad to its "Obsolete" and "Vintage" lists
This is the most recent story..
About the author Marco Lancaster Marco is the HARDWARE & OS EXPERT of Gizchina for the past 4 years. He is Fascinated for technology. He is constantly diving into the Software Development Field and is an expert in all kind of Hardware. He is passioned for the Chinese world of Smart Devices and an addict for technology in general.
Related Posts

Best April Fools’ Pranks from Google

Explore the Fresh OneDrive Features for Microsoft 365 Basic Users

Get ready gamers: Reports suggest a new Xbox Series X All-Digital Console is coming soon

Google Chat: New Features to Revolutionize Collaboration and Communication
- Help Center
- Privacy Policy
- Terms of Service
- Submit feedback
- Announcements
IMAGES
VIDEO
COMMENTS
This Tech Tuesday video shows teachers how to share Google Slides files with their students in full-screen presenter mode. You'll learn how to publish your f...
This help content & information General Help Center experience. Search. Clear search
Email as attachment. Before we get to that, you need to know where to find the Share function in Google Slides. Open Google Slides and click File, in the top bar. Click Share at the top of the drop-down menu. Or, click Share at the top right-hand side of your window. 1.
If you click the "Slideshow" button or press Ctrl/Cmd + F5, your presentation will start directly without any speaker notes. This is the most widely used and the simplest option. Next to the "Slideshow" button, there's a drop-down arrow. Click on it to see the different presentation modes: Presenter View.
Use the pen tool during a slideshow. On your browser, open a presentation in Google Slides. At the top right corner, click Slideshow . At the bottom left, click Options Enable pen tool. To draw or annotate, click and drag on your slide. Optional: To change the pen color, at the bottom, click Pen tool Select a color.
This video will show you how to share Google Slides files in present mode. If you want to share a file and then have the user open it as a presentation, this...
Remove a link to a presentation you own. Find the file or folder in Google Drive, Google Docs, Google Sheets, or Google Slides. Open or select the file or folder. Click Share or Share Copy link . Under "General access", click the Down arrow . Select Restricted.
Sharing your Google Slides in presentation mode is a simple process that can make all the difference in how your audience experiences your presentation. By following these steps, you can share your Google Slides in presentation mode: Click on the "Share" button; Under "General access," select "Anyone with the link" Click "Copy link"
Google Slides has a Share button that provides sharing options to set the access level, generate a sharing link, and email the slide deck to recipients. Once you click the button, a dialog box will appear. You can enter the email addresses of people you want to share the slide deck with select editing privileges (Viewer, Commenter, or Editor).
Do you want to share a link to your presentation that opens the slides in slideshow (presentation) mode? You can either use your existing Google Slides prese...
To use Google Slides in a Zoom meeting, all you need to do is: On your browser, set up your Google Slides presentation. Then, click the "Slideshow" drop-down button and select "Presenter View." Once your "Presenter View" Window appears, go to the Zoom app and click the "Share screen" button. Select your Google Slides window and click "Share."
To share a link: Locate and select the file you want to share, then click the Share button. A dialog box will appear. Click Get shareable link. A link to the file will be copied to your web clipboard. You can then paste the link in an email message or on the Web to share the file. When you're finished, click Done.
Here are the steps to follow: Click the "Share" button. Under General access, select "Anyone with the link". Set the role to "Viewer". Click "Copy link" and share it with others. Now you know how to make your Google Slides view-only. If you want to allow users to edit the slides, simply go back to step 3 and select the "Editor ...
In the Google Meet sharing options, select the A window option and select the window that has the Slide Show. Option 4: Use Google Slides Presenter View. If you only have one screen you can't use PowerPoint's Presenter View to see your speaking notes and show the audience just your slides. The only way to show your slides to the audience ...
If so, we'd suggest you save presentation file as .ppsx type file, if you are using PowerPoint in Windows, we'd suggest you go to PowerPoint File > Save as > Click More Options > select PowerPoint Show under Save as type, the file is saved as a .ppsx file. When the file is double-clicked, it opens as a slide show.
How to finish a presentation in Google Slides. The Present mode toolbar is only accessible when you view a presentation in Present mode. To do this, click the white Present button in the top-right corner of your screen. Once your presentation has started, hover your mouse in the bottom-left corner of the screen to bring up the Present mode toolbar.
To resize the Presenter view window in Google Slides, hover your cursor over any of its corners or sides and wait for the double-sided white arrow to appear. Then click and drag to alter the window to your preferred size and shape. To move the window across your screen, click and hold the very top of the window.
At the bottom of the meeting screen, click Present now A Tab . You can either present from the Google Meet tab, or present directly from the Slides tab. Select the tab with the Slides presentation, then click Share. In Google Meet, at the bottom right of the screen, click Start slideshow . Important: You can only control a presentation in ...
Go to File > Publish to the Web in the menu. Choose either "Link" or "Embed" per your intent. Then use the Auto-Advance Slides drop-down box to choose the timing for the slides. Here again, you can pick from every second up to every minute. To loop the slideshow, check the box for Restart the Slideshow After the Last Slide.
When you lead a class session or meeting and want to present a Google Slides presentation, it's very helpful to be able to see your presenter notes at the sa...
This makes them accessible even for those who aren't familiar with Google Slides. People can share videos on platforms like YouTube, TikTok, Facebook, or others without needing special software. Plus, videos don't need any special programs to watch or share files. Unlike Google Slides, which needs a Google account to see and send files. 2.
G oogle Slides helps you make impressive presentations with its diverse template library, collaboration options, and seamless integration with Google apps. You can use it on your Android phone ...
Click the "Slide Show" button in the bottom-right corner to enter presentation mode and test the video playback. Save Your Presentation: After adding the video, save your PowerPoint ...
This help content & information General Help Center experience. Search. Clear search
This help content & information General Help Center experience. Search. Clear search
This help content & information General Help Center experience. Search. Clear search