

How to Make an Object Appear and Disappear in PowerPoint Using Animations

Make an Object Appear and Then Disappear on a PowerPoint Slide Using Entrance and Exit Animations
by Avantix Learning Team | Updated September 7, 2023
Applies to: Microsoft ® PowerPoint ® 2013, 2016, 2019, 2021 and 365 (Windows)
You can combine entrance and exit animations in PowerPoint to make an object appear and disappear on a slide during a slide show. This can occur automatically or on click. An object is typically a shape, image, text placeholder or text box.
Recommended article: How to Use Morph in PowerPoint to Design Engaging Presentations
Do you want to learn more about PowerPoint? Check out our virtual classroom or in-person classroom PowerPoint courses >
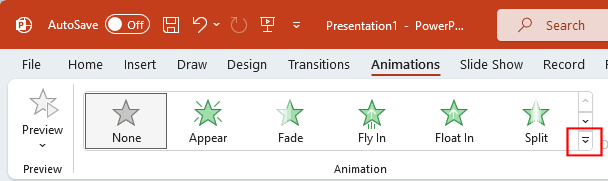
To apply animations, use the Animations tab in the Ribbon:

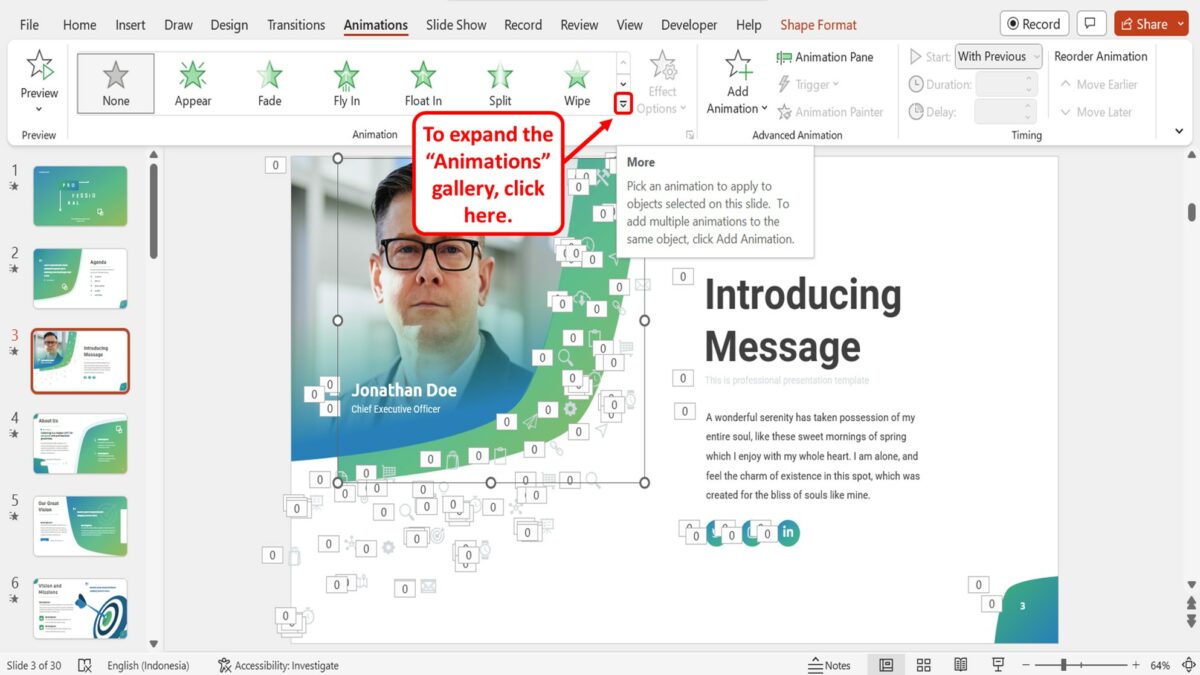
The expanded Animations Gallery appears when you click the More down arrow in the Animations group:

If you want to apply more than one animation to an object, you will need to use Add Animation in the Advanced Animation group.
Animations are typically added to objects in Normal View (but can be applied in Slide Master View).
In this article, we are using animations to make objects appear and disappear. Check out the article How to Use Morph in PowerPoint to Design Engaging Presentations for other ways to make objects move on or off a slide during a slide show using the Morph transition.
Add an entrance animation to make an object appear
To add an entrance animation to an object to make it appear on click:
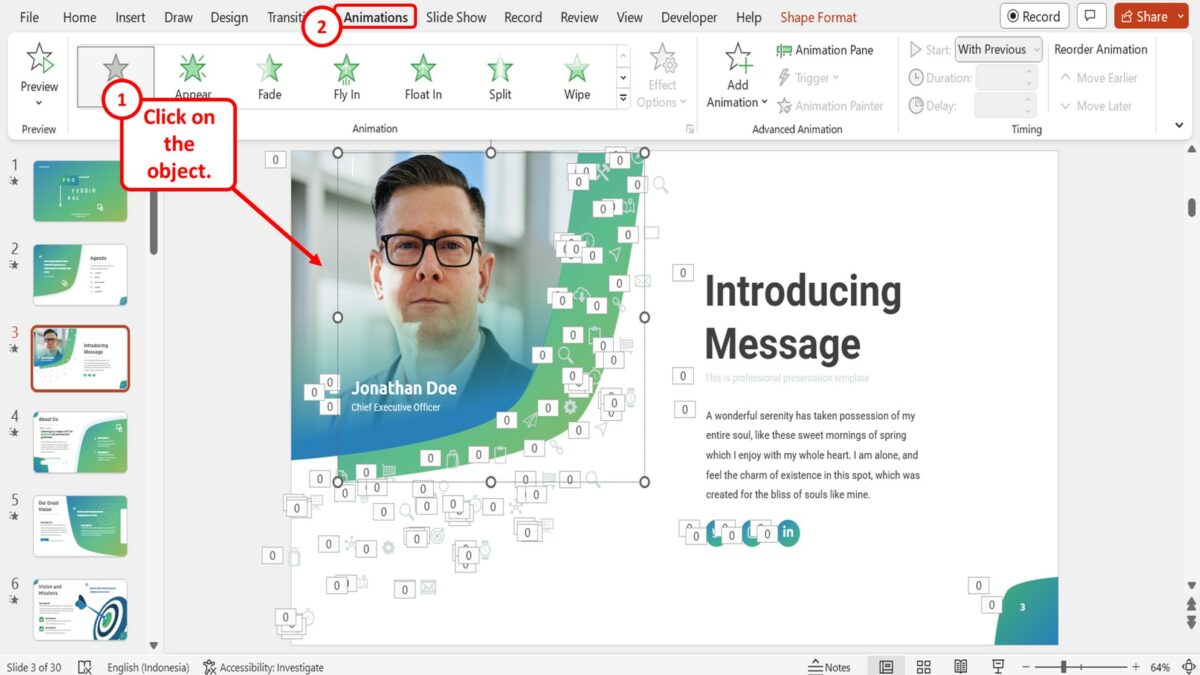
- Select an object. For text objects, click in the text box or placeholder or click its edge.
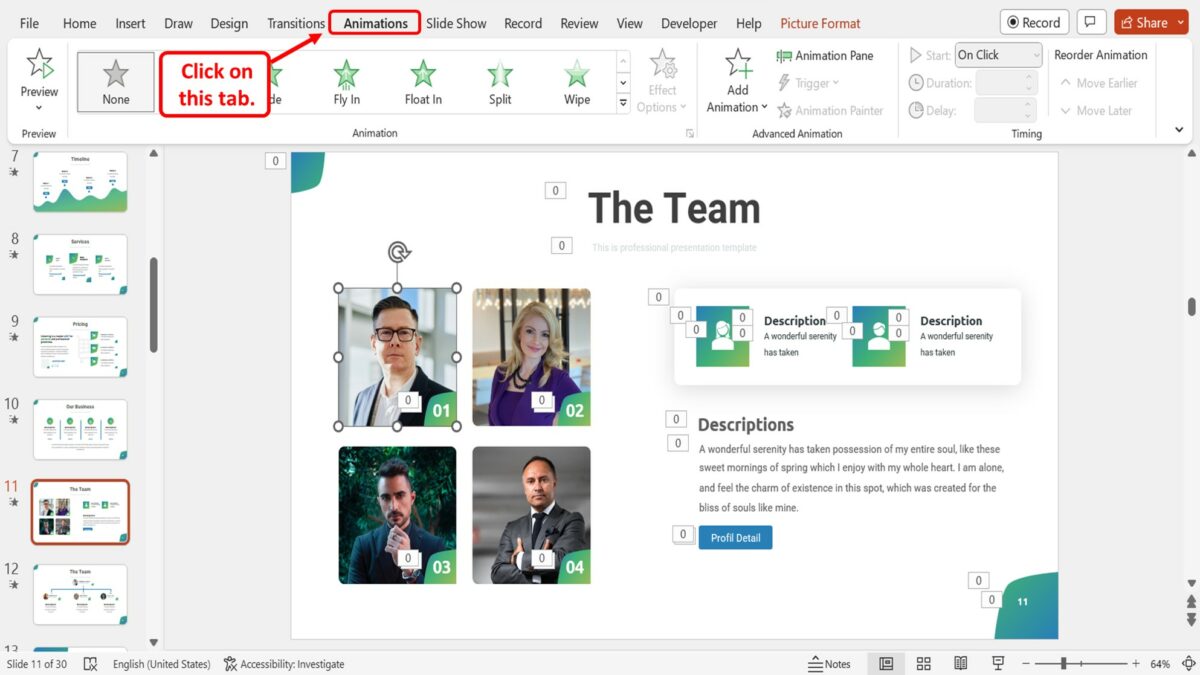
- Click the Animations tab in the Ribbon.
- In the Animations group, click the More down arrow on the bottom right of the Animations Gallery.
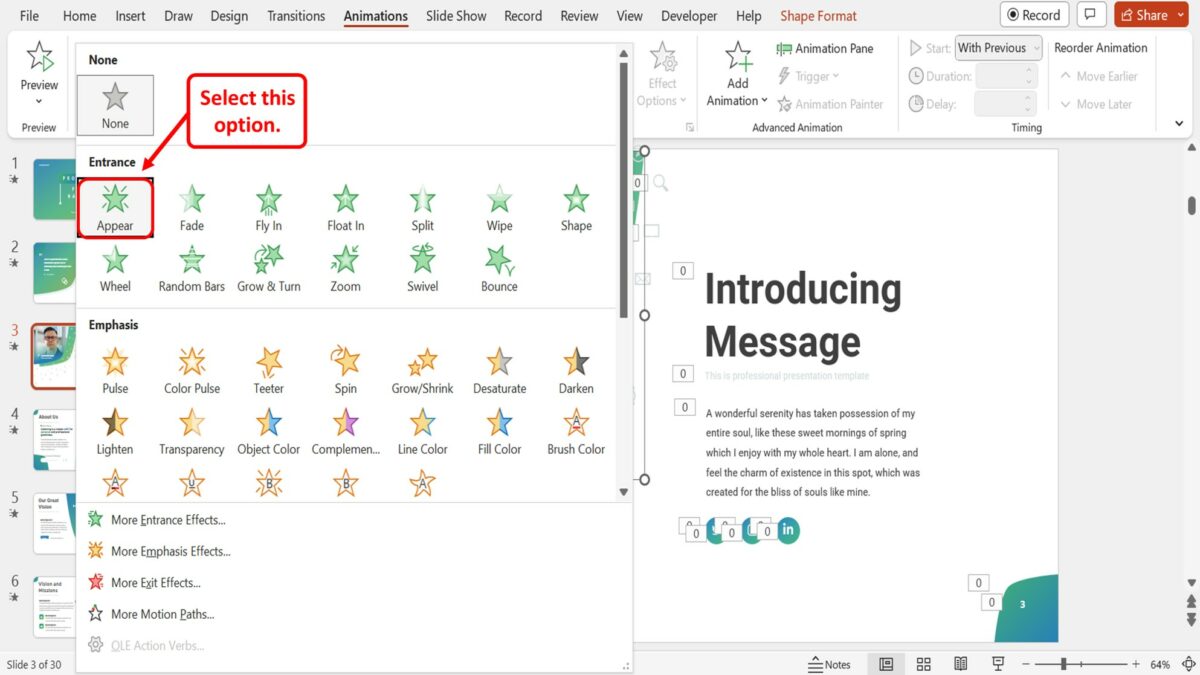
- Click the Appear entrance animation in the Entrance group. Other common entrance effects are Fly In or Fade.
You can also apply an entrance animation by clicking Add Animation on the Animations tab in the Advanced Animation group.
By default, the object will appear on click during a slide show.
Add an exit animation to make an object disappear
To add an exit animation to an object to make it disappear on click:
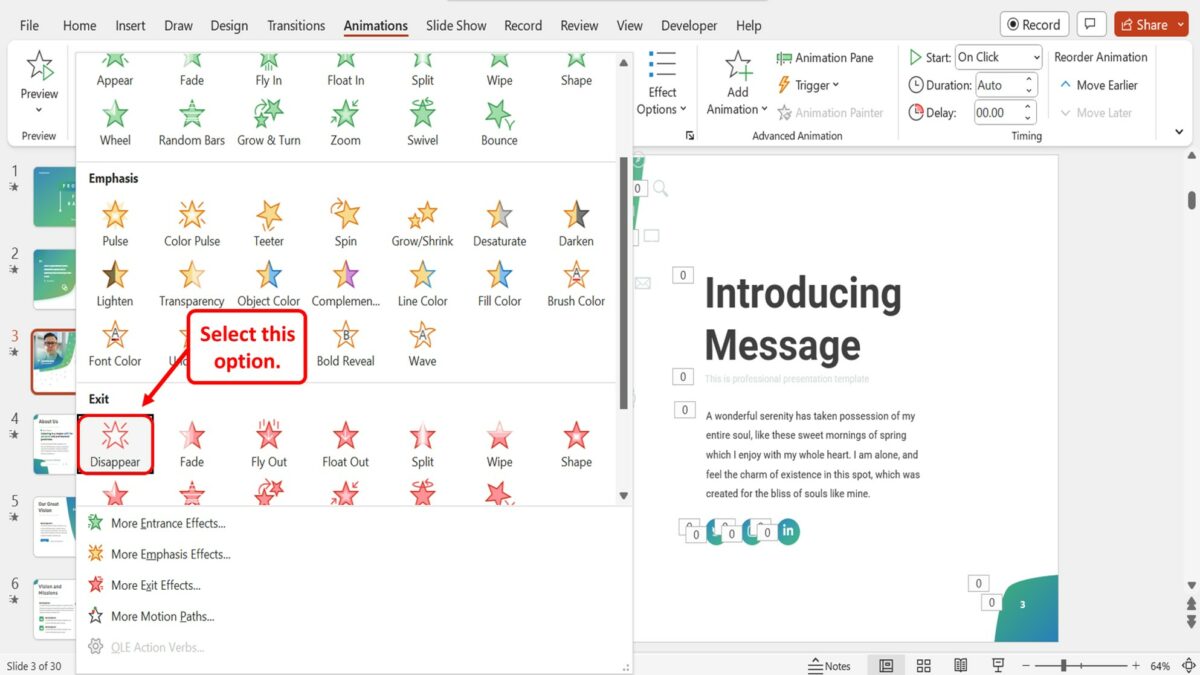
- Click Add Animation in the Advanced Animations group (you must select Add Animation if you are adding more than one animation to an object). A drop-down menu appears.
- Click the Disappear exit animation in the Exit group. Other common exit animations are Fly Out or Fade.
Display the Animation Pane
When you apply multiple animations to an object, it's best to display the Animation Pane so you can easily edit the animations.
To display the Animation Pane:
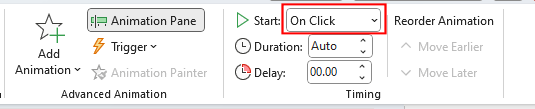
- Click Animation Pane in the Advanced Animations group. The Animation Pane appears on the right side of the screen.
The Animation Pane will display the animations you have applied. If you have applied an entrance and exit effect, two animation effects will appear in the Animation Pane. You can click the animation effect in the Animation Pane and click the arrow to the right to display a drop-down menu with options or you can select options in the Ribbon for that effect.
In the Animation Pane, a green star appears beside entrance animations and a red star appears beside exit animations as follows:

Change the way an object starts
Animations are set by default to start on click during a slide show. If you want an animation to start automatically, you will need to change the start setting.
To start an animation automatically, you have two options:
- After Previous – the animation sequence will begin once a previous animation effect or effects is completed. The start of a slide show is also a previous effect.
- With Previous – the animation sequence will begin at the same time as a previous animation effect or effects. The start of a slide show is also a previous effect.
To change the way an animation starts:
- Select the animation effect in the Animation Pane.
- In the Timing group, select an option from the Start drop-down menu.
Set the speed or duration of an animation
When you apply an animation, a duration or speed is automatically set for the animation (in seconds). The default duration is different for each animation effect. The initial duration is often fast and you may want to increase the duration to slow it down.
To set a speed or duration of an animation:
- In the Animations group, enter a time (in seconds) for the animation in the Duration area of the Timing group. You can click the up and down arrows to change the duration or type a duration.
Note the Duration in the example below:

Run a slide show
The final step is to run the slide show to see your object appear and disappear. Simply click the Slide Show button on the bottom right of the screen. Use the right and left arrows to move from slide to slide or start the animations. You can use many other methods to advance a presentation. Check out PowerPoint Slide Show Shortcuts (50+ Shortcuts) for other shortcuts you can use during a slide show.
Subscribe to get more articles like this one
Did you find this article helpful? If you would like to receive new articles, JOIN our email list.
More resources
How to Turn Off Automatic Text Resizing in PowerPoint
How to Change Slide Size or Dimensions in PowerPoint
How to Group and Ungroup in PowerPoint (with Shortcuts)
How to Add Slide Numbers in PowerPoint (Complete Guide)
How to Remove the Background of an Image in PowerPoint (2 Ways)
Related courses
Microsoft PowerPoint: Intermediate / Advanced
Microsoft PowerPoint: Design for Non-Designers
Microsoft PowerPoint: Animations Bootcamp
Microsoft Excel: Intermediate / Advanced
VIEW MORE COURSES >
Our instructor-led courses are delivered in virtual classroom format or at our downtown Toronto location at 18 King Street East, Suite 1400, Toronto, Ontario, Canada (some in-person classroom courses may also be delivered at an alternate downtown Toronto location). Contact us at [email protected] if you'd like to arrange custom instructor-led virtual classroom or onsite training on a date that's convenient for you.
Copyright 2024 Avantix ® Learning
You may also like

How to Insert or Type E with an Accent Mark in PowerPoint (È, É, Ê, Ë, è, é, ê, or ë)
You can insert or type e with an accent mark in PowerPoint using built-in tools or keyboard shortcuts (including Alt code shortcuts). The letter e can be inserted with an accent in both upper or lower case in text boxes or placeholders on slides, the slide master or layouts. The following are common accents in upper or lower case – È, É, Ê, Ë, è, é, ê, or ë.

How to Fade a Picture or Part of a Picture in PowerPoint (Using a Gradient)
You can fade a picture in PowerPoint by drawing a rectangle shape on top of the picture and then filling the rectangle with a gradient from opaque to transparent. This technique is often used to fade an image into the background of a slide. Since the rectangle is placed on top of the image and then text may be placed on top of the rectangle, you may need to reorder the objects.

How to Lock an Image, Shape or Other Object in PowerPoint
You can now lock an image, shape or other object in PowerPoint. Objects can be locked in Normal View or Slide Master View. Only PowerPoint 365 users can lock objects to prevent moving and resizing. This is helpful if you want to select and move other objects on the slide or prevent others from moving or resizing an object. You can lock items using the context menu or the Selection Pane.
Microsoft, the Microsoft logo, Microsoft Office and related Microsoft applications and logos are registered trademarks of Microsoft Corporation in Canada, US and other countries. All other trademarks are the property of the registered owners.
Avantix Learning |18 King Street East, Suite 1400, Toronto, Ontario, Canada M5C 1C4 | Contact us at [email protected]
Our Courses
Avantix Learning courses are offered online in virtual classroom format or as in-person classroom training. Our hands-on, instructor-led courses are available both as public scheduled courses or on demand as a custom training solution.
All Avantix Learning courses include a comprehensive course manual including tips, tricks and shortcuts as well as sample and exercise files.
VIEW COURSES >
Contact us at [email protected] for more information about any of our courses or to arrange custom training.
Privacy Overview
Pin it on pinterest.
- Print Friendly
Make an Object Appear and Disappear in PowerPoint With Animation
By: Author Shrot Katewa

Adding animation to PowerPoint slides is a great way to enhance your presentation and make it more engaging. One of the most useful animation effects is making an object appear and disappear to bring focus to specific parts of your slide and highlight the important points.
To make an object Appear and Disappear in PowerPoint with animation, go to the “Animation” tab and click on “More” to expand the gallery. Select the “Appear” or “Disappear” animation from the “Entrance” or “Exit” section simultaneously.
In this article, we will discuss in detail how to best use the animations in PowerPoint to make an object or text appear and disappear. Let’s dive in to create a dynamic visual experience for your audience!
1. How to Make an Object Appear in PowerPoint with Animation?
In Microsoft PowerPoint, the “Appear” animation effect can make an object appear on a slide during a presentation. To make an object appear with animation in a PowerPoint presentation, follow the 3 simple steps.
Step-1: Click on the “Animations” tab
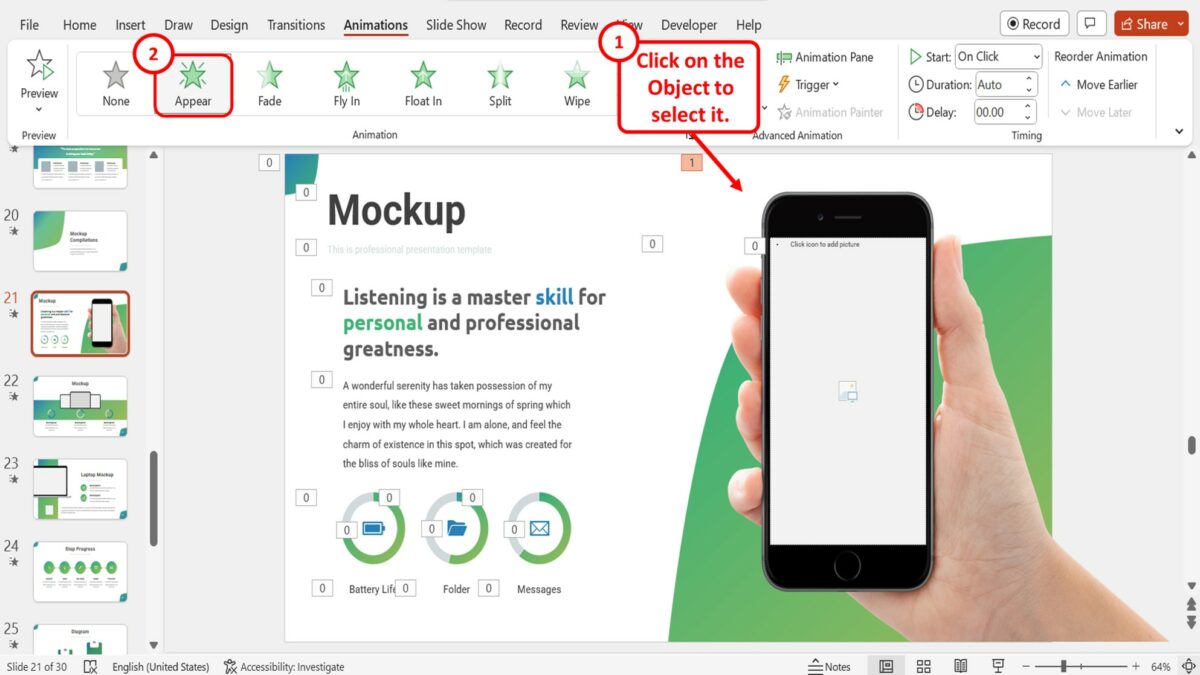
In the open slide, you have to first click on the object that you want to make appear with animation. Then click on the “Animations” tab in the menu ribbon located at the top of the screen.
Step-2: Click on the “More” option
The next step is to expand the “Animation” gallery. To do so, click on the “More” option which is the down arrow at the bottom right corner of the “Animation” group of the “Animations” menu.
Step-3: Click on the “Appear” option
Finally, all you have to do is click on the “Appear” option in the “Entrance” section of the “Animation” gallery to make the selected object appear during a presentation.
2. How to Make an Object Disappear in PowerPoint with Animation?
Using the “Animations” feature in Microsoft PowerPoint, you can make any object automatically appear and disappear during a presentation. To make an object disappear with animation, follow the 3 simple steps.

The first step is to click on the object that you want to make disappear with animation. Then click on the “Animations” tab in the menu ribbon located at the top of the screen.

The next step is to expand the “Animation” gallery. All you have to do is click on the “More” option. It is the down arrow at the bottom right corner of the “Animation” group of the “Animations” menu.
Step-3: Click on the “Disappear” option
The final is to click on the “Disappear” option in the “Exit” section of the “Animation” gallery to make the selected object disappear during a presentation.
3. How to Make the Same Object Appear and Disappear in PowerPoint?
In Microsoft PowerPoint, you can apply multiple animation effects to the same object. By doing so, you can make the same object appear at the start of the slide and then disappear at the end during a presentation. To make the same object appear and disappear using animations, follow the 4 easy steps.
The first step is to open the “Animations” menu. Click on the “Animations” tab in the menu ribbon located at the top of the screen.
Step-2: Click on the “Appear” option

The next step is to click on the object where you want to add the animation effects. In the “Animation” group of the “Animations” menu, click on the “Appear” option. This will make the object appear with animation when opening the slide.
Step-3: Click on the “Add Animation” option
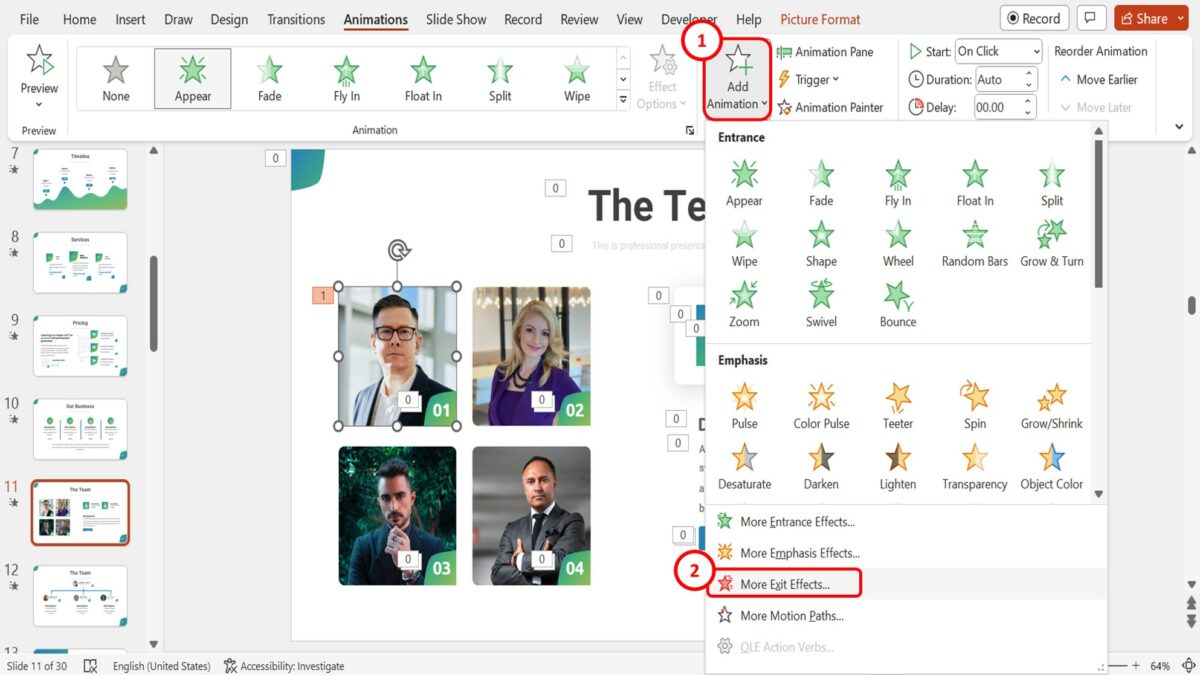
In the “Advanced Animation” group of the “Animations” menu, click on the “Add Animation” button. Then click on the “More Exit Effects” option at the bottom of the dropdown menu under the “Add Animation” button.
Step-4: Click on the “Disappear” option
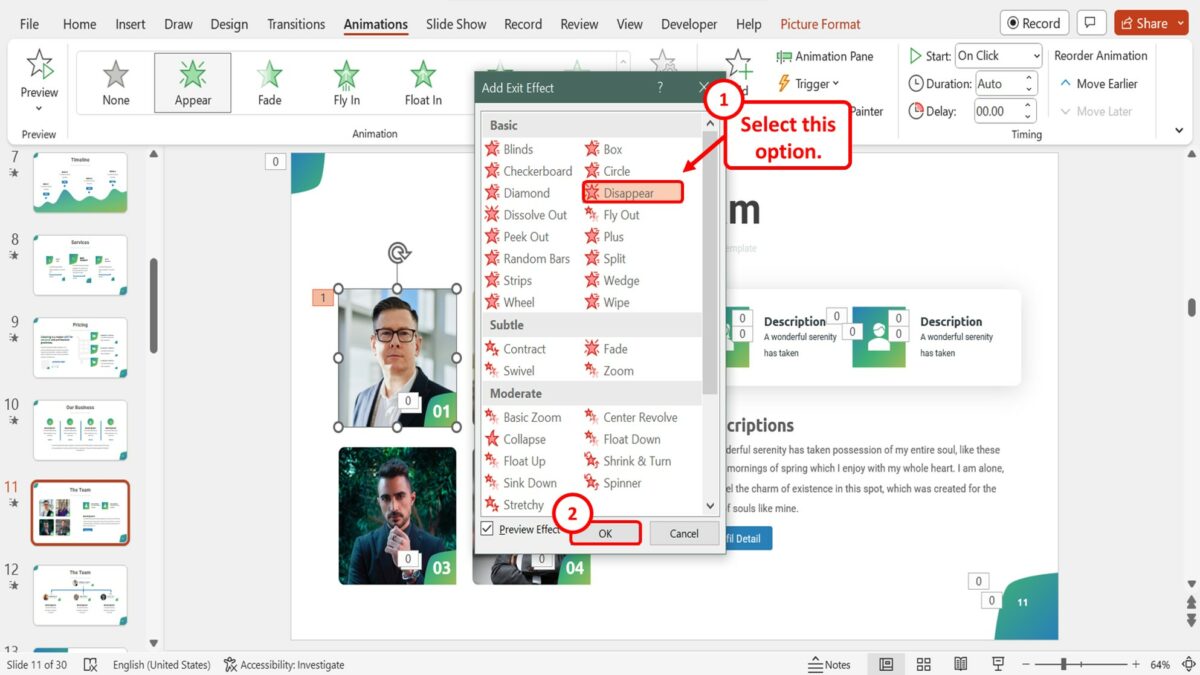
In the “Add Exit Effect” dialog box, click on the “Disappear” option in the right column under the “Basic” section. Then click on the “OK” button at the bottom of the dialog box to add both the “Appear” and “Disappear” animation effects to the selected object on the slide.
4. How to Make an Object Appear on Click in PowerPoint?
The “Trigger” feature in the “Animations” menu in Microsoft PowerPoint allows you to customize the animation trigger for an object on a slide. You can use the feature to make an object appear on click. All you have to do is follow the 4 quick steps.

The first step is to add the “Appear” animation effect to the object. Click on the “Animations” tab in the menu ribbon located at the top of the screen.
The next step is to click on the object where you want to add the animation effect to select it. Then click on the “Appear” option in the “Animation” gallery in the “Animations” menu to add the animation effect.
Step-3: Click on the “Animation Pane” option
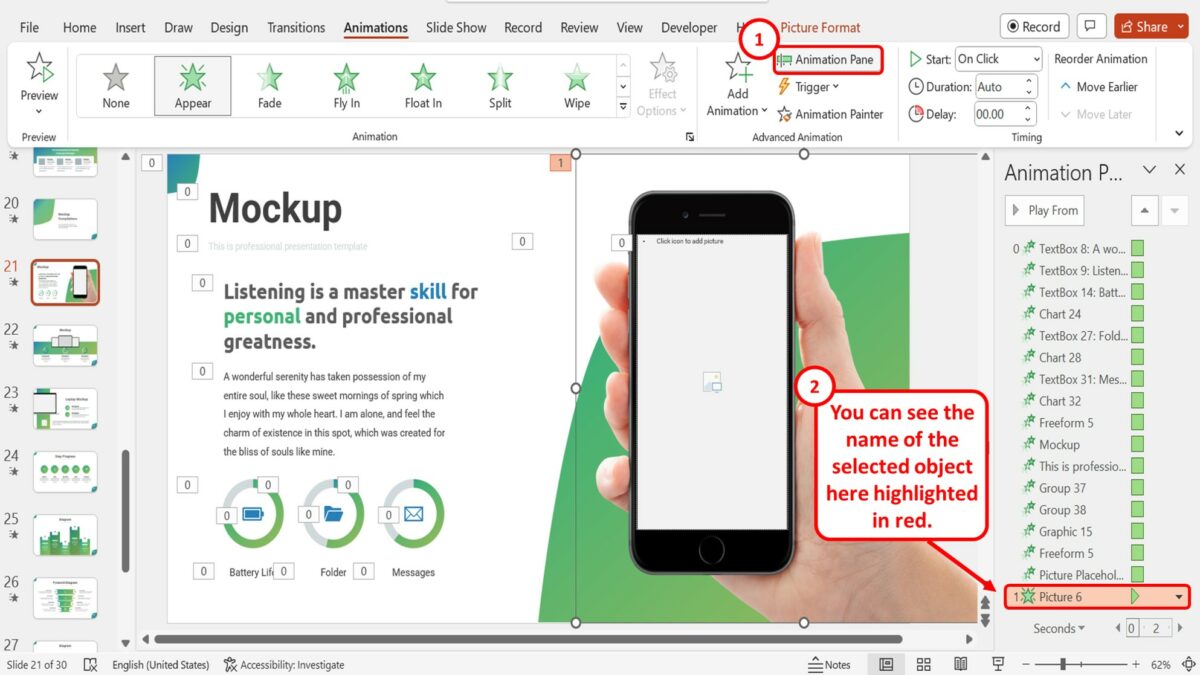
In the “Advanced Animation” group of the “Animations” menu, click on the “Animation Pane” option. In the “Animation Pane” sidebar on the right side of the screen, you can see the name of the selected object highlighted in red.
Step-4: Click on the “On Click Of” option
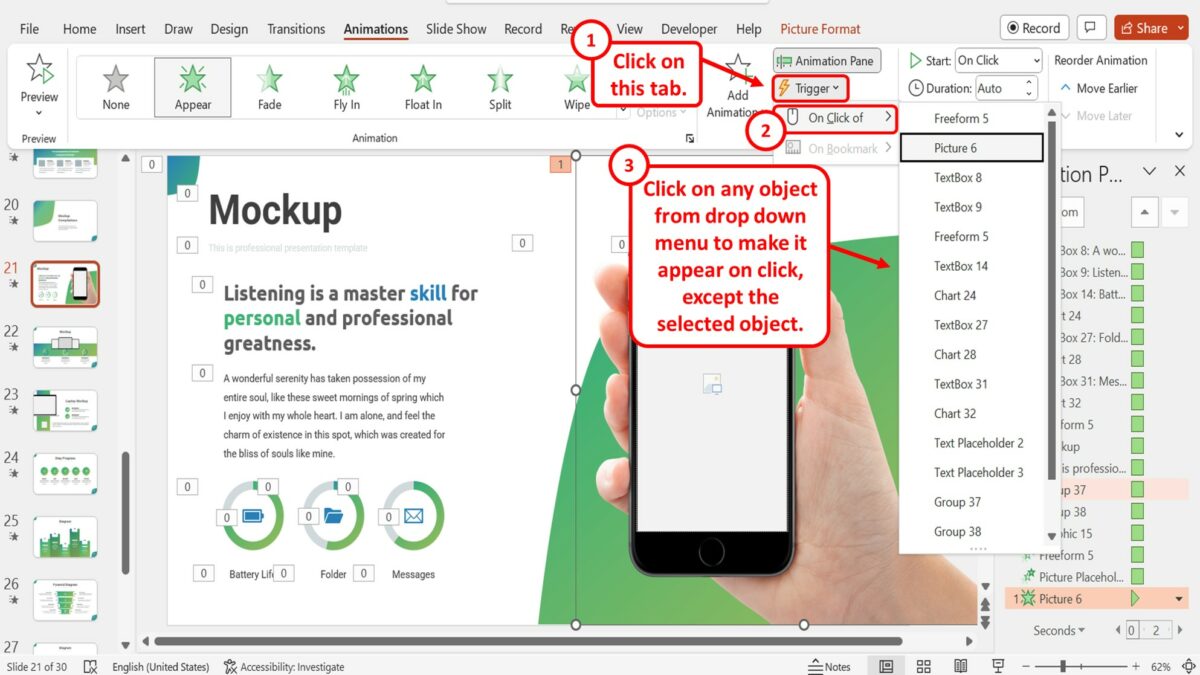
Finally, click on the “Trigger” option in the “Advanced Animation” group. Then click on the “On Click of” option in the dropdown menu under the “Trigger” option. In the pop-up menu by the “On Click of” option, you can select any object except the selected object to make it appear on click.
5. How to Make a Text Box Appear in PowerPoint with Animation?
In Microsoft PowerPoint, you can make a text box appear one paragraph at a time with animation. To do so, all you have to do is follow the 3 easy steps.
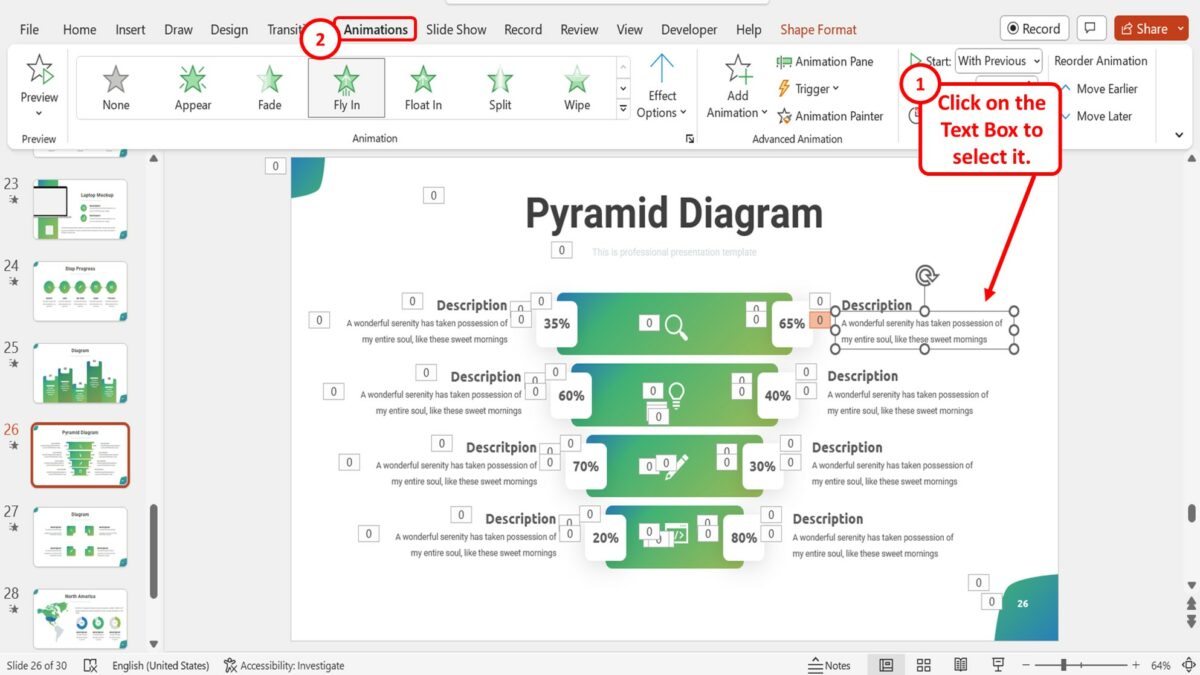
The first step is to select the text box that you want to animate. Then click on the “Animations” tab in the menu ribbon located at the top of the screen.

The next step is to apply the “Appear” animation effect. In the “Animation” group of the “Animations” menu, click on the “More” option which is the down arrow at the bottom right corner. Then click on the “Appear” option in the “Entrance” section of the dropdown menu under the “Animation” gallery.
Step-3: Click on the “By Paragraph” option
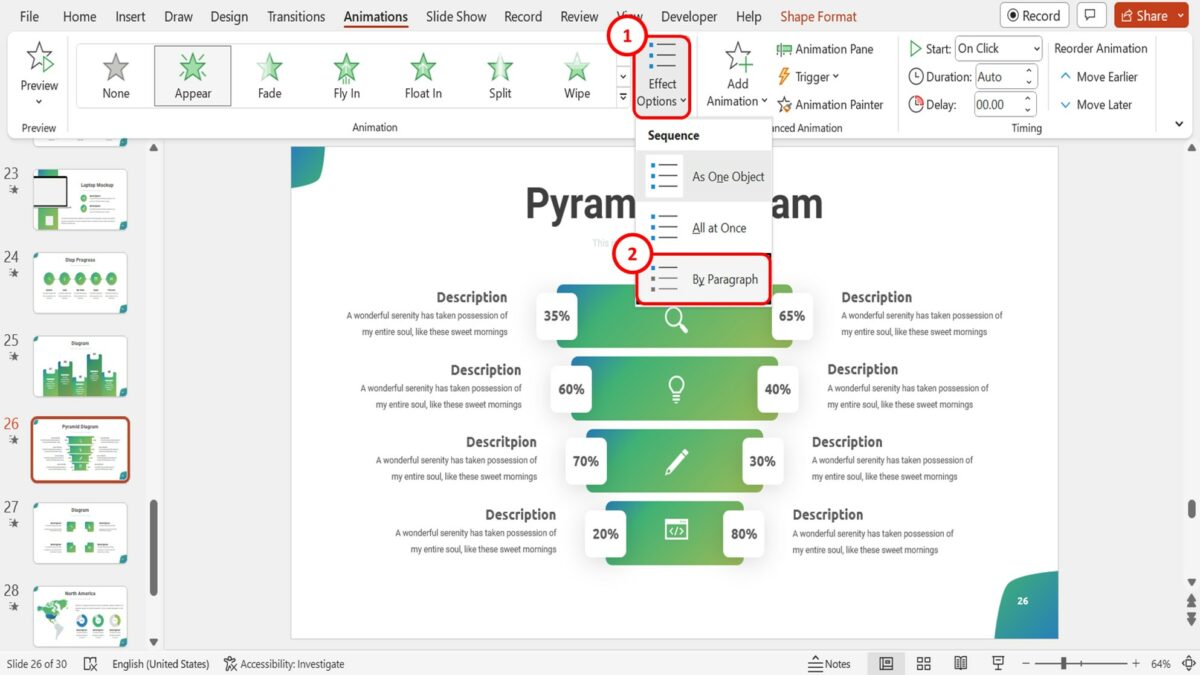
The final step is to click on the “Effect Options” button in the “Animation” group of the “Animations” menu. Then click on the “By Paragraph” option under the “Sequence” section of the dropdown menu under the “Effect Options” button to make the text box appear one paragraph at a time.
Critical PowerPoint Shortcuts – Claim Your FREE Training Module and Get Your Time Back!
How to Make Objects Appear and Disappear with PowerPoint Trigger Animations
- PowerPoint Tutorials
- October 22, 2014
If you’ve ever seen a presenter in PowerPoint click to reveal an object on screen (and then clicked to make that object disappear) and wondered how they pulled it off…
The answer is combining the Appear and Disappear animations with trigger animations in PowerPoint and setting them to ‘on click’.
This is an easy animation trick to pull off and works in all versions of PowerPoint 2007 and later.
It’s also the same trick we used in mouseover pop up text effect trick that you can read about here Everyone asked how we did it, so here it is.
In the graphic above, you can see that when the Western Region button is clicked, the western region turns blue. When you click the Easter Region, the eastern region turns red.
Note: EPS files and graphics are no longer supported in PowerPoint. So if you have an old EPS graphic, see how to import it into PowerPoint here .
Table of Contents
[watch] setting up appear and disappear triggers.
You are currently viewing a placeholder content from Youtube . To access the actual content, click the button below. Please note that doing so will share data with third-party providers.
When is this animation trick useful?
This is a great trick (combining PowerPoint animations and triggers) that you can use when you a map, a picture, text or some other object in PowerPoint that you want to have appear on screen during your presentation you click an object (to help you prove a point)…WITHOUT moving on to a next slide!
That means that you can use this animation trick to make objects appear and then disappear (to help you prove a point) without advancing to a new slide…which is why it is such a clever PowerPoint trick.
Part #1: Set up your objects
In the below tutorial I will set up the vector map of the United States (as demoed in the video above).
That said, you can use these steps to set up any appear and disappear trigger animations to make anything appear or disappear on screen (pictures, objects, text, anything)
1. Set up the vector map
Starting with your vector map, on your keyboard, hit CTRL + SHIFT + D to duplicate your slide, so that you have two versions of the exact same slide.
To learn more about the Duplicate Slide shortcut,
The reason you want to duplicate your slide is because you want to overlay a filled version of your graphic over the original one.

2. Un-group the vector graphic
On your duplicated slide, select your vector map (or graphic) and hit CTRL+SHIFT+G on your keyboard to ungroup the vector graphic.
This then allows you to work with and manipulate all of the individual pieces (that’s the beauty of using vector graphics in PowerPoint).

Ungrouping Shortcuts Explained
Besides CTRL + SHIFT + G <span “> ungrouping objects, you can also ungroup SmartArt graphics, as well as tables and charts if you first paste them as metafiles.
To paste a table or chart as a metafile, follow these steps:
- CTRL + C to copy your table or Chart
- ALT + SHIFT + V to paste special, and select one of the metafile formats
- CTRL + SHIFT + G the Metafile twice
To learn more about what you CAN and CANNOT group and ungroup in PowerPoint, check out our blog post here .
3. Group the pieces together
With the vector map now un-grouped, you want to group together the specific regions that you want to animate.
In this case, based on the data for my example, I’ll group the Western regions through Texas, and all the other states as the Eastern region.

Why are we grouping the objects together?
Besides making it easier to pull off our PowerPoint animation, this is the trick to overlaying our vector map over our original vector map without having to re-align anything (no need to waste our time).
4. Fill the grouped regions with their respective colors
Select your different grouped objects and fill them with their respective colors.
In this example, I will fill the Western regions blue, and the Eastern regions salmon pink as denoted on the rectangles at the top of the slide.

5. Copy and paste your regions back on top of the original vector graphic
With your regions grouped and colored, select them all, copy them, and then paste them back on top of the original (non-colored) vector map on the first slide.
Note: Because we grouped the objects together, they overlay exactly onto of the original vector map. Had we not grouped the objects together, they would not fit exactly over the top of the original map.
Don’t believe me? Try it…this is a killer bonus PowerPoint trick!

6. Open the Selections Pane
Back on your original PowerPoint slide, open the selections pane one of two ways:
Option 1: Using your mouse – navigate to the home tab, navigate to the Arrange tool and at the bottom of the dropdown select the selection pane.

Option 2: Using your keyboard – hit the ALT + F10 keyboard shortcut and the selection pane pops open on the right-side of your screen.

7. Name the trigger objects
Within the Selection Pane, scroll through your objects and find the shapes you want to use as triggers for the PowerPoint animation. In this case, I want to use the two rectangles at the top, so I need to scroll way down.
As the blue rectangle is Rectangle 1, so I will double-click the rectangle in the Selection Pane and label it as something that’s easier to remember like ‘Western Region’.

Next, we’ll do the same for the second trigger object. In this case the salmon pink rectangle is Rectangle 2, so I will double-click the rectangle and rename it ‘Eastern Region’.

Note: Renaming the PowerPoint objects like this is not necessary to pull off the appear and disappear animation trick, but it makes it A LOT easier, so I highly recommend this extra step.
With the trigger objects now named correctly, you can close the Selection Pane, either by clicking the X in the upper right-hand corner or by hitting ALT + F10 on your keyboard.
Part #2: Set up your animations
Now we need to hook up the appear and disappear animations and set them to trigger ‘on click’.
1. Hooking up your PowerPoint animations
Select the first group of states (I’ll start with the Western region in blue) and from the Animations Tab select the Appear animation. You should see a 1 appear next to the group.

2. Starting the animation on click (click to reveal)
With the animation applied and the group still selected, from the Animations Tab, select Trigger, On Click of and select your named shape (Western region in this case).

3. Setting the second animation
With the Appear animation set, you now want to add a second animation – Disappear – to that same group.
So with the group selected, from the Add Animation drop down, scroll down and find the Disappear animation.

4. Setting the disappear animation’s trigger (click to disappear)
With the second animation added, you again want to navigate to the Trigger drop down and select On Click Of and select your trigger shape, again the Western Region in this case.
So your first group should have both an Appear and Disappear animation set to it, based on the trigger event of clicking the blue rectangle.

5. Repeat the same sequence for your other grouped shapes
- Add the Appear animation
- Set the Appear animation to On Click of your other shape, the Easter region in this case
- Use the Add Animation drop down to add the Disappear animation
- Set the Disappear animation to On Click of your other shape, again the Easter region in this case
The result is that each of the rectangles on your PowerPoint slide should now have two animations both set to trigger with a click: an Appear animation and a Disappear animation.
This is how you get that click to reveal and click to disappear effect using trigger animations.

Part #3: Test your trigger animations
Now that you everything setup, it’s important to test it before you call call your presentation final.
Follow these steps to test your animated sequence.
1. Open the Animations Pane to double check your work
If you open the PowerPoint Animations Task Pane, it should look like the below image. The green star is the Appear animation and the red star is the Disappear animation.
Make sure that the object appears (the green star) before it disappears (the red star), otherwise this Animation trick will not work.

2. Test your trigger animations to make sure they work
With the animations set, hit SHIFT + F5 on your keyboard to launch Slideshow View (see shortcut demo below for help with this), and the slide starts out as the non-filled vector map (just like we wanted).
If I click the blue trigger rectangle (the Western Region), the western side of the map fills blue (perfect!).

If I click the red trigger rectangle (the Eastern Region), the eastern side of the map fills red.

So you can see that clicking the rectangles, makes the PowerPoint animation appear then disappear, revealing our objects…which is exactly what we want!
So that’s how you can use the appear and disappear animations (with trigger objects) to create an interactive graphic in PowerPoint.
The great thing about this trick is you can quickly and easily create a sophisticated graphic to impress your audience. Trust me, they will be impressed!
To learn more about our training courses and other PowerPoint tutorials, visit us here .
🔒 Unlock the PowerPoint Shortcuts Trusted by Industry Leaders KKR, American Express, HSBC, and More!
Join over 114,880 professionals from diverse fields including consulting, investment banking, advertising, marketing, sales, and business development who have supercharged their PowerPoint game with our proven methods.
✅ Customize compelling presentations effortlessly.
✅ Master time-saving techniques for faster deck creation.
✅ Boost your career prospects with top-notch PowerPoint skills.
Get FREE access to the Critical PowerPoint Shortcuts module of our premium training course by entering your name and email below.
DISCLAIMER: PC Users Only!
We respect your privacy and will keep your info safe and confidential.
Related Articles
- Bar chart trick: Right aligning categories (PPT, Word, and Excel)
- PowerPoint settings: program level vs. presentation level
- Set Up Slide Show: Customize how your PPT presentations run
- What is the Popup Toolbar in PowerPoint?
- Strikethrough Shortcut (l̶i̶k̶e̶ ̶t̶h̶i̶s̶) for Word, Excel & PowerPoint
About The Author

Popular Tutorials
- How to Strikethrough Text (l̶i̶k̶e̶ ̶t̶h̶i̶s̶) in Word, Excel & PowerPoint
- How to Make Animated Fireworks in PowerPoint (Step-by-Step)
- How to Create a Flash Card Memory Game in PowerPoint (Like Jeopardy)
- Keyboard Shortcuts Not Working: Solved
PowerPoint Tutorial Categories
- Strategies & Opinions
- Shortcuts & Hacks
- Presentation Design
- Pictures, Icons, Videos, Etc.
- New Features
- Miscellaneous
- Charts & Data Viz
We help busy professionals save hours and gain peace of mind, with corporate workshops, self-paced courses and tutorials for PowerPoint and Word.
Work With Us
- Corporate Training
- Presentation & Template Design
- Courses & Downloads
- PowerPoint Articles
- Word Articles
- Productivity Resources
Find a Tutorial
- Free Training
- For Businesses
We help busy office workers save hours and gain peace of mind, with tips, training and tutorials for Microsoft PowerPoint and Word.
Master Critical PowerPoint Shortcuts – Secure Your FREE Training Module and Save Valuable Time!
⌛ Master time-saving expert techniques.
🔥 Create powerful presentations.
🚀 Propel your career to new heights.
We value your privacy – we keep your info safe.
Discover PowerPoint Hacks Loved by Industry Giants - KKR, AmEx, HSBC!
Over 114,880 professionals in finance, marketing and sales have revolutionized their PPT skills with our proven methods.
Gain FREE access to a full module of our premium PowerPoint training program – Get started today!
We hate spam too and promise to keep your information safe.
You are currently viewing a placeholder content from Facebook . To access the actual content, click the button below. Please note that doing so will share data with third-party providers.
HatchJS.com
Cracking the Shell of Mystery
PowerPoint Animation: How to Make an Object Appear and Then Disappear
PowerPoint Animations: Appear and Disappear
PowerPoint presentations are a powerful tool for communicating information to an audience. They can be used to create engaging and visually appealing presentations that help to keep your audience’s attention. One of the many ways to make your PowerPoint presentations more interesting is to use animations. Animations can be used to make text, images, and other objects appear and disappear on the slide. This can help to emphasize important points and keep your audience engaged.
In this article, we will discuss how to use PowerPoint animations to make your presentations more effective. We will cover the basics of PowerPoint animations, including how to create them, how to control their timing, and how to use them effectively. We will also provide some tips for creating animations that are both visually appealing and engaging.
So if you’re looking to take your PowerPoint presentations to the next level, be sure to read on!
What is PowerPoint animation?
PowerPoint animation is a feature of Microsoft PowerPoint that allows you to add movement and visual effects to your presentations. You can use animation to draw attention to important points, make your slides more engaging, and help your audience understand your content better.
There are many different types of PowerPoint animation, including:
- Entrance animations: These animations make objects appear on the slide.
- Exit animations: These animations make objects disappear from the slide.
- Motion paths: These animations move objects around the slide.
- Rotation animations: These animations rotate objects around their axis.
- Scaling animations: These animations change the size of objects.
- Transparency animations: These animations make objects fade in or out.
You can use animation to create a variety of effects, such as:
- Emphasis: You can use animation to emphasize important points in your presentation. For example, you could make the title of your slide appear with a dramatic entrance animation.
- Movement: You can use animation to create a sense of movement in your presentation. For example, you could make a graph of sales figures move across the slide.
- Attention-grabbing: You can use animation to grab your audience’s attention. For example, you could make a picture of a product appear with a sudden zoom-in animation.
Types of PowerPoint animation
There are three main types of PowerPoint animation:
- Slide-level animation: This type of animation affects the entire slide. For example, you could use a slide-level animation to make all of the objects on a slide fade in at the same time.
- Object-level animation: This type of animation affects individual objects on a slide. For example, you could use an object-level animation to make a picture of a product spin around.
- Path animation: This type of animation makes an object move along a specific path. For example, you could use a path animation to make a text box move from one corner of the slide to the other.
Benefits of using PowerPoint animation
There are many benefits to using PowerPoint animation in your presentations, including:
- Increased engagement: Animation can help to keep your audience engaged by adding visual interest to your slides.
- Improved understanding: Animation can help your audience to better understand your content by making it easier to follow.
- Enhanced memorability: Animation can help your audience to remember your content better by making it more memorable.
When used effectively, PowerPoint animation can be a powerful tool for creating more engaging, effective, and memorable presentations.
How to create PowerPoint animation
To create PowerPoint animation, you can follow these steps:
1. Select the object you want to animate. 2. Click the Animations tab on the ribbon. 3. Choose the animation effect you want to use. 4. (Optional) Adjust the animation settings.** You can change the speed, direction, and duration of the animation. 5. (Optional) Add a trigger to the animation.** A trigger tells PowerPoint when to start the animation. You can trigger an animation when you click a button, when you move the mouse over an object, or when you enter or leave a slide.
Once you have created your animation, you can preview it by clicking the Play button in the Animations tab.
Tips for creating effective PowerPoint animation
When creating PowerPoint animation, it is important to keep the following tips in mind:
- Use animation sparingly. Too much animation can be distracting and make your presentation difficult to follow.
- Use animation to emphasize important points. Animation can be a great way to draw attention to important points in your presentation.
- Make sure your animations are clear and easy to understand. Your animations should be easy for your audience to follow.
- Test your animations before your presentation. Make sure your animations are working properly and that they are not too distracting.
By following these tips, you can create PowerPoint animations that are effective and engaging.
PowerPoint animation is a powerful tool that can be used to create more engaging, effective, and memorable presentations. By following the tips in this article, you can create PowerPoint animations that will help you to communicate your message effectively and reach your audience.
3. Problems with PowerPoint animation
PowerPoint animation can be a great way to add interest and excitement to your presentations. However, if it is not used correctly, it can also be distracting and annoying. Here are some common problems with PowerPoint animation:
- Too much animation. When you use too much animation, it can be overwhelming and difficult for your audience to follow. It is important to use animation sparingly and only when it is necessary to emphasize a point.
- Unnecessary animation. Sometimes, people use animation simply because they can. This can be a waste of time and can actually detract from your presentation. Only use animation when it is actually going to add value to your presentation.
- Confusing animation. If your animation is not clear and easy to understand, it can be confusing for your audience. Make sure that your animation is simple and straightforward so that your audience can easily follow what is happening.
- Distracting animation. Animation can be distracting if it is too flashy or attention-grabbing. It is important to make sure that your animation is not distracting from the content of your presentation.
4. Solutions to common problems with PowerPoint animation
There are a number of things you can do to avoid the common problems with PowerPoint animation. Here are some tips:
- Use only the necessary animation. Only use animation when it is necessary to emphasize a point or to make your presentation more engaging.
- Keep your animation simple. Make sure that your animation is simple and easy to understand. Avoid using complex or confusing animations.
- Test your animation with your audience. Before you give your presentation, test your animation with your audience to make sure that it is clear and easy to follow.
- Use animation sparingly. Animation can be a great way to add interest and excitement to your presentations, but it is important to use it sparingly. Too much animation can be distracting and annoying.
Summary of key points
- PowerPoint animation can be a great way to add interest and excitement to your presentations.
- However, if it is not used correctly, it can also be distracting and annoying.
- Some common problems with PowerPoint animation include too much animation, unnecessary animation, confusing animation, and distracting animation.
- To avoid these problems, use only the necessary animation, keep your animation simple, test your animation with your audience, and use animation sparingly.
Call to action
If you want to learn more about how to use PowerPoint animation effectively, there are a number of resources available online. You can find tutorials, articles, and guides on how to use animation in PowerPoint. You can also find templates and themes that can help you create professional and engaging presentations.
Q: How do I make an object appear and disappear in PowerPoint?
A: There are a few ways to make an object appear and disappear in PowerPoint.
- Use the Fade animation effect. To do this, select the object you want to animate, and then go to the Animations tab on the ribbon. In the Animation group, click the Add Animation button and select Fade . You can then choose how long the animation should take, and whether it should start automatically or when you click the mouse.
- Use the Appear and Disappear animation effects. To do this, select the object you want to animate, and then go to the Animations tab on the ribbon. In the Animation group, click the Add Animation button and select Appear or Disappear . You can then choose how long the animation should take, and whether it should start automatically or when you click the mouse.
- Use the Custom Animation feature. To do this, select the object you want to animate, and then go to the Animations tab on the ribbon. In the Advanced Animation group, click the Custom Animation button. This will open the Custom Animation dialog box. You can then use the Add Effect button to add animation effects to the object, and the Timing tab to set the duration and timing of the animations.
Q: How do I make an object appear and disappear on a specific slide?
A: To make an object appear and disappear on a specific slide, you can use the Trigger property of the animation effect. To do this, select the animation effect, and then go to the Effect Options dialog box. In the Trigger section, you can choose to have the animation start when the slide is displayed, when you click the mouse, or when another animation starts.
Q: How do I make an object appear and disappear multiple times?
A: To make an object appear and disappear multiple times, you can use the Repeat property of the animation effect. To do this, select the animation effect, and then go to the Effect Options dialog box. In the Repeat section, you can choose how many times the animation should repeat, and whether it should repeat indefinitely or until the slide is closed.
Q: How do I make an object appear and disappear with a delay?
A: To make an object appear and disappear with a delay, you can use the Delay property of the animation effect. To do this, select the animation effect, and then go to the Effect Options dialog box. In the Delay section, you can enter the number of seconds to delay the animation.
Q: How do I make an object appear and disappear with a sound effect?
A: To make an object appear and disappear with a sound effect, you can use the Sound property of the animation effect. To do this, select the animation effect, and then go to the Effect Options dialog box. In the Sound section, you can choose a sound file to play when the animation starts.
Q: How do I make an object appear and disappear smoothly?
A: To make an object appear and disappear smoothly, you can use the Easing property of the animation effect. To do this, select the animation effect, and then go to the Effect Options dialog box. In the Easing section, you can choose an easing function to control the speed of the animation.
PowerPoint animations can be a powerful tool to help you create more engaging and visually appealing presentations. By using appear and disappear animations, you can add interest and emphasis to your slides, and help your audience to better understand your content.
Here are a few key takeaways to remember when using appear and disappear animations:
- Use animations sparingly. Too many animations can be distracting and make your presentation difficult to follow.
- Use animations to highlight important points. Animations can help you draw attention to key information and make it easier for your audience to remember.
- Keep your animations simple. Complex animations can be difficult to follow and may not add much value to your presentation.
- Test your animations before your presentation. Make sure that your animations are working properly and that they are not distracting.
By following these tips, you can use appear and disappear animations to create more engaging and effective presentations.
Author Profile

Latest entries
- December 26, 2023 Error Fixing User: Anonymous is not authorized to perform: execute-api:invoke on resource: How to fix this error
- December 26, 2023 How To Guides Valid Intents Must Be Provided for the Client: Why It’s Important and How to Do It
- December 26, 2023 Error Fixing How to Fix the The Root Filesystem Requires a Manual fsck Error
- December 26, 2023 Troubleshooting How to Fix the `sed unterminated s` Command
Similar Posts
How to replace new lines in notepad.
Notepad Replace New Line: A Guide for Beginners Notepad is a simple text editor that comes pre-installed on Windows computers. It’s a great tool for creating and editing basic text files, but it doesn’t have a lot of features. One of the things that Notepad doesn’t do is allow you to easily replace new lines….
Python: How to Call a Parent Method
Python Call Parent Method: A Guide In Python, a parent method is a method that is defined in a parent class and inherited by a child class. When you call a parent method from a child class, you are essentially calling the method that is defined in the parent class. This can be useful for…
How to Take a Screenshot in Ubuntu VirtualBox
How to Take a Screenshot in Ubuntu VirtualBox VirtualBox is a powerful tool that allows you to run multiple operating systems on your computer simultaneously. This can be a great way to test out new software, learn about different operating systems, or troubleshoot problems. However, taking screenshots in VirtualBox can be a bit tricky. In…
How to Segue to Another View Controller in Swift
Swift Segue to Another View Controller Segue is a powerful tool in SwiftUI that allows you to transition between different views in your app. It’s easy to use and can be customized to create a variety of effects. In this tutorial, we’ll show you how to use segues to navigate between views in your SwiftUI…
How to Create a Temporary Table in Databricks
Databricks Create Temporary Table: A Quick Guide In Databricks, a temporary table is a read-only table that is created in the current Spark session and is only available for the duration of that session. Temporary tables are a useful way to store data that you need to access frequently, but don’t want to persist permanently…
How to Check if a Document Exists in Firebase Firestore
Firestore is a NoSQL database that stores data in documents. Documents are organized in collections, and each document has a unique ID. You can check if a document exists in Firestore by using the `exists()` method. The `exists()` method takes a document ID as its argument and returns a boolean value indicating whether the document…

Free Online Microsoft Training
Free tips and tricks for using Microsoft Office and Windows
Use PowerPoint animations to make an object appear and disappear
- By Belinda Anderson
- 15 January 2018
- Updated: 19 January 2024

This week I saw a great question on an online forum relating to Microsoft PowerPoint. The question asked how to make an object appear on screen for a few seconds, and then make it disappear only to be replaced with a different object. I’ve been asked about this on many occasions during training courses and it really is a nice easy task to do, so after answering the question I thought I’d create a post about it.
Using Animations in Microsoft PowerPoint can be lots of fun and allows the creative juices to flow. Having conducted professional development for teachers over the years there are some really great ways that teachers and students can use PowerPoint and in particular, animations in the classroom.
About PowerPoint Animations
PowerPoint Animations are a great way to make any presentation interactive and dynamic. There are four (4) different types of animations: Entrance , Emphasis , Exit and Motion Paths .
The type of animation you decide to use is directly related to what you want the object to do.
- Do you want an object to appear or disappear? Then you will need an Entrance or Exit effect.
- Do you want it to be highlighted or accentuated on the slide? Then you will need an Emphasis effect.
The Motion Paths effects provide great flexibility to make elements move anywhere you like. They can make a turn, loop around the screen – you create your own custom path.
There is such a thing as “too much of a good thing” when it comes to animations. I can definitely say that I’ve seen some terrible examples of how to use animations in Microsoft PowerPoint. While it is a great feature, I always give this little “disclaimer”. While animations can really improve the readability and retention of information, too much will make your audience feel like they are watching the latest creation from Disney Pixar. Too much is never good, so try to keep the number of objects you animate to a level which will not leave your audience feeling confused.
About the Animation Pane
The Animation Pane allows you to view all objects on the slide which have had an animation effect applied. The Animation Pane gives you a better view of what is animated and when animations will begin. It is also great for troubleshooting issues. The Animation Pane is not visible on the screen until you display it. I’ll show you how to do this a little further down this post.
Create a PPT animation
For this animation sequence, I am going to have an image of a caterpillar turn into a beautiful butterfly, this is inspired by my daughter’s recent “life cycle of a butterfly” presentation she did for class.
So let’s take a look now at how to work with animations in PowerPoint to achieve our goal.
- Firstly lets open Microsoft PowerPoint .
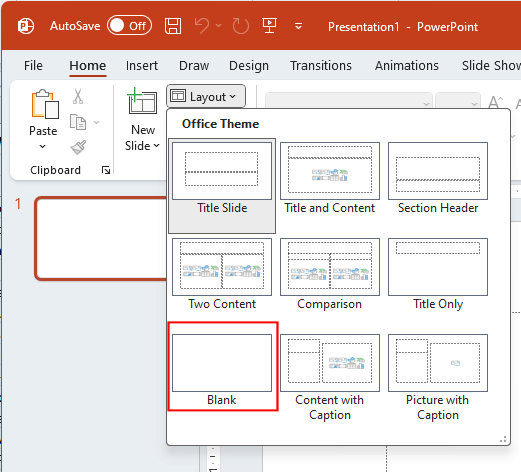
- Whenever I conduct a course in PowerPoint, I always emphasise the importance of choosing the correct slide layout , so for this animation sequence I need a blank slide.
- From the Home tab click the Layout button and choose Blank from the options:
- Now we need to insert our first image which will be a caterpillar.
- If you need to source images for your presentation you can use the built-in Insert > Pictures > Stock Images option, however, be sure to check copyright requirements on the image you choose, or you can perform a Google search and filter out images which are labelled for reuse, or use a stock image library such as Pexels.com .
- To insert the first image, select the Insert tab and choose Pictures then This Device .
- The Insert Picture dialog box will now appear:
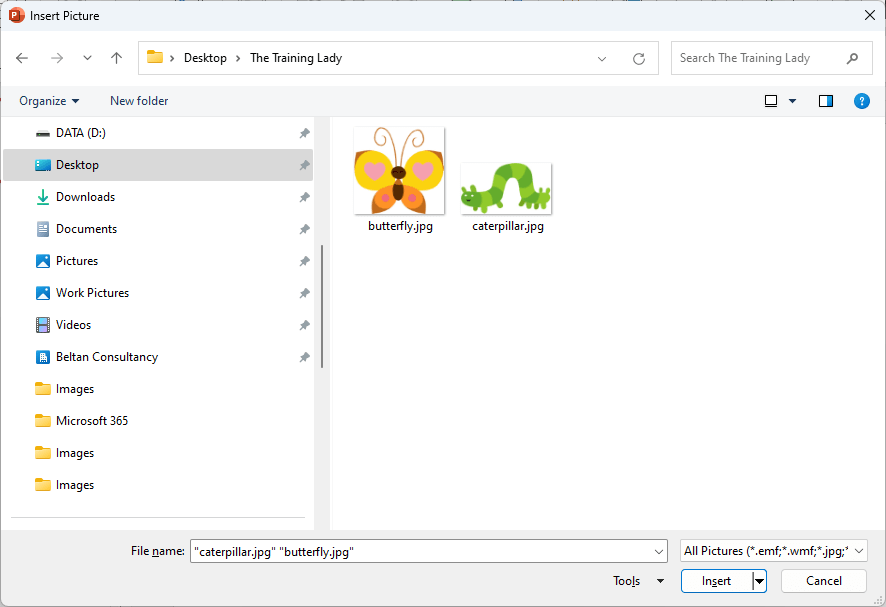
- Select the first image and click Insert .
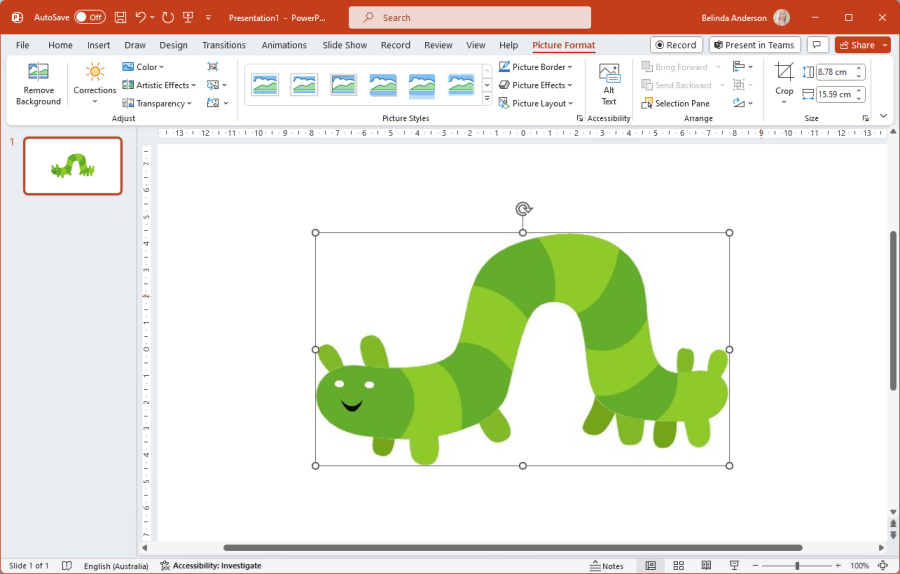
- The image is now displayed on the slide:
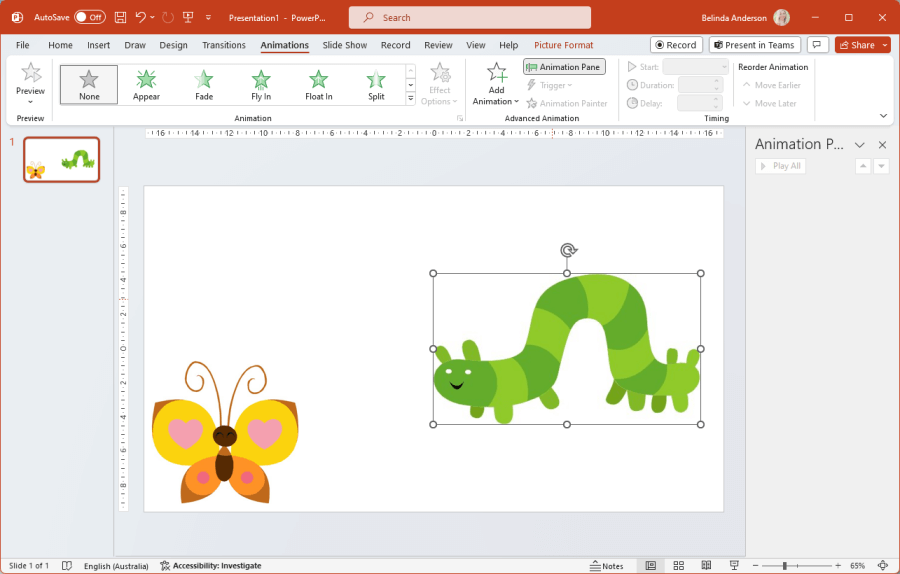
- Now to insert the second image, repeat the same process that you used for the first image.
- Once you have the butterfly on the slide you may need to resize it to a suitable size and then move the butterfly off to one side of the slide by simply clicking and dragging the image:

- The reason I suggest you move the butterfly to one side at the moment is to make setting up the animation sequence a little easier, at the end we will move the butterfly over the top of the caterpillar and increase the size.
Create the Animation
- Now select the caterpillar and click the Animations tab from the Ribbon.
- To display the Animation Pane click the Animation Pane button located in the Advanced Animation group.
- The Animation Pane will be displayed on the right side of the slide:
- For the caterpillar we want to make him disappear.
- From the Animation gallery select the More button which is underneath the down scroll arrow:
- From the list of available animations scroll down to the Exit type animations and click the Disappear animation type.
- You will now see the number 1 appear in a square on the top left corner of the image:

- The number helps us identify objects in a sequence, so this lets us know this animation will run as the first item in this sequence. It’s important to note that if you set multiple animations to run at the same time that they will all be numbered the same, instead of numbered individually.
Set Animation Timing
Animations all rely for the most part on timing. Timing requires us to specify when an animation will begin, how long we want it to last and if we want any delay used.
When it comes to the Start option you have 3 available:
- For this animation we want this to run without us having to prompt it to begin, so click the Start drop-down menu from the Timing Group and select After Previous :
A common question I get at this stage during a training day is “ Why are we using After Previous when this is the 1 st item in this sequence? ” That is a valid question and as I’ve outlined in the table above, PowerPoint recognises that when we start a presentation in slide show mode, that is the “previous” effect so it will automatically start an animation without us having to click.
- For the Duration option we need to set how long we want the animation to take, so in this case, how long till our caterpillar disappears?
- Use the up and down arrows to adjust this setting to 3 seconds (03.00) :

- For this sequence, we do not want to use a delay.
- Now select the butterfly image.
- From the Animation gallery, click the More button and select the Appear option.
- Within the Timing section, change the Start setting to be After Previous because we would like the butterfly to appear once our caterpillar has disappeared.
- Now in the Duration section, we can leave the default option of Auto . This will essentially leave the butterfly on the slide till we either move to another slide or exit the slideshow. If you wanted to include a 3 rd or 4 th animation then you would set this option to the number of seconds you want the butterfly to be displayed.
- Each images now has an animation attached to it.
- Click and drag the butterfly over the top of the caterpillar and make the image larger:

- We are now ready to preview our animation.
- Click on the first object in the Animation Pane , in our case it will be the caterpillar.
- From the Animations ribbon click the Preview button.
- You will now see a preview.
- To view the full animation in slideshow mode simply press F5 on the keyboard and sit back and watch.
- Once the animation has finished click Esc on the keyboard to exit.
- You have now created a simple, but effective, animation in PowerPoint.
I highly recommend you explore the huge range of animation options available in PowerPoint – this one is only the tip of the iceberg! Why not check out how to use the Morph & Zoom options or check out many other great posts related to Microsoft PowerPoint .
- Animations , Shapes , Slide show
- Microsoft PowerPoint
8 Responses
Any tips on how you can have something appear, dissappear and repeat on a sync? I want text to do this in line with a gif I have embedded
Hi Matthew, You can do this using the Repeat setting. Add the text in as needed then apply the animation you wish to use. From the Animation Pane click the drop down for the animation you want to repeat and choose Timing from the menu. You will then see the Start, Delay, Duration and Repeat options. Click the Repeat drop down menu and choose how many times you want that animation repeated. You can select 2, 3, 4, 5, 10, until next click, or until end of slide. Hope this helps. Thanks, Belinda
The question I have is how to have an object appear and then disappear on the same slide, e.g., imagine successive callouts appearing. When the next callout appears, the previous callout disappears.
Hi David, This post outlines how you can have an object appear and then disappear on the same slide. The Exit animation types in PowerPoint are perfect for this. If you use an “Entrance” type animation first on the callout, then also add an “Exit” animation to the same object and set it to start after the previous animation, you will achieve the effect you are after.
Hope this helps. Regards, Belinda
I want an object to appear on click, and then that same object disappear on the next click. In your post you have two objects and this solution works for two objects. But I have six objects that need to appear and then subsequently disappear (so really, four that need to be able to both appear and disappear on the same slide).
For example, if you had a third object after the butterfly, how would you set the butterfly to also disappear prior to having the third object appear? How do I apply two different animations to the same object? PowerPoint doesn’t seem to let me do this.
You can use [Effect Option] [After animation] and then select “Hide on Next Mouse Click” to have the object disappear. I too didn’t manage to put two (or more) animations to the same object (which is rather strange given the large set of disappear options).
Hi Nico, See comment below on how to apply two animations to one object.
Thanks, Belinda
Hi Alex, The trick to this is not to use the Animation gallery when choosing the animation effect you want. You need to specifically add the exit animation using the Add Animation button otherwise your original “entrance” animation disappears. Let me know if you have trouble getting this to work and I’ll write up a post for you on how to do this step by step. Check out this screen shot showing an Entrance (green stars) and Exit (red star) for each callout. https://snipboard.io/dVXomy.jpg Thanks, Belinda
Leave a Reply Cancel reply
Your email address will not be published. Required fields are marked *
Please enter an answer in digits: four + nine =
This site uses Akismet to reduce spam. Learn how your comment data is processed .
Recent Posts

- General (4)
- Microsoft Excel (37)
- Microsoft Forms (9)
- Microsoft OneNote (10)
- Microsoft Outlook (32)
- Microsoft PowerPoint (32)
- Microsoft Sway (8)
- Microsoft Teams (10)
- Microsoft Windows (23)
- Microsoft Word (31)

Powerpoint Assist
Tips for Powerpoint by Regina Griffin
How To Make Animation Disappear After Appearing In PowerPoint
Are you looking to enhance your PowerPoint presentations with eye-catching animations?
In this tutorial by Oregon-based teacher Regina Griffin, explore the benefits of using animation in PowerPoint and learn how to add animations to your slides.
Learn how to Make Animation Disappear After Appearing and get some helpful tips for using animation effectively. Let’s dive in and elevate your presentation game!
Key Takeaways:
- Use animation sparingly in your PowerPoint presentations to avoid overwhelming your audience.
- Keep your animation timing consistent to maintain a smooth and professional flow.
- Preview your animation before presenting it to ensure it appears and disappears as desired.
Why Use Animation in PowerPoint?
Utilizing animation in PowerPoint presentations enhances visual engagement and aids in conveying information effectively. Integrating entrance and exit animations through the ribbon interface can bring slides to life and captivate audiences.
Animation in a PowerPoint presentation can be a powerful tool for highlighting key points, guiding the audience’s attention, and making the content more memorable. By incorporating entrance animations , elements on slides can appear dynamically and engagingly, preventing monotony and keeping viewers interested. Similarly, exit animations can smoothly transition between slide content, helping to maintain a cohesive flow throughout the presentation.
How to Add Animation in PowerPoint
To incorporate animation in PowerPoint, select the desired object on a slide and apply animations using the Animation Gallery . You can trigger animations by clicking on the slide during a presentation.
Once you have selected the object, navigate to the ‘Animations’ tab on the PowerPoint toolbar. Here, you will find various animation options to choose from. Click on ‘Add Animation’ to open the Animation Gallery, where you can select the specific animation effect you want to apply to the object.
After adding the animation, ensure the Animation Pane is visible. The Animation Pane provides a timeline view of all animations on the slide, allowing you to adjust the sequence, duration, and other settings.
To activate the animation during the presentation, head to the ‘Slide Show’ tab and click on ‘Set Up Slide Show.’ Check the box next to ‘Advance slides’ and choose ‘By User’ to enable animations through user interaction.
Step 1: Select the Object
The first step in animating an object in PowerPoint is selecting the specific element you wish to animate. This selection process can be done conveniently using the Animation Pane.
When choosing an object for animation, it’s crucial to consider the relevance and significance of the element within your presentation. Choose objects that will enhance your message and engage your audience effectively.
By using the Animation Pane, you can easily view and manage the different animated objects within your slides. This tool provides a comprehensive overview of the animation sequence, allowing you to adjust timings, reorder animations, and customize effects with precision.
Step 2: Choose an Animation
After selecting the object, navigate to the Animation Gallery to choose from a variety of effects. Opt for entrance animations to create impactful visual transitions within your presentation.
Once you have accessed the Animation Gallery, you will be presented with a plethora of engaging options to animate your chosen object. These entrance animations serve as dynamic starting points for your slides, captivating your audience from the moment they appear on the screen.
You can make your selection from an array of effects that range from subtle fades to eye-catching swirls and spins, allowing you to tailor the animation to suit the tone and message of your presentation.
Step 3: Adjust the Animation Settings
Fine-tune your animations by adjusting settings in the Animation Pane. Control the timing, speed, and duration of the animation to align with your presentation’s flow and emphasis.
When customizing animation settings within the Animation Pane, go to the ‘Effect Options’ menu to adjust the speed of the animation. This can be crucial in ensuring that the animation doesn’t feel too rushed or too slow, creating a more polished and professional look to your presentation.
Utilizing the ‘Start’ drop-down menu allows you to specify when the animation should begin, making sure it complements the content on each slide. Consider using the ‘Delay’ option to create pauses between animations for added impact.
How to Make Animation Disappear After Appearing
Creating animations that vanish after appearing in PowerPoint involves utilizing the Animation Pane and grouping objects on a slide. This technique can add a dynamic touch to your presentation.
To make animations disappear seamlessly in PowerPoint, after setting the entrance animations for your objects, follow these steps:
- Select the objects you want to group by holding down the ‘Ctrl’ key while clicking on each one.
- Right-click on one of the selected objects and choose ‘Group’ from the menu. This will create a single group that you can treat as one object.
- In the Animation Pane, click on the animation that corresponds to the grouped objects. Adjust the ‘Start’ and ‘Duration’ options to control when and how long the animation lasts on the slide.
Option 1: Use the ‘After Previous’ Timing
Employing the ‘After Previous’ timing option in PowerPoint allows objects to disappear right after their appearance, creating seamless animated sequences. Utilize this feature within the Animation Pane for precise control.
When using the ‘After Previous’ timing option, each animated object in your presentation is triggered to start the moment the previous animation effect concludes, resulting in a smooth transition from one element to the next. This setting is particularly useful for ensuring that your animations flow seamlessly, avoiding abrupt changes that could disrupt the visual appeal of your slides. By accessing the Animation Pane, you can easily manage the sequencing of animations, adjusting the order and timing to achieve the desired effects throughout your presentation.
Option 2: Use the ‘With Previous’ Timing
Utilize the ‘With Previous’ timing option to make objects vanish simultaneously with other elements on a slide. This synchronized animation effect can enhance the visual coherence of your presentation.
When you choose the ‘With Previous’ timing setting for an animation in PowerPoint, it ensures that the selected object disappears at the same time as the preceding animation or event on that slide. This creates a smooth and polished transition between different elements, maintaining a seamless flow of information.
To manage these settings effectively, navigate to the Animation Pane, where you can adjust the order, timing, and duration of each animation. By organizing animations with the ‘With Previous’ option, you can control the sequence of object disappearances, creating a more engaging and professional-looking presentation.
Option 3: Use the ‘On Click’ Timing
Employ the ‘On Click’ timing option to trigger object disappearances when the presenter clicks during a slide show. This interactive animation control adds engagement and interactivity to your presentation.
By using the ‘On Click’ timing for animations in PowerPoint, you can give your audience more control over the pace of information delivery. This means that elements vanish or appear only when prompted by the viewer’s actions, making the presentation more engaging and dynamic.
- Setting up this feature is relatively straightforward. First, access the Animation Pane by navigating to the ‘Animations’ tab and selecting it.
- Then, select the object you want to assign the ‘On Click’ animation option to.
- Next, click on ‘Add Animation’ in the Animation Pane, and then choose ‘More Entrance Effects’.
Tips for Using Animation in PowerPoint
When incorporating animations in PowerPoint, consider using them sparingly to avoid overwhelming your audience. Maintain consistent timing and preview your animations before presenting to ensure a polished delivery.
Plus moderation, it is crucial to ensure that the timing of your animations is consistent throughout the presentation. This will create a smoother flow and enhance the overall viewer experience.
Before your big presentation, take the time to preview all animations to guarantee they align with the content seamlessly. This small step can make a significant difference in the professionalism and impact of your slideshow.
When managing groups of objects for animations, try utilizing the ‘Selection Pane’ feature in PowerPoint. This tool allows you to control the visibility, order, and animation effects of each object, simplifying the process and ensuring efficient animations.
Tip 1: Use Animation Sparingly
To prevent animation overload in PowerPoint presentations, it is advisable to use these effects sparingly and strategically. Previewing animations can help in assessing their impact on the overall presentation flow.
Strategic deployment of animations can significantly elevate the delivery of your message, capturing and retaining audience attention effectively. By carefully selecting when and how each animation is utilized, you can create a dynamic and engaging presentation without overwhelming your viewers. The preview function serves as a valuable tool for ensuring that the animations complement the content rather than distract from it. Through this feature, users can fine-tune the timing, sequencing, and type of animations used, enhancing the coherence and professionalism of the presentation.
Tip 2: Keep the Timing Consistent
Consistency in animation timing across slides and objects in PowerPoint presentations ensures a cohesive and professional visual experience for the audience. Use the Animation Pane to manage timings effectively.
By keeping the animation timings consistent, presenters can avoid distractions and maintain focus on the content being delivered. This not only enhances the overall quality of the presentation but also reflects positively on the presenter’s attention to detail.
Utilizing the Animation Pane in PowerPoint allows users to have a clear overview of all animated elements within their slides. This feature simplifies the process of adjusting timings for different objects, ensuring that animations are synchronized seamlessly.
Tip 3: Preview Your Animation Before Presenting
Before delivering your PowerPoint presentation, ensure to preview your animations to confirm smooth transitions and effects. Previewing allows for adjustments and refinements to enhance the overall visual appeal.
Utilizing the Preview feature within the Animation Pane for real-time assessments is a crucial step in perfecting your presentation. This tool allows you to see exactly how your animations will unfold in the live presentation mode, helping you catch any timing issues or unintended effects. By previewing, you can ensure that each animation complements your content seamlessly, creating a more engaging and professional experience for your audience.
Leveraging animation features in PowerPoint can elevate the quality of presentations by adding dynamic visual elements. The Animation Pane serves as a valuable tool for managing and customizing animations.
Animations play a pivotal role in capturing the audience’s attention throughout a presentation. By incorporating animations , presenters can convey complex concepts clearly and engagingly, making information more digestible for viewers. These visual aids not only enhance the aesthetic appeal of slides but also help in emphasizing key points effectively.
The Animation Pane, as a versatile resource, offers granular control over the timing, sequencing, and effects of each animation element. This feature enables presenters to fine-tune the presentation flow, ensuring smooth transitions and engaging storytelling. The visual feedback provided by the Animation Pane allows for easy adjustments and refinements, leading to a polished and professional presentation.
Resources for Further Learning
For those seeking to delve deeper into PowerPoint animation techniques, exploring advanced features like the Animation Pane and precise timing controls can enrich your presentation skills and elevate the visual impact of your slides.
Mastering the Animation Pane allows you to control the order and timing of each animation effect with precision, ensuring a seamless and engaging delivery. By leveraging this tool, you can create complex animations and customize the movement of objects on your slides to captivate your audience.
Optimizing timing effects within PowerPoint animations is crucial for maintaining audience engagement and retention. Utilizing entrance, emphasis, exit, and motion path animations effectively can transform static content into dynamic visuals that convey your message with flair.
Frequently Asked Questions
1. how do i make an animation disappear after it appears in powerpoint.
To make an animation disappear after it appears in PowerPoint, first select the object or text box that contains the animation. Then, go to the Animations tab and click on the drop-down arrow next to the animation you want to edit. From there, select “Effect Options” and under the “Timing” tab, choose the option to “Hide After Animation” in the “End” drop-down menu.
2. Can I make an animation disappear automatically without clicking anything?
Yes, you can make an animation disappear automatically without clicking anything. In the “Timing” tab under “Effect Options,” select the option to “Hide After Animation” in the “End” drop-down menu. This will make the animation disappear after it finishes playing without any manual action required.
3. How can I control the timing of when the animation disappears in PowerPoint?
To control the timing of when the animation disappears, select the animation and go to the “Timing” tab under “Effect Options.” Here, you can adjust the duration and delay of the animation, as well as choose the option to “Hide After Animation” in the “End” drop-down menu to determine when it disappears.
4. Is it possible to make an animation reappear after it disappears in PowerPoint?
Yes, you can make an animation reappear after it disappears in Powerpoint. Simply select the object or text box that contains the animation, go to the Animations tab, and click on the drop-down arrow next to the animation. Then, choose “Effect Options” and under the “Timing” tab, uncheck the box next to “Hide After Animation” to make it reappear.
5. What if I want to make multiple animations disappear and reappear in a specific order?
To make multiple animations disappear and reappear in a specific order, you can use the “Animation Pane” in PowerPoint. This allows you to see a list of all the animations on your slide and adjust their order and timing. Simply select the animations you want to edit and use the options in the “Animation Pane” to control their appearance and disappearance.
6. Can I apply the disappearing animation effect to only certain parts of an image or text?
Yes, you can apply the disappearing animation effect to only certain parts of an image or text. This can be done by grouping the parts you want to animate together and then applying the animation to the group. You can also use the “Animation Painter” tool to copy and paste the animation onto other objects or text boxes.
Similar Posts
How to get into presentation mode in powerpoint.
Are you looking to take your PowerPoint presentations to the next level? Presentation Mode in PowerPoint is a powerful tool that can help you create engaging and professional presentations. We will discuss why you should use Presentation Mode, how to enter it, its key features, and how to navigate through your slides. Explore the ins…
How To Make A Picture Transparent In PowerPoint
Are you looking to enhance your presentations and make your images stand out? Making a picture transparent in PowerPoint can be a useful tool for highlighting text, creating a layered effect, or adding a watermark. In this tutorial by Regina Griffin, a teacher from Oregon, US, you will learn how to easily make a picture…
How To Present In PowerPoint On Teams
Are you looking to create and present a PowerPoint presentation on Microsoft Teams? In this comprehensive guide, we will walk you through everything you need to know about using Microsoft Teams for your presentations. From creating a PowerPoint presentation to collaborating with others in real-time to presenting your slides during a Teams meeting, we’ve got…
How To Edit A Slide In PowerPoint
Are you looking to enhance your PowerPoint presentations but not sure where to start? In this comprehensive guide by Oregon-based teacher Regina Griffin, we will explore the importance of knowing how to edit a slide in PowerPoint. From basic functions like adding, deleting, and rearranging slides to advanced techniques such as using the Slide Master…
How To Update Charts In PowerPoint From Excel Automatically
Are you tired of manually update charts in PowerPoint from Excel every time your data changes? In this tutorial by Regina Griffin, a teacher from Oregon, US, we will explore the importance of automating this process. Learn how to save time, ensure data accuracy, and easily make updates and revisions with just a few simple…
How To Trim A Youtube Video In PowerPoint
Are you looking to enhance your PowerPoint presentations by incorporating YouTube videos? In this tutorial by Oregon-based teacher Regina Griffin, we will explore the importance of trimming YouTube videos in PowerPoint. From saving time to creating a more engaging presentation, trimming videos can greatly improve your overall delivery. Learn how to trim a YouTube video…
How-To Geek
How to control when a picture appears in powerpoint.
Animating objects in your PowerPoint presentation, when done properly, lets you help control the pace at which you give your audience information.
Quick Links
Animate your objects, setting the animation start time and speed.
Animating objects in your PowerPoint presentation, when done properly, lets you help control the pace at which you give your audience information. We’ve shown you how to hide an object in PowerPoint . Now, let's look at the various ways to make an object appear.
In a bit, we’re going to go through how to set the start time and speed of an animation, but first, we need to decide which type of animation we want to give our objects.
If you haven’t already inserted an image in your presentation, go ahead and do that now by heading to the "Insert" tab and clicking the “Pictures” button.
Go ahead and position the image where you want it and apply any formatting you want. Then, with your picture selected, switch over to the "Animations" tab.
You’ll the most common animations displayed right on the ribbon; click one to use it.
If you don't see one you like, click the little down arrow at the bottom right of the animations to see the full list.
In the drop-down menu, you'll see a lot more animations you can use, and you can find even more by clicking any of the "More..." options at the bottom of the menu. PowerPoint offers a lot of animations.
We're going to go with a simple Fade animation for our example here, but the same techniques apply no matter what you choose. Once you select your animation, a number will appear at the top-left of the object. This number indicates the order in which the object will appear on the slide if you have more than one animation. In this example, we have only one object with an animation, so we’ll only see the number “1.”
Now, if we play our presentation, the image will appear after you click your mouse (that's the default method for initiating an animation, but more on that later).
If we throw in another image into the mix and give it an animation, we’ll see the number “2” appear next to it, meaning it will be the second object to appear on the slide. Let’s try it out. On the second image, we’re going to select the “Float In” animation.
Now you’ll see the number 2 appear next to the object.
And here’s what it would look like in the actual presentation.
Pretty neat, right? As you can see, you can control which image appears first and how it appears in the presentation.
You can also apply multiple animations to a single object. This is handy for all kinds of things. You could use multiple animations for extra emphasis, or you make an object appear on and then disappear from the slide before moving on.
In this example, we’re going to make an object appear, then give it a little extra emphasis afterward.
First, select the object and then head over to the “Animations” tab. This time, click the “Add Animation” button. You must select the animations from here if you want to apply multiple animations.
Once selected, a drop-down menu will appear that looks just like the expanded animations drop-down we showed you earlier. We already applied the Fade animation to our object, so this time we're going to select the "Teeter" animation from the "Emphasis" section.
Now you’ll see both the number 1 and 2 next to the object, indicating the order in which the animations will happen.
Here’s what it looks like in action. First, it fades in, and then it teeters a bit.
Now that you understand how to use animations let’s talk about how to control their timing.
There are three options available for making your animation start:
- On Click: This makes the animation begin when you click your mouse. It's also the default trigger.
- With Previous: This initiates the object animation at the same time as the previous animation.
- After Previous: This makes the animation begin after the last animation finishes.
To find these settings, select the object you're animating, head to the “Animations” tab, and then click the box next to “Start.”
Select the start option you want from the drop-down menu.
You can also set a duration for the animation. Changing the duration makes the animation run slower or faster. If, for example, you have an object enter by flying in from the left, but it's flying in a little to quickly, you could increase the duration to make it move more slowly.
You can also add a delay that happens before the animation starts. This delay happens based on what start setting you use. For example, if your start setting is "On Click" and you have a delay of two seconds, the animation will start two seconds after clicking. If your start setting is "After Previous" and you have a delay of five seconds, the animation will start five seconds after the previous animation finishes.
The options you have available for manipulating how and when objects appear are nearly endless. Play around with these features a bit, and you'll be making a great presentation in no time!
How to Make an Object Disappear After Animation in PowerPoint
- Small Business
- Business Planning & Strategy
- More Business Planning & Strategy
- ')" data-event="social share" data-info="Pinterest" aria-label="Share on Pinterest">
- ')" data-event="social share" data-info="Reddit" aria-label="Share on Reddit">
- ')" data-event="social share" data-info="Flipboard" aria-label="Share on Flipboard">
How to Delete Windows Installer Patch Files
Opening the gimp layers palette, how to change navbar icons on blogger.
- How to Make a Picture Washed Out in GIMP
- How to Set Windows Media Player as Default
PowerPoint animation effects come in four forms. Entrance effects bring objects onto the slide. Emphasis effects highlight objects currently on the slide. Motion paths move objects from one part of the slide to another, and exit effects remove the object from the screen. Any object can accept multiple effects. This means that even if an object already takes place in an animation, you can apply an additional effect to make it disappear.
Click "Animations" in PowerPoint's menu bar.
Click "Animation Pane" in the "Advanced Animation" tab. The Animation Pane will open at the right of your screen, displaying your slide's current animation timeline.
Click the object that you want to disappear. PowerPoint will highlight the object on your slide and in the animation pane.
Click "Add Animation" in the ribbon's "Advanced Animation" tab. A drop-down menu will open.
Click the exit animation effect that you want to apply to the object. For example, you may want the Disappear effect, which removes the object instantly. Alternatively, select the Fade effect, which gradually renders the object transparent, or choose a flashier effect like Fly Out or Random Bars.
Click the effect's entry in the Animation Pane. For example, if Circle 1 already had a Spin effect, the pane will now list the Spin effect as Effect 1 and your new exit effect as Effect 2.
Drag the rectangle representing the exit effect on the Animation Pane to the right of the shape representing the previous animation effect.
Click the "Play" button in the Animation pane. The object will undergo its initial animation effect and then disappear.
- Microsoft Support: Animations III - Timing
- PowerPoint 2010 for Dummies; Doug Lowe
- YouTube: How to Make a Powerpoint Animation; Liamturn97
- PowerPoint 2010 Bible; Faithe Wempen
Ryan Menezes is a professional writer and blogger. He has a Bachelor of Science in journalism from Boston University and has written for the American Civil Liberties Union, the marketing firm InSegment and the project management service Assembla. He is also a member of Mensa and the American Parliamentary Debate Association.
Related Articles
How to make a pixelated image in illustrator, how to remove the finder toolbar, the taskbar start menu won't show, how to end a skype chat, how to fade an image in photoshop cs5, how to add textures to gimp, how to add a glow in gimp, how to fill pixels in photoshop on the background, how to put a shadow in excel, most popular.
- 1 How to Make a Pixelated Image in Illustrator
- 2 How to Remove the Finder Toolbar
- 3 The Taskbar Start Menu Won't Show
- 4 How to End a Skype Chat
How to Make an Object Disappear After Animation in PowerPoint
Making an object disappear after animation in PowerPoint is a neat trick that can add a touch of professionalism to your presentations. This can be accomplished by using the “Disappear” animation effect, which can be applied after your chosen animation to make the object vanish from the slide.
After you apply this effect, the object will perform the initial animation you’ve set (such as flying in from the side or fading in), and once that animation is complete, it will disappear from view, making for a smooth and impactful transition.
Introduction
Have you ever watched a PowerPoint presentation where an image or text box magically vanishes after swooping onto the slide, leaving you wondering, “How did they do that?” Well, you’re not alone! Making an object disappear after an animation is a slick way to keep your audience focused on the content that matters. This technique can be particularly useful for educators, marketers, or anyone looking to create a dynamic and engaging presentation.
By mastering this simple PowerPoint feature, you can direct your audience’s attention, control the flow of information, and add a professional flair to your slides. Whether you’re presenting a business proposal, teaching a class, or sharing a personal story, knowing how to make objects disappear can enhance your storytelling and keep your audience hooked on every word. So, let’s dive into the world of PowerPoint animations and learn how to make your slides stand out!
Step by Step Tutorial: Making an Object Disappear After Animation
Before we start, make sure you have your PowerPoint presentation open and you’ve already inserted the object you wish to animate.
Step 1: Select the object you want to animate
Click on the object that you would like to disappear after the animation.
Selecting the object is crucial because if you don’t, you might apply the animation to the wrong element on your slide. Ensure that you have clicked on the object so that it is outlined, indicating it is selected.
Step 2: Apply your desired entrance or emphasis animation
Go to the “Animations” tab, choose an entrance or emphasis effect from the gallery, and apply it to the selected object.
This step introduces your object onto the slide or highlights it in the way you want. You can choose from numerous animations like ‘Fade,’ ‘Fly In,’ ‘Zoom,’ etc. Make sure that the animation suits the flow and style of your presentation.
Step 3: Add the “Disappear” effect
With the object still selected, click on “Add Animation” and choose “Disappear” from the “Exit” section.
Remember, you must select “Add Animation” to layer the ‘Disappear’ effect on top of the entrance or emphasis effect. If you simply click on the ‘Disappear’ effect without adding it, it will replace the first effect you chose.
Step 4: Adjust the timing of the animations
In the “Animation Pane,” ensure that the “Disappear” effect is set to start “After Previous” to ensure it occurs after the initial animation.
Timing is essential to make the disappearance act smoothly. You can drag the effects on the timeline in the Animation Pane to reorder them or use the Start options (‘On Click’, ‘With Previous’, ‘After Previous’) to set them up correctly.
Additional Information
When you’re working on making an object disappear after animation in PowerPoint, you might want to keep in mind a few extra tips. Firstly, consider the broader context of your presentation. Is the disappearing act enhancing your message or just a decorative trick? Always prioritize your content’s clarity and impact over visual gimmicks.
Moreover, think about the pacing of your presentation. The duration of your animations can significantly affect the flow of your talk. You can adjust the speed of the animations to match the tempo of your speech. In addition, make sure the rest of your design complements the animations – a coherent color scheme and consistent typography can go a long way in professionalizing your slides.
Finally, remember that animations, including making objects disappear, should ultimately serve the story you’re telling or the information you’re conveying. Never let the medium overshadow the message. It’s not just about making an object vanish; it’s about making your point stick.
- Select the object you want to animate
- Apply your desired entrance or emphasis animation
- Add the “Disappear” effect
- Adjust the timing of the animations
Frequently Asked Questions
Can i make an object disappear without it entering first.
Yes, you can apply the “Disappear” effect directly to make an object vanish from the slide without an entrance animation.
Can I control the speed of the disappearance?
Absolutely! In the Animation Pane, you can modify the duration of the “Disappear” effect to make it as quick or slow as you like.
What if I want the object to reappear again?
You can add an entrance animation after the “Disappear” effect by using the “Add Animation” feature, setting it to start “After Previous.”
Can I apply this effect to text and images?
Yes, you can apply the “Disappear” effect to any object in PowerPoint, including text boxes, images, shapes, and more.
Will the “Disappear” effect work during a slideshow?
Definitely! The effect will play as programmed when you are presenting your PowerPoint in slideshow mode.
In summary, making an object disappear after animation in PowerPoint is a nifty feature that, when used judiciously, can significantly enhance the quality of your presentation. It’s a trick that’s not just about creating ‘wow’ moments but also about effectively conveying your message. By following the steps outlined in this article, you can master this technique and apply it to make your slides more dynamic and engaging.
Remember, while animations are fun and can add pizzazz to your presentation, the golden rule is to use them in a way that complements and reinforces your content. So, go ahead and experiment with making objects disappear in your next PowerPoint, but always keep your audience’s experience at the forefront of your design choices. Happy presenting!

Matthew Burleigh has been writing tech tutorials since 2008. His writing has appeared on dozens of different websites and been read over 50 million times.
After receiving his Bachelor’s and Master’s degrees in Computer Science he spent several years working in IT management for small businesses. However, he now works full time writing content online and creating websites.
His main writing topics include iPhones, Microsoft Office, Google Apps, Android, and Photoshop, but he has also written about many other tech topics as well.
Read his full bio here.
Share this:
Join our free newsletter.
Featured guides and deals
You may opt out at any time. Read our Privacy Policy
Related posts:
- How to Remove Animations From PowerPoint: A Step-by-Step Guide
- How to Rotate Animation in PowerPoint: A Step-by-Step Guide
- How to Set Time for Slides in Powerpoint
- How to Save Powerpoint as PDF with Notes
- How to Show One Point at a Time in PowerPoint: A Step-by-Step Guide
- Can I Convert My Powerpoint to Google Slides?
- How to Remove Animation from Powerpoint 2010
- How to Drag Slides From One PowerPoint to Another: A Step-by-Step Guide
- How to Add Page Numbers in Powerpoint 2010
- How to Make a Powerpoint Slide Vertical in Powerpoint 2013
- How to Unhide a Slide in Powerpoint 2013
- How to Delete a Slide in Powerpoint 2010
- How to Loop a Slideshow on Powerpoint 2013
- How to Rotate a Slide in PowerPoint: A Step-by-Step Guide
- How to Hide a Slide in Powerpoint 2010
- How to Change the Font on All Slides in Google Slides
- How to Delete Multiple Slides in Google Slides
- How to Make a Picture Fly in on Google Slides
- How to End Powerpoint on Last Slide in Powerpoint 2010
- How to Insert Slides from Another Presentation in Powerpoint 2010
Stack Exchange Network
Stack Exchange network consists of 183 Q&A communities including Stack Overflow , the largest, most trusted online community for developers to learn, share their knowledge, and build their careers.
Q&A for work
Connect and share knowledge within a single location that is structured and easy to search.
Make groups of objects appear and disappear in sequence with Powerpoint animation
I am making a presentation and I have a map in a slide. I would like to appear and disappear some polygons so that some regions are highlighted.
Firstly, I would like only the map to appear. Second, a group of polygons. Next, another group of polygons appears while the previous one disappears. And so on and so forth.
I think that the correct steps are:
(1) appear first group
(2) disappear first group
(3) appear second group (start with previous)
(4) disappear second group
(5) appear 3rd group (start with previous)
(6) disappear 3rd group
The problem is that I cannot insert for example exit animation in group 8. When I tried this, the entrance animation is converted to extra animation.
Any suggestions?

- microsoft-powerpoint
First: if you need to assign multiple animations to a single shape, don't use the Animation tab for the second and later animations. Instead, choose Add Animation in the Advanced Animation group. Using the buttons on the Animations tab REPLACES any existing animation with a new one.
Yes. VERY bad user interface design.
So what you do is this:
Add an entrance animation to the first shape.
Add an entrance animation to the second shape.
Use ADD ANIMATION to add an exit animation to the first shape, then drag it BELOW the second shape's entrance animation and set it to occur WITH PREVIOUS.
Follow the same pattern for the remainder of the shapes you need to animate.
- There's no limit to the sequence (e.g., OP's problem exceeding 7)? – fixer1234 Oct 15, 2016 at 23:22
- @fixer1234 Good question ... one that'll be left as an exercise for the reader/OP. Quiz in the morning. – Steve Rindsberg Oct 16, 2016 at 16:56
You must log in to answer this question.
Not the answer you're looking for browse other questions tagged microsoft-powerpoint animation ..
- The Overflow Blog
- Is GenAI the next dot-com bubble?
- Featured on Meta
- New Focus Styles & Updated Styling for Button Groups
- Upcoming initiatives on Stack Overflow and across the Stack Exchange network
- Google Cloud will be Sponsoring Super User SE
Hot Network Questions
- How to understand the idea of maximal entanglement intuitively?
- Is it impossible to protect an API from data redistribution?
- Prime and Composite 6x6 Chocolate Banana
- What does it mean that a language has a "effect system"?
- Why does a motor or ceiling fan exhibits low torque after capacitor-to-inductor swap?
- Can a function have a set as its value?
- Could a historic (1500- 1700 AD) bicycle stand rough terrain? If yes how?
- How to model squishy spheres?
- How do I change the page size for a pdf-file generated by plain-TeX?
- What type of cable is this (optic fiber) connecting to router?
- Linear condition between two continuous variables
- Finding food on the run
- What copyleft license could I use for a program that depends on non-free libraries?
- How to plan a trail route?
- Can you naïvely reduce the dimensionality of a QFT?
- University is killing my passion [for mathematics]
- Why is home ownership so low in Switzerland?
- How precise should I expect to be with metronome?
- How to answer pre screening question "do you have a car" if I currently don't but could get one?
- Why is my P2P_V2 peer connected over a v1 connection?
- At the start of Dune, who knew about the Spacing Guild's dependence on spice?
- Wraping rope (paper chord) around object like wishbone chair
- Booking hotel relative to local or home timezone
- JQ returns json lines without commas

Animate or make words appear one line at a time
An animation effect option called By Paragraph lets you make list items appear one at a time. This type of animation is sometimes called a build slide .
Make text appear one line at a time
On the slide, select the box that contains your text.
Select the Animations tab, and then pick an animation, such as Appear , Fade In , or Fly In .

For some animations, such as Fly In , select Effects Options , as you’ll need to pick a direction for the bullets to fly in from, such as bottom, top, left, or right.
Select Effect Options , and then select By Paragraph to make the paragraphs of text appear one at a time. (The other option, All at Once , makes all the lines of text appear at the same time.)

PowerPoint immediately previews the animation for you.
By default, when you present in Slide Show, each paragraph appears in response to a click. That way, you control when each paragraph appears. You can modify this setting by using the Start , Duration , and Delay controls on the far right end of the Animation tab of the ribbon.
Make text appear one letter at a time
You can also create a "typing" visual effect by making characters in a paragraph appear one at a time.
Select the Animations tab, and then select the Add Animation drop-down menu to select an animation, such as Appear .
Select the Animations tab, and then select Animation pane .

The Animation Pane opens on the right side of the PowerPoint window.
In the Animation Pane, select the arrow next to your animation, and select Effect Options .
In the dialog box, on the Effect tab under Enhancements , select the arrow next to Animate text , and select By letter . Then you can change the delay time in the seconds delay between letters box.

PowerPoint immediately previews the animation for you so that you can see the timing as the characters appear individually. You can repeat the preview by selecting the animation in the Animation Pane and selecting Play Selected .
Create a build slide
Change, remove or turn off animation effects
Select the Animations tab, and then pick an animation, such as Appear , Dissolve in , or Fly In .

For some animations, such as Fly In , select Effects Options on the Animation tab to pick a direction for the bullets to fly in from, such as bottom, top, left, or right.
Select Effect Options again, and then select By Paragraph to make the paragraphs of text appear one at a time. (The other option, All at Once , animates all lines of text in a placeholder or text box at the same time.)

By default, when you present in Slide Show, each paragraph appears in response to a click. That way, you control when each paragraph appears. You may also modify this setting by using the Start , Duration , and Delay options in the Animation pane.
On the Animations tab, select the Add Animation drop-down menu, and select an animation, such as Appear , Fade In , or Fly In .
Select the Animations tab, and then select Animation Pane .

(In PowerPoint for Mac 2011: On the View menu, select Custom Animation ).

In the Animation Pane, select the animation effect you want to modify, and then select the arrow next to Text Animations .
In the Animate text box, select By letter .

The default delay value for the time between letters appearing is 0.5 seconds, but you can change that by selecting the arrow next to Timing , and then choosing a new value in the Delay box.
Animate text in a shape
Now let's add Fly in and Spin animations to the text.
Select the shape text and select the Animations tab.
Select Fly in in Entrance Effects .

Select the text again and select Spin in Emphasis Effects . The Animations property pane now looks like this:

(Optional) In the Animations property pane, select each animation step and adjust the Effects options and Timing settings as required. Learn more .
To preview the animation, select the first animation and select Play From .
Animate a word on a slide
Change or remove animation effects
To preview the animation, on the View tab of the ribbon, in the Start Slide Show group, select From Current Slide , and then select to see each paragraph of text appear one at a time.

By default, when you present in Slide Show, each paragraph appears in response to a click. That way, you control when each paragraph appears.
Animate a picture on your slide
Animation effects available in PowerPoint for the web

Need more help?
Want more options.
Explore subscription benefits, browse training courses, learn how to secure your device, and more.

Microsoft 365 subscription benefits

Microsoft 365 training

Microsoft security

Accessibility center
Communities help you ask and answer questions, give feedback, and hear from experts with rich knowledge.

Ask the Microsoft Community

Microsoft Tech Community

Windows Insiders
Microsoft 365 Insiders
Was this information helpful?
Thank you for your feedback.
Contribute to the Microsoft 365 and Office forum! Click here to learn more 💡
April 9, 2024
Contribute to the Microsoft 365 and Office forum!
Click here to learn more 💡
PowerPoint Top Forum Contributors: Steve Rindsberg - John Korchok 👍✅
April 17, 2024
PowerPoint Top Forum Contributors:
Steve Rindsberg - John Korchok 👍✅
- Search the community and support articles
- Microsoft 365 and Office
- Search Community member
Ask a new question
Problem with Appear/Disappear Animations in PowerPoint
Report abuse.
If you need more than one animation on an object after the first has been added you MUST use "Add Animation"

2 people found this reply helpful
Was this reply helpful? Yes No
Sorry this didn't help.
Great! Thanks for your feedback.
How satisfied are you with this reply?
Thanks for your feedback, it helps us improve the site.
Thanks for your feedback.
Replies (3)
Question info.
- Norsk Bokmål
- Ελληνικά
- Русский
- עברית
- العربية
- ไทย
- 한국어
- 中文(简体)
- 中文(繁體)
- 日本語
IMAGES
VIDEO
COMMENTS
To add an exit animation to an object to make it disappear on click: Select an object. For text objects, click in the text box or placeholder or click its edge. Click the Animations tab in the Ribbon. Click Add Animation in the Advanced Animations group (you must select Add Animation if you are adding more than one animation to an object).
I have an object on a slide. I want it to appear with a click. Later, on a click, i want the same object to disappear. I select the object and set its animation to "appear" and that works fine. But, if i select it again because i want it, on a later click to "disappear", it changes the "appear" -> "Disappear".
To make an object disappear with animation, follow the 3 simple steps. Step-1: Click on the "Animations" tab. The first step is to click on the object that you want to make disappear with animation. Then click on the "Animations" tab in the menu ribbon located at the top of the screen. Step-2: Click on the "More" option.
Now we need to hook up the appear and disappear animations and set them to trigger 'on click'. 1. Hooking up your PowerPoint animations. Select the first group of states (I'll start with the Western region in blue) and from the Animations Tab select the Appear animation. You should see a 1 appear next to the group. 2.
A: To make an object appear and disappear with a sound effect, you can use the Sound property of the animation effect. To do this, select the animation effect, and then go to the Effect Options dialog box. In the Sound section, you can choose a sound file to play when the animation starts.
Create the Animation. Now select the caterpillar and click the Animations tab from the Ribbon. To display the Animation Pane click the Animation Pane button located in the Advanced Animation group. The Animation Pane will be displayed on the right side of the slide: For the caterpillar we want to make him disappear.
DISCOVER 4 INSANELY EASY METHODS to make objects APPEAR & DISAPPEAR ON CLICK in your presentations.-----...
Creating animations that vanish after appearing in PowerPoint involves utilizing the Animation Pane and grouping objects together on a slide. This technique can add a dynamic touch to your presentation. To make animations disappear seamlessly in PowerPoint, after setting the entrance animations for your objects, follow these steps:
In this PowerPoint tutorial, you'll learn how to make objects appear and disappear on click by combining PowerPoint animations with trigger shapes (a very co...
In today's tutorial, you will learn how to make an object appear or disappear in PowerPoint.Open PowerPoint.Select an object you need. Go to Animations tab. ...
To find these settings, select the object you're animating, head to the "Animations" tab, and then click the box next to "Start.". Select the start option you want from the drop-down menu. You can also set a duration for the animation. Changing the duration makes the animation run slower or faster.
8. Click the "Play" button in the Animation pane. The object will undergo its initial animation effect and then disappear. PowerPoint animation effects come in four forms. Entrance effects bring ...
Step 3: Add the "Disappear" effect. With the object still selected, click on "Add Animation" and choose "Disappear" from the "Exit" section. Remember, you must select "Add Animation" to layer the 'Disappear' effect on top of the entrance or emphasis effect. If you simply click on the 'Disappear' effect without adding ...
Animate text or objects. You can animate the text, pictures, shapes, tables, SmartArt graphics, and other objects in your PowerPoint presentation. Effects can make an object appear, disappear, or move. They can change an object's size or color. Effects can respond to mouse clicks or other actions, giving an interactive feel to your presentation.
And so on and so forth. I think that the correct steps are: (1) appear first group. (2) disappear first group. (3) appear second group (start with previous) (4) disappear second group. (5) appear 3rd group (start with previous) (6) disappear 3rd group. The problem is that I cannot insert for example exit animation in group 8.
Thanks in advance. Start with a new PowerPoint document and try these steps. First, insert an online graphic. Paste in an Apple. Select the image that you pasted in, and then open the animation panel (select the image, select "Animation Pane" from the "Advanced Animation group) The animation pane has a few sections: an event number (Starting ...
Select Effect Options, and then select By Paragraph to make the paragraphs of text appear one at a time. (The other option, All at Once, makes all the lines of text appear at the same time.) PowerPoint immediately previews the animation for you. By default, when you present in Slide Show, each paragraph appears in response to a click.
Appear and Disappear on Click | PowerPoint Animations In This Tutorial, I Will discuss How to use appear and disappear animation in Microsoft PowerPoint. We ...
That will be the reason then. There is a weird "bug" (or maybe feature) If you have a fairly complex series of triggers PPT can get confused as to whether a particular item should be on screen at the start or not. If you want an item on screen at the start add a w ith previous appear, if you don.t add a with previous disappear as the first (not ...
This tutorial explains how to make text or images appear or disappear in PowerPoint 2011 on a Mac. It is rare that any other animations should be used in pr...
Problem with Appear/Disappear Animations in PowerPoint. I've installed PowerPoint on a new machine and for some reason it won't let me add multiple animations on an object. The main one being, I select an object and set it to appear on click. I then want to trigger a disappear animation, but then the appear animation is removed.