
What is the Size of a PowerPoint Slide in Pixels?
By: Author Shrot Katewa

When creating a PowerPoint presentation, it is essential to determine the appropriate size for your slides. Understanding the size of a PowerPoint slide in pixels is crucial to ensure that your presentation looks great on all devices, from desktops to mobile devices.
The standard size of a PowerPoint slide is 1024×768 pixels and the widescreen PowerPoint slide is “1920×1080” pixels. It can also be adjusted based on your preferences or the requirements of the platform on which you plan to present your slides.
In this article, we will discuss the standard size of a PowerPoint slide in pixels or inches as well as how to adjust it to fit your needs. Let’s get started!
1. What is the Size of a PowerPoint Slide in Pixels?
In Microsoft PowerPoint, there are multiple preset slide sizes available. You can also customize the size of the slide using the “Custom Slide Size” feature available in the application. Depending on the slide size you select, the size of the slide in pixels will vary.
1.1 What is the Size of a PowerPoint Standard Slide in Pixels?
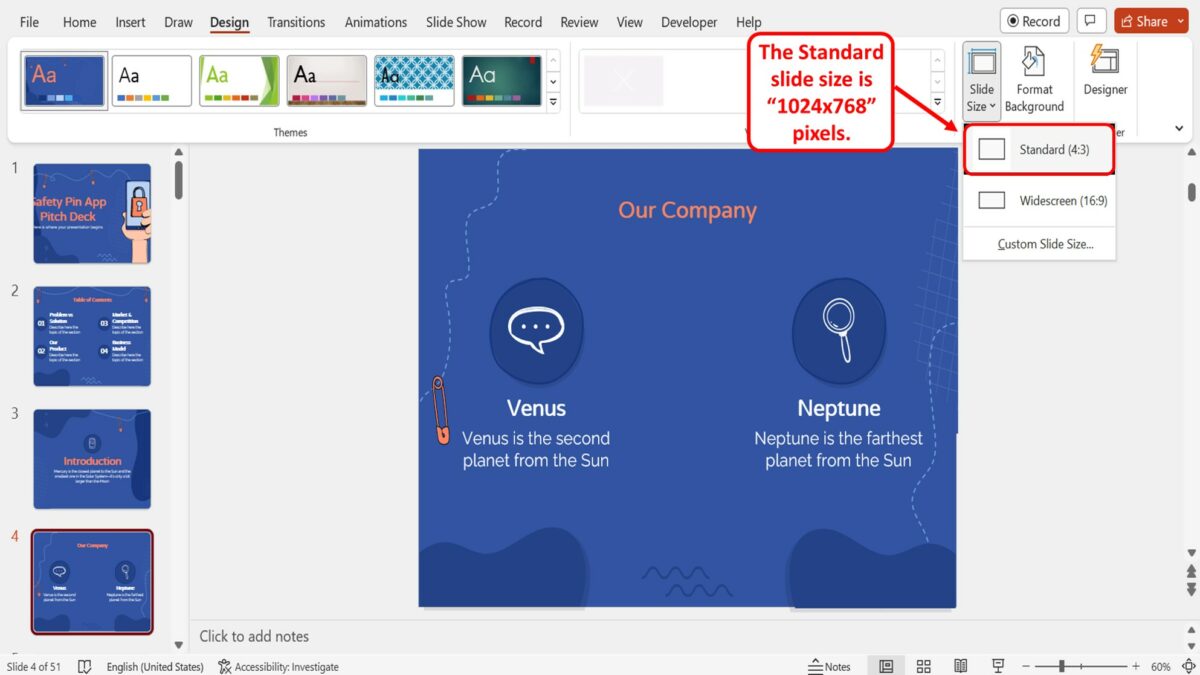
The “Standard (4:3)” option in Microsoft PowerPoint used to be the only size option in the beginning since most screens from 2010 and before were that size. The standard slide size in PowerPoint is “1024×768” pixels.
1.2 What is the Size of a PowerPoint Widescreen Slide in Pixels?
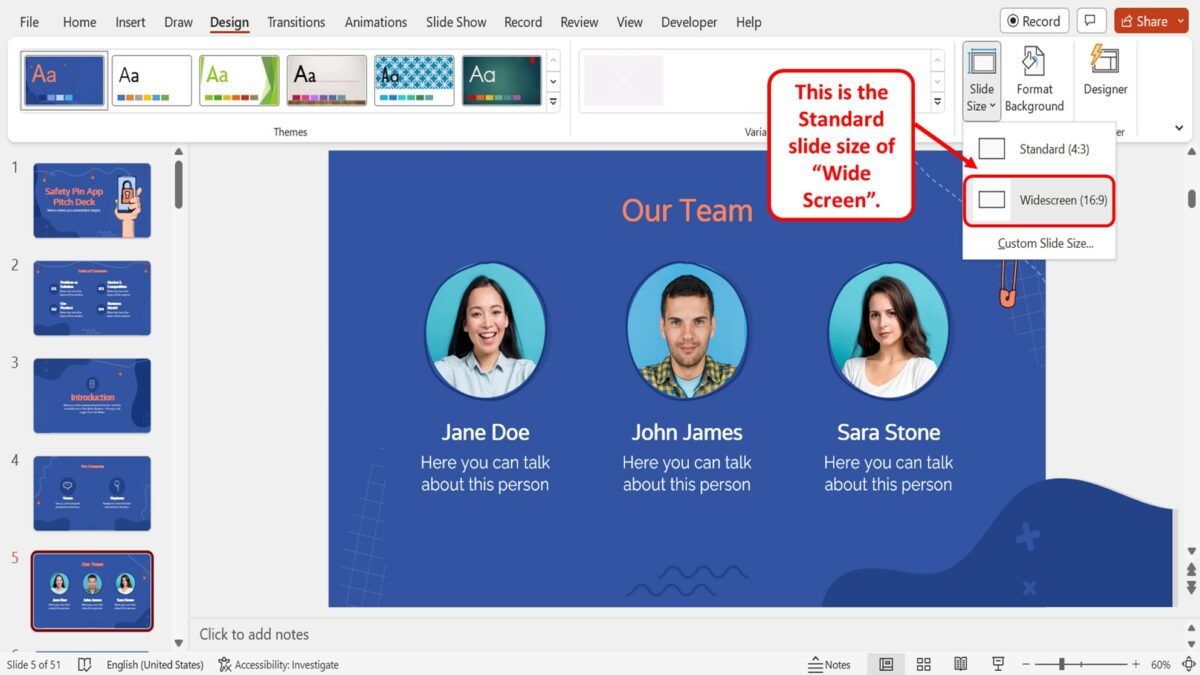
In Microsoft PowerPoint, the default size of the slides is the “Widescreen (16:9)” option. The widescreen PowerPoint slide is “1920×1080” pixels.
2. What is the Size of a PowerPoint On-Screen Show Slide in Inches?
In Microsoft PowerPoint, the size of the slides is mostly measured in inches. Using the “Slide Size” dialog box, you can check the dimension of a slide in inches. Depending on the type of the selected slide, the slide size varies. There are three different “On-Screen Show” slide sizes available in Microsoft PowerPoint.
2a On-Screen Show (4:3)
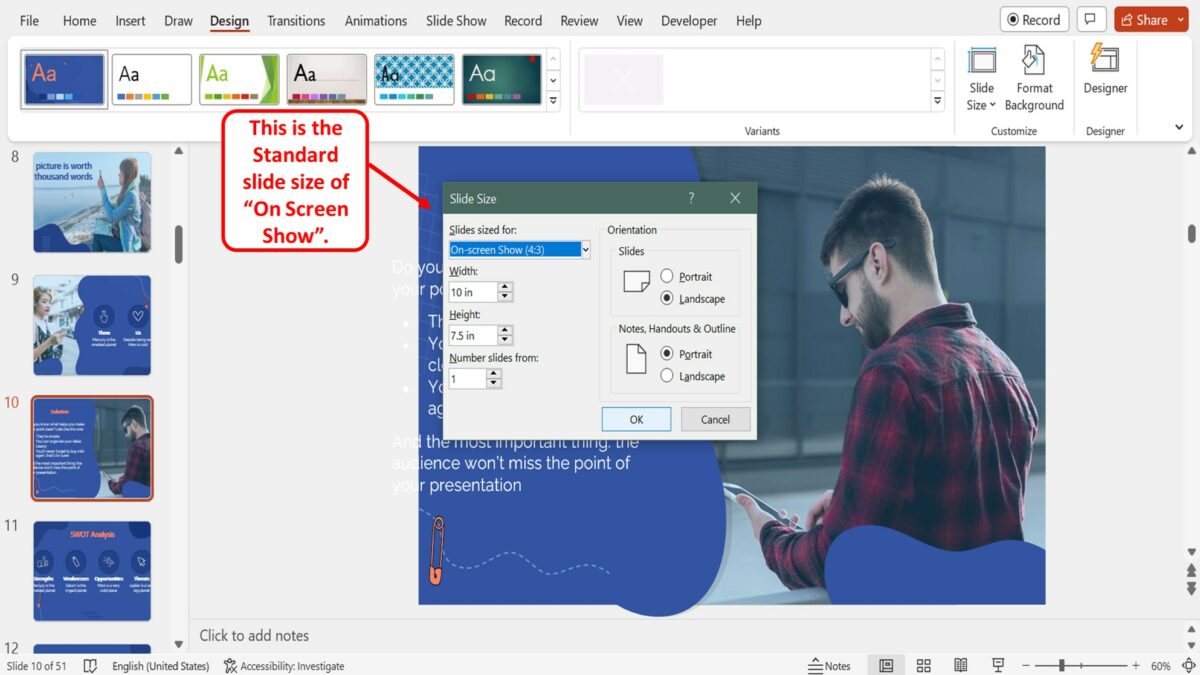
The “On-Screen Show (4:3)” slides are “10×7.5” inches in size. This is the “Standard” slide size.
2b On-Screen Show (16:9)
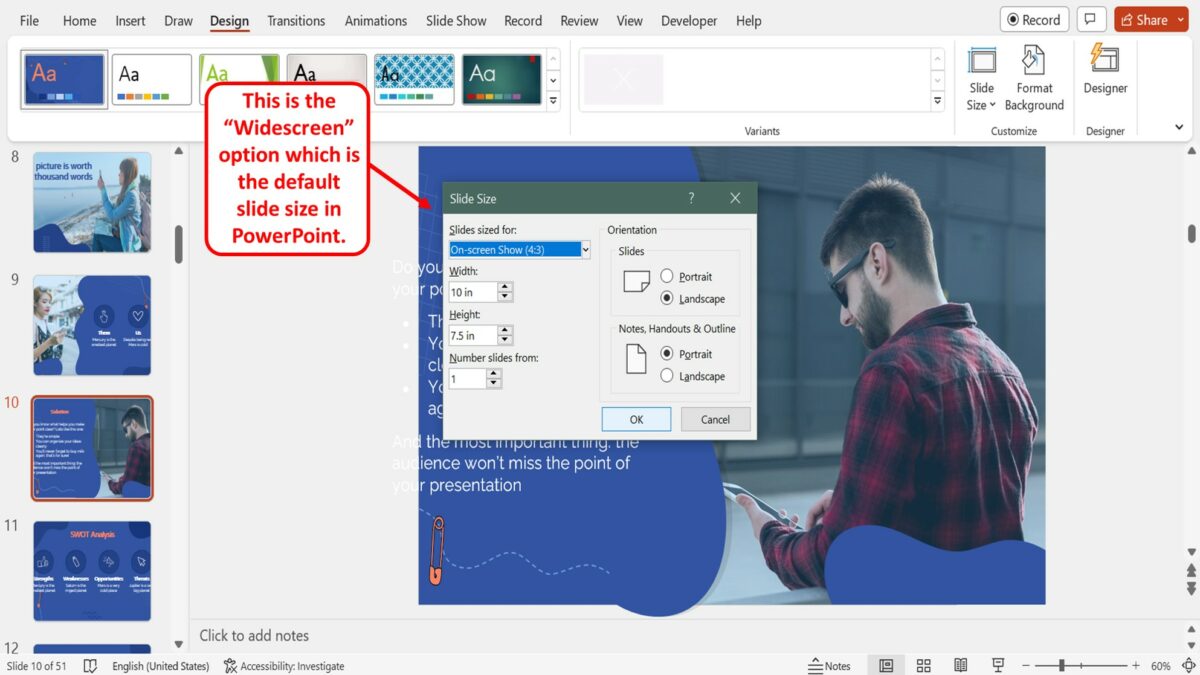
The “On-Screen Show (16:9)” slide size is “10 x 5.625” inches in dimension. This is the “Widescreen” option which is the default slide size in PowerPoint.
2c On-Screen Show (16:10)
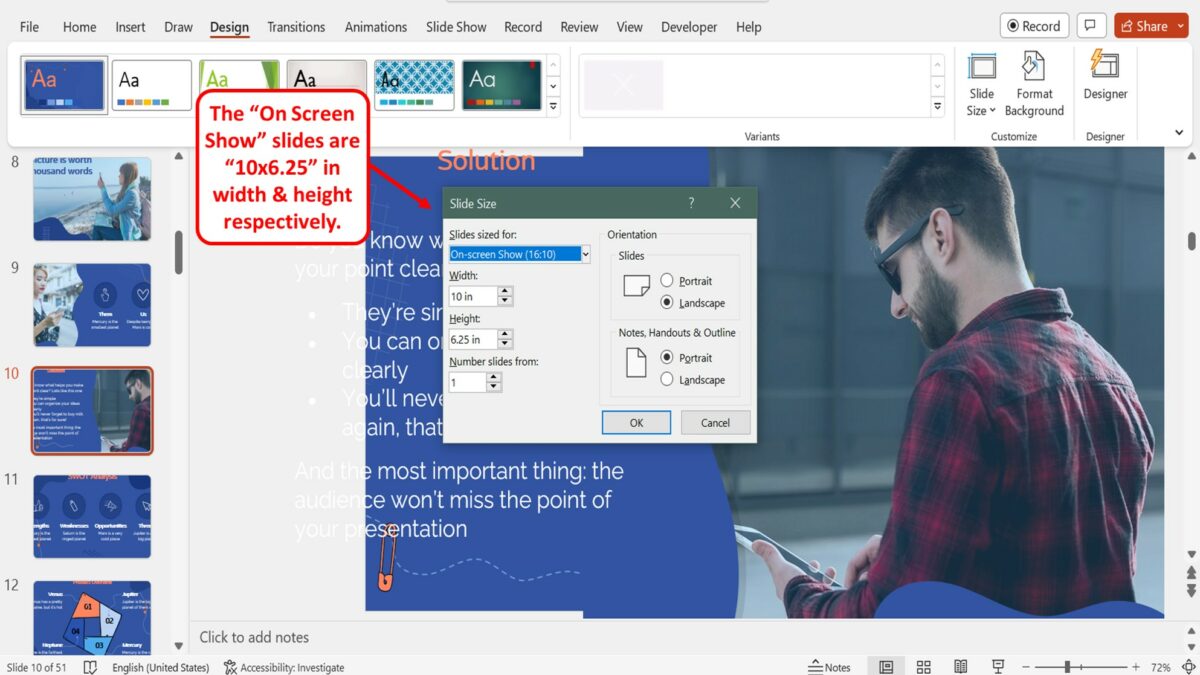
The “On-Screen Show (16:10)” slides are “10 x 6.25” inches in width and height respectively.
3. How to Find the Size of the Slide in Inches?
Using the “Slide Size” dialog box in Microsoft PowerPoint, you can find the size of the slides in your presentation in inches. To do so, follow the 3 quick steps.
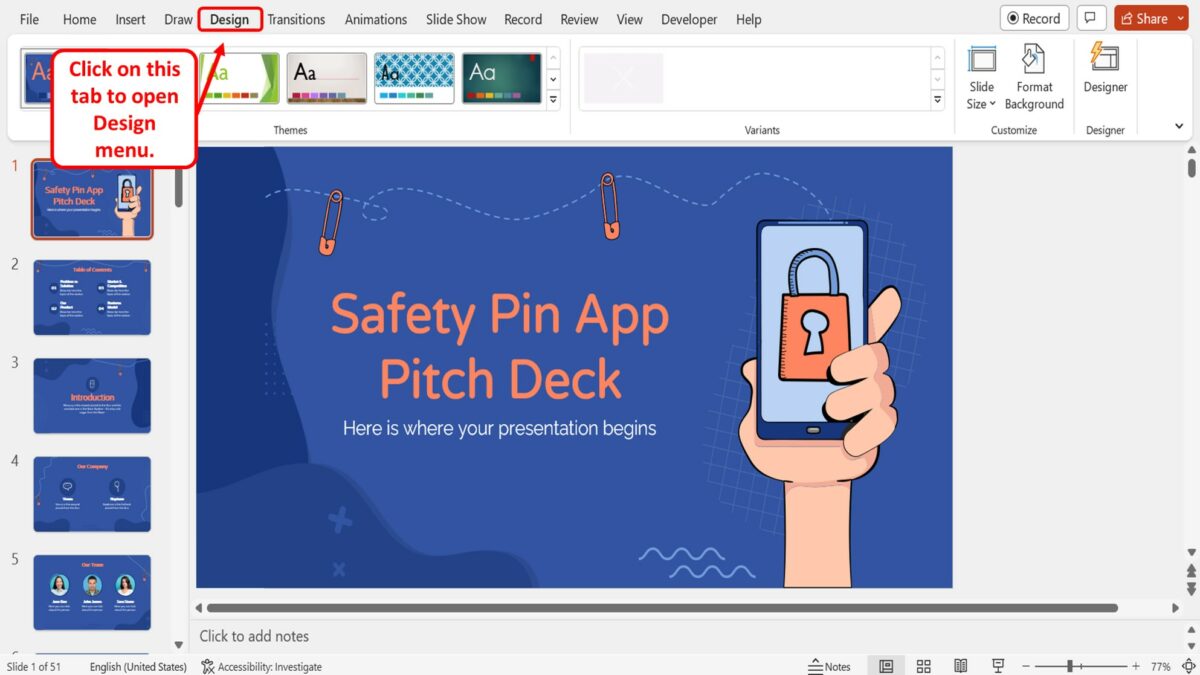
Step-1: Click on the “Design” tab
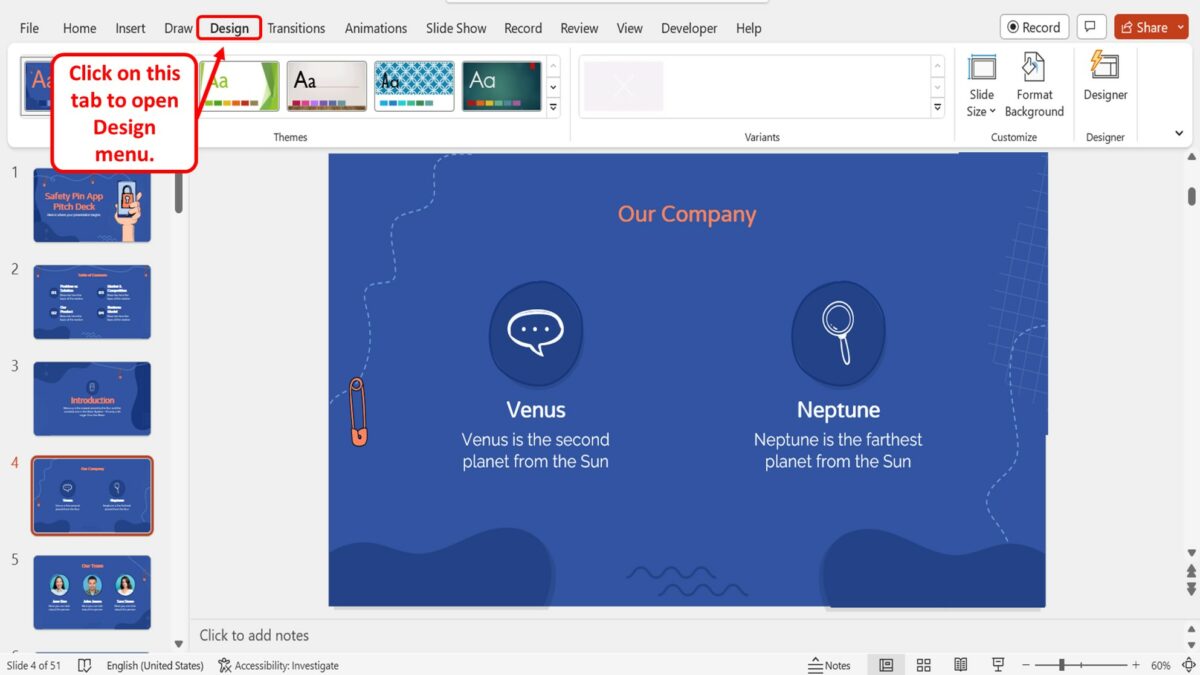
In the menu ribbon located at the top of the screen, click on the “Design” tab. This will open the “Design” menu.
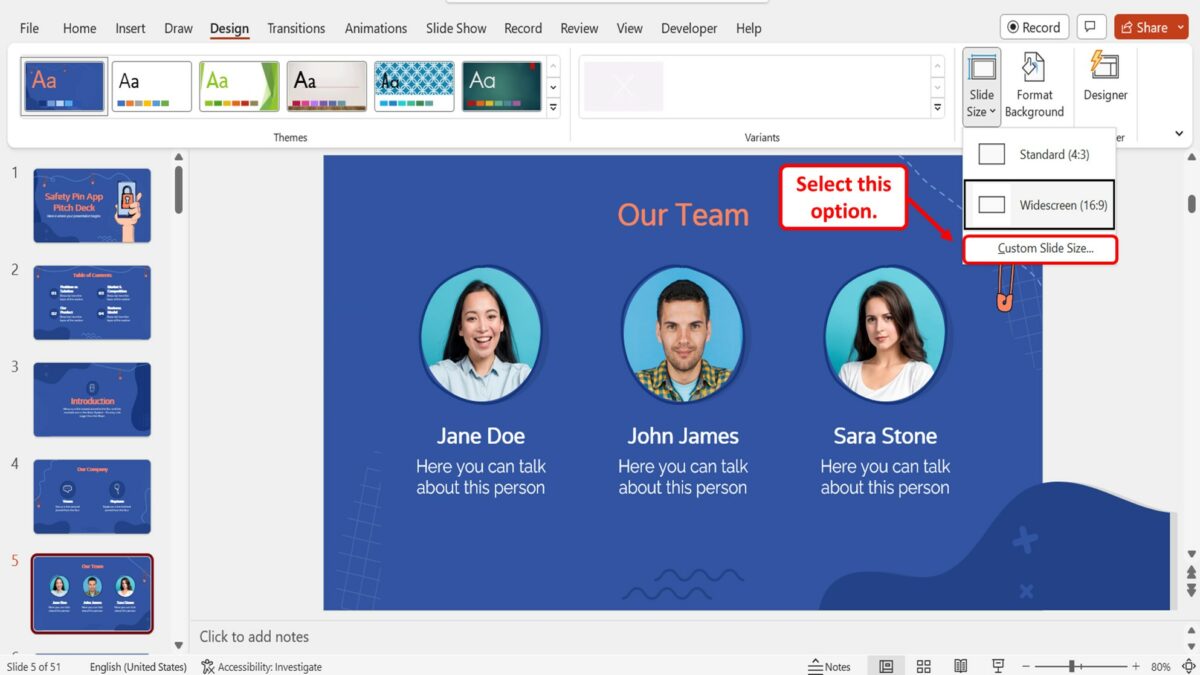
Step-2: Click on the “Slide Size” option
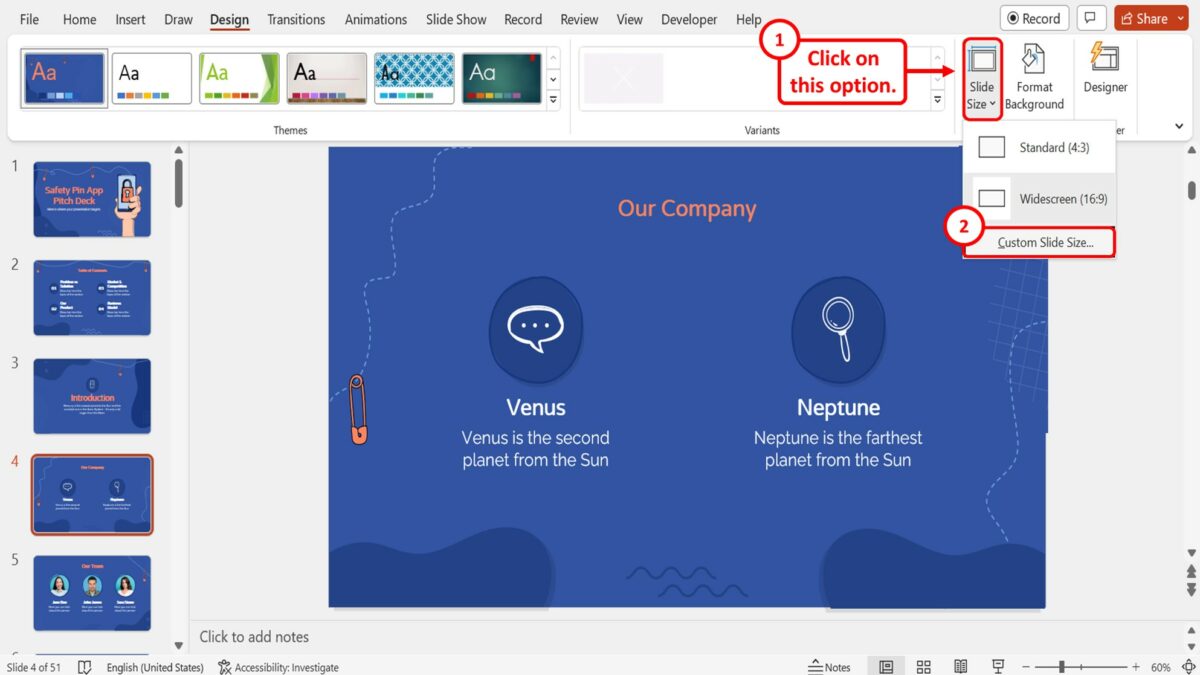
In the “Customize” group of the “Design” menu, click on the “Slide Size” option. Then click on the “Custom Slide Size” option in the dropdown menu under the “Slide Size” option. This will open a dialog box.
Step-3: Click on the “OK” button
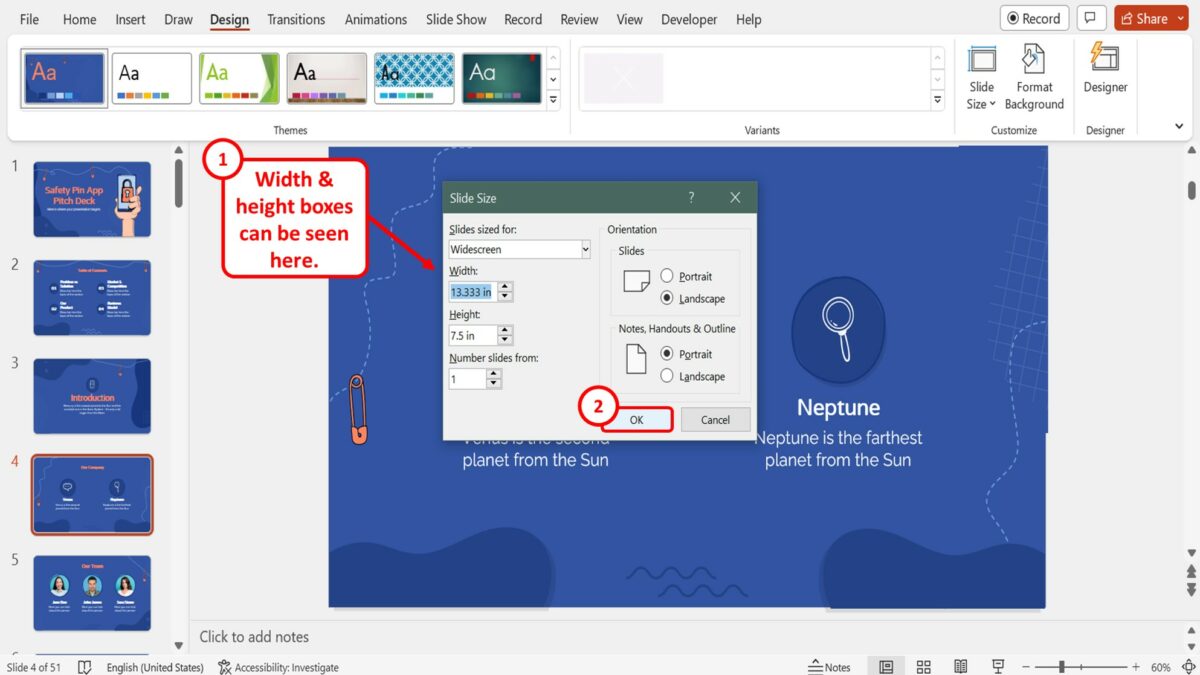
In the “Slide Size” dialog box, you can now see the size of the slide in inches in the “Width” and “Height” boxes. Then click on the “OK” button at the bottom of the dialog box to close it.
4. How to Change the Size of a PowerPoint Slide?
In Microsoft PowerPoint, you can change the side of the slides using the “Design” menu. However, you can only change the size of all the slides in a presentation at once. To change the size of the slide in PowerPoint, follow the 3 simple steps.
The first step is to open the “Design” menu. To do so, click on the “Design” tab in the menu ribbon located at the top of the screen.

In the “Customize” group of the “Design” menu, you have to now click on the “Slide Size” option. This will open a dropdown menu containing the preset slide size options available in PowerPoint.
Step-3: Click on your preferred slide size
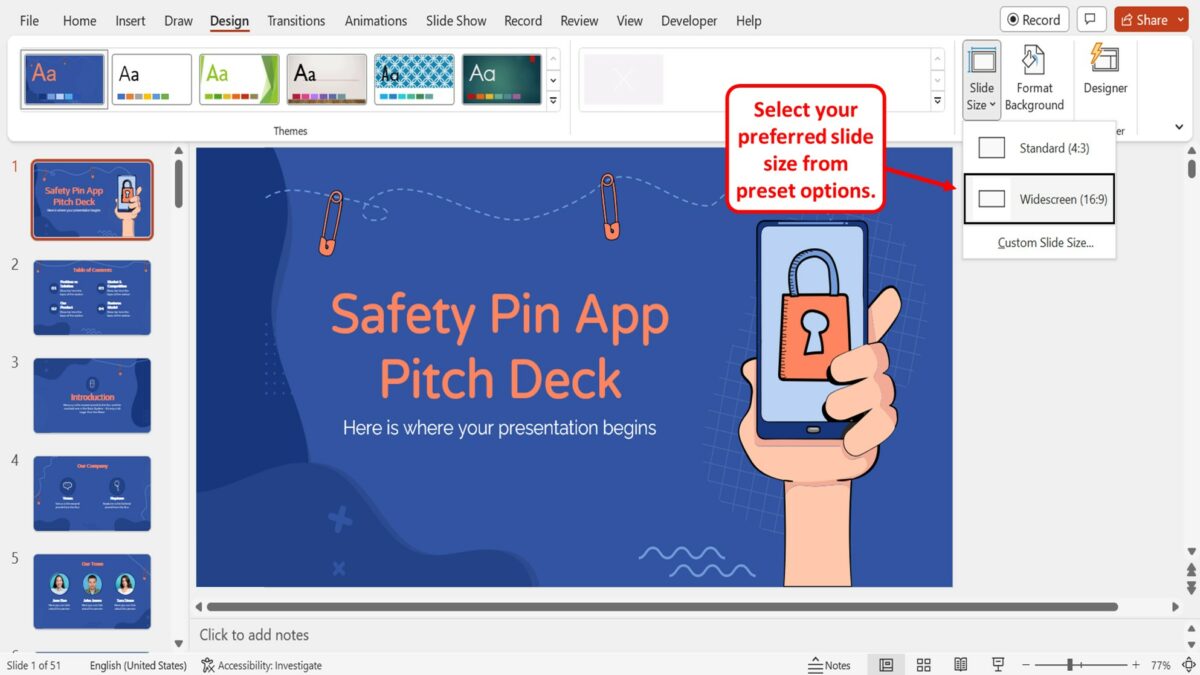
Finally, all you have to do is click on your preferred slide size option from the preset options available in the dropdown menu under the “Slide Size” option. The available slide sizes are “Standard” and “Widescreen” .
4.1 How to Customize the Size of a PowerPoint Slide?
The “Custom Slide Size” feature in Microsoft PowerPoint allows you to customize the size of all the slides in a presentation. Using the feature, you can set any dimension to the slides in your presentation. To customize the size of the slides in a presentation, follow the 7 easy steps.
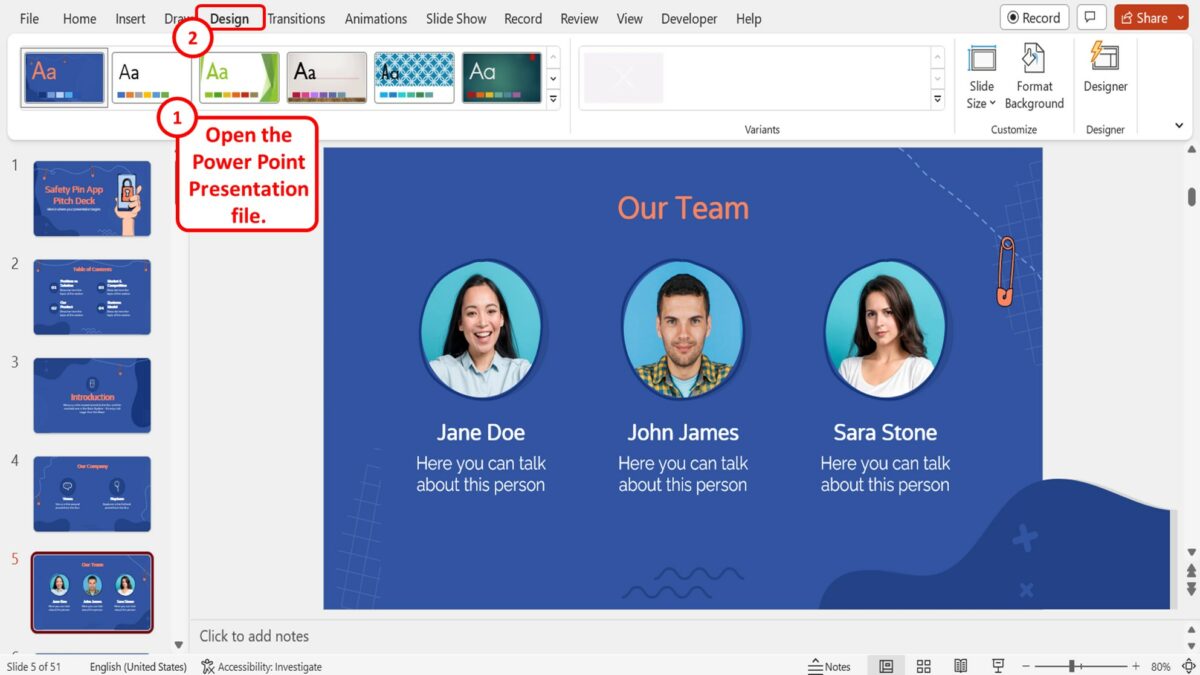
The first step is to open the PowerPoint presentation file where you want to customize the size of the presentation slides. Then click on the “Design” tab in the menu ribbon located at the top of the screen to open the “Design” menu.
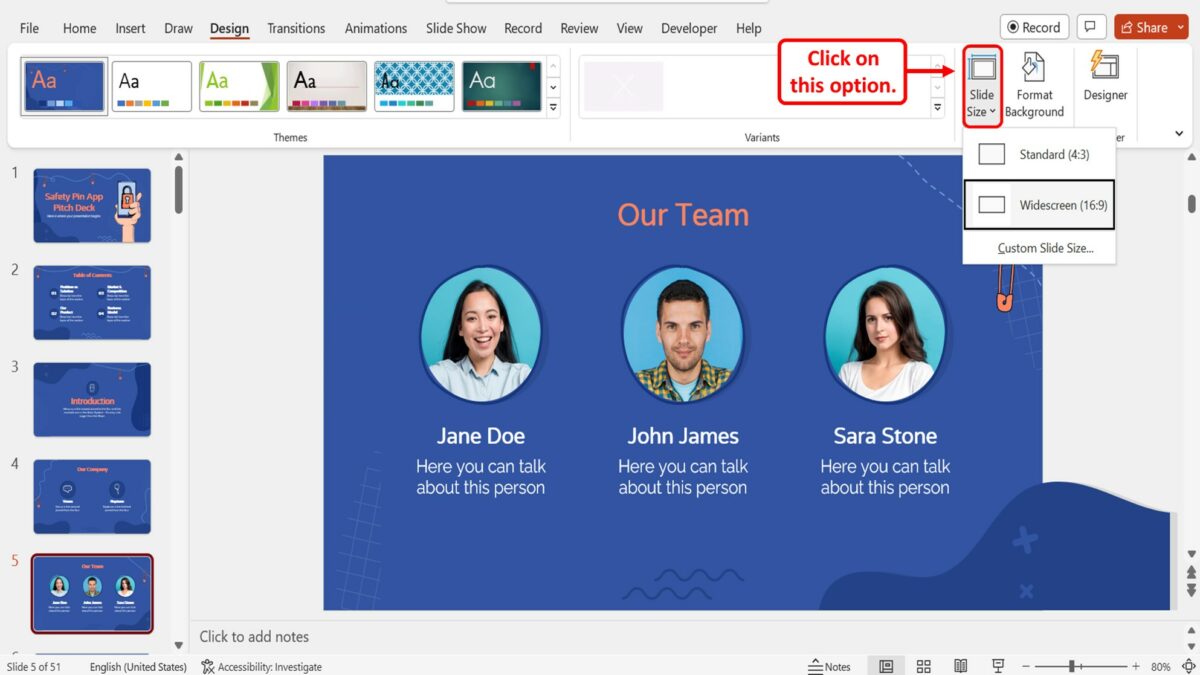
The next step is to click on the “Slide Size” option in the “Customize” group of the “Design” menu. In the dropdown menu, the default slide size is the “Widescreen (16:9)” option.
Step-3: Click on the “Custom Slide Size” option
Now all you have to do is click on the “Custom Slide Size” option at the bottom of the dropdown menu under the “Slide Size” option in the “Design” menu. This will open a dialog box.
Step-4: Click on the “Slide sized for” option
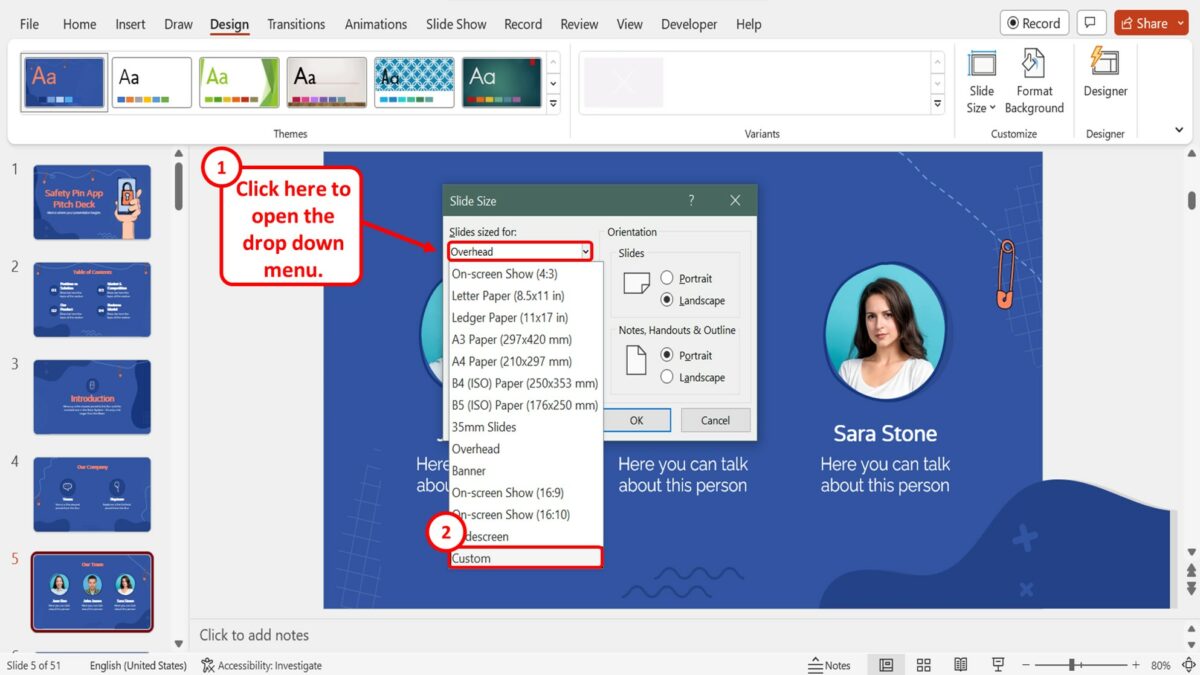
In the “Slide Size” dialog box, click on the “Slides sized for” option. Then click on the “Custom” option at the bottom of the dropdown menu under the “Slides sized for” box.
Step-5: Click on the “Width” box

In the “Slide Size” dialog box, the next step is to click on the “Width” box. Now you can type in your preferred width of the slides in inches. You can also use the up and down arrows in the “Width” box to increase or decrease the width of the slide respectively.
Step-6: Click on the “Height” box
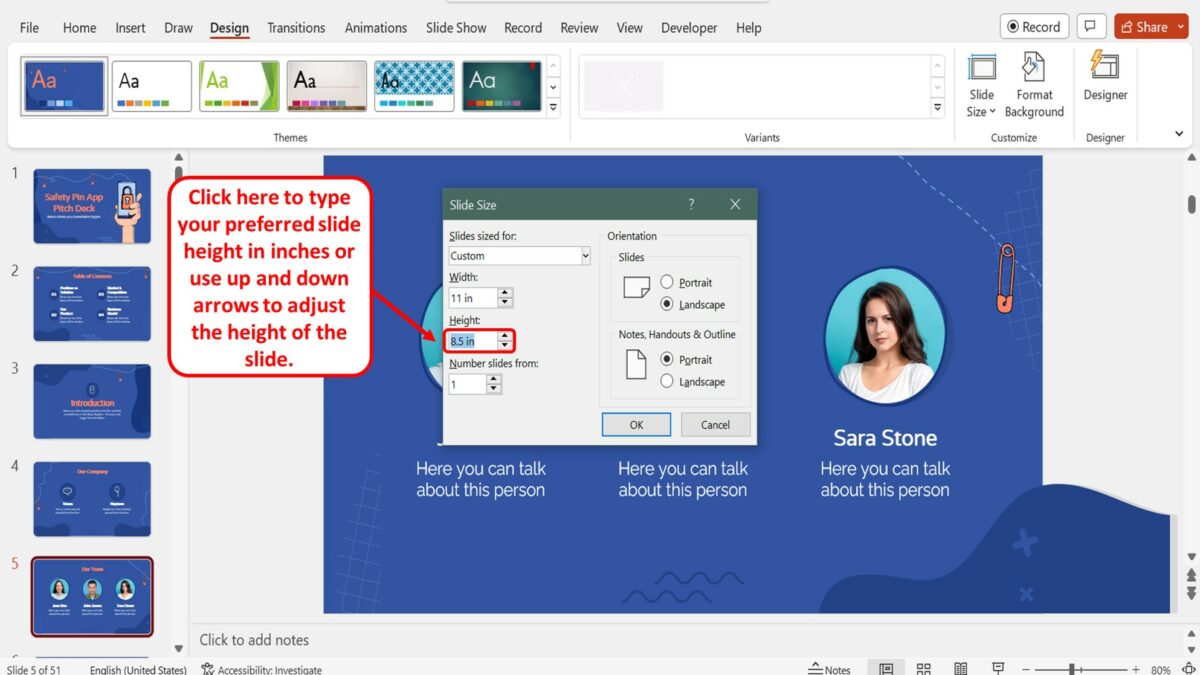
The next step is to customize the height of the slides. To do so, click on the “Height” box in the “Slide Size” dialog box and type in your preferred slide height in inches. You can also click on the up or down arrows in the “Height” box to adjust the height of the slides to your preference.
Step-7: Click on the “OK” button
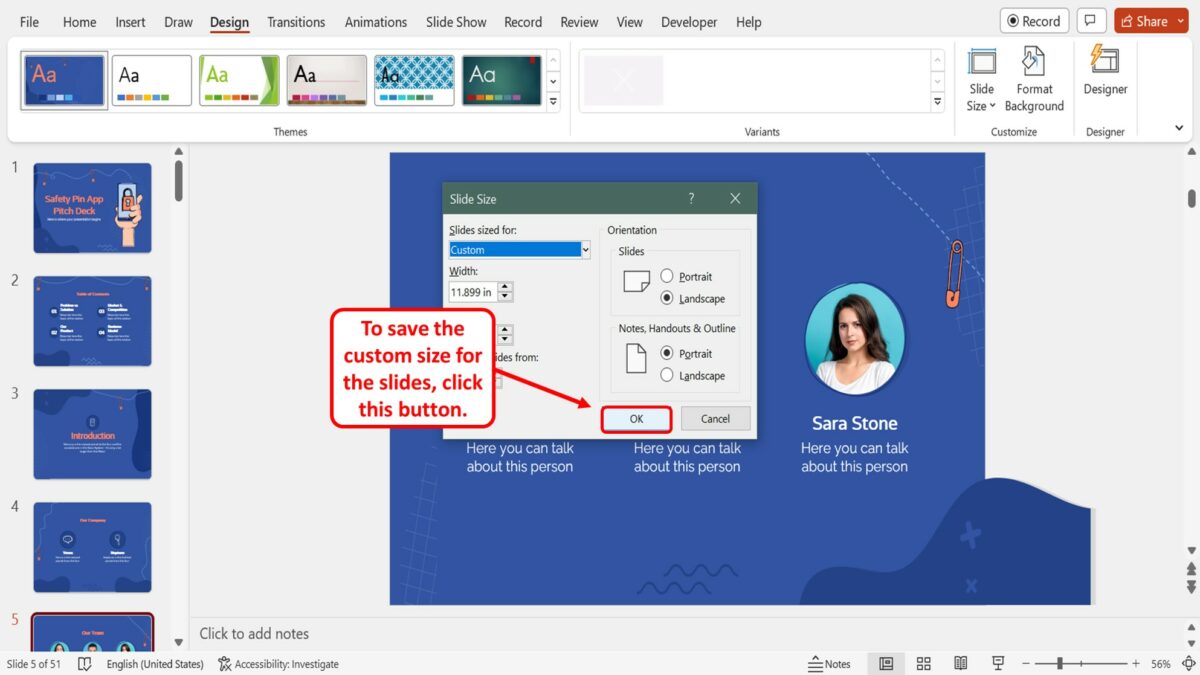
Finally, all you have to do is click on the “OK” button at the bottom of the “Slide Size” dialog box to save the custom size for the slides in the presentation file.
Determining the Size of a PowerPoint Slide in Pixels: A Guide
Have you ever wondered what the size of your PowerPoint slide is in pixels? It’s actually pretty simple to figure out, and you can do it with just a few clicks. In this article, I’ll walk you through the steps so you can determine the pixel dimensions of your presentation slides.
Step by Step Tutorial: Determining the Size of a PowerPoint Slide in Pixels
Before we dive into the steps, let’s understand why this is important. Knowing the pixel size of your slides can help you design better presentations that look great on any screen. Plus, if you’re creating content for the web or digital platforms, pixel dimensions are crucial for ensuring your work displays correctly.
Step 1: Open PowerPoint and go to the ‘Design’ tab
Click on the ‘Design’ tab located at the top of the PowerPoint window.
When you’re working on your PowerPoint presentation, the Design tab is where you’ll find all the options for customizing the look and feel of your slides. It’s the gateway to adjusting the size of your slides.
Step 2: Click on ‘Slide Size’
Look for the ‘Slide Size’ button on the right-hand side of the toolbar and click on it.
The ‘Slide Size’ button gives you access to various options for adjusting the size of your PowerPoint slides, including the ability to see and change the pixel dimensions.
Step 3: Select ‘Custom Slide Size’
In the drop-down menu that appears, select ‘Custom Slide Size’ to open the Slide Size dialog box.
The ‘Custom Slide Size’ option allows you to specify the exact dimensions for your slides, including width and height, in various units of measurement including pixels.
Step 4: Check the pixel dimensions
In the Slide Size dialog box, look for the width and height measurements in pixels.
The Slide Size dialog box will show the current size of your slides. If it’s set to a different unit of measurement, you can easily switch to pixels.
Step 5: Adjust the slide size if necessary
If you need to adjust the size of your slides, enter the desired dimensions in pixels and click ‘OK’.
You can customize the size of your PowerPoint slides to fit specific requirements or to ensure that your presentation looks its best on different devices or resolutions.
Once you’ve completed these steps, you’ll have successfully determined the pixel size of your PowerPoint slides. This information can be incredibly useful for graphic design purposes, ensuring that your presentation looks sharp and professional on any screen.
Tips for Determining the Size of a PowerPoint Slide in Pixels
- Always make sure you’re working with the latest version of PowerPoint for the most accurate size adjustments.
- If your presentation will be displayed on a large screen, aim for higher pixel dimensions to maintain image quality.
- Remember that changing the slide size can affect the layout of your content, so double-check your presentation after resizing.
- Consider the aspect ratio when customizing slide size; common ratios include 4:3 for standard screens and 16:9 for widescreens.
- Use pixel dimensions that match common screen resolutions to ensure your presentation looks great on most devices.
Frequently Asked Questions
What is the default size of a powerpoint slide in pixels.
The default size of a PowerPoint slide is 960 pixels wide by 540 pixels high for a widescreen (16:9) aspect ratio.
Can I change the pixel dimensions for all slides in my presentation at once?
Yes, when you adjust the slide size, the changes will apply to all slides in your presentation.
Will changing the slide size affect the quality of my images?
If you increase the slide size, you may need to use higher resolution images to maintain quality.
What should I do if the content on my slides gets distorted after resizing?
You may need to manually adjust the content on your slides to fit the new dimensions.
How do I know what pixel dimensions to use for my presentation?
Consider the device or screen where your presentation will be displayed and use dimensions that match its resolution.
- Open PowerPoint and go to the ‘Design’ tab
- Click on ‘Slide Size’
- Select ‘Custom Slide Size’
- Check the pixel dimensions
- Adjust the slide size if necessary
Determining the size of a PowerPoint slide in pixels is a piece of cake once you know where to look. Whether you’re a seasoned presenter or new to the game, understanding the pixel dimensions of your slides can make a world of difference in how your presentation is perceived. By following the steps outlined in this article, you can ensure that your slides are perfectly tailored to any screen size, making your message resonate with clarity and impact. Plus, with a few extra tips up your sleeve, you can easily navigate through any presentation design challenges that come your way. Remember, the devil is in the details, and in this digital age, knowing your pixels from your points can truly set you apart. So, go ahead, give it a try and watch your presentations transform from good to great!

Matt Jacobs has been working as an IT consultant for small businesses since receiving his Master’s degree in 2003. While he still does some consulting work, his primary focus now is on creating technology support content for SupportYourTech.com.
His work can be found on many websites and focuses on topics such as Microsoft Office, Apple devices, Android devices, Photoshop, and more.
Share this:
- Click to share on Twitter (Opens in new window)
- Click to share on Facebook (Opens in new window)
Related Posts
- How to Rotate a Powerpoint Slide Presentation
- How to Change Paper Size in Google Docs Quickly [5 Steps + Infographic]
- How to Download a Google Slides Presentation as a Powerpoint File
- How to Make Google Slides Vertical (5 Quick Steps)
- How to Do a Powerpoint Google Slides Presentation Conversion
- Adobe Photoshop: How to Change Ruler Units to Pixels from Inches
- How to Make a Powerpoint Slide Vertical in Powerpoint 2013: A Step-by-Step Guide
- How to Change Slide Size in Powerpoint 2016
- How to Delete a Slide in Powerpoint 2010: Step-by-Step Guide
- How to Add a New Slide in Google Slides: A Step-by-Step Guide
- How to Hide a Slide in Powerpoint 2010: A Step-by-Step Guide
- How to Delete Multiple Slides in Google Slides: A Step-by-Step Guide
- How to End Powerpoint on Last Slide in Powerpoint 2010: A Step-by-Step Guide
- How to Insert Slides from Another Presentation: Powerpoint 2024 Guide
- How to Add a Hyperlink on Google Slides
- How to Convert Powerpoint to Google Slides: A Tech Solution
- How to Remove Slide Numbers in Powerpoint 2019: Easy Steps
- Can You Print a Google Slide?
- How to Hide Background Graphics in Powerpoint 2013: A Step-by-Step Guide
- Can You Save a Powerpoint as a Video in Powerpoint 2013? Find Out Here!
Get Our Free Newsletter
How-to guides and tech deals
You may opt out at any time. Read our Privacy Policy
How-To Geek
How to change slide size in powerpoint.
PowerPoint allows you to change your presentation's slide sizes, which you may need to do to change how your slides are displayed or printed. Here's how.
Quick Links
Changing powerpoint slide sizes, changing to a custom powerpoint slide size.
PowerPoint allows you to format and present the content of your slides in different ways. If you want to print out or display your PowerPoint slides in a bigger or smaller-than-average size, you can change the slide sizes to match.
PowerPoint has two common slide sizes. The first, 4:3, is a good option if you're using older hardware to present your slides. If you're planning on presenting your PowerPoint presentation using a modern projector or display, then the 16:9 slide size should be your preferred choice.
By default, PowerPoint will default to the 16:9 side slide. To print your slides (full size, one per page), you'll likely need to use a custom slide size, rather than one of these options.
Switching to another size is thankfully an easy process---open your PowerPoint presentation to begin and then click the "Design" tab on the ribbon bar.
In the "Customize" section of the "Design" tab, select the "Slide Size" button. This will display the two common slide sizes in a drop-down menu.
Click either the "Standard (4:3)" or "Widescreen (16:9)" option to switch all of your PowerPoint slides to that size.
Unfortunately, it isn't possible to use multiple slide sizes in a PowerPoint presentation. Just as if you were making PowerPoint slides vertical , any changes you make to your PowerPoint slide sizes will apply to all slides.
Related: How to Make Slides Vertical in PowerPoint
It's possible to use a custom PowerPoint slide size if the default 4:3 or 16:9 options are unsuitable. You might choose to use a custom slide size if you're printing full-size PowerPoint slides using a custom page layout, for instance.
To do this, select Design > Slide Size > Custom Slide Size to display the "Slide Size" options menu.
Various preset slide sizes, such as A3 or A4 paper sizes, are shown under the "Slides Sized For" drop-down menu.
Select one of these preset options, or set your slide dimensions manually using the "Width" and "Height" option boxes. From there, click the "OK" button to save.
If you're scaling down to a smaller size, PowerPoint will ask you how it should handle any slide content.
Choose "Maximize" if you want the slide contents to remain at a similar scale, but with the risk that some of the content may be cut. Alternatively, click "Ensure Fit" to scale the slide contents down in size to match the new slide size without losing any content.
Once saved, the custom slide size you selected will be immediately applied to all of your slides, with slide content being resized or cut to match.

How to Change Slide Size or Dimensions in PowerPoint

Change PowerPoint Slide Size (Widescreen, Standard or Custom)
by Avantix Learning Team | Updated September 7, 2023
Applies to: Microsoft ® PowerPoint ® 2016, 2019, 2021 and 365 (Windows)
You can change the slide size or aspect ratio of a PowerPoint presentation in all versions. The default slide size or dimensions in 2013, 2016, 2019, 2021 or 365 is widescreen (16:9 aspect ratio). You can also enter a custom slide size if you prefer (including entering slide size in pixels). The best time to set slide size is when you first set up your PowerPoint presentation before you add any content. If you change the size later in the process, you may have to deal with distorted pictures and you may also need to adjust the position and size of various objects on slides in Normal View and in the slide master(s) and layouts in Slide Master View.
The most common slide sizes or aspect ratios are typically used as follows:
- Widescreen or 16:9 aspect ratio is frequently used for onscreen presentations using a projector, monitor or a widescreen TV. Older projectors used the standard aspect ratio but most new projectors are designed for widescreen.
- Standard or 4:3 aspect ratio is often used if slides are intended to be printed on letter size paper.
Slide size changes affect the entire presentation. You cannot change slide size for single slides.
You should never change slide size just before running a presentation as you may not be satisfied with the results. If you already have a presentation with images and other content, it's also a good idea to change slide size on a copy of the presentation so you can keep the original deck and slide size.
Note: Some Ribbon tabs may appear with slightly different names if you are working with PowerPoint 365 and have a smaller screen or different display settings. Buttons on the Ribbon may appear as icons only and are also affected by screen size and display settings.
Recommended article: How to Reduce the Size of PowerPoint Presentations (10 Ways to Compress Your PowerPoint Decks)
Do you want to learn more about PowerPoint? Check out our virtual classroom or live classroom PowerPoint courses >
Regardless of the version of PowerPoint you use, you should go through your slides after you change slide size to be sure you are satisfied with the results. Be sure to check the slide master(s) and layouts in Slide Master View as well.
Change slide size to widescreen or standard
To change slide size to widescreen or standard size:
- In Normal View, click the Design tab in the Ribbon.
- Click Slide Size in the Customize group. A drop-down menu appears.
- Select Widescreen, Standard or another option from the drop-down menu. A dialog box appears with options to maximize content or scale to fit (this dialog appears only if you are moving from a larger to a smaller slide size).
- Select the desired option.
Slide Size appears on the Design tab in the Ribbon:

The following dialog box appears in PowerPoint to maximize content or scale to fit only when you change slide size to a smaller size (such as widescreen to standard):

If you select Maximize, the slide content will not be resized when you change to the smaller slide size.
If you select Ensure Fit, PowerPoint will scale your content to fit the smaller slide size.
Change slide size to a custom size
You can use custom slide sizes. Simply choose options from the Slides sized for drop-down menu in the dialog box (such as A4 paper size) or enter custom dimensions.
To change slide size to a custom size:
- Choose Custom Slide Size from the drop-down menu. A dialog box appears.
- Select an option from the Slides sized for drop-down menu or enter the desired slide size in the Height and Width boxes.
- A dialog box appears with options to maximize content or scale to fit (this dialog appears only if you are moving from a larger to a smaller slide size).
Note that the measurement system in PowerPoint dialog boxes is based on your system settings. If you would like to change the measurement system, check out our article on How to Change the Measurement System in PowerPoint.
The following dialog box appears when you select Slide Size and then Custom Slide Size:

You can create posters in PowerPoint by entering a custom slide size such as 36 inches wide by 56 inches high or 91.44 cm wide by 142.24 cm high. The maximum slide size in PowerPoint is 56 inches or 142.24 cm. As a best practice, set the slide size before adding content to the poster.
Many PowerPoint users are not aware that you can enter slide size in pixels (simply enter the measurement with px beside the number). This is useful in a number of situations such as using PowerPoint to create social media posts. If you enter slide size in pixels (such as 200px), when you tab to another box or close the dialog box, PowerPoint changes the pixels to the equivalent in the current measurement system.
Deal with issues when changing slide size
When changing slide size in existing presentations with content, 4 common issues occur:
- Pictures may be distorted as PowerPoint tries to adjust images to fit slide size. Images on slides in Normal View will be affected as well as images on the slide master(s) and layouts. If pictures are distorted, you will need to either manually resize each image or delete them and insert them again.
- Objects such as placeholders and shapes that have been created in PowerPoint are not in the position you'd like. You may need to move objects or reset one or more slides (on the Home tab in the Ribbon, click Reset in the Slides group).
- Extra space is created if you change to a larger slide size. You may need to move or resize objects and adjust the slide master(s) or layouts in Slide Master View.
- If you have changed to a smaller slide size, you may need to increase font size for placeholders and text boxes.
Dimension differences between different slide sizes
In PowerPoint 2013 and later versions, widescreen (16:9) format measurements are different and are set to 13.33 inches wide by 7.5 inches high or 33.867 cm wide by 19.05 cm high. This matches the height of the 4:3 format.
Avoid issues when changing slide size
To avoid issues in PowerPoint related to slide size, you should:
- Try to set slide size as a first step after you create a presentation and before you have entered any content. In 2013 and later versions, the default is widescreen (16:9 aspect ratio).
- If you have changed slide size in a presentation with content, review your slides to be sure you are satisfied with the results. You should also check the slide master(s) and layouts in Slide Master View.
- Never change slide size just before running a presentation as you may not be pleased with the results and you won't have time to fix your slide deck.
- If you have created a presentation with content, make a copy of the presentation first and change slide size on the copy.
Keep in mind that widescreen is normally used for on screen presentations and standard is often used for printed presentations.
This article was first published on October 6, 2019 and has been updated for clarity and content.
Subscribe to get more articles like this one
Did you find this article helpful? If you would like to receive new articles, JOIN our email list.
More resources
How to Blur Text on a PowerPoint Slide
How to Get Slide Design Ideas Using PowerPoint Designer
How to Change Picture Brightness or Contrast in PowerPoint
How to Insert Slide Numbers in PowerPoint Presentations (Step-by-Step)
Where to Find Free Images for Your PowerPoint Presentations (10 Great Stock Photo Sites)
Related courses
Microsoft PowerPoint: Intermediate / Advanced
Microsoft PowerPoint: Design for Non-Designers
Microsoft PowerPoint: Animations Bootcamp
Microsoft Excel: Intermediate / Advanced
VIEW MORE COURSES >
Our instructor-led courses are delivered in virtual classroom format or at our downtown Toronto location at 18 King Street East, Suite 1400, Toronto, Ontario, Canada (some in-person classroom courses may also be delivered at an alternate downtown Toronto location). Contact us at [email protected] if you'd like to arrange custom instructor-led virtual classroom or onsite training on a date that's convenient for you.
Copyright 2024 Avantix ® Learning
You may also like

10 Keyboard Shortcuts in PowerPoint's Outline View
The outline has been an integral part of Microsoft PowerPoint for many years. It is dynamically linked to slide placeholders and is organized in a hierarchical way.

How to Change the Thumbnail for a Video in PowerPoint (using the Poster Frame Tool)
If you have inserted a video on a PowerPoint slide, you can display a custom thumbnail (or Poster Frame) for the video during a slide show. The thumbnail will display when you run a PowerPoint slide show and disappears when you start the video. For most videos, the thumbnail that displays is the first frame of the video clip. You can use the Poster Frame command to display a different frame in the video clip or a picture from another source as a thumbnail. A picture thumbnail could be either an image or an icon.

How to Use the Built-in Laser Pointer in PowerPoint (with Shortcuts)
During a PowerPoint slide show, you can change your mouse into a laser pointer to focus attention on a specific area on your slide. You can show or hide the built-in laser pointer using keyboard shortcuts or by using the context menu.
Microsoft, the Microsoft logo, Microsoft Office and related Microsoft applications and logos are registered trademarks of Microsoft Corporation in Canada, US and other countries. All other trademarks are the property of the registered owners.
Avantix Learning |18 King Street East, Suite 1400, Toronto, Ontario, Canada M5C 1C4 | Contact us at [email protected]
Our Courses
Avantix Learning courses are offered online in virtual classroom format or as in-person classroom training. Our hands-on, instructor-led courses are available both as public scheduled courses or on demand as a custom training solution.
All Avantix Learning courses include a comprehensive course manual including tips, tricks and shortcuts as well as sample and exercise files.
VIEW COURSES >
Contact us at [email protected] for more information about any of our courses or to arrange custom training.
Privacy Overview
Pin it on pinterest.
- Print Friendly
- Slide Library
- Slide Library for PowerPoint
- Downloadable slides and shapes
- Slide Library search
- Search Library via shortcut keys
- Slide Library update alerts
- Rename or delete objects
- Share Slide Library
- Save slides or shapes to Slide Library
- Save presentation to Slide Library
- Manage Templates
- View all templates and set default
- Agenda Wizard
- Create Agenda Slides
- Update Agenda Slides
- Agenda Slide Numbering
- Navigate via Agenda
- Table of Contents
- Import Agenda Items
- Save Agenda Format
- Manage Colors
- Color Palette Toolbar
- Customize Color Toolbar
- Apply fill with outline color
- Recolor Charts
- View RGB color values & names
- Theme Color Tints and Shades
- Share Color Palette with team
- Insert Shapes
- Standard PowerPoint shapes
- Callouts / Speech Bubbles
- Hand Drawn Circles
- Harvey Balls
- Create Mini Slides
- Move to Multiple Slides
- Right Facing Centered Triangle
- Status Indicators
- Arrange and Align Shapes
- Select same color or size
- Select shapes by attribute
- Align shapes
- Align to first selected shape
- Choose Align anchor point
- Align using shortcut keys
- Copy paste position multiple shapes
- Straighten Lines
- Swap positions
- Distribute evenly
- Set Horizontal Gaps
- Set Vertical Gaps
- Squeeze or expand gaps
- Remove gaps
- Group Objects by Row
- Group Objects by Column
- Send to back, bring to front
- Send backward, bring forward
- Flip or rotate
- Group, ungroup and regroup
- Edit Shapes
- Same height, same width
- Copy paste position, size
- Resize shapes
- Slice shapes
- Multiply shapes
- Stretch shapes and fill gaps
- Toggle line weight and style
- Change margins toggle
- Chevrons same angle
- Paragraph Styles
- Save Paragraph Styles
- Apply Paragraph Styles
- Use PowerPoint Indent Increase/ Decrease to apply bullet styles
- Reset Paragraph Styles
- Ticks and Crosses bullets
- Paint Formatting
- Advanced Format Painter
- Position & Size Painter
- Table Format Painter
- Style Painter
- Text Format Painter
- Change Shape Painter
- Chart Format Painter
- Angles & Curves Painter
- Animation Painter
- Cycle Accent Colors
- Format Text
- Fit text to textboxes
- Wrap Text Toggle
- Merge Textboxes
- Split Textboxes
- Increase/ Decrease Font size
- Change Text Case
- Color Bold Text
- Delete Text or Replace
- Insert Superscript text
- Format Tables
- Create table from text boxes
- Convert table to text boxes
- Convert text to table
- Insert columns and rows
- Paste Excel data without source formatting
- Paste Excel data into text box tables
- Export Table or Box Table Data to Excel
- Set cell margins
- Express Table layout
- Table stripes
- Autofit columns
- Evenly space columns
- Align shapes over tables
- Harvey Balls for Tables
- Status Indicators for Tables
- Customizable PowerPoint Shortcuts
- Extra PowerPoint shortcuts
- Add PowerPoint shortcuts
- Search shortcut keys
- Reassign PowerPoint shortcuts
- Reset PowerPoint shortcuts
- McKinsey PowerPoint shortcuts
- F4 or Ctrl+Y redo or repeat
- Printable PowerPoint Shortcuts PDF
- How to Print a Custom Shortcuts list
- Search Shortcut Keys
- Searchable PowerPoint Shortcuts list
- Format Toolbar Overview
- Format Toolbar Layout Options
- Lock or Unlock Objects
- Lock objects
- Lock objects to the Slide Master
- Unlock objects
- Proofing Tools
- Check Formatting
- Check Fonts
- Check Template
- Check Slide Layout
- Check Content
- Check Punctuation & Spacing
- Reduce File Size
- Flip Slides
- Set Proofing Language
- Change set language for PowerPoint presentations
- Slide Numbering
- Manage Slide Numbering
- Slide Numbers with totals
- Add words to Slide Numbers
- Change Starting Slide Number
- Skip Slide Numbers on Hidden Slides
- Slide Navigator
- Footers & Footnotes
- Filename Footer
- Enlarge Footnotes
- Refine Slides
- Add summary slide
- Format slide title
- Display No Fly Zone
- Send slide to appendix
- Camouflage mode
- Format Painter
- Set Grayscale
- Format Images
- Compress file size
- Format Charts
- Charts Toolbar
- Config Options
- Customize Settings
- Dark Mode Display
- Review Slides
- Customizable Status Stamps
- Sticky Notes
- Tag slides with filename and page number
- Share Slides
- Email selected slides in PPT or PDF format
- Print selected slides
- Save selected slides
- Slide Library for Teams
- Team Slide Library
- Create multiple Team Slide Libraries
- Synchronize Team Slide Libraries
- Synchronize Team Slide Library to your company Dropbox/ Box/ OneDrive folder
- Updating your Team Slide Library
- Import entire presentation to the Slide Library
- Share Slide Library with a colleague
- Share Custom Settings
- Share Custom Settings with Team
- Getting Started
- Getting started with PPT Productivity add-in for PowerPoint
- Downloadable PowerPoint Elements for Slide Library
- Tutorial - How to Create Custom Paragraph Styles for PowerPoint
- Can I use PPT Productivity on a Mac?
- PPT Productivity Basic Tools Tutorial
- PPT Productivity Plus Tools Tutorial
- New Features
- August 2023 update: Color Toolbar enhancement, new icons and more
- February 2023 update: New Slide Libraries available to download!
- January 2023 Update: Agenda Wizard, Format Painters + More
- How to copy and paste formatting in PowerPoint
- PowerPoint How To
- What are the most popular PowerPoint shortcuts?
- Where are PPT templates stored? Finding templates in PowerPoint
- Pasting data into a PowerPoint table without source formatting?
- Consulting Toolkit
- How to create effective consulting slides using Minto Principles
- Missing the McKinsey PowerPoint Shortcuts?
- Missing the Accenture QPT for PowerPoint?
- Missing the BCG PowerPoint Tools?
- Missing the Bain Toolbox for PowerPoint?
- How to add Stamps or Stickers to PowerPoint slides?
- Looking for a Consulting PowerPoint Toolbar?
- Top 10 PowerPoint Hacks / Shortcuts used by strategy consultants
- PowerPoint Tips
How to change slide size in PowerPoint 16:9, 4:3 and custom?
- March 25, 2021
Trying to change slide size in PowerPoint presentations? PowerPoint lets you choose between a couple of standard slide sizes plus a custom option. In this hints and tips blog post we provide a guide to:
- The different slide sizes in PowerPoint 16:9, 4:3 and custom sizes
- How to change a PowerPoint slide size
- How to change the orientation of PowerPoint slides from landscape to portrait
- A workaround to change selected slides to portrait for printing
Where to change slide size in PowerPoint?
From the PowerPoint Design tab on the ribbon, select the Slide Size feature button. You can find the slide size feature button on the far right end of the ribbon - refer to the screenshot below.

The three slide size options of standard, widescreen and custom will display, as shown in the screenshot below.

What are the PowerPoint slide size options?
PowerPoint offers three different slide sizes. What's the difference 4:3 vs 16:9 PowerPoint slide sizes? The Standard 4:3 and Widescreen 16:9 both have the same slide width , but have different slide heights:
- PowerPoint Standard (4:3) Slide Size: This is the original PowerPoint slide size. The standard screen size is easy to print and works well on older style pull down projector screens (when the screen shape is closer to a square than the newer widescreen layout). Powerpoint 4:3 dimensions are 10 in x 7.5 in (which is 33.867 cm x 19.05 cm). Standard PowerPoint slide size pixels = 1024 px x 768px
- PowerPoint Widescreen (16:9) Slide Size: The PowerPoint 16:9 widescreen option was a later addition but is now the default value in PowerPoint for new presentations. Widescreen is more commonly used now because the size is well suited for presenting on digital screens (typically shaped like elongated rectangles similar to a current TV screen). Powerpoint 16:9 dimensions are 10 in x 5.625 in (33.867 cm x 14.288 cm). Widescreen size 16:9 size ppt dimensions pixels = 1920 px x 1080 px
- On-screen show (4:3)
- Letter Paper (8.5x11in)
- Ledger Paper (11x17in)
- A3 Paper (297x420mm)
- A4 Paper (210x297mm)
- B4 (ISO) Paper (250x353mm)
- B5 (ISO) Paper (176x250mm)
- 35mm slides
- On-screen Show (16:9)
- On-screen show (16:10)

You can either select from one of the many options in the drop down list, or you can directly key in your preferred Width and Height for your PowerPoint presentation. As soon as you key in width and/ or height values, the drop down menu will update to show the Custom option.
Note that when you are entering a custom slide size you have the option to specify your PowerPoint size in pixels (e.g. specify pixels for width and height). You can do this by typing in your preferred height and width in pixels using px at the end. The minimum width or height in pixels for PowerPoint slides is 120 px and the maximum width or height is 720 px. When you specify the pixel size of PowerPoint slide, PowerPoint will convert the pixels automatically to your default unit of measurement (e.g. either cm or in).
You can then select the Orientation of the PowerPoint slides. You have the option of Portrait or Landscape orientation and you can select separately for the slides and the Notes, Handouts & Outline.
Can I resize selected slides in a PowerPoint presentation?
No - the PowerPoint resize option is applied to all slides in your presentation. You cannot change size of selected slides in your PowerPoint presentation.
Does PowerPoint auto resize content if slide size changes?
If you select to change the slide size for an existing presentation, PowerPoint will display a slide scaling popup menu. The menu will give you the following options for scaling your slides:
- Maximise : The maximize size scaling option in PowerPoint will make the content larger, but it may spill over the edges of your slide.
- Ensure Fit: The ensure fit scaling option in PowerPoint ensures that all content remains visible on the slide, however the content may shrink to ensure that it fits.
Can I change orientation of PowerPoint slides from Portrait to Landscape?
Trying to work out how to change PowerPoint to portrait layout? You can change the orientation of your PowerPoint slides from Landscape to Portrait for the entire presentation, (you cannot change only selected slides in a presentation). To change orientation of PowerPoint slides:
As per the steps above, from the PowerPoint Design tab on the ribbon, select the Slide Size feature button (on the far right end of the ribbon).
The three slide size options will display, as shown in the screenshot below. Irrespective of what size layout you want this time, you need to select the Custom Slide Size option from the PowerPoint ribbon.
From the Slide Size popup menu on the PowerPoint ribbon, you have the option to select Portrait or Landscape mode. You can select the orientation display without modifying your slide size if you already have the correct slide size selected.
You can change the orientation for both your PowerPoint slides and handouts. Note that changing the orientation does not automatically adjust your template (for example your logos will likely appear distorted and the title page of your presentation will look squished). You need to adjust your PowerPoint template separately. If you are changing orientation only for a single PowerPoint presentation, you can do this via your presentation's Slide Master. Or if you plan on creating multiple presentations in the new orientation, its worth spending the extra time to create a new .potx template file suited to the new orientation.
Can you have different orientation slides in a PowerPoint? presentation?
Trying to add a vertical slide in PowerPoint, but keep the rest of the presentation horizontal? Unfortunately it's not possible to have a combination of Portrait and landscape slide orientations in a single PowerPoint presentation. But there is a workaround if you are printing rather than online presenting your PowerPoint presentation.
If you are preparing a PowerPoint presentation that will be printed, a workaround to include different orientation pages in PowerPoint is to create a slide master layout with the orientation on its side. This is a way to rotate PowerPoint slides to Portrait without changing all slides. Refer to the screenshot below for an example.

This How to Guide was brought to you by the PPT Productivity team.

Want to see our tools in action?
Book a personalized demo with our PowerPoint professionals

Download 30 Day Free Trial
Download your 30 day free trial - Microsoft Office for Windows
Related productivity tips

How to hide slide numbers on PowerPoint Title Slide?
Want to hide the page or slide number on your PowerPoint Title slide, but display slide numbers on ...

Can I change PowerPoint starting slide number?
Do you want to start your PowerPoint Slide number / page numbers at zero or another number? By ...
Can I insert slide totals with slide numbers in PowerPoint? Yes!
PPT Productivity add-in recently released our Manage Slide Numbering feature for PowerPoint. ...
Critical PowerPoint Shortcuts – Claim Your FREE Training Module and Get Your Time Back!
How to Change Your PowerPoint Slide Size (16:9 vs. 4:3)
- PowerPoint Tutorials
- March 10, 2019
In this tutorial, you’ll learn how to change your slide size in PowerPoint.
That way you can create slides for any situation including on-screen presentations, printed documents, posters, postcards, handouts, etc.
First off, the two most used PowerPoint slide sizes are:
- 16:9 ratio for onscreen presentations and new overhead projectors. This is the default setting for the latest versions of PowerPoint.
- 4:3 ratio for printing slides on standard 8.5 x 11 pieces of paper as handouts.
When starting with a blank PowerPoint presentation, changing your slide size is super easy and straightforward. If not, there are a few issues you’ll need to deal with, each covered below.
That’s why it’s worth figuring out what slide size you need BEFORE you build your presentation. If you later convert your presentation to a different size, it can be painful!
It’s just like the old carpenter saying, “measure twice and cut once.” In PowerPoint, you’ll want to “ask twice (to double confirm the required size) and build once.”
Changing your PowerPoint slide size does not make your PowerPoint presentation larger or smaller. To reduce your PowerPoint file size, you need to learn how to compress a PowerPoint presentation .
Table of Contents
How to change your powerpoint slide size.
By default, new PowerPoint presentations start in the 16:9 slide size format.
This is the NEW standard for most modern overhead projects and monitors and is recommended for most presentations. That said, you can easily change your slide size to something else.

To change your slide size in PowerPoint, simply:
- Navigate to the Design tab
- Open the Slide Size drop down menu
- Select 4:3 , 16:9 or Custom Slide Size (see options below)
When starting with a blank presentation, you are now good to go. You will not have to worry about any of the conversion issues discussed below.
Notice too, how much wider the 16:9 slide size is versus the 4:3 slide size in the picture below. The new size gives you more room for the content on your slides.

When you are converting an existing presentation to a new slide size, you will additionally be given the following prompt:
“You are scaling to a new slide size. Would you like to maximize the size of your content, or scale it down to ensure it will fit on the new slide?
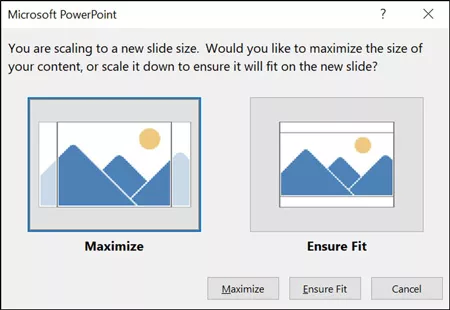
Maximize leaves all your content as is on your slide, even if it no longer fits on the new slide size that you selected.
Ensure Fit scales down your content in proportion to the new slide size you have selected. You will only see this option when moving from a larger slide size to a smaller one.
Custom PowerPoint slide sizes
Choosing Custom for your slide size gives you additional options to work with. Inside the dialog box you can choose your size on the left and your orientation on the right.
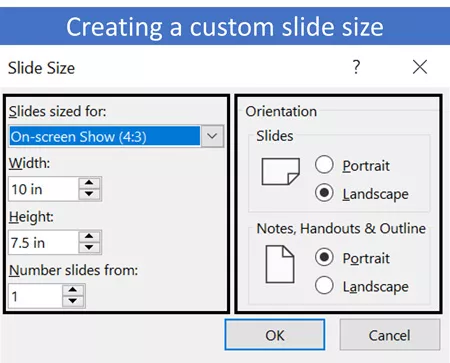
On top of that, you can also input your own custom slide size. However, I recommend using one of the preset PowerPoint dimension options.
- On-screen show (4:3)
- Letter Paper (8.5×11 in)
- A3 Paper (297×420 mm)
- B4 (ISO) Paper (250×353 mm)
- B5 (ISO) Paper (176×250 mm)
- 35mm Slides
- On-screen Show (16:9)
- On-screen show (16:10)
For your orientation options on the right-hand side of the dialog box, you can choose between Landscape and Portrait .
In most situations, you will want one of the default settings. Best practice is Landscape for your presentation slides and Portrait for your printed notes, handouts and outlines.

Issues when converting 4:3 to the 16:9 slide size in PowerPoint
When converting an existing 4:3 presentation with content into the 16:9 format, you are not given any conversion options. Instead, PowerPoint simply does the conversion for you, which can create several problems.
There are two issues you will face in the new 16:9 slide size.

The first issue is that all the images on your slide master (including company logos) will be stretched to fit the new, larger slide size.
To fix the stretched images, you will need to fix those images (or reinsert them) on your slide master, as if you were creating a PowerPoint template from scratch.
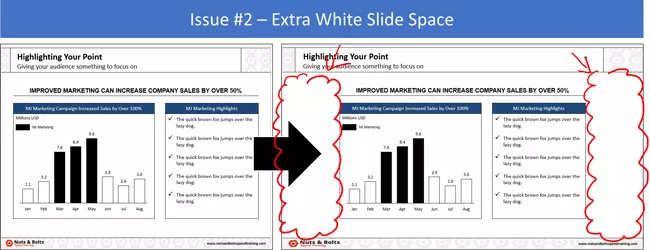
The second issue you will face in the larger 16:9 slide size is that you will have a lot of extra white space on your slides.
While you can leave the space blank, doing so will make your content look weird. Ideally you don’t want a lot of white empty space like that on your slides. Especially since all your font sizes will be so small.
That’s why if you have the time, I recommend resizing your content to fill in the white space. You can do this by either increasing the font size of your content, or adding additional visuals that support your message.
Issues when converting 16:9 to the 4:3 slide size in PowerPoint
When converting an existing 16:9 presentation to the 4:3 slide size, you are given the option to either Maximize or Ensure Fit (both covered below).
1. The Maximize option
This option means that the content on your slides will not be resized to fit the 4:3 slide size. The same is true if you move to any smaller slide size.

Maximize Issue #1: All the images on your slide master (including your company logo) will be distorted.
You might also have issues with other content placeholders, slide backgrounds or anything else that was built on your slide master. For these issues, you’ll first need to navigate to your Slide Master. Once you are there, you either adjust (or rebuild) your PowerPoint template so that everything fits properly.
Maximize Issue #2: Your content will not be scaled down to the smaller slide size. Instead, you’ll have overhanging content as pictured above.
For these kinds of spacing issues, you will need to work through your slides to adjust your content.
One recommendation as you move from the larger 16:9 slide size to 4:3, is to break up your slides. Take the contents from one larger slide and break it into two (or even three) separate slides.
Breaking up your content is preferable to just cramming more content on the smaller slide space. Doing so will make your content easier to read when presented on an overhead projector.
2. The Ensure Fit option
This option means that PowerPoint will scale down your content to fit the smaller slide size based on the size you selected.

Ensure Fit Issue #1: Distorted images, slide backgrounds and anything else that PowerPoint had to automatically resize on your slide master.
To fix these issues, you’ll need to navigate to your slide master and adjust (or rebuild) your template to make everything fit.
Ensure Fit Issue #2: Your content will be scaled down to fit your new slide size, leaving you with a lot of white space. In addition, all your font sizes will be smaller, making them hard to read.
For small content like this, you’ll need to work through your slides and resize your content accordingly. Keep in mind the people at the back of the room too when choosing a new font style and size.
Saving your custom slide size as a PowerPoint theme
If want to use your own custom slide size for all your future PowerPoint presentations, you can save and set it as a PowerPoint theme.
This is a two-step process as discussed below.
1. Save your custom slide size as a theme

To save your custom slide size (and settings) as your own custom PowerPoint theme, simply:
- Open the M ore options
- Click Save Current Theme
- Name your Theme (and don’t change the file location it saves to)
- Click Save
2. Set your custom theme as the default

To set a custom PowerPoint theme as the default for all your future presentations, simply:
- Open the More options
- Right-click your custom theme
- Select Set as Default Presentation
- Close out of PowerPoint (and do not save any presentations if it prompts you)
Once you’ve set your own custom theme as the Default Presentation, it will open every time you start PowerPoint. This saves you from always having to switch your slide sizes.
So that’s how you can change your PowerPoint slide size, either before or after you create your presentation.
And although you are given a lot of flexibility in the slide sizes you can choose from, I recommend using the default slide sizes as used by most people.
It’s also important to remember that switching slide sizes after you have built your presentation can be a total pain. So, to the extent possible, figure out your PowerPoint slide size first before you build out your presentation.
If you enjoyed the depth of this article, you’ll love our PowerPoint training courses and other free resources that you can learn more about here .
🔒 Unlock the PowerPoint Shortcuts Trusted by Industry Leaders KKR, American Express, HSBC, and More!
Join over 114,880 professionals from diverse fields including consulting, investment banking, advertising, marketing, sales, and business development who have supercharged their PowerPoint game with our proven methods.
✅ Customize compelling presentations effortlessly.
✅ Master time-saving techniques for faster deck creation.
✅ Boost your career prospects with top-notch PowerPoint skills.
Get FREE access to the Critical PowerPoint Shortcuts module of our premium training course by entering your name and email below.
DISCLAIMER: PC Users Only!
We respect your privacy and will keep your info safe and confidential.
Related Articles
About the author.

Popular Tutorials
- How to Strikethrough Text (l̶i̶k̶e̶ ̶t̶h̶i̶s̶) in Word, Excel & PowerPoint
- How to Make Animated Fireworks in PowerPoint (Step-by-Step)
- Strikethrough Shortcut (l̶i̶k̶e̶ ̶t̶h̶i̶s̶) for Word, Excel & PowerPoint
- How to Create a Flash Card Memory Game in PowerPoint (Like Jeopardy)
- Keyboard Shortcuts Not Working: Solved
PowerPoint Tutorial Categories
- Strategies & Opinions
- Shortcuts & Hacks
- Presentation Design
- Pictures, Icons, Videos, Etc.
- New Features
- Miscellaneous
- Charts & Data Viz
We help busy professionals save hours and gain peace of mind, with corporate workshops, self-paced courses and tutorials for PowerPoint and Word.
Work With Us
- Corporate Training
- Presentation & Template Design
- Courses & Downloads
- PowerPoint Articles
- Word Articles
- Productivity Resources
Find a Tutorial
- Free Training
- For Businesses
We help busy office workers save hours and gain peace of mind, with tips, training and tutorials for Microsoft PowerPoint and Word.
Master Critical PowerPoint Shortcuts – Secure Your FREE Training Module and Save Valuable Time!
⌛ Master time-saving expert techniques.
🔥 Create powerful presentations.
🚀 Propel your career to new heights.
We value your privacy – we keep your info safe.
Discover PowerPoint Hacks Loved by Industry Giants - KKR, AmEx, HSBC!
Over 114,880 professionals in finance, marketing and sales have revolutionized their PPT skills with our proven methods.
Gain FREE access to a full module of our premium PowerPoint training program – Get started today!
We hate spam too and promise to keep your information safe.
You are currently viewing a placeholder content from Facebook . To access the actual content, click the button below. Please note that doing so will share data with third-party providers.
Next Gen Data Learning – Amplify Your Skills

How to Adjust Slide Size in PowerPoint: A Quick & Easy Guide
by Sam McKay, CFA | PowerPoint

Ever started making a presentation in PowerPoint, only to realize that the slides are too small, or too big?
It’s happened to the best of us.
The good news is, adjusting the slide size in PowerPoint is a simple process that can help you avoid this problem and create presentations that look just right.
To adjust the slide size in PowerPoint, click on the “Design” tab, and then “Slide Size.” You can choose from two standard slide sizes, either “Standard (4:3)” or “Widescreen (16:9).” Additionally, you can also choose a custom slide size by entering the dimensions manually.
In this article, we’ll take you through the steps of adjusting the slide size in your presentation.
You’ll also learn about the various options available for slide size, and why it’s important to choose the right one for your presentation.
Let’s get started!

Table of Contents
What is Slide Size in PowerPoint?
Slide size in PowerPoint refers to the dimensions of a single slide in a presentation. It determines the width and height of the slide and can be customized to fit different screen aspect ratios and output formats.

Aspect Ratio: This is the proportional relationship between the width and height of a slide. The two most common aspect ratios for slides are 4:3 (standard) and 16:9 (widescreen).
Remember, the aspect ratio you choose will depend on the intended display or output format of your presentation.
Output Format: The slide size can be adjusted based on the output format you plan to use. For example, if you’re creating a presentation for a standard projector, you might choose a 4:3 aspect ratio.
On the other hand, if your presentation will be displayed on a widescreen TV or uploaded to an online platform, a 16:9 aspect ratio is typically recommended.
By customizing the slide size, you can ensure that your actual presentation looks its best on various devices and platforms.

2 Ways How to Adjust the Slide Size in PowerPoint
There are two ways to adjust the slide size in your presentation: using the default settings or customizing the size to meet your specific needs.
1. How to Adjust Slide Size Using the Default Settings
If you are using PowerPoint 2013 or later, you can adjust the slide size using the default settings.
Here’s how to do it:
Open your PowerPoint presentation.
Click on the “Design” tab in the Ribbon menu.
In the “Customize” group, click “Slide Size.”

Choose either “Standard (4:3)” or “Widescreen (16:9)” from the drop-down menu.
PowerPoint will adjust the slide size according to your selection.

Note: In PowerPoint 2010 and earlier versions, the “Design” tab is called the “Page Layout” tab. The steps are the same.
Now that you’ve learned how to adjust the slide size using the default settings, let’s move on to customizing the size to fit your specific needs .
2. How to Adjust Slide Size by Customizing It
If you have specific slide dimensions in mind for your presentation slides, you can easily customize the slide size in your presentation.
Follow these steps:
Open your presentation.
In the “Customize” group, click “Slide Size” and then select “Custom Slide Size” or “Page Setup”.

In the “Slide Size” dialog box, you can choose from a list of pre-defined slide sizes, including “On-screen Show,” “Letter Paper,” “A4 Paper,” and more. Alternatively, you can enter custom width and height values in the “Width” and “Height” boxes.
Click “OK” to apply your custom size.

Now that you’ve learned how to adjust the slide size in your presentation, let’s take a look at the different options available for slide size.
Options for Slide Size in PowerPoint
When you’re creating a presentation in PowerPoint, you have a few different options for the slide size . You can choose between the standard size (4:3) and the widescreen size (16:9).
Let’s take a closer look at these options and when you might want to use each one.

1. Standard Size (4:3)
The standard size in PowerPoint is a 4:3 aspect ratio. This means that for every 4 units of width, there are 3 units of height. It’s the traditional size for older television screens and projectors.
The 4:3 aspect ratio provides a more square-shaped slide orientation, which can be beneficial for certain types of content, such as:
Printed handouts
Vertical designs
Content intended for older display systems
Certain templates and design layouts

2. Widescreen Size (16:9)
The widescreen slide size in PowerPoint is a 16:9 aspect ratio. This means that for every 16 units of width, there are 9 units of height. It’s the standard size for most modern high-definition displays, including computer monitors, TVs, and projectors.
The 16:9 aspect ratio provides a more rectangular-shaped slide orientation, which can be beneficial for certain types of content, such as:
Video content
Web-based presentations
Screen sharing
Detailed images
Presentations that need to be compatible with a wide range of devices
Now that you’ve learned about the two main options for slide size for your presentation, let’s discuss why it’s important to choose the right one for your presentation.

Why Choose the Right Slide Size in PowerPoint?
Choosing the right slide size is crucial for creating an effective and professional-looking presentation. The size of your slides not only affects the layout and design but also influences how your content is displayed on different screens and devices.

Here are some key reasons why you should carefully consider your slide sizes:
Optimized content layout: The size of your slides will determine how much content can be displayed at once. A larger slide size, such as widescreen (16:9), allows for more space to work with, enabling you to create visually appealing and uncluttered layouts.
Consistency across devices: By selecting one slide size, you can ensure that your presentation will look consistent and well-proportioned when viewed on various devices , including laptops, projectors, and large displays.

Enhanced readability: Larger slides provide more room for text and images, making it easier for your audience to read and understand your content, even from a distance.
Professional appearance: A carefully chosen slide size demonstrates attention to detail and a commitment to delivering a high-quality presentation. It can also help you stand out as a professional and competent presenter.
Now that you understand the importance of choosing the right slide size for your presentation, let’s review the steps you can take to adjust it in your own PowerPoint presentations.

Final Thoughts
Learning how to adjust the slide size in PowerPoint can significantly enhance the quality of your presentations. By understanding the various options available and making the right choice, you can ensure that your content is well-organized, visually appealing, and consistent across different devices and screens.
So, whether you need a standard 4:3 aspect ratio or a widescreen 16:9 format, PowerPoint makes it easy to customize the slide size to meet your specific needs.
Furthermore, this flexibility allows you to create professional and polished presentations that leave a lasting impression on your audience.

So, the next time you start working on a presentation, remember the importance of slide size and use the knowledge you’ve gained here to make the right choice. Happy presenting!
If you want to learn more about using Powerpoint to enhance the visuals of your data analysis, check out our video below:
Frequently Asked Questions
How can i change the slide size in my powerpoint presentation to a4.
To change the slide size to A4, follow these steps:
In the “Customize” group, click “Slide Size” and then “Custom Slide Size.”
In the “Slide Size” dialog box, select “A4 Paper” from the “Slides sized for” dropdown menu.
Click “OK” to apply the A4 slide size.
What is the standard slide size in PowerPoint?
The standard slide size in your presentation is 10 inches by 7.5 inches, which is a 4:3 aspect ratio. However, with newer versions of PowerPoint, the default slide size is 13.333 inches by 7.5 inches, also a 4:3 aspect ratio.
How do I set custom dimensions for my PowerPoint slides?
To set custom slide dimensions for your PowerPoint slides, follow these steps:
In the “Slide Size” dialog box, enter your desired width and height in the “Width” and “Height” boxes.
Click “OK” to apply the custom slide size.
Repeat steps 1-4 for all the slides or selected slides only. You can then proceed to number slides or otherwise improve your slides.
What is the widescreen size in PowerPoint?
The widescreen size in PowerPoint is a 16:9 aspect ratio. This translates to a slide size of 13.333 inches by 7.5 inches in PowerPoint 2013 and later versions, and 10 inches by 5.625 inches in PowerPoint 2010 and earlier versions.
How do I change the slide size in PowerPoint to 16:9?
To change the slide size in your presentation to 16:9, follow these steps:
In the “Customize” group, click “Slide Size” and then “Widescreen (16:9).”
How do I adjust the aspect ratio of PowerPoint slides?
To adjust the aspect ratio of PowerPoint slides, follow these steps:
In the “Slide Size” dialog box, select your desired aspect ratio from the “Slides sized for” dropdown menu.
Click “OK” to apply the new aspect ratio.

Related Posts

How to Cite Pictures in PowerPoint: Step-by-Step Guide
When creating presentations, one of the most important aspects is to properly credit the sources of any...

How to Make a Picture Transparent in PowerPoint
In today’s digital age, creating professional presentations is an essential skill. And when it comes to...

How to Wrap Text in PowerPoint Text Box: 2 Quick Ways
One of the essential tools for managing text in PowerPoint is the text box. With the help of a text...

How to Make a Logo Transparent in PowerPoint: Quick Guide
A transparent logo can be a powerful tool in your branding arsenal. It allows your logo to seamlessly...

How to Add a Table of Contents in PowerPoint: User Guide
Want to add a table of contents in PowerPoint?Good. You're in the right place. To add a table of...

How to Create a Word Cloud in PowerPoint in 6 Simple Steps
Visual representations like word clouds are a great way to convey your content's key ideas and themes...

Superscript in PowerPoint + Subscript Explained
Are you struggling to effectively communicate chemical equations and mathematical formulas in your...

How To Insert a PDF into PowerPoint: 3 Quick Ways
Frustrated by the struggle to maintain formatting? How can you ensure that your beautifully designed...

How to Add Notes to PowerPoint in 4 Simple Steps
Have you ever found yourself struggling to remember key important points during a PowerPoint...

- Skip to primary navigation
- Skip to main content
- Skip to footer
Laura M. Foley Design
Cheat Death by PowerPoint!
What size should my slides be, 16:9 or 4:3?
July 3, 2017 by Laura Foley 2 Comments
Deciding on a slide format used to be easy when there was only one choice. Nowadays, you can choose between 4:3 format or 16:9. What do these numbers mean and which size should you choose for your presentations?
What the numbers mean
The above notation is called the “aspect ratio,” or the ratio of the width to the height of the slide. In the 4:3 aspect ratio, the dimensions are 1024 x 768 pixels (10.67″ x 8″); the height is 3/4 of the width. Back in the Ye Olde Days of PowerPoint, it was your only choice. Why? Because that’s the aspect ratio of actual slides, pictured above, television screens, and early computer monitors.
When high-definition screens came on the scene in the early 2000s, they were built in a 16:10 aspect ratio. But as more and more high-definition screens were manufactured, it became clear that screens with a 16:9 aspect ratio were cheaper to manufacture. So the 16:9 aspect ratio (1920 x 1080 pixels or 13.3″ x 7.5″) became the new standard.
What size should you choose?
From boardrooms to computer monitors to smartphone screens, 16:9 is the default screen aspect ratio so that’s the slide size I always go with. The 16:9 format gives you a lot of slide real estate to play around with! The legacy 4:3 aspect ratio, while still used, creates smaller slides and doesn’t look that great on newer screens.
How do you change an old 4:3 deck to the new 16:9 format?
Oh, this is super-fun to do and you’re a lucky duck if it becomes your job.
To resize your slides go to the Design tab on the ribbon and select Slide Size/Widescreen on the right side of the screen.

After you select the new size, this window will appear:

Now you’re faced with either everything on the slides being stretched out or squished to fill the space. Oh boy! Either way, after you make your selection you’ll need to go through the presentation slide by slide to ensure that everything looks good. This can be fairly straightforward if the creator of the presentation stayed within the template or a real pain in the rear if he/she didn’t. But do go through the deck to ensure that everything looks right.
If you’re a production artist that charges by the hour, reformatting an organization’s slides from 4:3 to 16:9 could be a nice little gig for you!
Other slide sizes for special events
Now, the 16:9 format is great for everyday use but what if you’re designing a presentation for an event? Last year, I was designing slides for a corporate conference where the setup included multiple, massive screens. For that event, the slides measured 52″ x 17″ and had a “leave this space blank” area on the bottom. Each event is different, so if you’re working on slides like these you need to become friends with the AV folks and find out what size slides they recommend for optimal viewing on that particular setup. The last thing you want to see on a gigantic stage are distorted graphics!
Bottom line
Unless you’re told otherwise, use the 16:9 format. You get a lot more space on each slide for your visuals and it’s really the way things are going.
Share this:

Contribute to the Microsoft 365 and Office forum! Click here to learn more 💡
April 9, 2024
Contribute to the Microsoft 365 and Office forum!
Click here to learn more 💡
- Search the community and support articles
- Microsoft 365 and Office
- Search Community member
Ask a new question
How to adjust slide and shapes by pixel
Report abuse, replies (38) .
* Please try a lower page number.
* Please enter only numbers.
4 people found this reply helpful
Was this reply helpful? Yes No
Sorry this didn't help.
Great! Thanks for your feedback.
How satisfied are you with this reply?
Thanks for your feedback, it helps us improve the site.
Thanks for your feedback.
Unlike Word, in which you can set the units of measurement, PowerPoint pulls the units of measurement from your computer system. So to change from inches to something else in PowerPoint, you have to make the change in the measurement system settings in Windows Control Panel. Unfortunately your only choices here are US and Metric, so pixels isn't an option.
2 people found this reply helpful
- Article Author |
- Volunteer Moderator
1 person found this reply helpful
3 people found this reply helpful
11 people found this reply helpful
PowerPoint slides must have some kind of finite resolution or dimension that could be measured in pixels or points though.
The standard 4:3 presentation for example is 1024x768 because if you add a 1024x768 to the presentation it fills the slide 100% with no scaling of the image. Or if you make text 576 points high it fills the slide 100%.
The pixel density of the image has no bearing, PowerPoint just reads the total pixel dimensions.
This is why I don't understand why it uses cm or inches (from the computer's settings) when it is primarily created for on-screen or projectors.
When the slideshow is running it plays full screen irrespective of the res of the playback device right?. For example playing back a 4:3 slideshow on a 1920 x 1080 screen just means that the graphics which are 1024x576 are getting blown up to fit the output screen resolution.
Having said that, if I insert a large image in (like 1920x1080) it is automatically scaled to 50%.
So in that case if a 4:3 show was played back on a 1920x1080 monitor that particular graphic would look crisper as I am guessing it retains its own native resolution (i.e. it's not being down-sampled before playback).
So in terms of actually creating the slides in the first place we should be able to use measurement units like points/pixels. Not centimetres or inches. Using points is probably a better way to think of it as that is how fonts are handled. Makes sense (I hope!).
>> PowerPoint slides must have some kind of finite resolution or dimension that could be measured in pixels or points though. SR: No, not really. PPT displays presentations at whatever resolution it finds itself talking to when you start the slide show. >> The standard 4:3 presentation for example is 1024x768 because if you add a 1024x768 to the presentation it fills the slide 100% with no scaling of the image. Or if you make text 576 points high it fills the slide 100%. SR: While this is all true, it doesn't mean much in terms of creating pixel-accurate drawings. There are really two measurement systems at work here: the slide size, which is sort of imaginary, but usually expressed in inches, and there's the number of pixels PPT tosses out to the video display when you view a slide show. SR: If you know up front that the display will be, say, 1024x768, then it's fairly easy to make pixel-accurate drawings. You know that the 10" (or whatever) width will display at 1024 pixels, so each pixel is equivalent to 10/1024. Do the math, enter the number you want. >> So in terms of actually creating the slides in the first place we should be able to use measurement units like points/pixels. Not centimetres or inches. Using points is probably a better way to think of it as that is how fonts are handled. Makes sense (I hope!). Again, if you know up front what size the display will be, you can enter the equivalent of pixels, or if you set up your slide size to something friendlier, you can make it even simper. Slide size 10.24" / 1024 --> A very easy number to work with per pixel when entering sizes. ;-) But as soon as that slide gets displayed on a different size projector/monitor, all your pixel calculations go out the window; rather than lead you into thinking it'll work, when in fact it's bound to break, I'm guessing MS decided not to let you used pixels. You can use points if you prefer. Instead of entering just a number in any of the size dialog boxes, enter the number followed by pt. 72pt for example rather than 1 inch.
Question Info
- Norsk Bokmål
- Ελληνικά
- Русский
- עברית
- العربية
- ไทย
- 한국어
- 中文(简体)
- 中文(繁體)
- 日本語
Reduce the file size of your PowerPoint presentations
If the file size of your presentation is too large, try the following tips to make it more manageable.
Compress pictures in your presentation
Select a picture in your document. The Picture Format tab appears.
On the Picture Format tab, in the Adjust group, select Compress Pictures .
Under Compression options , do any of the following:
Make sure that Apply only to this picture is not selected so that the changes you make here will apply to all pictures in the document.
Select Delete cropped areas of pictures . This option removes the cropped picture data but note that if you delete the cropped picture data, you won't be able to restore it.
Under Resolution , select Use default resolution .

Under Compression options , do either of the following:
Select Delete cropped areas of pictures . This option removes the cropped picture data but note that if you delete the cropped picture data, you won't be able to restore it.

Delete image editing data and lower default resolution
By default, when you edit an image, the data from the original is retained (to ensure the image can be restored). Discarding it means that you can't restore the changes you make, but it will reduce your file size. Lowering the default resolution for images also reduces your overall file size.
Go to File > Options > Advanced .
Under Image Size and Quality , do the following:
Select Discard editing data . This option removes stored data that's used to restore the image to its original state after it's been edited. Note that if you discard editing data, you won't be able to restore the image after you edit it.
Make sure that Do not compress images in file is not selected.

Reduce the character set of embedded fonts
To make your presentation more sharable with others who don't have the same fonts in their system, it's typical to embed the fonts you use. However, embedded fonts will increase your file size. To minimize the file increase, embed only those characters used in the presentation.
Go to File > Options > Save .

Note: If you've used custom fonts and want others to edit the presentation, select Embed all characters .
Reduce the file size of your Excel spreadsheets
Reduce the file size of your Word documents

Need more help?
Want more options.
Explore subscription benefits, browse training courses, learn how to secure your device, and more.

Microsoft 365 subscription benefits

Microsoft 365 training

Microsoft security

Accessibility center
Communities help you ask and answer questions, give feedback, and hear from experts with rich knowledge.

Ask the Microsoft Community

Microsoft Tech Community

Windows Insiders
Microsoft 365 Insiders
Was this information helpful?
Thank you for your feedback.
How to change the size of slides in Microsoft PowerPoint
The actual size(s) of the slide is less important than the aspect ratio. By default, slides in presentations that you create from the Blank Presentation template are set to Widescreen size.
To change the size of your presentation slides, on the Design tab, in the Customize group, click the Slide Size button and then:
Notes : The Standard slide size:
- 1600 x 1200
- 2048 x 1536
- 2560 x 1920
- Matches the aspect ratio of standard tablet screens
- Exactly fills the screen in the Slide pane and when printed on a tablet.
Notes : The Widescreen slide size:
- 1920 x 1080
- 2048 x 1152
- 2560 x 1440
- Does not match the aspect ratio of standard tablet screens
- Has empty space above and below when printed on a 4:3 screen.
- Click Custom Slide Size... :

In the Slide Size dialog box:

- Choose the slide orientation in the Orientation group.
After choosing the necessary options, click OK . The Microsoft PowerPoint dialog box will show two options on how to scale the existing slides to a new slide size:

Maximize the content size or scale it down to Ensure Fit it on the new slide.
Note : It is impossible to change the size or orientation just for some slides.
Please, disable AdBlock and reload the page to continue
Today, 30% of our visitors use Ad-Block to block ads.We understand your pain with ads, but without ads, we won't be able to provide you with free content soon. If you need our content for work or study, please support our efforts and disable AdBlock for our site. As you will see, we have a lot of helpful information to share.

How to compress pictures in the presentation

SketchBubble Review - Engaging Presentations at Your Fingertips

Embed fonts to view presentation on different PCs
- Presentation
What is the size of a PowerPoint slide in pixels

- December 14, 2022
Suppose you are a PowerPoint user or a professional PowerPoint presenter. In that case, you may face this question: What are PowerPoint slide size pixels while you are making a presentation, or can you change the size of the presentation window? Do you know what is the best size format for PowerPoint presentation design services ? You are going to find all of these questions answered in this blog post.

Table of Contents
What is the size of a PowerPoint slide in pixels?
Microsoft PowerPoint comes with multiple preset slide sizes, which can be customized and used based on the user’s needs. You can even put your feet away and, with the help of the “Custom Slide Size” feature, customize the PowerPoint slide size as you need. After all, you should notice that even when you change PowerPoint slide size or Google Slides dimensions , the slide size in pixels will be different.
The right slide format for your PowerPoint presentation size in pixels:
- 4:3 is perfect for iPad presentations, as well as for old monitors/projectors.
- 16:9 is known as the most common size for most modern notebooks and Chromebooks, and also it is the default aspect ratio in PowerPoint settings.
- 16:10 size is the ideal aspect ratio for presentations in MacBooks and office screens.
How to Adjust the PowerPoint size in pixels?
First, you need to be aware that the standard size for standard displays is 16:9, and for wider screens, it’s 4:3. Well, you are known with the standard PowerPoint dimensions pixels, now it’s essential to understand how to adjust the PowerPoint slide size in pixels . You should click on this task’s “Design” tab, then choose the “Slide Size” option with your mouse.

From this step, just select the desired size of the slide from the appeared dropdown menu. Once the size is determined, the slide will automatically adjust to the new size.

Wrong PowerPoint slide size pixels format issues
In some of your PowerPoint presentations, you might have observed that your slides do not cover the entire screen. The reason for this is that the PowerPoint presentation has a different aspect ratio compared to the device used in the creation/opening of the document. The most common problem is the following unevenness in the view.
- Thin black bands run along the top and bottom areas of the presentation.
- The size of the slides is reduced on display.
- Content can be stretched or compressed.
- Slides may be cut off.
The default aspect ratio on PowerPoint 2013 is set to 16:9 formats. But the display of many other monitors and MacBooks support 16:10. Therefore, you must select an appropriate aspect ratio for your PowerPoint templates. Always take note of the aspect ratio of the device that you wish to use in creating as well as opening your PowerPoint presentation.

How to change your PowerPoint aspect ratio?
- Open your PowerPoint presentation; upper the window, you can see the Design tab on the ribbon; select it.
- Now click on the Slide Size toolbar at the right end to see your choices.
- Select between Standard (4:3 aspect ratio), Widescreen (16:9), and custom slide size based on your demand.
- The last step is clicking on OK and choosing the correct scale for your presentation.
NOTE: In PowerPoint 2010, principles are the same as in 2013, except the notice under the Design tab is much messy, and you can’t quickly find the slide size function there.
How to Customize the PowerPoint slide size?
As we mentioned, there is a “ Custom Slide Size” feature in Microsoft PowerPoint for all versions that allows you to change the size of the PPT slide by customization. You can use any demotion by using this feature; follow these steps:
- Open your PPT and choose the Design tab from the menu, which is located at the top of the window.
- Now find the Slide Size in the right side of the Design menu
- Then select the Custom Slide Size option in the opened window in the design menu and click on it to see a dialog box.
- Click on the “Slide sized for” option on the opened dialog box to choose the custom option at the bottom of the opened menu.
- Click on the Width box to enter your preferred slide size in inches.
- For Height, do the same as the width and enter the size you want.
- Now, after adjusting your preferred slide size, click on the OK button to apply changes and save your custom size.
Nowadays, with progressing technology, you need to be familiar with all the features of the tool or application you use daily. This will help us to have a better output in our job and every other part between. PowerPoint is one of the best ways to show and share your work or information with others. You must know the right aspect ratio for your display if you have a projector, MacBook, or laptop. In this article, you learned about the best pixel size for your display to show your presentation in the ideal and perfect possibility to your audience.
What size is a 16:9 PowerPoint slide pixels?
Suppose you are making a 16:9-dimension presentation for widescreen or a presentation projector; the size is 1920 pixels X 1080 pixels . In that case, the image you are going to need for your PPT should be 1920 pixels wide and 1080 pixels high, and the image’s resolution should be approximately 100 – 150 pixels per inch.
What is the PowerPoint size in pixels, 16×9 or 4×3?
One of the first choices is the slide size on PowerPoint designing. Microsoft PowerPoint switched to the 16:9 aspect ratio of presentations in recent years as the default size of slides. It follows the trend of “wide-everything,” including smartphones, computer monitors, TVs, and projectors & beamers.

- Graphic Design , UI-UX
How to Become a Motion Graphic Designer?

A Brief Overview of Lean UX

UX Strategy and Its Components
you'r more than welcome
7 days a week, 9:30 AM – 5:30 PM
contact info
[email protected] +351910923549
- LB07129, Jebel Ali Freezone, Dubai, UAE
Got a Project?
We’re a team of creatives who are excited about unique ideas and help companies to create amazing identity by offering wide range of digital services
© 2021 All rights reserved.
Be the first one who knows about updates!
enter your email address 📩
Welcome to the club 🎉.
From now on, Temis will inform you of its most valuable content and offers. You can also subscribe to this list at the moment. We will also protect your privacy
Unravelling PowerPoint picture size and resolution
- Written by: Jamie Garroch
- Categories: PowerPoint design , PowerPoint productivity
- Comments: 6

If you come from a print media background you’ll be familiar with the importance of image resolution and how it affects quality. If you come from a web design environment you might be more familiar with pixels. But when it comes to PowerPoint, there’s an odd mix of measurements from the physical and digital worlds even though the majority of what is produced is shown on either a monitor or a projector. So what do presentation professionals need to know about picture size and resolution?
Pictures are made of dots
OK, so this might not be the most exciting news headline but we need to start from the beginning. A raster or bitmap picture (contrary to a vector image) is made up of thousands of tiny dots or pixels. Each of these dots is a single colour and the number of dots affects the file size of the picture. The image below shows how pixels are used to form an image. The first shows the image at a normal scale:

But when we zoom in you can clearly see each individual pixel that makes up the picture:

When you resize pictures in PowerPoint beyond their original 100% size, extra pixels have to be ‘invented’ by PowerPoint through a process of interpolation. This can cause pictures to appear blurry and degrade the quality of your slide show when displayed on a monitor or projector. In addition to the size of the picture in pixels, some image editors set a DPI (Dots Per Inch) parameter. This is usually only applicable for printed media and defines how many pixels (dots) are crammed into each inch. But PowerPoint does take DPI into account as you’ll see later.
So there are two aspects of a picture you need to be aware of:
Size : the number of pixels horizontally by the number of pixels vertically. This affects file size.
Resolution : the density of pixels per inch. This does not affect file size.
Points vs. Pixels
To add to the complexity of picture size and resolution, PowerPoint measures picture sizes in points under the hood and then converts them into your preferred measurement system, inches or centimetres, before displaying them in the user interface:

Points may mean prizes in game shows but in PowerPoint, points are not equivalent to prizes nor pixels. A point is actually 0.75 of a pixel on a 96 DPI monitor which comes from 96 DPI / 72 PPI ( dots or pixels per inch versus points per inch). The 96 number comes from the resolution of your monitor (more on that later) and 72 comes from the world of typography where a point is a physical unit of distance. A point (pt) is equal to 1/12 Pica, and 1 Pica = 1/6 inch. Hence 1 pt = 1/72 inch, meaning 1 inch contains 72 points. Phew!
Let’s see this in practice when examining a standard 16:9 widescreen slide in PowerPoint. If you click the Design tab followed by Slide Size and choose Custom Slide Size , you’ll see the size of your slide in either inches or centimetres:

Inches are actually easier to deal with here because you’re going to see conversions using DPI or Dots Per Inch. In the above example the slide has a size of 13.333 x 7.5 inches. Now, because there are 72 points per inch (don’t get this confused with dots per inch!) this translates to 960 (13.333 x 72) by 540 (7.5 x 72) points . This is what’s used to scale your picture as it’s inserted into your slide. That then translates to 1280 (960 / 0.75) by 720 (540 / 0.75) dots or pixels and that is what is used to project your picture during a slide show.
A little known secret is that regardless of the measurement system set on your computer, you can actually enter dimensions for your slide setup and/or objects on your slide by typing in a number followed by px for pixels or pt for points. As soon as you hit return, the number is converted to your default units of measurement. So entering 1in, 2.54cm, 72pt or 96px all yield the same result. Go ahead and try it!
Now, let’s take a look at what happens when you insert pictures into your slides at various sizes and resolutions.
Below are the settings for the stopwatch picture which we’ve scaled to 960 x 540 pixels at 72 DPI. Most decent image editor apps will allow you to set both the size and resolution and in this example we used the free GIMP (GNU Image Manipulation Program) app which is available for both Windows and Mac.

When it’s inserted into the slide it occupies the full slide size and PowerPoint has kept it scaled at 100%. This is because we have the same number of pixels in the picture as there are points for the slide and the image is set to 72DPI:

You’ll get the same result if you rescale the source picture in your preferred image editor to 1280 x 720 pixels, but at 96DPI. This is because PowerPoint scales it by the ratio of 72/96 or 0.75.
Making this picture larger than the slide or projecting it at anything bigger than HD720p can cause it to become blurry.
If you now insert the same picture scaled to HD1080P (1920 x 1080 pixels) at 72DPI you’ll see that it’s automatically scaled down in PowerPoint to 50% of its original size or ¼ the size of HD1080P so that it fits on the slide:

In this case, even though the picture has been scaled to the slide size all of the pixel data is still there for use when projecting. That means you can display or project this slide at a maximum size of HD1080P without any degradation of the picture.

If you were to project at a higher size such as 4k or 8k HD, there’s a chance that the projected image will not be pin-point sharp. This depends on the image interpolation algorithms in use by the combination of PowerPoint, your graphics card and the projector. If you insert the same picture at HD1080p size but with the DPI set to 144, it’ll get inserted at 100% scale and fit the slide exactly.
When looking at file size, it’s clear to see that it’s the number of pixels in the file that makes the difference and that the DPI setting does not impact file size at all. This is the relevant information in Windows Explorer for our test pictures:

So what have you learned?
- That the DPI setting within a picture file is used to scale the picture as it’s inserted onto the slide but it has no impact on the projected quality nor the size of the picture file.
- 960 x 540 pixels at 72 DPI
- 1280 x 720 pixels at 96 DPI
- The second picture will have a larger file size as it contains more pixel data.
Monitor Scaling
Now you know how DPI has an impact on pictures in PowerPoint, you might be asking yourself how does the Windows scaling affect all of this? When you change the scale factor in Windows Settings what is essentially happening is that the display DPI is being changed. You might have one HD1080p monitor set to 100% scale and another set to 200%. The corresponding monitor DPI values for these are:
- 100% = 96DPI
- 200% = 192DPI
This means that there are twice as many dots/pixels in use on the second monitor. The impact on PowerPoint is therefore that you need twice as many pixels in the image to display it optimally, irrespective of the DPI setting in the picture file. That means taking your HD1080p picture and sourcing a 4k version of it, which is 3840 x 2160 pixels.
Other PowerPoint Considerations
If you dig around in PowerPoint you’ll find a couple of other features that affect picture quality. The first is in the ribbon and the second is in the backstage.
Compress Pictures is found in the ribbon when you have a picture selected and you click the Format Picture tab:

This open a window that allows you to compress the currently selected picture or all pictures in your presentation:

You can click the ? icon in this window for lots more detail from Microsoft on what each of these settings does but basically, the Resolution section scales the image down to the set ppi (ppi here means dpi not points per pixel!). It doesn’t scale beyond the current DPI setting of the image because this implies creating new pixel data, which is why you’ll see some options greyed out.
You might think that PowerPoint is just changing the DPI setting in the image but it’s not. It also changes the size of the image in pixels. To test this we took the original stopwatch picture sized to 2048 x 1203 at 330DPI. Using the compress pictures tool, the picture was set to the Web (150 ppi) setting. We then used the free BrightSlide Export Media Files to observe the result in Windows Explorer:

As you can see, the resolution was indeed changed from 300 to 150 but the pixel count changed too, by an ratio of 1:2.2 (330/150). PowerPoint did this so that the picture on the slide remained the same physical in/cm size.
This is obviously a destructive process as pixels are deleted from the picture so use it with care. Also destructive is the option to delete cropped areas which deletes all the picture data outside of your cropping mask.
The other place you’ll see DPI is in the backstage when you click File / Options / Advanced , which corresponds to the Use default resolution option in the widow above. How convenient!

Maximum Size
While you’re learning all about slide and picture sizes, let’s complete the picture (sorry!) by covering the topic of maximum slide size. You might want to know this if you’re printing your creation onto a large format printer or displaying it on a monster projector. Currently, the maximum size for a PowerPoint slide is as follows:
56 x 56 in | 142.24 x 142.24 cm | 4032 x 4032 points | 5376 x 5376 pixels
Conclusion & Recommendation
Pictures in PowerPoint can be tricky to get to grips with. Choosing the right size has an impact on both the file size of your presentation and the maximum monitor/projection size you can use without degrading quality. In general, if you’re projecting at a maximum size of HD1080p, make sure you’re using pictures that are created at 1920 x 1080 pixels in size. Set the DPI to 144 if you want them to be inserted into your slide at 100% scale but remember that the DPI setting doesn’t itself impact file size or the quality of your image or how it’s projected during your slide show. Only pixels do that.

Jamie Garroch
Principal technical consultant, related articles, how to consistently brand graphs and charts across microsoft office.
- PowerPoint design / PowerPoint productivity
- Comments: 1
How do you make sure that your graphs and charts have consistent branding across Excel, PowerPoint and Word? Learn how to create and use custom templates that support your brand identity across Microsoft Office.

Protecting your prized PowerPoint content
- PowerPoint productivity / Presentation technology
Our comprehensive guide to password protecting PowerPoint files so your precious presentations stay just they you made them!

Hacking PowerPoint to create custom colors
- PowerPoint design
- Comments: 26
Tints and shades auto-generated by Microsoft from Theme Colors often take your content off-brand. How can you get the custom colors you want in PowerPoint? Read on to find out!

Thanks Jamie. A helpful article
I have a related question to help complete my understanding. Suppose you have a screen resolution of 1920 x 1080 pixels with PowerPoint slides sized set to match. What happens if you insert a picture with larger Pixel Dimensions eg 3840x 2160 pixels and then ‘Scale’ the picture to fit in the slide? Is the image ‘resampled’ down by removing pixels or is the image scaled down by shrinking existing pixels (which i imagine doesn’t make sense as presumably you can’t shrink pixels below the native pixel size for the screen) ? Similarly, if you inserted a smaller picture of eg 480 x 270 pixels and then ‘Scale’ up to fill the slide, are pixels added or are the existing pixels ‘stretched/made larger ?
Hope that makes sense and thanks for your help,
Hi Campbell. Great question! It depends on what is set for the file in File / Options / Advanced / Image Size and Quality. Take a look at the mouse hover tips for the options “Do not compress images in a file” and “Default resolution” for the answers to your questions.
Thanks for taking the time to reply to my question. The mouse hover ‘tips’ help explain what happens when the file is saved but I still have the same question when changing the size of the image on screen up/down before it is saved. I.e do you know if the images are ‘re-sampled’ by adding/deleting pixels or are existing pixels somehow stretched/shrunk. I hope that makes sense and thanks again for your help.
Useful. I did not realize ppt respects a units suffix in setting sizes in the Format pane.
I do not understand why Microsoft can’t make this app use pixels for the default dimensions. PPT is used for on-screen presentations at least 95% of the time, and yet they continue to use inches. Also, there is no easy way to see if an image (especially one used as a background image in a shape) is 100%.
For the type of picture you have, use JPG, not PNG. PNG is great for screenshots, but not “natural” images.
Leave a Reply Cancel reply
Save my name and email in this browser for the next time I comment.
Join the BrightCarbon mailing list for monthly invites and resources
From liaising with our high profile guest speakers to producing effective presentations for the whole day, BrightCarbon's input ensured the smooth running of this high profile event. David Gillan Manchester Insurance Institute

- Getting Started
- Screen Designer
- Setup & Configure
- Databeat Overview
- Microsoft 365
- Google Workspace
- Templates and design
- Troubleshooting
- Getting started
- Troubleshoot
- About DatabeatOMNI
- Databeat Server
- About OMNIplay
- Install & configure
- License key
- Remote control
- About OMNIcast
- Setup & configure
- PowerPoint Publisher
- Products & Prices
- Subscription
- OMNIplay3v7
- DS10 / DS10+
- DS13 / DS13+
- T22 / T22BR
- OMNIplay for Samsung
- Factory reset
- OMNIplay for LG
- OMNIplay for Android
- Firmware upgrade
- Databeat Booking Hub
- Databeat Knowledge base
- Integrations
How do I change the resolution and aspect ratio of a Microsoft PowerPoint presentation?
Microsoft powerpoint can be a powerful yet simple tool to create digital content. this article describes how you can change the resolution, aspect ratio and design format of a powerpoint presentation in powerpoint to fit your screen., set custom slide size.
When you are starting on a new PowerPoint presentation from scratch or when using your company profile template, the default slide size and resolution may not be optimal for what you are trying to do.
- Open your PowerPoint presentation and select the Design tab.
- Select Slide Size and select Custom Slide Size.
- Select Custom and enter your custom height and width. If you don't know what measurements to enter, please check the list below.
- Select OK (If prompted, then select Maximize )
You have now saved a new custom design, aspect ratio, and resolution of the PowerPoint presentation you are working on. Meaning you have ensured that the content will be optimal on your screen and not look "stretched" or "pixelated."
Tip: We recommend you check out the Databeat PowerPoint Publisher Plugin . Our user friendly plugin can help save time and energy when creating content and of course allow you publish your presentation as pictures or video to DatabeatOMNI directly from PowerPoint! Tip: Setting custom slide size can help you create content in different sizes and formats. I.E. to create custom size banners for websites, content for video walls with a special aspect ratio or even to create content for Social Media!
Slide size measurements in PowerPoint
PowerPoint's default measurement is in centimeters or inches, but when it comes to creating content for screens, you need to think about pixels instead!
Here is a list that can save you some time when setting up a new widescreen presentation. If you are creating content for portrait/vertical screens, swap width, and height.
Meaning 1 px = 0,026458333 cm if you want to calculate your own.
Tip: We recommend not going below Full HD (1920x1080) when creating content for a default Widescreen. To optimize please check out the resolution of your screen. Tip: In PowerPoint you may be able to enter your custom height and width in pixels by simply swapping "cm" for "px" to indicate you want pixels instead of centimeters. I.E. instead of entering "28,575 cm", try entering "1080 px" and see for yourself!
But why is this important?

Please note that they all have the same aspect ratio (16:9) and that Full HD is a quarter of a 4K UDH display. Check out Wikipedia's article on Graphic display resolutions if you want to learn more.
With this in mind, it is essential to know that when you publish content with low resolution to a screen that has a high resolution, it will be upscaled.
Here is a simplified comparison between the same logo in decent quality versus an inferior quality version, which is upscaled to the same size. This illustrates how your content will look bad and "pixelated" on a screen.

What to do if my PowerPoint language is set to Norwegian?

This browser is no longer supported.
Upgrade to Microsoft Edge to take advantage of the latest features, security updates, and technical support.
How to export high-resolution (high-dpi) slides from PowerPoint
- 10 contributors
- Applies to: PowerPoint for Microsoft 365, PowerPoint 2019, PowerPoint 2016, PowerPoint 2013, PowerPoint 2010, Microsoft Office PowerPoint 2007, Microsoft Office PowerPoint 2003
You can change the export resolution in Microsoft PowerPoint by saving a slide in a picture format. There are two steps to this process: Use the system registry to change the default resolution setting for exported slides, and then save the slide as a picture at the new resolution.
Step 1: Change the export resolution setting
Follow the steps in this section carefully. Serious problems might occur if you modify the registry incorrectly. Before you modify it, back up the registry for restoration in case problems occur.
By default, the export resolution of a PowerPoint slide that you want to save as a picture is 96 dots per inch (dpi). To change the export resolution, follow these steps:
Exit all Windows-based programs.
Right-click Start , and then select Run . (In Windows 7, select Start , and then select Run .)
In the Open box, type regedit , and then select OK .
Locate one of the following registry subkeys, depending on the version of PowerPoint that you're using:
PowerPoint 2016, 2019, PowerPoint for Microsoft 365
HKEY_CURRENT_USER\Software\Microsoft\Office\16.0\PowerPoint\Options
PowerPoint 2013
HKEY_CURRENT_USER\Software\Microsoft\Office\15.0\PowerPoint\Options
PowerPoint 2010
HKEY_CURRENT_USER\Software\Microsoft\Office\14.0\PowerPoint\Options
PowerPoint 2007
HKEY_CURRENT_USER\Software\Microsoft\Office\12.0\PowerPoint\Options
PowerPoint 2003
HKEY_CURRENT_USER\Software\Microsoft\Office\11.0\PowerPoint\Options
Select the Options subkey, point to New on the Edit menu, and then select DWORD (32-bit) Value .
Enter ExportBitmapResolution , and then press Enter.
Make sure that ExportBitmapResolution is selected, and then select Modify on the Edit menu.
In the Edit DWORD Value dialog box, select Decimal .
In the Value data box, specify a resolution of 300 . Or, use the parameters from the following table.
See the Limitations section for more information when you set this value.
Select OK .
On the File menu, select Exit to exit Registry Editor.
Step 2: Export the slide as a picture
In PowerPoint, open your slide presentation, and then open the slide that you want to export.
On the File menu, select Save As .
In the Save as type box, select one of the following picture formats:
- GIF Graphics Interchange Format (.gif)
- JPEG File Interchange Format (*.jpg)
- PNG Portable Network Graphics Format (*.png)
- TIFF Tag Image File Format (*.tif)
- Device Independent Bitmap (*.bmp)
- Windows Metafile (*.wmf)
- Enhanced Windows Metafile (*.emf)
You may want to change the picture's save location in the Save in box. You may also want to change the name of the picture in the File name box.
Select Save . You will be prompted by the following dialog box:

Select Current Slide Only . The slide is saved in the new format and resolution in the location that you specified in the Save in box.
To verify that the slide is saved in the resolution that you specified, right-click the picture, and then select Properties .
Limitations
When you set the ExportBitmapResolution registry value in PowerPoint, there's a maximum DPI limitation to consider for some versions of PowerPoint.
Maximum DPI is dependent upon the slide size. The formula is as follows: maxdpi = (sqrt(100,000,000 / (slide with * slide height)), where slide width and height are in inches.
For example, for a standard 13.3" x 7.5" slide, the equation would be: sqrt(100,000,000 / (13.333 * 7.5) ) = 1000.
PowerPoint 2019, 2016, 2013, and 365
There is no fixed DPI limit. Slide export is limited only by how large the resulting bitmap gets. PowerPoint can support bitmaps up to 100,000,000 pixels (width x height). For standard widescreen slides (13.3" x 7.5"), this means a maximum DPI of 1,000. For the older style 10" x 7.5" slides, this typically means a maximum DPI of 1,155.
PowerPoint 2010 and older
The maximum resolution that PowerPoint can export is 3,072 pixels, based on the longest edge of the slide. For example, the standard 10" × 7.5" slide has a maximum effective DPI value of 307. The 3,070-pixel result (10 × 307 = 3070) falls within the 3,072-pixel limit. However, any DPI setting that's greater than 307 for a standard slide reverts to the limit of 3,072.
The 3,072-pixel limit also applies to saving the slide programmatically.
For example, the following code programmatically saves a picture that has the dimensions of 3072 × 2304 pixels:
More information
For information about changing the size of your slides, see Change the size of your slides .
Was this page helpful?
Coming soon: Throughout 2024 we will be phasing out GitHub Issues as the feedback mechanism for content and replacing it with a new feedback system. For more information see: https://aka.ms/ContentUserFeedback .
Submit and view feedback for
Additional resources
IMAGES
VIDEO
COMMENTS
The standard size of a PowerPoint slide is 1024×768 pixels and the widescreen PowerPoint slide is "1920×1080" pixels. It can also be adjusted based on your preferences or the requirements of the platform on which you plan to present your slides. In this article, we will discuss the standard size of a PowerPoint slide in pixels or inches ...
Step 1: Open PowerPoint and go to the 'Design' tab. Click on the 'Design' tab located at the top of the PowerPoint window. When you're working on your PowerPoint presentation, the Design tab is where you'll find all the options for customizing the look and feel of your slides. It's the gateway to adjusting the size of your slides.
Basic steps. To change the slide size: Select the Design tab of the toolbar ribbon. Select Slide Size near the far right end of the toolbar. Select Standard (4:3 aspect ratio) or Widescreen (16:9) or Custom Slide Size. For more about the predefined sizes (including formats like Overhead, A3, A4, Banner, B4, and B5) or your own custom sizing ...
Click on the Design tab on PowerPoint's ribbon. The available options will change on the ribbon. Find the Customize section on the ribbon and click on the Slide Size icon. A drop-down menu opens with several options. Click on Custom Slide Size to open the Slide size menu and change your presentation's dimensions.
In the "Customize" section of the "Design" tab, select the "Slide Size" button. This will display the two common slide sizes in a drop-down menu. Click either the "Standard (4:3)" or "Widescreen (16:9)" option to switch all of your PowerPoint slides to that size. Unfortunately, it isn't possible to use multiple slide sizes in a PowerPoint ...
The default slide size or dimensions in 2013, 2016, 2019, 2021 or 365 is widescreen (16:9 aspect ratio). You can also enter a custom slide size if you prefer (including entering slide size in pixels). The best time to set slide size is when you first set up your PowerPoint presentation before you add any content.
Powerpoint 4:3 dimensions are 10 in x 7.5 in (which is 33.867 cm x 19.05 cm). Standard PowerPoint slide size pixels = 1024 px x 768px; PowerPoint Widescreen (16:9) Slide Size: The PowerPoint 16:9 widescreen option was a later addition but is now the default value in PowerPoint for new presentations. Widescreen is more commonly used now because ...
That said, you can easily change your slide size to something else. To change your slide size in PowerPoint, simply: Navigate to the Design tab. Open the Slide Size drop down menu. Select 4:3 , 16:9 or Custom Slide Size (see options below) When starting with a blank presentation, you are now good to go.
If you can't see the button, press Customize to reveal it, and then click or tap on Slide Size. This opens a dropdown menu with three available options: Standard (4:3) - click or tap on this option to get slides of 10 x 7.5 inches or 25.4 x 19.05 cm. Widescreen (16:9) - press to get slides of 13.33 x 7.5 inches or 33.867 x 19.05 cm.
Slide Dimensions. Okay, so when you open PowerPoint and start a new presentation, your slide size is set to the default which is 10 inches by 7.5 inches. This is also 1024 x 768 pixels at 96dpi. There are ways to widen the slide, make it smaller, and customize the dimensions to fit exactly what you're looking for.
To change the slide size to A4, follow these steps: Click on the "Design" tab in the Ribbon menu. In the "Customize" group, click "Slide Size" and then "Custom Slide Size.". In the "Slide Size" dialog box, select "A4 Paper" from the "Slides sized for" dropdown menu. Click "OK" to apply the A4 slide size.
The above notation is called the "aspect ratio," or the ratio of the width to the height of the slide. In the 4:3 aspect ratio, the dimensions are 1024 x 768 pixels (10.67″ x 8″); the height is 3/4 of the width. Back in the Ye Olde Days of PowerPoint, it was your only choice. Why?
Makes sense (I hope!). Again, if you know up front what size the display will be, you can enter the equivalent of pixels, or if you set up your slide size to something friendlier, you can make it even simper. Slide size 10.24" / 1024 --> A very easy number to work with per pixel when entering sizes. ;-)
Discarding it means that you can't restore the changes you make, but it will reduce your file size. Lowering the default resolution for images also reduces your overall file size. Go to File > Options > Advanced. Under Image Size and Quality, do the following: Select Discard editing data . This option removes stored data that's used to restore ...
Do you want to create professional and effective PowerPoint slides? Then you need to know how to work with the correct slide size, pixel resolution, and aspect ratio. In this article, you will learn how to change and manage PowerPoint slide sizes better, and avoid common mistakes and issues. You will also find useful tips and tricks from a presentation design expert.
By default, the size of the new presentation in PowerPoint, is currently a widescreen type presentation, 13.333 inch by 7.5 inch. Mostly you will have 96 dots per inch (dpi) on your screen settings, so this means that a default PowerPoint presentation has a resolution of 1280 by 720 pixels. A common term that you hear for televisions and videos ...
To change the size of your presentation slides, on the Design tab, in the Customize group, click the Slide Size button and then: Choose one of the pre-defined sizes: Standard (4:3) was the default slide size in older versions of Microsoft PowerPoint, like 2003 or 2007. Standard (4:3) slides have a size of 10 x 7.5 inches or 25.4 x 19.05 cm.
The right slide format for your PowerPoint presentation size in pixels: 4:3 is perfect for iPad presentations, as well as for old monitors/projectors. 16:9 is known as the most common size for most modern notebooks and Chromebooks, and also it is the default aspect ratio in PowerPoint settings. 16:10 size is the ideal aspect ratio for ...
Points may mean prizes in game shows but in PowerPoint, points are not equivalent to prizes nor pixels. A point is actually 0.75 of a pixel on a 96 DPI monitor which comes from 96 DPI / 72 PPI (dots or pixels per inch versus points per inch).The 96 number comes from the resolution of your monitor (more on that later) and 72 comes from the world of typography where a point is a physical unit of ...
Select Slide Size and select Custom Slide Size. Select Custom and enter your custom height and width. If you don't know what measurements to enter, please check the list below. Select OK (If prompted, then select Maximize) You have now saved a new custom design, aspect ratio, and resolution of the PowerPoint presentation you are working on ...
The aspect ratio (the relation of the horizontal pixels compared to the number of vertical pixels), is 4 by 3. Another common screen resolution with 4:3 aspect ratio; 1280 horizontal pixels results in 960 pixels on a vertical line. Wide screen aspect ratio, or 16:9 screens. Since a year of 5, almost all computer screens are wide screens, with ...
PowerPoint 2010 and older. The maximum resolution that PowerPoint can export is 3,072 pixels, based on the longest edge of the slide. For example, the standard 10" × 7.5" slide has a maximum effective DPI value of 307. The 3,070-pixel result (10 × 307 = 3070) falls within the 3,072-pixel limit.
Powerpoint works in a completely different unit than pixels so if you look at the standard presentation.xml within the .pptx file you'll see this line that defines the standard slide size: p:sldSz type="screen4x3" cy="6858000" cx="9144000"/ This 9144000x6858000 size is the standard 960x720 pixel template. (25.4cm x 19.05cm)