Home Blog Design How to Use Canva and PowerPoint for Presentations

How to Use Canva and PowerPoint for Presentations

Creating the perfect presentation design is a challenge that speakers often aim to achieve, only to find themselves lacking graphic design knowledge. Although high-tier options like Adobe Photoshop and Adobe Illustrator help users worldwide to put their ideas into pixels, the reality is they are not user-friendly interfaces for people outside the graphic design industry, namely business professionals, marketers, and educators. Hence, the need to find an alternative for making powerful graphics to use in our presentations – and here’s where Canva comes into the picture.
This web-based graphic design tool has quickly become the preferred choice of teachers, social media influencers, and small business owners due to its free-tier plans and pro plans at a convenient subscription-based fee.
In this article, we will see how to use Canva presentation in PowerPoint and how to export Canva to PPT, to create visually appealing presentations.
Table of Contents
Canva vs. Microsoft PowerPoint: Pros and Cons for Presenters
Designing with canva, how to export a canva presentation to powerpoint, how to use canva-made graphics in powerpoint, final words.
Although presenters often see Canva as an alternative to PowerPoint, the reality is that they differ in one single aspect: Canva is a graphic design tool, whereas PowerPoint is a presentation design software. Some of the tools available in PowerPoint are not there in Canva, and vice versa.

Going into more technical aspects, here are the Pros and Cons of working with either software as a presenter.
Pros of Canva as a Presentation Tool
User-friendly interface.
Canva’s drag-and-drop feature makes it easy for non-designers to create presentations by using its library of shapes, graphics, text styles, and other resources.
Wide Range of Templates
It offers a vast library of Canva templates, which can be easily customized in their online editor, saving time on design. There’s a con associated with this point, which we shall discuss later.
Magic Studio for Canva was released mid-Q3 this year with the idea of powering designs with AI tools. This tool is available in Canva search features and in the editor at the bottom right corner, which features the list options:
- AI text generation
- Suggested graphics to match your design
- Suggested photos to match your design
Collaboration Feature
Allows multiple users to simultaneously work on the same presentation, which is great for small team projects. Compared with PowerPoint, it does not require all users to be Premium to collaborate online.
Web-Based Platform
Being an online platform, it allows users to work from any device with Internet access without needing software installation. This particularly helps users with legacy computers who cannot install current versions of Microsoft Office.
Integrated Stock Library
Provides access to a broad selection of stock photos, illustrations, and icons within the platform. Just like with the Canva templates, there’s also a con to this point.
Customization Options
Users can upload images and fonts, enabling brand consistency across presentations. Note: The upload fonts feature is only available for Canva Pro users.
Photo Editing and Animation Features
Canva lets users tweak their graphics with simple-to-use controls. These options help us to adjust opacity, apply photo filters, add animation effects, add bevels and shadows, and more.
Cross-Platform Compatibility
Can export presentations to various formats (as a PDF document, as a video presentation in MP4 format, or even as images), making them viewable on different devices and platforms. The export options allow us to post directly into social media, create printables, post to the web, etc. While some export formats require an upgrade to a Canva Pro subscription (like the ability to export to SVG format), the basic export features are enough for simple presentations and beginners.
Cons of Canva as a Presentation Tool
Limited offline functionality.
Requires an internet connection for full functionality, which can be a limitation in areas with poor connectivity, for business people working on an airline flight, while using Airplane mode, or for people traveling in other zones without Internet access.
Fewer Animation and Transition Options
Unlike PowerPoint, the available options for animations and transitions are limited. Users can find this reiterative, which may be unappealing to using these effects in our presentations.
Premium Content
Although the Canva library is extensive in terms of assets, the reality is that most of these elements are only available for premium users. This applies to templates, shapes, images (mostly), and exporting options. Resizing the graphics you create in Canva to repurpose your design is only available to premium users.
Template Overuse
Popular templates can be overused, making presentations look similar to many others. This is of particular interest to business professionals, as people tend to easily associate some designs as being made with Canva.
Design Decisions
Unlike using a PowerPoint template , you have to work your way with Canva content, as the PPT templates tend to be quite generic and do not offer tools for data representation. Consequently, you have to know how and where to introduce those elements on your own rather than working with a presentation template that already assigned the space for such graphics.
Lack of Advanced Multimedia Integration
Integrating complex multimedia elements like videos is not as seamless as in some desktop applications. You won’t find options to link to source elements; you need to upload the content to your personal Canva library and manually add the resource to the slide. Presenters can also lose third-party integrations via plugins for some multimedia resources.
Pros of PowerPoint as a Presentation Tool
Widespread use and familiarity.
PowerPoint is the leading market tool for presentations, making most audiences and presenters are familiar with it at a basic operational level. This can help us to outsource technical issues quickly rather than aiming to use web-based interfaces to share Canva-created content.
Offline Access
PowerPoint can be used offline, which is ideal for people traveling, areas where the Internet connection is unreliable, or simply because we want to focus on creating the slides rather than facing distractions via the Internet.
Integration with Other Microsoft Office Tools
Seamlessly integrates with other Microsoft products like Excel and Word, making it easy to import data and documents. This is ideal for creating complex graphics for data representation, where the content can be synced, importing databases, working with Gantt Charts in software like Microsoft Project, and more.
Also, Microsoft PowerPoint has the same text editing capabilities as Microsoft Word – a striking contrast with Canva’s limited features.
Templates and Design Options
This is PowerPoint’s forte: the capability of using third-party presentation templates, like the ones provided by SlideModel . Users can buy pre-designed slide decks from professional vendors and ease the need to make design-related decisions. On top of that, Microsoft already includes some basic templates with its 365 subscription.
Advanced Features
Offers a broad range of features, including detailed animations and transitions, which can enhance presentations. For example, the ability to work with SVG graphics allows presentation designers to make pixel-perfect presentations without losing image quality. This is available to all users, unlike Canva, which requires a subscription to unlock certain elements.
Multimedia Capabilities
Supports embedding of various multimedia elements like audio, video, and images directly into presentations. You can use hyperlinks to embed content or work with third-party plugins for specific tasks.
Extensive Support and Resources
As a long-established tool, users can find tutorials everywhere, support communities, and additional resources available online.
Cons of PowerPoint for Presenters
Some features can be complex to use, and the interface may be overwhelming for new users. In particular, this is linked to editing PowerPoint Shapes and graphs, working with Slide Master , applying advanced animation effects and so on.
Unlike Canva or Google Slides, PowerPoint requires purchasing Office 365 or a standalone license.
Heavy Files
PowerPoint files, especially those with multimedia content, can become large and difficult to share via email. As a side effect, those heavy files can be complicated to handle in computers that lack sufficient RAM and processing power. Moreover, they require significant free disk space on your PC.
Time-Consuming
Creating a high-quality presentation with custom animations and graphics can be time-consuming. That’s the reason why we highly recommend users work their way with PowerPoint templates, and mix and match designs to create a unique slide deck .
Learning Curve
Users need to invest time in learning the software to fully utilize its advanced features. This applies to both acquiring the knowledge and practicing the skills you learned. And still, for some users, it feels frustrating not to achieve results relatively quickly.
In this section, we will learn how to use Canva to create graphics for a product presentation. The idea is to create placeholder graphics containing images of a product; then, we will export that content to continue creating our presentation in PowerPoint.
After creating our Canva account, we find ourselves at the Home screen. Go to Templates, and you will see something similar to this UI.

We can go straight to the Presentations (16:9) option or use the search bar to locate the template we want. In this case, we will opt for that scenario and search “Product.”
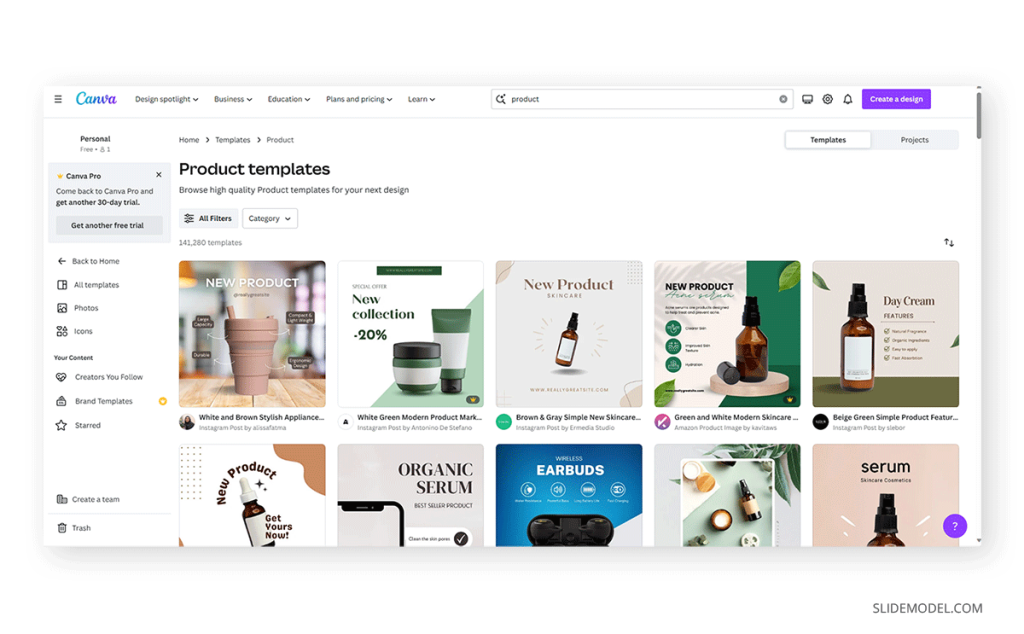
The images that show a little crown at the low right corner are premium templates, which means we cannot use them with a free account. We will pick a template that fits the needs of our presentation by clicking over it. At the contextual window that opens, select Customize this template .

The Canva builder may take a bit to load, especially if your internet connection is slow. You will find yourself with a window like this one, opened at the Design tab, which offers alternatives for other templates similar to the one you chose.

The Styles tab allows us to quickly change the layout, altering color themes and fonts. Sometimes, that can suit our needs immediately; sometimes, it requires extra work to customize to our preferences.

We can click on any element in this design and customize its content. Depending on the element type, the options are available for us. For this presentation, we will change the text and images, and alter font color at the button to make it stand out.

Next, it’s time to replace the images. We can drag and drop the image into Canva, or we can go to the Uploads button and add the content from there.

In this case, we’re using DALL-E-generated images for this product presentation, you can also use illustrations, photos, videos, or Midjourney illustrations . Once the images are uploaded, drag and drop them to replace the images in the placeholder areas. To complete this design, we removed the shape that came with the template – you can add a new shape by going to Elements > Graphics .

Learning how to use Canva for PowerPoint is pretty straightforward. Download your Canva design as a PowerPoint presentation, which you can do by accessing your design and going to the top-right corner to locate the button Share . Click on it, and then click on Download .
Under File Type , we will select PPTX , as it’s PowerPoint’s native format. Click on Download , and wait for the process of downloading the file to be completed. Depending on the graphic assets included, it can take a while.

At this point, don’t be surprised if you’ll be prompted to upgrade your Canva plan (if you don’t have a premium account). The reason is that Canva will charge you for exporting what they call premium graphics, and since most of the Canva presentation templates use premium graphics, this will be a limitation when exporting your Canva slides to PowerPoint.
A simple workaround is removing the premium graphics before exporting from Canva to PowerPoint. Although, take in mind this may affect the overall design of your presentation.
As you can see below, the PowerPoint file is entirely editable. Something to consider is that unless you have the font installed on your computer, PowerPoint will reassign to a generic font.

Remember the design we created before? Well, it’s time to use that image as part of a marketing deck presentation , which will represent a social media post to be used by the marketing team to promote the brand.
The first step is to download the design we created as PNG. We can close Canva after that.

We opened our PPT template, which is the Annual Marketing Plan PowerPoint Template , and customized the PowerPoint theme colors . Go to Insert > Pictures > This Device .

Select the image we created in Canva and upload it here. We will add some image shadow effects via Shape Format, and a textbox below that describes what the image is about.

And that’s how easily we can use graphics from Canva in our PowerPoint presentations. Remember, it’s best to work with PNG images rather than JPG to reduce file size and preserve image quality.
You can invite others to collaborate on your design by sharing a link to the editable design or by adding them via email as team members on your Canva account.
Canva uses standard cloud storage security measures to protect your data, but like any online platform, it’s important to use a strong password and follow good security practices.
There are two methods for this. You can upload a PPT template into Canva via the Canva Homepage by clicking on Projects , and then go to the Uploads folder. Drag and drop or click on Upload, as we’ve seen before. Once imported, you must click on that file to open it in the Canva editor. The second method is on the editor: go to the Uploads button and upload your PPT file as if it were an image or another media asset.
Yes, you can use SlideModel presentation templates in Canva. As a SlideModel subscriber, you can download .pptx files to import into Canva presentations. This way, you can enjoy the creative slide templates and graphics provided by SlideModel in your Canva presentations
Unfortunately, no, as Canva doesn’t have the same toolset to enable editing functions. That also applies to changing color, so we highly recommend you work with a final PPT file before switching to Canva.
Objects like charts, SmartArt, 3D objects, and WordArt aren’t supported in Canva and won’t be rendered if you upload a slide that contains them.
Yes, all users can download Canva presentations to PPTX format. In case the original Canva design isn’t a presentation file, like a banner or social media post, you won’t be able to resize for that output unless you have a premium account.
Yes, the file must be smaller than 70 MB, and you can import up to 300 slides.
Canva and PowerPoint can collaborate as complementary tools to help presenters overcome the limitations of each individual tool. It takes a while to create your desired workflow, but once that’s accomplished, you can elevate the quality of your PowerPoint or Google Slides presentations with Canva.
We don’t advise using Canva as an alternative to PowerPoint as the current state-of-the-art indicates it won’t support data representation or other PowerPoint stellar tools that make part of most PPT templates.

Like this article? Please share
Design, Microsoft PowerPoint Filed under Design
Related Articles

Filed under PowerPoint Tutorials • April 2nd, 2024
How to Round Corners in PowerPoint
Learn how to add rounded corners to shapes and images in PowerPoint. Elevate your presentations with sleek designs. Expert tips and step-by-step guides.

Filed under PowerPoint Tutorials • March 26th, 2024
How to Translate in PowerPoint
Unlock the experience of PowerPoint translation! Learn methods, tools, and expert tips for smooth Spanish conversions. Make your presentations global.

Filed under PowerPoint Tutorials • March 19th, 2024
How to Change Line Spacing in PowerPoint
Adjust text formatting by learning how to change line spacing in PowerPoint. Instructions for paragraph indenting included.
Leave a Reply
How To Make a PowerPoint in Canva? (Step-By-Step Guide)
Are you looking for an easy and cost-effective way to create stunning presentations? Look no further than Canva! Canva is a powerful design platform that makes creating professional-looking presentations a breeze – and in this step-by-step guide, we’ll show you just how easy it is to create a beautiful PowerPoint in Canva.
From exploring the benefits of using Canva, to customizing the design, adding text, images, and other elements, and exporting the presentation – we’ll cover it all! So let’s get started and make a presentation you’ll be proud to share.
Table of Contents
Short Answer
Creating a PowerPoint in Canva is easy and straightforward.
First, log in to your Canva account and select the “Create a Design” option.
Choose the PowerPoint icon and select a template that you want to use.
Add text, images, shapes, charts, and other elements to your presentation.
When you’re finished, click “Download” to save the PowerPoint to your computer.
Benefits of Creating a PowerPoint in Canva
Creating a PowerPoint presentation in Canva has a number of advantages.
For starters, Canvas user interface is intuitive and easy to use, making it simple for anyone to quickly create a presentation that looks professional and polished.
Additionally, Canva has a wide selection of templates to choose from, allowing users to create presentations that are tailored to their specific needs.
Furthermore, Canva makes it easy to add text, images, and other elements to further enhance the presentation.
And lastly, the ability to export the presentation as a PDF or PPT file makes it simple to share with others.
With Canva, creating a stunning presentation is a breeze.
Overview of Canva
Canva is an online platform for creating stunning visuals quickly and easily.
It has an intuitive user interface and a wide selection of templates for creating professional presentations.
With Canva, you can create high-quality presentations in minutes, with no prior design experience needed.
Canva offers a range of editing tools, including text, images, shapes, and more, which can be used to customize your presentation to your exact needs.
You can also access a library of royalty-free images and graphics to make your presentation truly unique.
Once youve finished your presentation, you can easily export it as a PDF or PPT file to share with your audience.
With Canva, creating a professional presentation has never been easier.
Choosing a Template
When creating a PowerPoint presentation in Canva, the first step is to choose a template.
Canva offers a wide selection of templates to choose from, ranging from classic and professional designs to more modern and creative layouts.
No matter what type of presentation youre creating, theres a template to match it.
Each template offers a variety of customization options, allowing users to make the presentation their own.
For instance, users can choose their own colors, fonts, and backgrounds to suit their needs.
Plus, if youre feeling extra creative, you can even upload your own images and logos to make your presentation truly unique.
Once youve chosen your template, its time to start customizing.
Canva makes it easy to add text, images, and other elements to your presentation.
You can customize the design to your liking, or use the pre-designed elements to create a professional-looking presentation in minutes.
Now that youve chosen a template, youre ready to start creating your PowerPoint presentation in Canva.
With its intuitive user interface and wide selection of templates, Canva makes it easy to create a stunning presentation in no time.
Customizing the Design
When it comes to creating a PowerPoint presentation in Canva, customizing the design is the key to making a great presentation.
Canva offers a wide range of templates that can be customized to your liking.
You can choose from a variety of layouts, fonts, colors, and graphics to make your presentation unique.
You can also add text, images, and other elements to further enhance the design.
To make the most of this feature, you can experiment with different combinations of layouts, fonts, colors, and graphics until you find the perfect combination for your presentation.
Once youve found the perfect design, you can save it and use it for future presentations.
Canva also makes it easy to adjust the size of elements within your presentation.
You can select an element and drag it to make it larger or smaller.
This allows you to adjust the size of graphics, text, images, and other elements to create a seamless look throughout your presentation.
Additionally, you can adjust the opacity of an element or the background color to make your presentation stand out.
By being creative with the design elements of your presentation, you can create something truly unique and eye-catching.
Adding Text
Adding text is one of the key elements of creating a PowerPoint presentation in Canva.
Canva makes it easy for users to add text to their slides, with a wide range of fonts and font sizes to choose from.
Additionally, users can customize the color, alignment, and other aspects of the text to make it stand out.
To add text to a slide, users can either type it directly into the slide or use the text box tool to create a text box.
The text box tool allows users to adjust the size and position of the text box, as well as the font and font size.
Additionally, users can adjust the color of the text and the background of the text box using the color picker tool.
Once the text is in place, users can further customize it by adding effects such as shadows, outlines, and gradients.
These effects can be used to make the text stand out and draw the viewer’s attention.
Additionally, users can add animations to the text, such as fade-ins and fade-outs, to make the presentation more engaging.
Adding Images and Other Elements
Adding images and other elements to your presentation is a great way to make it more engaging and interesting.
With Canva, you can easily search for and add images directly from the platform.
You can also add charts, diagrams, and other elements to further enhance the presentation.
To add an image, click on the Uploads tab and select Upload Image.
Alternatively, you can search for images from the Search tab or browse the library of free images.
To add an element, click on the Elements tab and select your desired element.
You can also customize the size, orientation, and color of the element.
Once youre done, click on the Done button to save the changes.
Finally, you can add text to your presentation by clicking on the Text tab and selecting your desired text.
You can customize the font, size, color, alignment, and other text settings to make it look just the way you want.
With Canva, adding images and other elements to your presentation is a breeze.
Exporting the Presentation
Creating a stunning PowerPoint presentation is now a breeze with Canva.
Exporting the presentation is the final step in the process.
Once you have completed the design of your presentation and are happy with the results, its time to export it.
Canva allows users to export their presentation as a PDF or PPT file.
Exporting is simple and straightforward.
To export, simply click on the Download button on the upper right-hand corner of the Canva page.
A drop-down menu will appear with the option to export as a PDF or PPT file.
Choose the desired format and click on Download.
When you export as a PDF, Canva will generate a high-quality PDF file that can be printed or shared electronically.
The PDF file will include all of the elements of your presentation, such as images, text, and graphics.
When you export as a PPT file, Canva will generate a PowerPoint file that is compatible with both Microsoft PowerPoint and Google Slides.
The PPT file will also include all of the elements of your presentation.
Once you have exported the presentation, you are ready to share it with your audience.
No matter which format you choose, your presentation will look professional and polished.
With Canva, creating a PowerPoint presentation is now quick and easy.
Final Thoughts
Creating a PowerPoint presentation in Canva is a great way to make a professional-looking presentation quickly and easily.
With its intuitive user interface and wide selection of templates, users can customize and enhance their presentations with text, images, and other elements.
Exporting the presentation as a PDF or PPT file is also simple.
With Canva, making a presentation is a breeze.
So don’t wait – get started on your own presentation today with Canva!
James Wilson
James Wilson has extensive knowledge in the information technology industry.His second love, besides dealing with computers, is smart home technology. He is continually updating information to better comprehend this problem and has a deep understanding of the apartment’s support system.
Recent Posts
Does Google Keep Have a Desktop App? Here's What You Need to Know
Yes, Google Keep does not have a dedicated desktop app. However, users can access Google Keep on their desktop through the web-based version which can be accessed via the Google Keep website....
How to Install Google Keep: A Comprehensive Guide for Beginners
To install Google Keep, you can simply go to the Google Play Store on Android devices or the App Store on iOS devices. Search for "Google Keep" in the search bar, then click on the "Install" button...
How to Use Canva to Level Up Your PowerPoint Presentations
Canva and PowerPoint both offer fantastic presentation creation capabilities. But together as a dynamic duo they enable next-level visual storytelling easily.
This guide details multiple techniques integrating Canva’s graphic design brilliance into PowerPoint’s versatile authoring environment. Read on to amplify presentation engagement and impact through Canva!
Table of Contents
Design Visually Stunning Slides with Canva
Canva simplifies building gorgeous, branded slides with:
- Professionally designed templates
- Drag-and-drop functionality
- Font and element libraries
- Collaboration features
Follow these steps creating presentations within Canva:
- Pick a Canva template or start blank
- Add text paragraphs, images, icons etc
- Customize colors, fonts, sizing
- Share to collect feedback
Whether starting from scratch or modifying templates, Canva empowers visually impactful designs quickly without deep technical skills.
Getting Canva Creations into PowerPoint
Now to bring imaginative Canva artwork beyond the web browser and into PowerPoint. Here are the top methods to import Canva:
Export as Image Files
The simplest approach – download Canva slides as JPG, PNG or SVG files. Then insert those graphic files into PowerPoint slides.
This maintains full control within the PowerPoint editing environment. But image formats lose vector data and interactivity compared to native objects.
Download Canva Presentations as PPTX
Canva enables saving complete presentations in PPTX format for opening directly in PowerPoint. Any slide animations won’t transfer over however.
While convenient, inconsistent font and element rendering reduces design fidelity. Manual adjustments recreating the original aesthetic in PowerPoint grows tedious.
Utilize the Canva Plugin
The official Canva plugin for Microsoft Office allows syncing Canva presentations into PowerPoint automatically.
After installing, the plugin toolbar inside PowerPoint facilitates import with customizable options. Edits made update across both Canva and PowerPoint instantly. This empowers lossless roundtrip creative workflows.
Embed Canva Slides
PowerPoint also enables embedding links to Canva slides for dynamic interactive content. Right-click within any slide and select “Embed Canva Design”.
When presenting, clicks load the associated Canva creation in a resizable frame. Unfortunately lacking offline support limits portability. Syncing updates also requires manual refreshes.
Optimizing Canva Presentations
Before finalizing Canva/PowerPoint integration, optimize designs considering:
- Font choices balancing readability with brand expression
- Color contrast checking for accessibility
- Consistency across visual motifs and layouts
Review transitions and test animation plans within finished PowerPoint decks. Identify any formatting quirks from conversion requiring touch-ups.
Bringing Canva and PowerPoint Together
With Canva’s graphic design excellence combined PowerPoint’s presentation prowess, engaging meeting audiences grows simpler than ever.
Just remember these best practices:
- Map content hierarchy for logical information flow
- Maintain version control for seamless team collaboration
- Test synchronization across platforms to match formatting expectations
Let us know any other questions on uniting Canva’s creative capabilities with PowerPoint’s functional flexibility!
Additional Canva Resources
- Free Presentation Templates
- Canva Plugin
- Plugin Documentation
Bringing Canva and PowerPoint together amplifies imagination with impact. We would love to hear about your tips and tricks for optimized integration! Let the creative juices flow.
Save my name, email, and website in this browser for the next time I comment.
- PRO Courses Guides New Tech Help Pro Expert Videos About wikiHow Pro Upgrade Sign In
- EDIT Edit this Article
- EXPLORE Tech Help Pro About Us Random Article Quizzes Request a New Article Community Dashboard This Or That Game Popular Categories Arts and Entertainment Artwork Books Movies Computers and Electronics Computers Phone Skills Technology Hacks Health Men's Health Mental Health Women's Health Relationships Dating Love Relationship Issues Hobbies and Crafts Crafts Drawing Games Education & Communication Communication Skills Personal Development Studying Personal Care and Style Fashion Hair Care Personal Hygiene Youth Personal Care School Stuff Dating All Categories Arts and Entertainment Finance and Business Home and Garden Relationship Quizzes Cars & Other Vehicles Food and Entertaining Personal Care and Style Sports and Fitness Computers and Electronics Health Pets and Animals Travel Education & Communication Hobbies and Crafts Philosophy and Religion Work World Family Life Holidays and Traditions Relationships Youth
- Browse Articles
- Learn Something New
- Quizzes Hot
- This Or That Game New
- Train Your Brain
- Explore More
- Support wikiHow
- About wikiHow
- Log in / Sign up
- Computers and Electronics
- Presentation Software
7 Simple Steps to Make PowerPoint Slides from Canva
Last Updated: February 26, 2024 Fact Checked
This article was written by Melissa Newman and by wikiHow staff writer, Megaera Lorenz, PhD . Melissa Newman is a Social Media Strategist & Content Developer based in Bristol, Pennsylvania. With six years of experience, she specializes in social media strategy, content development, and community management. Melissa earned an MS in Digital Innovation in Marketing from the Fox School of Business at Temple University and a BS from Temple University. She also holds certifications from Facebook, Google Analytics, Hootsuite, and HubSpot Academy. Melissa has won awards for her social media campaigns, including the Jesse H. Neal Award for Best Use of Social Media, a Hermes Creative Award, and an Azbee Award for Best Social Media Campaign. This article has been fact-checked, ensuring the accuracy of any cited facts and confirming the authority of its sources. This article has been viewed 12,679 times.
Canva is a browser-based graphic design tool that lets you create presentations similar to the ones you can design in Microsoft PowerPoint. If you’ve made a presentation in Canva but you want to save it as a PowerPoint document, you can easily save the whole presentation or just some individual slides. In this article, we’ll talk you through the process step-by-step.

- If you don't need a PowerPoint, you can also save Canva slides as a PDF or JPEG.

- For example, if you used any fonts in Canva that aren’t saved to your computer, you may need to download and install those fonts to get them to show up in PowerPoint.
- Keep in mind that you won’t be able to save animated elements from Canva to PowerPoint unless you download the slide as an MP4 video. Try creating your basic design in Canva, then adding animations in PowerPoint .
- Charts are another element that might not make the transition from Canva to PowerPoint. You may need to recreate your charts in PowerPoint.
Expert Q&A
You might also like.

Expert Interview

Thanks for reading our article! If you'd like to learn more about using Canva, check out our in-depth interview with Melissa Newman .
- ↑ https://www.canva.com/help/article/download-file-types/
About This Article

- Send fan mail to authors
Is this article up to date?

Featured Articles

Trending Articles

Watch Articles

- Terms of Use
- Privacy Policy
- Do Not Sell or Share My Info
- Not Selling Info
Keep up with the latest tech with wikiHow's free Tech Help Newsletter
- Slide Library
- Slide Library for PowerPoint
- Downloadable slides and shapes
- Slide Library search
- Search Library via shortcut keys
- Slide Library update alerts
- Rename or delete objects
- Share Slide Library
- Save slides or shapes to Slide Library
- Save presentation to Slide Library
- Manage Templates
- View all templates and set default
- Agenda Wizard
- Create Agenda Slides
- Update Agenda Slides
- Agenda Slide Numbering
- Navigate via Agenda
- Table of Contents
- Import Agenda Items
- Save Agenda Format
- Manage Colors
- Color Palette Toolbar
- Customize Color Toolbar
- Apply fill with outline color
- Recolor Charts
- View RGB color values & names
- Theme Color Tints and Shades
- Share Color Palette with team
- Insert Shapes
- Standard PowerPoint shapes
- Callouts / Speech Bubbles
- Hand Drawn Circles
- Harvey Balls
- Create Mini Slides
- Move to Multiple Slides
- Right Facing Centered Triangle
- Status Indicators
- Arrange and Align Shapes
- Select same color or size
- Select shapes by attribute
- Align shapes
- Align to first selected shape
- Choose Align anchor point
- Align using shortcut keys
- Copy paste position multiple shapes
- Straighten Lines
- Swap positions
- Distribute evenly
- Set Horizontal Gaps
- Set Vertical Gaps
- Squeeze or expand gaps
- Remove gaps
- Group Objects by Row
- Group Objects by Column
- Send to back, bring to front
- Send backward, bring forward
- Flip or rotate
- Group, ungroup and regroup
- Edit Shapes
- Same height, same width
- Copy paste position, size
- Resize shapes
- Slice shapes
- Multiply shapes
- Stretch shapes and fill gaps
- Toggle line weight and style
- Change margins toggle
- Chevrons same angle
- Paragraph Styles
- Save Paragraph Styles
- Apply Paragraph Styles
- Use PowerPoint Indent Increase/ Decrease to apply bullet styles
- Reset Paragraph Styles
- Ticks and Crosses bullets
- Paint Formatting
- Advanced Format Painter
- Position & Size Painter
- Table Format Painter
- Style Painter
- Text Format Painter
- Change Shape Painter
- Chart Format Painter
- Angles & Curves Painter
- Animation Painter
- Cycle Accent Colors
- Format Text
- Fit text to textboxes
- Wrap Text Toggle
- Merge Textboxes
- Split Textboxes
- Increase/ Decrease Font size
- Change Text Case
- Color Bold Text
- Delete Text or Replace
- Insert Superscript text
- Format Tables
- Create table from text boxes
- Convert table to text boxes
- Convert text to table
- Insert columns and rows
- Paste Excel data without source formatting
- Paste Excel data into text box tables
- Export Table or Box Table Data to Excel
- Set cell margins
- Express Table layout
- Table stripes
- Autofit columns
- Evenly space columns
- Align shapes over tables
- Harvey Balls for Tables
- Status Indicators for Tables
- Customizable PowerPoint Shortcuts
- Extra PowerPoint shortcuts
- Add PowerPoint shortcuts
- Search shortcut keys
- Reassign PowerPoint shortcuts
- Reset PowerPoint shortcuts
- McKinsey PowerPoint shortcuts
- F4 or Ctrl+Y redo or repeat
- Printable PowerPoint Shortcuts PDF
- How to Print a Custom Shortcuts list
- Search Shortcut Keys
- Searchable PowerPoint Shortcuts list
- Format Toolbar Overview
- Format Toolbar Layout Options
- Lock or Unlock Objects
- Lock objects
- Lock objects to the Slide Master
- Unlock objects
- Proofing Tools
- Check Formatting
- Check Fonts
- Check Template
- Check Slide Layout
- Check Content
- Check Punctuation & Spacing
- Reduce File Size
- Flip Slides
- Set Proofing Language
- Change set language for PowerPoint presentations
- Slide Numbering
- Manage Slide Numbering
- Slide Numbers with totals
- Add words to Slide Numbers
- Change Starting Slide Number
- Skip Slide Numbers on Hidden Slides
- Slide Navigator
- Footers & Footnotes
- Filename Footer
- Enlarge Footnotes
- Refine Slides
- Add summary slide
- Format slide title
- Display No Fly Zone
- Send slide to appendix
- Camouflage mode
- Format Painter
- Set Grayscale
- Format Images
- Compress file size
- Format Charts
- Charts Toolbar
- Config Options
- Customize Settings
- Dark Mode Display
- Review Slides
- Customizable Status Stamps
- Sticky Notes
- Tag slides with filename and page number
- Share Slides
- Email selected slides in PPT or PDF format
- Print selected slides
- Save selected slides
- Slide Library for Teams
- Team Slide Library
- Create multiple Team Slide Libraries
- Synchronize Team Slide Libraries
- Synchronize Team Slide Library to your company Dropbox/ Box/ OneDrive folder
- Updating your Team Slide Library
- Import entire presentation to the Slide Library
- Share Slide Library with a colleague
- Share Custom Settings
- Share Custom Settings with Team
- Getting Started
- Getting started with PPT Productivity add-in for PowerPoint
- Downloadable PowerPoint Elements for Slide Library
- Tutorial - How to Create Custom Paragraph Styles for PowerPoint
- Can I use PPT Productivity on a Mac?
- PPT Productivity Basic Tools Tutorial
- PPT Productivity Plus Tools Tutorial
- New Features
- August 2023 update: Color Toolbar enhancement, new icons and more
- February 2023 update: New Slide Libraries available to download!
- January 2023 Update: Agenda Wizard, Format Painters + More
- How to copy and paste formatting in PowerPoint
- PowerPoint How To
- What are the most popular PowerPoint shortcuts?
- Where are PPT templates stored? Finding templates in PowerPoint
- Pasting data into a PowerPoint table without source formatting?
- Consulting Toolkit
- How to create effective consulting slides using Minto Principles
- Missing the McKinsey PowerPoint Shortcuts?
- Missing the Accenture QPT for PowerPoint?
- Missing the BCG PowerPoint Tools?
- Missing the Bain Toolbox for PowerPoint?
- How to add Stamps or Stickers to PowerPoint slides?
- Looking for a Consulting PowerPoint Toolbar?
- Top 10 PowerPoint Hacks / Shortcuts used by strategy consultants
- PowerPoint Tips
How to create a Canva presentation and edit in PowerPoint
- April 28, 2023
So maybe you've heard about Canva and want to check out the templates, but feel overwhelmed at the prospect of learning how to use a new tool? Great news - you can generate a template and start a presentation in Canva, then export it to PowerPoint to edit further. Best of both worlds!
This blog post provides a step by step guide for how to create presentations in Canva and export to PowerPoint for editing.
Step 1: How to create templates in Canva
Once you arrive on the Canva landing page, you want to select ‘Presentations’. This will take you to a view where you can select your presentation format. For our example I’m selecting the Presentation 16:9 layout, because it is a size directly compatible with PowerPoint.

Canva has a lot of presentation templates and a feature to let you rapidly set up the templates even to customize the content structure.

Next I can select from available templates. I could create a new presentation from scratch, but the point of this is to leverage a Canva template as a starting point that I can complete in PowerPoint. I’ve selected a Real Estate template in this example.

Canva gives me the option to use all slides in the template, or to select specific slides. I’m going to start by using all slides so that I have them when I export.

Using Canva’s Magic Design feature
Rather than selecting a template as per the steps above, Canva also now has a Magic Design option. When you use Magic Design, you can enter the words to describe what your presentation is about. Based on this, Canva can generate a specific template as a more customized starting point. If you find an existing template that strongly aligns to your presentation intent then you may not need Magic Design. But if you cannot see a template that matches your needs, this is a great option.

For the Magic Design template I’m going to ask Canva for a ‘Consulting services proposal template’.

Canva generates several variant options based on what I have typed into the Magic Design prompt.

Admittedly most of them are not great, but we can do some further quick customizations. However I can also revise my prompt to see if I can improve the relevance of the results. For the following option I selected ‘start again’ and then I changed the prompt to ‘Strategy Consulting Services proposal for banking industry . From this search I got new template options, as follows:

I’m getting curious now about the prompts, so I’ve revised it again in the following example, to Strategy Consulting Proposal for Fintech .

Refining the search terms slightly seems to have changed the main graphic used in the variant. Ok, I’ll use this as my starting point for a template and do a few further customizations before I export it.
Once I select it, Canva loads the template into the editing view. Note that because Magic Design is still in Beta, there is an annotation that the technology is still new and improving (this review was completed in April 2023).

Once I click on any of the slides in my chosen template, the screen will refresh with some editing options. We can change the colors and images.

If you select to recolor a slide, a “Change all” button dynamically appears.

Note that if you primarily work with PowerPoint, the way that the Canva left hand panel of options dynamically changes can be confusing.
Once you’re happy with colors, another option to explore is Layouts. You can add more layouts to your presentation before you export it, to save time when you add / update the rest of your content.

Step 2: How to export Canva template to PowerPoint
Note that if you want to export your presentation to PowerPoint, there’s no point playing with the Canva Animations, as these will not come across when the file is converted.
Now that we’ve got a reasonable template, let’s export it to PowerPoint. It’s a bit trickier than you would expect – looks like Canva is trying to hide the PowerPoint option. To find it, click the Share button on the top right hand corner and you will see the following options.....

But you can Scroll down…

You would think that the Download menu would be the next step, but it’s not there! Instead click on the … More menu

And scroll down (yes, very hidden!!)

Here it is! Canva has a save as Microsoft PowerPoint Presentation button in the More... section. Click this option and follow the prompts to save.

Step 3: Opening your Canva Template in PowerPoint
Now that you have downloaded your Canva template to PowerPoint, you can open your presentation file in PowerPoint.

You should find that all text, images and colors can be updated or deleted.
It's important to note that when you import a Canva file into PowerPoint, it does not import the slides with a template into PowerPoint's template format. This means your slides are using a PowerPoint 'blank' template with images and color backgrounds over the top. If you want to insert a new slide into your presentation, the easiest way to do this is to use Ctrl + D to insert a duplicate of the slide with the relevant layout and then move and edit the slide.
But aside from the template constraint, you can edit the slides as you would a normal PowerPoint presentation.
Troubleshooting when converting Canva Presentation to PowerPoint
There are several limitations when you download Canva Presentations to PowerPoint:
- Templates and themes: If you are downloading a presentation from Canva to use as a presentation in PowerPoint, it will not have a template or theme set up for it. However if you are using Canva to create a template, this will not be as much of an issue. Refer to the section below for how to convert Canva template to a PowerPoint template
- Animations : As noted above, animations do not come across when you download a Canva presentation to PowerPoint
- Colors : When you download a presentation from Canva to PowerPoint, because there is not a template set up in PowerPoint for your presentation, you will not have easy access to the color palette that you downloaded from Canva. However if you are using PPT Productivity PowerPoint add-in , you can use the eyedropper feature on the Color Toolbar to select and save the colors from your presentation, making it much easier to reuse them if you need to make further updates.

Want to see our tools in action?
Book a personalized demo with our PowerPoint professionals

Download 30 Day Free Trial
Download your 30 day free trial - Microsoft Office for Windows
Related productivity tips

How to create PowerPoint Chart Templates
PowerPoint, with its array of features and tools, has become the go-to platform for creating ...

How can I share a PowerPoint presentation with custom fonts?
Can I share a PowerPoint Presentation containing customized fonts with others who do not have the ...

Great article on creating an engaging PowerPoint Presentation
The 'Psychotactics' website has been recommended to us by an associate and it's a very interesting ...
Yes To Tech
- Sep 17, 2020
Canva Presentation Tutorial: How To Make Presentation In Canva + How To Use Canva For Presentation

Want to easily create presentation slides but are tired of the options that PowerPoint provides? In this Canva presentation tutorial I'll show you how to create amazing presentations using Canva. Canva is my absolute favorite graphic design tool for non-designers and it comes with a number of presentation templates that you can customize.
If you've been wondering how you can create better presentations with Canva, stay tuned until the end of this video to learn how to use Canva to create a presentation, and to get a FREE cheat sheet with 9 amazing online business tools like Canva that you can use in your online business to save time and boost your productivity. Also, make sure to subscribe and hit the bell to be notified every time I post a new video. With that said let's go ahead and jump right in.
First off, if you don't have a Canva account yet, just click on the link in the description box below to create one for free .
After you've logged in to your Canva account, click on the search bar, and search for 'presentation'. Canva has a number of presentation templates that you can customize, which include all of the kinds of slides that you might need, or if you prefer, you can select a blank template to start from scratch.
To view the available slides within the presentation template, just click on the three little dots on the top-right of the presentation template, and click through the available slides at the bottom. Don't worry too much which presentation template you choose since you can always change it later.
Once you've selected a presentation design to customize, click on 'use this template' to edit it. Just like with any regular Canva template, you can click on any of the elements on the page to customize them, such as the background, image and text, or click on any of the options from the left-hand side panel to add new photos, elements or text into your design.
Using Canva to create a presentation is easy because it's super straightforward. To edit any of the existing elements on a presentation slide, all you have to do is click on it, and view the available options up top. For instance, you can change the color of this square to any other one of your choice, you can change what this text says by double clicking on it, and writing something new, you can change the appearance of this text by editing its font, size and color, and you can either add an effect to this image, or add a new one altogether by clicking on 'photos' from the left-hand side panel, searching for the photo of your choice, and then drag-and-dropping it right where this original photo is.
For more details on how to customize a Canva design, make sure to watch my video on ' how to use Canva '. I'll leave the link to it in the description box below.
As you can see, Canva has a number of slide options that you can customize for your presentation, such as cover, icons, outline or table of contents, photo and text, quote, step-by-step, comparison, numbers, three column, bar chart, text only with multiple headings, question or statement page, title for a section, video, photo and text again, big photo and text, and so on and so forth.
You can customize each of these slides, as well as add presenter notes to them, move them up or down to reorder your presentation slides, copy the page to duplicate this slide's design, delete it altogether, and add a new blank page.
To add an animation to any of your slides, select the page that you want to animate, and select one of the animation options available. You can either add a new animation to new slide, or choose 'apply to all pages' to add the same animation to all slides.
Once you're done customizing the presentation you created in Canva, rename your design up top, and then click on the downward pointing arrow on the far right of the screen . There are a number of options that you can choose from: present, where you can present these slides right now where you either advance at your own pace, set speed to automatically play or view your notes and upcoming slides, present and record, where you can record yourself while talking over a presentation, and then share the video on YouTube, as an evergreen webinar, or with specific people, download these slides as an image, PDF, video or GIF, share a link to this presentation with others, publish this presentation as a beautiful, responsive website, or download your presentation as a PowerPoint document.
Now you know how to use Canva to create a presentation so you can easily create your presentation slides. As promised, to get a FREE cheat sheet with 9 brilliant tools like Canva that you can use in your online business to save time and boost your productivity, just click on the link in the description box below.
So what will the presentation you create in Canva be about? I'd love to hear your answer and start a conversation in the comments below, and also make sure to click on the link in the description box below to get your free cheat sheet , as well as a free 30-day trial of Canva Pro .
If you're new around here, hi I'm Marina Lotaif from Yes To Tech, and I'd love for you to join the family. You can do so by hitting the subscribe button and if you're already subscribed, and want to be notified every Tuesday and Thursday at 9:45am Eastern, just click on the bell after you subscribe and you'll receive a notification every single time I post. I hope you're having a wonderful day wherever you are and I'll see you in my next video.
HOW TO USE CANVA TO CREATE A PRESENTATION: Create Better Presentations With Canva Pro. Want to easily create presentation slides but are tired of the options that PowerPoint provides? In this Canva presentation tutorial I'll show you how to create amazing presentations using Canva. Canva is my absolute favorite graphic design tool for non-designers and it comes with a number of presentation templates that you can customize. If you've been wondering how you can create better presentations with Canva, stay tuned until the end of this video to learn how to use Canva to create a presentation.
GET A FREE 30-DAY TRIAL OF CANVA PRO: https://canva.pxf.io/jA4Q5
CLICK TO TWEET: https://ctt.ac/ar4Zz
SUBSCRIBE FOR NEW VIDEOS EVERY TUESDAY & THURSDAY: http://bit.ly/youtubeyestotech
RESOURCES MENTIONED:
- FREE cheat sheet with 9 brilliant tools to run your online business: https://www.yestotech.com/onlinebusinesstools
- Get A FREE 30-day Trial Of Canva Pro: https://canva.pxf.io/jA4Q5
- How To Use Canva: https://Youtu.Be/Q0m7psfcl94
RELATED VIDEOS:
- How To Create A Facebook Cover In Canva: https://youtu.be/2tmOJOiG3Iw
- How To Remove Background In Canva: https://youtu.be/aGuUui8riyk
- How To Make Instagram Story Bingo Cards: https://youtu.be/FndNRDnoA7k
- How To Create Animated Instagram Stories With Canva: https://youtu.be/diWTo3ym4Jo
- How To Create A Scrolling Website Animation Without Photoshop: https://youtu.be/AnECTOo7M0M
DISCOUNT CODES & EXCLUSIVE OFFERS:
- ConvertKit (email marketing software): a 30-day free trial - https://convertkit.com/?lmref=7SUoRg
- Viraltag (social media marketing tool): a 14-day free trial and $15 off - https://viraltag.grsm.io/MarinaLotaif914
- Leadpages (landing page and website builder): a 14-day free trial - https://try.leadpages.com/yestotech
- Interact Quiz Maker (quiz, poll and giveaway maker): a 14-day free trial - https://www.tryinteract.com/#oid=59709_4020
- Hostinger (web hosting): 10% off with code YESTOTECH - https://www.hostinger.com/yestotech
- Wix (website builder): 50% off yearly premium packages (first time users only) with code EDU_Mar17411703 - http://bit.ly/wixforfree
- Canva Pro (graphic design tool): a 30-day free trial - https://canva.pxf.io/jA4Q5
- Visme (presentation, infographic and visual content creator): a free forever plan until you decide to upgrade - https://partner.visme.co/?ref=MarinaLotaif
- Teachable (online course platform): a free forever plan until you decide to upgrade - https://teachable.sjv.io/c/1134751/933427/12646
SHOP THE STORE:
- Brilliant Branding: https://mlotaif.lpages.co/brilliant-branding-evergreen/
- Wonder Website: https://mlotaif.lpages.co/wonder-website-evergreen
- Traffic Takeoff: https://mlotaif.lpages.co/traffic-takeoff-evergreen
- Webinar Sales Funnel Template: https://yestotech.teachable.com/p/webinar-sales-funnel-template
- Canva Crash Course: https://yestotech.teachable.com/p/canva-crash-course
- ConvertKit Tech Training Tutorials: https://yestotech.teachable.com/p/convertkit-tech-training-tutorials
- Power Productivity: https://yestotech.teachable.com/p/power-productivity-premium
SUBSCRIBE FOR MORE VIDEOS: http://bit.ly/youtubeyestotech
MY FAVORITE TECH, TOOLS, AND RESOURCES: https://www.yestotech.com/resources
JOIN THE CONVERSATION!
- Website: https://www.yestotech.com
- Facebook: https://www.facebook.com/yestotech
- Pinterest: https://www.pinterest.com/yestotech
- Instagram: https://www.instagram.com/yestotech
- Twitter: https://twitter.com/MarinaLotaif
Welcome to our YouTube channel! It's our mission at Yes To Tech to empower online entrepreneurs, bloggers, and small business owners like you to maximize your online presence - even if you're not tech savvy! Subscribe to our channel for tips and tricks on DIY website creation, social media marketing, e-mail marketing, branding, blogging, webinars, and video creation, for the tech needed when you're just getting started with your online business, and for step-by-step video tutorials created especially for the non-techie online entrepreneur's point of view.
DISCLAIMER: This video and description may contain affiliate links, which means that if you click on one of the product links, I’ll receive a small commission. This helps support the channel and allows me to continue to make videos like this. I only recommend products that I use and love. Thank you for your support!
WHAT YOU’LL LEARN IN THIS VIDEO:
How to use canva to create a presentation, create better presentations with canva, how to make a presentation in canva, how to use canva, create amazing presentations using canva tool, how to create a canva presentation with powerpoint, canva presentation tutorial, easily create presentation slides, canva tutorial
#canva #canvatutorial #presentation
https://youtu.be/zQUZdpKPhJw
Tags: how to use canva to create a presentation, create better presentations with canva, how to make a presentation in canva, how to use canva, create amazing presentations using canva tool, how to create a canva presentation with powerpoint, canva presentation tutorial, easily create presentation slides, canva tutorial, yes to tech
Recent Posts
How To Make A Clickable PDF Hyperlink In Canva Tutorial: How To Add Link In Canva
How To Edit Video In Canva: Canva Video Editor Tutorial
Wix Mailchimp Pop Up: How To Integrate Mailchimp Pop Up In Wix Site
How to Convert Canva Slides to PowerPoint
Do you have a Canva presentation that you need to use in PowerPoint? Here's how to convert it in just a few clicks.
Canva’s presentation tool makes it easy to put together a professional and visually engaging slide deck, regardless of your level of expertise. However, at some point, you may need to convert your Canva slides to PowerPoint to accommodate certain requirements, take advantage of more advanced features, or collaborate with others who prefer to work with PowerPoint.
Whatever the case, this article has got you covered. In this comprehensive guide, we'll walk you through the step-by-step process of seamlessly transitioning your Canva presentations to PowerPoint, ensuring that your hard work and creativity are preserved.
After you’ve created the perfect professional presentation in Canva , here is how you can export it as a PowerPoint file. Click the Share button in the top-right corner and select More from the drop-down menu.
Scroll down the list and click on Microsoft PowerPoint .
You can type PowerPoint in the search bar at the top to quickly find it.
By default, all the slides in your presentation will be selected to be exported. However, if you only want to export specific slides, click on the drop-down arrow under Select Pages . Disable the check marks beside the slides you don’t want to include, and click Done . Now click Download to export your selected slides.
In the file explorer window that pops up, choose a location for your file, give it a suitable name, and click Save . Your Canva slide deck will now be downloaded to your computer as a PowerPoint (PPT) file.
This method of exporting your Canva presentation into a PPT file has a few limitations. The fonts you used may change if you don’t already have them on your computer.
In addition, if you’ve applied standard animations or used Canva’s animation tool to create custom animations for certain elements, these elements will be removed in the PPT document. In the next few sections, we’ll walk through how to work around these limitations.
How to Convert Canva Slides to PowerPoint (Without Changing Fonts)
Depending on the fonts you use, your Canva slide deck won’t look the same in PowerPoint if you don’t have those exact fonts saved on your computer. PowerPoint will automatically replace those custom fonts with default fonts.
If you want to still stick with the custom fonts, one way to go about it is to explore the font library in PowerPoint to see if you would find similar-looking fonts.
Another way to go about this is to first find out the name of the font in Canva or use any of the five best sites for identifying fonts online . From here, you can download the fonts to your computer from any of the best free font websites . The process of adding your new fonts to PowerPoint is similar to that of adding new fonts to Microsoft Word .
How to Convert Canva Slides to PowerPoint (With Animations)
If you don’t want to lose all the cool animation you’ve added to your Canva presentation, you’ll have to export them as a GIF. Here’s how.
Click the Share button and select Download from the drop-down menu.
Ensure GIF is selected under File type. With this method, you’ll have to select one page at a time (under Select pages) to export as a GIF. When you’re done, click Download .
In the file explorer window that appears, choose a file location, give it a suitable name, and click Save . Your Canva slide will now be downloaded to your computer as a GIF file.
You have to repeat the same process for each page in your Canva slide deck. If your slides aren’t many, this shouldn't be much of a problem. However, if you’re working with a bunch of slides, this can be a bit tedious.
If you want to maintain the animated elements without the animations, you can go through a similar process but this time around, save your entire slide deck as a PNG file.
This will export each slide as a PNG file and place it in a zipped folder. From here you can extract the files, then drag and drop them into PowerPoint. Compared to exporting each slide as a GIF, this method will save you lots of time.
While the method of exporting your Canva slide deck into a .PPTX file removes animated elements, this method doesn’t let you modify slide elements in PowerPoint since they’re in GIF or PNG format. Keep these limitations in mind as you decide which method you want to use.
Converting Canva Slides to PowerPoint Is Easy
By following the steps outlined in this article, you can seamlessly transition your Canva presentations to PowerPoint, and get the best of both worlds! Whether you're working in Canva or PowerPoint, you can also choose to convert your presentations into videos.
We explain and teach technology, solve tech problems and help you make gadget buying decisions.
How to Create Presentations in Canva
Canva recently introduced new tools to create docs, whiteboards, videos, websites, and presentations. As such, you no longer need to rely on traditional software solutions like Google Slides, PowerPoint, or Keynote to create an upcoming business presentation. You can easily create presentations in Canva using its familiar suite of editing tools.

Canva offers real-time collaboration, several export options, a present tool, AI add-ons, and much more to make a professional PPT. Canva also lets you make instant presentations with pre-filed slides. Without further ado, let’s get started.
Pick Up an Aspect Ratio and Template
Before you start, make sure to pick a relevant aspect ratio for your presentation. If it’s a traditional PPT, go with a 16:9 aspect ratio. If you plan to show your PPT on mobile, use the 9:16 aspect ratio.
Tablet users can start with a 4:3 aspect ratio. Canva also offers some ready-to-use templates to get started. We highly recommend starting with a template to save some time.

You can also filter templates via style, theme, feature, and color. For example, you can check company, marketing, corporate, marketing, school, and other templates. Most templates are free to use, while some may require a Canva Premium subscription.
Under templates, you also find an option to create instant presentations. You can enter a prompt and check Canva’s suggestions to get started.

Customize a Page With Editing Features
Once you pick up a template, you have the option to add all pages to your presentations. You can click ‘Apply all pages’ and check every slide at the bottom. You can always select a slide and hit delete to remove it from your presentation.

Canva lets you change every aspect of the template with different text styles, filters, and image editing tools. You can change color, tweak transparency, copy style, and more.

We suggest spending some time with editing tools to customize your Canva presentation and add some personal touches.
Add Graphics, Stickers, and Images
Your presentation will not seem as interesting without graphics, stickers, images, and videos. Unlike Google Slides or PowerPoint, you don’t need to import media files to Canva to complete your slides. You can easily add relevant elements from the sidebar.
Step 1: Open a slide in your Canva presentation.
Step 2: Select Elements from the sidebar. Add graphics, icons, stickers, tables, videos, and more.
Step 3: You can explore the AI image generator and turn your creative ideas into images and videos with a single click.

You can add simple descriptions and even turn generated images into videos. Canva also offers a long list of graphics packs in several categories. The possibilities are endless here. It’s up to you to make a compelling slide using useful tools.
Tweak Page Animation
Once you create a page, tweak its animation to make a smooth transition between pages.
Step 1: Select a slide in Canva.
Step 2: Click Animate at the top.
Step 3: Check basic, exaggerated, photo movement, and other animation types from the left sidebar.

You can also tweak the animation intensity, which is great.
Add Presenter Notes
Do you plan to present your Canva PPT on a video conference? You can add notes to each slide so they appear during the Presenter view (more on that later).
When you create a PPT, select a slide and hit Notes at the bottom. Enter your notes that you want to remember or talk about during a video meeting.

Collaborate and Edit in Real Time
Similar to Google Slides and Microsoft PowerPoint, Canva lets you share and edit a presentation in real time. You can take inputs from your colleagues and create a share-worthy presentation in no time.
Step 1: When you are done making changes to your presentation, click Share at the top.
Step 2: Enter people, groups, or your team. Expand the collaboration link menu and select Anyone with the link.
Step 3: Expand the permission menu and select Can edit.

You can also share a link with view or comment-only permission. Select the Copy link and share it with your co-workers.
Enable Presenter View
Presenter view is a thoughtful touch from Canva to give presentations over a Google Meet or Teams call.
You can open a presentation in Canva and select Present at the top. Click Presenter View and check two windows opening up on your computer.

One window shows your presentation with notes open on the sidebar. Another window displays the current slide you are sharing with others over a call.

Download and Share Your Presentation
As expected, Canva gives several options to share and export your presentation. When you complete your presentation, click Share in the top-right corner and expand Download.
You can convert a presentation to PDF, PPTX (Microsoft PowerPoint compatible), MP4, JPG, PNG and SVG formats. Check our dedicated post if you wish to print your Canva presentation .

Use Canva Like a Pro
Canva has done a solid job, granting users access to rich tools to create a convincing presentation. We can’t wait to see how the Australian startup enhances our PPT experience with AI features in the future. Speaking of which, we would love to see a feature similar to ‘Design Ideas from Microsoft PowerPoint’ on Canva. Do let us know if you use Canva for presentations in the comments below.
Was this helpful?
Last updated on 07 January, 2024
The above article may contain affiliate links which help support Guiding Tech. However, it does not affect our editorial integrity. The content remains unbiased and authentic.

The article above may contain affiliate links which help support Guiding Tech. The content remains unbiased and authentic and will never affect our editorial integrity.
DID YOU KNOW

Parth Shah is an evergreen freelance writer covering how-tos, app guides, comparisons, listicles, and troubleshooting guides on Android, iOS, Windows, Mac, and smart TV platforms. He has over five years of experience and has covered 1,500+ articles on GuidingTech and Android Police. In his free time, you will see him binge-watching Netflix shows, reading books, and traveling.
More in Internet and Social

Missing Cast Option in Chrome? Here’s How to Add It Back to the Toolbar

How to Disable Dark Mode in Popular Apps
Join the newsletter.
Get Guiding Tech articles delivered to your inbox.
How to Create a Presentation in Canva
Lee Stanton Lee Stanton is a versatile writer with a concentration on the software landscape, covering both mobile and desktop applications as well as online technologies. Read more August 28, 2023
Canva presentations allow you to reimagine and create informative and visually appealing presentations. This is thanks to its massive media library and a wide array of easy-to-use custom presentation templates. And creating the presentations is relatively easy due to its intuitive user interface.

This article explores all the details you need to make a professional-level presentation, even if you’re a newbie on Canva.
How to Make a Canva Presentation
A study shows that 46% of people lose concentration during a presentation. But with Canva designs, you can capture your audience’s attention throughout your presentation by pairing your message with engaging visual elements. Although you can design your presentation from scratch, Canva also has unlimited editable templates to simplify your design process.
Some of the slide editing tools you’ll find on your presentation dashboard include:
- Elements: These include animated and static shapes, lines, grids, charts, and gradients you can add to your slides.
- Text: When you want to insert body text, headings, and subheadings in a slide, you come here to add a text box and to choose font styles.
- Uploads: This is where all the media you’ve imported from your device into Canva stays. It’s also where you add new images, videos, and audio to Canva.
Making Canva Presentation from Scratch
Pre-formatted slides can help you prepare a presentation in minutes if you’re in a hurry. However, they deny you an opportunity to try out different options. Luckily, Canva presentations allows you to use your design skills and creativity to create a presentation from a blank page. Here’s how:

Making Canva Presentation Using Templates

Making Collaborative Canva Presentation
If your presentation is a team project, you can easily collaborate with team members on Canva. To allow everyone work at the same time, you’ll need to assign them the sections to work on and send them an invitation link. Here are the steps for making a collaborative Canva presentation:

When your team members receive the link, they can open it and begin to work. Ensure each member is aware of their task on the presentation as any changes made from this point become instantly visible to others.
- From the Canva library, team members can find common elements, including logos, images, or colors, ensuring their design consistency.
- Any of your team members can tap on the “Chat icon” attached to the right corner of the slide to leave comments on any specific elements within the presentation. These comments help you to discuss ideas, provide feedback and facilitate communication between the members.
When everyone completes their task, edit the presentation and tap the “Present” button to start presenting. If you’re not making a presentation, tap the “Share” icon and download your presentation in your desired format.
Other Features Available for Canva’s Presentation Slide
There are many other things you can do to customize your presentation slide apart from adding background color, text, images, videos, and comments. These include the following:
- Add notes: Your slide should have less than 100 words to keep it uncluttered. If you have more points to help you during presentation, you can add them to the notes section. Go to the bottom left corner of your presentation dashboard, and you’ll see a “Notes” icon. If you tap on it, a blank page where you can add more points related to your slide opens.
- Animate your slide presentation: Animating slides is not easy, right? On Canvas, you can animate your slides in just a few clicks without needing to animate each slide individually. Select the slide you want to animate and tap “Animate” at the top. Select your animation combination and tap “Apply to all” at the bottom. This automatically animates all your slides.
- Record your presentation: You don’t have to use third-party software to record your presentation. Tap the “Present” icon at the top and select “Present and record” to start recording your screen.
Create a Presentation with a Lasting Impression
Whether you’re presenting in the boardroom, classroom, or virtual setting, Canva’s excellent features will help bring the best out of your presentation. Unfortunately, these methods don’t guarantee you an outstanding presentation alone. Remember, the success of any presentation lies in understanding your audience and maintaining a consistent and visually appealing design.
Why do you prefer using Canva to design your presentation? Which features give your design that special professional boost? Tell us in the comment section below.
Related Posts

Disclaimer: Some pages on this site may include an affiliate link. This does not effect our editorial in any way.

Aaron Donald March 16, 2024

Lee Stanton February 5, 2024
Lee Stanton September 25, 2023
Send To Someone
Missing device.
Please enable JavaScript to submit this form.
Canva vs PowerPoint (2024) — Which is Better?
This content has been independently produced in adherence to a strict honesty policy, but note that it contains affiliate links . When you buy via these, we may receive a commission.
Written by Chris Singleton | Researched and reviewed by Matt Walsh

In this Canva vs Powerpoint shootout, we compare an established presentation app (PowerPoint) with a cloud-based app that promises to make graphic design in general easy for everyone (Canva). Which solution comes out on top? And which one is best for your business?
Well read on, because we’re going to do a deep dive into both tools, and help you answer these important questions.
But first…
What’s the main difference between Canva and Microsoft Powerpoint?
Although Canva and PowerPoint can both be used to create attractive presentations, the two tools are quite different in nature.

While PowerPoint is a tool that has been specifically designed to let users create presentations , Canva is a multi-purpose tool that lets you design a huge range of visual assets — social media graphics, simple videos, presentations, slides, posters and even websites.

Another key difference to note between the two tools is that Canva only works if you are online .
This is because all your designs are saved in the cloud, as are all the templates, images and other visual elements the platform uses. Although a desktop app and a mobile app are available for Canva, these only work if an Internet connection is present, and in truth the best way to use Canva is probably via a web browser.
By contrast, PowerPoint can be used offline, via the desktop and mobile versions of the app.
Now, given that this is a Canva vs PowerPoint comparison, I’m going to largely focus on how good both tools are for creating presentations.
So, let’s move on and do that, starting with a look at the templates available for both Canva and PowerPoint.
Templates are the starting points for presentations — you pick one, tweak some colors, add your content and then present the results.
So what’s the template offering from Canva and PowerPoint like?
Well, in terms of quantity , it’s a clear win for Canva . Out of the box, Microsoft PowerPoint gives you just 70 or so templates to design with; and although you can download an additional 300+ free and premium templates from the Microsoft site, this total pales by comparison to Canva’s offering of 18,000+ ready-made presentation templates.

The quality of templates in Canva is better too; the templates are more varied in nature and are often bundled with more individual slide types.

In terms of aesthetics, I feel that Canva’s templates definitely have the edge. Many of the PowerPoint templates look quite dated (having in my view quite a 1990s look to them), employ very corporate fonts and scream ‘Microsoft’ at you.
By contrast, the Canva templates look really contemporary, make use of a wide range of interesting typefaces and are simply more ‘fun.’

Templates are just the starting point for a design of course — they can be brought to life and made much more appealing when customized.
So how easy is it to customize designs in Canva and PowerPoint?
Customizing presentations
Once you’ve picked a template in either PowerPoint or Canva, the next step is to customize it and make it your own.
Canva and PowerPoint let you do this by adding a variety of elements to a template and then positioning and resizing them. Let’s look at both processes — and how they differ — in turn.
Adding elements to a template
In Canva, you add elements to a template using a vertical menu on the left hand side of the screen (see screenshot below).

As you can see, this lets you add the following to your template:
- graphic elements (icons, photos, images, clip art, graphs)
- content you’ve uploaded to Canva
- backgrounds
If you’re on a ‘Canva Pro’ plan, this menu also lets you apply brand styles (more on using your own branding in Canva and PowerPoint shortly).
The best thing about the process of adding elements to a presentation in Canva is the simplicity: you simply pick the item you’d like to add and drag it onto your design. This makes for a really quick and smooth workflow.
Adding elements in PowerPoint involves a clunkier process. First, you need to click the ‘Insert’ option in the main menu.

You’ll then see a ‘ribbon’ menu that gives you the option to add items into your template (some of these are shown in the screenshot below).

Unlike in Canva though, there’s no drag-and-drop facility — you’ll need to click on the item type, browse the available elements, and then click an ‘insert’ button to add it to your presentation. And doing so will place it in the middle of your presentation, rather than the position you might have envisaged for it (not the end of the world, however as you can reposition it easily — more on doing this in a moment).
The assets you can add in PowerPoint are similar to those available in Canva, but there are two extra elements available from PowerPoint that are worth dwelling on for a moment.
3D models, as their name suggests, are 3D images that you can rotate to meet your requirements. Quite a lot of them are available, and they can help bring a presentation to life, or illustrate a point (see screenshot below for an example of a PowerPoint 3D model being manipulated).
Although there are a variety of 3D graphics available in Canva, you can’t rotate and customize them to meet your needs the same way as you can in PowerPoint.
(It’s also harder to find them, because there’s no dedicated option for displaying them — you’ll just have browse Canva’s image library and try to spot them).
As for equations, PowerPoint gives you the option to insert and edit them easily into presentations, thanks to its aptly named ‘Equation’ feature.

While at first glance this might strike you as a bit of a ‘niche’ feature, it’s actually quite an important one — there are a lot of math and science teachers out there who will find it extremely useful.
Positioning and resizing elements
Once you’ve added an element to a Canva or PowerPoint presentation, you’ll usually need to move or resize it.
The process of moving elements around a presentation in Canva and PowerPoint is very similar — a drag-and-drop process, where you simply click on the the item and move it where you want it to go, applies in both tools (see screenshot below).
Similarly, both tools let you specify which element should go in front or behind others via ‘bring forward’ and ‘send to back’ tools.

Resizing things involves a fairly similar process in both tools too — you click on an element, a container box appears around it, and you extend or reduce the edges of that container to resize the item (see screenshot below for a demonstration of this).
However, when it comes to resizing text, Canva takes a different approach to PowerPoint. Resizing text in Canva works exactly the same way as resizing an image — you extend or shrink the text’s container box to adjust its size, as demonstrated below.
But with PowerPoint, this automatic resizing of text doesn’t always happen; it depends on how much text you’ve got in a container.
If you’ve got a large block of text (i.e., several bullet points or paragraphs), PowerPoint will resize it as you adjust the container edges.
But for small blocks — single words, short sentences etc. — you’ll nearly always have to use a font dropdown menu to manually specify the font size (much as you’d do when formatting text in Microsoft Word). This makes for a more inconsistent and clunkier workflow.

It’s worth pointing out that Canva gives you fine grain control over font size too, if you want it — you can adjust font size manually in a similar way via a dropdown menu. This gives you the best of both worlds when it comes to formatting text.
Overall, the processes involved in adding, positioning and resizing elements in Canva and PowerPoint are fairly similar, but I find Canva’s approach a bit slicker and one that leads to a more efficient workflow.
Background removal
Both PowerPoint and Canva give you easy-to-use background removal tools: you just hit a suitably named ‘remove background’ (PowerPoint) or ‘Background remover’ (Canva) button to extract the image of a person from a busy background.
This is useful for creating headshots for your presentation, as the example below demonstrates, or placing different background colors behind a photograph of a person.

However, in my tests I found that the Canva background tool was the better one, especially when dealing with images where it was hard to distinguish the background from the person in the photograph. While Canva consistently managed to remove backgrounds from photographs in a way that left the person in the image ‘intact,’ PowerPoint consistently struggled to do this.
Here’s an example of the same image being used to test both tools’ background removal tools. In the case of Canva, I encountered no problems at all when separating the person from the background.

But look at what happened when I use the same image to test the background removal feature in Powerpoint:

As you can see, the subject’s hat and feet were removed by PowerPoint!
Now, PowerPoint does give you some tools to improve the results — you can use a ‘mark area’ tool to highlight bits of the image that you don’t want removed. But this is a bit fiddly to use; and ultimately, while Canva’s background removal tool just works out of the box, you’ll usually end up doing more manual tidying up with the PowerPoint one.
Ensuring brand consistency in Canva and PowerPoint
A key part of designing presentations for use in a corporate context involves branding — you usually need to stick to strict brand guidelines.
You can do this easily enough in Canva and PowerPoint, but the process differs for both products.
In Canva, you work with ‘brand kits’ that let you specify your brand colors, define your brand font, upload a brand logo and add other brand assets such as photos, graphics and icons. These can then be applied to anything you design using the platform.

In PowerPoint, you don’t get a similar brand kit tool — it’s a case of creating a template that adheres to your brand guidelines and re-using it.
You can also take the latter approach in Canva if you like, creating a branded template that serves as the starting point for your design.
So overall on the branding front, it’s a win for Canva , simply because it gives you two ways to create on-brand presentations, while PowerPoint only offers you one.
Royalty free images, videos and audio
Earlier I looked at how you can add elements to PowerPoint or Canva — but didn’t discuss what you can add.
On this front, both tools give you access to libraries of royalty free images and video; Canva goes one better and gives you free audio clips as well.

In terms of the quantity of multimedia files available, Canva is more generous: while Microsoft states that ‘thousands’ of royalty free images and videos are available for PowerPoint (so long as you are a Microsoft 365 subscriber), Canva gives you millions .
You might not think that this disparity would necessarily have a huge impact on presentation design or content — surely access to thousands of images is enough? — but it does, as a little test I ran showed quite quickly.
As part of our work in ecommerce, we create a lot of content about ecommerce companies such as eBay ; occasionally we need to create presentations about these platforms too.
Now, if I enter the phrase ‘eBay’ into PowerPoint’s image search, here’s what I get:

But look at the results offered by Canva for the same query:

So in this example, Canva gives me immediate access to the images I might need for my eBay presentation, while PowerPoint forces me to look elsewhere.
To be fair, it’s easy to grab images from royalty-free media sites (for example Unsplash or Pexels) or a Google image search. But this involves using other tools or add-ons, saving files locally, and then inserting them manually into your presentation — all of which can end up being a time-consuming process.
PowerPoint does try to make things a bit easier on this front, by giving you a facility to search for images online. However, you won’t necessarily have the rights to use the images you identify with it.
By contrast — and this is a key selling point of Canva in general — you are licensed to use all the images it gives you access to.
It’s a similar situation with videos in Canva and PowerPoint: although some stock videos are provided by PowerPoint, the range on offer is nowhere near as wide as Canva’s.
So, all in all, when it comes to providing access to royalty free videos, images and audio, it’s a clear win for Canva .
Apps and integrations
So far in this comparison we’ve looked at what PowerPoint and Canva can do ‘out of the box.’ But what about integrating them with other tools, or adding functionality?
Well, both Canva and PowerPoint give you access to a library of apps that let you do this.
Canva gives you around 190 apps and integrations to play with in its ‘app directory’; this can be accessed on the left-hand side of the Canva dashboard via a ‘Discover apps’ link.

The apps on offer include integrations with well-known social media platforms (Facebook, Instagram, Pinterest etc.) and marketing tools (like Mailchimp, LinkedIn and Hubspot); you’ll also find apps in the directory that add bits of functionality to Canva — for example image enhancement tools; frame tools; mockup tools and more.

As for PowerPoint, a wider range of add-ons is available — around 300 of them. A ‘get add-ins’ button in the PowerPoint ribbon menu lets you browse these.

However, while the Canva apps are quite broad in terms of their features and purposes, the ‘add-ins’ available for PowerPoint are essentially to do with presentation-related functionality.
(This is fair enough really, given that PowerPoint is a tool that has been designed for creating presentations and Canva is a multi-purpose graphic design app.)

You’ll find lots of PowerPoint add-ins to help you embed content from other services into your presentation; there’s also quite a few apps for sourcing stock images and icons for them. But you won’t find any official integrations between PowerPoint and social media apps, and there’s no add-ons for integrating PowerPoint with popular marketing tools either.
Accessing free trials of Canva and PowerPoint
If you’re interested in trying out all the features of Canva and PowerPoint, free trials are available for both. For a limited time only, you can avail of a 30-day free trial of Canva by clicking here .
As for PowerPoint, you can use it for free for 30 days as part of the Microsoft 365 free trial .
Creating charts
Both Canva and PowerPoint give you access to tools that let you create graphs and charts and add them to your presentations.
PowerPoint is the more generous tool in terms of the range of chart types that you can add to your presentations, letting you choose from around 60 chart designs — each of which come in a number of variants — to Canva’s 18.

The process for creating these graphs is much easier in Canva, however — while PowerPoint forces you to link an Excel spreadsheet to your graph, Canva just lets you enter the relevant data for the graph directly within the tool. This makes for a much easier workflow.
(And if you do want to use Excel as a source of data, this is possible too, via CSV file upload; you can also use Google Sheets as a source of data for your graphs).

But overall, PowerPoint is the more powerful tool when it comes to charts — while the customization options in Canva are fairly limited, you can edit just about any aspect of a chart created in PowerPoint.
There is one catch with the PowerPoint chart creation functionality however: it can only be used in the desktop version of PowerPoint — the online version doesn’t let you create charts.
Working with video
Both Canva and PowerPoint let you add video content to your presentations easily.
However — and in keeping with the fact that Canva is a ‘multi-purpose’ tool and PowerPoint is a ‘presentation-only’ one, the options for manipulating your video content in Canva are much more extensive.
This is because Canva includes a video editor in its feature set. While it’s not going to compete with the likes of Adobe Premiere or Final Cut Pro any time soon, it’s nonetheless very usable and very handy for creating simple videos that you can drop into your presentations. You can split, trim and create transitions between clips with ease; you can also remove backgrounds from them really easily too.

With PowerPoint, you can trim video content — so theoretically you can do some basic editing, by trimming a clip into different versions and inserting those into different slides.
But realistically, if you want to edit video for use in a PowerPoint presentation, you’re probably better off using a separate tool. So a win for Canva here .
Presenting tools
Creating a presentation is one thing; giving it is another! So how do Canva and PowerPoint shape up when it comes to the ‘presenting’ part of the equation?
Well, it’s fair to say that PowerPoint wins here, by giving you a host of tools for presenting your content exactly the way you want to.

Not only does PowerPoint give you lots of ways to present your slides, it gives you different ways to rehearse your presentation too. These even include an option to rehearse with a virtual ‘coach’ that assesses your performance — after you’ve given your presentation, your coach will give you a report containing information about your pace, length of presentation and suggestions on how to improve your performance.
The presentation options in Canva, by contrast, are pretty basic: you get just three ways to present — via a ‘standard’ presentation, a ‘present with notes’ option and an option to record your presentation.

On the subject of recording presentations, this works in a similar way in both tools: you can record your presentation with audio and video (i.e., your webcam). When finished, this can be exported as a video file.

Exporting and sharing your presentation
Once you’ve finished creating your presentation, you’ll want to share it with others. So what exporting and sharing options do Canva and PowerPoint offer?
Exporting presentations to different file types
When it comes to outputting presentations into different file formats, both tools let you export your content into a wide range of file types, although the options available differ.
Canva lets you export your presentation (either the whole thing, or individual slides) into the following file types:
- SVG (vector graphics file)
- PPTX (PowerPoint)
To export your Canva presentation into most of these formats, you simply click the share button above it, followed by the ‘download’ option.
Exporting to PPTX in Canva involves a slightly odd process however — this format isn’t included in the platform’s default export options. To save a file in PPTX format you have to install a dedicated app for doing so, then click the ‘Share’ button followed by ‘More…’ to access the PowerPoint export option. This is a bit convoluted.
As for PowerPoint, some of the formats it lets you export to includes:
If you’re unfamiliar with these file types the basic point I’d make is this: if you need your presentation in super high quality photographic or video format, then PowerPoint takes the win (thanks to the option to let you export your files in TIFF and MOV format).
However, if you want to export your presentation as vector graphic files (SVG), then Canva has the edge.
Sharing your presentations
When it comes to sharing your presentations with others, an easy sharing option is just to download your presentation as files which you then send to colleagues or clients.
However, both Canva and PowerPoint let you share your presentations in more sophisticated ways.
Canva is particularly flexible here, giving you a multitude of ways to share your presentation. For example, you can share it as a URL; embed it on a website; or create a QR code to share it to mobile phones.

There’s also the option of sharing presentations with colleagues for collaboration purposes. You’ll need to be on a Canva for Teams plan to do this; this allows you to create and share folders and files that can be accessed by multiple users.
(More on Canva plans and pricing shortly).
As for PowerPoint, the sharing options aren’t quite as extensive — you can share a link to a presentation, or enable multi-user access on the file. These options are probably fine for most applications, however.

(It’s important to note that if you are an existing Microsoft 365 user, PowerPoint slots much more neatly into that environment. You can pull in data from other 365 document types; make use of Microsoft 365 team collaboration features; and share your presentations on OneDrive easily.)
What about importing PowerPoint files in to Canva?
Canva recently released an import feature that lets you import PowerPoint files into Canva. However, depending on the fonts and layouts used in the original presentation, imported presentations may not always be faithful to the PowerPoint original.
Plans, pricing and value for money
It’s a bit tricky to compare the fees for Canva and PowerPoint, as two different pricing models are involved. But let’s do our best!
Let’s start with Canva .
Canva pricing
There are three versions of Canva available:
- Canva for Teams
As its name suggests, Canva Free is an entirely free plan. It doesn’t come with all the bells and whistles of the paid-for version of Canva — key omissions include the option to create a brand kit, use the background removal tool and access to premium content (i.e., the full library of stock photos, audio and images).

Despite this, it is still a highly functional tool that lets you create attractive designs and presentations easily.
Moving onto the premium plans, Canva Pro costs $14.99 per month and gives you access to the full range of Canva features and image/video libraries. However it can only be used by one user.
Canva for Teams starts at $29.99 per month. For this, 5 users get access to all the Canva features and libraries, plus a range of collaboration features (including the ability to set user permissions and lock custom templates). If you need to add more users to your account, the monthly price will increase — you can calculate the pricing for your team on the Canva website.
Note : for a limited time only, Canva has made a 30-day free trial available. This gives you access to the full suite of premium Canva features and assets for several weeks. You can access this here .
As for PowerPoint pricing, as mentioned above, the app comes as part of a wider package of Microsoft tools. There are a multitude of pricing options available, which range from $6.99 per user per month to $57 per user per month, depending on whether you need a basic business package or an enterprise one. A 30-day trial of Microsoft 365 is also available.
(For full details of the main pricing options for Microsoft 365, please read our Microsoft 365 versus Google Workspace comparison ).
In all cases, the key thing to remember about buying PowerPoint is this: you won’t just get PowerPoint, you’ll have access to a host of other Microsoft apps too — like Word, Excel and Outlook.
In a sense however, this is also the case with Canva: when you subscribe to it, you’re not just getting a presentation-making tool but a video editor, image editor, stock photography library, social media scheduler, basic website builder and more besides.
So in truth, both tools give you a lot of bang for your buck — and it will boil down to how much you value getting your hands on a range of Microsoft products as part of a subscription, or the simple ‘all-in-one’ approach taken by Canva.
Canva vs PowerPoint conclusion
So which is better for your project, Canva or PowerPoint?
For me, there are three main arguments for using Canva over PowerPoint. Most importantly, ease of use — Canva is an absolute breeze to use, and considerably better than PowerPoint in the user-friendliness stakes. Second, Canva’s library of stock images and videos is huge — for the price of a single iStock or Getty picture, you get access to millions of multimedia items per month with Canva. Although PowerPoint does give you access to some stock photography and videos, the choice available on both fronts is much more limited. And finally, there’s the fact that unlike PowerPoint, Canva does so much more than presentations — it’s a video editor, poster designer, website builder and much more besides.
PowerPoint is a better choice for some users, however — particularly those who have invested heavily in the Microsoft 365 ecosystem, or need to work with other businesses who routinely use Microsoft products. And buying PowerPoint means you end up getting a host of other useful industry-standard apps, like Word, Excel, Outlook and Publisher.
Below you’ll find a summary of the relative pros and cons of Canva and PowerPoint.
Reasons to use Canva instead of PowerPoint
- It’s a much easier-to-use product.
- It gives you access to a much bigger range of images, graphics and videos than PowerPoint.
- The bundled range of templates is much larger than PowerPoint’s.
- Its background removal tool is significantly better than PowerPoint’s.
- Working with video is significantly easier in Canva.
- Canva is not just a presentation-creating tool: it’s is a photo editor, an image enhancer, a screen recorder, a website builder and much else besides.
- There are more ways to share Canva creations than PowerPoint ones, particularly where social media is concerned.
Reasons to use PowerPoint instead of Canva
- When you buy PowerPoint, you’re actually subscribing to Microsoft 365 — and getting access to a host of really useful Microsoft products in the process.
- PowerPoint integrates much better with other Microsoft apps and services than Canva does.
- A significantly wider range of add-ons is available for PowerPoint.
- There are dedicated tools for working with 3D models and equations in PowerPoint — this is not the case with Canva.
- PowerPoint lets you output your presentations to a wider range of formats than Canva, including higher-res image and video formats.
- You can create more sophisticated graph types with PowerPoint.
- PowerPoint gives you more ways to rehearse your presentation.
Key alternatives to Canva and PowerPoint
Canva and PowerPoint are by no means the only tools for creating presentations.
When it comes to ‘all-in-one’ design apps like Canva, Visme, VistaCreate (formerly Crello) and Adobe Express are probably the main competitors. You can learn more about these products in our Canva vs Visme comparison , our VistaCreate (Crello) vs Canva comparison and our Adobe Express vs Canva shootout .
As for direct alternatives to PowerPoint, Google and Apple provide the main competition, in the form Google Slides (part of the Google Workspace suite) and Keynote (an iWorks product) respectively. We have yet to review Keynote or iWorks, but we do have a Microsoft 365 vs Workspace comparison available.
In certain contexts, Adobe Photoshop can be used as an alternative to Canva, but it’s not really a direct competitor to PowerPoint. Check out our Canva vs Photoshop comparison for more details on the key differences between this app and Canva.
Now…over to you!
Got any thoughts on PowerPoint vs Canva? Or any questions you’d like to ask? Do leave them in the comments section below — we read all comments and do our best to answer all visitor queries.
Canva vs PowerPoint — FAQ
Can i use canva and powerpoint for free.
In the case of Canva, a free version is available, or alternatively, you can make use of a 30-day trial of Canva Pro . PowerPoint can be tried for free for 30 days as part of a Microsoft 365 trial .
Is Canva better than PowerPoint?
It’s better in some ways — it’s easier to use, gives you more stock photography to play with, and gives you built-in video editing tools that are not present in PowerPoint. However, PowerPoint beats Canva when it comes to integrating with Microsoft 365 apps, giving you ‘niche’ tools for working with 3D models and equations, and being more flexible when it comes to creating graphs.
Can you create professional presentations in Canva?
Yes — you can create extremely professional presentations in Canva that make sophisticated use of audio, images and video; you can also export them to a wide range of formats.
Can I import PowerPoint presentations into Canva?
Yes. Canva recently released an import feature that lets you import PowerPoint files into Canva. However, depending on the fonts and presentation layouts involved, imported files may not always be faithful to the PowerPoint original.
About the author

Chris Singleton
- View on Facebook
- View on Linkedin
- View on Youtube
- View on Twitter
- http://Contact%20us
Chris Singleton is the Editor of Style Factory.
Originally from Dublin, Ireland, he is now London-based.
Since graduating from Trinity College Dublin in 1999, Chris has advised many businesses on how to grow their operations via a strong online presence, and now he shares his experience and expertise through his articles on the Style Factory website.
Chris started his career as a data analyst for Irish marketing company Precision Marketing Information; since then he has worked on digital projects for a wide range of well-known organizations including Cancer Research UK, Hackney Council, Data Ireland and Prescription PR. He founded Style Factory in 2009 as a way to share his expertise with a wider audience.
He is also the author of a book on SEO for beginners, “Super Simple SEO.”
You can connect personally with Chris via Twitter (X) or LinkedIn .
Comments (5)
Cancel reply.
Your email address will not be published. Required fields are marked *
Save my name and email in this browser for the next time I comment.
When I download my canva video presentation that i made it turns a little bit pixeled. Do you know why that happens?
The main culprit might be if your video involves footage that has been blown up too much — but it could theoretically be a Canva bug too. If you suspect the latter is at the root of the problem, I’d suggest trying a re-export, and having a word with the Canva support team if the issue persists.
You cannot print in Canva from the web — Canva files have to be always downloaded in some format, then printed. This is a bad process. There is no offline access either.
Canva is great, yes.
However, I find MS PowerPoint to be much more effective than Canva in producing graphical artwork from the bottom up for the following reasons:
(1) MS PowerPoint gradients are simply better. (2) Canva lacks indispensable vector-type tools like ‘Freeform’, ‘Curve’ and ‘Scribble’ that are present in MS PowerPoint and other Microsoft programs. (3) MS PowerPoint ‘Autoshapes’ and ‘Merge Shapes’ feature sets are lacking in Canva and are also quite indispensable for more complex graphical artwork/design from ‘scratch.’
Very thoughtful and helpful review. I am an advanced PPT user, and I started looking into Canva based on some recommendations. My first question was, hey, how does this compare to Powerpoint. Your review was excellent. Thank you!
Posted Nov 22, 2022

Create beautiful marketing graphics at scale.
Discover Glorify
Design & Inspiration
Canva vs Powerpoint - Which One is Better For Presentations in 2023

Canva Vs Powerpoint: Overview
Canva is a web-based visual design platform allowing non-designers to create various designs quickly.
Similarly, PowerPoint is a powerful yet simple-to-use presentation application built specifically for making professional-looking presentations.
The main difference is that PowerPoint is limited to presentations.
But with Canva, you can create presentations as well as a range of other design kinds.
Canva Overview

With thousands of ready-made templates and a massive collection of visual assets , Canva is used to generate everything from infographics to album artwork, flyers, posters, social media content, and a plethora of other visuals.
Designed with beginners in mind, Canva enables simplicity, pragmatism, and efficiency in all tasks performed through it, whether you need to create a birthday invitation, logo, or business presentation.
With Canva, you can post finished designs online and ask others to collaborate .
However, Canva's free version provides limited stock templates and pictures.
PowerpointPoint Overview

Within the Microsoft365 package, PowerPoint is an industry-standard option for creating presentations.
It's simple to use and offers plenty of templates. Still, it solely concentrates on creating presentation-style files with additional features like word processing and drawing.
PowerPoint is also an easy-to-use design tool.
It is well-organized and straightforward, and after being on the market for a time, it has partially established the criteria for outstanding presentation software.
PowerPoint has several important features that are continually upgraded to keep up with current trends.
Presentations, like with Canva, may be uploaded online and shared with others.
Canva Vs PowerPoint: Features
Undoubtedly, both Canva and PowerPoint are loaded with a wide variety of fantastic features.
But, despite this, they aim at different purposes.
Canva Features
Templates – Canva has around 12000 presentation templates (Presentations (16:9 and 4:3), Talking Presentations, and Mobile-First Presentations).
Stock library – 1+Million of photos, backgrounds, icons, videos, elements, graphics, and audio.
Graph maker – More than 20 pro types of charts to visualize your data. Additionally, it enables you to import your own Excel sheet.
Match and Move – Powerful animations and video transitions.
Notes and Footnotes – You can add a footnote on each page or notes within the private presenter screen feature.
PowerPoint Features
Templates – Using templates.office.com and other affiliate websites, you may find a wide variety of free templates that you can use for your presentation, along with the branded templates.
PowerPoint designer – AI-powered feature that generates ideas and can be used to buy professional designs created by experienced designers.
Cinematic motion mode – Create eye-catching presentations.
Library – Includes stock animations, transitions, and layouts.
Translation feature – Translate text and add spoken language and subtitles using the AI-powered Translator service.
Footnotes – Simply add a footnote to each page of your presentation.
Background editor – Adding, changing, and removing background color.
Keyboard features – Easily navigate using keyboard shortcuts.
Object insertion features – Add SmartArt graphics, tables, shapes, and charts.
Picture features – Add, compress, or change picture style.
Canva Vs PowerPoint: Pros and Cons
✅ Web-based, with mobile and desktop apps available.
✅ Beginner-friendly interface.
✅ Saving option to account, Google Drive, or Dropbox.
✅ Huge library of images, fonts, and color palettes.
✅ Object animation.
✅ Export images to PTT, JPG, PNG, PDF, and MP4 file format.
✅ 16 chart types.
✅ Real-time collaboration.
✅ Free access to 5GB cloud storage.
✅ 110 apps and integrations.
❌ Maximum of 30 slides per presentation.
❌ Lack of transition and animation options.
❌ Parallax scrolling is not available.
❌ Absence of useful filters for free design elements.
❌ Free plan is quite limited in features.
PowerPoint Pros
✅ Web-based, with PC and mobile apps available.
✅ Easy-to-use interface.
✅ Saving work offline or to One Drive and account .
✅ Export slideshows to GIF, MP4, PDF, WMV file formats.
✅ 50 chart types.
✅ Translation feature.
✅ Integration with social media, Microsoft 365, and other tools.
✅ Draw free-hand feature.
✅ Custom templates.
✅ Video inserting option , along with video recording and playing feature.
✅ Compatible with every operating system.
✅ Keyboard design shortcuts.
✅ Slideshow editing options, like adding a hyperlinked table of contents or drawing on the slide during the presentation.
PowerPoint Cons
❌ Limited free version.
❌ Lack of font variety.
❌ Files are not saved automatically.
❌ Too many features can be overwhelming for some less-experienced users.
❌ The software often glitches.
Canva Vs PowerPoint: Pricing
Canva pricing.
Canva has a free plan , with some restrictions to it. And Pro and Teams are Canva's two premium subscriptions.
More stock content, a background remover, a magic resizer, a brand kit, more export options, premium fonts, and edit history are included with the pro version.

PowerPoint Pricing
Microsoft PowerPoint is offered for a one-time subscription. Support is provided through email, a knowledge base, frequently asked questions, and other online tools.
You can buy it as a standalone product or as part of a Microsoft 365 bundle.

Canva Vs PowerPoint – Which One Is Better?
Both of these tools are good choices for creating presentations.
Canva is a one-in-all tool that allows you to create visuals for numerous occasions. The downside is that a free plan is quite limited.
If you need to brand your design or use advanced editing options, like the background remover, you should subscribe to a Pro plan.
On the other hand, PowerPoint is created explicitly for presentations. So, it is packed with many features, such as Designer, shortcuts, and video controls to spice things up.
But, this can be confusing for some users and requires a bit of a learning curve.
So, why not try a third option?
Glorify – The Third Solution
Glorify is an online ultimate design tool with powerful features specially created with eCommerce users in mind. But not just that.
With it, you can create almost anything – social media content, ads, banners, and, of course -- presentations.

Glorify has a free forever plan that offers various features to anyone in contrast to the above-mentioned tools:
Infinite canvas – Prepare marketing materials, brainstorm, and keep all of your assets in one place.
Brand kit – Create, edit, and personalize your designs within a click.
Annotation tool – Highlight all the prominent features of your product.
Template bundles – Stay consistent across platforms and save time using one design that fits all.
Background remover tool – Create perfect cut-out in seconds.
Mockups – Create realistic, 3D mockups with Shadows and Reflections.
Smart resize – Instantly resize any image.
Creating a presentation using Glorify is simple, thanks to its intuitive interface.
Let's look at these easy-to-follow steps.
Step 1. After logging in, choose the HD banner from Dashboard.

Step 2. This will open all the available templates. Again, you can start from Scratch or filter through offered templates using the Keyword or Niche and Theme filtering options.

Step 3. Glorify has many editing options. For example, you can upload your own image or choose among hundreds of images from the library.

Step 4. The Basic section of the Library offers to edit design by adding Icons, Shapes, Backgrounds, etc.

Step 5. The Brand kit is a feature that can be used to personalize any design with a click. Apply logo , custom font, and color palette straight from the Dashboard.

Step 6. Use Tools and Elements to further enhance your image.

Step 7. Every element of the template is customizable. Simply select any part of the image to edit it further.
For example, an editor on the right will appear by clicking on the text. You can select a font from the library or use a custom one. Also, you can change the font's style, position, height, or border.

Step 8. When you are happy with your design, you can share it via a link or email or save it as PNG, Transparent PNG.JPG, SVG, PDF, or SVG PDF.
The Glorify’s free plan doesn't require a credit card to get started, and you get access for 3 users within 1 workspace.
Additionally, all the features, like the Background remover, Brand kit, Smart resize , Infinite canvas , and more, are available for up to 5 projects per month.
Sign up today and create stunning visuals in no time using Glorify!
Similar Articles

Amazon Storefront Banner Sizes & Best Practices 2024
Discover the essence of Amazon Storefront banners and their pivotal role in captivating potential customers. Learn the optimal size – 3000 pixels wide by 600 pixels tall – for seamless integration and stunning visual impact. Uncover expert tips for crafting compelling banners that reflect your brand identity and drive sales
Glorify Team
March 28, 2024

Etsy Banner Sizes & Best Practices 2024
Discover the ins and outs of Etsy banner design with our comprehensive guide for 2024! Learn about optimal sizes, essential practices, and step-by-step creation using Glorify. Elevate your Etsy storefront and captivate customers with visually stunning banners that speak volumes about your brand and products. Unlock the power of effective branding on Etsy today!

Top 10 Website Design and Development Resources of 2024
Discover the must-have tools and resources for website design and development in 2024! From powerful web builders like Framer and Wix to essential design assets such as FontShare and Coolors, we've curated the ultimate list to fuel your creative journey. Dive into expert advice and review sites like Website Planet and Website Builder Expert, ensuring you stay ahead of the curve. Whether you're a seasoned developer or just starting out, find everything you need to craft professional websites with ease.
March 20, 2024

Social Media
Facebook cover sizes & best practices 2024.
Unlock the Power of Facebook Cover Design with Our 2024 Guide! Learn the optimal sizes, top tips, and step-by-step creation process. Elevate your brand's presence on social media effortlessly with Glorify's intuitive design platform. Explore stunning templates and make a lasting impression today!
March 14, 2024
Not that you’ve done checking the preliminary tasks on how to start an eCommerce store, it’s now time to bring the product to the delivery phase [...]

The path to Glory begins here
Start your free trial

#1 Design tool for e-commerce & marketing
All tutorials
Knowledge base
Sell templates
Give feedback
View all features
Annotate lines
Infinite canvas
Shadows & reflections
Stock images & graphics
Smart resize
Video & animation
Explore templates
Template marketplace
Product images
Social Media Posts
Hero headers
Presentations
Alternatives
Artboard vs Glorify
Canva vs Glorify
Follow us! 🥳

Product Hunt
© 2024 Glorify App - All rights reserved
Glorify Terms of Use
LTD Terms & Conditions
Privacy Policy
Cookies Policy
Android Police
How to curve text in google slides.
Grab everyone's attention with curved text in presentation slides
Google Slides offers formatting options to tweak text, photos, videos, and other elements in a presentation. However, it lacks a few important add-ons. For instance, unlike PowerPoint, there isn't a built-in way to curve text in Google Slides. If you want to make your presentation stand out among the rest, use the tricks below to curve text in Google Slides.
Adding curved text is a neat way to elevate your presentation. Still, don't go overboard with curve text in Google Slides. It may create unnecessary distractions and make it hard for your audience to read a slide. Instead, highlight a few headings or text you want to separate from the other paragraphs.
Although Google Slides is available on mobile platforms like iPhone and Android phones , we focus on the web version in the steps below.
Curve text in Google Slides using PowerPoint
There are a couple of ways to curve text in Google Slides. If you have a Microsoft 365 subscription plan, use the PowerPoint desktop app to curve text and copy it into Google Slides. In another trick, you can use a web tool like Canva or InkPx to get the job done. Let's start with PowerPoint.
- Open Microsoft PowerPoint on Windows or Mac.
- Create a new presentation and go to any slide.
- Resize a text box and enter the text you want to add in Google Slides.
- Expand the text effects icon and click Transform .
- Check your curved text in action. Drag the white dots around the text box to resize it.
- Open a presentation in Google Slides and select a slide where you want to add curve text.
PowerPoint offers dozens of curved text styles. You'll have no trouble finding a style that matches your presentation tone and theme.
How to delete a text box in Google Slides
Use an online tool to curve text in google slides.
PowerPoint requires a paid Microsoft 365 plan. If you don't have a subscription, use the tools below to generate and upload curved text in Google Slides.
Curve text using Canva
Canva is one of the best graphic design tools available. The web app offers several editing tools to create curved text in a design. You can download the image with a transparent background and upload it to Google Slides. Follow the steps below.
- Use the top menu to tweak text style, color, size, and more.
The ability to download an image with a transparent background requires a Canva Pro subscription.
How to add transparency to an image in Google Slides
Curve text using inkpx.
InkPx is a web tool for creating curved text. You can make one and upload it on Google Slides.
- Visit InkPx .
- Enter text and pick a color, style, and size. Then, tweak the radius, spacing, and other details.
- Pick a PNG or JPG image type and save the image.
- Launch a presentation in Google Slides.
- Select your image and open it in Google Slides.
Unlike Microsoft PowerPoint and Canva, InkPx is free to download and use. And unlike other web tools, you don't need to create an account to use the service.
Make your presentation stand out
Aside from curve text, there are other ways to make an interesting pitch. However, creating an engaging presentation from scratch can be time-consuming. Check the top Google Slides templates to get started and complete an applaud-worthy presentation in no time.
IMAGES
VIDEO
COMMENTS
Canva's alternative presentation maker has an intuitive graphs and charts tool to help you turn your numbers into awesome pieces of data visualization. Open the charts folder and start creating your own bar, line, pie, doughnut charts, or pictograms. You can also create circuit diagrams, organizational charts, and even mind maps.
Use the same 'banner' or title font throughout your design. Have the same 'frame' or 'grid' throughout your design. Apply the same background throughout your design. Use consistent fonts. 2. Work smarter, not harder. Create a template page for your presentation to keep all the points above about consistency in line.
Exporting a Canva presentation to PowerPoint. As you can see below, the PowerPoint file is entirely editable. Something to consider is that unless you have the font installed on your computer, PowerPoint will reassign to a generic font. Example of Canva presentation in PowerPoint (100% editable) How to Use Canva-made Graphics in PowerPoint
In this tutorial, you will learn how to save your Canva presentation as a PowerPoint presentation in a few simple steps. Canva home. Design spotlight Design spotlight. Visual documents. Visual Suite. Docs. Presentations. Whiteboards. PDF editor. Graphs and charts. Photos and videos. Video editor ...
Create better-looking PowerPoint presentations using these Canva hacks. 🎨NEED CANVA PRO? Use my link to receive a FREE 45-Day Trial of Canva Pro - https://l...
Creating a PowerPoint in Canva is easy and straightforward. First, log in to your Canva account and select the "Create a Design" option. Choose the PowerPoint icon and select a template that you want to use. Add text, images, shapes, charts, and other elements to your presentation. When you're finished, click "Download" to save the ...
PowerPoint also enables embedding links to Canva slides for dynamic interactive content. Right-click within any slide and select "Embed Canva Design". When presenting, clicks load the associated Canva creation in a resizable frame. Unfortunately lacking offline support limits portability. Syncing updates also requires manual refreshes.
I've made the switch! Presentations on Canva are SUPER EASY and convenient to put together. In this Canva tutorial video, I'll show you how to put a great lo...
Visit https://www.canva.com and click Your Projects in the menu pane on the left side of the page. Select the project you'd like to import to PowerPoint. 2. Click the Share button in the top right corner. Next to the Present button in the top right corner of the design window, you'll see a Share button.
Step 3: Opening your Canva Template in PowerPoint. Now that you have downloaded your Canva template to PowerPoint, you can open your presentation file in PowerPoint. You should find that all text, images and colors can be updated or deleted. It's important to note that when you import a Canva file into PowerPoint, it does not import the slides ...
Once you've selected a presentation design to customize, click on 'use this template' to edit it. Just like with any regular Canva template, you can click on any of the elements on the page to customize them, such as the background, image and text, or click on any of the options from the left-hand side panel to add new photos, elements or text into your design.
Converting Canva Slides to PowerPoint Is Easy By following the steps outlined in this article, you can seamlessly transition your Canva presentations to PowerPoint, and get the best of both worlds! Whether you're working in Canva or PowerPoint, you can also choose to convert your presentations into videos.
Step 1: Open a slide in your Canva presentation. Step 2: Select Elements from the sidebar. Add graphics, icons, stickers, tables, videos, and more. Step 3: You can explore the AI image generator ...
Choose a design from our presentation templates or create your own from scratch. Customize your presentation with colors, fonts, and key information. Add animations, videos, images, illustrations. Use assets and other media content from your Brand Kit (Pro) to stay consistent with your business or school brand.
Presentation Tutorial: How To Make a Presentation in Canva (FREE & EASY) // In this video, I'm going to show you a simple presentation tutorial on how use (F...
Making Canva Presentation Using Templates. On your home page, navigate to the "You might want to try" section and choose "Presentation.". Go to the left sidebar horizontal menu and tap on ...
Reasons to use Canva instead of PowerPoint. It's a much easier-to-use product. It gives you access to a much bigger range of images, graphics and videos than PowerPoint. The bundled range of templates is much larger than PowerPoint's. Its background removal tool is significantly better than PowerPoint's.
Step 1 - Select Presentation When Creating a New Design. Once logged into Canva.com, click the 'Create a design' button in the top right corner. This is where you select the type of design to create. Canva has many options, including PDFs, Instagram, and Facebook posts. To create Canva presentation, select 'Presentation (16:9).
In this video Hadas will teach us how to create quick presentations in Canva. She will show us how to customize templates from the Canva library to quickly p...
Canva Vs Powerpoint: Overview. Canva is a web-based visual design platform allowing non-designers to create various designs quickly.. Similarly, PowerPoint is a powerful yet simple-to-use presentation application built specifically for making professional-looking presentations. The main difference is that PowerPoint is limited to presentations. But with Canva, you can create presentations as ...
1. Open the template in Canva. 2. In Canva click on "Share" at the top right-hand corner, then click "More" 3. Scroll down further and you will see "Google Drive" button. 4. Choose the "PPTX" or Powerpoint file type. Make sure to click "All Pages" on select pages. 5. Your template is exported to Google Slides!
Open Microsoft PowerPoint on Windows or Mac. Create a new presentation and go to any slide. Select Insert at the top and click Text box . Resize a text box and enter the text you want to add in ...
Duplicate your title graphics across slides. Create a content slide to match your title graphic. Place padding around your text to make it easy to read. Increase your font size to emphasise your points. Reduce the amount of text on each slide to avoid clutter. Share.
Drag and drop your presentation file to the editor. On the top corner of the editor, click on File > Upload a file.; On the editor side panel, click on the Uploads tab, then click on Upload files.Select the files you want to upload, or drag and drop them in the Uploads tab. ; To use the file in your design, click on it from the Uploads tab in the editor side panel.
Present with Microsoft PowerPoint. Bring Canva's brilliant presentation templates into PowerPoint by publishing your design as a PowerPoint presentation. Permissions. When this app is open in a design, it can: Read the contents of the design. Additional information. Use in a design.