Unique 2D Autocad Exercises to Improve Your Skill Now
Few more autocad exercises.
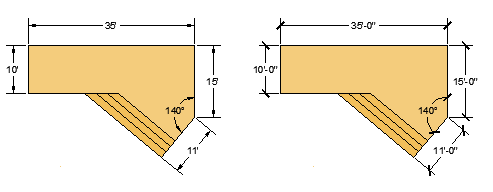
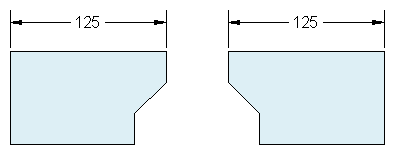
This Exercise was first introduced in this AutoCAD quiz . Feel free to check it to find out what the height of the image is.
The value of A will unveil itself after drawing the part you are given information about.

You can find this same Exercise in the post where we learned how to work with layers in AutoCAD .

The following image gives some missing information you will need.

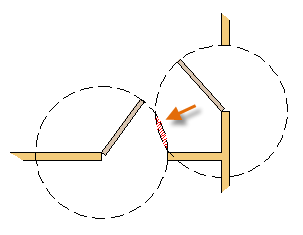
This is an easy one. It was actually first introduced when we learned how to draw circles and how to trim in AutoCAD .

Free eBook: AutoCAD exercises
Free eBook: Download this Series of Projects and learn AutoCAD on the go. Looking to learn AutoCAD the fastest way possible?

This is a cool exercise that will help you think a little bit. All dimensions are given!
While you are it, I believe you should check this AutoCAD quiz .
This exercise first appeared in this AutoCAD practice exercise .
If you were able to complete previous exercises, this one could be boring nevertheless it is not totally unnecessary to have it on the list. I should have put it above 😉

Exercise 10

Exercise 11

If you find any difficulties working on these Exercises, Here is what you need to do. Either drop a comment below or simply visit the series learn AutoCAD Basics , Each of these exercises was treated in depth in the last CAD series .
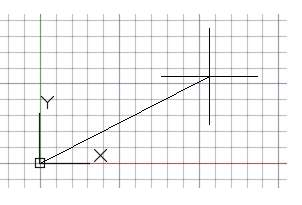
Let’s use the image below to practice in AutoCAD.

The following figure is a 2D figure and where all data are being provided. We should be able to replicate this with ease.
Step by Step AutoCAD exercise
Draw the following line

Draw the second line starting from the right end of the previously drawn line.
Use @50<-53 to draw it, and you should have the following.

Draw a line starting at the left end of the 30 unit line using @50<-79 ( 50 of length is arbitrary chosen and the angle 79 is found by doing 360-90-64-127 – the Sum of angles in any Quadrilateral is 360 degrees ).

Draw a line of an arbitrarily chosen length but make sure it forms 64 degrees with the line we have created in Step 2
( You can do this by creating a line aligned with the line with created in Step 2 and rotating it with 64 degrees counterclockwise )
What I will do here is:
Rotate the line created in step 2 from its bottom end with 64 degrees counterclockwise.

Create a line on the open side of the quadrilateral from the 2 points such as having the following.

Use the Fillet command with R=0 to join those two lines to close that hole at the bottom of the figure

Hope this has given you a glimpse of it all. Now you have more than what you need to start playing on your own
Related posts:

How to Learn AutoCAD: Complete free guide
Table of Contents
AutoCAD, developed by Autodesk, is a powerful computer-aided design (CAD) software used extensively in various industries such as architecture, engineering, and design. Its versatility and widespread adoption make it an essential skill for professionals in these fields. In this article, we will explore the significance of AutoCAD, the benefits of mastering it efficiently, and provide a comprehensive guide to learning AutoCAD step-by-step.
Understanding AutoCAD Basics
AutoCAD Definition and Applications: AutoCAD is a CAD software that allows users to create precise 2D and 3D drawings. In architecture, it facilitates the design of buildings and structures. Engineers use it for mechanical, electrical, and civil engineering projects. Additionally, it finds applications in product design, interior design, and more.
User Interface and Essential Tools: Upon launching AutoCAD, users encounter a user-friendly interface with various tools and menus. Understanding the layout of the interface, tool palettes, and command line is crucial for smooth navigation.
Navigation and Orientation: Navigating within AutoCAD involves panning, zooming, and rotating the view. Learning how to efficiently navigate in the drawing area is essential to work effectively.
Setting Up AutoCAD for Success
Installation Guide: We’ll walk readers through the process of installing AutoCAD on their computers, ensuring they have access to this powerful software.
Initial Configuration and Customization: Configuring AutoCAD to suit individual preferences and needs can significantly enhance productivity. We’ll guide readers through the initial setup and customization of settings.
Hardware Requirements: AutoCAD is a resource-intensive software, and having the right hardware can greatly impact its performance. We’ll provide tips on hardware requirements for a smoother operation.
Learning the Fundamental Commands
Essential Drawing and Editing Commands: Mastering fundamental commands like line, circle, trim, and extend is essential for creating accurate and efficient drawings. We’ll introduce these commands and provide practical examples and exercises for better understanding.
Common Mistakes and How to Avoid Them: Beginners often encounter common mistakes when using AutoCAD. We’ll discuss these errors and provide tips on how to avoid them to maintain a smooth workflow.
Mastering Advanced Techniques
Complex Drawing Tools and Commands: AutoCAD offers a wide array of advanced commands such as offset, array, and hatch. Exploring these tools will enable users to create intricate designs and streamline their workflow.
Utilizing Layers and Blocks: Organizing drawings using layers and blocks can significantly enhance efficiency. We’ll demonstrate how to utilize these features effectively.
Model Space and Paper Space: Understanding the concept of model space and paper space is vital for creating professional layouts suitable for printing.
Utilizing AutoCAD Resources
Reputable Online Tutorials and Forums: We’ll recommend trusted online tutorials and forums where users can access additional learning resources and connect with the AutoCAD community.
Official Documentation and Help Resources: AutoCAD provides comprehensive official documentation and help resources. We’ll emphasize the importance of utilizing these resources for effective learning.
Communities and User Groups: Being part of AutoCAD user groups and communities fosters knowledge sharing and troubleshooting assistance.
Enhancing Productivity with Shortcuts and Automation
Time-saving Keyboard Shortcuts and Command Aliases: Learning keyboard shortcuts and command aliases can significantly speed up the design process. We’ll introduce some of the most useful shortcuts.
Benefits of Macros and Scripts: Automating repetitive tasks using macros and scripts can save time and effort. We’ll discuss the benefits of using automation tools within AutoCAD.
Customizing Tool Palettes and Menus: Tailoring tool palettes and menus to individual needs can streamline the workflow and enhance productivity.
Learning from Real-world Projects
Practicing AutoCAD through Hands-on Projects: Hands-on projects offer practical experience and reinforce learning. We’ll encourage readers to undertake real-world projects to sharpen their skills.
Examples of Practical Projects: We’ll provide examples of practical projects relevant to readers’ interests, such as architectural floor plans and mechanical drawings.
The Importance of Persistence and Dedication: Learning AutoCAD requires dedication and practice. We’ll emphasize the importance of perseverance to achieve mastery.
Troubleshooting and Common Challenges
Identifying Common Issues and Troubleshooting: We’ll address common issues faced by beginners and provide troubleshooting tips to overcome them.
Dealing with Error Messages: AutoCAD may generate error messages during use. We’ll discuss common error messages and their solutions.
Preventing Data Loss and File Recovery: Data loss can be frustrating. We’ll share tips to prevent data loss and methods to recover files in case of accidental deletion.
How to Learn AutoCAD: tips
- Start with the Basics: Begin by understanding the fundamental concepts of AutoCAD, such as the user interface, navigation, and basic drawing commands. Familiarize yourself with essential tools and functions before moving on to more advanced features.
- Utilize Online Resources: Take advantage of the wealth of online tutorials, videos, and courses available. Many websites and platforms offer free and paid resources for learning AutoCAD. These resources provide step-by-step guidance and practical examples.
- Practice Regularly: Consistent practice is key to mastering AutoCAD. Set aside dedicated time each day or week to work on projects, exercises, and tutorials. The more you practice, the more confident and proficient you’ll become.
- Work on Real-world Projects: Apply your skills to real-world projects that interest you. Whether it’s designing a floor plan or creating a 3D model, hands-on projects reinforce learning and make the experience more enjoyable.
- Join AutoCAD Communities: Engage with other learners and professionals in AutoCAD communities and forums. Participating in discussions, asking questions, and sharing knowledge can provide valuable insights and support.
- Explore Advanced Features: Once you’ve grasped the basics, venture into more advanced features and commands. AutoCAD offers a wide range of tools for complex designs and modeling. Don’t be afraid to experiment and push your boundaries.
- Use Keyboard Shortcuts: Familiarize yourself with essential keyboard shortcuts. Using shortcuts can significantly speed up your workflow and make you more efficient in executing commands.
- Learn from Mistakes: It’s normal to encounter challenges while learning AutoCAD. Embrace mistakes as learning opportunities and take the time to understand what went wrong. Learning from your errors will help you improve.
- Stay Updated: AutoCAD evolves with new updates and features. Stay informed about the latest developments in the software and explore new functionalities to expand your skillset.
- Stay Motivated: Learning a new software can be challenging, but stay motivated and persistent. Set clear goals, track your progress, and celebrate your achievements along the way.
Remember that learning AutoCAD, like any new skill, takes time and patience. Be kind to yourself and enjoy the process of discovering the possibilities that AutoCAD offers for design and creativity. With dedication and practice, you’ll soon become proficient in this valuable tool.
Frequently Asked Questions (FAQ) – How to Learn AutoCAD
How long does it take to learn autocad.
The time it takes to learn AutoCAD varies depending on your prior experience, dedication, and learning pace. For beginners, it may take several weeks of consistent practice to acquire basic proficiency. More advanced skills may require a few months of continuous learning.
Can I learn AutoCAD on my own without formal training?
Yes, you can learn AutoCAD on your own without formal training. There are plenty of online tutorials, videos, and resources available to guide self-paced learning. Dedication, practice, and a willingness to explore the software are essential for successful self-learning.
Is prior experience in drafting or design necessary to learn AutoCAD?
No, prior experience in drafting or design is not required to learn AutoCAD. Beginners can start from scratch and gradually build their skills through practice and learning resources. Any background in design or engineering may be beneficial, but it is not mandatory.
Are there any free resources available for learning AutoCAD?
Yes, there are numerous free resources available for learning AutoCAD. Autodesk’s official website offers free tutorials and documentation. Additionally, various online platforms provide free video tutorials and user forums where learners can seek guidance and support.
Can I use AutoCAD for personal projects and hobbies?
Absolutely! AutoCAD can be used for personal projects and hobbies, such as designing your dream house, creating DIY projects, or even crafting artistic designs. It is a versatile tool that caters to various creative pursuits.
Related Posts:
- What is AutoCAD? A Comprehensive Exploration of Its Power and Potential
- CAD Glossary: Definitions of Essential Terms for Computer-Aided Design
- A Comprehensive AutoCAD FAQs for Beginners (Questions with answers)
AutoCAD Installation and Troubleshooting Guide FAQs
- What CAD career makes the most money?
- How to Become an AutoCAD Drafter (Complete guide)
- Best 7 AutoCAD certification programs
Architectural drafter job description
Online autocad certification : free complete guide.

Is it worth learning ANSYS SpaceClaim?

Best 10 CAD certification programs

Is it worth learning Leopoly?

Is it Worth Learning 3DS Max?

Is it Worth Learning TurboCAD?

Is it worth learning Bentley Systems?

Is it worth learning Onshape?
- AutoCAD Electrical
- Autodesk Inventor
- Robots structure (Upcoming)
- Certification Prep
- Structural analysis
- 3D Printing
- ul > li > a.menu-item.menu-item-24-a"> eBooks
- ul > li > a.menu-item.menu-item-12-a"> Free Courses
- ul > li > a.menu-item.menu-item-18-a"> Tutorials
- ul > li > a.menu-item.menu-item-23-a"> Community
- li.menu-item.menu-item-3"> Pricing
- li.menu-item.menu-item-2"> Signup for free
- li.menu-item.menu-item-1"> Login
- li:not(.tcb-excluded-from-group-item)"> All Courses
- Free Courses
- li:not(.tcb-excluded-from-group-item)"> Pricing
- Subscription and Billing
AutoCAD practice drawings with PDF eBook
Updated on December 18, 2023 | By Jaiprakash Pandey | Category AutoCAD | min reading time
Disclosure: Our content is supported by readers like you, we earn commission from affiliated products you buy from links placed on our website without any extra cost to you. This does not influence our content recommendations. Learn more about our affiliate process here .
The best way to practice AutoCAD skill is with AutoCAD practice exercises, the more your practice the better you get at making drawings using AutoCAD.
So, to help you practice I have created this article with ten 2D and ten 3D drawings that you can make using AutoCAD or any other CAD software as well.
To get the full list of 2D and 3D practice drawings download the PDF eBook which contains more than 70 drawings fully illustrated with dimensions.
Click the download button above to get your eBook.
2D drawings
Use AutoCAD, BricsCAD, ZWCAD or any other similar CAD software to make these drawings.

2D practice drawing 1

2D practice drawing 2

2D practice drawing 3

2D practice drawing 4

2D practice drawing 5

2D practice drawing 6

2D practice drawing 7

2D practice drawing 8

2D practice drawing 9

2D practice drawing 10

Learn to make these drawings in AutoCAD
The step by step method of making these practice drawings along with more than 50 other 2D practice drawings is in the following course.
3D Drawings
You can use AutoCAD, BricsCAD, ZWCAD, Solidworks, Fusion 360 or any other software with 3D workspace to practice these drawings.

3D practice drawing 1

3D practice drawing 2

3D practice drawing 3

3D practice drawing 4

3D practice drawing 5

3D practice drawing 6

3D practice drawing 7

3D practice drawing 8

3D practice drawing 9

3D practice drawing 10
Learn to make these 3D drawings in AutoCAD
The step by step method of making these practice drawings along with more than 50 other 3D practice drawings is in the following course.
These practice drawings are part of our collection of nearly 100 2D and 3D practice drawings from our practice drawing eBook.
You can get this eBook for free using the download bar at the top of this page.
Disclosure: On this site, we have placed some recommended products and services from which we get an affiliate commission for every purchase you make without any extra cost to you. Learn more about our affiliate process here .

About the Author
Jaiprakash Pandey
Jaiprakash Pandey is the published author of “Practical AutoCAD book” by Packt publication he is also an Autodesk AutoCAD certified professional and Autodesk expert elite community. He has been delivering CAD training to corporate clients for more than 8 years and his clients include Steel, Power, Automobile industries and also government organizations, fortune 500 companies and the military.
Continue Learning...
How to repair AutoCAD drawing file and fix its errors
All about the multiline command of autocad – with practical use cases, how to make a title block in autocad [complete tutorial].

Get SourceCAD Free Courses
Start learning your CAD and engineering tool for free with our free courses and eBooks. Get a certificate of completion on finishing the courses.
2d drawing Problem 10
You can get its step by step tutorial in this course https://sourcecad.com/courses/2d-autocad-practice-drawing-and-projects/
Where i can get video tutorial of these diagrams
It’s in this course https://sourcecad.com/courses/2d-autocad-practice-drawing-and-projects/
Hi, I have a circle with no radius, 2 parallel lines (4.3 apart) with the length of 75 to the center of the circle. The circle is attached to the line via an Ogee Curve with a Radius of 5. The question is how big is the circle and where is the line trimmed so that the circle, the curve, and the line all meet. If I had more information I would give it. The circle I am guessing is about twice the radius of the curve. I have been working on this for a few hours and have tried almost everything to get everything to work. Not even YouTube works when I ask this question. 😕
Hi Kim, could you roughly draw a shape or deign and send it to me as an image or screenshot it will be helpful for us to guide you better.
Session expired
Please log in again. The login page will open in a new tab. After logging in you can close it and return to this page.
Learn from thousands of free Tutorials
Auto cad training exercise for beginner-1.

AutoCAD Training Exercises for Beginners - 1. This video contains AutoCAD drawing tutorials based on what we learn in the previous lectures. Topics covered in the video are: Crating first AutoCAD drawing. Solving the AutoCAD basic exercises. This tutorial shows how to create drawing in AutoCAD for beginners.
Step 1: AutoCAD Training Exercises for Beginners -1
Was this tutorial useful?
Sign in or create account, forgot password.
If you don't receive the email within an hour (and you've checked your Spam folder), email us as [email protected].

AutoCAD Exercises
Autocad exercises & practice drawings for 2d & 3d cad users.
Hello & welcome dear friends, I am Sachidanand Jha founder of CADin360. I am from India. I am Engineer by heart and soul. I found that lots of AutoCAD Students were looking for AutoCAD Exercises, AutoCAD Practice drawings, AutoCAD 2D drawing , AutoCAD 3D drawing & so on. Some Students were looking for “ AutoCAD tutorials for beginners ” to learn AutoCAD basics. Some Students were looking for “free AutoCAD software” & AutoCAD Shortcuts keys. So I decided to share my knowledge and useful free CAD CAM CAE stuff via CADin360. If you are looking for AutoCAD Exercises or Practice drawings then you are at right place at right time. Here you will find some AutoCAD Exercises & practice drawings to test your CAD skills. These drawings also work for AutoCAD mechanical, AutoCAD Civil & other CAD software packages. Same drawings can also be used as Solidworks Exercise for practice.
For AutoCAD 2D Exercises or practice drawings – Click here For AutoCAD 3D Exercises or AutoCAD 3D drawings – Click here
If you want to learn AutoCAD from basics to advance then visit below-given page links to learn AutoCAD basics step by step. A completely free AutoCAD tutorial series containing approximately 200 video lessons covering AutoCAD 2D as well as AutoCAD 3D topics taught with AutoCAD 2017 & AutoCAD 2018 version. Some tutorials are in Pdf as well as in the video for students.
For AutoCAD Tutorials for beginners – Click here For AutoCAD Tutorials Pdf – Click here For AutoCAD Tutorials Videos – Click here
If you want Autodesk AutoCAD Software or other CAD packages then a free 30-day evaluation copy of AutoCAD can be downloaded from AutoDesk website.
You can find a link of AutoCAD 30 day’s trial and an education version at Download Page section of CADin360.
If you are looking for AutoCAD Shortcut keys or AutoCAD shortcut keys for mechanical then you can find it at Download Page of CADin360. For AutoCAD Shortcut keys – Click here

Life is a learning Process. If you find anything useful on this page or website then Please support us by sharing our website or pages. Some useful links are given below for you. Hopefully, you will find here something valuable in your life. Thanks & Regards Sachidanand Jha
AutoCAD 2019(windows) What’s new in AutoCAD 2019 Click Here Try AutoCAD free for 30 days Click Here Free 3 Years Educational licences for Students & Educators Click Here System requirements for AutoCAD 2019 Click Here AutoCAD Keyboard Shortcuts Keys Click Here Download & Install AutoCAD 2019 Product Help Click Here
AutoCAD LT 2019(windows) What’s new in AutoCAD LT 2019 Click Here Try AutoCAD LT free for 30 days Click Here Free 3 Years Educational licences for Students & Educators Click Here System requirements for AutoCAD LT 2019 Click Here AutoCAD LT Keyboard Shortcuts Keys Click Here Download & Install AutoCAD LT 2019 Product Help Click Here
AutoCAD 2018 for Mac What’s new in AutoCAD 2018 for Mac Click Here Try AutoCAD 2018 Mac free for 30 days Click Here Free 3 Years Educational licences for Students & Educators Click Here System requirements for AutoCAD 2018 for Mac Click Here AutoCAD Mac Keyboard Shortcuts Keys Click Here Download & Install AutoCAD 2018 for Mac Product Help Click Here
AutoCAD LT 2018 for Mac What’s new in AutoCAD LT 2018 for Mac Click Here Try AutoCAD LT 2018 free for 30 days Click Here Free 3 Years Educational licences for Students & Educators Click Here System requirements for AutoCAD LT 2018 for Mac Click Here AutoCAD LT Keyboard Shortcuts Keys Click Here Download & Install AutoCAD LT 2018 for Mac Product Help Click Here
AutoCAD Mechanical 2019 What’s new in AutoCAD Mechanical 2019 Click Here Try AutoCAD Mechanical 2019 free for 30 days Click Here Free 3 Years Educational licences for Students & Educators Click Here System requirements for AutoCAD Mechanical 2019 Click Here AutoCAD Mechanical Keyboard Shortcuts Keys Click Here Download & Install AutoCAD Mechanical 2019 Product Help Click Here
AutoCAD Architecture 2019 What’s new in AutoCAD Architecture 2019 Click Here Try AutoCAD Architecture 2019 free for 30 days Click Here Free 3 Years Educational licences for Students & Educators Click Here System requirements for AutoCAD Architecture 2019 Click Here Download & Install AutoCAD Architecture 2019 Product Help Click Here
AutoCAD Civil 3D What’s new in AutoCAD Civil 3D Click Here Try AutoCAD Civil 3D free for 30 days Click Here Free 3 Years Educational licences for Students & Educators Click Here System requirements for AutoCAD Civil 3D Click Here Download & Install AutoCAD Civil 3D 2019 Product Help Click Here
AutoCAD Electrical 2019 What’s new in AutoCAD Electrical 2019 Click Here Try AutoCAD Electrical 2019 free for 30 days Click Here Free 3 Years Educational licences for Students & Educators Click Here System requirements for AutoCAD Electrical 2019 Click Here Download & Install AutoCAD Electrical 2019 Product Help Click Here
Certification
Certification overview
Architecture, Engineering & Construction
Design & Manufacturing
Media & Entertainment
Support & Policies
My dashboard
Getting started with AutoCAD
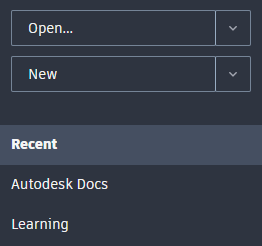
Becoming familiar with the AutoCAD user interface is your first step in getting to know the software. Tour the ribbon and try out the Command line. Learn how to open a drawing or create a new one, and then you can access them remotely. Create simple geometry using construction lines, grids, and the UCS as guides.
After you launch AutoCAD, click New on the Start tab to begin a new drawing, or Open to work on an existing drawing.
Drawing Tabs
The new drawing, Drawing1 , starts on a new tab that's just above the drawing area. You can click the tabs to switch between several open drawing files and the Start tab.

An asterisk (*) next to the drawing name indicates that the drawing needs to be saved. A quick way to close any drawing is to click the X control on its tab.
Go ahead and experiment with starting and opening drawings, and switching between the tabs. You can also drag the drawing tabs to reorder them.
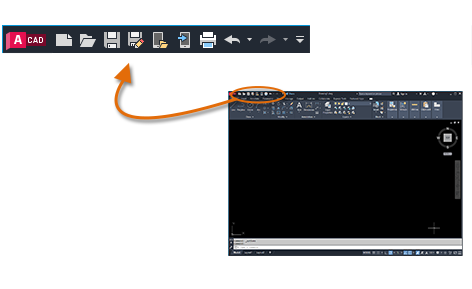
AutoCAD includes a standard tabbed ribbon across the top of the application. You can access nearly all the commands presented in this guide from the Home tab. In addition, the Quick Access toolbar shown below includes familiar commands such as New, Open, Save, Print, and Undo.
Note: If the Home tab is not the current tab, go ahead and click it.
The Command Window
At the heart of the program is the Command window, which is normally docked at the bottom of the application window. The Command window displays prompts, options, and messages.

You can enter commands directly in the Command window instead of using the ribbon, toolbars, and menus. Many long-time users prefer this method.
Notice that as you start to type a command, it completes automatically. When several possibilities are available such as in the example below, you can make your choice by clicking it or using the arrow keys and then pressing Enter or the Spacebar.
Most people use a mouse as their pointing device, but other devices have equivalent controls.
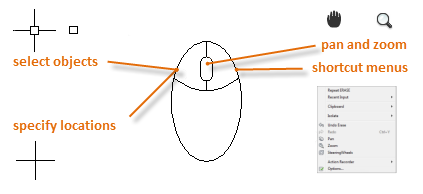
Tip: When you look for an option, try right-clicking. Depending on where you locate your cursor and whether you're in a command, the shortcut menu that displays provides relevant commands and options.
New Drawings
You can easily conform to industry or company standards by specifying settings for text, dimensions, linetypes, and several other features. For example, this backyard deck design displays two different dimension styles.
All these settings can be saved in a drawing template file. Click New to choose from several drawing template files:

- For imperial drawings that assume your units are inches, use acad.dwt or acadlt.dwt .
- For metric units that assume your units are millimeters, use acadiso.dwt or acadltiso.dwt .
The "Tutorial" template files in the list are simple examples for the architectural or mechanical design disciplines with both imperial (i) and metric (m) versions. You might want to experiment with them when you start creating dimensions.
Most companies use drawing template files that conform to company standards. They will often use different drawing template files depending on the project or the client.
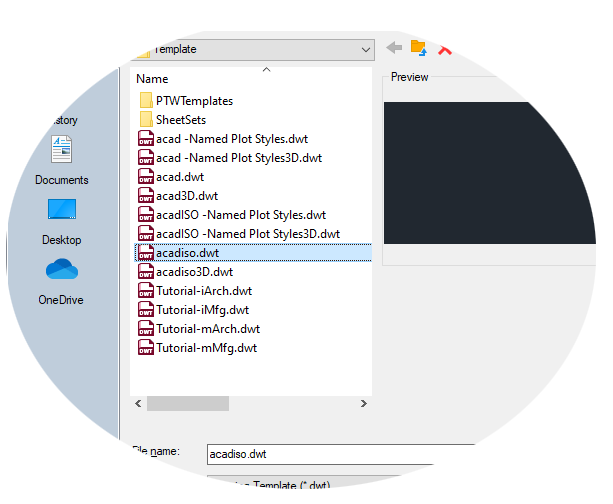
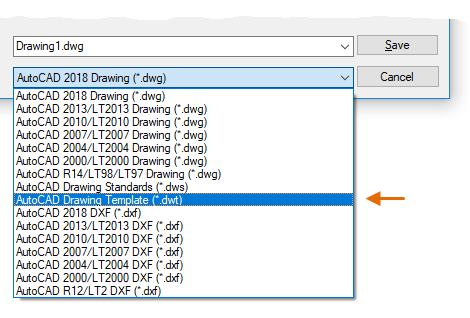
Create Your Own Drawing Template File
You can save any drawing ( .dwg ) file as a drawing template ( .dwt ) file. To create a new drawing template file based on an existing one, open the existing drawing template file, modify it, and then save it again with a different filename.
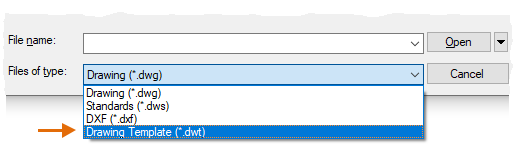
If you work independently, you can develop your drawing template files to suit your working preferences, adding settings for additional features as you become familiar with them. To modify an existing drawing template file, click Open, specify Drawing Template (*.dwt) in the Select File dialog box, and choose the drawing template file.
Important: If your company has already established a set of drawing template files, check with your CAD manager before modifying any of them.
After you start a new drawing, you'll first decide what the length of one unit represents—an inch, a foot, a centimeter, a kilometer, or some other unit of length. For example, the objects below could represent two buildings that are each 125 feet long, or they could represent a section from a mechanical part that is measured in millimeters.
Unit Display Settings
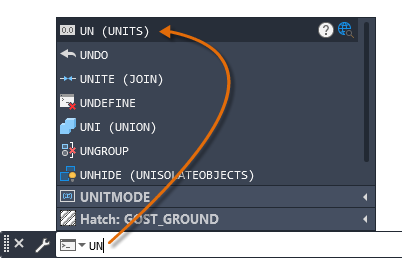
After you decide what unit of length that you want to use, the UNITS command lets you control several unit display settings including the following:
- Format (or Type). For example, a decimal length of 6.5 can be set to display as a fractional length of 6-1/2 instead.
- Precision. For example, a decimal length of 6.5 can be set to display as 6.50, 6.500, or 6.5000.
If you plan to work in feet and inches, use the UNITS command to set the unit type to Architectural, and then when you create objects, specify their lengths in inches. If you plan to use metric units, leave the unit type set to Decimal. Changing the unit format and precision does not affect the internal precision of your drawing. It affects only how lengths, angles, and coordinates are displayed in the user interface.
Tip: If you change a setting for the unit display or any other setting, you can save the settings in a drawing template file. Otherwise, you'll need to change the settings for each new drawing.
Model Scale
Always create your models at full size (1:1 scale). The term model refers to the geometry of your design. A drawing includes the model geometry along with the views, notes, dimensions, callouts, tables, and the title block displayed in the layout .
You'll specify the scale for printing a drawing on a standard-sized sheet later, when you create the layout.
Recommendations
- To open Help with information about the command in progress, simply press F1.
- To repeat the previous command, press Enter or the Spacebar.
- To see various options, select an object and right-click, or right-click a user interface element.
- To cancel a command in progress or if you ever feel stuck, press Esc. For example, if you click in the drawing area before entering a command, you'll see something like the following:
The easiest way to change your view is by using the wheel on your mouse.
- Pan a view in any direction by holding the wheel down and then moving your mouse.
- Zoom in or out by rolling the wheel.
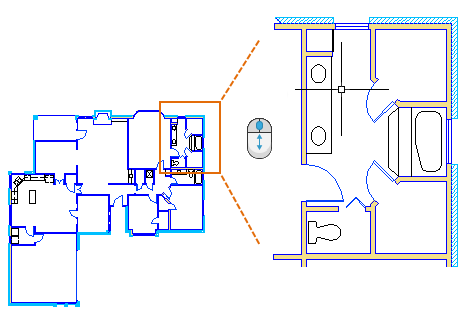
Tip: When you zoom in or out, the location of the cursor is important. Think of your cursor as a magnifying glass. For example, if you position the cursor in the upper-right area of the floor plan as shown below, rolling the mouse wheel magnifies that area without shifting it.
You can step back through a number of previous views by entering ZOOM in the Command window and then specify the Previous option.

A fast way to do this is by entering a command alias for the command. For example, the command alias for ZOOM is Z.
- Type Z in the Command window and press the Spacebar or Enter.
- Then type P and press the Spacebar or Enter.
The previous view displays. Also note that typing a command or a command alias followed by pressing the Spacebar or Enter key is often abbreviated with a description like this: "Enter the ZOOM command."
The other commonly used options in the ZOOM command are Window and Extents. The Window option enables you to specify a rectangular window of the area that you want to display. The Extents option displays all of the objects in the drawing area.
View or Modify Drawings from Remote Locations
It can be helpful to be able to access your drawing files while on a job site, the shop floor, at a meeting, or when travelling. With your AutoCAD or AutoCAD LT subscription, you can view, create, and modify drawings on any of these devices:
- Your primary desktop or laptop in your office location with AutoCAD or AutoCAD LT installed
- Another computer at a different site or at home using the AutoCAD web app on your web browser
- Your smartphone or tablet in a remote location using the AutoCAD mobile app
If you think you'll need to access your drawings from a remote location, try using the Save to Web & Mobile and Open from Web & Mobile commands.

To be able to access your drawings from a remote location, do one of the following:
- Download the free mobile app to your mobile device and sign in with the same Autodesk ID that you use for your AutoCAD or AutoCAD LT subscription.
- From a tablet or a different computer, use your web browser (64-bit Chrome or Firefox) to log in to https://web.autocad.com .
Access Drawings from a Cloud Storage Account
If you have an account with a cloud storage provider, you can add it to your Places bar in AutoCAD file selection dialog boxes for direct navigation to the drawings in your cloud storage account. Simply right-click within the Places bar and enter a name and path for the navigation shortcut.
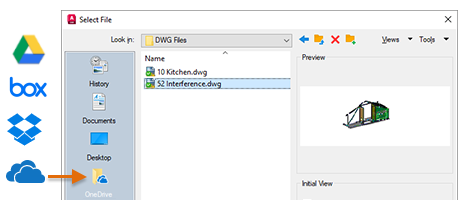
Navigation shortcuts for Microsoft OneDrive, Box, Dropbox, and Google Drive automatically display in your Places bar if you have an account.
You can create a lot of different types of geometric objects in AutoCAD, but you only need to know a few of them for most 2D drawings.
Tip: If you want to simplify the display while you create geometric objects, press F12 to turn off dynamic input.
The line is the most basic and common object in AutoCAD drawings. To draw a line, click the Line tool.

Alternatively, you can type LINE or just L in the Command window, and then press Enter or the Spacebar.
Notice the prompt in the Command window for a point location.
To specify the starting point for this line, you would type in the Cartesian coordinates 0,0. It's generally a good idea to locate one corner of your model at 0,0, which is called the origin point. To locate additional points, you could specify additional X,Y coordinate locations in the drawing area, however more efficient methods for specifying points are available, and will be presented in the Precision topic.
After you specify the next point, the LINE command automatically repeats itself, and it keeps prompting you for additional points. Press Enter or the Spacebar to end the sequence.
Grid Display
Some people like working with grid lines as a reference, while others prefer working in a blank area. To turn off the grid display, press F7. Even with the grid turned off, you can force your cursor to snap to grid increments by pressing F9.
Lines as Construction Aids
Lines can serve as reference and construction geometry such as
- Property line setbacks
- The mirror line of a symmetrical mechanical part
- Clearance lines to avoid interferences
- Traversal path lines
The default option of the CIRCLE command requires you to specify a center point and a radius.
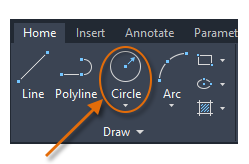
Additional circle options are available from the drop-down:
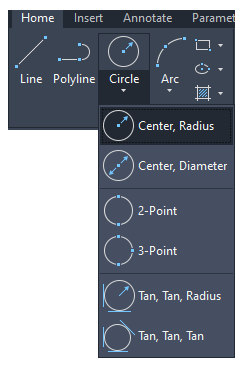
Alternatively, you can enter CIRCLE or just C in the Command window and click to choose an option. If you do, you can specify a center point, or you can click one of the highlighted command options as shown below.

Circles can be useful as reference geometry. For example, you can see that the two doors in the illustration can interfere with each other.
Polylines and Rectangles
A polyline is a connected sequence of line or arc segments that is created as a single object.
Use the PLINE command to create open or closed polylines for
- Geometry that needs to have fixed-width segments
- Continuous paths for which you need to know the total length
- Contour lines for topographic maps and isobaric data
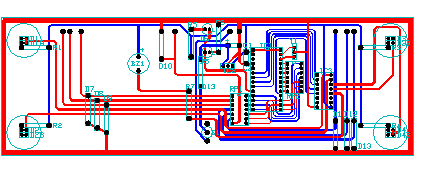
- Wiring diagrams and traces on printed circuit boards
- Process and piping diagrams
Polylines can have a constant width or they can have different starting and ending widths. After you specify the first point of the polyline, you can use the Width option to specify the width of all subsequently created segments. You can change the width value at any time, even as you create new segments.

Here is an example of a printed circuit board in which the traces were created with wide polylines. The landing pads were created with the DONUT command.
Polylines can have different starting and ending widths for each segment as shown here:

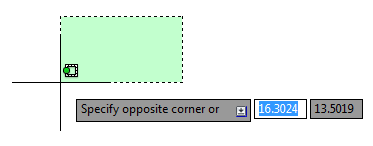
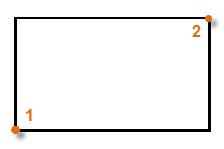
A fast way to create closed rectangular polylines is to use the RECTANG command (enter REC in the Command window).
Simply click two diagonal points for the rectangle as illustrated. If you use this method, turn on grid snap (F9) for precision.
The User Coordinate System (Optional)
The user coordinate system (UCS) icon indicates the direction of the positive X and Y axis for any coordinates that you enter, and it also defines the horizontal and vertical directions in a drawing. In some 2D drawings, it can be convenient to click and place the UCS to change the origin point and the X or Y axis.
For example, by reorienting the UCS, you can create rectangles that are automatically aligned with the X axis as shown.

To restore the user coordinate system to its original location, enter UCS in the Command window and press Enter to specify the default <World> option.
Hatches and Fills
In AutoCAD, a hatch is a single, compound object that covers a specified area with a pattern of lines, dots, shapes, a solid fill color, or a gradient fill.
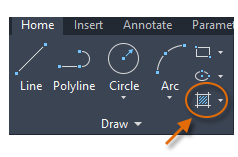
When you start the HATCH command, the ribbon temporarily displays the Hatch Creation tab. On this tab, you can choose from more than 70 industry-standard imperial and ISO hatch patterns, along with many specialized options.
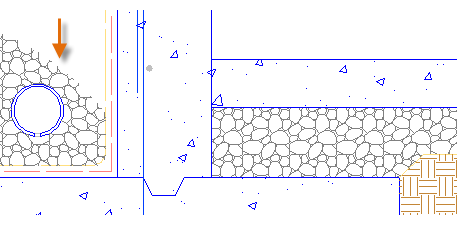
The simplest procedure is to choose a hatch pattern and scale from the ribbon, and click within any area that is completely enclosed by objects. You need to specify the scale factor for the hatch to control its size and spacing.
After you create a hatch, you can move the bounding objects to adjust the hatch area, or you can delete one or more of the bounding objects to create partially bounded hatches:
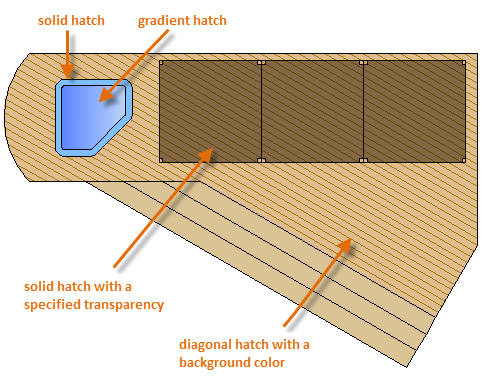
Tip: If you set a hatch pattern to be a solid or gradient fill, also consider setting a transparency level on the Hatch Creation tab for interesting overlap effects.
Here are some examples of how you can use solid-fill hatches:
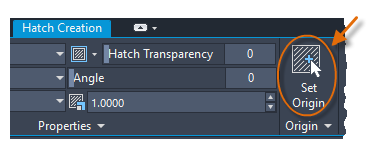
Tip: If you need to align the pattern in a hatch, which might be the case with the decking boards above, use the Set Origin option to specify an alignment point.
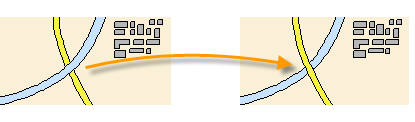
For overlapping hatches, fills, wide polylines, and text objects, use the DRAWORDER command to determine which objects are on top or below the others. For example, you probably want the yellow highway to cross the blue river rather than the other way around.
You can access several draw order options from the Modify panel on the ribbon. Click to expand the Modify panel, and then click the down-arrow as shown below.
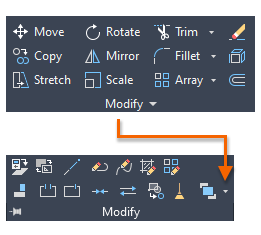
The drop-down list displays options for selected objects plus additional options that apply to all objects of a certain type, such as text.
Related learning
Browse content with related tags.
Interior designer , Product designer , Civil engineer (Hydrology / hydraulics) , Technical and engineering manager , Geotechnical Engineer , Civil engineer (Land and site design) , Environmental Engineer , Civil engineer (Geotechnical) , Civil engineer (Tunnels and bridges) , Civil engineer (Roads and highways)

Contents and Activities
- 1 - Introduction to AutoCAD Exercises Exercise 1-1 Exercise 1-2 Exercise 1-3 Exercise 1-4 Exercise 1-5 Exercise 1-6 Exercise 1-7 Exercise 1-8 Exercise 1-9 Exercise 1-10 Exercise 1-11 Chapter Review Chapter 1 Review Supplemental Material Input Search Options
- 2 - Drawings and Templates Exercises Exercise 2-1 Exercise 2-2 Exercise 2-3 Exercise 2-4 Exercise 2-5 Exercise 2-6 Chapter Review Chapter 2 Review Template Development Initial Template Setup Supplemental Material Recovering a Damaged File
- 3 - Introduction to Drawing and Editing Exercises Exercise 3-1 Exercise 3-2 Exercise 3-3 Exercise 3-4 Exercise 3-5 Exercise 3-6 Exercise 3-7 Exercise 3-8 Exercise 3-9 Exercise 3-10 Exercise 3-11 Exercise 3-12 Exercise 3-13 Exercise 3-14 Exercise 3-15 Exercise 3-16 Chapter Review Chapter 3 Review Supplemental Material Introduction to Isometric Drawings UNDO Options Drawing Files Chapter 3 Drawing Files (DWG, ZIP, 48 KB)
- 4 - Basic Object Commands Exercises Exercise 4-1 Exercise 4-2 Exercise 4-3 Exercise 4-4 Exercise 4-5 Exercise 4-6 Exercise 4-7 Exercise 4-8 Exercise 4-9 Exercise 4-10 Exercise 4-11 Exercise 4-12 Exercise 4-13 Chapter Review Chapter 4 Review Supplemental Material Isometric Circles and Arcs Multilines Spline Options Drawing Files Chapter 4 Drawing Files (DWG, ZIP, 231 KB)
- 5 - Line Standards and Layers Exercises Exercise 5-1 Exercise 5-2 Exercise 5-3 Exercise 5-4 Exercise 5-5 Exercise 5-6 Exercise 5-7 Chapter Review Chapter 5 Review Template Development Adding Layers Supplemental Material Additional Layer Commands Creating Layer Filters Layer Settings Drawing Files Chapter 5 Drawing Files (DWG, ZIP, 54 KB)
- 6 - View Tools and Basic Plotting Exercises Exercise 6-1 Exercise 6-2 Exercise 6-3 Exercise 6-4 Exercise 6-5 Exercise 6-6 Exercise 6-7 Exercise 6-8 Chapter Review Chapter 6 Review Supplemental Material View Transitions and Resolution Drawing Files Chapter 6 Drawing Files (DWG, ZIP, 206 KB)
- 7 - Object Snap and AutoTrack Exercises Exercise 7-1 Exercise 7-2 Exercise 7-3 Exercise 7-4 Exercise 7-5 Exercise 7-6 Exercise 7-7 Exercise 7-8 Exercise 7-9 Exercise 7-10 Exercise 7-11 Exercise 7-12 Chapter Review Chapter 7 Review Supplemental Material AutoSnap and AutoTrack Options Drawing Files Chapter 7 Drawing Files (DWG, ZIP, 68 KB)
- 8 - Construction Tools and Multiview Drawings Exercises Exercise 8-1 Exercise 8-2 Exercise 8-3 Exercise 8-4 Exercise 8-5 Exercise 8-6 Chapter Review Chapter 8 Review Drawing Files Chapter 8 Drawing Files (DWG, ZIP, 92 KB)
- 9 - Text Styles and Multiline Text Exercises Exercise 9-1 Exercise 9-2 Exercise 9-3 Exercise 9-4 Exercise 9-5 Exercise 9-6 Exercise 9-7 Chapter Review Chapter 9 Review Template Development Adding Text Styles Drawing Files Chapter 9 Drawing Files (DWG, ZIP, 77 KB)
- 10 - Single-Line Text and Additional Text Tools Exercises Exercise 10-1 Exercise 10-2 Exercise 10-3 Exercise 10-4 Exercise 10-5 Chapter Review Chapter 10 Review Supplemental Material Isometric Text Express Tools Text Express Tools Drawing Files Chapter 10 Drawing Files (DWG, ZIP, 67 KB)
- 11 - Modifying Objects Exercises Exercise 11-1 Exercise 11-2 Exercise 11-3 Exercise 11-4 Exercise 11-5 Exercise 11-6 Exercise 11-7 Exercise 11-8 Exercise 11-9 Exercise 11-10 Chapter Review Chapter 11 Review Supplemental Material Deleting Duplicate Objects Drawing Files Chapter 11 Drawing Files (DWG, ZIP, 104 KB)
- 12 - Arranging and Patterning Objects Exercises Exercise 12-1 Exercise 12-2 Exercise 12-3 Exercise 12-4 Exercise 12-5 Exercise 12-6 Exercise 12-7 Exercise 12-8 Exercise 12-9 Chapter Review Chapter 12 Review Drawing Files Chapter 12 Drawing Files (DWG, ZIP, 219 KB)
- 13 - Grips, Properties, and Additional Selection Techniques Exercises Exercise 13-1 Exercise 13-2 Exercise 13-3 Exercise 13-4 Exercise 13-5 Exercise 13-6 Exercise 13-7 Exercise 13-8 Exercise 13-9 Exercise 13-10 Exercise 13-11 Exercise 13-12 Exercise 13-13 Exercise 13-14 Exercise 13-15 Chapter Review Chapter 13 Review Supplemental Material Object Selection Filters Object Groups Express Tools Selection Express Tools Drawing Files Chapter 13 Drawing Files (DWG, ZIP, 126 KB)
- 14 - Polyline and Spline Editing Tools Exercises Exercise 14-1 Exercise 14-2 Exercise 14-3 Exercise 14-4 Exercise 14-5 Exercise 14-6 Exercise 14-7 Chapter Review Chapter 14 Review Drawing Files Chapter 14 Drawing Files (DWG, ZIP, 99 KB)
- 15 - Obtaining Drawing Information Exercises Exercise 15-1 Exercise 15-2 Exercise 15-3 Exercise 15-4 Exercise 15-5 Exercise 15-6 Exercise 15-7 Exercise 15-8 Exercise 15-9 Exercise 15-10 Chapter Review Chapter 15 Review Drawing Files Chapter 15 Drawing Files (DWG, ZIP, 119 KB)
- 16 - Dimension Standards and Styles Exercises Exercise 16-1 Exercise 16-2 Exercise 16-3 Exercise 16-4 Exercise 16-5 Chapter Review Chapter 16 Review Template Development Adding Dimension Styles Drawing Files Chapter 16 Drawing Files (DWG, ZIP, 48 KB)
- 17 - Linear and Angular Dimensioning Exercises Exercise 17-1 Exercise 17-2 Exercise 17-3 Exercise 17-4 Exercise 17-5 Exercise 17-6 Exercise 17-7 Exercise 17-8 Exercise 17-9 Chapter Review Chapter 17 Review Drawing Files Chapter 17 Drawing Files (DWG, ZIP, 123 KB)
- 18 - Dimensioning Features and Alternate Practices Exercises Exercise 18-1 Exercise 18-2 Exercise 18-3 Exercise 18-4 Exercise 18-5 Exercise 18-6 Exercise 18-7 Exercise 18-8 Exercise 18-9 Exercise 18-10 Chapter Review Chapter 18 Review Template Development Adjusting Center Mark and Centerline Object System Variables Adding Multileader Styles Drawing Files Chapter 18 Drawing Files (DWG, ZIP, 149 KB)
- 19 - Dimensioning with Tolerances Exercises Exercise 19-1 Exercise 19-2 Exercise 19-3 Exercise 19-4 Chapter Review Chapter 19 Review Supplemental Material Using GD&T Tools in AutoCAD Drawing Files Chapter 19 Drawing Files (DWG, ZIP, 32 KB)
- 20 - Editing Dimensions Exercises Exercise 20-1 Exercise 20-2 Exercise 20-3 Exercise 20-4 Exercise 20-5 Exercise 20-6 Exercise 20-7 Exercise 20-8 Exercise 20-9 Exercise 20-10 Exercise 20-11 Exercise 20-12 Exercise 20-13 Exercise 20-14 Exercise 20-15 Chapter Review Chapter 20 Review Supplemental Material Isometric Dimensions Drawing Files Chapter 20 Drawing Files (DWG, ZIP, 169 KB)
- 21 - Tables Exercises Exercise 21-1 Exercise 21-2 Exercise 21-3 Exercise 21-4 Exercise 21-5 Exercise 21-6 Exercise 21-7 Exercise 21-8 Exercise 21-9 Chapter Review Chapter 21 Review Template Development Adding Table Styles Supplemental Material Linking a Table to Excel Data Extracting Table Data Drawing Files Chapter 21 Drawing Files (DWG, ZIP, 63 KB)
- 22 - Parametric Drafting Exercises Exercise 22-1 Exercise 22-2 Exercise 22-3 Exercise 22-4 Exercise 22-5 Exercise 22-6 Exercise 22-7 Exercise 22-8 Exercise 22-9 Exercise 22-10 Exercise 22-11 Exercise 22-12 Exercise 22-13 Chapter Review Chapter 22 Review Drawing Files Chapter 22 Drawing Files (DWG, ZIP, 53 KB)
- 23 - Section Views and Graphic Patterns Exercises Exercise 23-1 Exercise 23-2 Exercise 23-3 Exercise 23-4 Exercise 23-5 Exercise 23-6 Exercise 23-7 Exercise 23-8 Exercise 23-9 Exercise 23-10 Exercise 23-11 Chapter Review Chapter 23 Review Express Tools The SUPERHATCH Command Drawing Files Chapter 23 Drawing Files (DWG, ZIP, 139 KB)
- 24 - Standard Blocks Exercises Exercise 24-1 Exercise 24-2 Exercise 24-3 Exercise 24-4 Exercise 24-5 Exercise 24-6 Exercise 24-7 Exercise 24-8 Chapter Review Chapter 24 Review Drawing Files Chapter 24 Drawing Files (DWG, ZIP, 115 KB)
- 25 - Block Attributes Exercises Exercise 25-1 Exercise 25-2 Exercise 25-3 Chapter Review Chapter 25 Review Supplemental Material Extracting Attribute Data Drawing Files Chapter 25 Drawing Files (DWG, ZIP, 27 KB)
- 26 - Introduction to Dynamic Blocks Exercises Exercise 26-1 Exercise 26-2 Exercise 26-3 Exercise 26-4 Exercise 26-5 Exercise 26-6 Exercise 26-7 Exercise 26-8 Exercise 26-9 Exercise 26-10 Exercise 26-11 Chapter Review Chapter 26 Review Drawing Files Chapter 26 Drawing Files (DWG, ZIP, 60 KB)
- 27 - Additional Dynamic Block Tools Exercises Exercise 27-1 Exercise 27-2 Exercise 27-3 Exercise 27-4 Exercise 27-5 Chapter Review Chapter 27 Review Express Tools Block Express Tools Drawing Files Chapter 27 Drawing Files (DWG, ZIP, 33 KB)
- 28 - Layout Setup Exercises Exercise 28-1 Exercise 28-2 Exercise 28-3 Exercise 28-4 Exercise 28-5 Exercise 28-6 Exercise 28-7 Chapter Review Chapter 28 Review Supplemental Material Creating and Editing Plot Style Tables Drawing Files Chapter 28 Drawing Files (DWG, ZIP, 92 KB)
- 29 - Plotting Layouts Exercises Exercise 29-1 Exercise 29-2 Exercise 29-3 Exercise 29-4 Exercise 29-5 Exercise 29-6 Exercise 29-7 Exercise 29-8 Exercise 29-9 Exercise 29-10 Chapter Review Chapter 29 Review Template Development Adding Layouts Supplemental Material Adding a Plot Stamp Express Tools Layout Express Tools Drawing Files Chapter 29 Drawing Files (DWG, ZIP, 143 KB)
- 30 - Annotative Objects Exercises Exercise 30-1 Exercise 30-2 Exercise 30-3 Exercise 30-4 Exercise 30-5 Exercise 30-6 Chapter Review Chapter 30 Review Drawing Files Chapter 30 Drawing Files (DWG, ZIP, 163 KB)
- 31 - External References Exercises Exercise 31-1 Exercise 31-2 Exercise 31-3 Exercise 31-4 Exercise 31-5 Exercise 31-6 Chapter Review Chapter 31 Review Express Tools Xref Express Tools Drawing Files Chapter 31 Drawing Files (DWG, ZIP, 243 KB)
- 32 - Introduction to Sheet Sets Exercises Exercise 32-1 Exercise 32-2 Exercise 32-3 Exercise 32-4 Exercise 32-5 Chapter Review Chapter 32 Review Drawing Files Chapter 32 Drawing Files (DWG, ZIP, 399 KB)
- 33 - Additional Sheet Set Tools Exercises Exercise 33-1 Exercise 33-2 Exercise 33-3 Exercise 33-4 Exercise 33-5 Exercise 33-6 Exercise 33-7 Chapter Review Chapter 33 Review Drawing Files Chapter 33 Drawing Files (DWG, ZIP, 282 KB)

AutoCAD is a software application that was developed by Autodesk. It is used for creating 2D and 3D computer-aided design drawings. This software has revolutionized the designing of technical drawings. It is also used for creating technical drawings for blueprints, architectural drawings, and manufacturing documents. It has certain features which make it more powerful than any other designing software. It helps in creating designs by adding thickness to lines and shapes. It also helps in creating 3D models and adding shadows and textures to it.
AutoCAD assignments are usually complex to design. It requires a lot of hard work and time. AssignU is a team of highly educated professionals who are passionate about providing quality service to their customers.
What is the prerequisite before selecting the autocad assignments to help?
Due to the world’s enhancing dependence on the internet, plenty of online resources like learning portals, online classes are increasingly extremely. Students, engineers, and construction workers who mainly want to enhance their knowledge of the AutoCAD software will surely get an option to attend classes without ever leaving their homes. They just need a PC and an excellent internet connection. To take the help of autocad assignments , one needs to know about the best online tutor. A good and experienced tutor can assist you with the details of autocad assignments.
Choose the best autocad assignments to help
The autocad homework help is one such industry in the global market that is rapidly increasing. Due to the demand of students of various kinds who keep looking out for options that make their academic life easy and fun. A lot of pressure, competition, priorities, and other situations in life do not allow a student to give hundreds of percent effort into all kinds of assignments.
Especially the task that involves writing is often disliked by the students who do not have much inclination towards it. To help such a group of students, the autocad assignment help service came to help them submit a good write-up in their school or college.
Things to know before selecting the homework help
- One must choose the homework helper according to his or her preference and should not go by unrequited pressurization from the service provider.
- While making the deals, the students should not allow any third party to act as an influence and therefore should use their sense of judgment in selecting the person they feel will do their assignment in the best way possible.
- The deal should only take place between the client and the homework helper. The student must give the job in the hand of a person who they feel is worthy enough. Whenever you want to choose the autocad drawing assignment help, you will have to ensure that you opt for the right one.
- The selection of the homework helper must be made keeping in mind that they at least hold a bachelor’s degree and must have other qualities that state them as professional.
- The homework helper must have suitable experience and the creative skill to deliver quality writing like autocad assignments .
- The writings delivered must be free from plagiarism, and hence the student should mention this while they make the deal.
- The writing and drawing should be based on profound research and should be informative.
- The autocad assignments should be devoid of grammatical errors.
- The students must make sure that the homework helper they are choosing must be available in communicating with the students whenever necessary.
This is the reason why autocad basic assignments help came into being. The service helps students from various backgrounds to help them compete well in the rat race of the world. They provide professional homework helpers, editors to complete the students’ assignments in the best possible way.
The writing services have elevated the academic life of the students. They no more lag behind in submitting their autocad assignments on time. This has also helped students to invest their precious time into some other field in which they are interested.
Also, this autocad assignment helper is ideal for the students who put effort into everything. Being involved in too many curricular activities cannot manage adequate time to deliver in producing decent writing and autocad drawing. Therefore to avoid such stress, the assignment writing service plays a significant role.
Find the best online help
There are ample students out there who are always seeking online help in their homework. Not even students get their autocad practice assignments done properly and in one go, which is why they need assistance. Some of the students get help from their parents or another family member. But due to the busy schedule and other hectic jobs, sometimes parents do not time to help their students with autocad assignments homework, which is why students get help from an online teacher.
Many teachers in recent days help a lot of students with their homework, but as they cannot be present all the time there, they help it through the internet. With the help of live chat or online video calls, the students get assistance.
Deal with the subject specialist
When a student wants to help a teacher in their homework, they will obviously look for someone who is the subject specialist. Basically, an AutoCAD Exercises teacher may not fulfill a student who wants to know about a chemistry issue. This is why the subject specialist would be necessary for them. So, whenever a student is going to deal with a teacher for online help in homework, they need to ask the teacher whether they are the subject specialist or not.
Ask them to take a test
Taking online help for homework cannot be a solution for the students. Rather it can make them dull and lazy. When a learner gets to know that they are already getting help from an online Advanced AutoCAD Exercises tutor, they become lazy to do the homework on their own. If a student asks the teacher to take their online test, it would be great for them too.
They would practice and revise their homework well, and then they can also give a test without any hassle or fear. It would also not make them lazy at all. In order to choose the best AutoCAD exercises with instructions helper, you will have to ensure that you consider choosing the reliable and experienced one.
One of the important facts about online homework help is that the teacher does that for money, and instead, they help all those students who are a little weak in studies. Apart from that, they also help those who do not have anyone in-house to assist in their autocad assignments homework.
You’re going to start by opening the auto cad. Click the plus symbol to create a new drawing, and then we’re going to change the unit. So if you type in units and the search bar, we’re going to change the type of units. It should be set at default to decimal. We’re going to change it to architectural, and that’s going to give us the feet and inches. And then, we can start creating a line.
The unit will be the line tool, and you can specify the different types of dimensions by clicking on the number and then the apostrophe. So remember, four apostrophes is four feet, four quotations would be four inches, and it’ll give us a setting that is true to scale.
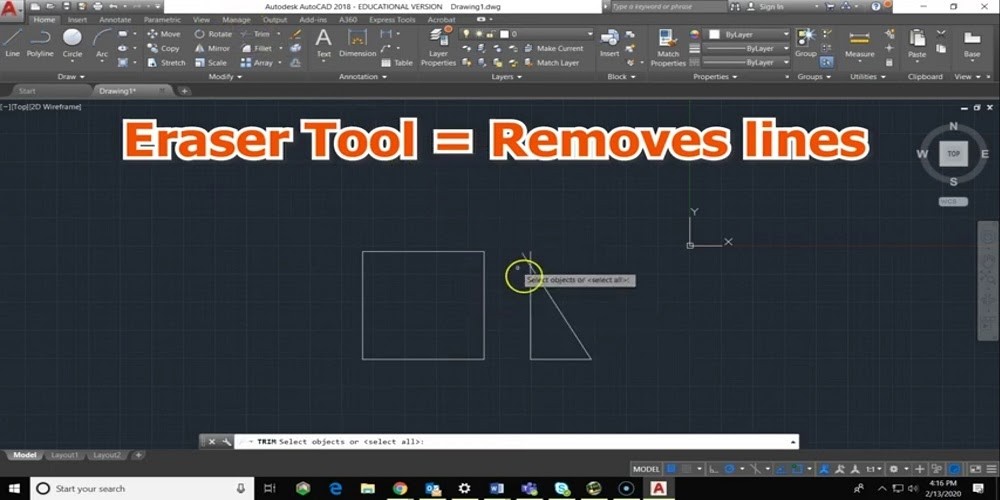
So you can show the cursor settings, and you can have it set to the midpoint headings like Perpendicular Parallel, what’s nearest. And those are just going to give you guides as you start drawing your lines. If you click “tab”, you can change the angle that is set at. So I’m going to start by clicking the line tool. You can also type line as well, And set the degree. And it will give you that degree when you start drawing your line. Now I can click the eraser tool, and you can begin erasing the different lines. So if I click eraser and I start hovering over the different lines, it’ll erase them.
But I can also click Trim, select the object, select both objects, click TRIM, and then select the extended lines that you want to remove.
Now we’re going to go to the layout. Notice that there’s a highlighted box in the centre of your screen. If you double click inside that screen, you can now change the scale of your drawing.
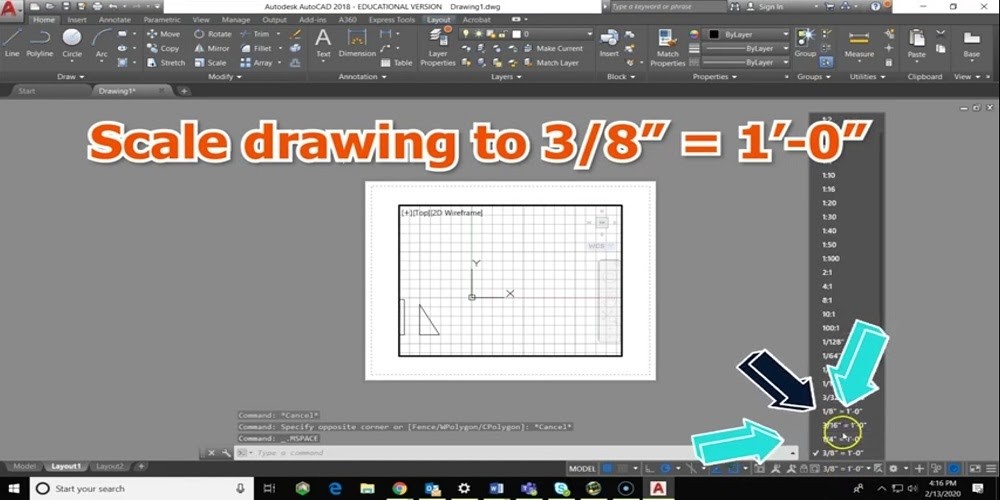
So holding the scroll wheel, you can move and lock that scale of your drawing. So right now, it’s at three-eighths seven inch equals one foot. Or minimize the window box, and you can click on the annotate text, multiple texts, and this is where you’re going to add your name, date and class.
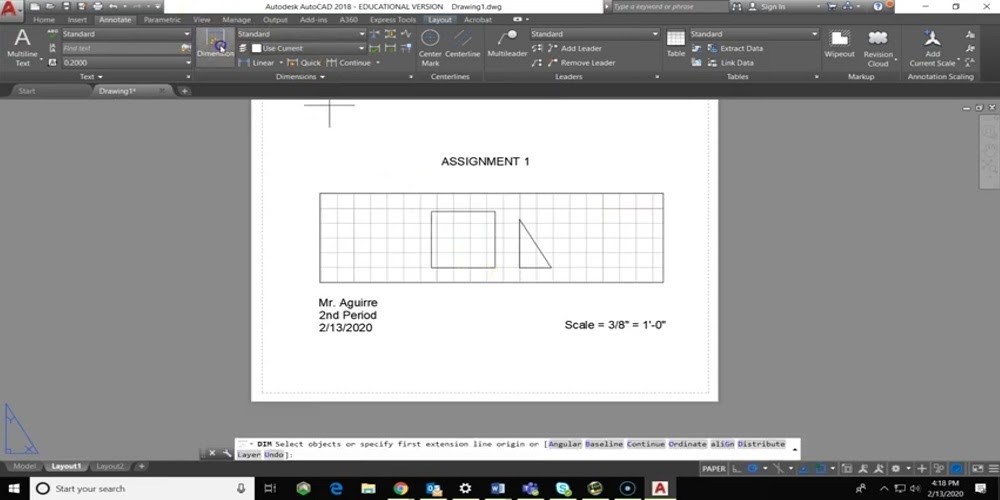
Also, try to name the scale as shown, so whatever scale that you’re drawing is at, you need to write scale equals the units, which is three-eighths of an inch equals one foot zero inches (⅜”=1’0″). You can add your dimensions, here I’m adding the dimension, but we need to go into the settings to change the dimensions. So click on manage dimension style. Then click on Modify.
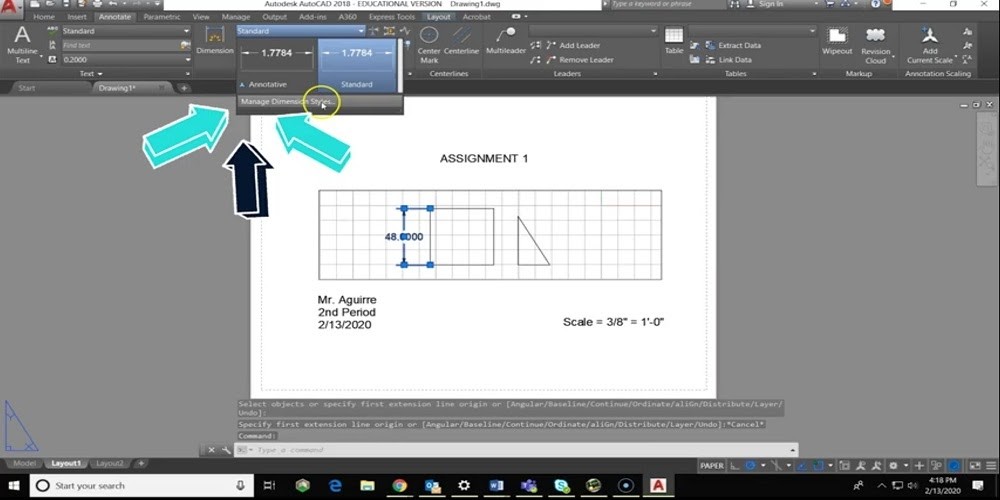
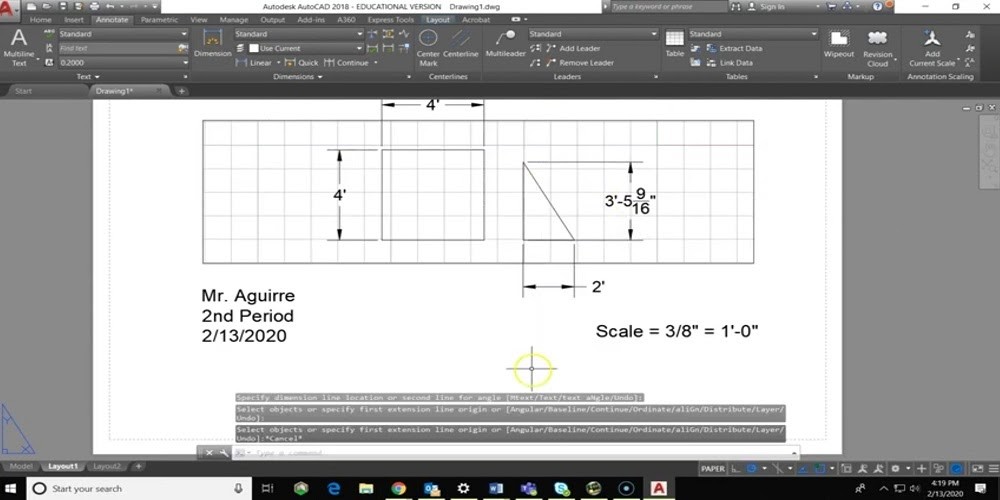
Change the primary unit to architectural. Click OK and click set current, and then close. So now, every time you dimension your object from one endpoint to the next point, it will give you units in feet and inches.
Now click, print and plot. You’re going to change this plot style to monochrome.ctb and then change the printer name to the Adobe PDF. We’re going to print on a scale of one to one. It’s going to be on a sheet of paper, which is eight and a half by eleven, and then click, OK. Now you’re going to name the file and make sure you save it with the assignment one name and enter your scratch drive folder. And now you have your PDF that you can turn into a Google classroom on assignment one. And you can continue to the next assignment, and that’s the end of this AutoCAD lesson.

Autocad Assignment Help
We Are Unique Academic Writing Agency Located In Usa And Netherlands. Hire Us For Your Autocad Assignment, Autocad Homework & Autocad Project.
We Are Number 1 In Autocad Projects.
AutoCad Assignment Help Checklist

- AutoCad Assignment Help
AutoCad Homework Help
Autocad project help, history of autocad, online tutoring for autocad, compatibility with other software, extensions of the autocad program, necessity of the professional help.
- Architecture
Engineering Drafting Tools
3d printing.
- Industrial Designing
- AutoCAD Mechanical
AutoCAD Electrical
- Creating a 3D workspace
- Flattening 3D to 2D
- Cushion Plate Drawing
- Rectangular and Polar Arrays
Orchard Drawings
Isometric drawing and motel drawing, geometric shapes, 3d modeling, material and mapping.
- Pentigon Drawings
- AutoCad Lines and Layers
Our Services
- Submit Your AutoCad Assignments

For AutoCad, we are one of the leading assignment help services of this industry.
We have pool of different professionals and experts who have competent skills as well as the experiences in different academic disciplines. Our experts have the ability to complete/ finish AutoCad assignments, homework, research papers, term papers, projects and other academic material.
We also offer editing and Autocad review services to the students. AutoCad Assignment Help These features are occasionally used by our customers. Many times, the unsatisfied customers want to use these services, however it can seldom happen. Our experts always try to make the assignments or homework as per the instructions of the customers.
AutoCAD Assignment Help can be frustrating. Projects can take weeks or months to complete; there is no master blueprint to follow, and when problems do occur, they can seem frustratingly difficult to resolve. Most importantly, though, it’s your job to make sure that you have a job.
When you are working on an AutoCAD assignment, one of the most important things that you should do is to review it often. Here are some suggestions to help you get started.
o Make a plan: It’s very important that you remember to actually make a plan when you’re working on your AutoCAD project. The job may be difficult at times, but so are many other things in life. You need to take time out of your busy schedule to set aside a few hours every day to work on the job. If you plan ahead, you can avoid any complications that might come up.
o Start with a small part: If you’re working on an assignment which has a small number of steps, you’ll be surprised how quickly you run into difficulties. Start with a step and keep it simple and straightforward. If you’re not happy with the end result, it’s much easier to get back to the drawing board. Work slowly, with lots of thought and effort, and you’ll find that you can get the job done in a relatively short amount of time.
o Keep your eye on the big picture: It’s much easier to overlook details than it is to see the bigger picture. AutoCAD is like this too. If you spend your time worrying about each and every little aspect of your job, you’ll find that the finished product will become less impressive. Spend a little time at the beginning working on a part of the project that interests you. This may be the best way to avoid a lot of Avoid distractions: It’s tempting to throw in as many details as possible. You need to keep in mind that there are many areas that can’t be changed. When you get down to the nitty-gritty, it’s generally worth the effort to leave the rest for later. There’s no sense in wasting time when the project will still end up poorly implemented.
o Focus on a few key areas: Try to complete tasks that cover most of the major parts of the project. By working on these important details, you can avoid wasting your time on unnecessary details that will slow down the process.
o Turn down solutions: You might be tempted to go through with a solution which is not as detailed as you would like. The problem with this is that it may be needed later. Rather than do it now, it’s best to turn it down to avoid a long period of work and redoing. It’s also easier to make changes to a small detail if you know it will be required later.
o Accept help: Many people are in the habit of saying, “I’m not good enough.” If you’re having trouble with a small aspect of your job, be willing to let someone else handle it. It doesn’t matter if you think the person is inept or incompetent, as long as they have the ability to get the job done.
o Make modifications: It can be difficult to change your computer file every time you make a change to your AutoCAD work. But it can be even more difficult to change the file manually. A better approach is to use AutoCAD’s built-in functions which will change the file and send it to you in its new form. You can use this technique to make small changes to your AutoCAD work and, if you’re careful, you’ll be able to get it to look great in a short amount of time.
o Learn from your mistakes: By taking your work seriously, you’ll find that mistakes are inevitable. You have to learn to deal with them quickly, so that you don’t cause further problems for yourself. Whether you get something wrong or get it right is entirely up to you, but it’s better to be prepared if something goes wrong.
A project such as this takes up a lot of time and energy. It can be overwhelming at times, but it doesn’t have to be if you stick to the tips above. to avoid issues that are sure to arise.
- 3D Rendering in AutoCAD
- Adding Text to Drawings
- Advanced Editing Methods
- Creating Your First Drawing
- Drawing Curves and Solid Fills
- Editing for Productivity
- Enhancing Your Drawing Skills
- Getting and Exchanging Data from Drawings
- Integrating AutoCAD into Your Projects and Organization
- Integrating AutoCAD into Your Work Environment
- Introducing 3D
- Introduction to Customization
- Introduction to VBA I in Auto CAD
- Learning the Tools of the Trade
- Mastering 3D Solids
- Organizing Your Work
- Printing and Plotting
- Storing and Linking Data with Graphics
- Uncategorized
- Using Advanced 3D Features
- Using Dimensions
- Working with Pre-existing Drawings and Raster Images
As a student, completing AutoCAD Homework Help is one of the most important tasks you can accomplish. This is because learning AutoCAD and designing a project is the key to doing well in your AutoCAD project.
Most of the time, students complain that they just cannot understand any AutoCAD project or have no idea how to complete a project on their own. It’s not that they are doing AutoCAD Homework Help; it’s just that they lack the skills. It doesn’t mean that you don’t have them or that you should stop trying to get them, it just means that you are not doing what you need to be doing.
You may feel like you are just unable to do your AutoCAD Software help because you simply cannot keep up with all the new material, or maybe you just aren’t ready for the learning curve. When you feel like you’re unable to learn more about AutoCAD, it’s time to take a look at why you’re not getting it.
When you don’t feel like you have enough information, there is a good reason for that. You are either not learning the right things, or maybe you are just doing AutoCAD Homework Help wrong. If this is the case, it’s time to change your approach and work on it until you get it right.
The first thing you should do is admit that you have a learning curve. Accept that some of your mistakes might be due to inexperience or lack of information, not because you don’t know how to do it.
Once you accept this, you are ready to start getting better at the project and at AutoCAD Homework Help. It may take a while to get to the point where you are comfortable with the tools and processes, but it will come.
Find a mentor and go over all of the information you need to learn. After you are confident enough to do the AutoCAD Homework Help on your own, you will soon find that you can move on to the next AutoCAD project and make more changes.
The good news is that once you do that, you’ll start seeing results. The momentum you are creating will keep your momentum going and you will start to find that the projects you are completing are better than the ones you were previously completing.
One thing you can do that helps you when you’re trying to understand AutoCAD is to practice using what you already know. This way, the project will be easier for you to complete and it will be easier for you to understand.
Even though it’s easier for you to complete projects, if you find yourself having trouble, you’ll know how to work through the problem. It’s just like with any other skill.
In order to get better at AutoCAD Homework Help, you need to continue learning and keep practicing. You will improve and begin to see the improvements when you keep working through it, but the sooner you begin, the sooner you will see the results.
If you’re busy with work or just don’t have the time to do the learning, there are many programs that can help you to do the AutoCAD Homework Help you need, but it will only show up on your project after you’ve worked through it. Getting started is the best way to improve, so start today!
AutoCAD is a software application which is widely used in the present world. It is an application which is used for the purpose to make sketches as well as the designs for 2D and 3D with the help of Computer Aided Design (CAD). In 1982, the first desktop application for AutoCAD was introduced.

The name of cloud based app and mobile app is AutoCAD 360. A large of number of civil engineers is used AutoCAD software application in order to make designs for different construction projects. The reason is that it is a lot easier than any other designing software.
In December, 1982, Autodesk was the first to introduce as well as advertise the AutoCAD Civil Engineering Help in different commercial markets. AutoCAD has the internal graphics controllers through which it is able to run on the microcomputers. Before the introduction of the AutoCAD software, the other applications for the CAD are operate on the minicomputers as well as the mainframes.
Since 1994, there are almost 750 training centers were developed all over the world in order to facilitate the AutoCAD learners. However, Autodesk was launched a flagship product for the AutoCAD in the march, 1986 which is used by professionals prior to the introduction of the AutoCAD.
In the different universities and colleges, the students are obliged to submit different types of projects, assignments, and homework for each and every course. In addition, they are also liable to write essays, research papers and term papers also. All these tasks are looking difficult when we talk about AutoCAD program. The reason is that it requires extensive knowledge as well the creative skills from the programmers or students of this course. The teachers or instructors usually require these tasks in order to evaluate the skills as well as the understanding of the students. The students who are able to perform better in these tasks then there is a chance that they will also get a huge success in their professional careers.
After you’ve started your AutoCad Project, you may be wondering how to keep the project updated. If you don’t know what you’re doing with the software, it can become very complicated and time consuming.
If you want to update the AutoCad project on your own, you can either use AutoCAD Mange Help or AutoCAD Maintain Project Help. Using these 2 AutoCAD help tools is not the best way to update a project because they aren’t meant for managing projects like this.
Although you might find these two AutoCAD tools to be useful, you will not get the results you’re looking for when it comes to an AutoCAD project update. By using Mange and Maintain, you will have to manually go through the entire project to make changes. This takes more time than it should.
In order to avoid wasting time trying to find the right tools for updating your AutoCAD project, I’m going to recommend you use these AutoCAD Project Help tools. You won’t have to go through the entire project to make changes anymore.
These tools will automatically detect any new files that you have added to your CAD file. This will make it easier for you to easily make changes to your CAD file.
Another handy tool that is in all versions of AutoCAD is AutoCAD Viewer. This tool allows you to view all of the changes you’ve made to the CAD file.
This tool will automatically create a dashboard for you to view the changes you’ve made to the files. If you make a change to a file and it doesn’t seem to add anything, you can quickly see that by simply looking at the dashboard.
Of course, you can always delete the old AutoCAD file and start over again, but why? It’s been several years since you’ve created your CAD file, and you don’t want to be starting from scratch.
Using this AutoCAD Project Help tool, you can import your old CAD file and use the tools you learned back then. This way, you can keep your old project as-is and use the advanced tools and functions that you didn’t have the first time around.
If you want to import your CAD file from another program, it’s easy to do. Just make sure you save the new file with the same name of the previous file.
If you have problems with AutoCAD, there are a few tools that can help you with basic troubleshooting. While using these tools, you can find out if something isn’t working correctly.
When you can’t seem to get a tool to work the way you want it to, you may need to re-download the previous version of AutoCAD and use the tools you were able to do before. Then, see if the problem persists.

Before the introduction of AutoCAD, a program is used to perform various functions of AutoCAD which named Interact CAD. Interact CAD was started in the year of 1977 and it was launched in 1979. However, interact AutoCAD is also known as the MicroCAD. It was developed by the Mike Riddle who was the cofounder of the Autodesk.
1982 in the exhibition of computer dealers. Comdex is the abbreviation of the computer dealers’ exhibition. According to the Autodesk, AutoCAD into Your Work Environment the 30 th and the latest version of AutoCAD for Windows was released in the year of 2015. In 2014, the fourth successive version of AutoCAD was launched for the Mac computers.
AutoCAD help services’ writers and experts always provide a best quality assignment or homework help to the customers. Particularly, the students have faced numerous difficulties while operating on the AutoCAD program. Therefore, people should take our professional help regarding AutoCAD programs in order to design different projects and many other things.
.DWG file format is used in the AutoCAD software application. In addition, .DWG and .DXF file formats are used for interoperability of CAD data. These file formats are particularly used for 2D drawing exchange. Moreover, .DWF file format is used to release CAD data.
Online Tutoring For AutoCAD Projects
Getting the support of an online tutoring service for your AutoCAD projects can really help you in terms of quality. You need to be prepared for anything with your project and online tutoring for AutoCAD is a real help.
This way, you can get the best support that you can from your online tutoring for AutoCAD mentor. Also, a tutoring service will offer you personalized services to help you in making your AutoCAD projects successful. These tutors will also be able to assist you with specific features that your AutoCAD software may not have, such as AutoCAD text expressions, Creating Hatch Patterns AutoCAD functions, AutoCAD styles and colors, and AutoCAD non-destructive editing.
Tutoring is one of the most crucial aspects of working with a tutoring service. After all, tutors are the ones who will be keeping your projects from becoming a complete failure. However, for it to be a success, you have to do your part as well.
If you are not familiar with the concepts of interactive learning software, you may have a hard time understanding the reason why you will need to use an online tutoring for AutoCAD tutor. Nevertheless, without these tutors, your AutoCAD projects would lack in some aspects that you need for them to be successful.
The reason why you need a tutoring service to help you is because there are not enough people who have the ability to take on this type of project. In other words, they are people who know how to work with AutoCAD better than anyone else. However, they cannot always be at your side when you are having problems. So, you can benefit from an online tutoring for AutoCAD mentor.
The idea of a tutoring service for your AutoCAD projects can really help you out. For example, you will not have to worry about a lack of motivation while completing your project. With a competent online tutoring for AutoCAD mentor, you will be able to continue with your project without any difficulty at all.
You can also benefit from being given support even if you have more than one student working on the same project. They will all have their own areas of expertise. In the end, this means that you will be learning about the areas of your project that are most complex.
When you begin your project, you will be able to go back and re-examine it and find where you went wrong. A good tutoring service will not only help you out with the technicalities, but will also help you deal with your emotions as well. You will be able to understand the overall picture and try to move forward instead of diving into every little aspect of the project.
Another advantage of using tutoring for your AutoCAD projects is that you will get to differentiate support. If you are getting your tutoring from the same website, you will be able to see the same tutors in the same course of teaching. However, if you use an online tutoring service for your AutoCAD projects, you will be able to choose a different tutor at each stage of your project.
At first, you will be able to get the same level of support in the same type of tutoring but then later on, you will be able to be introduced to different types of tutors for your project. This will make it easier for you to start at a level of expertise that is higher than that of the one that you already have in mind. In other words, the way you teach your AutoCAD projects will become easier to learn.
While using a tutoring service can help you out, it is still very important to make sure that you are actually getting the best services out of them. In order to do this, you will need to make sure that you are making the right choice when you choose your online tutoring for AutoCAD mentor. company. This is done by using several online services that can provide you with their own reviews of various tutoring services that are available.

AutoCAD software application has the compatibility to use files of different other applications. For instance, it allows the users to use ESRI ArcMAP 10 files as the drawing files of AutoCAD. In addition, civil 3D which is civil engineering design and documentation software also authorized to export the objects of the AutoCAD as LandXML. It is also possible to convert the .Pdf files in the Tools for Managing Layers . However, the users are unable to determine the accuracy of the results. AutoCAD also has the function to convert the third party files in some particular formats that include ISYBAU (Germany), PISTE Extension (France), OKSTRA and Microdrainage (UK) and Bentley MX GENIO Extension.
In addition, the students and the teachers who are registered at the Autodesk Education Community, they have the permit to use various applications of Autodesk. The registered students and faculty members are free to use these applications without paying any cost. AutoCAD application software is available for different operating systems such as Android, Macintosh Apple, and Microsoft windows.
AutoCAD software application is available in different languages. Initially, the AutoCAD versions were introduced in English language. Later on, all these are converted into different languages so that anyone might understand and use it easily. AutoCAD is available in different languages such as Chinese Traditional or Simplified, Portuguese, Korean, Spanish, German, Italian, French and many others.

AutoCAD is a software application which helps the large number of application program interface in order to do the automation as well as the customization. The extension of the AutoCAD program includes Visual LISP, AutoLISP, .NET and Visual Basic for Applications. ObjectARX is a programming environment which gives the support for products, creation of the products and the application for third party.
The users can get the add-on applications from the app store of Autodesk which is the developer of AutoCAD. With the help of these add-on applications, the users are able to share the drawing information in the form of .dxf files.
Furthermore, Autodesk has also released the student version of AutoCAD software application. The main purpose behind the invention of this version is to facilitate the students of universities and colleges. The reason is that all the professional versions are complex in use and students are unable to use that software. In addition, professional versions also create a lot of difficulties for the students.
Student version of AutoCAD software application is available to students and teachers on the issuance of license. The license expires after the issuance of 18-months; however the users are allowed to renew the license. Creating Custom Line Types student version is similar to the AutoCAD professional version. A large number of features of AutoCAD for professional are also present in the AutoCAD for students. However, there are some additional features are available in the student version such as editing and designing of the .DWG files.
Our writer are also developed the checklist for the customers so that all the tasks should be performed at a given time. We also offer editing and proofreading services at our services. If the customers might find any mistake in the work then our writers are liable to do rework on the tasks without charging any cost from them.

Nowadays, the technology is continuously increasing on a regular basis. It is necessary for them to get professional assistance, if they want to get success.
However, if someone is not taking it seriously then he might not be able to design project in AutoCAD program. In addition, there are numerous students who can take guidance from AutoCAD help services just because of getting good grades and their understanding about the AutoCAD application in nothing.
We also offer our AutoCAD help services, AutoCAD do my online class to the people of different countries. We offer our services in English language. The reason is that most of our customers have a command on English language. In addition, there are numerous experts and writers of our services who also use English as their primary language.
At our AutoCAD help services, our experts provide their professional assistance to the students and other individuals regarding different topics of AutoCAD application software. It is necessary for the good AutoCAD programmer to learn about the concepts of the AutoCAD software application. Following are the list of topics which we are covered at our AutoCAD helps services.
- Creating Basic Solid Primitives
- Blocks and WBLOCK
- Internet and collaboration
- Stretch Command
- Viewing in 3D – Isometric, Axonometric and Perspective
- Blocks, Drafting symbols, Attributes,
- User Coordinate Systems
- Extracting data
- Query commands – Area and Distance
- Lighting and Materials
- Material Properties
- The Pentigon Drawing
- Borders using Paper Space
- Editing and Modifying Drawings
- XREF and using multiple drawings
- Design Platte
- Layers and Layer Management
- Motel Drawing
- Modify and Change Cusion Plat
- Dimensioning and DIMSTYLE
- Custom symbols
- Section and Isometric Drawing
- Laying out curves
- Divide and measure commands
Therefore, the students, programmers, other individuals should take our AutoCAD help services. We are one of the leading professional help providers for AutoCAD programs of this industry. We offer our services 24×7 globally so that anyone can avail our services from any part of the world.
Using Architectural Design Elements
It is not difficult to design and construct a structure, but when it comes to how to design and build an architectural feature, it becomes much more challenging. There are a number of factors which determine the results that you will achieve when you apply the principles that are taught in the first few years of architecture school. The factors include the size of the building, its location and the purpose of the building.
With the many schools available, the subjects on which students are able to focus are quite varied and cover a variety of different aspects. While you do not have to concern yourself with these factors, it is a good idea to become familiar with them before you begin your design. Of course, when you first begin working on a project, your design will likely require the help of a professional architect. Tools for Managing Layers You can provide your own architectural elements for your building, but it is always helpful to be able to work with someone who has studied under the best architects in the world.
While there are a lot of elements that go into creating a building and designing an architectural feature, it is important to keep things simple. If you start with a complicated design, the more complex things will become when you get to the final stage.
First, you need to understand what you are going to need to do when you are doing any of the architectural projects that you want to do. You should know what you need to use as a base design so that you can begin building around that design.
Make sure that you are not trying to do too much too fast. Take some time to think about what you want to accomplish and then work on each aspect of the design as you go. This will make sure that you will have a well-designed building that will be structurally sound.
Architects are not perfect and they make mistakes and some will even make inaccurate predictions about your project. These predictions must be corrected before the completion of the project. At this point, you will need to make sure that you choose a professional to make sure that the design you have created meets the standards that are required by the building code.
Not only will you need to have accurate design projections for your building, but you will also need to know how to handle everything that goes into the project. In other words, if you are a beginner when it comes to architecture, you will also need to learn about all of the requirements that are needed.
Once you have made your plans for the project, you will also need to make sure that you have a set of blueprints that are accurate. While you may be able to get away with using digital blueprints, the original blueprints that were developed by an architect will be necessary. You should not allow anyone to take your original plans and create a brand new version of them.
It is very important that you find someone who is both an architect and a general contractor who are familiar with the standards of the local building codes. They should be able to provide the correct drawings for your project that will be used to develop your design.
When you begin your project, it is important to remember that the features that you are designing will change over time. You may find that you need to change the base design or even the materials that you will use for your project.
The best thing to do when you are working on your project is to make sure that you have all of the drawings available to you when you are going through the various changes that may occur. It is the responsibility of the designer to update you on any changes that are made and ensure that you know the changes that need to be made.
Architects have various methods of documentation that they will be using for the project. These methods should include how to create blueprints, the specifications for the site and also the various methods that will be used to document any changes that are being made.
The main advantage of using engineering drafting tools to create your prototype design is that you have the freedom to use the tools as they suit your needs. However, the lack of flexibility of using limited drafting tools is preventing many people from starting to use a design or prototype, which is costing them money.
As a result, many companies and entrepreneurs do not realize the huge potential of engineering drafting tools to create prototypes of products quickly and efficiently. One major mistake that most people make is not making use of the software tools that are available to them when creating prototypes.
Of course, this isn’t necessary and is probably something that most would wish to avoid, but it’s a key step in starting a new project. If you aren’t using the software tools, you’re likely to be using too much complex text files and complex drawing tools that are not designed for use with construction. This is making your life more difficult, and it could also be costing you money as well.
On top of the fact that the software tools are useful, Introduction to VBA I in Auto CAD they are what will allow you to successfully create prototypes of products. The AutoCAD software is a favorite of many engineers. I’ve personally used AutoCAD and I can vouch for how useful it is to help you create prototypes that are easier to visualize.
The types of things that AutoCAD will help you create and edit are charts, diagrams, and drawings. It will even be able to easily build a 3D model of what you are working on.
If you are just starting out, you’ll need to get a hold of some basic AutoCAD templates to use. You can get these free, and they are a good way to start to familiarize yourself with the software. The use of templates will make the learning curve much easier.
Tools such as the software tools mentioned above are vital to allow you to successfully create prototypes quickly and efficiently. The AutoCAD software and AutoCAD templates allow you to start working on your prototypes in a much more organized manner.
Once you’ve purchased your tools, you’ll need to start thinking about the design. You’ll need to have a look at a template to see how the design would work, and then decide on a color scheme for your prototype.
In order to get the right colors to match the desired production colors, you’ll need to adjust the color scheme for each prototype in accordance with the color scheme you have chosen for the finished product. This will help you to create your design as quickly as possible.
There are many options to help you get started on your design. AutoCAD will allow you to import images from your computer, or you can use the software tools to set up your design in software such as Adobe Illustrator.
AutoCAD drafting tools will allow you to quickly create a design and give you the freedom to use the software as you see fit. When looking for an AutoCAD template for free, you’ll find that a lot of the good ones have their templates available for a small onetime cost.
If you use AutoCAD properly, you’ll find that it’s a great utility item to have around. So next time you are looking for an efficient way to create prototypes, think about what the AutoCAD program can do for you.
A huge demand in the 3D printing industry has been around the process of architectural design. In today’s technology driven society, designers now have the ability to create anything they wish through rapid prototyping and additive 3D printing. Many companies and individuals have taken advantage of this great technological tool.
The wide variety of choices available in CAD packages are beyond the scope of this article. The process of creating a CAD file can be accomplished by both individuals and companies with the right knowledge. If you have special needs, Editing Existing Buttons your best bet is to contact a 3D printing specialist who will help you explore your options.
An architecture or design firm has access to special software which can be used to create designs in a format that can be made into a model or is then sent to a printer for creation. This process is referred to as displacement modeling. Using the computer generated models; a physical product can be created.
Once the design is complete, the design is sent to a printer. This product can be a cup, vase, figurine, or any other object that you can imagine. The use of digital fabrication allows architects to quickly create a number of items without the cost and hassle of having to stock raw materials. The innovative aspect of the CAD design tools is the cost saving.
If you need to get your business or product out to the public but lack the funds needed to get it printed, you may want to consider using the same CAD design services that the architectural firms use. The same software that is used in a studio is also accessible to individuals. This is a cost effective and efficient way to launch your company.
CAD design software comes in many different formats. At first, the software required will be less sophisticated than the computer-aided design software (CAD) used by larger firms. The basic package will include the ability to print designs directly on flat surfaces. As the firm grows, the functionality of the software will expand to include more features including menu boards, page layout tools, and multi-user user accounts.
The use of CAD design software will help a company’s business grow. There is a much wider selection of programs than one company could acquire on their own. This expands the number of options, a designer has.
If you want to work in collaboration with a design company, your best bet is to find one that specializes in digital and additive technologies. The companies that are ready to help will offer the tools and services that you need at a competitive price. Your personal experience will determine if you are willing to spend your money.
The term “computer graphic” refers to the quality of an image as produced by a computer. This is a subjective measurement. A CAD design can look very well done if you have a highly advanced machine at your disposal, but this is not the same as a real life picture.
It does not take long for a photographer to produce a photo and immediately begin printing it. The same can be said about a CAD designer. The computer takes the design and converts it into a high resolution image, and then from there into a real life digital object that can be printed.
When you begin printing computer generated objects, you realize the limitations of the same. What looks perfect on your computer screen is not always the same on a piece of real wood. A CAD designer can reproduce a CAD file as accurately as possible, but it will still vary in quality between a piece of furniture and a computer generated object.
A CAD designer has a lot of knowledge and experience in creating top-quality images, so their creations will be faithful representations of the originals. Their printing projects are not restricted to a few pieces of printed furniture.
Industrial Design and CAD Software
Industrial design and CAD software have been instrumental in the design process for many years. While some individuals may have little need for a designer’s perspective, this type of application is the best option for many of the companies that depend on a cost-effective design process.
The use of this technology can be employed to produce ideas with great accuracy. When combined with an innovative CAD system, this software can also assist in developing these ideas.
For instance, an organization could generate ideas with minimal cost while still retaining the proper information for all employees involved. CAD and Industrial design systems also enable design professionals to see how a design will look at each stage of the process. Introduction to Customization This makes it easy to compare ideas for duplication.
It is important to remember that not all CAD systems are equal. Those that contain complicated interface features and those that lack the functionality should be avoided. A good designer with high level experience is essential to the success of the company.
The use of CAD and Industrial designing systems enables designers to use pre-defined designs or freely modify their own creations. This enables them to fully understand the design process and why certain parts are removed. In addition, there are different ways in which designers can customize a design.
These tools will allow a designer to define the optimal details for each part of the design and to create designs that incorporate other areas of the project. Industrial designers can achieve this through the use of tools such as the AutoCAD Trace tool. This can enable a designer to see the results of a design from the beginning all the way through to the end of the design process.
This is an efficient flowchart that presents an actual picture of the design, using parts and components to properly define each part. It is a vital part of a CAD design tool that can help a designer to create a well defined piece of work. If a design has multiple areas, the AutoCAD Trace tool can be used to divide the design into sections or subsections that can be further divided into sub-sections.
One tool that is frequently used in this type of process is the Pattern Assembly Tool. This feature can be used to easily draw different stages of the design using exact measurements. It allows a designer to produce detailed information about each stage of the design.
It is important to remember that the design process is sometimes affected by complex technologies. It is therefore important to use CAD and Industrial designing software that has these specific technologies included. When this is not the case, a designer can find themselves working with programs that do not understand the intricate details of the process.
While most CAD systems today use pre-defined or highly optimized workflows, other design types require the use of custom processes. Some of these types of designs require special attention as a design is built up from concept to completion. In these cases, professional designers can be enlisted to assist with creating the best workflows possible.
There are many tools available that allow design engineers to implement solutions for complex problems. This includes tools that offer detail regarding the manufacturing process and those that give detailed descriptions of the production process. Using these programs during the design process is a very effective way to ensure the design can be completed in a timely fashion.
If a design does not include a clear breakdown of the steps that will take place during the production process, this tool is absolutely essential. This information is critical in order to create solutions that can be put into action. After all, a design that fails to contain this information will leave the final product with no purpose.
AutoCAD Mechanical Design
A challenge that most students of AutoCAD Mechanical Design face is the fact that they do not necessarily have any mechanical experience in the field. This means that they are forced to use a typical 2D drafting technique in order to design and develop AutoCAD models.
There are some tools and techniques that you can use when designing AutoCAD Mechanical models that will help you avoid the design mistakes that will result in poor results. Using these simple methods will help you create better, more accurate models. The following paragraphs discuss these methods and explain why it is important to follow them, when designing AutoCAD Mechanical products.
Understanding the basics of geometry is very important when learning how to design AutoCAD models. You should learn about the basic concepts of three-dimensional geometry, before attempting to construct AutoCAD products in this manner. This includes rotational, translational, and angular (angles) geometry.
When working with rotational geometry, there are two sides of a sphere. Finding the Properties of a Solid Each side is referred to as an axis, and an angle. This means that each axis can be rotated from its original position. Therefore, we have ax symmetric models, and symmetric models.
It is important to realize that it is not easy to achieve accurate rotational models. This means that if you want to build a good, accurate rotational model, it is crucial that you understand rotational geometry. This can be done by taking classes or working through projects that show how to do this.
If you want to use parallel or similitude geometry, you will have to work around the concept of left-right and up-down directions. You must pay attention to these relationships and ensure that all your edges are symmetrical. It is very important to do this in order to have an accurate model.
You should remember that it is usually not easy to represent physical spaces accurately, when working with Rotational Models. Because of this, it is important to find a way to group the edges of your Rotational model. In addition, you must also keep in mind that if you want to understand the details of the model, it is best to copy the parts from an original. This is because you can perform many operations and changes on a model that you have simply copied.
When working with angular symmetry, it is important to realize that there are no real straight lines that you can use. As such, it is essential that you group the edges of your angle and square geometry into one cohesive unit.
By keeping this in mind, you can design Angular and square models without having to break things down into their individual pieces. It is very important to do this so that you can effectively create a model.
If you do not have access to an AutoCAD printer, then you should take advantage of the high-quality machining and milling services that are available from your local hardware store. Although you may be able to use a machine at home, you will find that it is much faster and easier to use an AutoCAD model than to manually construct this product.
Set up an AutoCAD drawing for a full-scale model, or some smaller scaled prototypes. Take some time to understand the steps required to successfully fabricate a model. This will make it easier to reproduce the finished model, by using the same tools and the same steps.
Using this approach, you will save money and improve your knowledge of the machinery. When you do this regularly, you will find that you are able to produce a product that is accurate and of a high quality. Finally, you will find that you have a better understanding of how to use AutoCAD mechanical equipment and even use it more successfully.
Before you start working on any Electrical component for your AutoCAD schematic, or on any new electronic systems, take the time to understand how AutoCAD Electrical works. By doing this, you will be better prepared for any future projects that you may work on. The process of understanding AutoCAD Electrical is easy and can be accomplished in just a few minutes, by simply taking a few minutes to consider these points.
Your computer system is divided into many small subsystems that make up what you know as your computer. These subsystems work together and are connected with the motherboard so that they can all interact with each other and the mainframe computer to which they are connected.
The motherboard is one of the most important components of your computer, because it is where all of the other key processes take place. One of the most important tasks that this subsystem performs is that of starting the computer when the power is switched off.
You also must understand that the voltage coming from the motherboard is one of the two things that are known as “Vcc” in the world of electrical engineering . The other is the current from the motherboard, which is the “I/O.”
It goes without saying that the AutoCAD Electrical is the second part of the electronic parts that make up your computer system. This is why it is important to know exactly what your key components are as well as what they are called.
The primary component that you see when you look at your computer monitor is the CRT screen. Customizing Toolbar Tools These screens that you see on the back of your computer monitors, or on the monitor that you have attached to your computer.
The CRT screen is not attached to your computer at all, rather it is attached on the right side of your computer monitor. It is attached to the motherboard via a wiring harness, or connector.
Another point of importance when it comes to computers is that the chipset, or the small electronic component, is on the left side of your computer. This is the component that is attached to your computer and is responsible for converting the analog input signal into digital output.
The first electronic components that you will need to understand are the I/O devices. These are the components that have the ability to convert information into electrical signals, and they are generally represented by devices such as a keyboard, printer, or an RS232 port, among others.
The next component that you will need to understand is the motor of your computer. It is this component that runs the fans and provides power to the computer when the computer is turned on.
The last of the major components in your computer is the hard drive. The hard drive drives information, and stores software in your computer, but also helps to provide the ability to access this information from other machines via the internet, or a LAN.
It is important to know that this information can be found on the Knowledge Base. This is where you will find all of the additional information that you need about these components and how to use them.
Creating a 3D Workbench Using AutoCAD
You may be doing a lot of designing and construction in your 3D workspace but do not know how to create a 3D model or view one. If you do not have the right tools, you can easily create them by yourself. Here are some helpful tips to help you.
The first step is to create a workbench. A workbench can be a table or a surface that is flat and extends up to a height of 5 feet. There should be at least two feet of clearance space on either side for a stool or walk-behind armchair to be placed.
Drawers can also be installed and used. A toolbox is also an important piece of furniture that should be provided as well. Creating a 3D Editing Solids In case, you plan to place tools on the workbench, it is important to have a working pen box or some other secure storage device to keep the tools.
Additional shelves can be installed, for instance, behind the table. This shelf may be made out of wood or plastic. It can provide good storage space for your extra tools and important files and documents.
You can also install a laser cutter to create a 3D model. A laser cutter will allow you to cut the model at a high resolution without any effort. An added advantage of using a laser cutter is that it will enable you to print and customize a certain shape for each component.
For a compact and easy-to-carry case, you can use an expandable model box. This will allow you to carry the model anywhere. You just need to be sure that it has wheels for easy rolling.
The next option is an expandable computer printer. This type of printer will allow you to print high-quality designs for prototypes. If you want to create several different types of models, you can do so. It is very important to take note that it will be cheaper to buy several boxes than to rent one for your office.
If you plan to print and edit your three-dimensional pictures, you can make use of a digital camera. However, if you plan to print your entire office, you can buy a three-dimensional printer and use it to print everything. If you prefer to have an even larger machine, it is possible to purchase a CNC printer which is commonly used to produce prototypes, lathes, stampings, drawer slides, extrusion benders, etc.
Create your own design software. These programs are available to download from online stores. You can easily download CAD design software and use it to create your design. The design will be converted into a format that is compatible with your computer and printers.
Before creating a model, you must be sure that the dimensions that you have input are compatible with your print device. Make sure that you read the instructions that come with the devices and your printer before you start. This will avoid problems with the performance.
After your design is finished, the next step is to load the model to the machine. This is usually done using the loading tray. Before putting the model on the tray, you have to check that the pieces are properly aligned. Otherwise, you may damage the piece and ruin the material.
You can create a ready project by choosing one that you like to use. Choose something that is proven to be efficient and ideal for you. The third step is to run the first model for an average amount of time and see how your model turns out.
Flattening 3D to 2D – Autodesk Design Suite
Before you start working on the Flattening 3D to 2D task in Autodesk Design Suite, it is a good idea to know exactly what the objective of your work is. You will then be able to visualize the level of difficulty and understand whether or not you are capable of completing the project. If you cannot, you can always find someone to do it for you. To help you get started, here are a few pointers to get you started.
For instance, if you want to flatten a flat surface, you should make sure you can use tools such as Plane and Axes. Moving Objects in 3D Space If you have Photoshop, you can quickly turn your flat surface into a three dimensional model by selecting the Flat tool. On the Tools menu, select Refine Path, this will adjust the look of your chosen flat surface so that it resembles a plane.
However, you may also be more comfortable using the tool to blend different flat surfaces. If you choose to use the tool, you will use the tools Saturate, Clamp, and Curve to flatten your selected flat surface. Using these tools will create a three dimensional effect from a flat surface.
If you are working on a rough, irregular, or curved surface, then the path selection tool will help you create a smooth surface. To create the smooth surface, select the Lasso tool and place the tip of the brush along the curve or irregular surface. After selecting the tip of the brush, press the Option/Alt key combination and move the cursor along the path until the desired effect is achieved.
If you are using the Path Selection tool to create a smooth flat surface, you will need to play with the position of the tip of the brush and the shape of the path you are creating. Pressing the Option/Alt key combination can easily change the direction or center of the curve.
As an alternative to flattening a flat surface, you can create a new rough surface. To do this, you can select the Brush tool and add the path of your choice. Use the Path Selection tool to create a rough surface by selecting the path and moving the tip of the brush along the path.
In order to create a smooth surface, you will need to add points to the curve you are creating. On the Path Selection tool, select the tool (Chop) and move the cursor in a way that makes a high quality chop line. Place the cursor at the end of the curve and press the Option/Alt key combination, which will create the high quality chop line.
You can also add points to curved surfaces, which can provide you with a complex finish. To do this, select the Curve tool and then use the Path Selection tool to cut the curves you wish to add. Add as many points as you wish to make the surface smoother one.
Once you have created the curved surfaces that you are working on, it is time to turn your attention to textured surfaces. To do this, first select the Texturing tool. Select the tool and click the canvas on which you want to apply texturing.
The Texturing tool can be used to remove any texture from the surface you are working on. This is usually done in order to create some texture so that the final product will have more character.
Once you have added texturing to your textured surface, you can now add some lighting effects to make the final product. To do this, select the Lamp tool and select the area where you want to apply the lighting effect.
When you are ready to remove the texturing, select the tool and use the Path Selection tool to select the entire area. Then select the Toolbar and use the edit option and delete all the texturing. On the other hand, if you are working on a flat surface, you can use the Texturing tool to fill in some areas.
Draw a Cushion Plate Drawing
If you want to learn how to draw a Cushion Plate Drawings, this tutorial will show you how. This is a design you can use to save time drawing at home. It does not require a computer, drawing paper or a stapler.
Here are the steps you need to follow when learning how to draw a Cushion Plate drawing. Integrating AutoCAD Projects Organization It can be as simple or as complicated as you like, it is all up to you.
The first step is to draw a Cushion in different sizes. You can do this with a ruler. You will also need to know the width of your cushion. Then draw different shapes and build a template to determine the number of templates needed.
Use the template to cut out the number of templates you need. This step is quite easy and time saving. Using templates will make your project much easier to complete.
After you have cut out the templates, measure the exact measurements of your cushion. Use a chalk line to mark the measurements. Using the templates, draw the same set of lines on to the cushion template.
Repeat the process again, but this time draw a cushion in each measurement. When you are finished, take a pencil and color the lines black. To finish the Cushion, use several layers of double sided tape to glue the drawing to the template. The next step is to print off the template onto card stock and use a marker to draw on the template.
In the same way as before, add your text. If you want, you can also sketch the same design using the AutoCAD software to help you build your Cushion design.
Once you have completed all of the drawings, it is time to glue them together with glue and some tape. For each piece, fold and tuck the tape between the two pieces to ensure that the ends are not glued to each other.
The next step is to laminate the pieces and cut them out, which will give you an impression of the final size of the piece. You can also use the glue and tape to connect the pieces for strength.
After all of the pieces are glued and taped, trim any excess paper by hand and then use a very sharp razor blade to smooth the edges. If you are going to use the Cushion Plate Drawing as your final project, I would recommend you file the edges of the cardboard to fit the shape of the cushion.
Here is a final hint; because the Cushion plate drawing is used as a guide, it is important to remember that one side is always up. Never use it as a measuring device or ruler. If you find that you cannot do it yourself, try to contact a professional for assistance.
That is all there is to learning how to draw a Cushion Plate Drawing. You can put your skills to work by creating a Cushion drawing that is tailored to your needs.
Making Rectangular and Polar Arrays with AutoCAD
Not all users of Autodesk AutoCAD recognize the differences between rectangular and polar arrays. Understanding how to use both types of objects will make designing much easier and make your project more precise.
A rectangular is just that: a single oval-shaped piece of paper. While rectangular arrays can be modified with additional rectangles, only a single rectangle can fit on a sheet of paper at one time. It is therefore necessary to remove some excess paper so that the next rectangles fit perfectly.
On the other hand, rectangular arrays can be folded in half or even three quarters. Other Surface-Drawing Tools This allows the user to produce stacked rectangles. There is no limit to the number of stacked rectangles that can be produced with this technique. However, a rectangular array cannot be made into a stack.
Also, grids on the back of the rectangles are fixed and cannot be changed. The grids are just a visual reference for the user. They don’t allow you to manipulate the geometry or position of the objects.
Polar arrays are created from two or more flat sheets of paper. The paper itself is cut into strips about 1″ wide. Gathers are then sewn across the strips and glued together to create an extensive grid. The grid is now cut into two or more pieces and tied with a bow. The pieces are connected by using a band of thread to close the grid, making it into a rectangular or a polar array.
Polar or square rectangles can be split up into smaller pieces using a knife or other cutting instrument. These smaller squares can then be joined together to create larger squares or rectangles.
The best way to make rectangular and polar arrays is to lay out a grid and to draw rectangles and squares to match the grid. However, with a polar array the grid has to be accurately measured. If the user can’t find a ruler, he or she can purchase a grid and follow its directions exactly.
By adding the appropriate pieces of paper, you can make rectangular arrays for a specific purpose. After the sheets of paper have been cut to the right dimensions, it’s time to add the paper to the roll.
While most users know how to measure the width and height of sheets of paper, it is usually easier to draw the paper onto a sheet of tracing paper before attaching it to the roll. Once the paper is traced on a sheet of tracing paper, it is easy to bring it out to the side of the printer and print it.
Polar arrays and squares can be used to build many different things. The rectangular and polar arrays are often used to create building plans or architectural blueprints. These blueprints are used to describe the structure of the building from the floor plan up to the roof and floor tiles.
For example, the paper can be split into tiles and then cut into small pieces so that they can be attached to the floor and walls. While these small pieces are not required for the final building, they are essential to the accuracy of the paper. Therefore, the floor plan must include the appropriate tiles for each room.
A typical building needs insulation between the wall and the ceiling. Since vertical surfaces are covered by tiles, the paper will not need to be adjusted to fit the frames. Vertical objects can be smoothed out with sharp-edged paper.
In my work as a designer of Orchard Drawings, I have noticed that there are some things that tend to confuse people. These are the seven factors that seem to most confuse people.
Part of the problem is people forget to check the size of their paper. It should be noted that Orchard Drawings is not the same as an ordinary drawing in design software. They are almost entirely different. They are larger and they require more paper.
Secondly, people forget to take time to view the small print. If you are working on a large format drawing, you will see that it will print large and legible text on your computer monitor. This text may not be legible if you are working on a small format drawing, which will require you to enlarge it in order to read it all.
Another major issue is that people tend to rush through their work. Drawing Curves and Solid Fills This is where they do not put as much time as they would need to complete their drawing. It is possible to have a rapid design done and still find time for that extra bit of work to make it great. With a bit of time, you can speed up your project and actually do what you have intended to do.
First of all, you want to check that the construction paper is good quality. This will ensure that your drawing will be strong and that it will be durable. Also, it will make sure that it will be able to withstand the test of time. Your company logo, slogan, and contact information will be easier to read than if the construction paper is outdated.
Another important aspect that many people forget to consider is that you should spend some time working with your printer. You should check the speed and quality of your printer to ensure that youare going to be satisfied with your product. It is important to take advantage of your printer so that you can save time by making changes without having to purchase new paper. This will also help you save money as you won’t need to keep purchasing printer ink.
Most people don’t realize that if they are working on a printing job, they need to consider the business card size that they will be using. This is especially true when you are trying to accomplish a large layout that will take several hours to finish. Make sure that you have a good amount of space to move around.
Next, you will need to realize that for Orchard Drawings to be successful, you will need to learn how to edit your work. This means that you will need to think about not only your selected items, but how you will go about getting them. For instance, if you were to have a golfing event, you might use a brochure for the event and print out copies for each guest that will be coming to the event.
It is also important to remember that if you are going to use a brochure for your drawing, you will want to think about the small things that you can add to your brochure. Make sure that you have a little area to write notes on your brochure. Add some notes to your event. Also, if you are using a business card for your drawings, make sure that you keep it organized.
Finally, you will want to make sure that you know how to use the paper you use for your drawing. That means using a pencil so that you can draw around a particular object. Using a permanent marker, it is possible to write things on the card that will be used for the event.
There are many things that you will want to think about before you do it. There are various factors that you will want to consider to make sure that you have completed an Orchard Drawings draws that you really like. There are people, who will buy a pencil, paper, and pen just to get one of these designed and then there are those who do it all by hand.
The basics tips will help you get started on your own personal design. The next thing to do is find a resource or manual that will help you get started.
Isometric drawing and motel drawing are somewhat different from traditional drawing. The process is largely self-imposed, and requires a great deal of focus, patience, and careful planning.
Usually, when people think of drawing they think of two types: oil painting and tracing paper. While both drawing methods have their uses, they are not mutually exclusive. In fact, you can use a combination of them to draw a simple layout for your new AutoCAD project.
There are many books and videos that teach the basics of drawing, but drawing is really not that difficult. Adding a Background Scene There are three main things that you will need to do in order to get started. You will need to purchase a quality pen, a pen stand (which holds the pen upright), and a soft, well lubed eraser.
In order to draw isometric drawings, you will need to use a soft pencil. The pencil must be soft, because the ink does not flow through it the same way as in the case of a soft, hard pencil.
You will also need to draw the top part of your drawing. You can use a solid or outline drawing for this, or you can make a sketch out of four parts: top, left, right, and bottom.
These four parts are then merged together to form the whole drawing. The drawing will show you how to add your shading, which is done by applying varying degrees of shadows and highlights to your drawing.
Adding your shading with your pencil is much more difficult than adding it to a traditional drawing. With an isometric drawing, you will most likely not be able to see the difference between the shading and the background of your drawing. For this reason, you will need to apply multiple tones of shadow to the drawing.
As a reminder, you should know that a basic concept for drawing is to keep the center of your drawing the same. In other words, if your drawing begins at the right and ends at the left, you should start the center of your drawing at the left. The center will become more important as you progress and begin to use more complex concepts.
It will take some practice to be able to draw an isometric drawing. This is true whether you are trying to draw simple shapes or complex ones such as circles or planar objects. However, it will take some practice.
When you begin to become more comfortable with drawing, you may want to try more complex shapes. You may also want to try to draw some of the items you will need to carry with you on your trip. You will find that your drawing skills will become more accurate the more you draw.
Learning to draw on your own is something that is easy to learn. You will not only learn how to make a drawing of a room, but you will also learn how to take your drawing outside.
If you would like to take your AutoCAD drawing and motel drawing to the next level, you should consider adding the additional concepts that are needed to successfully map out your new hotel. For an inexpensive cost, you can really learn to take your drawing to the next level.
Some of the most common tools for use with Geometric Shapes in AutoCAD are: – Computer Generated Shapes. Although this method is pretty easy to use, you still need to know the basics. You will learn more about this method in future lessons.
A variety of AutoCAD viewers are available, such as Open Office or WYSIWYG Drawers. These are capable of displaying and editing both text and geometry (3D object) files. In most cases, you will need to be able to run scripts from a remote server so you can manipulate the files with the help of AutoCAD.
On the other hand, if you are working on a CDW that you can modify later, Effect With Lighting you can edit the geometry data on your own using the AutoCAD files, as well as convert it to a geometry image file. This makes the conversion process much faster.
Geometrically Shaped Complexes are also known as buildings. They are basically sections of a building that was tiled. You can only cut the brick or tile if you have taken into account all of the other surfaces that are present. The logic behind the Geometric Shaped Complexes is very simple, as there are more brick, tile, and mortar layers than glass, trim, and other moldings that often end up being used to make the building appear smoother.
Geometrically Shaped Roof Extensions is an AutoCAD function which is used for the roof of a house. It can add any number of roof extension structures that you can place over existing roofs.
Shingles and tiles are another common tool used for various building projects. Shingles and tiles are part of the whole building facade, but because they are attached to the wall, they are not part of the brickwork itself.
The roof extension is one of the most popular types of roof extensions and also one of the most used. When you are designing a new house, you may want to build a new section of roof, or remodel a section of the existing roof. For example, you may want to create a patio in your home and add a screened-in area around it.
You can add a siding on the side of your house, but that section will be attached to the wall so that it can support the weight of the heavier materials. If you were to attach the roofing to the existing wall, then you could use a shingle or tile that was more expensive. Not only that, you could also be using a less secure kind of roofing material.
If you were to remove the roofing, then you would be able to see the flat surface underneath. If you were to place a shingle or tile on top of that surface, you could damage the underlying material, or it may even cause the damaged area to crack. Roofing extensions can be used to place shingles, tiles, and any other type of roofing materials, and even make the roof more weatherproof.
Using AutoCAD, a lot of people who have little experience designing houses find it easier to get a better result than using traditional methods. And by creating a roof extension, many homeowners can add a beautiful design and style to their homes.
To do this type of building project, you will need to hire an experienced builder. Some people even start their own construction company that offers a Geometric Shaped Roof Extension as part of the building package. So if you are going to start a roofing company, you may want to consider this method of incorporating a roof extension onto your home.
Just remember, when you are working on a new building project, you will not always be able to start work immediately. If you don’t know how to go about designing a new house, a roof extension is a great way to help you complete your next project.
XREF Gen Software
Creating a new type of part called XREF (Dynamic Infrared Reflection) is absolutely essential for a successful XREF AutoCAD project. By enabling a CAD drawing to work in real time, a 3D model can be evaluated and precisely scaled and placed in accordance with the changes in the XREF data. The resulting model should also have a feature set that is appropriate for its environment. So it is very important that the model that is created is XREF compatible.
XREF (Dynamic Infrared Reflection) is an automatically computed representation of the original drawings using data from actual physical dimensions as opposed to a virtual model. This particular data is dynamic, changes all the time and, as such, can be a real time “test bed” of a new design for usability and functionality.
Once the data base is developed for your design, you can send the XREFs to your manufacturer or distributor without having to create them. You’ll then have a simple way to access this data for proper model generation and refinement. Moving a Surface XREF Every bit of information is accessible and can be changed at any point in time. For example, a transparent part such as a light blue plate in a small room in which is not used frequently will show up in the XREF, so that it can be rendered with full functionality.
In addition, as the material’s texture changes in real time, the color of the part can change accordingly. As another example, if the material that is to be rendered starts out being lighter, as you can see on the part, the part will be rendered brighter and the XREF will show more detail than when it was originally darker, which will help you to avoid making the part appear to have faded over time.
Even if the design does not necessarily require a 3D model, it can be rendered using a normal depiction of the original CAD file. In fact, it is possible to create various types of prototypes in the absence of any model.
Creating unlimited edition of a piece of part is simple. All you need is a little bit of software called XREF Gen that allows unlimited number of XREFs that can be saved into one high quality file, which is what you’ll use to render the model.
Many manufacturers today use level geometry for large pieces of equipment, such as cranes, elevators, ships, truck and buses. It is very difficult to create a model with level geometry by hand, and even more difficult to edit once the geometry has been created.
XREF Gen permits you to create any number of planes with three dimensional details. Once the XREFs are created, you can use them as you see fit to render large models, including interiors and exteriors. Also, they can be used to create long shots or close-ups, depending on how much detail you want in your render.
Many companies today are using XREF Gen to create a non-generated level geometry model, which they can use in place of a non-generated original non-generated CAD model. The advantage of using a non-generated model is that you don’t have to carry around any printed model that may have some details that are not correct. For instance, you may create a CAD model of a crane that is so detailed that it looks like a finished product.
However, if you do want to save the material’s details, you can simply use XREF Gen to take the CAD model and use it as you see fit. There is no need to have to worry about a printed model that may not represent the final product. Also, you can convert a non-generated part into a generated XREF, which is just as easy as converting any CAD model into an original CAD model.
Furthermore, XREFGen will allow you to generate a part of any size, shape and material that you can imagine. To generate XREFs of a certain material such as steel or a plastic material, you simply have to select the material that you want and open the layers in the program. XREFGen will automatically generate the part based on the material selected and the details of the model that you desire.
If you want to get into the world of digital 3D modeling, there are a few basic things you will need. A computer with a video card and a scanner can be very helpful in creating your 3D models. You should also know how to do the basic 3D modeling process, which is exporting the models to the web.
Digital modeling is a process that helps users to manipulate 2D and 3D objects. For example, if you are creating a sculpture using a software program such as AutoCAD, you would place the object where you want it to go and then draw the object and you will have the object you need. However, if you are trying to build a car, you have to think about how to create it and draw it so that it will look good on the engine block. You need to work out the geometry of the car itself first.
In addition, you can be able to recreate a digital model that you have created with Creating Complex 3D Surfaces AutoCAD or similar programs. Since you will be designing a car or a house for example, you need to be sure that you can import a file into a design program.
Nowadays, this is easier than ever, because the Internet has made this possible. You can download AutoCAD design programs or other CAD design programs and have them on your computer and then you can draw out a digital model of whatever you are trying to model. This way, you are not limited to just drawing the main body of the car or house.
The reason you want to draw the model of the object first is because it makes it much easier to go back later and refine and make changes to the model, once you have started working on it. The program will already have a skeleton, which will help you to start drawing the shape of the car or house. It also allows you to create a different look by changing the color scheme or the materials that you use for the exterior or interior.
There are many software programs that will allow you to sketch models. Sketching and exporting is one of the most common ways to import a digital model to the AutoCAD program. You can also export the file and just store it on your hard drive.
You will need a system that will allow you to export a vector model to the computer. Many people now use AutoCAD Design Suite or Adobe Photoshop to create 3D models. One of the advantages of doing it with AutoCAD design suite is that you can see all the parts of the model you are going to build.
This means that you will be able to draw them all at different sizes and use different fonts so that you can find them quickly. You will not have to zoom in or out and look for a part, which saves time. And the programs will have high quality rendering, so you will get an accurate image of the object.
AutoCAD’s Simulate tool allows you to do a lot of things when modeling a car. You can change the lights and the windows and use different reflections. The ability to change a surface material is a very important part of modeling cars, as it allows you to choose a material that is reflective or not, so that you can adjust it to be different depending on what you are using it for.
Digital models can be used to create artwork, as well. You can cut out a representation of the car, to look at in your living room. It can also be used to make other things that need to be modeled, such as buildings or things that are made from plastics.
Another thing that you can do is to have the computer render your sketch, so that you can see exactly what you will be working with. This is called a step by step process. It is a more detailed form of digital modeling than an AutoCAD modeler is doing.
Digital modeling is something that can be done for free and you do not have to be an expert to do it. It is a good learning tool for new artists, as well as someone who want to do their own drawings.
Material and mapping, This can be an intimidating concept to the first time designer or even to the experienced designer. Material and mapping are generally thought of as “everything and the kitchen sink”. I think that is a good description of the middles of AutoCAD, but it’s more than that.
These basic characteristics are typically how things are created in a typical design project but don’t let the labels fool you. Turning a Solid into a Shell I’ve learned a lot about AutoCAD since starting this journey (I’m already looking at you Realtor! ), but I still had a difficult time grasping the main concepts.
One of the main concepts I think is important for anyone to learn in material and mapping is how to design your own parts. You can do this with AutoCAD. To make your own parts you will need some text, a .obj file, and a new part object.
You should open the .obj file with an AutoCAD expander. For me this was Alt+(shift+) on my keyboard. If you aren’t familiar with creating your own objects or data, this will likely take a little while to learn.
Once you have the .obj open, you will use the new part tool in AutoCAD. To open the part tool, simply hit F3. If you don’t know what this means, the number is the tool for your left hand. On my keyboard it is D3.
So now you’re looking at the Material and Mapping tab. Now you should understand what the black rectangle means, and that’s the new part you want to create. You can follow the blue arrows for the best result. With your new material, you should be able to see that there are many possibilities.
The blue arrows show you how many sides you can have for your new part. Each side you can add will change the material properties (i.e. reflection, damping, and friction).
Another tab I like to look at when it comes to material and mapping is the Material Properties tab. Again, this tab has lots of information you need to know. These properties will allow you to add these materials to your project.
In addition to materials, there are several other types of materials. These materials include metals and plastics. Just to list a few:
Once you find what type of material you want, click the plus sign next to it. This will allow you to adjust the properties of that material.
While material and mapping are the basics, there are a few other things you need to know. Learning about derivatives and permutations is just one example. I wrote an entire article about derivatives and permutations.
Remember, you will use the material and mapping when you start designing your new material and mapping. Material and mapping are the “heart” of your design. Don’t go into design without understanding these concepts and how they can help you.
Pentagon Drawings
Pentagon drawings are widely used in commercial and corporate projects where you have to work fast and with great accuracy. With these types of designs, you can be sure that your project will look professional and have to do the best with all its aspects. The key is to find the best, and inexpensive materials to help you do your work quickly and efficiently.
When you begin work on a project that has a complicated parts, it is good to make use of some diagrams that are suited for you. For this type of layout, you should first choose which kind of Pentagon drawing you want to use for your work. Separating a Divided Solid There are several options, and each one can be useful in the right situation.
Each type of drawing has different styles to suit different kinds of projects. It can be difficult to choose a style that would be suitable for a complex project. It is important to know how different styles would go with the overall design of your project before deciding which one you will use.
The first one you should choose is called an “Oval Shaped Sketch”. You can find these drawings by searching the internet for “Oval Sketch”. Since this kind of drawing does not have the typical square shape of a pentagon, it is ideal for all kinds of complex projects. It gives a more intricate design and can provide you with clear ideas about how the projects should go.
You can choose to use either the ones with curves or a combination of curves and angles, but most people prefer the former. These drawings are usually made with a plane and are called “Curved Shapes”. This makes them perfect for complex projects where you need a great amount of details, such as those involving cars, planes, boats, and many other vehicles.
The other type of design you can find on Pentagon drawings is called “Triangle Shapes”. Since they are irregular in shape, you should use a plane for this kind of design. This gives you more control and makes it easier to draw even the slightest changes that are needed for your project.
“Circle Shapes” can also be found on drawings. Circles are quite popular as they are easy to draw and to understand. These drawings are ideal for any projects that involve precise measurements, or large designs.
There are two types of quadrant drawings: ones that have four parts and those that have five parts. They are called Quadrant 4-0 and Quadrant 5-0. If you only have three parts, it is more likely that you will use Quadrant 5-0, since it gives you more details and a better quality sketch.
The first two types of pentagon drawings are called “Octagon Shapes”. Since they can be made with many angles, they are more complicated than the regular ones. Since they require a very high level of precision, they are perfect for complex projects, and even for different types of products.
If you would like to have better results for your Pentagon drawings, you can add color to the drawings by making use of the colors available for your project. It is more helpful if you print the designs so that you can have a copy to use as a reference while you work on your project.
Your final decision about the shape you want for your Pentagon design should be done carefully. You should take into consideration the dimensions and the complexity of the part of the project that you will be working on. A complex drawing can give you more ideas and it is a good idea to have a basic diagram of your project, and this is where the extra details come from.
Whatever Pentagon drawings you are going to use, it is good to understand how to create your own work. This is the only way you can be certain that you will get the best results from your work. Whether you are making your own drawings or buying the same ones you see online, you should keep these tips in mind so that you can ensure that your work is error free.
AutoCAD-Lines and Layers
AutoCAD-Lines and Layers can work in two distinct ways. It is a data source, which permits you to enter data into a program with AutoCAD symbols or other objects. A data layer is an interface between the layers and the projects. It also provides a means for modeling the types of objects and their relationships.
With AutoCAD, you can convert the data input into a data layer, which can be then used to create the different types of objects. Then you can use the layers to create the various objects that have varying degrees of complexity and be able to manipulate the data layers to create different types of objects.
For instance, one might set up a data layer that shows the different objects as different textures on a table. Then you could use this layer to create different types of plates and the different shapes that might come out of that plate with the different sizes.
If you were to add a second data layer that showed the different weights of the plates, you would have a different part of the table that was constantly changing and growing. You would be able to change the weights that came out of the plate, which would add more dimensions to the table. In the end, you had the table filled with different numbers of objects, and you could model anything within the matrix that AutoCAD would allow you to.
There are several ways to determine which data layers will make the most sense for your particular project. First, determine what type of information that you are looking for and then identify which data is directly relevant to that specific project. The easier it is to deal with a particular layer, the more accurate it is likely to be when it comes time to use it.
There is also the end result of the layer, and that should be a significant factor in your decision making process. In other words, if the desired end result of the project is a building or some other object that is going to be used, the layer will be easier to work with. If it is intended to be used for illustration purposes, the layer will not be as valuable as it would be if you were looking for some other type of object.
When working with data layers, one can use a mode of operation known as mode switching. Adjusting That Control Meshes This allows you to quickly switch from one mode of operation to another, without being forced to save your changes each time.
It is important to keep in mind that with AutoCAD-Lines and Layers, any attempt to alter the data or manipulate the object may cause an error to occur. If the data you enter has too many symbols in it, it may be difficult to get your symbols into the projected matrix. Thus, if you are working with any type of text, or symbols, you need to make sure they are properly set to fit into the data that you input.
While working with a layer, one should always check the types of data that it contains. If you find something that needs to be changed, you can change the layer’s properties so that you can change the data that it contains.
When working with AutoCAD-Lines and Layers, there are several options to modify the data. These include using Object Properties to change the attributes of an object.
The options available for modifying a layer are the Attributes and Additional Parameters. Using the Object Properties button allows you to view all of the attributes and select the ones that you wish to change.
Using the additional parameters you can specify the radius of each point of the layer. This is necessary because if you do not set the layer’s perimeter, the AutoCAD software will use the shortest side of the input. By using the range selections, you can specify which side is accurate, allowing you to fix the problem with the image much faster.
Time is Quality
Guaranteed top grades, high quality services.
We are one of the best and leading AutoCAD help services of this industry. The reason for that is that the quality of our services is quite exceptional.
All these experts have remarkable knowledge and experience regarding the AutoCAD software application. They are always available to provide their exceptional services to the learners in reasonable prices.
The services of our tutors are always important for those who want to become experts in the AutoCAD program.
At our AutoCAD help services, we never disclose the names of our customers to the general public. A lot of customers do not like that their private information is shared with the others.
Every customer has his own personal issues so that it is important for us to keep their information in secret.
Pizzas Ordered
Clients worked with, autocad projects/ assignment completed, love affairs.
Our Services Are Delivered By Our Team With Years Of Experience Are Passionate About Developing Business.
AutoCAD Assignment Help
What we offer.
- AutoCad Help
- AutoCad 3D Help
- AutoCad Drawings Help
- AutoCad Express Tools
- AutoCad Commands Help
- AutoCad Assignments
- Cad Applications
AutoCAD Project Help
- AutoCAD Homework help
- 3D AutoCad Blocks
- AutoCad Commands List
- AutoCad Plotting
AutoCAD Homework Help
- Auto Cad Assignment Help
- Auto Cad Project Help
- Help with AutoCad
- Business AutoCad Service
AutoCAD Program Training
- Engineering Drawings
- AutoCad Plot
- Cad Assignments
- AutoCad Orthographic Projections
- AutoCad Tutorials
Development of Program or Model
- AutoCad 2D Help
- AutoCad Mechanical Drawings
- AutoCad Trim
- AutoCad CTB
Client Testimonials
“The guys are the best AutoCad experts you will ever get.”
“These guys did my AutoCad Project in hours. Forever obliged.”
“To err is human, to rescue is AutoCadHelp.net”
Submit Your AutoCAD Assignments
Feel free to send us an inquiry. we reply back real quick..
AutoCAD Homework Help | AutoCAD Assignment Help
Receive the best quality AutoCAD homework help on TutorBin to improve your understanding of the subject and achieve academic success.

Trusted by 1.1 M+ Happy Students
Autocad homework help - for achieving academic excellence.
Starting your academic journey with AutoCAD opens the door to the fascinating world of computer-aided design (CAD) software. AutoCAD is a powerful tool widely used in architecture, engineering, and design. It helps students learn how to accurately make 2D and 3D drawings and models. AutoCAD is extensive, with nearly 3000 commands, which can be challenging, especially for students pursuing mechanical or civil engineering degrees. Understanding all the ins and outs of AutoCAD might appear overwhelming because it's a highly intricate and multifaceted software program. But don't worry; TutorBin AutoCAD homework help is here to guide you with expert assistance and support.
Our expert AutoCAD tutors specialize in simplifying the complexities of CAD by breaking down the software into meaningful and relevant segments. We offer round-the-clock accessibility and engaging, interactive sessions to create a learning environment tailored to your needs. Whether you're struggling with 2D drafting or diving into 3D modeling, our expert tutors are dedicated to your success.
Don't be discouraged by AutoCAD's complexity. Use our knowledge and start your exciting learning adventure today. Our main aim is to help you become a pro at this vital design and engineering software, and we'll be by your side throughout your journey.
AutoCAD Homework Help - Best Online Help For Students
Many students find AutoCAD challenging to learn, but TutorBin offers high-quality online AutoCAD homework help tailored to your needs. Our platform features expert AutoCAD tutors ready to guide you through AutoCAD, helping you master it. We focus on your success by providing personalized guidance that matches your learning style and pace, making AutoCAD concepts clear and practical. With an easy-to-use interface, timely support, and a commitment to your academic progress, TutorBin is your trusted partner for excelling in AutoCAD. Say goodbye to homework stress and get the best support here.
AutoCAD Homework Help - Who Can Benefit from Online Assistance?
Embarking on intricate AutoCAD assignments can leave you in a quandary. TutorBin extends a helping hand to anyone grappling with the intricacies of AutoCAD. Whether you're an engineering, architecture, or design student, our online AutoCAD homework assistance is a helpful solution. In this digital era, adept guidance is easily within reach for learners across all levels, from novices to advanced practitioners.
If drafting, 2D and 3D modeling, or the labyrinthine AutoCAD commands pose challenges, platforms like TutorBin offer a nurturing environment to connect with proficient tutors. Through our expert guidance, you can confidently refine your skills, complete assignments, and unlock your full potential to ace this subject in order to achieve academic success. Don't allow intricate drawings or perplexing commands to hinder your progress – embrace online AutoCAD homework help and stride confidently in your design expedition.
AutoCAD Tutors Online - Is It Worth To Hire Them?
Our skilled tutors give you personalized guidance and know a lot about AutoCAD's tools and how it works. By getting our online AutoCAD tutor help, you can learn from their technical knowledge and experience. This can help you improve drafting and design and overcome challenges more easily. Since they're online, you can learn at your own speed and when it's best for you. So, hiring them is a good idea because you'll get a lot out of it.
Do My AutoCAD Homework
Completing AutoCAD assignments can pose significant challenges for students, leading them to seek online assistance. These challenges can vary from tackling complex drawings and 3D modeling to limited software proficiency and time constraints. TutorBin AutoCAD assignment help is your solution to overcoming these hurdles. Here are some specific challenges that students encounter:
1. Complexity of Design Requirements
AutoCAD assignments frequently involve intricate design specifications and requirements, which can overwhelm students, particularly those in their early education stages. Understanding and implementing these complex design elements can be challenging without proper guidance and support.
2. Inadequate Instruction
Some students may receive insufficient or unclear instructions from their professors or educational institutions regarding AutoCAD assignments. This lack of clarity can leave students feeling lost and unsure about how to proceed, necessitating external assistance.
3. Scale and Precision
AutoCAD requires a high level of precision, especially when working on architectural or engineering designs. Students may struggle with accurately scaling drawings and ensuring that measurements are correct, which can impact the quality of their assignments.
4. 3D Modeling Complexity
When assignments involve 3D modeling in AutoCAD, students may struggle to grasp the intricacies of creating and manipulating three-dimensional objects. This complexity can make it challenging to visualize and construct complex 3D models accurately.
5. Symbol Libraries and Standards
AutoCAD assignments often require specific symbols, annotations, and industry standards. Students may struggle to locate and utilize the appropriate symbol libraries and adhere to the required standards, leading to errors and inconsistencies in their work.
6. Integration with Other Software
Some assignments may necessitate integrating AutoCAD with other software tools or applications, such as Autodesk Revit or SolidWorks. Students may face difficulties seamlessly integrating these software packages, affecting the overall functionality of their designs.
AutoCAD Topics & Concepts Covered
Autocad assignment help.
When you choose TutorBin for your AutoCAD assignment help, you're making a smart decision that can significantly impact your academic success. Our platform is dedicated to providing students like you with top-notch assistance in AutoCAD and various other subjects. Here's what you can expect when you connect with us for your AutoCAD homework help:
1. Comprehensive CAD Assistance
Our experts provide support for various AutoCAD areas, including 2D drafting, 3D modeling, rendering, and parametric design, covering architectural, mechanical, and electrical projects.
2. Concept Clarity
Strengthen your foundational knowledge by resolving doubts and better grasping intricate AutoCAD concepts.
3. Troubleshooting & Error Resolution
Resolve complex AutoCAD issues such as software glitches, compatibility challenges, and drawing errors to keep your projects on course.
4.Customization & Scripting
Learn to customize AutoCAD through scripts and macros, automating tasks, crafting custom commands, and tailoring AutoCAD to your specific requirements.
5. Enhanced Visual Presentations
Elevate the visual appeal of your AutoCAD drawings and models with advice on materials, rendering settings, and creating professional project presentations.
6. Plagiarism Prevention
Ensuring originality and integrity in your CAD projects through education, citation, and ethical practices.
7.On-Time Submissions
Ensure timely assignment submissions with the support of our expert AutoCAD tutors, who excel at managing deadlines.
TutorBin AutoCAD Homework Help
Students from around the world choose us for their AutoCAD help with homework, based on our distinctive advantages. Let's explore what distinguishes us:
1. Expert Guidance
Our AutoCAD tutors have in-depth knowledge of the software's features, tools, and techniques. They can guide you through various aspects, from basic drawing to advanced 3D modeling, ensuring you gain a comprehensive understanding.
2. Personalized Learning
Our online AutoCAD tutors provide tailored learning experiences, adjusting their teaching to your skill level, learning style, and goals. This individualized attention boosts your skill development.
3. Enhanced Learning
Beyond assignment completion, TutorBin aims to deepen your understanding of AutoCAD. Our tutors provide detailed explanations and feedback, helping you grasp the software's core concepts.
4. Boost Confidence
By receiving expert guidance and enhancing your AutoCAD skills with TutorBin, you will develop the confidence necessary to excel in upcoming projects and courses.
5. Immediate Feedback
Our online tutoring platforms offer real-time interaction, providing instant feedback on your assignment to help you correct mistakes and improve your skills.
6. Flexible Scheduling
We provide scheduling flexibility, especially beneficial for busy students and professionals. Choose timings that suit you, making learning convenient.
7. Cost-Effective
Unlike traditional in-person tutoring, our online AutoCAD tutors offer more competitive rates, making high-quality teaching accessible to a wider audience.
8. Convenience
Learning AutoCAD online means studying from the comfort of your home or any location with an internet connection, eliminating the need for commuting and allowing you to learn at your own pace.
9. Revision Assistance
If you need revisions or have questions after receiving your assignment, our tutors are readily available to provide post-delivery support and address any concerns.
10. Plagiarism-Free Work
Academic integrity is paramount at TutorBin. We guarantee that all solutions provided are original and free from plagiarism, ensuring your work's credibility.
11. Confidentiality
Your privacy and security are of utmost importance to us. Rest assured that your personal information and assignment details are kept confidential.
AutoCAD Assignment Help - Expert Tutors for Immediate Assistance
Struggling with AutoCAD assignments? TutorBin offers a quick and effective solution. Our team of skilled AutoCAD tutors is dedicated to providing you with immediate support. Whether you're grappling with intricate drawings or advanced 3D modeling, our tutors will walk you through each step. Don't let the complexities of AutoCAD software hinder your progress; we're here to simplify problems and boost your comprehension.
Explore a streamlined path to mastering AutoCAD with our comprehensive solutions and expert assistance. Say goodbye to the stress of incomplete assignments and receive academic excellence with TutorBin.
Receive the timely assistance you need and excel in your AutoCAD assignments with us. Our tailored solutions and committed support are designed to enrich your learning journey and ensure your success. Don't allow AutoCAD to hold you back – conquer it confidently with our expert guidance.
AutoCAD Homework Help Online Worldwide
Wherever you are on the map, TutorBin AutoCAD help with homework is within your reach. Our online support is accessible to students all around the world, breaking down geographical barriers to your success. Join our diverse global community of learners, and let's elevate your AutoCAD skills together. No matter the time zone, we're here to empower you on your academic journey. Don't miss out on the opportunity to excel in AutoCAD – join us today and experience the academic growth on your own.
AutoCAD Help FAQs Searched By Students
Can i pay someone to do my autocad homework help.
Yes, at TutorBin, you can pay for our qualified tutors to handle your AutoCAD homework, leading to a better understanding and improved knowledge of the subject.
Where can I get help with AutoCAD assignments?
When you're stuck with AutoCAD homework, you can use sites like TutorBin for expert AutoCAD assignment help. Just visit the website, share what you need, and they'll provide round-the-clock professional assistance to enhance your understanding and skills.
What should I do if I need help with AutoCAD?
If you're saying, "I need help with AutoCAD," you're in the right place. Simply submit your assignment on TutorBin, and our tutors will provide your guidance.
Are there online AutoCAD homework helpers available?
Yes, at TutorBin, you'll find online AutoCAD homework helpers who can assist you with your assignments.
How much should AutoCAD homework cost?
There is no fixed cost for AutoCAD homework assistance. The cost depends on the complexity of your problem areas, deadline proximity, and availability of tutors.
Recently Asked AutoCAD Questions
- Q 1 : 1- Draw 3 views (front, side and top) of the below assembly part by using AutoCAD software and obeying technical drawing rules. Demonstrate all necessary measurements. See Answer
- Q 2 : 2- Draw below 2-D assembly part by using AutoCAD software and obeying technical drawing rules. Demonstrate all necessary measurements. See Answer
- Q 3 : ACAD1-4 Stair Section Project Brief: The interpretation of data is an important skill used when we create the necessary technical documents for a project. For this project you will utilize plan and detail views of a stair to create the required stair section to communicate the sizes and components of its construction. For additional AutoCAD information, refer to the modules found in AutoCAD 2023 Student Notes. Deliverables: AutoCAD .dwg drawing file of your completed stair section. Plotted drawing showing your stair section to the indicated scale. Your instructor will indicate their preferred format. Assessment: Start a new drawing using the acadiso metric template. Format units - Length Type: decimal to 2 decimal places / angle type: decimal degrees to 2 decimal places See Answer
- Q 4 : 1. When drawing in 2D, what axis do you NOT work with? a) X b) Y c) Z d) WCS 2. What should you pay attention to when learning AutoCAD? a) The Command Line b) The Status Bar c) The Title Bar d) Tool Icons 3. Polar coordinates are used mostly for drawing...? a) Circles b) Arcs c) Vertical lines d) Angled lines 4. What does WCS stand for? a) Western CAD System b) Worldwide Coordinate Sectors c) World Coordinate System d) Wrong CAD Settings 5. How many points do you need to define for the rectangle command? a) One b) Two c) Four d) None/n6. How long will a line from 1,4 to 4,4 be? a) Four units b) Eight Units c) Can't accurately tell from those coordinates d) Three Units 7. How should you select objects when using the stretch command? a) With a crossing window b) Pick them one by one c) Hold the shift key while selecting d) Type 'S' 8. The origin of a drawing is at: a) The first point you select 0,0 b) A random point in space 10,10 9. Objects are rotated around the a) Base point b) Bottom right of the object c) Centre of the object d) Origin 10. When using the TRIM command, which do you select first? a) The cutting edges b) The object to be trimmed c) Everything d) Nothing 11. The fillet command creates? a) Sharp Corners b) Round Corners c) Round and Sharp Corners d) None of the above 12. A polar array creates new objects... a) In a grid pattern b) In a straight line c) In a circular pattern d) In a northern pattern 13. The distances of a chamfer are: a) Always different b) Always the same c) Sometimes different d) Never the same/n14. You should use O snaps when you dimension... a) Never b) Always c) Only on lines d) Only on arcs and circles 15. How many layers should a drawing have? a) One b) Ten c) One for each object d) As many as are needed to clearly display the objects 16. Scaling objects makes them... a) Bigger b) Smaller c) It only stretches them d) Both Bigger and Smaller 17. Which one is NOT a vaild type of unit? 18. a) Architectural b) Decimal c) Open d) Metric What do you NOT need to consider when starting a CAD drawing? If you can draw it a) If you have enough paper b) If you have all the measurements needed c) If AutoCAD is installed on your computer 19. Panning allows you to... a) Minimize the drawing b) See all of the drawing at once c) Close in on a small area d) Move around the drawing at the same scale 20. Why should you use the Zoom tools? a) To be more accurate b) To be faster c) To make your drawing easier d) All of the above/nAnswer any 2 Questions. 1. Discuss in detail about Layout in AutoCAD. 2. How to insert 3 phase wire in AutoCAD Electrical. 3. Explain in detail about view cube. PART - C Answer any 2 Questions. 1. Explain in detail about AutoCAD Layer. See Answer
- Q 5 : This project is included here as a way to help you get used to the Screencast-o-matic software. You will be using this software in future assignments. Screencast-o-matic allows you to capture your computer screen while you click and narrate what is happening. This requires a computer/laptop with a microphone. You could be running a PowerPoint slide deck on your laptop and narrating as you go, capturing the whole thing as a presentation. Or, as in this assignment, you could be demonstrating a piece of software. Your job: 1. Visit the Screencast-o-matic website and download the free screen capture software. 2. Review how to use the software. You can check out their Ultimate Guide On How to Screen Record. 3. Choose a piece of CAD software you are comfortable using and record a 5-minute introductory tour of the software. Treat this as if you are introducing the software to someone who has no idea what it does or how to use it. (You narrating while clicking.) See Answer
- Q 6 : CVEN 1025 3 Credit Lab 2 Lab Work: AutoCAD 2023 Instructor . Chapter 3 Exercises • Exercise 1, p62 • . • • Exercise 4, p53 • Complete circle exercise, save and submit labp4.DWG file. Exercise 5, 64 . • Complete horizontal line exercise, save and submitlabp5.DWG file. Exercise 8, p56 Submission Details: Denver IN THE CITY Complete horizontal line exercise, save and submit labp1.DWG file. AutoCAD Civil Engineering Graphics and Computer Aided Design Complete circle exercise, save and submit labpe DWG fle Exercise 9, p56 Complete horizontal line exercise, save and submit labp.DWG fle Exercise 12.56 Complete circle exercise, save and submit lab12.DWG fie • Using Polar Tracking, Polar Snap, and Dynamic Input p63 Complete exercise, save and submit ptrack-polarsnap.dwgfe . Submit to Canvas 6 AutoCAD Drawing Files (DWG) Textbook Chapters to Review: • AutoCAD 2023 Instructor . Chaplers 3 and 8/nCVEN 1025 001-3 Credits Autocad Introduction Homework Exercise 2: . Please complete the following problems from the text book Chapter 3 . 10 12 13 15 Chapter 8 Submission Details: . Submit to Canvas asa dwg enver MAIN THE CITY Textbook Chapters to Review: . Chapter 3 and 8. AutoCAD Civil Engineering Graphics and Computer Aided Design See Answer
- Q 7 : need a cad design for a jaw articulator Need to use autocad software and Need to send the model design only The image added is taken from INTERNET and is for reference purpose only yes, what we need to do is after you we need to send student 5-6 models example with website links and then student will confirm on whcin we need to work See Answer
- Q 8 : B00GG Wonder Care™ ADING REAKTION 720000 Wonder Care Deep Breathing Lung Exerciser | Washable & Hygienic I... Visit See Answer
- Q 9 : Ex. 1. Prepare a 3D model of an object 38 21 Computer Aided Design 36 3 14 58 84 Basics of 3D modelling 12 43 10 1 Ex. 2. Prepare a 3D model of an object 60 55 Computer Aided Design 10 50. 35 14 30 77 Basics of 3D modelling OF 20 18 30 2 Ex. 3. Prepare a 3D model of an object 40 0.9 91 36 Computer Aided Design 24 30 66 84 Basics of 3D modelling 18 26 37 1 3 Ex. 4. Prepare a 3D model of an object 45 26 15 Computer Aided Design 40 26 38 78 Basics of 3D modelling 15 16 26 4 20 Ex. 5. Prepare a 3D model of an object QF Computer Aided Design 8 30 50 45 50 60 R20 90 R15 Basics of 3D modelling 40 3 70 5 See Answer
- Q 10 : Homework Exercise 5: • Please complete the following problems from the text book. o Chapter 20 ▪ 5 o Chapter 21 1 ▪ 2 o Chapter 22 1 Chapter 30 1 Submission Details: • Submit to Canvas as a .dwg Textbook Chapters to Review: • Chapter 20, 21, 22, and 30. See Answer
- Q 11 : Homework Exercise 5: • Please complete the following problems from the text book. o Chapter 20 ▪ 5 o Chapter 21 1 ▪ 2 o Chapter 22 1 Chapter 30 1 Submission Details: • Submit to Canvas as a .dwg Textbook Chapters to Review: • Chapter 20, 21, 22, and 30. See Answer
- Q 12 : 1. Create 3 Circles and 2 Rectangles 2. Select all a. b. 3. Selects Similar a. b. c. Use the "selall" command Take a screenshot of selected objects Use the "selectsimilar" command 4. Group a. Use the group command b. Select your 3 circles c. Name this group circles d. Save the file as "lab5a" 6. Block Select one of your objects Take a screenshot of selected objects 5. Group Edit a. Use the groupedit command b. Remove one of the circles from the group c. Save the file as "lab5b" 7. Insert a. Use the block command b. Choose a base point and select the two rectangles c. Name the block rectangles a. Use the "-insert" command b. Insert the retangles block c. Save the file as "lab5c" 8. Xreference a. Open a new file b. Use the xreference command c. Select attach dwg d. Select your lab file lab5a.dwg e. Insert the file into your drawings at 0,0 wit a scale of 1 and rotation of 0 f. Save the file as "lab5d" See Answer
- Q 13 : Q1 Where can you choose the type of projection (First angle or Third angle) to use in a drawing? Question options: File properties. Document properties. Sheet properties Drawing properties. See Answer
- Q 14 : Q2 2 Top Plane 3 Right Plane 1 Front Plane Plane C Object 1. Plane A 2. Plane B 3. Plane C Hane B Plane A See Answer
- Q 15 : Q3 What is an oblique surface? Question options: A surface that is slanted in two different directions. An elongated surface. A curved surface. A surface that is slanted in one direction. See Answer
- Q 16 : Q4 For third-angle projections, the orthographic view is Question options: projected on a plane located between the viewer's position and the object. Projected on a plane located beyond the object. Projected on a plane to the left of the object. Projected on a plane under the viewer's position. See Answer
- Q 17 : Q5 For first-angle projections, the orthographic view is Question options: projected on a plane located between the viewer's position and the object. projected on a plane located beyond the object. Projected on a plane to the left of the object. Projected on a plane under the viewer's position. See Answer
- Q 18 : Q6 recedence of Lines: Order these types of lines by precedence in drawings, with lines taking precedence coming before lines they take precedence over. Questions options: _3__ Hidden Line ___1__Centerline __2__Solid Line See Answer
- Q 19 : 2. Layer Properties Manager and Linetype Manager A. Begin a New drawing and use Save to assign the name CH11EX2. Set Limits to 11 x 8.5, then Zoom All. Use the Linetype Manager to list the loaded linetypes. Are any linetypes already loaded? PICK the Load button then right-click to Select All linetypes. Select OK, then close the Linetype Manager. B. Use the Layer Properties Manager to create 3 new layers named OBJ, HID, and CEN. Assign the following colors, linetypes, and lineweights to the layers by clicking on the Color, Linetype, and Lineweight columns. OBJ HID CEN C. Make the OBJ layer Current and PICK the OK tile. Verify the current layer by looking at the Layer Control drop-down list, then draw the visible object Lines and the Circle only (not the dimensions) as shown in Figure 11-46. Red Yellow Green FIGURE 11-46 $1.50- Continuous Hidden2 Center2 1.00 5.00 -2.50 Default Default Default 1.25 L 2.50 -1.00 2.00 1.50 See Answer
- Q 20 : 4. Create a New BSHEET Template Drawing Complete this exercise if your system is configured with a "B" size printer or plotter. A. Using the template drawing in the previous exercise, create a template for a standard engineering "B" size sheet. First, use the New command. When the Select a Template File dialog box appears, locate and select the ASHEET.DWT. When the drawing opens, set the model space Limits to 17 x 11 and Zoom All. B. Activate Layout 1. Erase the existing viewport. Activate the Page Setup Manager and select the Modify button. In the Page Setup dialog box select a print or plot device that can use a "B" size sheet (17 x 11). In the Paper Size drop-down list, select ANSI B (11 x 17 inches). Close the dialog box and the Page Setup Manager. C. Make VPORTS the Current layer. Then use the Vports command and select a Single viewport and accept the default (Fit) option to create one viewport at the maximum size for the printable area. Finally, make the Model tab active. All other settings and layers are okay as they are. Use Saveas and save the new drawing as a template (.DWT) drawing in your working directory. Assign the name BSHEET. See Answer
Popular Subjects for AutoCAD
- Geotechnical / Foundation Engineering
- Material Science
- Reinforced Cement Concrete
- Steel structure
- Structural Analysis
- Basics of Civil Engineering
- Construction Planning And Management
- Design Of Wood Structure
- Engineering Drawing
AutoCAD Experts of TutorBin
Get Instant AutoCAD Solutions From TutorBin App Now!
Get personalized homework help in your pocket! Enjoy your $20 reward upon registration!

Download on the App Store

Download on the Google Play

Testimonials
TutorBin AutoCAD homework help is a dream come true for anyone aiming to become a CAD designer. The tutors are patient, knowledgeable, and passionate about what they do. Their visual aids and step-by-step explanations were invaluable in helping me master AutoCAD. Thanks to TutorBin, I'm one step closer to my career goals!

I was feeling overwhelmed by my AutoCAD homework until I discovered TutorBin. Their tutors are not only knowledgeable but also patient and supportive. They tailored their teaching to my pace and made learning AutoCAD a breeze. I wouldn't have aced my assignments without their help!

I was struggling with my AutoCAD assignments, and that's when I turned to TutorBin. Their AutoCAD homework help was a game-changer! The expert guidance I received not only improved my grades but also boosted my confidence in using AutoCAD for my engineering projects. Highly recommended!

I couldn't have asked for better AutoCAD homework help. TutorBin tutors are well-versed in the intricacies of AutoCAD, and their assistance was indispensable for my engineering coursework. Their clear explanations and real-world applications made all the difference. Thank you, TutorBin!

TutorBin AutoCAD homework help is a must-try for any architecture student. The tutors not only helped me tackle my assignments but also provided insights into architectural design techniques using AutoCAD. Their guidance has elevated the quality of my projects, and I'm truly grateful.

Get Instant Homework Help On Your Mobile
All The Answers, In Your pockets

Get Answers In Few Hours
Get Homework Help Now!
Homework Help & Tutoring

Our name 24HourAnswers means you can submit work 24 hours a day - it doesn't mean we can help you master what you need to know in 24 hours. If you make arrangements in advance, and if you are a very fast learner, then yes, we may be able to help you achieve your goals in 24 hours. Remember, high quality, customized help that's tailored around the needs of each individual student takes time to achieve. You deserve nothing less than the best, so give us the time we need to give you the best.
If you need assistance with old exams in order to prepare for an upcoming test, we can definitely help. We can't work with you on current exams, quizzes, or tests unless you tell us in writing that you have permission to do so. This is not usually the case, however.
We do not have monthly fees or minimum payments, and there are no hidden costs. Instead, the price is unique for every work order you submit. For tutoring and homework help, the price depends on many factors that include the length of the session, level of work difficulty, level of expertise of the tutor, and amount of time available before the deadline. You will be given a price up front and there is no obligation for you to pay. Homework library items have individual set prices.
We accept credit cards, debit cards, PayPal, Venmo, ApplePay, and GooglePay.
If you need assistance with AutoCAD courses or drawings in general, we provide AutoCAD tutoring both online and through homework help with qualified tutors that cover other engineering programs as well. Our tutors are made up of teachers at the college level, graduate students, and professionals in the engineering field.
Our tutoring and homework help model is built to help you whenever you need it. To use our homework help service, all you need to do is fill out our submit form letting us know your due date and upload any supporting documents and materials. Our tutors will respond to your request - sometimes in minutes! They will give you a quote based on how long it will take to complete the assignment. Once you receive your quote you are free to discuss the quote and any concerns with your tutor. There is no obligation with our service. We want you to feel comfortable with the tutor of your choosing.
You have the option to choose a specific tutor from our selection of AutoCAD tutors or you can submit your tutoring request so all AutoCAD tutors can see it.
Our tutors are available 24/7 in our Tutor Center! Each tutor can assist you in both live tutoring sessions and homework at any academic level, from bachelor's degrees to doctorates. If you have a specific AutoCAD assignment with which you are having trouble, we also have AutoCAD homework that has been completed. You can use past assignments as guidance for completing your current AutoCAD homework. Our homework library is a vast collection of completed homework assignments to enable you to find the right content to fit your needs.
To fulfill our tutoring mission of online education, our college homework help and online tutoring centers are standing by 24/7, ready to assist college students who need homework help with all aspects of AutoCAD. Our engineering tutors can help with all your projects, large or small, and we challenge you to find better AutoCAD tutoring anywhere.
College autocad homework help.
Since we have tutors in all AutoCAD related topics, we can provide a range of different services. Our online AutoCAD tutors will:
- Provide specific insight for homework assignments.
- Review broad conceptual ideas and chapters.
- Simplify complex topics into digestible pieces of information.
- Answer any AutoCAD related questions.
- Tailor instruction to fit your style of learning.
With these capabilities, our college AutoCAD tutors will give you the tools you need to gain a comprehensive knowledge of AutoCAD you can use in future courses.
24HourAnswers Online AutoCAD Tutors
Our tutors are just as dedicated to your success in class as you are, so they are available around the clock to assist you with questions, homework, exam preparation and any AutoCAD related assignments you need extra help completing.
In addition to gaining access to highly qualified tutors, you'll also strengthen your confidence level in the classroom when you work with us. This newfound confidence will allow you to apply your AutoCAD knowledge in future courses and keep your education progressing smoothly.
Because our college AutoCAD tutors are fully remote, seeking their help is easy. Rather than spend valuable time trying to find a local AutoCAD tutor you can trust, just call on our tutors whenever you need them without any conflicting schedules getting in the way.

- school Campus Bookshelves
- menu_book Bookshelves
- perm_media Learning Objects
- login Login
- how_to_reg Request Instructor Account
- hub Instructor Commons
- Download Page (PDF)
- Download Full Book (PDF)
- Periodic Table
- Physics Constants
- Scientific Calculator
- Reference & Cite
- Tools expand_more
- Readability
selected template will load here
This action is not available.
5.4: Module 30 Creating 2D Drawings from Solid Models
- Last updated
- Save as PDF
- Page ID 19972

- Wally Baumback
- Vancouver Community College via BC Campus
Module 30 Creating 2D Drawings from Solid Models
Learning Outcomes
When you have completed this module, you will be able to:
- Apply the SOLVIEW, SOLDRAW, and SOLPROF commands to automatically create 2D working multiview drawings, including pictorial views, from solid models.
Creating 2D Drawings from Solid Models
After an object is constructed as a solid 3D model, there are AutoCAD commands and features available to create and dimension a 2D working multiview drawing. Before you go any farther in this module, you must know and understand the following concepts:
- Creating and modifying AutoCAD layout drawings.
- Working in paper space.
- Creating, editing and setting the scale of viewports.
These three concepts are covered in the AutoCAD 2D book.
AutoCAD Command: SOLVIEW
The SOLVIEW command is used to create views and the necessary layers of a 3D solid model.
Shortcut: none

Important: Before you use the SOLVIEW command, ensure that the current visual style is 2D Wireframe and the Hidden linetype is loaded into the drawing.
AutoCAD Command: SOLPROF
The SOLPROF command is used to create a profile of edges of straight and curved surfaces of a solid model as it is viewed from a selected viewpoint.

Important: Before you use the SOLPROF command, ensure that the current visual style is 2D Wireframe and the Hidden linetype is loaded into the drawing.
AutoCAD Command: SOLDRAW
The SOLDRAW command is used to convert views created by the SOLVIEW command by projecting the 3D objects onto a 2D plane and changing hidden objects onto the hidden layer.

WORK ALONG: Creating 2D Drawings from a Solid Model
Using the NEW command, start a new drawing using template: 3D Layout English .
Save and name the drawing: AutoCAD 3D Workalong 30-1 .
Set the current UCS as World, the current view as SE Isometric, and the current visual style to 2D Wireframe.
Using the LINETYPE command, ensure that the Hidden linetype is loaded in the current drawing.
Set the Insertion Units to inches and insert the block: AutoCAD 3D Workalong 30-1 at 0,0,0.
Explode the block and change the layer that the solid model is on to layer: Solid 7 . Using the Properties window, check to ensure that the object is a 3D solid. (Figure Step 6)

Save the drawing but do not close it.
Enable layout: Module Layout D . (Figure Step 8)

Enter the SOLVIEW command, as shown below, to create the top view of the model. Name it: Top. (Figure Step 9)
Command: SOLVIEW
Enter an option [Ucs/Ortho/Auxiliary/Section]: U
(Enter U to draw the view from the UCS.)
Enter an option [Named/World/?/Current] <Current>:
(Accept the default Current.)
Enter view scale <1.0000>:
(Accept the scale of 1.)
Specify view center: P1
(Select a location for the centre of the view.)
Specify view centre <specify viewport>:
(Press Enter to accept the location.)
Specify first corner of viewport: P2
Specify opposite corner of viewport: P3
Enter view name: Top
(The view must be named.)

Enter the SOLVIEW command again, but this time create the front view by projecting orthographically from the top view. Name it: Front . When done that way, the two views will be aligned. (Figure Step 10A and 10B)
Enter an option [Ucs/Ortho/Auxiliary/Section]: O
Specify side of viewport to project: (mid)
Specify view center: P4
Specify first corner of viewport: P5
Specify opposite corner of viewport: P6
Enter view name: Front

Using what you just learned, create the right side view and name it: Right . (Figure Step 11A and 11B)
Specify view center:
Specify first corner of viewport:
Specify opposite corner of viewport:
Enter view name: Right
Enter an option [Ucs/Ortho/Auxiliary/Section]:

Use the MVIEW command to create a viewport in the top right corner of the drawing. Change the scale of the viewport to 1:1 and the current view to SE Isometric. Pan the model in the viewport to centre it. (Figure Step 12)

Using the UNITS command, set the length precision to 8 decimal places. Open the Properties window and select all four viewports as shown in the figure. Check to ensure that the scale of all viewports are set to 1:1. Lock their display. (Figure Step 13)

Enter the SOLDRAW command, as shown below, to change the multiviews viewports to 2D. (Figure Step 14A and 14B)
Command: SOLDRAW
Select viewports to draw.
Select objects: 1 found
Select objects: 1 found, 2 total
Select objects: 1 found, 3 total
(Select the three multiview viewports.)
Select objects:
One solid selected.

Change to current space to Model and select the isometric view as the current viewport. Enter the SOLPROF command as shown below. (Figure Step 15A and 15B)
Command: SOLPROF
(Select the solid model.)
Display hidden profile lines on separate layer? [Yes/No] <Y>:
(Select the default.)
Project profile lines onto a plane? [Yes/No] <Y>:
Delete tangential edges? [Yes/No] <Y>:
Enter an option

Change the colors of the layers as shown in the figure. (Figure Step 16)

Turn Layer: VPORT off and your completed drawing should appear similar to the figure. (Figure Step 17)

Save and close the drawing.
Key Principles
Key Principles in Module 30
- Before you use the SOLVIEW and the SOLPROF commands, ensure that the current visual style is 2D Wireframe and the Hidden linetype is loaded into the current drawing.
Lab Exercise 30-1
Time allowed: 45 minutes.
Start a new drawing using the template shown above.
Draw the plines on layer: Pline and the solid model on layer: Solid 3 .
Using the figures as a reference, draw the solid model. (Figure Step 3A, 3B, and 3C)

Enable layout: Module Layout D and using the command SOLVIEW, create the three multiviews. Set the scale of the viewports to 1.5:1 and lock their display.
Use the SOLDRAW command to change the views to 2D.
Using the MVIEW command, create two views and set their view to SE Isometric. Scale the viewports to 1:1 and lock their display. Set one of the views to display shaded.
Use the SOLPROF command to create the hidden lines in the isometric viewport. (Figure Step 7)

Change the color of the layers to Red for object lines and Blue for the hidden lines. (Hint: See Step 16 of WORKALONG: Creating 2D Drawings from a Solid Model)
Fill in the titleblock in paper space.
Turn layer: VPORT off. (Figure Step 10)

IMAGES
VIDEO
COMMENTS
Step 4. Draw a line of an arbitrarily chosen length but make sure it forms 64 degrees with the line we have created in Step 2. ( You can do this by creating a line aligned with the line with created in Step 2 and rotating it with 64 degrees counterclockwise) What I will do here is: Rotate the line created in step 2 from its bottom end with 64 ...
AutoCAD Definition and Applications: AutoCAD is a CAD software that allows users to create precise 2D and 3D drawings. In architecture, it facilitates the design of buildings and structures. Engineers use it for mechanical, electrical, and civil engineering projects. Additionally, it finds applications in product design, interior design, and more.
AutoCAD Training Exercises for Beginners - 1. This video contains AutoCAD drawing tutorials based on what we learn in the previous lectures. Topics covered i...
So, to help you practice I have created this article with ten 2D and ten 3D drawings that you can make using AutoCAD or any other CAD software as well. To get the full list of 2D and 3D practice drawings download the PDF eBook which contains more than 70 drawings fully illustrated with dimensions. Click the download button above to get your eBook.
CAD models work the same way. There are guidelines which should be followed for most models. · Add material, cut away material, add little details (i.e. fillets and chamfers). · Keep sketches simple. Don't try to make multiple features with a single feature. · Try not to start your model by sketching a rectangle.
AutoCAD Training Exercises for Beginners - 1. This video contains AutoCAD drawing tutorials based on what we learn in the previous lectures. Topics covered in the video are: Crating first AutoCAD drawing. Solving the AutoCAD basic exercises. This tutorial shows how to create drawing in AutoCAD for.
This free online course presents practice exercises to help you learn how to use AutoCAD for 2D and 3D drawings. Autodesk's AutoCAD is a popular program used to create, view and edit computer-aided designs (CAD) and drawings. It helps you to streamline your design workflows with 3D navigation, image referencing, mesh modelling and user ...
AutoCAD drawings. Learn the basics of drawing and become an expert in no time. Type: Tutorial. Length: 2 min. Related learning. Tutorial 2 min. Use palette tools. AutoCAD. View. Tutorial 3 min. Control the tool palettes display. AutoCAD. View. Tutorial 2 min. About tool palettes. AutoCAD. View. Tutorial 4 min. Create simple action macros.
AutoCAD Drawing Tutorial for Beginners - 3. This is AutoCAD Practice Drawings 2D. In this tutorial we will solve some of the basic exercises in AutoCAD. Thes...
Welcome To A_CAD Tutorials I am Anket KamtekarIn this video I show the 2D basic Exercise Of Autocad for Beginners AutocAD 2D Practice Drawing | Exercise 1 | ...
Here you will find some AutoCAD Exercises & practice drawings to test your CAD skills. These drawings also work for AutoCAD mechanical, AutoCAD Civil & other CAD software packages. Same drawings can also be used as Solidworks Exercise for practice. For AutoCAD 2D Exercises or practice drawings - Click here. For AutoCAD 3D Exercises or AutoCAD ...
Getting started with AutoCAD. Becoming familiar with the AutoCAD user interface is your first step in getting to know the software. Tour the ribbon and try out the Command line. Learn how to open a drawing or create a new one, and then you can access them remotely. Create simple geometry using construction lines, grids, and the UCS as guides.
Drawing files available for downloading are provided in AutoCAD drawing (DWG) format. The AutoCAD software is required to open the drawing files. The AutoCAD software is not included and must be obtained separately. View All. 1 - Introduction to AutoCAD. 2 - Drawings and Templates. 3 - Introduction to Drawing and Editing.
Autodesk AutoCAD is the industry standard software used by professionals all around the world to create computer-aided designs (CADs), 3D models and architectural drafts as well as technical drawings. This course takes you from knowing nothing about AutoCAD to a level where you can start creating your own drawings and working on existing drawings.
The autocad assignments should be devoid of grammatical errors. The students must make sure that the homework helper they are choosing must be available in communicating with the students whenever necessary. This is the reason why autocad basic assignments help came into being. The service helps students from various backgrounds to help them ...
Working with Pre-existing Drawings and Raster Images; AutoCad Homework Help. As a student, completing AutoCAD Homework Help is one of the most important tasks you can accomplish. This is because learning AutoCAD and designing a project is the key to doing well in your AutoCAD project. ... Set up an AutoCAD drawing for a full-scale model, or ...
AutoCAD Homework Help - For Achieving Academic Excellence. Starting your academic journey with AutoCAD opens the door to the fascinating world of computer-aided design (CAD) software. AutoCAD is a powerful tool widely used in architecture, engineering, and design. It helps students learn how to accurately make 2D and 3D drawings and models.
AutoCAD. If you need assistance with AutoCAD courses or drawings in general, we provide AutoCAD tutoring both online and through homework help with qualified tutors that cover other engineering programs as well. Our tutors are made up of teachers at the college level, graduate students, and professionals in the engineering field.
#autocadforbeginners #autocad2024 #caddmaniac This AutoCAD tutorial series consists of complete AutoCAD drawing course (2D & 3D) of around 14-15 hours, consi...
1EP. Step-by-step solution. Step 1 of 2. Procedure for drawing the Fold pattern is as follows: • Turn on the object snap on the computer system. • Then draw a circle using circle command. • Draw the lines using line command at required positions. • Select a point on the corners of the lines and select end point and mid points using Osnap.
With the AutoCAD web app, you can edit, create, and view CAD drawings and DWG files anytime, anywhere. ... The core technology of AutoCAD in an online DWG editor and DWG viewer. Trusted. The AutoCAD web app is Autodesk's official online CAD program. Connected. Draft with precision, speed, and confidence from anywhere ...
The SOLVIEW command is used to create views and the necessary layers of a 3D solid model. Shortcut: none. Draw Pull-down. Home Ribbon. Important: Before you use the SOLVIEW command, ensure that the current visual style is 2D Wireframe and the Hidden linetype is loaded into the drawing. AutoCAD Command: SOLPROF.
This problem has been solved! You'll get a detailed solution from a subject matter expert that helps you learn core concepts. Question: AutoCAD drawing assignment. Please send link to autoCAD file. Or provide way to get autoCAD file. Please dont attempt to answer unless can provide file as most do. thank you. AutoCAD drawing assignment.