
Cloud Storage

Custom Business Email

Video and voice conferencing

Shared Calendars

Word Processing

Spreadsheets
Presentation Builder

Survey builder

Google Workspace
An integrated suit of secure, cloud-native collaboration and productivity apps powered by Google AI.

Tell impactful stories, with Google Slides
Create, present, and collaborate on online presentations in real-time and from any device.
- For my personal use
- For work or my business

Jeffery Clark
T h i s c h a r t h e l p s b r i d g i n g t h e s t o r y !

E s t i m a t e d b u d g e t

Make beautiful presentations, together
Stay in sync in your slides, with easy sharing and real-time editing. Use comments and assign action items to build your ideas together.

Present slideshows with confidence
With easy-to-use presenter view, speaker notes, and live captions, Slides makes presenting your ideas a breeze. You can even present to Google Meet video calls directly from Slides.

Seamlessly connect to your other Google apps
Slides is thoughtfully connected to other Google apps you love, saving you time. Embed charts from Google Sheets or reply to comments directly from Gmail. You can even search the web and Google Drive for relevant content and images directly from Slides.

Extend collaboration and intelligence to PowerPoint files
Easily edit Microsoft PowerPoint presentations online without converting them, and layer on Slides’ enhanced collaborative and assistive features like comments, action items, and Smart Compose.

Work on fresh content
With Slides, everyone’s working on the latest version of a presentation. And with edits automatically saved in version history, it’s easy to track or undo changes.

Make slides faster, with built-in intelligence
Assistive features like Smart Compose and autocorrect help you build slides faster with fewer errors.

Stay productive, even offline
You can access, create, and edit Slides even without an internet connection, helping you stay productive from anywhere.
Security, compliance, and privacy

Secure by default
We use industry-leading security measures to keep your data safe, including advanced malware protections. Slides is also cloud-native, eliminating the need for local files and minimizing risk to your devices.
Encryption in transit and at rest
All files uploaded to Google Drive or created in Slides are encrypted in transit and at rest.
Compliance to support regulatory requirements
Our products, including Slides, regularly undergo independent verification of their security, privacy, and compliance controls .
Private by design
Slides adheres to the same robust privacy commitments and data protections as the rest of Google Cloud’s enterprise services .

You control your data.
We never use your slides content for ad purposes., we never sell your personal information to third parties., find the plan that’s right for you, google slides is a part of google workspace.
Every plan includes

Collaborate from anywhere, on any device
Access, create, and edit your presentations wherever you are — from any mobile device, tablet, or computer — even when offline.

Get a head start with templates
Choose from a variety of presentations, reports, and other professionally-designed templates to kick things off quickly..

Photo Album

Book Report

Visit the Slides Template Gallery for more.
Ready to get started?
- PRO Courses Guides New Tech Help Pro Expert Videos About wikiHow Pro Upgrade Sign In
- EDIT Edit this Article
- EXPLORE Tech Help Pro About Us Random Article Quizzes Request a New Article Community Dashboard This Or That Game Popular Categories Arts and Entertainment Artwork Books Movies Computers and Electronics Computers Phone Skills Technology Hacks Health Men's Health Mental Health Women's Health Relationships Dating Love Relationship Issues Hobbies and Crafts Crafts Drawing Games Education & Communication Communication Skills Personal Development Studying Personal Care and Style Fashion Hair Care Personal Hygiene Youth Personal Care School Stuff Dating All Categories Arts and Entertainment Finance and Business Home and Garden Relationship Quizzes Cars & Other Vehicles Food and Entertaining Personal Care and Style Sports and Fitness Computers and Electronics Health Pets and Animals Travel Education & Communication Hobbies and Crafts Philosophy and Religion Work World Family Life Holidays and Traditions Relationships Youth
- Browse Articles
- Learn Something New
- Quizzes Hot
- This Or That Game New
- Train Your Brain
- Explore More
- Support wikiHow
- About wikiHow
- Log in / Sign up
- Computers and Electronics
- Website Application Instructions
- Google Applications
How to Create a Presentation Using Google Slides
Last Updated: November 30, 2023
wikiHow is a “wiki,” similar to Wikipedia, which means that many of our articles are co-written by multiple authors. To create this article, 17 people, some anonymous, worked to edit and improve it over time. This article has been viewed 236,621 times. Learn more...
This tutorial will show you how to make a PowerPoint-like presentation using Google Slides. Presentations can be used for school, business, and so much more.

- You can also just type in https://slides.google.com , log in if you haven't already, and will be taken to the Slides page.
- If you don't have a Google account, learn to create one now!

- For more options, hover over the arrow on the right edge of the Google Slides option, where a smaller drop-down menu will appear. From here you can select to create a presentation from a template or a blank slide.

- Be sure to add a title and subtitle by clicking where you are prompted to add text.

- You can also change a pre-existing slide's layout by clicking the layout option on the upper editing bar.

- As you add animations to each element by clicking the blue "+ Select an object to animate", they will begin to pile up. Click on each one to edit it.
- Change the transition from slide to slide by clicking the default "Slide: No transition" at the top of the sidebar. You can choose whether to apply to all slides or just one.
- Preview your animations by clicking Play at the bottom of the sidebar.
- Remove an animation by clicking the small x on its rectangle, and drag each animation up or down to change the order.

Community Q&A
wikiHow Video: How to Create a Presentation Using Google Slides
- If you have a pop-up blocker, make sure to disable it so Slides can work properly. Thanks Helpful 0 Not Helpful 0
- Hover over each tool to see its keyboard shortcut and function. Thanks Helpful 0 Not Helpful 0
- Remember, these are the basic functions- Google Slides contains many more tools that you can work with as you explore the creator. Thanks Helpful 0 Not Helpful 0

You Might Also Like

About This Article
To create a new Google Slides presentation, open a web browser and go to Slides.Google.com. If you want to start from a template, you can choose one from the template gallery. Otherwise, click "Blank" to create a new blank presentation. Your blank presentation starts with a single simple slide with space to enter a title and subtitle. You can personalize this slide, as well as other slides you add, by editing the placeholder text, as well as choosing a slide theme from the panel to the right. To insert another slide, click the "Insert" menu and select "New Slide," or press "Control M" for a quick keyboard shortcut. You'll also find other things you can add to your slide on the Insert menu, including the option to add an image, a text box for typing, videos, shapes, charts, and other features. After adding a new slide, click the "Layout" menu to choose a slide layout—you can give each slide its own layout or reuse the same layout as much as necessary. Edit the placeholder text, and then insert objects from the Insert menu. To move an object, click the arrow in the toolbar, hover the mouse cursor around the object's border line until it turns to a 4-point arrow, and then click and drag it. Each slide you add will have a thumbnail in the left panel—click a slide's thumbnail to open that slide for editing. To see your presentation as a viewer would, click your first slide in the left panel, and then click "Present" at the top corner. Click the Escape key to go back to editing. Google Slides also has some built-in effects you can access from the "Transition" menu—here you can animate a slide's transition into the next slide, as well as animate individual objects. To apply an effect, background, theme, layout, or any other setting to more than one slide at once, select the slides in the left panel by holding down the Control key as you click each thumbnail. Your presentation will automatically save to your Google Drive as you work—type a name for the presentation in the top-left corner so you can easily find the file when you need it. Did this summary help you? Yes No
- Send fan mail to authors
Is this article up to date?

Featured Articles

Trending Articles

Watch Articles

- Terms of Use
- Privacy Policy
- Do Not Sell or Share My Info
- Not Selling Info
Keep up with the latest tech with wikiHow's free Tech Help Newsletter
- The Best Tech Gifts Under $100
- Traveling? Get These Gadgets!
How to Use Google Slides to Make a Presentation
An overview of Google's presentation software
:max_bytes(150000):strip_icc():format(webp)/susiej20131-5ab94d9e18ba0100378d30cb.jpg "how to make a powerpoint presentation on google slides")
- Ohio State University
What to Know
- Go to File > Download to save a presentation. To publish it, choose File > Publish to the web > Link or Embed > Publish .
- Choose Share to add collaborators. View edit history from File > Version history > See version history .
- Select File > Make available offline to work on a presentation offline.
Google Slides is an app that allows you to easily collaborate and share presentations with text, photos, audio, or video files. Similar to Microsoft's PowerPoint, it's hosted online and can be accessed in a web browser from any device with an internet connection. Here's everything you need to know to begin creating your own presentations.
How to Publish Google Slides
You can publish your Google Slides presentation online using a link or embedded code. You can also limit access to who can see the presentation through permissions. These are live documents, so whenever you make a change it also appears on the published version.
To publish a Google Slides presentation online:
Go to File > Publish to the web .
Select Link to get a shareable URL. You can also choose how much time passes before each slide advances and whether or not the presentation restarts after the final slide.
Select Embed to generate code you can add to your website. There's also an additional option here to choose the size of the slides.
Once you tweak all of the settings, select Publish .
What Is Google Slides?
Google Docs is a set of office and education applications, similar to the tools in Microsoft 365 . Google Slides is the company's answer to Microsoft's presentation tool, PowerPoint. You can create dynamic presentations with images and audio . You can even add GIFs to put some fun into your presentation. One of the main advantages of using Google's tools is that they're free; all you need is a Google account and an internet connection.
But there are other great reasons to use Google Slides, like wide compatibility. Users can view and edit presentations on their PC or Mac. Google Slides also has Android and iOS apps so you can work on your presentation on a tablet or smartphone.
Google Slides Basic Features
Here's a quick look at some of the basic features of Google Slides.
Export PowerPoint Presentations to Google Slides
To convert one of your PowerPoint presentations to Google Slides , upload it to Google Drive.
Some PowerPoint features won't carry over to Google Slides.
You can also save your Google Slide presentation as a PowerPoint file, a PDF, or other file formats. Go to File > Download , and select one of the options.
Use Google Slides Offline
Google Slides is cloud-based , but you can access and edit documents in Google Drive offline . Once you're connected to the internet again, all of your work syncs to the live version. If you want to take your work offline, go to File > Make available offline .
Live Collaboration on Google Slides
One of Google Slides' key advantages over Microsoft's PowerPoint is live-team collaboration, regardless of where your co-workers are located. You can share Google Slides from Google Drive and invite collaborators via their Google accounts. You control what level of access each person has, such as whether they can only view or edit the presentation.
Live collaboration allows everyone on the team to work on, and view, the same presentation simultaneously from satellite offices. Everyone can see live edits as they're created.
For this to work, everyone must be online.
The easiest way to invite others to view or edit your project is via the Share button in the upper right. From there, you can copy a link to the presentation or you can add collaborators via their email addresses.
Google Slides Version History
Because Google Slides is cloud-based, it continuously auto-saves while you're working online. The Version History feature keeps track of all changes, the time they were made, and who made them. To see the document's history of edits, go to File > Version history > See version history .
Google Slides Built-In Themes
Just like PowerPoint, Google Slides offers pre-designed themes , backgrounds, colors, and fonts. It also provides some nice design features, including zooming in and out of your slides and the ability to apply masks to images to modify their shapes.
Get the Latest Tech News Delivered Every Day
- How to Create a Microsoft Sway Presentation
- What Is a PPTX File?
- How to Use Google Duet in Slides
- How to Change a Google Slides Background
- The 8 Best Google Drive Add-ons for 2024
- How to Make a PowerPoint Presentation
- How to Use Microsoft's Free PowerPoint Viewers
- How to Add Audio to Google Slides
- How to Change the Slide Size in Google Slides
- How to Link Slides in Google Slides
- What Is Microsoft PowerPoint and How Do I Use It?
- How to Convert Powerpoint to Google Slides
- How to Make Google Slides Portrait
- How to Use Google Slide Animations and Transitions
- How to Add Music to Google Slides
- What Is a PPTM File?
- Generative AI
- Office Suites
- Collaboration Software
- Productivity Software
- Augmented Reality
- Emerging Technology
- Remote Work
- Artificial Intelligence
- Operating Systems
- IT Leadership
- IT Management
- IT Operations
- Cloud Computing
- Computers and Peripherals
- Data Center
- Enterprise Applications
- Vendors and Providers
- Enterprise Buyer’s Guides
- United States
- Netherlands
- United Kingdom
- New Zealand
- Newsletters
- Foundry Careers
- Terms of Service
- Privacy Policy
- Cookie Policy
- Copyright Notice
- Member Preferences
- About AdChoices
- E-commerce Affiliate Relationships
- Your California Privacy Rights
Our Network
- Network World
Google Slides cheat sheet: How to get started
How to use google slides to create, collaborate on, and lead business presentations..

Need to build a slide presentation for a meeting, training, or other event? Google Slides is an easy-to-use web app that comes with the essential tools and more. It stores your presentations in the cloud with Google Drive. Anyone with a Google account can use Slides and Drive for free, and they’re also included with a Google Workspace (formerly G Suite) subscription for business and enterprise customers. There are Google Sheets mobile apps for Android and iOS, too.
This guide will help you become familiar with the Google Slides web interface and show you how to start a new presentation, upload a Microsoft PowerPoint file to edit in Google Slides, collaborate with others on your presentation, and finally, present it to others.
Create or open a presentation
Log in to your Google or Workspace account. Then:
From Google Slides : At the top of the home page, you’ll see a “Start a new presentation” header, with a row of thumbnails underneath. To start a new, blank presentation, click the Blank thumbnail. To start a new presentation in a template, select one of the thumbnails to the right or click Template gallery toward the upper-right corner, then click any thumbnail on the page that appears.

The Google Slides home page. (Click image to enlarge it.)
Below the “Start a new presentation” area you’ll see a list of presentations that are stored in your Google Drive or shared with you. To open a presentation, click it in this list.
The list of your presentations appears in reverse chronological order starting with the presentation you most recently opened. Clicking the “AZ” icon at the upper right of this list changes the sort order to Last modified by me , Last modified , or in alphabetical order by presentation title. You can also browse to a specific folder by clicking the folder icon next to the “AZ” icon.
From Google Drive : Presentations stored in your Google Drive are listed in the main window of the Drive home page. To see a listing of presentations that others are sharing with you, click Shared with me in the left column. From either list, double-click a presentation to open it in Google Slides.
To start a new, blank presentation, click the New button at the upper-left of the screen and then click Google Slides .
If you want to use a template to start a new presentation, click the New button, then move the cursor over the right arrow next to Google Slides and select From a template . The template gallery for Google Slides will open; click a thumbnail to start a new presentation in that template.

Creating a new presentation from Google Drive.
From Google Slides or Drive: You also can use the search box at the top to find presentations in your Google Drive or shared with you. Enter words or numbers that may be in the presentation you’re looking for.
Upload a PowerPoint presentation to Slides
You can edit a Microsoft PowerPoint presentation in Google Slides, but first you must upload it to Google Drive.
From Google Slides: Click the folder icon ( Open file picker ) that’s above and toward the right corner of your presentations list. On the panel that opens, click the Upload tab. Drag-and-drop your PowerPoint file (.ppt or .pptx) onto this panel, or browse your PC’s drive to select it.
From Google Drive: Click the New button, then File upload , and select the PowerPoint file from your PC’s drive and click Open .
Traditionally, when you uploaded PowerPoint files to Google Drive, they were automatically converted to Slides format. That’s still the case when you upload PowerPoint files via the Google Slides home page .
However, Google now supports the ability to edit Microsoft Office files in their native format. By default, any .pptx files that you upload via Google Drive will remain formatted as PowerPoint documents. You can edit and collaborate on a PowerPoint file right in Slides, with all changes made by you or your collaborators saved directly to the PowerPoint file.
On the Google Slides and Drive home pages, native PowerPoint files will be denoted with an orange “P” icon, and when you open a native PowerPoint file in Sheets, you’ll see a “.PPTX” flag to the right of the document title.

Native PowerPoint files show the PowerPoint icon (top) instead of the Google Slides icon (bottom).
If you’d rather have Google convert PowerPoint files to Slides format automatically when you upload them via Google Drive, click the gear icon in the upper-right corner of the Drive home screen and select Settings from the drop-down menu. In the Settings box next to “Convert uploads,” check the checkbox marked Convert uploaded files to Google Docs editor format .
Work in a presentation
When you open a new or existing presentation, its first slide appears in the main window of Google Slides. Here’s a breakdown of the toolbars, menus, panes, and sidebars that appear around your presentation.
The left pane shows thumbnails of all the slides in your presentation. Click a thumbnail, and the slide it represents will appear in the main window, where you can edit it.

The Google Slides editing interface. (Click image to enlarge it.)
Your presentation’s title appears along the top of the screen. To change it, click anywhere inside the title and start typing.
The menu bar below your presentation’s title has a complete set of tools for working with presentations. These are the main submenus to know:
- File has commands for taking action on the whole presentation, including Print, Rename, and Share.
- Edit lists the standard editing commands such as copy, cut, paste, delete, duplicate, and find and replace.
- View lists several ways that you can view your slides as you design and edit them. This includes arranging them into a grid, previewing them as a slideshow, or zooming in on them. You can also watch the transition effect that takes place between slides when they’re played in a slideshow.
- Insert lets you add several objects to your slides, including charts, diagrams, pictures, tables, and text. You can also add links to YouTube videos or sound or video files that are stored in your Google Drive.
- Format lets you change the look of your slides. Certain functions on this submenu become clickable depending on whether you’ve selected an image or text on a slide, or selected the slide itself.
- Slide is where you can add, delete, or duplicate a slide that you’ve selected. You can also add a preset layout to a slide, change its background or theme color, or add and edit a transition effect that takes place between slides when your presentation is played as a slideshow.
- Arrange lists tools that let you group or reorder objects on a slide in relation to another. For example, you can place an image behind another image or group an image and a block of text together to make them easier to move at once.
- Tools leads to several miscellaneous functions. These include letting you record a voice clip to go with a slide, running a spell checker, and showing you a list of objects in your presentation that are linked to other files.
The toolbar directly above your presentation puts commonly used commands in easy reach. From this toolbar, you can click buttons to add to a slide or change its background, comments, layout, objects (images, lines, shapes, text), text style, theme colors for the whole presentation, transition effects during a slideshow, and more. The buttons on the toolbar change depending on whether you’ve selected image or text on a slide or the slide itself.
Notice that there’s no Save button in the toolbar — or anywhere in Google Slides. That’s because Slides automatically saves any changes you make to your presentation.
Speaker notes: Along the bottom of each slide you’ll see an area marked Click to add speaker notes . Here you can type in brief notes to remind yourself what to do or say when the slide is being shown. Only you will see these notes when you show your presentation to an audience.
Themes sidebar: When you start a new blank presentation, the Themes sidebar opens on the right side of the screen. (You can also open this sidebar at any time by clicking Theme on the toolbar above your presentation.) Themes apply the same fonts, colors, and other design elements to all the slides in a presentation, giving it a consistent look and feel. Click a thumbnail in this sidebar to change your presentation to that theme.
Create and manage slides
Here are the basic things to know about working with slides in a presentation.
Add a new, blank slide to your presentation: Click the + button at the left end of the toolbar above your presentation. Alternatively, if you click the down arrow next to the +, you can choose a layout to use as the basis for a new slide.

Click the down arrow next to the + button in the toolbar to choose a layout for a new slide.
Apply or change a slide’s background: Select the slide’s thumbnail in the left sidebar and click Background on the toolbar above your presentation. On the panel that opens, you can change the slide’s background color or use an image file from your Google Drive, Google Photos account, or PC as the background.
Apply or change a slide’s layout: Select the slide’s thumbnail in the left pane, then click Layout on the toolbar above your presentation. On the panel that opens, select the layout you want to apply to this slide.
Apply or change a slide’s transition: Select the slide’s thumbnail in the left sidebar and click Transition on the toolbar above your presentation. In the Motion sidebar that opens along the right side of the screen, you can apply or change the animated transition effect that is played before this slide.

Choosing a transition style in the Motion pane.
Move a slide to a different spot in the slideshow sequence: Click and hold its thumbnail in the left sidebar, drag it up or down to another place in the sequence, and release it.
Delete a slide: Right-click its thumbnail in the left sidebar and select Delete from the pop-up menu. Alternatively, select its thumbnail and select Edit > Delete from the menu bar or just press the Delete key.
Share and collaborate on a presentation
Presentations are often a group effort, with several team members contributing to and polishing a presentation. In Slides, it’s easy for multiple collaborators to work on a presentation together.
First, you need to share the presentation. When you’re viewing your presentation in Google Slides, click the Share button at the upper-right. Or, from your Google Drive homepage, click to highlight the presentation that you want to share. Then, in the toolbar toward the upper right, click the Share icon (a head-and-shoulders silhouette with a +).
Either way, the “Share” panel will open.

Setting permissions for a file being shared privately.
Share a presentation privately
In the entry box, enter the email addresses (or names of your Google Contacts) of the people with whom you want to share. By default, the people you invite to your presentation can edit it and reshare it with others.
To change access permissions for invitees: Click Editor to the right of the entry box and choose another option from the drop-down menu. Commenter means they can view your spreadsheet and add comments but can’t change it. Viewer means they can view your presentation but can’t edit it or add comments.
To prevent your presentation from being reshared, downloaded, or printed: Click the gear icon at the upper-right of this panel. On the smaller panel that opens, uncheck the boxes by Editors can change permissions and share and Viewers and commenters can see the option to download, print, and copy .
When you’re done setting permissions (and, optionally, typing in a message to your invitees), click Send , and everyone you’ve added will receive an email with a link they can click to access the document.
The shared presentation icon.
A presentation you’ve shared (or that others have shared with you) will have an icon of two silhouetted heads next to it in the presentations list on your Google Sheets and Google Drive home pages.
To limit or change a person’s access to your presentation: With the presentation open in Google Slides, click the Share button at the upper-right. Or, from Google Drive, highlight the presentation and click the Share icon.
The Share panel reopens showing a list of all the people you’ve invited, along with their permission status. Click the down arrow to the right of a person’s name, change their permission level or remove their access entirely, and click Save .

You can change permissions for people you’ve shared a presentation with on an individual basis.
If you have a Google Workspace subscription, another option is to select Give temporary access and, next to Access expires , select a date within one year of the current date. If you set an expiration date for a person that you’ve assigned as Editor, their access will be downgraded to Commenter on the expiration date.
Share a presentation publicly
Most business users will want to share presentations privately with select colleagues or clients, but you do have the option to share a presentation publicly. At the bottom of the Share panel is a “General access” area where you can copy a link to the document. By default, this link is restricted to those you invite to the document. To change it to a public link, click Restricted and select Anyone with the link from the menu that appears.
Click Copy link and the link to your presentation will be copied to your PC’s clipboard. You can share this link by pasting it into a chat message, document, email, forum post, or most other means of online written communication. Anyone who clicks this link will be able to view your presentation online. (Be aware that anyone can copy and reshare this link.)
To allow anyone in the public to comment on or edit your presentation: At the bottom right of the Share panel, click Viewer and select Commenter or Editor from the drop-down menu. Then click the Done button. Now the web link to your presentation will let anyone who clicks it add a comment or edit it.

Sharing a spreadsheet publicly.
To turn off public sharing for your presentation: Bring up the Share panel again. Near the bottom, click Anyone with the link and select Restricted from the menu, then click the Done button.
Note: You can apply both public and private sharing methods to your presentation. For example, you could allow the public to only view your presentation, but allow specific people that you’ve invited to comment on or edit it.
Collaborate on a presentation
The people you’ve shared a spreadsheet with can view or work on it at the same time as you or at other times. Remember that people who have Editor privileges to your presentation can change all aspects of it. Having multiple people making changes to a presentation can get confusing. In most cases, setting everyone to Commenter is the best way to collaborate in Slides: People can attach comments to a slide or to objects in a slide, but their comments won’t alter your presentation’s information or design.
To add a comment to a slide: Right-click its thumbnail in the left sidebar and select Comment from the menu that opens. Alternatively, you can select its thumbnail and select Insert > Comment from the menu bar or click the Add comment button (a speech balloon with a + sign).
A blank comment card with your name on it opens to the right of the slide in the main window. On this card’s entry line, type a brief comment, and when you’re finished, click the Comment button.

Typing in a new comment.
To add a comment to an object on a slide: Right-click the object (a block of text, chart, image, picture, etc.) and select Comment from the menu that opens. Alternatively, you can select the object and select Insert > Comment from the menu bar.
To draw someone’s attention to a comment: As you’re composing the comment, type the @ symbol and begin typing their name, then select the person from the list of suggested Google contacts that appears. They’ll receive an email notifying them of the comment and linking to it.
To read, reply to, or remove a comment: A slide that contains a comment is denoted in the left sidebar with a speech balloon by its thumbnail. Click the slide’s thumbnail to make the slide appear in the main window, and you’ll see all its comment cards on the right.
To reply to a comment, click its card. The card will expand to reveal an entry line where you can add a comment in response.

Replying to a comment.
Clicking the checkmark at the upper right marks the comment card as “resolved” and removes the card from the presentation. Clicking the card’s three-dot icon opens a menu that lets you edit or delete your comment.
To see a list of all comments: Click the Open comment history icon (the speech balloon) to the left of the Slideshow button. A sidebar will open along the right side of the screen; it lists all the comment cards in your presentation. When you click a comment on this list, the view of your presentation in the main window will jump to the cell where the comment is located and open its comment card.

The Comments pane lets you quickly review all comments and jump to specific ones.
For more details about collaborating on your presentation, including what it’s like to collaborate in real time, see “ How to collaborate on a document ” in our Google Drive guide. You can also collaborate on a presentation in Google Chat; that’s covered later in this story.
Recover older versions of a presentation
It’s easy to go too far when making tweaks to a presentation. Fortunately, it’s also easy to roll back to an earlier version of the presentation. Click File > Version history > See version history . This opens a panel on the right that shows a list of older versions of your presentation.

Using Version history to view an earlier version of a presentation. (Click image to enlarge it.)
To view an earlier version of your presentation: Click the date for it in the list. That version of the presentation will then appear in the main window.
To restore an earlier version so it replaces your current presentation: With the version you want to restore showing in the main window, click the yellow Restore this version button at the top of the screen. The restored version will then appear at the top of the version history list.
To give an older version a unique name: Click on its date. You’ll be prompted to type in words to replace the date. (The date and time will then appear in smaller size underneath the new name.)
Give a presentation
When it’s time to play your presentation to an audience, Google Slides has two modes: Slideshow and Presenter view. Slideshow mode essentially shows what your audience will see. Presenter view mode provides additional tools for your eyes only that run alongside Slideshow mode.
Slideshow mode: Click the Slideshow button at the upper-right corner of the screen. Google Slides will expand to full-screen view and show the slide that’s currently in the main window. (If you want to start the slideshow from the first slide in your presentation, click the down arrow to the right of the Slideshow button and select Start from beginning .)

The control bar in Slideshow mode lets you click through the slides, turn on auto-play, use a laser pointer effect, and more. (Click image to enlarge it.)
When you move the on-screen pointer to the lower-left corner of your presentation, a control bar appears. You use this to click forward and back through the slides. Clicking the three-dot icon on the control bar opens a menu with other controls, such as starting auto-play and adjusting how quickly it moves from slide to slide.
On this menu, Turn on the laser pointer turns the mouse pointer into a simulated red laser dot. Captions preferences — available only if you’re using a Chrome browser or Chromebook — lets you turn on real-time, automatic transcribing of your words as you say them (English only) and shows them to your audience as on-screen captions. Open speaker notes takes your presentation out of full screen and opens a separate “Presenter view” window, as described below.
Presenter view mode: Click the down arrow to the right of the Slideshow button and select Presenter view . This shows the presentation in your browser window and launches a separate window that assists you while you’re giving your presentation.

Presenter view lets you (but not your audience) see your speaker notes while presenting. (Click image to enlarge it.)
From the Presenter view window, you can jump to any slide in your presentation, read the speaker notes you wrote for a slide, and control the Q&A feature. There’s also a timer that you can set to remind yourself how much time you’re spending showing a slide — or the entire presentation — to your audience.
Click the AUDIENCE TOOLS tab to use the Q&A feature, which lets you take questions from your audience. To open questions for a slideshow, click the Start new button. A web link appears at the top of your presentation. An audience member watching your presentation on their computer, phone, or tablet can click/tap that link, which will take them to a page where they can type a question for you. You’ll see the question in your Presenter view window, and you can choose whether to show their question to the rest of your audience during the presentation. To close questions for a presentation, turn the switch from ON to OFF .

Audience members can submit questions from their devices, and the presenter can decide whether to display them as part of the slideshow. (Click image to enlarge it.)
Present in Google Meet
Need to give a presentation during a Google Meet video meeting? As long as you’re using a Chromium-based browser (Chrome, Microsoft Edge, Opera, etc.), it’s easy: Toward the upper right of the Google Slides page, click the Google Meet icon. From the panel that opens, select a meeting that’s scheduled on your Google calendar today, start a new meeting, or type/paste in the web link or code that you have for another meeting.

Click the Meet icon to get started presenting to a video meeting.
If you start a new meeting, a sidebar for the meeting will open on the right. At the bottom of the sidebar, click the Present now icon (a box with an up arrow). On the panel that appears, select your presentation and click the Share button, and you’ll be presenting to the meeting.

Choose which tab or window you want to share and click the Share button. (Click image to enlarge it.)
If you join a scheduled meeting, you have two choices: “Join the call” and “Just present this tab.” If you click Join the call , a sidebar for the meeting will open on the right. Follow the same steps as above to present to the meeting. If you click Just present this tab , you’ll go directly to the panel where you select your presentation and click Share , but you won’t have a sidebar where you can follow the main meeting.
To stop sharing your presentation to the meeting, click the Stop sharing button at the top left of your browser window.
For more details about using Google Meet, see our Google Meet cheat sheet .
Download and export a presentation
Google Slides lets you download presentations for use offline. On the top menu, select File > Download and choose a file format. You can save your presentation to your PC as a PowerPoint (.pptx) file or in other formats such as PDF, or as JPG or PNG for an individual slide.
5 tips for working with Google Slides
Now that you’re comfortable working in Google Slides, try these intermediate tips.
Use the Google Slides mobile app
With the exception of the “Version history” tool, the Google Slides app for Android , iPhone , and iPad has many of the same features described in this guide.
When you have a slideshow open, the toolbar at the top of the screen lets you take a variety of actions:
- To present your slides on your phone or tablet, on a Chromecast device, or in a Google Meet meeting, tap the triangle icon.
- To share your presentation with other people, the headshot silhouette. (See “How to share from the Google Drive, Docs, Sheets, and Slides mobile apps” in our Google Drive cheat sheet .)
- To view all the comments in the presentation, tap the Comments icon (a chat balloon) if you see it in the toolbar, or tap the three-dot icon and select View comments from the menu that appears.
- The three-dot menu also lets you see the presentation’s Q&A history, export it, make it available offline, and more.

The Google Slides Android app.
To edit or comment on a slide: Tap the slide, and a menu will appear that lets you add or view comments for that slide or edit it. Tap an element on a slide, such as text or an image, and tools to edit that element will appear.
Any changes you make to your presentation in the mobile app are automatically saved and will appear the next time you open it in the Google Slides web app.
Get suggested slide layouts and content
Click the Explore icon at the lower-right corner of the screen. The Explore sidebar will open along the right side. In most cases, you’ll be presented with thumbnails of suggested layouts that Google Slides has automatically customized for the slide that’s open in the main window. Click the one you want, and it will be applied to the slide.

Use the Explore tool to get suggested layouts (left) and search for images (right).
At the top of the Explore sidebar is a search box. You can type in a word or phrase to find related content on the web or in your Google Drive. Search results appear on separate Web, Images, and Drive tabs in the sidebar. Click a web or Drive result to open it in a new browser tab. On the Images tab, click the + icon on the upper-right corner of an image to insert it onto your slide.
Create custom slide layouts to use as templates
You can design your own slide layouts to use as templates in any future presentation. First, open a new, blank presentation as described above. Then:
- On the menu bar over the blank presentation, select View > Theme builder .
- The main window switches to a layout editor. Toward the left you’ll see a column with the heading THEME on top and LAYOUTS just below that. Click the thumbnail of any layout in the LAYOUTS list. It will appear in the main window.
- You can remove objects that are already in any layout. For example, click on a block of text. A frame appears around the text. Without selecting the text itself, move the pointer to ward an edge of the frame, right-click, and select Delete from the menu that opens.

Creating a custom slide layout. (Click image to enlarge it.)
- Using the formatting toolbar above the slide, you can add new objects to the slide, including images, image placeholders, shapes, lines, and blocks for text. (Tip: enter placeholder words inside the text blocks.) When you click on any object, a frame appears around it. Drag and drop the frame to relocate it on the slide, or drag its edges to change its shape or size. You can also add or change the border and background colors for any object on the slide and/or change the background color for the whole slide.
- When you’re finished designing your layout, click the Rename button above the slide and give the layout a unique name.
- If you want to create another custom layout, click on the thumbnail of another layout under the column LAYOUTS and repeat the above steps starting from #3.
- When you are finished custom-designing all your layouts, click the X toward the upper-right of the slide layout in the main window.
- Along the top of the screen, click anywhere inside Untitled presentation and start typing. Tip: Use a name that indicates this is a template (e.g., “Annual Budget Presentation – Template”).
In the future, you can make new presentations starting from this template, and your custom slide layouts will be available.
- Open the template presentation you created in the steps above. On the menu bar, click File > Make a copy > Entire presentation . On the panel that opens, type in a name for the new presentation you want to create and click the Make a copy button. Google Slides will open this new presentation in a new browser tab.
- On the toolbar above the first slide of your new presentation, click Layout . From the panel of thumbnails that opens, select one of the layouts that you created. It will then be applied to the slide in the main window.
Collaborate on a presentation in Google Chat
An alternative way to collaborate on a presentation is to share it in Google Chat. Other people in your chat can add comments and help make changes to your presentation.
Start in Google Chat . To the left of the box where you type in your chat messages, click the + icon and select Drive file from the menu that opens. A panel will open over the screen listing the files in your Google Drive. Find and click your presentation to highlight it, then click INSERT on the lower-right corner.
You’ll be taken back to the chat message box. Click the blue right-pointing arrow to the right of the box, and a panel will open over the screen designating permissions for the shared presentation. By default, permissions are set to Comment. To change this, click Comment and select View or Edit . You can also allow the people in the chat to share a web link to your presentation with others outside of the chat by selecting Turn link sharing on .

You can share a presentation to individual or group chats in Google Chats. (Click image to enlarge it.)
After you’ve set the permissions, click SEND , and your message will appear in the chat stream with a large thumbnail of your presentation. To open a presentation in the chat, click the thumbnail. The presentation will open inside a large window that’s laid out alongside the right of the chat stream.
This is actually Google Slides running inside the chat window with your presentation loaded in it. Thus, most of the Slides commenting and editing tools are available for you and others in the chat to use on your presentation (if you granted them permission to comment or edit). The user interface is the same, except there’s no menu bar.

Collaborating on a presentation from within a Google Chat. (Click image to enlarge it.)
Use keyboard shortcuts
Save time in Slides by using keyboard shortcuts for common tasks. Below are some of the most useful to know. For more, select Help > Keyboard shortcuts from the top menu when you have a spreadsheet open or press Ctrl + / (Windows, Chrome OS) or ⌘ + / (macOS).
Handy Google Slides keyboard shortcuts
This story was originally published in September 2019 and updated in August 2022.
Related content
Google can’t seem to quit cookies, delays killing them again, apple reportedly cuts vision pro production due to low demand, windows 11: a guide to the updates, windows 10: a guide to the updates, from our editors straight to your inbox.
Howard Wen ( www.howardwen.com ) is a longtime contributor to Computerworld . He specializes in explainer guides, how-tos, and reviews of office applications and productivity tools.
More from this author
Google sheets power tips: how to use dropdown lists, google workspace power tips: tap into cross-app productivity, how to use google’s genai-powered note-taking app, how to use the new genai template tool in google sheets, show me more, the end of non-compete agreements is a tech job earthquake.

Meta opens its mixed-reality Horizon OS to other headset makers

A crafty new Android notification power-up

After 10 years of progress, does mixed reality (XR) have a future? | Ep. 147

More tech layoffs as AI takes hold | Ep. 146

Why the world will be wearing more technology in the future

After 10 years of progress, does mixed reality (XR) have a future?

More tech layoffs as AI takes hold

How to Convert PowerPoint to Google Slides (Step-by-Step)
- PowerPoint Tutorials
- Shortcuts & Hacks
- October 11, 2019
In this article, you’ll learn two ways to convert PowerPoint to Google slides to take full advantage of the online Google Slides platform.

And while it’s easy to convert back and forth between PowerPoint and Google Slides, it’s important to keep in mind that not all your presentation content will properly convert (as discussed below).
That’s why I recommend using (and sticking with) whichever software program your team and/or clients are most comfortable using.
Note: You can use your Google Drive platform to store and distribute your PowerPoint presentations without having to convert to the Google Slides file format.
To do that, simply upload your PowerPoint presentations to your Google Drive (as discussed below) and use it as a file folder.
To learn how to do the reverse and convert Google Slides to PowerPoint, read our article here .
Note: Because Google Slides is an online platform, you will need access to the internet before you can upload and import PowerPoint files into its format.
[Watch] Converting PowerPoint to Google Slides
You are currently viewing a placeholder content from Youtube . To access the actual content, click the button below. Please note that doing so will share data with third-party providers.
Google Slides Pros and Cons
Google Slides is the second most popular program for creating and delivering presentations behind Microsoft PowerPoint.
And while some people prefer one program to the other, if you are trying to decide which program to use, I recommend choosing whichever program your client or project team is using.,
That will just make everyone’s lives easier.
Google Slides pros:
- Free to use
- Cloud-based – no software installation required
- Offline mode to use when you’re not connected to the internet
- Automatic saving
- History review to check previous changes made
- Easy to share for seamless collaboration
- Works 100% the same on Mac and PC
Google Slides cons:
- Basic animations and fewer transitions
- Fewer and much less robust templates (there are some in a gallery of pre-made basic templates)
- Has slightly fewer export formats than PowerPoint
- Not accepted by many corporations and organizations with strict privacy rules
Upload PowerPoint to Google Slides
The first way to convert a PowerPoint presentation into the Google Slides format is to upload it to a Google Drive folder and then convert its file format.
To do that, simply follow these steps:
1. Open a Google Drive folder

To open a Google Drive folder to start the conversion process, simply:
- Navigate to your Google slides login here
- Find a folder and click on it to open it
Although you can later move your presentation to another folder in your Google Drive, it’s best to convert your PowerPoint presentation into a Google Slides document exactly where you want it to be.
This saves you from losing your presentation after you convert it.
2. Upload PowerPoint to Google Drive
There are two different ways you can get your PowerPoint presentation into Google Drive:

To upload a file directly from within a Google Drive folder, simply:
- Right-click inside your Google Drive folder
- Select Upload Files
- Navigate to your PowerPoint file
- Select your file
- Click Open
Another way to upload PowerPoint to Google Drive, is to just click and drag it into your Google Drive folder, as pictured below. This can be faster if you already have the file folder open on your computer, instead of navigating to it from your Google Drive.

To learn how to snap your File Explorer windows side-by-side using your Windows 10 shortcuts, see our guide here .
Note: Uploading your PowerPoint presentations to Google Drive does not automatically convert them. Notice in the picture below that the presentation is still in the PowerPoint .pptx file format. So, simply uploading a PowerPoint file to Google Drive does not automatically convert it to Google Slides.

3. Open PowerPoint in the Google Slides format
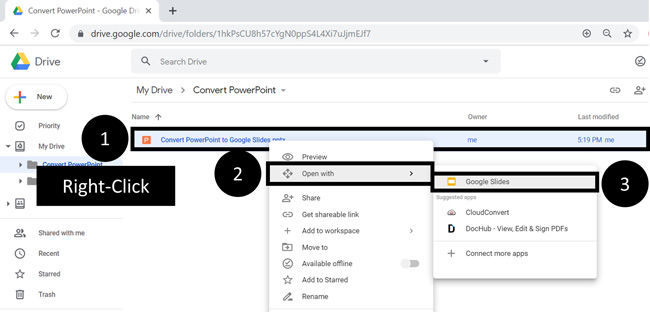
To open your PowerPoint presentation in the Google Slides file format, simply:
- Right-click your PowerPoint file
- Select Open With in the action menu
- Choose Google Slides
Choosing Google Slides, you will see a conversion icon. When it’s complete, you will see your PowerPoint presentation as a Google Slides document, but it will still be in the .pptx file format as you see below, so we are not done yet.

To finish the PowerPoint to Google Slides conversion process, continue on to the next step below.
Note: Not all PowerPoint features are available in the Google Slides format. If your presentation has PowerPoint features that cannot be converted to Google Slides, you will see the warning at the top of your screen.

Some PowerPoint features can’t be displayed in Google Slides and will be dropped if you make changes.
This is a good time to double check your presentation to make sure all your PowerPoint slides have been properly converted. Things to look at are logos, pictures, animations, ink, etc.
4. Save your PowerPoint presentation in the Google Slides format
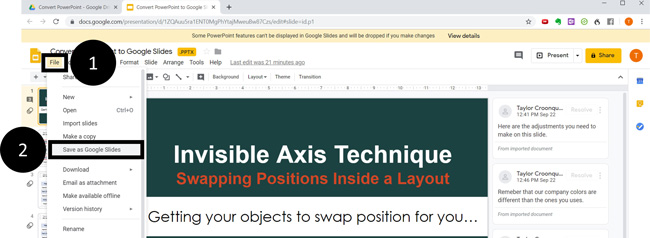
To finish your PowerPoint to Google Slides conversion process, simply:
- Open the Google Slides File menu
- Select Save as Google Slides
Doing so, you will now see your presentation as a TRUE Google Slides presentation, as pictured below. The .pptx file extension is no longer be there.

On top of that, if you navigate back to your folder, you will see your presentation in both the Google Slides and PowerPoint file format.
After double-checking your Google Slides presentation, I recommend deleting your old PowerPoint file so you don’t get confused (unless you want to keep it as a reference).
5. Delete your PowerPoint presentation
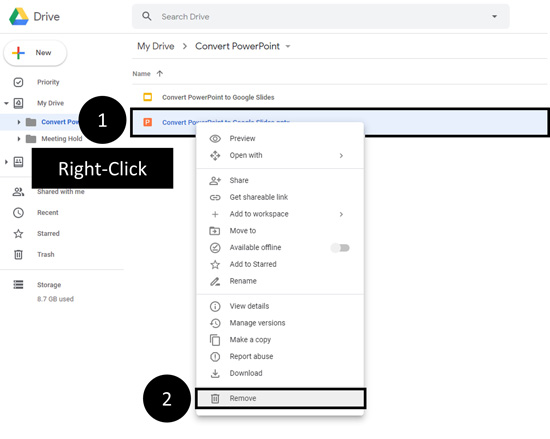
To delete your PowerPoint presentation from your Google Drive, simply:
- Navigate to your Google Drive folder and Right-click your file (the .pptx one)
- In the right-click menu, select Remove
This leaves you with just the Google Slides presentation in your folder.
#2. Import PowerPoint to Google Slides
Instead of uploading your PowerPoint presentations to Google Drive and then converting them, you can import them directly inside of a Google Slides document.
You can do this in a blank presentation, or with an existing Google Slides presentation.
1. Open a blank Google Slides file

To create a new Google Slides presentation to start the conversion process, simply:
- Choose a Folder for where you’ll want your presentation to be
- Right-click and select Google Slides
You can alternatively click the New icon beneath the Google Drive logo to start a new presentation, instead of right-clicking.
Doing so opens a blank Google Slides document in a new tab in your web browser. This blank presentation is what you will use in the next few steps to convert your PowerPoint presentation.

Note: Instead of starting from a blank Google Slides presentation, you can also start from within an existing Google Slides presentation and import your PowerPoint slides directly into it.
2. Open the Import slides dialog box

To open the Import slides dialog box, from within Google Slides simply:
- Open the Google Slides File menu
- Select Import Slides
3. Upload PowerPoint to Google Slides
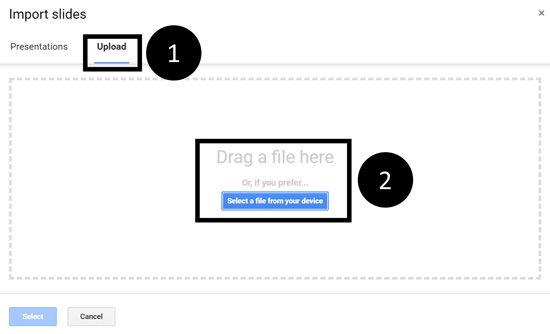
To import slides from a PowerPoint presentation into your Google Slides document, simply:
- Click the Upload option
- Navigate to your PowerPoint presentation and click on Open (or click and drag it into the dialog box)
Selecting your presentation, your PowerPoint is uploaded to Google Slides as pictured below. Depending on the size of your PowerPoint presentation, this could take a few seconds or a few minutes.

Note: If you have already uploaded your PowerPoint presentation to your Google Drive, you can also use the Presentations tab to find the presentation you want to convert instead of uploading it from your computer.

4. Select the PowerPoint slides you want to convert to Google Slides
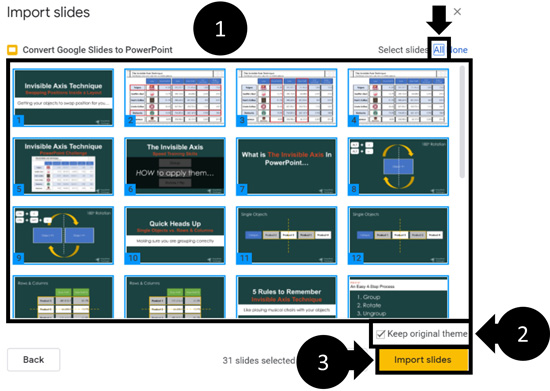
To import your PowerPoint slides into your Google Slides presentation, simply:
- Select the PowerPoint slides you want to import (or select All in the upper right-hand corner)
- Check or uncheck Keep Original Theme (see note below)
- Click Import slides
- Delete the first blank slide

Selecting Import Slides , your selected slides are imported into the Google Slides format, and you are done. You can now edit or present your presentation in Google Slides.
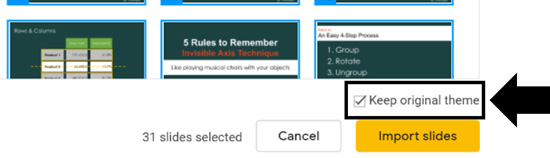
Keep Original Theme
Selecting Keep original theme means that Google Slides converts your PowerPoint template (as best as it can) to the Google Slides format.
Un-selecting Keep original theme means that just your content will be imported into whatever Google Slides theme you are using (as best as it can). To learn more about PowerPoint themes and how they work, read our article here .
So that’s how to convert PowerPoint to Google Slides and the different options you have.
Although you can quickly and easily convert between the two different formats, not all PowerPoint features will properly convert to the Google Slides format. So, to the extent that you can avoid converting back and forth, the better off you will be.
You can always keep your files in the PowerPoint format and still use your Google Drive to store and share your presentations with your team.
If you enjoyed this article, you can learn more about our PowerPoint training courses and other presentation resources, visit us here .
What’s Next?
Related articles, about the author.

Popular Tutorials
- How to Strikethrough Text (l̶i̶k̶e̶ ̶t̶h̶i̶s̶) in Word, Excel & PowerPoint
- How to Make Animated Fireworks in PowerPoint (Step-by-Step)
- Strikethrough Shortcut (l̶i̶k̶e̶ ̶t̶h̶i̶s̶) for Word, Excel & PowerPoint
- How to Create a Flash Card Memory Game in PowerPoint (Like Jeopardy)
- Keyboard Shortcuts Not Working: Solved
PowerPoint Tutorial Categories
- Strategies & Opinions
- Presentation Design
- Pictures, Icons, Videos, Etc.
- New Features
- Miscellaneous
- Charts & Data Viz
We help busy professionals save hours and gain peace of mind, with corporate workshops, self-paced courses and tutorials for PowerPoint and Word.
Work With Us
- Corporate Training
- Presentation & Template Design
- Courses & Downloads
- PowerPoint Articles
- Word Articles
- Productivity Resources
Find a Tutorial
- Free Training
- For Businesses
We help busy office workers save hours and gain peace of mind, with tips, training and tutorials for Microsoft PowerPoint and Word.
Master Critical PowerPoint Shortcuts – Secure Your FREE Training Module and Save Valuable Time!
⌛ Master time-saving expert techniques.
🔥 Create powerful presentations.
🚀 Propel your career to new heights.
We value your privacy – we keep your info safe.
Discover PowerPoint Hacks Loved by Industry Giants - KKR, AmEx, HSBC!
Over 114,880 professionals in finance, marketing and sales have revolutionized their PPT skills with our proven methods.
Gain FREE access to a full module of our premium PowerPoint training program – Get started today!
We hate spam too and promise to keep your information safe.
You are currently viewing a placeholder content from Facebook . To access the actual content, click the button below. Please note that doing so will share data with third-party providers.
How to convert Google Slides to a PowerPoint presentation in 4 easy steps
- It's easy to convert Google Slides to a PowerPoint presentation on your computer.
- To save a Google Slides presentation as a PowerPoint deck, use the File menu to download the Google Slides file as a PowerPoint (.pptx) file.
- Your browser will then give you the option to open or save the PowerPoint file on your computer.
- Visit Business Insider's homepage for more stories .
Whether you regularly use Google Slides or Microsoft PowerPoint , it's just a matter of time before you need to convert one of those files into the other.
If you have a PowerPoint presentation that you need to convert into a Google Slides deck, read our article, " How to convert a PowerPoint presentation to Google Slides in 2 different ways ."
If you need to go the other way and save a Google Slides presentation as a PowerPoint deck, it's even simpler. Here's how to do it.
How to convert Google Slides to PowerPoint
1. Open Google Drive in a web browser.
2. Locate and open the Slides deck that you want to convert to PowerPoint. You can zero in on your slides by clicking the three horizontal lines at the top left of the page and choosing "Slides" from the menu.
3. In the open presentation, click "File."
4. Click "Download" and then click "Microsoft PowerPoint (.pptx)."
A PowerPoint version of the document will be saved to your computer. Find the file depending upon what browser you're using:
- In Firefox, you'll see a dialog box that lets you open the file in PowerPoint or save it to your hard drive.
- In Google Chrome, the file will be automatically downloaded. You can find it in the download bar at the very bottom of the browser window.
- In Microsoft Edge, you should see a dialog box at the bottom of the browser asking if you want to open or save the file.
Related coverage from How To Do Everything: Tech :
How to add music or other audio to a google slides presentation, how to embed a youtube video into a powerpoint presentation, depending on the version of your powerpoint, how to edit google docs files offline, for when you're without internet or trying to eliminate online distractions, how to embed a youtube video in google slides in 4 simple steps to make your slideshow presentations more engaging.
On February 28, Axel Springer, Business Insider's parent company, joined 31 other media groups and filed a $2.3 billion suit against Google in Dutch court, alleging losses suffered due to the company's advertising practices.
Watch: I cut Google out of my life for 2 weeks, but the alternatives prove why Google is so much better
- Main content

- SUGGESTED TOPICS
- The Magazine
- Newsletters
- Managing Yourself
- Managing Teams
- Work-life Balance
- The Big Idea
- Data & Visuals
- Reading Lists
- Case Selections
- HBR Learning
- Topic Feeds
- Account Settings
- Email Preferences
How to Make a “Good” Presentation “Great”
- Guy Kawasaki

Remember: Less is more.
A strong presentation is so much more than information pasted onto a series of slides with fancy backgrounds. Whether you’re pitching an idea, reporting market research, or sharing something else, a great presentation can give you a competitive advantage, and be a powerful tool when aiming to persuade, educate, or inspire others. Here are some unique elements that make a presentation stand out.
- Fonts: Sans Serif fonts such as Helvetica or Arial are preferred for their clean lines, which make them easy to digest at various sizes and distances. Limit the number of font styles to two: one for headings and another for body text, to avoid visual confusion or distractions.
- Colors: Colors can evoke emotions and highlight critical points, but their overuse can lead to a cluttered and confusing presentation. A limited palette of two to three main colors, complemented by a simple background, can help you draw attention to key elements without overwhelming the audience.
- Pictures: Pictures can communicate complex ideas quickly and memorably but choosing the right images is key. Images or pictures should be big (perhaps 20-25% of the page), bold, and have a clear purpose that complements the slide’s text.
- Layout: Don’t overcrowd your slides with too much information. When in doubt, adhere to the principle of simplicity, and aim for a clean and uncluttered layout with plenty of white space around text and images. Think phrases and bullets, not sentences.
As an intern or early career professional, chances are that you’ll be tasked with making or giving a presentation in the near future. Whether you’re pitching an idea, reporting market research, or sharing something else, a great presentation can give you a competitive advantage, and be a powerful tool when aiming to persuade, educate, or inspire others.
- Guy Kawasaki is the chief evangelist at Canva and was the former chief evangelist at Apple. Guy is the author of 16 books including Think Remarkable : 9 Paths to Transform Your Life and Make a Difference.
Partner Center
How to Record a Presentation on Google Slides
Do you want an easy way to record a Google Slides Presentation as a video to share later with your teammates? Once you have the Zight screen recorder, the process is easy and fast.
Article Last Updated: April 23, 2024

What Is a Google Slides Presentation?
What do you need to record google slides presentations, how to record a presentation on google slides with zight: step-by-step guide, faqs on how to record a presentation on google slides.
Here’s an interesting statistic: 91% of people believe a well-designed slide deck can increase your confidence as a presenter. The first step to creating a good presentation is to choose the best software, and then record the presentation in HD.
Tell you what? You can create slides with Google Slides, then use the Zight screen recording software to present and narrate your slides to your audience. This has many benefits, including saving your presentation for future collaboration or asynchronous communication , which, in many ways, has more benefits than synchronous communication in a digital and remote workspace.
Read on as we tell you how to create this presentation from scratch, in just a few steps!
Google Slides is a free web-based presentation software provided by Google as part of the Google Drive suite. You can use it on any device with an internet connection, offering various features like an easy-to-use presenter view, speaker notes, live captions, and the ability to present to Google Meet video calls. Plus, your slides can contain text, images, videos, animations, and more to create dynamic content.
While you can present live in a meeting, today’s work landscape teams need to improve communication and productivity with asynchronous video communication . So, when you can’t gather everyone in a Google meeting, you need a way to create and share a presentation with your teams. Your options include recording a Google Slides presentation with narration, just like you create a PowerPoint presentation with Zight .
Here’s what you need:
To record a presentation on Google Slides, you will need a few things:
- A device with an internet connection: It’s best to have a computer to make it easy to create and present Google Slides
- A screen recording software like Zight: While Google Slides allows you to present live in a meeting, it won’t record audio or video files to send later. That’s where Zight comes in, allowing you to record and narrate your slides as you present so you can share with attendees at a later time
- An external microphone (optional) to record audio for your presentation. However, you can still use your native microphone on your computer
- A webcam (optional): If you want to show yourself presenting alongside the slides, a webcam will be necessary for recording. To make things easy, you can just use the Zight webcam recorder which will use your native webcam app
- A Google account: You can only access Google Slides with a Google account, so make sure to sign in to be able to create slides
- Google Slides: Before using the screen recording tool , you want to create and add content to the Google slides you will be narrating. More on this below!
Before you start recording, search for Google Slides on your browser, log in to your account and open an untitled presentation.
Alternatively, click File on a current Google Slides presentation page, then New, and Presentation (or from the template gallery to pick a presentation template).
Add content to your slides, using the (+) sign on the upper left-hand side of your Google Slides presentation page (or Ctrl+M) to add new slides. You can also click the dropdown menu next to the (+) sign and choose slides with your ideal layout. Add content to the slides by typing in text, inserting images, videos, shapes, or charts, and customize them with a unique theme and background color.
Once your Google slides are ready, here’s how to start recording:
1. Download Zight
If you don’t have Zight, click the red button below to download.
- Record your screen with audio and webcam
- Annotate with arrows, lines, and blur
- Instantly share with a link or upload to YouTube or Vimeo
Alternatively, search for “Zight” on your web browser and create an account. Then, download the app that’s compatible with your computer. Zight is available for Mac , Windows , and even as a Google Chrome extension .
2. Choose your Screen Recording Preferences
Open your presentation on Google Slides and ensure you can easily navigate to the slides once you’re ready to record.
On the Zight App
Launch the Zight app and click Record.
You’ll find recording options like Full Screen and Select Region, plus the Screen Only or Screen & Cam options. Screen Only is good when you don’t want to use your webcam, while the latter allows you to incorporate your webcam for a personal touch.
Then, select your audio/mic and webcam options, move your webcam overlay to a good space on your screen, and click Start Recording. Wait for the 3-second timer to count down before you go to the Google Slides presentation.
On the Google Chrome Extension
Click on the Zight icon on the upper left of your Google Chrome browser, click Record, and select either Screen Only or Screen & Cam. Then, turn on your microphone and webcam camera.
Next, click Start Recording and choose Entire Screen. After that, select the screen you want to record, and click Share. Click your mouse on any part of the screen to start recording and wait out the 3-second countdown.
The Zight screen recorder software will now be recording your entire screen.
3. Start Narrating Your Google Slides Presentation
On the Google Slides presentation page, click on the dropdown menu next to Slideshow.
Click Presenter View if you are viewing the first Google slide. Alternatively, click Start from the beginning if you are not on the first slide. This will turn your presentation into a full-screen view and you will see that Zight is sharing your screen.
Then, start narrating your Google slides in high video and audio quality.
You can pause and resume your screen recording and restart it to capture moments you may have missed in the beginning. You can also cancel the recording and delete the file to avoid uploading it to the cloud.
4. Annotate Your Presentation
One of the best things about presenting your Google Slides with Zight is that you can annotate the video just as easily as you narrate it.
If you are recording from the Zight app, you can pause the recording and then click the annotations button on the recording menu (the icon looks like a pen).
Once you do, you will see the different annotations you can add to the slides, including a pen, highlighter, arrow, line, ellipse, and rectangle. You can choose a different color for your annotations, even how long the annotation lasts on the final recorded video.
After annotating, resume the recording, rinse and repeat!
5. Finish Recording and Edit Your Video
Once you narrate all your Google slides, click the Finish recording button and wait for the file to upload to the cloud. Zight will also open the file on your default browser where you can edit the video file further.
When the video link opens, click the Edit button, and continue to split and merge sections, trim, crop, filter, and finetune different sections until the presentation is faultless. Click Done to save those settings.
On top of the recording, annotating, and editing of your Google Slides presentation, Zight will also transcribe your video and send the text to your email so you can go through the notes in case you missed something.
You can also add custom branding, and use AI features to generate a video summary and video titles. If you want to share the presentation with global teams, you will also love that you can translate the video file into 50 different languages for seamless communication.
6. Share the Presentation for Asynchronous Communication
To share the presentation, you can send the shareable link to your teams via Slack , Asana , Trello , and other chat boards and productivity software you use at work.
Alternatively, you can embed the video file in an email, or even download it on your computer then upload it on a platform like YouTube to reach a global audience.
7. Collaborate and Track Analytics
The best part about recording your presentation in superior video footage with Zight is how you can save it for collaboration later.
Firstly, you can save the video to a Collection on your Zight dashboard or add it to a Favorites list. This way, the video will be readily available and you can track how many people interact with it, either through comments or reactions to finetune your collaboration and communication strategy.
In addition, this video presentation will always be available on your Zight cloud account, and, as long as you keep it, even your colleagues or recipients can always retrieve it for future reference.
There you have it, an easy way to record your Google Slides presentation using Zight! With this method, you can easily create and share professional-looking recordings of your presentations to a global audience.
If you want to feel more confident before your audience with a well-designed and narrated deck, ensure you have a reliable internet connection before starting the recording. In addition, close any unnecessary tabs or programs on your computer to avoid interruptions. Finally, while Zight may use the native mic on your computer, you can prefer to use a high-quality microphone for better audio clarity.
Most importantly, don’t forget to rehearse and practice your presentation beforehand to ensure a smooth delivery and minimize any mistakes during the recording. With these tips in mind, you can confidently create engaging presentations that will impress your audience.
So why wait? Get Zight today and take your presentations to the next level!
I) Can I Record My Screen in Google Slides?
No. Google Slides does not have a built-in screen recording feature. However, you can use third-party apps like Zight to record your presentation.
II) How do you turn a Google slide into a video?
Since Google Slides does not record the screen and audio (apart from when you’re presenting in a Google meeting), you will need a third-party app to record your screen and turn your slides into a video. Follow the steps mentioned above to record and then export your presentation as a video.
When you record your Google Slides presentation with Zight, you’ll also be able to explain the contents of your slides in high-quality audio for an even better personal touch to what would be a boring presentation without narration.
III) How Do You Create a Presentation on Google Slides?
To create Google slides, follow these steps:
- Go to Google Drive and sign in.
- Click on the “New” button, then select “Google Slides.”
- Choose a template or start with a blank slide.
- Add your content by typing in text, and inserting images, videos, shapes, or charts.
- Customize your slides by changing the theme, background-color
Create & share screenshots, screen recordings, and GIFs with Zight
Get Zight for iOS.
- Help Center
- Google Docs Editors
- Privacy Policy
- Terms of Service
- Submit feedback
- Get started with Google Slides
- Create a presentation
How to use Google Slides
Want advanced Google Workspace features for your business?
Try Google Workspace today .
Google Slides is an online presentation app that lets you create and format presentations and work with other people.
Step 1: Create a presentation
To create a new presentation:
- Open the Slides home screen in Google Slides .
You can also create new presentations from the URL https://slides.google.com/create .
Step 2: Edit and format a presentation
You can add, edit or format text, images or videos in a presentation.
- Insert and arrange text, shapes and lines
- Add, delete and organise slides
- Add animations to a slide
Step 3: Share and work with others
You can share files and folders with people and choose whether they can view, edit or comment on them.
Related articles
Learn more about Tool finder for Docs, Sheets and Slides
Need more help?
Try these next steps:.
Using Google products, like Google Docs, at work or school? Try powerful tips, tutorials, and templates. Learn to work on Office files without installing Office, create dynamic project plans and team calendars, auto-organize your inbox, and more.
Got any suggestions?
We want to hear from you! Send us a message and help improve Slidesgo
Top searches
Trending searches

teacher appreciation
11 templates

tropical rainforest
29 templates

46 templates

pediatrician
27 templates

spring season
34 templates

23 templates
The best Google Slides and Powerpoint presentation templates
Here's a selection of the best free & premium google slides themes and powerpoint presentation templates from the previous month. these designs were the most popular among our users, so download them now, the best presentations from april.

Premium template
Unlock this template and gain unlimited access
Minimal Charm
Are you looking for a monochromatic theme that is interesting at the same time? How about using a simple and clean theme, along with black-and-white pictures, to convey business or corporate content in a professional way?

Minimalist Business Slides
Minimalism is an art style that frees the canvas and that lets the content stand out for itself. It’s a way of conveying modernism, simplicity and elegance and can be your best ally in your next presentation. With this new design from Slidesgo, your business presentations will be as professional...

Notebook Lesson
These are the last days before the Summer break! We know that there are some pending lessons that you need to prepare for your students. As they may be thinking about their friends and their holidays, catch their attention with this cool template!

World Environment Day
We know that taking care of the environment is of a paramount importance, and it is the perfect time of the year to encourage awareness and action for the protection of nature. Let’s teach our kids about the necessity of preserving nature with this cool template!

Futuristic Background
When you need to impress everybody and stay relevant, you must look ahead and aim to be the first. Take a peek into the future with this new template Slidesgo has just designed. It’s free and perfect for techie topics or just for giving your presentation a futuristic vibe!

School Assignments
Design some school assignments for your students so they can learn while they are having fun. Download this cool template now and make use of its resources. It looks like a sheet of a notebook and we have added drawings of stationery. Get your pencil!

Generation of '27
Generation of '27 is a group of avant-garde poets and artists who began to publish their work in the 20s of the 20th century. To help you explain this interesting part of Spanish literature to your students, we propose you this old-style brown template, with different illustrations of books, pens,...

Strategic Roadmap Infographics
How far can your company go? We know that for you there are no limits and that your company is capable of surpassing everything it decides to do. This is great, but to organize all the goals you want to achieve, designing a strategic roadmap will be a great idea...

Chalkboard Background
There’s an object that comes to mind when you think of a classroom. What’s in there, other than the students, the teacher and the desks? A chalkboard! The design of our new template focuses on this! Since today is Teachers’ Day in Spain, we’re sure you’re going to love it!

Papyrus History Lesson
History lessons tend to be boring for students, since they need to remember dates and a bunch of information. Make it entertaining by editing our free presentation template, whose backgrounds based on ancient papyrus rolls take it to the next level.

Minimalist Korean Aesthetic Pitch Deck
Templates based on a minimalist style are usually very useful in business presentations, as they make the audience focus on the content and not on the ornaments of the design. This minimalist style template that we propose here is perfect for a pitch deck to present your product or your...

Happy Pastel Summer
Soak up the sunny vibes of summer with the hottest Google Slides and PowerPoint template! This sunshine-infused masterpiece is your passport to organization and fun in the sun. Picture this: palm trees swaying, colorful cocktails clinking, and the soft sand beneath your feet as you effortlessly plan your days and...

Sunset Beach Agency
Do you imagine yourself surfing the waves under a beautiful sunset? Perhaps this cool image is what you'd like to project to your clients or audience. Present your agency with this editable template for Google Slides and PowerPoint! Maybe you operate in the field of travels and trips, or perhaps...

Elegant Bachelor Thesis
Present your Bachelor Thesis in style with this elegant presentation template. It's simple, minimalist design makes it perfect for any kind of academic presentation. With an array of features such as section dividers, images, infographics and more, you can easily create a professional and creative presentation that stands out from...

AI Tech Agency
It’s amazing how robots and computers are able to perform tasks that we thought only humans could do. If your agency is specialized in artificial intelligence, this free marketing presentation template can help you get your points across easily!

Minimalist Aesthetic Slideshow
When you combine a minimalist design with abstract shapes and a palette composed of pastel colors, you get a successful result. This template has all of the aforementioned, plus an elegant typography and some icons of plants. It's quite unique and works for any topic, so give it a try!

Social Skills Subject for Middle School - 6th Grade: How to Treat Your Teachers
You must treat your teachers with respect, as they are the ones who are in charge of your learning (besides your parents). Besides, as you learn to do that, you'll also learn how to address your superiors. Since we want education to be fun too, here's a template that will...
Cream & Pastel Palette Healthcare Center Characters
Let us introduce you to a new way of presenting healthcare centers. Did you think that we were going to use blue? Tut-tut! This time, the palette revolves around cream (the color of the backgrounds) and other pastel tones. As you explain in detail (or in brief) your healthcare services,...
- Page 1 of 1248

Register for free and start editing online
How-To Geek
How to convert google slides to powerpoint.
Want to edit a Google Slides file in PowerPoint? You can easily convert it to .pptx in a few simple steps. Here's how.
If someone sent you a presentation on Google Slides, but you'd rather work on it in Microsoft PowerPoint, you can easily convert it to a .pptx file in just a few simple steps. Here's how it's done.
First, you'll need to access your Google Slides presentation in Google Drive. To do this, head on over to the Drive website in your browser of choice.
Next, open the Google Slides file that you'd like to convert to PowerPoint.
Once you've opened the Google Slides document, select the "File" tab in the top-left corner of the window.
In the drop-down menu, select the "Download" button.
In the submenu that appears, you'll see a list of download options, ranging from .pptx to .pdf to different image formats . To convert this presentation to a PowerPoint file, select the "Microsoft PowerPoint .pptx" option from the menu.
Once selected, the file will begin converting to .pptx and download to your computer. Once finished, you can open the file and begin editing.
Converting a PowerPoint to Google Slides is just as simple. If this is what you're looking to do, open Google Drive , select "New," and then click the "File Upload" option. In File Explorer (or Finder on Mac), select the file to upload it. Once in Drive, right-click the document, select "Open With," and then choose "Google Slides."

5 Better Alternatives To Google Slides
I f you're looking to create a compelling presentation to showcase a new idea or persuade others, Google Slides may be the first option that comes to mind. But with few built-in templates, basic themes, and a limited graphics collection, you'll likely have a hard time making your presentation stand out against others.
If you want to make your presentation truly stand out, there are several alternatives to Google Slides that offer extra perks and features to give your presentations an edge. While Google focuses on integrating Slides with its other work-based apps like Sheets and Docs, other presentation apps focus more on design elements, transitions, and themes to help you convey your brand or personal image throughout your presentation.
We've tested these Google Slide alternatives to give you an idea of other available options to deliver impactful presentations. If you're looking for a way to make boring information more fun and engaging, here are the best presentation apps to replace Google Slides.
Read more: Major Graphics Card Brands Ranked Worst To Best
Microsoft PowerPoint
There's a reason so many businesses around the globe use Microsoft PowerPoint. Building its reputation as the go-to option for delivering high-quality presentations, the software generated $100 million in annual sales only three years after its initial release in 1990.
Microsoft PowerPoint may be Google Slides' largest competitor, but there are plenty of unique features that can add an extra flourish to your slides. PowerPoint excels in its impressive library of custom animations and slide transitions, which are fairly limited in Google Slides. Another unique feature is its AI-powered Designer tool. This provides professional design schemes that mirror the words used in your slides. For instance, if your title slide is named "Basketball Team 2024," Designer will automatically suggest pictures and slide layouts associated with basketball.
As PowerPoint has been in development longer than Google Slides, it naturally offers more nuanced features if you're looking for something specific. For example, you can save individual slides as an image file (using .png or .jpeg formats) or as a separate presentation file. There's also a large library of free PowerPoint templates designed to speed up your workflow. Moreover, PowerPoint integrates seamlessly with Microsoft Teams with its PowerPoint Live function, allowing you to easily share your presentation with your co-workers.
Prezi offers an innovative approach to showing presentations with its unique canvas feature. Unlike traditional presentation software, Prezi lets you zoom and pan around a flexible canvas. The canvas may feel distant to something of a presentation program, but there is still some linear order provided thanks to the Timeline view.
Finding ways to visualize data is one of the biggest challenges when dealing with presentation software. Prezi resolves this struggle with the help of its Story Blocks: a series of infographics available in multiple designs to visually represent data. You can easily edit infographics and even add animations to individual shapes. This can help add a story to your presentation and help you emphasize key points.
To further enhance your presentation visually, Prezi offers several topic path settings, which let you change how Prezi transitions from one topic to another. These options include subtopics, which are super helpful for breaking large chunks of information down. If you're looking for a unique, modern approach to presenting information, Prezi is a top pick.
If you're looking to create a professional presentation to convince potential clients about your business idea, Slidebean is a popular choice among professionals with plenty of customization options. One of the issues with Google Slides is its fairly limited template library, which is filled mostly with basic designs. Slidebean offers a better alternative with a broad selection of innovative templates split into categories for convenience.
The app's user interface is easy to navigate so that you can create slides in less time. Each slide has a dedicated Design and Outline tab. You can use the Outline tab to quickly edit the information on each slide without being distracted by all the visual elements. Another productivity-enhancing feature is the ability to generate a presentation theme from your website. Simply enter your URL, and Slidebean will automatically apply the theming to your presentation.
Slidebean is another presentation app to take advantage of AI. Using the Auto-Design feature, you can generate recommended slide layouts based on your existing content. It also features AI text suggestions designed to suit different industries. Overall, Slidebean offers a quicker, more efficient method for creating stunning presentations compared to Google Slides.
Canva is a well-known app among graphic designers, but it's also capable of making stunning presentations. The app also has mobile editions, so you can easily create and edit presentations on your Android phone , iOS device, or tablet. As long as you have an internet connection, you can modify your designs wherever you are.
To get started, head to Canva's online presentation maker . Canva offers a vast range of templates categorized by topic, which easily surpasses the simple templates in Google Slides . While some of the templates are only available to Canva Pro members, there is an ample amount of free templates to help you get started. You'll also find a large selection of stock photos, shapes, and illustrations to create beautiful customized slides.
Because Canva is built for graphic designers, you can access several features to give your presentation consistent theming. These include color palettes, font sets, and even a brand kit that allows you to add your company's fonts (available to Pro members only). One time-saving feature is Canva's Uploads tab, which lets you access recently uploaded media files. This offers a convenient way to copy content between different presentations.
Visme is a powerful visual design tool able to create videos, infographics, and presentations. One of the perks of using Visme is the company's free educational content, which offers advice on how to create impactful content to boost your brand. After signing up, the company also asks whether you're using Visme for your business, education purposes, or personal use to offer personalized tips.
In terms of charts and graphs, Visme offers some of the most impressive features we've seen from a presentation app, so you can effortlessly convey important statistics. From the Data tab, you can access dozens of graph styles to visually represent your data. Then, simply double-click a chart inside your presentation to edit the values instantly in a simple table format.
Another area that Visme excels in is collaboration. You can either generate a link to publish your presentation on the web or share your presentation privately with others. For each team member, you can choose who can view, edit, and comment slides for a seamless workflow. There's also a Slack integration that lets you receive messages whenever changes are made to your presentation. Visme is free for all users, with limited features available in its premium plans.
Read the original article on SlashGear .

IMAGES
VIDEO
COMMENTS
Present slideshows with confidence. With easy-to-use presenter view, speaker notes, and live captions, Slides makes presenting your ideas a breeze. You can even present to Google Meet video calls ...
Rename your presentation—Click Untitled presentation and enter a new name.. Add images—Click Insert Image to add images from your computer, the web, Google Drive, and more. You can also move, delete, or resize images. Add text—Click Insert Text box to add new text boxes. Then, click a text box to enter text. You can move, delete, or re-size text boxes.
Step 2: Edit and format a presentation. You can add, edit, or format text, images, or videos in a presentation. Insert and arrange text, shapes, and lines; Add, delete & organize slides; Add animations to a slide; Step 3: Share & work with others. You can share files and folders with people and choose whether they can view, edit, or comment on ...
To create a new Google Slides presentation, open a web browser and go to Slides.Google.com. If you want to start from a template, you can choose one from the template gallery. Otherwise, click "Blank" to create a new blank presentation. Your blank presentation starts with a single simple slide with space to enter a title and subtitle.
This Google Slides tutorial for beginners is a complete crash course, taking you by the hand and showing you step by step how to make some amazing and mesmer...
How to Create a Blank Presentation. Now that you have a Google account, it's time to create your first presentation. Head over to Google Slides and place the cursor on the multicolored "+" icon in the bottom-right corner. The + turns into a black pencil icon; click it. Pro Tip: Type.
If you're just getting started with making presentations in Google Slides, then this ultimate beginner tutorial guide is for you. Google Slides is a powerful alternative to PowerPoint. It's great for designing and sharing your presentations online. It's freely available, easy to start using, and packed with powerful tools.
Learn all of the basics of using Google Slides. This tutorial covers everything you need to know to create professional presentations.🕒 Timestamps- 0:00 Cre...
What to Know. Go to File > Download to save a presentation. To publish it, choose File > Publish to the web > Link or Embed > Publish. Choose Share to add collaborators. View edit history from File > Version history > See version history. Select File > Make available offline to work on a presentation offline. Google Slides is an app that allows ...
Open the template presentation you created in the steps above. On the menu bar, click File > Make a copy > Entire presentation. On the panel that opens, type in a name for the new presentation you ...
Create stunning presentations with Google Slides. Discover slide templates for every use case, use AI to generate unique visualizations, and more. ... Import Microsoft PowerPoint or Canva presentations online, and enhance your collaboration with Slides' features like comments, action items, and granular sharing controls. ...
Locate and select your PowerPoint file, then click "Open." After the file uploads to Google Drive, right-click it and choose Open With > Google Slides. The presentation will open in Google Slides but remain a PowerPoint file as you can see next to the name on the top left. Click File > Save as Google Slides from the menu to convert it.
Navigate to your file (s) and then click "Open.". Alternatively, you can drag and drop a file from your computer directly into the web browser for an easy upload. Once your file uploads, right-click it, point to "Open With" on the context menu, and then select "Google Slides.". Google then converts your presentation into a Google ...
4. Select the PowerPoint slides you want to convert to Google Slides. To import your PowerPoint slides into your Google Slides presentation, simply: Select the PowerPoint slides you want to import (or select All in the upper right-hand corner) Check or uncheck Keep Original Theme (see note below) Click Import slides.
Today, I want to show you guys how I make my presentations on Google Slides! I didn't use a template for this video but there are template resources that I'v...
Select the PowerPoint file and import it into your Google Drive account. To do so, click New → File upload. Then locate the file in your computer and click Open. As an alternative, you can drag the file directly to your browser. Once the file has been uploaded, double-click it. Click Open with and choose Google Slides.
Creative and Bold Theme for Marketing. Download the "Creative and Bold Theme for Marketing" presentation for PowerPoint or Google Slides and take your marketing projects to the next level. This template is the perfect ally for your advertising strategies, launch campaigns or report presentations. Customize your content with ease, highlight your ...
Use the Insert > Audio option to add audio to your Google Slides. If you want to add some soft music to your presentation, you can. In fact, this method of how to make Google Slides look good has nothing to do with visuals! First, click on Insert. From the menu that drops down, click on the Audio option.
1. Open Google Drive in a web browser. 2. Locate and open the Slides deck that you want to convert to PowerPoint. You can zero in on your slides by clicking the three horizontal lines at the top ...
Download the "Catholic Priest" presentation for PowerPoint or Google Slides and start impressing your audience with a creative and original design. Slidesgo templates like this one here offer the possibility to convey a concept, idea or topic in a clear, concise and visual way, by using different graphic resources. You...
When in doubt, adhere to the principle of simplicity, and aim for a clean and uncluttered layout with plenty of white space around text and images. Think phrases and bullets, not sentences. As an ...
Go to File > Publish to the Web in the menu. Choose either "Link" or "Embed" per your intent. Then use the Auto-Advance Slides drop-down box to choose the timing for the slides. Here again, you can pick from every second up to every minute. To loop the slideshow, check the box for Restart the Slideshow After the Last Slide.
3. Start Narrating Your Google Slides Presentation. On the Google Slides presentation page, click on the dropdown menu next to Slideshow. Click Presenter View if you are viewing the first Google slide. Alternatively, click Start from the beginning if you are not on the first slide.
Keep the text on your slides brief and to the point, using bullet points to emphasize crucial details. Choose fonts that are easily readable from the back of the room and proofread your slides ...
Step 2: Edit and format a presentation. You can add, edit or format text, images or videos in a presentation. Insert and arrange text, shapes and lines; Add, delete and organise slides; Add animations to a slide; Step 3: Share and work with others. You can share files and folders with people and choose whether they can view, edit or comment on ...
The best Google Slides and Powerpoint presentation templates Here's a selection of the best free & premium Google Slides themes and PowerPoint presentation templates from the previous month. These designs were the most popular among our users, so download them now! ... Available for Google Slides and PowerPoint, this design set offers ...
First, you'll need to access your Google Slides presentation in Google Drive. To do this, head on over to the Drive website in your browser of choice. Next, open the Google Slides file that you'd like to convert to PowerPoint. Once you've opened the Google Slides document, select the "File" tab in the top-left corner of the window.
It also features AI text suggestions designed to suit different industries. Overall, Slidebean offers a quicker, more efficient method for creating stunning presentations compared to Google Slides ...