ATLANTA, MAY 23-24 PUBLIC SPEAKING CLASS IS ALMOST FULL! RESERVE YOUR SPOT NOW
- Public Speaking Classes
- Corporate Presentation Training
- Online Public Speaking Course
- Northeast Region
- Midwest Region
- Southeast Region
- Central Region
- Western Region
- Presentation Skills
- 101 Public Speaking Tips
- Fear of Public Speaking

Proper Conference Room Setup Makes Presenting Much Easier

The downside is true as well. Improper conference room setup can actually make you more nervous and make delivering the presentation more difficult.
This post has two parts. Part one is about The Different Conference Room Styles . In that section, I’ll give you different conference room setup options with pros and cons of each. Then, in Part Two, I’ll give you the Best Practices for How to Set Up a Conference Room and how to set up a meeting room. These best practices will help you avoid some of the big mistakes that presenters make when they set up the tables, chairs, and audiovisual for meetings.
Part One: The Pros and Cons of Different Conference Room Styles.

For instance, when I teach a leadership development class, I sometimes change the room set up at each break. This is helpful, because the purpose of the class is to increase the :comfort zone” of the participants. So, changing the way the chairs are set up or the way the tables are set up makes the participants have to move to a new seat each time.
When I teach the group how to remember names, a u-shaped room is ideal. That way, each person is able to view every other participant in the room. (They aren’t looking at the back of anybody’s head.)
However, when I cover a module on presentation skills, a chevron style classroom setup is better. This style allows the presenter to be the center of attention. It also lets every person in the audience have a great view of both the speaker and the speaker’s visual aids.
Then, in the same class on the afternoon of the first day, we cover meeting skills. In that session, I push two classroom tables together to make bigger meeting tables. And I put six to eight chairs around each table. This allows each table to operate as a separate group.
However, unless you are covering multiple topics in the same presentation, you shouldn’t need to do this, by the way. For example, when I teach a regular two-day public speaking class , I keep the same chevron-style class setting throughout the entire class.
The point is to alter the conference room set up to fit the needs of the audience. And when the needs change, alter the conference room set up as well.
List of Different Conference Room Styles:
- Theater/Auditorium
Boardroom Style: All the Participants Gather Around a Single Long and Skinny Boardroom Table.

One major advantage of the boardroom style is that almost every building has some type of conference room. Another is that the table is already set up in the room. Finally, this style is ideal if you want the participants to communicate with each other (from a seated position.) Everyone in the room can see each other face-to-face.
The major disadvantage, though is that the audio and visual components are often built into the room. So you lose a lot of flexibility with this room style. Also, when people design boardrooms, they often make the screen or display the center of attention. As a result, the presenter will often have to deliver the presentation from either side of the screen.
The other major disadvantage of this style is that if you have more than 12 people, the style doesn’t work very well. The room is too crowded and people have a hard time moving around to go to the restroom or get a coffee refill.
Still though, for a small group, a boardroom is often the best option.
U-Shaped Style: Tables Are Set in a Square Shape with One End Opened for the Presenter.

This room setup is also very easy. All you need is a minimum of three tables to set it up. The major advantage of the U-Shaped style is that the entire group can still see everyone in the room face-to-face. So, this setup is ideal for team meeting where you want the audience to communicate with each other and share ideas.
Just like with the boardroom style, though, the major disadvantage is the group size. As the group gets larger, you lose the major advantages. So, if you have 14 or 16 people, you get the same advantages of the boardroom even though the group is a little larger. However, at 18, 20, or 22 people, you begin to lose this advantage. It will be difficult and impractical to get all 22 people to participate in a discussion.
So, since you lose this value, as the group gets bigger, you may want to switch to a classroom setup.
Just as an FYI, there is an alternative style called the “open square” style. It is the same as U-Shaped, but the open end is closed off. Between you and I, I have never really found any value in this style. You lose a lot of the advantages of the U-Shaped style without adding ANY advantages.
Theater Style or Auditorium Style: Chairs Set Side-by-Side as in a Movie Theater.

The major advantage of the theater style is that you can comfortable seat a large number of people. The entire room will be able see and hear the main speaker (or speakers.) So, if you are organizing an annual meeting for hundreds (or thousands) of people, you might use this style for an opening introduction. Or, if you invite a keynote speaker or comedian to speak, this room style works well.
However, this style has a huge disadvantage. The audience has no place to write or take notes. So, if your audience has handouts or printed content, avoid this conference room style. (Use the classroom style instead.) The other major disadvantage of this room setup is that it will be very difficult to get the audience to interact each other or the speaker. So when organizing a big meeting, this conference style doesn’t have as many uses as other styles.
Classroom Style: A Series of Six foot by One Foot Tables Set Up in Rows.

The advantages are that you can comfortably fit more people using this style and everyone in the room can see the presenter. Also, every audience member has his or her own space. And no one has to sit with their back to the stage. Another huge advantage is that the speaker has more control and authority in the room. It is easier to get and keep the attention of the audience.
The only real disadvantage to this style is that you’ll have difficulty getting groups to interact in teams. If you want to create small groups to discuss items from the meeting, you may need to get a row to turn around. When you do this, you’d need to leave the stage to give instructions.
Still though, this is the conference room style that I use most often when I set up meeting rooms.
Banquet Style: Six to Ten People Gather Around Big Round Tables.

Each audience member styles gets adequate space. They also get to see the people at their table face-to-face as with the boardroom style. So, this conference room style is kind of a hybrid between classroom style and boardroom style.
A major disadvantage, though, is that this style takes up a lot of space. So, it is more expensive if you are renting space from a hotel or convention center. The other major disadvantage is that some people at the table with have limited view of the stage. They often have to turn their chairs when speakers are talking. So, they lose the advantage of having the personal space.
Still, though, this style has works well if you want a big group of people to interact with each other. It allows you to have tables discuss items with each other and brainstorm solutions to challenges.
Part Two: Best Practices for Proper Conference Room Set Up for Presentations (How to Set Up a Meeting Room.)

For instance, if you cram 20 people into a boardroom, they will be uncomfortable. You may be presenting well, but the facial expressions from the audience may be less-than-cordial. If multiple people in the room are giving you negative facial expressions, you might begin to feel a little more self-conscious.
Basically, the way you set up the conference room can either make presenting easier or make it harder. Improper room setup can cause challenges that you just don’t want or need when you present.
Below are some of my favorite ways to set up a conference room for a presentation. These are the “best practices” that I have discovered over 20 years of presenting.
1) Present from the Short-Side of the Conference Room.

In the podcast that I did about eye-contact, I gave an example of how this can cause challenges. The analogy that I used there was to think about sitting in a movie theater with only three rows of seats. If you happen to be on either end, your view isn’t great. If you are the speaker, it is even worse. It is difficult for you to keep eye contact with the people on either side of the room.
To fix this, just present from the “short” side of the room. If you are presenting in a rectangular room, you will have two short walls and two long walls. Present from the short wall that is farthest away from the main door to the room.
By the way, a good A/V person can make presenting on the long-side of the room better. They will often set up big screens on both sides of the stage. This allows the audience to be closer to the speaker and still see the visual aids. Still though, this is just fixing a symptom caused by another problem.
2) Make Yourself the Center of Attention, Not the Visual Aid.

When presenters violate this room setup tip, it can cause some major problems with delivery. For instance, the speaker will often move to the side of the room and look at the visual aid screen as he or she speaks. Obviously, the audience will look at the screen as well. Now that the visual aid is the center of attention, the speaker will often move behind the audience to continue to speak. Instead of being an interesting dialogue between the speaker and the audience, the presentation will become a monologue.
This room setup for a presentation can lead to the click… talk… click… talk method of delivery. (This is really boring.) So, move your screen to the side.
3) Get Rid of the Lectern.

If you feel like you need to have notes to deliver your presentation, make sure to read How to Memorize Your Speech . This post gives a number of tips that will allow you to deliver your entire presentation without notes.
Just so you know, standing behind a lectern is a technique that presenters sometimes use to feel more comfortable. In reality, though, it often makes people more nervous. Any time we feel threatened, we want to put something between us and the potential threat. In martial arts, students are taught to put their hands (fists) between themselves and the threat. For presenters, we put a lectern between us and the threat. A good example of how the demeanor of a presentation changes with a lectern is political debates. Candidates who feel like they have an advantage connecting with voters on a personal level always favor “town hall” style debates. (Just as an FYI, audiences do too.)
4) Place Whiteboard or Flipchart to the Proper Side When You Set Up Your Room for a Presentation.

If I forget and place the board on the wrong side of the room, I will have to cross in front of the board and stand on the opposite side to write. I makes for an awkward transition in the speech.
Also, since I’m left-handed, I pay attention to moving the whiteboard for each presenter. Just before I introduce the next speaker, I will move the stand over for a right-handed person. Obviously, if you are the meeting leader and every speaker is right-handed, this is much easier. But you’ll be surprised at how many speakers are left-handed. So, pay attention.
5) Chevron Style Room Set Up Is My Favorite Conference Room Setup Style.
Basically, you set up your room classroom style. This is rows of six-foot tables straight across. However, put an isle in the middle of the room that is maybe six-foot or so wide. Then, move the edge of the table that is on the isle back about three feet, so that the tables now angle toward the front-center of the room. Instead of the rows being straight across, now, they will be slightly “V” shaped.
When you set up your room for a presentation this way, you are creating a stage to present from. Basically, you can now walk into your isle to be closer to the audience. However, when you do, the folks on the front row don’t have to crank their necks to follow you. They will be looking directly at you.
Best Practices for Room Set Up for a Presentation in a Boardroom
If you are presenting in a boardroom, many of the tips still work. You still want to present from the short-side of the room. If the room has a dropdown screen that is in the center of the room or on the long-side of the room, you can always just project onto a whiteboard. (I do this a lot when I use boardrooms.) It allows me to be able to write on my slides as well, so it is really helpful.
The biggest suggestion I can make about presenting in a boardroom is to stand up when you speak. If everyone is seated in the boardroom (including you) when you start your presentation, just stand up to call attention to your visual aid. (Then don’t ever sit back down.)
Never, ever, ever sit on one side of a boardroom table and use visual aids on the opposite side of the table. This is the HUGE mistake that amateur presenters make that will cause your presentation to be so boring, you will put your audience to sleep. Avoid it at all costs. Stand up and use your visual aid to add to your verbal presentation — not replace it.

Podcasts , presentation skills
View More Posts By Category: Free Public Speaking Tips | leadership tips | Online Courses | Past Fearless Presentations ® Classes | Podcasts | presentation skills | Uncategorized
How to use room setup styles to maximize engagement

Engagement and participation are two key words that every facilitator, event organizer and meeting professional sets as a goal when designing meetings, training sessions or conferences. Room setup plays a big role in making engagement happen.
Room setup is the seating arrangement of participants: the placement by which they receive content and interact with one another. It is a critical aspect of every event because the atmosphere the physical space creates will impact the experience in obvious, and subtle, ways.
As an event begins, there’s always an invisible barrier between a speaker and their audience. In fact, there is also a psychological barrier among participants, especially when they do not know each other well.
Design your next session with SessionLab
Join the 150,000+ facilitators using SessionLab.
Recommended Articles
A step-by-step guide to planning a workshop, how to create an unforgettable training session in 8 simple steps, 47 useful online tools for workshop planning and meeting facilitation.
Thoughtful conference setup can minimize these invisible, social barriers to encourage engagement and participation. Different arrangements enable variety both in learning and involvement whether the purpose is for meetings, in-person or video conferences, trainings and presentations, or workshops and interactive learning events.
In this article, we will discuss different meeting room setups and their efficacy and drawbacks to help you choose which is the right one for your meeting, workshop or conference. We will cover:
Why room layout is important
Deciding where to host an event, conference or workshop is an essential step in its planning and design . Room layout and other conditions determined by the location will determine some of your event choices. Let’s review some of the main reasons why room setup is important for event design:
For practical reasons
- Meeting room setup will determine accessibility. Consider whether your participants require accessible spaces, and how they will reach the space (e.g. steps, elevators). The Youth Disability Advocacy Services has a great infographic you can refer to for more insight on inclusive spaces.
- Location arrangements will determine what activities you can and cannot lead. Moving around in order, for example, to do Impromptu Networking , a favorite Liberating Structures method to start an event, may be impossible in an auditorium.
- Timing of breaks will also change based on the location. If participants need to go around the building, down a flight of stairs and across a corridor to reach a cafeteria or toilette, you cannot expect a quick break to last 5 minutes.
For psychological reasons
- The type of room setup, as we will see in further detail below , will immediately communicate to participants what is expected of them in terms of more or less active participation.
- A surprising room arrangement is a powerful way of shaking people out of consolidated habits and opening their minds to new experiences , ideas and opportunities.
- A room setup that echoes the topics of the day is a guaranteed way of making your day memorable. Hosting a conference on water management by the banks of a river, a future scenarios workshop on a theatre stage or an open space day dedicated to the future of work inside an abandoned factory are all true-life examples of exceptional settings for memorable events.
What is the best room setup for workshops?
In her practical manual The Workshop Book , Pamela Hamilton states: “If the workshop is taking place in the same room where you have other meetings, the room itself will keep people in old thinking habits”. Workshops typically involve hands-on activities, facilitation techniques , group discussions, simulations, and collaborative exercises , which allow participants to explore, ideate, and participate in achieving their desired outcomes.
Because of their highly participatory nature, workshops deserve extra attention when organizing seating and setting up the space. If you want to know more about what makes a workshop tick, and how these events are different from meetings and conferences, you can read a full introduction here .
Here are some of the things a workshop leader will pay special attention to when it comes to room setup:
- Will the seating arrangement need to be changed during the session ? If yes, avoid using a place where tables are fixed to the ground.
- Will participants need to use laptops , or have note taking/sketching space?
- What type of visuals do you plan to use. Slides? Flipcharts? Video conferencing? Make sure all participants have an unobstructed view of the visuals so that they don’t need to twist and turn to see the visuals.
- Where will participants go for small-group activities ? Ideally, it should be possible for everyone to work comfortably without going so far that they can no longer see or hear the facilitators!
- What are the acoustics like in the room? Many conference spaces are not designed to keep in mind the possibility of many participants talking at the same time. This is even more true in case of hybrid workshops, where you expect interaction between online and in-real-life participants. For more on the specific requirements of hybrid events, see our dedicated guide .
- Is it ok to hang posters on the walls? Check that the masking tape you’ll be using doesn’t ruin the plaster, nor your markers leave blue and red splotches on the walls if someone decides to write directly on a poster rather than on the sticky-notes!
Facilitators typically ask for access to a workshop space at least one hour before the start time. What will participants see when they walk into the room?
Overall, you are looking for a clean and welcoming space , with materials ready to use as well as for a surprise effect that will jostle people out of their daily routine (putting chairs in a semi-circle or around working tables is usually all that is needed to achieve this).
As the workshop progresses, don’t forget to keep the space clean of any clutter and re-arrange materials as needed.
Particularly for workshops that last more than one day, it is very satisfying to see walls fill up with posters, canvases, and other artifacts created by participants. This gives everyone a feeling of progress and achievement and can do wonders to anchor learning through visual memory.
What to keep in mind when choosing locations
Next to these considerations that are tightly related to workshop design, there are other logistical matters you’ll need to keep in mind when choosing locations and setting up rooms. Let’s quickly see what to check:
- Do you need to inform people on how to reach the venue ? You might want to set up arrows or signs or send participants detailed instructions. If you are hosting a public participation event, for example, can it be reached by public transport?
- Consider where snacks and meals will be served . You might want to dedicate some extra tables to coffee break supplies when a break room is unavailable.
- Check the location of restrooms and water fountains and make sure these are easy to find and access for participants. And while you are at it, make sure recycling bins are available and clearly marked. More ideas for greener events are in this useful list from the European Commission .
- Usually, the number of chairs should match with the number of participants, allowing a few extra chairs in case you have extra participants.
- Power supply and outlets . There should be enough to accommodate charging of laptops and other electronic devices needed for training and exercises, placed accessible but strategically so not to hinder the speakers, trainers and participants. You don’t want people tripping over power cords.
- Internet access . Do you want/need your participants to have internet access? If yes, make sure that the WiFi code is easily visible to everyone upon arriving. And if you need to use the internet during the session for any task, make sure that the bandwidth is enough to accommodate everyone.
- Heating and cooling . The venue must be warm or cool enough. For larger groups, expect that the temperature will rise over time with more people in the room.
- Additional furniture . Aside from tables and chairs, what other furnishing should be added or removed from the room to provide better comfort and utility to both facilitators and participants?
- Lighting . The venue must have enough lighting for speakers and participants to be able to see clearly but without being too bright. Natural lighting is preferable as people tend to get less tired , and attention spans last longer.
As you can tell, there is a lot to keep in mind to plan excellent events! Checklists are a great way to keep track of everything you need for room setup and preparation. In SessionLab’s planner , you can add a checklist to the top of your agenda for the day, and make sure you get those boxes ticked before you start.
An in-depth look into meeting room options
Each seating arrangement fulfills different purposes and matches different types of event style and size. Here are the 10 most popular kinds of seating arrangement setups for different types of events:
Theater or auditorium style seating
Theater-style seating is a classic one: participants are seated in rows of chairs, much like in a theater or cinema, to watch and listen to a speaker or several speakers as well as visual and auditory aids. There’s generally a gap in the middle to allow easy access for central seats and a large stage to accommodate speakers, visuals and auditory aids. This style, thus, is typical for events with a large number of attendees where content is delivered as a lecture.

- Theater-style seating allows for a large number of participants.
- Maximum seating capacity of the venue can be achieved.
- Since every chair is facing the stage, the focus is on the speaker.
- Since the focus of the audience is directed on the speaker and not on each other, participants are hindered from interacting with one another.
- There are often no provisioned spaces for participants to take notes, bring out their devices and record notes.
- Audience members tend to be too close to each other for comfort, and there’s a tendency for pushing past other people to enter or exit from seats.
- Spaces for aisles are needed to ensure access to seats
This type of seating arrangement is best for conferences, annual board meetings, product launches, lectures and performances . These events call for less interaction and focus more on visuals and listening to speakers and presenters.
U Shape Style
A U-shaped seating arrangement is just what the name describes; a letter U setup of tables and chairs arranged in an open-ended shape with the participants facing inwards. It is a classic boardroom setup that enables members to both face each other and the speaker.
Removing the tables and only having chairs in a u shape style allows for open interaction between the trainers and participants. This version is often used for skills development trainings and workshops.

- A u shape setup enables the presenter to closely engage with each participant.
- Participants can interact with one another.
- The open area can be set up as a presentation area or as a focal point.
- The seating capacity of the room is not maximized since floor space is not fully utilized.
- A majority of the participants view the front (speaker and visual aids) in a sideway position. This can become uncomfortable as the session progresses.
As described earlier, this type of seating arrangement is ideal for boardroom meetings and video conferences with a limited number of participants, but it is also good for training sessions or interactive workshops if you remove the tables .
If you keep the tables, then this setup allows for note-taking with laptops and other digital devices that aid in writing and learning.
Banquet Style Setup
The banquet style room arrangement is a round table setup with participants facing each other like at a dinner table. This encourages full interaction between people sitting at one table. It is often used for interactive workshops with group discussions and exercises.

- Full potential for interaction between participants as they face each other.
- Allows for more members to get to know each other; useful for networking purposes.
- It maximizes the use of the space in the room.
- Although it’s easy to interact with other members at the table, it’s not easy to mingle with other participants at other tables.
- It has the tendency to isolate groups and form cliques.
The banquet-style setup is good for formal and informal gatherings such as weddings , galas , sit-down dinners , music and entertainment – parties where there’s no need to constantly focus attention toward a stage/central platform.
It can also be suitable for large group workshops where teams are expected to work together over the course of the event.
Boardroom Setup or Conference Style Seating
Conference or boardroom style has one large table that fits around 7 to 20 people with room for their various equipment such as laptops, mobile devices and video conferencing devices. All participants face the middle to enable discussion and interaction from all directions. The boardroom or conference room style can also be adjusted to include many tables that form a hollow square/rectangle.

- Conference room layout allows for direct interaction between participants from any direction
- Table space allows for the use of laptops and other gadgets, paperwork and consumption of food and drinks.
- There are spots from where some participants may not be able to view slides or other visual presentations clearly.
- Because participants are able to use their laptops and other devices, they can easily shift their attention away from the meeting.
- The people at the far end of the table may feel isolated. Using circular or even square type conference tables can diminish this isolation.
This type of seating setup is ideal for business meetings , video conferencing, brainstorming and open discussions .
Classroom Style Seating
It is a classic classroom style setup where tables and chairs are arranged in parallel rows facing the front of the room. It is common for lectures and primarily supports interaction between the speaker and the audience and less among meeting participants. Participants sharing a table can do small group exercises or share their work with one another.

- Tables or desks are provisioned for taking notes and use of devices.
- It maximizes the space and seating plan with tables/desks.
- Line of vision for participants seated near the front corners or back corners is compromised
- Because of the angles of certain seats and tables, several participants may have to twist or turn to have a good view of the speaker or visual aid.
- Interaction and eye contact is unlikely in this setup and group discussions can be difficult.
The classroom style seating is ideal for instructive types of training sessions and workshops where the members need to take notes or use laptops and the flow of discussion is mostly from trainer/speaker to the audience. However, choosing this room setup requires a thoughtful agenda design in order to get participants properly engaged with the content; the room setup itself does not support interactive learning experiences.
Crescent Rounds Seating or Cabaret Style Seating
As the name suggests, members of the audience are seated at a round table but leaving empty space towards the stage or the location of the speaker. Tables are either scattered or strategically placed to maximize engagement as well as line of vision. The setup is conducive to small group exercises or discussions while keeping a focus on centrally displayed information or a speaker.

- The half crescent shape creates a focal point towards the stage to instruct and brief group work.
- Because there’s no hindrance to line of sight of the speaker and visuals, participants do not have to move to uncomfortable positions or twist around to see the front.
- Table setup encourages chatter within the group that’s irrelevant to the content or event objectives.
- It is not as compact as banquet style seating. More tables are used without maximizing seating.
The cabaret arrangement is useful for training sessions that aim for small group discussions and exercises combined with visual presentations . It is also popularly used for awards and gala nights .
Reception Style Seating
A reception style arrangement is similar to a banquet one but with extra cocktail tables in between group tables. The cocktail or high tables with no chairs are for mingling or networking. They are also good for breakout discussions and collaboration between members of the audience belonging to different groups.

- Allows for focused group exercises at the main tables, while the cocktail tables provide convenient opportunities for breakout conversations or engaging with other group/table members.
- A dynamic setup which encourages participation and prevents boredom.
- Room space may not be fully utilized compared to more traditional training setups.
- Not all members of the audience might appreciate a dynamic setup.
It is best applied to dynamic and creative training sessions with collaborative exercises . The reception style is also great for team building events .
Chevron Setup
The chevron or V-shaped setup is actually similar to a classroom arrangement but tables and chairs are angled for better line of vision and engagement between participants themselves as well as with the speaker.
- It basically mimics the classroom setup but with improved view from outer ends to give participants better line of vision.
- Tables give members the space to take notes and user their devices.
- It can maximize seating capacity and is good for large groups.
- It allows for small group exercises for people sitting at the same table.
- Participants are not facing each other and some will be behind others; this does not encourage active listening, and can still hinder line of vision in this way.
Similarly to the classroom setup, the chevron shape is suitable for training sessions and workshops where instructions and individual work dominate.
Fishbowl format
The fishbowl setup is used for dialogue type events. Four to five chairs are arranged in an inner circle – the fishbowl – while the remaining chairs are arranged in concentric circles around the middle area.
Speakers take the inner seats and start discussing the topic introduced by the moderator. In an open fishbowl , one seat is left free, and anyone from the outer circles can join the conversation. At the same time, then, another member from the fishbowl must give up his place in the inner circle.
This style is often used for forums or large group discussions where participants can openly discuss topics covered with the speakers or experts. It enables the whole group, or all members, to actively participate and be involved with the content, i.e. ask questions, make suggestions or give their own conclusions.

- Encourages participation in larger groups.
- Speakers are put at a position of equal distinction with participants, meaning they are among the group instead of at the head of the room or on a stage.
- This setup may be a problem for shy and introverted members of the audience who are afraid to participate. It may be harder to get their opinions or know what they think.
- It is hard to divide the large group into smaller sets for more intimate discussions of the topics.
- No tables or room for taking notes or using laptops.
Fishbowl is best for forums, conferences and large group meetings where there is a high expectation of participation.
Cluster setup or team table seating
Team tables, or clusters, is a similar setup to the banquet style but it is more for informal type of events. You can choose between cocktail style or high top tables and seating. The tables and chairs depend on the volume of people at the event. A sit-down table setup is for training in groups with a lot of group discussions and exercises, such as in team building, yet with an informal vibe and tendency for mingling or changing places.

- An informal setup is always good for building rapport among participating members.
- People can move around and still be comfortable in the training or event.
- Tables can be arranged to maximize lines of sight.
- Depending on the size of the room or the arrangement of the tables, line of vision can still be hindered.
Clusters are used for training with a lot of group discussions or exercises . It is best for team building and networking events where there’s still room to mingle and move around.
What is the best room setup for your conference, event or meeting?
The room design for your event should be determined by the goals you want to achieve and the number of participants you have. See some examples below:
- Have a large audience? Consider one of the room arrangements that can effectively be scaled up, even to hundreds of participants. For example: Auditorium, Banquet, Crescent or Reception
- Want to facilitate networking? Reception or rotating banquet tables can be a useful room design.
- Need participants to actively work together during the event? Choose a setup that fosters teamwork: U-Shape, Banquet
- Want to combine effective content delivery and participants working on their own devices? Classroom or Chevron can be a great fit.
- Do you have a group of 5-10 people that need to make a decision about a project? Choose a setup that supports open communication, such as U-Shape, Boardroom or Hollow Square.
- Are you planning for an interactive soft skills development training session? You may choose a u-shape without tables that allows you to present information and facilitate group conversation, then allow the group to break up into smaller circles by rearranging the chairs.
Knowing the answer for these two factors – interactivity and group size – will help you pick from these room setups:

If you have a longer, more complex event that spans over multiple days or if the session has different tracks, you should be prepared to arrange the room differently for different segments/days, if necessary.
How to get your meeting room style properly implemented
So, you have designed the meeting, you have a plan, and you have figured out which room arrangements will get you through your session. This means you are done with the planning work!
What can you do to ensure that your plan will be properly put into practice? Here are some tips to follow to have your planned room arrangement set up for you:
- Most of the time, the venue will take care of the complete set up of your desired room arrangements and other related logistics requirements. In order to minimise the chance of miscommunication, it is best if you can show examples of what you want. (For instance, show what a u-shape seating looks like and clearly specify whether you want or don’t want tables in front of the seats.)
- If you ask for different room arrangements over the course of your meeting, make sure to communicate this in terms of your agenda timing . If you need different room setups, you may want to ask for multiple rooms so you can flexibly move from one room to another.
- Even with the best communication from your side and a great venue, the initial setup you will find at the venue might need adjustments. Make sure you have time to do this before participants start to arrive.
- Don’t place participants too far away from yourself (the speaker/trainer/facilitator).
- Remove unnecessary seats
- Check if visuals (presentation screen, flipcharts) can be seen by all participants.
- If you like to move around while you speak, do a check from different seats to see which spots in the room might be blind to some. Make sure everyone can see you at all times.
- Don’t use fonts that are small and hard to read Mind that, if you have multiple rows, not everyone might be able to see the bottoms of your slides.
- Lastly, have a checklist of equipment and materials you need, so you don’t forget to bring any of the tools and props you might need during your session.
Despite all the best planning though, in real life sometimes things escape control completely. The location manager loses the keys at the last minute (this is a real story). Communication before the event is insufficient. Your train is late. So before we close this review of room setups, let’s see what happens when all the planning goes out the window.
Facilitating in weird locations: what can you do?
A delightful conversation recently took place in SessionLab’s Community space around the question: What is the strangest place you have facilitated in? From churches to parking lots, outdoor gardens to heavily guarded intelligence facilities, it seems that any place large enough to accommodate a group can ultimately work out for facilitation.
Reading those stories, two top tips emerge to help you face the situation with poise and style in case you are asked to work in a less-than-ideal location yourself:
- Acknowledge what is going on and get participants on your side. Facilitators are often encouraged to model vulnerability and honesty in their stance, and finding yourself in a weird location is a great opportunity to do just that. Don’t pretend the space is ideal if it is not: explain what is going on and ask for participants’ support in making it work.
- Deploy extra creativity and make the best of it. If columns block the view in the middle of the room, turn the columns into symbols of an important value or topic for the day. If the doors are locked and you have to work outside, take it as an opportunity for an outdoor practice or impromptu interviews with passers-by. Weird locations are a great playground for improvisation.
- But make sure participants are comfortable. If the location makes it impossible for people to sit, see, or hear, they are not going to have the focus they need to work well together. Call for a break and renegotiate options with your client, including moving the workshop to a later date!
Now over to you…
We hope you have found useful tips above on how to design a room setup for your next event.
What is your number one tip for getting room arrangements right? And what is the strangest place you have facilitated in?
Let us know about your experience in the comments or join the conversation in our friendly Community space .
12 Comments

What a Resource! You guys are soooo helpful, and giving!????????????

You’re welcome, Franklin – I’m happy to see that you like the article!

THANK YOU! I have been asked to step in for a collegue who has gone sick, and needed some thoughts as it is several years since I taught TtT. A browse through your blog has given me confidence to deliver the first few days this using his notes until he is well again.
That’s fantastic to hear, David, wishing you a great delivery! By the way, if you want see more tips on what to include in a train-the-trainer programme, you might find some useful ideas in this post: https://www.sessionlab.com/blog/train-the-trainer/

Thank you, Robert, for a wonderful insight on a room set up for any event.
You’re welcome, Vandana!

Hey, apart form room based conferences, have you guys used online conferencing tools like Webex, R-HUB HD video conferencing etc? If yes, kindly share the feedback.
Thank you for the question, Barbara. We mostly focused on live sessions so far, but remote facilitation is getting to be more frequent. Sounds like an interesting topics to cover in the future :-)

Thank you so much Robert for this helpful figures, cheers.

Wow…thanks now I have an idea about room setting

Which room set up can accommodate 250 guests?

Thanks for sharing all of the options for setting up training sessions. Several of them were unfamiliar. Great resource!
Leave a Comment Cancel reply
Your email address will not be published. Required fields are marked *

Going from a mere idea to a workshop that delivers results for your clients can feel like a daunting task. In this piece, we will shine a light on all the work behind the scenes and help you learn how to plan a workshop from start to finish. On a good day, facilitation can feel like effortless magic, but that is mostly the result of backstage work, foresight, and a lot of careful planning. Read on to learn a step-by-step approach to breaking the process of planning a workshop into small, manageable chunks. The flow starts with the first meeting with a client to define the purposes of a workshop.…
How does learning work? A clever 9-year-old once told me: “I know I am learning something new when I am surprised.” The science of adult learning tells us that, in order to learn new skills (which, unsurprisingly, is harder for adults to do than kids) grown-ups need to first get into a specific headspace. In a business, this approach is often employed in a training session where employees learn new skills or work on professional development. But how do you ensure your training is effective? In this guide, we'll explore how to create an effective training session plan and run engaging training sessions. As team leader, project manager, or consultant,…

Effective online tools are a necessity for smooth and engaging virtual workshops and meetings. But how do you choose the right ones? Do you sometimes feel that the good old pen and paper or MS Office toolkit and email leaves you struggling to stay on top of managing and delivering your workshop? Fortunately, there are plenty of online tools to make your life easier when you need to facilitate a meeting and lead workshops. In this post, we’ll share our favorite online tools you can use to make your job as a facilitator easier. In fact, there are plenty of free online workshop tools and meeting facilitation software you can…
Design your next workshop with SessionLab
Join the 150,000 facilitators using SessionLab
Sign up for free
- Speech Writing
- Delivery Techniques
- PowerPoint & Visuals
- Speaker Habits
- Speaker Resources
- Speech Critiques
- Book Reviews
- Browse Articles
- ALL Articles
- Learn About Us
- About Six Minutes
- Meet Our Authors
- Write for Us
- Advertise With Us
How to Optimize Room Setup for Training and Presentations
If your audience seating arrangement and overall room setup isn’t aligned with the design of your session, you are starting from a position of weakness.
In this article, we describe the core principles that factor into your room setup choices. We then offer an in-depth view of several popular options, and point out the advantages and disadvantages of each. Finally, we end with tips you can use to optimize the room for your audience and set yourself up for success.
Core Principles for Choosing a Seating Setup
Before we dig into the many seating styles available, let’s first review the high-level audience-centric principles which will guide your choices.
- Comfort — Are audience members able to participate fully while facing forward? Or do they need to constantly twist around? Is there enough room for them to get to their seat easily? Will they be bumping into one another constantly? If they are comfortable, they can focus on listening to you.
- Sight lines — Can audience members see the presenter? The slides? Each other? Clear sight lines allow your audience to absorb the visual component of your message, whether it be slides, body language, or anything else.
- Utility — Is a surface provided for using a laptop, taking notes, practice exercises, eating, or drinking? You want your audience members to be active learners, so give them space to do it.
- Proximity — Are audience members relatively close to the screen, the presenter, and each other? Or is it sparse seating? Too far apart drains energy from the room, but too close can be uncomfortable.
- Compatibility — Is the layout of the room and the seating arrangement optimal for the style of presentation/training being offered? Does it support slide content? Large-group discussions? Small-group exercises?
These five principles will be our focus as we tour many popular seating styles available for your room.
Theater Style Seating Setup
Theater style seating is a series of chairs arranged in parallel rows, all facing forward to the front of the room. No tables are provided. Most large lecture theaters and movie theaters are arranged this way.
- Allows high-density seating; that is, for a given room size, theater style seating maximizes the potential audience size.
- Because audience members are close to each other and the speaker, this arrangement tends to maximize the energy in the room.
Disadvantages
- No surface on which to place laptops, writing pads, food, or any other items.
- Poor sight lines for people sitting near the front corners and, in very large rooms, people sitting toward the back and along the sides.
- Angle of seats may require some audience members to “twist” their body to face the speaker or screen.
- May be cumbersome to get to seats, depending on locations of walking aisles.
- Less overall comfort (i.e. hot, stuffy) due to high density.
- Audience members have essentially zero eye contact with each other, making discussions inconvenient and unlikely.
Best for…
- Presentations for large audiences where the information flow is one-way (from speaker to audience) and there is no requirement for taking notes or using laptops.
Classroom Style Seating Setup
Classroom style seating is a series of tables (or desks) and chairs arranged in parallel rows, all facing toward the front of the room.
- Tables (or desks) provide space for laptops, note-taking, and food.
- Highest density of any seating arrangement involving tables or desks.
- Poor sight lines for people sitting near the front corners.
- Angle of seats and tables requires some audience members to twist their body to face the speaker or screen.
- Training sessions where most audience members are taking notes or using laptops, and where most of the information flows from the speaker to the audience.
Boardroom Style Seating Setup
Boardroom style seating is a single large table (or several smaller tables butting up against one another) surrounded by chairs on both sides. The most common shape is rectangular (as shown in the diagram), but variations include both circular or square tables.
- Lots of eye contact between audience members promotes discussion.
- Tables allow for laptops, note-taking, and food.
- Terrible sight lines to view slides for many audience members, particularly those at the “far end”.
- Even worse sight lines from audience members to see the presenter, who must either stand to the side (not good) or sit (worse).
- Multi-tasking (e.g. using a laptop while viewing slides or the presenter) requires lots of body twisting.
- Depending on length (and shape) of table(s), audience members at the extreme ends can feel isolated. Tables which are circular or square can mitigate this.
- Small groups focused on discussion and making decisions where there’s no primary presenter and little reliance on slides.
U-Shaped Style Seating Setup
U-shaped style seating is a series of tables forming three sides of a square or rectangle, with seating arranged around the outside. In this arrangement, all seats face the middle of the “U” shape.
- Clear sight lines (both audience-to-presenter and audience-to-audience) fosters large group discussions.
- Presenter can walk into open space within the “U”; this creates a unique dynamic because they are “immersed” within the audience.
- Tends to lead to very low density seating, and thus requires a larger room for the same size audience.
- Audience members at the “bottom” of the “U” are seated a large distance from screen, leading to several bad results: [a] readability of slides or flip charts is reduced, [b] participants are more easily distracted, and [c] participants are more likely to lose focus.
- Audience members in the “corners” can feel relatively isolated.
- Training sessions which are designed to emphasize large group interactions, with less emphasis on slide content.
Banquet Style Seating Setup
Banquet style seating is when a number of tables are scattered throughout the room, with seating arranged entirely around each table. Tables are often circular, but can be other shapes as well.
- Tables create focal points which promote small-group discussions.
- Small group settings create feelings of inclusiveness, and counteract the isolated feeling or anonymity that individual participants may feel within a large group.
- Many people are naturally facing away from screen, and must turn away from table to see slides or presenter.
- Tables can promote side chatter among groups unrelated to event goals.
- Table space can be limited, depending how many people are seated at each table. (i.e. there is less individual space compared to classroom, boardroom, or U-shaped style seating)
- Moving to/from seats can be cumbersome, depending on overall room size and walking aisles.
- Training sessions which are designed to emphasize small-group exercises, with less emphasis on slide content.
Cabaret Style Seating Setup
Cabaret style seating is when a number of tables are scattered throughout the room, with seating arranged only partly around each table. This avoids anyone sitting with their back to the front of the room where the speaker or screen are located.
- Most people are facing screen and presenter with limited twisting.
- Lower density compared with Banquet style seating. More tables and a larger room are required for the same number of people.
- Training sessions which are designed to emphasize a balance between small-group exercises and slide content.
Chevron Style Seating Setup
Chevron style seating (or V-shaped seating) is when tables are arranged in a series of angular patterns relative to one another, with seating on one side so that every chair is oriented optimally to face the screen or speaker. In narrow rooms, tables might be arranged in true “V”-shapes (as shown in the diagram); in wider rooms, tables might be arranged with a central “wing” connecting the two ends of the “V”, like this: \_/ .
- Everyone faces the screen and presenter, so nobody has to twist their chair. Note-taking or using a laptop is thus comfortable for everyone.
- Many audience members are now able to make full or partial eye contact with each other, promoting group discussion.
- Relatively high density (similar to Classroom seating).
- Individual tables support small-group exercises.
- While some large group discussion is supported, it isn’t ideal because some people are still looking at the backs of other people’s heads.
- Training sessions which are designed to emphasize slide content, but also want to incorporate some small-group exercises and some large-group discussion.
What is the Best Seating Arrangement?
It depends! There’s no single seating arrangement that works best for all speakers and all settings. I have had productive sessions (both as the speaker and as an audience member) in all of the above arrangements, and I’ve also been in many rooms which were not set up properly to support the goals of the session.
A trainer who trained me several times usually adopts U-shaped style seating, because her courses rely heavily on large-group discussion, and she feels very comfortable sitting in the middle of the “U”.
On the other hand, I generally prefer chevron style seating for the courses that I teach, because I feel it offers the best blend of comfort and flexibility to support the slide content, large-group discussions, and small-group exercises which I design into my courses.
Tips for Optimizing the Room for Your Audience
Regardless of the seating arrangement that you choose for your event, be thoughtful and action-oriented when it comes to setting up your room for success. Every style above can be modified and enhanced to further support your goals.
- Be proactive. Plan for success. The overall success of the presentation or training session reflects on you. Ask questions about what is possible. Think about the seating arrangement that will best support your format, and make it happen.
- Show up early and roll up your sleeves. If the room isn’t set up as you requested (and if the furniture isn’t all bolted to the floor), then go ahead and move it. Several times, I’ve asked for chevron-style seating with tables, and discovered that the tables were stacked at the back of the room. Moving them was a small effort to invest in the success of the training session.
- Pull the seats forward. When your audience is unnecessarily far away from you, it’s harder for them to hear you, harder for them to read your slides, and harder for you to connect with them. I have routinely moved all of the seats forward to improve this situation.
- Eliminate unnecessary seats. Suppose you know that your audience is going to be 30 people, but the room is set up with 6 rows of 10 chairs each (=60 seats total). Most people tend to choose a seat toward the back. The result is that most of your audience will sit in the back half of the room. This reduces the overall energy in the group, and makes it harder for them to hear you and see you (and your slides). You have several options: [a] push the chairs/tables all the way back so they aren’t an option, [b] tip the chairs on the back rows forward to indicate they are blocked, or [c] “tape” them off.
- Identify and solve sight line problems. Check the seats in the corners to make sure that someone sitting there can see [a] the screen, [b] you (even as you move around) and [c] any other equipment you’ll be using (e.g. flip charts, white boards, etc.). I recently delivered a training session in a long, narrow room which could only be set up in Boardroom style. The consequence was that most participants would not be able to see both the screen and the flip chart if I left them side by side. So, I decided to pull the flip chart to a central location when I needed it, and then push it away again to support focusing on slides.
- Plan your movement with room constraints in mind. Remember that your body will block sight lines too. Map out where you can stand to avoid blocking your audience’s view of the screen, whiteboard, or flip chart.
- Design your slides with room constraints in mind. If you know that the room will be set up in such a way that everyone past the front row can’t see the bottom 10% of your slides (which is the case in many rooms), then don’t place any useful information there.
Which seating arrangements do you prefer?
As a speaker or trainer, which seating style helps you achieve your goals?
As an audience member, which seating style is most conducive to your goals?
Have you ever been in a room which was set up in a way that contradicted the goals of the session?
Please share your thoughts in the comments.
Please share this...
This is one of many public speaking articles featured on Six Minutes . Subscribe to Six Minutes for free to receive future articles.
Add a Comment Cancel reply
E-Mail (hidden)
Subscribe - It's Free!
Similar articles you may like....
- 28 Tips for Designing Training Courses: Case Study
- Book Review: 101 Ways to Make Training Active (Mel Silberman)
- Book Review: Telling Ain’t Training (Stolovitch, Keeps)
- How to Dress for Public Speaking
- How to Achieve All Your Resolutions
- How to Plan a Great Group Discussion
Find More Articles Tagged:
Yes – just yes! It always amazes me how many presenters just accept the room as it is when they walk in.
I’ve been known to turn the entire room around to get what I wanted. (Mind you, my team weren’t all that impressed by how hard they had to work 😉 )
Thanks, Simon. Good to hear that others are being proactive with the room setup too.
Recent Tweets
How to Optimize Room Setup for Training and Presentations @6Minutes #IndezineRecommends https://t.co/KG5y89F4LY… https://t.co/T8Xe4lB2wb — @BlogIndezine Jun 26th, 2018
How to Optimize Room Setup for Training and Presentations @6Minutes #IndezineRecommends https://t.co/PShmLbjT2l… https://t.co/bSHv2cWQaa — Education PowerPoint (@EducationPPT) Jun 26th, 2018
How to Optimize Room Setup for Training and Presentations @6Minutes #IndezineRecommends https://t.co/AaA5rbkYhj… https://t.co/qMxgrpWDVn — @CEPowerPoint Jun 26th, 2018
How to Optimize Room Setup for Training and Presentations @6Minutes #IndezineRecommends https://t.co/w1EgtZVcbf… https://t.co/IrBRYZ6tuZ — Agentha (@AgenthaSite) Jun 26th, 2018
How to Optimize Room Setup for Training and Presentations @6Minutes #IndezineRecommends https://t.co/77mtzWKcEh… https://t.co/xHrKpFKx6r — @ChristianPPT Jun 26th, 2018
“How to Optimize Room Setup for Training and Presentations” https://t.co/n1AVSUwlup #events #eventplanning — @HITConfGuy Jun 26th, 2018
How to Optimize Room Setup for Training and Presentations https://t.co/3DRR5NQCXu by @6minutes — Presentation Guild (@presentguild) Jun 26th, 2018
How to Optimize Room Setup for Training and Presentations https://t.co/GQTPFJCEig — @empoweredpres Jun 26th, 2018
How to Optimize Room Setup for Training and Presentations https://t.co/Y9f5JzSumJ by @6minutes — @yuthyia Jun 26th, 2018
How to Optimize Room Setup for #Training and #Presentations https://t.co/HREZ8R6QJi https://t.co/0flCiUYmCc — Rohit Chattopadhyay (@rohitchat23) Jul 25th, 2018
Six Minutes Copyright © 2007-2019 All Rights Reserved.
Read our permissions policy , privacy policy , or disclosure policy .
Comments? Questions? Contact us .
The Throughline Blog
Practical Media Training and Public Speaking Tips
Speaking Environment Part 1: The Room, Setup, and Other Considerations

Photo credit: Matthew Osborn/Unsplash.com
As a presenter, it’s crucial that you give your speaking environment the same kind of attention you give to the content of your talk . Presentation logistics – including the room, the seating layout, the temperature, your audio and video tools, and more – play a critical role in the success of your presentation.
In most cases, you’ll have at least some influence over those considerations, and you should exert it to ensure the audience is as comfortable and receptive to your ideas as possible.
This post begins a four-part series that focuses on how to best prepare for and approach your speaking environment – from the room setup to your timing, as well as other considerations – so that your presentation is heard and experienced exactly as you intended.
We begin with some space-related elements that can affect the way your audience experiences your talk.
4 Ways to Improve Your Speaking Environment
1. choose the right room.
I once saw a band play at New York City’s 21,000-seat Madison Square Garden. The group was past their peak popularity and, unfortunately for them, they performed in an arena that was more than half empty. It was sad to see the one-time radio staple reduced to playing for thousands of empty plastic chairs.
Imagine if they had booked a smaller venue instead? The concert hall would have been sold out, the audience would have felt electrified, and the fans would have left feeling good that their favorite musicians could still pack a room.
That example highlights the decisive factor when selecting a room – you want one that places people as closely together as possible , but with just enough space between each person to ensure their comfort. (We look forward to being able to do that again post-pandemic!) It’s difficult to build an intimate rapport in a vast room with hundreds of square feet of unused space. (If you don’t have any say regarding the room selection, you may be able to influence the seating arrangement, which can help. We’ll say more about that in the next post.)

2. Be Wary of Environmental Factors
You’re probably familiar with the dreaded “war of the thermostat.” You like it cold; your co-worker likes it warm. You crank the heater in the autumn; your roommate throws open the windows to bring in crisp outside air.
While you may not be able to create the ideal room temperature for everyone, your goal is to create a space as conducive to the audience’s ability to receive your message as possible. High temperatures can negatively impact people’s moods, even triggering anger and hostile thoughts . Low temperatures, which multiple studies find are more uncomfortable for women than men, can come at the cost of productivity.
Rooms set to between 71- and 76-degrees Fahrenheit (about 22- to 24-degrees Celsius) are usually right on the money.
3. Head off Distractions
I once gave a talk in a hotel conference room. One room over, the guests were being led in a drum circle (long story). With only a thin wall separating us, it was virtually impossible to stick to my original plan – so we called for a break, migrated into the hallway, and finished our session there.
Hopefully, you won’t face such a massive distraction. But anticipating what could go wrong allows you to help mitigate risks, as the examples below demonstrate:
- If loud sounds such as construction work or hallway music pose a threat to audience attention, ask the building manager or hotel staff to help halt the noises.
- If the room in which you’re speaking has a beverage station, ask the catering manager not to refresh or clean it during your talk (I’ve had audiences distracted by banging glasses and poured ice).
- If you’re speaking in a room that has large glass walls or windows, stand on the opposite side so audience attention remains on you, not the passersby on the other side of the pane.
Finally, avoid standing near the exit or entryway. It’s like being near the kitchen or bathroom in a restaurant. Every time someone arrives late or leaves to take a break, you must reengage your audience’s attention.
4. Adjust the Lighting
In general, avoid putting the audience in the dark or semi-darkness. Doing so makes it easy for them to zone out and makes it difficult for you to encourage interaction or elicit questions.
The lighting should allow the audience to see you clearly and, if appropriate for your event, have enough illumination to take notes or read handouts. If you’re displaying visuals, test your slides before the audience arrives to make sure the lighting isn’t washing out the screen. If necessary, dim the lights near the screen to create a sharper image.
Finally, technology allows most presentations to be displayed without the need for a projector. But if you do need one, ask that it be placed toward the front of the room. If it is too far back, you run the risk of being awash in light, blocking the screen, and having light beaming into your eyes.

Photo by Charles Deluvio on Unsplash
Presentation Preparation is Key
You may have a greater influence in the way your public speaking environment is organized if you think about the setup you want to create as far in advance as possible.
Questions that will influence your decisions about such elements as seating arrangements, equipment, and timing include:
- What’s the audience size?
- Is this a short presentation or an hours-long training?
- Are you providing a one-way flow of information or seeking regular participation and feedback?
- Are you a keynote speaker, presenting to a small group, or moderating a discussion?
- Do you want audience members to interact with one another?
- Are you doing small-group exercises or breakout sessions?
- Do you plan on using slides or other visuals?
- Will your audience need or want to take notes?
- Do they have space to comfortably rest their notepads, laptops, refreshments, etc.?
We’ll go into more depth on your answers to those preparation questions during this four-part series. But, for now, here are a few high-level pointers:

- Arrive early on the day of your talk. Doing so gives you time to organize and prepare (and if necessary, clean) the room before you speak. You’ll often find me kneeling on the floor to tape down wires, clearing a conference room table of unnecessary wires, and moving chairs closer to the front of the room.
- Coordinate with the audiovisual technician. A/V pros, if available to you on site, are crucial allies in getting your presentation up and running. However, their go-to best practices may not match your best practices for your specific talk. You are the person in the front of the room. Consider their ideas – they’re often right – but don’t automatically yield to their expertise.
Ultimately, audience members won’t notice when the setup is just right. They’re unlikely to comment on the crisp sound of a new microphone, for example – but you’ll hear about it if your words are incomprehensible due to reverberating echoes bouncing off the walls of a cavernous ballroom.
Here’s what we’ll cover in this series:
Part Two: Presentation Timing
Part Three: Microphones and Other Tech Considerations
Part Four: The Seating Arrangement
- presentation logistics
- presentation skills training
- public speaking tips
- speaking environment
Share this article
- Share on Facebook
- Share on Twitter
- Share on LinkedIn
- Share on Email
STAY UP TO DATE WITH THE THROUGHLINE NEWSLETTER
Join the thousands of professionals who receive our email newsletter. Improve your public speaking and media interviewing skills—and enhance your career— by signing up.
Learn More About Our Training Services
Public speaking and media training custom courses designed to make you a more effective communicator.
More from the throughline blog

In public speaking tips Why Your Speech Should Have Two Closes

In public speaking tips 12 Ways to Boost Your Charisma (Study)

In public speaking tips Study: Your Bad Audio Makes You Sound Dumber
This website or its third party tools use cookies, which are necessary to its functioning and required to achieve the purposes illustrated in the privacy policy . If you want to know more or withdraw your consent to all or some of the cookies, please refer to the privacy policy. By closing this banner or continuing to browse otherwise, you agree to the use of cookies.
To continue, please use a supported browser.
What's The Ideal Conference Room Setup? A Quick Guide to Implementing Effective Meeting Room Design

In these days of COVID-19, you can’t just pull up a chair to someone’s desk for a quick chat. And even the smallest group standing around 6 feet apart in the hallway is going to feel uncomfortable and bother others nearby.
You could plop down in the conversation pit if your office has an open workspace plan, but even if you aren’t bothering anyone else the action around you will be distracting at the very least. And wouldn’t you rather have a big screen everyone can see rather than everyone scrunching around someone’s laptop to view the display? What if you need video conferencing?
Conference room design matters because there is no such thing as one-size-fits-all meeting space.
Looking to get the most out of your office space? Robin can help. See how today.
Elements of good conference room setup
A traditional conference rooms has a large rectangular or oval table surrounded by chairs. That can be just right for board meetings, interviews, etc. In reality, though, we use “conference” rooms for all sorts of gatherings.
So, what makes an effective meeting room?
Spaces that are uncomfortable, cumbersome, or ill-equipped detract from your ability to get work done. Meetings are delayed, attendees are inattentive. No wonder people say meetings are a waste of time. This won’t do. You have to come together in groups large and small to conduct your company’s business.
“A meeting area that’s comfortable stylish and fully equipped will help you communicate better and build relationships,” notes Gaiku . “It can effectively lead to attracting clients or finalizing deals.” Or, we might add, brainstorming the Next Big Thing.
You’re there to work, so you want a results-oriented environment. Therefore, effective meeting room design includes:
- Comfortable, visually as well as physically
- Well-equipped
Flexibility is critical. You can’t create a separate conference room for every conceivable purpose because every meeting has unique characteristics. Spaces designed for flexibility can be configured as needed to accommodate many types of meetings without sacrificing other important elements.
What should be in a conference room?
Everything needed to conduct any sort of meeting that might take place within that room — equipment and supplies — should be right at hand to avoid delays or interruptions. Don’t forget that you’ll need to stock conference rooms with COVID-19 related supplies such as hand sanitizer and wipes that can be used to freshen equipment and work surfaces.
In terms of equipment and furniture, you’ll need:
- Controllable lighting.
- Sound (audio system and sound-proofing, because many meetings are confidential).
- Digital display(s).
- Video conferencing system.
- Reliable, strong wireless internet connection.
- Temperature controls (and up-to-date HVAC sanitation protocols ).
- Table(s) – in larger rooms , multiple smaller tables make it easy to reconfigure seating arrangements as needed.
- Chairs (those that swivel and have wheels are far more conducive to conversation and easier to move around), or sofas.
- Plates of chocolate chip cookies. (OK, maybe not critical, but in some organizations this might be a cultural must-have. And, seriously, food and beverages are commonly part of meetings.)
Let’s add extra space to that list. No one should have to get up and go stand somewhere else just to see or hear better. On the other hand, especially during longer meetings some participants want to move around. They have a bad back. Or they think better on their feet. Well-thought-out conference room design allows for that.

Types of conference room setups
A conference room can be used for any meeting of 2+ people who need to work together or be educated together:
- Intimate one-on-ones
- Casual brainstorming sessions
- Formal presentations
- New product launches
- Interviews and personnel reviews
- Team huddles
- Departmental meetings
- Collaborative work sessions
- Training sessions
- Board or client meetings
- Annual or other all-hands meeting
- Quick status updates
- All-day or multi-day conferences
A meeting room may also be ideal for any employee who wants a quiet getaway to concentrate or ruminate.
What are five basic seating arrangements used for small group meetings?
Small groups come together to converse or collaborate, so seating arrangements must facilitate engagement. The entire group may be small, or a larger gathering might require small-group seating for breakout sessions, team project work or “musical chairs” style networking.
- U-shape . Everyone can see each other as well as a video conferencing screen or interactive whiteboard if it’s a virtual meeting , plus the presenter or group leader can move around and still be seen.
- Traditional conference table. This is great for board meetings, etc. where attendees may have to spread out paperwork as well as use a laptop to take notes. The table can be augmented with a tool such as Meeting Owl to allow remote participants to hear and see, but the room will also need multiple display screens for those in the room to comfortably see virtual attendees.
- Hollow square. Great for in-person meetings but not when there will be remote attendees.
- Classroom style . Good for training sessions or seminars where participants will need to take notes during a presentation.
- Banquet-style setup . Round tables are useful for lunch meetings or strategy sessions.
A comfy conversation area with sofas or cushy chairs and a coffee table can also work nicely for small groups that just want to chat for a few minutes in a relaxing setting.
What is included in meeting room audio systems?
Lousy acoustics can kill a meeting. People who can’t hear easily miss important information, or they tune out and don’t bother to listen. Audio systems have to accommodate video conferencing as well as in-room sound levels and quality.
Room layout affects acoustics, in two ways. The size, shape and any internal barriers affect sound distribution but so can the seating arrangement. In small meeting rooms, speakers built into video display screens may be just fine. For larger spaces, though, conference room equipment should include components that accommodate flexible meeting room setup:
- Multiple speakers or a mobile “pod” to amplify sound
- Multiple, omnidirectional microphones, preferably just a few feet apart
- Multiple display screens
- Auxiliary equipment such as amplifiers, AV distribution equipment and recording devices
Often overlooked? Sound masking technology that eliminates distractive noise from outside the conference room. In some companies this is also essential to prevent eavesdropping on extremely sensitive or proprietary discussions.
If you’ve always had a secret yearning to become an expert on conference room audio systems, you can read up on the details here .
Benefits of a good conference room setup
Conference space that accommodates online meetings provides all the benefits of any good conference room, plus versatility in terms of convenience and inclusion. With online capability, everyone is automatically invited into the meeting whether it will be a one-way formal presentation or fully interactive session. Greater participation ensures maximum brain-power and diverse perspectives are applied to every project and decision, and that can translate into significant competitive advantage.
Besides, a room setup that allows video conferencing and other digital interaction makes a great impression on employees as well as visitors. Your company gets it.
What technologies are necessary for the modern conference room?
Technology is a must for today’s conference room. Some tools are optional, but others are crucial:
- Plenty of power and outlets to serve AV equipment, personal devices and allow for recharging during long meetings. With a wireless presentation system in place, everything will be easier and no one will trip over a power cord
- Internet access and bandwidth powerful enough to serve everyone’s devices and also prevent dropped or poor quality transmissions
- Video conference tools
- Interactive whiteboard
- Digital display screen(s).
- A good audio system.
While these essentials and gadgets make meetings more productive, there is another technology that will significantly improve every meeting experience: conference room scheduling software that is fully integrated with conference rooms and digital signage.
The right meeting room scheduling tool allows your people to book the right space for their size and purpose, shows attendees how to get there, and ensures the space is reserved just for them. It also enables last-minute space finding and booking. It works smoothly with calendaring tools as well as common platforms such as Microsoft Teams.
Why are meeting room audio systems so important?
Earlier, we listed the key audio system elements for successful meeting rooms. Quality, state-of-the-art tools and equipment demonstrate you care about everyone’s time and convenience. In general, it is better to have it and not need it than the reverse, but room size and intended purpose(s) should dictate audio requirements.
For example, a huddle room or boardroom doesn’t require a huge display screen or multi-speaker sound system, whereas a larger conference room designed for flexibility should have multiple screens as well as microphones and speakers. Figuring this out can get complicated, but no worries -- Robin’s office space calculator can help you determine a good conference room setup.
How to choose a conference room setup
How do you know what kind of meeting room to book.
All too often this decision is based on whatever you can get, as long as you can squeeze everyone in. But you’re making do rather than setting the stage for a really great, productive and energizing meeting. Whether you’re looking to have a small group discussion or planning to host hundreds, you need a space that fits.
- How many people will there be?
- What is the purpose of the meeting? It might be a presentation, a collaborative work session, a networking event or reception, or a working luncheon or dinner. Or a combination of these activities.
- What tools will attendees or facilitators need? Think about an interactive whiteboard, video conferencing, projected visuals, etc.
The dimensions of the room will determine what seating arrangement(s) you can use. Larger, flexible conference rooms can accommodate a variety of options and, often, multiple configurations within the same space. So you might have auditorium or theatre style seating for a full group, then smaller setups to serve other purposes.
How to properly implement your room design
We’ve assembled a guide filled with definitions and tips to help you design and implement the best meeting spaces for your organization.
For example, seating capacity takes on a whole new meaning now. Not how many bodies will the fire marshal allow you to fit into the room, but how can you create a seating arrangement that encourages interaction and productivity while also ensuring safe distancing. In fact, there is a whole new list of pandemic-related policies and protocols that come into play for safe return to work.
Planning the ideal conference room setup is not a one-and-done. These spaces will always be a work in progress because your business is growing and changing and working spaces have to reflect that to stay relevant and useful. The right meeting room scheduling software will capture room usage data you can analyze to continuously improve conference room design and implementation.
How can online conferencing benefit your organization?
- Immediacy and agility. Teams can convene right now or very soon, if needed, so you can maintain valuable momentum rather than waiting around for folks to travel across town or across the country/globe. Eliminating the need to travel can also increase meeting attendance if time or finances are limited.
- Monetary savings. Bringing employees and guests into town for meetings is expensive. Digital meetings also save on unnecessary paper and printing, etc.
- Inclusivity. Video conferencing serves all the people, all the time. This is exceptionally important now that remote work and hybrid working arrangements are the norm. Employees can collaborate easily and well. Your company can interview and hire globally, if you want, and meet with investors, vendors and others easily and efficiently.
- Better experience for employees, visitors and other stakeholders.
Every one of these benefits can boost morale as well as your bottom line. But they won’t do that unless your organization invests in flexible, well-equipped conference room setup options.
Looking to get the most out of your meeting spaces? Robin can help. See how today.

featured report
Return to Office Report 2024
Related articles.

4 Strategies for Managing Meeting Room Disruptions

Top 5 Tablets for a Conference Room Schedule Display

6 Advantages of Conference Room Schedule Displays
Book desks with your team, find rooms for brainstorming, automate workplace processes, and better understand office utilization.

Meeting room design: Tips and best practices
Meeting room design is a critical consideration for the modern office. Every organization, no matter the size, requires well planned space designed specifically for collaboration.
In this article, we explore modern meeting room design, including critical considerations for any collaborative space.
Client Panel Discussion
Lessons learned from office reopenings
What are the benefits of good meeting room design?
Meeting room design has always been important, because meetings have always been important. Productivity and innovation in the workplace requires good collaboration. The more a company can provide spaces that foster collaboration, the better.
Now that we’re moving into a new era of increased hybrid work , good meeting room design will be even more critical.
Hybrid workspaces are ones where employees may be interacting less—if at all. Meetings and conferences might therefore be the only time some employees get out of their home office and into a space where they can interact with their co-workers in person.
The right meeting room design can enhance these less frequent interactions, hopefully increasing both productivity and collaboration.
Ultimately, the office is no longer the default location where people work, nor is it the only location. According to OfficeSpace CEO David Cocchiara , “for industries that are able to embrace flexible working , the office is becoming more of a destination. Employees don’t go there just because they have to be there. They go because there’s something they’re trying to accomplish.”
A good conference room is therefore one that maximizes how all workers, including remote and hybrid workers, are able to use the office. Whether that’s for collaboration, planning, or brainstorming.

Modern meeting room design: 4 best practices
Gone are the days of white walls and uncomfortable office furniture. Today’s offices are embracing a wide range of meeting room design options, bringing modern interior design ideas into collaborative workspaces. This can include ergonomic furniture, embracing natural light and cutting-edge technology, and using well planned and branded meeting room names .
Specifically, offices may want to consider the following four elements of a good office meeting room design.
1. Choose an appropriate layout
Meeting rooms are not all equal. Some are for board meetings, others for presentations or meetings with clients, and others still for casual brainstorming sessions.
That’s why there is no one best meeting room layout that works for every office.
Companies with a more hierarchical structure may want to stick with the classic boardroom layout. This is typically one large conference table and a leader at the helm.
Meeting spaces typically used for presentations may be better suited with a horseshoe table or a classroom setup—think the conference room in The Office , where the chairs all face the front of the room.
Smaller tables that can move around as necessary can help stimulate participant engagement and foster creativity.
Finally, offices looking to create more synergistic spaces may want to consider round tables. Alternately, they may want to create a more casual space with coffee tables and comfy chairs.
In either scenario, the goals of the office for a meeting space should help shape its layout.
2. Prioritize comfort
No one works well when they’re uncomfortable, and no one enjoys squirming through meetings. No matter what type of layout is being used, meeting and conference rooms should therefore follow best practices for office design.
Namely, shareable spaces should be comfortable both visually and physically. Yes, those ‘living room inspired’ casual spaces with comfy chairs might be easier to design in this way. But even more rigid conference tables can bring in comfortable swiveling chairs and other elements to create a more inviting space.
3. Invest in a good table
The table is ultimately where the magic happens, so it’s worthy of more consideration than other furniture in the room.
Of course, the type of table used in a conference room will depend on the layout. The height and size will vary by meeting room design. Some spaces may want a standing table, others smaller and lighter ones that can move easily.
In either case, the company should choose a sturdy table with built-in tech hookups as appropriate.
4. Follow occupancy guidelines
Even before the pandemic, limiting occupancy meant maximizing comfort and effectiveness of a meeting room space.
Many meetings are now hybrid, so that not everyone will be physically present. This can help with social distancing, but it’s just a start. Offices can also take advantage of new software for social distancing , so it’s possible to track occupancy in shareable spaces in real time and adjust as necessary.

The most important meeting room design considerations
The most important meeting room design considerations are comfort, safety, and ease of use. Ensuring that all attendees feel relaxed and at ease, and that they can book rooms easily, is the surefire way to improve collaboration and employee experience .
This means thinking carefully about your setup. How will this meeting space be used? What kind of work will be performed here?
For example, in open offices, it’s common to provide private spaces for phone calls.
These private ‘phone booths’ and other small meeting rooms will have very different considerations than a large conference room that needs to accommodate the entire office.
Hybrid offices will also want to pay particular attention to flexible meeting room design.
Specifically, they will want to ensure they are using the necessary design and technology to make it easy to run effective hybrid meetings . We’ll cover technology in greater detail below, but this basically means making video conferencing easy.
How can I make my meeting room more comfortable?
To make a meeting room more comfortable, be strict in following occupancy guidelines for both safety and comfort. It’s also essential to use proper technology.
The office interior matters, but even the best designed space can’t overcome overcrowding. Meeting room attendees will feel the most comfortable when their needs are met from a health and safety perspective, and when they have easy access to the tools they need to be productive.
What is the difference between a meeting room and a conference room?
The terms ‘meeting room’ and ‘conference room’ are usually interchangeable.
Some organizations may choose to differentiate between the two. This can be done using ‘conference room’ to denote the more formal spaces reserved for official occasions like board meetings, while ‘meeting rooms’ are for more informal collaboration.
Ultimately, the specific terms matter less than being consistent in room naming choices.

How to improve your meeting room
The best way to improve meeting rooms in the modern office is to use modern meeting room booking software , along with a suite of other tools to make it easier to use these spaces. Cool meeting room design only goes so far; an office space needs to incorporate modern technology to make their meeting rooms most effective.
Specifically, room booking has to be incredibly easy. Works must be able to instantaneously find the space they need, when they need it.
This typically means being able to both book spaces instantaneously for impromptu sessions, as well as book and reserve spaces well in advance.
Ideally, this software will also include integrations that lets participants access meetings through tools like Microsoft Team or Slack, as well as through a mobile app .
Meeting room digital signage can help give an immediate cue as to what spaces are currently in use. Also, integrating with Zoom meeting calendars can help everyone see how people will be using rooms well into the future.
Of course, modern conference room design should also include a fast and reliable internet connection, as well as lighting and temperature controls. If the space will be used for videos and presentations, offices should include an appropriate sound system. The company may also want to consider using acoustic panels to avoid distracting people outside the meeting.
Finally, don’t forget further collaboration tools like a projector, laptop hook-ups, and video conference capabilities.
And never underestimate the importance of a good, old-fashioned white board.
What is a smart meeting room?
A smart meeting room is one that uses both modern software and hardware to improve collaboration and efficacy. They are typically designed for easy video conferencing and virtual collaboration.
Smart meeting rooms can also use technology to integrate with other smart elements of the office.
For example, IoT sensors can be used to automatically update the occupied status of a room, further streamlining the room booking process.

What is the purpose of a meeting room?
A meeting room is meant to foster communication and enhance collaboration. In other words, the purpose of a meeting room is to provide a space for employees to do the important, shared work of moving a company forward.
A modern conference room can also help keep a hybrid workforce more connected to each other and to the office.
See OfficeSpace in Action
Get a personalized demo and create a hybrid workplace that works for everyone
OfficeSpace offers the right software and booking tools to enhance any meeting room design. Reach out for a free demo.
Photos: FURKAN TELLIOGLU , yann maignan , Tatiana Balletti , Matheus Natan , Carrie Hays
Office Size
Completion date.
- Architecture & Design Firms
- Financial & Investments
- Food & Beverage
- Consulting & Business Svcs
- Law & Legal Services
- Advertising & Marketing
- Film, Media & Publishing
- Non-Profit & Government
- Coworking Offices
- United States
- Netherlands
- San Francisco
- New York City
Offices Featuring
- Davis Furniture
- Herman Miller
Work Spaces
- Open Offices
- Private Offices
- Work Lounges
Support Spaces
- Receptions Areas
- Elevator Lobbies
- Phone Booths
- Bike Storage
- Locker Area
- Acoustic Ceiling Baffle
- Acoustic Ceiling Panel
- Acoustic Wall Panel
Meeting Spaces
- Breakout Spaces
- Large Meeting Rooms
- Small Meeting Rooms
- Brainstorm Rooms
- Standing Meeting Points
- Small Open Spaces
- Large Open Spaces
- Assembly Rooms
- Green Walls
- Glass Walls
- Exposed Duct
- Chalkboards
- Whiteboards
Displays & Technology
- Wall-Mounted Displays
- Ceiling-Mounted Displays
- Video Walls
- Video Conferencing
- Projection Screens
- Cement Floors
- Wood Floors
- Parquet Floors
Environmental
- Glass Graphics
- Wall Graphics
- Signs / Wayfinding
Miscellaneous
- Photos with People
- Plans & Drawings
- Outdoor Terraces
- Office Exteriors
- Tiered/Stadium Seating
- Coffee Tables
- Occasional Tables
- Personal/Laptop Tables
- Picnic Tables
- Bench Seating
- Executive & Task Seating
- Guest & Side Seating
- Lounge Chairs
- Modular Lounge Seating
- Stackable Seating
- Outdoor Seating
- Outdoor Tables
- General Storage
- Desk Organizers
- Desks & Workstations
- Desk Systems
- Furniture Systems
- Cafe Tables
- Conference Tables
- Height-Adjustable Tables
- Training / Multi-purpose Tables
- Reception Desks
Acoustics & Environment
- Accessories
- Acoustic Lighting
- Acoustic Ceiling Baffles
- Acoustic Ceiling Panels
- Hanging Acoustic Panels / Screens
- Acoustic Wall Panels
- Signs & Wayfindings
- Planters & Planter Boxes
Phone Booths & Meetings Pods
- Meeting Pods
- Task & Table
- Floor Lamps
- Backlight / Panel
- Lay-in / Troffer
- Suspended Circular / Round
- Mounted Circular / Round
- Track / Directional
- Wall / Sconce
- Stair and Handrail
- Biophilic Lighting
Walls, Doors, Ceilings, Tech
- Wall Systems
- Door Systems
- Ceiling Elements
- Collaboration
- Digital Displays
- Smart Window Film / Privacy Glass
Railing Systems
- Rails / Rail Systems
Beverage Systems
- Hydration and Tea Points
Fabric & Textiles
- Wall Finishes
- Andreu World
- Anthom Design House
- Bernhardt Design
- Boss Design
- Carl Hansen & Søn
- Clear Design
- ERG International
- Global Furniture Group
- Grand Rapids Chair
- Haworth Ancillary
- Icon Modern
- KFI Studios
- Leland Furniture
- Martin Brattrud
- Phase Design
- SitOnIt Seating
- Source International
- Venue Industries
- Willow Park
- Focal Point
- Pablo Designs
- Pinnacle Architectural Lighting
- Prudential Lighting
- Visual Comfort
Acoustics & Materials
- 3form Elements
- Corona Group
- Impact Acoustic
- Senses Akustik
- Spinneybeck
Walls & Doors
- Skyfold Inc.
- Tour Offices
- Browse Photos
- Explore Products
- Explore Brands
- Read Articles
- Material Bank Collections
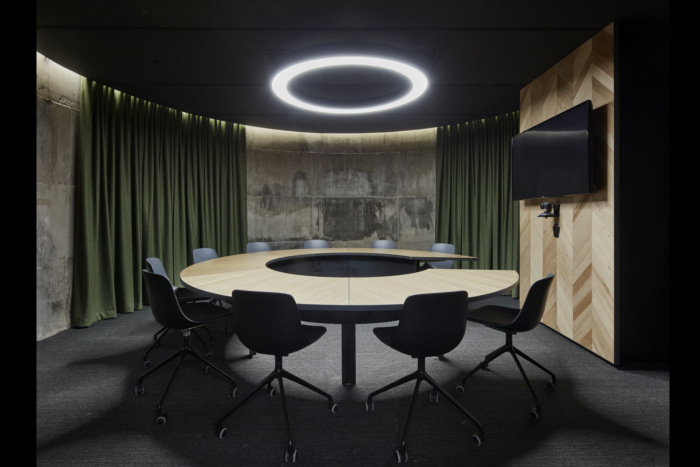
Conference Room Design
Everyone knows that unnecessary meetings are the worst part of any work day. But for the meetings that do need to happen, having them in conference room that is well-designed and outfitted with the correct tools can make a big difference when trying to get things accomplished.
Conference Rooms, Meeting Rooms, Boardrooms?
At Office Snapshots we use the term Meeting Room to designate rooms where meetings happen, though globally conference room and meeting room are used interchangeably.
When categorizing project photos we differentiate these spaces by their size and formality even though the function of being a room where people meet is essentially the same:
Small Meeting Room : Meeting rooms which seat 6 or less people Large Meeting Room : Meeting rooms which seat 7 or more people Boardroom : Meeting rooms which are more formal and are reserved for executives
Meeting Room Equipment
Naming conventions aside, the provided tools and equipment can either make a meeting room a joy to use or an absolute disaster waiting to happen.
The basic categories are seating, work surfaces, collaborative equipment, acoustics and privacy, though exact specifications are highly subjective and dependent on what an organization needs.
Here are a few thoughts and ideas:
Seating : Longer meetings might require more comfortable and ergonomic seating. Shorter meeting might not even need seating as some companies choose to have stand-up meetings to help ensure brevity.
You can also add bench seating around the conference room perimeter to help expand the maximum number of people when necessary.
Work Surfaces : Most work requires a table of course, though some alternatives might include smaller laptop tables or a lectern for presentation-heavy meeting rooms.
Collaborative Equipment : Videoconferencing, room displays, and writing surfaces such as whiteboard or chalkboards. Meeting rooms scheduling systems can also be important depending on the size of your organization.
Privacy & Acoustics : Some conference rooms require improved privacy and might utilize translucent window film or window curtains to improve the rooms isolation. Quality acoustics also play an important role by keeping sound either in or out to improve focus as well as the quality of video conferencing.
Conference Room Example Projects
Conference rooms and meeting spaces are an important part of just about every office design project. Some of our favorites have been selected and highlighted below.

Conference Room Photo Inspiration
We've reviewed thousands of conference room photos and categorized them according to size and the level of formality. From casual breakout spaces and stand-up meeting points to all-hands assemblies and formal boardrooms, start your search using the links below.

The Office Snapshots Weekly Newsletter
A weekly digest of the latest office designs delivered every Monday ( view sample )
- Email Address *
- Email This field is for validation purposes and should be left unchanged.
Part magazine, part platform, part database. Office Snapshots is the world's largest and most popular office design destination.
- Media/Press
- Hospitality Snapshots
- Home Snapshots
- Education Snapshots
- Healthcare Snapshots
Presentation Room Design
Rooms include audio, presentation cabling, and display.
Three options to meet your needs
University IT offers three standard presentation room solutions based on room capacity.
Medium Room
Need more choices.
If your room is an unusual size or has unique needs, contact us to discuss building a custom conference room .
- Explore all services
- Cloud Solutions Q&As
- Get started with IT
- Practice secure computing
- Work Anywhere Guide
- Find answers
- Request something
- View system and project status
- Browser recommendations
- Tech Resources & Support (for students)
University IT
- Organization chart
- Current job openings
- Communities of Practice
- UIT Community (UIT staff only)
UIT Web Editors
- Stanford Home
- Maps & Directions
- Search Stanford
- Emergency Info
- Terms of Use
- Non-Discrimination
- Accessibility
© Copyright Stanford University . Stanford , California 94305 .
- link for presentation enquiry emails
- link to presentations on twitter
- buy Presentation Genius on Amazon
- Presentation Genius YouTube channel
- Presentation Genius on Facebook
- simon on Linked In
- mobile phone

Three room layouts for presentations
I’ve been working in more cities than there are days in the week recently. I’ve seen more training rooms than friends 🙂 (Fortunately that’s changed this week in case you cared! 🙂 ). That got me thinking however, about how the different rooms affect presentations.
Room layout: Example 1

Let’s start north of the border with this bunker-like monstrosity! 😉 The caption kind of gives it away, to be honest. The expectation was that I’d sit at the table with my slides appearing on the wall behind me. My concerns were that this created a very clear barrier between me and the audience and (because I was sitting down) it sucked the energy out of what was going to happen. Fortunately it’s not hard to shuffle things like that around, and ten minutes later it looked a bit different.
I moved the table out of the way, turning it 90 degrees as I pushed it to the wall. That way I not only got it out of the way, I had:
- got somewhere to put my laptop so that I can see my slides as I present, without looking over my shoulder at the big display;
- create a big space for me to stand/perform in; and
- removed the psychological barrier between me and the audience.

All I had to do at this point was move the flip chart to the side of the screen and sort out the last two random chairs at the front.
Note the picture on the screen. I always use that one. I know exactly what it should look like, so it’s a great tester for the set up. As you can see, it didn’t quite fill the screen, so I needed to spend a few minutes looking at the zoom (and then the focus) of the projector to have things as big as they could be.
After that, job done and I was ready. It took about 15 minutes in all, but was very much worthwhile from the audience’s perspective.
(By the way, the pic is of my daughters. I don’t just use it as a set-up image, it’s a great way to stay rooted when I’m not able to get home, but that’s just a personal thing… 😉 )
The way the audience’s chairs were laid out gave a very specific feel to the room and the audience’s expectations, too. By putting them in ‘theatre’ layout it gave the immediate impression (as you entered at the back of a long, thin room) of row after row of the backs of seats. Not only is that an uninviting first impression, visually, it also sets up in people’s heads the idea that they’re there to be (passive) receivers of stuff from the front.
Different layouts such as a horseshoe have a more ‘interactive’ feel.
Room layout: Example 2

Firstly that starts to feel to people that they’re in some kind of competition, staring down the opposition team on the other side of the room… but just as importantly, it left no room for me to get in and mix in with the participants. I had no choice but to deliver from the front. At least this room had space for me to do that (and natural daylight, thank heavens!) but as people weren’t facing me, twisted necks were bit of a problem!
Ten minutes of sweating later and things are a lot better as I’d moved things about six feet apart by putting a table’s depth between them. I’m not claiming this is rocket science, just that it’s not something that unconfident presenters often think of, as all too often nerves get the better of them and they take what they’re given.
Your room layout might not be as fixed as you think! If there’s a better way to do what your presentation is supposed to do, don’t be afraid to get sweaty!
Room layout: Example 3

Some venues are just an absolute joy!
Leave a Comment Cancel
Your email address will not be published. Required fields are marked *
Email Address:
Save my name, email, and website in this browser for the next time I comment.
Currently you have JavaScript disabled. In order to post comments, please make sure JavaScript and Cookies are enabled, and reload the page. Click here for instructions on how to enable JavaScript in your browser.
ReleuctantStoryTeller
Are your presentations "okay on the day" but don't have an impact ? Adding stories to your presentations will make the biggest difference, helping you really engage with your audience. But not sure how to get started?

This will close in 23 seconds
Got any suggestions?
We want to hear from you! Send us a message and help improve Slidesgo
Top searches
Trending searches

teacher appreciation
11 templates

tropical rainforest
29 templates

46 templates

pediatrician
27 templates

spring season
34 templates

23 templates
Interior Design Presentation templates
If you have a passion for tidiness, are attentive to the "visual noise" that furniture can convey, or play home decorating games in your free time, interior design might interest you. whether you're a professional designer or an amateur decorator, you'll love these creative templates about interior design and decorating..

Interior Design Catalog
How much peace these images transmit! A home decorated perfectly and following design trends is a delight... This template has a catalog structure in which interior design is the protagonist. There are a variety of photos and sections to include your products with all their features. Anyway, all the structures...

Industrial Design College Major
Is your creative mind capable of designing objects that are going to be used by lots and lots of people? Perhaps industrial design should be your major! If you work in a college, you might want to take a look at this template to talk about this awesome degree. Most...

Interior Design Portfolio
Inspire your prospects or employers with our latest work portfolio template created exclusively for interior designers. Show off your expertise and wow them with what you’re capable of by adding your own photos and even design touch to this fully editable template.

Design Inspiration Business Plan
Download the "Design Inspiration Business Plan" presentation for PowerPoint or Google Slides. Conveying your business plan accurately and effectively is the cornerstone of any successful venture. This template allows you to pinpoint essential elements of your operation while your audience will appreciate the clear and concise presentation, eliminating any potential...

Premium template
Unlock this template and gain unlimited access
Interior Architecture Renovation Project Proposal
Bring life to any interior architecture project with this elegant and deluxe template! It contains a simple design but with a creative tone that will help you make an impact on your audience. Perfect for any interior renovation project proposal, this template will give you all the resources you need...

Interior Design Company Profile
When thinking about the design of this template to present the profile of an interior design company, we were inspired by elegance, sophistication and good taste. The result: a beautiful minimalist black and white template with a highly stylized sans-serif typeface. Download it now and discover the structure you were...

Bath Interior Design Brochure
We may live in a digital world these days.. but still, there’s nothing like pressing a piece of paper in someone’s hand to give them information and make sure they retain it! That’s why we have created this printable brochure template to help your bathroom interior design business along. Short...

Interior Design Project Proposal
Interior design is in fashion! These decoration professionals help us to create the perfect environment depending on the needs of our home. It's a bit like what we do at Slidesgo, offering you amazing designs according to your needs to decorate and present your information in a wonderful way. Let's...

Home Decor & Furniture Catalog
If the Sims and Animal Crossing were among your favourite games growing up, you will love this catalog full of furniture to decorate your home. These modern slides have lots of resources so that you can sell your furniture in a way that your clients will love. Picture the perfect...

Living Wall Decoration Project Proposal
Download the "Living Wall Decoration Project Proposal" presentation for PowerPoint or Google Slides. A well-crafted proposal can be the key factor in determining the success of your project. It's an opportunity to showcase your ideas, objectives, and plans in a clear and concise manner, and to convince others to invest...

IDEA Furniture Factory Company Profile
We've just unpacked some slides, assembled them together following the instructions and, finally, created this template! Help the public have a better idea of your company profile by showing a slideshow like this one. Is your business related to furniture? Then get some inspiration from our layouts. Talk about your...

Interior Design
Create a new presentation using this template and find out how design affects the way your audience perceives your message. Square lines and shapes will give balance to your work. Add some pictures to the mix and you’ll get a dynamic and attractive message.

Rustic Interior Designer Portfolio
Interior designers listen up! We have a special portfolio here for you: This Google Slides and PowerPoint template exudes a rustic charm with its light brown background and thoughtfully crafted elements. Showcase your creativity and expertise with help from the AI-generated placeholders, customizing each slide to reflect your unique style....

Minimal Interior Design Guide
If you really want to feel comfortable at home, maybe you should seek some professional help. Interior designers can help you with that, and Slidesgo can help them get a great guide in the form of a slideshow. Build trust with your potential customers by editing these minimalist slides, containing...

Furniture Delivery and Assembly Business Plan
If the Swedish can do it, why can't you? There are businesses whose main product is furniture. More precisely, furniture that you assemble yourself. It's double satisfaction: you decorate your home and build something with your own hands. If you work for such a company, then you just have to...

Visual Arts Major for College: Interior Design
Interior design is the art and science of enhancing the interior of a building to achieve a healthier and more aesthetically pleasing environment. If you have studied this degree, it’s your turn to talk about it with this helpful template and encourage future students to take this major. The slides...

Office Interior Design Portfolio
As the saying goes, you never get a second chance to make a first impression. Whether you're looking to impress a potential client, or foster a sense of creativity and innovation, a portfolio is the way to showcase your personality and style. Since a lot of people work in offices,...

Cottagecore Interior Design Guide
With its bright, cozy aesthetic and charming farmhouse style, cottagecore is one of the most popular interior design styles today, and that’s why we have a template for you here to create your very own Cottagecore Interior Design Guide! Whether your clients are interested in bright, airy rooms or cozy,...
- Page 1 of 3
New! Make quick presentations with AI
Slidesgo AI presentation maker puts the power of design and creativity in your hands, so you can effortlessly craft stunning slideshows in minutes.

Register for free and start editing online
- Home In Bloom Sale | Save Up To 20%
- Offers & Coupons
- Friends of the Kuotes
- Design Projects
- Living Room
- Kitchen & Bath
- Dining Room
- Trade Exclusive
- Email Sign-Up | Save 15%

How to Present A Client’s Interior Design Mood Board

Let’s cut to the chase: No one hires a designer who can’t present his or her ideas. It’d be like hiring a chef who can’t cook or a singer who can’t sing. Luckily, we happen to be experts in visually presenting ideas to clients, so today’s article will focus on just that.
We’ll preface by saying that every interior designer is different. Not every interior designer approaches the design process the same way when it comes time to create a design board or a mood board. Below, we’ve outlined some of the strategies we’ve found useful while constructing design schematics for our design projects , but make sure to let us know your own thoughts and strategies in the comment section below!
What is a Design Schematic?

A design schematic is not the same thing as a mood board. Let’s start there. A mood board is an arrangement of images, materials, textures, fonts, and colors that evokes the style of a project or concept. For many, a mood board is the springboard for design creativity. The mood board you create should be an organized display of your thoughts and ideas, and as an end result, a board should then be a useful tool you can use to effectively communicate your design ideas to your client. A mood board is what you’ll typically receive from a decorator, stylist, or e-design website (Except for our Design Team . We provide design schematics , which we’ll explain in detail next).
A design schematic is a complete room design similar to a mood board, but it includes a floor plan with furniture and decor laid out to scale. This is important to have for clients who aren’t just looking to update their home with some new wallpaper. With a design schematic, you can show your clients the exact location and dimensions of every piece in their home in addition to architectural details and appliances. A design schematic provides clients with trust, and it’s what you’ll receive from us here at the KKH’s Design Services or at another professional interior design firm.
Why a Design Schematic?

Mood boards are an ideal tool for editing down your design. You are able to mix and match design elements and remove and add ideas with ease. The design schematic is then the next step in which you can lay out your design in a comprehensible way. It also serves as a method for brainstorming or collaborating with clients and other architects and designers if need be. One of the most difficult parts of interior design, especially for your client, is envisioning what a space is going to look like at the end. The design schematic is a great solution for this problem.
How to Present a Board to Your Client

Image via destinationliving.com.au
Step #1 Getting Started
At the Kuotes , we like to start with a color that inspires us, a piece of fabric we’re fawning over, or even a photograph of our travels. But really, the opportunities are endless. Start with whatever it is that inspires you, be it a work of art or an outfit you find on a fashion blog. Where does our inspiration come from? Everywhere! But we curate all of our favorite pieces all on our site in seven unique collections: French Country , Industrial Loft , Modern Classic, Coastal Beach , Hollywood Regency , Rustic Lodge, and Global Bazaar. Another strategy is to use Pinterest to gather ideas for inspiration. Head over to our Pinterest page for plenty of design inspiration!

Step #2 Lay Out Your Room
In our opinion, it is important for a board to include the layout of the room. A layout provides the container for your creativity and allows for accurate furniture placement and scaling. Creating your room layout can be completed in several ways, and your method should be dictated by your own preferences and skills. Our friend Philip Mitchell does FREAKING AMAZING hand sketches of his spaces. However, if sketching isn’t your forte and you want everything to scale, many designers put together a comp in AutoCAD or Rhinoceros 3D.
These are computer programs used by many designers to map out rooms and accurately place furniture. We always encourage our readers to learn more and take classes in programs like AutoCAD; however AutoCAD is very technical and difficult to use without some proper training. If interior design school isn’t for you, we highly recommend the tutorials and lessons on Lynda.com . Or, just reach out to us at the Design Bar at [email protected], and we can create a to-scale design schematic for you!

Step #3 Highlight Fabrics, Colors, and Materials
Go through fabric and color swatches and pin them to your board. Form an idea of which fabrics and materials are going to go with which piece. As designers, we frequently get questions like: What color should I use? What will this color look like in the room? Boards are the perfect solution for showing your client color in relation with other items they like.
You should also include any floor tile, rug or upholstery material, or pattern that you want to highlight. Just call our office , and you can request fabric swatches and wood and upholstery samples from Kathy Kuo Home to help you decide on what’s best for your design.
Pro Tip: Some designers like to build a hierarchy into their boards. For instance, if you really want a piece of tile you adore to be the standout aspect of the room, attach it to a piece of foam board and place it on the board so that it stands in the forefront and more prominently than your other design elements.
Other designers, such as our own Kathy Kuo, like to actually create separate boards for plans, fabrics, products, etc. It really all depends on your design process and whether your client wants a full room makeover.
Step #4 Add Product!
The last step is to add personality to your board with standout furniture pieces or accessory items. Our advice? Don’t feel the need to put every last piece of product on the board. Just place the furniture and accessories that define the design aesthetic (unless you’re doing a full mockup). Oh, and of course… shop Kathy Kuo Home !

Digital Board vs. Hard Board
When you create a design board, make sure you know how your board is going to be presented. Will you be meeting your client in person, or do they want the board to be emailed and sent to a team of people? The answer will decide whether you produce an offline or online board.
The distinction is not trivial. A physical handmade board will generally be more freestyle and require the extra visual bells and whistles to make it interesting to a client. An online design board should be tight and very easy to process, using clean lines and exact dimensions and scale (basically, a design schematic).
Pro Tip: When making a physical design board, don’t be afraid to get…physical with it. Cutting up foam board and spray mounting cut-out images and swatches can be a bit of a chore, but it can be a powerful presentation tool (especially for older, more traditional clients).
The tactile nature of collage-style design boards also enhance the tactile and emotive experience for your client. Use smaller foam board for larger corporate clients because your board will likely need to be left behind and passed through multiple hands and departments.
Want to Use Kathy Kuo Home’s Method?

Kathy Kuo Home To The Trade
Are you an interior designer or architect? We want to work with you through our Trade program ! From custom solutions to swatch sampling and volume requests, our trade specialists are here to help you with all of your design needs–from helping you order from the best brands in the industry, to assisting with 3D visualization. Receive a competitive no-minimum trade discount on all orders. Plus, unlock deeper savings as you spend with our tiered pricing program. Plus, you become eligible to have your work featured on our blog!

Kathy Kuo Home
Related posts, #friendsofthekuotes: april 2024.
- Pro Tips from Kathy
Favorites From Kathy Kuo: April 2024
The kkh guide to the best benches for every room.
- The Trade Exclusive
Kathy Kuo Home Trade Member Spotlight: Lindsey Gilley Interiors
#friendsofthekuotes: march 2024, 3 summer design motifs to embrace now, 63 thoughts on “ how to present a client’s interior design mood board ”.
Our homes are not just physical structures; they are an extension of our personality and a reflection of our style. That’s why I believe that home design is an art form that allows us to express ourselves and create a space that truly feels like home.
This is tremendous, i got all information about harmonize the furniture and accessories to be aesthetically pleasant for client to approve interior design proposers.Thank you
I guess we need a guide to make a perfect hardboard for the client as a presentation. I’m glad to have read this post.
When I made a physical design board, it was so horrible. After reading your opinion now I am able to make it wisely.
Haha! I’m so happy you deemed this helpful!
I loved reading this blog. So informative and helpful. Very relevant in this age. Thanks so much for sharing these amazing tips.
I liked that you said that one tool to use when having an interior design done in your home is the use of swatches to choose colors and materials. I would imagine ht a professional would have good access to swatches and samples that would help you to make your choices. I would be suer to consider hiring a professional to help design the interior of my home so I can ensure a beautiful result.
Nice Blog! I really appreciate the efforts you have put in compiling this blog. Will read few of them. Keep sharing the good stuff.
Thanks so much for your kind words! So happy to hear you enjoyed reading this post!
Thanks for explaining that a design schematic is different from a mood board because it includes a floor plan laid out to scale. My husband and I will be moving into a pretty nice new home soon, and we think hiring an interior designer would really help us optimize the space. I’m glad I read your article because you gave me a much better idea of what to expect from the process of working with an interior designer.
Hi Kathy, great post!! Do you use any 3D Rendering Programs to aid with the design presentation? I’m currently using VRay for Sketchup, but I find it’s taking hours and sometimes days for a clear render.
The mood boards you show here – did you use Photoshop, ir InDesign? I always get caught up, as it takes a while for me to remove backgrounds in Photoshop, haha. Any info/tips are helpful! Thank you!
Hi, could you point me to any article that shows importance of showing stuff like posters, pictures, plants in selling the room? I’m having a debate with a colleague.
Nice article! This is the method we use as well. Thank you
Our pleasure. Glad you enjoyed it!
Pingback: Interior Design Board | Hospital and Medical Centre
thanks for this post it is very valuable to me.
I have been thinking about getting an interior designer to help layout our home. I really appreciated how this talked about starting with a color that inspires. I will have to keep this in mind.
Hi Max! Glad you found the article helpful! All the best!
The best article. Thanks for sharing your wonderful site.
Your blog was sooo helpful… thank you for sharing. Great advise
Thank you so much for sharing this post with us, It’s great 🙂
Thanks for sharing nice blog post and amazing interior design ideas! article is very good regarding tips interior design.
Highlighting fabrics, colors & materials seems to be a perfect example. Very helpful!
Thank you for the article! I was very much at a dead end upon starting a presentation for a client; but luckily, I found this right in time 😀
I’m happy it helped 🙂
I really wanna say thanks to you for such an amazing blog which i have never had seen earlier .. And i am feeling pleasurable to left comment on this …
Good Post.!
I am random user to this blog.! But after reading this excellent article.! tips.. i will reach regular to this blog.
It was so useful info shared.!
Thanks for sharing.
Excellent post. I was checking constantly this blog and I’m impressed! Extremely helpful info particularly the last part ?? I care for such information a lot. I was looking for this particular info for a very long time. Thank you and best of luck.| Thank you
Hi Bhanwarlaji, thanks for the kind words! We’re so happy you like the blog 🙂
Kathy, Great work, I love making mood boards for clients as well. Question- Do you always ask permission to use the images that are on your board? I have started doing this a lot more and I often share my work online, but I am worried about copyright/image right laws. In the past I did not ask permission and used photos from google, but now that business is growing I have been more careful. Any experience with this?
Hi Staci, thanks for reaching out.
This is definitely a sensitive issue and something we’re learning more and more about as we also continue to grow. I’d say it mostly depends on how the image is used and who the image is shared with. If you’re just sharing inspiration on Pinterest or emailing directly with a client, it’s okay to do so. Designers and artists always get ideas and inspiration from other designers and artists, and you’re allowed to share photos already on the internet. If the photo is collaged on a mood board, the key is to make sure you’re not presenting the photos/ideas/designs as your own (always make sure to give credit to the photographer). However, if you’re using images on mood boards as part of a pitch to a large client, commercial client, or anyone else who will distribute the image publicly, I would ask permission for the photo. Additionally, if you are using the photos in any way to promote or market your business (on your website, social media, ads, etc.), you DEFINITELY need to request permission and likely purchase rights to the image. In most cases, the rights to a photo is owned by the photographer or a licensing company.
This post was incredibly helpful. Thank you. I wonder, though… 1. When do you present the design to the client, exactly? After two or three rooms have been designed, etc? 2. Do you present an entire home design (finishes and furniture), say for a new build home all at once or do you schedule a few presentations throughout the duration of the process? 3. How soon after the client approves the designs in a written form do you begin ordering everything?
Hi Kevin, thanks for your questions! Here are my thoughts 🙂
1. When do you present the design to the client, exactly? After two or three rooms have been designed, etc.?
We always charge, design, and approve on a room-by-room basis. Starting with one room and getting it right makes it much easier to understand your client and develop a concept for other rooms belonging to the same project.
2. Do you present an entire home design (finishes and furniture), say for a new build home all at once or do you schedule a few presentations throughout the duration of the process?
As I mentioned for your first question, it’s very important to keep your client informed and up to date throughout the design process. “Surprise Reveals” are mostly only found on HGTV 🙂
3. How soon after the client approves the designs in a written form do you begin ordering everything?
The client should definitely sign off on the invoice/line item list of products before you begin ordering .
Your idea to use a physical design board with more traditional clients is smart. Personally, I like to see the texture of something up close. Plus, you never know exactly what color you are seeing when using a computer screen. The only way to see what a certain swatch of paint or fabric will look like in a given room is to physically bring it there.
Thank you so much, Melissa. These are really amazing Tips. such great design.
hi ms kathy kuo! i have encountered your brand name in the game ‘design home’ i thought it’s just a game, but all designers there are real 🙂 amazing 🙂 i’m an inspiring interior designer. Right now,i’m studying interior styling first, this blog is very helpful 🙂
Hi Rochelle,
I’m glad you’re finding our articles helpful! 🙂
Thank you for clearly defining the difference between the mood board and design schematic. One of the tips I learned in design school is to scale your materials to the amount used in your design. For example, the flooring sample will be larger than the sofa fabric sample, because you’ll have more flooring relative to your sofa. Also, layout your materials so those in close proximity show together (sofa fabric with your pillow fabrics).
Hi Melissa,
Thanks for reaching out. I definitely agree with your tips! Thanks so much for sharing 🙂
Hello, You have no idea that this post is a life saver for me. Thank you so much, for filling out each minor details off how to represent a design board.
After working in the Architecture field for 13 years, I got really tired of having to gather all the architectural materials from a search engine, and then compile a sample board on layout software. It takes a long time and is cumbersome. Now I compile our architectural sample boards through Spec Ninja software. I can select from thousands of materials, products and paint chips and add them to my own design boards, edit those boards and export them for the client or municipality.
Thanks for sharing the best posts they very help us. I g0t such a great information on this topic. You made a good site it’s very interesting one.
Hello I love this article; it was very informative.. However my question are 1. Do you charge the client more if you give them the inspiration board? Cuz I thought you show it to them not give it to them 2. What if I don’t have knowledge of photoshop ( is there an easier way to create schematic digital board; like the (autocad) is there a app or something I don’t need all that technical stuff just something basic for now
Thanks for reaching out! We typically provide all of our design services (design schematics, layouts, renderings, etc) after we’ve consulted with the client and agreed on payment. As for the technical aspects of interior design, in today’s design world learning and working with design programs is necessary and expected for pretty much everyone in the trade. If you’re new to the programs, there are several resources you can use to learn (I really like Lynda.com as an easy online resource, but many schools, libraries, community centers, etc. offer classes you can take as well).
Nice post. And I greatly enjoyed your thoughts.
Fantastic post. I am really enjoyed your post. Thanks for sharin it
Nice Blog and amazing interior design! Always full of useful and helpful information.article is very engaging and informative, and I really enjoyed reading it.
Fantastic post. I am enjoyed to read your article. Thanks for sharing a nice post with us
Thanks, admin share for your valuable knowledge with us. As a designer, we have to present our client like it. I agree with u.
Thanks, Sandra! We’re so happy we were able to help 🙂
Pingback: How To Increase Your Homes Value | Home
Pingback: Lesje moodboards maken. Zo doe je dat dus! - INTERIOR JUNKIE
Nice blog..very useful information is giving to us.
Pingback: In 3 stappen een kleurenmoodboard maken - Interior Tales
This was so helpful thank you!! I am always looking for ways to strengthen my presentations to clients 🙂
We’re so glad you found it helpful!
Hello Thank You for posting this on your blog! Very helpful! I always strive for a better presentation…. In the digital presentation what programs are used to clip and layer items on one page? Is this photoshop? If so is there an edition of photoshop that works best for interior designers? Is there an easy program to achieve the look you have provided on your mood boards? I am really very interested in learning the simplest way to create a digital board. Any advice is appreciated! Thank! Rose
We’re so glad you liked the article. For our blog posts/shopping boards/Pinterest graphics, we put those together on Photoshop, the current creative suite. When presenting boards to clients, we do all of our schematics on AutoCAD or on Illustrator with an AutoCAD plugin to ensure everything is to scale. Hope this helps!
As a designer of wedding/event spaces, this was very helpful! Loved the tip to always start with the overall floor-plan to show the scale and flow of the room, BEFORE getting into specifics about colors and textures. Super helpful. Thanks!
Fabulous. Thank you
Leave a Reply Cancel reply
Your email address will not be published. Required fields are marked *
Save my name, email, and website in this browser for the next time I comment.

How to Create a Professional Interior Design Presentation in 6 Steps – Cedreo
Interior designers love coming up with fun and interesting ideas for their clients’ homes. However, it’s important not just to have those ideas in mind, but to clearly communicate them to clients through an interior design presentation. When your clients see a detailed representation of the completed project, it’s easier for them to get excited about it and make better design decisions. Better interior design presentations reduce back-and-forth, streamline communication, and help you close more deals. Fortunately, with design software like Cedreo, it’s easier than ever to create professional interior design presentations that wow your clients. Ready to take your interior design projects to the next level and start landing more clients? Check out this 5-minute read with some pro tips for your next interior design presentation.
What’s Included in an Interior Design Presentation?
Depending on your client’s needs, an interior design presentation could include several different elements. Here are a few you should consider adding to your next presentation:
3D floor plan
While 2D floor plans are traditionally included in most interior design projects, they can be hard for a lot of clients to understand. 3D floor plans , on the other hand, remove the guesswork and help bring your ideas to life. With Cedreo home design software , you can draw in 2D while instantly seeing the 3D plan view.

Showing your clients 3D plans will help them understand the size, layout, and flow of the space. This is especially helpful once you add furnishings.
Furniture plan
A furniture plan includes furniture with accurate measurements that show the exact space around each piece. Adding furniture to your 3D plans helps clients visualize the actual shape, color, and texture of each piece in combination with the rest of the decor. With Cedreo design software, you can quickly switch out furniture pieces based on feedback from your clients.
Material samples
Samples are an important part of design presentations. Try adding them to a mood board so your clients can see, touch, and feel the different materials. Most clients appreciate seeing physical samples ofs tile, paint swatches, furniture fabric, and wood finishes.
Before even starting a project, you should have gotten a target budget from your clients. If it’s a large project, it’s best to break down the cost per room and/or each aspect of the design. You can also show the different costs based on what options they choose.
Realistic 3D renderings are becoming more and more important in modern interior design presentations. These show a 3D view of your project complete with details like interior lighting, sunlight, shadows, and textures.

Although they used to be expensive and complicated to create, with Cedreo, you can get photorealistic renderings of your design with just one click.
3 Types of Interior Design Presentations
Depending on what stage of the project you’re in, presentations can take on a variety of forms. Here are some of the most common types of project presentations:
Mood Boards
Mood boards are a collage of images, samples, and plans that show certain design ideas for your client’s project. They’re a great place to start, as they give you an easy way to present the style and “flow” of your ideas. You can create a physical mood board with a simple foam board and samples, clippings, or images of ideas you’d like to pursue. Alternatively, you can use basic graphic design software to make a digital mood board. Although you might be tempted to fill the mood board with every option available, it’s best to keep it simple and uncluttered. If needed, you can create several complete mood boards and let your clients choose which they like best. This type of presentation is an important step that helps you determine your client’s preferences before moving on to sketching the design in detail.
Hand-drawn sketches used to be the cornerstone of interior design presentations. However, they are quickly being replaced by more advanced 3D renderings (see the next section). If you’re able to create professional sketches to showcase specific details of the project, that can be a nice way to impress your clients with your skills and attention to detail. Just keep in mind that a poorly drawn sketch can actually lead to clients feeling more confused than enlightened. That’s why most modern designers use a digital tool like Cedreo to create realistic 3D renderings.
3D Renderings
Photorealistic 3D rendering presentations are how you really seal the deal. Presentations like these help you stand out as a design professional. They’re a big step towards making clients happy, because you can show them exactly what the finished project will look like. This gives your clients clear expectations and saves you both from unnecessary frustration. To create high quality renderings you need a program like Cedreo 3D design software . Fortunately, Cedreo is easy to use. That means even with no previous experience you can quickly create top-quality renderings.
Of all the types of interior design presentations, 3D renderings are the most powerful, because they:
- Show your client exactly how the end project will look
- Lead to faster design decisions
- Are easy to create and present thanks to Cedreo interior design software
Learn more about how to use Cedreo to create interior design renderings .
6 Steps to Create a Professional Interior Design Presentation
Whether you’re new to the design business or you’re a design pro looking to expand your portfolio, you can create a professional interior design presentation in just six steps. Pro Advice! These steps are easiest with an interior design tool like Cedreo.
1. Sketch your initial design concept
Start by putting some of your initial design concepts down on paper. Draw a basic layout of the space and make note of its dimensions (this will help you in step 2). Sketch out ideas you might have for each area. Then add any other comments that you should keep in mind while creating the rest of your presentation.
2. Draw a 3D floor plan
The next part of the design process is to create the floor plan. A floor plan is essentially the container for all your creative ideas, so this is an important step.

Most design programs make you follow extra steps in order to produce 3D home plans. But with Cedreo, as you draw your layout in 2D, you instantly see the 3D view of the plan. This gives you immediate design feedback that comes in handy as you start to decorate the space.
3. Choose a design atmosphere
At this point, you’ve already spoken with your client to determine their tastes and styles. Before you start furnishing a space, it’s important to have this clearly in mind. You can select a pre-made design atmosphere that lets you “set the mood” for a particular design. Choose from visual styles like contemporary, modern, or charming. Then, instead of having to sift through thousands of pieces of furniture, decor, and materials, you’ll only see the ones that fall under your selected style.
4. Furnish and decorate each room
Whether you’re going with a specific design atmosphere or want the flexibility to choose each piece yourself, Cedreo has what you need. Cedreo’s extensive design library gives you 7,000+ pieces of furniture and decorations to choose from. That means you have the flexibility to find the right combination of pieces to fit your client’s tastes. And if you’re running short on time, Cedreo also gives you pre-made product packs for different rooms types. Choose one of these and you can decorate a room with the click of a button.
5. Customize surfacing and materials
Now it’s time to fine-tune the details. If you already presented your clients with a mood board, you probably have an idea of what textures, colors, and materials they like. Customize your 3D plans with those materials. Use Cedreo, and you’ll be able to choose from thousands of different surface materials like fabrics, wood, tile, paint, and more. Then just drag-and-drop the materials to virtually any surface of the home. This gives you more power to customize every aspect of the space from flooring to furniture.
6. Adjust light settings
Now that you’ve got all the details of your design concept in place, it’s time to prepare for the 3D renderings. An important part of that is controlling the lighting. Showing a space with an accurate mix of both artificial and natural light is essential for providing clients with a realistic visual of their space. But doing something like this in a normal CAD program is highly technical and difficult.

If you’re using Cedreo for this step, you can let the software manage the interior lighting and sun orientation automatically. And if you want to control the lighting manually, it takes just a few seconds. Once the lighting and point of view are set, submit your design for rendering and in just 5 minutes, it’ll be ready for your client.
Share and collect feedback
Once you’ve got your renderings, it’s time to share them with your team and clients. Just download the 2D plans, 3D plans, and 3D renderings in popular image formats. These are easy to send to your clients or even add to a digital mood board. Choose the Enterprise Plan with Cedreo for streamlined collaboration, and you can share designs with your team inside the platform. Once you receive feedback, make any final adjustments to the design. Since Cedreo is cloud-based, anywhere you have a laptop and internet connection you can quickly update the plans online and download the latest version for your clients.
Ready to Create Better Interior Design Presentations?
Ready to take your interior design presentation to the next level? There’s no better place to start than with Cedreo home design software. It’s engineered to save designers like you loads of time. Make your clients happy and close more deals. Start using Cedreo today !
These articles might be of interest to you:
Explore the articles covering the latest Cedreo’s features, keep up-to-date on 3D home design news, and hear more about what our clients have to say.

How to create stunning interior design presentation boards

How to create successful architecture presentation boards

The Most Popular Residential Roof Styles for Your Designs
- Popular Professionals
- Design & Planning
- Construction & Renovation
- Finishes & Fixtures
- Landscaping & Outdoor
- Systems & Appliances
- Interior Designers & Decorators
- Architects & Building Designers
- Design-Build Firms
- Kitchen & Bathroom Designers
- General Contractors
- Kitchen & Bathroom Remodelers
- Home Builders
- Roofing & Gutters
- Cabinets & Cabinetry
- Tile & Stone
- Hardwood Flooring Dealers
- Landscape Contractors
- Landscape Architects & Landscape Designers
- Home Stagers
- Swimming Pool Builders
- Lighting Designers and Suppliers
- 3D Rendering
- Sustainable Design
- Basement Design
- Architectural Design
- Universal Design
- Energy-Efficient Homes
- Multigenerational Homes
- House Plans
- Home Remodeling
- Home Additions
- Green Building
- Garage Building
- New Home Construction
- Basement Remodeling
- Stair & Railing Contractors
- Cabinetry & Cabinet Makers
- Roofing & Gutter Contractors
- Window Contractors
- Exterior & Siding Contractors
- Carpet Contractors
- Carpet Installation
- Flooring Contractors
- Wood Floor Refinishing
- Tile Installation
- Custom Countertops
- Quartz Countertops
- Cabinet Refinishing
- Custom Bathroom Vanities
- Finish Carpentry
- Cabinet Repair
- Custom Windows
- Window Treatment Services
- Window Repair
- Fireplace Contractors
- Paint & Wall Covering Dealers
- Door Contractors
- Glass & Shower Door Contractors
- Landscape Construction
- Land Clearing
- Garden & Landscape Supplies
- Deck & Patio Builders
- Deck Repair
- Patio Design
- Stone, Pavers, & Concrete
- Paver Installation
- Driveway & Paving Contractors
- Driveway Repair
- Asphalt Paving
- Garage Door Repair
- Fence Contractors
- Fence Installation
- Gate Repair
- Pergola Construction
- Spa & Pool Maintenance
- Swimming Pool Contractors
- Hot Tub Installation
- HVAC Contractors
- Electricians
- Appliance Services
- Solar Energy Contractors
- Outdoor Lighting Installation
- Landscape Lighting Installation
- Outdoor Lighting & Audio/Visual Specialists
- Home Theater & Home Automation Services
- Handyman Services
- Closet Designers
- Professional Organizers
- Furniture & Accessories Retailers
- Furniture Repair & Upholstery Services
- Specialty Contractors
- Color Consulting
- Wine Cellar Designers & Builders
- Home Inspection
- Custom Artists
- Columbus, OH Painters
- New York City, NY Landscapers
- San Diego, CA Bathroom Remodelers
- Minneapolis, MN Architects
- Portland, OR Tile Installers
- Kansas City, MO Flooring Contractors
- Denver, CO Countertop Installers
- San Francisco, CA New Home Builders
- Rugs & Decor
- Home Improvement
- Kitchen & Tabletop
- Bathroom Vanities
- Bathroom Vanity Lighting
- Bathroom Mirrors
- Bathroom Fixtures
- Nightstands & Bedside Tables
- Kitchen & Dining
- Bar Stools & Counter Stools
- Dining Chairs
- Dining Tables
- Buffets and Sideboards
- Kitchen Fixtures
- Wall Mirrors
- Living Room
- Armchairs & Accent Chairs
- Coffee & Accent Tables
- Sofas & Sectionals
- Media Storage
- Patio & Outdoor Furniture
- Outdoor Lighting
- Ceiling Lighting
- Chandeliers
- Pendant Lighting
- Wall Sconces
- Desks & Hutches
- Office Chairs
- View All Products
- Designer Picks
- Side & End Tables
- Console Tables
- Living Room Sets
- Chaise Lounges
- Ottomans & Poufs
- Bedroom Furniture
- Nightstands
- Bedroom Sets
- Dining Room Sets
- Sideboards & Buffets
- File Cabinets
- Room Dividers
- Furniture Sale
- Trending in Furniture
- View All Furniture
- Bath Vanities
- Single Vanities
- Double Vanities
- Small Vanities
- Transitional Vanities
- Modern Vanities
- Houzz Curated Vanities
- Best Selling Vanities
- Bathroom Vanity Mirrors
- Medicine Cabinets
- Bathroom Faucets
- Bathroom Sinks
- Shower Doors
- Showerheads & Body Sprays
- Bathroom Accessories
- Bathroom Storage
- Trending in Bath
- View All Bath
- Houzz x Jennifer Kizzee
- Houzz x Motivo Home
- How to Choose a Bathroom Vanity

- Patio Furniture
- Outdoor Dining Furniture
- Outdoor Lounge Furniture
- Outdoor Chairs
- Adirondack Chairs
- Outdoor Bar Furniture
- Outdoor Benches
- Wall Lights & Sconces
- Outdoor Flush-Mounts
- Landscape Lighting
- Outdoor Flood & Spot Lights
- Outdoor Decor
- Outdoor Rugs
- Outdoor Cushions & Pillows
- Patio Umbrellas
- Lawn & Garden
- Garden Statues & Yard Art
- Planters & Pots
- Outdoor Sale
- Trending in Outdoor
- View All Outdoor
- 8 x 10 Rugs
- 9 x 12 Rugs
- Hall & Stair Runners
- Home Decor & Accents
- Pillows & Throws
- Decorative Storage
- Faux Florals
- Wall Panels
- Window Treatments
- Curtain Rods
- Blackout Curtains
- Blinds & Shades
- Rugs & Decor Sale
- Trending in Rugs & Decor
- View All Rugs & Decor
- Pendant Lights
- Flush-Mounts
- Ceiling Fans
- Track Lighting
- Wall Lighting
- Swing Arm Wall Lights
- Display Lighting
- Table Lamps
- Floor Lamps
- Lamp Shades
- Lighting Sale
- Trending in Lighting
- View All Lighting
- Bathroom Remodel
- Kitchen Remodel
- Kitchen Faucets
- Kitchen Sinks
- Major Kitchen Appliances
- Cabinet Hardware
- Backsplash Tile
- Mosaic Tile
- Wall & Floor Tile
- Accent, Trim & Border Tile
- Whole House Remodel
- Heating & Cooling
- Building Materials
- Front Doors
- Interior Doors
- Home Improvement Sale
- Trending in Home Improvement
- View All Home Improvement
- Cups & Glassware
- Kitchen & Table Linens
- Kitchen Storage and Org
- Kitchen Islands & Carts
- Food Containers & Canisters
- Pantry & Cabinet Organizers
- Kitchen Appliances
- Gas & Electric Ranges
- Range Hoods & Vents
- Beer & Wine Refrigerators
- Small Kitchen Appliances
- Cookware & Bakeware
- Tools & Gadgets
- Kitchen & Tabletop Sale
- Trending in Kitchen & Tabletop
- View All Kitchen & Tabletop
- Storage & Organization
- Baby & Kids
- Housekeeping & Laundry

- View all photos
- Dining Room
- Breakfast Nook
- Family Room
- Bed & Bath
- Powder Room
- Storage & Closet
- Outdoor Kitchen
- Bar & Wine
- Wine Cellar
- Home Office
- Popular Design Ideas
- Kitchen Backsplash
- Deck Railing
- Privacy Fence
- Small Closet
- Stories and Guides
- Popular Stories
- Renovation Cost Guides
- Fence Installation Cost Guide
- Window Installation Cost Guide
- Discussions
- Design Dilemmas
- Before & After
- Houzz Research
- View all pros
- View all services
- View all products
- View all sales
- Living Room Chairs
- Dining Room Furniture
- Coffee Tables
- Home Office Furniture
- Join as a Pro
- Interior Design Software
- Project Management
- Custom Website
- Lead Generation
- Invoicing & Billing
- Landscape Contractor Software
- General Contractor Software
- Remodeler Software
- Builder Software
- Roofer Software
- Architect Software
- Takeoff Software
- Lumber & Framing Takeoffs
- Steel Takeoffs
- Concrete Takeoffs
- Drywall Takeoffs
- Insulation Takeoffs
- Stories & Guides
- LATEST FROM HOUZZ
- HOUZZ DISCUSSIONS
- SHOP KITCHEN & DINING
- Kitchen & Dining Furniture
- Sinks & Faucets
- Kitchen Cabinets & Storage
- Knobs & Pulls
- Kitchen Knives
- KITCHEN PHOTOS
- FIND KITCHEN PROS
- Bath Accessories
- Bath Linens
- BATH PHOTOS
- FIND BATH PROS
- SHOP BEDROOM
- Beds & Headboards
- Bedroom Decor
- Closet Storage
- Bedroom Vanities
- BEDROOM PHOTOS
- Kids' Room
- FIND DESIGN PROS
- SHOP LIVING
- Fireplaces & Accessories
- LIVING PHOTOS
- SHOP OUTDOOR
- Pool & Spa
- Backyard Play
- OUTDOOR PHOTOS
- FIND LANDSCAPING PROS
- SHOP LIGHTING
- Bathroom & Vanity
- Flush Mounts
- Kitchen & Cabinet
- Outdoor Wall Lights
- Outdoor Hanging Lights
- Kids' Lighting
- Decorative Accents
- Artificial Flowers & Plants
- Decorative Objects
- Screens & Room Dividers
- Wall Shelves
- About Houzz
- Houzz Credit Cards
- Privacy & Notice
- Cookie Policy
- Your Privacy Choices
- Mobile Apps
- Copyright & Trademark
- For Professionals
- Houzz vs. Houzz Pro
- Houzz Pro vs. Ivy
- Houzz Pro Advertising Reviews
- Houzz Pro 3D Floor Planner Reviews
- Trade Program
- Buttons & Badges
- Your Orders
- Shipping & Delivery
- Return Policy
- Houzz Canada
- Review Professionals
- Suggested Professionals
- Accessibility
- Houzz Support
- COUNTRY COUNTRY
New & Custom Home Builders in Elektrostal'
Location (1).
- Use My Current Location
Popular Locations
- Albuquerque
- Cedar Rapids
- Grand Rapids
- Indianapolis
- Jacksonville
- Kansas City
- Little Rock
- Los Angeles
- Minneapolis
- New Orleans
- Oklahoma City
- Orange County
- Philadelphia
- Portland Maine
- Salt Lake City
- San Francisco
- San Luis Obispo
- Santa Barbara
- Washington D.C.
- Elektrostal', Moscow Oblast, Russia
Professional Category (1)
- Accessory Dwelling Units (ADU)
Featured Reviews for New & Custom Home Builders in Elektrostal'
- Reach out to the pro(s) you want, then share your vision to get the ball rolling.
- Request and compare quotes, then hire the Home Builder that perfectly fits your project and budget limits.
Before choosing a Builder for your residential home project in Elektrostal', there are a few important steps to take:
- Define your project: Outline your desired home type, features, and layout. Provide specific details and preferences to help the builder understand your vision.
- Establish a budget: Develop a comprehensive budget, including construction expenses and material costs. Communicate your budgetary constraints to the builder from the beginning.
- Timeline: Share your estimated timeline or desired completion date.
- Site conditions: Inform the builder about any unique site conditions or challenges.
- Local regulations: Make the builder aware of any building regulations or permits required.
- Land Surveying
What do new home building contractors do?
Questions to ask a prospective custom home builder in elektrostal', moscow oblast, russia:.
If you search for Home Builders near me you'll be sure to find a business that knows about modern design concepts and innovative technologies to meet the evolving needs of homeowners. With their expertise, Home Builders ensure that renovation projects align with clients' preferences and aspirations, delivering personalized and contemporary living spaces.
BUSINESS SERVICES
Connect with us.
- Registration
*required fields
Log in to your account
Please, fill in the form below:
If you have forgotten your password, please click on the following link >>
Where Can I Find the Best Interior Design Education in Elektrostal, Russia?

Latest news

Sail Away in Style: Design Trends for Decorating Your Yacht's Living Spaces

Small Space, Big Impact: Maximizing Plant Use in Compact Interiors

From Mountains to Seas: The Diversity of Earth's Landscapes and How to Incorporate Them in Our Homes

Top Home Interior Design Trends: Exploring Modern, Transitional, and Farmhouse Styles

Embracing the Past: Vintage Revival in Contemporary Interior Design

Seamless Transitions: Blurring the Lines Between Indoor and Outdoor Living
See questions on:

Through the Lens: The Art of Landscape Photography and the Beauty of Nature

Reimagining Urban Landscapes: Green Infrastructure and Smart City Initiatives

Green Spaces, Healthy Places: Exploring the Impact of Landscapes on Human Health

Landscapes of the Future: Sustainable Design and Conservation

Turning Your Garden into a Year-Round Wonderland

Top 5 Flooring Companies in Dubai: Best Flooring Dubai Supplier

10 Timeless Interior Design Trends That Never Go Out of Style

The Changing Face of Interior Design Throughout History

Downsizing Dilemma: Understanding the Trend of Shrinking Spaces

Designing for Brand Identity: Interior Design in Retail Spaces

Exploring the Charm of Shabby Chic Interior Design

Urban Maximalism

The Impact of Lighting Design on Office Productivity and Well-Being

Interior Design Trends in 2024 That You Should Follow
In the forum :, how can you choose a sofa that will be easy to create a sense of unity with in a small living room, what are the tools used in interior design, where to buy interior design magazine, what is the best way to incorporate different themes in modern kitchen, are kitchen cabinets considered furniture, what is in style for kitchen curtains, how do i choose between traditional and contemporary kitchen cabinet hardware, can you mix rustic with modern, how interior designers make money, how to find the perfect loveseat, how does japandi design use traditional scandinavian elements such as blonde wood and clean lines, where to buy living room furniture, where to study interior design in brussels, why use fitted and flat sheet, what are the seven principles of interior design, is track lighting out of style, what is the purpose of a japanese zen garden, what are the different types of modern interior design, what furniture colors are in for 2021, can autocad be used for 3d printing, should living room furniture sit on area rug, what is this chair called, what is your favorite thing about industrial style kitchens, where can set designers work, what makes a living room feel cozy, what is garden in landscape design, what is the 60's interior design style, how do outdoor furniture clips work, how to design backyard with pool, what do you think is the biggest advantage to getting an online interior design education.
IMAGES
VIDEO
COMMENTS
A room that focuses the audience on the presenter and their media simultaneously is always effective. For the correct screen size, follow the 6:1 ratio (divide the distance between the media screen and the farthest viewer by 6). The resulting number should equal the ideal screen height. (This is based on general design principles for the ...
A Boardroom Style Room Setup is ideal for small groups (usually fewer than 12 people) where different speakers will present. This room style works best for staff meetings, project briefings, or problem-solving meetings. If the meeting is going to be fairly short and you will only have a single main speaker, this may be your ideal conference room setup.
The banquet style room arrangement is a round table setup with participants facing each other like at a dinner table. This encourages full interaction between people sitting at one table. It is often used for interactive workshops with group discussions and exercises. Banquet Style Seating Arrangement.
Eliminate unnecessary seats. Suppose you know that your audience is going to be 30 people, but the room is set up with 6 rows of 10 chairs each (=60 seats total). Most people tend to choose a seat toward the back. The result is that most of your audience will sit in the back half of the room.
Finally, avoid standing near the exit or entryway. It's like being near the kitchen or bathroom in a restaurant. Every time someone arrives late or leaves to take a break, you must reengage your audience's attention. 4. Adjust the Lighting. In general, avoid putting the audience in the dark or semi-darkness.
Projector. Digital display screen (s). A good audio system. While these essentials and gadgets make meetings more productive, there is another technology that will significantly improve every meeting experience: conference room scheduling software that is fully integrated with conference rooms and digital signage.
Specifically, offices may want to consider the following four elements of a good office meeting room design. 1. Choose an appropriate layout. Meeting rooms are not all equal. Some are for board meetings, others for presentations or meetings with clients, and others still for casual brainstorming sessions.
Here are a few thoughts and ideas: Seating: Longer meetings might require more comfortable and ergonomic seating. Shorter meeting might not even need seating as some companies choose to have stand-up meetings to help ensure brevity. You can also add bench seating around the conference room perimeter to help expand the maximum number of people ...
Pro tip: use a remote control so that you can move around the room and make a point of presenting from the side of the table rather than being stuck at one end. That way you can work more easily with different people and you're not too far from anyone. What's more, it gives you the advantage of distancing you from your slides and puts you ...
Medium Room. Room capacity. 6-12. Display. 1 up to 80-in. screen. Estimated equipment budget range. Starting at $4,000 and up plus all related construction costs.
Download the Large Presentation Room files: Large Presentation Room Design Guide SALES AND INQUIRIES Headquarters Headquarters Sales Tech Support 5225 Wiley Post Way Suite 500 Main: +1.801.975.7200 Tel: +1.801.975.7200 Tel: +1.801.974.3760 Salt Lake City, UT 84116 [email protected]@clearone.com
When you're in front of a mirror, practice tilting your head and then bringing it back to center. Focus on remembering what it feels like in your muscles when you're perfectly straight. When you mean business, this is where you want your head to be. 5. Have a Ball! Yes, sure, have fun, but we mean an actual ball.
Room layout: Example 1. Initial presentation se-up with a "Presenters' Table" at the front. Let's start north of the border with this bunker-like monstrosity! 😉 The caption kind of gives it away, to be honest. The expectation was that I'd sit at the table with my slides appearing on the wall behind me.
Think of this step in the interior design process as if you were painting a room: The time spent cleaning, taping and spackling the space is rewarded with the clean lines and smooth strokes that make for a successful conclusion to the project. Similarly, it may take some time to adequately prepare for a design presentation, but this crucial ...
The first step to creating a dynamic interior design presentation is to sketch your initial design concepts for each area clients want to be revamped. Draw a basic layout of the space, make note of its dimensions, and add comments that will help guide the remainder of your design process. 2. Draw a 3D floor plan.
Interior Design Portfolio. Inspire your prospects or employers with our latest work portfolio template created exclusively for interior designers. Show off your expertise and wow them with what you're capable of by adding your own photos and even design touch to this fully editable template. Business. 16:9.
A design schematic is a complete room design similar to a mood board, but it includes a floor plan with furniture and decor laid out to scale. ... and design presentations that fit their clients style, budget, timeline (provided by designer) with their personal logo in place of our own. We will also provide budget sheets-one for the client ...
Then add any other comments that you should keep in mind while creating the rest of your presentation. 2. Draw a 3D floor plan. The next part of the design process is to create the floor plan. A floor plan is essentially the container for all your creative ideas, so this is an important step.
Search 23 Elektrostal' home & house stagers to find the best home stager for your project. See the top reviewed local home stagers in Elektrostal', Moscow Oblast, Russia on Houzz.
Just answer a few questions to get matched with a local Design-Build Firm. Or browse through the list of trusted Design-Build Firms in Elektrostal' on Houzz: See Elektrostal' Design-Build Firms' profiles, dive into their work photos and check out customer reviews. Reach out to the pro(s) you want, then share your vision to get the ball rolling.
Search 1,121 Elektrostal' new & custom home builders to find the best custom home builder for your project. See the top reviewed local custom home builders in Elektrostal', Moscow Oblast, Russia on Houzz.
Sergey Groshkov Interior Design 3D Visualization is a renowned school that offers top-notch education in the field of interior design. Located at Ulitsa Pobedy, 2, к . 5, Elektrostal, Moscow Oblast, Russia, 144004, this institution is known for its exceptional curriculum and experienced faculty.