- Start the presentation and see your notes in Presenter view Article
- Add speaker notes to your slides Article
- Rehearse and time the delivery of a presentation Article
- Record a slide show with narration and slide timings Article
- Print your PowerPoint slides, handouts, or notes Article
- Create a self-running presentation Article


Start the presentation and see your notes in Presenter view
Using Presenter view is a great way to view your presentation with speaker notes on one computer (your laptop, for example), while only the slides themselves appear on the screen that your audience sees (like a larger screen you're projecting to).
If you're using PowerPoint 2013 or a newer version, just connect the monitors and PowerPoint automatically sets up Presenter View for you.
If Presenter view appears on the wrong screen, you can swap the display quickly .
Turn off Presenter view if you prefer not to use it.

Start presenting
On the Slide Show tab, in the Start Slide Show group, select From Beginning .

Use the controls in Presenter view
To move to the previous or next slide, select Previous or Next .

To view all the slides in your presentation, select See all slides .

Tip: You’ll see thumbnails of all the slides in your presentation (as shown below), making it easy to jump to a specific slide in the show.

To view a detail in your slide up close, select Zoom into slide , and then point to the part you want to see.

For more details on zooming in, see Zoom in to part of a slide .
To point to or write on your slides as you present, select Pen and laser pointer tools .

Press the Esc key when you want to turn off the pen, laser pointer, or highlighter.
To hide or unhide the current slide in your presentation, select Black or unblack slide show .

You can use PowerPoint on your smartphone as a remote control to run your presentation and view your speaker notes. See Using a laser pointer on your smartphone when presenting in PowerPoint for more information, including a brief video.
Swap the Presenter view and Slide view monitors
To manually determine which screen shows your notes in Presenter view and which shows only the slides themselves, on the task bar at the top of Presenter view, select Display Settings , and then select Swap Presenter View and Slide Show .

What the notes look like in Presenter view
Tip: You can add notes either while you’re presenting, directly from Presenter view, or as you’re editing your presentation. For information on how to add speaker notes to your presentation see Add speaker notes to your slides.

The notes appear in a pane on the right. If you need to add or delete something, simply click in the text box to edit it. The text wraps automatically, and a vertical scroll bar appears if necessary. You can change the size of the text in the Notes pane by using the two buttons at the lower left corner of the Notes pane:

To change the size of the panes in Presenter View, point your mouse at the vertical line that separates them, then click and drag.
Tip: If you don't need to see the current slide in Presenter View at all, and would like your notes to be larger, drag that vertical separator line all the way to the left.
Turn off Presenter view
If you want Presenter view turned off while you are showing your presentation to others:
On the Slide Show tab of the ribbon, clear the check box named Use Presenter View .

Keep your slides updated
If you're working with a team of people to create your slide deck it may be that changes are being made to the slides right up to the last minute. Traditionally once you've started your presentation your slides wouldn't update. If you're using PowerPoint for Microsoft 365 you have the option to let your slides be updated by your team even as you're presenting so that you always have the up-to-the-minute changes.
You can turn this on by going to the Slide Show tab of the ribbon, selecting Set Up Slide Show , and checking the box for Keep slides updated .

If you've already started your presentation and you want to make sure that setting is on, you can do that from Presenter view. Select the More slide show options button (which looks like three dots) and on the menu make sure Keep Slides Updated is checked.

Using a laser pointer on your smartphone when presenting in PowerPoint
To start using Presenter view, select Slide Show > Presenter View .

To move to the previous or next slide, select the Previous or Next arrow.

To turn off the pen, laser pointer, or highlighter, press the Esc key.
To make the screen black or to un-black the screen, Press b on the keyboard.

Extend your Mac desktop to the second monitor
On the Apple menu, select System Preferences .
Open the Displays app.
Click the Arrangement tab in the dialog box.
Clear the Mirror Displays check box.
By doing this process, you now have a two-monitor setup. You can present a PowerPoint slide show on one screen while having other applications open on the other screen, keeeping those other apps private to yourself.
To manually determine which screen shows your notes in Presenter view and which shows only the slides themselves, on the task bar at the top left of Presenter view, select Swap Displays .
When your computer is connected to a projector and you start Presenter View, it appears on your computer's screen, while only the slides appear on the projector screen.

The notes appear in a pane on the right:
The text wraps automatically, and a vertical scroll bar appears if necessary.
You can edit the text in the Notes pane.
You can change the size of the text in the Notes pane by using the two buttons at the lower left corner of the Notes pane:

You can adjust the size of the current slide, and notes and next slide panels, by using your mouse to grab and drag the vertical line that separates the two panels.
Turn off Presenter view before a presentation begins
On the PowerPoint menu, select Preferences .
In the PowerPoint Preferences dialog box, under Output and Sharing , click Slide Show .

In the Slide Show dialog box, clear the Always start Presenter View with 2 displays check box.

Close the dialog box.
Turn off Presenter view during a presentation
At the top of the Presentation view window, click Use Slide Show .

This button closes Presenter view. As a result, both your personal computer screen and the projector screen show the slide show.
If you're working with a team of people to create your slide deck it may be that changes are being made to the slides right up to the last minute. Traditionally once you've started your presentation your slides wouldn't update. If you're using PowerPoint for Microsoft 365 for Mac you have the option to let your slides be updated by your team even as you're presenting so that you always have the up-to-the-minute changes.
You can turn this on by going to the Slide Show tab of the ribbon, and checking the box for Keep Slides Updated .

Create a self-running presentation
Record your slide show
Keep slides updated

Need more help?
Want more options.
Explore subscription benefits, browse training courses, learn how to secure your device, and more.

Microsoft 365 subscription benefits

Microsoft 365 training

Microsoft security

Accessibility center
Communities help you ask and answer questions, give feedback, and hear from experts with rich knowledge.

Ask the Microsoft Community

Microsoft Tech Community

Windows Insiders
Microsoft 365 Insiders
Was this information helpful?
Thank you for your feedback.
How to Add Notes to PowerPoint Presentations: A Comprehensive Guide

Sara Wanasek

Presenting a slideshow can be a daunting task, especially when you’re speaking to a large audience. Thankfully, most presentation software comes equipped with the ability to add notes to your slides, making it easier for you to stay on track and deliver a seamless presentation – no full memorization needed.
In this blog, we will explore two different ways that you can to add notes to PowerPoint:
- Presentation notes that you prepare in advance and only you can see or
- Adding live notes to your presentation for your audience to see
By leveraging these techniques, you’ll be able to engage your audience effectively and deliver memorable presentations. Let’s dive in.
How to Add Presenter Notes in PowerPoint
Presenter Notes in PowerPoint are notes that you can view on your screen while you are presenting. Your audience will not see these notes, just you, so you can stay on track, remember important points, and deliver your information clearly and easily. Presenters, here’s everything you need to know to add notes to PowerPoint.
Add Notes in Edit Mode
Notes can be added to any slide in PowerPoint. Follow these steps:
- Start by clicking on the Notes button located beneath each slide. If you don’t see it, click on the View tab at the top of the screen and then click on Notes Page.
- Begin typing your notes for that slide, providing additional details, reminders, or cues to guide your presentation.
- Repeat the process for each slide you want to add notes to.
Once you’ve added your notes, you’re ready to deliver your presentation with confidence!

Present with Notes
Now that your notes are added to your presentation, let’s learn how to use them during the presentation. Do note that to present with the Presenter Notes, you will need to be connected to another screen or projector.
- First, select the Slide Show tab in the PowerPoint ribbon
- In the Set Up section, click the check box for Presenter View
- Enter Presentation Mode! You should see your presentation on one screen (such as your projector) and your notes displayed on the other screen (such as your laptop).
⚠️ If the Presenter view appears on the wrong screen, you can swap this by clicking on the Display Setting on top of the Presenter view screen.

As you move through your slides, your notes will automatically advance with the slides, keeping you right on track.
Print Notes
If you prefer a physical copy of your notes to present with or want to share it with your audience, you can print them from PowerPoint.
To do this go into File → Print → and under Settings , choose Notes Pages . Now, you can Print .
Presenting with notes in your PowerPoint presentation helps you stay on track, maintain confidence, engage your audience, adapt to unexpected situations, and appear professional and organized, ultimately leading to a smoother, more impactful delivery. But what if you want to further explain a concept with notes and annotations during your presentation? You can with annotation tools! →
Add Notes During a Presentation
Need to add notes to aid your presentation and help your audience understand, follow along, and stay engaged? Presenter tools such as annotations are great tools to help your presentation delivery and pace. By interacting with your slide information throughout your presentation, you can encourage active learning and audience participation in the presentation. There are a few ways you can add notes to PowerPoint:
Add Notes to Any Slide
During your presentation, you can add notes in two main ways:
1.You can use PowerPoint’s built-in simple pen and highlighter to add notes to your slide. This is found in the bottom left corner of the screen click on the pen and choose your color to begin drawing.
2. For sightly more advanced pen tools, text boxes, and shapes, you can use the free PowerPoint add-in ClassPoint, to add notes to PowerPoint sides . Once downloaded, ClassPoint , an audience engagement tool, will add a toolbar at the bottom of your presentation screen with these additional annotation & presentation tools .
This gives you different thickness options and color options for the pens , highlighters , shapes , and text boxes on your slide.
Insert Whiteboard Slides
Did you know you can even add a blank whiteboard slide into your PowerPoint presentation while you are presenting? With ClassPoint, it’s true!
Perfect for when you run out of space, want to brainstorm, or have fresh details to convey to the audience.
To add a whiteboard slide to your presentation, click on the Whiteboard icon on the ClassPoint toolbar. From there, choose a template provided, or add your own whiteboard background design . This slide will be opened & inserted right into your presentation and you can begin adding your notes. All annotations added will be saved once you exit out of the presentation mode.
Add disappearing laser ink
With ClassPoint’s presentation toolbar, you can also use the laser pointer to write with disappearing ink!
Although this will not save to your slide, it is a great way to help your audience follow along and make connections to your slide information.
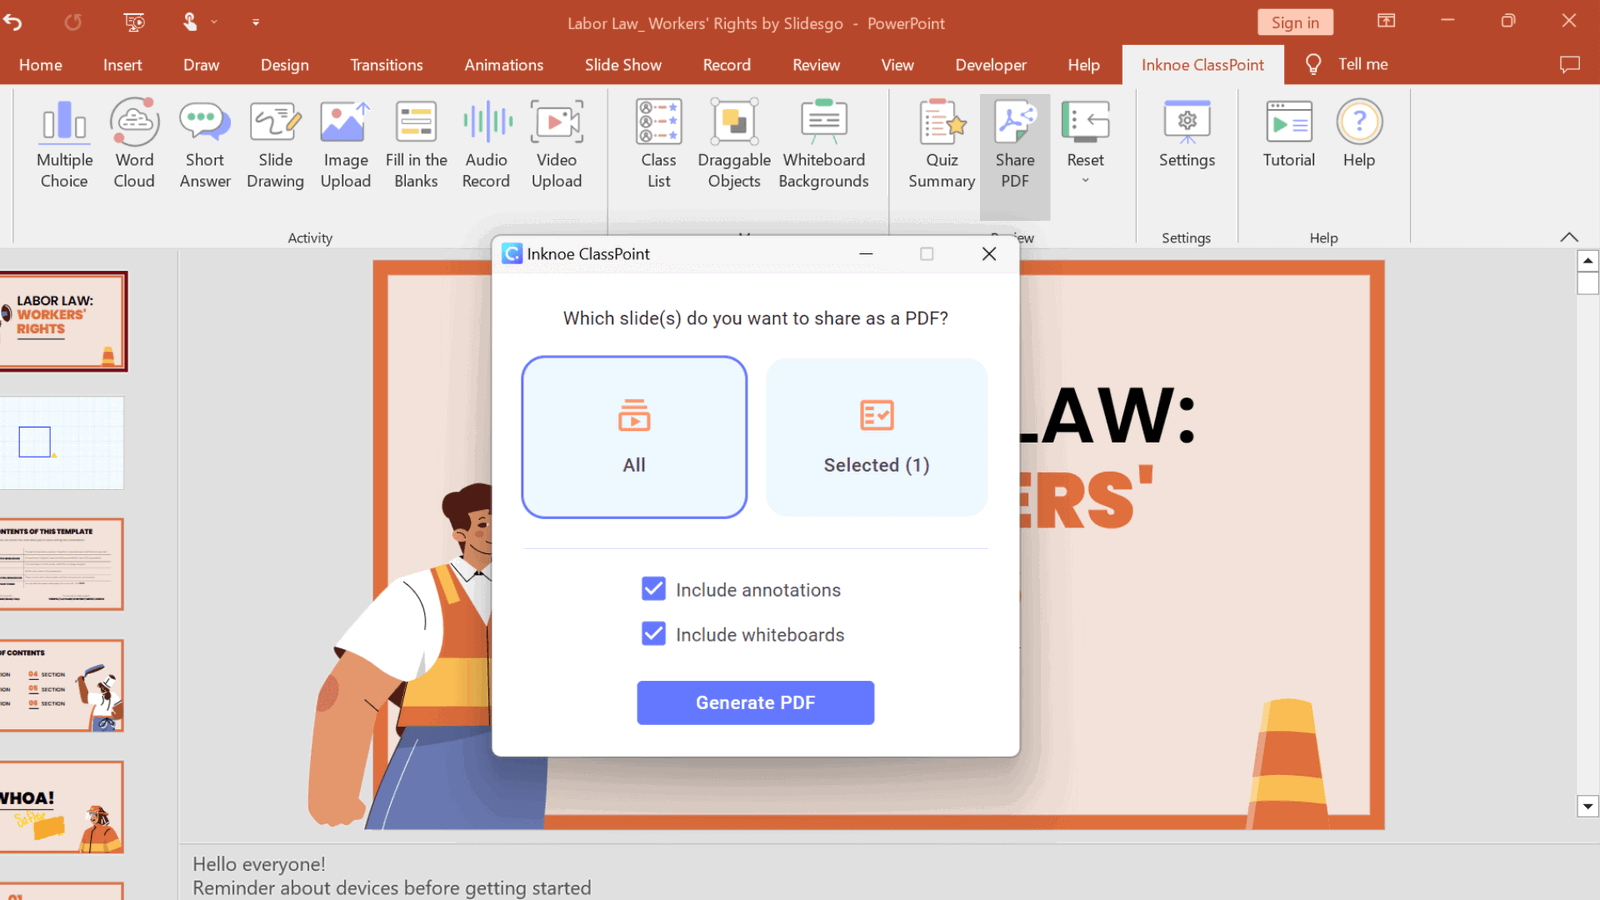
Share Notes
Just like when you printed your Speaker Notes above, you can also share all the notes you added to your PowerPoint slides. Print your presentation, or share it with your audience via a QR code.
Click on the Share PDF icon on the ClassPoint tab in the PowerPoint ribbon. Select to include the whiteboard and annotations that you made and click Generate . A QR code will appear that your audience can scan to access your PowerPoint slides and see all the notes you have added!
Overall, adding annotations to your PowerPoint presentation is a great way to enhance your message, engage your audience, and make your presentation more effective. So if you haven’t tried it before, why not give it a go and see the difference it can make to your next presentation?
Adding notes to your presentation is a simple but effective way to elevate your overall performance. Whether you’re adding notes in edit mode or during your presentation, PowerPoint offers a variety of tools to help make your presentation a success. Start implementing these strategies with ClassPoint, and watch as your presentations become more engaging and impactful than ever before!
About Sara Wanasek
Try classpoint for free.
All-in-one teaching and student engagement in PowerPoint.
Supercharge your PowerPoint. Start today.
500,000+ people like you use ClassPoint to boost student engagement in PowerPoint presentations.

- PRESENTATION SKILLS
Managing your Presentation Notes
Search SkillsYouNeed:
Presentation Skills:
- A - Z List of Presentation Skills
- Top Tips for Effective Presentations
- General Presentation Skills
- What is a Presentation?
- Preparing for a Presentation
- Organising the Material
- Writing Your Presentation
- Deciding the Presentation Method
- Working with Visual Aids
- Presenting Data
- Managing the Event
- Coping with Presentation Nerves
- Dealing with Questions
- How to Build Presentations Like a Consultant
- 7 Qualities of Good Speakers That Can Help You Be More Successful
- Self-Presentation in Presentations
- Specific Presentation Events
- Remote Meetings and Presentations
- Giving a Speech
- Presentations in Interviews
- Presenting to Large Groups and Conferences
- Giving Lectures and Seminars
- Managing a Press Conference
- Attending Public Consultation Meetings
- Managing a Public Consultation Meeting
- Crisis Communications
- Elsewhere on Skills You Need:
- Communication Skills
- Facilitation Skills
- Teams, Groups and Meetings
- Effective Speaking
- Question Types
Subscribe to our FREE newsletter and start improving your life in just 5 minutes a day.
You'll get our 5 free 'One Minute Life Skills' and our weekly newsletter.
We'll never share your email address and you can unsubscribe at any time.
When you start to give presentations, you will realise that you also have to work out how to manage your text.
Whether you’re confident enough to speak with very brief notes, or you need a full text, you need to consider how you record it to remind you what you’re going to say.
There are various examples of ways you might choose to manage your text.
These include:
Full Text Notes
Notes on Cue Cards
Keywords on Cue Cards
Full text script.
The main advantage of this method is that the entire text is in front of you so you cannot forget what you want to say.
The disadvantage, however, is that you will pay less attention to the group or audience whilst reading the text. If you are speaking to a small group, this method might be overly formal, as written text sounds very formal when spoken out loud. If you read a prepared text, you should know what you are going to say very well so that you can maintain eye contact with your listeners whilst not losing your place.
Reading the text is not always an easy option as it can sound stilted and rather unnatural. Remember to engage with your audience as much as you can.
When reading from a full-text script it is also much harder to change what you’re going to say halfway through, if you see that your audience is starting to fidget.
To help, you can use big bold headings to guide your eyes through the text so that you can skip sections if you want.
Notes Pages from a Slide Package
Most presentation packages, including PowerPoint, have an option to create a page of ‘Slide Notes’.
You can use these to write out more or less detailed points about what you plan to say in relation to every slide that you use.
The advantage is that everything that you want to say is tailored to your slides. However, the packages are not very sophisticated: you cannot, for instance, highlight sections, or play with the font size very easily. This means that it can be hard to identify quickly and visually the most important points to make.
You will also end up with a sheaf of papers, which can get a bit flappy and hard to handle. This can come across as somewhat unprofessional.
To use cue cards, write your main points on separate index cards and, underneath each point, write the supporting material in a concise way.
When using Cue Cards...
Use only one side of the card and number the cards so that you can easily reorder them if you drop them.
On the bottom of each cue card, write a link statement to lead you into the next point.
The advantage of using cue cards is that you are speaking directly to the audience, which increases your rapport with them.
Small index cards also look more professional than large sheets of paper which may prove difficult to handle. The disadvantage is that you have to write them by hand since PowerPoint and similar packages don’t offer an option for ‘keycards’, only ‘Notes pages’.
To avoid losing your thread, ensure that you are familiar with the main points of your argument and the links between one idea and the next so that you become less reliant on the cards.
Further simplify the information on the cue cards by drawing out keywords that will remind you of the key points that you wish to convey.
The advantages of using keywords on cue cards are the same as above but their use increases spontaneity and rapport with the audience even further.
However, if you become side-tracked, it is easy to lose the thread and possibly miss key points. It’s best only to use this method if you are very familiar with your subject and feel confident in making the presentation.
Mind maps are diagrams used to represent words, ideas, tasks, or other items linked to and arranged around a central key word or idea. Mind maps are used to generate, visualize, structure, and classify ideas, and can be used as notes to aid a presentation.
The advantages of using a mind map are similar to those of using keywords on cue words but it is easier to illustrate complex relationships than with keywords.
However, again, using mind maps as a presentation aid requires you to be familiar with the subject material and a confident speaker. When presenting it can be difficult to keep track of your progress through a mind map, but it can be very helpful if you want to interact with your audience, as you can just reorder your points to fit the session.
It’s up to you!
When you’re giving a presentation, it’s up to you to choose a method of handling your notes that works for you.
Whatever you do, someone is sure to judge you on it, so you simply have to make sure that you’re comfortable, and don’t worry what anyone else says.
The important thing is to get your points across confidently and competently, and not to show off.
Continue to: Working with Visual Aids Deciding the Presentation Method
See also: Preparing for a Presentation Writing Your Presentation Coping with Presentation Nerves Dealing with Questions
- Slidesgo School
- Google Slides Tutorials
How to Add and Work with Speaker Notes in Google Slides

Speaker notes are very useful when giving presentations. These help you highlight the key concepts that you want to talk about in each slide, and they’re not visible for your audience. In this new Slidesgo School tutorial, you’ll learn how to create speaker notes and where to place them. You’ll also find out how to present using speaker notes .
Adding Speaker Notes
Using the presenter view.
- Open your presentation in Google Slides.
- At the bottom of the screen there’s a text field with the message “Click to add speaker notes”. The text that you enter here will be visible for you during your presentation, but not for your audience.
- If you can’t see this text field, click View → Show speaker notes.
- To display the speaker notes during your presentation, you need at least two screens: one for the presentation and another for the notes.
- Click the drop-down arrow next to the Present button.
- Select Presenter view. Your presentation will be displayed fullscreen and a new window will appear, where you can see some information and options:
- Timer : You can check how much time has passed since the beginning of your presentation. You can also pause or reset the timer by clicking the corresponding buttons.
- Previous and Next: Click the corresponding thumbnail to go back to the previous slide or move on to the next slide.
- Zoom: Next to the slide number you’ll find a “+” button and a “-” button. These allow you to increase or decrease the size of the speaker notes.
- Audience Tools: This tab contains a button to allow questions from your audience, which will appear here. You must share the URL that appears above (it will also be displayed at the top of the main screen). If you don’t want to receive further questions, disable this option by clicking Off.
Once you receive the first questions, you can click Present to display them on the main screen. To hide them again, just click Hide.
Do you find this article useful?
Related tutorials.

How to Use the Presenter View in Google Slides
Google Slides, like PowerPoint, has different presentation modes that can come in handy when you’re presenting and you want your slideshow to look smooth. Whether you’re looking for slides only, speaker notes or the Q&A feature, in this new Google Slides tutorial, you’ll learn about these and their respective settings. Ready? Then let’s explore the presenter view!

How to Download Google Slides Templates
When preparing a presentation, many people start panicking because they realize how much time it will take to edit each and every slide. Creating them from scratch, filling them in, looking for pictures, moving the elements...How stressful! But there is a solution that saves you a lot of time. We're sure that you've browsed the internet for templates, or basically, pre-established designs and elements, that can be downloaded for free and can be edited to your liking. Are we right? Then, we have some good news for you!

Discover our collection of printable templates
With the advance of technology, printing has become something that is no longer a necessity. Smartphones have made the paper format less and less frequent, but there are still certain cases in which having physical resources is much more convenient. Whether it's for taking notes, handing out assignments, making worksheets or handing out business cards or invitations, it's necessary to print your customized designs.From now on, in every Slidesgo printable presentation that you download, you will find the instructions for printing on the third slide. Depending on the style, colors or format of each presentation, we will tell you if you can...

How to Add Superscript and Subscript in Google Slides
Let’s take the most famous formula: E=mc^2, Einstein’s relativity equation. It wouldn’t be the same if it was E=mc2, right? Okay, yes, some people write it like that because it’s very famous and it won’t be misunderstood. But technically… It can! This is where the sophistication of superscript or subscript enters the room! Do you know how to write them in equations, copyright brands or even footnotes in your presentations? Let’s figure out how.
- SUGGESTED TOPICS
- The Magazine
- Newsletters
- Managing Yourself
- Managing Teams
- Work-life Balance
- The Big Idea
- Data & Visuals
- Reading Lists
- Case Selections
- HBR Learning
- Topic Feeds
- Account Settings
- Email Preferences
What It Takes to Give a Great Presentation
- Carmine Gallo

Five tips to set yourself apart.
Never underestimate the power of great communication. It can help you land the job of your dreams, attract investors to back your idea, or elevate your stature within your organization. But while there are plenty of good speakers in the world, you can set yourself apart out by being the person who can deliver something great over and over. Here are a few tips for business professionals who want to move from being good speakers to great ones: be concise (the fewer words, the better); never use bullet points (photos and images paired together are more memorable); don’t underestimate the power of your voice (raise and lower it for emphasis); give your audience something extra (unexpected moments will grab their attention); rehearse (the best speakers are the best because they practice — a lot).
I was sitting across the table from a Silicon Valley CEO who had pioneered a technology that touches many of our lives — the flash memory that stores data on smartphones, digital cameras, and computers. He was a frequent guest on CNBC and had been delivering business presentations for at least 20 years before we met. And yet, the CEO wanted to sharpen his public speaking skills.
- Carmine Gallo is a Harvard University instructor, keynote speaker, and author of 10 books translated into 40 languages. Gallo is the author of The Bezos Blueprint: Communication Secrets of the World’s Greatest Salesman (St. Martin’s Press).
Partner Center
How to View Notes in PowerPoint While Presenting on Teams

Do you frequently use Microsoft Teams for online presentations, but struggle to view your notes simultaneously? If so, it’s important to know how to view your PowerPoint notes while presenting on Teams. By doing so, you’ll be able to stay organized, on-topic, and well-prepared during your presentation. In this article, we’ll explore step-by-step instructions on how to view notes in PowerPoint while presenting on Teams. Let’s dive in.
Table of Contents
Why You Need to Know How to View Notes in PowerPoint While Presenting on Teams
Firstly, it’s essential to understand precisely why it’s so crucial to learn how to view notes in PowerPoint while presenting on Teams. By doing so, you’ll have access to all the essential information and talking points during the presentation without getting lost or distracted. By keeping prompt notes for quick reference, you’ll be able to stay on topic and maintain your confidence throughout the presentation. Furthermore, by viewing your notes onscreen alongside your PowerPoint presentation, you’ll be less likely to forget crucial points and details, which can help you to deliver a more successful and impactful presentation altogether.
Another reason why it’s important to know how to view notes in PowerPoint while presenting on Teams is that it allows you to customize your presentation for different audiences. With access to your notes, you can easily adapt your presentation on the fly to better suit the needs and interests of your audience. For example, if you notice that your audience is particularly interested in a specific topic, you can quickly refer to your notes and adjust your presentation accordingly. This level of flexibility and adaptability can help you to engage your audience more effectively and deliver a more memorable presentation overall.
The Benefits of Viewing Notes While Presenting on Teams
There are numerous benefits to viewing notes while presenting on Teams. For one, it can help to keep you on track, ensuring that you don’t miss any important points or ideas throughout your presentation. Additionally, it can be a convenient way to access information quickly, without having to refer to physical notes or other external sources. By keeping your notes visible on your screen, you’ll be able to give the audience clearer explanations, details, and statistics that can help you to maintain their engagement throughout the presentation.
How to Prepare Your PowerPoint Slides for Presenting on Teams
Before you learn how to view your notes in PowerPoint while presenting on Teams, it’s crucial to ensure that your PowerPoint slides are fully prepared for the Teams presentation. This involves taking care of the visual elements such as the font size, type, color, and layout of the slides. It’s a best practice to keep the slides concise and straightforward while also keeping the audience engaged with visually appealing slides, and effective transitions. By preparing your PowerPoint slides upfront, you’ll be able to focus better on your presentation and deliver a more impactful and effective message.
Step-by-Step Guide: How to View Notes in PowerPoint While Presenting on Teams
Now that you understand the importance of viewing notes in PowerPoint while presenting on Teams and have prepared your slides let’s explore the step-by-step process of how to view notes while presenting on Teams.
Open your PowerPoint presentation and select the “Slide Show” tab on the top menu bar.
Click on the “Presenter View” button located within the “Monitors” group. This will initiate the Presenter View mode.
You will now see the Presenter View appear on your primary screen, and your presentation on the secondary screen. Here, you’ll be able to see your notes in one section, along with the next slide and timing for each slide.
To advance to the next slide, use the arrow keys on your keyboard, or click on the forward button located at the bottom of the presenter view section.
If you wish to make any quick annotations or highlight points during the presentation, you can use the laser pointer tool, which will make it easier for the audience to follow your cues.
Once done with the presentation, press the “Esc” key to exit the presentation mode.
Tips for Using the Presenter View in PowerPoint on Teams
There are some essential tips and tricks that you should keep in mind when using the Presenter View in PowerPoint on Teams. Firstly, adjust the settings to match your needs and preferences. Adjust the font, text size, and color of the notes to get the attention of your audience. Also, keep a reliable internet connection and a computer that can handle a high-graphic presentation. This will ensure that you enjoy a seamless experience, with no interruptions or delays. Additionally, keep your notes organized and labelled in a clear and logical manner, for easy reference when presenting.
Troubleshooting Common Issues When Viewing Notes in PowerPoint on Teams
Despite the ease of use of PowerPoint on Teams, there are some common issues that can arise when viewing notes. For instance, if you have a low-quality video or network problem, the notes and slides might not display correctly. The fix is to ensure that you have a high-quality connection and adjust the display resolution of your presentation. Also, ensure that your PowerPoint software is up-to-date, and avoid opening too many files at once, as this can make the software crash and your notes inaccessible.
Best Practices for Using Presenter View in PowerPoint While Presenting on Teams
To make the most of the Presenter View in PowerPoint presentation on Teams, it’s essential to follow best practices for its use. Some of these include choosing a well-lit and quiet place to present, using a high-quality microphone, and maintaining eye contact with the camera if presenting virtually. Additionally, continually referring to your notes and utilizing the laser pointer tool can help to reinforce your arguments and improve your delivery. Finally, ensure that you engage your audience during the presentation by asking questions, responding to feedback, and keeping them interested throughout the presentation.
Advanced Techniques: Customizing the Presenter View in PowerPoint on Teams
There are some advanced customization options that you could take advantage of when using the Presenter View in PowerPoint on Teams. For instance, you can customize the gradient or solid color of your background, amend the size and location of the notes section, and adjust the timing for the presentation. This comes in handy especially when you want to add more details or data to the presentation to automate certain functions, like changing the slide transitions or animations.
How to Take Advantage of the Laser Pointer Tool in Presenter View on Teams
The laser pointer tool is a handy presenter tool that helps you highlight crucial points and get the audience’s attention. By using this tool, you can focus audience attention on a particular point or graph, which can help to help emphasize the point you’re making. You can easily access the laser pointer tool during your presentation by clicking on the “Use Pen” button in the Presenter View tab. Please select the “Laser Pointer” option to activate the tool, and then click on the slide where you wish to use the pointer.
Maximizing Your Presentation Impact with Notes and Annotations on Teams
One of the best ways to maximize the impact of your presentations on Teams is to use notes and annotations to make your presentation more organized, informative, and engaging. You can choose to add comments, highlights, or even bold text to your notes, which can help to reinforce your points and communicate more effectively with your audience. Annotations, on the other hand, can help emphasize a point, establish credibility, elicit emotions, or even create more interactivity with your audience.
Comparing Presenter View Versus Normal View: Which is Better for Your Presentation?
When it comes to presenting on Teams with PowerPoint, you have the option of using the Presenter View or the Normal View. While the latter option might be more straightforward and more accessible, Presenter View offers substantial benefits like seeing the next slide and having your notes visible alongside the slides. This helps to keep your presentation more organized and engaging. On the other hand, Normal View offers a more straight forward approach, and is ideal for short, less detailed presentations. Ultimately, the choice between Presenter View and Normal View comes down to the specific needs of your presentation and your audience, and what will work best to help you deliver the most effective results.
How to Switch Between Full-Screen and Presenter View Modes in PowerPoint on Teams
Another useful trick to learn is how to switch between Full-Screen and Presenter View modes in PowerPoint on Teams. To switch to full-screen mode while in presenter view, press the “F5” key. To return to presenter view, press the “Esc” key. This can come in handy when you want a more immersive presentation, but with quick access between your notes and your slides.
Using Presenter View as a Teaching Tool for Online Learning with Microsoft Teams
Using Presenter View as a teaching tool is a great way to enhance learning, cover significant topics, and ensure that the class is kept focused and engaged during online classes. With Presenter View on Teams, teachers can utilize the notes and annotations to help explain concepts, reinforce essential concepts, and keep the students engaged throughout the presentation. Some students might find it easy to follow the teacher’s notes and images during the presentation, while others might prefer to have them in-hand afterward. Overall, using Presenter View on Teams is an innovative and effective approach to modern teaching and e-learning.
Best Practices for Collaborating with Co-Presenters Using Presenter Mode on Teams
When it comes to working with co-presenters using Presenter View on Teams, there are some best practices to follow to ensure an excellent presentation. Firstly, assign roles to each co-presenter to avoid confusion and make running of the presentation smooth and effortless. Secondly, ensure that there is proper coordination and communication between the co-presenters to avoid any confusion or overlap during the presentation. Finally, ensure that everyone has access to the notes and annotations, and that everyone follows the same presentation guidelines to ensure an organized and effective presentation.
Viewing notes in PowerPoint while presenting on Teams is easy once you know how to do it. By following the step-by-step guide and implementing the tips and tricks we’ve covered in this article, you’ll be able to deliver professional, well-organized, and effective presentations to your audience on Teams, no matter what your topic or subject happens to be. Whether you’re preparing for a business meeting or holding a webinar, utilizing the PowerPoint presenter view on Teams is a great way to inform, educate, and entertain your audience all at once.
By humans, for humans - Best rated articles:
Excel report templates: build better reports faster, top 9 power bi dashboard examples, excel waterfall charts: how to create one that doesn't suck, beyond ai - discover our handpicked bi resources.
Explore Zebra BI's expert-selected resources combining technology and insight for practical, in-depth BI strategies.

We’ve been experimenting with AI-generated content, and sometimes it gets carried away. Give us a feedback and help us learn and improve! 🤍
Note: This is an experimental AI-generated article. Your help is welcome. Share your feedback with us and help us improve.

How To Download Google Slides With Speaker Notes

- How-To Guides
- Software Tutorials

Introduction
Google Slides is a powerful online presentation tool offered by Google as part of their suite of productivity applications. With Google Slides, users can create, edit, and collaborate on stunning presentations that can be accessed from any device with an internet connection. It offers a wide range of features and templates to help users create professional-looking slideshows.
One of the great advantages of Google Slides is the ability to add speaker notes to your presentation. Speaker notes are an essential tool for presenters as they provide additional context, talking points, and reminders during a presentation. They can help speakers stay on track, provide more in-depth explanations, and ensure that the key points are covered.
However, there may be occasions when you need to download your Google Slides presentation along with the speaker notes. This could be for backup purposes, sharing with someone who doesn’t have internet access, or for printing handouts. In this article, we will explore different methods to download Google Slides with speaker notes.
We will cover three methods: using the “Download as” option, exporting as PowerPoint and adding speaker notes, and downloading as a PDF with speaker notes. Each method has its advantages and can be used depending on your specific needs. So, let’s dive in and learn how to download Google Slides with speaker notes!
What are Google Slides
Google Slides is a cloud-based presentation software developed by Google. It is part of the Google Workspace suite of applications and provides users with a simple and intuitive platform to create, edit, and share presentations.
Similar to Microsoft PowerPoint, Google Slides allows users to create slideshows with various multimedia elements, such as text, images, videos, charts, and animations. It offers a wide range of themes, templates, and formatting options to help users create visually appealing and professional-looking presentations.
One of the standout features of Google Slides is its collaborative capabilities. Users can invite others to collaborate on the same presentation in real-time, making it an ideal tool for group projects or remote teams. Multiple users can simultaneously edit slides, add comments, and make revisions, ensuring seamless collaboration and improved productivity.
Google Slides also integrates seamlessly with other Google Workspace applications, such as Google Docs and Google Sheets. Users can easily import content from these applications or export their slides as documents or spreadsheets. This integration streamlines the workflow and allows for a more cohesive and integrated work experience.
Furthermore, Google Slides offers a variety of sharing options. Users can share their presentations with specific individuals, create a link to share with a larger audience, or publish the presentation on the web. With the ability to control viewing and editing permissions, presenters have full control over who can access, view, and modify their slides.
Whether you’re a student, teacher, business professional, or someone who needs to deliver impactful presentations, Google Slides provides a user-friendly and feature-rich platform to create compelling slideshows.
Now that we have a brief understanding of what Google Slides is, let’s explore why you might want to download Google Slides with speaker notes.
Why Download Google Slides with Speaker Notes
When delivering a presentation, having access to speaker notes is incredibly valuable. Speaker notes provide additional information, reminders, and talking points that can help guide the presenter and ensure a smooth and informative presentation.
Here are a few reasons why you might want to download Google Slides with speaker notes:
- Backup and Offline Access: By downloading your Google Slides presentation with speaker notes, you have a local copy saved on your device. This serves as a backup in case of any technical issues or internet connection problems during your presentation. It also allows you to access your presentation offline, which can be useful when presenting in areas with limited or no internet connectivity.
- Sharing with Non-Google Users: Not everyone has a Google account or access to the Google Slides application. By downloading your presentation with speaker notes, you can share it with individuals who don’t use Google services. This ensures that they can still view the slides and have access to the accompanying speaker notes for a comprehensive understanding of your presentation.
- Printing Handouts: Sometimes, presenters prefer to provide printed handouts to their audience for reference or note-taking. By downloading your Google Slides with speaker notes, you can easily print handouts that include both the slide content and the speaker notes. This allows your audience to follow along with the presentation and have reference material to review later.
- Archiving and Documentation: Downloading Google Slides with speaker notes also serves as a way to archive and document your presentations. This can be useful for record-keeping, future reference, or when you need to track the evolution of your presentation over time. Having speaker notes included in the downloaded version ensures that you have a comprehensive record of the information and insights shared during each presentation.
These are just a few examples of why downloading Google Slides with speaker notes can be advantageous. Now that we understand the importance of having speaker notes and the benefits of downloading them, let’s explore different methods to accomplish this task.
Method 1: Using the “Download as” Option
Google Slides provides a simple and straightforward way to download your presentation with speaker notes using the “Download as” feature. Follow the steps below to utilize this method:
- Open your Google Slides presentation in your web browser.
- Click on the “File” menu at the top left corner of the screen.
- From the drop-down menu, select the “Download” option.
- You will see a list of download options. Choose the file format you prefer, such as Microsoft PowerPoint (.pptx) or PDF (.pdf).
- After selecting the desired format, a dialogue box may appear asking if you want to include speaker notes. Ensure that the “Speaker notes” box is checked.
- Click on the “Download” button to begin the downloading process.
- Once the download is complete, you will have a copy of your Google Slides presentation with speaker notes saved on your computer or device.
Using the “Download as” option is a quick and convenient method to obtain your Google Slides presentation along with the speaker notes. You can choose the file format that suits your needs, whether it’s to edit the slides further in PowerPoint or share a PDF version with others.
Now that we’ve covered the first method, let’s move on to exploring another approach to download Google Slides with speaker notes.
Method 2: Exporting as PowerPoint and Adding Speaker Notes
If you prefer to work with Microsoft PowerPoint and want to add or modify speaker notes before downloading your Google Slides presentation, you can use the method of exporting as PowerPoint. Follow these steps to accomplish this:
- From the drop-down menu, select the “Download” option, then choose “Microsoft PowerPoint (.pptx)” as the file format.
- A .pptx file will be downloaded to your computer, representing your presentation in a PowerPoint format.
- Open the downloaded .pptx file using Microsoft PowerPoint.
- In PowerPoint, navigate to the “Notes” section, which is typically located below the slide view.
- In the “Notes” section, you can add, edit, or delete speaker notes as needed. These notes will be synced with the corresponding slides in your presentation.
- After making any necessary changes to the speaker notes, save the PowerPoint file.
- You now have a copy of your Google Slides presentation with updated speaker notes in the PowerPoint format.
By exporting your Google Slides presentation as a PowerPoint file, you have the flexibility to customize the speaker notes to your liking. PowerPoint offers additional formatting features and tools that you can use to enhance your presentation even further.
This method allows you to take advantage of PowerPoint’s rich editing capabilities while retaining the original content and layout from your Google Slides presentation. It is particularly useful if you want to fine-tune the speaker notes or make additional changes before finalizing your presentation.
Now that we have explored the second method, let’s move on to the final approach to download Google Slides with speaker notes.
Method 3: Downloading as PDF with Speaker Notes
If you prefer to have your Google Slides presentation with speaker notes in a format that is widely accessible and easily shareable, you can choose to download it as a PDF file. Follow the steps below to download your presentation as a PDF with speaker notes:
- From the drop-down menu, select the “Download” option, then choose “PDF Document (.pdf)” as the file format.
- A PDF file will be downloaded to your computer, containing your Google Slides presentation along with the speaker notes.
- Open the downloaded PDF file using a PDF viewer or reader program.
- In the PDF file, you will see the slides displayed, with the accompanying speaker notes visible below each slide.
- You can now view, share, or print the PDF file, ensuring that both the slides and speaker notes are available to your intended audience.
Downloading your Google Slides presentation as a PDF with speaker notes provides you with a portable and universally accessible document format. PDF files can be easily viewed on various devices and operating systems without the need for specific presentation software.
This method is particularly useful when you want to distribute your presentation to others who may not have access to Google Slides or PowerPoint. The PDF file ensures that the content, layout, and speaker notes are preserved, allowing recipients to have a comprehensive understanding of your presentation.
Now that we have explored all three methods to download Google Slides with speaker notes, let’s summarize what we have learned so far.
In this article, we have explored different methods to download Google Slides with speaker notes. Speaker notes are essential for presenters as they provide additional information, reminders, and talking points during a presentation. Having access to speaker notes in a downloadable format can be useful for various reasons.
We started by understanding what Google Slides is – a cloud-based presentation software that allows users to create, edit, and collaborate on presentations online. We then discussed the importance of downloading Google Slides with speaker notes.
Method 1 involved using the “Download as” option in Google Slides to save the presentation along with the speaker notes. This quick and convenient method allows you to choose the desired file format, such as PowerPoint or PDF, for downloading.
Method 2 focused on exporting the Google Slides presentation as a PowerPoint file. This method allows you to further customize the speaker notes using PowerPoint’s features and tools before downloading the presentation.
Finally, Method 3 demonstrated how to download the presentation as a PDF with speaker notes. This method provides a universally accessible and easily shareable format, allowing recipients to view the slides and accompanying speaker notes without requiring presentation software.
By utilizing these different methods, you can ensure that you have a copy of your Google Slides presentation along with the valuable speaker notes. Whether you want a backup copy, need to share with non-Google users, print handouts, or archive your presentations, downloading Google Slides with speaker notes is a practical and beneficial approach.
We hope this article has helped you understand the various methods available to download Google Slides with speaker notes. Choose the method that best suits your needs and make the most of your presentations!
Leave a Reply Cancel reply
Your email address will not be published. Required fields are marked *
Save my name, email, and website in this browser for the next time I comment.
- Crowdfunding
- Cryptocurrency
- Digital Banking
- Digital Payments
- Investments
- Console Gaming
- Mobile Gaming
- VR/AR Gaming
- Gadget Usage
- Gaming Tips
- Online Safety
- Tech Setup & Troubleshooting
- Buyer’s Guides
- Comparative Analysis
- Gadget Reviews
- Service Reviews
- Software Reviews
- Mobile Devices
- PCs & Laptops
- Smart Home Gadgets
- Content Creation Tools
- Digital Photography
- Video & Music Streaming
- Online Security
- Online Services
- Web Hosting
- WiFi & Ethernet
- Browsers & Extensions
- Communication Platforms
- Operating Systems
- Productivity Tools
- AI & Machine Learning
- Cybersecurity
- Emerging Tech
- IoT & Smart Devices
- Virtual & Augmented Reality
- Latest News
- AI Developments
- Fintech Updates
- Gaming News
- New Product Launches
- Unleashing Young Geniuses How Lingokids Makes Learning a Blast
Related Post
10 best ai math solvers for instant homework solutions, 10 best ai homework helper tools to get instant homework help, 10 best ai humanizers to humanize ai text with ease, designing for flexibility: materials and manufacturing techniques in flexible hybrid electronics, robots acquires spyontech, clear hearings: navigating ear health with the scopearound otoscope, related posts.

How To Download Google Slides As PDF With Speaker Notes

How To Download A Google Slide As A PDF

Displaying Speaker Notes On Google Slides With Your Phone

How To Record Audio on Google Slides

How To View Slides Without A Projector

How To Download Google Slides With Audio To Powerpoint

How To Download A Picture From Google Slides

How To Download An Image Off Of Google Slides
Recent stories.

Unleashing Young Geniuses: How Lingokids Makes Learning a Blast!

How to Sell Counter-Strike 2 Skins Instantly? A Comprehensive Guide

10 Proven Ways For Online Gamers To Avoid Cyber Attacks And Scams

Esports World Cup Games Announcement: What’s on the Horizon
- Privacy Overview
- Strictly Necessary Cookies
This website uses cookies so that we can provide you with the best user experience possible. Cookie information is stored in your browser and performs functions such as recognising you when you return to our website and helping our team to understand which sections of the website you find most interesting and useful.
Strictly Necessary Cookie should be enabled at all times so that we can save your preferences for cookie settings.
If you disable this cookie, we will not be able to save your preferences. This means that every time you visit this website you will need to enable or disable cookies again.
we are running a prolonged open beta. a free tier and some advanced options for people who want to support development. see more

transform your notes into online presentations with one click
focus on what you want to say
put your thoughts in writing. drop text into our editor, add illustrations, data, code snippets and more. sort your ideas into meaningful segments.
just one click transforms your notes into beautiful, responsive presentations. no need for you to worry about design: we got you.
easy to use
what you see is what you mean
we will interpret the structure of your texts as instructions for our design engine. you can apply specific instructions by marking up your text in our editor - or by using your beloved markdown flavor of choice. all in plain text.
our text engine is very accommodating when it comes to accepting different styles of markup. it is also quite powerful in extending existing conventions to give your notes awesome presentation features.
the editor can hold your hand in applying markup or get out of the way entirely, however you like. it is designed to guide you towards giving your notes helpful structure and to highlight semantic elements. even if you have never heard of markdown.
see for yourself in our live tutorials

hello world
share your thoughts
write or paste content into the editor. include images, graphs, animations, LaTeX or code. just choose a style and make your notes public: both your notes and your presentations can be exported to work as standalone artifacts or shared online.
invite people to discuss your work: open a comment section right inside your presentation.
make it live. sync your presentation across devices. use your phone as a remote control. create sessions to get feedback while presenting. no matter the screen size, we make it work for you.
overcome barriers
we are building an interface that adapts to different needs. choose a mode that helps you get your ideas out there. no matter if in the dark of the night, in the desert sun, distracted by the world, or using assistive technology.
we hope to empower everyone with accessible design and specialized editor modes. so that you can create and share stunning presentations. so that you can communicate visually. across barriers.

protect your notes with easy encryption
we want your data to be safe, so we try to make encryption as easy and user friendly as can be. in fact, we make encryption mandatory. when your content touches our server, it is already locked. only your password can unlock it again.
all the magic happens right in your browser, no installation necessary. access your work from any device. we automatically save snapshots of your notes, encrypted from the moment you start writing.
your notes can be exported and re-imported in plain text (yes, even the images) to survive the pending apocalypse, readable for humans and machines alike. it is up to you to edge the data into titanium plates for additional safe keeping.

recent updates

february 2023
pdf and print
need your presentation set in stone to preserve it for future generations? not a problem anymore with the export to PDF.

remote control
secretly glance at your presentation notes and fully control your presentation from your phone with the brand new control window!

october 2021
concentrate on the slide you are currently working while the others are waiting for their turn — slightly faded out.

point it out
now everyone knows what you're talking about—with the pointer! also broadcast for all your curious live viewers in the multi user session.

whether you watch your presentation on your own screen or your audience watches it on theirs, everyone can see it full screen.

colorful update
our most colorful theme has received a makeover to become even more colorful! for those days when you just can't stand the gray screens anymore. have a look and change the theme

it happened! we finally opened slidenotes for you! now you can go into the editor and play around and you can support our development while getting full functionality.

january 2021
we added node diagrams to slidenotes! now you can show off all your connections. draw your very own concept maps. check out our new node tutorial

december 2020
enable or disable comments in your presentation when you share it with the world. no mansplaining on your watch—unless you are OK with it.

november 2020
presenting live
multiuser sessions. awesome! you can remotely share your presentation without the need of sharing your screen. and: your phone is now a remote control

for an easier way to create lists and write code go to the advanced options and enable the tab functionality. thank us later. try tabbing in our tutorials

october 2020
tech mulligan
we completely re-engineered the technology that runs in the background. we made some bold choices, invested sweat and tears, but now everything is faster and better.

august 2020
inline code
code is no longer limited to encapsulated blocks; you can use and properly display markdown code inline. the editor will understand the popular backtick syntax and ignore markup transformation.

register for advanced functionality
you can support ongoing development. in fact, we run this open beta as a sort of crowd funding campaign: no monthly subscription—if you have the means and the inclination to pay for a years' worth of service, you get all sorts of perks. and a year of service at the paid tier. we promise to keep the servers running until at least through 2024 (they are paid for already).
free tier: ad-hoc presentations
free forever
paid tier: supporters get pro functionality
become a supporter
coffee support
pitch in 5€
slidenotes is open source . for a glimpse of new features we are brewing have a look at our Github issues . we are constantly working on improving slidenotes. always feel free to contact us on Github or write an email: hi[at]slidenotes.io
and there now is a newsletter for reports about slidenotes and other exciting projects of our pxi | lab : sign up for our newsletter subscribe HP i'd like lab notes from pxi sent to this email and i'm happy with the terms
- Study Guides
- Homework Questions
Oral Presentation 3 Format 成
- Computer Science
How-To Geek
How to print google slides with notes.
Practice your presentations offline!
Quick Links
Print a google slides presentation with speaker notes, key takeaways.
To print your Google Slides presentation with speaker notes, launch your presentation, select File > Print Preview, click "1 Slide Without Notes," change the option to "1 Slide With Notes," and select "Print." You can then print or save your slideshow as a PDF.
Do you want to practice your presentation offline? Or maybe you need to share your presentation notes with your audience? Either way, Google Slides lets you print your presentations with your speaker notes included. We'll show you how to do that or simply save it as a sharable PDF file .
Related: How to Insert a PDF in Google Slides
When you print your presentation with notes included, Slides prints one slide on each page with your notes.
Related: How to Make Slides Vertical in Google Slides
To do that, first, open your preferred web browser and access Google Slides . Sign in to your account on the site, then launch your presentation.
On your presentation screen, in Google Slides' menu bar, select File > Print Preview.
You'll see your presentation's print preview. On this page, in the toolbar at the top, click "1 Slide Without Notes" and choose "1 Slide With Notes."
Slides will refresh your print preview, allowing you to see the new preview that includes your speaker notes. If you're happy with how it looks, then in the toolbar at the top, click "Print."
Your web browser's standard print window will launch. Here, select your printer and other options like what pages to print, the number of copies to print, and so on.
If you'd like to save your presentation as a PDF to attach in an email or print using a different device, then in the printer menu, choose your PDF printer. In Google Chrome, this printer is labeled as "Save as PDF."
Then, at the bottom of the print window, click "Print" to begin printing your presentation (you'll click "Save" if you've chosen to save your slides in a PDF file).
And that's it. You now have a physical (or PDF) copy of your presentation with your speaker notes included. Take a look at other useful Google Slides features to make the most of this free service.
- Global (EN)
- Albania (en)
- Algeria (fr)
- Argentina (es)
- Armenia (en)
- Australia (en)
- Austria (de)
- Austria (en)
- Azerbaijan (en)
- Bahamas (en)
- Bahrain (en)
- Bangladesh (en)
- Barbados (en)
- Belgium (en)
- Belgium (nl)
- Bermuda (en)
- Bosnia and Herzegovina (en)
- Brasil (pt)
- Brazil (en)
- British Virgin Islands (en)
- Bulgaria (en)
- Cambodia (en)
- Cameroon (fr)
- Canada (en)
- Canada (fr)
- Cayman Islands (en)
- Channel Islands (en)
- Colombia (es)
- Costa Rica (es)
- Croatia (en)
- Cyprus (en)
- Czech Republic (cs)
- Czech Republic (en)
- DR Congo (fr)
- Denmark (da)
- Denmark (en)
- Ecuador (es)
- Estonia (en)
- Estonia (et)
- Finland (fi)
- France (fr)
- Georgia (en)
- Germany (de)
- Germany (en)
- Gibraltar (en)
- Greece (el)
- Greece (en)
- Hong Kong SAR (en)
- Hungary (en)
- Hungary (hu)
- Iceland (is)
- Indonesia (en)
- Ireland (en)
- Isle of Man (en)
- Israel (en)
- Ivory Coast (fr)
- Jamaica (en)
- Jordan (en)
- Kazakhstan (en)
- Kazakhstan (kk)
- Kazakhstan (ru)
- Kuwait (en)
- Latvia (en)
- Latvia (lv)
- Lebanon (en)
- Lithuania (en)
- Lithuania (lt)
- Luxembourg (en)
- Macau SAR (en)
- Malaysia (en)
- Mauritius (en)
- Mexico (es)
- Moldova (en)
- Monaco (en)
- Monaco (fr)
- Mongolia (en)
- Montenegro (en)
- Mozambique (en)
- Myanmar (en)
- Namibia (en)
- Netherlands (en)
- Netherlands (nl)
- New Zealand (en)
- Nigeria (en)
- North Macedonia (en)
- Norway (nb)
- Pakistan (en)
- Panama (es)
- Philippines (en)
- Poland (en)
- Poland (pl)
- Portugal (en)
- Portugal (pt)
- Romania (en)
- Romania (ro)
- Saudi Arabia (en)
- Serbia (en)
- Singapore (en)
- Slovakia (en)
- Slovakia (sk)
- Slovenia (en)
- South Africa (en)
- Sri Lanka (en)
- Sweden (sv)
- Switzerland (de)
- Switzerland (en)
- Switzerland (fr)
- Taiwan (en)
- Taiwan (zh)
- Thailand (en)
- Trinidad and Tobago (en)
- Tunisia (en)
- Tunisia (fr)
- Turkey (en)
- Turkey (tr)
- Ukraine (en)
- Ukraine (ru)
- Ukraine (uk)
- United Arab Emirates (en)
- United Kingdom (en)
- United States (en)
- Uruguay (es)
- Uzbekistan (en)
- Uzbekistan (ru)
- Venezuela (es)
- Vietnam (en)
- Vietnam (vi)
- Zambia (en)
- Zimbabwe (en)
- Financial Reporting View
- Women's Leadership
- Corporate Finance
- Board Leadership
- Executive Education
Fresh thinking and actionable insights that address critical issues your organization faces.
- Insights by Industry
- Insights by Topic
KPMG's multi-disciplinary approach and deep, practical industry knowledge help clients meet challenges and respond to opportunities.
- Advisory Services
- Audit Services
- Tax Services
Services to meet your business goals
Technology Alliances
KPMG has market-leading alliances with many of the world's leading software and services vendors.
Helping clients meet their business challenges begins with an in-depth understanding of the industries in which they work. That’s why KPMG LLP established its industry-driven structure. In fact, KPMG LLP was the first of the Big Four firms to organize itself along the same industry lines as clients.
- Our Industries
How We Work
We bring together passionate problem-solvers, innovative technologies, and full-service capabilities to create opportunity with every insight.
- What sets us apart
Careers & Culture
What is culture? Culture is how we do things around here. It is the combination of a predominant mindset, actions (both big and small) that we all commit to every day, and the underlying processes, programs and systems supporting how work gets done.
Relevant Results
Sorry, there are no results matching your search..
- Topic Areas
- Reference Library
Handbook: Financial statement presentation
Handbook | November 2023
Latest edition: In-depth guide on presentation and disclosure requirements, plus considerations under SEC regulations.

Using detailed Q&As and examples, we explain various presentation and general disclosure requirements included in the Codification (i.e. ASC 205 to ASC 280), other broad topics (e.g. related parties under ASC 850 and subsequent events under ASC 855) and SEC regulations. This November 2023 edition incorporates updated guidance and interpretations.
Applicability
- All entities
Relevant dates
- Effective immediately
Key impacts
In the financial statement process, considerable time is devoted to determining what items get recorded and how to account for them, but the critical final mile is determining how they need to appear – i.e. how they are presented and disclosed.
Once the debits and credits have been settled, presentation and disclosure is how that information is conveyed to financial statement users in a transparent, understandable and consistent manner. Disclosure goes ‘behind the numbers’ and is necessary to fully understand the financial statements.
ASC 205 to 280 in the FASB’s Accounting Standards Codification® are dedicated to presentation and disclosure and provide the baseline requirements. Other ASCs address more detailed requirements, specific to certain transactions or industries. For SEC registrants, there is yet more guidance that contains many additional requirements, and which has helped shape practices over the years for all other entities.
In this Handbook, we pull together many of the general requirements and practices to provide you with a fuller picture of how the different financial statements are constructed and how they interact with one another.
Report Contents
- Financial statements: general principles
- Balance sheet
- Income statement
- Comprehensive income
- Notes to the financial statements
- Risks and uncertainties
- Related parties
- Subsequent events
Download the documents:
Financial statement presentation
Executive Summary
Explore more

Handbook: Statement of cash flows
Latest edition: Our comprehensive guide to the statement of cash flows, with Q&As and examples to explain key concepts.

Handbook: Segment reporting
Latest edition: Our comprehensive guide to ASC 280 – with analysis, Q&As and examples.

Handbook: Earnings per share
Latest edition: Our comprehensive guide to EPS, with new and updated interpretive guidance on forward purchase/sale contracts and unit structures.
Meet our team

Subscribe to stay informed
Receive the latest financial reporting and accounting updates with our newsletters and more delivered to your inbox.
Choose your subscription (select all that apply)
By submitting, you agree that KPMG LLP may process any personal information you provide pursuant to KPMG LLP's Privacy Statement .
Accounting Research Online
Access our accounting research website for additional resources for your financial reporting needs.
Thank you for contacting KPMG. We will respond to you as soon as possible.
Contact KPMG
Job seekers
Visit our careers section or search our jobs database.
Use the RFP submission form to detail the services KPMG can help assist you with.
Office locations
International hotline
You can confidentially report concerns to the KPMG International hotline
Press contacts
Do you need to speak with our Press Office? Here's how to get in touch.
IMAGES
VIDEO
COMMENTS
Start presenting. On the Slide Show tab, in the Start Slide Show group, select From Beginning. Now, if you are working with PowerPoint on a single monitor and you want to display Presenter view, in Slide Show view, on the control bar at the bottom left, select , and then Show Presenter View.
Next, in the pane on left, select the slide where you'd like to add speaker notes. Next, click the "Notes" button at the bottom of the window. A small box reading "Tap to Add Notes" will appear beneath the slide. For Mac users, this will say "Click to Add Notes.". Now, simply type the speaker notes for that slide.
Here's how to add notes in PowerPoint: Select a slide you want to add notes to. View the Notes pane located beneath each slide. If it's not visible, you can make it appear by clicking Notes on the bottom taskbar. You will see a blank space with the prompt "Click to add notes."
When you're creating a presentation in PowerPoint, you can add speaker notes to refer to later while delivering the slide show in front of an audience. Learn...
You have a few convenient ways to open the Speaker Notes section below your slide as you create your presentation. Double-click the three dots at the bottom of the Google Slides window. Drag up using the three dots at the bottom to resize the Speaker Notes section as you please. Click View > Show Speaker Notes in the menu to select it.
During your presentation, you can add notes in two main ways: 1.You can use PowerPoint's built-in simple pen and highlighter to add notes to your slide. This is found in the bottom left corner of the screen click on the pen and choose your color to begin drawing. 2. For sightly more advanced pen tools, text boxes, and shapes, you can use the ...
Learn how to insert and use presenter, speaker notes in a PowerPoint presentation in PowerPoint 2021 for Microsoft 365. Learn more at https://kaceli.com. Lea...
Select a slide you'd like to add notes. Locate the Notes pane positioned beneath each slide. You'll find a blank space with the prompt "Click to add speaker notes." Enter your notes there, and you're all set. Remember, you can always edit speaker notes on Google Slides. You only need to click inside the Notes pane to edit the content and click ...
In this video I will show you how to see your speaker or presenter notes while presenting your Microsoft Powerpoint presentation. You will learn how to view...
If you want to customize your Presenter View experience, follow these steps: On the 'Slide Show' tab, click 'Set Up Slide Show.'. Under 'Multiple Monitors,' select the 'Use Presenter View' checkbox. If you're using a single monitor, select the 'Display slide show on' option and choose your primary monitor.
Mind maps are used to generate, visualize, structure, and classify ideas, and can be used as notes to aid a presentation. The advantages of using a mind map are similar to those of using keywords on cue words but it is easier to illustrate complex relationships than with keywords. However, again, using mind maps as a presentation aid requires ...
Adding Speaker Notes. Open your presentation in Google Slides. At the bottom of the screen there's a text field with the message "Click to add speaker notes". The text that you enter here will be visible for you during your presentation, but not for your audience. Adding speaker notes. If you can't see this text field, click View → ...
Here are a few tips for business professionals who want to move from being good speakers to great ones: be concise (the fewer words, the better); never use bullet points (photos and images paired ...
To present your PowerPoint presentation, simply click the "Slide Show" tab, and then click "From Beginning" or "From Current Slide". To view your notes while presenting, click the "Notes" button on the bottom left-hand side of the screen. This will bring up a window with your notes, while your audience sees your slides on the ...
Maximizing Your Presentation Impact with Notes and Annotations on Teams. One of the best ways to maximize the impact of your presentations on Teams is to use notes and annotations to make your presentation more organized, informative, and engaging. You can choose to add comments, highlights, or even bold text to your notes, which can help to ...
Printing PowerPoint with Notes on Mac. Open your slideshow in PowerPoint on Mac and head to File > Print. When the print window opens, select "Show Details" on the bottom left if you see a condensed view of the print options. On the right side, below Paper Size, you'll see a drop-down box. Make sure that "PowerPoint" is selected here.
Follow the steps below to download your presentation as a PDF with speaker notes: Open your Google Slides presentation in your web browser. Click on the "File" menu at the top left corner of the screen. From the drop-down menu, select the "Download" option, then choose "PDF Document (.pdf)" as the file format.
To see the full course that this video came from, go here: ️https://www.simonsezit.com/courses/microsoft/powerpoint-2021-online-course/In this Microsoft Pow...
focus on what you want to say. put your thoughts in writing. drop text into our editor, add illustrations, data, code snippets and more. sort your ideas into meaningful segments. just one click transforms your notes into beautiful, responsive presentations. no need for you to worry about design: we got you. try it.
Oral Presentation 3 Topics: ⚫ Individual Topics: 4 minutes per person. You can complete it either in a video or in person. Because we are going to attend Annual York University Culture Day, video is preferred. It ' s better to use pictures or videos to help us to understand your presentation. ⚫ You can choose between the following two topics: 我讲个故事给你听 ...
Sign in to your account on the site, then launch your presentation. On your presentation screen, in Google Slides' menu bar, select File > Print Preview. You'll see your presentation's print preview. On this page, in the toolbar at the top, click "1 Slide Without Notes" and choose "1 Slide With Notes." Slides will refresh your print preview ...
Using detailed Q&As and examples, we explain various presentation and general disclosure requirements included in the Codification (i.e. ASC 205 to ASC 280), other broad topics (e.g. related parties under ASC 850 and subsequent events under ASC 855) and SEC regulations. This November 2023 edition incorporates updated guidance and interpretations.