
SwiftUI Sheet: Modal, Bottom, and full screen presentation in iOS
Written by: Karin Prater
Published on: May 8, 2023
Building apps become more and more complex because more features and screens are added. SwiftUI helps to manage these advanced interfaces and user flows. One essential aspect of a great user experience is the effective use of presentation styles for displaying additional content or capturing user input. In this blog post, I will show you the different presentation styles in SwiftUI, including sheets, bottom sheets, and fullScreen presentations, showcasing how to create and manage these presentations to enhance your app’s functionality and user experience.
I am going to use a Shopping app as an example that I started developing for other tutorials about SwiftUI presentations like menus and popovers .
What is a modal view in SwiftUI?
A modal view is a view presented on top of another view, typically used for user input or displaying additional information. SwiftUI provides a powerful and flexible way to create modal presentations, such as sheets, popovers, alerts, or confirmation dialogs, to focus on important, narrowly scoped tasks within your app. To get an overview of all these presentation styles have a look at this overview of SwiftUI presentation styles .
What are SwiftUI sheets?
A sheet in SwiftUI is a presentation style that displays a new view on top of the current view. Sheets slide in from the bottom of the screen, which is why they are often referred to as bottom sheets. They cover the main content. SwiftUI has newer features to set the size of the sheet. If you for example what to create a half sheet and allow the user to see parts of the underlying content.
Example use cases for sheets are:
- Settings Menu : Present a sheet to allow users to access and modify app settings without leaving the main interface.
- Adding an item : In a to-do list app, use a sheet to display a form for users to add a new task without navigating away from the main task list.
- User profile editing : In a social media app, present a sheet for users to edit their profile information without leaving their profile view.
- Sharing options : Present a sheet with various sharing options when users want to share content from your app with others. This is done automatically with ShareLink.
- Info view: Show introduction and help documentation in a sheet. The user can dismiss the info view easily and go back.
Examples of presenting sheets in full screen mode are the following (fullScreenCover):
- Onboarding : Use fullScreenCover to present an onboarding flow that introduces users to the app’s features and functionality when they first open the app.
- Authentication : In apps requiring user authentication, use a fullScreenCover to present a login or sign-up screen, ensuring the user focuses on the authentication process before accessing the app’s content.
- Media viewer : In a gallery or media app, use fullScreenCover to display images or videos in a full-screen mode for an immersive viewing experience.
- Terms and conditions or privacy policy : When users need to review and accept terms and conditions or privacy policies, present them using fullScreenCover to ensure they focus on the content without distractions.
- In-app purchases or subscription plans : In apps offering in-app purchases or subscription plans, use fullScreenCover to present the available options and payment flow, ensuring users can concentrate on the purchasing process.
- Ads: Force the user to watch ads and only allow to continue once the ad has finished.
SwiftUI Example Project
I will use a shopping app as an example. It is a very basic implementation and uses the Fake Store API . It consists of 2 screens: one view where the list of all products is displayed and a detail view for the product.
Download the project files here: https://github.com/gahntpo/Sho…
How do I present a sheet in SwiftUI?
For my shopping app example I want to show a sheet where the user can select from a list of categories. You could use a popover, but my list of categories will eventually be quite long. I think it will better fit in a sheet. In the following image, you can see how the app should look like.

The main content of the app is ProductListView inside a NavigationStack. I added the `Choose Category` button in the toolbar.
In order to show the ProductCategoryListView in a sheet, when the user taps on the `Choose Category` button, I first have to declare a state property and toggle it.
I can then use the .sheet modifier and bind the respective @State property to the showCategorySelector parameter:

Get Hands-on with SwiftUI Layout .
Master SwiftUI layouts with real-world examples and step-by-step guide. Building Complex and Responsive Interfaces.
Execute an action when the sheet closes
Now the user can select a category, but the product list does not update. When the sheet is closed, I want to update the product list and show only products in the selected category. You can use the argument onDismiss to execute code when the sheet is dismissed. In the following example, I reset the products array and call load() which executes a fetch request to the Fake Store API:
Can I use multiple sheets in SwiftUI?
Often you need to toggle multiple different views. In the shopping app example, I could add another sheet that shows the settings view.
How to show sheets from items inside List and ForEach?
Sheet works also with a binding to the selected item. This is useful if you want to show sheets for items inside List or ForEeach . Here is a simple example:
How to present a full-screen modal view using fullScreenCover()?
To present a full-screen modal view using fullScreenCover(), add the .fullScreenCover modifier to the view you want to present from, provide an optional condition using the isPresented binding, and supply the view you want to present. In the shopping app example, I have a detail view with a buy button. When the user I not logged in, I want to show a login screen in full screen:

Controlling the height of sheet with presentationDetents modifier to create a half sheet
So far, I should you the sheet and full-screen cover. Both cover the main view completely. But sometimes you want to show a half sheet and allow the user to see parts of the main content. In the product list example, I could show the category selections screen only in a half-bottom sheet. You can do this now with presentationDetents which is available for iOS 16+ and macOs 13+. The presentationDetents modifier needs to be placed inside the sheet. Here is how to add it to ProductCategoryListView:

The user can drag the sheet indicator to change the size of the sheet if you provide multiple sheet sizes. The configurations from the above image are done with:
These are the configuration for detents:
- system provided: large and medium
- fraction: give the percentage of the current screen height
- height: give the absolute height in points
When the sheet is opened, it is presented with the smallest presentation size. If you want to set a specific size, you can use the binding to the selection property:
This can also be used to programmatically adjust the size of the sheet. For example, you could choose the height depending on the currently selected category.
Prioritizing scrolling over resizing the sheet
ProductCategoryListView has a List inside. Both the List and the sheet react to a swipe up/down gesture. SwiftUI needs to decide who is going to react to the gesture. The default is that the sheet gets to gesture to resize. In my case, I want to allow the user to scroll inside the category list. This can be done with the newer presentationContentInteraction
presentationContentInteraction takes either a value of resizes or scrolls.
Allow interaction with the view behind sheet with presentationBackgroundInteraction
Per default, when the sheet is open, you cannot interact with the view behind the sheet. With iOS 16 and macOS 13, you can now make it interactable. Here is an example that uses the new presentationBackgroundInteraction modifier:
This will always allow to interact with the below view. If you want to enable this only for certain sizes of the sheet, you can further customize presentationBackgroundInteraction like so:
In the current shopping app example, it probably does not make sense. When the user taps on a product in the list, the detail view is opened.
How to customize the appearance of sheet?
With iOS 16+ and macOS 13+, you can now change the background color of the sheet. Here is an example to use presentationBackground with a gradient background:
You could also use a material background to make the sheet semi-transparent:

Also available with iOS 16+ and macOS 13+, is presentationCornerRadius modifier. This changes the corner radius of the sheet:

Dismiss Sheets and FullScreenCover
Sheet can be dismissed with a swipe-down gesture. If you want to prevent this, use the new interactiveDismissDisabled modifier:
FullScreenCover does not allow swipe-down to dismiss. You have to add buttons to allow the user to dismiss sheets programmatically. Use the environment value dismiss:
Dismiss works for all system presentations including sheet, fullscreenCover, or popover. Inside NavigationView, it will also pop the current view that means navigate back to the root view.
In summary, SwiftUI provides a versatile way to create modal views, such as sheets, fullScreenCovers, and more. Sheets are particularly useful for displaying additional content or prompting user input without navigating away from the main interface. This blog post explored various aspects of sheets in SwiftUI, including presenting sheets, using multiple sheets, controlling sheet height, customizing appearance, and dismissing sheets. By utilizing these techniques, developers can create dynamic and interactive user interfaces that enhance the overall user experience.
What is the difference between a sheet to other presentation forms in SwiftUI like popover, alerts and confimation dialogs?
Sheets provide a more flexible presentation style that allows for greater customization and interaction, compared to other presentation forms like popovers, alerts, and confirmation dialogs, which serve more specific and focused purposes.
Sheets differ from other presentation forms in SwiftUI, such as popovers, alerts, and confirmation dialogs, in several ways:
- Popovers : A popover is a small, contextual view that appears next to the control that triggered it. Unlike sheets, popovers only cover a small portion of the screen, and their content is directly related to the triggering control. Popovers are commonly used on iPadOS and macOS, but they are adapted to sheets when used on iPhone devices.
- Alerts : Alerts are used to display important information or require user confirmation before proceeding with an action. They typically cover a small area in the center of the screen and include a title, message, and one or more buttons for user interaction. Unlike sheets, alerts interrupt the user’s workflow and demand immediate attention.
- Confirmation dialogs : Confirmation dialogs are similar to alerts in that they require user input before proceeding with an action. However, they can be more customizable and may include additional controls or views beyond just a title, message, and buttons. While sheets are used for more extensive tasks and allow for greater customization, confirmation dialogs focus on quickly gathering user input for a specific action.
How do I present a view in SwiftUI?
You can present a view in SwiftUI using presentation modifiers like .sheet, .fullScreenCover, or by creating a custom bottom sheet.
How do I create a modal in SwiftUI?
To create a modal in SwiftUI, use the .sheet modifier with a binding to manage the presentation state. Note that modals are deprecated in iOS 15 and it is recommended to use sheets instead.
How do I present a view to another view in SwiftUI?
To present a view on top of another view in SwiftUI, use presentation modifiers like .sheet or .fullScreenCover, or create a custom bottom sheet.
To present a sheet in SwiftUI, attach the .sheet modifier to the view you want to present the sheet from, use a binding to manage the presentation state, and provide the view you want to present as a sheet.
What is fullScreenCover in SwiftUI?
fullScreenCover in SwiftUI is a presentation modifier that presents a view covering the entire screen, hiding the underlying view. It is useful for onboarding, login, or other situations where the user should focus on a single task.
How do I dismiss full screen cover in SwiftUI?
To dismiss a full screen cover in SwiftUI, use a binding to manage the presentation state and toggle the binding value when you want to dismiss the cover. You can also use the @Environment(.dismiss) property wrapper to dismiss the full screen cover programmatically.
Further Reading and Resources
SwiftUI Popovers and Popup Menus: The Ultimate Guide
- How to Show SwiftUI Alerts with Buttons, Textfields and Error Messages
- SwiftUI in Action: A Deep Dive into Action Sheets and Confirmation Dialog
- Exploring Navigation in SwiftUI: A Deep Dive into NavigationView
- Better Navigation in SwiftUI with Navigation Stack
3 thoughts on “SwiftUI Sheet: Modal, Bottom, and full screen presentation in iOS”
Hu, Is there a way to force a sheet to portrait mode only?
As fare as I know, SwiftUI itself doesn’t provide a built-in way to enforce orientation modes.
Anyway at all too display the tab bar above the sheet? Similar to Apples ‘Find My’ app. When sheet is present it blocks tab bar view, my sheet will always be present on my home view.
Leave a Comment Cancel reply
Save my name, email, and website in this browser for the next time I comment.
SwiftUI Menu and Context Menu: Buttons with Dropdown Lists
Subscribe to my newsletter.
Want the latest iOS development trends and insights delivered to your inbox? Subscribe to our newsletter now!
© Swiftyplace
Privacy Policy | Terms Of Service
The SwiftUI Performance Checklist
Dive deep into the do's and don'ts that every developer should follow to optimize app performance and avoid common pitfalls.
16 SwiftUI Practices You Need to Know
99 PROVEN SwiftUI TIPS FOR iOS Developers
Get latest tips and strategies to boost your apps
SUBSCRIBE TO OUR
JOIN THE ELITE CLUB
Enjoy l uxury, exclusivity and discretion
NOW TREAT YOURSELF!
Get 25% Off & Free Shipping On Your First Order. Enter Code WELL25SPE
A weekly blog about Swift, iOS and Xcode Tips and Tricks
Every Tuesday, curated Swift content from the community for free.
RocketSim: An Essential Developer Tool as recommended by Apple
SwiftLee > SwiftUI > Sheets in SwiftUI explained with code examples
In this article
Sheets in SwiftUI explained with code examples
Presenting a sheet in swiftui.

Presenting a sheet on macOS

Dismissing a sheet
Enum-based sheet presentation, creating a coordinator.
Stay Updated with the Latest in SwiftUI
The 2nd largest newsletter in the Apple development community with 18,327 developers . Don't miss out – Join today:
Featured SwiftLee Jobs
- Lead Software Engineer @ M7 Health • $105K - $185K
- Senior Android Engineer @ Speechify
- Test Automation Lead, Engineering Productivity @ Ordergroove • $140K - $170K
Find your next Swift career step at world-class companies with impressive apps by joining the SwiftLee Talent Collective. I'll match engineers in my collective with exciting app development companies. SwiftLee Jobs
Using a UISheetPresentationController in SwiftUI
This article explores how you can create a layered and customized sheet experience in SwiftUI.

Giovanni Monaco
During WWDC 2021 Apple has announced a new way to create a layered and customized sheet experience in UIKit. This is possible using a new UIPresentationController subclass called UISheetPresentationController .
If you want to know more about it check out the following session from WWDC 2021 which talks about how we can build a non-modal experience in our app to allow interaction with content both in a sheet and behind the sheet at the same time.

UIKit now supports medium/large detents, which allows you to create a vertically resizable sheet that only covers half the screen. This is why it is often referred to as half-modal or full-modal. if you want to know more about detens have a look at Apple’s documentation.
SwiftUI currently provides only one way to achieve a modal experience. sheet(isPresented:onDismiss:content:) is a view modifier that presents a sheet with a large detent only when a given condition is true. What we would like instead is to use the UIKit exclusive medium detent in our SwiftUI apps.
Bringing the medium detent to SwiftUI
Fortunately, the UIKit/SwiftUI integration can be easily achieved. SwiftUI can be integrated into a UIKit app using UIContainerView and UIHostingController , while UIKit can be integrated into a SwiftUI app using UIViewRepresentable .
Check out our tutorials Using a SwiftUI View in a UIKit App and Using a SwiftUI View in a UIKit App as an individual component if you want to dig deeper.
Using all of this, we have created a view modifier that allows the use of sheets with detents, so you can use the new UIKit feature focusing on using only SwiftUI in your apps.
Thanks to our code snippets you can get something like the animated image below in a few minutes. To get access to this new half-modal experience you can just copy and paste the code snippets below and use your brand new modifier sheetWithDetents(isPresented:detents:onDismiss:content:)
Let's explore together the 3 code snippets we have created to make your life as a frontend developer easier.
1. SheetPresentationForSwiftUI is a struct conforming to the UIViewRepresentable protocol. This is needed to create and manage the UIKit UISheetPresentationController in SwiftUI.
2. sheetWithDetentsViewModifier is a structure conforming to the ViewModifier protocol. This is needed to create our custom ViewModifier that emulates the structures o d already available view modifiers.
3. Finally, when working with custom modifiers, it’s usually a smart idea to create extensions of View that make them easier to use. In the code snippet below, we wrapped the sheetWithDetentsViewModifier modifier in a View extension.
Using the custom sheetWithDetents modifier
We can now use our custom sheetWithDetents(isPresented:detents:onDismiss:content:) modifier like this:
The detents property is an array of detents where the sheet may rest at. The array must have at least one element and detents must be specified in order from smallest to largest height.
In the animated image below we see what we've created, and the best part of all this is that the Xcode canvas continues to give us a preview of what we're programming in a true SwiftUI style as if there were no reference to UIKit.
Wrapping up
We explored how you can create a layered and customized sheet experience in SwiftUI, taking the best that UIKit has to offer. A few code snippets to unlock even more of SwiftUI's hidden potential.
Sign up for more like this.
IMAGES
VIDEO
COMMENTS
To draw attention to an important, narrowly scoped task, you display a modal presentation, like an alert, popover, sheet, or confirmation dialog. In SwiftUI, you create a modal presentation using a view modifier that defines how the presentation looks and the condition under which SwiftUI presents it. SwiftUI detects when the condition changes ...
For example, you might toggle a Boolean inside a button press, which triggers an alert to show. You can attach presentations to your main view or any of its children – even to the button that adjusts your state so the presentation triggers. It’s a subtle distinction, but it’s important to understand that these presentations aren’t ...
Use presentation modifiers to show different kinds of modal presentations, like alerts, popovers, sheets, and confirmation dialogs. Because SwiftUI is a declarative framework, you don’t call a method at the moment you want to present the modal. Rather, you define how the presentation looks and the condition under which SwiftUI should present ...
A vital aspect of this UI design involves SwiftUI presentations and navigation, which are key to delivering a seamless user experience. This blog post, “The A-Z of SwiftUI Presentations and Navigation”, provides an in-depth exploration of various presentations such as sheets, popovers, popup menus, alerts, action sheets, confirmation ...
SwiftUI Sheet: Modal, Bottom, and full screen presentation in iOS. Building apps become more and more complex because more features and screens are added. SwiftUI helps to manage these advanced interfaces and user flows. One essential aspect of a great user experience is the effective use of presentation styles for displaying additional content ...
Sheets in SwiftUI explained with code examples. Sheets in SwiftUI allow you to present views that partly cover the underlying screen. You can present them using view modifiers that respond to a particular state change, like a boolean or an object. Views that partly cover the underlying screen can be a great way to stay in the context while ...
SwiftUI provides views, controls, and layout structures for declaring your app’s user interface. The framework provides event handlers for delivering taps, gestures, and other types of input to your app, and tools to manage the flow of data from your app’s models down to the views and controls that users see and interact with.
Hacking with Swift; Swift UI Lab; Swift with Majid; WWDC by Sundell; Swift by Sundell; If you’ve got a great resource to share with the community, let me know and I’ll gladly add it to this list. As I said at the start of the article, If you have requests for more detail on a subject, or if you think I’ve made a mistake, let me know in a ...
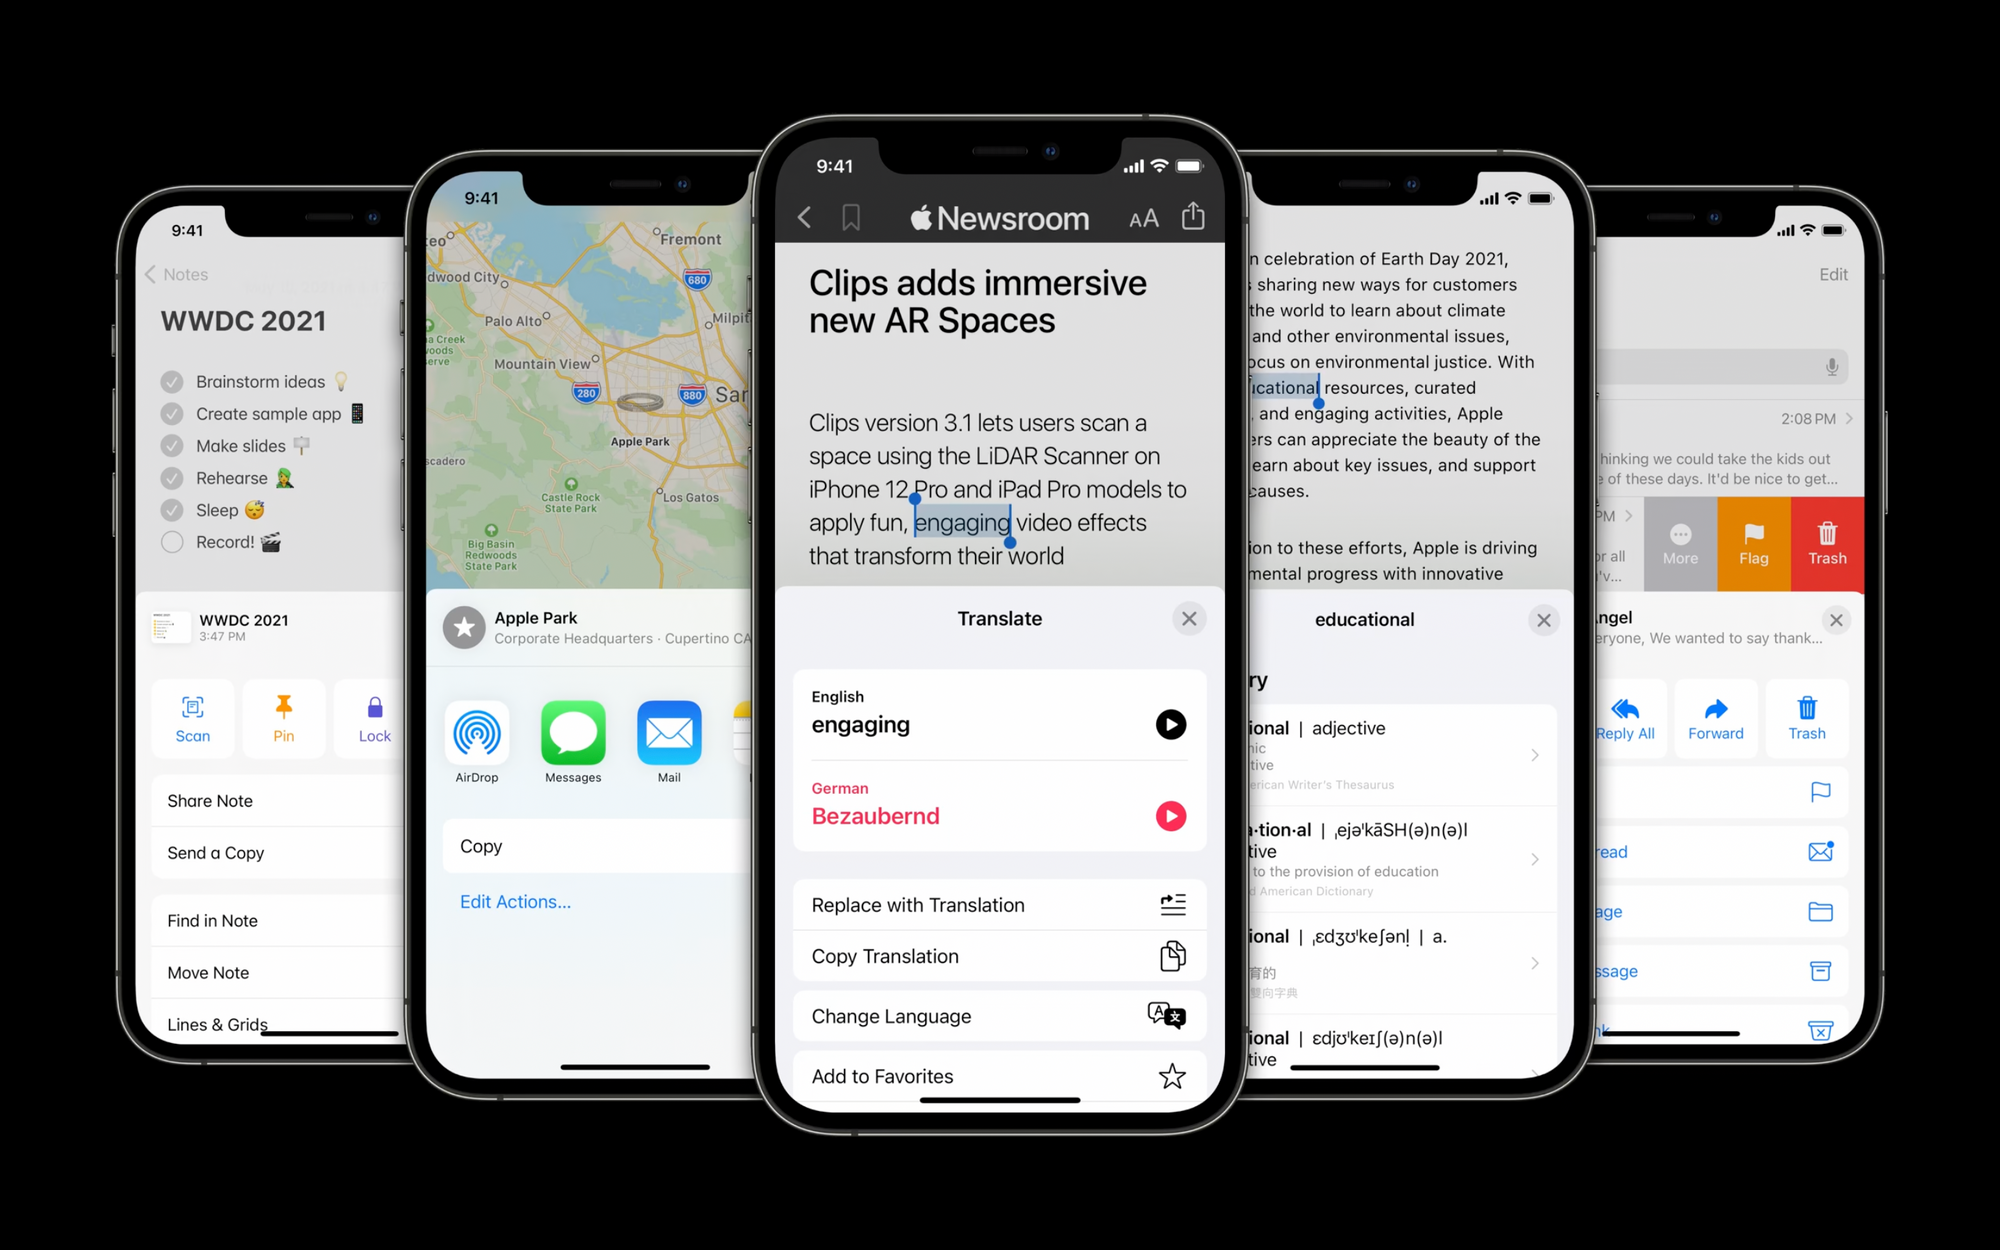
Mar 11, 2022 • 5 min read. During WWDC 2021 Apple has announced a new way to create a layered and customized sheet experience in UIKit. This is possible using a new UIPresentationController subclass called UISheetPresentationController. Some system apps (Notes, Maps, Newsroom, Mail) make use of the UISheetPresentationController.
SwiftUI tutorial: Building a complete project. Building a menu using List. Composing views to create a list row. Polishing designs with fonts and colors. Displaying a detail screen with NavigationLink. Observable objects, environment objects, and @Published. Adding items to an order with @EnvironmentObject.