
Using the Assignment Tool in Brightspace
With the Assignment tool, it is easy to create and manage assignments in Brightspace. No more assignments lost in email and you can annotate right on the assignment.
Click a link below to jump to a specific section or browse through all the assignment changes.
- Brightspace assignment walkthrough video
- The main view of the new assignment experience
Grading options
Availability dates & conditions, submission & completion, evaluation & feedback, copy assignments.
Below you’ll find a walkthrough video and screenshots of what you will find in the assignment tool.
Updated Jan 20, 2022
Brightspace assignment walkthrough
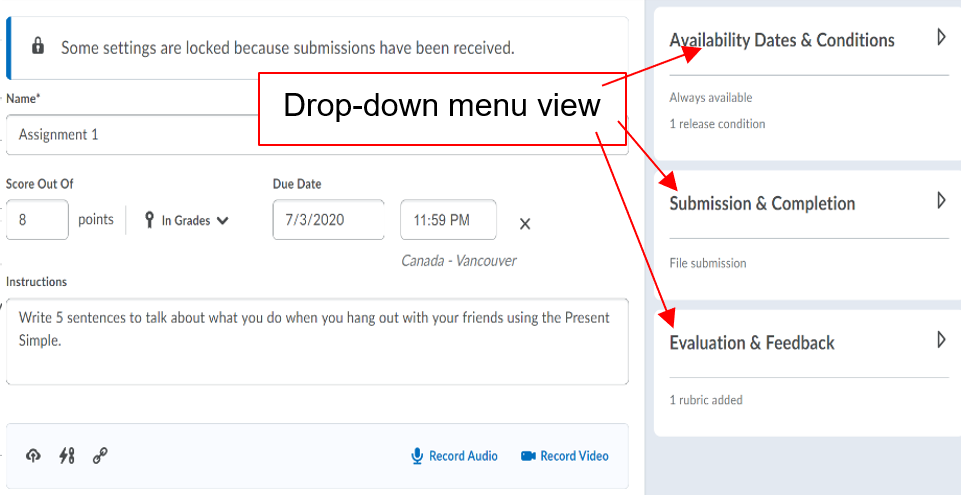
The main view of the assignment tool.
This is a screenshot of the assignment tool. It has been streamlined to reduce scrolling and has clearer titles for the right side menu sections that used to be tabs.
The main portion of the page has a space for the assignment name, grading options, due date, assignment instructions, attachment options, and one click buttons to record audio or video for the assignment.

In Brightspace, you can hover over the attachment options to see a tooltip title of what it attaches.

At the bottom of the page next to the Save and Cancel buttons is a toggle control the visibility of the assignment.
On the right side of the screen are 3 menu boxes that you can open up for more options: Availability Dates & Conditions, Submission & Completion, and Evaluation & Feedback.
The default grading option for assignments is ungraded. To change this, click the box under “Grade out of” . This then brings up more grading options.

There is now space to type the points total and an In Grades dropdown menu for linking or removing grade items. After you have given the assignment a points value, it will automatically create a grade item in your gradebook even if you do not use the Edit or Link to Exiting grades option to link a grade item . It will have the same name as your assignment.
Choose from grades
Clicking Edit or Link to Exiting brings up a popup box that you can create and link a new grade item . Or choose to link to an existing grade item .
A new grade item will automatically have the same name as your assignment. You can change this in the Gradebook if you choose. You can also choose a grade category for the item or pick a specific grading scheme.
To link to an existing grade item, choose it from the dropdown menu that appears.

Remove from grades
If you can see the In Grades dropdown menu, that means that a grade item has been automatically added to your gradebook with the same name as this assignment. Choose Not in Gradebook to remove the grade item . You will still be able to see the point value you have added but it will not be in the gradebook.
Reset to ungraded
This option will unlink the assignment from your gradebook and your Grade Out of box will reset to saying ungraded.
Click the triangle next to Availability Dates & Conditions title to open up those options.
This section includes options for Start and End dates , Release Conditions, and Special Access .

These are the options for file submission .
Select whether this is an individual or group assignment. Add an assignment category if you choose. *This is different than a gradebook category.
Choose file submission type: File, Text, On Paper, or Observed in Person.
Choose how many files are allowed per submission and which file submission is saved. Add an email address to be notified when an assignment has been submitted.

You also have the option of restricting which file type is allowed for submission from the Allowable File Extensions dropdown menu. You can reference this Brightspace page to see which file types are Annotatable Files .

This section has options for adding Rubrics and Learning Objectives . You can also toggle on and off your annotation tool . This tool allows you to digitally mark up files submitted by students.
Turning on Anonymous Marking allows you to evaluate the assignment without seeing student names. This must be enabled before any submissions are made.
This also has the option to use our Turnitin integration to manage student file submissions.

Previously, you could copy assignments in the same course or use the course copy tool to copy assignments to a different course. Now you can copy assignments to a different course right from the assignment page.
- Click the down arrow next to the Assignment title to bring up the context menu
- Choose Copy to Other Courses
- Click the checkbox next to the course(s) to copy the assignment to those courses
- Indicate if you want to also copy the associated rubric and grade item
- Double check your selection on the next screen then click Copy

Once the assignment is successfully copied, the you will see a message of Copy Complete with a green checkmark.

Hopefully you find the assignment tool from Brightspace to be an improvement and that it helps you in your assignment creation. As always, if you have questions please contact the IDAT team for any Brightspace help.
Share this:
Related posts, discover more from instructional design that works.
Subscribe now to keep reading and get access to the full archive.
Type your email…
Continue reading
How do I create an assignment in Brightspace?
Brightspace , Instructor Help
The Assignments tool allows instructors to create a space in Brightspace where they can build, collect and eventually grade class assignments. Students can submit their work by uploading files or by using the text box. In addition to typing in text, learners can also use this option to submit work that includes links or Echo 360 videos for example. These assignments c an be accessed, annotated and graded by the course instructor and TAs within Brightspace. The tool s upports both individual and group assig nments.
This article presents the steps involved in creating Assignments for your course. It will address both the New Assignment Experience (Section A) and the Classic Assignment Experience (Section B). Note that features common to both experiences are described in more details in the first section only.
Here are the steps to access the Assignments tool from the navigation bar to create a new assignment, which are the same in both experiences.
1. To create a new assignment, select Course Tools > Assignments from the navigation bar .

2. In the Assignments tool, click on New Assignment .

The layout of the window you will see next will depend on the type of assignment experience currently set for your course page. To check the version you are using and to toggle between the available options, expand the dropdown menu as indicated in the screenshot below.

Section A: New Assignment Experience
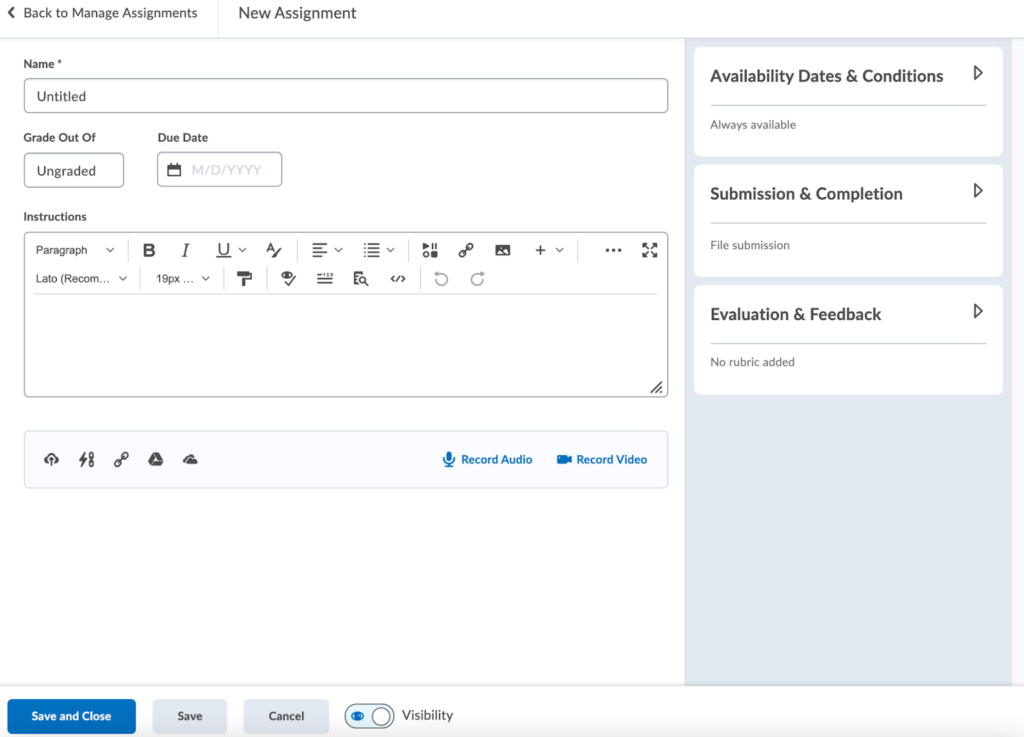
This experience provides a clean and simple interface with reduced scrolling, optimal for mobile devices. It is useful for new users to get used to the Brightspace course building environment. This experience consists of condensed input boxes and settings nested under drop-down menus, as shown in the picture below:
The first step is to enter the name of your assignment (required), its score (points), due date, instructions, and eventual files. Uploading files can be useful if you wish for your students, for example, to write their answers on a provided answer sheet. It also allows you to provide complex instructions (including images) or to make any other file related to your assignment available to learners.

Please note that if you input a value in the Score Out Of box, an extra setting will appear. It will let you link the assignment to a grade item in the gradebook. For more information about the gradebook, please visit How do I enter/edit grades using the Brightspace Gradebook?

The Due Date option allows you to set up a deadline for your assignment. Students can still submit their work past the due date, but Brightspace will highlight those submissions as overdue.
If you choose to upload a file, please follow these steps.
1. The dialogue below will appear when clicking to upload a file. Drag and drop your file or click the Upload button to search for files on your device.

2. Once the file name has appeared after loading, click Add .
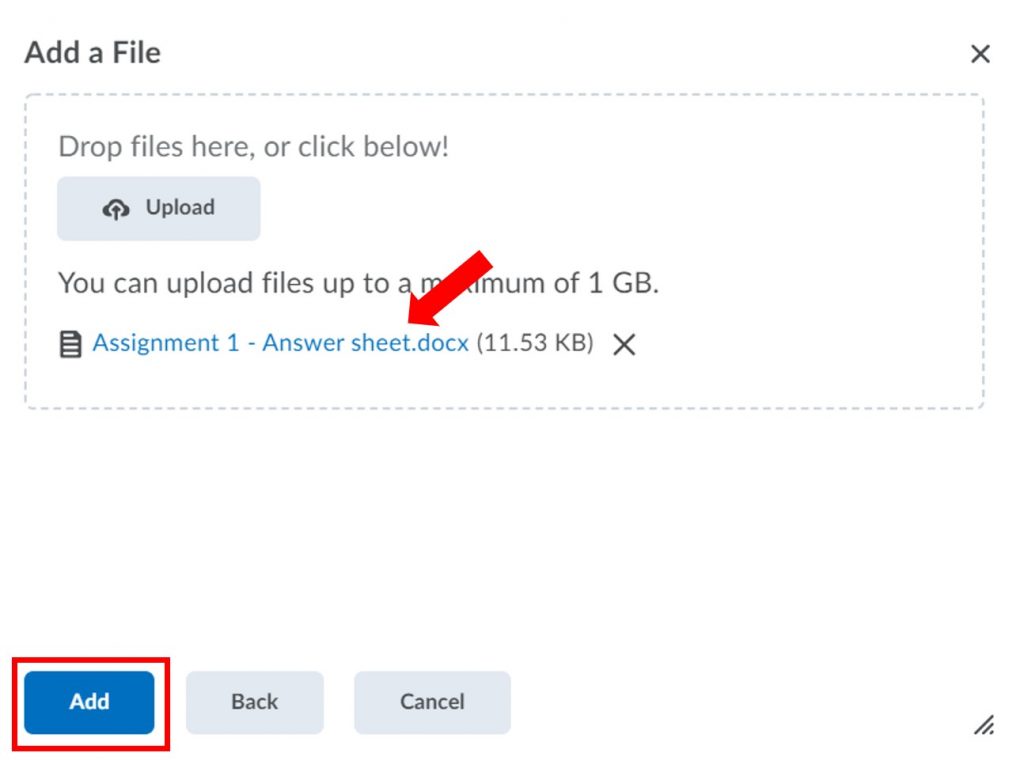
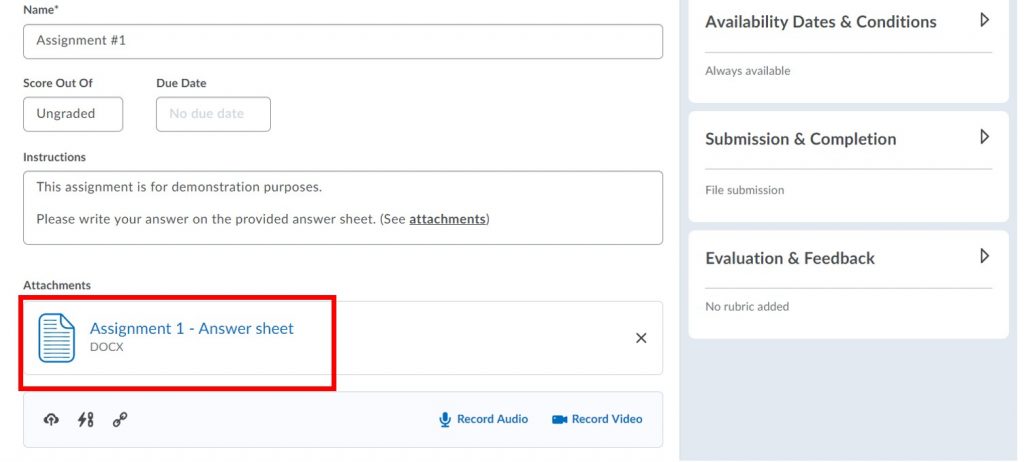
3. Check to make sure the file is shown under Attachments .
On the right, you can then set the dates and the conditions for the assignment to be available using Availability Dates & Conditions , include the details about Submission & Completion , and enter how the assignment will be evaluated and how feedback will be given under Evaluation & Feedback .
Availability Dates & Conditions

- Start Date : specifies when your assignment will start. Note that before the this date, students can still see the assignment if you choose to publish it, but they will not be able to make their submissions.
- End Date : specifies when your assignment will end. After this date, the assignment will automatically lock and no further submission can be made. This is different than the Due Date mentioned above.
- Release Conditions : specify the conditions the students have to satisfy in order to see and access the assignment. For example, they need to visit specific content in the course page (specified by the instructor) or be in a particular group. For more information, please visit: How to update release conditions and dates for a module or a topic within a module?
- Special Access : used to grant users late/early access. This is useful when there is an accommodation you wish to make for learners or to extend a deadline for specific users.
Submission & Completion
- Assignment Type : allows you to set whether this will be an individual or group assignment. You will only be able to make it a group assignment if groups have been previously created .
- Submission Type : used to set whether students will be asked to either submit a file (and how many) or type in their response directly in the space provided in Brightspace, and how Brightspace will keep submissions. It also allows for submission on paper (or by email), and assignment observed in person, which would also apply to student presentations via Zoom for example.
- Notification Email : makes Brightspace send an email to the people whose addresses are included in this field, such as supplemental instructors and TAs.
Evaluation & Feedback
- Rubrics : used to create a new rubric or add an existing one. Visit this topic for more details about the Rubrics tool.
- Learning Objectives : if you have learning objectives built for your course, you can select them here.
- Annotation Tools : allows you to annotate on the students’ submissions. It is useful when you need to provide in-line feedback to students. This option is turned on by default.
- Anonymous Marking : choose this option when you want to hide students’ identities when marking their work. Please note that once selected, you cannot undo this option.
When you are done with the settings, click Save and Close . This will complete your assignment creation process.
To access a quick video guide on how to create an assignment by using the new assignment experience, please visit this post .
Section B: Classic Assignment Experience
This UI provides a more laid-out view of the Assignment tool, but with additional scrolling and navigation. It also has a few features that are not present in the new experience. This interface may be more useful for more experienced users and those who prefer traditional input methods such as mouse and keyboard. The most prominent difference in the classic experience when compared to the new is the utilization of Tabs instead of Drop-down menus (see picture below).

1. Once you click on New Assignment, Brightspace will take you to the Properties Tab . Enter your assignment name (required before you can switch to another tab) and instructions . As well, if you have any attachments or external link or wish to link this assignment to another existing course activity, you can do so by expanding the drop-down menu as highlighted in the picture below.

2. In the Submission, Completion and Categorization section, you can select the type of your assignment (individual or group), the type of submission (file, text, paper, or in person), and how Brightspace will keep those submissions. Additionally, you can also choose to send graders, such as TAs, a notification email whenever a new submission is made. The Category setting (highlighted in red) allows you more organization to your Assignments. For example, you could organize your assignments under categories such as In-class, Mid-terms, and the like. Please note that for the New Assignment Experience , the Category setting is not implemented yet.

3. In the Evaluation and Feedback section, you can enter your assignment Score and associate it to a grade item the gradebook, if this assignment will be worth a mark. Additionally, you can make and attach rubrics to your assignments, enable annotation and anonymous marking . Exclusively to the classic UI, you are also provided with a preview of how the students see their score according to how you set it up under Student View Preview . This experience also includes the option to allow your students to add the assignment to their e-Portfolio .

4. In the Restrictions tab, you can set dates such as Start , End and Due Dates . It is recommended that you take into consideration the time difference between the default time zone as shown on Brightspace to that of your students. Also, special access for students and release conditions can be set up here.

5. The Objective tab allows you to add learning objectives to your assignment if you have them set up for your course.

6. When you are done with all the settings, click Save and Close .
If you have any question about creating assignments for your course, please contact us at [email protected] .
About this post
This post was last updated:
We acknowledge and respect the Lək̓ʷəŋən (Songhees and Esquimalt) Peoples on whose territory the university stands, and the Lək̓ʷəŋən and W̱SÁNEĆ Peoples whose historical relationships with the land continue to this day.
Brightspace Support

Updates to Brightspace for November and December 2021
Posted by Michael Coley on Thursday, December 16, 2021 in Releases .
There are several highlights from the most recent Brightspace updates, and today we want to focus on three things that will be most helpful to Brightspace users. Links to the full release notes are available at the end of this post.
Assignments – New Assignment Creation Experience Universally Enabled
This feature sets the new assignment creation experience to ON by default. This means that the old/classic assignment experience will no longer be available. For information and guides about how to use the new assignment creator, check out our Assignment guides here .
Email – Increased Limits for To and CC Fields
This feature increases the number of email addresses that can be added to the To and CC fields in a single email to 200. Previously, the limit was 50 email addresses.
Homepage Courses Widget – Updated to Include Symbols for Course Updates
Starting on December 20, courses listed on your Brightspace homepage will begin to display symbols for different updates to the course. These updates include Unread Discussion Posts, Ungraded Quiz Attempts, New Assignment Submissions, and Assignment Submissions with Unread Feedback. We hope this will serve as a way to quickly update yourself about your course at a glance.
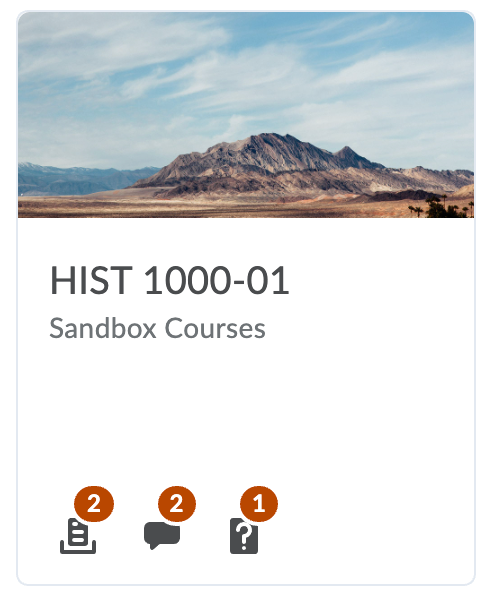
These are an example of what the new update icons will look like. Hovering over any icon will tell you what update it stands for.
For more information about these updates, and the others we didn’t have space to mention, you can find the full release notes linked below.
- November Release Notes
- December Release Notes
Leave a Response
If you're seeing this message - that means some of our site's content isn't loading properly. Click here to reload and try another method.
- Int'l Campuses
- Corporate Training
- Future Students
- Current Students
- International Students
- Financial Aid
Brightspace
New features.
As part of its continuous improvement model, D2L releases feature enhancements on a monthly basis. View summaries for each monthly release (as it relates to the features that make up Algonquin’s Brightspace environment).
Digital Learning Environment Weekly Update: New Name for Our Weekly Updates
Posted on Friday, September 18th, 2020
New Name, Same Great Content
With the addition of a number of new tools that have been integrated with Brightspace in the last few months, our LMS Weekly Update has been renamed to Digital Learning Environment (DLE) Weekly Update , in order to accurately represent our support for you.
What’s New in Brightspace: September Release
Assignments – The new Assignment creation experience now has Special Access options
The June Brightspace release included a new assignment create and edit experience, that will eventually replace the current Assignment tool. As of today, the Special Access options are available to you, when using this new assignment view. You can use Special Access rules in a Assignment to provide students with alternate time restrictions, attempt limits, or different due dates.
Class/User Progress – Include Pulse activity in usage data: Learner activity data is now captured more accurately through the addition of a new system usage metric. Previously, Pulse usage was not tracked, and learners who accessed their courses through the app were misrepresented as having low engagement and could not access conditionally released content.
- Class Progress has a new System Access performance indicator , which displays the number of times each student has accessed the system through the LMS website or Pulse in the last 30 days. You can add System Access to the Class Progress dashboard by clicking Settings.
- User Progress has a new System Access History section, which displays the number of times the student has accessed the system through the LMS website or Pulse in the last 30 days. You can select System Access History to display in the User Progress report by clicking Settings.
My Mediasite
As you already know, My Mediasite is a new tool in Brightspace, with a simple interface that allows you to create, record, share, and publish your presentations easily. Mediasite hosts these videos and also has a Brightspace integration that allows you to embed video content directly within your courses.
Whenever you or your students are prompted for the user name and password when you are asked to sign in to access Mediasite content, make sure you use your Algonquin College user name and NOT the full email address.
- Please remind your students that the Zoom calendar events in their courses (notifications automatically added in the courses’ calendars when you schedule Zoom meetings) are NOT necessarily supposed to match the schedule on their timetables.
- When creating recurring Zoom meetings , before saving the meetings, make sure that there is only one day of the week checked off (assuming that you are giving a lecture only once a week). As the week day when you set up the meetings gets automatically checked off, there have been situations when two week days were checked off by mistake, and this creates confusion among students.
Multiple Ways to find Answers to your Questions:
- Book Online Appointments with our Team. You will notice that, the booking form and the emails confirming the appointments, now have a different name : Digital Learning Environment (DLE) Support
- Email our DLE Team at [email protected]. After emailing us, you will receive an automatic reply with your case number.
- Access our Digital Learning Environment Knowledge Base (DLEKB).
- Brightspace Tips Monthly Releases New Features What's New
LMS Weekly Update: The Discover self-enrollment tool and other system enhancements
Posted on Friday, August 28th, 2020
The Discover self-enrollment tool
As a new school year begins, we are pleased to announce the deployment of the Discover self-enrollment tool in Brightspace. This tool allows our students to self-enroll in various offerings like courses, spaces and resources that will help make their journey at Algonquin College a success.
Starting today, you will see a new Discover link on the Brightspace homepage navigation menu.
My Mediasite available in Brightspace
My Mediasite is a new tool, replacing TechSmith Relay, with a simple interface that allows you to create, record, share, and publish your presentations easily. Mediasite will host these videos and also has a Brightspace integration that allows you to embed video content directly within your courses. View help guides, tips, tricks and advice on our new LTS webpage, and sign up for info sessions and training sessions.
August system release
This month’s system release brings a few enhancements to the system:
Assignments – Copy assignment option You now have the option to select the Copy Assignment option, in the drop-down menu for an existing assignment, to quickly create new assignments within a course.
This feature copies all settings of an existing assignment, except the associated grade item and Turnitin settings.
Checklists – Copy a checklist Now you can now perform copy actions for checklists. You can copy a whole checklist, a checklist category (including all items within it), or individual items in a checklist.
Classlist – User experience changes When adding users to a classlist (Tools/Classlist/Add Participants) search results now include users who are currently enrolled in the course. Previously, enrolled users were not displayed in these search results, suggesting that the user might not exist in the system. On the search results page, an icon displays beside an enrolled user’s name, indicating their enrollment status.
Grades – Unrelease all final grades Grades features a new workflow to quickly undo the release of final grades for a course. You can easily select Unrelease All from the Final Grades drop-down menu.
Notifications – Deleted content links to message Notifications for content that is subsequently hidden/deleted/conditionally released are now removed from the Brightspace notifications area on the minibar. Notifications that arrive via email or in Brightspace Pulse push notifications, now provide a link to the Course Table of Contents, with a message that states ‘Item not available’. Previously, clicking the link created a ‘404 Not Authorized error’.
Question Library – Attach files in “written response” type of questions When creating a written response question, now you can allow learners to upload files in their answers and include embedded images. Learners can also record audio or video responses when answering written response question types.
Quizzes – User experience updates for editing quizzes with attempts To improve the user experience for instructors who edit quizzes with previous attempts by learners, the following updates have been made:
- Points for past quiz attempts are no longer modified when edits are made that affect the overall points and/or the grading calculations for a quiz. A learner’s grade on previous quiz attempts must now be changed directly by the instructor using the ‘Update All Attempts’ workflow. Previously, the points for all past quiz attempts were modified automatically, which could alter a learner’s grade unexpectedly.
- Warning messages now appear when editing a quiz question with previous attempts, to clearly communicate to instructors that editing quiz questions does not affect the content or automatically change the score of learners’ past attempts.
Online Faculty Brightspace Support ( Monday to Friday, from 8 am to 5 pm)
When emailing us your requests, we would appreciate if you could ensure that all information relevant to your issue is provided. For example:
- The complete course code, including semester and section number (20F_ABC1234_010).
- The user’s first name and last name (ideally user name, too), when asking us to add users to courses.
- For merged courses’ requests, specify if you need to keep the individual sections available or not.
- When asking to have coordinator access to a program, include list of all courses (codes and section numbers).
Multiple Ways to find Answers to your Brightspace Questions:
- Book Online Appointments with the Brightspace Faculty Support Team
- Email Brightspace Faculty Support Team at [email protected]. After emailing us, you will receive an automatic reply with your case number.
- View our collection of the LMS Weekly Updates on the Brightspace website.
- Peer-to-Peer Community Support – click here to find out how you can get support from other teachers or volunteer for this support.
- More Brightspace and Zoom links on the Academic Continuity website
- Access here Professional development opportunities offered by LTS.
- Monthly Releases New Features Uncategorized What's New
LMS Weekly Update: Getting Ready for the Fall Semester
Posted on Friday, August 21st, 2020
My Mediasite available in Brightspace on Tuesday, August 25th
My Mediasite is a new tool, replacing TechSmith Relay, with a simple interface that allows you to create, record, share, and publish your presentations easily. Mediasite will host these videos and also has a Brightspace integration that allows you to embed video content directly within your courses. Attend one of the information sessions offered by LTS, to learn about the main features of My Mediasite, what type of learning content you might create with it, and have a chance to ask questions about possible ways in which it could be used. Stay tuned for more details and documentation in the next week.
Course Copier vs Instructor
As our Support Team receives every week a large number of requests to add users to Brightspace courses, we would like to provide some help and avoid the need of sending back emails asking you to clarify the request.
Ask us to use the Course Copier role when adding faculty to previously taught courses (new instructors or faculty taking over a new course, with the purpose of familiarizing with the content or copying it).
Users with the course copier role in a course:
- Have read-only access to all course content and NO access to students grades and assignments, protecting the integrity of the course and students’ privacy.
- Can copy content over to their own courses, where they have instructor access.
- Can export course components, with the purpose of importing them into their own courses.
- Note: There are times when YOU need to add other teachers to your courses (without asking our help), with the intention of having them perform a course copy or export some content. Instead of adding them with the instructor role, please use the course copier role. Don’t forget to remove them from the course once the copy is completed.
Ask us to use the Instructor role:
- When a Coordinator/Chair needs access to students’ grades or their assignments/quizzes.
- When there is an urgent need to add a faculty to a course, with the purpose of teaching it (note that the instructor still needs to be scheduled in Genesis, even if the urgent access was given in Brightspace).
- When a coordinator needs to load content for a new part time instructor, and requires the ability to add new content or modify existing one.
- When, from any reason, an user needs to have access to the gradebook or students’ work (discussion boards, assignments files, etc).
Question of the Week – How do I transfer content in between courses?
Course Copy
- Read the Course Copy article in our KB, for Step-by-step instructions describing how to copy the entire course content or only some components
- Avoid copying the announcements, as you might end up having them sent as emails to students in the destination course, depending on the availability of the course. We recommend using the Select Components button, and uncheck the Announcements option.
Export/Import Course Components Process
- Read the Export Course Components article, for step-by-step instructions on exporting content.
- Read the Import Course Components article, for step-by-step instructions on importing content. This option can also be used when importing a zip file containing test banks from publishers.
Reminder: New Assignment Create and Edit Experience
The June Brightspace release introduced a new assignment create and edit experience, available across all your courses, on an opt-in/opt-out basis.
- Access here the Knowledge Base article for instructions on how to turn it off or on.
- Access here the Knowledge Base article for on overview of the benefits and limitations of the new assignment experience in its current state.
- New Features Pilots and Projects What's New
LMS Weekly Update: New Assignment Create and Edit Experience
Posted on Friday, June 19th, 2020
New Assignment Create and Edit Experience
The June Brightspace release includes a new assignment create and edit experience . This will be available to faculty immediately across all courses, on an opt-in/opt-out basis, providing an early opportunity to test and provide feedback ahead of the summer vacation.
Eventually, D2L will make this new experience view as the default one for assignment creation, but for now it is OPTIONAL.
How to Turn OFF or ON the New Assignment Create and Edit Experience
TURN IT OFF: If you would prefer to continue using the old assignment creation view at this time, you can opt-out of the new experience with a single click. When you go to create a new assignment, you will see a welcome screen and some options. Simply select ‘Turn it off’, and this will be applied across all of your courses.
LEAVE IT ON: If you would like to look at the new view and test it out (by selecting Leave it on ) before switching back to the old view, or if you clicked Leave it on by mistake and now want to turn it off , you can do so by clicking the chevron in the top right corner, and then selecting Turn it off .
Feedback on the New Assignment Create and Edit Experience
D2L will use the feedback that they receive to make improvements to this tool as they go. You will be prompted to provide this feedback to D2L when selecting “Turn it off” and we would also appreciate it if you could share any feedback with us at [email protected].
Reminder: Turnitin Mappings to be reset on August 21, 2020
Please take a moment today to schedule a reminder for yourself to export the content you wish to keep before August 21st, 2020. If you have any questions or need assistance, please email [email protected], with the subject line “Turnitin Export”.
Instructions on How to Export/Import your QuickMarks and Rubrics:
- The Export/Import Process for Turnitin Quickmarks sets
- The Export/Import Process for Turnitin Rubrics
More H5P sessions offered by LTS
H5p is a new tool, now integrated within Brightspace, that allows you to create interactive, graded or non-graded digital learning activites, to help students master content, or build interactive videos and other rich-media elements in your Brightspace course. Sign up here for PD sessions on H5P offered by LTS and go to their website for information on how to use H5P.
- Monthly Releases New Features
LMS Weekly Update: December new features for Brightspace and common solutions
Posted on Wednesday, December 19th, 2018
As the Brightspace Support team encounters common technical questions, they will now be posted within a new Common Solutions section of the Brightspace Support website.
Refer to this page as well as the FAQ section regularly to see if your questions or concerns are already listed here.
https://www.algonquincollege.com/brightspace/common-solutions/
https://www.algonquincollege.com/brightspace/faqs/
Summary of new features — December release
As part of D2L’s continuous improvement model, Brightspace implements incremental enhancements each month to the Learning Management System.
By Dec. 21, you will notice the following changes within Brightspace:
Assignments
Changeable assignment and submission type
- Modify existing assignments by changing assignment or submission types, without having to create a new one, if it has no learner submissions.
Learner name links directly to Evaluate Submission page
- Access Evaluate Submissions by clicking on learner’s name on Submissions
- Previously, clicking on learner’s name launched sending student an email; sending email to students still possible by clicking on box beside student name and clicking Email
Improved Grading Experience
- You can click on submission’s file name to download
- Markup Document button is now called Launch Turnitin
- Publish and Save Draft buttons are more conveniently located; there is also an extra Next Student link
Discussions Improved rubrics grading experience
- Rubrics assessments and feedback automatically save as draft while updates are in progress
- In draft state, rubrics will not be visible to learners until instructor clicks on Save & Publish
- Feedback can be bulk published to all or select users
- Published feedback for changes to the Total Score can be removed through a new feature called Retract Feedback. ( Overall Score and Overall Feedback can be edited without retraction)
- New grading pop-up window for easier grading contains all rubrics for the discussion, a list of all posts made by the student, and a place to enter Overall Feedback
Improved Creation Experience
- Auto-save during creation and editing
- Change rubric type and scoring method during creation
- Re-order criterion via drag and drop (or keyboard)
- Improved logic for points-based rubrics where new levels automatically follow existing point scoring sequences
- Individual criterion cells in custom point rubrics dynamically scale when editing its out of value
- Overall Score is visibly separated from rubric and displayed in its own section
Enhanced Written Response question type
- Instructors can add initial text to Written Response questions
- New Features What's New
This site uses cookies to offer you a better browsing experience. Find out more on how we use cookies and how you can change your settings.
ASSIGNMENTS
Creating an assignment using the new experience.
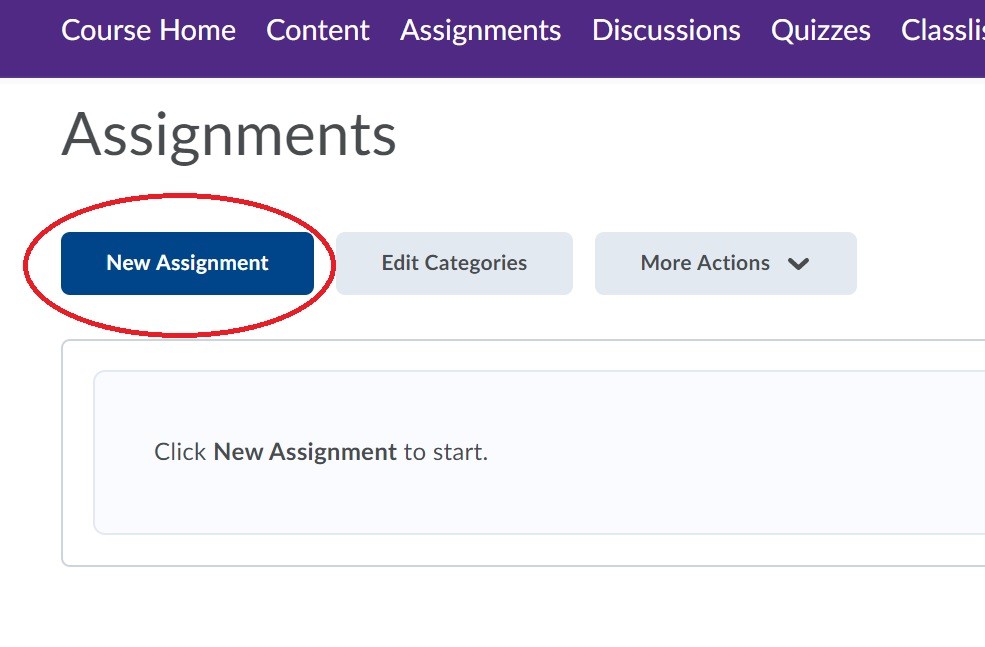
To create an assignment in Brightspace, first navigate to the Assignments section of your navigation bar. If you lost the link, you can edit your navigation bar to put it back:
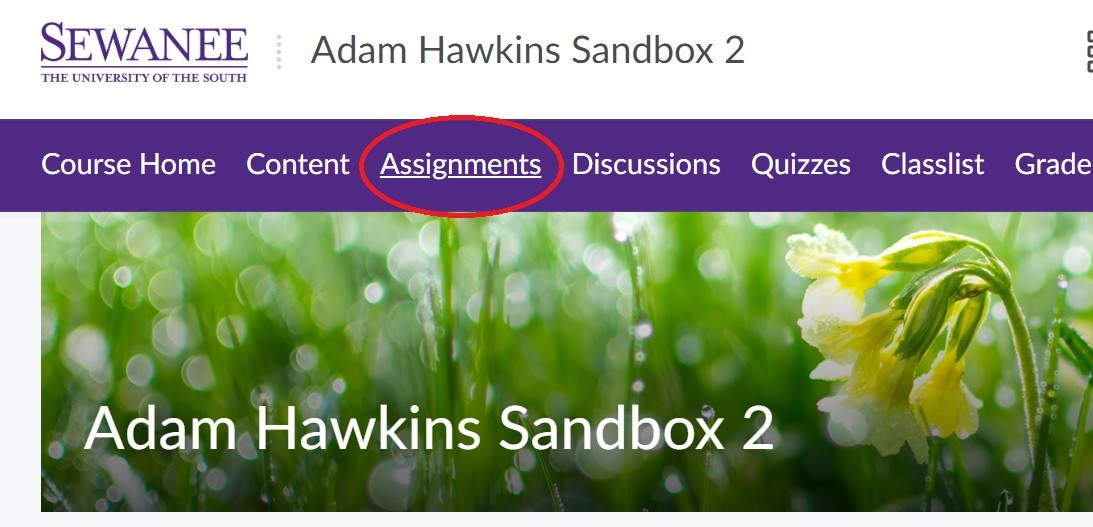
From this window, click on the blue New Assignment button to begin creating your assignment:
You’ll immediately notice a new layout with three menu cards on the right. These cards contain settings that will compliment the Assignment by adding additional control options. We'll look at these in a minute. Staying mostly the same are the standard boxes for Name, Grade Out Of, and Due Date.
Also provided is a familiar text box for brief instructions to your students. If you have a longer prompt (or some already written in other file formats) you can easily attach files to the assignment using the icons a the bottom of the page. The first icon (an arrow pointing into a cloud) is for uploading a file, the second (a lightning bolt and chain) is for linking to another activity within the class, and the third (a chain link) is for attaching a link to a website or external tool. You'll notice here that you also have the option to record audio or video for the assignment.
The following is an overview of some of the basic options for your assignment. As always, if you have questions please don't hesitate to reach out to your faculty technology coordinator or the helpdesk.
Availability Dates and Conditions for Release:
- Release Conditions: You can add a condition to be met before students can view the assignment. There are several to choose from such as completing a checklist, visiting content, or participating in class discussion board. To remove condition, click on the X to the right of the condition.
- Special Access: To provide time accommodations for students, you can create exceptions to the start and end date for specific students. To do this, click on Manage Special Access and the light blue "Add Users to Special Access" button. Here you can set alternative dates and apply to select students.
Submission and Completion (Depending on your previous selected assignment and grade settings, some of these may not be available)
- Assignment Type: If this is a group project, you can select Group Assignment and set your groups using the Group Tool. Individual Assignment is the default.
- File Submission - Word, PDF, JPEG, etc.
- Text Submission - In a text box much like the one where you wrote the assignment description. This has limited editing tools and features, but it allows for students to submit a quick response.
- On Paper Submission - Students hand you a physical copy of the completed assignment.
- Observed in Person - Students to demonstrate mastery of the assignment by performance. This option could be especially helpful for the fine arts and laboratory sciences.
- Files Allowed Per Submission - Unlimited allows students to continue to revise and edit and submit until the deadline. Selecting One File will limit the student to a single submission.
- Allowable Files Per Submission - The default is No Restrictions which means students can upload in any of the allowable filetypes. Selecting Annotatable Files ensures that faculty can mark on the submission. There are more than 20 accepted files types for annotation, the most commonly used being .doc., .docx., .ppt., .xls., .jpg., and .pdf. For a complete list see here .
- Notification - If you wish to receive an email alert when a student submits and assignment, enter your email in this box.
Evaluation & Feedback
- Rubrics - If you have created rubrics for other assignments, you can attach them to the here for students to see. If you haven't created them or you want them specific to this task, you can create a new one now.
- NOTE: If the student's name appears in the paper, you will still be able to see it. This feature only blocks the name of the student from the submission timestamp.
- NOTE: You will not be able to see any learners' name in the submissions until you have hit the Publish All Feedback button. You can read more about this feature here .
Always remember to hit Save and Close in the lower left corner to apply your changes.
Further Resources
Sewanee workshop: brightspace assignment.
A workshop on creating and grading assignment from our faculty support staff.
Brightspace Assignments Documentation
Documentation from D2L/Brightspace on creating and managing assignments.
Create an Assignment
A short video tutorial from D2L/Brightspace on creating assignments.
Grade an Assignment
A video from D2L/Brightspace on grading assignments.
Graduate Programs


Sorry, but Internet Explorer is no longer supported.
For the best D2L.com experience, it's important to use a modern browser.
To view the D2L.com website, please upgrade to Microsoft Edge , or download another browser such as Google Chrome or Mozilla Firefox .
Home » Create Assignments Easily in Brightspace
Create Assignments Easily in Brightspace
The new assignment creation experience allows you to enhance your teaching success by easily creating, posting, and updating assignments the in Brightspace platform.
Related Videos

Supporting Social Emotional Learning in Higher Education with D2L Brightspace
An Instructor’s View of D2L Brightspace for Higher Education

5 Ways D2L Brightspace Supports Principals

Do More with the Quiz Tool in D2L Brightspace

Increase Communication and Collaboration With Discussions

Brightspace Parent & Guardian

Showcase growth with the Portfolio tool in D2L Brightspace
(for thought)
Brightspace Tip #178: New Assignment Creation Experience
The new Assignment creation experience was one of the changes that we saw beginning with our June 2020 Continuous Delivery update . While this new experience simplifies the creation of assignments, it currently does not have all the options that are available in the old experience. You can toggle between the new assignment creation experience and the old experience by clicking on the down arrow in the upper right corner of the New Assignment or Edit Assignment pages. Here are some screenshots:

D2L is building on the functionality of the new assignment creation experience. Expect additional functionality to be added to the new assignment creation experience in the coming months. Any changes to the new assignment creation experience will be made as a part of our Continuous Delivery Updates.
Want more information?
Continuous Delivery release notes View all the Brightspace training recaps Brightspace Known Issues Request a sandbox course Sign-up for Brightspace training sessions You can find Brightspace help at D2L's website. Join the Brightspace Community . Try these Brightspace How-To documents . Visit our Brightspace FAQs for additional Brightspace information or schedule a one-on-one session , email , or call Janice Florent: (504) 520-7418.
Note: Are you doing something innovative in Brightspace or perhaps you've discovered a handy tip? Share how you are using Brightspace in your teaching and learning in The Orange Room .
Share this post:
Leave a reply.
Your email address will not be published. Required fields are marked *
Notify me of follow-up comments by email.
Notify me of new posts by email.
This site uses Akismet to reduce spam. Learn how your comment data is processed .
- Brightspace
- Google Apps
- Submit a Ticket
Division of Information Technology
Brightspace: new discussion experience.
Audience: Faculty and Teaching Assistants
As of May 18th, 2023, we have transitioned to the New Discussion Experience in Brightspace. This new experience has changed the appearance of the Discussion creation area to be uniform with the area to create an Assignment. While this Discussion creation area may look different, this new experience will not effect the following:
- Discussion Settings
- Replying to Discussions
- Grading Discussions
- Creating Forums from the main Discussion menu.
What Has Changed?
Creating a forum in a discussion topic, creating a grade item, categorizing a grade item, linking a topic to an existing grade item, hiding discussion topics.
What has Moved?
When creating a Discussion, the creation area will now resemble how it appears when creating an Assignment in Brightspace. The old experience had various tabs at the top of the screen that would allow instructors to customize their Discussions; these have now moved to the right of the screen in the new experience and they are given new titles.

In the old experience, when creating a Discussion Topic you had to either assign the topic to an existing forum, or create a new forum in the Discussion creation area. In the new experience, by default, a forum will be created automatically. This forum will have the same name as the topic.

To assign a topic to a specific forum, select the Change Forum link, then choose to either Create a Forum or Choose an Existing Forum to assign the topic to a forum that was already created.

In the old experience, when creating a topic, you would have to go to the Assessment tab and either link the Discussion to an existing grade item, or click a link to create a new grade item. In the new experience, this works differently. Instead of going to a separate tab, you will have access to a box that says Grade Out Of from the main topic creation area.

To assign a Grade Item you created from the Discussion Topic creation area to a Grade Category, select the button that says In Grade Book , and then choose Edit or Link to Existing .

Once clicked, make sure you have the option Create and Link to a New Grade Item selected, and then you can then click a button titled Choose Grade Category.

Once selected, you can choose the applicable category to assign this grade item to.

In the new Discussion experience, if you would like to link your topic to an existing Grade Item, you can do so by selecting the In Grade Book button, and then choose Edit or Link to Existing.
Once clicked, you can choose the option titled Link to an Existing Grade Item. Then choose the drop down selector to find the grade item you wish to link the topic to.

When creating or editing a topic, you are now able to hide the topic from learners at the bottom of the screen by selecting the eye icon.
What Has Moved?
All customization options that existed in the old Discussion experience still exist in the new one. These features have been moved to three new areas in the topic creation screen:
Availability Dates & Conditions
Post & completion, evaluation & feedback.
In the Availability Dates & Conditions section, you can find the following:
- The option to include the start or end dates for a Discussion Topic
- Release Conditions
- Group and Section Restrictions for the Topic

In the Post & Completion section, you can find the following options:
- Default participation (default discussion setting)
- Allow learners to hide their name from other learners (previously titled: allow anonymous posts)
- Learners must start a thread before they can view or reply to other threads
- Posts must be approved before they display in the topic
These options were previously available in the properties tab in the old experience.

In the Evaluation & Feedback section, you can find the following options which were located in several different areas of the old experience:
- Adding a rubric (formally in the assessment tab)
- Allow evaluation of individual posts (formally in the assessment tab)
- Mange learning objectives (formally in the objectives tab)
- Allow learners to rate posts (formally found in the properties tab)

Additional Information
There are no additional resources available for this article.
Provide Feedback
Your feedback is important to us, help us by logging in to rate this article and provide feedback.
Getting Help
The Division of Information Technology provides support on all of our services. If you require assistance please submit a support ticket through the IT Service Management system.
Supported By
Brightspace support via suny helpdesk.
- Phone: 1-844-673-6786
- Submit a ticket or chat online
Academic Technology Services
- (631) 632-9800
- Submit a ticket
We can't sign you in
Your browser is currently set to block JavaScript. You need to allow JavaScript to use this service.
To learn how to allow JavaScript or to find out whether your browser supports JavaScript, check the online help in your web browser.
Your browser is currently set to block cookies. You need to allow cookies to use this service.
Cookies are small text files stored on your computer that tell us when you're signed in. To learn how to allow cookies, check the online help in your web browser.

D2L Employee Sign in
Sign in with your email address.
Don't have an account? Sign up now
IMAGES
VIDEO
COMMENTS
This layout is consistent with other areas of Brightspace including Assignments, Content, and Lessons, where you can upload and create a new assignment. Access the new Assignment page. There are several different starting points to create assignments. To create an assignment in the Classic Content Experience. In Content, select the module where ...
The new assignment experience was created to be more a streamlined and simple tool for assignment creation. The new user experience Switching to the old/new interface The New User Experience The main difference between the new and old interfaces, is that the new interface has widgets on the right side. The old experience had...
This video explains how to create an assignment through Content in Brightspace as an instructor. The new Assignments creation experience has a fully immersiv...
Figure: Overview of the Assignments tool interface. When instructors navigate to Assignments, they will see all the assignments created within their course with options for creating new assignments and editing and evaluating previous ones. New Assignment: Create a new assignment. Edit Categories: Create or manage categories for your assignments ...
When an instructor using the New Assignment Evaluation Experience opens new window to evaluate text-only rubrics, the Overall Score displays for each rubric, and the instructor can override the level if necessary. Figure: Use the Overall Score slider in mobile and New Assignment Evaluation Experience views to view and override the score level.
With the Assignment tool, it is easy to create and manage assignments in Brightspace. No more assignments lost in email and you can annotate right on the assignment. Click a link below to jump to a specific section or browse through all the assignment changes. Brightspace assignment walkthrough video; The main view of the new assignment experience
The new assignment creation experience allows you to enhance your teaching success by easily creating, posting, and updating assignments the in Brightspace p...
The New Assignment Experience. On Friday, Nov. 13, 2020, Brightspace revealed a change to the Assignment Creation experience. When new, major workflow changes are introduced in Brightspace, they often begin as optional workflows prior to becomingofficial and mandatory. The new experience has no impact on existing assignments, but if you make ...
Section A: New Assignment Experience . This experience provides a clean and simple interface with reduced scrolling, optimal for mobile devices. It is useful for new users to get used to the Brightspace course building environment. This experience consists of condensed input boxes and settings nested under drop-down menus, as shown in the ...
There are several highlights from the most recent Brightspace updates, and today we want to focus on three things that will be most helpful to Brightspace users. Links to the full release notes are available at the end of this post. Assignments - New Assignment Creation Experience Universally Enabled This feature sets the new assignment...
Within the Brightspace platform, access the course where you would like to grade an Assignment. Then in the Navigation bar for that course, click on "Course Admin". Scroll down and click on "Assignments". Click on an "Assignment" title to access the submissions. On the Assignment Users list page, click on an individual submission to ...
LMS Weekly Update: New Assignment Create and Edit Experience. Posted on Friday, June 19th, 2020. New Assignment Create and Edit Experience. The June Brightspace release includes a new assignment create and edit experience. This will be available to faculty immediately across all courses, on an opt-in/opt-out basis, providing an early ...
Creating an assignment Using the New Experience. To create an assignment in Brightspace, first navigate to the Assignments section of your navigation bar. If you lost the link, you can edit your navigation bar to put it back:. From this window, click on the blue New Assignment button to begin creating your assignment:. You'll immediately notice a new layout with three menu cards on the right.
2 out of 2 people found this helpful. You can use the Assignments tool to create and edit assignments, see users' submission times, view submissions on the Evaluate Submission page, associate assignments to rubrics and competencies, and return submissions with grades and feedback. For assignments that included file submissions, you can ...
On the navbar, click Assignments.; On the Assignments page, click New Assignment.; Enter a Name, Instructions, and add any Attachments.; Select an Assignment Type, Individual assignment or Group assignment. Group assignment enables you to have one submission per group, but you must associate the assignment with a Group Category.Any group member can submit and view files for a group assignment.
Find helpful resources, technical documentation, video tutorials, blogs, discussions, and connect with other Brightspace users. Check out these tables to compare Classic Assignment creation functionality to the New Assignment Creation Experience
Create Assignments Easily in Brightspace. The new assignment creation experience allows you to enhance your teaching success by easily creating, posting, and updating assignments the in Brightspace platform. Categories: Mobile Accessible, Mobile Learning, Online and Remote Learning, Product & Service Updates, Teaching and Training, Technology.
The new Assignment creation experience was one of the changes that we saw beginning with our June 2020 Continuous Delivery update.While this new experience simplifies the creation of assignments, it currently does not have all the options that are available in the old experience. You can toggle between the new assignment creation experience and the old experience by clicking on the down arrow ...
As of May 18th, 2023, we have transitioned to the New Discussion Experience in Brightspace. This new experience has changed the appearance of the Discussion creation area to be uniform with the area to create an Assignment. While this Discussion creation area may look different, this new experience will not effect the following: Discussion ...
From your course navbar, click Content. Do any of the following: Drag and drop locally saved files to the unit, lesson, or folder you want to add the material to directly in the navigation area. From the table of contents, select the unit, lesson, or folder you are adding material to and click Create New.
We would like to show you a description here but the site won't allow us.
Within a course, click Course Admin, then select Assignments.; Create a new assignment or edit an existing assignment. Select the Standards tab and click Add Standards.; Select the check boxes for the learning outcomes you want to align to the current assignment and click Add.; Click Save and Close.; Note: Learning Outcomes are not compatible with Competencies and Learning Objectives; when ...
Add or edit categories. Navigate to Assignments. On the Assignments page, click Edit Categories. Figure: The Edit Categories option on the Assignments page. Do any of the following: Click Add Category to create a new category. Click the name of an existing category to modify it. Hit Enter, or click outside of the current cell to save your changes.