
Top Contributors in PowerPoint: Steve Rindsberg - Jim_ Gordon - John Korchok ✅
March 11, 2024

Top Contributors in PowerPoint:
Steve Rindsberg - Jim_ Gordon - John Korchok ✅
- Search the community and support articles
- Microsoft 365 and Office
- Search Community member
Ask a new question
Embedded powerpoint presentation is not downloadable anymore ?
I have embedded some powerpoint presentations into a website using the html code. Up until now anyone who accessed my website was then able to open the powerpoint presentation and then download it for their own purposes. Now this does not work anymore - one can click on the optional button "download" - but nothing downloads. Instead another powerpoint window opens up with the same options. You may try yourself: https://sites.google.com/view/ibbioson/1-molecules/b-1-1-carbohydrates-and-lipids to better understand what I am trying to explain.
Is there any advice on how to solve this issue? To me it seems like a bug because it all of a sudden occurred. I don't recall having changed any permissions - and to be honest, I wouldn't know which ones to change anyways. Any help on this is greatly appreciated.

[Moved from PowerPoint/For education/Other]
Report abuse
Replies (22) .
* Please try a lower page number.
* Please enter only numbers.
- Volunteer Moderator
As a workaround, after a user clicks on the Download button, they should then be able to choose Open in Desktop App and save the file to any location on their computer:

Was this reply helpful? Yes No
Sorry this didn't help.
Great! Thanks for your feedback.
How satisfied are you with this reply?
Thanks for your feedback, it helps us improve the site.
Thanks for your feedback.
- Microsoft Agent |
Hi Niki1979 ,
Thank you for posting in Microsoft Community.
There are a few possible ways to download an embedded PowerPoint presentation from the web, depending on how the presentation is embedded and what software you have. Here are some options:
If the presentation is embedded as a file link, you can right-click the link and choose Save link as or Save target as to save the file to your computer 1 .
If the presentation is embedded as an object, you can right-click the object and choose Save as picture to save the file as an image 1 . However, this will not preserve the animations or transitions of the presentation.
If the presentation is embedded as an iframe, you can right-click the iframe and choose Copy frame address to copy the URL of the presentation 1 . Then, you can paste the URL in your browser and download the presentation from there.
If the presentation is embedded as a video, you can right-click the video and choose Save video as to save the file as a video 1 . However, this will not preserve the interactivity or hyperlinks of the presentation.
If none of the above methods work, you can try to extract the media files from the presentation by converting it to a zip file and opening it as a folder 2 . To do this, you need to have access to the original presentation file and follow these steps 2 :
Make a copy of the presentation file and rename the file extension from .pptx to .zip.
Double-click the zipped file to open it as a folder and navigate to the ppt/media subfolder.
Copy and paste the media files you want to extract to another location on your computer.
Rename the zipped file back to .pptx to restore the original presentation.
You may as well check this article:
Save embedded media from a presentation (audio or video) - Microsoft Support
and Extract files or objects from a PowerPoint file - Microsoft Support
I hope this helps you download the embedded PowerPoint presentation from the web. If you have any other questions, please let me know. 😊
Microsoft Moderator
Thank you for your reply. I don't know if you can see the screenshot I have attached in my OP, but I do not have the option to click "open in desktop app" if I am not signed into my Microsoft account. Maybe I should emphasize, that this website and the embedded link is mainly for teacher colleagues - many of them who don't have a microsoft account. So, that option which you recommend is not an option, because it does not exist.
Thanks anyways for the effort!
Hm, this reply feels like an IA generator has created it...I wonder if my OP was even read to output that. Clearly, none of these options is possible because the powerpoint presentation is embedded as a html code. I have provided an example to my website where I have the ppt embedded - see original post.
As a workaround, add a link to your web page to the presentation file.
If others don't have a Microsoft account, then they don't have a current version of Office and probably cannot open the presentation they would download.
Thanks again for your effort in trying to help solving this issue.
The workaround is not really practical - I have 60 different presentations on that website, I simply cannot post a separate link to each of them somewhere else...
This issue also doesn't have anything to do with the current or not-current version of Office. I am fully update to the very last version - but if I try to download it (without being signed into my account) I cannot download it either. Also, no matter whether or not you have an outdated Office Version - the file should still be downloaded. To open it you would need the latest version maybe, but not for downloading...
I agree that when you click on Download a Copy , it should download a copy. But it doesn't, so I'm trying to help you find workarounds. You can report the bug in your embedded presentation by clicking on the three-dot icon at the right end of the menu bar, then choosing Give Feedback to Microsoft>Report a Problem .
Normally, when you sign in, you stay signed in. If you're using Microsoft 365, Office becomes non-functional when you sign out, so I'm not sure why you think others sign out when they're not using the programs.
You users also have the option of saving to OneDrive.
You don't have to post the links somewhere else. Posting a download link immediately below the embedded presentation would be simpler.
Thanks again for taking the time to reply. I appreciate the suggestion for a workaround, but I just cannot see myself posting the links directly below each of my 60 different ppts now...It is a viable workaround solution, I agree, but not practical if I want to save my nerves.
I have already reported a the bug using the suggested way - let's see what comes back.
Look, the embedded link to the ppt in the website allows Users without a OneDrive or personal microsoft account to use the powerpoint presentations by simply downloading the file. Hell, they wouldn't even have to open it in the powerpoint desktop app (or the browser app), but instead drag-and-drop to a GoogleDrive and open as GoogleSlides. That too, works just fine (with some loss in functionality or formatting). Just because you download a pptx file doesn't mean that you need to have a personal or business account. The reason why I can test this scenario, is because I use a different browser where I am not signed into my own Microsoft account - so, I am simulating what other ppl without Microsoft account would see. And: All of what I have been describing used to work perfectly fine up until 6 days ago...so, I don't think there is another explanation other than that this is some sort of an error or bug. At least I don't know what else the issue could be.
Thank you for the response and do understand that those options which was posted was provided in a manner that you have thought that it was Artificial Intelligence that created it. I hope that those options was been tried and checked as well on your end. We also agree with the workarounds which was provided by John Korchok .
I have tried all options, but none of them is viable. It is not acceptable having to post a link to the powerpoint presentation below each of my more than 60 different powerpoint presentations which are embedded as an html file on a website as a workaround - because it isn't a workaround. Especially, because this issue didn't use to be an issue for the last 2 years until 10 days ago. It has never been a problem to download the presentation without being a registered Microsoft account user.
I find it hard to believe that as a Microsoft Moderator there are not any better suggestions to solve this problem. This is clearly a microsoft bug - I have also reported the problem, but not heard anything for the last 5 days since reporting.
Question Info
- Norsk Bokmål
- Ελληνικά
- Русский
- עברית
- العربية
- ไทย
- 한국어
- 中文(简体)
- 中文(繁體)
- 日本語

How to Extract All Video or Audio Files from a PowerPoint Deck

Try This Great Trick to Easily Extract All Embedded Video or Audio from a PowerPoint Presentation
Avantix Learning Team | Updated August 11, 2021
Applies to: Microsoft ® PowerPoint ® 2013, 2016, 2019 and 365 (Windows)
If you want to extract embedded video or audio files from a Microsoft PowerPoint deck to use in another presentation, you can copy and paste them between presentations or you can extract them by converting the presentation to a zip file type. Starting in PowerPoint 2010, video and sound files are embedded (copied into the presentation) by default.
In newer versions of PowerPoint, you can right-click a video or audio file (typically in Normal View), select Save Media As from the drop-down menu and save the file with a new name on your PC or a shared drive.
The following trick to extract all media works with any Microsoft PowerPoint file using XML (Extensible Markup Language) format. XML files are stored as a package and can therefore be unzipped. They also end with an "x" such as .pptx (2007 and later versions).
Note: You can't extract YouTube videos that are embedded in a presentation using this method.
Recommended article : How to Insert or Embed a Video from a File in PowerPoint (and Control Playback)
Do you want to learn more about PowerPoint? Check out our virtual classroom or live classroom PowerPoint courses >
Extract video and audio files by changing the file extension
In order to use the following procedure, Windows Explorer must be set so that it shows file names with extensions.
To extract embedded video and audio files from a PowerPoint deck:
- In Windows Explorer, select the presentation (it should have a .pptx extension) with the embedded video and audio you wish to extract.
- Right-click and choose Copy or press Ctrl + C.
- Right-click and choose Paste or press Ctrl + V.
- Right-click the copy of the presentation and choose Rename in the drop-down menu.
- Change the file extension .pptx to .zip (Windows must be set to display file extensions).
- Press Enter. A dialog box appears warning you that the file may become unusable if you change the extension.
- Click Yes to continue. The file icon changes to a folder icon.
- Double-click the zipped folder. The zipped folder contains multiple folders (some contain information such as XML code or properties).
- Double-click the ppt folder.
- Double-click the media folder to view image, video and audio files. Each file is given a generic name.
- Copy these files (or the entire folder) to another location for use in other presentations and to rename the files. Copying to another location will unzip the files. You can also click the Extract button in Windows Explorer to extract the files to another location.
Linked audio and video files will not be extracted.
This article was first published on July 15, 2017 and has been updated for clarity and content.
Subscribe to get more articles like this one
Did you find this article helpful? If you would like to receive new articles, join our email list
More resources
How to Insert a Video in PowerPoint (from a File on Your PC or Shared Drive)
How to Embed a YouTube Video in PowerPoint
PowerPoint Keyboard Shortcuts to Play and Control Video During a Slide Show
A Beginner's Guide to Video Formats in PowerPoint
Related courses
Microsoft PowerPoint: Intermediate / Advanced
Microsoft PowerPoint: Design for Non-Designers
Microsoft PowerPoint: Animations Bootcamp
Microsoft Word: Intermediate / Advanced
Microsoft Word: Power User
VIEW MORE COURSES >
Our instructor-led courses are delivered in virtual classroom format or at our downtown Toronto location at 18 King Street East, Suite 1400, Toronto, Ontario, Canada (some in-person classroom courses may also be delivered at an alternate downtown Toronto location). Contact us at [email protected] if you'd like to arrange custom instructor-led virtual classroom or onsite training on a date that's convenient for you.
Copyright 2024 Avantix ® Learning
You may also like

How to Insert or Type E with an Accent Mark in PowerPoint (È, É, Ê, Ë, è, é, ê, or ë)
You can insert or type e with an accent mark in PowerPoint using built-in tools or keyboard shortcuts (including Alt code shortcuts). The letter e can be inserted with an accent in both upper or lower case in text boxes or placeholders on slides, the slide master or layouts. The following are common accents in upper or lower case – È, É, Ê, Ë, è, é, ê, or ë.

How to Fade a Picture or Part of a Picture in PowerPoint (Using a Gradient)
You can fade a picture in PowerPoint by drawing a rectangle shape on top of the picture and then filling the rectangle with a gradient from opaque to transparent. This technique is often used to fade an image into the background of a slide. Since the rectangle is placed on top of the image and then text may be placed on top of the rectangle, you may need to reorder the objects.

How to Lock an Image, Shape or Other Object in PowerPoint
You can now lock an image, shape or other object in PowerPoint. Objects can be locked in Normal View or Slide Master View. Only PowerPoint 365 users can lock objects to prevent moving and resizing. This is helpful if you want to select and move other objects on the slide or prevent others from moving or resizing an object. You can lock items using the context menu or the Selection Pane.
MORE POWERPOINT ARTICLES >
Microsoft, the Microsoft logo, Microsoft Office and related Microsoft applications and logos are registered trademarks of Microsoft Corporation in Canada, US and other countries. All other trademarks are the property of the registered owners.
Avantix Learning |18 King Street East, Suite 1400, Toronto, Ontario, Canada M5C 1C4 | Contact us at [email protected]
Our Courses
Avantix Learning courses are offered online in virtual classroom format or as in-person classroom training. Our hands-on, instructor-led courses are available both as public scheduled courses or on demand as a custom training solution.
All Avantix Learning courses include a comprehensive course manual including tips, tricks and shortcuts as well as sample and exercise files.
VIEW COURSES >
Contact us at [email protected] for more information about any of our courses or to arrange custom training.
Privacy Overview
Pin it on pinterest.
- Print Friendly
How to embed a video in PowerPoint for a more engaging presentation

Making an engaging PowerPoint presentation is no easy feat.
You have to figure out what to say, and what you want your audience to grasp. Then, decide how to bring the two together to deliver a compelling presentation.
One popular way to add flair is by embedding video into the content, like what Dr. Frans de Waal did in his TED Talk on inequity aversion . To emphasize his points, he included videos of animal experiments, turning a mind-numbingly boring topic into an engaging and viral presentation—which now has over 5 million views.
In this step-by-step guide, you’ll learn how to embed a video in PowerPoint so you can create exceptional presentations that grab your audience’s attention and help them remember what you said.
How to embed a video in PowerPoint from your PC or Mac
First, of course, you’ll need a video, either one online or from your media library. The next step is to find a way to make it play during your PowerPoint presentation. You could do it manually by bringing up the video from another website or program while you’re speaking, but that process is clunky and you might end up facing technical challenges.
Luckily, there are simpler and easier methods of embedding videos in PowerPoint. You can link to your video file externally or embed it directly in your presentation.
Use the tutorial below to insert videos in PowerPoint from a computer.
How to embed a video in PowerPoint in Windows
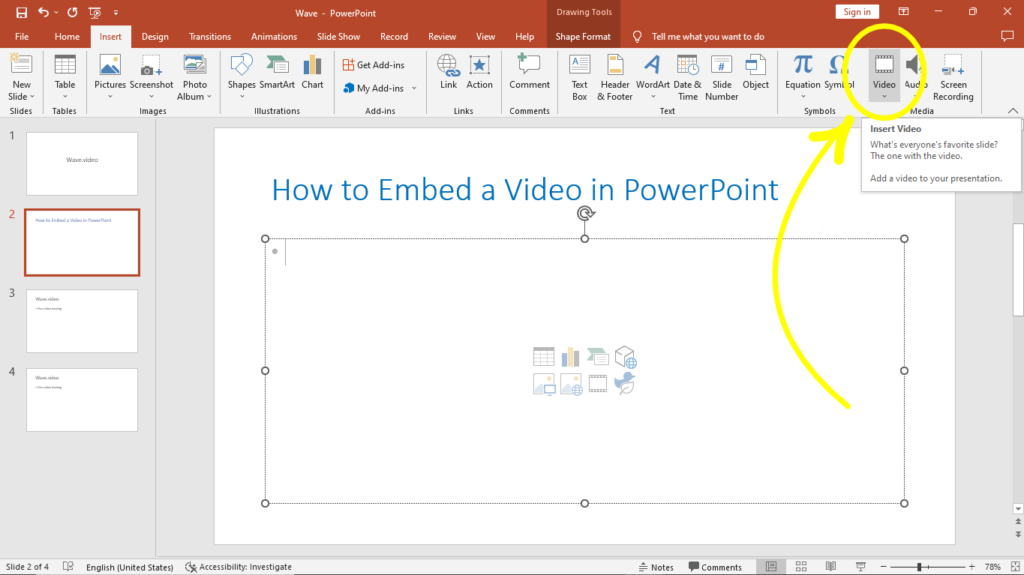
Step 1: select the powerpoint slide.
Launch Microsoft PowerPoint on a Windows computer and open a blank or existing PowerPoint file.
Then, go to the slide you want to embed a video and select the Insert tab in the toolbar.
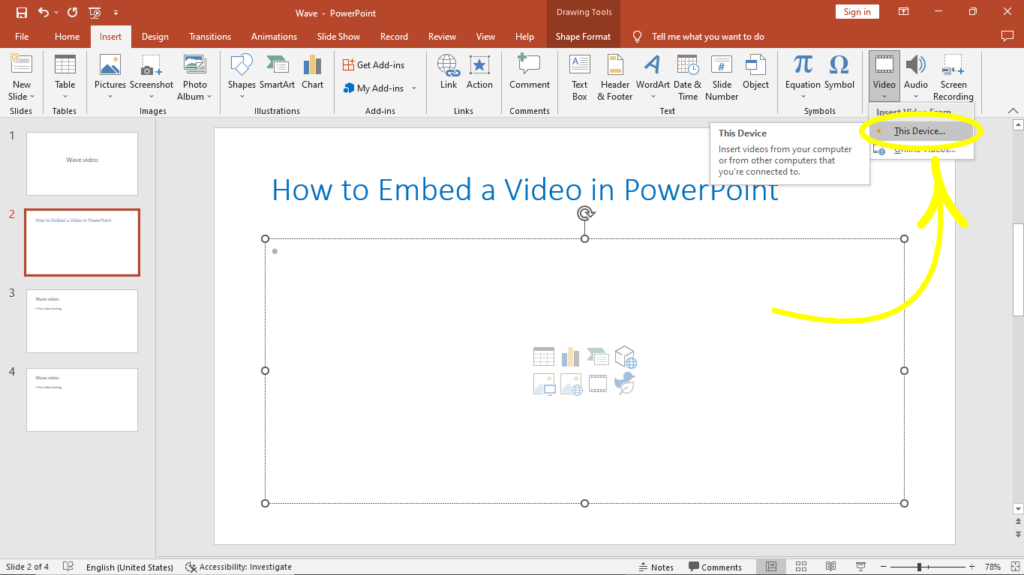
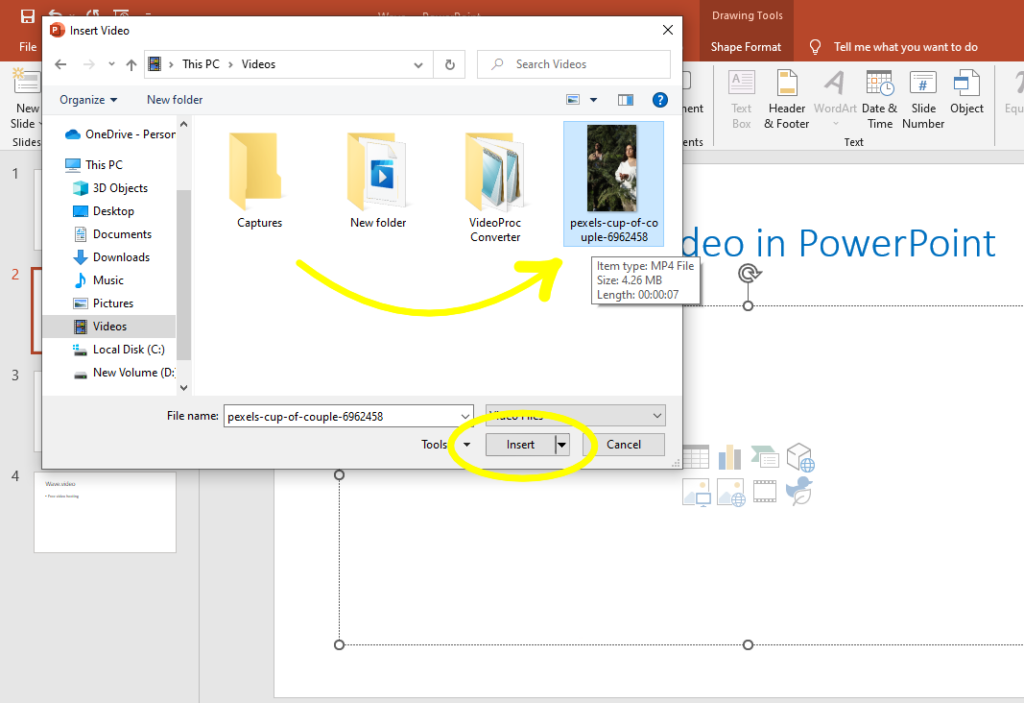
Step 2: Click Video > This Device
Select the Video option. Here, you can either embed a video from your computer or from an online source, like a website or YouTube and other supported platforms.
Click This Device from the drop-down menu to embed a video from a folder on your computer.
PowerPoint supports MP4 files encoded with H.264 video and AAC audio. So, you can upload videos in file formats, such as M4V, MOV, ASF, AVI, MPG, MPEG, or WMV.
If you don't want to play a video full screen, resize it to your preferred dimensions.
For precise height-to-width proportions:
- Select Format (PowerPoint 2013 or newer) or Options (PowerPoint 2010) in the Size group
- Click the Dialog Box Launcher Icon image
- Click Size, then select the Lock aspect ratio checkbox under Scale
- Enter your preferred height and width under Size and rotate or enter the percentage of size that you want in the Scale height and width boxes
Then, select Video Format to access formatting options like borders and effects or right-click the video for more options. You can also use the Designer tool to choose from professional slide templates.
Then, click the Playback tab to trim your video, add captions, choose playback options, like In Click Sequence, Automatically, or When Clicked On.
Note: In PowerPoint for Microsoft Office 365 or PowerPoint 2016 version 1709 or later, you can use the In Click Sequence option. This way, your video can play in sequence with other actions you’ve programmed on the slide, like animations or transitions.
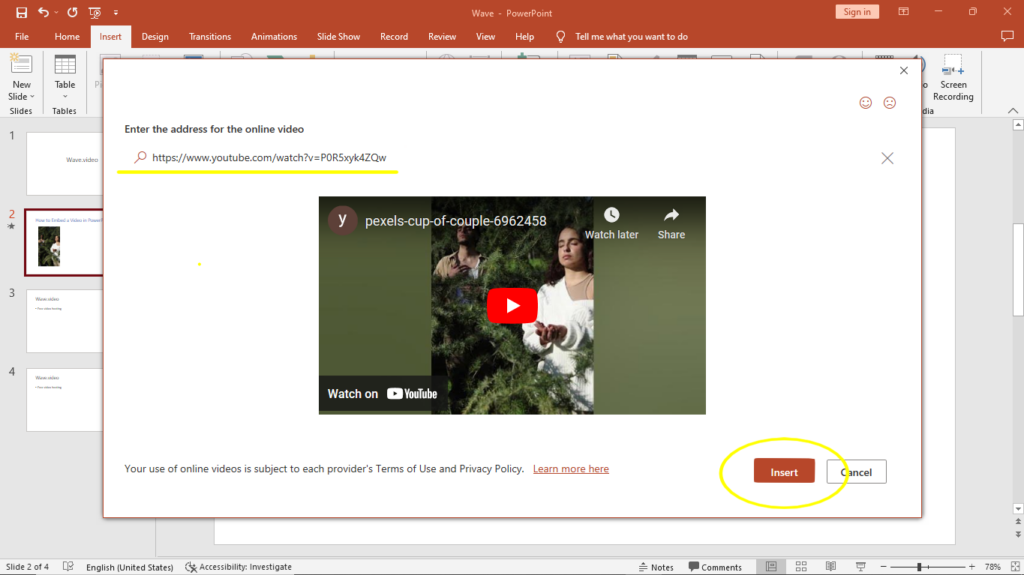
To insert a web video, select Video > Online Videos .
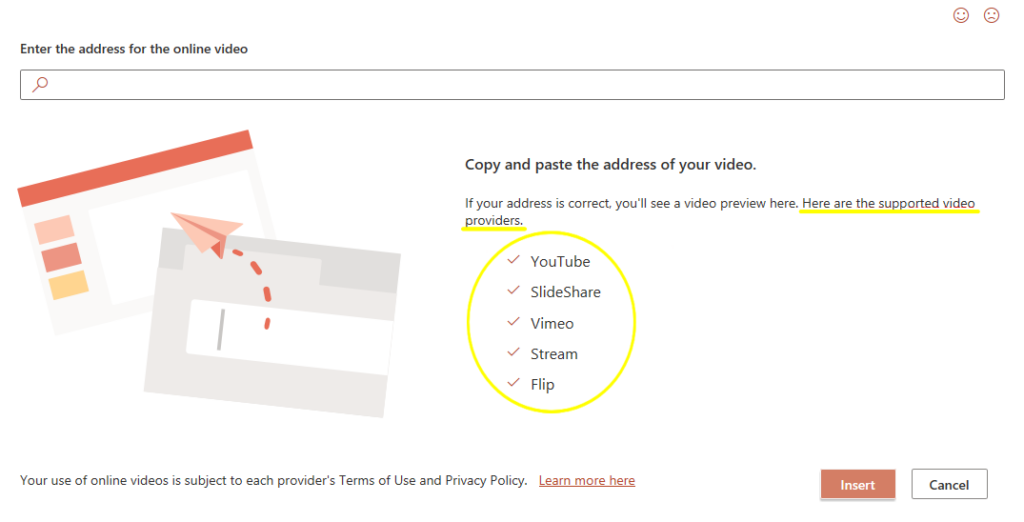
Note: PowerPoint supports YouTube, SlideShare, Vimeo, Stream, and Flip video providers.
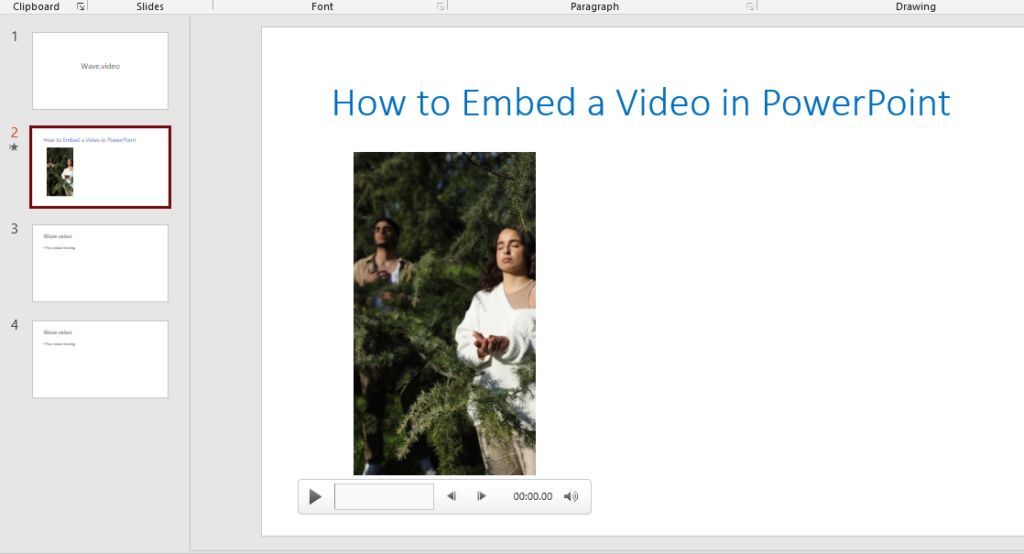
Step 3: Click Insert
If you choose to embed an online video, copy the link to the video you want to embed and paste it in the blank field. A preview of your video will appear in the Insert video pop-up.
Click the Insert button to embed the video in your presentation.
PowerPoint will download and insert the video on the selected slide. You can drag the edges of the video thumbnail to resize it, then use Video Format options, like shape, border, and effects to enhance the video.
Select the Playback tab to insert captions or choose how your video plays (automatically or when clicked).
Note: You can’t change when an online video starts. But if you’re embedding a YouTube video, you can copy the video URL at the current time to link from a specific start time.
Click the Slide Show tab to preview the video with all the formatting changes you made. Then, save your presentation to your computer or click the Share button to move or copy it to the cloud.
How to embed a video in PowerPoint on a Mac
To embed a video in PowerPoint for Mac, you’ll need to save the video file in the same folder as your presentation.
Launch PowerPoint and open a blank or existing presentation, then select the slide you’d like to add a video to.
Select Insert .
Step 2: Click Video > From File
Click Video to access video embed options from the drop-down menu:
- Video browser
- Video from file
- Stock videos
- Online film
Select Video from file to insert a video file from your Mac.
In the Choose a Video dialog box, select the video file you want to insert, then click the Insert button to embed the video on the slide.
If you want to put a link to the video on the slide, click Show Options in the lower left corner of the dialog box.
Then, select the Link to file box, and click Insert .
Select the Video Format tab to add effects and choose whether your video will play automatically or when clicked.
Tip: If you’re using the 2016 version of PowerPoint (or newer), you can play back videos with multiple audio tracks. These versions also support closed captions and subtitles embedded in video files.
Select the Playback tab to do the following:
- Trim your video
- Add fade in and fade out effects
- Play the video on full screen or hide during the show
- Insert captions
- Select start time options (in click sequence, automatically, or when clicked)
- Loop the video to play repeatedly and continuously during the presentation
- Rewind your video
How to embed a video in PowerPoint from YouTube
Embedding a YouTube video to a PowerPoint presentation is simple. You can use the video URL or integrated search function to embed a video you uploaded to YouTube or someone else’s video (with permission).
To add a video to your PowerPoint presentation, you’ll copy the video embed code and paste it into the slide you want. The code will load the video at the source and play it on the platform you’re using.
You won’t need to download and upload the video from YouTube and the video will load and play faster regardless of the file size. Plus, you can share video content that’s covered under copyright, so you’re not in danger of crossing any legal lines.
Follow these steps to embed a video in PowerPoint from YouTube on a Windows PC or Mac.
How to embed a video in PowerPoint from YouTube in Windows
Step 1: click “insert video”.
Open a PowerPoint presentation and select the slide you want to embed your video.
Click Insert > Video .
Step 2: Choose “Online video”
Select the Online Videos option.
Step 3: Insert the URL from YouTube
Right-click the video to copy the video link or embed code, or click Share to get the embed code. Then, paste the URL or embed code in the link field.
A preview of your video will appear in the Insert video dialog box.
Click Insert to embed the video in your presentation.
Resize the video thumbnail, then use the video formatting options to enhance it.
Click Playback play the video automatically or when clicked or add captions. Then, preview the video with all the edits you made and save or share your presentation.
Note: YouTube’s video file formats are similar to those PowerPoint supports, so your video will likely play without issues. However, YouTube supports some formats that PowerPoint doesn’t, including FLV, 3GPP, WebM, DNxHR, ProRes, HEVC (h265), and CineForm. If your video isn’t playing, check to make sure it’s a supported file format.
How to embed a video in PowerPoint from YouTube on a Mac
Step 2: choose “online film”.
Select Online Film .
A URL pop-up will appear prompting you to enter the link to the YouTube video.
Go to YouTube and copy the link or embed code of the video you want to embed in your presentation. You can right-click the video and select copy video URL or copy embed code, or click Share and copy the video link or embed code.
Paste the video link or embed code in the URL pop-up in your PowerPoint presentation, then click Insert .
Resize your video and polish your slides before saving the presentation to your computer.
How to insert a video file link in PowerPoint
Embedding a video in PowerPoint may be convenient, but it increases the size of your presentation.
To reduce your presentation file size, insert a video file link to create a linked video. The downside with linked videos is that links can break, but you can prevent this by copying and storing your presentation and linked videos in the same folder, then linking to the video there.
Ensure you have a stable internet connection, then use the steps below to insert a video file link in PowerPoint on a PC or Mac.
Insert a video file link in PowerPoint on a PC or Mac
Step 1: take a screenshot of the video.
Find the video you want to link to in PowerPoint and take a screenshot of the clip.
To take a screenshot in Windows, you can either use the Snipping tool, press the PrtScn (print screen) key and Windows Logo key on your keyboard.
If you’re using a Mac computer, you can take a screenshot by pressing and holding SHIFT + COMMAND + 3 keys together (for full screenshot) or SHIFT + COMMAND + 4 keys to screenshot a specific area.
Step 2: Insert the screenshot in your presentation
Alternatively, navigate to the slide you want to add your screenshot to, select Insert > Pictures > Picture from File . Then, find the screenshot you took, select Insert to add it to the slide, then crop, resize, and position it to your liking.
Step 3: Hyperlink the image to your video
Right-click the image and select Link .
If your video is in Descript, copy the video link from your dashboard.
Insert the video link in the address field then click OK .
The hyperlink will be connected to the image itself, not other elements on the slide or the entire slide.
Click Slide Show to test your video and ensure it links to the right video. When you click on the image, it will open in a web browser, ready for you to play.
Why can’t I embed a video in PowerPoint?
Embedding videos to a PowerPoint presentation is a straightforward process, but sometimes the video may fail to play. Let’s review some reasons for playback failure and how to resolve them.
Video playback issues
Video playback may fail in PowerPoint if:
- The storage folder is corrupt
- The video’s audio is out of sync
- The video file is corrupt, damaged, in an unsupported file format, or missing certain files
How to fix: Convert your video into a supported file format, check PowerPoint playback settings, or make the video visible by unchecking the Hide while not playing option in the playback tab. You can also save your presentation using the PPT or PPTX extension, so it’s easier to open the file in older or modern Office versions.
File size and compatibility
Your video might not play if the file is too big. To resolve this issue, compress the media file by going to File > Info > Compress Media. Then, select one of these options:
- Presentation quality/full HD: Adjusts the video size while maintaining its quality.
- Internet quality/HD: Saves on space and video quality.
- Low quality/Standard: Saves more space but doesn’t keep overall video and audio quality. This option is ideal if you want to share the presentation with others and ensure your videos will still play.
If your video file is incompatible with PowerPoint, it may be in an unsupported file format or missing a codec.
How to fix: Convert the video to a supported format or add a missing codec to your computer for smooth playback.
Broken links
When adding an online video, you might accidentally enter an incorrect link or the video link may be broken at the source. This means it won’t embed correctly and won’t play when you’re presenting.
How to fix: Before inserting or embedding an online video, install the required updates for your version of PowerPoint and check that you’ve copied the right link. Then, test your video to ensure it plays on any device.
Make the best videos to embed in PowerPoint with Descript
Embedding a video in PowerPoint is a pretty simple process with several benefits for you and your audience. To prevent yawns and glazed-over eyes, you’ll need professional-quality videos that will draw your audience in, keep them engaged, and improve message recall.
Descript’s audio and video editing software lets you record, edit, and publish studio-grade videos to YouTube, then embed them in your PowerPoint presentations in a few clicks.
Plus, Descript’s AI-powered automatic transcription generates high-quality transcripts from your video’s audio, which you can use as notes while making your presentation. You can also use Descript’s AI features to get text summaries, auto-generate copy for social media posts, and enhance your audio with Studio Sound .
Take Descript for a spin today to make quality videos that will help you deliver exceptional PowerPoint presentations.
Featured articles:

How to create an internal company podcast to keep employees connected
Learn how to boost company culture and improve communication with an internal podcast in this step-by-step guide.

AI for Creators
9 AI content creation tools to supercharge your creativity
AI content creation is exploding, but some tools are better than others. Find the best in this guide.

How to write a YouTube script that engages your audience: The ultimate guide
Are you looking to create better narratives in your YouTube videos? Learn how to write a YouTube script that keeps people hooked.

175 YouTube channel name ideas for more subs
Unlock the perfect name for your YouTube channel. Discover 175 YouTube channel name ideas for more subs and views!

Other stuff
10 excellent Loom alternatives to record your screen
Looking for the best ways to record your screen without Loom? Find out 10 Loom alternatives, their features, and pricing.

Tips & Tricks
How to make videos for social media: 9 winning tips
Looking to learn how to make videos for social media? Find out in this complete guide.
Articles you might find interesting

How sound design for fiction podcasts can benefit nonfiction shows
I got my start sound designing for fiction podcasts, and when I made the jump to nonfiction, I was surprised at how much my time with fiction prepared me to edit on the other side of the fence.

The 10 most important podcast metrics to improve your show
Having hard data on your listeners’ habits can give you a sense of what’s working and what’s not. Here are the podcast metrics to look out for.

Point of view shot: Why a subjective shot is important in film
Here’s a deep dive on this essential shot, including how best to use it and some of the classic film scenes that made it famous.

Social Media Marketing Tips to Fine-Tune Your Strategy
Learn how to do a successful social media marketing strategy for your podcast, video channel, or any other brand, defining your audience, measurable goals, and some other things.
Video resolution 101: What it is and how it impacts video quality
Our comprehensive guide to video resolution. Learn how it impacts your video quality, the types you need to know, and why it matters when it’s time to create stunning videos.
.jpg)
How to write AI prompts: 5 expert tips
Having trouble creating good content with AI? Discover how to write AI prompts with these examples, tips, and tricks.

Join millions of creators who already have a head start.
Get free recording and editing tips, and resources delivered to your inbox.
Related articles:
Share this article
Just $59.95 for a limited time (normally $99.95).

How to embed a PowerPoint presentation into a website or blog
Do you want to know how to add a powerpoint presentation to your website or blog without having to upload multiple slide images or a video of the entire presentation .
In this guide, I'll show you how to make your presentation more interactive and engaging for your audience on the web. I'll explain how to upload your presentation slideshow directly to your blog, so your readers can enjoy all the functions of a PowerPoint presentation directly on your website or blog page.
To help you understand better, I'll show you an example of a presentation that has already been uploaded to this blog. With the help of PowerPoint for the Web, you can make your presentations more accessible and engaging for your audience. So, let me guide you through the process of seamlessly integrating your PowerPoint presentation into your website or blog.
This presentation is part of our Law PowerPoint Template . You can use this template or any other template from the PresenterMedia PowerPoint Templates library.
This template can be accessed and download at no cost by simply signing up for the PresenterMedia free basic plan .

The only version of PowerPoint that allows users to create embed code is PowerPoint for the Web .
Historically, consumers were able to save a presentation as a video and embed it onto a website. But it wasn't the same as allowing readers to click through the slides, and download if needed. Microsoft heard from their clients and added the ability to embed the web application into the latest iteration of PowerPoint (for Web). With that said, let's check out this feature from Microsoft!
Let's get started Embedding!
Now that you've seen what a PowerPoint looks like once embedded, let's get into the process of completing the task at hand.
Begin by opening the PowerPoint 365 Web Application (link here !) Note* You may need to sign into your Microsoft Office account before you start.
After the site is open, select the presentation you'd like to embed into your website if already uploaded (or start from scratch).

If you haven't uploaded your presentation to PowerPoint for the web, choose the upload option.

Okay, once you've upload or selected your PowerPoint file it will load into the PowerPoint web application.

Next, click "File" from the upper left corner of PowerPoint and select "Share" from the options on the left side.

Then, select "Embed" from the two option on the right.
The default embed code in my PowerPoint is 476 x 288. As a rule, 610 x 367 will fit on most websites comfortably, but if you want your viewer to have a full-screen experience, then 1186 x 691 dimensions would be preferable. However, this option is customizable, so you can choose any size you desire.

Copy the Embed Code and paste it into the body of your website or blog.
Last, but not least, be sure to save the code in your site or blog, and voila! You've successfully embedded a PowerPoint presentation into your website.
To recap: How to embed a PowerPoint presentation into a website includes 4 simple steps:
Open your presentation in Office 365's version of PowerPoint
Click File > Share > Embed
Copy the embed code
Paste the embed code to your website.
Thanks so much for checking out this tutorial! Let us know if you have any burning questions about PowerPoint or Office 365!
This embedding a PowerPoint Presentation tutorial is also available on our YouTube video here:
Why is embedding a PowerPoint Presentation in a blog or website a Smart Move?
When it comes to showcasing presentations on your website or blog, embedding a PowerPoint slideshow is a great way to make them more engaging and interactive. Unlike static images, an embedded presentation allows your audience to navigate through slides, interact with content, and absorb information in a more immersive way. This not only enhances the visual appeal of your presentations but also makes it easier for your viewers to explore the content at their own pace .

Categories:
Recent posts:.
- March 2024 Suggestions
- Save and Link a PPSX File in PowerPoint
- PresenterMedia February 2024 Newsletter - Graphics, Updates, News
- New Artwork and Illustrations for February
- Improvements Update: SlideClips Video Maker | February 2024
- PresenterMedia January 2024 Newsletter - Graphics, Updates, News
- January 2024 Suggestions
- How to Convert PPTX to Google Slides and Enhance Your Presentations
- December 2023 Suggestions
- Help! Images have black background in PowerPoint | Get the Fix

Your presentations are going to be amazing! See Plans and Pricing

© 2009-2021 Eclipse Digital Imaging, Inc.
Quality PowerPoint Templates , Animations, videos, and 3D Clipart. PowerPoint® is a registered trademark of Microsoft Corporation.
Notification Title!
This is the message.
- ADB and Fastboot
- Samsung Odin
- Android Tips
- Keyboard Shortcuts
- Tools and Utilities
Extract Images and Embedded Files from Word, Excel & PowerPoint
- by Adnan Ahmed
- April 30, 2020
Microsoft’s suite of applications is undoubtedly one of the most essential ones installed first on any Windows PC. First, there was just Word, which allowed easy editing of documents on the go, then came Excel, for editing and managing spreadsheets the easier way, and then PowerPoint, to make presentations appear more lively. We have seen a lot more applications evolve like Outlook, One Note, Project, and much more. Long story short, Microsoft is approaching us consumers to make our tasks really simple.
As we all know, the popular Office apps are Word, Excel, and PowerPoint. If you are in a situation where you need to extract all the media like images, and videos embedded inside of these files, then you’re in the right place. The newer versions of Microsoft Office apps have extensions like .docx, .xlsx, and .pptx. The ‘x’ in all of these extensions symbolizes that all of these are Microsoft XML supported applications, which means that they are actually compressed files that you can use to extract media directly. On the other side, the older non-supported XML documents like .doc, .xls. and .ppt cannot do this directly.
We will first be taking a look at how you can use the newer extensions to extract embedded images and files directly onto your Windows PC. Down below will also be a tutorial about a software which can do the same for these older non-XML supported files. You can access and view your files on Windows 10 more quickly using these File Explorer shortcuts .
Extract Embedded Files from Office Documents (.docx, .xlsx, or .pptx)

Note: To access the raw text of your document, open the document.xml or similar file.
How to extract images from documents (.doc, .xls, or .ppt).

If you have any issues with the tutorial, we’re always here to help you. If you think we’ve helped you plenty, then why not surf around our little space and grasp more such tips and tricks?
Read Next: How to Save Spotlight Lockscreen Images on Windows 10
Related Posts

How to Set Up Shizuku and Use Rootless Apps and Mods

How to Check Battery Health and Status via ADB (Android)

How to Use ADB to Check Apps Running in Background on Android

How to Stop Apps Running in Background on Android

How to Clear PowerShell and CMD Screen and Command History

Samsung Galaxy S24 Bloatware List and Removal Guide
- Subscription
How to Embed a Video in PowerPoint: 4 Ways Explained in Detail

No matter the industry or purpose, a perfectly executed PowerPoint presentation can make all the difference. It’s also well-known that video performs better than other media formats in conveying information.
People tend to lean on and respond better to a particular learning format, whether audio, visual or a hybrid. The combined audio and visual output in video ensure you consider every demographic in your audience, and as a result, you’re likely to achieve your objectives with the presentation.
Following these detailed steps, find out how to embed a video in PowerPoint.
How to Embed a Downloaded Video in PowerPoint
Here’s how to go about it:
- Launch PowerPoint on your PC and open the presentation into which you want to embed the video.
- Scroll through the various slides, and identify where you want to embed the video.
- Go to the Insert tab and select the video option. This is on the top right corner of your screen.
- Select This Device from the dropdown menu, and navigate to the file location where you’ve saved the downloaded video. Choose the video and click open on the system prompt.
- In the media library, choose the video you want to add to the presentation and click on the Insert button.
- The transfer should be almost instantaneous, but it can delay slightly with larger files. Reposition the embedded video to a more desirable place in the slide and hit save.
How to Add a Video Link to PowerPoint
An embedded video link may be most appropriate if you’re bothered by a large PowerPoint document. Still, this method has its limitations. You must be able to guarantee the availability of the video through the link, at least for the foreseeable period that the PowerPoint will be in use.
For this reason, you should consider using a reliable video hosting provider that can ensure the link will be live almost indefinitely.
Here’s how to do it:
- Launch PowerPoint on your device and locate the PP document into which you want to embed the video link. Alternatively, you can open find the PP document on your device and open it directly.
- With the document opened, select the Insert tab on your ribbon and look for the video option on the top right section of the window.
- At the moment , Ms. Office PowerPoint 2016 only allows links to online videos hosted on five platforms: YouTube, SlideShare, Flip, Vimeo, and Stream. Due to this, if you’re using Ms. Office 2016 or an earlier version, you must host the video on either of the five.
- Depending on where you’ve hosted the video, you might want to change the access settings for the video link to enable access for all users in case you have to share the PowerPoint document with others.
How to Embed a YouTube Video in PowerPoint
With the former , you only need to download the YouTube video to your device. You can then embed the downloaded YouTube video into the PowerPoint document, as shown in the first tutorial.
If you’re embedding a YouTube video in PowerPoint via its link, refer to the steps mentioned above on how to add a video link to PowerPoint. However, you must ensure that the resource will be available for as long as the PowerPoint document is in use and all access restrictions are removed.
Add your video wherever you want!
How to Link a Video Hosted on Wave.video
You’re missing out on many great features if you’re not using Wave.video free video hosting.
So how do you link a video hosted on Wave.video? If you’re using Ms. Office 2016 or earlier, you may have noticed that the Wave.video isn’t on the list of supported video providers, and thus you can’t embed your Wave.video link in your PowerPoint document .
Here’s a simple workaround for this:
- First, log into your Wave.video account or sign up for a free one if you haven’t already.
- Once you are in your account, open the My Projects tab, the button is on the homepage.

- Upload the video you want to embed or choose one from your collection, and click on it.
- Now, you are on the page of setting the video hosting. On the left side of the screen, click Player . This is not necessary, but it’s essential if you want to customize the video to align more with your brand. Change the player color, toggle with the control options, once you are done with all the changes, remember to save it (click on the Save changes button).
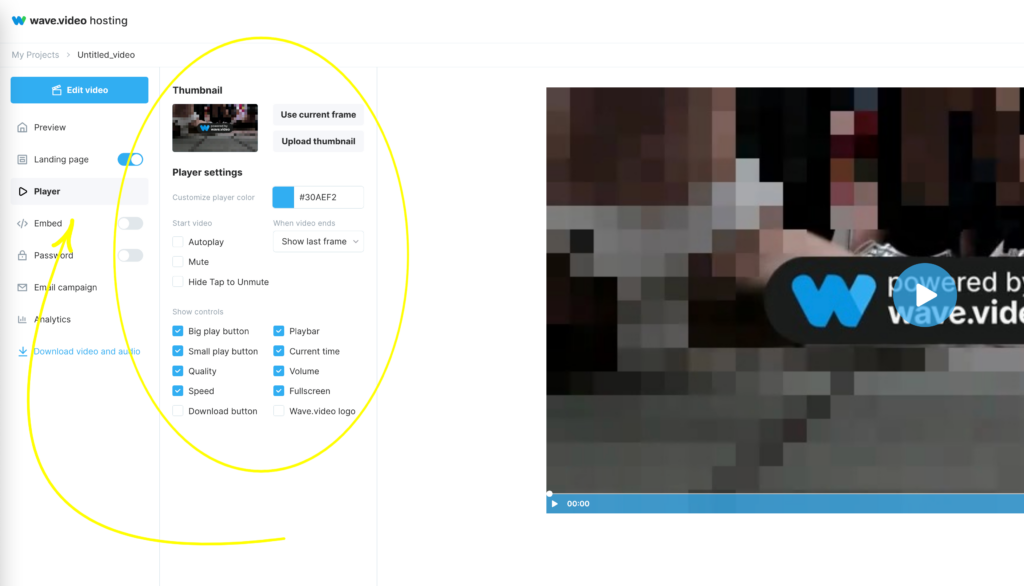
- If you need to make some changes to the video itself, click on the Edit video button. Once complete, hit the Publish button.
- Select the video option, then publish to your YouTube or Vimeo channel. You can restrict these videos to private. Allow the authentication to go through, and if necessary, log in to your account and grant Wave.video access to the platform.
- Hit the share button, and log in to your Vimeo or YouTube account. Open the video you’ve just shared there, and copy the link.
- Next, open PowerPoint and go to the insert tab.
- Select Video and choose the Online Videos option. Paste the link in the specified space and hit insert. Give it a moment, and the new video should appear on the slide.
Frequently Asked Questions
Why can i not embed a video in powerpoint.
The video file could be incompatible with Ms. PowerPoint. Supported video file types include: *.AVI, *.WMV, *.MP4, *.M4V, *.MOV, *.MPG and *.MPEG.
If your file is in another format, simply upload the video to Wave.video for free, download it in any of the supported file formats, and embed the now suitable video file in PowerPoint.
PowerPoint only allows you to embed video links from five supported video providers . These include Vimeo, YouTube, SlideShare, Flip, and Stream. If your video link isn’t from any video provider in this list, you won’t be able to embed it in PowerPoint. The only solution is to upload the video to approved providers, generate or copy the video link, and paste it on the PowerPoint link prompt .
How do you put a YouTube video in PowerPoint without ads?
Ideally, you can download the YouTube video and embed it directly from your device into PowerPoint afterward.
However, some videos contain burn-in ads , and you’ll still run into the ads even if you download the video.
The best option is downloading the video to your device and uploading it to Wave.video. You can then use advanced editing capabilities on the free video editor tool to cut out any ads in the video.
Once you’ve done this, you can download the ad-free version and embed it as a video from your device. Alternatively, you can publish the video to your YouTube or Vimeo channel right on Wave.video, then embed it as a link on PowerPoint.
How to add a TikTok video to my PP presentation?
There are two ways to do this. First, you can download the TikTok video to your device and embed it as a video on your PowerPoint presentation. The procedure is the same as how to embed a downloaded video in PowerPoint .
However, the TikTok video can sometimes be bulky, especially if it’s in MOV format. In this instance, you download it to your device and then upload the video to Wave.video for free.
You can then edit it on the free video editor tool or publish it on one of Ms. PowerPoint’s supported video providers.
Once you’ve published it, load the video from your channel, copy the link, and paste it as described on how to add a video link to the PowerPoint tutorial .
Can I embed a video into PowerPoint 2013 and earlier versions?
Yes. PowerPoint 2013 and earlier versions support embedding videos into PowerPoint documents.
PowerPoint 2010 had a problem at some point, but the issue was resolved, and you should be able to embed a video into a PowerPoint document with that version too.
Since the design is the same across all the Ms. Office versions, the procedures should be the same, with minimal differences.
Final Thoughts
Any PowerPoint presentation falls into two categories, informational or a business pitch. In both, it’s vital to convey the information in the presentation in an easy-to-understand manner and in an engaging format to avoid losing your audience.
Video can help you achieve this objective. By shifting from the monotonous blocks of text to an engaging audio-visual output, you can emphasize certain concepts further and, in some cases, accommodate audio-visual learners in your audience.
Fortunately, if you ask yourself once again, “How to embed a video in PowerPoint?” You’ll see that it is not as difficult as it sounds. With a bit of practice and step-by-step following this guide, you should be well on your way to creating spectacular presentations with embedded videos.
Join our newsletter — it’s free!

How to Download a Video from Facebook – A Simple Guide

How to Download a Facebook Live Video – A Step-by-Step Guide

12 Ways to Repurpose Long Video to Extend Reach and Get More Value

How to Download Audio from YouTube: Simple Guide and Best Tools
We’ll keep you in the loop!
Join 5,000 marketers who read our articles first
Insert and play a video file from your computer
Depending on the version of PowerPoint that you're using, you can insert an embedded video (the default behavior) or link to a video file stored on your computer.
Inserting an embedded video is convenient, but it increases the size of your presentation.
A linked video keeps your presentation file smaller, but links can break. We recommend storing presentations and linked videos in the same folder.

Supported video formats
We recommend that you use .mp4 files encoded with H.264 video (a.k.a. MPEG-4 AVC) and AAC audio.
For more details, see Video and audio file formats supported in PowerPoint .
Embed a video stored on your PC
In Normal view, click the slide that you want the video to be in.
On the Insert tab, click the arrow under Video , and then select This Device (or Video on My PC ).
In the Insert Video box, click the video that you want, and then click Insert .
Link to a video stored on your PC
To help prevent broken links, we recommend copying the video into the same folder as your presentation, and then linking to it there.
In Normal view, click the slide where you want the link to the video to be in.
In the Insert Video box, click the file that you want to link to, click the down arrow next to the Insert button, and then click Link to File .

Newer versions of PowerPoint support the playback of video with multiple audio tracks. They also support closed captions and subtitles that are embedded in video files. For more information, see Make your PowerPoint presentations accessible .
Find out where a linked video is stored
If there's already a video on a slide and you want to know where it's stored, go to File > Info . Under Optimize Media Compatibility , there will be information about all media files in the presentation—whether they are linked or embedded in the file. If there are any linked videos, PowerPoint gives you a View Links hyperlink. Click it to open a dialog box that shows the storage location of any linked files.
YouTube video
If you want to insert a video on YouTube, switch to Insert or link to a video on YouTube .
Preview a video
When a video is selected on a slide, a toolbar appears below the video that has a play/pause button, a progress bar, incremental forward/backward buttons, a timer, and a volume control. Click the Play button at the left of that toolbar to preview the video.

Play a video automatically or when clicked
By default, in Slide Show, the video plays as part of the click sequence. That means that when you click anywhere on the slide to advance to the next step (or when you press the Spacebar, Right arrow key, or other key that advances to the next step) the video plays. This Start option is called In Click Sequence .
But if you prefer, you can make the video start automatically as soon as it appears onscreen, or make it play when it is clicked:
Select the video frame.
On the ribbon, on the Playback tab, open the Start list and choose the option you prefer:

For more details about the options for playing the video in Slide Show, see Set the 'Play' options for a video .
In PowerPoint 2013, we recommend that you use .mp4 files encoded with H.264 video (a.k.a. MPEG-4 AVC) and AAC audio.
On the Insert tab, click the arrow under Video , and then click Video on My PC .
On the Insert tab, click the arrow under Video , and then click Video on my PC .
By default, in Slide Show, the video plays when it is clicked . But if you prefer, you can make the video start automatically as soon as it appears onscreen:
On the PowerPoint ribbon, on the Playback tab, open the Start list and choose Automatically :

To get the correct instructions, select the version of PowerPoint that you're using:
Insert a video stored on your computer
In Normal view, select the slide you'd like to add a video to.
On the Insert tab, click Video , then click Movie from File .
In the Choose a Movie dialog box, select the file you want to insert.
If you want to embed the video on the slide, simply click Insert .
If you want to put a link to the video on the slide, click Options at the lower left corner of the dialog box, and then select the Link to file box, and then click Insert .
Once you've added a video to your presentation, you can add effects and choose whether the video plays automatically or when it is clicked.
Tip: You can play back video that has multiple audio tracks. Closed captions and subtitles that are embedded in video files are also supported. For more information, see Make your PowerPoint presentations accessible .
Insert a video stored on your computer
Open a new or existing presentation in PowerPoint for the web.
Select Insert > Video > This Device .

Select the video you want and select Open to insert it in your slide.

After your video has been inserted and appears on the slide, you can move, resize, or apply shape effects to your video.

PowerPoint for the web supports insertion of video files up to 256 MB.
We recommend using .mp4 video file format for best presentations quality and experience. We also support the following file types: .mov, .wmv, .avi, .m4v, .mkv, .asf, .ts.
The speed at which videos from your computer or laptop are inserted is dependent on your network connection.
Want to insert an online video instead?
Go to Insert a YouTube video for all the details.
Video and audio file formats supported in PowerPoint
Add text to a video

Need more help?
Want more options.
Explore subscription benefits, browse training courses, learn how to secure your device, and more.

Microsoft 365 subscription benefits

Microsoft 365 training

Microsoft security

Accessibility center
Communities help you ask and answer questions, give feedback, and hear from experts with rich knowledge.

Ask the Microsoft Community

Microsoft Tech Community

Windows Insiders
Microsoft 365 Insiders
Was this information helpful?
Thank you for your feedback.
Blog > How to add a YouTube Video in PowerPoint
How to add a YouTube Video in PowerPoint
07.08.20 • #powerpointtips.
Sometimes, you want to show your audience a YouTube video during a presentation. Some people do so by opening the browser, going to YouTube and then typing the video title into the search bar, when in fact there is a much easier and more convenient way. In the this post, you'll learn how you can directly insert a YouTube Video into PowerPoint that plays automatically on your slide. Also, we have got some great suggestions about videos you could show your audience.
You can watch our video (which is by the way inserted from YouTube as well) down below and learn how to add a video to your slides in just one minute! If you don't feel like watching the video, you can also follow the step-by-step guide down below.
Step-by-Step Tutorial
- Go to Insert in the PowerPoint task line on the top.
- Click on Video on the top right corner. Then choose the option Online Video .

- A window will open which will ask you to insert the video’s URL.

- Open the YouTube video you would like to embed in your browser. You can simply right click on the address bar in the browser and copy the URL. Alternatively, perform a right mouse click on the video, and then click on Copy Video URL .

- Go back to PowerPoint and insert the URL by either pressing CTRL+V or right click and then Paste . Then click on Insert .

- Your video will then be inserted on your current slide. Just like any element, you can change its size or move it around now.
- To start the video (either while editing or in presentation mode), simply click on the play button.

YouTube video with offline playback
With the previously described option, it is necessary to have a stable internet connection while presenting. As that can not always be guaranteed, there is also a way of inserting YouTube videos that work offline. Follow these steps:
- Open the YouTube Video in your Browser. Copy the URL by clicking the address bar and then Right Click > Copy.
- Open the website y2mate.com . Paste your copied URL into the text field, then click Start .

- Choose one of the options for download (and click the Download button. We recommend 1080p or 720p.

- A window will open, and your video will convert. When it's ready, click Download .mp4" .
- After your file has downloaded, you should see it in your Downloads folder in the browser. By clicking "Show in folder", you'll see where it's saved on your device.

- Right click on the file in your folder and click Copy .
- Go to the PowerPoint slide where you want your video to be placed. Right click and Paste . Your video should now appear and play if you click on it.

What kinds of videos can I use in a presentation?
Videos are an amazing way to liven up your presentation. Especially when you're talking for a long time, the audience tends to get tired. That's where a variation of multimedia elements, such as videos, can be helpful. We recommend putting videos in the main part of a presentation, but of course you may also start or finish by presenting a video to your audience. There is no limit for the type of video, the only guideline you should follow is relevance. Before mindlessly pasting a video to your slide, ask yourself: "What purpose does this video fulfill within my presentation?" Is it supposed to inform and teach the audience, is it something you really want everybody to see, or is it just a funny little clip to lighten the mood? All of those purposes are fine. With this tip, you're one step closer to a wonderful presentation! If you want to learn more about successful presentations and Audience Engagement, check out our blogpost Top 10 Tools for increasing Audience Engagement .

Set the start of your video
After you've added a video from YouTube, it starts to play by default when you click anywhere on the slide during the presentation. That's usually fine, but can sometimes be annoying, e.g. when you have more than one video on one slide. In that case, it is helpful to set the Start to When clicked on . The video then won't start until you click directly on it. You can do that by first clicking on your video, going to the Playback tab on the right and then select When clicked on in the Start-selection. By choosing Automatically here, your video will start automatically, without having to click on it.
Add a video from your device
If you want to add a video that is saved on your computer, you can do so by following the tutorial in our article Insert a local Video .
Useful Keyboard Shortcuts
How can I insert a YouTube video to PowerPoint?
Go to Insert > Video > Online Video. Copy the video URL from the address bar and paste it to the window that opens. Click Insert and your video should appear instantly.
Can I play a video directly on my PowerPoint slides?
Yes. You can insert a video from YouTube by using the URL, and it will be played directly on your slide. In our tutorial , you'll learn how to do so.
Can I play an offline video from YouTube in PowerPoint?
Yes, it is possible to play an offline YouTube video on your PowerPoint slides. We show you how it is done in our tutorial .
Related articles
About the author.

Pia Lehner-Mittermaier
Pia works in Marketing as a graphic designer and writer at SlideLizard. She uses her vivid imagination and creativity to produce good content.

Get 1 Month for free!
Do you want to make your presentations more interactive.
With SlideLizard you can engage your audience with live polls, questions and feedback . Directly within your PowerPoint Presentation. Learn more
Top blog articles More posts

Common mistakes in PowerPoint and what makes a bad presentation

Create Flowchart / Decision Tree in PowerPoint – Templates & Tutorial

Get started with Live Polls, Q&A and slides
for your PowerPoint Presentations
The big SlideLizard presentation glossary
Internal preview.
An Internal Preview is a statement, which is made in the body of the speech, so that the audience knows what the speaker is going to discuss next.
A podcast is an audio or video contribution that can be listened to or viewed via the Internet. Podcasts can be used for information on specific topics but also for entertainment.
B2B means Business to Business. B2B events are between at least two companys. They help to build interpersonal relationships, which are important for a successful company.
Web-Based-Training (WBT)
Web-Based-Training (WBT) is an older term for learnmethods that can be accessed over the internet.
Be the first to know!
The latest SlideLizard news, articles, and resources, sent straight to your inbox.
- or follow us on -
We use cookies to personalize content and analyze traffic to our website. You can choose to accept only cookies that are necessary for the website to function or to also allow tracking cookies. For more information, please see our privacy policy .
Cookie Settings
Necessary cookies are required for the proper functioning of the website. These cookies ensure basic functionalities and security features of the website.
Analytical cookies are used to understand how visitors interact with the website. These cookies help provide information about the number of visitors, etc.

How to Embed PowerPoint in SharePoint: Presentation Slides
Last Updated on December 14, 2023
Are you looking to integrate PowerPoint presentations seamlessly into your SharePoint environment?
In this article, you will learn how to embed PowerPoint in SharePoint using two popular SharePoint web parts.
Let’s get started.
Table of Contents:
PowerPoint and SharePoint Integration
Step 1: upload your powerpoint file, step 2: add the file and media web part, step 3: select your powerpoint file, step 1: prepare your powerpoint file, step 2: add the embed web part, step 3: embed the powerpoint link, using powerpoint in sharepoint.
Integrating Microsoft PowerPoint with SharePoint offers a seamless experience for users looking to enhance their presentations and collaboration efforts.
This integration is particularly beneficial for businesses and educational institutions where sharing information efficiently is crucial.
By embedding PowerPoint slides directly into SharePoint, users can access and view presentations without needing to download them.
Key benefits:
- Centralized access
- Real-time collaboration
- Enhanced security
- Version control
Fortunately, embedding a PowerPoint presentation into SharePoint is easy.
Here are two ways to accomplish this:
Sign up for exclusive updates, tips, and strategies
Using the File and Media Web Part
The file and media web part in SharePoint is an efficient tool for embedding PowerPoint presentations directly into your SharePoint site.
This feature allows users to view the presentation without needing to download it or open it in a separate application.
Note : This web part was formerly the file viewer web part (not the page viewer web part).
Here’s how to use the file and media web part to embed a PowerPoint presentation:
Before embedding, upload the PowerPoint slide file to a document library in your SharePoint site.

Ensure that the file is optimized for web viewing, with a reduced file size and compatible media formats.
Related : How to Upload Files and Documents to a SharePoint Library
Go to the SharePoint page where you want to embed the PowerPoint presentation and edit that web page:
- Click on the “ Edit ” button to start editing the page.
- Select the “ + ” icon to add a new web part and choose “ File and media ” from the list of available web parts.

If you can’t see it, you can also search for it.
If the file isn’t a recent document, you can browse through your site.
Otherwise, select the file you wish to embed:

You can actually upload from here (but it’s helpful if you upload first to your library of choice).
By the way, if you want to change the start slide, you can click on the pencil icon of the web part to edit the properties.

Once you are satisfied with the preview, click “ Publish ” to make the changes live.
Your PowerPoint presentation is now embedded and viewable by anyone who has access to the SharePoint page.
Using the Embed Web Part
The embed web part in SharePoint Online provides a flexible way to embed PowerPoint presentations.
It’s especially useful when you want to include content hosted externally or require more customization in the presentation display.
This method is particularly useful for presentations that are frequently updated or sourced from different platforms.
Here’s how to use it:
Ensure your PowerPoint presentation is saved in a location accessible via a URL.
This can be within SharePoint or an external site like OneDrive or a public server.
You can also upload it to a document library:
Confirm that the link to the PowerPoint file is sharable and accessible to your intended audience.
Go to the SharePoint page where you wish to embed the presentation:
- Get to edit mode on that page
- Click on the “ + ” icon to add a new web part
- Choose “ Embed ” from the list of available web parts

In the embed web part link box, paste the link to your PowerPoint presentation.
The web part will automatically process and display a preview of the embedded presentation.

Some considerations here:
- Ensure the link used in the embed web part is always active and accessible to the target audience .
- Be cautious when embedding content from external sources to avoid security risks and make sure you have access rights.
If the embed didn’t work, check the link. If it doesn’t accept website address links, try creating an embed code (iFrame) for it.
After making sure the presentation is displayed as desired, publish the page to make the embedded presentation visible to viewers.
Integrating PowerPoint presentations into SharePoint streamlines collaboration and enhances document accessibility within organizations.
Utilizing SharePoint’s file and media and embed web parts simplifies this integration, offering versatile options for embedding and managing presentations.
Embracing this powerful combination of Microsoft tools can significantly enhance communication and collaborative processes in any professional setting.
Stuck up somewhere in the steps? Any of the methods not working? Comment down any questions you have.
If you need business-related information, reach out using the contact page . I’ll get back to you as soon as possible.

How to Embed File in PowerPoint

Microsoft PowerPoint is an essential tool for creating captivating presentations. When creating presentations, you may need to use media that is not directly part of the PowerPoint program. These could be videos, images, audio files, and more. PowerPoint allows you to embed these files directly into your presentation to make it more comprehensive and interactive.
Table of Contents
Why Embedding Files in PowerPoint is Important
Embedding files in your PowerPoint presentation is essential for various reasons. First, it eliminates the need to have the media files stored separately. This means that your presentation will contain all the necessary components, making it more convenient for sharing. Secondly, it makes the presentation self-contained, preventing the risk of inadvertently losing or deleting the media files you link to your presentation. Additionally, embedding files in PowerPoint can help you modify or edit your presentation in the future, especially when you don’t have access to the Internet or external storage devices.
Another advantage of embedding files in PowerPoint is that it can help you reduce the file size of your presentation. When you link to external media files, PowerPoint creates a reference to the file, which can increase the size of your presentation. However, when you embed the files, PowerPoint compresses them, reducing the overall size of your presentation. This can be particularly useful when you need to share your presentation via email or upload it to a website.
Finally, embedding files in PowerPoint can help you create more engaging and interactive presentations. By embedding videos, audio files, or interactive charts, you can capture your audience’s attention and make your presentation more memorable. This can be especially useful when you’re presenting complex data or information that may be difficult to understand without visual aids. With embedded files, you can create a more immersive and interactive experience for your audience, helping them better understand and retain the information you’re presenting.
Types of Files That Can Be Embedded in PowerPoint
Microsoft PowerPoint supports embedding various file types, including images, audio, videos, and more. Images can be embedded in formats such as BMP, JPEG, GIF, and PNG, among others. For audio files, you can use formats such as MP3 and WAV. Lastly, video files can be embedded in formats such as MP4, Windows Media Video (WMV), and more.
In addition to the file types mentioned above, PowerPoint also supports embedding other types of files such as Excel spreadsheets, Word documents, and PDFs. This can be useful when you want to include additional information or data in your presentation without having to switch between different programs. To embed these files, simply go to the “Insert” tab, click on “Object,” and select the file you want to embed.
Step-by-Step Guide on How to Embed a File in PowerPoint
Let’s walk through the process of embedding a file in your PowerPoint presentation.
- Open your PowerPoint presentation and navigate to the slide where you want to insert the file.
- Click on the “Insert” tab in the top navigation bar, then navigate to the “Media” section and choose “Audio,” “Video,” or “Picture,” depending on the file you want to insert.
- After selecting your desired media file, PowerPoint will automatically embed the file in your presentation. You can also choose the “Link to File” option if you prefer to link to an external file.
- Edit the size, position, and formatting the file within your slide to match your desired presentation theme.
- Save your PowerPoint presentation and share it with others!
It’s important to note that embedding a file in your PowerPoint presentation can increase the file size of your presentation. This can make it difficult to share or upload to certain platforms. To avoid this issue, consider compressing your media files before embedding them in your presentation. You can also choose to link to external files instead of embedding them to reduce the overall file size of your presentation.
How to Embed Images in PowerPoint
When embedding an image in your PowerPoint presentation, ensure you have the right format. Once you have the desired image file, follow the steps mentioned above to insert it. PowerPoint will automatically embed the image in your presentation. You can also choose to edit and resize the image within your slide to fit your desired design. PowerPoint offers several editing options to enhance your image, including transparency, brightness, and contrast.
It is important to note that when using images in your PowerPoint presentation, you should always consider copyright laws. Make sure you have the necessary permissions or licenses to use the image, or use images that are in the public domain or under a Creative Commons license. Additionally, using high-quality images can greatly enhance the overall look and feel of your presentation, so consider investing in professional stock photos or hiring a photographer to capture custom images for your presentation.
How to Embed Videos in PowerPoint
Adding a video to your PowerPoint presentation can make it more engaging and informative. To insert a video, you need to have the video file in your computer or device. Follow the steps described above for adding an audio or image file, and PowerPoint will automatically embed the video file in your presentation. To edit the video file, you can trim the start and end points or add effects such as fades or overlays.
It is important to note that when embedding a video in PowerPoint, you should ensure that the video file is in a compatible format. PowerPoint supports a variety of video formats, including MP4, WMV, and AVI. If your video file is not in a compatible format, you may need to convert it using a video converter tool before embedding it in your presentation. Additionally, it is recommended to keep the video file size small to avoid slowing down your presentation or encountering playback issues.
How to Embed Audio Files in PowerPoint
Adding audio files to your PowerPoint presentation can make it more dynamic. To embed an audio file, click on the “Insert” tab, navigate to the “Media” section and choose “Audio.” Select the desired audio file and PowerPoint will automatically embed it in your presentation. You can edit the audio file by setting the starting and ending points, setting volume levels, or choosing to play automatically or manually.
It is important to note that when embedding audio files in PowerPoint, you should always test the presentation on the computer and sound system that will be used during the actual presentation. This will ensure that the audio quality is optimal and that there are no technical issues during the presentation.
Additionally, it is recommended to keep the audio files short and relevant to the content of the presentation. Long audio files can be distracting and may cause the audience to lose focus on the main message of the presentation. By keeping the audio files short and to the point, you can enhance the overall impact of your presentation.
Advantages of Embedding Files in PowerPoint vs Linking
Embedding files in PowerPoint has several advantages over linking to external files. First, embedding files makes your presentation more self-contained, allowing you to share it without having to worry about others having the same external files. Secondly, embedding files makes your presentation load faster by eliminating the need to load the external file when opening the presentation. Lastly, embedding files ensures that your media files will be available even if you have limited or no Internet access.
Another advantage of embedding files in PowerPoint is that it allows you to make changes to the embedded file within the presentation itself. For example, if you have an embedded Excel chart in your PowerPoint presentation, you can make changes to the chart directly within PowerPoint without having to open the Excel file separately. This saves time and makes the editing process more efficient.
Troubleshooting Tips for Embedding Files in PowerPoint
If you encounter any issues when embedding files in your PowerPoint presentation, be sure to check your computer’s storage space. Large files can sometimes cause storage capacity issues. Also, ensure that the file format you are trying to embed is supported by PowerPoint. Lastly, verify that the media file is not corrupted or damaged.
Best Practices for Embedding Files in PowerPoint Presentations
When embedding files in your PowerPoint presentation, always ensure that you have the necessary rights to use the media files to avoid copyright infringement. Also, optimize your media files to reduce the file size without losing the quality of the media. Furthermore, try to use media that is relevant to your presentation and enhances your content’s message.
How to Remove Embedded Files from a PowerPoint Presentation
If you need to remove an embedded file from your PowerPoint presentation, click on the file and delete it from your slide. This action will also delete the embedded file from the presentation’s storage. If you have linked external files, consider whether removing them will affect the presentation’s functionality.
How to Edit Embedded Files within a PowerPoint Presentation
Editing embedded files within your PowerPoint presentation is easy. To edit an image, click on it, and then click the “Format” tab under the “Picture Tools” option. From here, you can adjust the picture’s brightness, contrast, and transparency. Similarly, to edit a video, click on it, and then click the “Playback” tab under the “Video Tools.” Here, you can modify video settings such as the start and end times, trimming, or looping options.
Creative Ways to Use Embedded Files in Your Presentation
Embedded files can enhance your presentation in various creative ways. Some ideas include adding videos to show examples, pictures to clarify concepts, and audio to add narration or sound effects. You can also use animations to bring your presentation to life and add transitions to create smooth visual effects when moving between slides.
Enhancing Your Presentation with Embedded Interactive Content
Interactive content can be embedded in your PowerPoint presentation to engage your audience. Some examples include adding quizzes, polls, surveys, and games. Interactive content can help you gather feedback from your audience, keep them engaged, and make the presentation more memorable.
Tips for Reducing the File Size of Embedded Media in Microsoft PowerPoint
Large media files can make your PowerPoint presentation difficult to share and increase the chances of sluggish performance. To reduce the file size of your embedded media, you can optimize it using various PowerPoint tools. These include compressing images, shortening video length, and reducing the quality of audio files. You can also choose to link to external files or delete unnecessary media files to decrease the presentation’s file size.
Embedding files in your PowerPoint presentation can make your presentation more engaging, informative, and self-contained. With these simple steps, you can embed images, videos, and audio files in your presentations. Follow the best practices mentioned above to create compelling presentations and capture your audience’s attention.
By humans, for humans - Best rated articles:
Excel report templates: build better reports faster, top 9 power bi dashboard examples, excel waterfall charts: how to create one that doesn't suck, beyond ai - discover our handpicked bi resources.
Explore Zebra BI's expert-selected resources combining technology and insight for practical, in-depth BI strategies.

We’ve been experimenting with AI-generated content, and sometimes it gets carried away. Give us a feedback and help us learn and improve! 🤍
Note: This is an experimental AI-generated article. Your help is welcome. Share your feedback with us and help us improve.

How-To Geek
How to embed a youtube video in powerpoint.
During a presentation, a mix of media always performs best.
Quick Links
Finding a youtube video’s embed code, embedding a youtube video in powerpoint, searching the youtube video in powerpoint.
During a presentation, a mix of media always performs best. Using images, graphs, charts, and videos not only makes your presentation more informative but also more engaging for the audience. If you have a YouTube video you’d like to use during your presentation, it’s as simple as embedding it in a slide. Here’s how.
Rather than linking to a YouTube video in your presentation, embedding it in the slide is usually the better option. It gives your presentation a more professional look because you won't be leaving your slide to pop open the YouTube website. Keep in mind, though, that even with the video embedded in your presentation, you’ll still need to be connected to the internet to play the video.
First, head over to YouTube and find the video you want to embed. Once you’re there, select the “Share” option, which you'll find in the video description.
A window will appear, giving you a few different vehicles for sharing the video. Go ahead and click the “Embed” option in the “Share a link” section.
Another window will appear, providing the embed code along with a few other options. If you wanting to start the video at a particular time, select the “Start at” box and enter the time when you’d like the video to start. Additionally, you can select whether you’d like to player controls to appear and if you want to enable privacy-enhanced mode.
Note: Privacy-enhanced mode keeps YouTube from storing information about visitors that visit your website that the video is embedded on unless they play the video. Since we will be using the embed code in a PowerPoint presentation, this option is not necessary.
Select “Copy” at the bottom right of the window to copy the embed code to your clipboard. Alternatively, select the code and use the Ctrl+C shortcut.
We’re finished with YouTube, for now, so head on over to PowerPoint and open your presentation.
Select the slide where you want to embed the YouTube video. On the “Insert” tab, click the “Video” button.
On the drop-down menu, select the “Online Video” option.
The Insert Video window that appears lets you search YouTube for a video or paste in that embed code you copied from the YouTube website. Paste the embed code and click the arrow to complete the action.
Your video will now appear in the presentation. To resize the video, click and drag the corners.
Note that at first, the video will appear as a black rectangle. Don’t worry---this is normal. Simply right-click the video and then select “Preview.”
This will give you a quick preview of how the video will look during your presentation.
You can also search for a YouTube video from that Insert Video window in PowerPoint. Type in your search terms and then click the search icon.
Several options will appear---888,341 in the case of the Rick Astley’s Never Gonna Give You Up video for which we searched. Select the one you want to use.
Then select “Insert” at the bottom-right of the window.
That’s all there is to it. Generally, we recommend searching the actual YouTube website and using the embed code the way we described earlier---mostly because the site is much easier to search and you can watch the videos before selecting the one you want. Still, if you know exactly what you're after, this method might work fine for you.
- Get Great Eclipse Photos with Your Phone
- The Best Noise-Canceling Headphones to Buy
How to Save Sounds From PowerPoint Slideshows
Copy any embedded audio file for use in a different presentation
- Brock University
Music and other sound objects that are embedded in a PowerPoint slideshow can be extracted and used in another presentation or for any other purpose. How you go about extracting the audio file depends on your version of Microsoft 365 or Office. Follow this tutorial to learn how to extract audio from PowerPoint slideshows.
Information in this article applies to PowerPoint 2019, 2016, 2013, 2010, 2007, 2003; and PowerPoint for Microsoft 365.
Extract Embedded Sounds in PowerPoint 2019, 2016, 2013, and 2010
Beginning with PowerPoint 2010 , sound files are embedded in presentation files by default. This method of extracting a sound file works on .pptx files in PowerPoint 2019, 2016, 2013, and 2010 for Windows PC.
You need to set Windows File Explorer so it shows file names with extensions in order to follow this process.
Open Windows File Explorer .
Select the presentation file (in .pptx format), right-click, and choose Copy .
Right-click a blank area in the folder where you want to place a copy of the file and choose Paste .
Rename the copy of the presentation to differentiate it from the original.
Change the file extension of the copied file from .pptx to .zip .
Press Enter and select Yes to continue. The file icon changes to a folder icon.
Double-click the ZIP folder to reveal a list of folders inside.
Double-click the ppt folder in the list of folders.
Double-click the Media folder and copy the sound files to another folder.
Extract Embedded Sounds (PowerPoint 2007)
To extract an embedded sound file in a PowerPoint 2007 presentation:
Open the PowerPoint 2007 presentation file.
To edit the file, first open PowerPoint and then open the presentation file.
Select the Office button and choose Save As .
In the Save As dialog box, select the Save as Type down arrow and choose Web Page (*.htm; *.html) .
In the File name text box, enter a file name.
Select Save .
PowerPoint creates a file with the new filename and an HTM extension. It also creates a new folder, called yourfilename_files , containing all the embedded objects in the presentation. At this point, close PowerPoint.
Open the newly created folder to see all the sound files listed, along with any other objects that were inserted into the presentation. The file extensions are the same type as the original sound file type. The sound objects will have generic names, such as sound001.wav or file003.mp3 .
How to Sort Files by Type
If the new folder contains many files, sort the files by type to quickly locate these sound files.
To sort files by type:
Right-click a blank area of the folder window.
Choose Arrange Icons by > Type .
Look for the files with file extensions of WAV , WMA , or MP3 . These are the sound files that were embedded in the original PowerPoint show file.
Extract Embedded Sounds (PowerPoint 2003)
To extract an embedded sound file in a PowerPoint 2003 presentation:
Open PowerPoint 2003.
Do not double-click directly on the file icon to open PowerPoint, which would open the PowerPoint 2003 presentation. You want to be able to edit the file, so you must first open PowerPoint and then open this file.
Go to File , select Open , and choose the presentation file.
From the menu, choose File > Save as Web Page .
PowerPoint 2003 creates a file with the new file name and an HTM extension. It also creates a new folder, called yourfilename_files , containing all the embedded objects in your presentation. At this point, close PowerPoint.
Open the newly created folder to see all the sound files listed, along with any other objects that were inserted into the presentation. The file extension is the same type as the original sound file type. The sound objects will have generic names, such as sound001.wav or file003.mp3 .
Get the Latest Tech News Delivered Every Day
- Why Doesn't the Music or Sound Play in My PowerPoint Presentation?
- What Is a PPTX File?
- Change a PowerPoint Show File to a Work File
- How to Use Microsoft's Free PowerPoint Viewers
- How to Insert PDF Files Into PowerPoint Presentations
- Print Slides From a PowerPoint Show File for PC
- Create Pictures From PowerPoint Slides
- How to Save PowerPoint Presentations as PDF Files
- Copy Slides to Another PowerPoint Presentation
- What Is a PPTM File?
- What Is a PPT File?
- How to Use Portrait and Landscape Slides in the Same Presentation
- Keep Your PowerPoint Presentation Fonts From Changing
- How to Convert PowerPoint to Video
- Create a Default Presentation Template in PowerPoint
- Hide Sound Icon on PowerPoint Slideshows
PowerPoint: How to Add Audio to Powerpoint on Windows 10 and Mac
Last Updated Thursday, August 31, 2023, at 5:00 am
Known Issue (August 14, 2023):
Some Windows 11 users are experiencing issues with PowerPoint exports when they are turned into .mp4 files. Visuals within the exported PowerPoint are appearing as flipped, or upside down. We are working with Microsoft to find a solution.
As a workaround, please convert the file as a .WMV file option and save it in My Media. The following are directions on how to convert a PowerPoint Presentation with audio to a .WMV file . For more support or to help troubleshoot issues, please reach out to the LTS Help Desk at [email protected] .
Microsoft PowerPoint offers features to record audio narration and export it as a video. PowerPoint records audio slide-by-slide rather than in one continuous file, allowing creators to easily re-record a slide if they make a mistake or need to change something later. Exporting as a video and uploading to Kaltura or Canvas for streaming is advantageous since it standardizes file types, doesn't require a download to view, is in a format that can be captioned, and allows viewers to navigate more efficiently.
A recent update has made the process comparable on a Mac, but the specifics vary. Windows 10 instructions follow; Mac users can click the link below to jump to the appropriate instructions.
- Instructions for Mac users
Windows 10 Instructions:
The following instructions explain how to add audio to your PowerPoint presentation on Windows 10 and export that PowerPoint as an MP4. The text instructions cover the same information as the embedded video below.
NOTE: If you have an older version of PowerPoint, you may need to update it to access the features described below. If you do not have PowerPoint, you can download it and other Microsoft Office products for free by going to office365.uwec.edu. If you have questions about updating or installing PowerPoint, contact the LTS Help Desk at [email protected] or 715-836-5711.
- Design your PowerPoint TIP: Use images and limit text to better engage viewers/listeners.
- Click Record Slide Show NOTE: Audio may start recording automatically if you have an older version of PowerPoint. It will still work, but this version offers reduced functionality.
- Record narration and avoid reading text on the slide out loud to viewers. Click the blue Replay button to listen to the recorded audio and ensure it was recording.
- Press [Escape] or the ‘X’ button located in the top right of the screen when the audio recordings are finished. You will see a speaker icon on slides that have audio.
- Select Export (steps 10-14 are shown in screenshot below).
- Select Create a Video .
- Optional: Select Full HD (1080p) for the video quality; it is unlikely a higher quality is needed.
- Select Use Recorded Timings and Narrations.
- Follow prompt/pop-up window to save the video in a memorable location.
- How to upload and share with Kaltura (Instructors should use Kaltura. Students will need to use it if the file is over 500 MB, which a PowerPoint probably won't be and they can use Canvas.)
- How to upload and share in a Canvas assignment (students)
- How to upload and share in a Canvas discussion (students) - the instructions refer to the "rich content editor" which is just the features in the top of the discussion post reply.
Elaboration on the Recording Features:
- Timing Feature – there is a rolling time feature for the individual slide and the overall presentation. Allows the speaker/presenter to monitor how long they are talking.
- Microphone Feature - Click on Settings and select Microphone and then the specific device to set up before recording.
- Replay Feature - Use to check that the audio is recording properly before starting additional slides.
- Clear Feature - Select Clear to delete/re-record audio.
- Don’t set the camera to record - Make sure this button has a diagonal slash through it to avoid the problem.
Mac Instructions:
The following instructions will teach you how to add audio to your PowerPoint presentation on a Mac and export that PowerPoint as an MP4. The text instructions cover the same information as the video embedded below.
NOTE: It is essential to have the Office 365 version of PowerPoint or you will not be able to save your PowerPoint as a video. If necessary, you can download it and other Microsoft Office products for free by going to office365.uwec.edu. If you have questions about updating or installing PowerPoint, contact the LTS Help Desk at [email protected] or 715-836-5711.
- TIP: Use images and limit text to better engage viewers/listeners.
- Click Record Slide Show
- TIP: Before you begin recording your full presentation, do a practice recording to verify your microphone and other settings are correct.
- NOTE: Avoid reading the text written directly on the slide; use the slide to elaborate on the material being presented.
- Stop speaking for a second to prevent the audio from cutting out as slides change. Resume speaking when the time starts moving again under the Current slide timing feature to the left of the recording button.
- Click Stop or Pause at the top of the screen and then End Show in the top left corner when all the audio recordings have been finished.
- Check the audio by clicking on Play from Start under the Slide Show tab or the presenter mode icon at the bottom of the screen.
- Edit the name of the file and where you would like to save the video following PowerPoint's prompts.
- Click Export
- Upload your mp4 video to Kaltura or Canvas to share it:
- How to upload and share to My Media (Instructors should use My Media. Students will need to use it if the file is over 500 MB, which a PowerPoint probably won't be and they can use Canvas.)
- How to upload and share in a Canvas discussion (students) - the instructions refer to the "rich content editor" which is the tool at the top of the discussion post reply.
Additional Video Tool Options
For more information about recording options available, click here to view a comparison of each tool's features.
How to download Embedded SlideShare Documents [with Video]
- To know whether the document has been hosted on slideshare or not, check for the slide share logo at the bottom bar of the embedded PowerPoint presentation .
- Next you will find small a grey coloured rectangular button on the bottom left corner of the embedded presentation where it would be written as “View on SlideShare”.
- Click on that ‘view on slideshare’ button which will take you to the original slideshare page where the presentation has been uploaded same as in the case of embedded YouTube videos.
- Now above the fold of the presentation at slideshare.net, you can find the ‘download’ button which is located at third location from left.
- Click on the download button
- Now another window will open asking you to login into slideshare.net or create a new account in order to download the presentation.
- If you already have an account with slideshare then login into that otherwise you can also login using your facebook account without creating a new slideshare account filling up the long forms.
- Simply click on the blue coloured button titled as ‘login with facebook’, then in another window, authorise the slideshare application to use your facebook profile details.
- Now when you are logged in, your presentation will automatically start to download. Otherwise if the download does not start, then you can see a link on the webpage saying that “If download doesn’t start automatically then click here”, so click on that link and the presentation will be downloaded into your computer.
- NEXT ARTICLE
- PREVIOUS ARTICLE
Post a Comment
2 comments:.
Thanks for sharing
You are welcome. Keep visiting...
If you liked this blog then Join me at: Facebook Twitter
Follow Me on Social Media
Recent Posts
Popular posts.
- How to download documents in google docs
- Open & Closed Loop Control System - Advantages & Disadvantages
- Why is CAMS crediting Rs.1 to my bank account?
- Traffic Lights controller using 8051 microcontroller (Easy Assembly Program)
- Autotransformer – Introduction, Advantages and Applications
- Full wave bridge rectifier circuit [Multisim Simulation]
- Why semiconductors are used in solar cells not conductors
- How to remove nofollow tag from blogger blogspot blog
- How to make a Heart Curve using Matlab Programming
- 9 Level Cascaded Multilevel Inverter Simulation (Simulink)
Blog Archive
Useful websites.
- Coding Tips by 123mylist.com
IMAGES
VIDEO
COMMENTS
There are a few possible ways to download an embedded PowerPoint presentation from the web, depending on how the presentation is embedded and what software you have. Here are some options: If the presentation is embedded as a file link, you can right-click the link and choose Save link as or Save target as to save the file to your computer 1.
In Windows Explorer, select the presentation (it should have a .pptx extension) with the embedded video and audio you wish to extract. Right-click and choose Copy or press Ctrl + C. Right-click and choose Paste or press Ctrl + V. Right-click the copy of the presentation and choose Rename in the drop-down menu.
Step 3: Insert the URL from YouTube. Right-click the video to copy the video link or embed code, or click Share to get the embed code. Then, paste the URL or embed code in the link field. A preview of your video will appear in the Insert video dialog box. Click Insert to embed the video in your presentation.
To recap: How to embed a PowerPoint presentation into a website includes 4 simple steps: Open your presentation in Office 365's version of PowerPoint. Click File > Share > Embed. Copy the embed code. Paste the embed code to your website. Thanks so much for checking out this tutorial!
Learn how to Extract Embedded Video in PowerPoint. This video is a response to a question raised in our comments section.Contents of this video:=====...
How to delete an audio file that is embedded in a PowerPoint presentation. You might change your mind and no longer want to use a certain audio file that you embedded in a PowerPoint presentation. In that case, click or tap on its speaker icon and then press the Delete key on your keyboard. PowerPoint removes the audio file in an instant.
In order to extract the embedded content of a newer office file, you need an application like WinRAR or 7Zip, or if you are running a newer version of Windows, it is already built-in. Go to the location where your Office file is situated. Press F2 to rename the file, and replace the file extension (from .docx, .xlsx or .pptx) to .zip.
In PowerPoint, scroll through the slides and choose which one would look best with a video. In the Delusi template, I'm going to select the seventh slide. 2. Insert Your Video Into PowerPoint. To embed a video in PowerPoint, go to the Insert tab. On the far-right side of the screen, click the Video drop-down.
Learn how to extract an embedded video from a PowerPoint presentation. You may want to do this if you have lost the original copy of the video and all you ha...
On the PowerPoint window, in the left sidebar, click the slide in which you want to add a video. At the top of the PowerPoint window, click the "Insert" tab. In the "Insert" tab, under the "Media" section (which is to the extreme right side of the interface), click "Video." You'll now see an "Insert Video From" menu.
The video file could be incompatible with Ms. PowerPoint. Supported video file types include: *.AVI, *.WMV, *.MP4, *.M4V, *.MOV, *.MPG and *.MPEG.. If your file is in another format, simply upload the video to Wave.video for free, download it in any of the supported file formats, and embed the now suitable video file in PowerPoint.. PowerPoint only allows you to embed video links from five ...
In the Insert Video box, click the file that you want to link to, click the down arrow next to the Insert button, and then click Link to File. Newer versions of PowerPoint support the playback of video with multiple audio tracks. They also support closed captions and subtitles that are embedded in video files.
Choose one of the options for download (and click the Download button. We recommend 1080p or 720p. A window will open, and your video will convert. When it's ready, click Download .mp4". After your file has downloaded, you should see it in your Downloads folder in the browser. By clicking "Show in folder", you'll see where it's saved on your ...
Step 2: Add the file and media web part. Go to the SharePoint page where you want to embed the PowerPoint presentation and edit that web page: Click on the " Edit " button to start editing the page. Select the " + " icon to add a new web part and choose " File and media " from the list of available web parts.
Open your PowerPoint presentation and navigate to the slide where you want to insert the file. Click on the "Insert" tab in the top navigation bar, then navigate to the "Media" section and choose "Audio," "Video," or "Picture," depending on the file you want to insert. After selecting your desired media file, PowerPoint will ...
Select the slide where you want to embed the YouTube video. On the "Insert" tab, click the "Video" button. On the drop-down menu, select the "Online Video" option. The Insert Video window that appears lets you search YouTube for a video or paste in that embed code you copied from the YouTube website. Paste the embed code and click ...
Open the PowerPoint 2007 presentation file. To edit the file, first open PowerPoint and then open the presentation file. Select the Office button and choose Save As . In the Save As dialog box, select the Save as Type down arrow and choose Web Page (*.htm; *.html) . In the File name text box, enter a file name. Select Save .
Click the Slide Show tab. NOTE: Do not add audio under Insert and Record Audio; this method will not allow you to save your PowerPoint as a video since it does not synchronize timings to automatically move the slides with the audio. Click Record Slide Show. Review the narration setup and navigation before recording.
To download the slideshare documents embedded within the posts, simply follow the steps listed below: To know whether the document has been hosted on slideshare or not, check for the slide share logo at the bottom bar of the embedded PowerPoint presentation .