
How To Turn a Powerpoint Presentation Into a Video
The quick and easy was as well as expert tweaks
Powerpoint is a popular tool used to present and showcase a product or message. It comes with many layouts, themes, and tools to help you build professional presentations. What if you spend a lot of time creating a visually appealing and well laid-out presentation and you want to share it with someone who doesn’t have Microsoft Office?
The short answer is you can’t. However, if you turn it into a video it can be easily viewed by most people with an Internet connection. Another benefit of turning Powerpoint into a video is it is a great way to repurpose your content into another format. Video is quickly becoming a huge part of businesses’ digital marketing strategy.

Even though Powerpoint is not marketed as a video tool, and there are many video tools, apps, and platforms available, you might be thinking why should you use Powerpoint?
A few good reasons are:
- As mentioned above, you can’t share your presentation with someone who doesn’t have Powerpoint installed on their computer.
- You have already spent a lot of time creating a fully automated Powerpoint presentation and don’t want to start from scratch with a video.
- Video creation is not in your arsenal of skills, and you don’t want to learn how to use a new tool.
The Quick & Easy Way
If your presentation is complete with automatic timings, transitions and animations, you might be shocked to learn how easy it is to convert it into a video.
- Open your Powerpoint presentation.
- Click on File , select Save As , and from the drop-down menu, choose MPEG-4 Video (*.mp4). (available in Powerpoint 2010 and above).

Too easy? It actually is. But keep in mind this only works for presentations that are already completely set up and ready to show to viewers.
Use The Export Option
- Another way to convert to a video file is to click on File , choose Export , and click on Create a Video .

- There are a few options for you to select that will affect how your final video turns out. Start by selecting quality.

The choice you make will affect the clarity, resolution, and video file size. The higher the quality, the larger the file.
I generally use Full HD (1080p), but if you have a slow Internet upload speed or the file size is an issue, HD (720p) will also produce a high-res HD video.
Choose The Timings
The next option controls how long each slide stays on the screen or the timings of your video.

- If you choose Don’t Use Recorded Timings and Narrations , each slide will be shown for the same amount of time. When you use this option, you can select the number of seconds you want each side to stay before moving onto the next one.

- Now let’s click Create Video and save your file to your computer.

- Find the location where you saved your video and play it. It will open in your default video player or app. The slides will play for the length of time you set above.
- You may wish to do this to allow viewers to read slides with longer text. This can be accomplished by choosing a different timing setting. Select Record Timings and Narrations.

- This option enables you to customize how long each slide lasts on the video and gives you the option to record a voiceover. If you want to record a voiceover, you have several options. To change your microphone, look under settings .

- You can also include a box of yourself recording the video by selecting the Camera option from the settings shown above.
- To start your voiceover, click on the red Record button. Powerpoint will give you a few seconds to get ready while it counts down 3, 2, 1.

- While you are recording your voice, your Powerpoint is also recording the timings. The amount of time you spend on each slide before moving to the next will set the timing.
- To move to the next slide, use the arrow keys. When you get to the end, “X” out of the recording screen. You will then be taken back to the settings page with the timings you recorded.
- Click on Create Video and save it to your computer. Each slide in your video will now last as long as it took you to talk about it when recording.
How To Set Up Powerpoint Presentations With Transitions, Animations & Timings
If you would prefer to set the animations, timings, and transitions before creating the video, below are a few examples of how to do so. This way, you can use the quick and easy way to convert it into a video described above.
What Are Transitions?
Have you ever seen a Powerpoint presentation that does something flashy or catches your eye between slides? Those special effects are called transitions.
There are three categories of transitions you can choose to use in your presentation. They are:
- Subtle : Basic and simple movement from one slide to another.
- Exciting: More elaborate and more interesting than subtle.
- Dynamic: When used between two slides that are similar in layout, this transition will only move the placeholders, not the slides.

When applied in moderation, transitions can add a professional and visually appealing effect to your presentation.
If you use too many transitions, the results can be confusing, erratic, and distracting.
Apply a Transition
- Select the slide from the Slide Navigation panel where you want to apply the transition. This slide will appear after the transition you choose.
- Click on Transitions from the top navigation. Note that the default is None . Click on More or the down arrow to see all the available options.

When you click a transition, you will automatically see a preview of what it will look like if selected. You can either use the transition for a single slide or click Apply to All to use the same transition for all the slides in your presentation.

Customize The Direction Of The Transition
Each transition has different effect options.
- To choose the one you want to use, click on Effect Options , select one, and watch Powerpoint automatically show you a preview of your selection.

Change The Duration Of a Transition
- Choose the slide you want to change the time for and look for the Duration field. In this example, the side is set to 01.00 .

- Let’s increase the time to .025 to make the transition a little slower. You can choose to set the duration for the selected slide only.
- Click Apply to All to use the same transition duration for all the slides.
Add Sound To The Transition
- Click on the dropdown menu next to Sound from the top bar navigation. Choose a sound, then preview it.

- To preview the sounds, from the top bar navigation click Slide Show and then From Current Slide .

How To Move To The Next Slide
If you are doing a live presentation in front of an audience, you usually would press the spacebar or click your mouse to advance to the next slide.
However, as we are converting the presentation to a video, you want to use the Advance Slides setting to automate the process.

- Now you want to remove (deselect) the checkmark next to On Mouse Click . In the After field, enter the amount of time you want the slide to be displayed before moving onto the next one. In the example above, the slide will last 00:03.36 .
Custom Animations
Animations in Powerpoint add motion to different elements in your presentation. The purpose is to draw attention to the key points, such as specific text, shapes, tables, images, and other objects.
Using animations in Powerpoint videos makes it more engaging and exciting to watch. Some of the types of motion you can add to your slides are:
- Changing the color or size of an image or text.
- Causing an image to appear or disappear.
- Moving an object around your slide.
Add An Animation
- Start by selecting an object to animate, click on Animations , and choose an option. If you don’t see the Animation Pane , click on it to open it.

- Now click on Effect Options and choose one. Different animations have different options.

To start an animation, click on the drop-down menu next to Start and choose from one of the options below:
- On Click will start the animation when you click a slide.
- With Previous will start the animation at the same time as the previous animation on the previous slide.
- After Previous will play it immediately after the previous animation completes.
Click on Duration to set how long you want the animation to last. If you want to add a delay before an animation starts, use the Delay option.
To add more effects, click on Add Animation and choose the one you want to use. If you want to change the order an animation appears on the slide, click on the animation marker.

- Choose Move Earlier or Move Later to change the order the animation appears in the sequence.
Add An Animation To a Group
- Press control on your keyboard and select the objects you want to include in the group.
- Next click on Shape Format , then Group , and Group again.

- Then select Animations and choose the one you want to use.
Animate Text
- Highlight the text where you want to add an animation.
- Click Add Animation and choose an option. You will see it in the Animation Panel on the right side.

- The next step is to click the drop-down menu next to the animation you just added. This is another place where you can decide when you want it to start. Choose from Start On Click , Start With Previous , or Start After Previous .
- Click the drop-down again next to the text animation, and this time select Effect Options.

Here is where you will set the direction, timing, and other specific animation options.
There are a lot of special effects you can add to Powerpoint. With practice, you will be able to create an engaging presentation using automatic animations and transition timings.
Once you are finished completing the above steps, you can use the simple way described at the beginning of this content to turn a Powerpoint presentation into a video. In just a few minutes, you will have a compelling, engaging, and visually appealing video to share with others.

David has a background in small business and lives in Australia. He is a WordPress and Ubuntu Developer who enjoys design, CSS and tech tool integration. Read David's Full Bio
Read More Posts:

Leave a Reply
Your email address will not be published. Required fields are marked *
Home Blog PowerPoint Tutorials How To Convert a PowerPoint Presentation to a HD Video in 3 Steps
How To Convert a PowerPoint Presentation to a HD Video in 3 Steps
There are many reasons why you may consider converting a PowerPoint presentation to a High-Definition video ; for example if you want to share a presentation online through YouTube or Vimeo, create a self-running presentation or save the slide show video to a DVD.

In this article we will guide you on how to convert a PowerPoint presentations to a High Definition video (as an MP4 video file,Windows Media Video .wmv file or QuickTime Video File .mov) using Microsoft PowerPoint.
PowerPoint lets you save presentations as videos directly from the File > Save As dialog box; however if you need to choose the output video quality while saving the presentation then it is recommended to use the File > Export > Create a Video option.
High Definition (HD) or high-quality presentation uses a higher resolution (1280×720 or 1920×1080) to save the video information. It can improve the overall experience while watching a presentation online or playing a PowerPoint slideshow in a kiosk. It would be the preferred format if you plan to upload your video presentation to YouTube or Vimeo, and have higher quality. The main drawback is that the presentation video file size will be bigger and more bandwidth may be required.

Why You Should Convert a PowerPoint to a Video Format?
Converting a PowerPoint to a video format can have several advantages. From making intuitive videos to engaging your audience to address complex topics in just a few minutes.
Create a Video Slideshow
You can use the converted video file to create a video slideshow for display at an event or edit the content of the video to generate a video presentation.
Create Presentations and Tutorials
PowerPoint enables users to export their videos with voice-over narration and animations. This can help create extensive presentations for an audience
Use Professional Editing Software to Create Engaging Videos
Adding a voice-over, additional graphics, and some footage can help create a professional-looking presentation by using a video editing application. Similar to how you use Instagram tools to convert images into a stunning video, some famous video editing apps that can help you make the most out of your converted PowerPoint file to a video format include Adobe Premiere Pro, Camtasia Studio, iMovie, Final Cut Pro, etc. If you are a Windows user, you can look into alternatives to Final Cut Pro like Lightworks, Movavi Video Editor, and Shotcut.
Create a Video Instead of Using PowerPoint
You can convert PowerPoint to video by simply letting your slides play out, making the presentation easy to play for end users without the need to have PowerPoint installed. This approach can also be helpful if you intend to present your slides using a video player instead of PowerPoint, as the latter might not be available everywhere, whereas video players often come with all types of desktop and mobile operating systems.
Upload a Video Online
Many presenters also like to upload their presentations online for an audience. A teacher might be interested in making his/her presentation available for students, or an industry expert might wish to share a concept with others in the industry by uploading a video to a YouTube channel. Either way, converting your PowerPoint to a video can help make the content easily shareable via video streaming platforms like YouTube and Vimeo. Such a video can also be shared privately via file-sharing apps like Box, Dropbox, OneDrive, Google Drive, etc.
How To Convert PowerPoint to Video (Windows)
Step 1 – go to file > export.
The first step to save a PowerPoint presentation as a HD video go to File -> Export and then click Create a Video button.

Step 2 – Choose Video Resolution
Now, select a resolution to export your video. Other than the Standard (825×480) resolution, the high-definition resolution options include HD (Medium 1280×720), Full HD (Large 1920×1080), or Ultra HD 4K (Largest file size 1920×1080). If you are using an older version of PowerPoint, you might have limited options to select between HD resolutions, since versions older than PowerPoint 2013 only supported HD videos (1280×720).

Optional Step: Save Narrations, Laser Pointer Gestures & Recorded Timings in the Video Exported from PowerPoint
Aside from saving the PowerPoint presentation as an HD video, you can also save a video file that incorporates all the recorded timings during a rehearsal, narrations, and even laser pointer gestures.
In case you have recorded narrations for your slides, you can use them or select Record a Video option to instantly start narrating your slides. The Preview Timings and Narrations option in the same drop-down menu does what it says, it enables you to check and ensure that your narrations are correctly timed with your slides, so you can make necessary edits before finalizing your video.

Optional Step: Select Slide Duration
Choose the default time spent on each slide (in seconds) and whether to save the narrations, timings, and gestures. By default, 5.00 seconds are spent on each slide unless you have a different timing recorded for the presentation slideshow.

Step 3 – Select Video Format and Create a Video Presentation
Click Create Video button and choose the destination folder and output file name. For end users wondering how to convert ppt to MP4, this is the step where you can select MP4 as your output format. PowerPoint supports saving slide decks to MP4 or WMV video formats. Once you confirm, wait a few seconds in order for the file is being saved on your hard disk. Presentations with a lot of slides may require a longer wait time.

Something good about saving presentations as a video file is that all animations, transitions, and media are preserved.

How to Convert PowerPoint to Video (Mac)
If you’re wondering how to make a PowerPoint into a video on Mac, the steps are quite similar to how you would export PowerPoint to video on a PC, with a few minor differences.
Step 1 – Go to File > Export
To convert PowerPoint to video on Mac, go to File -> Export.
Step 2 – Choose Video Format
If you have been wondering how to save PowerPoint as MP4 on Mac, this is the step where you can pick a video file format to save your presentation as a video, including MP4 and MOV.
The difference between the PC and Mac during this step is the difference in the availability of video conversion options. The PC version, along with MP4, allows saving a video in the Windows Media Video (WMV) format, unlike Mac, which offers QuickTime video format (MOV) instead.
Step 3 – Select Video Resolution and Create Video
The new version of PowerPoint for Mac allows saving a presentation in HD (Medium 1280×720), Full HD (1920×1080), or Ultra HD 4K (1920×1080) format. The higher the resolution, the higher the file format, so make sure you have enough disk space to save a very heavy file, especially if you opt for Ultra HD 4K resolution.
Save Narrations, Laser Pointer Gestures & Recorded Timings (Optional)
To save narrations, recorded timings, and laser point gestures, select the Use Recorded Timings and Narrations option.
Select Slide Duration (Optional)
To precisely time how long each slide is presented in the video, select the time duration. The default duration is 5.00 seconds, unless you have specified time for each slide separately in the presentation.
Select Export to create your video. Depending on the resolution you have selected, it might take several minutes before the video is converted. Higher resolutions take more time to conversion.
Saving videos from PowerPoint can help you at the time you need to share a presentation slideshow online (for example, uploading it via YouTube or Vimeo, or any other online video platform ), but you can also use this technique to prepare a PowerPoint presentation for a kiosk, make interactive PowerPoint presentations or create a self-running presentation. PowerPoint presentations saved as videos can also be easily run from mobile devices without the need for PowerPoint to be installed on the device. If you wish to save your PowerPoint to video in a format easily accessible, you can opt for PowerPoint save as MP4 instead of using WMV or MOV file formats that are not supported by all types of video players.

Like this article? Please share
mp4, Presentation Ideas, Presentation Videos, Video, Windows Media Video, wmv Filed under PowerPoint Tutorials
Related Articles

Filed under Presentation Ideas • February 15th, 2024
How to Create a 5 Minutes Presentation
Master the art of short-format speeches like the 5 minutes presentation with this article. Insights on content structure, audience engagement and more.

Filed under Design • January 24th, 2024
How to Plan Your Presentation Using the 4W1H & 5W1H Framework
The 4W1H and 5W1H problem-solving frameworks can benefit presenters who look for a creative outlook in presentation structure design. Learn why here.

Filed under Presentation Ideas • December 13th, 2023
How To Make a Presentation Interactive
In this article, we will explore the insights behind what makes a presentation interactive. Join us to discover techniques that guarantee a presentation success.
6 Responses to “How To Convert a PowerPoint Presentation to a HD Video in 3 Steps”
Can’t believe no one has commended you for this helpful tutorial! We want to mount several TVs in the lobby and exam rooms of our veterinary hospital to run informational presentations for our clients about pet care, our services, and helpful products. Recording a PowerPoint as a video and then putting it on a USB thumb drive to connect to the TV seems like it will be an effective, inexpensive way to get that accomplished. Thank you so much!
I second the above comment. Thank You
how to present a power point presentation on a smart tv..and having it loop over to continuous display..keep running.
This was very helpful. I had no clue that this could be done. I dedicated a PC to running the Power Point presentation for our lobby. Having it run on the TV via USB will free up that resource for us.
I haven’t dug into it yet, but is there a way to make it loop?
I keep getting this audio data not supported. Is there anyway to remove this?
Send us your issue to [email protected] we might be able to help you.
Leave a Reply

- Certifications
How To Save A PowerPoint As A Video: 8 Easy Steps
- February 15, 2023
PowerPoint presentations have become a staple of modern business, and with good reason: they’re fast, easy to use, and virtually anyone can put together one.
That said, the world has never been more plugged-in than it is today; that means your presenters need to be plugged-in too. To save a PowerPoint as a video instead of just reading from notes will not only help your presentation feel more dynamic but also make it easier for your audience to understand what you’re trying to say.
In this blog post we’ll cover everything you need to know about saving a PowerPoint as a video, from how to choose the right software and format for your slide deck to the best tips for making your video slides stick in viewers’ minds long after they leave your desk.
How to Save a PowerPoint Presentation As A Video
When it comes to saving presentations as videos , you have a few different options. Depending on what kind of content you’re creating, you may have a preference for one over the others. Before we dive into the specifics of each, let’s take a quick look at the pros and cons of each format so you can make an informed decision. – Slides as a video: these are either a slideshow or a series of short clips connected together with an introduction, a transitional shot, and an exit shot like any standard PowerPoint.
– Slides combined with narration as a video: in this format, you either read your slides and narrate them as you would for a normal PowerPoint presentation, or you record a separate voice-over track. – Slides combined with music and animation as a video: in this format, you either read your slides and narrate them as you would for a normal PowerPoint presentation, or you record a separate voice-over track. This is a bit different than the next two formats, as it combines PowerPoint with the addition of music and graphics.
Software for saving a PowerPoint as a video
Ok, let’s talk about the software. You may be able to create videos in Microsoft Office, or you may need a dedicated video editing software like Adobe Premiere or Apple Final Cut Pro X. In either case, there are a few things you should look for when choosing a software.
– How stable is the software and how reliable is it? No matter how good your video editing skills are, if a piece of software crashes mid-creation, you’ll end up with a useless video. – What format support does the software allow you to use? Let’s say you’re looking to create a PowerPoint-to-Video presentation. Then, the video editing software you choose should have support for exporting to the MP4 format, so you can avoid using someone else’s proprietary format.
– How easy is it to learn and use? If you’re looking to save a PowerPoint presentation as a video, you should know that different software work differently. Some may be easier to understand or may even come with tutorials to help you get started.
Final Cut Pro X for pros and Cons of Using It
Easily one of the best video editing software options out there, Final Cut Pro X comes with phenomenal pros and a few cons. The pros of using it are that it’s incredibly easy to use, supports virtually every video format you could want, and is incredibly reliable.
The cons of using FCX are that it is only available on Mac computers, and it’s only $299. That being said, it’s a great option for businesses that need a powerful video editing tool, but don’t want to break the bank getting it.
How to Create Your Video Slides
Now that you have the software you need, you’ll need to learn how to use it. If you’re using a dedicated video editing software like Final Cut Pro X, it will likely come with a tutorial to help you get started. If not, don’t worry; it’s incredibly easy to learn. Here are a few tips to get you started. – Make sure your microphone(s) work properly before you start recording.
This should be obvious, but we’ve seen countless times where users forget to test their microphones before starting a project. – Choose a good location for your recording. Even though you can record in almost any location, room tone is always better than the hallway or bathroom. – Speak clearly and slowly.
These two things will keep you from making mistakes that could ruin your video. – Add some flare to your video. This could mean adding a few filters to your footage, sprinkling your video with some text, or adding some music. – When you’re finished recording, make sure to export your video as an MP4 file. This is the file type your video editing software will expect.
How to Save a PowerPoint as A Video From Microsoft Office
Microsoft Office is one of the most popular office suites in the world, and one of its most popular features is the ability to create and save PowerPoint presentations. If your presentation is already saved in the ppt or pps file format, you can easily convert it to a video, and the best part is that it takes just a few seconds.
You can also save your presentation as a video directly from the PowerPoint application, but this is only possible on Mac computers. If you are using a different operating system, you will need to use Microsoft Office to convert the ppt file to a video.
What is saving a PowerPoint as a video?
This is the question that you should be asking yourself before you start creating your video presentation. Before you can save a PowerPoint as a video, you need to know what format you’re exporting it in. There are multiple formats you can export your PowerPoint as a video in, and the best one for you depends on what kind of video you want to create.
If you’re looking to create an MP4-to-video presentation, there are two formats you should keep in mind. The first and most common is the MP4 format. This is a relatively new format that’s quickly gaining popularity and is supported by nearly all modern devices. The other format you need to keep in mind is the MOV file. This format is older but still supported and is more commonly used in mobile devices.
Tips for making your PowerPoint video stick
There are a few key things you can do to make your PowerPoint video as memorable as possible. These include making sure to keep your presentation interesting and engaging, that your transitions are smooth and don’t cause any stutters or jumps, and that your visuals are clear, sharp, and easy to understand.
When it comes to keeping your presentation interesting, you want to make sure to avoid falling into one of the most common traps that PowerPoint presenters fall into: talking too much.
While you want to make sure you cover the content you want to cover, too much information is never a good thing, and that’s why you want to make sure you keep your presentation interesting. When it comes to keeping your presentation engaging, you want to avoid talking above your audience’s head. This means you should make sure you’re speaking at a level that your audience can understand.
PowerPoint presentations have been a staple of business for decades, and there’s no reason to change that now. If you want to make your next PowerPoint presentation a video, though, you’ll want to make sure you save a PowerPoint as a video. These are the best tips to help you make that happen.
Share This Post:
2 thoughts on “how to save a powerpoint as a video: 8 easy steps”.
Monitoruj telefon z dowolnego miejsca i zobacz, co dzieje się na telefonie docelowym. Będziesz mógł monitorować i przechowywać dzienniki połączeń, wiadomości, działania społecznościowe, obrazy, filmy, WhatsApp i więcej. Monitorowanie w czasie rzeczywistym telefonów, nie jest wymagana wiedza techniczna, nie jest wymagane rootowanie.
Aby całkowicie rozwiać wątpliwości, możesz dowiedzieć się, czy twój mąż zdradza cię w prawdziwym życiu na kilka sposobów i ocenić, jakie masz konkretne dowody, zanim zaczniesz podejrzewać, że druga osoba zdradza.
Add a Comment Cancel reply
Save my name, email, and website in this browser for the next time I comment.
Get A 5X Raise In Salary

Reset Password
Insert/edit link.
Enter the destination URL
Or link to existing content
Small Business Trends
How to make a powerpoint into a video.

Small business owners use Microsoft PowerPoint presentations for multiple purposes. Be it a sales presentation, elevator pitch, or financial presentation, PowerPoint never lets you down. So, learning how to make a PowerPoint into a video can go a long way, for a video has more reach and better conversion than most content formats.
There are two options to turn PowerPoint presentations into videos – the first is an Export option, and the other is a Save As option.
This article will explore both the options to help you convert your personal or professional presentations into videos.
How to Turn a PowerPoint into a Video
Here is the step-by-step process to export a file as a video:
1. Go to the File Menu
Click on the File menu of your presentation and select Export option.

2. Click Create a Video Option
Once you select the Export option, you will see multiple options to export your presentation on the right side. Click on the Create a Video Option.

3. Select the Quality of Your Video
As you select Create a Video Option, a dialog box about the quality of your video appears on the right side. You can choose the quality of your video from the drop-down menu.
It is good to select HD quality as most Internet-abled devices these days come with HD screens.

5. Set Time Spent on Slides
In this tab, you can set how much time is spent on each slide in your video. Each slide will be played for the same time you select. After setting time spent for slides, click on the Create Video button.

Once you Click Create Video, a new window opens that offers you an option to choose a location to save your video and the type of video file you want. You can save your video in MPEG-4 format or Windows Media Video.

5. Add Recorded Timings and Narrations
If you want a few slides with long text to be shown for a longer duration, you should set recorded timings and narrations.
Select Don’t Use recorded timings and narrations and click on record a video.

In addition to adding your narrations, you can also include a box of yourself explaining the slide by selecting the camera option.
PowerPoint records timing as you record your voice. The time you spend on each slide before moving to the next slide will be the timing for that slide. And the newly created video will use recorded timings.

Once you’re done recording timings and narrations, you can export the video. The conversion process will take a few minutes, depending on the size of your project.

Video Quality Options
When you pick the Export Option in PowerPoint for the video creation process, you will be presented with the following options to choose presentation quality in the video:
Ultra HD (4K)
The 4K video quality option takes the largest file size of all available options and offers ultra-high quality (3840 × 2160) resolution.
If you plan to show your PowerPoint videos on a big projector, you can select 4K quality. Your audience will require excellent Internet quality to play a PowerPoint video in 4K resolution.
Full HD (1080hp)
This video quality option demands a large file size and provides full-high quality (1920 x 1080) resolution. Full HD resolution is well-suited for most situations as it is a common screen resolution for smartphones.
If you pick the HD video quality option, it will take a medium file size and offer medium quality (1280 x 720). You can use this quality for smaller web videos.
Now, most PCs come with HD screens. So, it is better to aim for a higher resolution than this.
Standard (480p)
The standard quality (852 x 480) results in the smallest file size, offering the lowest quality. With most internet devices having HD displays, it is no point in using this video quality option.
But if your target audience has extremely poor internet speed, you can opt for standard quality.
How to Save a PowerPoint as a Video File
If you want to quickly turn your PowerPoint file into a video, you can use save a PowerPoint as a video option. The process is quite simple.
1. Find Location to Save Video
Go to the File tab. Click on Save As and browse the location to save your video.

2- Pick Video Format
Write a file name and select Save As Type to scroll down. Set Windows media video or MPEG-4 and select the Save button. Your video will be ready in a few minutes, depending on the size of your project.

How to Save a PowerPoint Presentation as an MP4
To save a PowerPoint presentation as an MP4, select Save As Type and choose the MPEG-4 option. And then, click the Save button to get your presentation video.

Uses in Business
Here are the key benefits of converting a PowerPoint presentation into a video:
1. Easy Content Accessibility
Your audience can consume videos on any internet-enabled device without having PowerPoint installed. So, by converting your presentation into a video, you improve the accessibility of your content.
2. Improved Content Reach
When you turn your PowerPoint presentation into a video format, you get a myriad of options to share your content. You can upload the video file to YouTube or other video platforms for consumption.
You can send the link to your presentation video to your email subscribers. Also, you can easily share videos on social media to reach more people.
3. Enhanced Comprehension
Videos are easy to understand with minimal effort. So, knowing how to convert PowerPoint to a video file format can help you make your presentation more comprehensible.
4. More Conversions
Videos are a popular form of content in marketing because they offer a better conversion rate than other content types. So, if you’re using presentations to sell your products/services, video conversion of those presentation slides can help you sell more.
Microsoft PowerPoint is a great tool to implement presentation ideas . And if you don’t make common PowerPoint mistakes , there is no reason your presentation wouldn’t shine. To further increase the reach of your content, you can create videos from your presentations.
If you want a quick video, you can save a PowerPoint presentation as a video. The Export method will serve you better if you need to customize your video presentation.
Once you have turned your presentation into a video, you can read this guide to video marketing to succeed.
Read More: how to embed a video in PowerPoint
Image: Depositphotos

Comments are closed.
© Copyright 2003 - 2024, Small Business Trends LLC. All rights reserved. "Small Business Trends" is a registered trademark.
- Ad Creative Eye-catching designs that perform
- Social Media Creative Engaging assets for all platforms
- Email Design Templates & designs to grab attention
- Web Design Growth-driving designs for web
- Presentation Design Custom slide decks that stand out
- Packaging & Merch Design Head-turning apparel & merch
- eBook & Digital Report Design Your digital content supercharged
- Print Design Beautiful designs for all things printed
- Illustration Design Visual storytelling for your brand
- Brand Identity Design Expertise & custom design services
- Concept Creation Ideas that will captivate your audience
- Video Production Effortless video production at scale
- AR/3D Design New creative dimensions that perform
- AI-Enhanced Creative Human expertise at AI scale

How to Save a PowerPoint Presentation? [PPT & Other Formats!]
By: Author Shrot Katewa
![How to Save a PowerPoint Presentation? [PPT & Other Formats!]](https://artofpresentations.com/wp-content/uploads/2022/03/Featured-Image-How-to-Save-a-PowerPoint-Presentation.webp "how to save a powerpoint presentation with video")
Saving a PowerPoint presentation is one of the most important things that you need to do when you are creating a presentation using PowerPoint. Unlike some of the modern web-based presentation applications, you need to make sure that you save a PowerPoint presentation when you are using an offline version!
To save a PowerPoint presentation, click on the “File” tab. Then, from the backstage view, click on the “Save” option from the left panel. Choose the location or the folder where you want to save the presentation on your computer, and click on “Save”.
In this article, we shall not only understand how to save a standard PPT or PPTx file, but we shall also take a look at how to save a PowerPoint presentation in different file formats such as a PDF, video or an image!
So, let’s get started!
1. How to Save a PowerPoint Presentation?
Once you have saved a PowerPoint presentation, you can easily save it again with just one click. Furthermore, you can also save a PowerPoint presentation in other formats. However, the process of saving a PowerPoint presentation is slightly different on Windows and on Mac.
Let’s understand the process in further detail.
1a. Saving a PowerPoint Presentation on Windows
To save a PowerPoint Presentation on Windows PC, you can follow either of the 2 simple methods.
Method-1: Using the “Save” button on Quick Access Toolbar
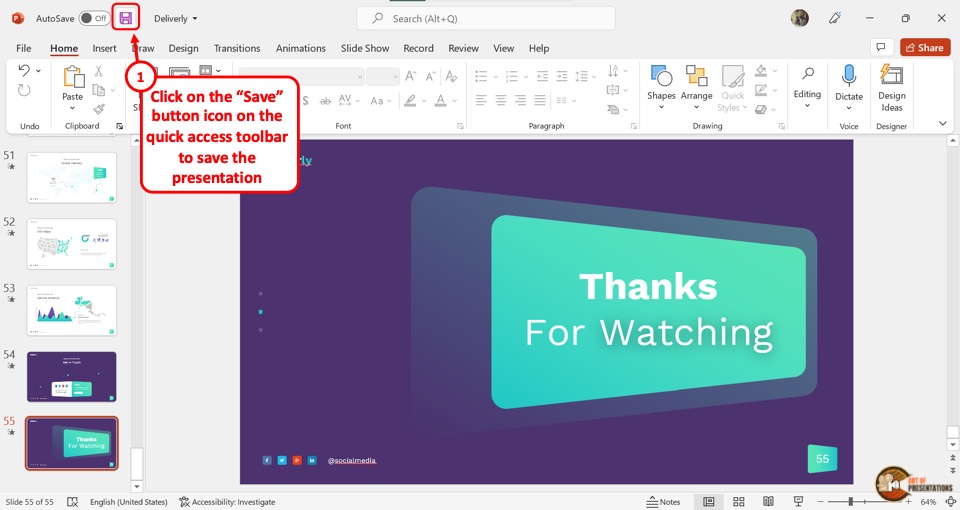
In the Quick Access Toolbar located at the very top of the screen, click on the “Save” icon.
The “Save” icon is located on the left side in the Quick Access Toolbar and looks like a floppy disk. Clicking on the “Save” button will immediately save the PowerPoint presentation in its current location as a “.pptx” file.
If you have opened a new presentation and you are saving it for the first time, clicking on the “Save” button will open a new explorer window. Simply navigate to the folder where you wish to save the new presentation on your computer, and click on “ Save “.
Method-2: Using the “File” tab
Another, more common method is to use the “File” tab in PowerPoint to save your PowerPoint presentation.
Here’s what you need to do –
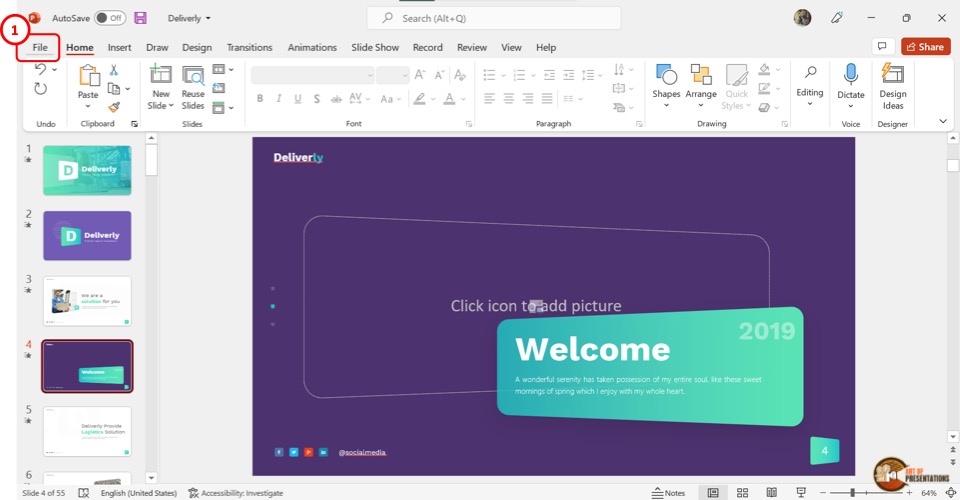
Step 1 – Click on the “File” Tab
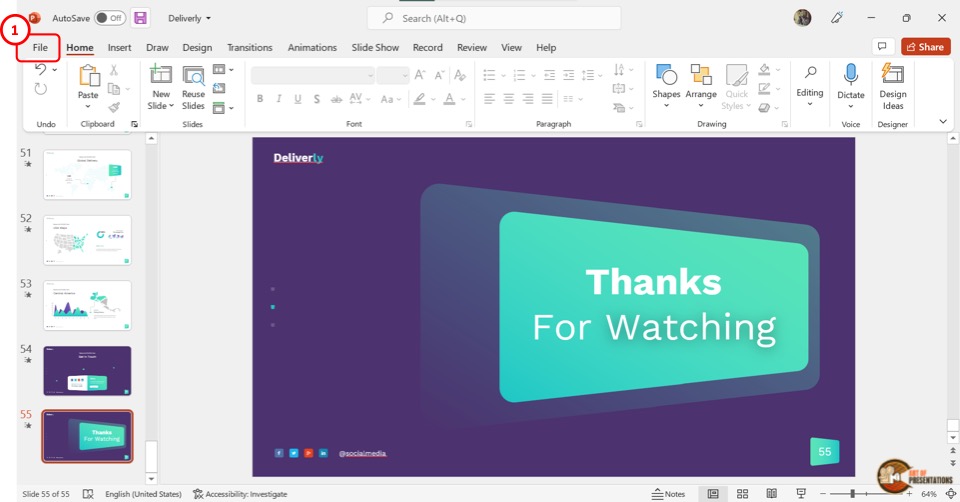
Another way to save a PowerPoint presentation is to use the “File” menu. You have to first click on the “File” tab located at the left corner of the menu ribbon at the top of the screen.
Step 2 – Click on the “Save” option
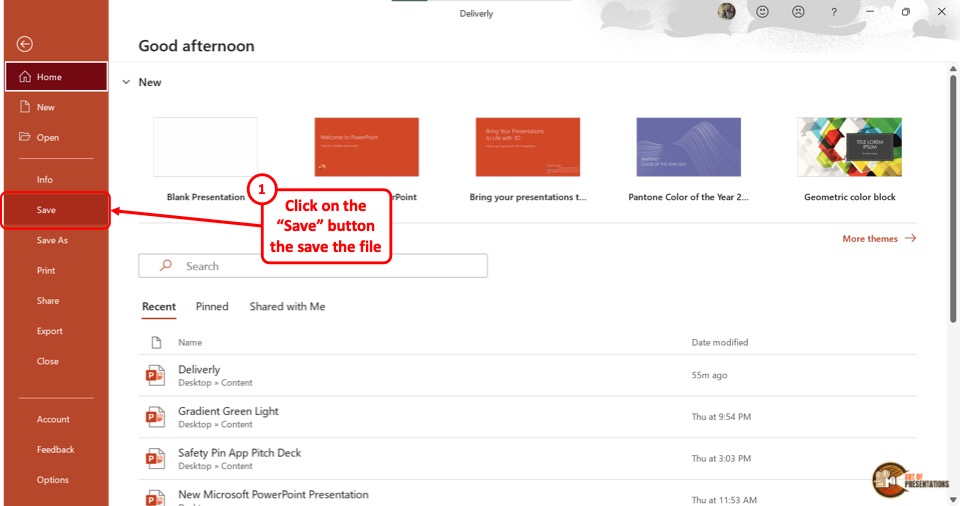
This will open the backstage view in PowerPoint. Now, click on the “Save” option from the sidebar on the left side of the screen. This will save the Microsoft PowerPoint as a “.pptx” file in the current location.
1b. Saving a PowerPoint Presentation on Mac
On a Mac computer, you can use the “File” menu as well to save the PowerPoint presentation.
The first step is to click on the “File” menu in the menu bar located at the top of the screen (above the PowerPoint window). This will open a dropdown menu. Click on the “Save” option from the dropdown menu to save the presentation as a “.pptx” file which is the standard format for presentations.
1c. Shortcut Keys to Save a PowerPoint Presentation
Microsoft PowerPoint also allows you to save a presentation with keyboard shortcuts. All you have to do is press the “Ctrl+S” keys on your keyboard in an open PowerPoint file. This will save the PowerPoint presentation.
1d. Best Format to Save a PowerPoint Presentation?
PowerPoint allows you to save a presentation in various different file formats! For instance, you can use the .ppt format if you wish to open the presentation file using PowerPoint 2007 or earlier. You can use .ppsx to open presentation directly as a PowerPoint Show file that opens it in the presentation mode.
In fact, there are several other formats you can save a presentation in. We shall explore how to save a PowerPoint presentation in several different formats later in the article.
However, the best format to save a PowerPoint Presentation is a “.pptx” file. This type can support all the latest as well as the older features of the PowerPoint presentation.
If you will be opening the presentation using a different software other than Microsoft PowerPoint, “.odp” is the best format. For printing, make sure to save the PowerPoint presentation as a PDF. That said, .pptx file format can help serve these purposes too.
2. How to Save a PowerPoint Presentation as PDF
Saving a PowerPoint presentation in PDF format is the suitable method for printing out your presentation. To save the PowerPoint presentation as a PDF file, follow the 4 easy steps.
Step-1: Click on the “File” Tab
First, click on the “ File ” tab in PowerPoint to open the back stage view of PowerPoint.
Step 2 – Click on the “Save As” option
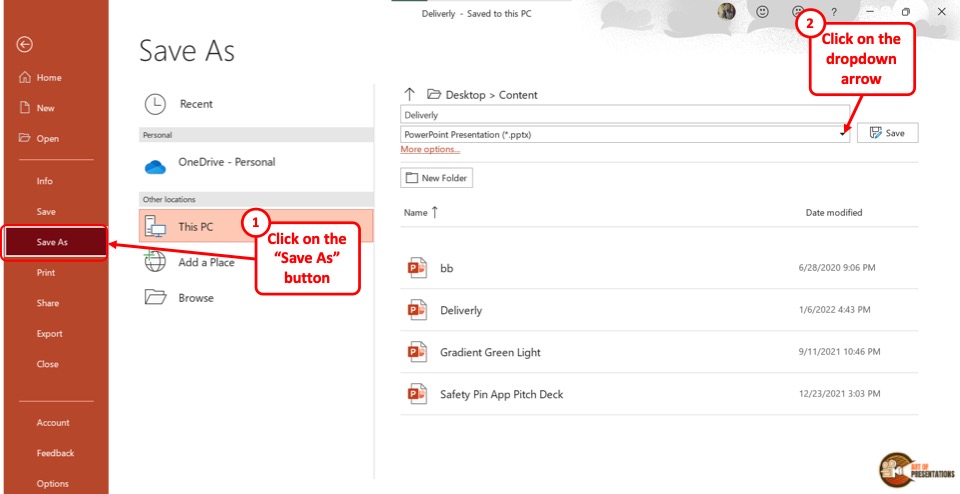
In the menu ribbon located at the top of the screen, click on the “File” tab. In the “File” menu, click on the “Save As” option from the sidebar on the left side of the screen.
Step-3: Click on the “PDF (*.pdf)” option
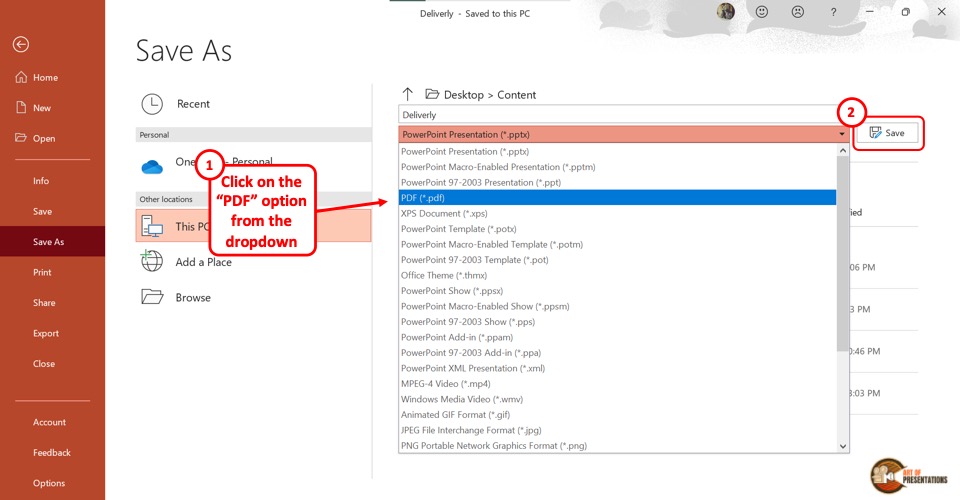
In the “Save As” screen, click on the box that shows “PowerPoint Presentation (*.pptx)” . This will open a dropdown menu. Click on the “PDF (*.pdf)” option from the dropdown menu.
Step-4: Click on the “Save” button
Now all you have to do is click on the “Save” button beside the box to save the PowerPoint presentation as a PDF file (as shown in the image in step 2).
3. How to Save a PowerPoint Presentation as a Video?
In Microsoft PowerPoint, you can also save a presentation as a video. This allows you to play the presentation slides as a video rather than a slide show.
3a. On Windows
To save a PowerPoint presentation as a video on a Windows PC, follow the 3 easy steps.
Step-1: Click on the “File” tab
The first step is to open the “Save As” screen. To do so, click on the “File” tab in the menu ribbon. In the “File” menu, click on the “Save As” option.
Step-2: Choose the “.mp4” file format from the “Save As” tab
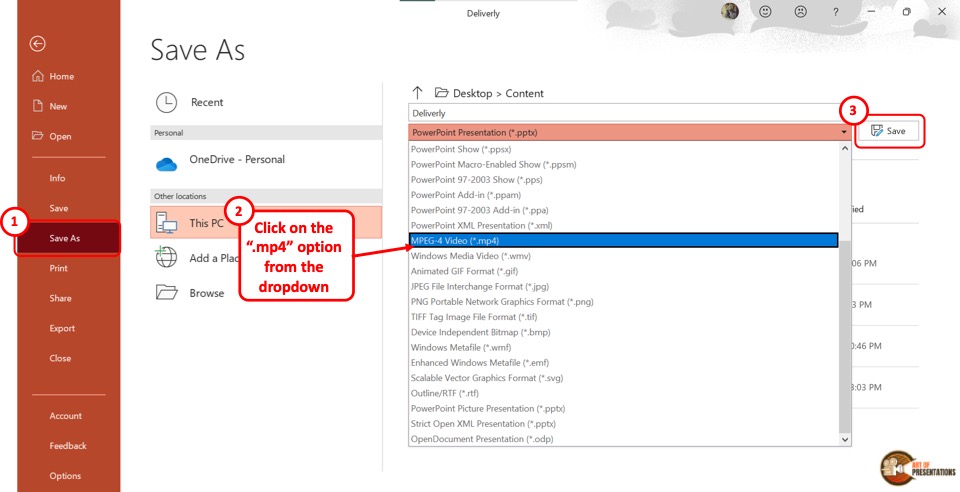
The next step is to click on the “Save As Options” box. It is the second box on the right side of the “Save As” screen. In the dropdown menu, click on either the “MPEG-4 Video (*.mp4)” option or the “Windows Media Video (*.wmv)” option.
Step-3: Click on the “Save” button
The final step is to click on the “Save” button (as indicated in step 2 above). It is located on the right side of the “Save As Options” box. This will save your PowerPoint presentation as a video.
To save a PowerPoint presentation as a video on a Mac device, follow the 3 simple steps.
Step-1: Click on the “Export” option
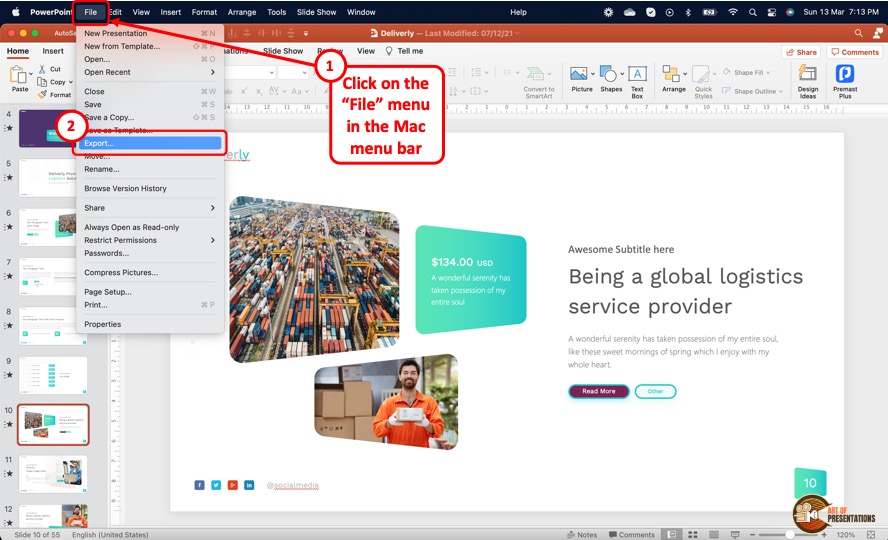
In the menu bar at the top of the screen, click on the “File” option. In the “File” dropdown menu, click on the “Export” option. This will open a dialog box.
Step-2: Click on the “File Format” box
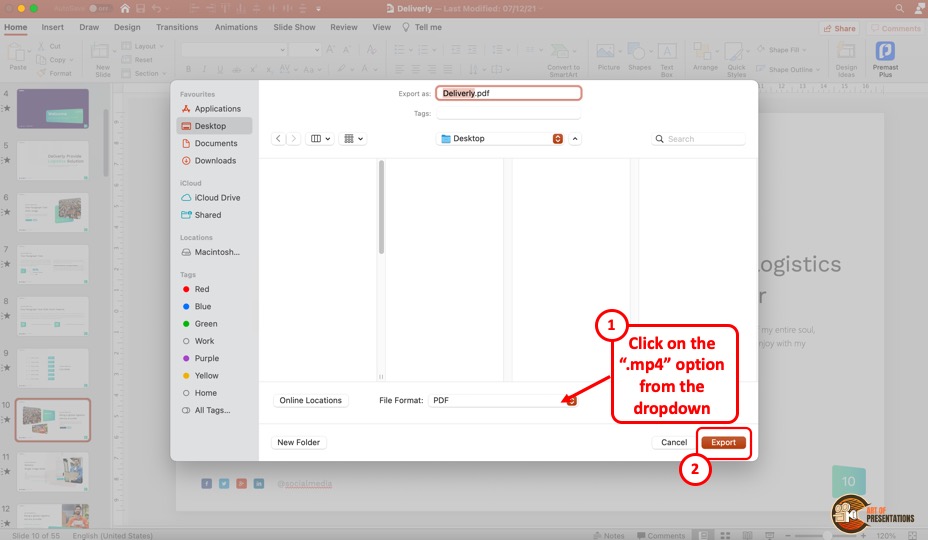
In the dialog box, click on the “File Format” box. This will open a dropdown menu. You can click on either the “MP4” option or the “MOV” option as you prefer.
Step-3: Click on the “Export” button
In the dialog box, you can also click on the “Quality” option to select the quality of the video. Once you are satisfied with the selections in the dialog box, click on the “Export” button at the bottom (as shown in the image in the previous step). This will save the presentation as a video.
4. How to Save a PowerPoint Presentation to Open in Slideshow Mode?
Microsoft PowerPoint allows you to save the PowerPoint presentation as a “PowerPoint Show” file. This opens directly as a slideshow. To save a PowerPoint presentation to open in slideshow mode, follow the 2 easy steps.
In the open PowerPoint file, click on the “File” tab from the menu ribbon which is located at the top of the screen. In the “File” menu, click on the “Save As” option.
Step-2: Click on the “PowerPoint Show (*.ppsx)” option
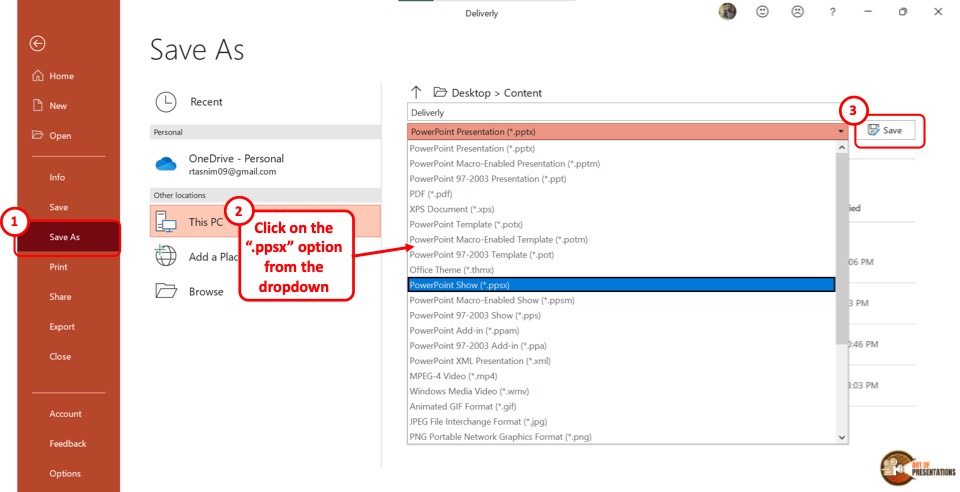
In the “Save As” screen, click on the “Save As Options” box which shows “PowerPoint Presentation (*.pptx)” . This will open a dropdown menu. Click on the “PowerPoint Show (*.ppsx)” option.
Now all you have to do is click on the “Save” button to save the PowerPoint presentation to open as a slideshow.
5. How to Save a PowerPoint Presentation as an Image?
In Microsoft PowerPoint, you can save the presentation as an image in five different formats: “Animated GIF Format (*.gif)” , “JPEG File Interchange Format (*.jpeg)” , “PNG Portable Network Graphics Format (*.png)” , “TIFF Tag Image File Format (*.tif)”, and “Scalable Vector Graphics Format (*.svg)” .
To save your presentation as an image, follow the 3 simple steps.
Step-1: Click on the “Save As” option from the “File” tab
The first step is to click on the “File” tab in the menu ribbon. Then click on the “Save As” option from the “File” menu.
Step-2: Select your preferred image format
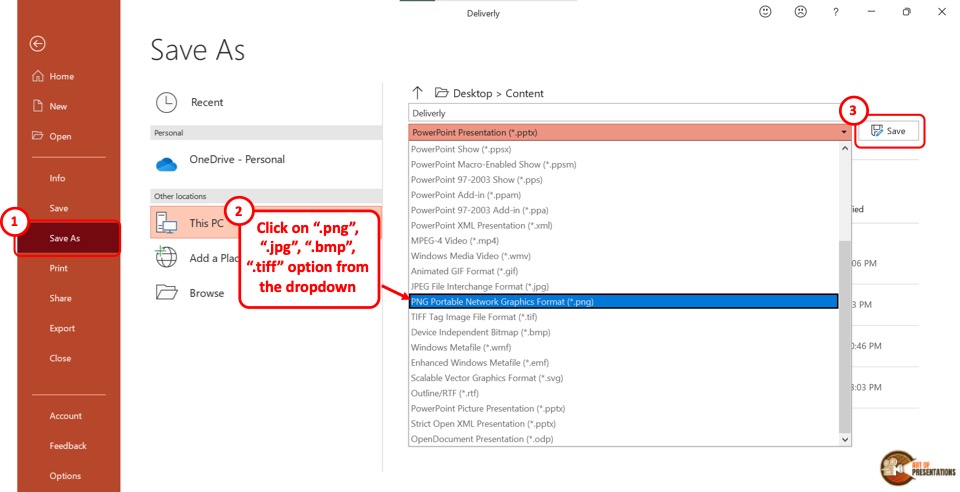
In the “Save As” screen, click on the “Save As Type” box which is the second box in the right column. From the dropdown menu, click on your preferred image format from the five available formats.
Now all you have to do is click on the “Save” button (as shown in the image in step 2) beside the “Save As Type” box. This will save your presentation in a folder containing each slide as a separate image file.
6. How to Save a PowerPoint Presentation as a Template?
A PowerPoint template is a predesigned presentation that you can edit to add your own content. To save a presentation as a template, follow the 3 easy steps.
The first step is to click on the “File” tab in the menu ribbon. Then click on the “Export” option from the sidebar in the “File” menu.
Step-2: Click on “Change File Type”
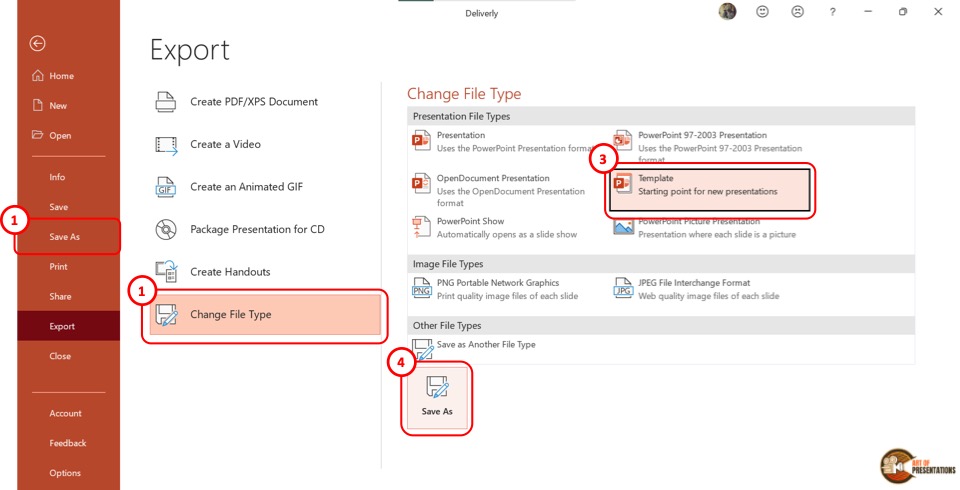
Now you have to click on the “Change File Type” option. Under the “Presentation File Types” group in the right column, click on the “Templates” option. Then click on the “Save As” button at the bottom of the screen.
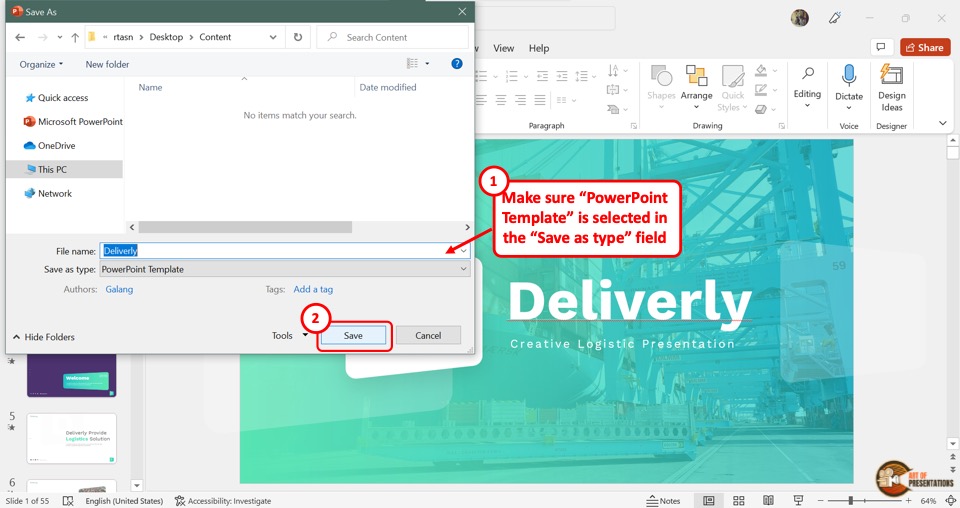
In the “Save As” dialog box, you will see that the “Save as type” box shows the “PowerPoint Template” format. Now all you have to do is click on the “Save” button.
7. How to Save PowerPoint Presentation as Google Slides?
Microsoft PowerPoint does not offer any feature to upload a presentation to Google Slides directly. However, Google Slides does offer you an option to upload your PowerPoint presentation and save it in Google Slides!
Step-1: Save Your PowerPoint Presentation
The first step is to save your PowerPoint presentation using any method described in the section 1 of this article.
Make sure that you note down the location of the folder in which you have save the PowerPoint file.
Step-2: Click on the “Open file picker” option in Google Slides
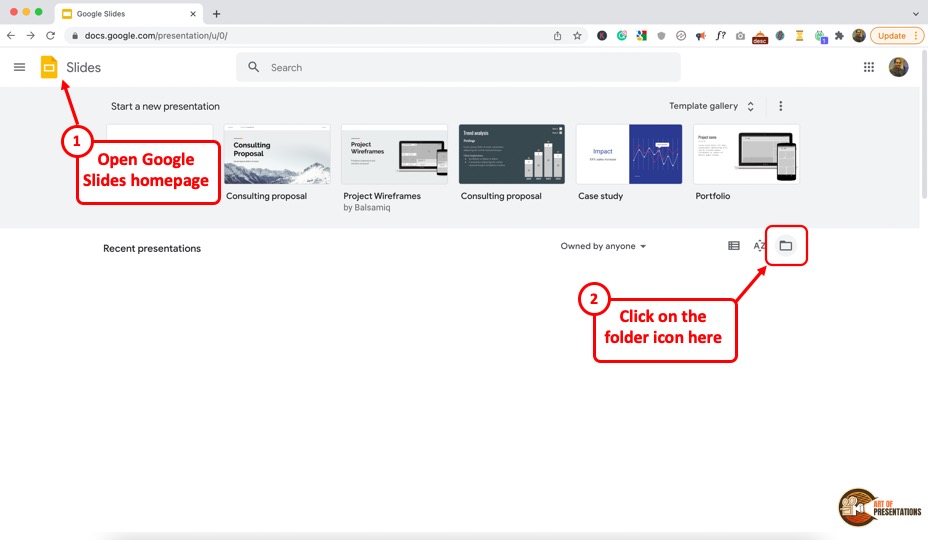
Now, the next thing you need to do is open your Google Slides account by visiting slides.google.com . If you aren’t logged in, make sure you sign in with your account credentials.
Next, you will be presented with Google Slides home screen (as shown in the image above). In Google Slides, click on the “Open file picker” icon which looks like a folder. This will open the “Open a file” dialog box.
Step-2: Click on “Upload”

In the “Open a file” dialog box, click on the “Upload” tab.
From your “File Explorer” window, drag and drop the PowerPoint presentation in the dialog box. Now the presentation will automatically open in Google Slides.
Also Read – How to “ Make a Copy of a Google Slides Presentation ” and how to “ Share a Google Slides Presentation Correctly ” with others!
You can also click on the “ Select a file from your device ” button (blue button in the center of the screen). This will open the file explorer window. Navigate to the folder in which you have saved your PowerPoint presentation, and click on “OK”. This will open and save the presentation file in Google Slides.
8. How to Save a PowerPoint Presentation to a Flash Drive?
To save a PowerPoint presentation on a flash drive or any external device, follow the 3 simple steps.
In the menu ribbon located at the top of the screen, click on the “File” tab. In the “File” menu, click on the “Save As” option.
Step-2: Click on “Browse”
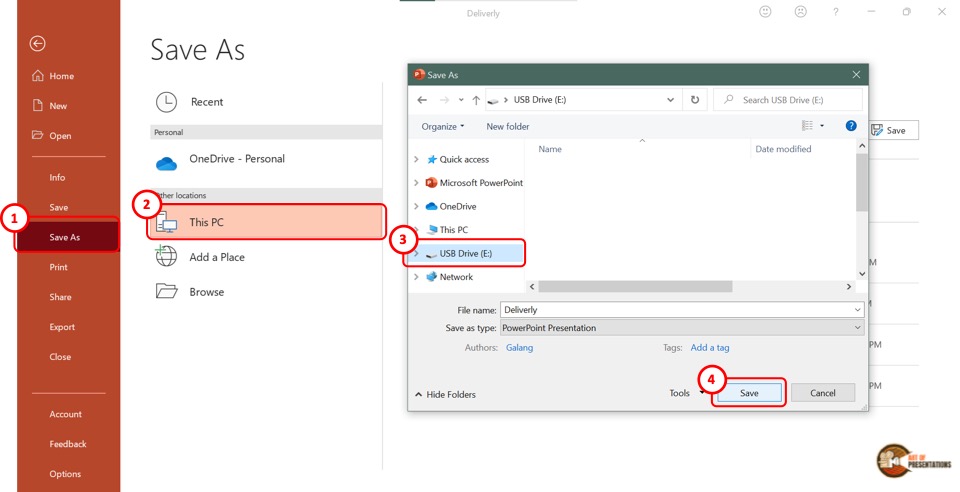
In the “Save As” screen, click on the “Browse” option which is the last option in the left column. This will open the “Save As” dialog box. In the sidebar on the left of the dialog box, click on the external disc.
Now all you have to do is click on the “Save” button at the bottom of the dialog box to save the PowerPoint presentation on the flash drive (as shown in the image in step 2).
9. How to Save a Copy of a PowerPoint Presentation?
The “Save A Copy” feature of Microsoft PowerPoint allows you to save changes in your presentation in a copied file without changing the original file.
Check out my article to learn detailed steps on how to save a copy of a PowerPoint presentation .
10. How to Save a Read-Only PowerPoint Presentation?
The “Read-Only” feature of Microsoft PowerPoint allows you to protect your PowerPoint presentation .
Using this feature, you can share your presentation with others without giving them the access to change your presentation. To save a read-only PowerPoint presentation, follow the steps mentioned below –
The first step is to click on the “File” tab in the menu ribbon. From the sidebar in the “File” menu, click on the “Info” option.
Step-2: Click on the “Protect Presentation” button

The next step is to click on the “Protect Presentation” option in the “Info” screen. This will open a dropdown menu. Click on the “Always Open Read-Only” option from the dropdown menu.
Step-3: Click on the “Save” option
Now all you have to do is save the presentation. To do so, click on the “Save” option in the sidebar right under the “Info” option. Alternatively, you can press the “Ctrl+S” keys on your keyboard.
If you have received a presentation that opens only in the read-only mode, but you don’t know how to work with it, check out my other article on “ How to Edit a Presentation in Read-Only Mode “.
11. How to Save a PowerPoint Presentation Without Notes?
When saving a PowerPoint presentation, you might want to remove the speaker notes. To do so, all you have to do is follow the 5 quick steps.
In the menu ribbon, click on the “File” tab. Then click on the “Info” option from the “File” menu.
Step-2: Click on “Check for Issues” on the “Info” tab
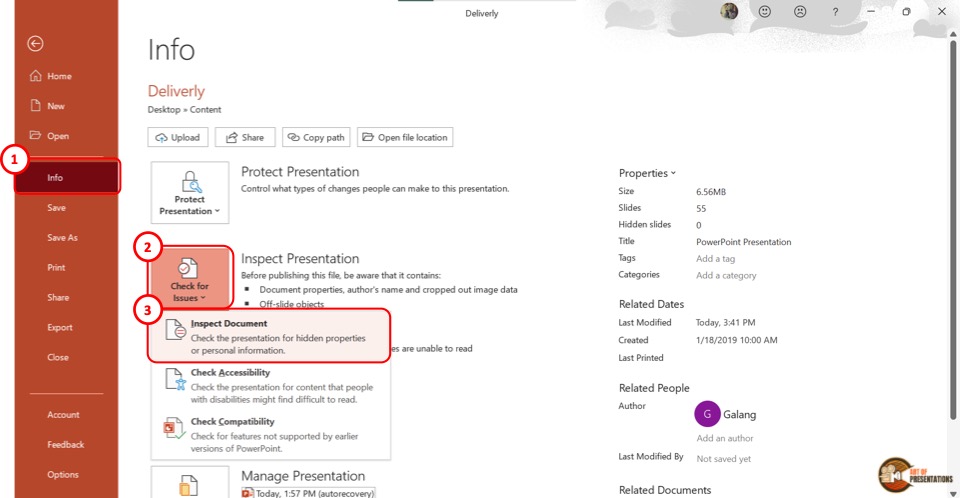
In the “Info” option, click on the “Check for Issues” button. Then click on the “Inspect Document” option from the dropdown menu. This will prompt a dialog box.
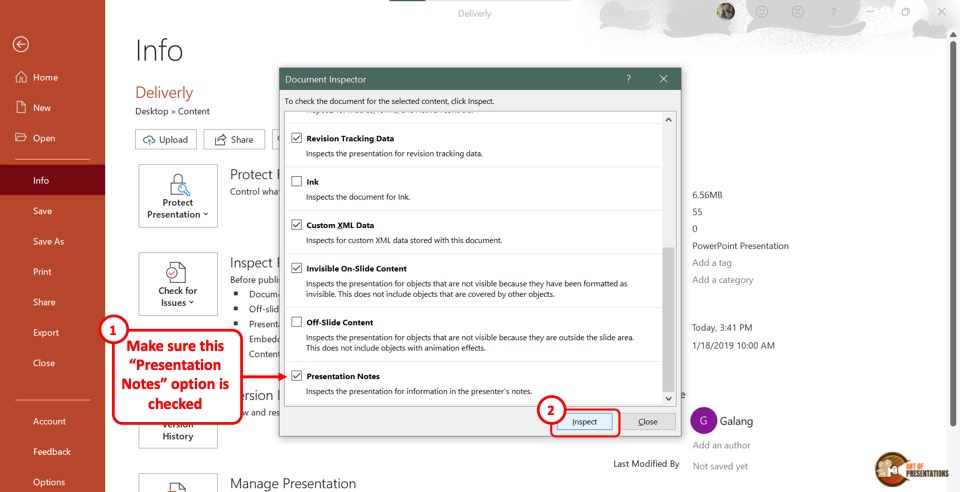
Step-3: Click on the “Inspect” option
In the “Document Inspector” dialog box, scroll all the way to the bottom and make sure the “Presentation Notes” option is selected. Then click on the “Inspect” button at the bottom of the dialog box.
Step-4: Click on the “Remove All” option
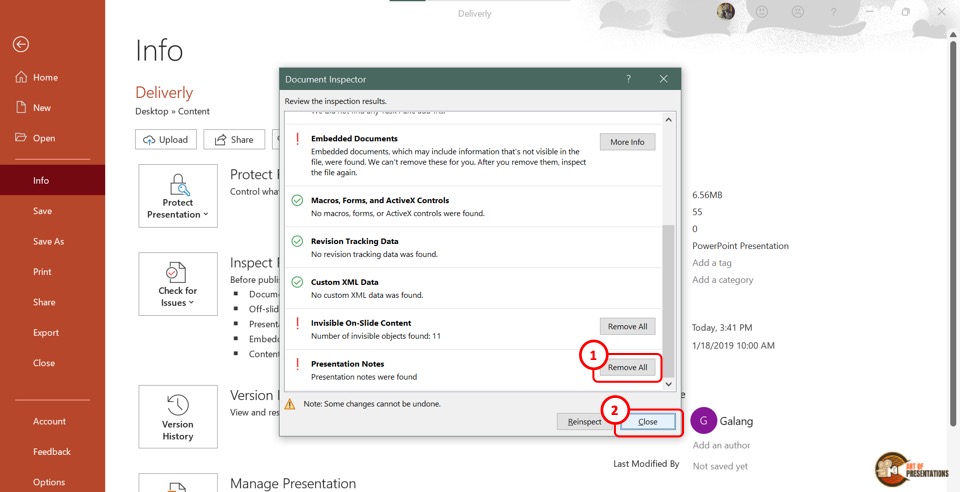
Once the inspection results are shown in the “Document Inspector” dialog, scroll to the bottom again to find the “Presentation Notes” option. Then click on the “Remove All” button at the right side of the “Presentation Notes” option.
Now all you have to do is click on the “Close” button at the bottom of the dialog box to finish the process.
Step-5: Click on the “Save” option
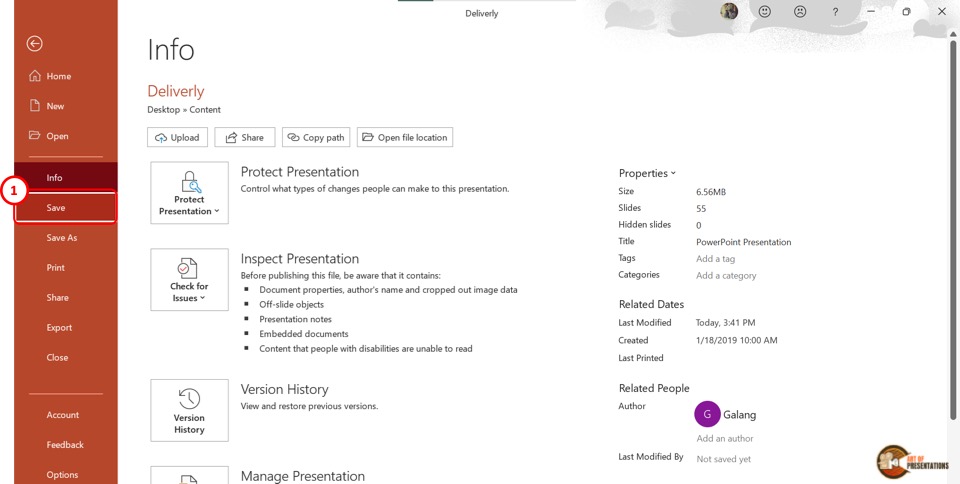
The final step is to click on the “ Save ” option in the sidebar of the “File” menu to save the presentation without notes. You can alternatively press the “Ctrl+S” keys on your keyboard.
12. How to Save PowerPoint Presentation Directly in Microsoft Teams?
If you are delivering a PowerPoint presentation to an audience using Microsoft teams, you can easily share a PowerPoint deck with your audience in the following steps –
- First, open the Microsoft Teams application and login to the meeting.
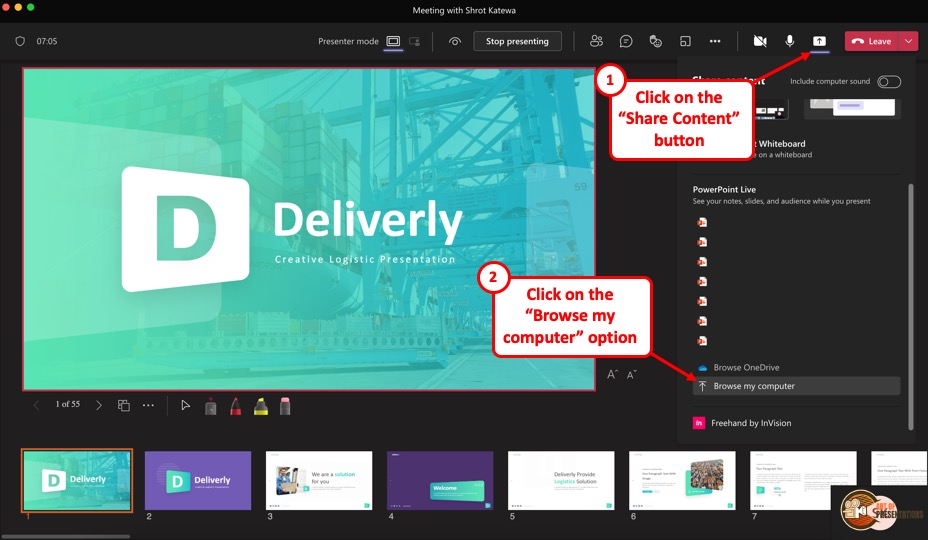
- On the “ Meeting Controls ” menu available in the top part of your meeting screen, locate the “ Share Content ” option.
- Click on the share content button. This will show the most recent PowerPoint files that you opened. You can either choose to click on one of the files visible. Alternatively, scroll down on the right panel and click on the “ Browse my computer ” option.
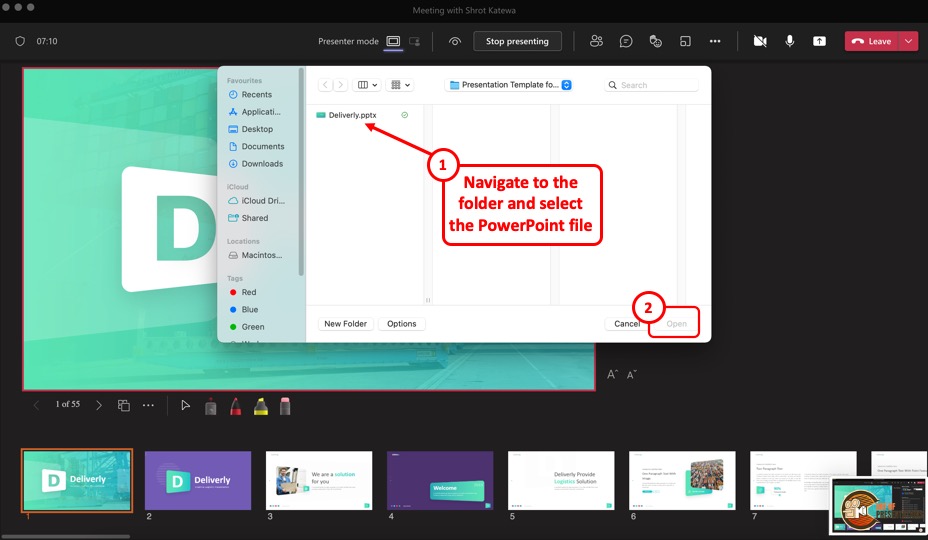
- This will open a new file browser window. Navigate to the respective location where your PowerPoint presentation is saved, click on it to select it. Then, click on “Open” to open the presentation in Microsoft Teams.
- The presentation will open by default in the presenter mode and shared with the audience of the meeting.
13. How to Enable Autosave in PowerPoint Presentation?
The autosave option is only available if you are using the Microsoft Office 365 version of PowerPoint . Other than that, you will have to manually save the PowerPoint file in all other versions.
You can autosave the PowerPoint presentation to the OneDrive cloud, and also autosave recovery files. To enable autosave in PowerPoint presentation, follow the 4 simple steps.
Step-1: Click on the “AutoSave” button
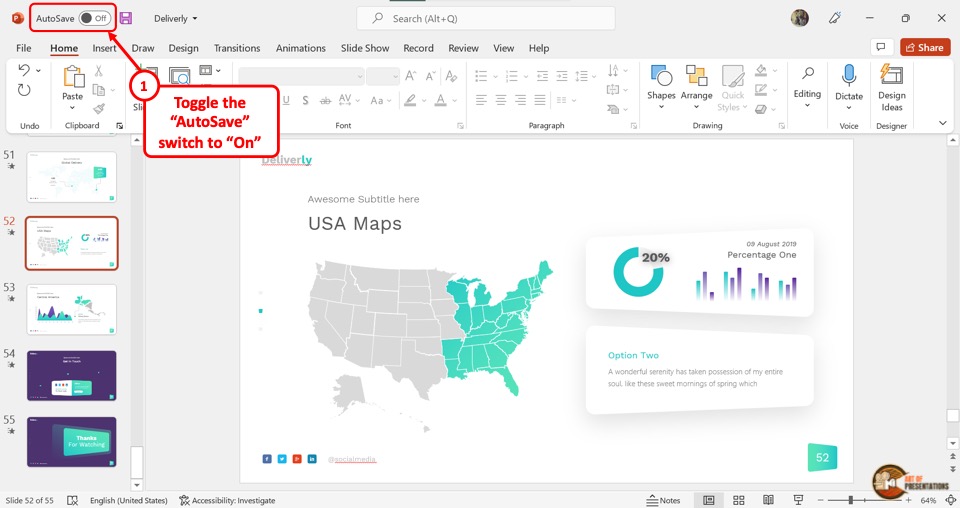
To simply turn on autosave in the OneDrive cloud for the PowerPoint presentation, all you have to do is click on the slider beside the “Autosave” option.
It is located in the left corner of the Quick Access Toolbar at the top of the screen.
Step-2: Click on “Options”
To access more autosave options, click on the “File” tab in the menu ribbon. Then click on the “Options” option which is the last option in the sidebar in the “File” menu. It will open a dialog box.
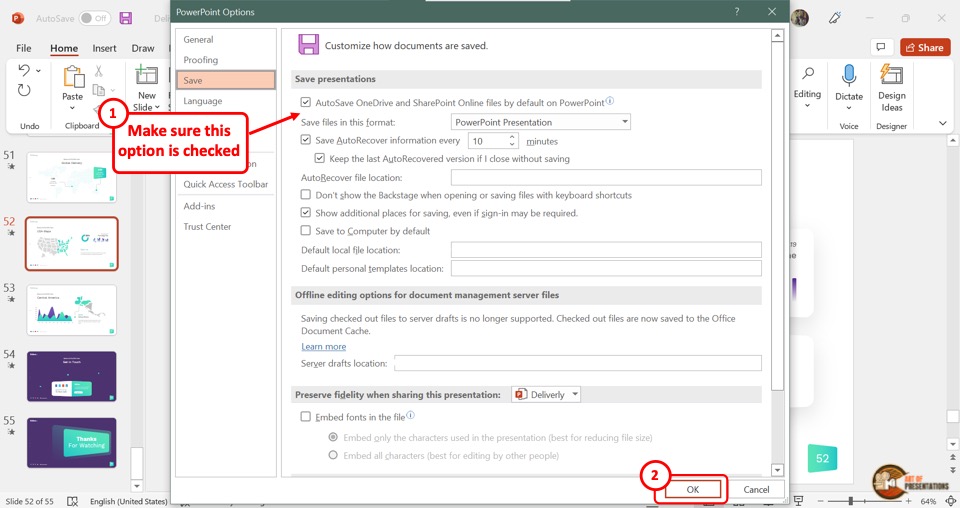
In the “PowerPoint Options” dialog, click on the “Save” option from the sidebar located on the left side. Now you can enable your preferred autosave options in the “Save presentations” section.
Click on the “Autosave OneDrive and SharePoint Online files by default on PowerPoint” for auto-saving on the cloud. You can also select how often the auto-recovery copy is saved by clicking on the box at the right side of the “Save Autorecover information” option.
Step-4: Click on the “OK” button
Now all you have to do is click on the “OK” button at the bottom of the “PowerPoint Options” dialog box to enable your autosave preference (as shown in the image in step 2).
Credit to Cookie_studio (on Freepik) for the featured image of this article (further edited).

How to Record Customized Camera Feeds With Cameo in PowerPoint
T he widespread adoption of remote work and virtual meetings has led many people and organizations to realize they don't have to be physically present in the same conference room to make presentations. In fact, you don't even need to conduct them live.
However, recording your PowerPoint slides with your face on them requires technical know-how and third-party apps like OBS. This makes recording presentations a bit difficult and discourages people from doing it.
Thankfully, Microsoft has addressed this issue in PowerPoint 365 with the Cameo feature. Here's what it is and how to use it.
What Is Cameo in PowerPoint?
Cameo is a PowerPoint feature that lets you add your webcam or any other camera feed into your presentation. This makes it easier to present virtually, as your audience can see you from within your slides.
Previously, you needed a third-party app like OBS to overlay yourself on your presentation. You can also use a green screen overlay in Capcut or other similar apps to achieve the same effect. However, this takes a lot of effort and know-how.
But with this feature, you can do it from inside PowerPoint with just a few clicks. Here's how to insert a cameo into your slides.
- Go to Insert > Cameo .
- After clicking on Cameo, PowerPoint will insert a placeholder object on your current slide and open the Camera Format tab.
- You can edit the object as you wish, much like any other shape on PowerPoint. You can also click on the options in the Designer pane on the right side of the screen to help you work faster.
- Once you're happy with its placement on your slide, click on the Preview button to see your live video.
With that, you can start presenting your PowerPoint slides via screen sharing while still keeping yourself on the screen.
How to Record Your PowerPoint Presentation With Cameo
You can also insert a cameo from Record > Cameo . Clicking on this will bring you to the same menu tab and insert a placeholder object for your video. However, even if you didn't set up Cameo beforehand, you can insert it directly while recording your presentation. Here's how:
- Go to Record > From Beginning or Record > From Current Slide .
- In the recording screen, click on the Camera icon at the top. This will insert a round object containing your video in your slides' lower-right-hand section.
- Click on the Red icon to start recording your presentation.
- Go through your presentation as usual. For more information, check out our guide on turning your presentations into videos .
- Once you've finished, click the Red icon again to stop recording.
- Click Export to go to the Export to video screen .
- Change the File Name as needed, then click Browse to select the location where you will save your recorded video.
- Once done, click Export Video .
With that, you don't have to spend much effort to add your video feed to your PowerPoint presentation recording. However, the app only places your video at one location across every slide; it might cover some of your content. That's why it's better to use the Cameo feature when you're building or editing your PowerPoint presentation.
If you're unhappy with your recording, press the Retake Video on the left of the record icon. You can pick between On Current Slide or On All Slides .
What You Need to Record Customized Camera Feeds
You need a webcam and a Microsoft 365 account to record your customized camera feed. Furthermore, you cannot use Cameo or record presentations in the PowerPoint web app. You need to download and install it on your computer to use these features.
The Cameo feature is already available on Microsoft PowerPoint 365 in Windows and Mac. However, recording your presentation with Cameo is only available on Windows. As of the time of writing, this feature isn't available for the main PowerPoint 365 for Mac version.
If you're running macOS, you must be a Microsoft 365 Insider to get this feature. However, since the Cameo recording feature is already announced in the Microsoft 365 Insider blog , we hope it will be available in the mainstream PowerPoint for Mac version in a few months.
Recording Your Presentations Is Now Much Easier
The Cameo feature has made presenting PowerPoint slides in video calls easier. And with the recording function, you no longer need a third-party app to put your video over your presentation.
You can integrate it into each slide, allowing you to control where you are on your screen. And you also save a lot of time and effort, as you can record and save your presentation as a video from within Microsoft PowerPoint.

How-To Geek
How to convert google slides to a video or gif.
Share your Google Slides with ease with these quick tips.
Quick Links
Convert using powerpoint, capture with your screen recording tool, use a google slides add-on.
While it's easy to share Google Slides using a link or publishing it to the web , you may want a single non-editable file that you can share privately. By converting the slideshow to a video or GIF, your visitors can watch it as you intended. Here are three methods to try.
Microsoft PowerPoint offers both video and GIF exporting . So, if you have PowerPoint, you can open the Google Slides presentation in it and create the video or GIF from there.
Related: How to Convert Google Slides to PowerPoint
Open your Google Slides presentation and go to File > Download. Select "Microsoft PowerPoint (.pptx)" in the pop-out menu.
Head to your downloads folder and click or double-click the file to open it in PowerPoint.
Go to File > Export. Then, choose "Create a Video" or "Create an Animated GIF."
If you pick a video, you can then use the drop-down boxes to choose the quality and whether you want to include recorded timings and narrations. You can also set the duration per slide. Click "Create Video."
If you pick a GIF, you can choose the quality, make the background transparent, set the duration per slide, and include only specific slides if you like. Click "Create GIF."
For both video and GIF, you'll then be prompted to choose a location, optionally change the name, and click "Export" when you finish. Then, grab your video or GIF and share it where you please.
If you have a screen recording tool, such as Game Bar on Windows , the Screenshot Utility on Mac , or a third-party application, you can capture your slideshow as it plays. Then, save the video file to share or turn it into a GIF using an online tool.
Related: How to Screen Record on Your Mac
Get your screen recording tool ready and select the Slideshow drop-down box at the top of Google Slides and pick "Start From beginning."
To ensure you don't see your mouse cursor in the recording when advancing through the slides, you can set it to automatically play.
When the presentation appears in full-screen mode, click the three dots on the right of the floating toolbar, move to Auto-Play, and choose the time per slide.
Then, start capturing with your screen recording tool and stop when the slideshow finishes. You can then edit or share your video.
Additionally, you can use a file converter to obtain a different video file format or turn the video into a GIF. You can use a few free online tools including Cloud Convert , Convertio , or Zamzar .
One other way to convert Google Slides to a video or GIF is with an add-on. There are a few Google Slides add-ons that you can try if you search the Google Workspace Marketplace.
One that works well and allows you to create a video or a GIF for up to five slides for free is Slides to Video .
Related: Everything You Need to Know About Google Chrome's Profile Switcher
Slides to Video works using Google Chrome with the same Google account as Google Slides. If you use a different browser, there are other add-ons such as Video and GIF From Slides and Creator Studio that each offer a free trial.
Once you install the add-on, open your presentation and go to Add-Ons in the menu. Move your cursor to Slides to Video and pick "Create Video" in the pop-out menu.
When the sidebar opens, you can choose a duration per slide or a default for all slides at the top. Then, use the Choose Your Export Type drop-down box to pick "MP4" or "GIF." Click "Create Video."
You'll see the progress as your video or GIF is created. When complete, you'll receive an email to your Gmail account and will also see a link in the sidebar to download the file.
Until Google Slides provides the export option to create a video or GIF, these workarounds can help you get the job done.
For more, learn how to add a YouTube video or how to add other types of videos and customize the playback in Google Slides.

Present on multiple monitors (and view speaker notes privately)
You can present with 2 monitors: Using Presenter View is a great way to view your presentation with speaker notes on one monitor (your laptop, for example), while your audience views the notes-free presentation on a different monitor (like a larger screen you're projecting to).
Note: Make sure the device you're using for your presentation supports the use of multiple monitors. Check with your manufacturer for up-to-date information about multiple monitor support.
To do this procedure and split the view between projectors in this way, you must be connected to the second screen.
Set up PowerPoint to use Presenter view with two monitors
On the Slide Show tab, in the Monitors group, select Use Presenter View .

Windows Display Settings should open.
In the Display Settings dialog box, on the Monitor tab, select the monitor icon that you want to use to view your speaker notes, and then select the This is my main monitor check box.
If the This is my main monitor check box is selected and unavailable, the monitor is already designated as the primary monitor.
Select the monitor icon for the second monitor—the one the audience will watch, and then select the Extend my Windows Desktop onto this monitor check box.
Notes: If the Windows Display Settings don't open, do the following:
Windows 10: Click Start > Settings > System > Display . At the top, under Customize your display , is a diagram of the screens connected to your computer, with each screen numbered. If you are connected to a project, typically it will be represented in the diagram as screen 2. Select screen 1 in the diagram, then scroll downward. Ensure that the check box named Make this my main display is selected. Above that check box, in the Multiple displays list, select Extend these displays .
Windows 8: Right-click the Windows Start button, click Control Panel > Display > Adjust resolution . In the Multiple displays list, click Extend these displays . Select the monitor on which you want to view your speaker notes, and click Make this my main display .
You can use PowerPoint on your smartphone as a remote control to run your presentation and view your speaker notes. See Using a laser pointer on your smartphone when presenting in PowerPoint for more information, including a brief video.
Deliver your presentation on two monitors
On the Slide Show tab, in the Set Up group, click Set Up Slide Show .

In the Set Up Show dialog box, choose the options that you want, and then click OK . If you choose Automatic , PowerPoint will display speaker notes on the laptop monitor, if available. Otherwise, PowerPoint will display speaker notes on the main display identified in your Display settings ( Settings > Display ).

Extend vs. Duplicate: What happens after the slide show ends
PowerPoint does something behind the scenes to make the process of starting a slide show on a second monitor as smooth and quick as possible. When you enter Slide Show, PowerPoint automatically changes your display settings (also known as your display topology) to Extend .
What can be confusing is what happens after your slide show concludes:
In PowerPoint 2013 , when your slide show ends, PowerPoint leaves the display topology as Extend . (The benefit of this approach is that the next time you present on a second monitor, the first slide will appear with minimal delay. The drawback is that PowerPoint may be overriding your preferred display setting of "duplicate". Some people don't like this override.)
In newer versions , in the same end-of-slide-show scenario, PowerPoint reverts to your default setting, returning to Duplicate , if that's what you have chosen.
If you are using PowerPoint 2013 and you want PowerPoint to revert to the default setting, rather than keeping the Extend setting, you can tell it to do that by making a small change to the Windows registry as described below.
In this procedure, you are creating a command that adds a new setting to the Windows Registry for PowerPoint, and then you are running that command:
Create a new file in Notepad.
Copy and paste the following three lines of text into Notepad:
On the File menu in Notepad, click Save As .
Name the file Update.reg . (It's important that the file name extension be .reg ).
In the Save as type box, choose All Files (*.*) .
Take note of the folder in which you are saving the file. Then click Save , and close Notepad.
Open File Explorer from the Start menu and navigate to the folder where you saved Update.reg.
Double-click Update.reg .
Answer "Yes" to the two prompts that ensue.
With that completed, PowerPoint will now revert to your default display topology at the conclusion of a slide show.
(Read more technical details in this community forum post that was answered by a PowerPoint program manager .)
Video: Use Presenter view
View your speaker notes as you deliver your slide show
Video: Rehearse timings for a slide show
Zoom in to part of a slide in Slide Show view
Print your PowerPoint slides, handouts, and notes
Create a self-running presentation
Start the presentation and see your notes in Presenter view
PowerPoint videos not playing on secondary monitor

Need more help?
Want more options.
Explore subscription benefits, browse training courses, learn how to secure your device, and more.

Microsoft 365 subscription benefits

Microsoft 365 training

Microsoft security

Accessibility center
Communities help you ask and answer questions, give feedback, and hear from experts with rich knowledge.

Ask the Microsoft Community

Microsoft Tech Community

Windows Insiders
Microsoft 365 Insiders
Was this information helpful?
Thank you for your feedback.
IMAGES
VIDEO
COMMENTS
In the Seconds spent on each slide box, select the default time you want to spend on each slide. Select Create Video. Enter a file name and then browse to the location you want to save your video. In the Save As type box, select if you want to save the video as a MPEG-4 Video or Windows Media Video. Tip: The MPEG-4 Video format is recommended ...
Watch this video to learn how to convert your PowerPoint presentation into a video. When you make a recording of a presentation, all its elements (narration,...
To turn a PowerPoint presentation into a video, first, open your presentation with the PowerPoint app on your Windows or Mac computer. In the top-left corner of PowerPoint, click the "File" option. From the sidebar that opens after clicking the "File" option, select "Export." In the "Export" menu, click "Create a Video."
Save in a video format. Select File > Export. (Don't use Save As, because it doesn't offer video options.) Open the File Format list and select the video format that you want ( MP4 or MOV ). If the MP4 and MOV options aren't in your version of PowerPoint, see Requirements below for more information. Select the video Quality you want ...
📽️💻 How to Save a PowerPoint Presentation as a Video | MicrosoftIn this tutorial, learn how to easily convert your PowerPoint presentation into a video for...
Learn how to publish your own video using Microsoft PowerPoint with narration, annotations, animations, and timings. As full disclosure, I work at Microsoft ...
Under the Save & Send menu, find and click on Create a Video. Click on the Computer & HD Displays option to customise the video size and quality (small, medium and large size & quality). Click the Don't Use Recorded Timings and Narrations to select if you're using timings and narrations. Click Create Video and another dialogue box opens.
The Quick & Easy Way. If your presentation is complete with automatic timings, transitions and animations, you might be shocked to learn how easy it is to convert it into a video. Open your Powerpoint presentation. Click on File, select Save As, and from the drop-down menu, choose MPEG-4 Video (*.mp4). (available in Powerpoint 2010 and above).
Training: After you create your PowerPoint presentation, you can save it as a video to share with others. Watch this video to learn how. Related topics. ×. Share and co-author Add, reply to, or delete comments Video; Share a presentation Video; Save a presentation as a video ...
Browse to the location where you want to save the file and give it a name then press "Save.". While the video is being created, you will see the small progress bar at the bottom of your PowerPoint window. Wait till this is done and then go to your video. Now you can double-click your video file and it will automatically play with your video ...
The first step to save a PowerPoint presentation as a HD video go to File-> Export and then click Create a Video button. Step 2 - Choose Video Resolution. Now, select a resolution to export your video. Other than the Standard (825×480) resolution, the high-definition resolution options include HD (Medium 1280×720), Full HD (Large 1920×1080 ...
These two things will keep you from making mistakes that could ruin your video. - Add some flare to your video. This could mean adding a few filters to your footage, sprinkling your video with some text, or adding some music. - When you're finished recording, make sure to export your video as an MP4 file.
1. Go to the File Menu. Click on the File menu of your presentation and select Export option. 2. Click Create a Video Option. Once you select the Export option, you will see multiple options to export your presentation on the right side. Click on the Create a Video Option. 3.
From the drop-down menu that appears, select "Video on My PC" if you're using a Windows machine or "Movie from File" if you're on a Mac. A dialog box will then open. Navigate to the location of the video, select it, and click "Insert." With the video now embedded in your presentation, save and then close PowerPoint.
Mac. Click on the File menu. Click Export. Under the File Format dropdown menu, select MP4 or MOV. Select your video quality and timing. Note: There are limitations on Mac for saving your presentation as a video. You will lose saved recorded timings, narrations and animations. Click Export.
In this video tutorial, I show you how to save PowerPoint presentations as a video. I walk you through the steps of setting up your slides and then how to e...
Go to the PowerPoint Preferences > Output and Sharing > Save > Font Embedding. Tick the box that says, "Embed fonts in the file." On Windows: Go to File > Options > Save. In the section "Preserve fidelity when sharing this presentation," tick the box which says, "Embed fonts in the file.
To save the PowerPoint presentation as a PDF file, follow the 4 easy steps. Step-1: Click on the "File" Tab. First, click on the " File " tab in PowerPoint to open the back stage view of PowerPoint. Step 2 - Click on the "Save As" option. In the menu ribbon located at the top of the screen, click on the "File" tab.
On the PowerPoint window, in the left sidebar, click the slide in which you want to add a video. At the top of the PowerPoint window, click the "Insert" tab. In the "Insert" tab, under the "Media" section (which is to the extreme right side of the interface), click "Video." You'll now see an "Insert Video From" menu.
Learn how to use PowerPoint better, from setting up your slide designs to working with text, images, video, charts, multi-media, and more. Discover how to work with PowerPoint's core presentation tools to make great presentations quickly, while maximizing your presentation design workflow.
Right-click (or Control-click on macOS) the audio icon or video, and click Save Media as. Tip: Ensure your disk has enough space to save the media file, otherwise you'll have to free up space and try again. In the Save Media as dialog box, choose a folder and also enter a name for the media file. If the Save Media as option doesn't appear on ...
Go to Record > From Beginning or Record > From Current Slide. In the recording screen, click on the Camera icon at the top. This will insert a round object containing your video in your slides ...
Want to know how to save/export your PowerPoint presentation as a video file in MP4 format? This video will show you how you can covert your standard Microso...
Open your Google Slides presentation and go to File > Download. Select "Microsoft PowerPoint (.pptx)" in the pop-out menu. Head to your downloads folder and click or double-click the file to open it in PowerPoint. Go to File > Export. Then, choose "Create a Video" or "Create an Animated GIF." If you pick a video, you can then use the drop-down ...
Deliver your presentation on two monitors. On the Slide Show tab, in the Set Up group, click Set Up Slide Show. In the Set Up Show dialog box, choose the options that you want, and then click OK. If you choose Automatic, PowerPoint will display speaker notes on the laptop monitor, if available. Otherwise, PowerPoint will display speaker notes ...