How To Make A Pizza Process Essay
This sample essay on How To Make A Pizza Process Essay offers an extensive list of facts and arguments related to it. The essay’s introduction, body paragraphs, and the conclusion are provided below.
How to Make a Pizza Generally if you ask someone what their favorite food is you’ll probably hear the word pizza. Pizza is one of everyone’s favorite foods. There is so many different toppings, cheeses, sauces, and crust styles. But not everyone knows how to make a pizza, so this essay will break the recipe down step by step to tell someone how to prepare and create a pizza.
First, to start out you must start by prepping all of the necessary items for the pizza. Generally you will start by making the dough.
The dough consist of two and a half cups of flour, one and a half teaspoon of yeast, half a teaspoon of salt, a small pinch of sugar, and a cup of warm water.
In order to make the dough you mix yeast, warm water, and sugar into a mixer. Then you will turn the mixer on to low and let mix for about ten minutes. Then after ten minutes of mixing you will add the flour, sugar, and salt and let mix for about twenty more minutes. Finally after the dough is finished, you will pull the dough out of the bowl and place it on a table in order to rise and later be cut, weighed, and rolled into a proportional size, round dough ball.

Proficient in: Cooking
“ Have been using her for a while and please believe when I tell you, she never fail. Thanks Writer Lyla you are indeed awesome ”

Essay About Pizza
The second step to making a pizza is preparing the pizza sauce. The pizza sauce consists of 6 oz. of tomato paste, one and a half cups of water, one-third cup of olive oil, two cloves of minced garlic, a half teaspoon of oregano, half teaspoon of basil, and half teaspoon of rosemary. To start the sauce you will need to mix the tomato paste and water into a large pot. Then you will mix in your minced garlic. To mince the garlic just chop it a little bit finer than dicing it. After the garlic you will put in your dried spices.
After all of your ingredients are in give the sauce a good stirring in order to mix all of the ingredients really well. Then turn the stove on to low and let simmer for about a half hour. Later when the sauce has simmered you can add salt and pepper for taste and even sugar to sweeten the sauce a little bit. The third step to making a pizza is choosing your types of cheeses and toppings. Most pizzas use mozzarella, parmesan, and romano cheese. However you can use substitutes like provolone, fontina, feta, monterey jack, or blue cheese that give your pizza a different flavor.
Most stores have pre shredded cheese but if not use a cheese grader to shred your desired cheese. After choosing your cheese you will then pick the toppings on you pizza which could be either meat like ham, sausage, pepperoni, ground beef, italian sausage, chicken, or any other kind of meat you like. For your vegetables you can use onions, green peppers, tomatoes, olives, mushrooms, chilies, and also any other vegetable that you like. To prepare your toppings for the pizza you will need a knife and a cutting board to cut your meat and vegetables into smaller bite size pieces.
Most meats will come packaged in smaller sizes or already ground up but if not just simply cut the pieces into smaller portions. For the vegetables the easiest way to cut them is by dicing them. When dicing a vegetable cut vertical slits all the way down the vegetable and then turn the vegetable on its side and cut where the slit is the deepest. This will make little small cubes of the vegetable which is very delicious on pizza. Now that all of the essential ingredients are prepared for a great pizza you can get on your way to making a pizza.
After gathering all of your prepared ingredients, you will start with the dough again by rolling out the dough, weigh the dough to determine the size and thickness of your crust and then roll it into an even round ball. After that is done compress the dough in a bin of flour to prevent breaks and sticking of the dough. Afterwards roll the dough out until it is at your desired level of thickness and size. Then stretch the dough onto one of your baking sheets. If you want a thicker crust for your pizza uses a pan with a sidewall. It is the same process except after you roll the dough out take your sidewall pan and press the dough into the pan.
It is okay if the dough isn’t completely even in the pan because it will rise evenly when it is baked. After your dough is on or in your pan, the next process is to apply your pizza sauce. Do not apply the sauce right after it has been simmering give it time to cool so it does not melt your cheese. The easiest tool to use for this is a ladle. Use the ladle to apply as much sauce as you desire. After this is done use the bottom of the ladle to spread out the pizza sauce. It is easier to start in the center and create spiraling circles around the dough leaving enough room for crust to form.
After the pizza sauce is spread nice and even, the next step is to apply your cheese and toppings. A lot of pizza makers like to put the parmesan and romano cheese on first and then thicker mozzarella cheese. After the cheese is on there the next step is to apply your toppings. Before you apply your toppings all over the pizza remember when the cheese melts the toppings will slide with the cheese, so be sure to evenly spread your toppings out. After the toppings are spread out on the pizza the next step is to bake it in the oven. First the oven must be preheated to 425 degrees.
Other temperatures may have to be used due to the differences in ovens. After the oven is preheated place your pizza in the oven and let it bake for 15-20 minutes. When the pizza is done it will have a light golden crust. After the pizza is done take it out of the oven. Be sure to use a pair of hot mats or mittens to grab the pizza. Let the pizza cool for about five minutes. After the pizza is done cooling use a pizza cutter or knife to cut the pizza in to slices. After the pizza is cut into slices, serve the pizza on a pan and enjoy.
Cite this page
How To Make A Pizza Process Essay. (2019, Dec 06). Retrieved from https://paperap.com/paper-on-essay-process-make-pizza/
"How To Make A Pizza Process Essay." PaperAp.com , 6 Dec 2019, https://paperap.com/paper-on-essay-process-make-pizza/
PaperAp.com. (2019). How To Make A Pizza Process Essay . [Online]. Available at: https://paperap.com/paper-on-essay-process-make-pizza/ [Accessed: 29 Mar. 2024]
"How To Make A Pizza Process Essay." PaperAp.com, Dec 06, 2019. Accessed March 29, 2024. https://paperap.com/paper-on-essay-process-make-pizza/
"How To Make A Pizza Process Essay," PaperAp.com , 06-Dec-2019. [Online]. Available: https://paperap.com/paper-on-essay-process-make-pizza/. [Accessed: 29-Mar-2024]
PaperAp.com. (2019). How To Make A Pizza Process Essay . [Online]. Available at: https://paperap.com/paper-on-essay-process-make-pizza/ [Accessed: 29-Mar-2024]
- Value Chain in Domino's Pizza Pages: 18 (5381 words)
- Pizza Colosseum Pages: 4 (1073 words)
- Domino's Pizza Strategy Case Study Pages: 5 (1312 words)
- Analysis of Dominos Pizza Environment Pages: 4 (1098 words)
- Research Paper On Domino's Pizza Pages: 3 (669 words)
- Domino’s Pizza Founder Tom Monaghan Pages: 4 (1078 words)
- Pizza Hut Bangladesh Opens First International Chain Restaurant Pages: 12 (3321 words)
- How Can Knowing Oneself Make Someone A Better Person Essay Pages: 5 (1217 words)
- Essay Examples on Due Process Pages: 3 (706 words)
- Does Technology Make Us More Alone Pages: 2 (362 words)

- Undergraduate
- High School
- Architecture
- American History
- Asian History
- Antique Literature
- American Literature
- Asian Literature
- Classic English Literature
- World Literature
- Creative Writing
- Linguistics
- Criminal Justice
- Legal Issues
- Anthropology
- Archaeology
- Political Science
- World Affairs
- African-American Studies
- East European Studies
- Latin-American Studies
- Native-American Studies
- West European Studies
- Family and Consumer Science
- Social Issues
- Women and Gender Studies
- Social Work
- Natural Sciences
- Pharmacology
- Earth science
- Agriculture
- Agricultural Studies
- Computer Science
- IT Management
- Mathematics
- Investments
- Engineering and Technology
- Engineering
- Aeronautics
- Medicine and Health
- Alternative Medicine
- Communications and Media
- Advertising
- Communication Strategies
- Public Relations
- Educational Theories
- Teacher's Career
- Chicago/Turabian
- Company Analysis
- Education Theories
- Shakespeare
- Canadian Studies
- Food Safety
- Relation of Global Warming and Extreme Weather Condition
- Movie Review
- Admission Essay
- Annotated Bibliography
- Application Essay
Article Critique
- Article Review
- Article Writing
- Book Review
- Business Plan
- Business Proposal
- Capstone Project
- Cover Letter
- Creative Essay
- Dissertation
- Dissertation - Abstract
- Dissertation - Conclusion
- Dissertation - Discussion
- Dissertation - Hypothesis
- Dissertation - Introduction
- Dissertation - Literature
- Dissertation - Methodology
- Dissertation - Results
- GCSE Coursework
- Grant Proposal
- Marketing Plan
- Multiple Choice Quiz
- Personal Statement
- Power Point Presentation
- Power Point Presentation With Speaker Notes
- Questionnaire
- Reaction Paper
Research Paper
- Research Proposal
- SWOT analysis
- Thesis Paper
- Online Quiz
- Literature Review
- Movie Analysis
- Statistics problem
- Math Problem
- All papers examples
- How It Works
- Money Back Policy
- Terms of Use
- Privacy Policy
- We Are Hiring
How to Make Pizza, Essay Example
Pages: 3
Words: 882
Hire a Writer for Custom Essay
Use 10% Off Discount: "custom10" in 1 Click 👇
You are free to use it as an inspiration or a source for your own work.
Pizza is ranked among the popular foods that the world has. It refers to flat bread; round in shape, normally baked with an oven and on top is covered with mozzarella cheese, and tomato sauce. However, it is not necessary to use the afore-mentioned toppings, since they can be done according to personal preference, culture, and religion. In the discussion that follows, the focus is on the process of preparing a pizza.
While preparing a pizza, it is important to know that the steps are very simple, although it is vital to follow them well, in order to get a good product.
Adding yeast
The following is the process of preparing a pizza. Warm water is poured in a mixing bowl, and then sugar is dissolved in it. Next, yeast is added, and like sugar, one should wait until it dissolves. However, yeast is not added at once, but is it added continuously while stirring.
Sugar and water added
The mixture of sugar and water should be left to settle for ten minutes, or even more, in order to allow yeast to become active. More yeast and oil is added when the mixture appears cloudy and foamy on the surface. The two are equally dissolved through stirring.
Adding flour
Next, one should add two cups of flour to the foamy mixture, while stirring and only stop after it has dissolved in it. In order to get perfect results, one should ensure the entire mixture appears smooth. In order to ensure the dry flour is moistened, one should use hands to combine it.
Kneading the mixture
On seeing that all the moisture has absorbed the flour, and it has become a solid mass, one should discard it from the mixing bowl, and place it on a surface with flour in order to knead it properly.
Testing the dough
In order to ensure the dough is kneaded properly, one should fold it in half, and squeeze it repeatedly for around fifteen to twenty minutes. One can tell dough is kneaded well, when it appears into a silky textured ball.
Coat the dough
While in this form, it is time to coat is with a layer of olive oil. Next, the coated dough is placed on the large bowl of mixing, which is as well smeared with olive oil.
Panning the dough
The next step is panning the well-prepared dough of pizza. Many people, who have prepared pizza as challenging, because spreading the dough on the pan determines its eventual shape, have identified this step.
Methods of spreading pizza
In order to get this right, pizza makers have introduced various methods one can use to suit one’s need. Some of the well-known ways include hand tossing pizza, pizza dough pressing, and pizza dough pressing, and lastly pin rolling pizza among others.
Making pizza sauce
After making the pizza, the next step is making a pizza sauce. While at home, it is advisable to use tomato sauce, which has limited amounts of basil and oregano. Some people who eat pizza are even comfortable taking it with less tomato sauce.
Ingredients for a tomato sauce
Notably, tomato sauce is easier to make for a person who is at home. The ingredients to produce a perfect tomato sauce include butter, basil, canned Italian tomatoes, minced yellow onions, black pepper, minced garlic, salt, tomato puree, and olive oil.
Making a tomato sauce
The first step involves melting olive oil with butter in a large oven. Gradually, sauté the onion and garlic. Next, add salt, tomatoes, puree, basil, oregano, and pepper, and leave it to boil. The mixture is then covered and left to keep bubbling for close to two hours. While the mixture is still bubbling, keep stirring. Tomatoes should be crushed using a smasher, and the process should continue until the sauce attains a texture of a soup.
Cooling the sauce
Next, the sauce is put aside in order to cool down, prior to smearing it on the pizza. In the event, the cooling process is not fast, it is advisable to place it in a fridge.
Topping the pizza
Next is the process of pizza topping, which is done by spreading the sauce on the dough surface. While smearing the sauce, a margin should be left on the outer part of the dough in order to allow the crust to crisp and rise easily. Adding the pizza top should be done according to one’s preference.
Baking the pizza
The last step involves baking the pizza. The oven should be heated in advance to 450 0 F for around fifteen to twenty minutes. Following the preheating, the pizza should be placed on the center of the oven. The pan should be placed in such a way that, enough room for circulation of air is allowed. The pizza maker should ensure baking continues at that temperature for almost twenty minutes. Signs to show that the pizza is cooked include cheese melting and beginning to turn brown. In addition, the edge of the crust is brown, and at this stage, one should turn it to confirm the bottom side is equally brown.
Pizza ready
If the afore-mentioned signs are witnessed, the pizza is cooked and ready for consumption.
Evidently, preparation of pizza is a tedious process, and if not followed correctly, one may end up producing a low quality product. Therefore, it advisable for pizza makers to prepare in advance and ensure all the ingredients is in place, to ensure a good product.
Stuck with your Essay?
Get in touch with one of our experts for instant help!
Telemonitoring Heart Failure Patient, Article Critique Example
American Culture and Stories, Research Paper Example
Time is precious
don’t waste it!
Plagiarism-free guarantee
Privacy guarantee
Secure checkout
Money back guarantee

Related Essay Samples & Examples
Voting as a civic responsibility, essay example.
Pages: 1
Words: 287
Utilitarianism and Its Applications, Essay Example
Words: 356
The Age-Related Changes of the Older Person, Essay Example
Pages: 2
Words: 448
The Problems ESOL Teachers Face, Essay Example
Pages: 8
Words: 2293
Should English Be the Primary Language? Essay Example
Pages: 4
Words: 999
The Term “Social Construction of Reality”, Essay Example
Words: 371
Teaching the Pizza Preparation Process Essay
Introduction, preparation of mixtures to be used for pizza making, dough making from the already prepared mixtures, preparation and baking of pizza from dough balls.
Pizza preparation can be one of the most daunting tasks at home. As one of the best foods for human consumption, its preparation requires great attention. The basic component in pizza making is baking flour. To add flavor, other ingredients are needed depending on what taste is required. The innards which are added to the prepared dough might include various food toppings and cheese. Stepwise explanation of preparation is vital for making pizza dough up to the baking process. Therefore, a clear exposition on a pizzeria preparation procedure should begin with the dough-making process.
The fundamental step in pizza preparation is ensuring that one has mixtures required for it. To prepare the first mixture, a medium bowl is needed, and little olive oil is poured to it. Pour half a liter of warm water of about 120 degrees Celsius into the medium container, followed by six and twelve grams of yeast and sugar, respectively. In another larger dish, add six hundred and twelve grams of wheat flour and salt in that order and then mix. Consequently, you have two bowls of mixtures, a medium one containing warm water, yeast and sugar and the larger pot holding a mixture of salt and wheat flour.
Then, your objective as a pizza maker at this particular instance should be combining the two mixtures. In your large bowl containing the mixture of salt and wheat flour, make a well at the center of the blend using your fingertip. Gradually, pour the mix from the medium bowl into the well you have just made with your fingertip. Add 360 milliliters of olive oil to the combination in the large bowl. Using a kitchen fork to pull the drier parts of the mix to the wet concoction, combine thoroughly for five minutes. Finally, the blend is made in readiness to be kneaded by hands.
Next, you aim at ensuring that the blend results in a soft dough. The mixture you have at this particular time is uniformly mixed. Add little flour to a kitchen table where you intend to knead the mush using your hands for five minutes. In kneading, you should use the heel of your fists to push the concoction down and forward. Turn the paste around till it is a little tacky. The resulting preparation is now to be covered for some time.
As the dough has been well kneaded, preparations are made to cover it. Wash the large bowl which you had initially used in mixture preparation and dry it using a clean piece of cloth. Oil the bowl on the inner side with your olive oil. Put the kneaded mush into the dish and cover with plastic wrap on top of it. The paste should be left in a covered position for one to two hours, depending on the ambient temperatures and ingredient preparation methodologies. Eventually, you have made well-covered kneaded dough and given it time to rise and double its size due to the yeast applied.
At last, the dough is made, and it is checked after every twenty minutes, within two hours. Poke the mush using your hands, and if indentation is left, then that shows it is ready. Once this has been ascertained, use a kitchen knife to divide it. The larger the pieces cut, the bigger the pizzas, and the smaller the slices cut, the tinier the pizzas. Nonetheless, minuscule nubs sliced are more expedient to handle, especially for domestic purposes. At this point, shape the cut bits into balls for every single pizza. Envelope them with a moistened cloth and leave them for ten minutes. In examining whether the dough orbs are ready, you shall prod them to check for depression on them.
Lastly, pizzas are to be made from balls and baked. Clean the pizza pan before sprinkling it with semolina which is a ready-made powder through the process of wheat milling and usually stocked in retailer shops. The additive provides a chewy, crispy taste for the pizza to be made. In order to flatten the center of the dough, pull the ends of the dough using your hands. Continue adding more semolina for efficient preparation of the pizzas, making sure that thinness is uniform. As the unfurled dough is now flat, spread your favorite innards on its top part and place the pizza pan with its ingredients in a baking oven for five minutes for those five hundred degrees Fahrenheit -temperature ovens. The pizza will be ready, and you should serve it with any drink of your taste.
Pizza making is a stepwise procedure which is easily comprehensible. Two different mixture bowls are needed specifically for paste preparation. The mixtures are important because they are blended once again to make the paste. Later, orbs of dough are made from the mush by cutting it into required sizes. The balls are then spread uniformly in pizzeria pans, and such ingredients as minced meat, black olives, mushrooms, and pepperoni are added to the pizza before baking for five to ten minutes in an oven. Inarguably, pizza making is an elaborate procedure, but it is optional to add the ingredients, which are referred to as toppings.
- Chicago (A-D)
- Chicago (N-B)
IvyPanda. (2022, July 1). Teaching the Pizza Preparation Process. https://ivypanda.com/essays/teaching-the-pizza-preparation-process/
"Teaching the Pizza Preparation Process." IvyPanda , 1 July 2022, ivypanda.com/essays/teaching-the-pizza-preparation-process/.
IvyPanda . (2022) 'Teaching the Pizza Preparation Process'. 1 July.
IvyPanda . 2022. "Teaching the Pizza Preparation Process." July 1, 2022. https://ivypanda.com/essays/teaching-the-pizza-preparation-process/.
1. IvyPanda . "Teaching the Pizza Preparation Process." July 1, 2022. https://ivypanda.com/essays/teaching-the-pizza-preparation-process/.
Bibliography
IvyPanda . "Teaching the Pizza Preparation Process." July 1, 2022. https://ivypanda.com/essays/teaching-the-pizza-preparation-process/.
- The Bread Making Process: Main Steps
- Debate on Human Reproductive Cloning
- Baking From the Point of View of Chemistry
- Dough Pizza’s Business Case Study
- Tactical Plan of Opening New Outlet of Dough Pizza
- Rembrandt, a Master of Renaissance Painting
- Dough Pizza Company's Decline Phase Planning
- Dough Pizza Market Position
- Dough Pizza Company in the Food Truck Industry
- Dough Pizza Company's Product Feasibility Analysis
- Epistemology, Ontology, and Researcher Positionality
- The Process of Writing a Paper
- Netiquette: The Use and Importance of Emails
- Elements of a Good Essay
- Writing Dissertation: Personal Development Plan
How to write a process essay
 1")
- August 25, 2023
Process essays are one of the most common types of essays . It’s simply explaining a process of how to do something.
In this article, we’ll show you how to write a process essay in steps with interactive examples.
Process essay definition
Let’s take a look at the steps outlined below to write a clear and effective process essay.
Choose a topic
You should start by choosing a topic that not only interests you but also attracts your target audience.
Whether it’s brewing the perfect cup of coffee or conquering the art of origami, your topic should be engaging and well-defined. Let’s have a look at topic examples:
- Crafting Exquisite Miniature Bookbindings
- Building a Sustainable Vertical Garden
- Making the Perfect Cup of Coffee
So for this guide, I’ve chosen “Making the Perfect Cup of Coffee”. Now let’s continue with the next steps.
Create a process essay outline
Now that you’ve your topic at hand, it’s time to create an outline to present the steps chronologically. Outline will also help you organize your thoughts and ideas so you won’t get lost during the writing process.
Let’s examine this step with an example of a process essay explaining “Making the Perfect Cup of Coffee”.
Process essay outline example
- Thesis statement
- Provide safety precautions if necessary.
- Address to the reader
- Provide any variations or customization options if applicable.
- End with a memorable concluding thought or call to action.
By presenting the steps in chronological order, your readers can follow the process smoothly.
During this step, just make sure to:
- Expand on each step you outlined earlier.
- Use clear and concise language.
- Make use of bullet points or numbered lists to make the process visually appealing.
After completing the outline, it’s time to write an interesting introduction.
Write an introduction
- Hook the reader's interest with a hook sentence
- Offer a brief overview of the topic and its significance
- Introduce and explain the process with a thesis statement at the end of introduction
Process essay introduction example
Introduction
Now that we have an intro on our hand, you need to tell what materials you need to finish the process.
Write the materials needed for the process
Listing the necessary materials for the process is a best practice for process essays. Typically found just after the introduction, this paragraph is devoted to outlining the necessary materials.
Here, p rioritizing the list is important; the more influential a component is, the higher its position on the list should be.
Example material list for process essay
Body paragraphs
Materials needed
- High-quality coffee beans that align with your flavor preference.
- A grinder for optimal flavor extraction.
- Equipment for brewing methods, such as a pour-over apparatus, a drip coffee maker, a French press, or an espresso machine.
- Fresh and clean water for brewing.
- Optional additives like milk, cream, sugar, flavored syrups, or other preferred elements.
Start writing the process
Right after listing the materials needed, it’s time to start writing the process itself.
When describing your process, be careful not to make it too complicated. To keep your readers on track, use transitional words like “after,” “eventually,” “first,” “then,” and others help you maintain an understandable tone.
Or simply use a 1,2,3, bullet point structure as seen in example below to remind readers of their step during the process.
Body paragraphs - Process writing example
Materials needed ...
- Grind the beans just before brewing for optimal freshness. Use a burr grinder and adjust the coarseness to match your brewing method (coarse for French press, fine for espresso).
- Weigh your coffee grounds using a scale. A standard ratio is 1 to 2 tablespoons of coffee per 6 ounces of water, but adjust to your taste.
- Ensure the water is heated to the ideal temperature, typically between 195-205°F (90-96°C). Water that's too hot or too cold can affect the taste.
- Pay attention to the brewing time. Generally, 4-5 minutes is suitable for most methods, but again, adjust based on your preference.
- After finishing, regularly clean your coffee maker or French press to prevent rancid oils and residue from affecting your coffee's taste.
As seen from the example above, using an imperative language structure is generally preferable. It makes total sense as you’re describing a process in steps and usually don’t need a full sentence structure.
Give tips and supporting details
After explaining the process above, it’s now time to provide tips and supporting details. Here, make use examples, tips, and even warnings if necessary.
In other words, anticipate the questions your readers might have and address them as you go along.
Body paragraphs - Supporting details
Supporting details & tips
- Ensure safe handling of hot water and coffee-making equipment.
- Water that's too hot can result in over-extraction, while water that's too cold won't extract enough flavor.
Write a conclusion
At this step, you simply need to write a conclusion paragraph to end your process essay. First summarize the key points, and restate the process in a concise and short sentence. And finally, finish your process essay by a memorable sentence or a call-to-action.
Process essay conclusion example
Revise and polish your essay.
Now that you’ve written your essay, take a breath, and then come back for some editing. Check for consistency, correct sentence structure, efficient transitions , tense selection , and other linguistic issues that may arise.
If possible, make use of proofreading tools like QuillBot or Grammarly .
- Think about potential reader misunderstandings and address them. If needed, explain what should be avoided.
- Offer explanations for steps that might seem unusual or complicated.
- Define any unfamiliar terms or materials that the reader might not understand. This ensures clarity in your essay.
So you’ve successfully learned how to write a captivating process essay. Remember, practice makes perfect. The more you write, the better you’ll become.
 2")
Recently on Tamara Blog
How to write a discussion essay (with steps & examples), writing a great poetry essay (steps & examples), how to write a process essay (steps & examples), writing a common app essay (steps & examples), how to write a synthesis essay (steps & examples), how to write a horror story.
Master the Pizza Making Process Controlling these Powerful Pizza Elements
By: the PROs
August 3, 2023
Bakers Percentage , Pizza Making

Welcome to the wonderful world of the pizza making process, a tantalizing journey through the pizza elements. This age-old culinary craft turns simple ingredients into delicious symphonies, all happening right in your own kitchen.
Dive into the art and science of creating the perfect crust, simmering a rich sauce, and mastering the melty wonder of cheese, not forgetting those unique toppings that give each pizza its personality.
Whether you’re a first-time dough handler or an experienced home chef, there’s always a new secret to be discovered in the pizza making process.
So why wait?
Get ready to explore the elements of pizza making and create your mouthwatering masterpiece. Let’s delve into this delicious adventure.
Let’s get started!
Here’s What You Will Find:
Pizza is a simple word that immediately conjures images of golden crusts, vibrant sauce, melted cheese, and many toppings . A word that holds the power to bring a smile to your face, no matter where in the world you are. But beyond the ecstasy of tasting this universally adored dish lies an equally gratifying journey — the journey of the pizza making process.
The process of crafting a pizza is an enchanting dance of ‘pizza elements,’ where each component plays a unique role, creating a harmony of flavors and textures. The beauty of pizza lies not just in its taste but also in the artisanal craft of its creation, one that turns humble ingredients into a piece of edible art.
Every element matters, whether it’s the pillowy dough, the vibrant sauce, the creamy cheese, or the vibrant toppings.
Every choice you make affects the final masterpiece, and the options are endless. The pizza making process offers a playground for your culinary creativity, where you can experiment, learn, and ultimately savor the fruit of your labor.
Through the course of this post, we’ll delve deep into each of these ‘pizza elements,’ guiding you in mastering the art of pizza making right in your own kitchen. So tighten your apron and fire up the oven because we’re about to embark on a mouthwatering journey into the heart of pizza creation.
What is the Pizza Making Process?
The pizza making process is a culinary journey that involves creating a dough, which serves as the foundation, and crafting a sauce that adds a layer of flavor. This is topped with cheese for a creamy texture and other toppings for added taste and character.
The pizza is then baked at a high temperature for a crispy crust and bubbly, melted cheese. This process also involves carefully considering time, particularly for the fermentation and proofing of the dough and the baking duration, to ensure the pizza is cooked to perfection.
Pizza Making Process
Creating a pizza is not just about tossing some dough and spreading toppings. It’s a thoughtful, methodical process that can be broken down into several key steps. Understanding these steps is the first step towards mastering pizza making.
Step 1: Preparing the Dough
This is the foundation of your pizza and one of the most critical aspects of the pizza making process. Start by choosing the right ingredients, then combine flour, yeast , water, oil, salt, and sugar into a smooth and pliable dough. Once mixed, it needs to be kneaded until it’s elastic.
After kneading, the dough needs time to ferment and proof , allowing the yeast to work its magic and giving it a light, airy texture.
Step 2: Making the Sauce
While your dough is proofing, preparing your pizza sauce is the perfect time. Traditional pizza sauce is tomato-based and includes ingredients like garlic, oregano, and basil for a robust flavor. However, feel free to get creative and experiment with other types like white sauce, barbecue sauce, or even pesto.
Step 3: Prepping the Toppings
You can start prepping your toppings while your dough is proofing and your sauce is simmering. This could include grating cheese (usually mozzarella, but the cheese world is your oyster), slicing vegetables, cooking any meat, or even prepping more unconventional toppings like fruit or eggs.
Step 4: Assembling the Pizza
Once your dough has properly risen, it’s time for assembly. Start by stretching your dough into the desired shape, then spread your sauce, sprinkle your cheese, and add your chosen toppings.
Step 5: Baking the Pizza
The pizza is now ready to go into the preheated oven. The ideal temperature and baking time depend on your specific dough and the thickness of your pizza. However, a good starting point is a very hot oven—around 475 to 500 degrees Fahrenheit for about 10-15 minutes.
Step 6: Slicing and Serving
After your pizza comes out of the oven, give it a couple of minutes to cool down before you slice it. This waiting period allows the cheese to set slightly, making the slicing process easier and the pizza easier to handle.
Now that you have a bird’s eye view of the pizza making process, let’s delve deeper into each element, starting with the base of any great pizza—the dough.
Elements of Pizza
Embarking on a pizza-making process isn’t just about blending ingredients and popping them in the oven. It’s about understanding and appreciating each component’s unique role, collectively forming what we refer to as the ‘pizza elements.’
From the dough that forms the foundation to the sauce that imparts a burst of flavor, the cheese that adds a layer of creamy texture, and the toppings that provide character, each element is crucial to your pizza’s final masterpiece.
Let’s delve deeper into these vital components, to better understand their roles and learn how to perfect them.
The pizza dough serves as the canvas for your edible masterpiece. It’s a vessel for the sauce and toppings and a critical player in your pizza’s overall flavor and texture.
- Types of Pizza Dough: There are several types of pizza dough to choose from, each contributing to a unique pizza experience. From thin and crispy Neapolitan-style dough to the thicker and chewier New York-style, and even the deep, focaccia-like crust of the Sicilian pizza, your choice of dough sets the tone for your pizza. Gluten-free options are also available for those with dietary restrictions.
- Making Pizza Dough from Scratch: Creating your pizza dough is a simple process involving mixing flour, yeast, water, and a touch of salt and sugar. The magic happens when the yeast ferments, converting the sugars in the dough into carbon dioxide, which raises the dough. The process of kneading the dough helps develop the gluten strands in the flour, making the dough elastic and giving your pizza crust its structure.
- Proper Dough Fermentation and Proofing: After the dough is made, it needs to rest and proof. This period allows the yeast to continue fermenting, developing complex flavors in the dough, and causing it to rise. The longer the dough ferments, the more flavor it will have. A good rule of thumb is to let your dough proof at room temperature for at least 1-2 hours or in the fridge for up to 24 hours for a deeper flavor.
The sauce is the first layer of flavor that interacts with your palate when biting into a pizza. It should complement the dough and balance the flavors of your toppings.
- Traditional Tomato Sauce: A classic tomato-based pizza sauce is a simple blend of ripe tomatoes, garlic, olive oil, salt, sugar, and herbs like basil and oregano. It’s important to cook this mixture into a concentrated sauce, allowing the flavors to meld together and the excess moisture to evaporate.
- Alternative Pizza Sauces: While the tomato sauce is traditional, you can experiment with other varieties. Alfredo, pesto, or even a simple olive oil and garlic base can uniquely flavor your pizza. Your choice of sauce should harmonize with your chosen toppings.
The right cheese can take your pizza from good to great, offering a creamy, salty element that holds all the other toppings in place.
- Commonly Used Cheeses in Pizza: Mozzarella is the most common choice due to its mild flavor and excellent melting properties. However, other cheeses like provolone, cheddar, gouda, or even a sprinkle of parmesan can add depth to your pizza’s flavor profile.
- Applying Cheese: When applying cheese, less is more. Too much cheese can make your pizza greasy and overpower the other flavors. It’s also important to evenly distribute the cheese to ensure every slice gets an equal share.
Toppings are a great way to customize your pizza and add color, texture, and additional flavors.
- Traditional Pizza Toppings: This includes ingredients like pepperoni , bell peppers, mushrooms, onions, olives, and anchovies. These toppings have been time-tested and are popular for a reason—they complement the pizza’s base elements well.
- Creative and Unusual Pizza Toppings: Don’t be afraid to experiment with less traditional toppings like pineapple, figs, smoked salmon, capers, or even eggs. Different and unexpected toppings can make your homemade pizza truly unique.
Temperature
The temperature at which you bake your pizza is crucial to achieving the desired texture and coloration.
- Ideal Baking Temperature: Pizza is best baked in a very hot oven. Traditional wood-fired pizza ovens can reach temperatures over 900°F, but in a home setting, set your oven to the highest temperature it allows—typically between 475-500°F. High heat ensures a crisp, well-browned crust and bubbling caramelized cheese.
- Preheating the Oven: Preheating your oven before baking is essential. This allows the oven to reach a consistent temperature throughout, resulting in even baking. If you’re using a pizza stone or steel, preheat it in the oven for at least an hour. The stone absorbs the heat and then transfers it evenly to the pizza, helping to achieve a crispy crust .
Time plays a significant role in various pizza-making stages, affecting the preparation and baking process.
- Fermentation and Proofing Time: As discussed earlier, once you’ve prepared the dough, it needs time to rest, ferment, and proof. This period allows the yeast to create gases, causing the dough to rise and develop flavor. Depending on your schedule and flavor preferences, the dough can be proofed at room temperature for a shorter period (1-2 hours) or in the fridge for a longer slow fermentation (up to 24 hours).
- Baking Time: The exact baking time for your pizza depends on a few factors, including the thickness of your crust, the heat of your oven, and the type and amount of toppings. However, at a high heat of around 475-500°F, most pizzas will be perfectly baked within 10-15 minutes. Keep a close eye on the pizza to avoid burning it. The crust should be golden, and the cheese should be melted and slightly browned.
Now that we understand each pizza element better let’s move on to assembling and baking your pizza.
When you learn how to master these elements combined, you will achieve the maximum level of pizza proficiency, resulting in every pizza maker’s most desired skill, and that is consistency.
Choosing the Right Ingredients
Before we begin assembling our pizza, we must emphasize the importance of selecting quality ingredients. The flavor of your pizza is largely determined by the components you choose, so opt for the freshest and highest quality ingredients whenever possible. Fresh vegetables, high-quality cheeses, and premium meats can elevate your pizza from good to extraordinary.
Choosing the right ingredients is a crucial part of the pizza making process, as it directly impacts the taste and quality of your pizza. The core elements of a pizza — the dough, sauce, cheese, and toppings — all deserve careful consideration.
- Dough: The choice of flour is vital when making your dough. As mentioned earlier, bread flour is often favored due to its higher protein content, leading to better gluten formation and a chewier crust. However, all-purpose flour can also be used if bread flour is not available. Additionally, yeast is needed for the dough to rise; active dry yeast is a common choice, but instant yeast can also be used.
- Sauce: The most common type of pizza sauce is tomato-based, typically made from high-quality canned crushed tomatoes or tomato puree, garlic, a dash of salt, and various herbs such as oregano and basil. You could choose a white sauce (bechamel), pesto, or barbecue sauce if you prefer a different flavor profile. Homemade sauces often have a fresher taste, but some excellent store-bought options are also available.
- Cheese: Mozzarella is the gold standard for pizza cheese due to its excellent melting properties and subtle, milky flavor that complements other ingredients. For an authentic Italian-style pizza, you might use fresh mozzarella. Other cheeses like cheddar, gorgonzola, or fontina can also be used either in combination with mozzarella or on their own, depending on the flavor profile you’re aiming for.
- Toppings: The choice of toppings can vary immensely based on personal preference. Traditional Italian pizzas often feature simple, high-quality toppings like fresh basil leaves, tomatoes, and prosciutto. Other popular toppings include various vegetables (like bell peppers, onions, mushrooms, and olives), meats (like sausage, pepperoni, and chicken), and even fruits like pineapple. Fresh ingredients generally provide the best flavor.
- Olive Oil: A good quality extra virgin olive oil is often used in both the pizza dough and as a finishing drizzle on the baked pizza. Its rich flavor complements the other ingredients and contributes to the overall taste of the pizza.
- Herbs and Spices: Herbs and spices can elevate the flavor of your pizza. Dried oregano and fresh basil leaves are classic choices. Crushed red pepper flakes can provide a bit of heat, and freshly ground black pepper can add a touch of spice.
Choosing high-quality ingredients that work well together is key to making a delicious pizza. While these are some common choices, feel free to experiment with different ingredients based on your taste preferences. The beauty of homemade pizza is that you can customize it exactly to your liking.
Making the Dough
Making the dough is arguably the most important part of the pizza-making process. It’s the foundation of your pizza and will greatly affect the overall taste and texture of the final product. Let’s expand upon this crucial step:
- Choosing the Right Flour: The type of flour you use can significantly impact your dough. Bread flour is commonly used for pizza dough due to its higher protein content, leading to more gluten formation and a chewier crust. However, all-purpose flour can also work if bread flour is not available.
- Hydration: The amount of water you use to hydrate your flour also plays a critical role in your dough. This is often expressed as a percentage of the weight of the flour. Most pizza dough recipes will have a hydration level of around 60-70%. More water can make a more sticky dough and harder to handle, but it can also produce a lighter, airier crust.
- Mixing and Kneading: After combining your flour, water, yeast, and salt, it’s time to mix and knead. This process develops the gluten in the flour, creating a strong network of proteins that gives the dough its structure and allows it to stretch without breaking. You’re looking for a smooth, elastic dough that’s slightly tacky but not too sticky.
- Fermentation and Proofing: Once your dough is kneaded, it needs time to rest and ferment. During this process, the yeast consumes the sugars in the flour, producing carbon dioxide gas and alcohol. The gluten network traps the gas, causing the dough to rise. The alcohol and other byproducts of the yeast add flavor to the dough. After the initial rise, the dough is divided and shaped into balls, then allowed to proof until it has doubled in size . This can take anywhere from 1-2 hours at room temperature for a quick proof up to 24-48 hours in the refrigerator for a slow, cold ferment, which can develop more complex flavors.
- Shaping: Shaping your pizza dough into a disc is a skill that takes a little practice. The goal is to stretch the dough into a thin layer without tearing it or pushing out all the gas bubbles that have formed during fermentation and proofing. This often involves a combination of pressing, stretching, and rotating the dough by hand. Some people even toss the dough in the air, but that’s more for show than anything else.
- Resting Before Baking: After shaping, it’s a good idea to let your dough rest for a few minutes before adding your toppings. This allows the gluten to relax, making the dough easier to work with and helping it maintain its shape during baking.
As you can see, making the dough involves several stages and various factors contributing to your pizza crust’s final texture and flavor. By understanding these factors and how they interact, you can begin to master the art of pizza dough.
Assembling the Pizza
- The Base: Start by placing your shaped dough on a pizza peel or an inverted baking sheet dusted with flour or cornmeal. This makes it easier to transfer the pizza into the oven later.
- Sauce: Spread a thin layer of your chosen sauce over the dough, leaving the edges clear for the crust. Remember, less is more when it comes to sauce. Too much can make your crust soggy.
- Cheese: Sprinkle your cheese evenly over the sauce. This helps create a barrier that prevents the other toppings from making the crust soggy. Again, moderation is key to avoiding an overly greasy pizza.
- Toppings: Now for the fun part. Add your selected toppings, but be careful not to overload the pizza. Too many toppings can weigh down the crust and extend the baking time.
Did you Know?
Did you know the soul of the pizza-making process is the pizza maker and not the ingredients?
Get Ready to Become a Homemade Pizza PRO!
Baking the Pizza
Once your pizza is fully assembled, it’s time for the final and perhaps most transformative stage – baking.
- Preheating the Oven: Before you start assembling your pizza, make sure to preheat your oven to the highest temperature it can go, usually between 475-500°F. If you’re using a pizza stone or steel, place it in the oven during preheating. These tools absorb heat and will help achieve a crispy, restaurant-style crust at home.
- Transferring the Pizza: If you’ve assembled your pizza on a peel or an inverted baking sheet, you can slide it directly onto your preheated pizza stone or onto a baking sheet in the oven. Be quick and careful with this transfer to maintain the shape of your pizza and prevent any toppings from shifting.
- Baking Time: The time your pizza needs to bake will depend on the thickness of your crust, the temperature of your oven, and the quantity and type of your toppings. However, at a high heat of around 475-500°F, most pizzas will be ready within 10-15 minutes. You’ll know your pizza is done when the crust is golden brown, and the cheese is melted and slightly caramelized.
- Rotating the Pizza: If you notice that one side of the pizza is cooking faster than the other, you might need to rotate the pizza halfway through the baking time to ensure even cooking. This is especially important if your oven has hot spots.
Once your pizza is beautifully baked, resist the urge to slice it immediately. Let it rest for a few minutes to allow the cheese to set, making it easier to slice and eat. Now, all that’s left is to enjoy the fruits of your labor, a perfectly baked homemade pizza.

The element of time plays a vital role in several stages of the pizza-making process, impacting both the preparation and the final result in terms of flavor, texture, and overall quality. Let’s delve deeper into the significance of time in various aspects of pizza making.
- Time in Dough Preparation: The process of making the pizza dough includes two significant periods where time is key: fermentation and proofing. Fermentation is the process where yeast consumes the sugars in the dough and produces carbon dioxide gas, leading to the dough’s rise. This step also helps develop complex flavors in the dough. Proofing is the rest period after the dough has been formed and before it’s shaped and baked. The yeast continues to ferment during proofing, further developing the dough’s flavor and texture. Depending on your flavor preferences and schedule, the dough can be proofed at room temperature for a shorter period (1-2 hours) or in the fridge for a slower fermentation process (up to 24 hours).
- Time in Baking: Time is an essential factor in baking the pizza. The precise baking duration depends on various aspects, including the thickness of your pizza crust, the heat of your oven, and the type and amount of toppings you’ve chosen. However, generally speaking, most pizzas baked in a home oven preheated to the highest temperature (usually between 475-500°F) will be perfectly cooked within 10-15 minutes. The goal is to achieve a golden-brown crust and melted slightly caramelized cheese.
- Resting Time: Once the pizza is out of the oven, give it some time to rest before slicing it. This allows the cheese to set slightly, making the pizza easier to handle and the slicing process smoother. It also gives the flavors time to meld together, which can enhance the overall taste of your pizza.
Time is a critical element in pizza making, contributing significantly to the development of flavor, the creation of the perfect crust, and the final presentation and taste of your homemade pizza. Understanding and managing the element of time in pizza making can help ensure that your pizzas are always delicious and satisfying.
The element of temperature is another key player in the pizza-making process, influencing both the preparation and baking stages. Understanding its importance can distinguish between an average pizza and a great one. Let’s explore this in more detail:
- Temperature in Dough Preparation: The temperature of the water used to activate the yeast is crucial when preparing the pizza dough . The water should ideally be warm, around 105-110°F. Water that is too hot can kill the yeast, while water that is too cool may not properly activate it. The room temperature can also affect the dough’s fermentation and proofing stages. Warmer temperatures can speed up these processes, while cooler temperatures slow them down, potentially impacting the flavor and texture of your dough.
- Temperature in Baking: Baking temperature significantly impacts how your pizza turns out. Pizza is traditionally baked at very high temperatures. In wood-fired ovens, this can be as high as 900°F. However, the highest setting in a typical home oven is usually around 475-500°F. Baking pizza at a high temperature ensures a well-browned, crispy crust and beautifully melted, slightly caramelized cheese. It also helps to preserve the freshness and flavor of the toppings.
- Preheating the Oven: Preheating your oven before baking the pizza is vital. This ensures a consistent, high temperature throughout, which results in even baking. If you’re using a pizza stone or steel, it should be placed in the oven during preheating. These tools absorb heat and help achieve a perfectly crisp crust by evenly transferring that heat to the pizza.
- Temperature of the Toppings: The temperature of your toppings can also affect the final result. Toppings that are too cold may not cook properly in the time it takes for the pizza to bake. Therefore, it’s usually a good idea to bring ingredients like cheese and meats to room temperature before placing them on your pizza.
Maintaining and managing the correct temperatures at all stages of pizza-making is crucial for achieving the best possible result. From the preparation of your dough and the baking process to the final quality and taste of your pizza, the temperature is an element that requires careful consideration.
Finishing Touches
Even after your pizza comes out of the oven, you can take a few additional steps to enhance its flavor and appearance. These finishing touches can turn your homemade pizza into a truly gourmet experience.
- Resting: Before you slice your pizza, let it rest for a few minutes. This allows the cheese to be set and makes it easier to cut and serve.
- Fresh Herbs: Sprinkle fresh herbs, such as basil or oregano, over your hot pizza. The heat will release the herbs’ aromatic oils, adding a burst of freshness to your pizza.
- Extra Virgin Olive Oil: A drizzle of good quality extra virgin olive oil over the finished pizza can add a layer of richness and depth of flavor.
- Freshly Grated Parmesan: A sprinkle of freshly grated Parmesan cheese can enhance the flavor profile of your pizza, adding a nutty, slightly salty element that complements many traditional pizza toppings.
- Chili Flakes or Hot Sauce: If you like a bit of heat, add some chili flakes or a dash of your favorite hot sauce.
Cleaning Up
One less glamorous yet essential part of the pizza-making process is cleaning up after your culinary creation is complete. However, it doesn’t have to be a chore. Here are a few tips to help streamline the process.
- Clean as You Go: Try to clean utensils and bowls as you finish with them. It makes the task less daunting than facing a mountain of dirty dishes at the end.
- Scrape the Dough: If you have bits of dough stuck to your work surface, use a dough scraper to remove them easily. You can also sprinkle some flour over the stuck-on dough to help lift it.
- Caring for Your Pizza Stone: Remember never to wash it with soap if you use a pizza stone. The stone is porous and will absorb the soap, affecting the taste of your future pizzas. Simply scrape off any stuck-on food with a brush or plastic scraper, and let the stone dry completely before storing it.
With these steps, the process of creating homemade pizza is complete, from crafting the dough to savoring the final product and cleaning up afterward. By understanding the pizza-making process and each of the pizza elements in depth, you’re well on your way to creating your own gourmet pizza at home. Enjoy the journey!
The Last Slice
Pizza-making is an art form, a culinary journey combining creativity and science. By understanding each step of the pizza making process and the unique role of each pizza element, you can transform simple ingredients into a gastronomic masterpiece.
Every aspect contributes to the final result, from choosing the right ingredients, mastering the dough, and fine-tuning the temperature and time to applying those finishing touches. The journey may seem detailed, but remember, the beauty of pizza is in its versatility and the freedom it allows for personal expression.
So, whether you’re a seasoned home cook or a novice in the kitchen, embrace the process, experiment with flavors, and, most importantly, enjoy the delicious fruits of your labor. With the right knowledge, tools, and a dash of passion, you’re well-equipped to bring the art of gourmet pizza making into your own kitchen.
Happy pizza making!
Additional Resources

Baker’s Percentage Charts for Pizza Dough: Unlock the Secret Formula for Perfect Pizzas Every Time!
December 15, 2023
This baker’s percentage chart will give you a starting point to develop your own recipe. These are the four main base recipes that can be adapted to any other pizza style.

Bakers Percentage Calculator for Pizza Dough: Is as Easy as 123
July 26, 2023
This Baker’s Percentage Calculator will allow you to you calculate the baker’s percentage for any given pizza recipe in a few seconds.

Baker’s Percentage for Pizza: Mastering the Science of Pizza Dough
In this article, we are going to uncover the math behind making great pizza at home. At first, it will appear a little intimidating, but don’t worry. Let us do the numbers; the only thing you need is your imagination!
Check Amazon’s Pizza-Making Must-Haves

Why have two pizza peels when you can only have one. This pizza peel surpasses the benefits of wood peels with the convenience of a metal peel. It's made entirely from anodized aluminum for a lightweight design that's incredibly durable, too. It's designed to be used frequently in high-heat pizza ovens.

The Etekcity Lasergrip 800 Digital Infrared Thermometer is a versatile and reliable tool for accurate temperature measurements. Its non-contact design allows you to measure temperatures from a distance, making it safe and hygienic for various applications. With a wide temperature range of -58°F to 1382°F (-50°C to 750°C), this infrared thermometer is perfect for both everyday cooking needs and professional uses.
The built-in laser pointer helps you target the specific area you want to measure, ensuring precision and consistency. Whether you're grilling, cooking, or performing household maintenance, the Etekcity Lasergrip 800 provides fast and accurate temperature readings with ease.

Making great crusts traditionally requires a 700-1000F wood-fired oven. Nerdchef Steel Stone replicates that performance in a home oven with its super-high heat transfer ability - transferring heat energy 20 times faster than ceramic. It creates beautiful and crispier crusts, gorgeous blistering throughout, and it cooks faster.

The Chef's flour is a general-purpose, high gluten flour that works well for many recipes. "Tipo 00" refers to how refined the flour is. Chef's Flour is best for those who want to bake in their traditional home oven up to 500 degrees Fahrenheit!
Not a PRO? Not a Problem!
Take a pizza class to bring your pizza skills to the next level,
so you can be a PRO!
Related Posts

Best Grill for Pizza in 2024
March 7, 2024
Best Grill for Pizza Picture this: a warm summer evening, the sun casting a golden glow as it sets, the …

How to Cook Pizza in Air Fryer in 3 Easy Steps for the Perfect Crust!
March 6, 2024
Do you want to learn how to cook pizza in an air fryer? Thanks to this fantastic hack for an …

What is Uncured Pepperoni? Demystifying the Differences and Unveiling the Flavor Secret Behind Your Favorite Pizza!
Editor’s Note: This article received its latest update on March 6, 2024, ensuring you have access to the most current …
Subscribe to our Recipe of the Week newsletter and receive our partners’ latest recipes, tips, and discount offers.
Keep in Touch!
[email protected]
Leave a comment cancel reply.
Save my name, email, and website in this browser for the next time I comment.
This site uses Akismet to reduce spam. Learn how your comment data is processed .
How to Make Pizza at Home
An easy homemade pizza recipe from our test kitchen with tips to make it your own.

We've been independently researching and testing products for over 120 years. If you buy through our links, we may earn a commission. Learn more about our review process.
Ingredients
Cornmeal for baking sheet
Flour for surface
pizza dough (thawed, if frozen)
marinara sauce
mozzarella cheese, coarsely grated
grated parmesan
Basil, for sprinkling
- Step 2 On a lightly floured surface, shape pizza dough into a 14- to 16-in oval or circle and place on prepared sheet (make sure that the dough slides easily around the sheet, if not, add a bit more cornmeal).
- Step 3 Spread sauce on dough, leaving a ½-in boarder all the way around and sprinkle with mozzarella and then Parmesan. If using a stone, slide the pizza off the sheet onto the stone. Bake until crust is golden brown, 10 to 12 minutes. Sprinkle with basil just before serving, if desired.
Five Steps for Delicious Pizza at Home:
1. start with a solid pizza dough recipe..
To quote Ina Garten, “store-bought is fine,” but making pizza dough from scratch allows you to control the ingredients and ultimately the results. A lot of recipes call for “00” flour, but remember that “00” only refers to the fine grind of the flour, not a high protein content, which is often insinuated by pizza dough recipes. A finer grind requires less hydration than a typical all-purpose grind, which creates a less chewy dough, while a higher protein percentage provides more structure.
When we chatted with Laura Meyer, Administrator and Instructor at the International School of Pizza and one of the presenters on Breville’s “ Meet the Makers: A Virtual Pizza Tour ,” and she shared that most pizzerias use a blend of flours, which contribute to a unique texture and taste. When shopping for flour, she recommends purchasing from smaller mills that offer more variety, including curated pizza dough mixes, like this one from Central Milling .
2. Make the dough.
Pizza dough can be made by hand, in a food processor , or in a stand mixer . When making a pizza dough by hand , it’s best to start by using a wooden spoon to stir together the liquid ingredients (including proofed yeast) in a large bowl with half of the dry ingredients. From there, add the remaining dry ingredients little by little, until the dough starts to form a shaggy ball and has difficulty incorporating more dry ingredients. Once the ball is firm, transfer to a floured surface and use your hands to knead until it is smooth and springs back when touched.
To make pizza dough in a food processor , add the dry ingredients to the bowl first. Pulse a few times to stir. Then, with the motor running, use the feed tube to slowly add in the liquid ingredients until the dough forms a ball and rotates around the bowl without sticking to the sides. Process for about 30 seconds.
To make pizza dough in a stand mixer , add the liquid ingredients to the bowl first and, while the mixer is running on low, add in the dry ingredients, little by little, until the dough forms a ball and doesn't stick to the sides. Increase the speed to medium-low and allow to knead for about 5 to 6 minutes, adding in more dry ingredients as necessary. The beater or dough hook may be used.
3. Proof the dough.
Once the dough is kneaded, transfer to a large bowl and cover with plastic wrap and/or several dish towels so it can proof. As the dough proofs, it will form air bubbles, which increase the size of the dough, and develop flavor. Proofing can take place in a warm area where it will bulk up quickly, or even in the fridge over a couple of days. (If proofing in the fridge, cover loosely with plastic wrap to avoid condensation from forming.) The longer you proof dough, the more flavorful it will become; take care not to overproof because it can become sour. A general rule of thumb is to proof it until it doubles in bulk.
After the dough has proofed, divide into individual balls that can be stretched just before cooking.
4. Prepare the sauce and toppings.
Different styles of pizza use different types of sauce. Since the sauce cooks in the oven, there’s no need to cook it beforehand unless you’re looking for an extra deep tomato flavor. For a Neapolitan style, try whole canned tomatoes that you break up with your hands, or for New York style, try crushed tomatoes seasoned with dried Italian seasoning.
When adding the sauce to the dough, add less than you think you'll need and use the bottom of a ladle to even it out as much as possible. Pools of sauce slow down the cooking process and cause wet spots.
Almost anything can be used as pizza topping, but keep in mind that you want to try to balance the flavors as much as possible. If you like a lot of sauce and it’s very flavorful, stick to simple flavors that won’t compete, like cheese and simply seasoned vegetables. If you have toppings you want to show off, like a creamy burrata or a special meat like prosciutto, let those ingredients be the star by using a scant amount of sauce or other overpowering additions.
Toppings can be added to pizza raw or cooked, before or after cooking the pizza. When deciding how to use, think of the flavors you want to achieve; cooking them before will create deeper flavors, while cooking them during will create more simple ones. Pre-cooking meat, like sausage, on the other hand, will make it drier, while cooking it on the pizza will make it more tender and juicy.
5. Shape the dough.
When ready to form the pizza, Anthony Falco, International Pizza Consultant and the first instructor on Breville’s “Meet the Makers: A Virtual Pizza Series, ” recommends doing so on a wooden peel that can be used to transfer the pizza to the oven. Flour the peel generously and often to make sure the dough doesn’t stick. All purpose flour can be used, or some people like semolina or cornmeal; both are granular and don’t clump.
To shape the dough, Meyer recommends using your hands versus a rolling pin, which can deflate the dough and make it less airy. Push it down in the middle first, and then form the crust a little so it can stay intact while the rest of the dough is shaped. When done, Falco uses his fingertips to dimple the center, which he says leaves air in there and is also good for toppings.
6. Bake the pizza.
Now, for the fun part. Pizza can be baked many ways: in the oven, in a toaster oven, in a skillet and then finished under the broiler, in a sheet pan, or on a grill. To bake pizza in an oven, Meyer highly recommends a baking steel, which retains heat even better than a baking stone. She also recommends investing in two, particularly if you plan on making more than one pizza at a time. To use, position the baking steel or stone on the top rack of your oven (instead of the bottom, which is often recommended!) while your oven heats up to 500ºF or the highest temperature. If you don’t have a baking steel or stone, you may also use a sheet pan flipped upside down.
When heated, use a wooden or perforated peel to transfer the pizza to the baking steel or stone on the upper rack. Monitor it until the cheese is melted, the crust is browned and the bottom is fully cooked. The pizza may be transferred to the middle rack toward the end of cooking to finish.
- Toaster ovens are a great option to make pizza because they get very hot in a short amount of time. Many are big enough to fit a 12-inch pie and can be used with a stone. Use the highest temperature on convection mode and the bottom rack.
- Cast iron skillets are a popular way to make pizza. They can be used to start the cooking process on the stovetop for a very crispy bottom, or completely in the oven for a saucy, deep dish. When using a cast iron, apply a generous amount of oil to the bottom of the pan, and stretch your dough directly in the pan. Top with ingredients, and either heat over medium high until the crust forms and finish in a hot oven, like this method, or under a broiler, or transfer skillet with uncooked pizza to the middle rack of a preheated oven until fully cooked.
- Sheet pans may also be used to make Grandma or Sicilian style pizza. Just like when using a cast iron skillet, generously coat the bottom of the pan with oil before spreading out the dough. Bake on the bottom rack of a very hot oven until browned and crispy.
- To make pizza on a grill, heat until the temperature reaches about 700ºF. Shape the dough, brush one side with oil and cook, oil-side down, over medium-high with the lid closed until firm. Add more oil to the top, flip and then add the toppings. Reduce the heat to medium, close the lid, and cook until the cheese is melted and bottom is golden brown.
7. Cool the pizza.
Once your pizza is cooked, Falco recommends using a metal pizza peel to remove it from the oven. He also suggests transferring it to a wired rack before serving, where it can stay crisp and not soak up any possible condensation.
At Home Pizza-Making Must Haves

Epicurean Pizza Peel
This pizza peel is large enough to build a 12-inch pizza on and can be used to transfer pizza in and out of the oven. It's sturdy, yet lightweight with a reversible beveled edge to get under cooked pizza. It can also be used for cutting on and serving.

Cuisinart 3-Piece Pizza Grilling Set
A flexible metal pizza peel makes for easy pizza retrieval; plus, this one has a folding handle for storage. The included pizza cutter and pizza stone, which can be used in the oven or on the grill, feel like a bonus.

Baking Steel The Original Baking Steel
Baking steels get even hotter than pizza stones, which better replicate brick-oven results; their rectangular shape allows for more heating and cooking area.

Lodge Cast Iron Skillet
Cast iron skillets get hot and stay hot without the use of pizza stones or steels. Top with extra sauce for a deep dish, or as you normally would for a more personal pan take.
@media(max-width: 64rem){.css-o9j0dn:before{margin-bottom:0.5rem;margin-right:0.625rem;color:#ffffff;width:1.25rem;bottom:-0.2rem;height:1.25rem;content:'_';display:inline-block;position:relative;line-height:1;background-repeat:no-repeat;}.loaded .css-o9j0dn:before{background-image:url(/_assets/design-tokens/goodhousekeeping/static/images/Clover.5c7a1a0.svg);}}@media(min-width: 48rem){.loaded .css-o9j0dn:before{background-image:url(/_assets/design-tokens/goodhousekeeping/static/images/Clover.5c7a1a0.svg);}} Cooking Tips

How Long Do Hard-Boiled Eggs Last?

How to Cook Rice in a Rice Cooker

What Is Confectioners' Sugar?

Please Do Not Wash Your Thanksgiving Turkey

Our Best Tips on How to Season a Turkey

The Most Delicious Charcuterie Board Ideas

What Is Sushi Grade Fish?

Here's Exactly How to Freeze Soup

How to Cook Bacon in the Oven

How to Use a Pizza Stone

Here’s How to Cut an Onion Perfectly Every Time
Steps In A Process: How To Make A Pizza
Students will construct their own pizzas (or pizza shop menus). Students will identify the steps in the process of making a pizza Students will write about how to make a pizza with complete sentences and supporting details that allow the reader to envision the pizza being made
DOWNLOAD LESSON PLANS
Steps in a process making a pizza – w.2.3 w.2.5.
F.I.T. Family books to read at home with parents and younger siblings
Secret Pizza Party by Adam Rubin and Daniel Salmieri The Little Red Hen (Makes a Pizza) by Philemon Sturges The Little Red Hen by Jerry Pinkney Tops & Bottoms by Janet Stevens E-I-E-I-O: How Old MacDonald Got His Farm by Judy Sierra Secrets of the Garden by Kathleen W. Zoehfeld Maisy Grows a Garden by Lucy Cousins I Will Not Ever Eat a Tomato by Lauren Child Diary of a Worm by Doreen Cronin The Tale of Peter Rabbit by Beatrix Potter
WEBSITE LINKS
- Smithsonian Institute’s How Does Pizza Grow?
- Sustainable Food Laboratory
- School Garden Checklist by Let’s Move!
- Harvest Calendar for Rhode Island
- The Edible Schoolyard Project
- Wholesome Wave
- What is Soil? from Soil4Kids
- Engineering is Elementary’s Designing Plant Packages
- Printable Maps from National Geographic
- Cooking Light’s How to Make Pizza Dough
- IRA/NCTE Read Write Think
BOOKS AND ARTICLES
Pizza, Grains, Cheese and Tomatoes
Butterworth, C. (2011). How Did that Get in my Lunchbox? The Story of Food. Somerville, MA: Candlewick Press.
Child, L. (2000). I Will Never Not Ever Eat a Tomato. Somerville, MA: Candlewick Press.
De Laurentiis, Giada. (2013). Recipes for Adventure: Naples! New York: Grosset & Dunlap.
Eamer, C. (2012). The World in Your Lunchbox: The Wacky History and Weird Science of Everyday Foods. Toronto, Ontario: Annick Press.
Integrated Marketing Services.(2012). Fresh Produce Guide: 300(+) Fruits, Vegetables and Herbs . Apopka, FL: Integrated Marketing Services.
Keller, L. (2003). Arnie, the Doughnut (Adventures of Arnie the Doughnut) . New York: Henry Holt and Co.
Pinkney, J. (2006). The Little Red Hen. New York: Dial Books for Young Readers.
Rubin, A. and Salmieri, D. (2013). Secret Pizza Party! New York: Dial Books for Young Readers.
Sturges, P. (1999). The Little Red Hen (Makes a Pizza). New York: Puffin Books.
Taus-Bolstad, S. (2013). From Wheat to Bread. Minneapolis, MN: Lerner Publishing Group, Inc.
Creasy, R. (1994). Blue Potatoes, Orange Tomatoes. San Francisco, CA: Sierra Club Books for Children.
Hardesty, C. (2000). Grow Your Own Pizza: Gardening Plans and Recipes for Kids. Golden, CO: Fulcrum Publishing.
Sierra, J. (2014). E-I-E-I-O: How Old MacDonald Got His Farm. Somerville, MA: Candlewick Press.
Stevens, J. (1995). Tops & Bottoms. New York: Houghton Mifflin Harcourt Publishing Company.
Zoehfeld, K.W., (2012). Secrets of the Garden: Food Chains and the Food Web in Our Backyard. New York: Alfred A. Knopf.
Bial, R. (2000). A Handful of Dirt . New York: Walker Publishing Company, Inc.
Kudlinski, K. (2005). What Do Roots Do? Minnetonka, MN: Northwood Books for Young Readers.
NSTA Press. (2001). Dig In! Hands-On Soil Investigations . Arlington, VA: National Science Teachers Association Press.
Schreiber, A. (1994). Log Hotel . New York: Scholastic Trade.
Silver, D. (1993). One Small Square: Backyard. New York: W.H. Freeman and Company.
Tomecek, S. (2002). Dirt. Washington, D.C.: National Geographic Society.
Cronin, D. (2003). Diary of a Worm. New York: Joanna Cotler Books.
French, V. (2009). Yucky Worms. Somerville, MA: Candlewick Press.
Holmes, K. (1999). Earthworms. Mankato, MN: Bridgestone Books.
Kalman, B. (2004). The Life Cycle of an Earthworm. New York: Crabtree Publishing Company.
Llewellyn, C., Watts, B. (2000). Earthworms . London: Franklin Watts.
Loewen, N. (2006). Garden Wigglers: Earthworms in Your Backyard. North Mankato, MN: Picture Window Books.
Pfeffer, W. (2004). Wiggling Worms at Work. New York: HarperCollins Children’s Books.
Ross, M.E., (1996). Wormology. Minneapolis, MN: Carolrhoda Books.
Sunlight and Water
Bang, M., Chisholm, P. (2009). Living Sunlight: How Plants Bring the Earth to Life. New York: The Blue Sky Press.
Strauss, R. (2007). One Well: The Story of Water on Earth. Tonawanda, NY: Kids Can Press Ltd.
Kingsolver, B. (2007). Animal, Vegetable, Miracle: A Year of Food Life . New York: Harper Perennial.
Lehr, S. (1991). The Child’s Sense of Developing Theme: Responses to Literature . New York: Teachers College Press.
Louv, R. (2008). Last Child in the Woods: Saving Our Children from Nature-Deficit Disorder. Chapel Hill, NC: Algonquin Books of Chapel Hill.
Obama, M. (2012). American Grown: The Story of the White House Kitchen Garden and Gardens Across America . New York: Crown.
Pappas, C., Kiefer, B., and Levstik, L. (1999). An Integrated Language Perspective in the Elementary School: An Action Approach, Third Edition . New York: Addison Wesley Longman, Inc.

How to Make Pizza
A guide by Sam Sifton
You can make pizza at home. In fact, you can make pizza that will equal some of the best on the planet. With planning and practice, you can become good at it — even if you are a relatively novice cook. We are here to help that happen.
Before You Start
Plan ahead. Make the dough at least a day before you intend to make pizza, to give it enough time to rise.
Buy a food scale on which to weigh the ingredients for dough and toppings. It’s a smart investment: In baking, weight is a more accurate measurement than volume.
You will need a cooking surface. This could be a pizza stone or steel, or four to six unglazed quarry tiles measuring 6 inches by 6 inches from a building supply store. Whichever you use, heat in a very hot oven for at least an hour before cooking.
Roberta’s Pizza Dough
Recipe from carlo mirarchi , brandon hoy , chris parachini and katherine wheelock adapted by sam sifton.
- Yield Two 12-inch pizzas
Melina Hammer for The New York Times
This recipe, adapted from Roberta’s, the pizza and hipster haute-cuisine utopia in Bushwick, Brooklyn, provides a delicate, extraordinarily flavorful dough that will last in the refrigerator for up to a week. It rewards close attention to weight rather than volume in the matter of the ingredients, and asks for a mixture of finely ground Italian pizza flour (designated “00” on the bags and available in some supermarkets, many specialty groceries and always online) and regular all-purpose flour. As ever with breads, rise time will depend on the temperature and humidity of your kitchen and refrigerator.
Our Greatest Pizza Recipes —Sam Sifton
Featured in: A Little Pizza Homework .
Ingredients
- 153 grams 00 flour (1 cup plus 1 tablespoon)
- 153 grams all-purpose flour (1 cup plus 1 tablespoon and 2 teaspoons)
- 8 grams fine sea salt (1 teaspoon)
- 2 grams active dry yeast (3/4 teaspoon)
- 4 grams extra-virgin olive oil (1 teaspoon)
Preparation
- In a large mixing bowl, combine flours and salt.
- In a small mixing bowl, stir together 200 grams (a little less than 1 cup) lukewarm tap water, the yeast and the olive oil, then pour it into flour mixture. Knead with your hands until well combined, approximately 3 minutes, then let the mixture rest for 15 minutes.
- Knead rested dough for 3 minutes. Cut into 2 equal pieces and shape each into a ball. Place on a heavily floured surface, cover with dampened cloth, and let rest and rise for 3 to 4 hours at room temperature or for 8 to 24 hours in the refrigerator. (If you refrigerate the dough, remove it 30 to 45 minutes before you begin to shape it for pizza.)
- To make pizza, place each dough ball on a heavily floured surface and use your fingers to stretch it, then your hands to shape it into rounds or squares. Top and bake.
Storing the Dough
Allow for a minimum of three to four hours for your dough to rise. But planning further ahead pays dividends: You can store that dough in the refrigerator until you are ready to cook, which means any weeknight can be pizza night.
Melina Hammer for The New York Times pizza dough..Published 04-09-2014
We put our pizza dough in the refrigerator to rise, placing the balls of dough on a floured baking pan covered loosely with a clean, damp kitchen towel. The chill leads to a slow rise, so we generally allow it to go overnight, or for at least six to eight hours. For a faster rise, leave the dough out on a countertop, similarly covered. It should be ready — that is, roughly doubled in size — in three or four hours.
Time imparts a marvelous tanginess to pizza dough, but it extracts a price as well. What you want to avoid is a skin developing on the dough . When the dough has risen, if you are not going to use it right away, wrap it tightly in plastic wrap , or place it in a quart-size plastic bag. Pizza dough so wrapped will last in the refrigerator for three days or so.
Another option is to freeze the dough using this incredibly easy freezer dough recipe . Make it, put it in the freezer in a freezer-safe plastic bag, and then move it to the refrigerator on the morning of the evening you want to cook.
If you end up making pizza at least once a week, consider investing in a few pizza dough pans , available in restaurant supply stores.
Shaping the Pizza
Shaping a pizza takes practice. The goal is to make a thin circle of dough, with a raised edge around circumference of the pie. Don’t worry if that doesn’t happen the first few times. Pizzas shaped like trapezoids or kites taste just as delicious.
Working on a floured surface, with floured hands, softly pat down the risen ball of dough into a circle , rotating it as you do.
Using the tips of your fingers, push down gently around the perimeter of the pie, rotating it as you do, to create the edge.
Pick up the dough and lightly pass it back and forth between your palms, trying to rotate it each time you do, using gravity to help the dough stretch. At approximately 12 inches in diameter, the pizza is ready to go.
Return the pizza to the floured surface, making sure that the side that you first pressed down upon remains facing upward, and gently slide the pie back and forth a few times to make sure that it does not stick . Add a little more flour to the surface beneath the pie if it does.
Gently slide a lightly floured pizza peel beneath the pie, or place it carefully on a floured cutting board or the back of a baking pan. Make sure again that the dough can slide back and forth. If it does, the pie is certified for topping.
The act of topping a pizza is a gentle one. Use a light touch. Above all, try not to overload the pie, particularly its center, which will lead to an undercooked crust. Two to three tablespoons of sauce are all you need, and perhaps a small drizzle of olive oil, accompanied by a couple of other toppings.
Pizza sauce does not need to be cooked ahead of time, and is so simply prepared that there is no reason to use the store-bought variety. Instead, use a food processor to combine a can of whole, drained tomatoes with a splash of olive oil and a sprinkle of salt.
Spread the sauce out on the dough using the back of a spoon, stopping approximately 1/2 inch from the dough’s edges. Do not use too much ; two or three tablespoons is enough. Keep leftover sauce refrigerated.
Mozzarella is the traditional pizza cheese, but depending on the sort of pie you are creating, really any good melting cheese will do: fontina, Cheddar, Colby, blue, provolone and smoked Gouda, among others, make for delicious pizzas.
Meat on a pizza is an option for some. Sausage and meatballs are both traditional toppings and should be cooked beforehand. Pepperoni, ham and other cured meats do not need to be, though delicate sheets of air-dried beef or pork should perhaps go onto the pie midway through or at the end of the cooking process, lest they dry out in the heat.
Anchovies are a marvelous addition to pizzas, and so are clams and mussels , even sheets of smoked salmon, particularly when paired with crème fraîche and capers.
Making a fried egg breakfast pizza is not for freshman-class pizza makers. Sliding a pizza topped with a raw egg into a hot oven takes patience and practice. In the meantime, while your pizza is cooking, gently fry an egg in olive oil in a small skillet on the stove, and when the pizza is done, slide it gently on top of the pie.
You can put anything on a pizz a . The question is where, and when. Herbs can go below cheese to protect them from the heat of the oven, or onto the top of the pie when it’s done.
Pineapple can take heat like a fireman and can go on from the start, raw. Grapes can, too (a nice pairing for sausage). Mushrooms , though, should be cooked on the stovetop before you use them as a topping for pizza. Likewise peppers both red and green. (Thinly-sliced jalapeno pepper is an exception.) Potatoes can go on a pizza raw only if you’re cooking in a very, very hot oven and you’ve sliced them very, very thinly – otherwise, parboil them before slicing and adding them to the top of a pie. Grilled asparagus is an excellent addition to a “white,” or tomato-free pizza. We like thinly sliced Brussels sprouts , sometimes, on similar pies (pair with pancetta!), and leeks melted slowly over butter as well.
As a rough guide: Precook anything that won’t cook fast, or cut it so thinly that it will. Anything delicate, like a pile of arugula dressed simply in lemon juice and oil, can go on the pie when it’s done, to cook gently in the pizza’s residual heat.
Cooking the Pizza
We cook most of our pizzas in the oven, on top of a stone or a steel. But you can bake pizza in a sheet pan as well, or grill it outdoors. You can even cook a pizza on a stovetop.
Baking in the Oven
To bake a pizza in an oven, you’ll need either to do it on a stone or metal surface, or in a sheet pan. Either way, you should set the oven to its highest temperature and let it heat it for a full hour before you intend to cook.
If you are using a pizza stone, steel or a set of tiles, begin by placing it on the middle rack of the oven before you turn it on, allowing it to preheat for a hour.
When you’re ready to cook, carefully place your shaped dough on a lightly floured pizza peel or cutting board, or on the back of a baking pan. Gently shake the peel, board or pan back and forth a few times to make sure the dough can move, then add your toppings.
Pick up your pizza peel with the topped pie on top of it, and gently slide the pie onto the stone or tiles, starting at the back of the oven and working your way toward its front. Bake for about four to eight minutes, until the edges are a beautiful golden brown, and the sauce and cheese are bubbling nicely. Slide the peel back under the baked pizza to remove it from the oven, and then slide the pizza onto a cutting board, where it can be cut into slices.
If you are using a sheet pan, lightly oil the pan , then stretch the risen dough into the shape of the pan, then top and place in the oven until golden brown and bubbling.
Pan-Frying on the Stovetop
Cooking a pizza on top of the stove is a simple way to get started in the pizza-making game, and a single ball of dough will yield two pan pizzas .
Simply heat a 10-inch cast-iron skillet over medium-high heat, then film it with olive oil. Take one half of a ball of risen pizza dough and press it out into a circle just smaller than the pan .
When the oil shimmers, put the dough in the pan and adjust the heat so it browns evenly without burning. Prick the dough all over with the tines of a fork. Cook this round in the pan for a minute or so, then turn it over with the bottom is browned and cover with toppings. Either top the pan with a lid to melt the cheese or run it under a broiler to achieve the same result.
Grilling Outdoors
Grilling pizza really means grilling one side of a flatbread over fire , then turning it over and topping it. And while you can certainly use our essential pizza dough recipe to do that, a sturdier dough recipe that is less prone to ripping will yield a better result.
To cook a pizza on a grill requires some planning. You need to cook one side of the pizza before turning it over and topping it, and cooking the other side. So take time to assemble all the ingredients you’ll need to make the pizzas beforehand.
Prepare a hot fire; if your grill grate is clean, you shouldn’t need to oil it. Slide the pizza dough from the peel onto the rack. After a few minutes, use tongs to lift the dough and check whether it’s browning on the bottom . Watch closely so it doesn’t burn. When it’s nicely browned, use the tongs to flip the dough over, then brush it with olive oil and cover it with toppings. Place the lid on the grill for a few minutes more until the cheese is melted.
Our Best Pizza Recipes

Pizza Margherita
Sam Sifton, Carlo Mirarchi, Brandon Hoy, Chris Parachini, Katherine Wheelock
15 minutes, plus 1 hour to heat oven

Quick Pizza Dough
Suzanne Lenzer
About 30 minutes

Green and White Pizza

Mari Uyehara, Cathy Lo, Joe Beddia, Pizzeria Beddia
2 hours 15 minutes, plus about 28 hours’ fermenting, rising and resting

Lidey Heuck

Rick Easton’s Pizza With Peppers
Mark Bittman, Rick Easton
1 hour, plus rising

Pizza Sauce

Creamed Kale Pizza

Cheeses Pizza
See all recipes
Improving writing skills since 2002
(855) 4-ESSAYS
Type a new keyword(s) and press Enter to search
How to make a pizza.
- Word Count: 787
- Approx Pages: 3
- View my Saved Essays
- Downloads: 44
- Grade level: High School
- Problems? Flag this paper!
Making the perfect pizza is like an artist making a masterpiece. It takes time and practice to make a great pizza. The more you work at it, the better your pizza will look time after time. Don't get frustrated if your pizza doesn't come out the way you want it. The part of pizza making is like a fine wine it gets better with age. The first thing you will need to make the pizza are all the ingredients and utensils. The ingredients you will need consist of dough, pizza sauce, sugar, cheese, and pepperoni. You can also add other toppings on your pizza such as mushrooms, sausage, bacon, and peppers if you'd like to. Utensils you will need are as followed; a pizza pan about the size of the pizza you want to make, a medium size bowl, a fork, a long handle metal spoon, and a pizza cutter to cut your pizza with. First, we can start out by making your sauce. I like to use pre-made pizza sauce to simplify the pizza making process. After I pour the can of pizza sauce into a bowl, I add a ½ cup of sugar. After that, stir up your sauce until the sugar dissolves. If you want to make your own sauce, I'm sure you can find many different recipes over the Internet. Use one that suits your tastes and needs. Now that we have our sauce made, we need to spread our dough out on the pizza pan. If you put vegetable spray on the pan and your hands, it will help you to spread the dough on to the pan. Take your dough and roll it into a ball and place it in the center of your pizza pan. Take your hands and spread out the dough, from the middle of the pan outwards. If you start at the outside ends of the dough then your pizza will be too thick in the middle and too thin around the edges. It's a good idea to spread the dough out so it's about the same thickness all the way around the pan. The next step you can do is optional. If you take a fork or some like a fork and poke little holes in the pizza dough, it will help keep your pizza from bubbling up.
- Page 1 of 3
Essays Related to How to make a Pizza
1. how to make a pizza casserole.

If you really in the mood for a pizza taste and a great dish. Then I have the perfect dish for you a sausage and pepperoni pizza casserole. Before you start you must make sure you have the right ingredients for the dish. ... Once you are done with this make sure that the oven is at 350 degrees Fahrenheit if not wait till the oven reaches the right temperature. ... Once done cooling you are ready to enjoy the great taste of this wonderful pizza casserole dish. ...
- Word Count: 311
- Approx Pages: 1
- Grade Level: High School
2. Propaganda In Advertising

The commercial starts off with a puppet named Andy printing out pictures of Domino's Pizza on pieces of paper and sticking them in pizza boxes instead of pizza. One of the Domino's workers finds the paper and tells Andy that they still make all of their pizza's by hand. ... Next, a man's voice comes on while a picture of a delicious looking pizza and he tells the viewer to come to Domino's because they make their pizza's by hand. ... The propaganda technique that is used in this ad is transfer because Domino's uses a cartoon figure, which is humorous, to g...
- Word Count: 824
3. Dumpster Diving
So for food he began to dig around dumpsters and this is where he explains how he had no choice to this and how he starts learning how cruel and ignorant people can be. For instants he started hanging around a pizza parlor because they would throw out pizza that people didn't pick up or if they made the wrong kind of pizza they would just throw it out. ... But when the pizza parlor employees found out that some one was digging in the trash for the old pizza they started to put a lot of chili thinking that people wont want it for being to hot. ... Well I already knew how rude people coul...
- Word Count: 678
4. Business Interview - Fusion Grill and Bar

Question: Why did you start Fusion as opposed to transforming an existing pizza chain? ... Question: How many people does Fusion currently employ? ... It only makes sense that legislators be focused on supporting the needs of the foundation of this country's economic force. Question: How do you compete with larger restaurant chains to get customers to your restaurants? ... How do you discover the special ingredients you need to keep your pizza up to par? ...
- Word Count: 592
- Approx Pages: 2
5. Narrative About My Roommate

You can almost say he's my brother from another mother so you can imagine how much I know about him. ... This is where I realized how in love Justin was with his girlfriend. ... He then leaves. 30 minutes pass so I call him to make sure he got there and I get no answer so I call again. ... I thought to myself I can't be mad because he at least got me pizza. The label on my pizza box real "small chicken pizza" I opened the box and there was onions and bacon, with chicken. ...
- Word Count: 806
6. Advertising

But if Nike gets someone who is arrested the next day for drug abuse for example, it doesn't make Nikes image seem respectable. ... Using someone like Elvis for a pizza brand would not be the most effective advertising. Elvis made music professionally, not pizzas. ... If the pizza product slogan was "Elvis, the king of pizza's", then this might work. ... The advertisement requires someone who is in touch with how women think, act, and most importantly go through during her period. ...
- Word Count: 748
7. Advertising

8. Process Essay: How to Make Lasagna

Becoming a new housewife can be quite a challenge. There is so much expected of a wife in so many different cultures. One thing that is set in all cultures and expected of the woman, will be cooking. When you get married, one of the biggest expectations is to know how to cook. In a Hispanic culture,...
- Word Count: 785
9. The Parody
When he tries to act like a powerful mastermind, he merely makes a fool of himself. ... Pizza the Hut is even more unsightly. Pizza sauce and cheese drip from his stomach-churning body. ... Lord Helmet turns to the next group and asks, "How about you?" ... Now let's see how you handle it." ...
- Word Count: 1366
- Approx Pages: 5
- PRO Courses Guides New Tech Help Pro Expert Videos About wikiHow Pro Upgrade Sign In
- EDIT Edit this Article
- EXPLORE Tech Help Pro About Us Random Article Quizzes Request a New Article Community Dashboard This Or That Game Popular Categories Arts and Entertainment Artwork Books Movies Computers and Electronics Computers Phone Skills Technology Hacks Health Men's Health Mental Health Women's Health Relationships Dating Love Relationship Issues Hobbies and Crafts Crafts Drawing Games Education & Communication Communication Skills Personal Development Studying Personal Care and Style Fashion Hair Care Personal Hygiene Youth Personal Care School Stuff Dating All Categories Arts and Entertainment Finance and Business Home and Garden Relationship Quizzes Cars & Other Vehicles Food and Entertaining Personal Care and Style Sports and Fitness Computers and Electronics Health Pets and Animals Travel Education & Communication Hobbies and Crafts Philosophy and Religion Work World Family Life Holidays and Traditions Relationships Youth
- Browse Articles
- Learn Something New
- Quizzes Hot
- This Or That Game New
- Train Your Brain
- Explore More
- Support wikiHow
- About wikiHow
- Log in / Sign up
- Food and Entertaining
- Sandwiches and Quick Meals
How to Make Pizza from Scratch
Last Updated: September 21, 2023 Approved
This article was co-authored by Ollie George Cigliano . Ollie George Cigliano is a Private Chef, Food Educator, and Owner of Ollie George Cooks, based in Long Beach, California. With over 20 years of experience, she specializes in utilizing fresh, fun ingredients and mixing traditional and innovative cooking techniques. Ollie George holds a BA in Comparative Literature from The University of California, Berkeley, and a Nutrition and Healthy Living Certificate from eCornell University. wikiHow marks an article as reader-approved once it receives enough positive feedback. In this case, 100% of readers who voted found the article helpful, earning it our reader-approved status. This article has been viewed 169,038 times.
Pizza is yummy, filling, and relatively easy to make. Plus, you can create this delish treat right from your own home! Prepare the dough, sauce, and ingredients separately. Once each of these elements is ready, combine them and cook the pizza at a high temperature until it turns crispy and delicious.

Ingredients
Pizza dough.
Makes enough for two 10-inch to 12-inch (25.4-cm to 30.5-cm) pizzas
- 1-1/2 cups (375 ml) warm water
- 1 package or 2-1/4 tsp (11.25 ml) active dry yeast
- 3-1/2 cups (875 ml) bread flour
- 2 Tbsp (30 ml) olive oil
- 2 tsp (10 ml) salt
- 1 tsp (5 ml) sugar
Pizza Sauce
Makes 2 cups (500 ml) of sauce
- 1 Tbsp (15 ml) olive oil
- 2 tsp (10 ml) minced garlic
- 1/4 cup (60 ml) minced sweet onion
- 1/2 tsp (2.5 ml) dried oregano
- 1/2 tsp (2.5 ml) dried basil
- 1 lb (450 g) diced fresh tomatoes OR 14.5-oz (430-ml) can of diced tomatoes, undrained
- 1/2 tsp (2.5 ml) sugar
- 1/4 tsp (1.25 ml) salt
- 1/4 tsp (1.25 ml) ground black pepper
Pizza Toppings
Makes enough for 1 or 2 pizzas
- 8 oz (225 g) mozzarella cheese
- 4-inch (10-cm) stick of pepperoni
- 4 oz (110 g) bulk sausage
- 1/2 of a small onion, roughly chopped
- 1 sweet bell pepper, roughly chopped
- 1/4 cup (60 ml) fresh basil
Pizza Assembly
- 1 to 2 Tbsp (15 to 30 ml) olive oil
- 1/4 cup (60 ml) cornmeal
Preparing the Pizza Dough

- Ideally, the water should be "blood temperature," or between 96 to 98.6 degrees Fahrenheit (35.5 to 37 degrees Celsius).
- Allow the mixture to sit for 5 minutes, or until the yeast fully dissolves and starts to foam.

- For this recipe, you'll knead the dough by hand. If you plan to use a stand mixer, however, you can place the flour into the bowl of the mixer instead of the table or counter.

- After mixing the water into the flour, repeat this step with another one-third of the water, followed by the remaining third.
- When finished, a very sticky dough should form.

- If you'd prefer to knead the dough using a stand mixer, fit it with the dough hook attachment and work the dough on low to medium spread for 10 minutes. [2] X Research source

- Ideally, the air temperature should be between 75 and 85 degrees Fahrenheit (24 to 29 degrees Celsius).
- If you do not have a warm enough spot, heat the oven to 150 degrees Fahrenheit (65 degrees Celsius). Turn off the preheated oven and give it several minutes to cool slightly, then allow the bowl of dough to rise inside.

- Place the balls of dough 1 inch (2.5 cm) apart on a lightly floured surface. When they expand enough to touch, they'll be ready to use or store.
- If you wish to save one or both rounds for another time, you can place the dough in an airtight container and freeze it for up to two weeks. Fully thaw frozen dough to room temperature before working with it, though.
Preparing the Pizza Sauce

- If you don't mind getting your hands dirty, you could also crush the tomatoes by hand instead of using a fork. Doing so would actually make it easier to control the process.
- Set the tomatoes aside after crushing them.

- Give the oil at least 30 to 60 seconds to warm up. You should be able to turn the pan and easily coat the bottom with the oil once it's warm enough.

- Watch the contents of the saucepan carefully at this point. Minced garlic can burn quickly if you leave it unattended.

- Allow the mixture to cook at medium-high heat, stirring frequently, until it begins to boil gently.

- You can simmer the sauce for up to 90 minutes. A sauce that simmers for longer periods will be thicker and more flavorful.

- If you want to save part of the sauce or all of the sauce for later, you can pour the cooled sauce into an airtight container and refrigerate it for up to one week. If frozen, the sauce can last for up to two months.

- After you puree the sauce, it should be ready to use.
Preparing the Pizza Toppings

- For an even cheesier experience, double the amount of cheese and slice it into 1/4-inch (6-mm) thick pieces.
- You can save time by using pre-shredded cheese or change the flavor by mixing different types of cheese.

- If desired, you could dice the pepperoni into small cubes instead of slicing it.
- You may omit the pepperoni if you do not wish to include it.

- The sausage is only optional. You can skip it or add other meats to the pizza, as well. Some meats, like bacon, will need to be cooked and crumbled ahead of time. Others, like ham, only need to be sliced.

- While this recipe only lists onions and peppers, you can use other vegetables, as well. Poaching the vegetables in oil will make them taste richer. [5] X Research source
- Allow the oil to heat slowly to 190 degrees Fahrenheit (90 degrees Celsius) before adding the vegetables. If the oil sizzles or steams, it is too hot. Poach the vegetables in this hot oil until they soften, then fish them out with a slotted spoon and drain on clean paper towels.

- Do not use a knife. Chopping fresh basil could cause it to bruise.
- You can also experiment with other fresh herbs, like oregano and parsley.
Pizza Assembly and Cooking it

- Meanwhile, prepare a pizza stone or round baking sheet by coating it with a fine, even layer of cornmeal or flour.

- If necessary, use a lightly floured rolling pin to flatten the dough to a thickness of 1/4 inch (6 mm) or less. [6] X Research source
- Alternatively, spread the dough out as much as possible on the work surface, then carefully pick it up. Place both fists beneath it and gradually stretch the dough out further, using a circular motion.
- Note that if the dough shrinks back while you roll it out, allow it to rest for 5 minutes before continuing.

- The oil should help the crust remain crisp even after you add the toppings.

- Ideally, you should leave 1/2 inch (1.25 cm) between the edge of the sauce and the edge of the pizza dough. Leaving a little space should prevent the sauce from bubbling over the edge of the pizza and making a mess.

- Continue to leave 1/2-inch (1.25-cm) of the outer crust edge uncovered.
- Add toppings sparingly. If you add too many, you run the risk of drowning out the flavors instead of allowing them to complement one another.

- Consider rotating the pizza after the first 5 to 7 minutes to ensure even browning.

Community Q&A
- No oven? No problem! You can make pizza without an oven using a skillet, grill, or tawa. Thanks Helpful 0 Not Helpful 0

Things You'll Need
Prepare the pizza dough.
- Small mixing bowl
- Cutting board, clean table, or clean countertop
- Large mixing bowl
- Plastic wrap
Prepare the Pizza Sauce
- Medium mixing bowl
- 2-qt (2-L) saucepan
- Spatula or wooden spoon
- Immersion blender
Prepare the Toppings
- Sharp knife
- Small skillet
- Small saucepan
- Slotted spoon
- Paper towels
Assemble and Cook the Pizza
- Pizza stone or pizza-shaped baking sheet
- Rolling pin
- Pastry brush
- Pizza slicer
You Might Also Like

- ↑ http://www.jamieoliver.com/news-and-features/features/how-to-make-pizza-from-scratch/#LyI8LiyvDsBvGZXu.97
- ↑ http://www.simplyrecipes.com/recipes/homemade_pizza/
- ↑ http://www.foodnetwork.com/recipes/basic-pizza-sauce-recipe.html
- ↑ http://www.kitchentreaty.com/our-very-favorite-homemade-pizza-sauce/
- ↑ http://www.bonappetit.com/test-kitchen/cooking-tips/article/pizza-with-mario-batali
- ↑ https://www.thekitchn.com/how-to-make-really-good-pizza-at-home-cooking-lessons-from-the-kitchn-178384
About This Article

To make pizza from scratch, start by mixing water, yeast, salt, and sugar in a bowl. In a separate mound of flour, use your fingers to form a deep well with high walls, and pour your wet mixture in the well to make your dough. Then, knead the dough for 10 minutes before allowing it to rise in an oiled bowl for 1 hour. Once it has risen, cut the dough in half, flatten and shape the dough into a circle, and transfer it to a pizza stone or baking sheet. Next, add your pizza sauce, cheese, and toppings, like pepperoni. Finally, place the pizza in a 450°F oven for 10 to 15 minutes, slice, and serve. To learn how to make your own pizza sauce, keep reading! Did this summary help you? Yes No
- Send fan mail to authors
Reader Success Stories
Mar 23, 2023
Did this article help you?
Alina Albatroz
Jul 13, 2017
Apr 4, 2018
Nov 13, 2022

Featured Articles

Trending Articles

Watch Articles

- Terms of Use
- Privacy Policy
- Do Not Sell or Share My Info
- Not Selling Info
Don’t miss out! Sign up for
wikiHow’s newsletter
- Watch Full Seasons
- TV Schedule
- Newsletters
- Sweepstakes
- Restaurants
- Recipes on TV
- Food Network on Max
- Comfort Food

- Easter Basket Challenge 8am | 7c
- Easter Basket Challenge 9am | 8c
- Spring Baking Championship 10am | 9c
- Spring Baking Championship 11am | 10c
- Diners, Drive-Ins and Dives 12pm | 11c
- Diners, Drive-Ins and Dives 12:30pm | 11:30c
- Diners, Drive-Ins and Dives 1pm | 12c
- Diners, Drive-Ins and Dives 1:30pm | 12:30c
- Diners, Drive-Ins and Dives 2pm | 1c
- Diners, Drive-Ins and Dives 2:30pm | 1:30c
- Diners, Drive-Ins and Dives 3pm | 2c
- Diners, Drive-Ins and Dives 3:30pm | 2:30c
- Diners, Drive-Ins and Dives 4pm | 3c
- Diners, Drive-Ins and Dives 4:30pm | 3:30c
- Diners, Drive-Ins and Dives 5pm | 4c
- Diners, Drive-Ins and Dives 5:30pm | 4:30c
- Diners, Drive-Ins and Dives 6pm | 5c
- Diners, Drive-Ins and Dives 6:30pm | 5:30c
- Diners, Drive-Ins and Dives 7pm | 6c
- Diners, Drive-Ins and Dives 7:30pm | 6:30c
- Diners, Drive-Ins and Dives 8pm | 7c
- Diners, Drive-Ins and Dives 8:30pm | 7:30c
- On Tonight Diners, Drive-Ins and Dives 9pm | 8c
- Diners, Drive-Ins and Dives 9:30pm | 8:30c
- Diners, Drive-Ins and Dives 10pm | 9c
- Diners, Drive-Ins and Dives 10:30pm | 9:30c
- Diners, Drive-Ins and Dives 11pm | 10c
- Diners, Drive-Ins and Dives 11:30pm | 10:30c
- Diners, Drive-Ins and Dives 12am | 11c
- Diners, Drive-Ins and Dives 12:30am | 11:30c
- Diners, Drive-Ins and Dives 1am | 12c
- Diners, Drive-Ins and Dives 1:30am | 12:30c
- Diners, Drive-Ins and Dives 2am | 1c
- Diners, Drive-Ins and Dives 2:30am | 1:30c
- Diners, Drive-Ins and Dives 3am | 2c
- Diners, Drive-Ins and Dives 3:30am | 2:30c
- Diners, Drive-Ins and Dives 4am | 3c
- Diners, Drive-Ins and Dives 4:30am | 3:30c

- Trending Eats

- Product Reviews
- Shop Everything
- Spring Into Cooking
- All Sweepstakes + Contests

How to Make and Form Pizza Dough: A Step-by-Step Guide
Related to:.

Step 1: Getting Started Start with a medium bowl that's been lightly coated with olive oil. Add warm water (about 110 degrees F), dry yeast and sugar. Note: The activated yeast feeds on the sugar and makes the dough rise. In another bowl, combine flour and salt. Have a fork, cutting board, knife, pizza pan and rolling pin (optional) handy.
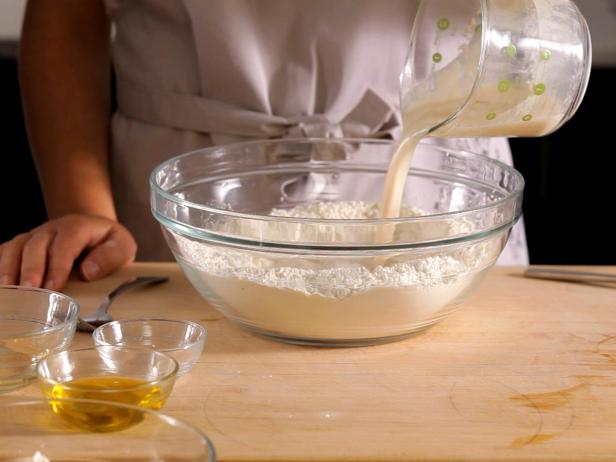
Step 2: Make a Well in the Center of the Dough In the bowl containing the flour and salt, make a well in the center and add the yeast. Tip: If the yeast doesn't foam, check the expiration date and water temperature (should be approximately 110 degrees F). Add the olive oil. Use a fork to pull the dry into the wet, then mix.
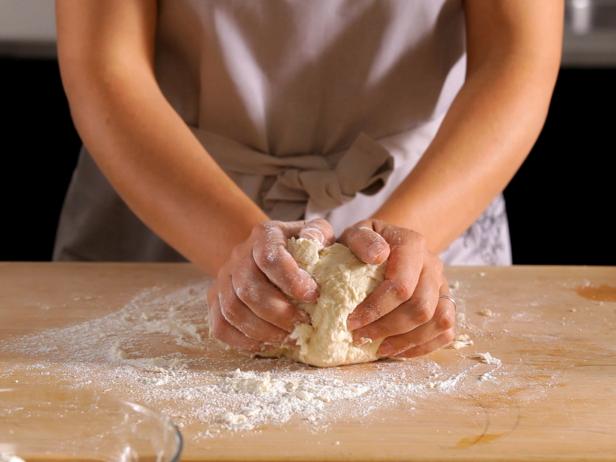
Step 3: Knead the Dough When the dough starts to come together, get in there with your hands and knead it for a few minutes on a lightly floured board. Use the heel of your hand to push the dough down and forward. Give it a few turns. You're done when the dough is a little tacky.
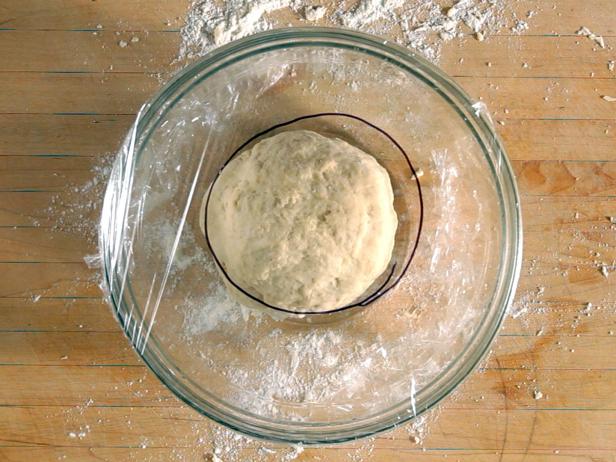
Step 4: Cover the Dough in Plastic Wrap Place the kneaded dough into the oiled bowl, cover with plastic wrap and let it rise in a warm spot until it doubles in size. Tip: Chart the progress of the rising dough by using a marker on the plastic wrap to circle the size of the ball of dough at the beginning of the process. It can take anywhere from 1 to 2 hours for the dough to rise, depending on the recipe and ambient temperature.
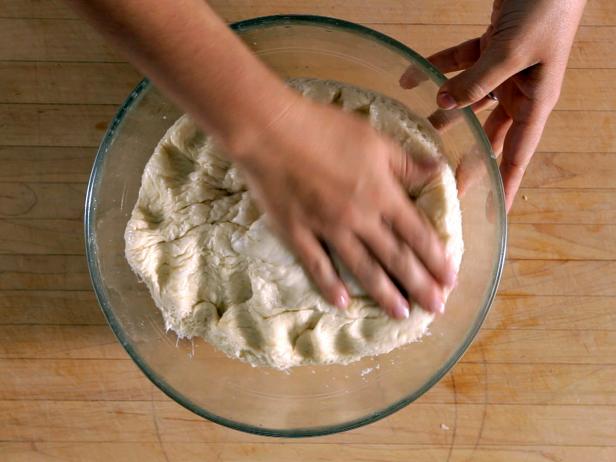
Step 5: Check to See If the Dough Is Done If the dough leaves an indentation when poked, it's ready.
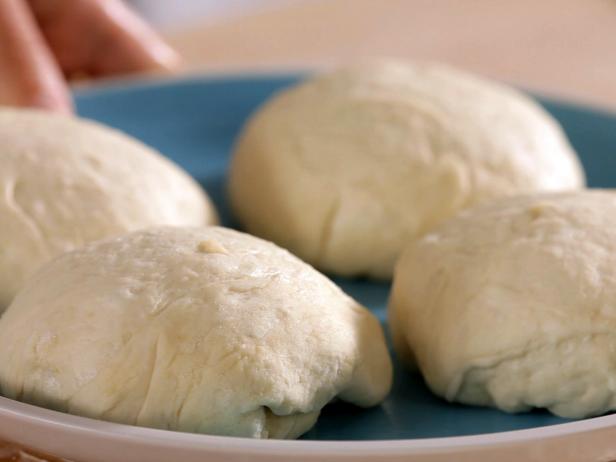
Step 6: Divide the Dough Once the dough has risen properly, use a knife to divide it. The larger the piece, the bigger the pizza; the smaller portions are easier to handle at home. Form into balls for individual pizzas, and place on a plate. Cover with a damp cloth. Let the balls of dough rest until you poke them and see an indentation.
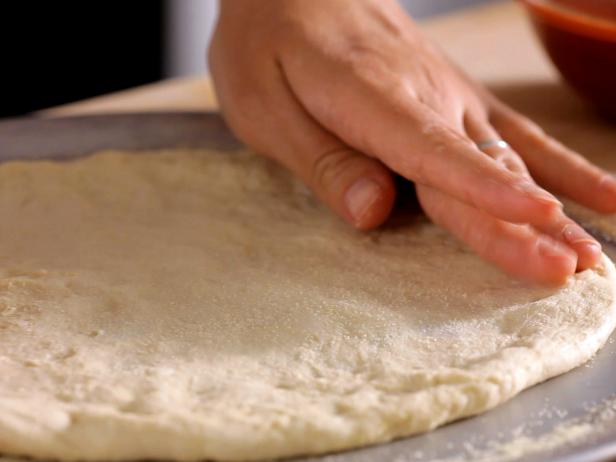
Step 7: Shape the Dough Sprinkle a pizza pan with a little semolina for good separation and a nutty crunch. Place a ball of dough in the center of the pan and spread it out, using a rolling pin or your hands. Spin it. Pull the dough to the edges of the pan to thin out the center. Add some more semolina for better separation. Make sure the thickness is even.
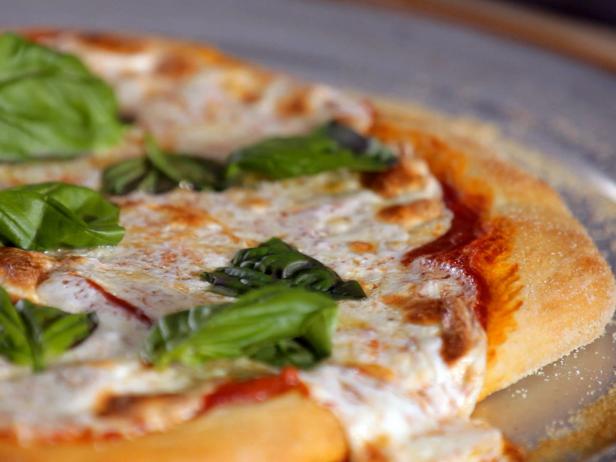
Step 8: Top the Pizza and Bake Top the spread dough with your favorite ingredients and bake in a 500-degree F oven for approximately 10 minutes. Perfect pizza every time. Watch our how-to video for more.

How to Freeze Cake

Everything You've Ever Wanted to Know About Making a Bundt Cake

A Primer on Every Single Type of Yeast for Baking

How to Proof Yeast

This Shapeshifting Cake Batter Is the Ultimate Party Trick

10 Ways to Crimp Pie Crust

How to Freeze Cookies and Cookie Dough

A Comprehensive Guide to Baking at High Altitudes

The Ultimate Guide to Chocolate for Baking (and Beyond)

How to Make Powdered Sugar
Ultimate baking guide, latest stories.

KFC Offers a Fresh, Tiny Take on the Fast-Food Hand Pie Mar 28, 2024

5 Best Charcoal Grills of 2024, According to Experts Mar 28, 2024

5 Best Gas Grills of 2024, According to Experts Mar 28, 2024

10 American Bakers Say Bonjour to All-New Pastry Competition, Next Baking Master: Paris Mar 27, 2024

7 Best Cookie Sheets and Sheet Pans of 2024, Tested and Reviewed Mar 28, 2024

5 Best Mandoline Slicers of 2024, Tested and Reviewed Mar 28, 2024

Can You Freeze Tortillas? Mar 27, 2024

Wendy’s Is Giving Out Cards for Free Breakfast Sandwiches for a Year Mar 28, 2024

Can You Freeze Cream Cheese? Mar 27, 2024

This Diabetes Dietitian Wants You To Embrace Carbs and Your Culture Mar 26, 2024

What to Buy During Walmart's Super Spring Savings Event Mar 28, 2024

The Best Ways to Save on Groceries During Amazon's Big Spring Sale Mar 25, 2024

The Best Kitchen Deals from Amazon's Big Spring Sale Mar 25, 2024

This Pro-Level Knife Sharpener Is My Favorite Way to Sharpen Knives Mar 27, 2024

New Data Suggests Intermittent Fasting May Affect Heart Health Mar 22, 2024

12 Chocolate Bunnies Your Easter Basket Needs This Year Mar 22, 2024

The Best Outdoor Storage Cabinets for Grilling and Backyard Entertaining Mar 25, 2024

MacKenzie-Childs Unveils New Rosy Check Collection Mar 21, 2024

Do Sleepy Girl Mocktails Really Work? Mar 21, 2024

MTN Dew Releases Two New Baja Flavors Mar 21, 2024

Hostess Launches Meltamors, The First Snack It Explicitly Suggests Microwaving Mar 21, 2024

42 Gifts for Mom That Show How Much You Care Mar 22, 2024

Jalapeños Are Getting Milder. Here’s How to Turn Up the Heat. Mar 20, 2024

Subway Is Bottling Its Signature Sauces for You To Use in Everything Mar 18, 2024

Fresh Ube Is Hard To Find in the U.S. – Here’s How You Can Still Cook and Bake With It Mar 19, 2024

OXO Just Released Its Own Stanley Tumbler Dupe Mar 19, 2024

5 Best Stainless Steel Skillets of 2024, Tested and Reviewed Mar 22, 2024

How to Melt Chocolate Chips On the Stovetop or In the Microwave Mar 19, 2024

How to Melt Chocolate (In the Microwave and On the Stove) Mar 22, 2024

26 Mother's Day Food Gifts All the Moms in Your Life Will Love Mar 20, 2024
Recipe of the day.
Get an editor-picked recipe delivered to your inbox daily.
By entering your email address, you agree to our Terms of Use and acknowledge the Privacy Policy . Food Network and its affiliates may use your email address to provide updates, ads, and offers.
To withdraw your consent or learn more about your rights, see the Privacy Policy .
- Healthy Eating
- 12 Days of Cookies
- Food Network Favorites
- Food.com Eats of the Week
- Thanksgiving Countdown
- Food.com Recipe of the Day
- Food Network Veggie Eats
- Food Network Shopping
- Food Network Kitchen
- Sweepstakes Updates
Related Pages
- How to Bake a Cake
- Easy Chocolate Chip Cookies Recipe
- How to Make a Basic Tomato Sauce
- How to Make Scrambled Eggs
- How to Cook Pasta
- How to Make a Perfect Omelet
- How to Grill the Perfect Burger
- How to Make a Milkshake
- How to Make Pickles, Step-by-Step
The process below shows how to make dough for a pizza. Summarise the information by selecting and reporting the main features and make comparisons where relevant.
Unauthorized use and/or duplication of this material without express and written permission from this site’s author and/or owner is strictly prohibited. Excerpts and links may be used, provided that full and clear credit is given to Writing9 with appropriate and specific direction to the original content.
Fully explain your ideas
To get an excellent score in the IELTS Task 2 writing section, one of the easiest and most effective tips is structuring your writing in the most solid format. A great argument essay structure may be divided to four paragraphs, in which comprises of four sentences (excluding the conclusion paragraph, which comprises of three sentences).
For we to consider an essay structure a great one, it should be looking like this:
- Paragraph 1 - Introduction
- Sentence 1 - Background statement
- Sentence 2 - Detailed background statement
- Sentence 3 - Thesis
- Sentence 4 - Outline sentence
- Paragraph 2 - First supporting paragraph
- Sentence 1 - Topic sentence
- Sentence 2 - Example
- Sentence 3 - Discussion
- Sentence 4 - Conclusion
- Paragraph 3 - Second supporting paragraph
- Paragraph 4 - Conclusion
- Sentence 1 - Summary
- Sentence 2 - Restatement of thesis
- Sentence 3 - Prediction or recommendation
Our recommended essay structure above comprises of fifteen (15) sentences, which will make your essay approximately 250 to 275 words.
Discover more tips in The Ultimate Guide to Get a Target Band Score of 7+ » — a book that's free for 🚀 Premium users.
- Check your IELTS essay »
- Find essays with the same topic
- View collections of IELTS Writing Samples
- Show IELTS Writing Task 2 Topics
Art classes such as painting or drawing are important for children s development so it should be compulsory in high school.Do you agree or disagree
Some people say that playing computergames is bad for children in every aspect. ohters say that palying computergames can have positive effects on the way children develop. discuss both views and give youre opinion., write a letter to the restaurant, applying for the job. in your letter: •explain what you are currently doing •describe your suitability for this area of work • say when you can attend an interview, some people believe that nowadays we have too many choices. to what extent do you agree or disagree with this statement, are computers an essential features of modern education what subjects can be better taught using computers are there aspects of a good education that cannot be taught using computers give reasons for your answer and include any relevant examples from your own knowledge or experience..
how to make a pizza in procedural writing
All Formats
Resource types, all resource types.
- Rating Count
- Price (Ascending)
- Price (Descending)
- Most Recent
How to make a pizza in procedural writing

How to make a Pizza : Procedural Writing Organizers (Editable in Google Slides)

- Google Apps™

How to Make Pizza Sequencing and Procedural Writing

How to Make A Pizza | Procedural and Sequence Writing

FREEBIE! | How to Make A Pizza | Procedural and Sequence Writing

How To Make a Pizza Cover Page

How To Make A Pizza Craft Procedure Writing Prompt

PROCEDURAL CRAFTIVITY BOOSTER PACK / INSTRUCTION WRITING

HOW TO WRITE PROCEDURES | Procedural Writing Slides

How to make a pizza writing craftivity

Procedural Writing Templates Bundle: 5 How To packets with anchor charts & word

How to Make a Pizza : Digital Procedural Writing for Google Slides™

- Google Drive™ folder
- Internet Activities

How to Make a Pizza : Procedural Writing and Craftivity

How To Make Pizza | How To Writing | Procedural Writing Activity

How - To Writing Crafts Bundle 2 | Procedural Writing | Seasonal Craft Activities

Procedural Text Writing Templates: How to make a Pizza .

How - to / Procedural Writing Mini Books

How - to Make PIZZA Procedural Brainstorming and Writing Templates

Pizza Pizza List Writing & Sequencing Printable Activity

How to Make a Pizza | Procedural Writing Flipbook

Writing Workshop: How To Make A Pizza English & Spanish

Procedural Writing Templates, Crafts, & Project

" How to " Procedural Writing Prompts

Burger and Pizza How To Procedural Writing Craftivities

How to writing , connect & order steps in a procedural text

- We're hiring
- Help & FAQ
- Privacy policy
- Student privacy
- Terms of service
- Tell us what you think
Enjoy with Essays
Tuesday, january 4, 2011, how to make a pizza, 33 comments:.
Have got bunch of home work? Don't would like hang out on writing? Use this paper writing service essay-writing-place.com . This one always providing structured article with guarantees!
Bad Grammar.
I try so bad it is with money
I try it so bad it with money
I love your blog.
i think i think i think
This comment has been removed by the author.
Thank you is vere delicious.
The first one dainty you ignore that one I meant to say good job with your essay
This is a post that i find very useful, i have to admit that i love pizza and now that i know how to make one i think i will be eating at my own given time. Wall decorating services I will take into consideration the recipe you have given so i can try it out too.
Bad grammar.
Author has bad grammar
thank you very very muchhhhhhhhhhhhhhhhhhhhhhhhhhhhhhhhhhh
It's good but you need to work on your grammar. Some part didn't even make sense.
My teacher will be happy about me
thank you for paragraph
this person has bad grammer
There is two things I learned how to make pizza and to make my home work
Wonderfully written
I wrote this essay in the exam Thank u very much��������������������������
Thank you for rasipi
hi im frm the future
bell paper?
wanderfull to tougth about it.
Final Paper
Sophia Melo Gomes
- Words to pages
- Pages to words
Eloise Braun
John N. Williams
Diane M. Omalley
Finished Papers

Estelle Gallagher
Customer Reviews
is a “rare breed” among custom essay writing services today
All the papers delivers are completely original as we check every single work for plagiarism via advanced plagiarism detection software. As a double check of the paper originality, you are free to order a full plagiarism PDF report while placing the order or afterwards by contacting our Customer Support Team.
Being tempted by low prices and promises of quick paper delivery, you may choose another paper writing service. The truth is that more often than not their words are hollow. While the main purpose of such doubtful companies is to cash in on credulity of their clients, the prime objective of is clients’ satisfaction. We do fulfill our guarantees, and if a customer believes that initial requirements were not met or there is plagiarism found and proved in paper, they can request revision or refund. However, a refund request is acceptable only within 14 days of the initial deadline.
Our paper writing service is the best choice for those who cannot handle writing assignments themselves for some reason. At , you can order custom written essays, book reviews, film reports, research papers, term papers, business plans, PHD dissertations and so forth. No matter what academic level or timeframe requested is – we will produce an excellent work for you!
Customers usually want to be informed about how the writer is progressing with their paper and we fully understand that – he who pays the piper calls the tune. Therefore, with you have a possibility to get in touch with your writer any time you have some concerns or want to give additional instructions. Our customer support staff is there for you 24/7 to answer all your questions and deal with any problems if necessary.
Of course, the best proof of the premium quality of our services is clients’ testimonials. Just take a few minutes to look through the customer feedback and you will see that what we offer is not taking a gamble.
is a company you can trust. Share the burden of academic writing with us. Your future will be in safe hands! Buy essays, buy term papers or buy research papers and economize your time, your energy and, of course, your money!
How Do I Select the Most Appropriate Writer to Write My Essay?
The second you place your "write an essay for me" request, numerous writers will be bidding on your work. It is up to you to choose the right specialist for your task. Make an educated choice by reading their bios, analyzing their order stats, and looking over their reviews. Our essay writers are required to identify their areas of interest so you know which professional has the most up-to-date knowledge in your field. If you are thinking "I want a real pro to write essay for me" then you've come to the right place.
IMAGES
VIDEO
COMMENTS
After the oven is preheated place your pizza in the oven and let it bake for 15-20 minutes. When the pizza is done it will have a light golden crust. After the pizza is done take it out of the oven. Be sure to use a pair of hot mats or mittens to grab the pizza. Let the pizza cool for about five minutes.
Making a tomato sauce. The first step involves melting olive oil with butter in a large oven. Gradually, sauté the onion and garlic. Next, add salt, tomatoes, puree, basil, oregano, and pepper, and leave it to boil. The mixture is then covered and left to keep bubbling for close to two hours.
- We have to get people to want to learn how to make a pizza. Pass out rough draft paper. Cut students loose to begin their writing. Reconvene when dough has risen enough. Depending on food allergies/school process, choose Cooking Pizza or Creating Pizza Shop Menus COOKING PIZZA:
Preparation of Mixtures to Be Used for Pizza Making. The fundamental step in pizza preparation is ensuring that one has mixtures required for it. To prepare the first mixture, a medium bowl is needed, and little olive oil is poured to it. Pour half a liter of warm water of about 120 degrees Celsius into the medium container, followed by six and ...
Hook sentence. Background information. Thesis statement. Step 1: Begin with the basics. Describe the initial steps or preparations required. Explain any tools, materials, or ingredients needed. Provide safety precautions if necessary. Step 2: Break Down the Process. Divide the process into clear, sequential steps.
In order to make the dough you must mix yeast with warm water and sugar and let it stir in a big mixer for about eight minutes. Then after eight minutes you will add the flour and salt and let mix for about twenty-five more minutes. Finally after the dough is finished, you will put it on a table to be made into the pan size.
Start by choosing the right ingredients, then combine flour, yeast, water, oil, salt, and sugar into a smooth and pliable dough. Once mixed, it needs to be kneaded until it's elastic. After kneading, the dough needs time to ferment and proof, allowing the yeast to work its magic and giving it a light, airy texture.
Shape the dough, brush one side with oil and cook, oil-side down, over medium-high with the lid closed until firm. Add more oil to the top, flip and then add the toppings. Reduce the heat to ...
Steps in a Process Making a Pizza - W.2.3 W.2.5. F.I.T. Family books to read at home with parents and younger siblings. Secret Pizza Party by Adam Rubin and Daniel Salmieri. The Little Red Hen (Makes a Pizza) by Philemon Sturges. The Little Red Hen by Jerry Pinkney. Tops & Bottoms by Janet Stevens. E-I-E-I-O: How Old MacDonald Got His Farm by ...
In a large mixing bowl, combine flours and salt. In a small mixing bowl, stir together 200 grams (a little less than 1 cup) lukewarm tap water, the yeast and the olive oil, then pour it into flour mixture. Knead with your hands until well combined, approximately 3 minutes, then let the mixture rest for 15 minutes.
Take your dough and roll it into a ball and place it in the center of your pizza pan. Take your hands and spread out the dough, from the middle of the pan outwards. If you start at the outside ends of the dough then your pizza will be too thick in the middle and too thin around the edges.
Add oil and warm water, stirring to combine. Dump dough onto a lightly floured surface, and knead for about 3 minutes, until dough is smooth. Divide dough into 10 equal pieces, rolling each piece into a ball. Allow to rest, covered with plastic wrap, for at least 30 minutes.…. 301 Words.
Preheat the oven to 450 degrees Fahrenheit (230 degrees Celsius). Allow the oven to preheat for at least 30 minutes or up to 60 minutes. Meanwhile, prepare a pizza stone or round baking sheet by coating it with a fine, even layer of cornmeal or flour. 2. Flatten and shape the dough.
Step 2: Make a Well in the Center of the Dough In the bowl containing the flour and salt, make a well in the center and add the yeast. Tip: If the yeast doesn't foam, check the expiration date and ...
First. of all, the following ingredients should be ready: four cups or 500 grams of flour, a cup and a half or 325 grams of water, two. teaspoons of salt and. a. half a teaspoon of active dry yeast to make. pizza. dough.
dough. for making pizza is produced. Overall, there are 7 initial stages in the production of. dough. for cooking pizza. First. of all, the ingredients (4 cups flour (500 grams), 1.5 cups water (about 325 grams), 2 tsp salt, and 1/2 tsp dry active yeast) are put in the mixer following 3 stages these ingredients are mixed. In the.
Pre-heat your oven to 420 degrees Fahrenheit and wait for it to get to temperature. Once it is pre-heated put the pizza in the oven on the middle rack and allow to cook for about twenty-five minutes. Now, check on the pizza, the cheese should be melted and the crust should be a little golden.
The dough should now be very smooth and flat. The size of the dough should cover an area of 20 inches by 24 inches and have the color of a dirty yellow. Lay the dough on the flat surface. Next, take a fork and poke tiny holes in the dough. The holes should cover the entire area of the pizza and look sparse.
Students will learn and write about how to make pizza using the word wall vocabulary cards, cut and paste sequencing, and literacy extension including a pizza themed glyph. Great for literacy centers and writing time.This resource is included in a How to Bundle. Check out the bundle here!How to Make Pizza:*4 Step picture sequencing (offered in ...
First, put flour, salt, cooking oil, and water into bowl. Then knead dough using your own hand. After the dough blow up, roll it to make a circle. Second, we are going to make a topping. Grate a mozzarella, and cop mushrooms also bell paper. Next, spread the dough that you have made a circle with sauce and put mozzarella mushrooms and bell paper.
How To Make Pizza Process Essay, Hexagonal Writing Essay, Crisis In Tourism Philippines Case Study, Malayalam Essay Topic Matrubhasha, Paper Typing Websites, Weekly Homework Sheet 3 Answer Key, Graduate Nurse Resume Writer Tinggalkan Balasan Batalkan balasan. Alamat email Anda tidak akan dipublikasikan.
Our writers and editors must go through a sophisticated hiring process to become a part of our team. All the candidates pass the following stages of the hiring process before they become our team members: Diploma verification. Each essay writer must show his/her Bachelor's, Master's, or Ph.D. diploma. Grammar test.
Process Essay How To Make Pizza. 1 (888)814-4206 1 (888)499-5521. 989 Orders prepared. 4.8 (3157 reviews) $ 4.90. ID 10243.