- Start the presentation and see your notes in Presenter view Article
- Add speaker notes to your slides Article
- Rehearse and time the delivery of a presentation Article
- Record a slide show with narration and slide timings Article
- Print your PowerPoint slides, handouts, or notes Article
- Create a self-running presentation Article


Start the presentation and see your notes in Presenter view
Using Presenter view is a great way to view your presentation with speaker notes on one computer (your laptop, for example), while only the slides themselves appear on the screen that your audience sees (like a larger screen you're projecting to).
If you're using a newer version of PowerPoint, just connect the monitors and PowerPoint automatically sets up Presenter View for you.
If Presenter view appears on the wrong screen, you can swap the display quickly .
Turn off Presenter view if you prefer not to use it.

Start presenting
On the Slide Show tab, in the Start Slide Show group, select From Beginning .

Use the controls in Presenter view
To move to the previous or next slide, select Previous or Next .

To view all the slides in your presentation, select See all slides .

Tip: You’ll see thumbnails of all the slides in your presentation (as shown below), making it easy to jump to a specific slide in the show.

To view a detail in your slide up close, select Zoom into slide , and then point to the part you want to see.

For more details on zooming in, see Zoom in to part of a slide .
To point to or write on your slides as you present, select Pen and laser pointer tools .

Press the Esc key when you want to turn off the pen, laser pointer, or highlighter.
To hide or unhide the current slide in your presentation, select Black or unblack slide show .

You can use PowerPoint on your smartphone as a remote control to run your presentation and view your speaker notes. See Using a laser pointer on your smartphone when presenting in PowerPoint for more information, including a brief video.
Swap the Presenter view and Slide view monitors
To manually determine which screen shows your notes in Presenter view and which shows only the slides themselves, on the task bar at the top of Presenter view, select Display Settings , and then select Swap Presenter View and Slide Show .

What the notes look like in Presenter view
Tip: You can add notes either while you’re presenting, directly from Presenter view, or as you’re editing your presentation. For information on how to add speaker notes to your presentation see Add speaker notes to your slides.

The notes appear in a pane on the right. If you need to add or delete something, simply click in the text box to edit it. The text wraps automatically, and a vertical scroll bar appears if necessary. You can change the size of the text in the Notes pane by using the two buttons at the lower left corner of the Notes pane:

To change the size of the panes in Presenter View, point your mouse at the vertical line that separates them, then click and drag.
Tip: If you don't need to see the current slide in Presenter View at all, and would like your notes to be larger, drag that vertical separator line all the way to the left.
Turn off Presenter view
If you want Presenter view turned off while you are showing your presentation to others:
On the Slide Show tab of the ribbon, clear the check box named Use Presenter View .

Keep your slides updated
If you're working with a team of people to create your slide deck it may be that changes are being made to the slides right up to the last minute. Traditionally once you've started your presentation your slides wouldn't update. If you're using PowerPoint for Microsoft 365 you have the option to let your slides be updated by your team even as you're presenting so that you always have the up-to-the-minute changes.
You can turn this on by going to the Slide Show tab of the ribbon, selecting Set Up Slide Show , and checking the box for Keep slides updated .

If you've already started your presentation and you want to make sure that setting is on, you can do that from Presenter view. Select the More slide show options button (which looks like three dots) and on the menu make sure Keep Slides Updated is checked.

Using a laser pointer on your smartphone when presenting in PowerPoint
To start using Presenter view, select Slide Show > Presenter View .

To move to the previous or next slide, select the Previous or Next arrow.

To turn off the pen, laser pointer, or highlighter, press the Esc key.
To make the screen black or to un-black the screen, Press b on the keyboard.

Extend your Mac desktop to the second monitor
On the Apple menu, select System Preferences .
Open the Displays app.
Click the Arrangement tab in the dialog box.
Clear the Mirror Displays check box.
By doing this process, you now have a two-monitor setup. You can present a PowerPoint slide show on one screen while having other applications open on the other screen, keeeping those other apps private to yourself.
To manually determine which screen shows your notes in Presenter view and which shows only the slides themselves, on the task bar at the top left of Presenter view, select Swap Displays .
When your computer is connected to a projector and you start Presenter View, it appears on your computer's screen, while only the slides appear on the projector screen.

The notes appear in a pane on the right:
The text wraps automatically, and a vertical scroll bar appears if necessary.
You can edit the text in the Notes pane.
You can change the size of the text in the Notes pane by using the two buttons at the lower left corner of the Notes pane:

You can adjust the size of the current slide, and notes and next slide panels, by using your mouse to grab and drag the vertical line that separates the two panels.
Turn off Presenter view before a presentation begins
On the PowerPoint menu, select Preferences .
In the PowerPoint Preferences dialog box, under Output and Sharing , click Slide Show .

In the Slide Show dialog box, clear the Always start Presenter View with 2 displays check box.

Close the dialog box.
Turn off Presenter view during a presentation
At the top of the Presentation view window, click Use Slide Show .

This button closes Presenter view. As a result, both your personal computer screen and the projector screen show the slide show.
If you're working with a team of people to create your slide deck it may be that changes are being made to the slides right up to the last minute. Traditionally once you've started your presentation your slides wouldn't update. If you're using PowerPoint for Microsoft 365 for Mac you have the option to let your slides be updated by your team even as you're presenting so that you always have the up-to-the-minute changes.
You can turn this on by going to the Slide Show tab of the ribbon, and checking the box for Keep Slides Updated .

Create a self-running presentation
Record your slide show
Keep slides updated

Need more help?
Want more options.
Explore subscription benefits, browse training courses, learn how to secure your device, and more.

Microsoft 365 subscription benefits

Microsoft 365 training

Microsoft security

Accessibility center
Communities help you ask and answer questions, give feedback, and hear from experts with rich knowledge.

Ask the Microsoft Community

Microsoft Tech Community

Windows Insiders
Microsoft 365 Insiders
Was this information helpful?
Thank you for your feedback.
View Options in PowerPoint – A Complete Beginner’s Guide!
By: Author Shrot Katewa

There are many different types of presentations view available in PowerPoint including Normal View, Outline View, Presenter View, and Slide Show View to name a few. All these views serve different purposes and it is important to know how to use them appropriately to get the most out of PowerPoint!
In this article, we will talk about what each type of view does in PowerPoint and how to access them so that you can choose the best for your needs! So, let’s get started!
[ A Quick Note Before We Begin – for this article, I will be using one of the presentation templates from Envato Elements . With Envato Elements, you get access to thousands of presentation designs with unlimited downloads so you never run out of options again. Plus, you get free previews so you know exactly what you’re getting before buying! It is also very affordable. Check out their pricing here ]
1. What are the Different Type of View Options Available in PowerPoint?
Microsoft PowerPoint is equipped with a variety of Slide View options that can be used for different purposes.
These are the different view options available in PowerPoint –
- Normal View
- Slide Sorter View
- Notes Page View
- Reading View
- Outline View
- Slide Show View
- Presenter View
- Slide Master View
2. How to Access the Different View Modes in PowerPoint?
To access the different view modes in PowerPoint, you have to click on the ‘View’ tab in the ribbon. The 2-step process is described below.
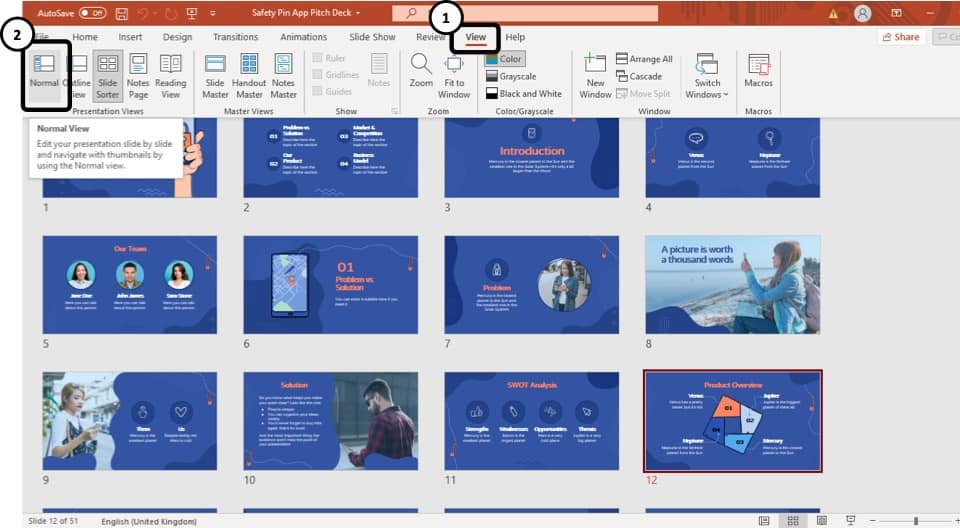
Step-1: Click on the ‘View’ tab
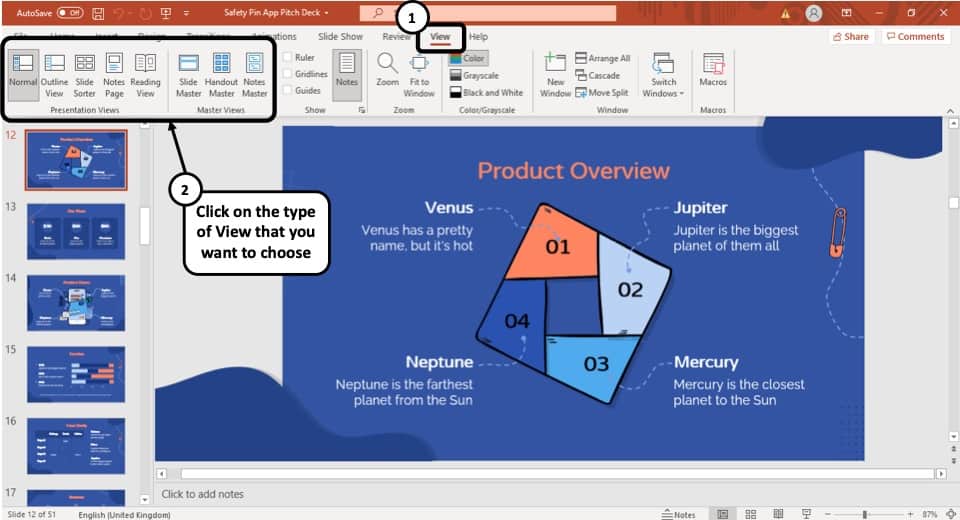
At first, select the ‘View’ tab, which is the second to last tab in the ribbon section of your PowerPoint Window.
Step-2: Select your preferred ‘View Mode’
Once you have access to the ‘View’ tab, you can select your preferred view mode such as the Outline View , Slide Sorter view, Slide Master view, etc. from the Presentation View section or the Master View section. (as shown in the image in step 1)
3. What is the Purpose of Various View Modes in PowerPoint?
Each view mode in PowerPoint has its own purpose. Let’s go through the purposes of the different slide view options one by one below –
1. Normal View
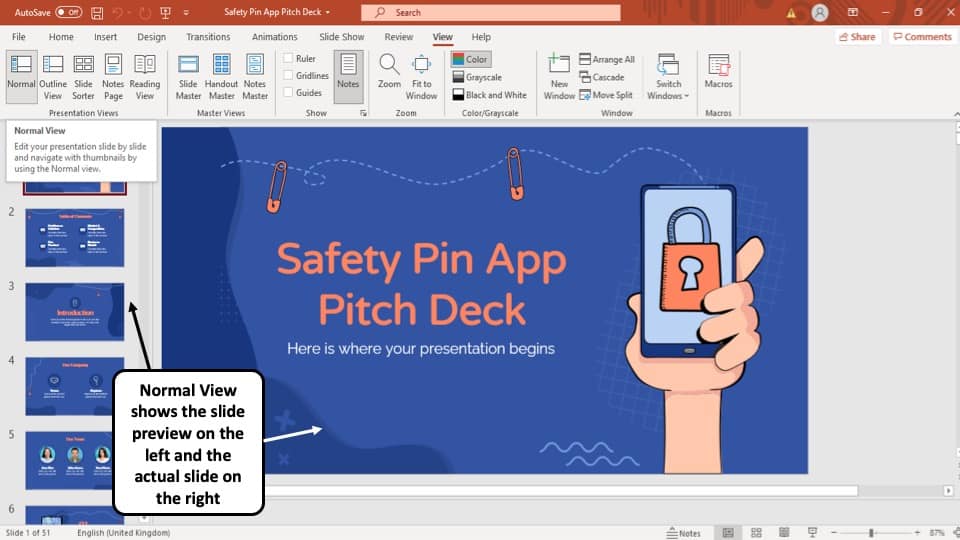
The ‘Normal View’ option is the first option in the ‘Presentation Views’ section of the ‘View’ tab. It is the most commonly used viewing option and is also the default slide view for PowerPoint.
The slides appear on the left of the PowerPoint window in the ‘Slide Navigation’ bar. Thumbnails of the slide are represented as boxes in the ‘Slide Navigation’ bar with its consecutive serial number to the left of it.
The main function of normal view mode in PowerPoint is to navigate through slides in a vertical grid while allowing you to add, design, or edit the slides while getting a preview of the slides on the left.
2. Slide Sorter View
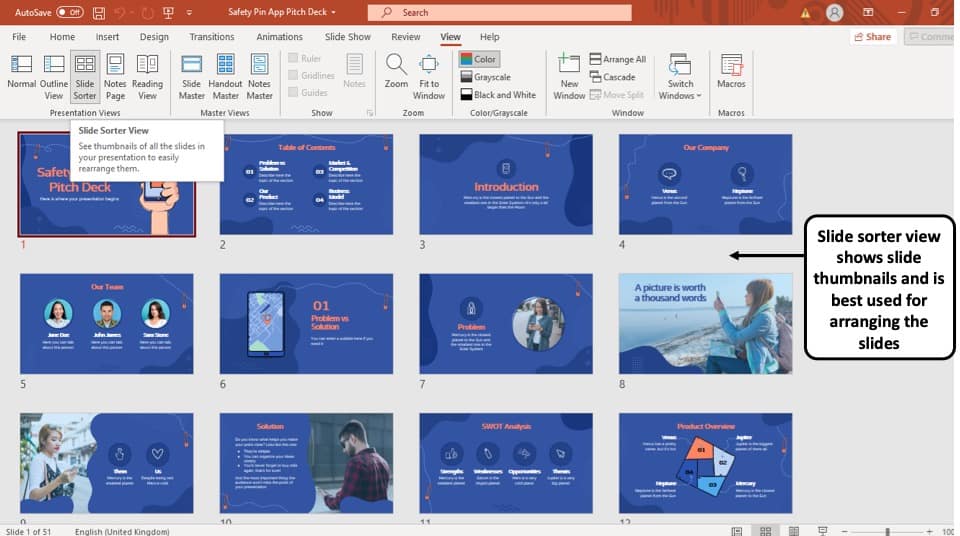
The ‘Slide Sorter’ option gives you an overview of all the slides in your PowerPoint presentation.
The slides are represented as thumbnails as a grid of boxes arranged side by side. The serial number of the slide is given on the bottom left corner of the slide thumbnail.
This option serves the purpose of viewing the slides together in one window making it easier to rearrange and organize them in a quick fashion.
3. Notes Page View

The ‘Notes Page View’ option gives you the view of each slide and its speaker notes in one page.
In this view, the slides appear at the top and the speaker notes are given on the bottom of the two sections. The serial number of the slide is not shown in this view. You can also edit speaker notes from here.
The main purpose of the notes page view in PowerPoint is to preview what each page will look like before you print the slides with speaker notes.
4. Reading View:
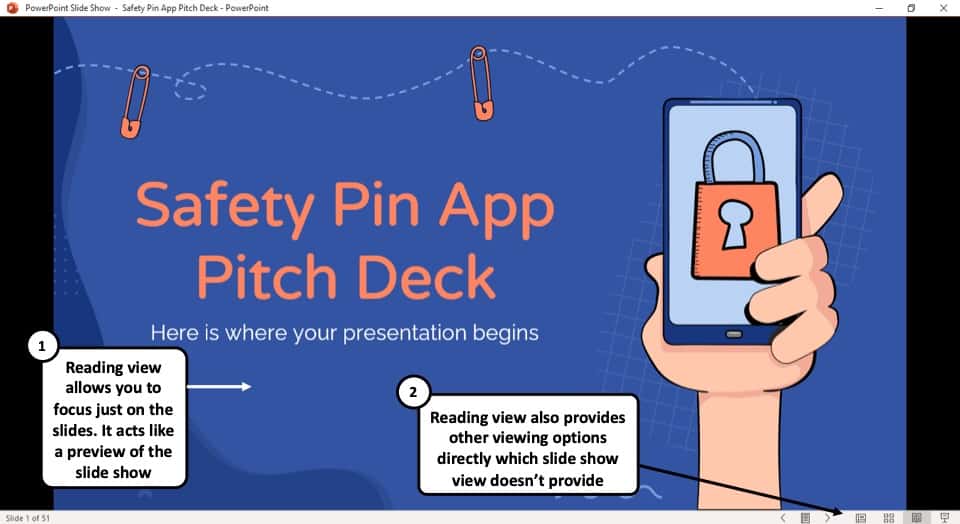
The Reading View option allows you to view your PowerPoint presentation without going into Full Screen mode. All the transitions and animations can be seen in this view. The serial number of the slide is given at the bottom right corner of the window.
It is used to preview the slide and review the slides with full focus. This mode also makes other view options easily accessible, which is not the case in ‘Slide Show’ mode where the presentation is shown in the full screen, and the options are not visible on screen.
The reading mode is actually more useful for word documents, as it allows the reader to focus just on the text. In my opinion, it adds little value to a PowerPoint presentation.
5. Outline View:
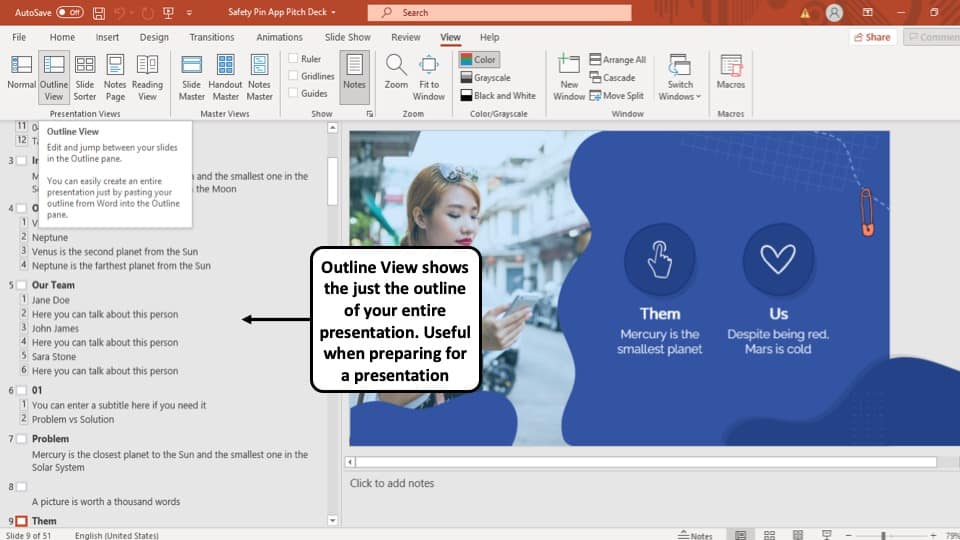
The ‘Outline View’ shows you the entire outline of your PowerPoint presentation in the ‘Slide Navigation’ bar.
In this view, there is no thumbnail of the presentation. Instead, there is an outline of all the data present in that slide. The serial number of the slide is at the left followed by a small white box that represents a slide and then the outline of that slide.
You can also create an entire slide in the pane of this view by copy and pasting data from Microsoft Word. However, you will have to design the slide separately once the data has been added to each slide.
6. Slide Show View:

The Slide Show View is the view that your audiences are going to see. This view shows each slide of your PowerPoint presentation in full screen.
All the transitions, animation, and multimedia files in your PowerPoint presentation are played here. Consecutive slides can be accessed using the direction keys on your keyboard or by clicking once on the slide.
7. Presenter View:
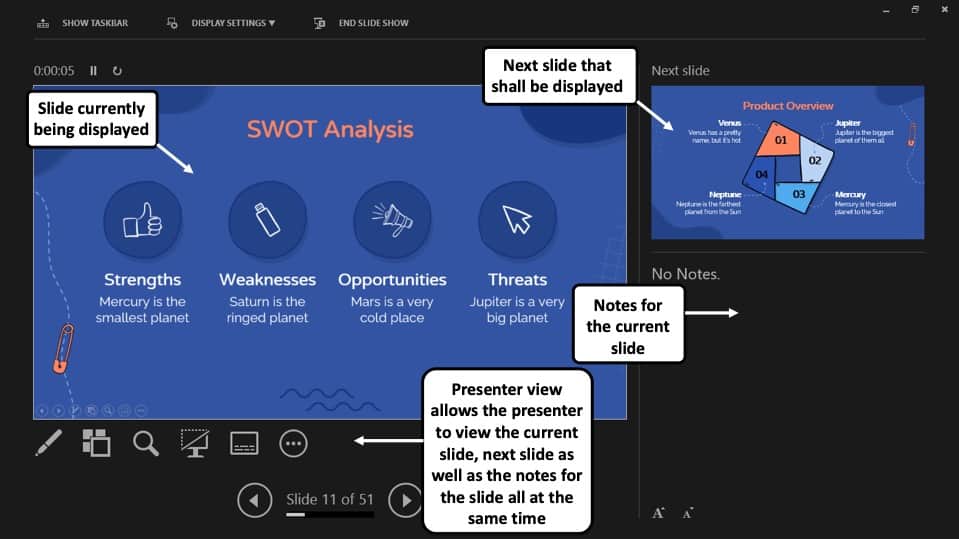
This is the view that you as a presenter are going to see while the audience is seeing the ‘Slide Show’ view.
Although you can give a presentation even in the slide show view, but it is always recommend to deliver the presentation using the “Presenter View” mode in PowerPoint as it provides you with additional features and benefits!
This view mode in PowerPoint will split the screen in multiple windows. The window on the left represents the current slide that is being displayed (the one that is visible to your audience).
The window in the top right section indicates the next slide in the queue. Whereas, the notes section displays the notes or key points made by each slide. Both, the notes section as well as the next slides window are only visible to the presenter and not to the audience!
The purpose of the “ Presenter View ” is to give the presenter all the aids to be prepared for the next slide and highlight the key points to be made on the current slide while delivering the presentation.
8. Slide Master View:
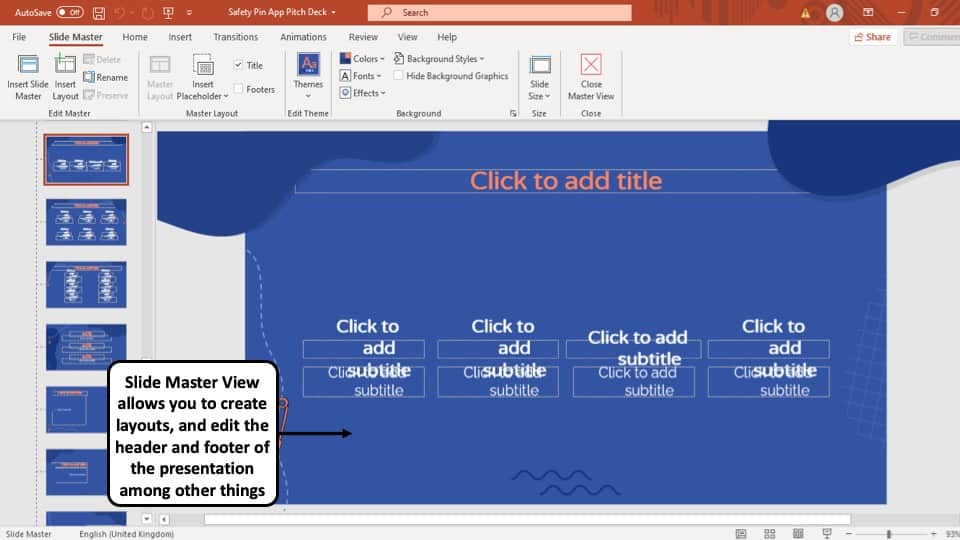
This view gives you a view of all the layouts used on the slides of your PowerPoint presentation.
The ‘ Slide Master View ’ option allows you to edit all the aspects of the layouts in your presentation such as fonts, background, color, and pretty much everything you can think of.
You can edit all the slide layouts of the presentation. Furthermore, you can also edit the header and footer of the presentation using the “ Slide Master View ” in PowerPoint.
4. How to Open the Presenter View in PowerPoint?
There are 2 different ways you can enter into Presenter View in PowerPoint –
- Using Slide Show View
- Using the short cut key i.e. Alt+F5
If you are using the Office 365 version of PowerPoint , you can actually directly access the “Presenter View” in the View section. Simply click on “View”. Then, click on “Presenter View”
Let’s look at both the methods quickly –
Method 1 – Using the Slide Show View
Step-1: Click on the ‘Slide Show’ button at the bottom right corner of the screen
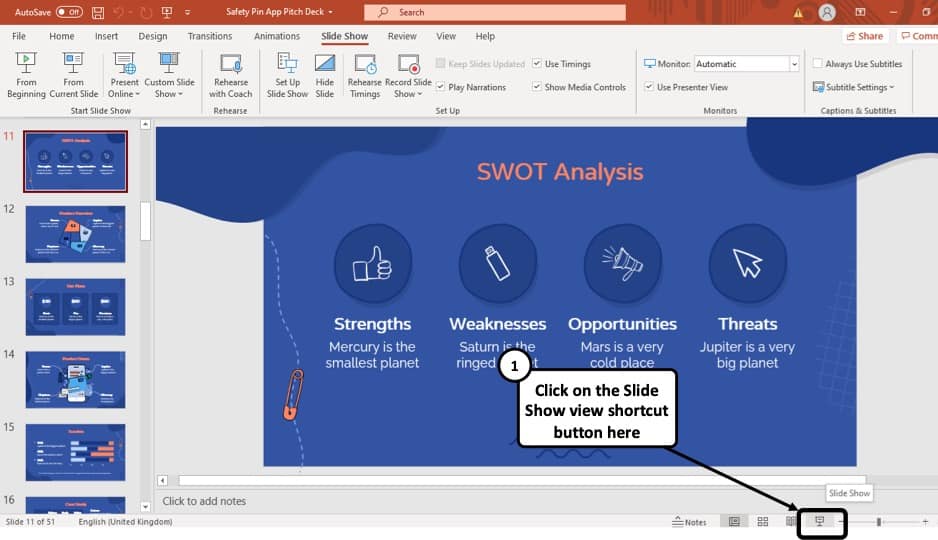
At first, you have to click on the ‘Slide Show’ button that looks like a projector screen which is located at the bottom right corner of your PowerPoint window. (as indicated in the image above)
Step-2: Right-click and choose “Show Presenter View”
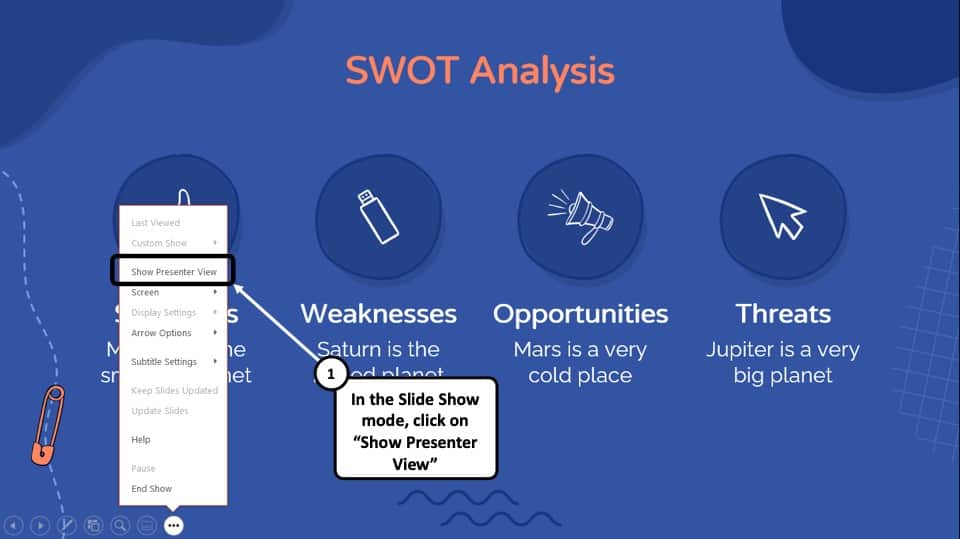
Once you are in the ‘Slide Show’ mode, using your mouse right-click anywhere on the screen. From the menu that appears, choose the “ Show Presenter View ” option
Method 2 – Using the Keyboard Shortcut
Alternatively, you can press ‘ Alt + F5 ’ on your keyboard and that will immediately open the ‘Presenter View’ mode.
The keyboard shortcut to open the “Presenter View” in PowerPoint on Mac is “Option+Enter” key.
5. How to Change PowerPoint Back to Normal View?
To change your PowerPoint back to ‘Normal View’ from ‘Slide Show’ mode, ‘Presenter View’ option or the ‘Reading View’ option, all you have to do is simply press the ‘ESC’ button on the keyboard of your computer. This will take you back to Normal View.
If you are using any other view apart from these 3 view modes in PowerPoint, you need to do the following –
If you are in a different viewing option, such as ‘Slide Sorter’ option, or the ‘Reading View’ option then you have to select the ‘Normal View’ option from the ‘View’ tab instead of the ‘Slide Sorter’ option or the different slide view option you are currently on.
More PowerPoint Related Topics
- How to Crop a Picture in PowerPoint? [Complete Step-by-Step Tutorial!]
- How to Give a Presentation on Zoom? A Helpful Resource!
- What is a Presentation Clicker? [And How to Use it!]
- How to Convert a PowerPoint to PDF? [A Simple Guide!]
- PowerPoint vs Google Slides: Which is Better? [ULTIMATE Test!]
- How to Change Bullet Style in PowerPoint? A Complete Guide
Credit to Pressahotkey (via Freepik) for the featured image of this article
- Great Tech Gifts for Any Occasion
- The Best Gadgets for The Beach or Pool
Different Ways to View Slides in PowerPoint
Use different views to design, organize, outline, and present your slideshow
- Brock University
Many people spend all their time in the Normal view when working on their PowerPoint presentations . However, there are other views that are useful as you put together and present your slideshow. In addition to Normal view (also known as Slide view), you'll find Outline view, Slide Sorter view, and Notes Page view.
Information in this article applies to PowerPoint 2019, 2016, 2013; PowerPoint for Microsoft 365, and PowerPoint for Mac.
Design Slides in Normal View
Normal view, or Slide view as it is often called, is the view you see when you start PowerPoint. It is the view where you'll spend most of your time in PowerPoint. Working on a large version of a slide is helpful when you're designing your presentation .
Normal view displays thumbnails of each slide, the slide where you enter your text and images, and an area to keep presenter notes.
To return to Normal view at any time, select View > Normal .
The four slide views are located on the View tab. Toggle between them to compare views.
Organize a Presentation in Outline View
In the Outline view , your presentation is displayed in outline form. The outline contains the titles and main text from each slide. The graphics are not shown, although there may be a small notation that they exist. You can work and print in either formatted text or plain text.
Outline view makes it easy to rearrange your points and move slides to different positions. Outline view is useful for editing purposes. And, it can be exported as a Word document to use as a summary handout .
To view an outline of your presentation instead of thumbnails, select View > Outline View .
Rearrange a Presentation in Slide Sorter View
Slide Sorter view shows a miniature version of all the slides in the presentation in horizontal rows. These miniature versions of the slides are called thumbnails.
Use Slide Sorter view to delete or rearrange your slides by dragging them to new positions. Add effects, such as transitions and sounds, to several slides at the same time in Slide Sorter view. And, add sections to organize your slides. If you are collaborating with colleagues on a presentation, assign each collaborator a section.
To locate the Slide Sorter view, select View > Slide Sorter .
Keep Presentation Prompts in Notes Page View
When you create a presentation, add speaker notes that you refer to later while delivering the slideshow to your audience. Those notes are visible to you on your monitor, but they aren't visible to the audience.
Notes Page view shows a small version of a slide with an area below for speaker notes . Each slide is displayed on its own notes page. Print these pages to use as a reference while making a presentation or to hand out to audience members. The notes do not show on the screen during the presentation.
To locate the Notes Page view, select View > Notes Page .
Get the Latest Tech News Delivered Every Day
- Outline View in PowerPoint or OpenOffice
- Slide Layouts in PowerPoint
- The 10 Most Common PowerPoint Terms
- How to Use Speaker Notes in PowerPoint
- How to Print PowerPoint Slides
- How to Select More Than One Slide in PowerPoint
- How to Use the Slide Sorter View in PowerPoint
- How to Hide and Unhide a Slide in PowerPoint
- How to Print PowerPoint Slides With Notes
- Thumbnails Are Used for Navigation in Digital Files
- Converting PowerPoint Slides to Word Documents
- How to Add Page Numbers in PowerPoint
- Add, Delete or Change the Order of PowerPoint Slides
- Converting PowerPoint Presentations to Word Documents
- How to Make a Slideshow on PowerPoint
- Beyond the Basics in PowerPoint
- All-Access Subscriptions
- Business Licensing
- Lightroom Classic
- Photoshop Elements
- Crystal Reports
- Interview Skills
- Resume Skills
- Excel for Lawyers
- Outlook for Lawyers
- QuickBooks for Lawyers
- Word for Lawyers
- Microsoft Office Suite
- Outlook on the Web
- Microsoft Project
- Microsoft Teams
- QuickBooks Online
- QuickBooks Pro
- Video Course Options
- SUBSCRIPTIONS
- Photoshop Elements 2024
- Photoshop Elements 2023
- Photoshop Elements 2022
- Photoshop Elements 2021
- Photoshop Elements 2020
- Photoshop Elements 2019
- Photoshop Elements 2018
- Photoshop Elements 15
- Google Classroom for Teachers
- Google Docs
- Google Drive
- Google Forms
- Google Sheets
- Google Slides
- Mac OS Keyboard Shortcuts
- Excel Formulas and Functions
- Excel Keyboard Shortcuts
- Excel Tables PivotTables and Charts
- Access for Microsoft 365
- Excel for Microsoft 365
- Microsoft Office 365
- Outlook for Microsoft 365
- PowerPoint for Microsoft 365
- Publisher for Microsoft 365
- Word for Microsoft 365
- Access 2021
- Microsoft Office 2021
- Outlook 2021
- PowerPoint 2021
- Publisher 2021
- Access 2019
- Microsoft Office 2019
- Outlook 2019
- PowerPoint 2019
- Publisher 2019
- Access 2016
- Microsoft Office 2016
- OneNote 2016
- Outlook 2016
- PowerPoint 2016
- Publisher 2016
- Microsoft Office 2013
- OneNote 2013
- Outlook 2013
- PowerPoint 2013
- Microsoft Office for iPad
- QuickBooks Pro 2024
- QuickBooks Pro 2023
- QuickBooks Pro 2022
- QuickBooks Pro 2021
- QuickBooks Pro 2020
- QuickBooks Pro 2019
- QuickBooks Pro 2018
- QuickBooks Pro 2017
- QuickBooks Pro 2016
- QuickBooks Pro 2015
- QuickBooks Pro 2014
- Sage 50 Accounting
- Windows 11 and 10 Keyboard Shortcuts
- Chrome OS for Chromebooks
- Word and Excel (Mac) 2022
- Word and Excel (PC/Windows) 2021-2016 and 365
- QuickBooks Desktop (PC/Windows) 2024
- QuickBooks Desktop (PC/Windows) 2023
- QuickBooks Desktop (PC/Windows) 2022-2015
- Windows 11 and 10
- Our History
- Customer Service
- Testimonials
- Lost Password
- Register a Product
- Manage My Account
- Member Login
Try the PowerPoint Course for Free!
Slide show view in powerpoint – instructions, how to use slide show view in powerpoint:.
This video lesson, titled “ Start a Slide Show ,” shows how to use Slide Show view in PowerPoint. This video is from our complete PowerPoint tutorial , titled “ Mastering PowerPoint Made Easy v.2016-2013 .”
Overview of How to Use Slide Show View in PowerPoint:
Slide Show view in PowerPoint lets you show a presentation on or from your computer. You can view either the entire presentation or just a few slides. This is the best way to view or preview a presentation to ensure it is clear, focused, and impactful in the way you want.
To run a presentation in Slide Show view in PowerPoint, click the “Slide Show” tab in the Ribbon. To start the slide show from the first slide, then click the “From Beginning” button in the “Start Slide Show” button group. Alternatively, to start the slide show from the currently selected slide, click the “From Current Slide” button in the “Start Slide Show” button group.
To advance through the slides and animations in a presentation in Slide Show view, click the screen. Alternatively, to advance through the slide show, press “Spacebar” on your keyboard. After viewing the entire presentation, the slide show closes and returns to its previous view. However, to exit the slide show at any time, press the “Esc” key on your keyboard.
Alternatively, you can select commands in a pop-up menu or click buttons in a toolbar to navigate the presentation and access annotation options. To show a pop-up menu that contains commands for navigating the presentation and adding slide annotations in Slide Show view, right-click the screen. Then select the command to perform. Alternatively, move your mouse onscreen in Slide Show view to see a small semi-transparent toolbar appear in the lower-left corner of the screen. Then click the desired button to perform.

A picture showing the pop-up menu of commands in Slide Show view in PowerPoint.
To see a listing of the keyboard shortcuts you can use in Slide Show view in PowerPoint, right-click a slide in Slide Show view to show the pop-up menu. Then select the “Help” command in the pop-up menu to open the “Slide Show Help” dialog box. To show commands based on category, select the desired category at the top of the dialog box. The keyboard shortcuts for that category then appear in the dialog box. These can help you minimize onscreen distraction when delivering your presentation. To close the dialog box after examining the shortcuts, click its “OK” button.
Instructions on How to Use Slide Show View in PowerPoint:
- To run a presentation in Slide Show view in PowerPoint , click the “Slide Show” tab in the Ribbon.
- To start the slide show from the first slide , then click the “From Beginning” button in the “Start Slide Show” button group.
- Alternatively, to start the slide show from the currently selected slide , click the “From Current Slide” button in the “Start Slide Show” button group.
- To advance through the slides and animations in a presentation in Slide Show view , click the screen.
- Alternatively, to advance through the slide show , press “Spacebar” on your keyboard.
- After viewing the entire presentation, the slide show closes and returns to its previous view.
- Alternatively, to exit the slide show at any time , press the “Esc” key on your keyboard.
- Alternatively, you can select commands in a pop-up menu or click buttons in a toolbar to navigate the presentation and access annotation options.
- To show a pop-up menu that contains commands for navigating the presentation and adding slide annotations in Slide Show view , right-click the screen.
- Then select the command to perform.
- Alternatively , move your mouse onscreen in Slide Show view to see a small semi-transparent toolbar appear in the lower-left corner of the screen.
- Then click the desired button to perform.
- To see a listing of the keyboard shortcuts you can use in Slide Show view in PowerPoint , right-click a slide in Slide Show view to show the pop-up menu.
- Then select the “Help” command in the pop-up menu to open the “Slide Show Help” dialog box.
- To show commands based on category , select the desired category at the top of the dialog box.
- The keyboard shortcuts for that category then appear in the dialog box.
- When finished, click the “OK” button in the “Slide Show Help” dialog box to close it.

About Joseph Brownell

How to See Your Notes When Presenting in PowerPoint

As a presenter, delivering a seamless and confident presentation is key to making a lasting impression. However, it can be challenging to remember every detail of your presentation, especially if you have a lot of content to cover. Fortunately, with PowerPoint’s Presenter View, you can easily access your notes and confidently deliver your presentation. In this article, we will cover all aspects of using PowerPoint’s Presenter View to enhance your presentation.
Table of Contents
Why You Need to See Your Notes When Presenting in PowerPoint
Presenting without having your notes at hand can be daunting and can affect the quality of your presentation. Whether you are presenting in front of a small group or a large audience, you will need to have access to your notes. This will help you deliver your presentation confidently, as you will have a clear idea of what to say or do next. In addition, having your notes visible can help you stay focused on the topics you want to cover and avoid straying off-topic.
Another reason why it is important to see your notes when presenting in PowerPoint is that it can help you manage your time effectively. By having your notes visible, you can keep track of the time and ensure that you are covering all the important points within the allocated time frame. This can help you avoid rushing through the presentation or running out of time before you have covered all the key points.
Furthermore, having your notes visible can also help you engage with your audience better. When you are confident and well-prepared, you are more likely to make eye contact with your audience and use body language effectively. This can help you build a connection with your audience and keep them engaged throughout the presentation.
How to Access Presenter View in PowerPoint
Before you can access Presenter View, you need to have a PowerPoint presentation open in Slide Show mode. Once your presentation is open, simply click on the ‘Slide Show’ tab and check the box beside ‘Use Presenter View.’ Your screen will then automatically switch to Presenter View, allowing you to see your notes and other helpful controls.
Presenter View is a great tool for giving presentations, as it allows you to see your notes and upcoming slides while your audience only sees the current slide. You can also use Presenter View to zoom in on specific parts of your slide, draw on your slides, and even use a virtual laser pointer to highlight important information. To exit Presenter View, simply press the ‘Esc’ key on your keyboard.
Understanding the Presenter View in PowerPoint
Presenter View is a powerful tool that enables you to manage your presentation effectively. It comprises several elements, including:
- The slide display area, which shows the slide that your audience sees.
- The notes section, which displays any text that you have added as notes or comments.
- The timer, which can help you stay within your allotted time.
- The navigation controls, which let you move forward and backward in your presentation easily.
- The zoom slider, which enables you to zoom in and out of your slides for added detail.
- The laser pointer and highlighter tools, which allow you to emphasize important points on your slides.
Presenter View also allows you to preview upcoming slides, giving you a chance to prepare for the next section of your presentation. This feature can be especially helpful if you need to refer to specific information on a later slide.
In addition, Presenter View provides a way to keep your audience engaged by allowing you to add annotations to your slides. You can draw attention to specific areas of your slide, highlight key points, or even add additional information that may not be included in the slide itself.
Setting Up Presenter View: Step-by-Step Guide
If you want to customize your Presenter View experience, follow these steps:
- On the ‘Slide Show’ tab, click ‘Set Up Slide Show.’
- Under ‘Multiple Monitors,’ select the ‘Use Presenter View’ checkbox.
- If you’re using a single monitor, select the ‘Display slide show on’ option and choose your primary monitor.
- If you’re using dual monitors, select the ‘Display slide show on’ option and choose the monitor that you want to display Presenter View on.
- Customize the Presenter View by selecting the options that you want to use, such as speaker notes, the timer, and the navigation controls.
- Click ‘OK.’ Your Presenter View should now be set up.
It’s important to note that not all versions of PowerPoint have the Presenter View feature. If you don’t see the ‘Use Presenter View’ checkbox under ‘Multiple Monitors,’ it’s likely that your version of PowerPoint doesn’t support this feature. In this case, you may need to upgrade to a newer version or use a different presentation software that offers Presenter View.
How to Customize Presenter View Settings in PowerPoint
If you have specific preferences for Presenter View, you can customize it by following these steps:
- Click the ‘Settings’ button in the Presenter View toolbar.
- Select the options that you want to use, such as the color scheme, font size, and slide size.
- Click ‘Save Changes’ to apply your changes.
Customizing your Presenter View settings can greatly enhance your presentation experience. For example, you can choose to display your notes on one screen while your audience sees only the slides on the other screen. Additionally, you can select the option to display a timer or a clock to help you keep track of time during your presentation. Experiment with different settings to find what works best for you and your audience.
Using Presenter View on Dual Monitor Setup
If you have a dual-monitor setup, you can use Presenter View to present your slides on one screen while managing your notes and tools on the other screen. To do this, simply select the ‘Use Presenter View’ checkbox under ‘Multiple Monitors’ in the ‘Set Up Slide Show’ dialog box. Once you start presenting, the Presenter View screen will appear on the secondary monitor, while the slides will appear on the primary screen.
Presenter View is a great tool for presenters who want to keep their notes and tools hidden from the audience. With Presenter View, you can see your notes, upcoming slides, and a timer, while your audience only sees the current slide. This feature is especially useful for longer presentations, where you may need to refer to your notes or keep track of time.
Another benefit of using Presenter View is that it allows you to easily navigate through your presentation. You can use the arrow keys on your keyboard to move forward or backward through your slides, or you can use the thumbnails on the Presenter View screen to jump to a specific slide. This makes it easy to adjust your presentation on the fly, without having to interrupt the flow of your presentation.
Troubleshooting Common Issues with Presenter View in PowerPoint
If you experience common issues with Presenter View, such as notes not displaying correctly, audio not working, or distorted visuals, try these troubleshooting tips:
- Make sure that your computer meets the minimum system requirements for using Presenter View.
- Check that the correct audio output is selected in the control panel.
- Review your slides and notes to ensure that there are no formatting errors.
- Try closing other open applications to free up system resources.
- Ensure that your computer is updated with all available updates.
- Try reinstalling or repairing PowerPoint to eliminate any software conflicts.
However, if these troubleshooting tips do not resolve your issues, there may be other factors at play. One possible cause of issues with Presenter View is outdated or incompatible drivers for your computer’s graphics card. Check with your computer manufacturer or graphics card manufacturer to see if there are any updates available.
Another potential issue could be related to your computer’s display settings. Make sure that your display settings are optimized for the resolution and aspect ratio of your presentation. You may also want to try adjusting the scaling settings to see if that improves the display of your slides and notes.
Tips and Tricks for Effective Note-taking During Presentation
To get the most out of Presenter View, try these effective note-taking tips:
- Organize your notes by slide or topic to stay on track during the presentation.
- Use bullet points and keywords to keep your notes concise and easy to read.
- Include cues or action words to remind you of any demonstrations, animations, or other interactive elements in your presentation.
- Use the highlighter tool to draw attention to the most critical points.
Enhancing Your Presentation with Presenter View
Presenter View can enhance your presentation in several ways, such as by allowing you to add visual aids and multimedia elements, manage your time effectively, and engage your audience. By using Presenter View, you can keep your presentation on track, highlight key information, and maintain your audience’s attention throughout.
The Importance of Rehearsing Your Presentation with Presenter View
Practicing your presentation with Presenter View can help you become familiar with the interface, identify any errors or issues, and ensure that your presentation will run seamlessly. Use Presenter View during your presentation rehearsal to simulate the actual presentation environment and get a feel for how it works.
Taking Advantage of the Laser Pointer and Highlighter Tools in Presenter View
The laser pointer and highlighter tools are handy for emphasizing key points on your slides and improving audience engagement. To use them, simply press and hold the ‘Ctrl’ key and click the mouse to activate the laser pointer or highlighter. Release the key to deactivate them.
How to Switch Between Slides and Notes during a Presentation
If you need to switch between slides and notes during your presentation, simply click the ‘Notes’ button in the Presenter View toolbar. This will display your notes and allow you to scroll through them as needed.
Utilizing the Timer and Countdown Features of Presenter View
The timer and countdown features are useful for keeping your presentation on track and ensuring that you do not exceed your allotted time. To use them, simply enable the ‘Timer’ feature in the ‘Settings’ section of Presenter View. You can then set the countdown time and choose whether to display it during the presentation or keep it hidden.
Sharing Your Screen Using Presenter View in Microsoft Teams or Zoom Meetings
If you are using Microsoft Teams or Zoom Meetings to deliver your presentation remotely, you can still use Presenter View by sharing your screen. To do this, simply select the ‘Share Screen’ option and choose the ‘Presenter View’ screen. This will allow you to present your slides while keeping your notes and controls visible to you for an uninterrupted presentation experience.
By following the steps and tips outlined in this article, you can use PowerPoint’s Presenter View to deliver a polished and professional presentation that wows your audience. Always remember to rehearse your presentation before the actual day so that you’re comfortable with the tools and settings for Presenter View, and ready to tackle any issue that might arise.
By humans, for humans - Best rated articles:
Excel report templates: build better reports faster, top 9 power bi dashboard examples, excel waterfall charts: how to create one that doesn't suck, beyond ai - discover our handpicked bi resources.
Explore Zebra BI's expert-selected resources combining technology and insight for practical, in-depth BI strategies.

We’ve been experimenting with AI-generated content, and sometimes it gets carried away. Give us a feedback and help us learn and improve! 🤍
Note: This is an experimental AI-generated article. Your help is welcome. Share your feedback with us and help us improve.

How-To Geek
How to view and restore old versions of powerpoint files.
Accidentally deleted something important from a PowerPoint presentation?
Quick Links
Requirements, how to see older versions of your powerpoint presentations.
Microsoft PowerPoint lets you view and switch to older versions of your presentations. If you accidentally deleted something important and it got overwritten in PowerPoint, here's how to restore it.
Before you get started, make sure that you have a Microsoft 365 subscription. The ability to view and restore previous versions of PowerPoint presentations can be accessed only through a Microsoft 365 subscription.
Fortunately, this subscription also gives you access to all other Office apps, along with 1TB of OneDrive storage. You can put the cloud storage to good use by automatically saving your presentations to OneDrive.
Also, enabling auto-save on PowerPoint is required for accessing version history. To do so, you'll need to create a new PowerPoint presentation and then turn the "AutoSave" switch on in the document's title bar. When PowerPoint shows you a confirmation pop-up, select "OneDrive."
Related: How to Automatically Save PowerPoint Presentations to OneDrive
Now that you've sorted out the basics, open PowerPoint and load any PowerPoint presentation. There are two ways to check version history here, and we'll show you both.
First, click "File" in the menu bar.
In the left pane, click "Info."
Click "Version History" on the right.
Alternately, you can click the file name at the top of the document that you've opened and select "Version History" from the pop-up menu.
No matter which method you choose, a new pane labeled "Version History" will open up on the right-hand side of your presentation in PowerPoint.
Microsoft PowerPoint sorts older versions of the document by date and time here. To load a previous version of the presentation, click the "Open version" button below the version that you need to go back to.
This will open a read-only file that shows an older version of your PowerPoint presentation. Right below the ribbon menu, you'll see a button labeled "Restore." Click it to go back to the previous version.
Note that this will overwrite your PowerPoint presentation. You can always repeat the same steps to visit the modified version of your document in case you want to copy any additional changes to the older version.
If you use Microsoft 365 apps frequently, you might also be interested in knowing how to restore previous versions of Excel workbooks or Word documents .
Related: How to View and Restore Previous Versions of a Word Document
Critical PowerPoint Shortcuts – Claim Your FREE Training Module and Get Your Time Back!
How to Make a PowerPoint Presentation (Step-by-Step)
- PowerPoint Tutorials
- Presentation Design
- January 22, 2024
In this beginner’s guide, you will learn step-by-step how to make a PowerPoint presentation from scratch.
While PowerPoint is designed to be intuitive and accessible, it can be overwhelming if you’ve never gotten any training on it before. As you progress through this guide, you’ll will learn how to move from blank slides to PowerPoint slides that look like these.

Table of Contents
Additionally, as you create your presentation, you’ll also learn tricks for working more efficiently in PowerPoint, including how to:
- Change the slide order
- Reset your layout
- Change the slide dimensions
- Use PowerPoint Designer
- Format text
- Format objects
- Play a presentation (slide show)
With this knowledge under your belt, you’ll be ready to start creating PowerPoint presentations. Moreover, you’ll have taken your skills from beginner to proficient in no time at all. I will also include links to more advanced PowerPoint topics.
Ready to start learning how to make a PowerPoint presentation?
Take your PPT skills to the next level
Start with a blank presentation.
Note: Before you open PowerPoint and start creating your presentation, make sure you’ve collected your thoughts. If you’re going to make your slides compelling, you need to spend some time brainstorming.
For help with this, see our article with tips for nailing your business presentation here .
The first thing you’ll need to do is to open PowerPoint. When you do, you are shown the Start Menu , with the Home tab open.
This is where you can choose either a blank theme (1) or a pre-built theme (2). You can also choose to open an existing presentation (3).
For now, go ahead and click on the Blank Presentation (1) thumbnail.

Doing so launches a brand new and blank presentation for you to work with. Before you start adding content to your presentation, let’s first familiarize ourselves with the PowerPoint interface.
The PowerPoint interface

Here is how the program is laid out:
- The Application Header
- The Ribbon (including the Ribbon tabs)
- The Quick Access Toolbar (either above or below the Ribbon)
- The Slides Pane (slide thumbnails)
The Slide Area
The notes pane.
- The Status Bar (including the View Buttons)
Each one of these areas has options for viewing certain parts of the PowerPoint environment and formatting your presentation.
Below are the important things to know about certain elements of the PowerPoint interface.
The PowerPoint Ribbon

The Ribbon is contextual. That means that it will adapt to what you’re doing in the program.
For example, the Font, Paragraph and Drawing options are greyed out until you select something that has text in it, as in the example below (A).

Furthermore, if you start manipulating certain objects, the Ribbon will display additional tabs, as seen above (B), with more commands and features to help you work with those objects. The following objects have their own additional tabs in the Ribbon which are hidden until you select them:
- Online Pictures
- Screenshots
- Screen Recording
The Slides Pane

This is where you can preview and rearrange all the slides in your presentation.
Right-clicking on a slide in the pane gives you additional options on the slide level that you won’t find on the Ribbon, such as Duplicate Slide , Delete Slide , and Hide Slide .

In addition, you can add sections to your presentation by right-clicking anywhere in this Pane and selecting Add Section . Sections are extremely helpful in large presentations, as they allow you to organize your slides into chunks that you can then rearrange, print or display differently from other slides.

The Slide Area (A) is where you will build out your slides. Anything within the bounds of this area will be visible when you present or print your presentation.
Anything outside of this area (B) will be hidden from view. This means that you can place things here, such as instructions for each slide, without worrying about them being shown to your audience.

The Notes Pane is the space beneath the Slide Area where you can type in the speaker notes for each slide. It’s designed as a fast way to add and edit your slides’ talking points.
To expand your knowledge and learn more about adding, printing, and exporting your PowerPoint speaker notes, read our guide here .
Your speaker notes are visible when you print your slides using the Notes Pages option and when you use the Presenter View . To expand your knowledge and learn the ins and outs of using the Presenter View , read our guide here .

You can resize the Notes Pane by clicking on its edge and dragging it up or down (A). You can also minimize or reopen it by clicking on the Notes button in the Status Bar (B).
Note: Not all text formatting displays in the Notes Pane, even though it will show up when printing your speaker notes. To learn more about printing PowerPoint with notes, read our guide here .
Now that you have a basic grasp of the PowerPoint interface at your disposal, it’s time to make your presentation.
Adding Content to Your PowerPoint Presentation
Notice that in the Slide Area , there are two rectangles with dotted outlines. These are called Placeholders and they’re set on the template in the Slide Master View .
To expand your knowledge and learn how to create a PowerPoint template of your own (which is no small task), read our guide here .

As the prompt text suggests, you can click into each placeholder and start typing text. These types of placeholder prompts are customizable too. That means that if you are using a company template, it might say something different, but the functionality is the same.

Note: For the purposes of this example, I will create a presentation based on the content in the Starbucks 2018 Global Social Impact Report, which is available to the public on their website.
If you type in more text than there is room for, PowerPoint will automatically reduce its font size. You can stop this behavior by clicking on the Autofit Options icon to the left of the placeholder and selecting Stop Fitting Text to this Placeholder .
Next, you can make formatting adjustments to your text by selecting the commands in the Font area and the Paragraph area of the Home tab of the Ribbon.

The Reset Command: If you make any changes to your title and decide you want to go back to how it was originally, you can use the Reset button up in the Home tab .

Insert More Slides into Your Presentation
Now that you have your title slide filled in, it’s time to add more slides. To do that, simply go up to the Home tab and click on New Slide . This inserts a new slide in your presentation right after the one you were on.

You can alternatively hit Ctrl+M on your keyboard to insert a new blank slide in PowerPoint. To learn more about this shortcut, see my guide on using Ctrl+M in PowerPoint .
Instead of clicking the New Slide command, you can also open the New Slide dropdown to see all the slide layouts in your PowerPoint template. Depending on who created your template, your layouts in this dropdown can be radically different.

If you insert a layout and later want to change it to a different layout, you can use the Layout dropdown instead of the New Slide dropdown.
After inserting a few different slide layouts, your presentation might look like the following picture. Don’t worry that it looks blank, next we will start adding content to your presentation.

If you want to follow along exactly with me, your five slides should be as follows:
- Title Slide
- Title and Content
- Section Header
- Two Content
- Picture with Caption
Adding Content to Your Slides
Now let’s go into each slide and start adding our content. You’ll notice some new types of placeholders.

On slide 2 we have a Content Placeholder , which allows you to add any kind of content. That includes:
- A SmartArt graphic,
- A 3D object,
- A picture from the web,
- Or an icon.
To insert text, simply type it in or hit Ctrl+C to Copy and Ctrl+V to Paste from elsewhere. To insert any of the other objects, click on the appropriate icon and follow the steps to insert it.
For my example, I’ll simply type in some text as you can see in the picture below.

Slides 3 and 4 only have text placeholders, so I’ll go ahead and add in my text into each one.

On slide 5 we have a Picture Placeholder . That means that the only elements that can go into it are:
- A picture from the web

To insert a picture into the picture placeholder, simply:
- Click on the Picture icon
- Find a picture on your computer and select it
- Click on Insert
Alternatively, if you already have a picture open somewhere else, you can select the placeholder and paste in (shortcut: Ctrl+V ) the picture. You can also drag the picture in from a file explorer window.

If you do not like the background of the picture you inserted onto your slide, you can remove the background here in PowerPoint. To see how to do this, read my guide here .
Placeholders aren’t the only way to add content to your slides. At any point, you can use the Insert tab to add elements to your slides.
You can use either the Title Only or the Blank slide layout to create slides for content that’s different. For example, a three-layout content slide, or a single picture divider slide, as shown below.

In the first example above, I’ve inserted 6 text boxes, 3 icons, and 3 circles to create this layout. In the second example, I’ve inserted a full-sized picture and then 2 shapes and 2 text boxes.
The Reset Command: Because these slides are built with shapes and text boxes (and not placeholders), hitting the Reset button up in the Home tab won’t do anything.
That is a good thing if you don’t want your layouts to adjust. However, it does mean that it falls on you to make sure everything is aligned and positioned correctly.
For more on how to add and manipulate the different objects in PowerPoint, check out our step-by-step articles here:
- Using graphics in PowerPoint
- Inserting icons onto slides
- Adding pictures to your PowerPoint
- How to embed a video in PowerPoint
- How to add music to your presentation
Using Designer to generate more layouts ideas
If you have Office 365, your version of PowerPoint comes with a new feature called Designer (or Design Ideas). This is a feature that generates slide layout ideas for you. The coolest thing about this feature is that it uses the content you already have.
To use Designer , simply navigate to the Design tab in your Ribbon, and click on Design Ideas .

NOTE: If the PowerPoint Designer is not working for you (it is grey out), see my troubleshooting guide for Designer .
Change the Overall Design (optional)
When you make a PowerPoint presentation, you’ll want to think about the overall design. Now that you have some content in your presentation, you can use the Design tab to change the look and feel of your slides.
For additional help thinking through the design of your presentation, read my guide here .
A. Picking your PowerPoint slide size
If you have PowerPoint 2013 or later, when you create a blank document in PowerPoint, you automatically start with a widescreen layout with a 16:9 ratio. These dimensions are suitable for most presentations as they match the screens of most computers and projectors.
However, you do have the option to change the dimensions.
For example, your presentation might not be presented, but instead converted into a PDF or printed and distributed. In that case, you can easily switch to the standard dimensions with a 4:3 ratio by selecting from the dropdown (A).
You can also choose a custom slide size or change the slide orientation from landscape to portrait in the Custom Slide Size dialog box (B).

To learn all about the different PowerPoint slide sizes, and some of the issues you will face when changing the slide size of a non-blank presentation, read my guide here .
B. Selecting a PowerPoint theme
The next thing you can do is change the theme of your presentation to a pre-built one. For a detailed explanation of what a PowerPoint theme is, and how to best use it, read my article here .
In the beginning of this tutorial, we started with a blank presentation, which uses the default Office theme as you can see in the picture below.

That gives you the most flexibility because it has a blank background and quite simple layouts that work for most presentations. However, it also means that it’s your responsibility to enhance the design.
If you’re comfortable with this, you can stay with the default theme or create your own custom theme ( read my guide here ). But if you would rather not have to think about design, then you can choose a pre-designed theme.
Microsoft provides 46 other pre-built themes, which include slide layouts, color variants and palettes, and fonts. Each one varies quite significantly, so make sure you look through them carefully.
To select a different theme, go to the Design tab in the Ribbon, and click on the dropdown arrow in the Themes section .

For this tutorial, let’s select the Frame theme and then choose the third Variant in the theme. Doing so changes the layout, colors, and fonts of your presentation.

Note: The theme dropdown area is also where you can import or save custom themes. To see my favorite places to find professional PowerPoint templates and themes (and recommendations for why I like them), read my guide here .
C. How to change a slide background in PowerPoint
The next thing to decide is how you want your background to look for the entire presentation. In the Variants area, you can see four background options.

For this example, we want our presentation to have a dark background, so let’s select Style 3. When you do so, you’ll notice that:
- The background color automatically changes across all slides
- The color of the text on most of the slides automatically changes to white so that it’s visible on the dark background
- The colors of the objects on slides #6 and #7 also adjust, in a way we may not want (we’ll likely have to make some manual adjustments to these slides)

Note: If you want to change the slide background for just that one slide, don’t left-click the style. Instead, right-click it and select Apply to Selected Slides .
After you change the background for your entire presentation, you can easily adjust the background for an individual slide.

Inside the Format Background pane, you can see you have the following options:
- Gradient fill
- Picture or texture fill
- Pattern fill
- Hide background
You can explore these options to find the PowerPoint background that best fits your presentation.
D. How to change your color palette in PowerPoint
Another thing you may want to adjust in your presentation, is the color scheme. In the picture below you can see the Theme Colors we are currently using for this presentation.

Each PowerPoint theme comes with its own color palette. By default, the Office theme includes the Office color palette. This affects the colors you are presented with when you format any element within your presentation (text, shapes, SmartArt, etc.).

The good news is that the colors here are easy to change. To switch color palettes, simply:
- Go to the Design tab in the Ribbon
- In the Variants area, click on the dropdown arrow and select Colors
- Select the color palette (or theme colors) you want
You can choose among the pre-built color palettes from Office, or you can customize them to create your own.
As you build your presentation, make sure you use the colors from your theme to format objects. That way, changing the color palette adjusts all the colors in your presentation automatically.
E. How to change your fonts in PowerPoint
Just as we changed the color palette, you can do the same for the fonts.

Each PowerPoint theme comes with its own font combination. By default, the Office theme includes the Office font pairing. This affects the fonts that are automatically assigned to all text in your presentation.

The good news is that the font pairings are easy to change. To switch your Theme Fonts, simply:
- Go to the Design tab in the Ribbon
- Click on the dropdown arrow in the Variants area
- Select Fonts
- Select the font pairing you want
You can choose among the pre-built fonts from Office, or you can customize them to create your own.
If you are working with PowerPoint presentations on both Mac and PC computers, make sure you choose a safe PowerPoint font. To see a list of the safest PowerPoint fonts, read our guide here .
If you receive a PowerPoint presentation and the wrong fonts were used, you can use the Replace Fonts dialog box to change the fonts across your entire presentation. For details, read our guide here .
Adding Animations & Transitions (optional)
The final step to make a PowerPoint presentation compelling, is to consider using animations and transitions. These are by no means necessary to a good presentation, but they may be helpful in your situation.
A. Adding PowerPoint animations
PowerPoint has an incredibly robust animations engine designed to power your creativity. That being said, it’s also easy to get started with basic animations.
Animations are movements that you can apply to individual objects on your slide.

To add a PowerPoint animation to an element of your slide, simply:
- Select the element
- Go to the Animations tab in the Ribbon
- Click on the dropdown arrow to view your options
- Select the animation you want
You can add animations to multiple objects at one time by selecting them all first and then applying the animation.
B. How to preview a PowerPoint animation

There are three ways to preview a PowerPoint animation:
- Click on the Preview button in the Animations tab
- Click on the little star next to the slide
- Play the slide in Slide Show Mode
To learn other ways to run your slide show, see our guide on presenting a PowerPoint slide show with shortcuts .
To adjust the settings of your animations, explore the options in the Effect Options , Advanced Animation and the Timing areas of the Animation tab .

Note: To see how to make objects appear and disappear in your slides by clicking a button, read our guide here .
C. How to manage your animations in PowerPoint

The best way to manage lots of animations on your slide is with the Animation Pane . To open it, simply:
- Navigate to the Animations tab
- Select the Animation Pane
Inside the Animation Pane, you’ll see all of the different animations that have been applied to objects on your slide, with their numbers marked as pictured above.
Note: To see examples of PowerPoint animations that can use in PowerPoint, see our list of PowerPoint animation tutorials here .
D. How to add transitions to your PowerPoint presentation
PowerPoint has an incredibly robust transition engine so that you can dictate how your slides change from one to the other. It is also extremely easy to add transitions to your slides.
In PowerPoint, transitions are the movements (or effects) you see as you move between two slides.

To add a transition to a PowerPoint slide, simply:
- Select the slide
- Go to the Transitions tab in the Ribbon
- In the Transitions to This Slide area, click on the dropdown arrow to view your options
- Select the transition you want
To adjust the settings of the transition, explore the options in the Timing area of the Transitions tab.
You can also add the same transition to multiple slides. To do that, select them in the Slides Pane and apply the transition.
E. How to preview a transition in PowerPoint

There are three ways to preview your PowerPoint transitions (just like your animations):
- Click on the Preview button in the Transitions tab
- Click on the little star beneath the slide number in the thumbnail view
Note: In 2016, PowerPoint added a cool new transition, called Morph. It operates a bit differently from other transitions. For a detailed tutorial on how to use the cool Morph transition, see our step-by-step article here .
Save Your PowerPoint Presentation
After you’ve built your presentation and made all the adjustments to your slides, you’ll want to save your presentation. YOu can do this several different ways.

To save a PowerPoint presentation using your Ribbon, simply:
- Navigate to the File tab
- Select Save As on the left
- Choose where you want to save your presentation
- Name your presentation and/or adjust your file type settings
- Click Save
You can alternatively use the Ctrl+S keyboard shortcut to save your presentation. I recommend using this shortcut frequently as you build your presentation to make sure you don’t lose any of your work.

This is the standard way to save a presentation. However, there may be a situation where you want to save your presentation as a different file type.
To learn how to save your presentation as a PDF, see our guide on converting PowerPoint to a PDF .
How to save your PowerPoint presentation as a template
Once you’ve created a presentation that you like, you may want to turn it into a template. The easiest – but not technically correct – way, is to simply create a copy of your current presentation and then change the content.
But be careful! A PowerPoint template is a special type of document and it has its own parameters and behaviors.
If you’re interested in learning about how to create your own PowerPoint template from scratch, see our guide on how to create a PowerPoint template .
Printing Your PowerPoint Presentation
After finishing your PowerPoint presentation, you may want to print it out on paper. Printing your slides is relatively easy.

To open the Print dialog box, you can either:
- Hit Ctrl+P on your keyboard
- Or go to the Ribbon and click on File and then Print

Inside the Print dialog box, you can choose from the various printing settings:
- Printer: Select a printer to use (or print to PDF or OneNote)
- Slides: Choose which slides you want to print
- Layout: Determine how many slides you want per page (this is where you can print the notes, outline, and handouts)
- Collated or uncollated (learn what collated printing means here )
- Color: Choose to print in color, grayscale or black & white
There are many more options for printing your PowerPoint presentations. Here are links to more in-depth articles:
- How to print multiple slides per page
- How to print your speaker notes in PowerPoint
- How to save PowerPoint as a picture presentation
So that’s how to create a PowerPoint presentation if you are brand new to it. We’ve also included a ton of links to helpful resources to boost your PowerPoint skills further.
When you are creating your presentation, it is critical to first focus on the content (what you are trying to say) before getting lost inserting and playing with elements. The clearer you are on what you want to present, the easier it will be to build it out in PowerPoint.
If you enjoyed this article, you can learn more about our PowerPoint training courses and other presentation resources by visiting us here .
🔒 Unlock the PowerPoint Shortcuts Trusted by Industry Leaders KKR, American Express, HSBC, and More!
Join over 114,880 professionals from diverse fields including consulting, investment banking, advertising, marketing, sales, and business development who have supercharged their PowerPoint game with our proven methods.
✅ Customize compelling presentations effortlessly.
✅ Master time-saving techniques for faster deck creation.
✅ Boost your career prospects with top-notch PowerPoint skills.
Get FREE access to the Critical PowerPoint Shortcuts module of our premium training course by entering your name and email below.
DISCLAIMER: PC Users Only!
We respect your privacy and will keep your info safe and confidential.
About The Author

Popular Tutorials
- How to Strikethrough Text (l̶i̶k̶e̶ ̶t̶h̶i̶s̶) in Word, Excel & PowerPoint
- How to Make Animated Fireworks in PowerPoint (Step-by-Step)
- Strikethrough Shortcut (l̶i̶k̶e̶ ̶t̶h̶i̶s̶) for Word, Excel & PowerPoint
- How to Create a Flash Card Memory Game in PowerPoint (Like Jeopardy)
- Keyboard Shortcuts Not Working: Solved
PowerPoint Tutorial Categories
- Strategies & Opinions
- Shortcuts & Hacks
- Pictures, Icons, Videos, Etc.
- New Features
- Miscellaneous
- Charts & Data Viz
We help busy professionals save hours and gain peace of mind, with corporate workshops, self-paced courses and tutorials for PowerPoint and Word.
Work With Us
- Corporate Training
- Presentation & Template Design
- Courses & Downloads
- PowerPoint Articles
- Word Articles
- Productivity Resources
Find a Tutorial
- Free Training
- For Businesses
We help busy office workers save hours and gain peace of mind, with tips, training and tutorials for Microsoft PowerPoint and Word.
Master Critical PowerPoint Shortcuts – Secure Your FREE Training Module and Save Valuable Time!
⌛ Master time-saving expert techniques.
🔥 Create powerful presentations.
🚀 Propel your career to new heights.
We value your privacy – we keep your info safe.
Discover PowerPoint Hacks Loved by Industry Giants - KKR, AmEx, HSBC!
Over 114,880 professionals in finance, marketing and sales have revolutionized their PPT skills with our proven methods.
Gain FREE access to a full module of our premium PowerPoint training program – Get started today!
We hate spam too and promise to keep your information safe.
You are currently viewing a placeholder content from Facebook . To access the actual content, click the button below. Please note that doing so will share data with third-party providers.
- PRO Courses Guides New Tech Help Pro Expert Videos About wikiHow Pro Upgrade Sign In
- EDIT Edit this Article
- EXPLORE Tech Help Pro About Us Random Article Quizzes Request a New Article Community Dashboard This Or That Game Popular Categories Arts and Entertainment Artwork Books Movies Computers and Electronics Computers Phone Skills Technology Hacks Health Men's Health Mental Health Women's Health Relationships Dating Love Relationship Issues Hobbies and Crafts Crafts Drawing Games Education & Communication Communication Skills Personal Development Studying Personal Care and Style Fashion Hair Care Personal Hygiene Youth Personal Care School Stuff Dating All Categories Arts and Entertainment Finance and Business Home and Garden Relationship Quizzes Cars & Other Vehicles Food and Entertaining Personal Care and Style Sports and Fitness Computers and Electronics Health Pets and Animals Travel Education & Communication Hobbies and Crafts Philosophy and Religion Work World Family Life Holidays and Traditions Relationships Youth
- Browse Articles
- Learn Something New
- Quizzes Hot
- This Or That Game New
- Train Your Brain
- Explore More
- Support wikiHow
- About wikiHow
- Log in / Sign up
- Computers and Electronics
- Presentation Software
- PowerPoint Presentations
How to Open a PPT File on PC or Mac
Last Updated: September 1, 2022 Tested
Using PowerPoint
Using google slides, using powerpoint online.
This article was co-authored by wikiHow Staff . Our trained team of editors and researchers validate articles for accuracy and comprehensiveness. wikiHow's Content Management Team carefully monitors the work from our editorial staff to ensure that each article is backed by trusted research and meets our high quality standards. The wikiHow Tech Team also followed the article's instructions and verified that they work. This article has been viewed 85,283 times. Learn more...
This wikiHow teaches you how to open and view the contents of a PPT (PowerPoint presentation) file in Windows and macOS. PPT is the native presentation format in Microsoft PowerPoint's earlier versions and is supported by all versions of the software. If you don't have PowerPoint, you can open the file in Google Slides or PowerPoint Online (a free version of PowerPoint accessible on the web).

- If you don't have PowerPoint installed on your computer, make sure to check out this article for detailed instructions on how to download it.
- Alternatively, you can download and use Apache OpenOffice ( https://www.openoffice.org/download ), or Apple Numbers ( https://itunes.apple.com/tr/app/numbers/id409203825 ).
- To open the PPT with a different program, just select the program you want to use on the "Open with" menu.

- If you're prompted, sign in with your Google account.

- Alternatively, you can drag and drop your PPT file here.

- If you're prompted, sign in with your Microsoft account.

Expert Q&A
You might also like.

About This Article

1. Right-click the PPT file. 2. Hover over Open with . 3. Select Microsoft PowerPoint . Did this summary help you? Yes No
- Send fan mail to authors
Is this article up to date?

Featured Articles

Trending Articles

Watch Articles

- Terms of Use
- Privacy Policy
- Do Not Sell or Share My Info
- Not Selling Info
wikiHow Tech Help Pro:
Level up your tech skills and stay ahead of the curve

Try Process AI free
How to view powerpoint without microsoft office.
Do you want to view PowerPoint presentations without Microsoft Office? Yep, it’s possible! Here, we’ll show you how.
One way is with online platforms. These let you upload and view presentations directly from your browser. No Office required!
Plus, there’s specialized software for viewing PowerPoint files. It has a simple interface, so anyone can access them without any trouble.
Let’s look at an example. Sarah was working on her final project presentation. But when she got to the university computer, there was no Office installed. No worries! She used an online platform to present her masterpiece, and it worked perfectly.
Explaining the need to view PowerPoint without Microsoft Office
PowerPoint presentations are now used widely in many industries. Viewing them without Microsoft Office is essential if it’s not installed on the device.
Fortunately, there are alternatives. Online viewers let you upload and view presentations in a web browser, removing the need for Microsoft Office.
Another way is to convert the PowerPoint file to another format like PDF, JPEG, etc. A number of free conversion tools exist online. Then you can open it with software that supports these formats.
Many operating systems and mobile devices have built-in apps or software that allow you to view PowerPoint files without installing Microsoft Office. They provide basic viewing features and make it easy to navigate the slides and content.
To illustrate the importance of this capability, here’s a true story. A colleague once prepared an important presentation on his home computer, which didn’t have Microsoft Office. With minutes until his presentation was due, he couldn’t open the PowerPoint file. But, he found an online viewer that let him access it without hassle. He was able to deliver the presentation on time, thanks to this alternative solution.
Overview of alternative programs for viewing PowerPoint presentations
No need for Microsoft Office ! Alternative programs such as Google Slides and LibreOffice Impress allow for easy access to PowerPoint files. Formatting and content will remain the same.
Google Slides is an online app with a user-friendly interface. It also has collaboration features. All you need is an internet connection to access it.
LibreOffice Impress is part of the open-source LibreOffice suite. It has lots of features for viewing PowerPoint presentations. Animations, transitions, and embedded media are all supported. The original layout is maintained.
If you convert PowerPoint files into PDF format you can also view them without Microsoft Office. Adobe Acrobat Reader will preserve the integrity of the presentation. This method is great for sharing or distributing presentations.
Alternative programs and PDF viewers provide a reliable way to view PowerPoint presentations. They offer compatibility, accessibility, and keep the original content and design. Whether you use Google Slides, LibreOffice Impress, or Adobe Acrobat Reader – there are plenty of options available for viewing PowerPoint presentations with ease!
Step-by-step guide on how to view PowerPoint without Microsoft Office:
Need to view a PowerPoint presentation without Microsoft Office? Here’s a step-by-step guide:
- Online Viewers: Upload the file to Google Drive and open it using Google Slides, or use Microsoft’s own online viewer – PowerPoint Online.
- Alternative Software: Download and install LibreOffice, then open the presentation using its Impress application.
- File Conversion: Convert the PowerPoint file into a universal format, like PDF or JPG, using online converters or software like Adobe Acrobat or Nitro Pro.
- Mobile Devices: Some devices offer built-in apps or viewers specifically designed for viewing presentations.
I recently used Google Drive’s online viewer to quickly view an important presentation. It saved me time and let me easily navigate the slides.
By trying out these methods and tools, you can easily view PowerPoint presentations – even without Microsoft Office!
Highlighting the pros and cons of each option
Viewing PowerPoint files without downloading any software? This can be done by using online viewers. Although they allow for easy viewing, some features of the desktop version may be missing. Plus, there could be restrictions on file size or privacy.
Alternative software programs are available too, with similar features to Microsoft Office . However, complex formatting or exclusive features might not be compatible.
Storing PowerPoint presentations in the cloud or in portable apps are further options. Access from any device with an internet connection is possible with cloud storage. Portable apps let you run software from USB drives. Keep in mind, though, that stable internet or specific hardware might be needed.
The demand for flexibility and accessibility has led to the development of better alternatives, improving our ability to view PowerPoint presentations without relying on Microsoft Office . As technology advances, more efficient options are emerging.
Additional tips and considerations for viewing PowerPoint presentations without Microsoft Office
No Microsoft Office? No problem! Here are five key points to help you view PowerPoint presentations without it:
- Utilize online platforms like Google Slides, SlideShare, and Zoho Show . Upload the file or access it directly.
- Convert the PowerPoint presentation to a compatible format and open it using another presentation software (e.g. Keynote or OpenOffice).
- Use free PowerPoint viewers from Microsoft .
- Try cloud storage services like OneDrive or Dropbox . Preview the slides using their built-in feature.
- Download alternative software like LibreOffice Impress or WPS Office Presentation .
Formatting might be different when using non-Microsoft programs. So, it’s advisable to review the presentation beforehand. Also, it’s important to check the compatibility of your operating system with the software. Not all programs might provide the same functionality as PowerPoint. However, Google Slides is one of the most popular alternatives for viewing and creating presentations online (Statista, April 2021).
Let’s review. Viewing PowerPoint presentations without Microsoft Office is an easy way to go for those who don’t have access to the software. Now, let’s explore more details to make the most of this alternative solution.
You can open and view PowerPoint files from your web browser with online platforms like Google Slides or PowerPoint Online . These tools give you a smooth experience – you can move through slides, access speaker notes, and even present your slideshow.
Another way is to transform PowerPoint files into PDF format . Not only does this make them compatible with different devices, but it also keeps the formatting and layout of the original presentation. By using PDF viewers such as Adobe Acrobat Reader or Foxit Reader , you can easily view your PowerPoint presentations.
In addition, you can view PowerPoint presentations on your phone or tablet using various mobile apps for both iOS and Android. Some popular ones include Microsoft PowerPoint Mobile, Google Slides, and Prezi Viewer .
Pro Tip: If you need offline access and more advanced features for creating or editing PowerPoint presentations, check out alternative office suites like LibreOffice or Apache OpenOffice . These software packages offer comprehensive solutions that go beyond just viewing PowerPoint files.
You have lots of options, so you don’t need to stick to Microsoft Office to view PowerPoint presentations. Unlock convenience and flexibility by trying out online platforms, converting files to PDF, using mobile apps, or exploring alternative office suites. Happy presenting!

No credit card required
Online PowerPoint Viewer App
View powerpoint online. ppt, pptx., powered by aspose.com and aspose.cloud ., * by uploading your files or using our service you agree with our terms of service and privacy policy ..
Send the download link to
Press Ctrl + D to store it in your bookmarks in order not to search it again
We've already processed ??? files with total size of ??? Mbytes.

How to open a presentation using Aspose Viewer
- Click Drop or upload your files .
- Select the presentation you want to open and view on your device.
- Wait for Aspose Viewer to process and open the file.
After uploading and opening your presentation, you can perform these tasks:
- Zoom : zoom-in and zoom-out.
- Navigate through its slides.
- Use different modes : full-screen mode, slideshow mode, etc.
- Download the file as a PowerPoint file, image, PDF, or in other formats.
Note: We delete all files from our servers after 24 hours. If you get a download link to share your presentation, the link will stop working after 24 hours.
Aspose Viewer App is a free and easy-to-use online presentation viewer or reader. You get to open your presentation from any computer (Windows, macOS) or smartphone (Android, iOS). Simply upload your file and view it. No software installation is needed.
You can use the Viewer app to present your slides (or demonstrate a presentation) to people. If necessary, you can also share a temporary presentation (or slide) link with people. The Viewer app shows each slide of the presentation as an image, which is a convenient format that protects against editing and copying.
The Viewer App’s intuitive interface allows you to perform these basic tasks: navigate through slide pages, zoom into presentation slides, observe presentation slides in the navigation menu, download a full presentation in its original format or download presentation slides as images.
Other Aspose Apps you may want to try: Collage web app for making collages and merging JPG photos; Video web app for converting presentations to videos. Read an article on opening or viewing presentations: How to Open and View Presentations Without PowerPoint or Office

Aspose.Slides PowerPoint Viewer
- PowerPoint Reader, PowerPoint Viewer, and PowerPoint Player in a single Aspose.Slides app.
- Open any PowerPoint and OpenOffice presentation format: PPT , PPTX , ODP .
- Use the free PowerPoint Web Viewer to open PPT, PPTX online and view PPS , ODP files.
- Powerful PowerPoint Viewer is an alternative for Windows 10 PCs, Android smartphones, iPhones, and other devices.
- PowerPoint Viewer for 64 bit or 32 bit systems.
- App includes PowerPoint Viewer for all recent Microsoft PowerPoint editions: PowerPoint Viewer 2010, 2013, 2016, and 2019.
- Use PowerPoint Player to demonstrate presentations at business meetings, public conferences, daily standups, online meetings, etc.
- How do I open a presentation online without PowerPoint? With Aspose’s free Presentation Viewer, you can open and view any presentation from any device or OS: Windows, macOS, Android, iOS, etc.
- Can I open my PowerPoint online? Yes. With this Viewer app, you can open all the widely-used PowerPoint files (PPT, PPTX, ODP, and others) online.
- What operations are available in the online Viewer? You can do many operations: Go into full-screen mode, use slides overview, specify an autoplay timer, and so on.
- Is the Presentation Viewer easy to use? Yes, the app is very easy to use. All you have to do is upload your presentation file to open or view it. You can then switch to full-screen mode, for example.
- Can I open my PowerPoint in my browser? Yes, you can. On the Aspose’ Viewer page, you just have to upload your presentation to open and see its contents.
Fast and Easy-To-Use Viewer
Support for All Platforms
Viewer Quality
Other supported viewers.
We provide viewers used to open many other file formats. Please, go through the list below.
- PDF Viewer (View PDF document)
- ODP Viewer (OpenDocument Presentation File Format)
- OTP Viewer (Origin Graph Template)
- POTM Viewer (Microsoft PowerPoint Template)
- POTX Viewer (Microsoft PowerPoint Open XML Template)
- PowerPoint Viewer (PowerPoint Open XML Presentation)
- PPS Viewer (Microsoft PowerPoint Slide Show)
- PPSM Viewer (Microsoft PowerPoint Slide Show)
- PPSX Viewer (PowerPoint Open XML Slide Show)
- PPT Viewer (PowerPoint Presentation)
- PPTM Viewer (Microsoft PowerPoint Presentation)
- PPTX Viewer (PowerPoint Open XML Presentation)
- DOCX Viewer (Open DOCX files online)
- DOC Viewer (Open DOC files online)
Oops! An error has occurred.
Error has been reported successfully..
You have successfully reported the error, You will get the notification email when error is fixed. Click this link to visit the forums.
� Aspose Pty Ltd 2001-2022. All Rights Reserved.
IMAGES
VIDEO
COMMENTS
Select the Slide Show tab. Select the Use Presenter View checkbox. Select which monitor to display Presenter View on. Select From Beginning or press F5. In Presenter View, you can: See your current slide, next slide, and speaker notes. Select the arrows next to the slide number to go between slides. Select the pause button or reset button to ...
Turn On PowerPoint Presenter View. In PowerPoint for macOS, simply click on Presenter View on the Slide Show tab to kick off the presentation in Presenter view. Turn on Presenter View by clicking on Presenter View on the Slide Show tab. You'll see the Presenter View interface on one screen.
Now, if you are working with PowerPoint on a single monitor and you want to display Presenter view, in Slide Show view, on the control bar at the bottom left, select , and then Show Presenter View. Use the controls in Presenter view. To move to the previous or next slide, select Previous or Next.
Take advantage of the PowerPoint Presenter View to practice and present your PowerPoint speaker notes. This view also helps you as a presenter by showing you...
Click From Beginning. Holding down the Alt key and clicking From Beginning, the Presenter View will launch from the very first (non-hidden) slide in your presentation. You can also launch the presenter view from the beginning of your presentation at any time by clicking Alt + F5 on your keyboard.
To see the full course that this video came from, go here: ️https://www.simonsezit.com/courses/microsoft/powerpoint-2021-online-course/In this Microsoft Pow...
Alternatively, you can use the following keyboard shortcuts while viewing your slideshow: Spacebar or Right Arrow Button: Go to the next slide in the presentation.; Left Arrow Button: Go to the previous slide in the presentation. Esc: End the show. W: Hide your current slide and display a white screen. Press the same key again to bring back the slide's content.
In this video, you'll learn the basics of presenting your slide show in PowerPoint 2019, PowerPoint 2016, and Office 365. Visit https://edu.gcfglobal.org/en/...
To access the different view modes in PowerPoint, you have to click on the 'View' tab in the ribbon. The 2-step process is described below. Step-1: Click on the 'View' tab. At first, select the 'View' tab, which is the second to last tab in the ribbon section of your PowerPoint Window. Step-2: Select your preferred 'View Mode'.
Use Slide Sorter view to delete or rearrange your slides by dragging them to new positions. Add effects, such as transitions and sounds, to several slides at the same time in Slide Sorter view. And, add sections to organize your slides. If you are collaborating with colleagues on a presentation, assign each collaborator a section.
This is the best way to view or preview a presentation to ensure it is clear, focused, and impactful in the way you want. To run a presentation in Slide Show view in PowerPoint, click the "Slide Show" tab in the Ribbon. To start the slide show from the first slide, then click the "From Beginning" button in the "Start Slide Show ...
Check the box beside the "Use Presenter View." Select from the "Start Slide Show" section to start your presentation "From the Beginning." Click the three dots menu on your full-screen slideshow view and select "Show Presenter View." When your presentation displays "Presenter View," you can scroll and use it for your speech.
Consider choosing readability over aesthetics, and avoid fancy fonts that could prove to be more of a distraction than anything else. A good presentation needs two fonts: a serif and sans-serif. Use one for the headlines and one for body text, lists, and the like. Keep it simple.
Look for Slide Show tab. When found, click it and select From Beginning visible under Start Slide Show group. If you are working with PowerPoint on a single monitor and still want to display ...
If you want to customize your Presenter View experience, follow these steps: On the 'Slide Show' tab, click 'Set Up Slide Show.'. Under 'Multiple Monitors,' select the 'Use Presenter View' checkbox. If you're using a single monitor, select the 'Display slide show on' option and choose your primary monitor.
There are two ways to check version history here, and we'll show you both. First, click "File" in the menu bar. In the left pane, click "Info." Click "Version History" on the right. Alternately, you can click the file name at the top of the document that you've opened and select "Version History" from the pop-up menu.
To do that, simply go up to the Home tab and click on New Slide. This inserts a new slide in your presentation right after the one you were on. You can alternatively hit Ctrl+M on your keyboard to insert a new blank slide in PowerPoint. To learn more about this shortcut, see my guide on using Ctrl+M in PowerPoint.
Download Article. 1. Find the PPT file you want to open on your computer. Open the folder that contains your presentation, and locate your PPT file. 2. Right-click on the PPT file. This will open your file options on a drop-down menu. 3. Hover over Open with on the menu.
Here's a step-by-step guide: Online Viewers: Upload the file to Google Drive and open it using Google Slides, or use Microsoft's own online viewer - PowerPoint Online. Alternative Software: Download and install LibreOffice, then open the presentation using its Impress application.
Aspose.Slides PowerPoint Viewer. PowerPoint Reader, PowerPoint Viewer, and PowerPoint Player in a single Aspose.Slides app. Open any PowerPoint and OpenOffice presentation format: PPT, PPTX, ODP. Use the free PowerPoint Web Viewer to open PPT, PPTX online and view PPS, ODP files.; Powerful PowerPoint Viewer is an alternative for Windows 10 PCs, Android smartphones, iPhones, and other devices.