MS Word Help
Tips and tricks for Microsoft Word Users
- About MS Word Help
- Make A Speech Bubble In Word
Speech bubbles are a good way to help your document deliver its message. You’d be surprised at just how easy it is to make a speech bubble in Word .
Let’s get straight to it and add one now. On the Insert tab, click Shapes (in the Illustrations group) > Oval Callout . The shapes are not visibly named, but the Oval Callout shape is in the Callouts section near the bottom.
Clicking the shape doesn’t insert it; it simply activates the tool. You still need to draw the shape on the page by clicking and dragging in your document. Once you’ve clicked and dragged, you should get something like this:
This is all well and good if you want something quick. We, on the other hand, are genteel and sophisticated. We desire a speech bubble that has a curved bit like this:
We can make that curve by manipulating the points on the shape. If you’ve used image editors like Adobe Illustrator or Fireworks, this should be a doddle. If you haven’t, don’t worry because it’s quite easy anyway.
With the speech bubble still selected, make sure you’re working on the Format tab of the Drawing Tools contextual tab (it pops up whenever a shape is selected).
Click Edit Shape (in the Insert Shapes group) > Edit Points . You’ll notice that the bounding box for the shape has gone. Each point that defines the shape is also now selectable and able to be manipulated.
Click on the point right at the bottom and drag it further down. Because this point is now selected, you should see some yellow handles that you can drag around to alter the curve of the lines coming out of that point.
Try it. Drag those handles around to get a feel for how they affect the curvature. Those handles affect the curve of the lines near the selected point. To change the curvature of a line near the point at the other end, select that point and repeat the process. This is often necessary to achieve a nice smoothe curve.
To get the following speech bubble, drag the yellow handle on the right upwards and to the right. Do the same with the yellow handle on the left.
The curve looks fine as it leaves the bottom point, but it soon goes awry further up. We can fix that by selecting the point (click on it) and then by dragging the leftmost yellow handle to the right. You can even drag the point itself over to the right to get something like this:
Categories: Uncategorized - Tags: bezier curves , curves , insert shape , speech bubble

Recent Posts
- Word 2010 AutoCorrect
- The Toolbar In Word 2010
- Soft Return In Word
- Vertical Text In Word
- Number Of Occurrences Of A Particular Word
- Changing Case In Word
- Autosave Documents In Microsoft Word
- Word Default Save Location
- Remove Borders From A Table In Word
- How To Convert Table To Text In Microsoft Word 2007
- How To Password Protect Microsoft Word 2007 document
- Insert Page Numbers In Microsoft Word 2002
- Numbered List With Only Odd Numbers
- Change Font Colour In Microsoft Word 2002
- Compatibility Mode In Word 2016
- Word 2016 AutoText
- Make Diagonal Text In Word
- Start A Numbered List With A Number Other Than One
- Insert Comments In Word
Admin Login
Powered by Catalyst
Copyright © 2015 MS Word Help
How to Create Text Bubbles in Microsoft Word: A Step-by-Step Guide
Creating text bubbles in Microsoft Word is a breeze once you get the hang of it. You’ll be using the Shapes feature, found in the Insert tab, to draw a text box and then customize it to look like a speech or thought bubble. Here’s a quick rundown: click on the Insert tab, choose a shape that resembles a bubble, draw it onto the document, and then type your text inside it. Simple, right?
After completing these steps, you’ll have a text bubble that you can resize, move around, and edit just like any other text in your Word document. Whether you’re designing a comic strip, creating a presentation, or just want to make your document more visually appealing, text bubbles can add a fun and engaging element to your work.
Introduction
Ever felt like your Word documents are a bit drab? Well, spice things up with text bubbles! They’re not just for comic books and messaging apps; text bubbles can be a creative way to highlight information or add a touch of whimsy to your projects. From presentations to newsletters, text bubbles can help bring attention to quotes, thoughts, or even instructions.
Think about it, wouldn’t it be cool to have a character “speak” a quote in your school assignment? Or maybe you’re creating a how-to guide, and you want to make it more interactive with thought bubbles that contain tips. That’s where Microsoft Word’s nifty shapes feature comes in handy. It’s not just for boring rectangles and circles; there’s a whole array of shapes that can be turned into text bubbles.
Now, before you start thinking that this is some high-tech, complicated process, let me assure you, it’s not. Anyone can create text bubbles in Word, and it’s a skill that can come in handy more often than you might think. Whether you’re a student, a teacher, a business professional, or just someone who likes to get creative with their documents, knowing how to make text bubbles is a valuable addition to your Microsoft Word toolkit. So, let’s dive in and get those bubbles popping!
Step by Step Tutorial: Creating Text Bubbles in Microsoft Word
Before we start, make sure you’ve got Microsoft Word open and a document ready to go. The steps we’ll go through will help you add some personality to your text with customizable bubbles.
Step 1: Open the Insert Tab
Click on the Insert tab at the top of the screen.
This is where all the magic begins. The Insert tab is like the entrance to a treasure trove of features that can enhance your document.
Step 2: Find and Select the Shapes Menu
Locate and click on the Shapes menu, which is usually found in the Illustrations group.
You’ll see a variety of shapes. Some look like clouds, others like callouts – these are the ones you’re looking for.
Step 3: Choose a Bubble Shape
Scroll through the options and select a shape that resembles a speech or thought bubble.
There are different styles to choose from, so go ahead and pick one that suits your needs. Remember, you can always change it later.
Step 4: Draw the Bubble on Your Document
Click and drag your mouse on the document to draw the bubble.
Don’t worry about getting it perfect the first time. You can always adjust the size and shape later.
Step 5: Type Your Text Inside the Bubble
With the bubble selected, start typing your text directly into it.
The text will adjust to fit inside the bubble. You can change the font, size, and color to make it stand out.
Additional Information
When creating text bubbles in Microsoft Word, there are a few extra tips and tricks that can help you take your bubbles to the next level. For example, did you know you can add effects to your text bubbles? Yes, that’s right! Word allows you to add shadows, reflections, and even 3D effects to make your bubbles pop off the page.
Another useful tip is to use text bubble shortcuts. If you find yourself using text bubbles frequently, you can save your favorite bubble shape to the Quick Access Toolbar. This means you can insert your preferred text bubble with just one click, saving you time and effort.
Remember, while text bubbles are a fun and unique way to enhance your document, they should be used sparingly and with purpose. The goal is to add value to your content, not to distract from it. So go ahead, get creative, but stay focused on your document’s overall message.
- Open the Insert tab.
- Select the Shapes menu.
- Choose a speech or thought bubble shape.
- Draw the bubble on your document.
- Type your text inside the bubble.
Frequently Asked Questions
Can i change the color of my text bubble.
Yes, you can change the color of your text bubble by selecting the bubble, clicking on the Format tab, and choosing a new color from the Shape Fill menu.
How do I resize my text bubble?
Click on the text bubble to select it, then click and drag any of the handles on the corners or sides to resize it.
Can I copy and paste my text bubble into another document?
Absolutely! Just select the text bubble, copy it, and then paste it into the other document where you want it to appear.
Is it possible to add a picture inside a text bubble?
Yes, you can insert a picture inside your text bubble. Just select the bubble, click on the Format tab, and choose the Fill option to select a picture.
Can I make my text bubble transparent?
Yes, you can adjust the transparency of your text bubble by selecting it, clicking on the Format tab, and adjusting the transparency slider in the Shape Fill menu.
Creating text bubbles in Microsoft Word is a fantastic way to add a touch of flair and emphasis to your documents. Whether you’re working on a school project, a business report, or just adding some personality to your writing, text bubbles are a versatile tool that can help your documents stand out. Remember to use them appropriately, have fun with customization, and don’t be afraid to experiment with different styles and effects to find the perfect bubble for your needs. With a little practice, you’ll be a text bubble pro in no time!

Matthew Burleigh has been writing tech tutorials since 2008. His writing has appeared on dozens of different websites and been read over 50 million times.
After receiving his Bachelor’s and Master’s degrees in Computer Science he spent several years working in IT management for small businesses. However, he now works full time writing content online and creating websites.
His main writing topics include iPhones, Microsoft Office, Google Apps, Android, and Photoshop, but he has also written about many other tech topics as well.
Read his full bio here.
Share this:
Join our free newsletter.
Featured guides and deals
You may opt out at any time. Read our Privacy Policy
Related posts:
- How to Insert Text Box in Google Docs
- How to Create a Speech Bubble in Photoshop CS5
- How to Draw in Microsoft Word 2013
- How to Draw a Circle in Word 2010
- How to Remove the Bubbles From My Apple iPhone Screen: A Step-by-Step Guide
- How to Create Bubble Letters in Microsoft Publisher: A Step-by-Step Guide
- How to Insert a Square Root Symbol in Word
- How to Remove Section Breaks in Word Documents
- How to Select All in Word for Office 365
- How to Place Shapes in a Semi-Circle in PowerPoint: A Step-by-Step Guide
- How to Make All Columns the Same Width in Excel 2013
- How to Return to Normal View in Word 2010
- How to Center Text in Word [2023 Guide]
- How to Draw a Text Box in Word: A Step-by-Step Guide
- How to Remove Strikethrough in Google Docs (A Simple 4 Step Guide)
- How to Do a Hanging Indent on Google Docs
- How to Count Characters in Microsoft Word 2013 (A Quick 3 Step Guide)
- How to Make Four Frames on Microsoft Word: A Step-by-Step Guide
- How to Write Above a Line in MS Word: A Step-by-Step Guide
- How to Insert a Check Mark in Word 2013
How to Insert Word Bubbles in Microsoft Word

Pictures may be worth a thousand words, but graphics can also hold a thousand words – or just a few. The iconic word bubble, used to represent a person's thoughts or commentary on the page, is a simple way to add design to your Microsoft Word documents. Word calls these graphic touches "callouts," and offers quick insertion options and unlimited formatting for using word bubbles in Word files.
Advertisement
Click the "Insert" tab in the ribbon, then click the "Shapes" button and move to the Callouts section.
Video of the Day
Click one of the word bubbles, such as Rectangular Callout or Rounded Rectangular Callout. Note that the cursor will change to a plus symbol once selected.
Position the cursor on the Word document and press and hold down the left mouse button. Drag until the word bubble is your preferred size, then release. The bubble appears on the page.
Click a corner or border of the bubble and drag it into your preferred place, such as directly over the top of a person's head in an image on the page.
Click the bubble to open the Drawing Tools tab at the top of the screen. By default, the word bubble is a medium blue with a dark blue border.
Click the "Shape Fill" menu on the Drawing Tools tab's ribbon. Click "No Fill" to clear the medium blue for a more traditional white-background.
Click the "Shape Outline" menu and select a different color for the bubble's border, if desired.
Add text to the bubble by clicking the "Draw Text Box" button on the Drawing Tools tab's ribbon. Click and drag the mouse inside the word bubble to create a text area, and then release the button when the desired field appears in the document. Start typing to insert text in the word bubble. You can also format the fill and border of the text box as per the previous steps.
Save the Word document if finished or continue to add additional word bubbles as desired.
- North Carolina State University: Illustrations and Drawing
- Microsoft Office: Add Shapes
- GCF Learn Free: Word 2013 Shapes
Report an Issue
Screenshot loading...
How to Create Text Bubbles in Microsoft
- Small Business
- Human Resources
- ')" data-event="social share" data-info="Pinterest" aria-label="Share on Pinterest">
- ')" data-event="social share" data-info="Reddit" aria-label="Share on Reddit">
- ')" data-event="social share" data-info="Flipboard" aria-label="Share on Flipboard">
How to Set Line Spacing in WordPad
How to merge xps documents, how to center the text in gimp.
- How to Bullet a Graph in Excel
- How to Get Rid of FFDShow
Speech bubbles or balloons are sometimes referred to as text bubbles. They are labels that display words and emotions of a character in an illustration or depict a phrase about an illustration or text. In business, text bubbles are often referred to as “callouts” as they’re used to call attention to a specific point, word or sentence, or provide instructions in documents, spreadsheets and presentations. The method to create text bubbles is similar across Microsoft Office Word, Excel and PowerPoint. It simply involves inserting a predefined bubble shape into your project and editing it as needed.
Select the “Insert” tab in your Microsoft Office application.
Click “Shapes” in the Illustrations section on the ribbon, and then locate the “Callouts” section near the end of the Shapes drop-down menu.
Select the type of text bubble you want to use, such as a “Rectangular Callout,” “Rounded Rectangular Callout,” “Oval Callout,” “Cloud Callout” or a “Line” callout option.
Position the crosshairs cursor, which appears when you select a callout, near the area where you want to create the text bubble shape.
Press the “Shift” key on your computer keyboard, and then click and drag the cursor to the right or left depending on the direction you want the bubble tail to point until the bubble is the size you want. Release the mouse key.
Roll your cursor over the bubble until it changes into the “Move” four arrows cursor, and then click and drag the text bubble to the position where you want it.
Align the tip of the tail to point at the text, illustration or section that you plan to talk about in the bubble.
Click inside the bubble and type your text. When you’re finished, reposition and edit the text the same way you would in a normal text box.
- Robin Houghton: Using Speech Bubbles to Get Your Point Across
- YouTube: Word 2010 Tutorial Inserting Shapes Microsoft Training Lesson 13.1
- YouTube: MS Excel 2010 Tutorial 6 Adding Pictures and Shapes
- YouTube: PowerPoint 2010: Inserting Shapes
- If you position a text bubble to overlap with text already on a page, the bubble will block the text. To make the bubble transparent so that the text shows through it, select the bubble shape so that the “Format” tab appears above the ribbon. Click the tab, locate the Shape Styles section, click “Shape Fill” and then select “No Fill.”
- To change the outline of the bubble to a different color or to a dashed outline, click “Shape Outline” in the Shape Styles section and select a color option, or roll your cursor over “Dashes” and select a line option.
- To narrow, widen, shorten or lengthen the bubble's tail, select the shape and then click and drag the yellow handle at the end of the tail as desired.
Based in Southern Pennsylvania, Irene A. Blake has been writing on a wide range of topics for over a decade. Her work has appeared in projects by The National Network for Artist Placement, the-phone-book Limited and GateHouse Media. She holds a Bachelor of Arts in English from Shippensburg University.
Related Articles
How to automatically text wrap in powerpoint 2007, how to make diagonal text in word, how to make text bigger on a mac desktop, how to make a 3d cylinder in powerpoint, how to add shading in powerpoint 2003, how to create an invisible button in powerpoint for a callout, how to create bubble letters in microsoft publisher, how to generate text in the shape of a half circle in powerpoint 2007, how to turn off superscript in powerpoint, most popular.
- 1 How to Automatically Text Wrap in PowerPoint 2007
- 2 How to Make Diagonal Text in Word
- 3 How to Make Text Bigger on a Mac Desktop
- 4 How to Make a 3D Cylinder in PowerPoint
- ONLYOFFICE /
- ONLYOFFICE Tips and Tricks
Text bubbles: a big guide
Although a text bubble seems to be a simple element, not everyone knows how to make it. Today we’ll cover what it is and how to do a text bubble from zero or using ready templates.

What a text bubble is and when you can use it
First, it is worth understanding what does it mean. A text bubble, also called a speech bubble, speech balloon, or dialogue balloon is a rounded or irregularly shaped outline filled with text and features a tail pointing toward the speaker.
The concept is well-known thanks to Superman, Batman, and Disney characters who spoke through speech bubbles. In comics, they express the words, thoughts, or emotions of a given character. However, text bubbles have gone far beyond the pages of comic books.
It is widely used in presentations. Want to make your report less boring? Add a text bubble as a design element to your slide, creatively illustrate your words, highlight the main idea, or frame an inspiring quote with it. You can also use them to create memes or cues in visual materials.
In formal documents, text bubbles are often called “callouts” as they are designed to attract the reader’s attention to a specific point or give instructions.
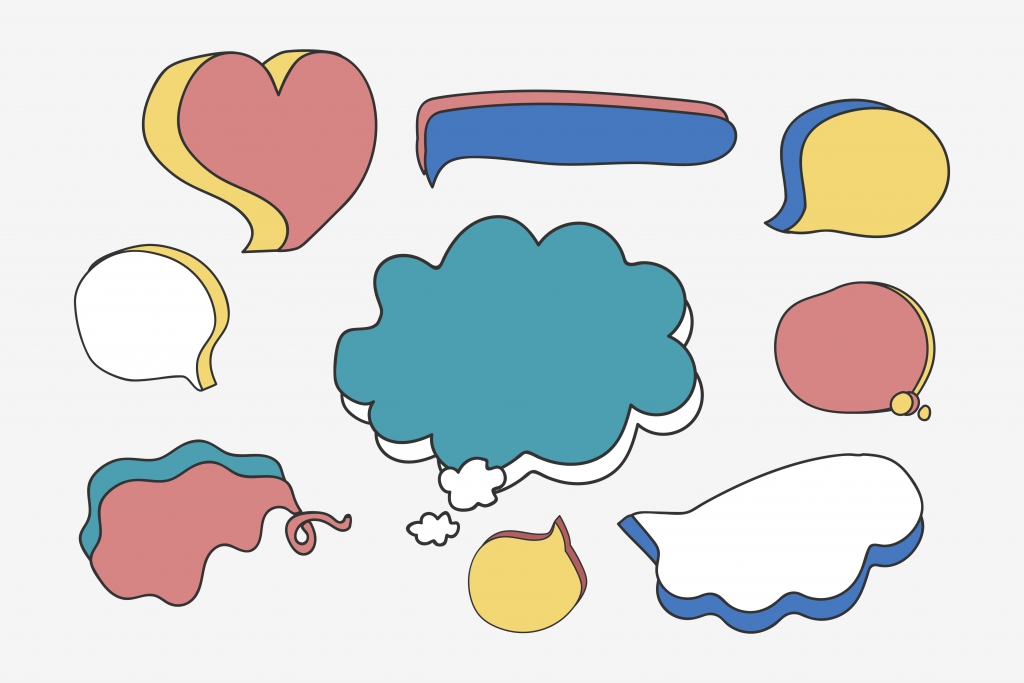
How to create text bubble using ready png
Creating text bubbles for any purpose is not very difficult today. The first and most obvious way is to find a ready speech bubble template in png format on the Internet. For example, download it from Google or find suitable ones on specialized stocks. Many stocks offer free templates for any purpose and to any taste. Then you can add a text bubble to a photo in any image editor.
If you want to use a ready-made speech bubble, make sure it does not violate copyright law.
How to create text bubble online
The easiest and fastest way to create a text bubble is an online service (for example, Phrase it or FlexClip ). It does not require any professional skills. All you need is to follow these steps:
- Choose a background picture (You can add a speech bubble to any stock picture or upload a photo from your device);
- Choose a bubble form;
- Place it on the picture;
- Add and edit the text;
- Download the picture on your devices or send it by email.

How to create speech bubble in Word , Excel, and PowerPoint files
The previous methods describe how to add a text bubble to a photo. However, you may need to add it to a text document, spreadsheet, or presentation to make a note, pay attention to a specific statement or give an example. Another reason you might want to know how to add a text bubble is when you already have an illustration inserted into your document, but you want to enhance it. In this case, creating a new image using online services will take more time than doing it directly in the editors.
Let’s see how to make a speech bubble in Word, Excel, or PowerPoint formats with ONLYOFFICE editors.
- Using ready png image . If you have a ready-made png image to add to your document, go to Insert —> Image —> Image from File and choose the picture from your device.

- Using shapes in editors. It is also possible to create a text bubble from scratch in document, spreadsheet, or presentation editors using shapes. The task is much easier than it may seem.
The shape feature has different shapes of text bubbles: rectangular selection can be used for quotes, oval callouts often serve as speech balloons, and cloud – for thoughts.
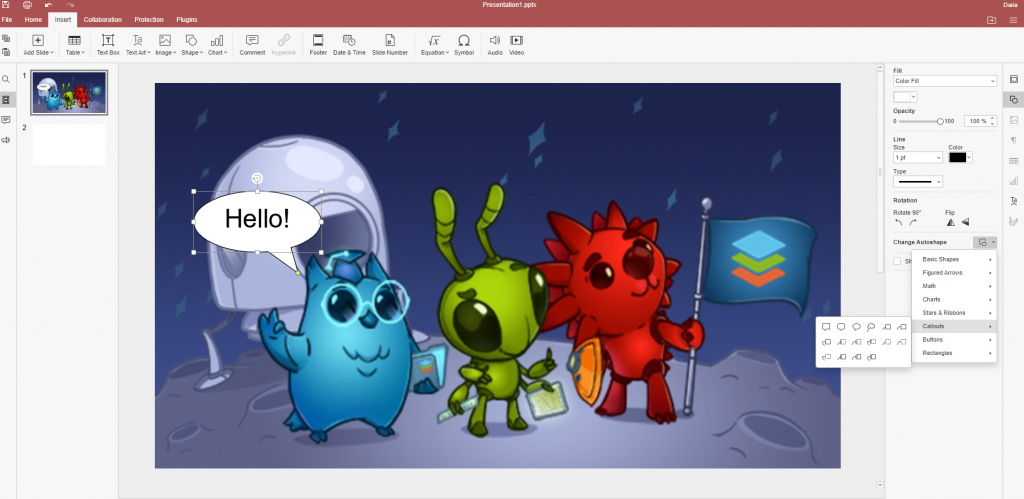
Go to Insert —> Shape —> Callouts and choose the necessary one.
Draw a speech bubble shape on the page. Then, modify its size, make a tail longer or shorter, or change its direction by moving the yellow point. Ideally, the tail should be pointed to the mouth or head of the speaker, if there is an illustration, or to the sentence or part of the text whose brief thought a text bubble expresses.
If you have already set the size and added text to a shape and then decided to choose another shape, there’s no need to delete the shape and start over. Use Change Autoshape option on the right-side toolbar to change the shape but keep the size and text.
How to add text and change font
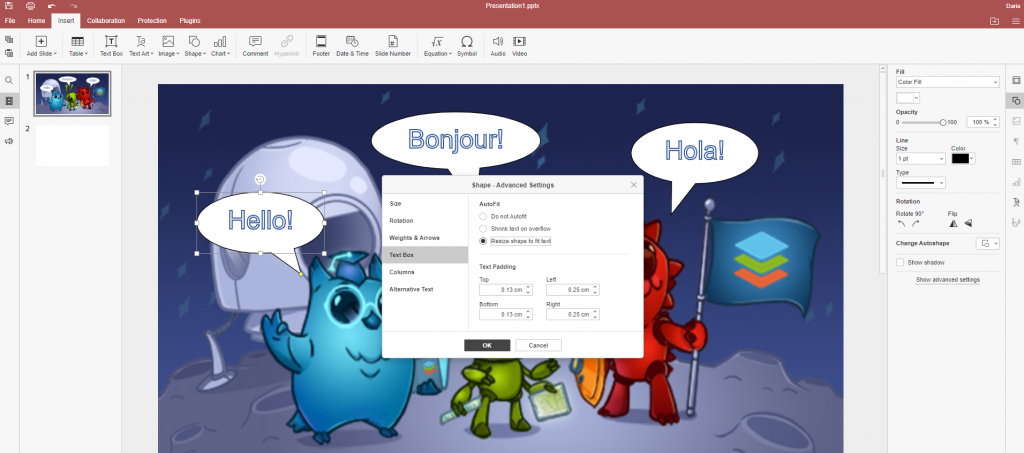
To add text to a speech bubble, you just need to double-click it and enter the text. To change the font, you can use the usual fonts or apply text art on the right-side toolbar.
There’s a handy feature here. Instead of manually changing the size of the text bubble so that all the text is visible, you can set the automatic adjustment.
Click the shape, go to Advanced Settings , and choose to Resize shape to fit text . That way, after you enter the text, the bubble will automatically resize.
How to change background color or make it transparent
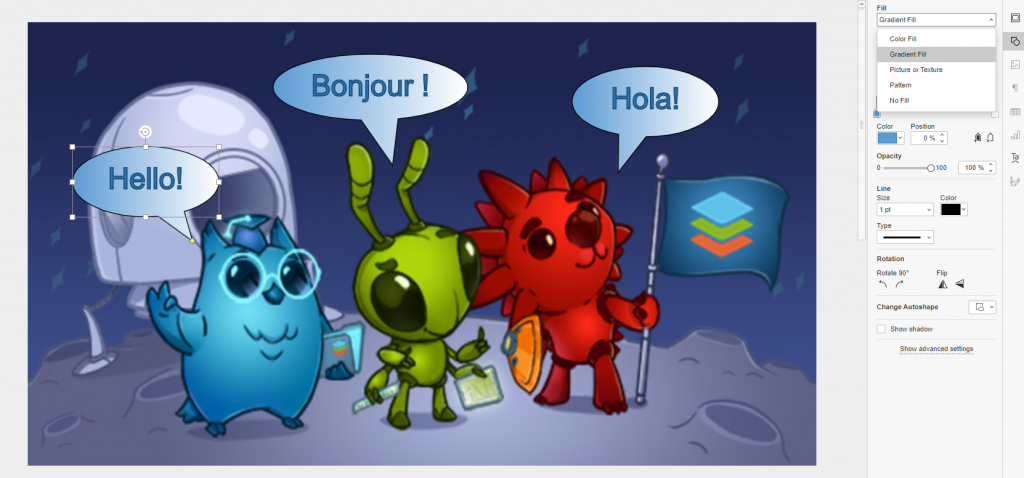
Speaking about text bubbles, we shouldn’t forget the background color, as it also matters. The bubble color helps to convey emotions or feelings. For example, red implies the speaker’s anger and rage.
You can easily change the default background of the shape. Click it and choose another color on the right-side toolbar. It is possible to choose a pattern for the background or make a text bubble transparent or gradient. Just select the desired option from the drop-down list under Fill on the right-side toolbar.
That is how to create a text bubble in different ways. As you noticed, it can be easily done even in document editors, using simple shapes and your imagination. Try it now in ONLYOFFICE Editors:
START ONLINE GET DESKTOP EDITORS
Useful links
New features of ONLYOFFICE Desktop Editors v6.4
How to add Youtube video in presentation
How to create a Gantt chart in Excel sheets
How to save Word document as PDF
Recent posts

How to edit .md files in ONLYOFFICE

ONLYOFFICE DocSpace turns 1: a retrospective report
ONLYOFFICE connector v7.0 for Alfresco is released with PDF filling, advanced security options and much more
How to Insert Word Bubbles in Microsoft Word
By adrian grahams / in computers & electronics.

Interesting graphics and illustrations can help bring to life an otherwise dull Microsoft Word document. One way of brightening up a boring block of text is to insert a word- or speech-bubble shape. Word comes with a range of different shape illustrations, and you'll find a selection of speech bubbles listed under Callouts in the shape-picker tool on the Insert tab on the main program menu. Once you've added a word bubble to the document, you can add text to it.
- Interesting graphics and illustrations can help bring to life an otherwise dull Microsoft Word document.
- One way of brightening up a boring block of text is to insert a word- or speech-bubble shape.
Launch Microsoft Word.
Click "File" and then "Open" to open the document in which you want to add the word-bubble shape. Click "New" to create a new Word document.
Click "Shapes" in the "Illustrations" group on the "Insert" tab.
Locate your preferred word-bubble illustration from the thumbnails in the "Callouts" section of the "Shapes" context menu.
Click the shape thumbnail to insert into the document. This launches a cursor that you can drag across the screen to draw the shape to the size that you require.
Click the shape in the document to highlight it. Click inside the speech bubble, and then type the text that you want to include.
In Step 5, you can change the shape of the word bubble by selecting "Change Shape" under "Edit Shape" on the "Insert Shapes" group in the "Format" tab.
How to make a speech bubble on Word Online?
Speech bubbles are fun and those of you who have read a comic know how important they are. Though speech bubbles are common in comics their function is not limited. This article tutorial looks at How to make a speech bubble on Word Online. It also looks at how to add text to speech bubbles.
To insert a speech bubble into a Word online document click on the Insert tab in the top ribbon of the document. From the options select Shapes. Scroll down to the callouts section and click on the one you would like to add. Once selected simply drag and add the callout to the document.
As Word online has only basic functions and formatting options you do not have too many options when it comes to speech bubbles. Nonetheless, here is how to add a speech bubble if you are using Word online.
- Login to Word online, locate and open the document you would like to work on

- Once you have the document open click on the spot where you would like to add the speech bubble.
- Now go to the Insert tab in the top ribbon of the document
- From the options click on Drawing
You will have a popup window

- Click on Insert and then on Shapes
- You will have a drop-down menu

- You have one shape that looks like a speech bubble, click on it.
- You will then need to drag and add it to the canvas
- After you have formatted it click on Save and close in the top right
- The shape will be added to the document.
- To edit the shape double-click on it, the changes will need to be made from the drawing preview popup.
How to put text in a speech bubble in Word?
On the desktop version of Word online, you have more formatting options. Here is a step-by-step guide on how to insert a callout in Word.
- Locate and open the word document by double-clicking on it
- Scroll through the document and click where you need the speech bubble to appear. The cursor should blink at the spot

- Click on the Insert tab in the top ribbon of the document
- From the options in the tab click on Shapes. You will have a dropdown with the various shapes you can add to the document.

- Scroll down to the callouts section
- From here you can choose the shape and style you like.
To add the callout to the document you will need to click and drag after selecting the shape.
The shape, color, and other aspects of the callout can be changed at any time by clicking on it > selecting it > and then using the formatting tools.
Read How to insert a check box in Word Online?
How to add text to a speech bubble in Word?
Once you add a speech bubble to the document you can add text at any time. Not only can you add text but also format it at any time. This section looks at how to add text to a callout in Word.
- Start by clicking on the callout to select it

- After selecting the callout you can make changes to the shape or color or other aspects using the Shape format option.
- Add text to the callout by clicking
- To format text use the options in the Home tab
How to make a fillable speech bubble in Word?
You can add a speech bubble to a word document and print it without adding text. You can also add multiple speech bubbles and use it at Parties, as activities for kids, and much more. Here is how to insert a blank speech bubble into a document.
- Locate and open the Word document you would like to work on
- Move the cursor to the spot where you would like the bubble
- Click on the Insert tab
- Go to Shapes. You will have a dropdown menu.
- Scroll down to callouts
- Click on the design you like
- Drag and place it in the document.
To duplicate speech bubbles follow these steps.
- Click on the speech bubble and select it
- Use the copy option in the Home tab or use keyboard shortcuts to copy. Ctrl + C on Windows and Command + C on Mac
- Now click where you would like the second bubble
- Use the paste option in the home tab or use keyboard shortcuts. Ctrl + V on Windows and Command + V on Mac.
You can repeat this as many times as you like.
Here is how to print speech bubbles.
Once you have added speech bubbles to the document you can print them easily.
- Click on File in the top ribbon
- From the options click on Print
- Make the desired changes in the page layout or number of copies and print.
You can also use the keyboard shortcut Command + P on Mac and Ctrl + P on Windows for the print menu.
How to create speech bubbles printable pdf in Word?
Speech bubbles created in Word can easily be converted into printable PDFs. Follow these steps
- Start by creating the speech bubble and formatting it the way you need it.
- Now click on File
- You will see Save As or Save a copy.

- Change the file name
- Click on the arrow near File format

- From the options click on PDF
- Now click on Export.
The Word document will convert into a PDF. To print simply open the PDF and click on the print option.
Multiple choice bubbles in Microsoft Word?
Multiple choice bubbles or fill-in bubbles are bubbles that you can use in your Word document. Here is how you can create multiple-choice answer sheets on your Word document. You can use this method for other multiple-choice question-and-answer formats.
- Open the Word document you would like to work on
- Enter the question or questions
There are two ways you can do this using a table or without a table. Here is how to do it using a table

- Click on the Insert tab.
- Go to Table and you will have a dropdown menu. From here you can choose the number of rows and columns you would like to add.
- Once you have the table add the content
After you have added the content you can add bubbles

- Go to Shapes and you will have a drop-down menu

- Go to basic shapes and click on the circle.
As a default, the circle will come filled in. To use it as a bubble remove the existing color.

- Click on the bubble to select. Once the bubble is selected you will have the Shape Format tab.
- Go to shape fill
- From the options click on white or the color of your page

- The bubble should look like this.

To create a multiple-choice sheet you will need to copy the bubble and paste it against the other questions or answers.
This tutorial looked at how to make a speech bubble on Word Online . We went over how to use the limited formatting options in Word online to create speech bubbles. The article then looked at how to add callouts using the desktop version of Word. Finally, it explored how to add bubbles for multiple-choice questions.
You may also like the following word online tutorials:
- How to make Word Online table of contents hyperlink?
- How to change pdf to Word Online?
- How to put spacing between bullet points in Word Online?

My name is Carissa Gudino and I am an expert in word online, using Word Online in my day-to-day tasks. In this blog, I will share with you tips and tutorials on how to use word online to its fullest potential. I work for various clients in various countries like the United States, Canada, the United Kingdom, Australia, New Zealand, etc. My tutorials are designed to help beginners, as well as more experienced users, learn new tricks and tips on Microsoft word online. Check out more .

Word: speech bubble create how to
- Apr 25, 2024
If you want to create picture stories in Word, it is to use speech bubbles. We will show you how to create this.
Speech bubbles in Word to create
- Open Word on your Computer.
- Select the Insert tab.
- Click on "forms". Under the sub-item "legends" you find bubbles has several speech variants.
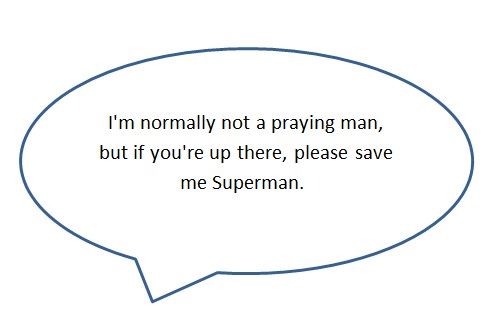
- Select a speech bubble and you click on your document. The speech bubble is thus created.
- Under "type" you can fill color, and border color of the speech bubble change.
YOU MAY ALSO LIKE

Word: Vertical line - so it goes
- Thu 25, 2024

Outlook: Blocked open attachments - how to
Fri 26, 2024, leave a comment, recent posts.

How to Choose Best Software Development Company [10 Tips]

The Sports Betting for Dummies

Investing in Blockchain Startups: Identifying Promising Projects for High Returns

Swine Fortune: Exploring Piggy Bank Bonuses in Slot Games
Subscribe to our newsletter to get notification about new updates, information, etc..

How to Make Bubble Letters in Microsoft Word
Make your flyer look all cutesy
If you’re using Microsoft Word to create an event flyer , party invitation, or greeting card, you’re probably looking for upbeat and fun styles. For the text, consider using bubble letters to add some whimsy to your creation.
Bubble letters appear curvy and bouncy with an almost cartoon-style feel, making them ideal for casual creations. You can use one of Word’s built-in font styles or download a bubble typeface from an online source. Then, simply apply the style and spruce it up to your liking. Here’s how to create bubble letters in Word on Windows and Mac.
Use a Word Font Style for Bubble Letters
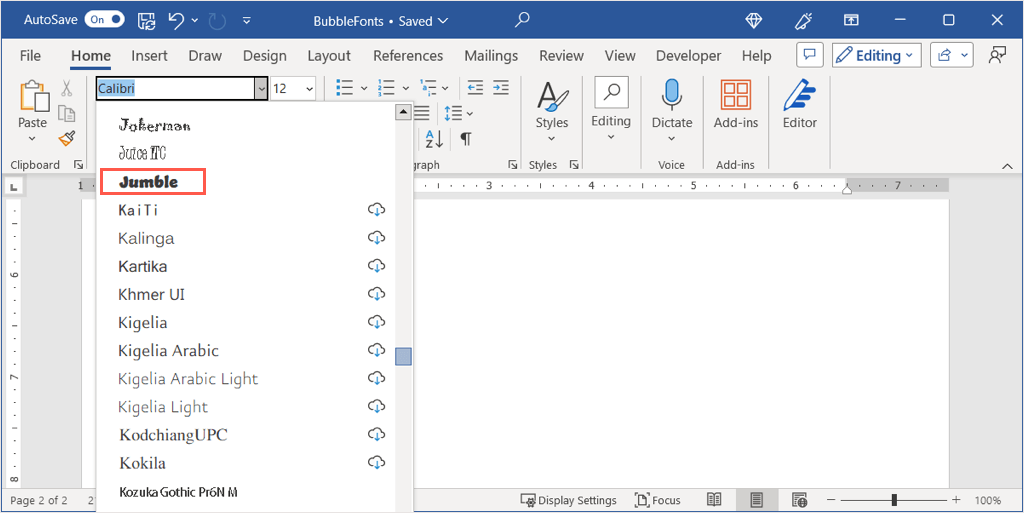
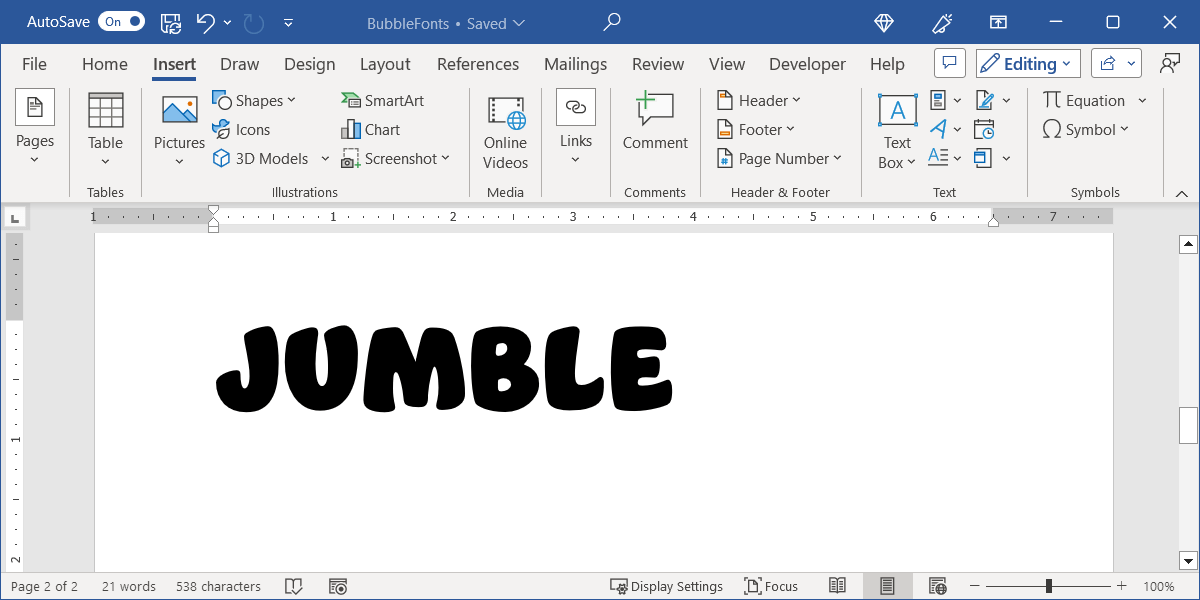
Microsoft Word provides numerous font styles to pick from with one of them being perfect for bubble letters. The style is called Jumble and it’s available in Word on Windows and Mac.
- Select the text you want to turn into bubble letters and head to the Home tab. Tip : Bubble letter words often look better in all uppercase, but you can include lowercase if you prefer.
- Open the Font drop-down box which displays your current font style.
- Select Jumble .
You’ll then see those airy letters that you can leave as-is or add some flair as we’ll describe later.
Download and Install a Bubble Letter Font
If you’ve never added a new font on your computer before, there are many websites offering both free and paid styles. For bubble letters specifically, here are four free sites and a cool option for you to consider from each. We’ll then explain how to install the font on both Windows and Mac.
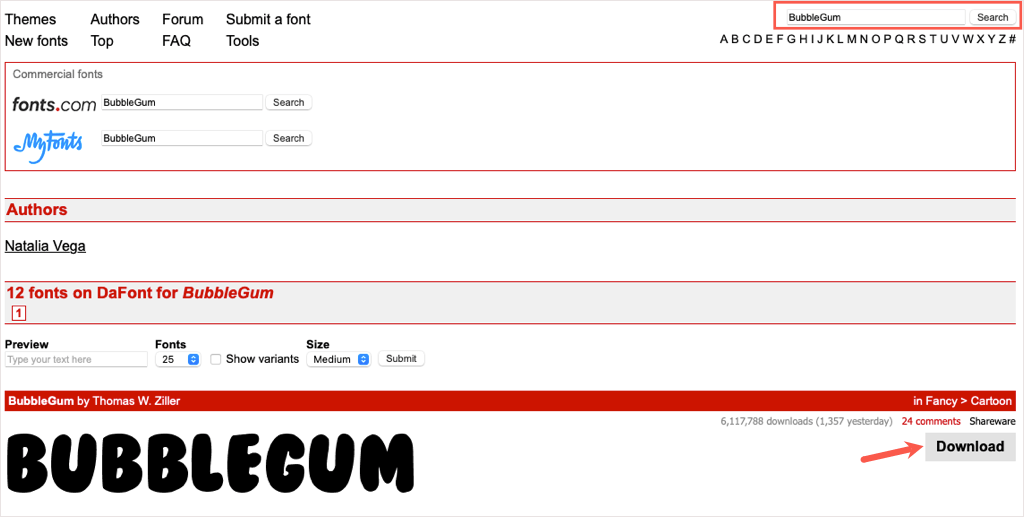
DaFont is a free font site suggested by Microsoft on their Add a Font support page . This site provides over 100 bubble styles for you to choose from. One great bubble font is called BubbleGum.
You can use the Search box at the top to find “BubbleGum” and then select Download to the right.
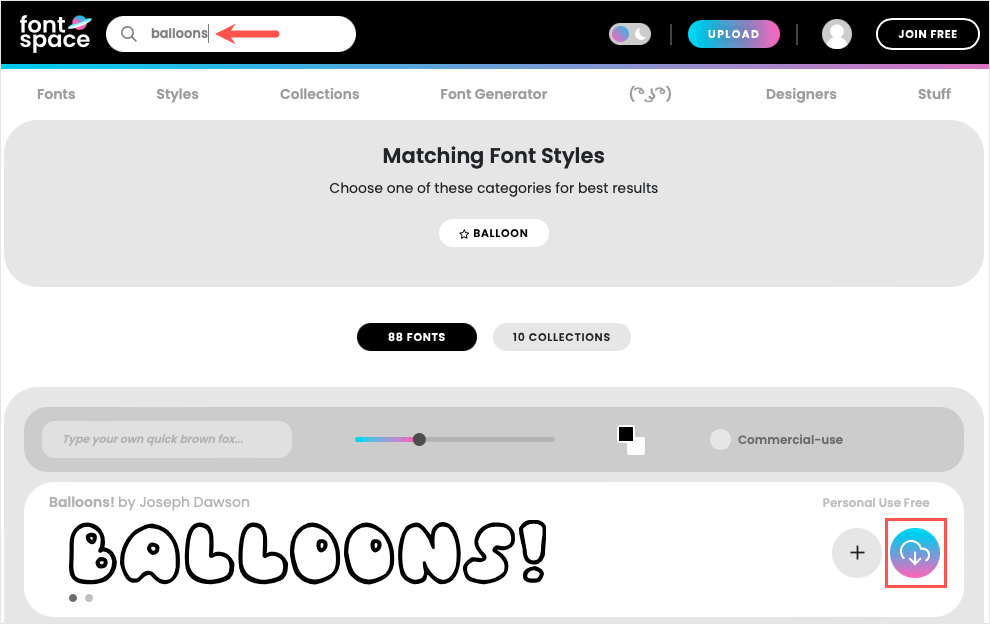
Another terrific source for fonts is FontSpace. They have an entire category dedicated to bubble style fonts with one standout option called Balloons!. This is a cute option if you want a bubble outline style rather than a filled font.
Like DaFont, use the Search box at the top to locate “Balloons” and choose the Download icon (cloud and arrow) on the right.
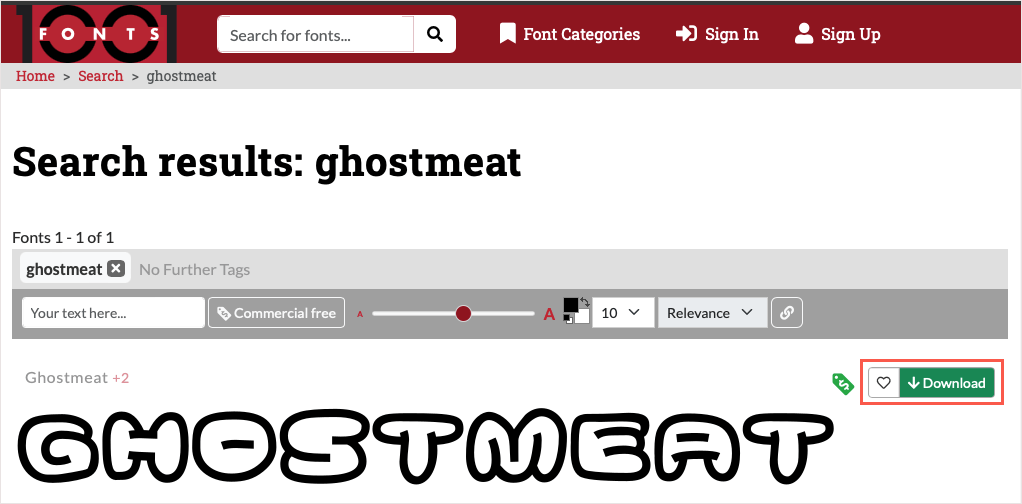
If you’re looking for something unique, take a look at the Ghostmeat bubble font from 1001 Fonts. This one is also outlined with white in the center but emits an almost scribble or hand lettering feel.
Search for “Ghostmeat” in the box at the top and select Download when you see the font.
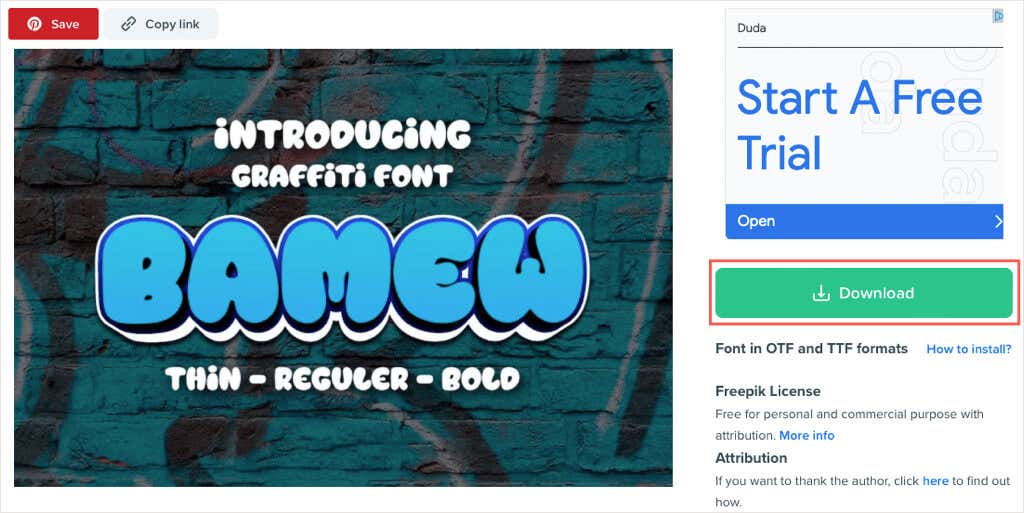
One more site you may want to check out is Freepik. They have three pages of options with a super puffy style called Bamew which resembles a graffiti letter font.
This site’s Search is a bit more difficult when looking for a particular font name. So, it’s best to use this direct link to the Freepik bubble fonts .
Browse through the options for one you like or select the Bamew style and choose Download .
Install Your Bubble Letter Font
Once you find a bubble style you like and download it, you simply need to install the font on your Windows computer or Mac to make it available in Microsoft Word.
Install a Font on Windows
- You can select the Downloads option in the web browser you’re using or launch File Explorer and open your Downloads folder. The file should be in a ZIP format.
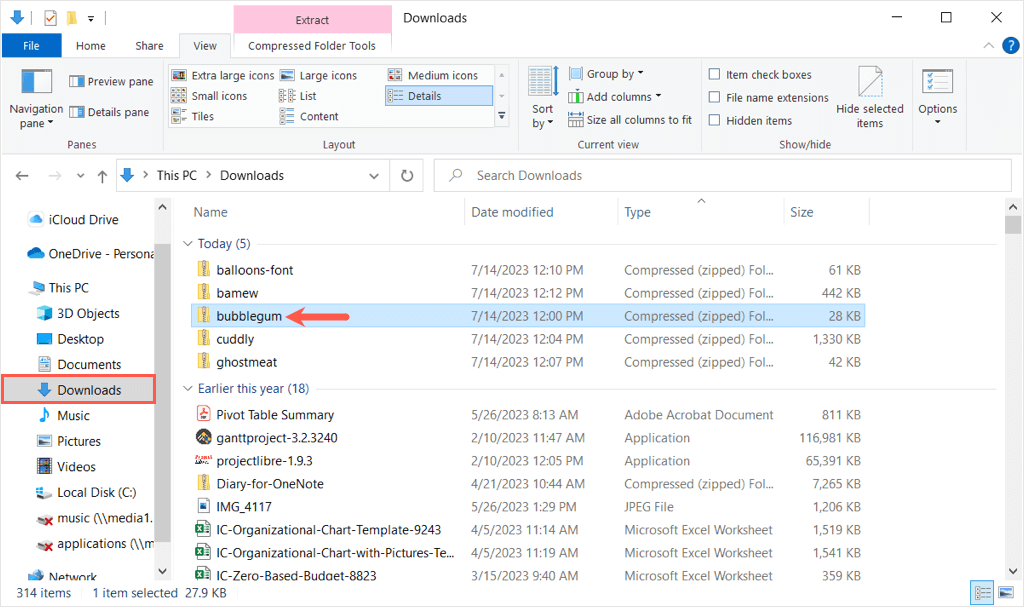
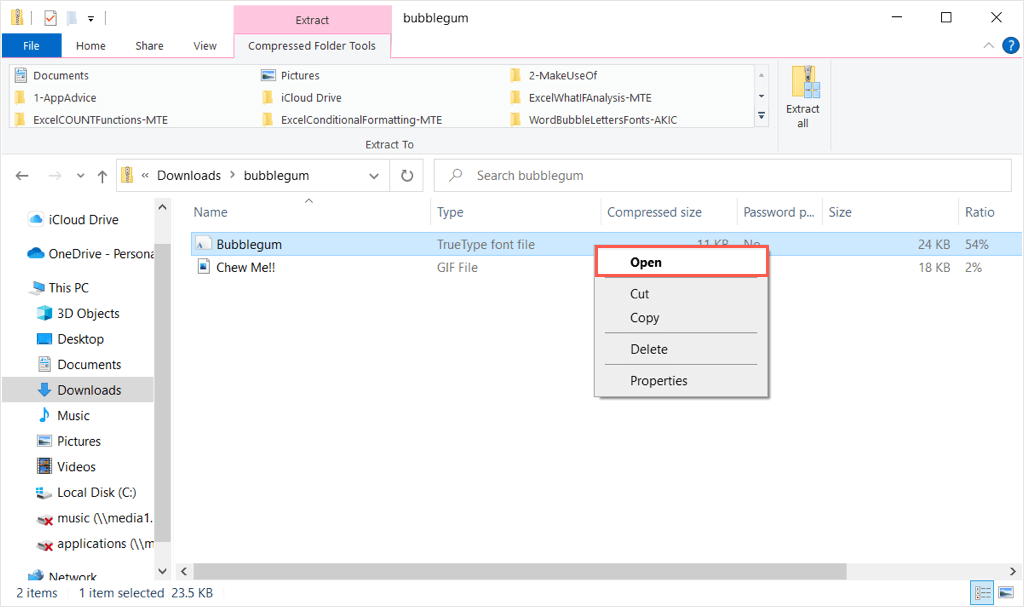
- When you double-click the ZIP file to extract the contents, you’ll see various files, depending on the exact font you picked. You may see TrueType, OpenType, or both file types. Right-click the one you want to install and choose Open .
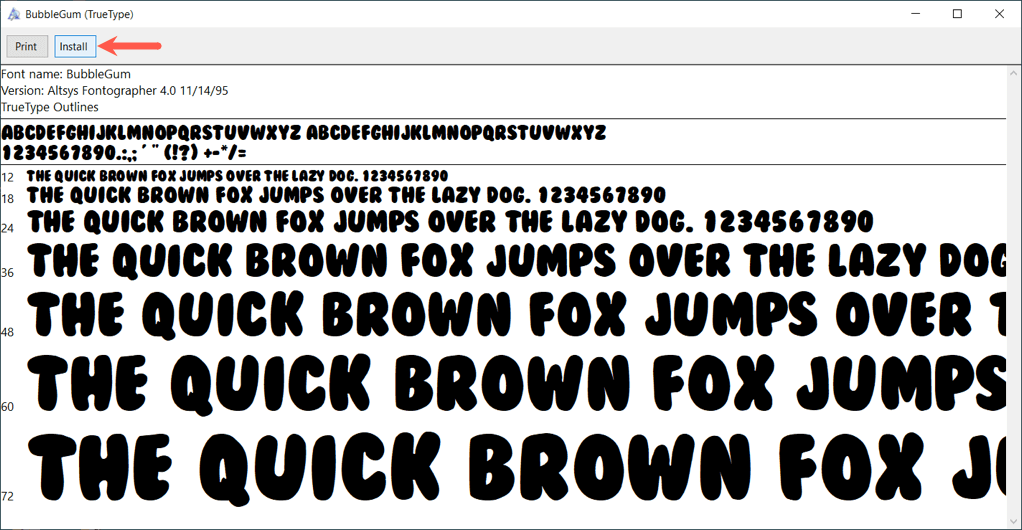
- In the subsequent window, you’ll see a preview of the font. Select Install at the top and then close the window.
When you return to Microsoft Word, you should see your new bubble style in the Font drop-down box on the Home tab.
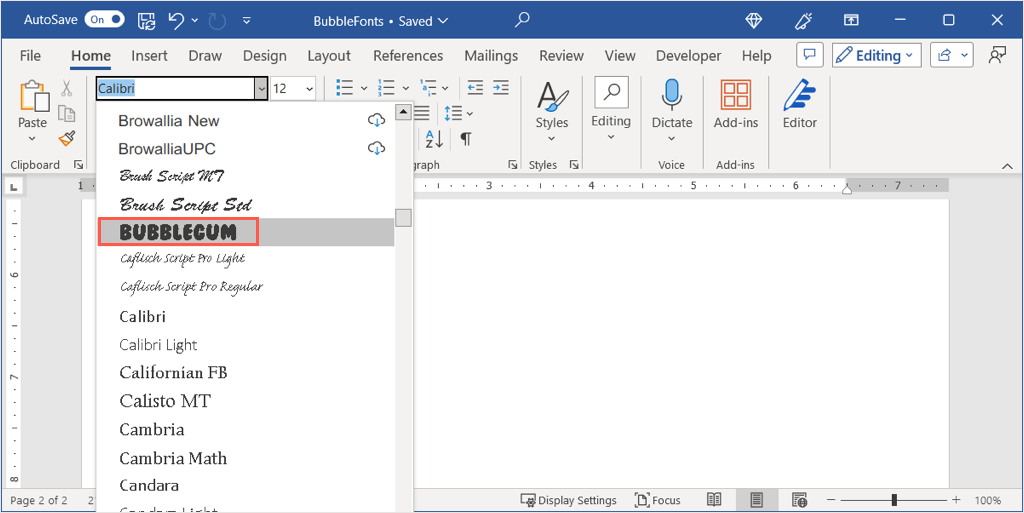
Note : You may need to restart Microsoft Word to display the new font .
Install a Font on Mac
- Like on Windows, you can open the Downloads location for your web browser or launch Finder and open the Downloads folder to install the font on Mac .
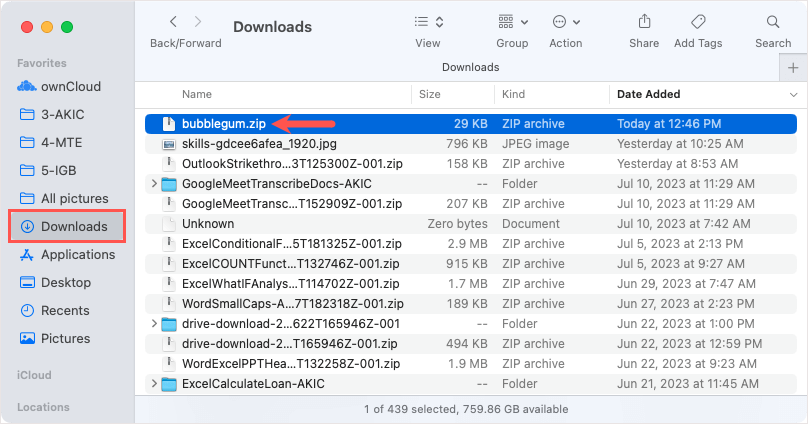
- Double-click the ZIP file and then open the folder inside. You may see more than one file, depending on the font you downloaded.

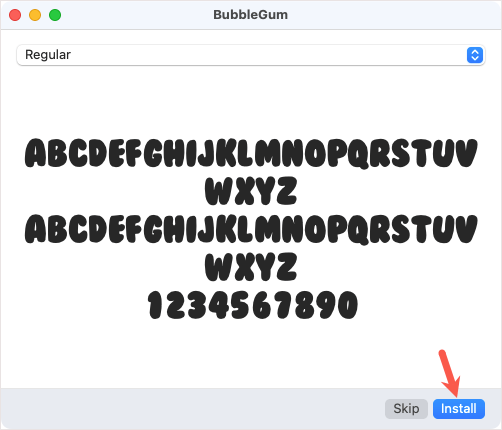
- Then, double-click the file you want to open and you’ll see a preview of it in the macOS Font Book showing the bubble letter alphabet. Select Install and then close the window.
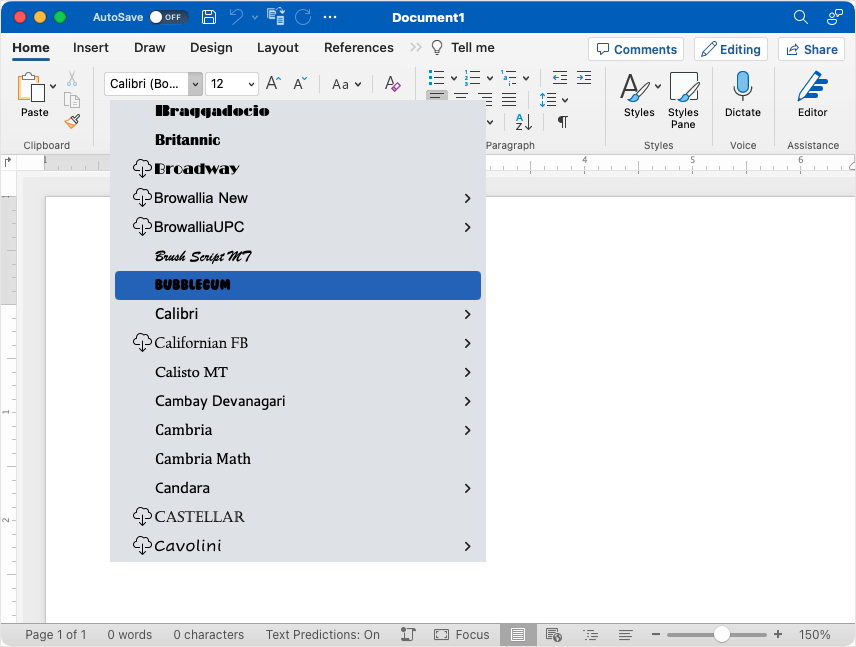
Restart Microsoft Word, go to the Home tab, and you’ll see your new bubble style in the Font drop-down box.
Bonus: Enhance Your Bubble Letters
While you can certainly use the bubble font as-is, whether the Jumble style in Word or the one you install, you can also spruce it up a bit. To make it bubblier or more colorful, here are just a couple of suggestions using Word’s built-in font formatting features.
Add Color to the Font
If you have a color scheme for the item you’re creating, you can easily change the font from basic black.
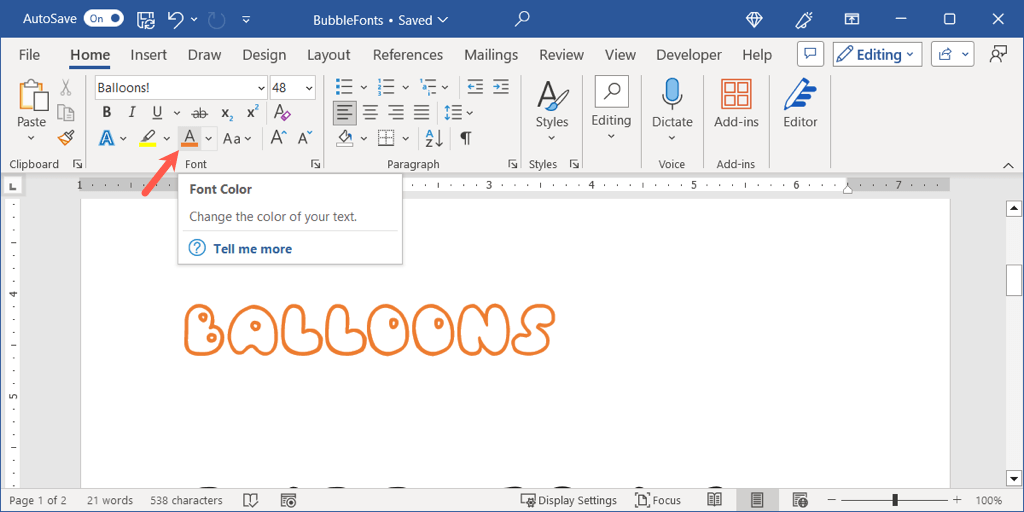
Select the text, go to the Home tab, and pick the color in the Font Color drop-down menu.
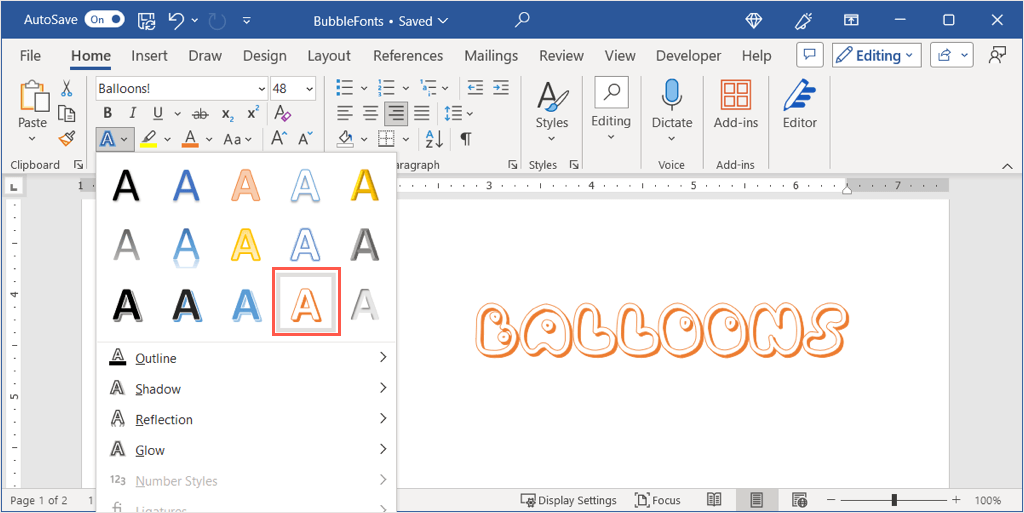
You might want to take it a step further and add some depth to the letters using a text effect.
On the Home tab, pick a style in the Text Effects drop-down menu or on the Insert tab use the Word Art menu. Here, we select the orange, white, and shadow option.
Transform the Text to 3D
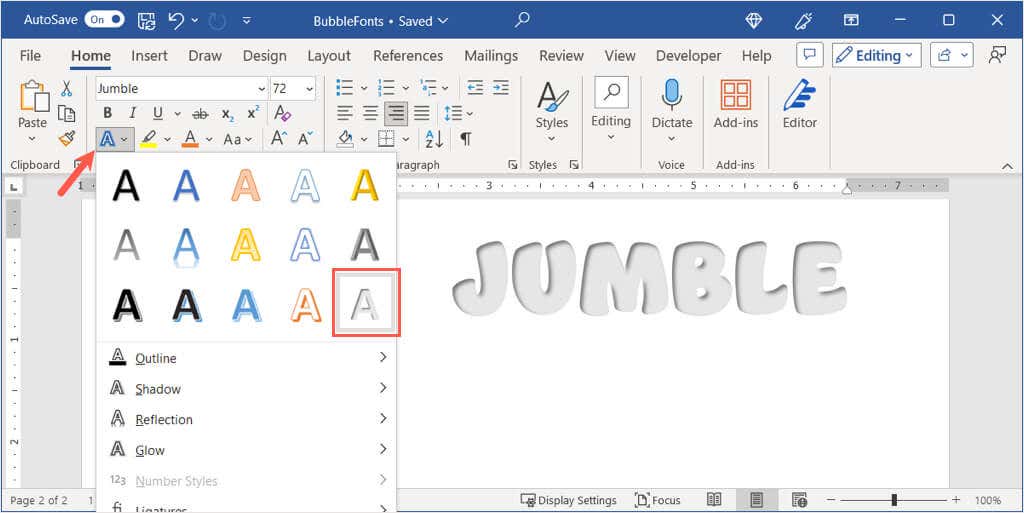
To make your letters look more like real bubbles, you can apply both a text and 3D effect.
- Go to the Home tab, open the Text Effects , and choose the light gray inner shadow option on the bottom right.
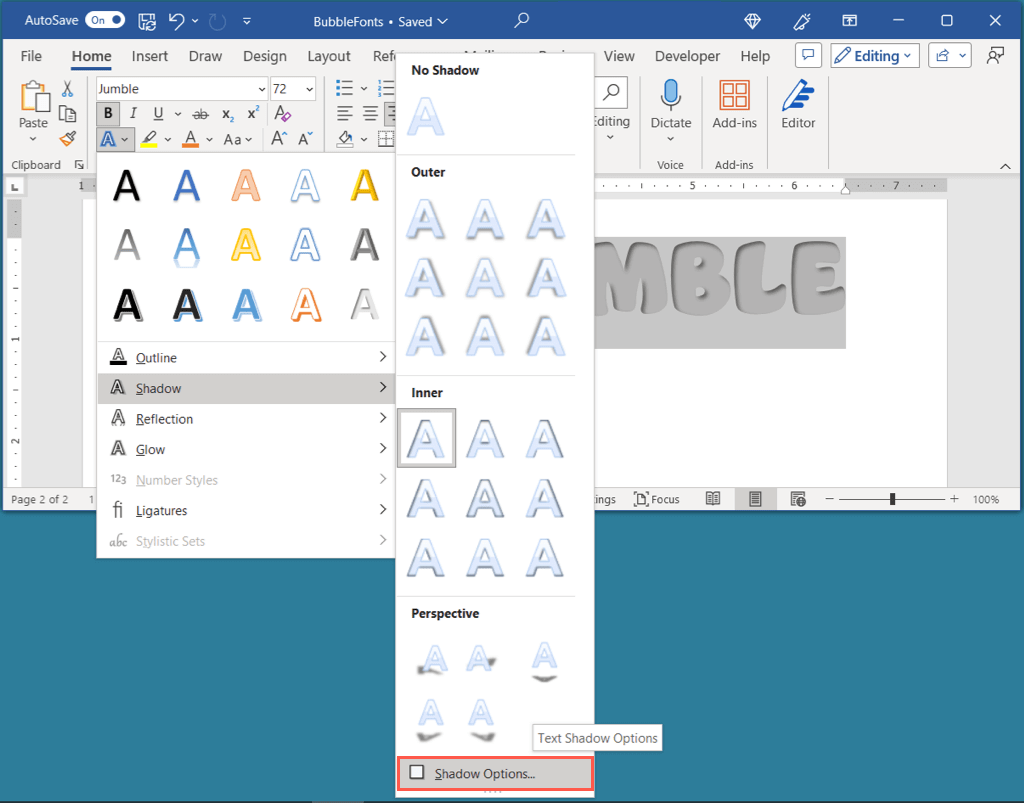
- Return to the Text Effects drop-down menu, move to Shadow , and select Shadow Options to open the formatting sidebar.
- Then, expand the 3-D Format section, open the Top bevel drop-down menu, and pick Round or Angle. You’ll then see your bubble letters pop.
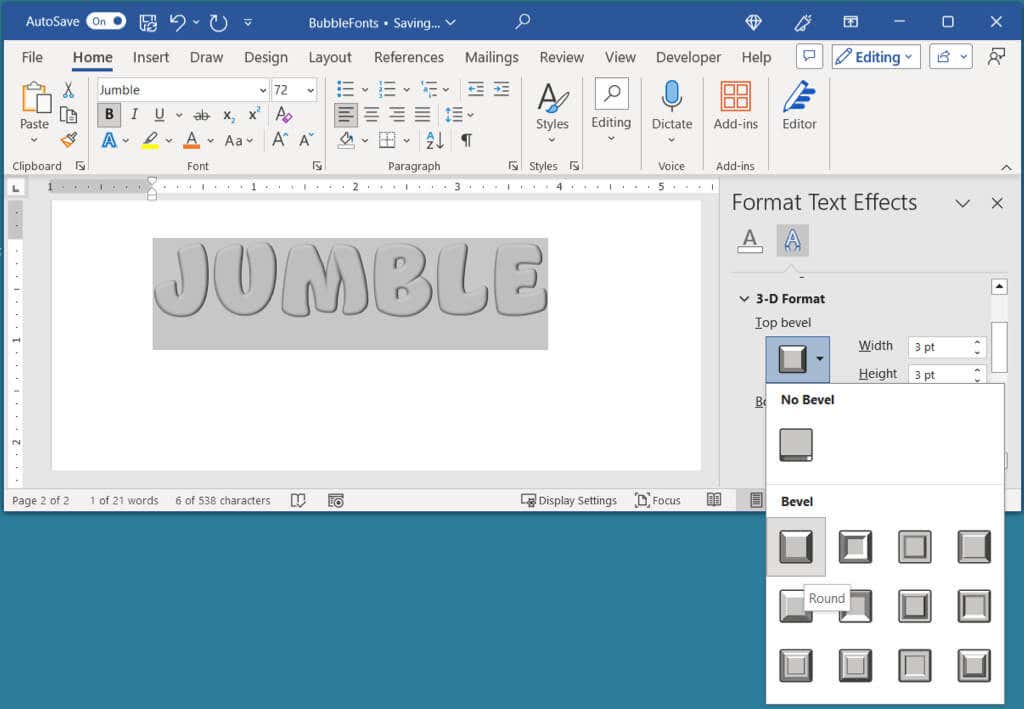
- You can also apply a different color afterwards, again, using the Font Color menu on the Home tab.
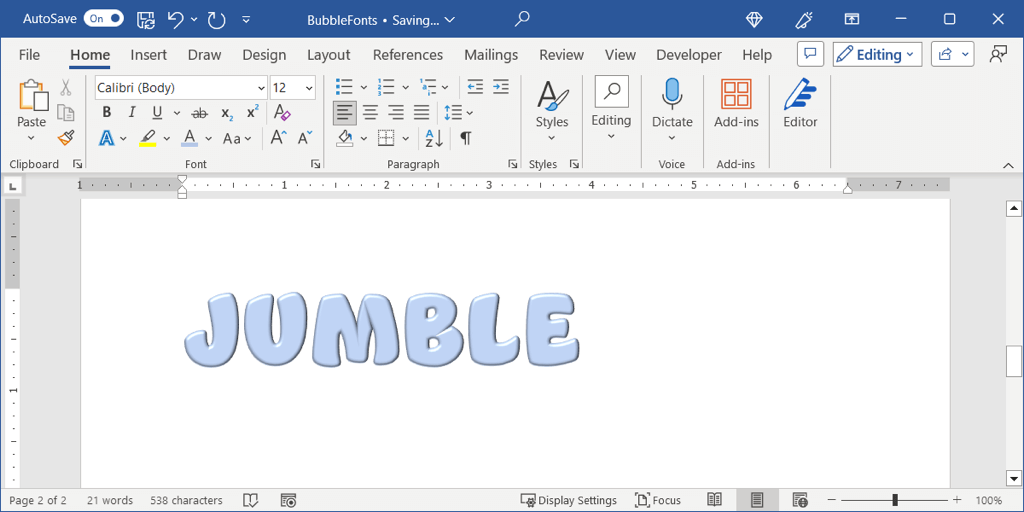
Additionally, you can try out Word’s other font formatting features like Glow, Reflection, or Shadow to apply different unique looks to your letters.
Now that you know how to make bubble letters in Word, check out a related tutorial like how to change the default font in your Microsoft Office apps including PowerPoint.
Sandy Writtenhouse is a freelance technology writer and former Project, Department, and Program Manager. She turned her education, job experience, and love of technology into a full-time writing career. With all sorts of gadgets in her home and her hands, she seeks to help others make life easier through technology. Read Sandy's Full Bio
Read More Posts:


Contribute to the Microsoft 365 and Office forum! Click here to learn more 💡
April 9, 2024
Contribute to the Microsoft 365 and Office forum!
Click here to learn more 💡
Word Top Forum Contributors: Stefan Blom - Charles Kenyon - Suzanne S. Barnhill - Doug Robbins - MVP Office Apps & Services (Word) - Jim_ Gordon 👍✅
April 17, 2024
Word Top Forum Contributors:
Stefan Blom - Charles Kenyon - Suzanne S. Barnhill - Doug Robbins - MVP Office Apps & Services (Word) - Jim_ Gordon 👍✅
- Search the community and support articles
- Microsoft 365 and Office
- Search Community member
Ask a new question
Adjusting shape of speech bubble
I want to make a speech bubble that is more rectangular than the default while still being more oval than the rectangular option. Unlike with other shapes there is no parameter that can adjust the curve of the shape. Are there any add-ins that could let me make customized speech bubbles?
Report abuse
- Volunteer Moderator
There are no parameters to change the curve, but there is a way -- however clumsy. After inserting the shape, while it's still selected, click the Edit Shape button on the Shape Format ribbon and click Edit Points in the menu.
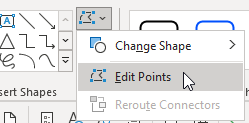
A square dot appears on the shape where the position and curvature can be changed. By right-clicking a point or a place on the shape's border, you can also add or delete points, change straight lines to curves, or open the path.
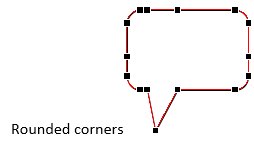
When you select a point, two white squares appear, connected to the point. They control the curvature of the border at that point. You can drag the squares nearer or farther from the point, and closer to or farther from the border, changing how rounded and how smooth the border is.
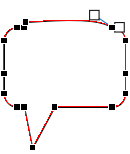
The trouble is that there's no control of the changes other than dragging with the mouse, so it's nearly impossible to ensure that the changes are symmetric.
If you manage to achieve a shape that you like, you can save it as a building block through the same mechanism as creating an AutoText entry.
I don't know of any add-in that works with these shapes. If you find one, please let me know!
2 people found this reply helpful
Was this reply helpful? Yes No
Sorry this didn't help.
Great! Thanks for your feedback.
How satisfied are you with this reply?
Thanks for your feedback, it helps us improve the site.
Thanks for your feedback.
Replies (4)
Question info.
- Norsk Bokmål
- Ελληνικά
- Русский
- עברית
- العربية
- ไทย
- 한국어
- 中文(简体)
- 中文(繁體)
- 日本語
Speech Bubbles: 10 Astonishing Templates for Presentations
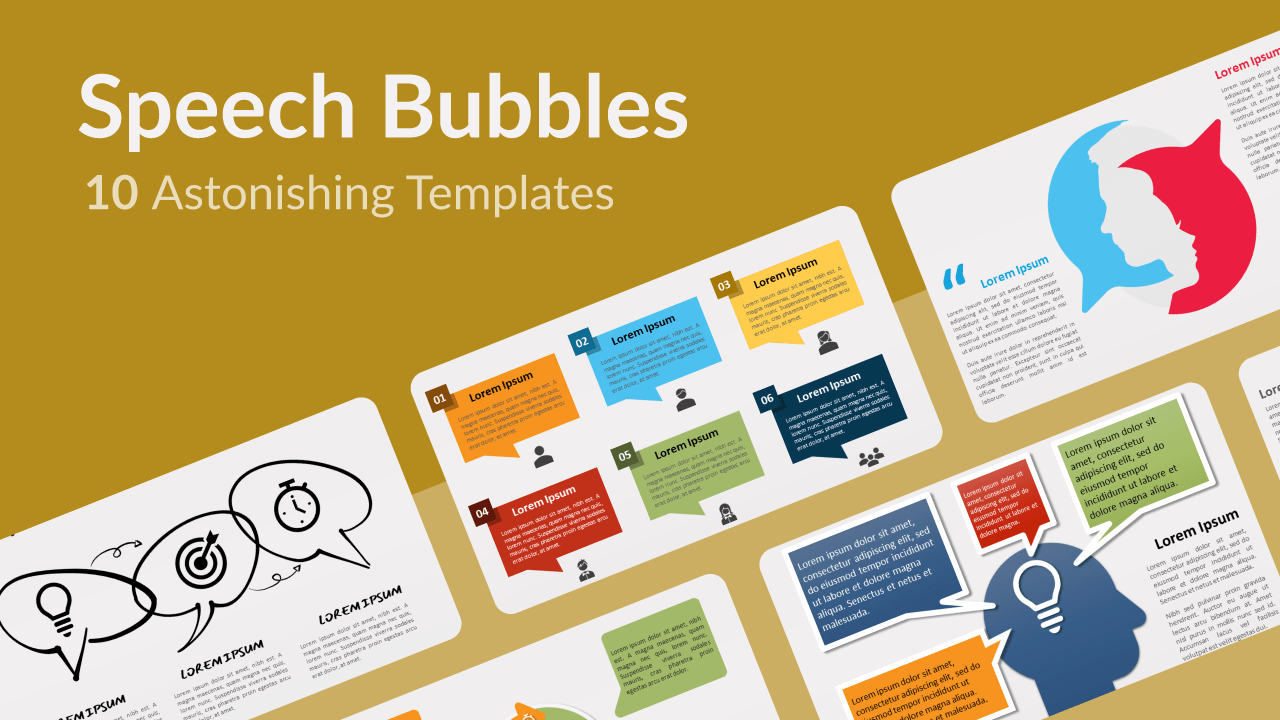
If you want to get your message across loud and clear, why not use speech bubbles in your presentations? This tool, so common in comic books, can be used in many ways and for many purposes. Moreover, it will bring a fun, lively, and modern touch to your presentations. So enjoy our selection of 10 free speech bubbles templates for PowerPoint and Google Slides! They will undoubtedly leave your audience speechless!
Speech bubbles , also called speech balloons, is a quite recent graphic invention. However, there is no doubt it is here to stay. Indeed, what better way is there to report the exact words or thoughts of a person? Dialogue balloons are also very effective to transcribe dialogues in a conversation.
In this selection of 10 astonishing speech bubble templates , you will realize their uses are manifold. You will indeed find word balloons for quotes, ideas, and thoughts but also circular and linear process diagrams, radial converging charts, and other specialized slides. Choose the speech balloon template that best fits the needs of your next presentation and download it for free. Remember the bubbles when you are going to give your next speech!
1. Brainstorm and Ideas
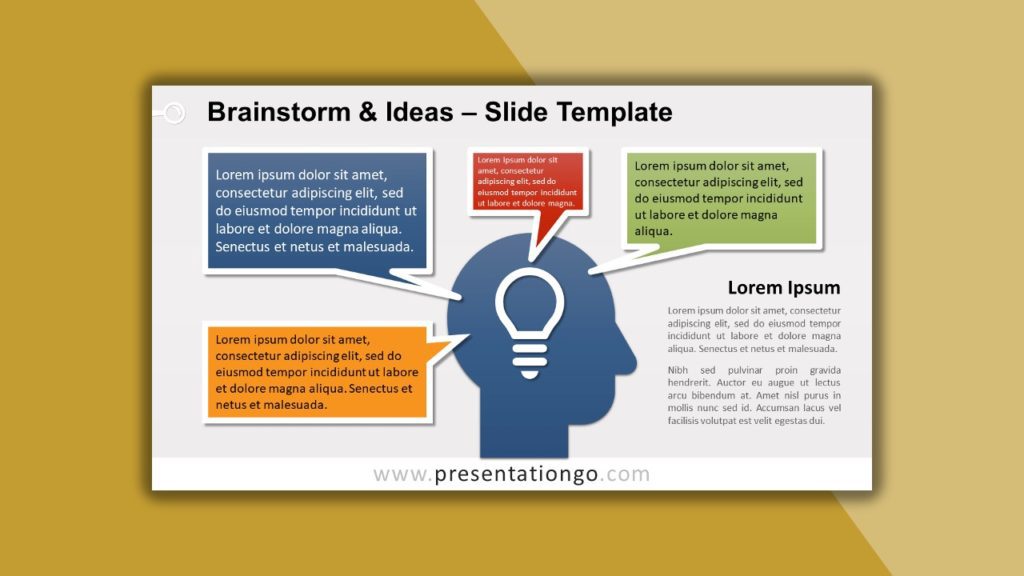
A light bulb inside your brain: the perfect metaphor for brilliant ideas! This is exactly what this free Brainstorm and Ideas template for Google Slides and PowerPoint illustrates. The head silhouette in the center allows you to highlight the cleverness of your thoughts. But how can you express and share them? Thanks to speech bubbles, of course! The head is indeed surrounded by four colorful speech balloons. Besides, there is another text placeholder to describe the main idea of your brainstorming .
2. Speech Bubble Collection
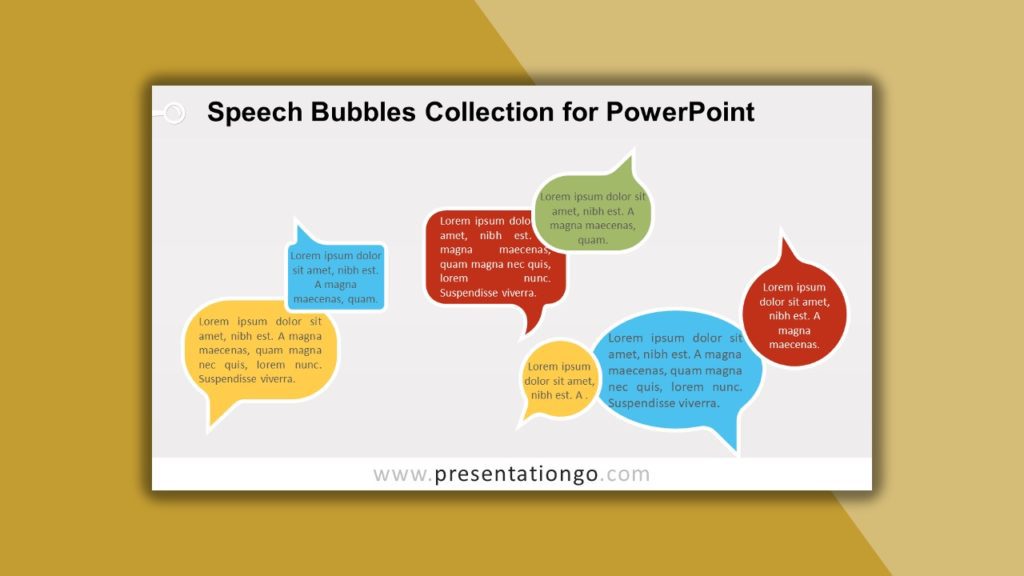
Do you need a speech bubble with a specific shape, size, or color? You will probably find it in our Speech Bubble Collection. Indeed, this free slide for Google Slides and PowerPoint contains a set of seven speech bubble illustrations. You will find round, square, rectangular, and oval word balloons. Of course, you can adjust the size and change the colors if you wish. These speech balloons are ideal to display verbatims, quotes, thoughts, and ideas.
3. Doodle Speech Bubbles
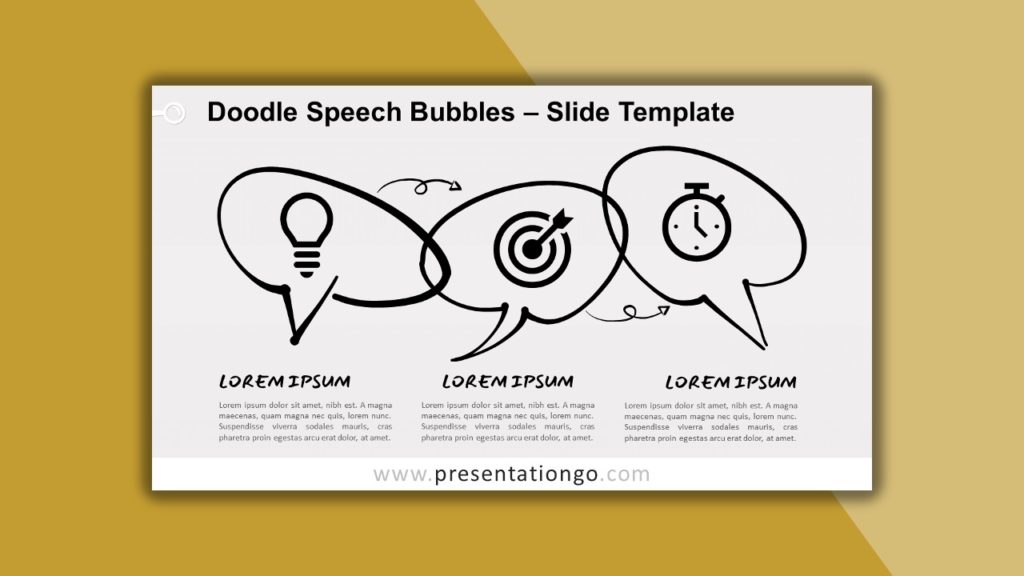
Do you need speech bubbles that look personalized and handcrafted? This Doodle Speech Bubbles template can actually fit a lot of purposes. This illustration with three horizontally-aligned speech balloons can be used to present quotes but also grouped lists of information. You will also find arrows that connect each bubble to the one on the right in order to emphasize their relationship. You can therefore employ this free diagram as a process or workflow chart. So, if you want to give a fun and informal touch to your presentation, download this free template now!
4. Speech Balloon Process
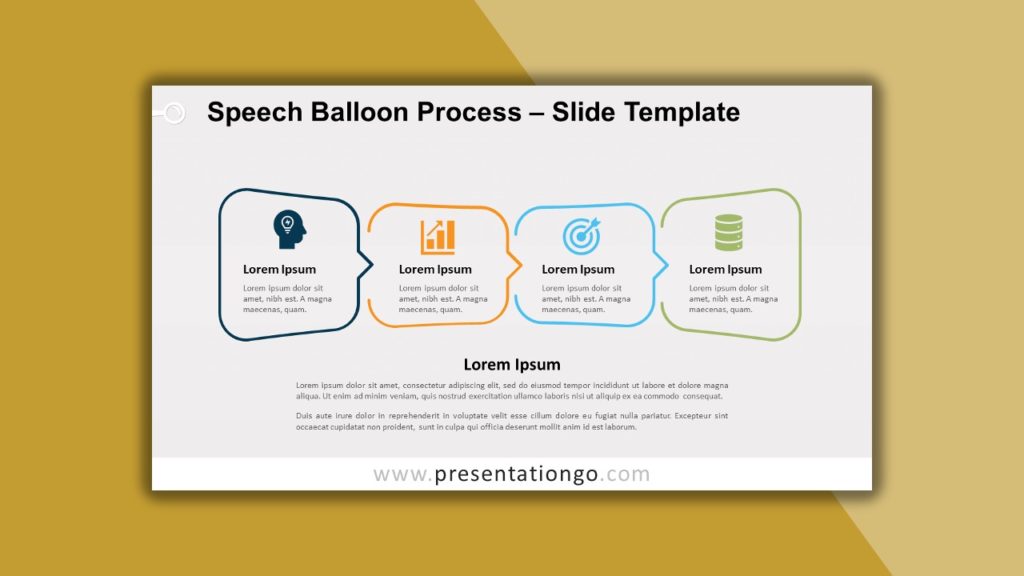
One idea always leads to another! This is the concept this speech balloon diagram will convey to your audience. You can indeed find 4-word balloons aligned horizontally and linked to each other thanks to the tails of each speech bubble. That is why this slide is perfect to showcase the connections and conversions from one step or idea to the next in your tasks, processes, or projects. Moreover, you can include absolutely anything inside each bubble: text, titles, icons, or numbers. So let your ideas speak for themselves with this free Speech Balloon Process slide template!
5. Cycle and Speech Bubbles
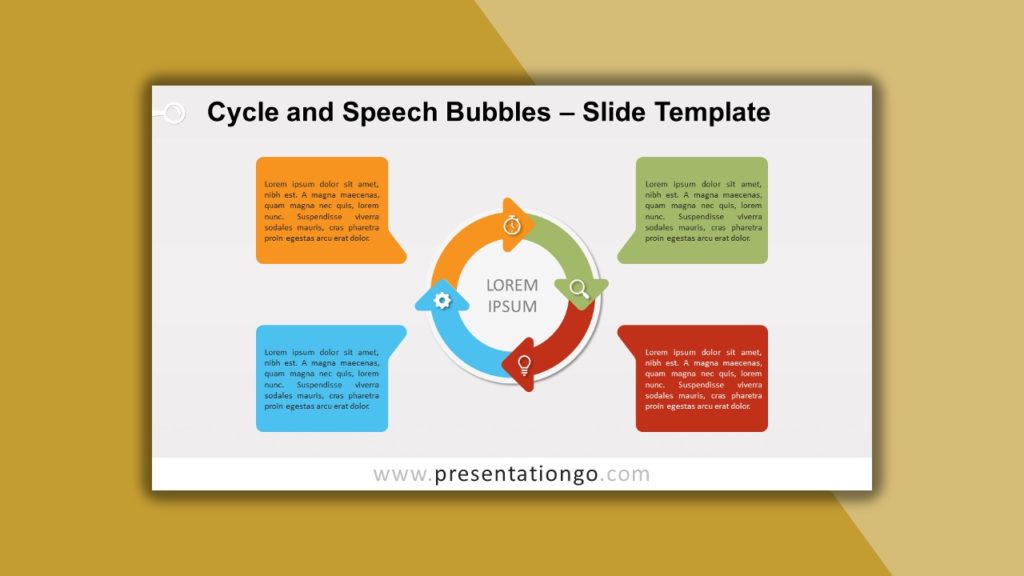
Even your cycle matrix diagram will benefit from a few speech bubbles, 4 to be exact! Indeed, you will be able to present the 4 options (stages, tasks, or steps) of your process or project thanks to the colorful circle in the center. Each stage is represented by an icon and a color that appears again in the 4 speech bubbles located around the circle. Not only can you write your main title at the center of the cycle matrix but you can also use the speech bubbles on the side to describe your stages in detail.
6. Speech Bubble Converging Radial
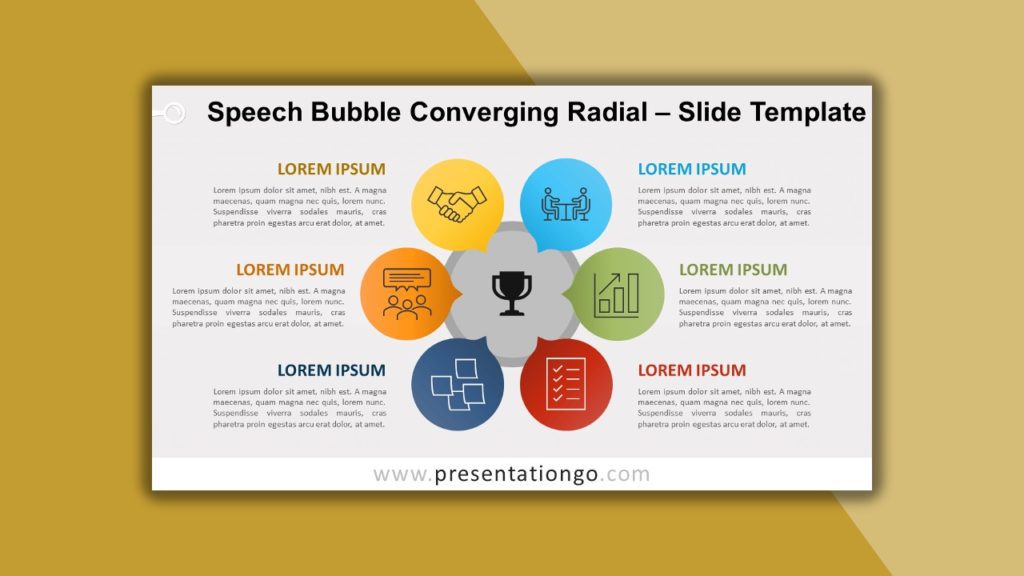
All your ideas communicate with each other. In this free Converging Radial diagram, 6 speech bubbles face the central circle that represents your main concept or idea. Around it, you can find these 6 colorful speech balloons for you to express your thoughts and their relationship with the central idea or objective. This original way to present your thoughts, data, or projects will mesmerize your audience. You just have to choose the right icons and a brief title and text for each idea, and the convincing job is done!
7. Man and Woman Quotes
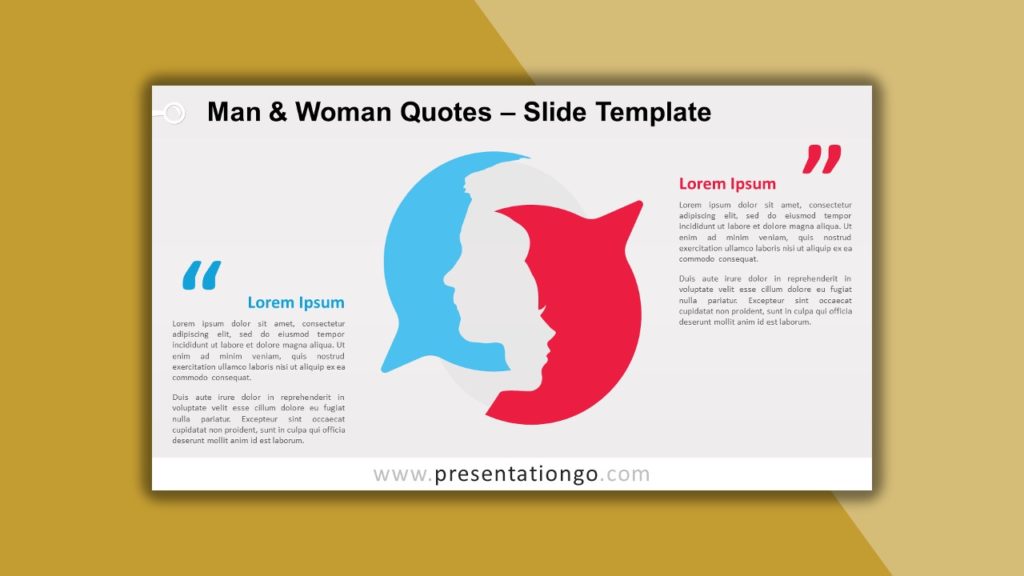
This amazing and unique design is an ingenious tool for you to display two quotes that you want to relate, compare or contrast. One will be a woman’s quote and the other will be a man’s words. Indeed, the negative space design technique used here represents a man and a woman’s head silhouette inside a speech bubble shape. The characters face different directions, thus emphasizing the dichotomy between the man and the woman’s quotes or thoughts. That is why this diagram is also ideal to compare the male and the female population, their opinions and perspectives.
8. Speech Bubble Grid
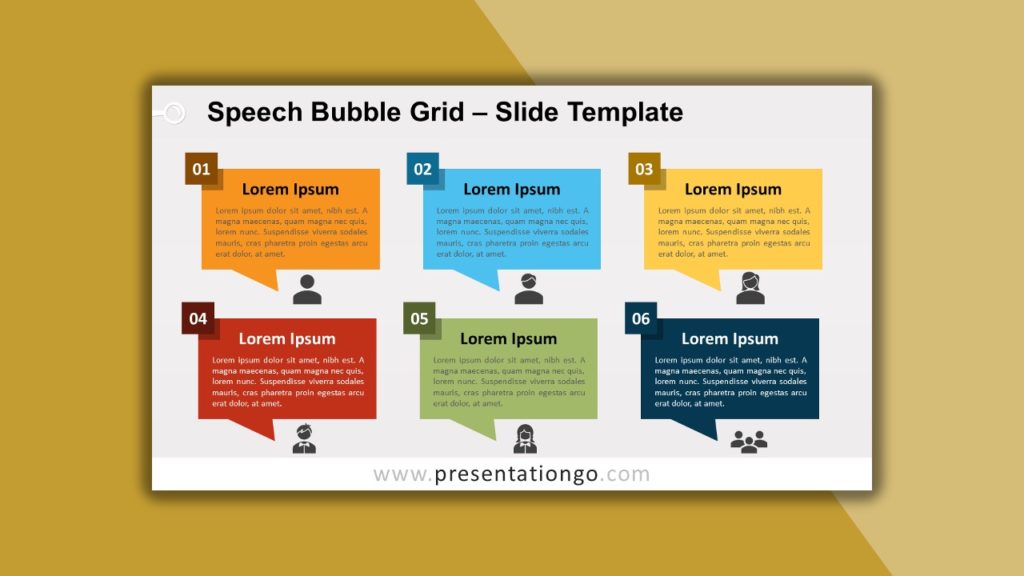
It’s time for everyone to speak up! Well, maybe not everyone but at least 6 people. You can indeed find 6 options in this free speech bubble grid for PowerPoint and Google Slides template. The most important part will be the messages, quotes, ideas, or thoughts that you can include clearly in the colorful speech balloons. You can also add a number and most importantly, an icon beneath each speech bubble to symbolize the intellectual author of the idea. Let everyone enjoy their freedom of speech!
9. Brain Quote Diagram
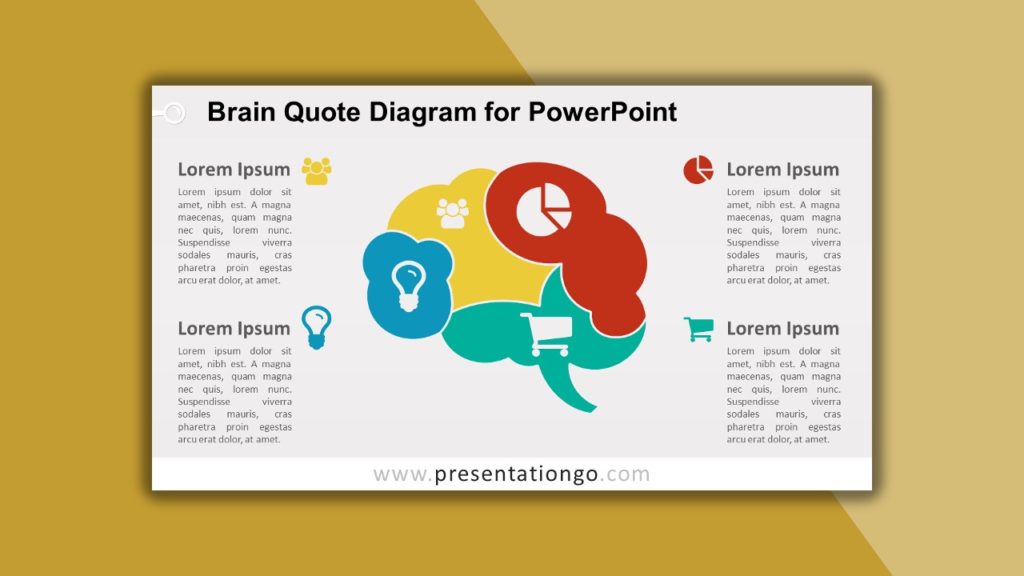
Where do your ideas and words come from? Obviously from your brain! We have therefore created an original design that represents a human brain looking like a speech bubble. The resemblance between both shapes is indeed uncanny. In addition, the brain is divided into 4 colorful parts in order to show 4 ideas, or thoughts. It can also be used as a matrix or to illustrate the concepts of brainstorming, mind, and creativity.
10. Businessman with 4 ideas
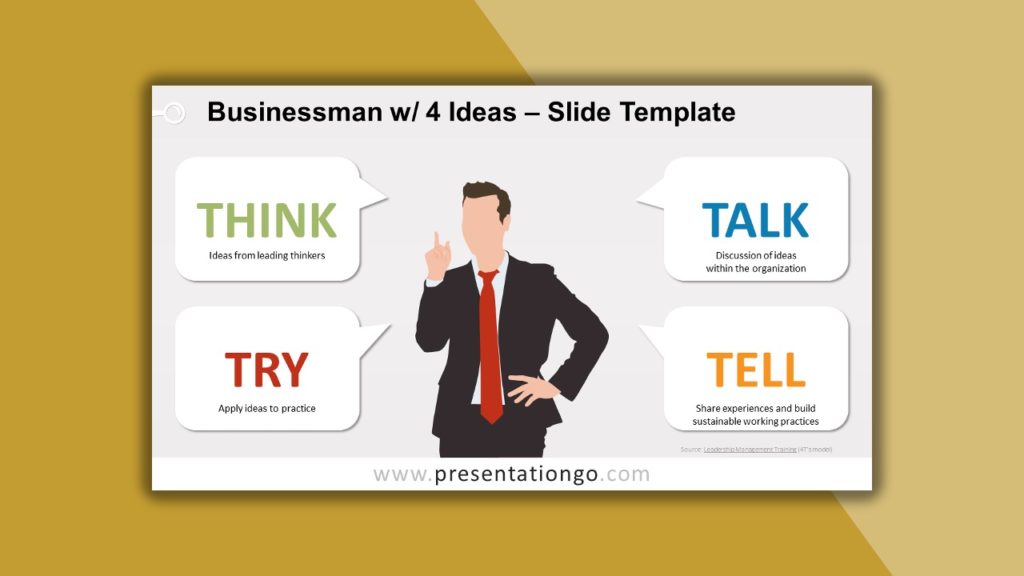
This businessman is never short of ideas! He actually has 4 at the same time. Thanks to this free Businessman with 4 ideas template slide for PowerPoint and Google Slides, he can express all of them at the same time! Around the businessman silhouette, you will indeed find 4 speech bubbles, ideal to illustrate 4 ideas, concepts, or projects. So unleash the leader inside you and share your brilliant ideas with the world!
We hope you like our selection of the 10 Astonishing Templates with Speech Bubbles for Presentations .
Search Blog by topics
Search templates by categories, search templates by colors.
Love our templates? Show your support with a coffee!
Thank you for fueling our creativity.
Charts & Diagrams
Text & Tables
Graphics & Metaphors
Timelines & Planning
Best-Ofs & Tips
Terms and Conditions
Privacy Statement
Cookie Policy
Digital Millennium Copyright Act (DMCA) Policy
© Copyright 2024 Ofeex | PRESENTATIONGO® is a registered trademark | All rights reserved.

To provide the best experiences, we and our partners use technologies like cookies to store and/or access device information. Consenting to these technologies will allow us and our partners to process personal data such as browsing behavior or unique IDs on this site and show (non-) personalized ads. Not consenting or withdrawing consent, may adversely affect certain features and functions.
Click below to consent to the above or make granular choices. Your choices will be applied to this site only. You can change your settings at any time, including withdrawing your consent, by using the toggles on the Cookie Policy, or by clicking on the manage consent button at the bottom of the screen.
Thank you for downloading this template!
Remember, you can use it for free but you have to attribute PresentationGO . For example, you can use the following text:
If you really like our free templates and want to thank/help us, you can:
Thank you for your support

Manga Tutorial for Beginners 08 Let’s draw frames and speech bubbles.
Hello, this is ГФ. Since I explained the rules regarding the outline and canvas, it’s time for the real work of drawing Manga. Starting off with “Frames” and “Speech Bubbles”.
Click Here for Previous Tutorials. Manga Tutorial for Beginners 01 Process of Manga Making Manga Tutorial for Beginners 02 Let’s Make Outline (Part 1) Manga Tutorial for Beginners 03 Let’s Make Outline (Part 2) Manga Tutorial for Beginners 04 Get Ready to Draw Manga with MediBang Paint! Manga Tutorial for Beginners 05 Let’s Make Name(outline) Manga Tutorial for Beginners 06 Let’s think about frame layout and screen. Manga Tutorial for Beginners 07 Considerations when setting up the canvas. Manga Tutorial for Beginners 08 Let’s draw frames and speech bubbles.
When you want to begin with lining the frames, the “Panel Division” tool comes in handy.
First, create a layer for dividing the panels. Choose “Add / 1 Bit” from the Layer tab and by clicking the gear icon on the right, change the layer name to “Panel” etc.
If you click “Add Panel Material” from the Layer tab while selecting the panel layer you just created, the following window appears.
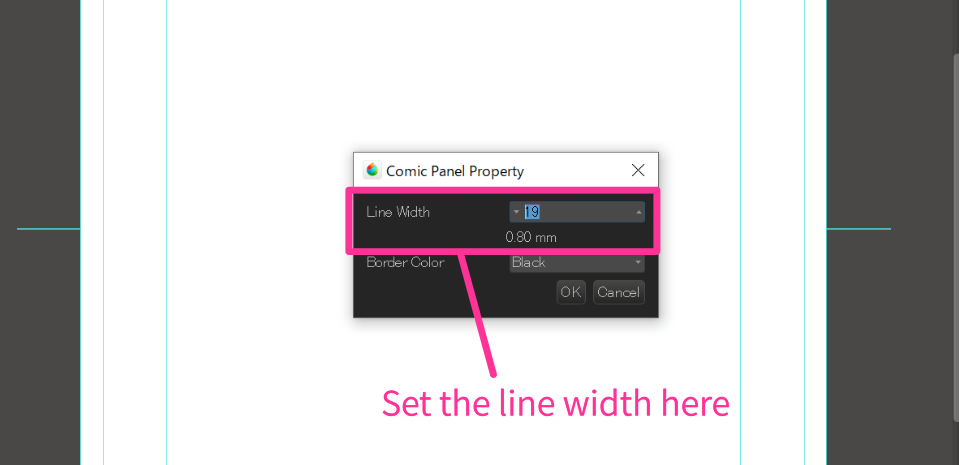
Here, you can set the line width first. For reference, the numbers below (0.73mm on default) represent the thickness when you write on the analog canvas. There is no rule behind the line width but generally it is set thicker than the drawing lines. Most of the Manga uses 0.5mm to 1.0mm. I will be selecting 19 (0.8mm), as that’s what I usually draw with.
By clicking “OK”, a frame will be drawn as shown below. Additionally, the “Divide Tool” on the left tool bar is selected.
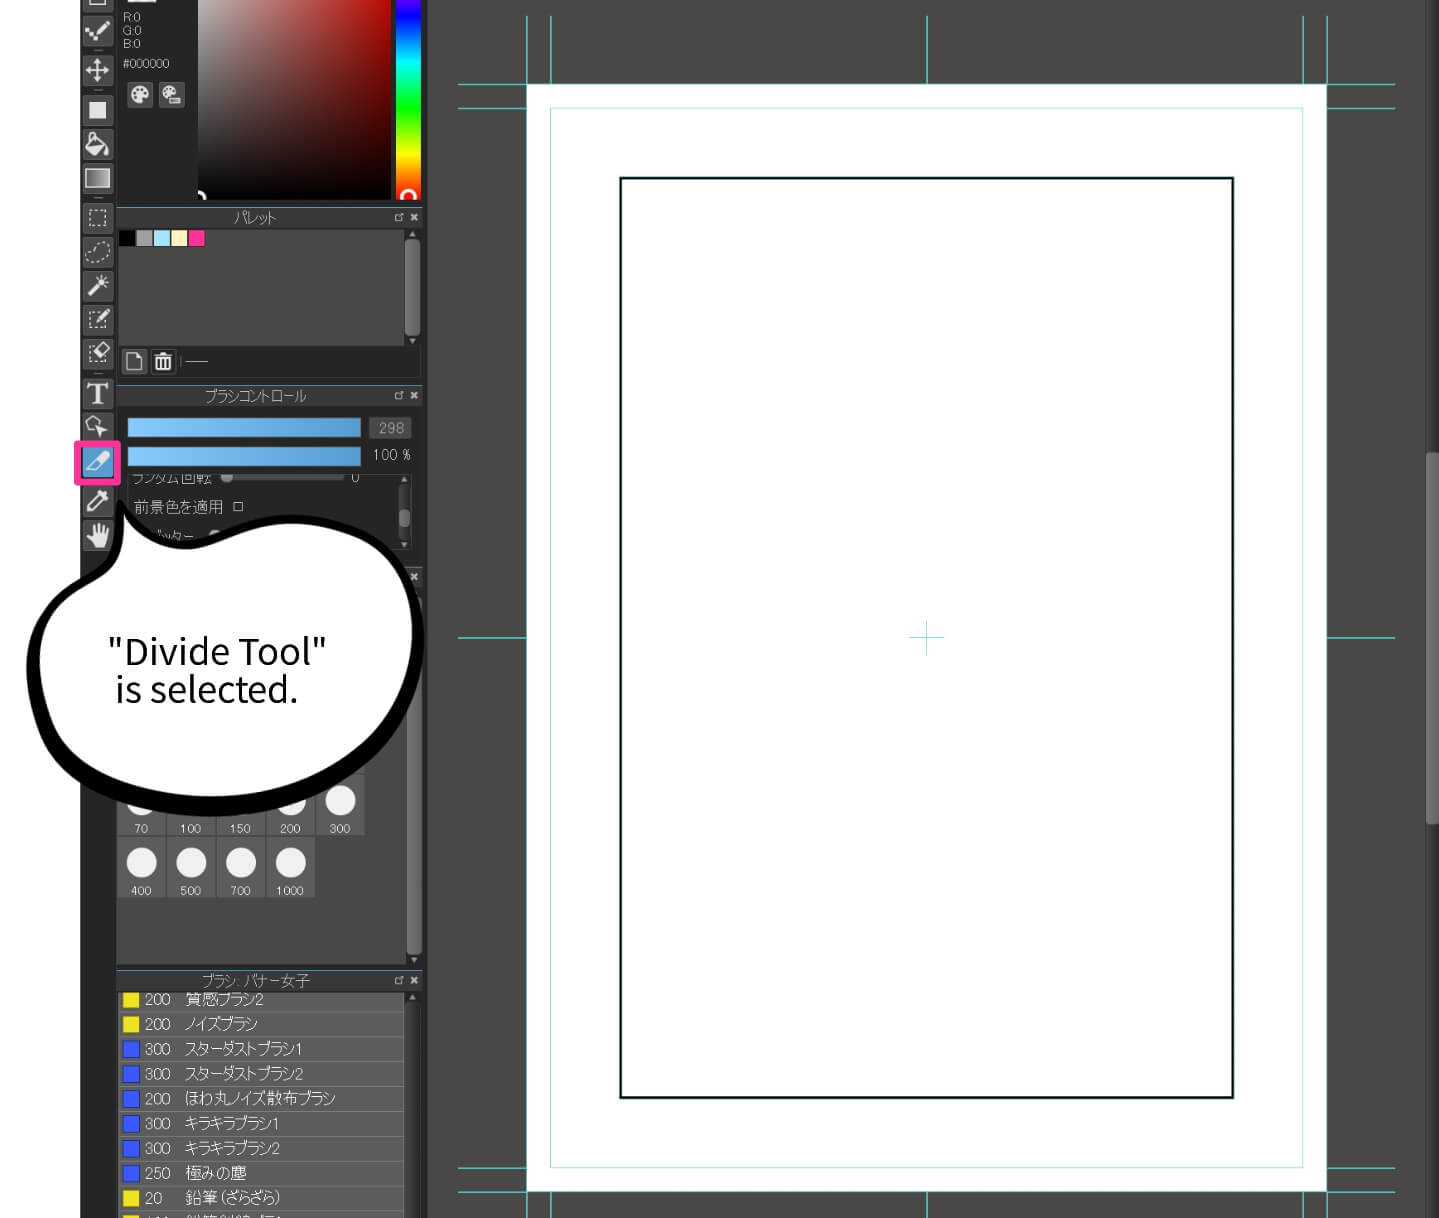
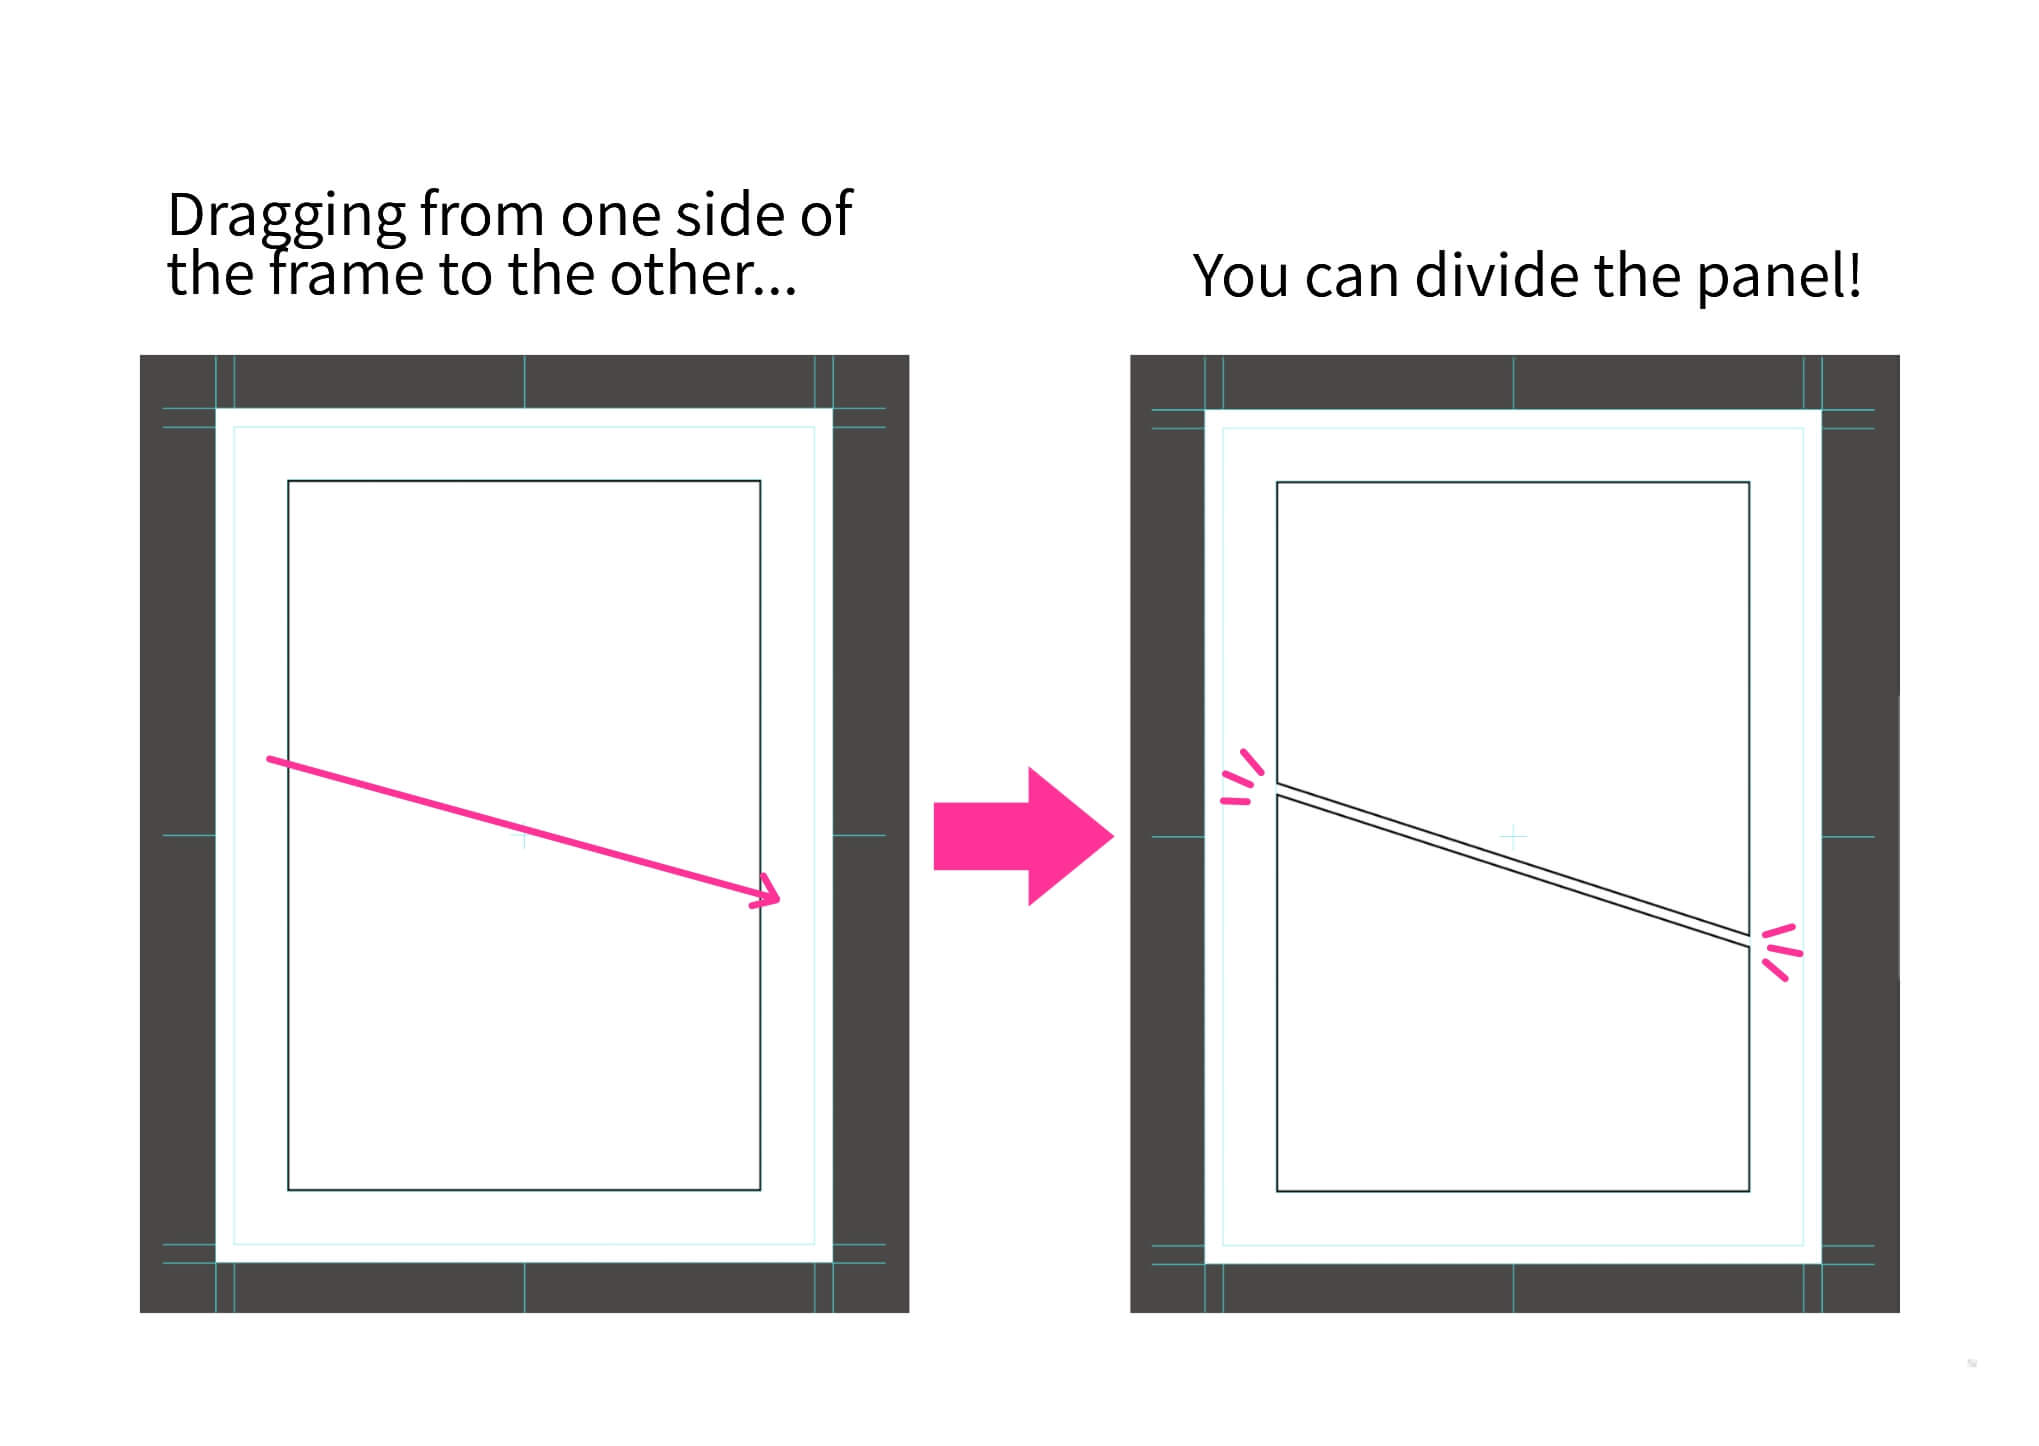
While selecting the “Divide Tool” you can divide the panel by clicking on the frame and dragging to the other side. Repeat this process to make multiple divisions of the panel. If you want to adjust the angle for when you divide diagonally, you can press the the shift key as you drag.
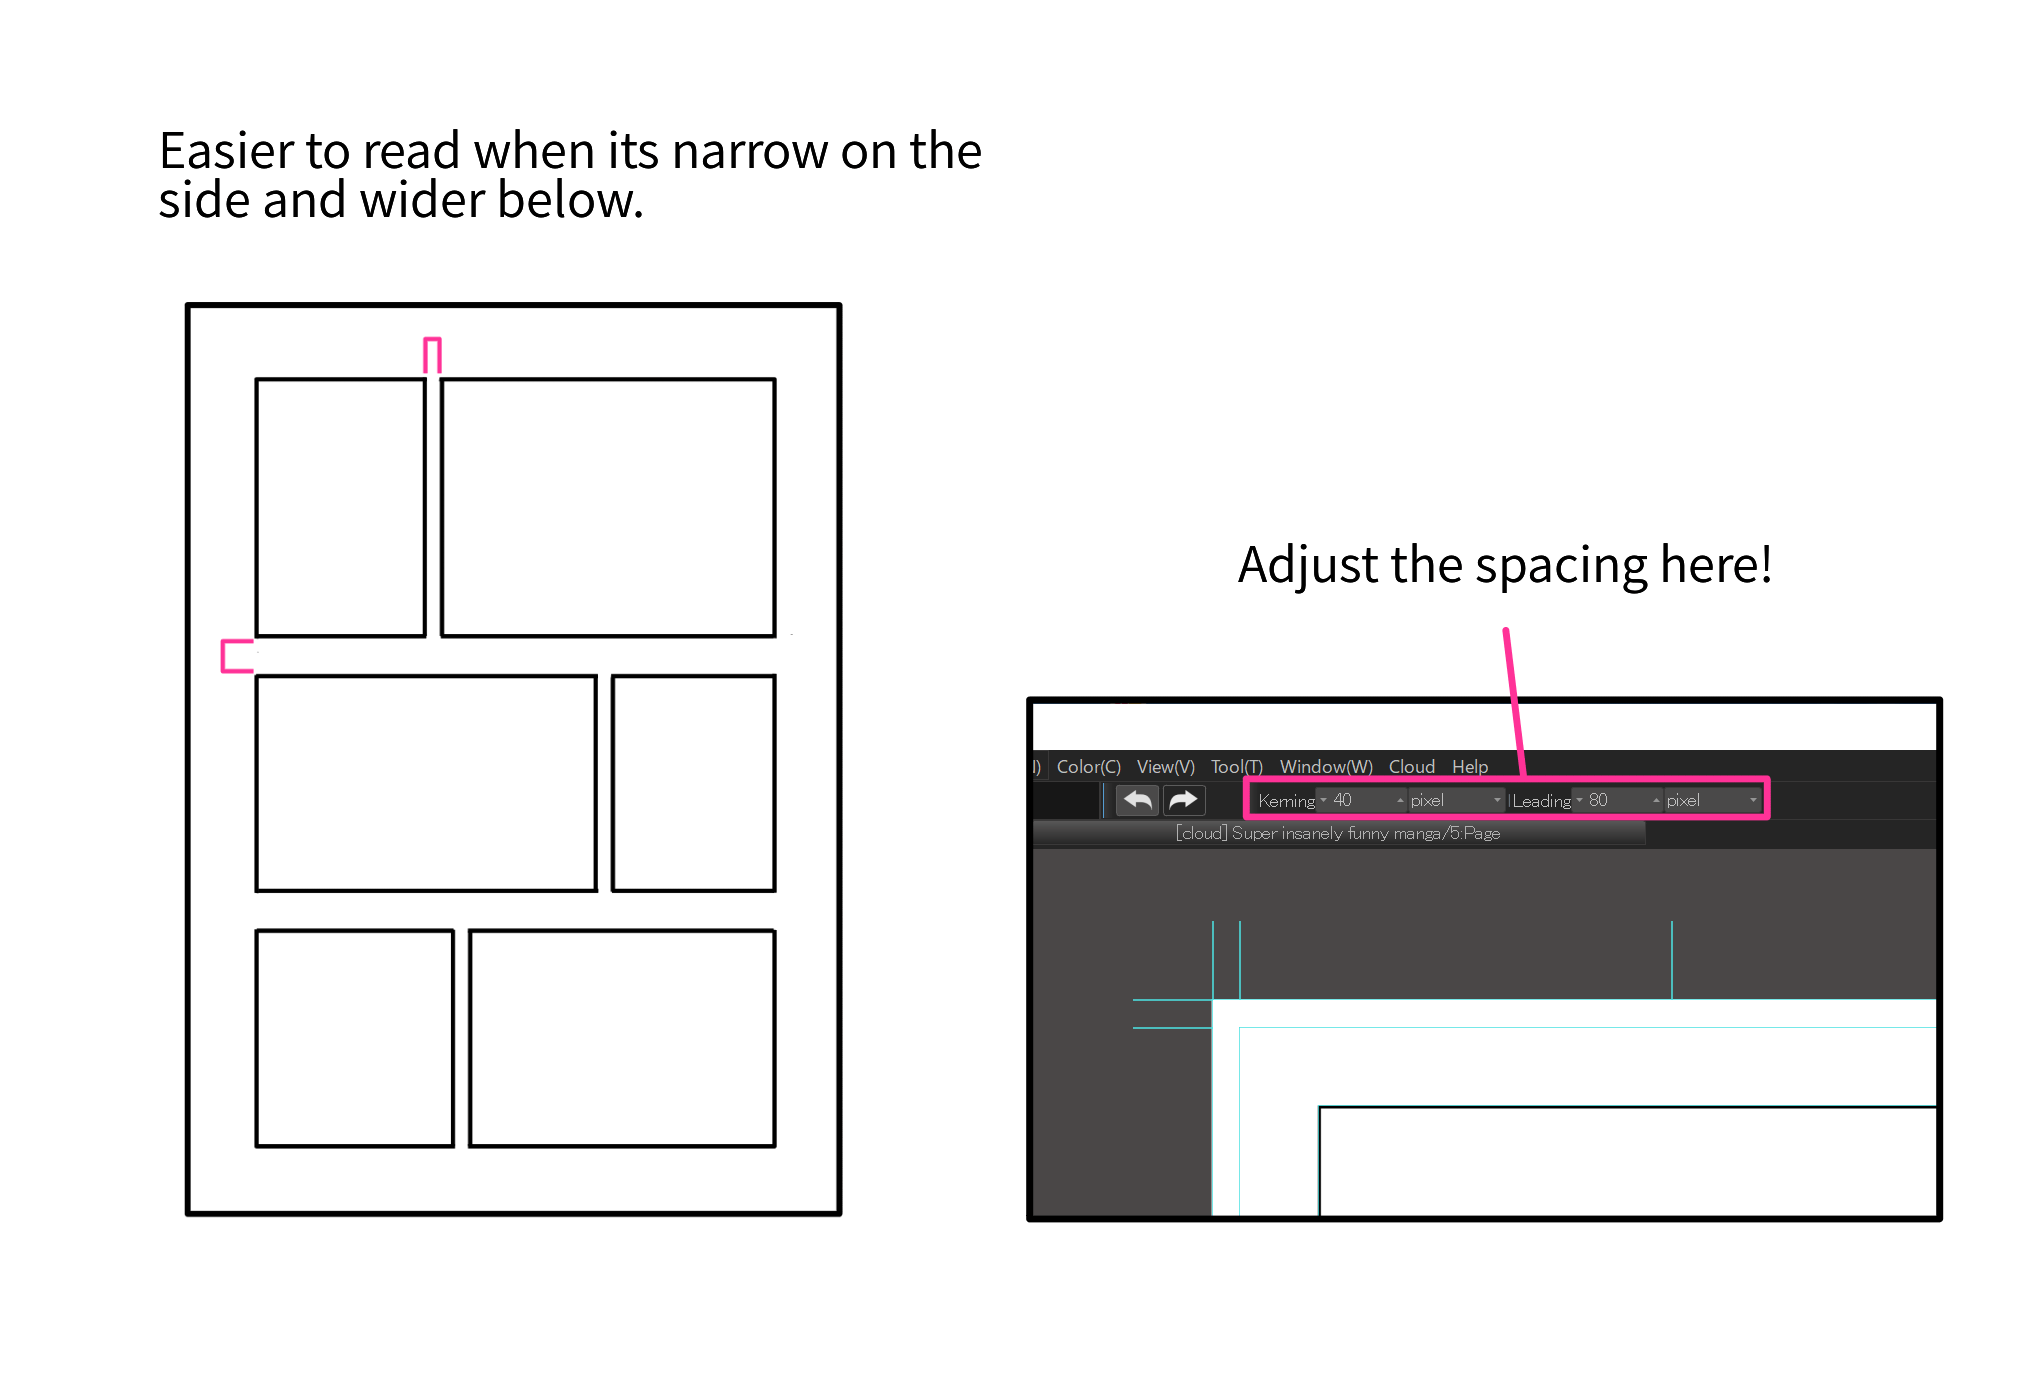
Since the panel is read right to left from the top row and move downwards as you reach the left division, it is easier to read if the spaces on the side are narrow and the spaces above / below are wider. You can change the settings for spacing at the top of the screen. The image uses pixels but you can also set in millimeters.
If you want to make a panel that breaks out beyond the margin (tachikiri), you can change to the “Operation Tool” from the tool bar and select the panel you want to edit. Then when you bring the cursor to the frame, while selecting the panel, it will change to a moving arrow. By dragging the frame on the arrow cursor mode, you can change the shape of frame line. You can make the break-out panel by expanding the frame beyond the page.
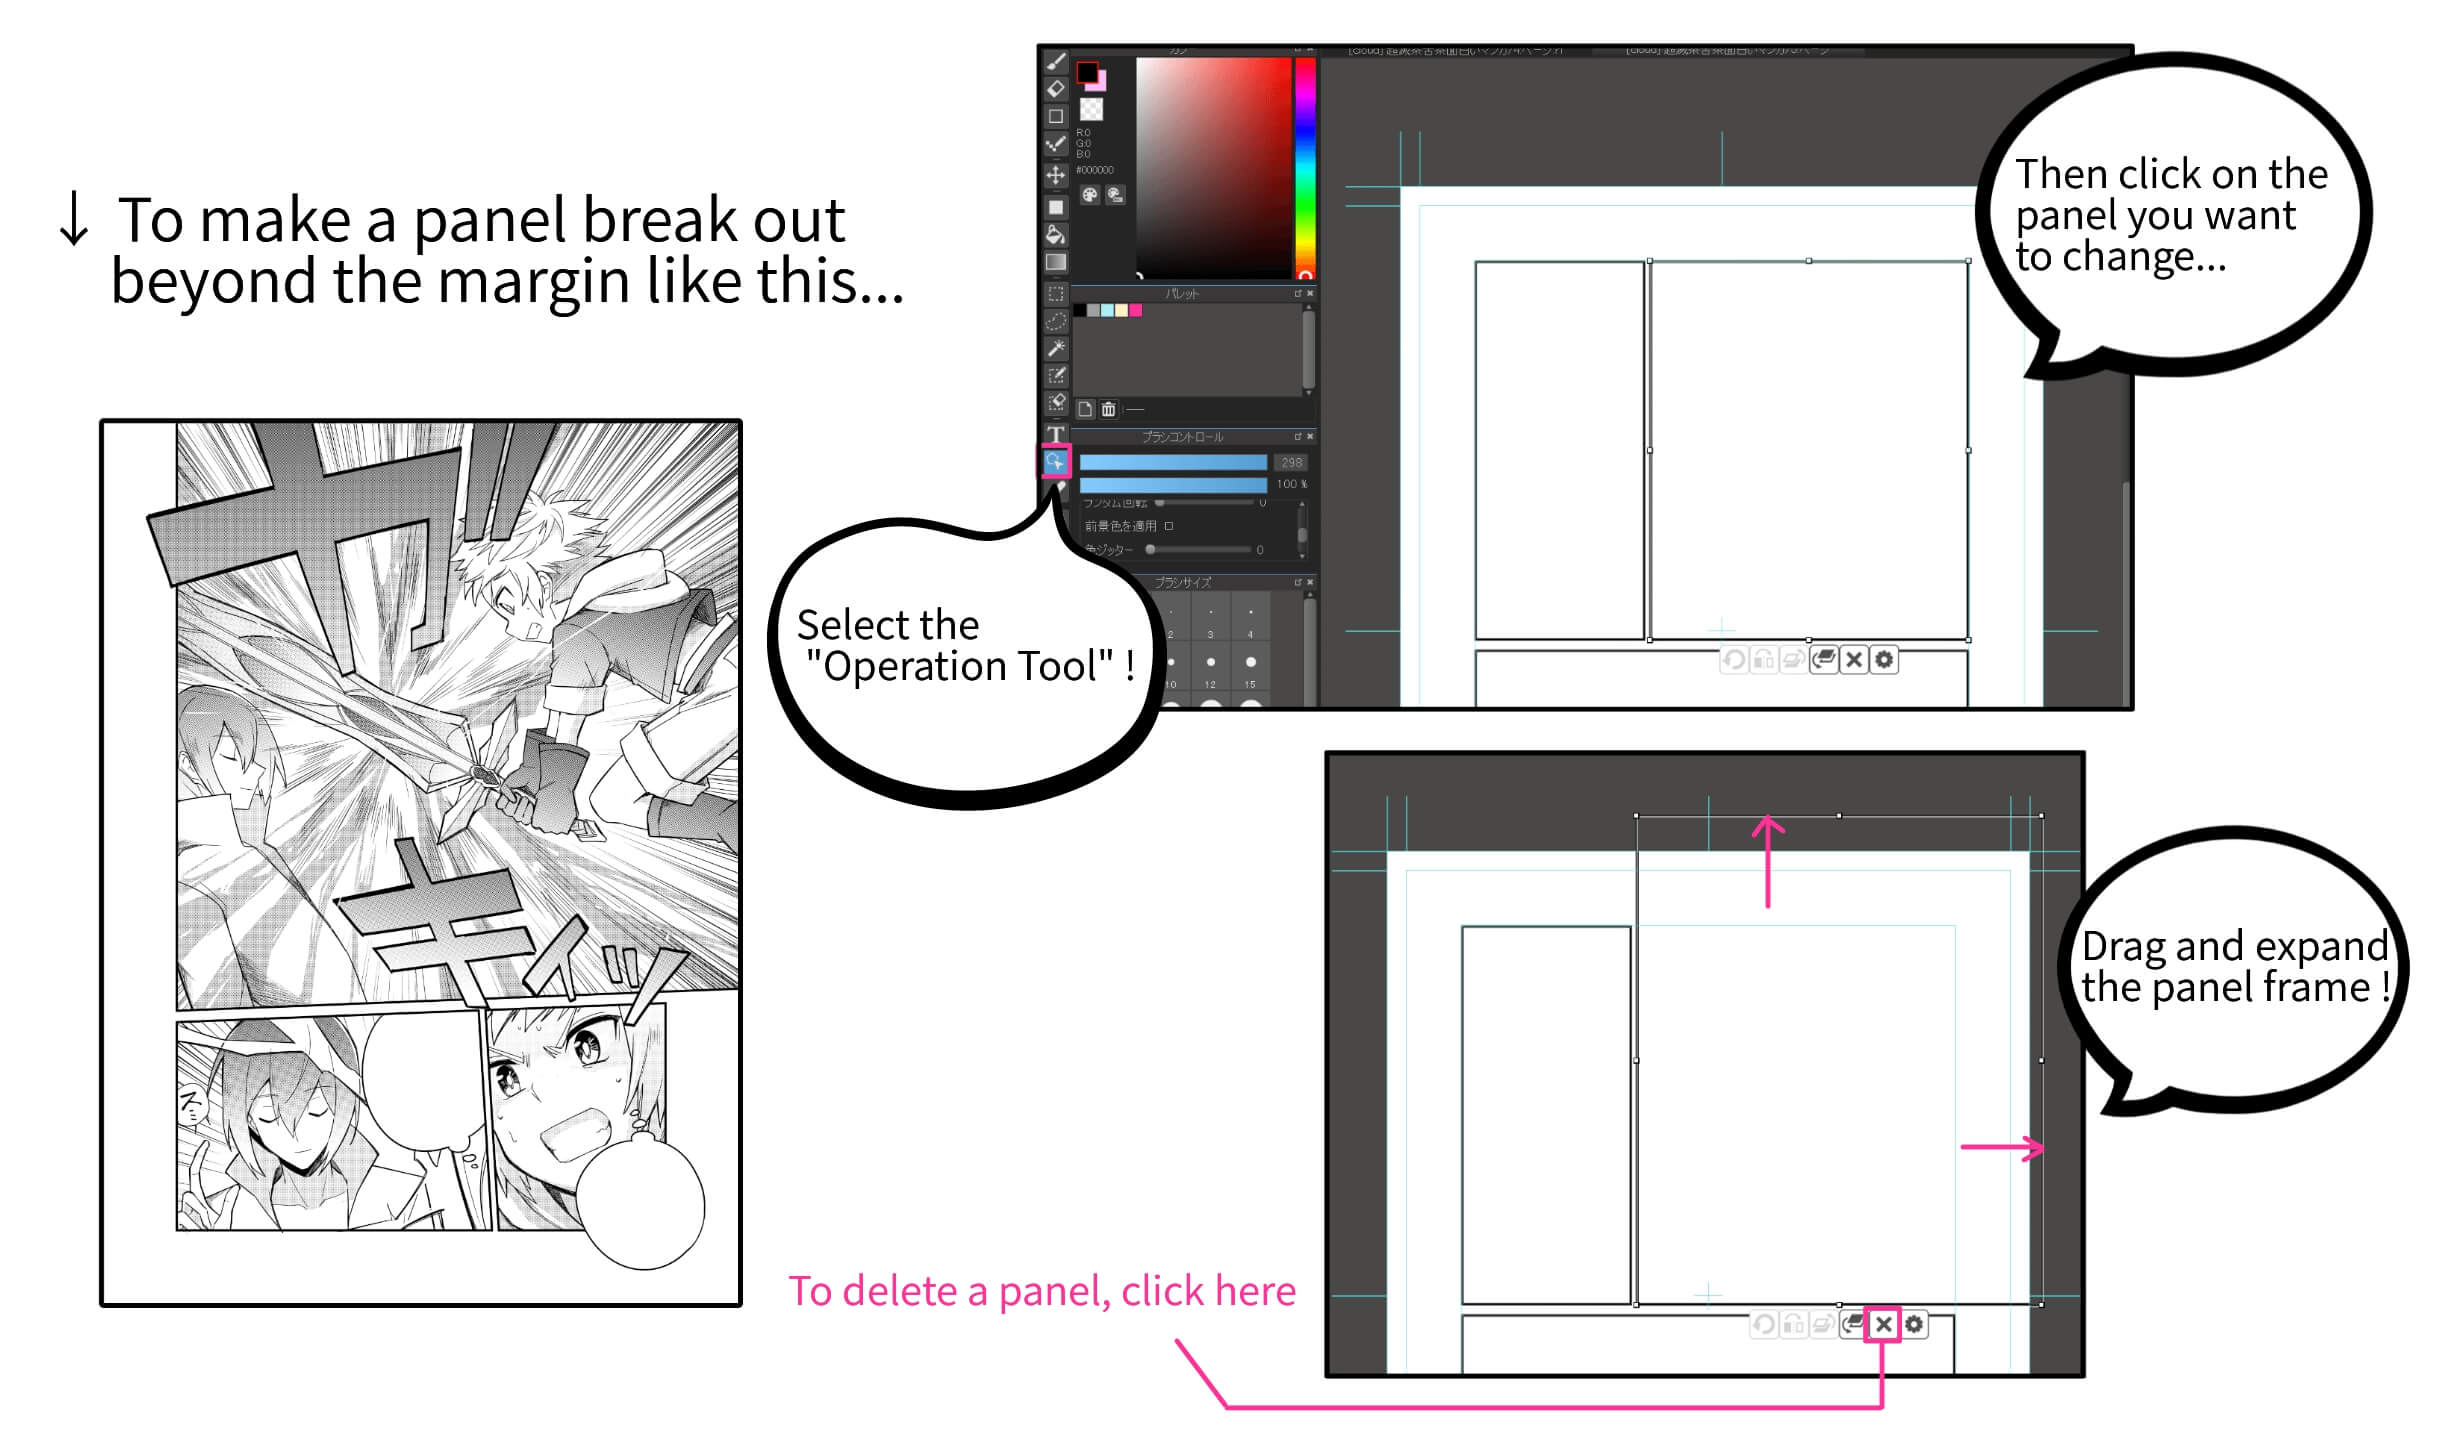
If you want to delete a panel, click the ” × ” icon while you select the panel using the “Operation Tool”.
Frames (panels) drawn using the “Division Tool” cannot be erased with the “Eraser Tool”. If you want to erase a portion of the panel with the eraser, select “Rasterize Material” from the Layer tab.
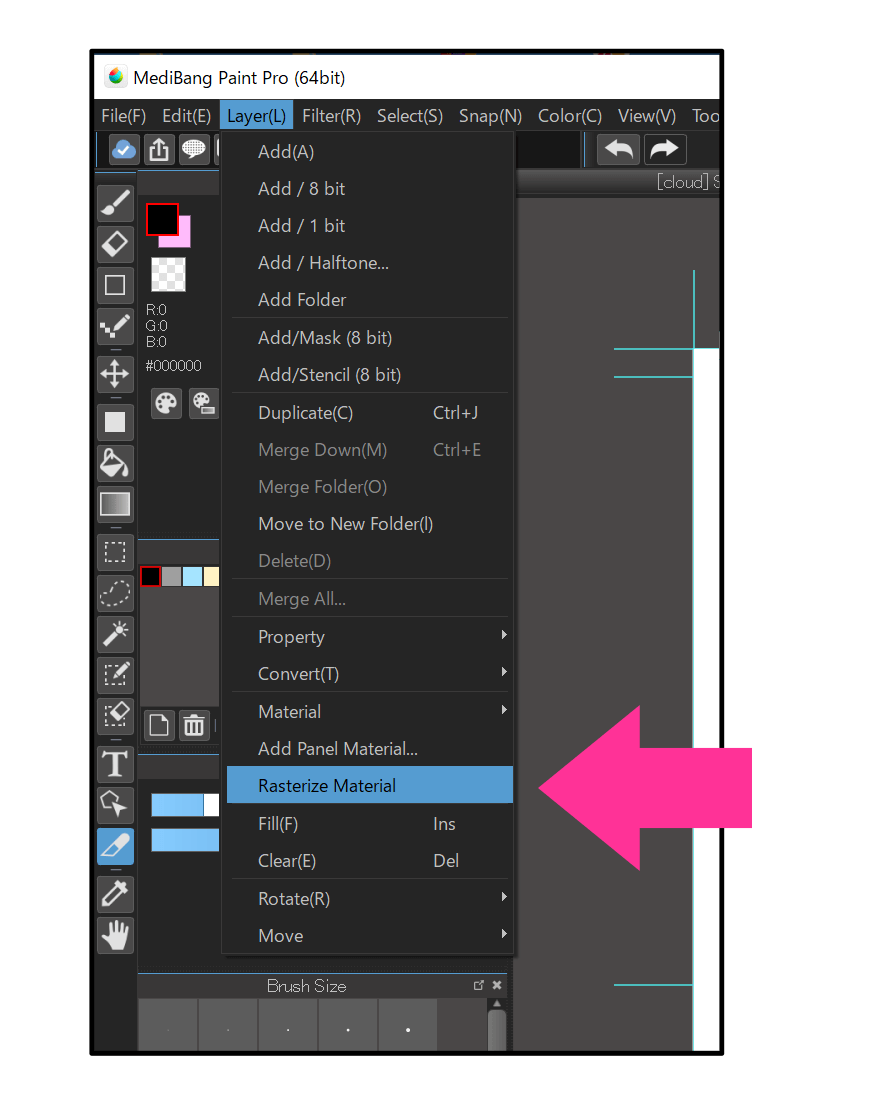
However, you can also do the same without rasterizing; by using the “Mask Layer”.
While selecting your panel layer, click on the fourth icon from the left inside the Layer window. From the three “Add Layer” options, select “Add Layer (Mask)”.
Then a layer called “Mask” gets created, if you draw on this layer using black, you will not be able to see the drawings on the layer below. You can apply this method to hide a portion of the panel frame.
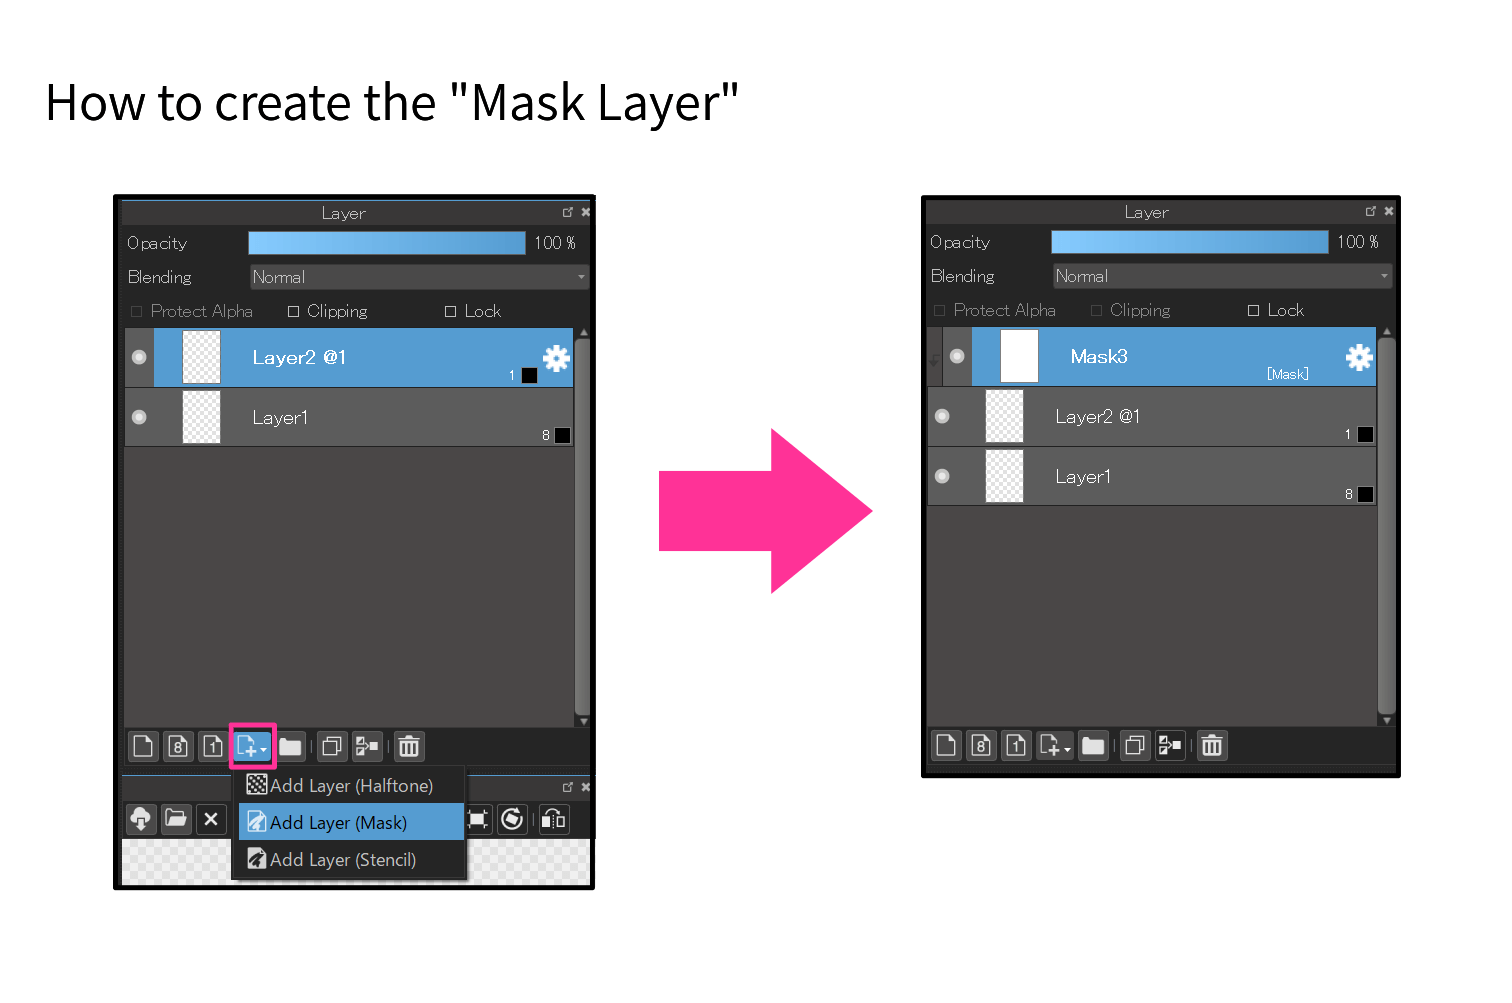
The mask layer allows to hide a part of the drawing without erasing it. It will be useful when you apply this process to other cases.
When the panel division is finished, speech bubbles come next.
2. Speech Bubbles
There are various styles of speech bubbles as shown below.
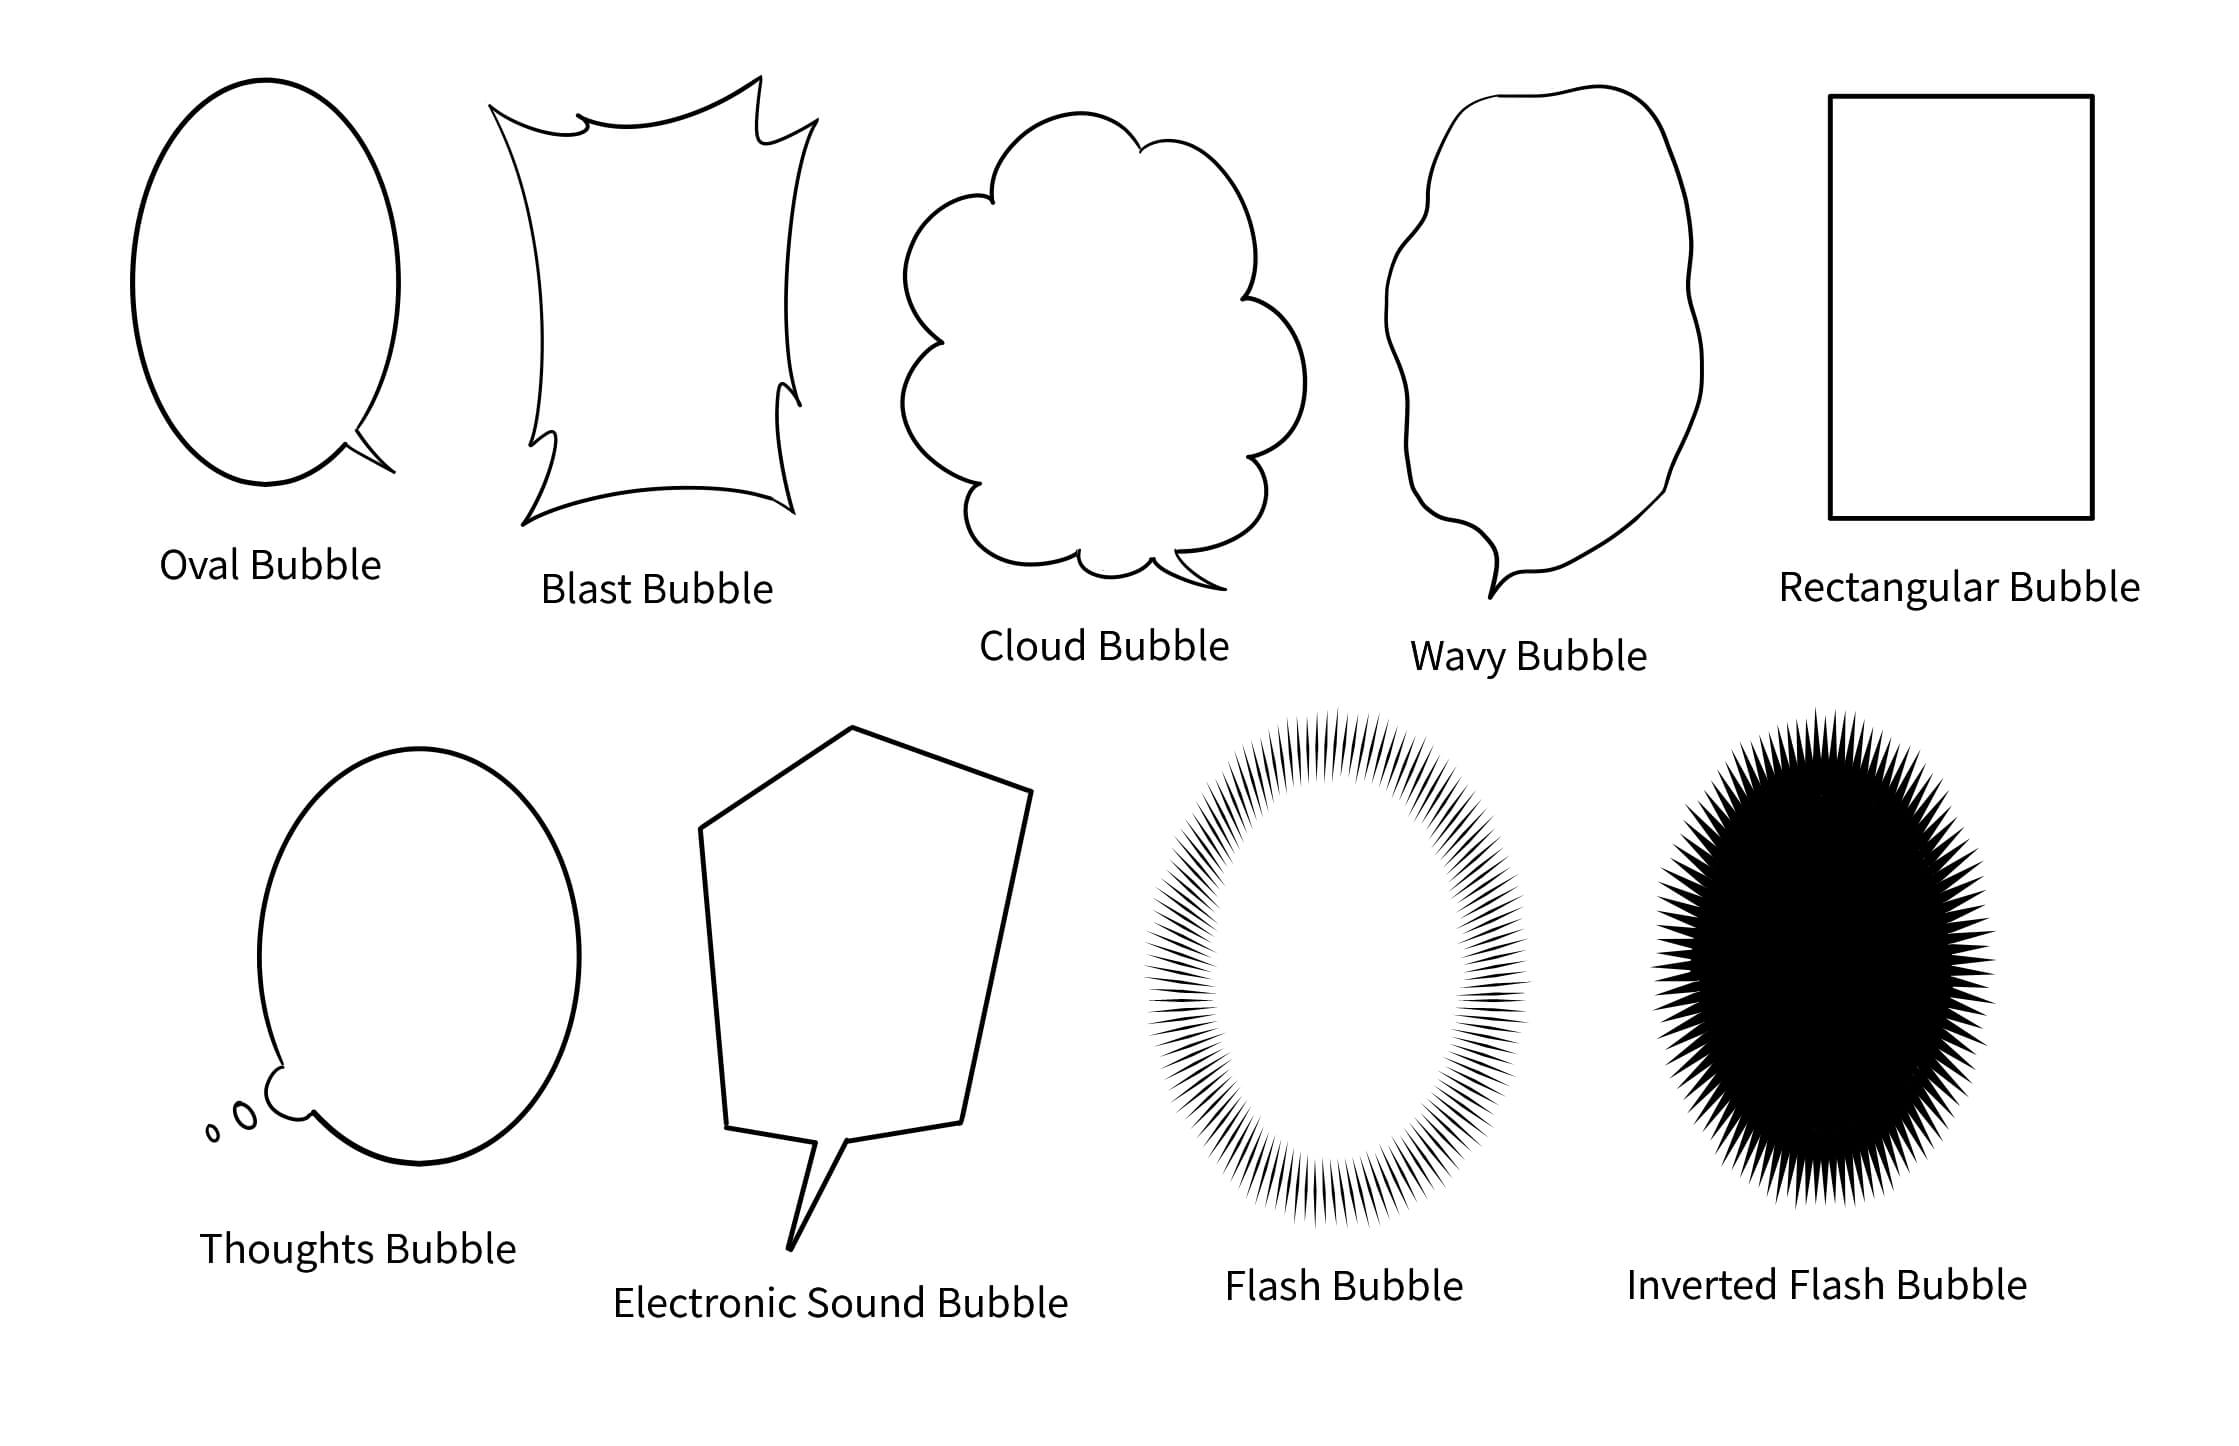
Before drawing the bubbles, create a layer for speech bubbles. Select “Add / 1 Bit” from the Layer tab and change the name to “Speech Bubbles” etc.
After creating the layer, begin drawing the speech bubbles. Let’s start off with the standard oval bubble.
・Oval Bubble
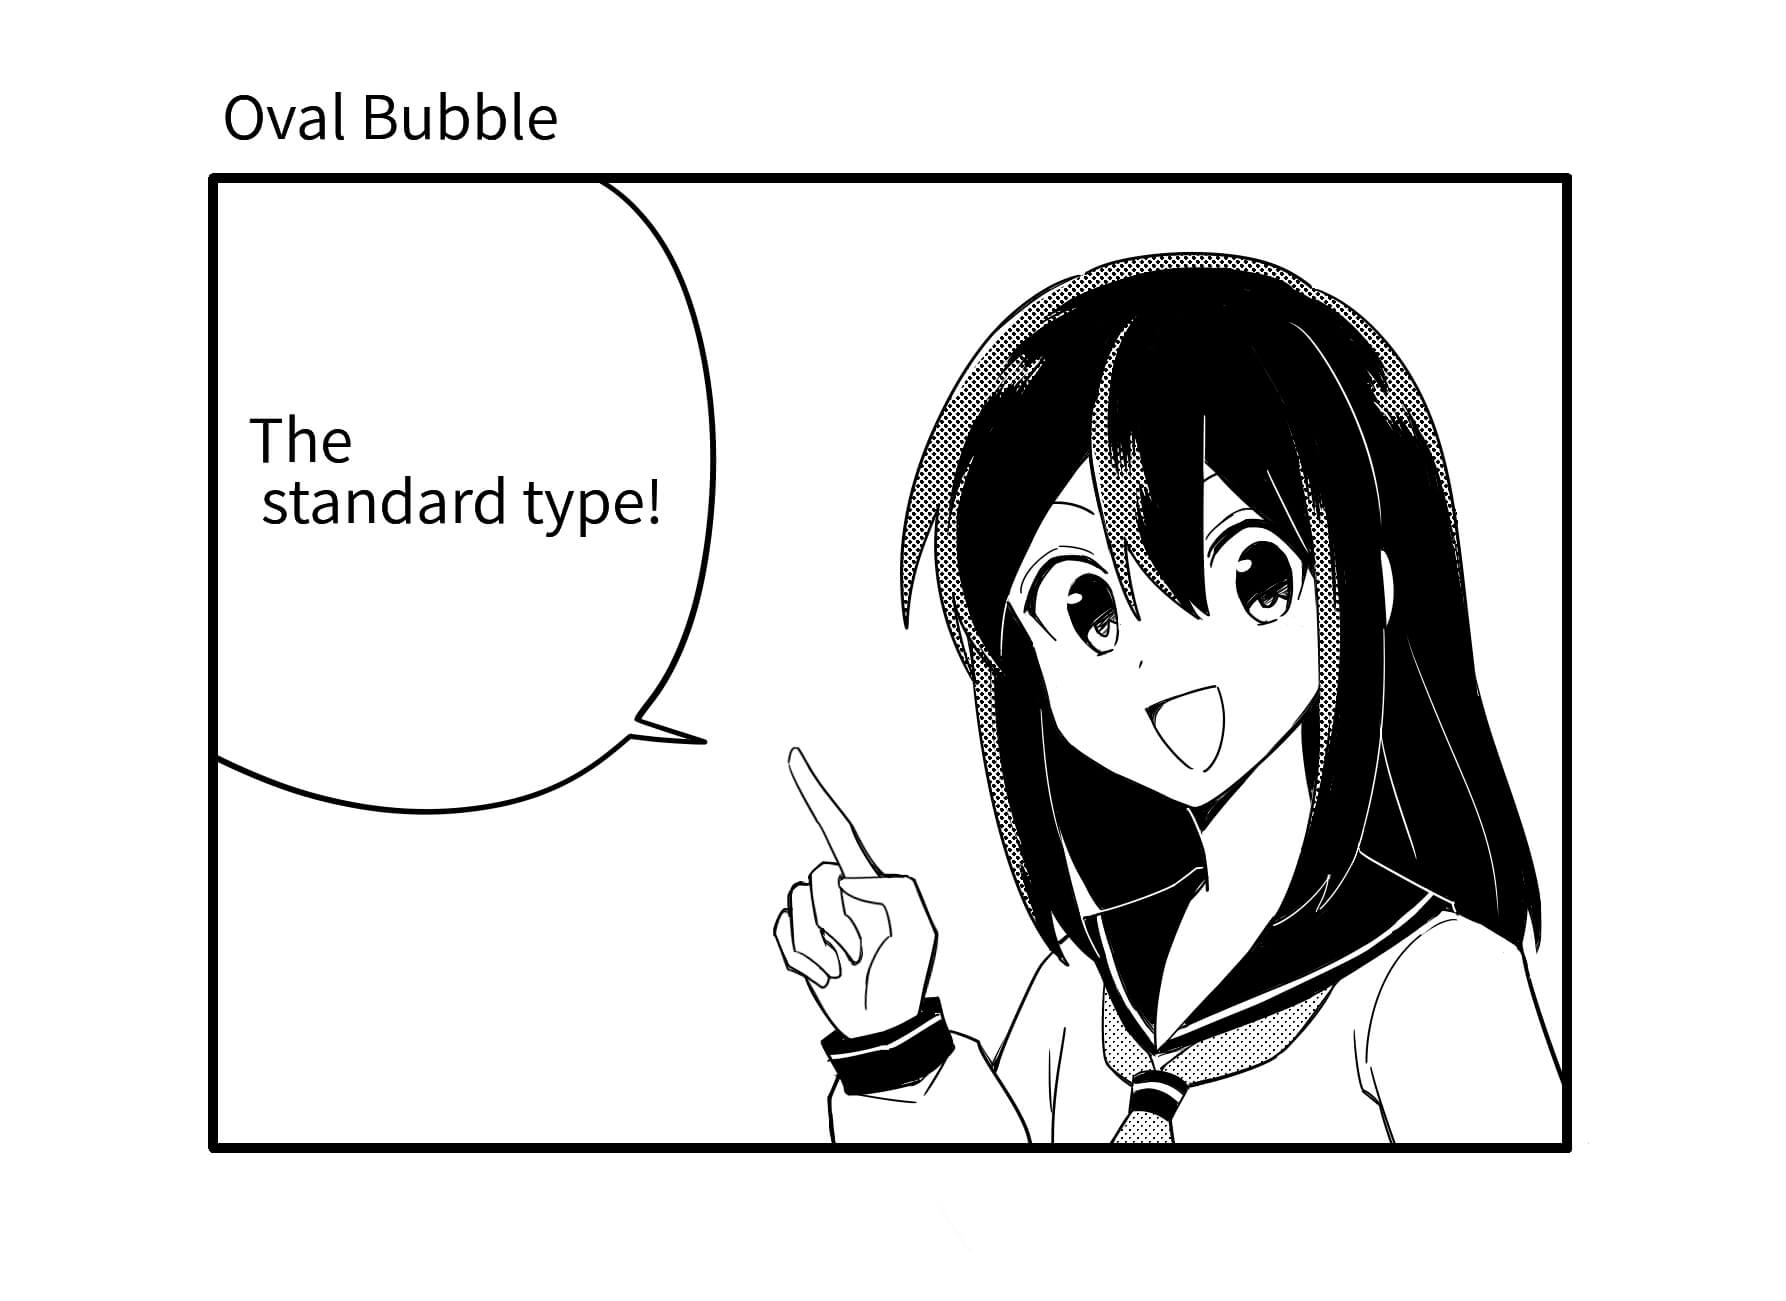
Draw the bubble to enclose the speech lines with some space around them. You can either draw freehand or using the oval tool.
The thickness of speech bubble lines are usually the same as the main drawing or a little thicker. I mostly use 15px for the drawing and 20px for the speech bubbles; use this as the reference if you are confused.
If you want to use the oval tool select “Shape Brush Tool”, the 3rd icon in the toolbar, and choose “Ellipse” from the brush shape options.
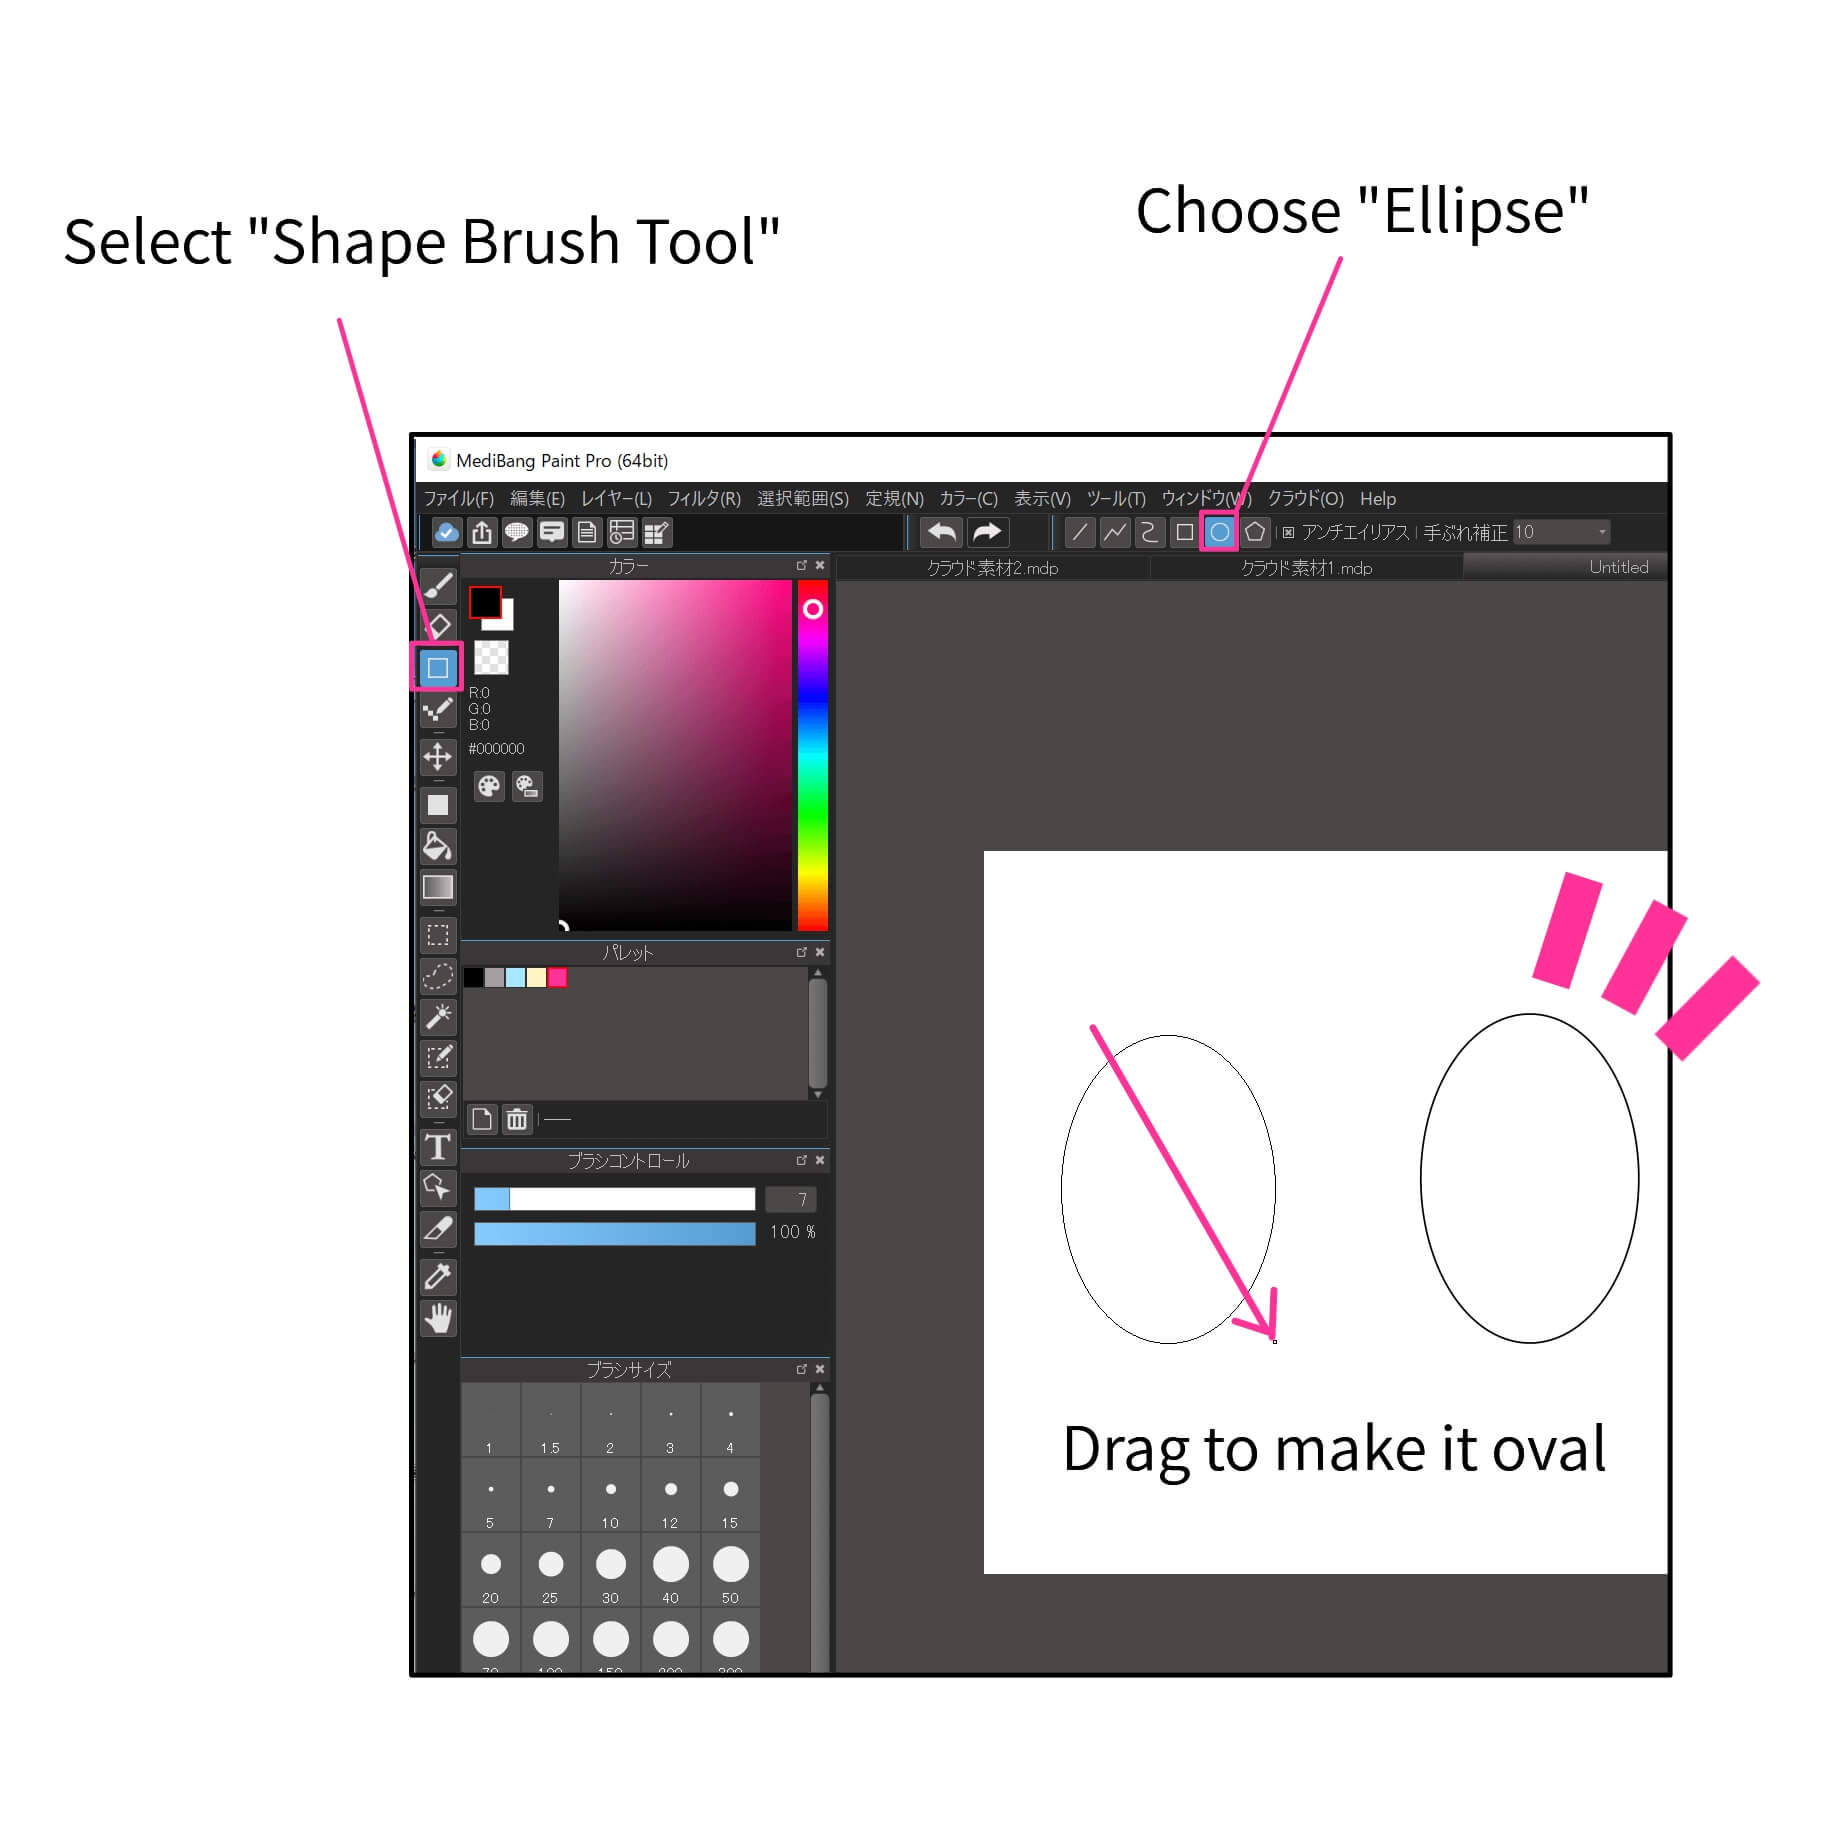
It may turn out thicker than the freehand bubble since the strength of the brush does not apply to the “Shape Brush Tool”. If that’s the case, reduce the line thickness before drawing.
The “tail” of the speech bubble may not appear in some styles or scenes, but it clarifies which person is talking so it should be added for scenes with many characters.
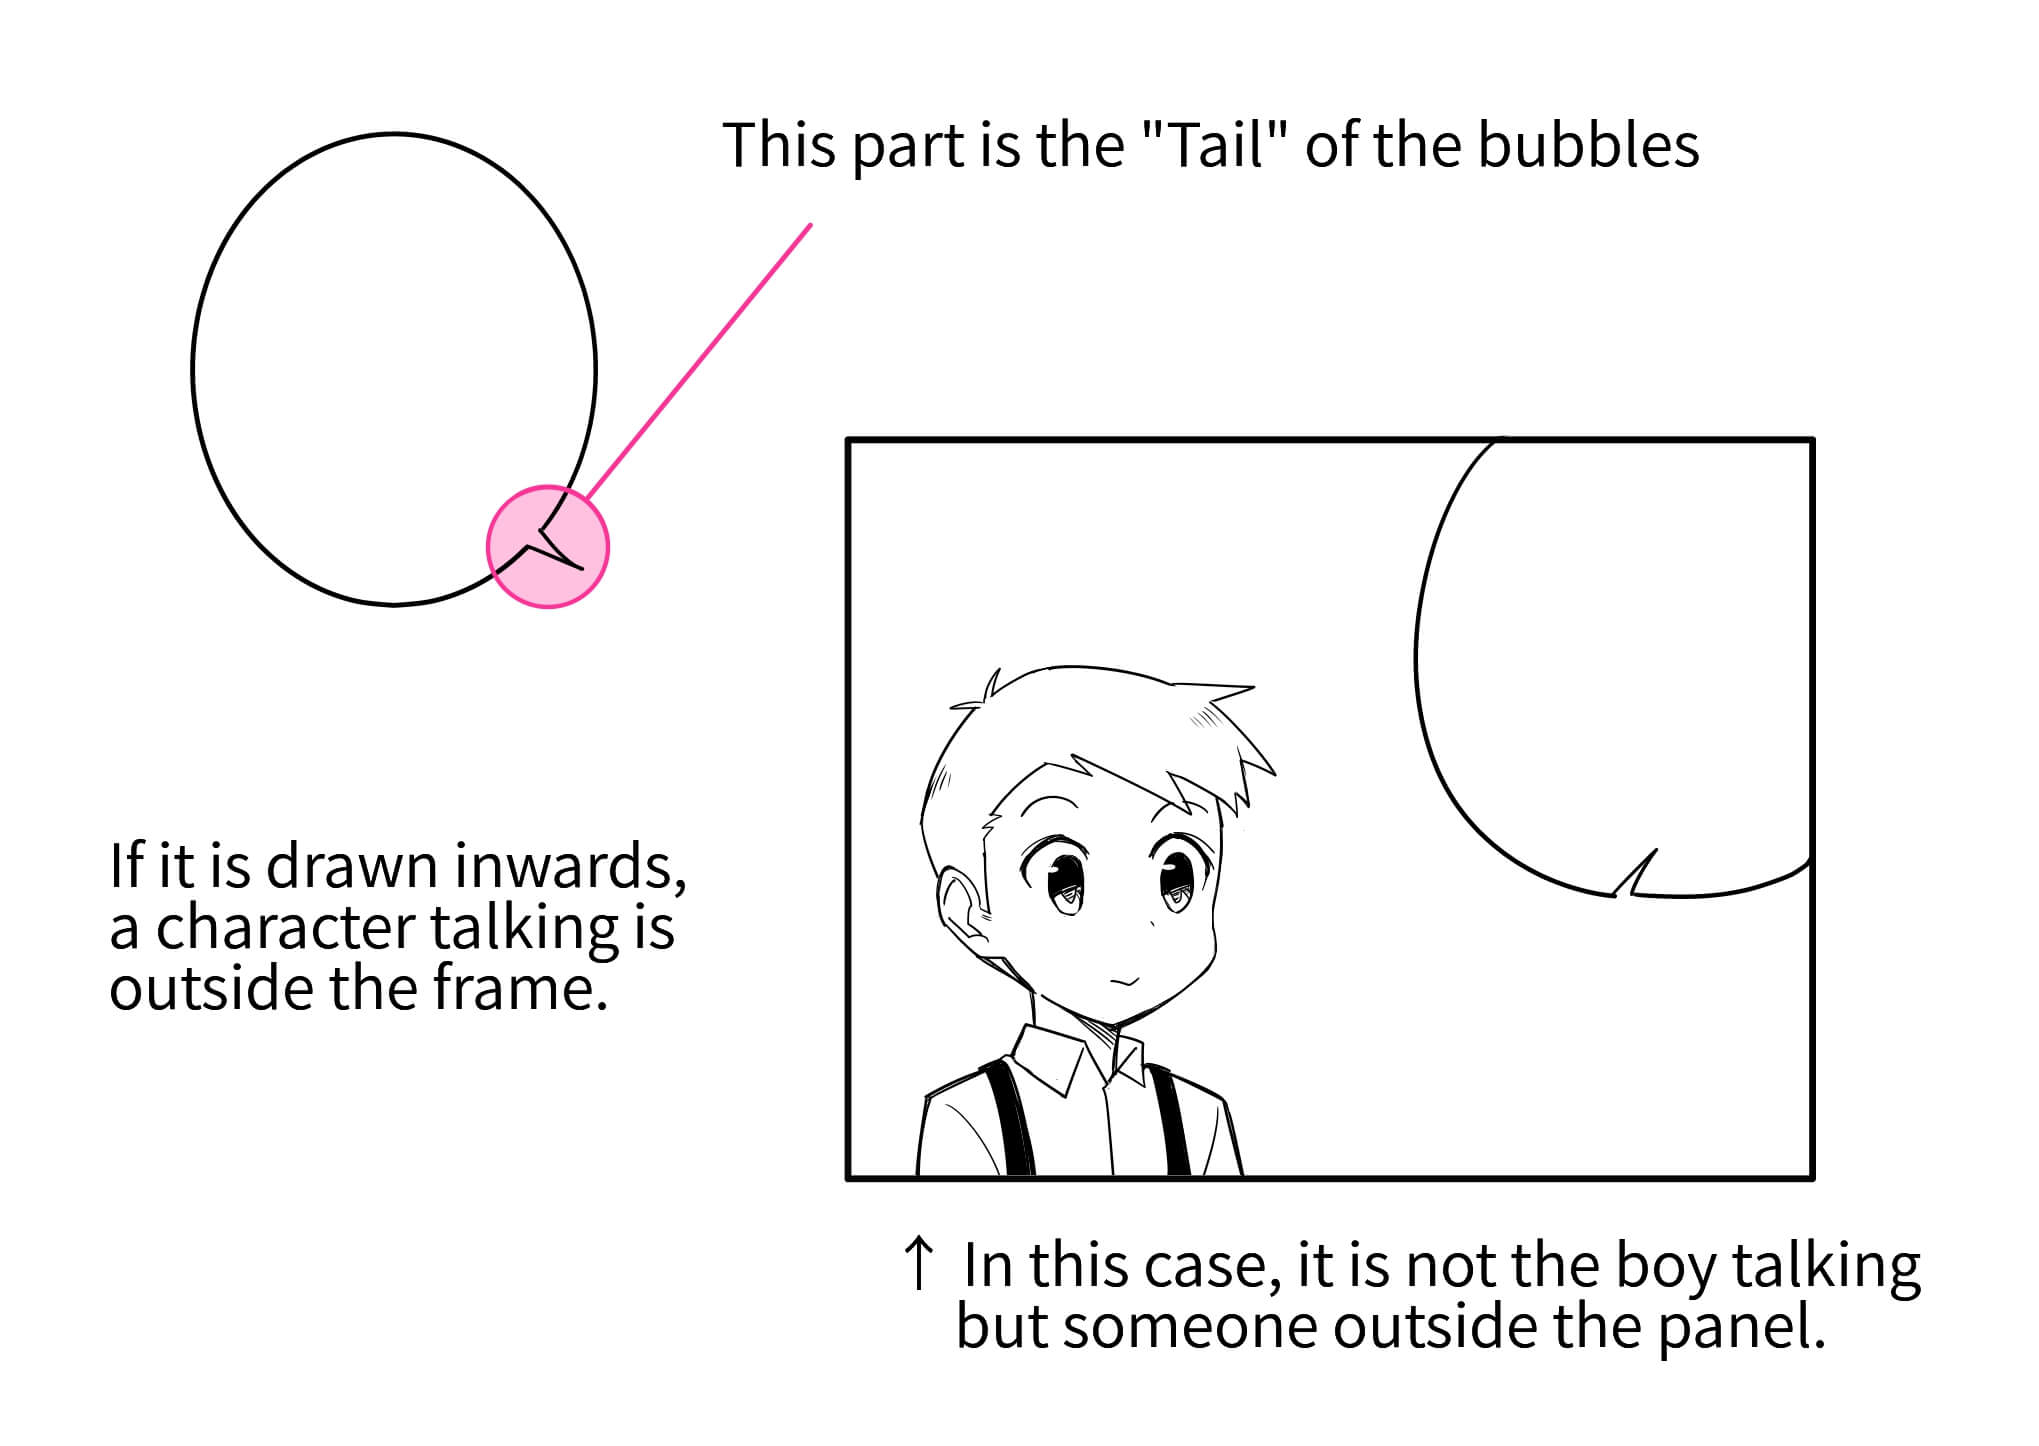
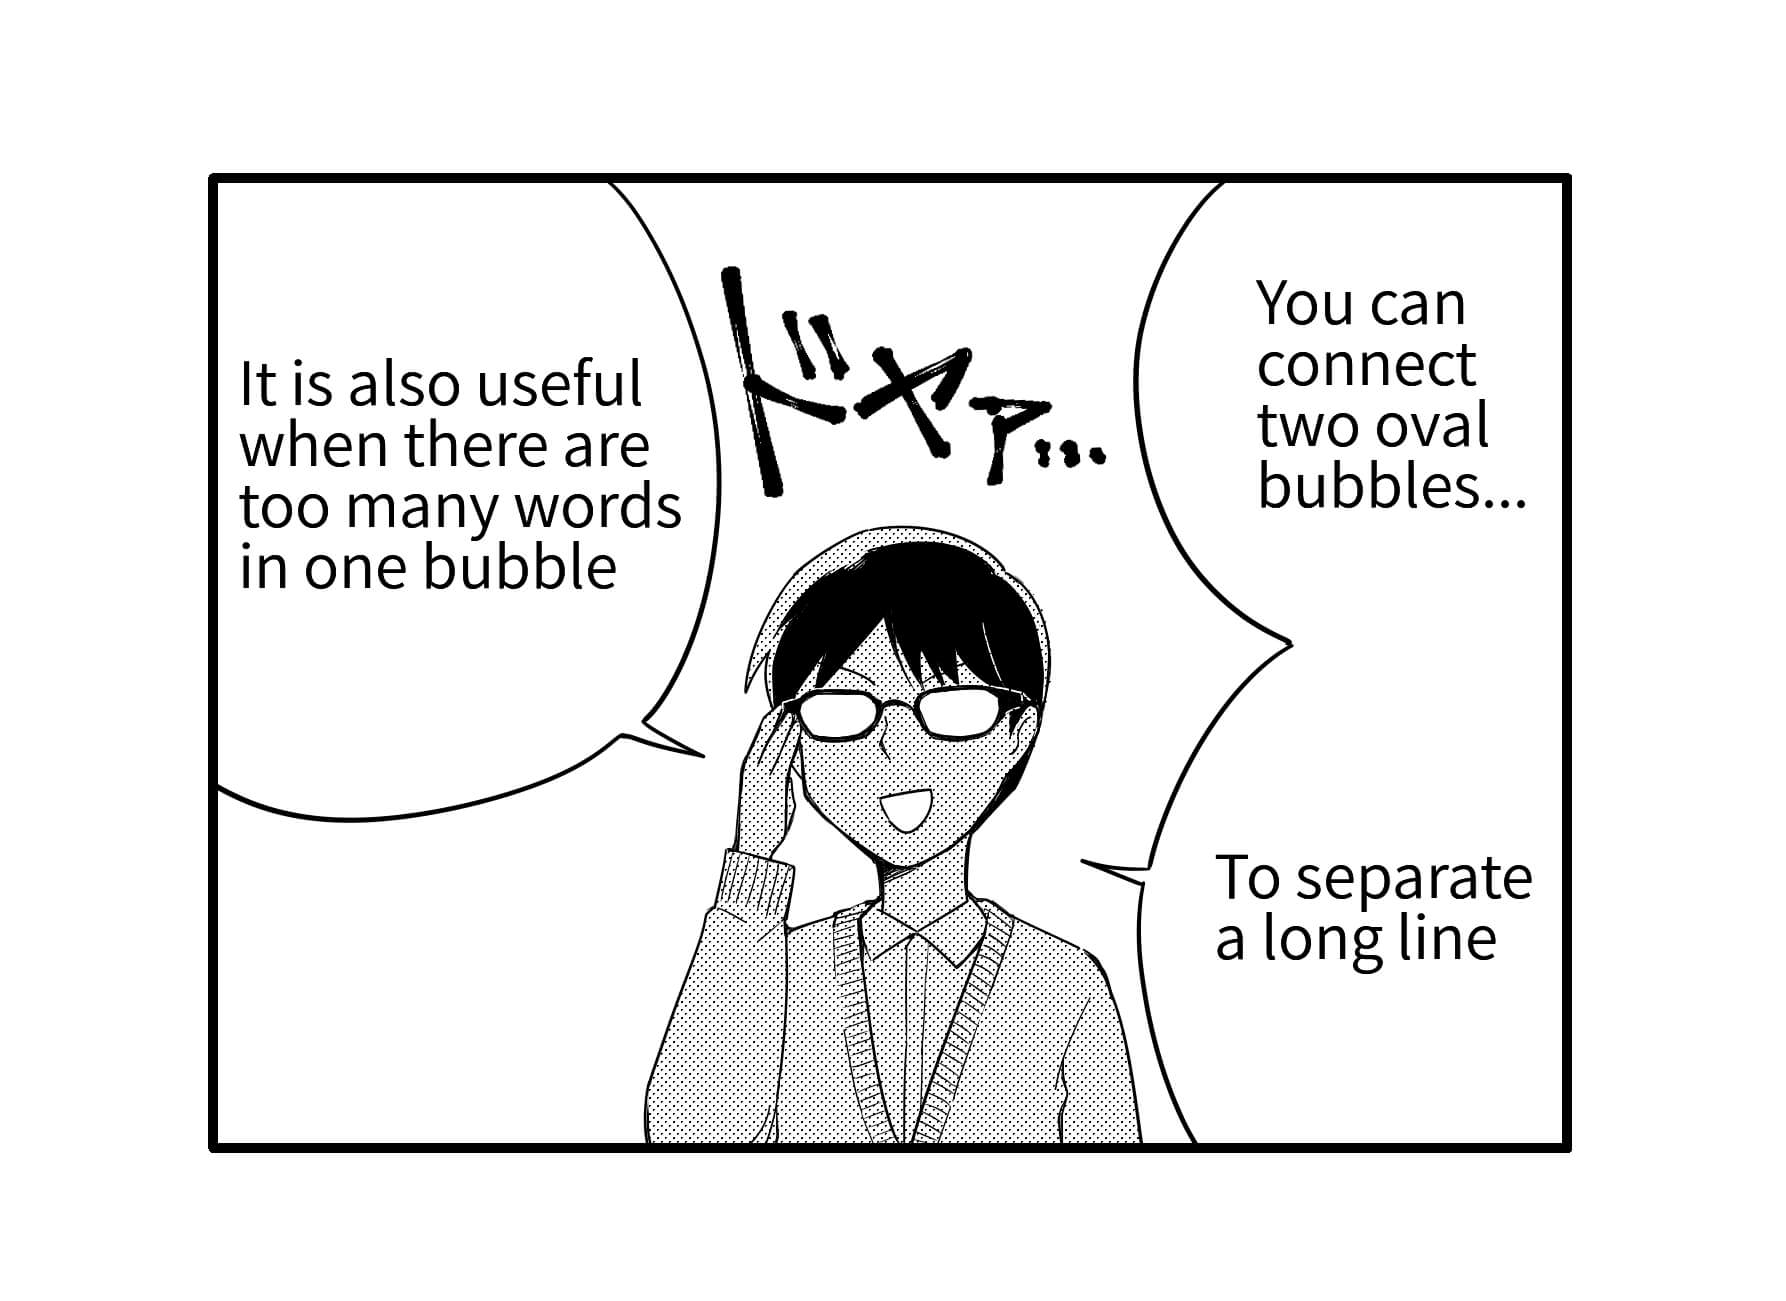
If one person is talking for a long time, you can use a double bubble. Instead of diving into two different bubbles, it shows a clear time sequence.
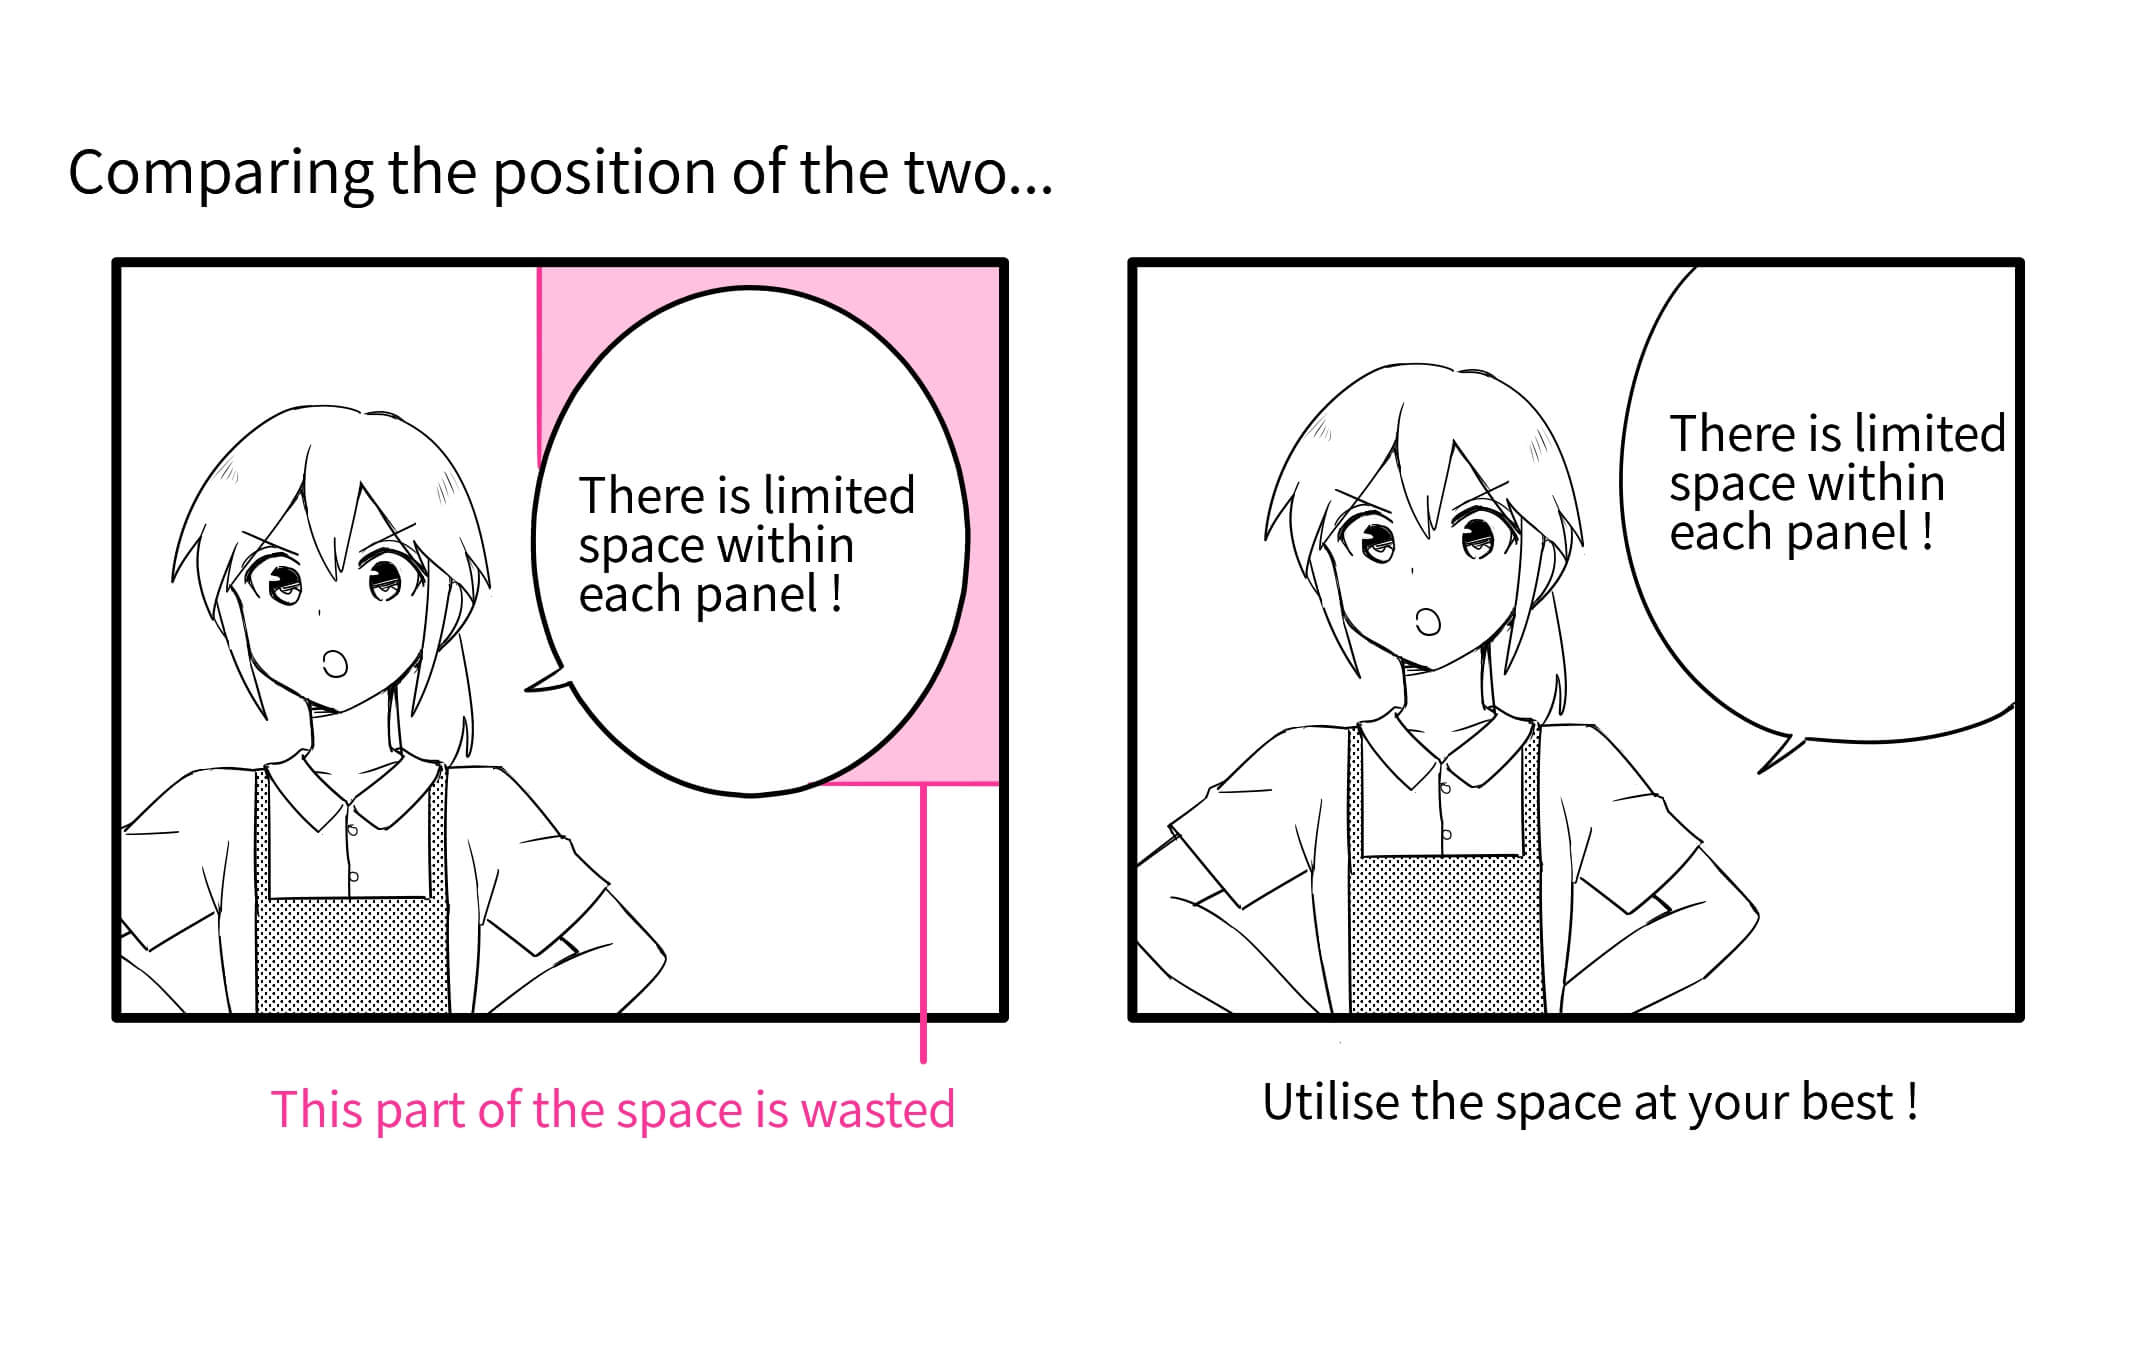
There is also no rule for the position of speech bubbles but you can create more space for the drawing if you place it next to the corner. This is because drawing a large, readable bubble takes up a lot of space. Simplifying the speeches does not only make it easy to read but also to create more space for the drawing.
Let’s try drawing different shapes of speech bubbles.
・Needle / Blast / Explosion Bubble
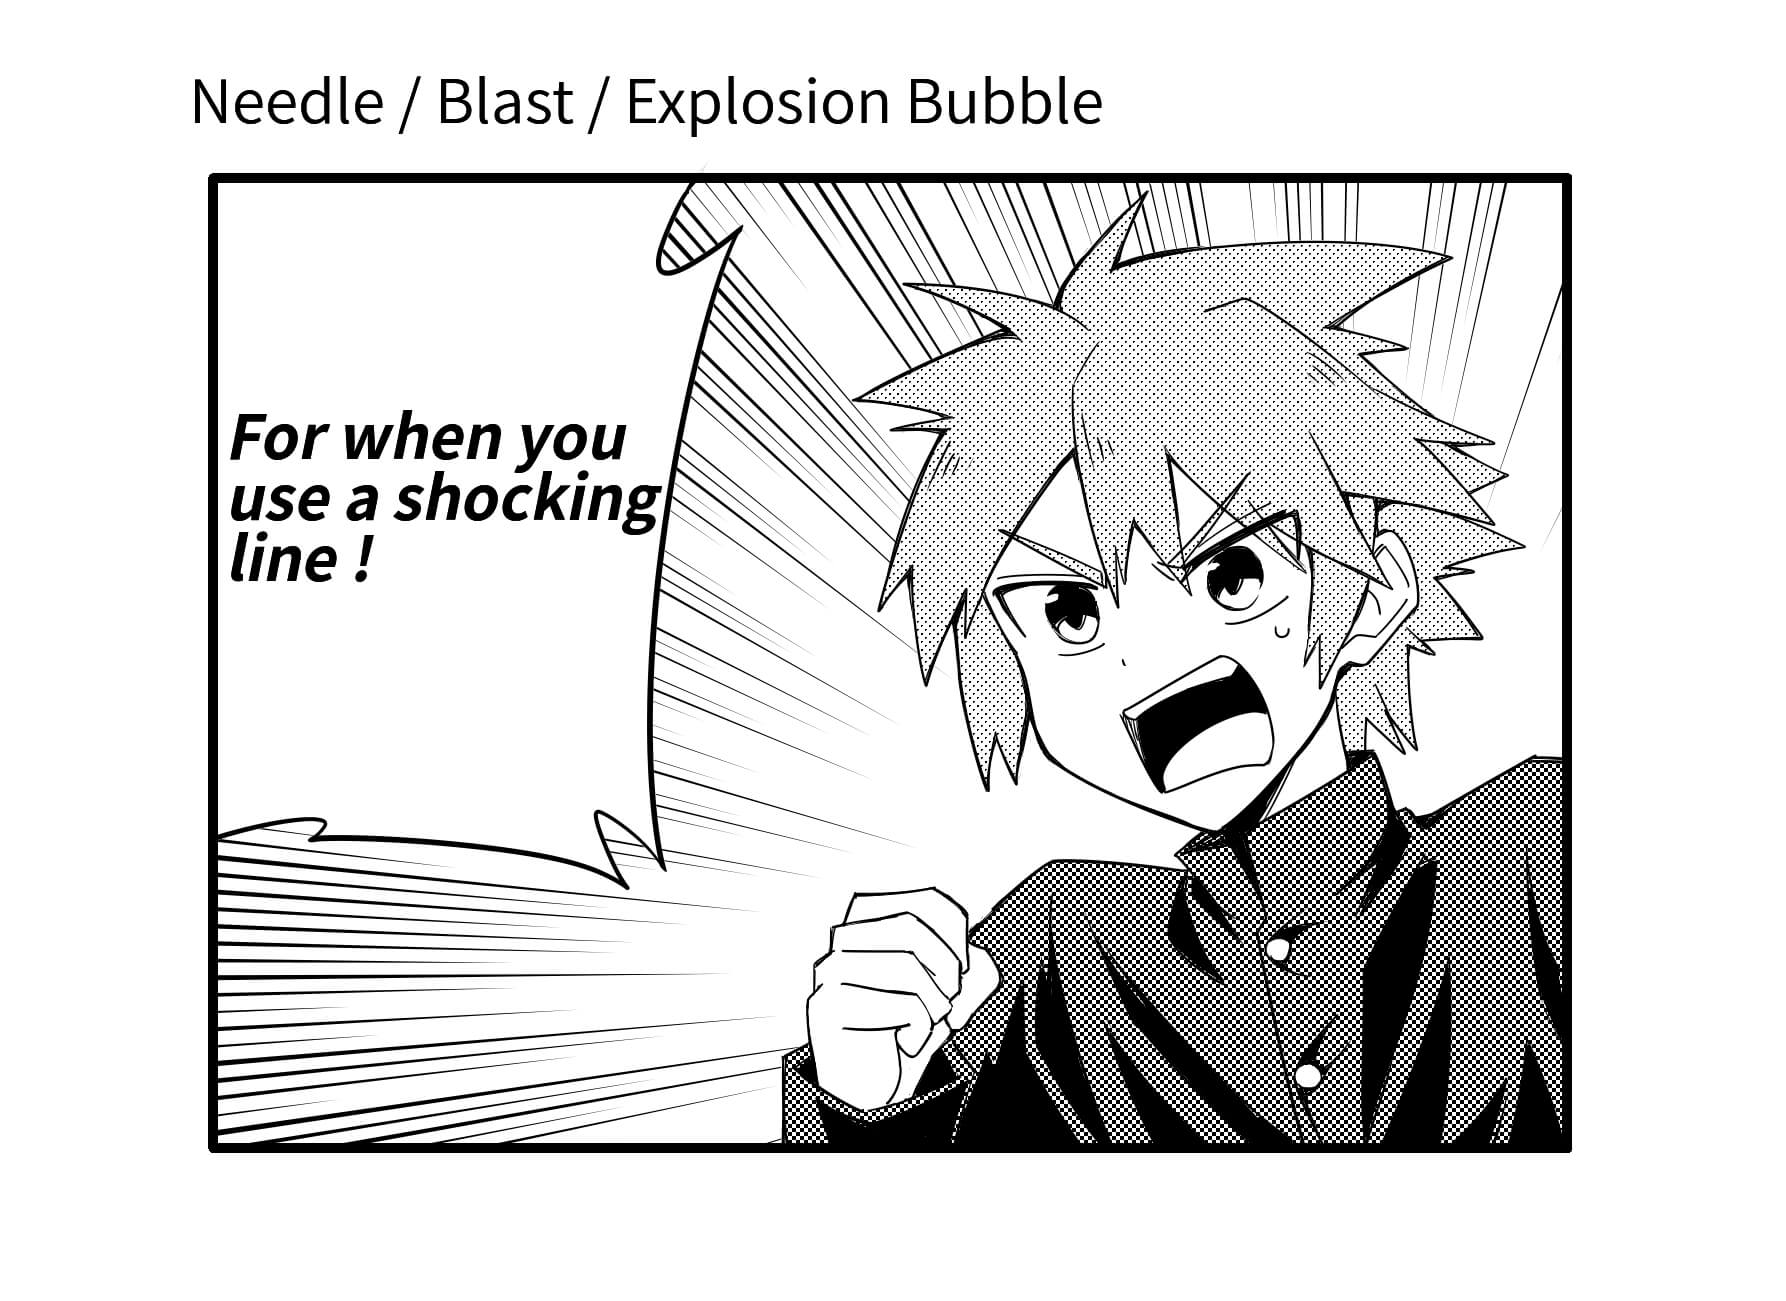
It is mostly used for when the character speaks loudly. It can easily be drawn freehand but if you want to straighten them out, use the “Polygon” in the Shape Brush Tool.
・Cloud Bubble
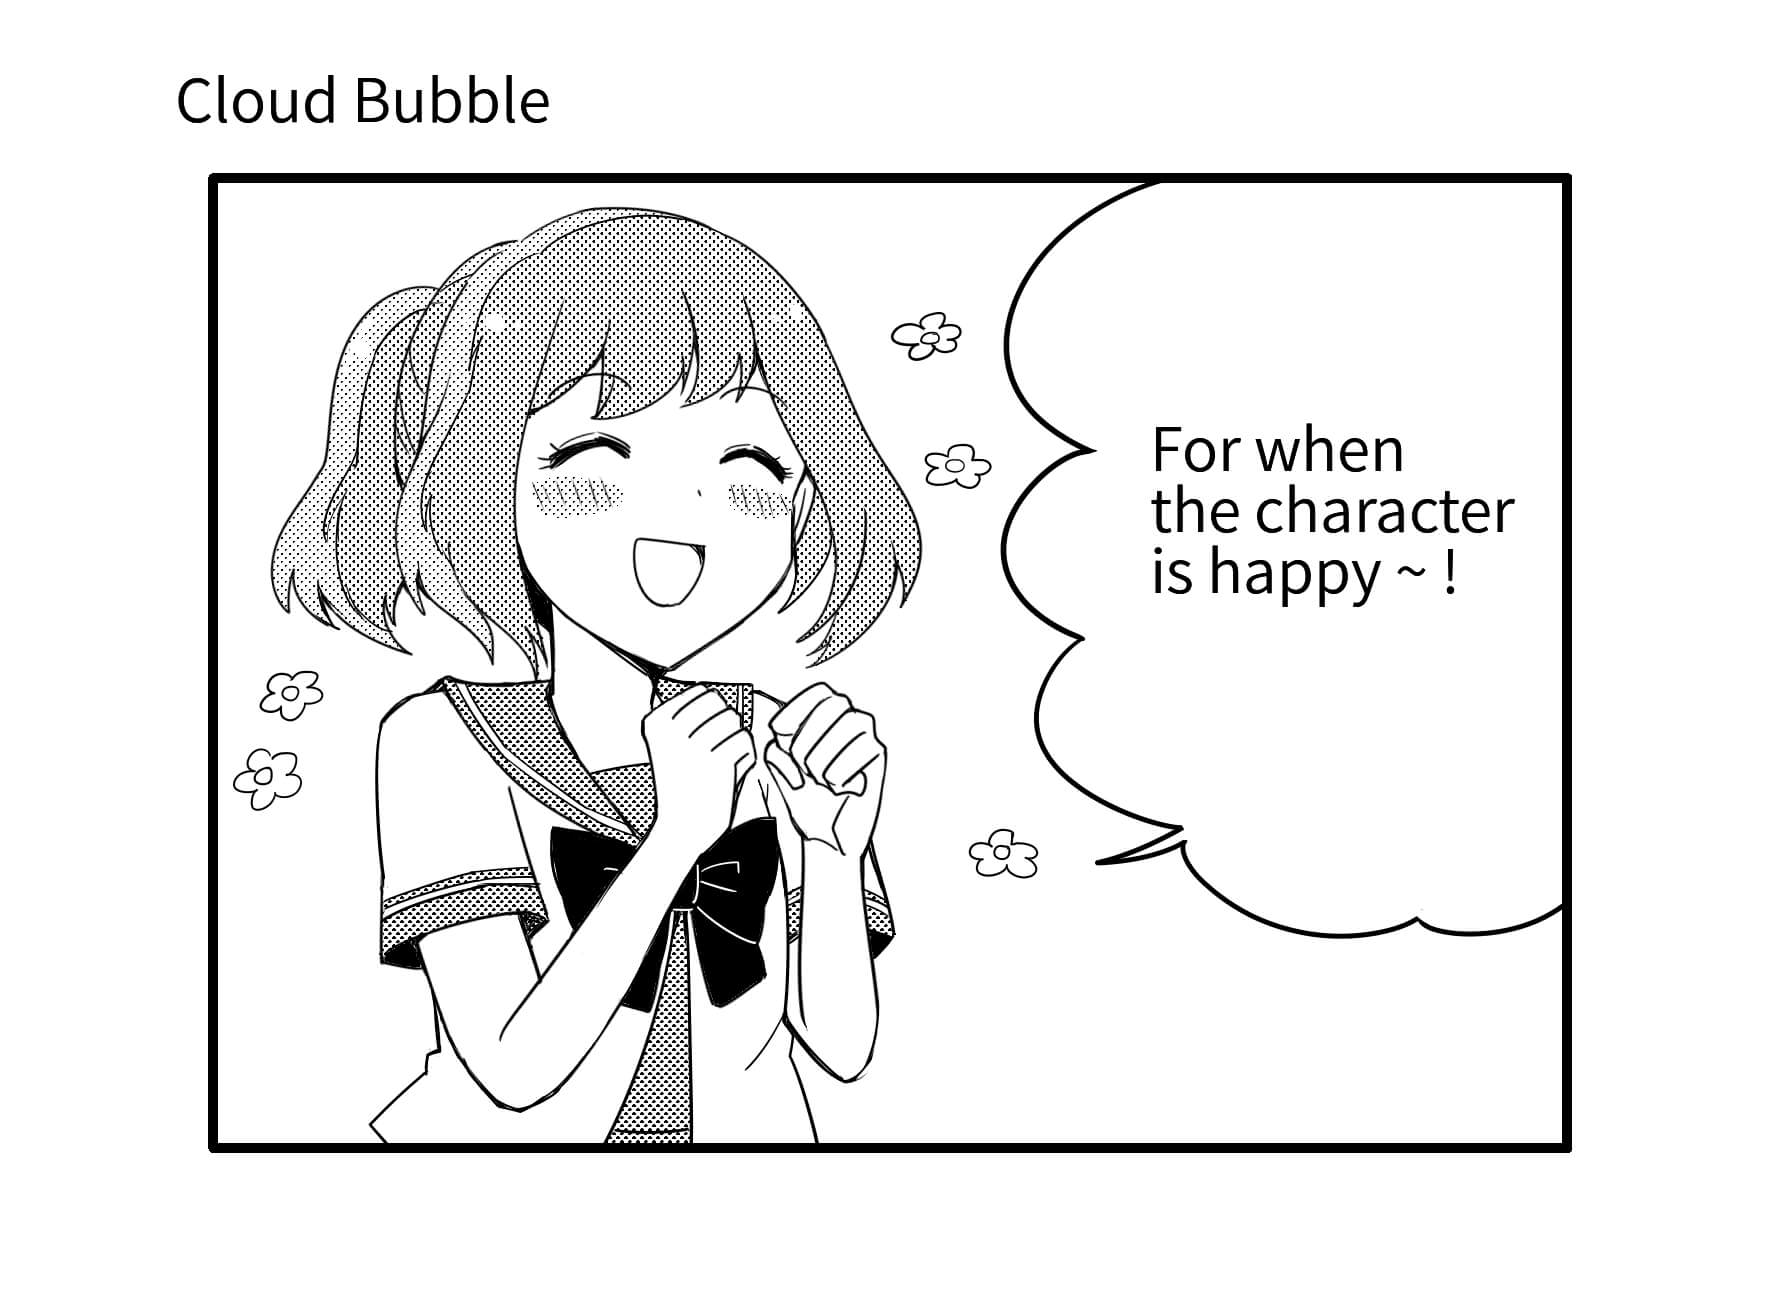
This is used for cheerful lines or comical speeches. It will be easy if you draw this like a flower in freehand.
・Wavy Bubble
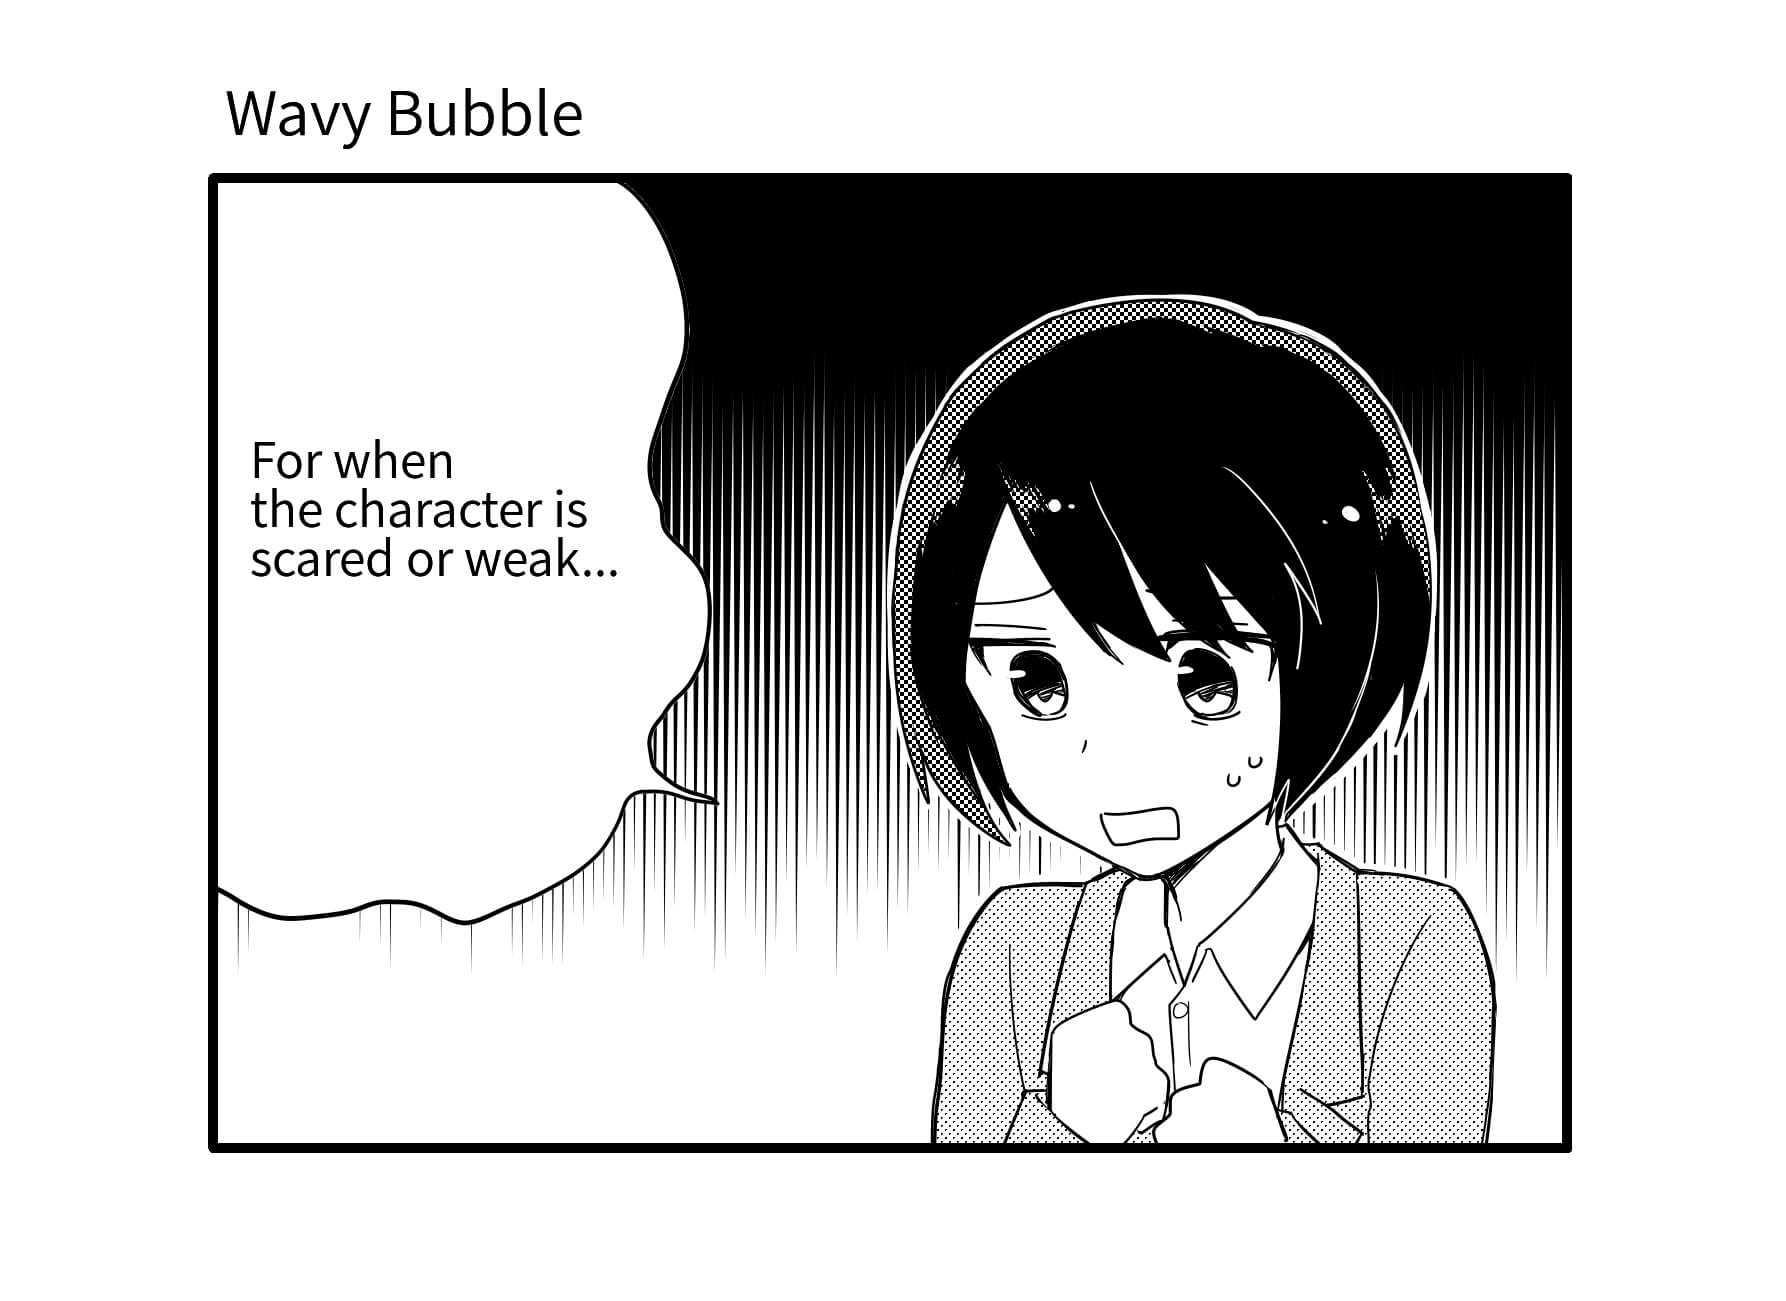
It can be used when the character is injured or when they are talking in fear. You can draw this easily by relaxing your grip on freehand.
・Thoughts Bubble
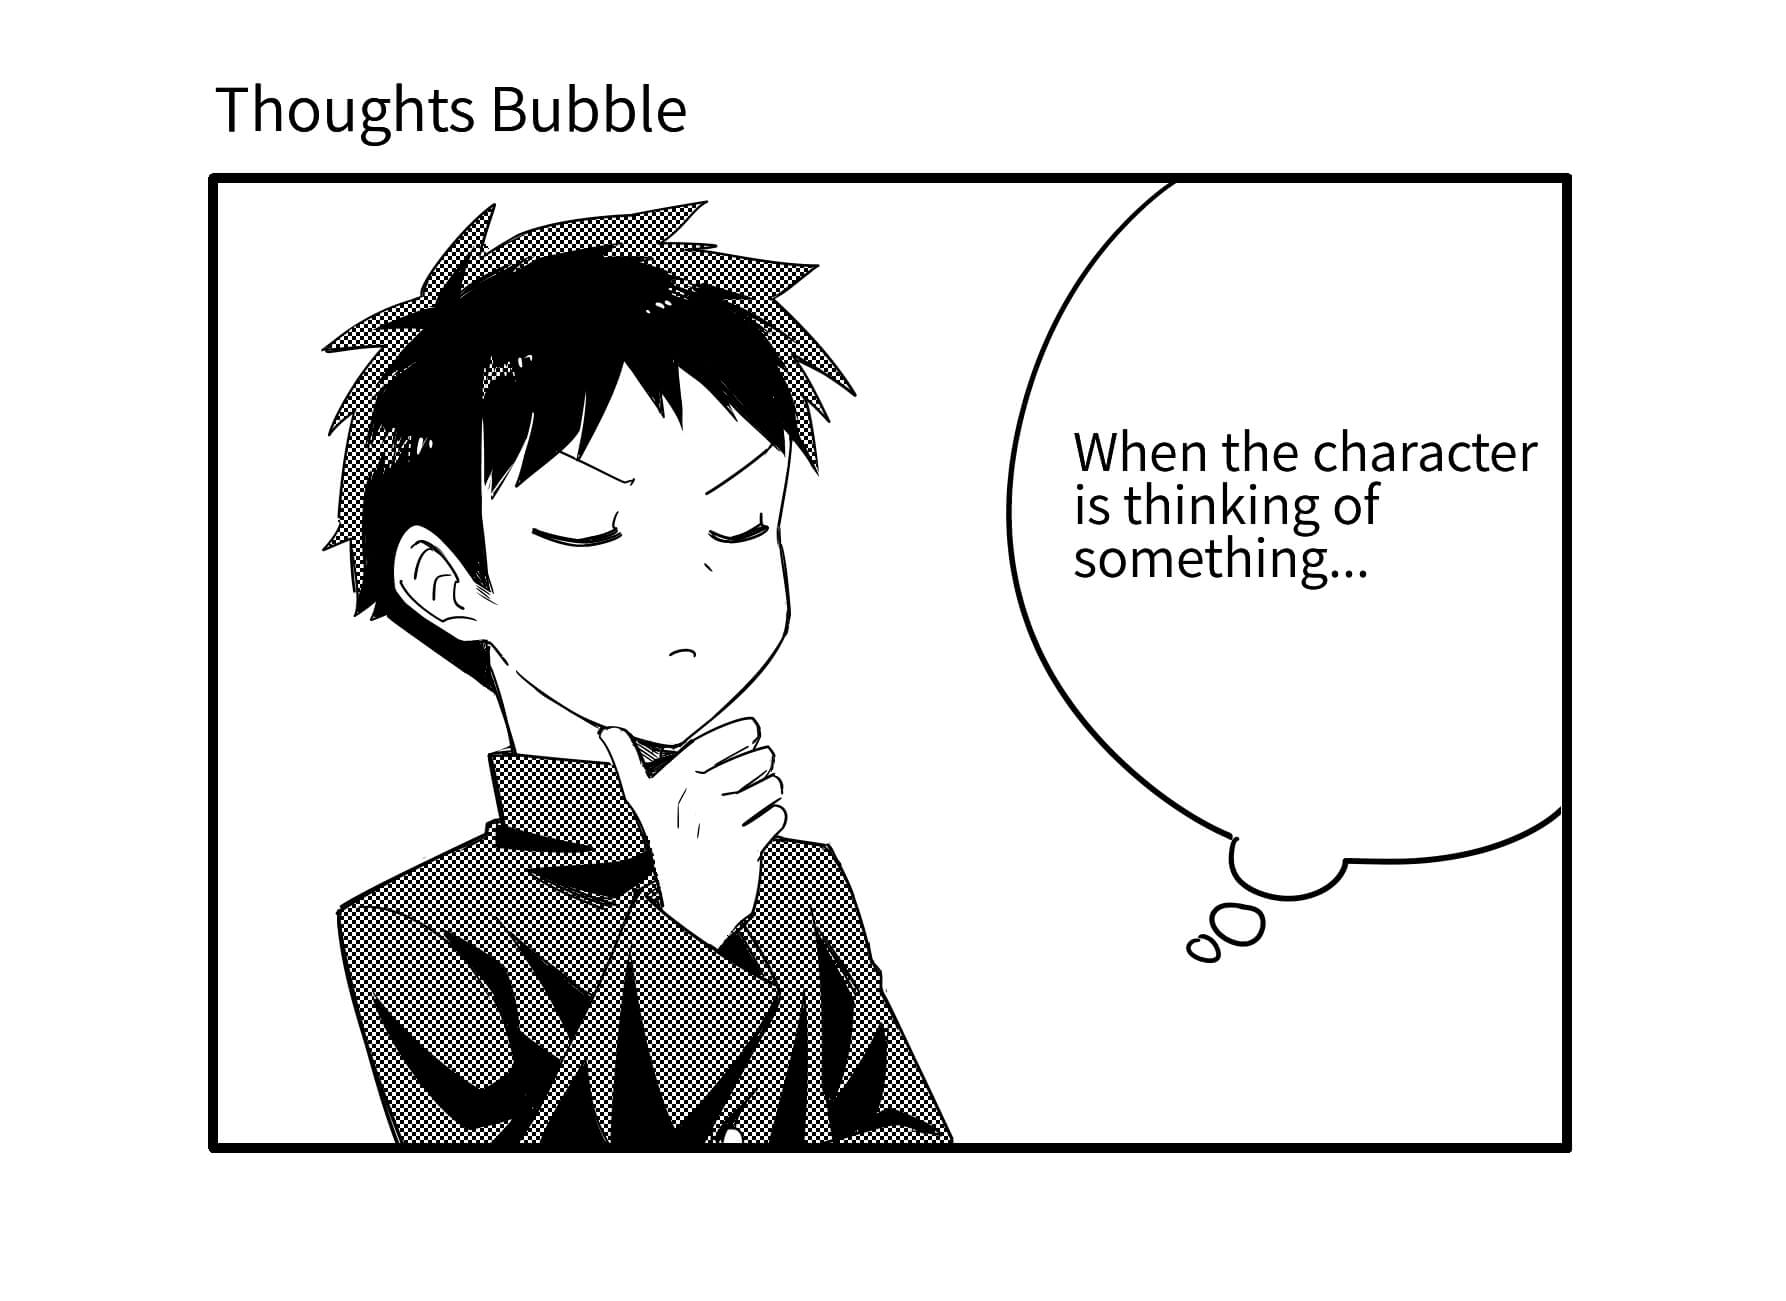
It is an oval bubble with circular tails and represents what the character is thinking about. You can either use the Shape Brush Tool or draw freehand.
・Rectangular Bubble
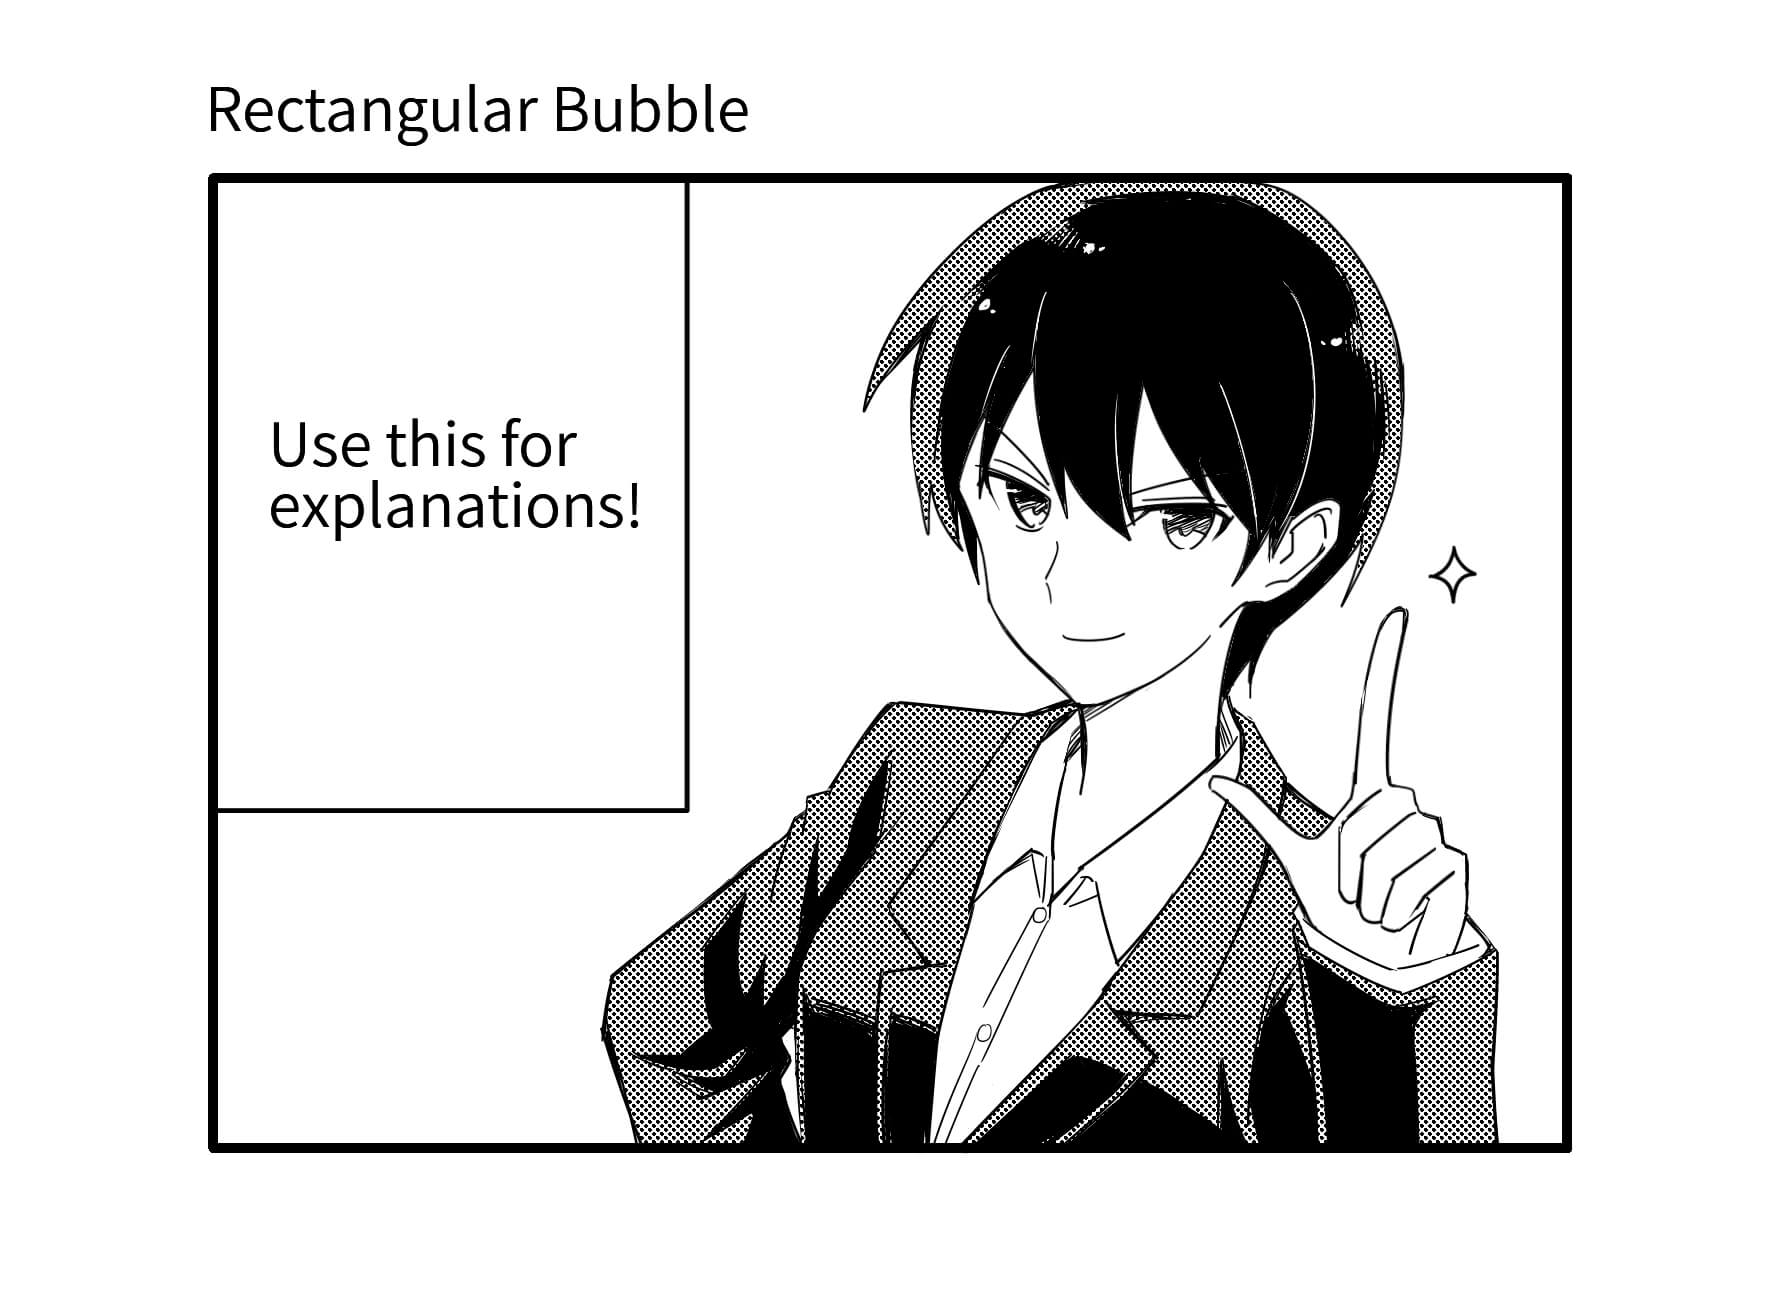
It is used for narrations and inner voice spoken in light-hearted tones. Use “Rectangle” in Shape Brush Tool to draw easily.
・Electronic Sound Bubble
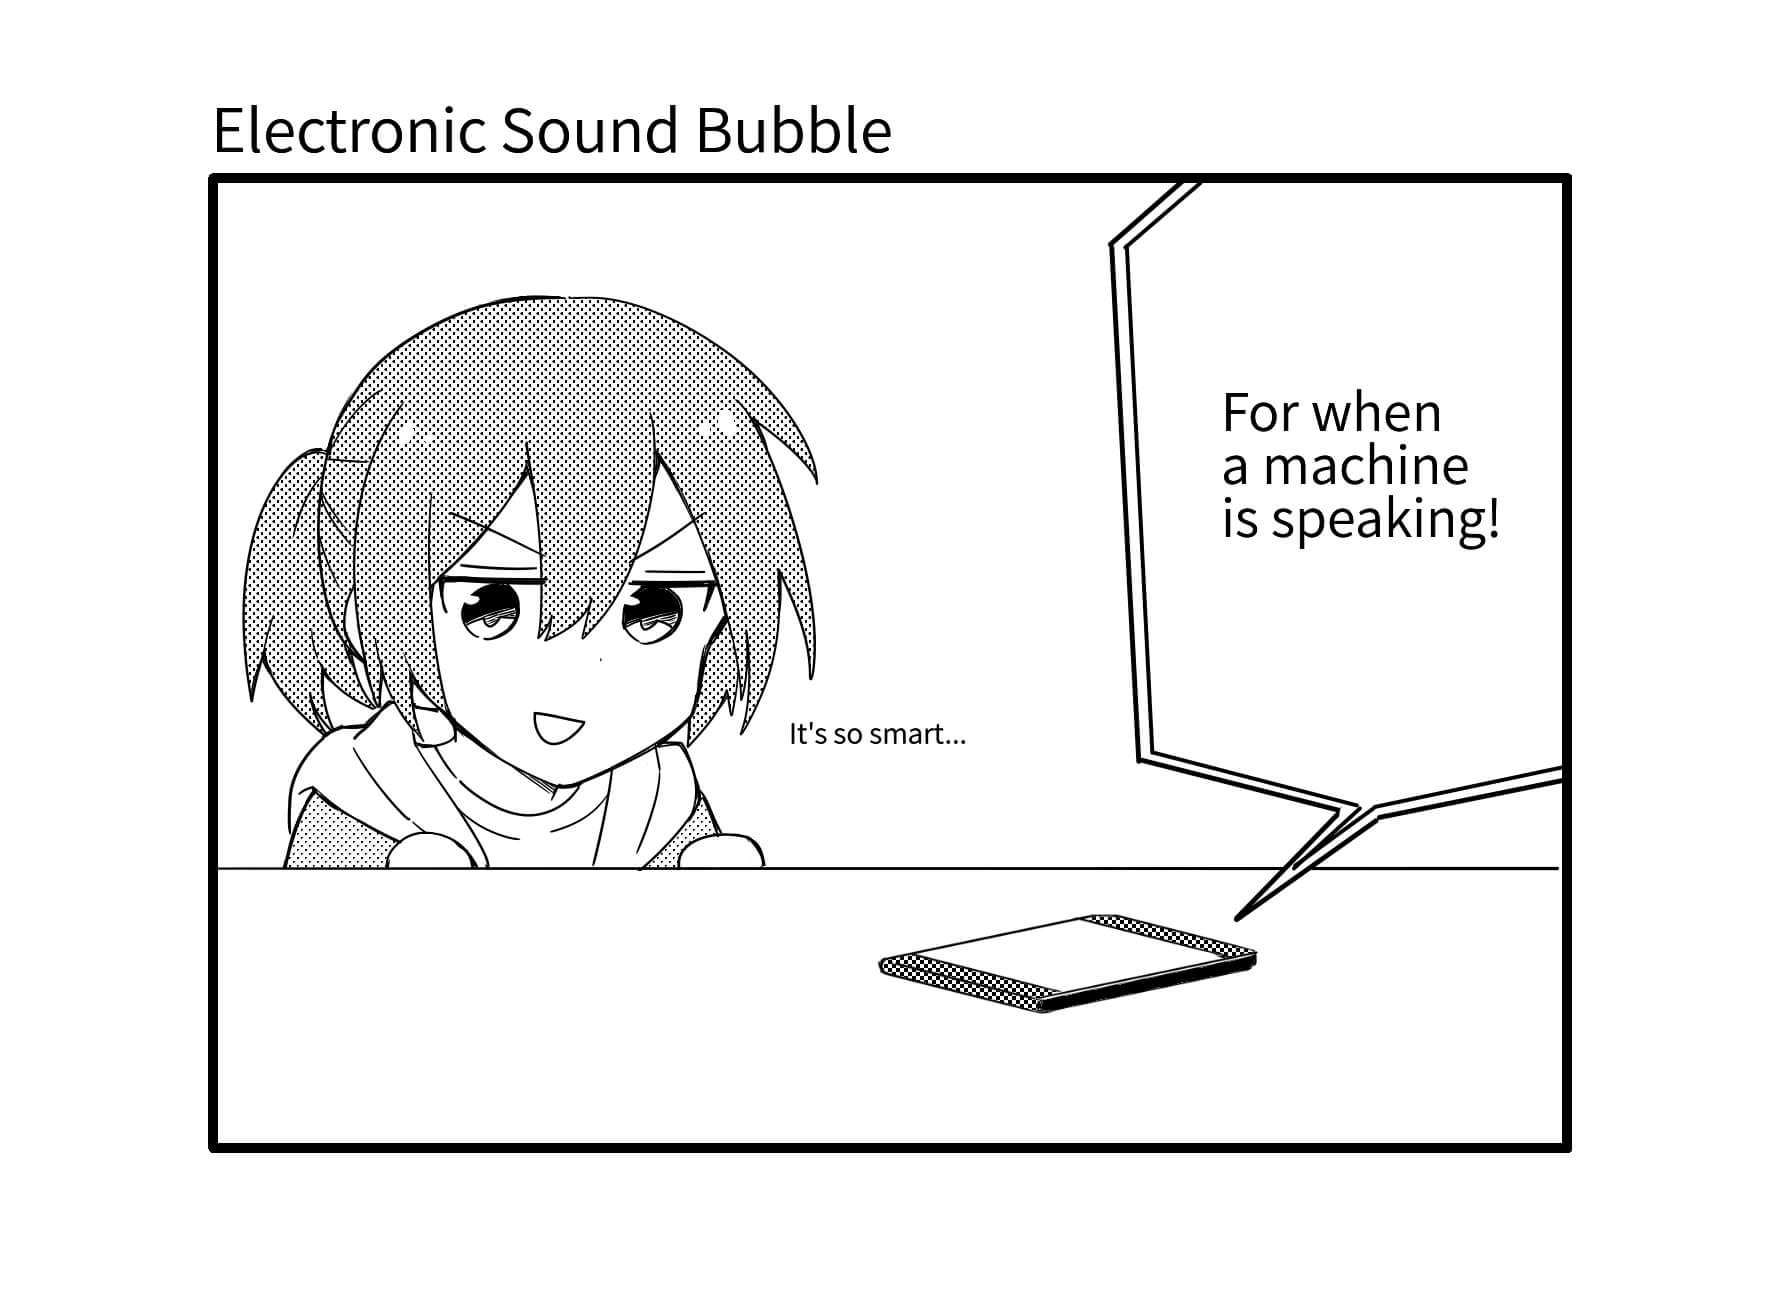
They express lines spoken through a speaker, by a machine and sounds from electronic devices. You can use the “Polygon” of Shape Brush Tool to draw these.
・Flash Bubble
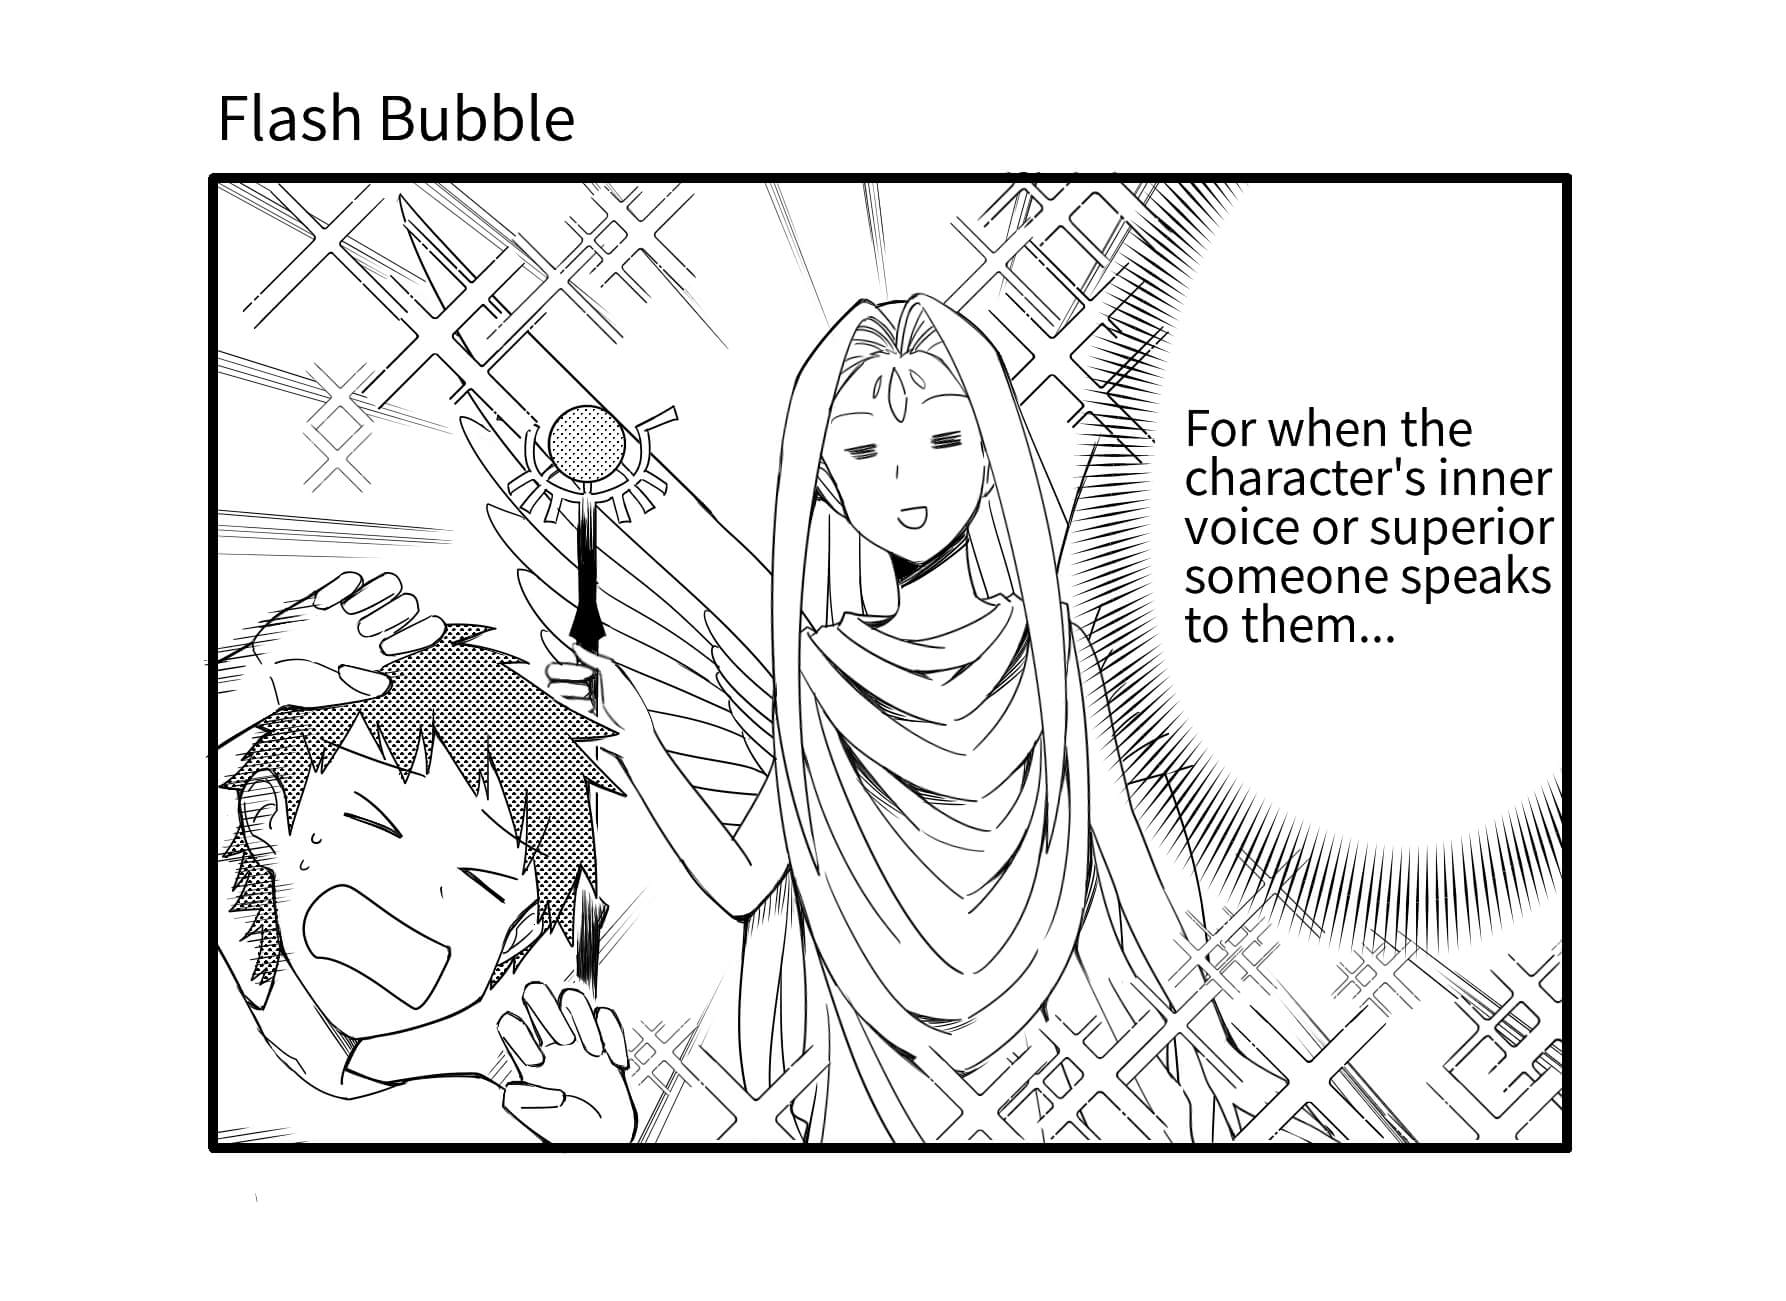
This is used for occasions where the inner voice implies a shocking line or when a superior existence is vocalized directly to the character’s mind.
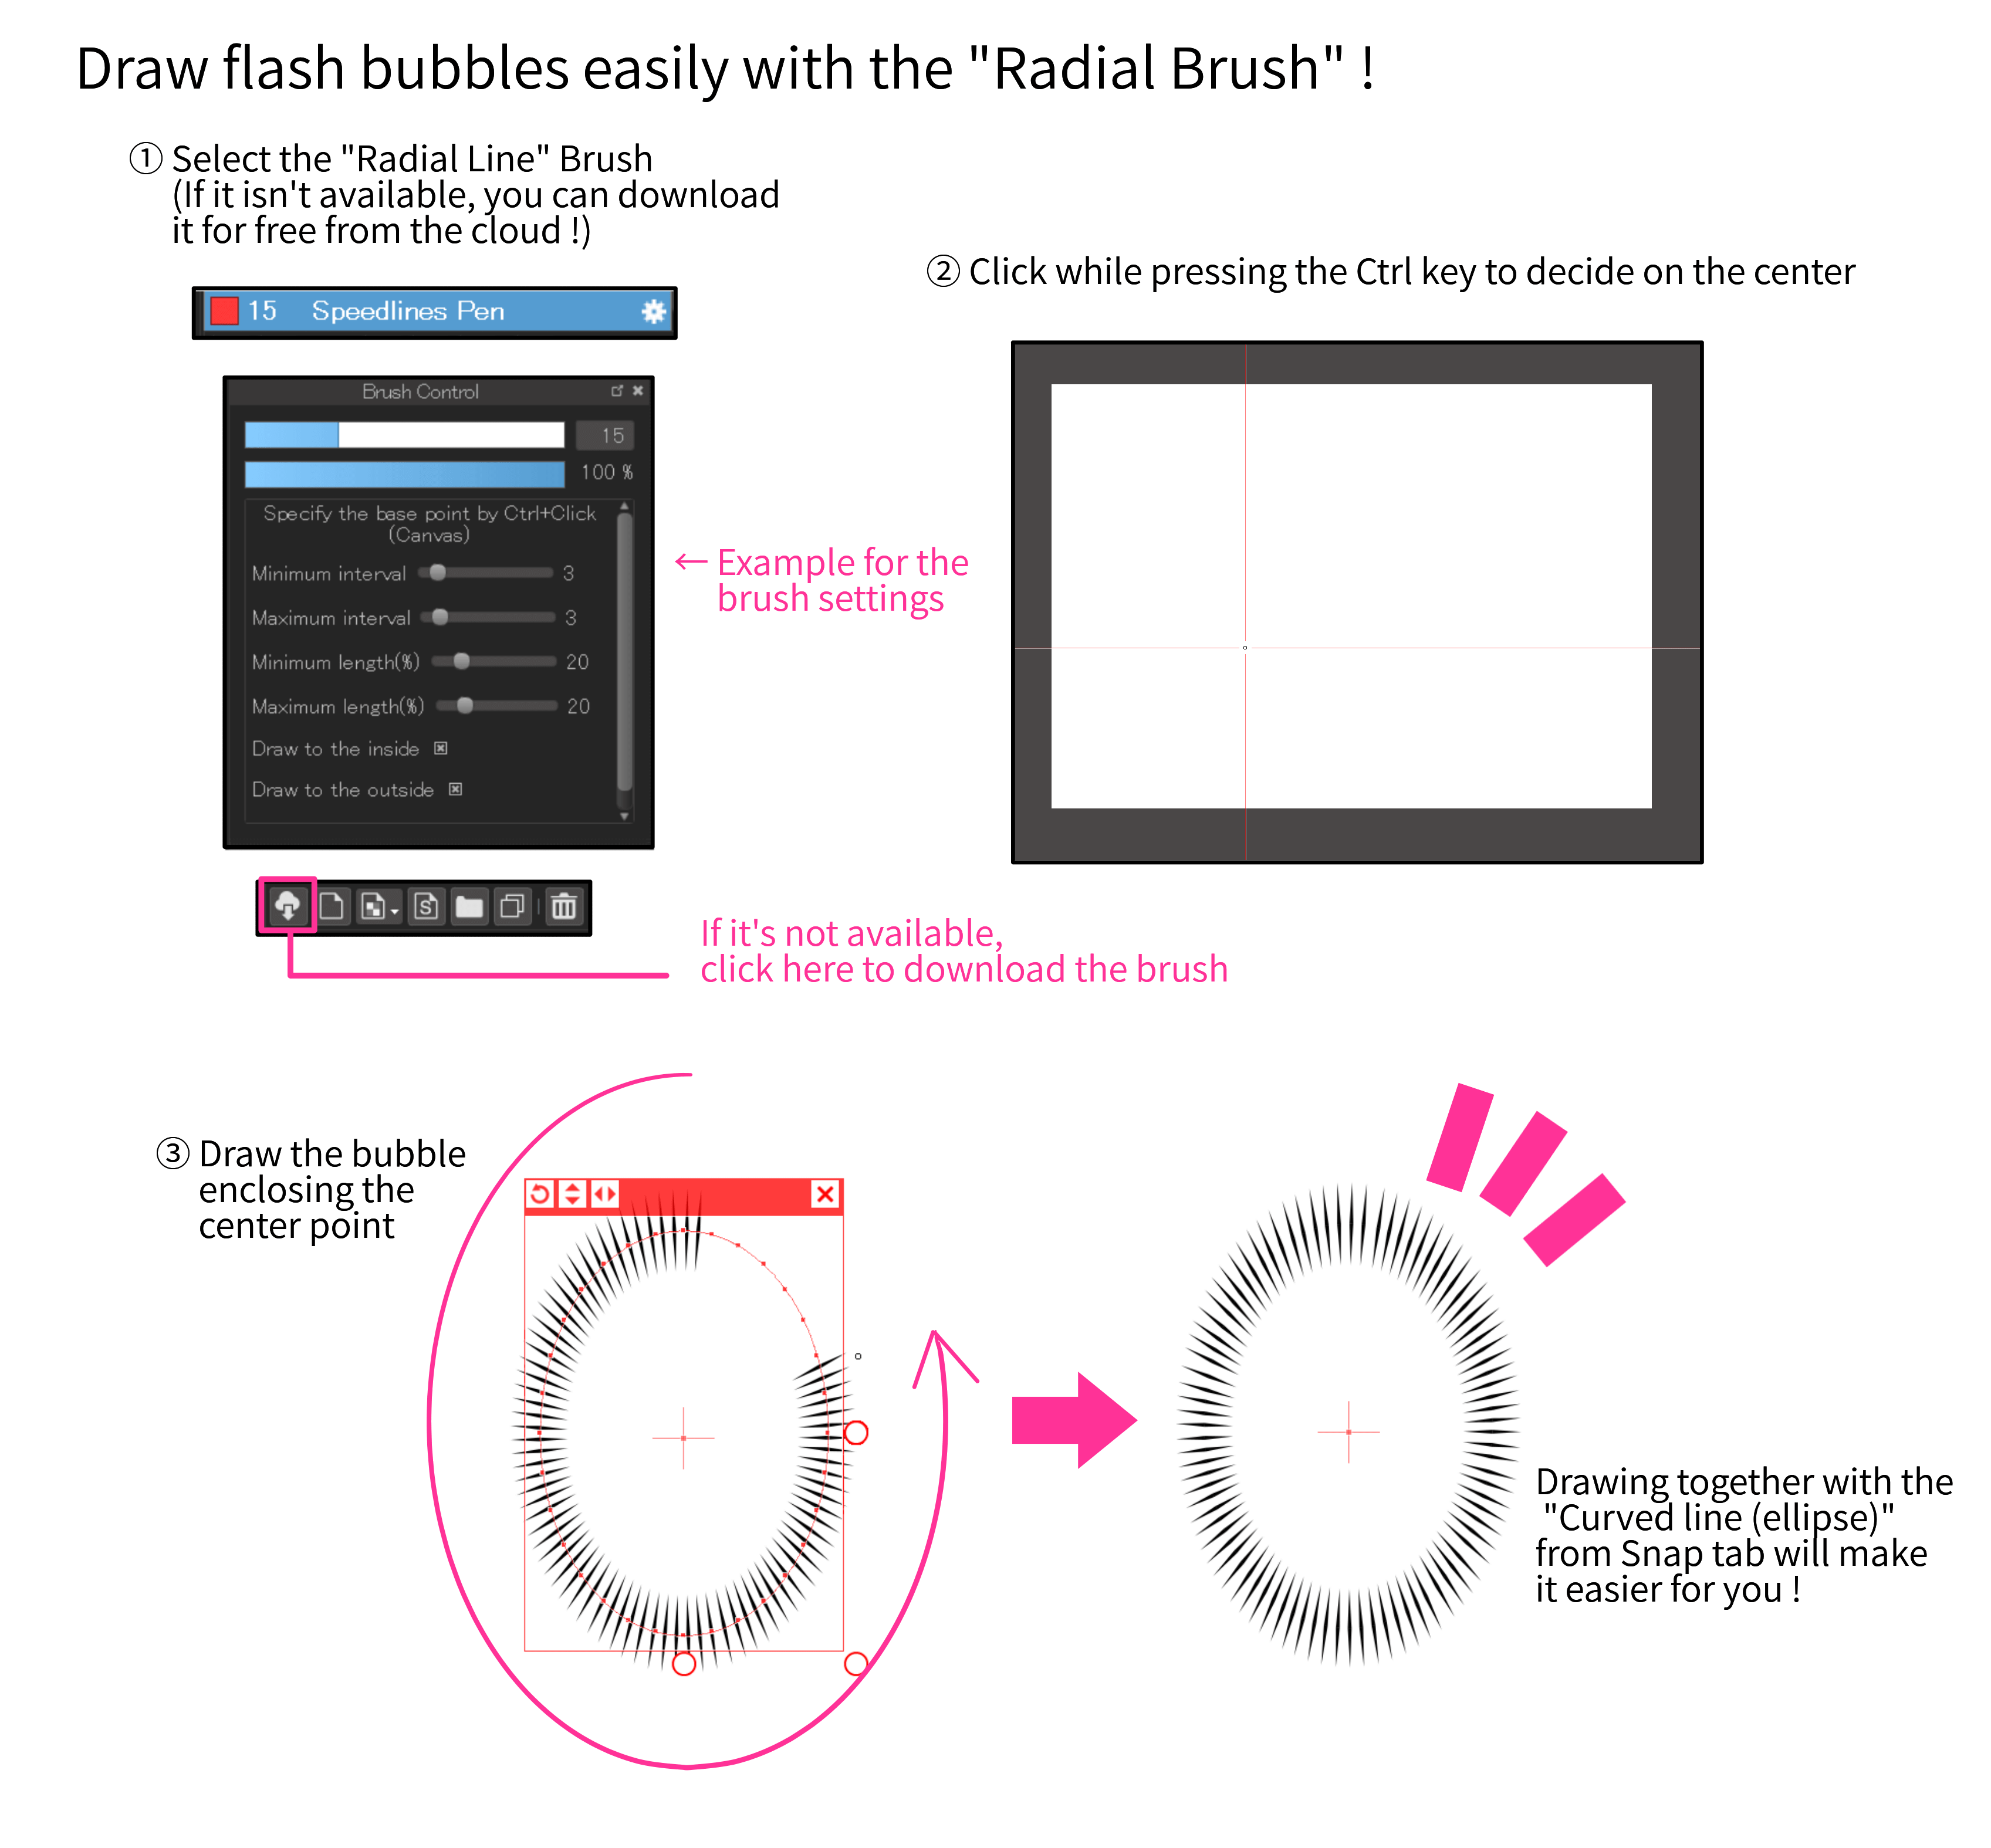
The flash bubble can be drawn easily using the “Radial Brush” from Cloud Brushes.
・Inverted Flash Bubble
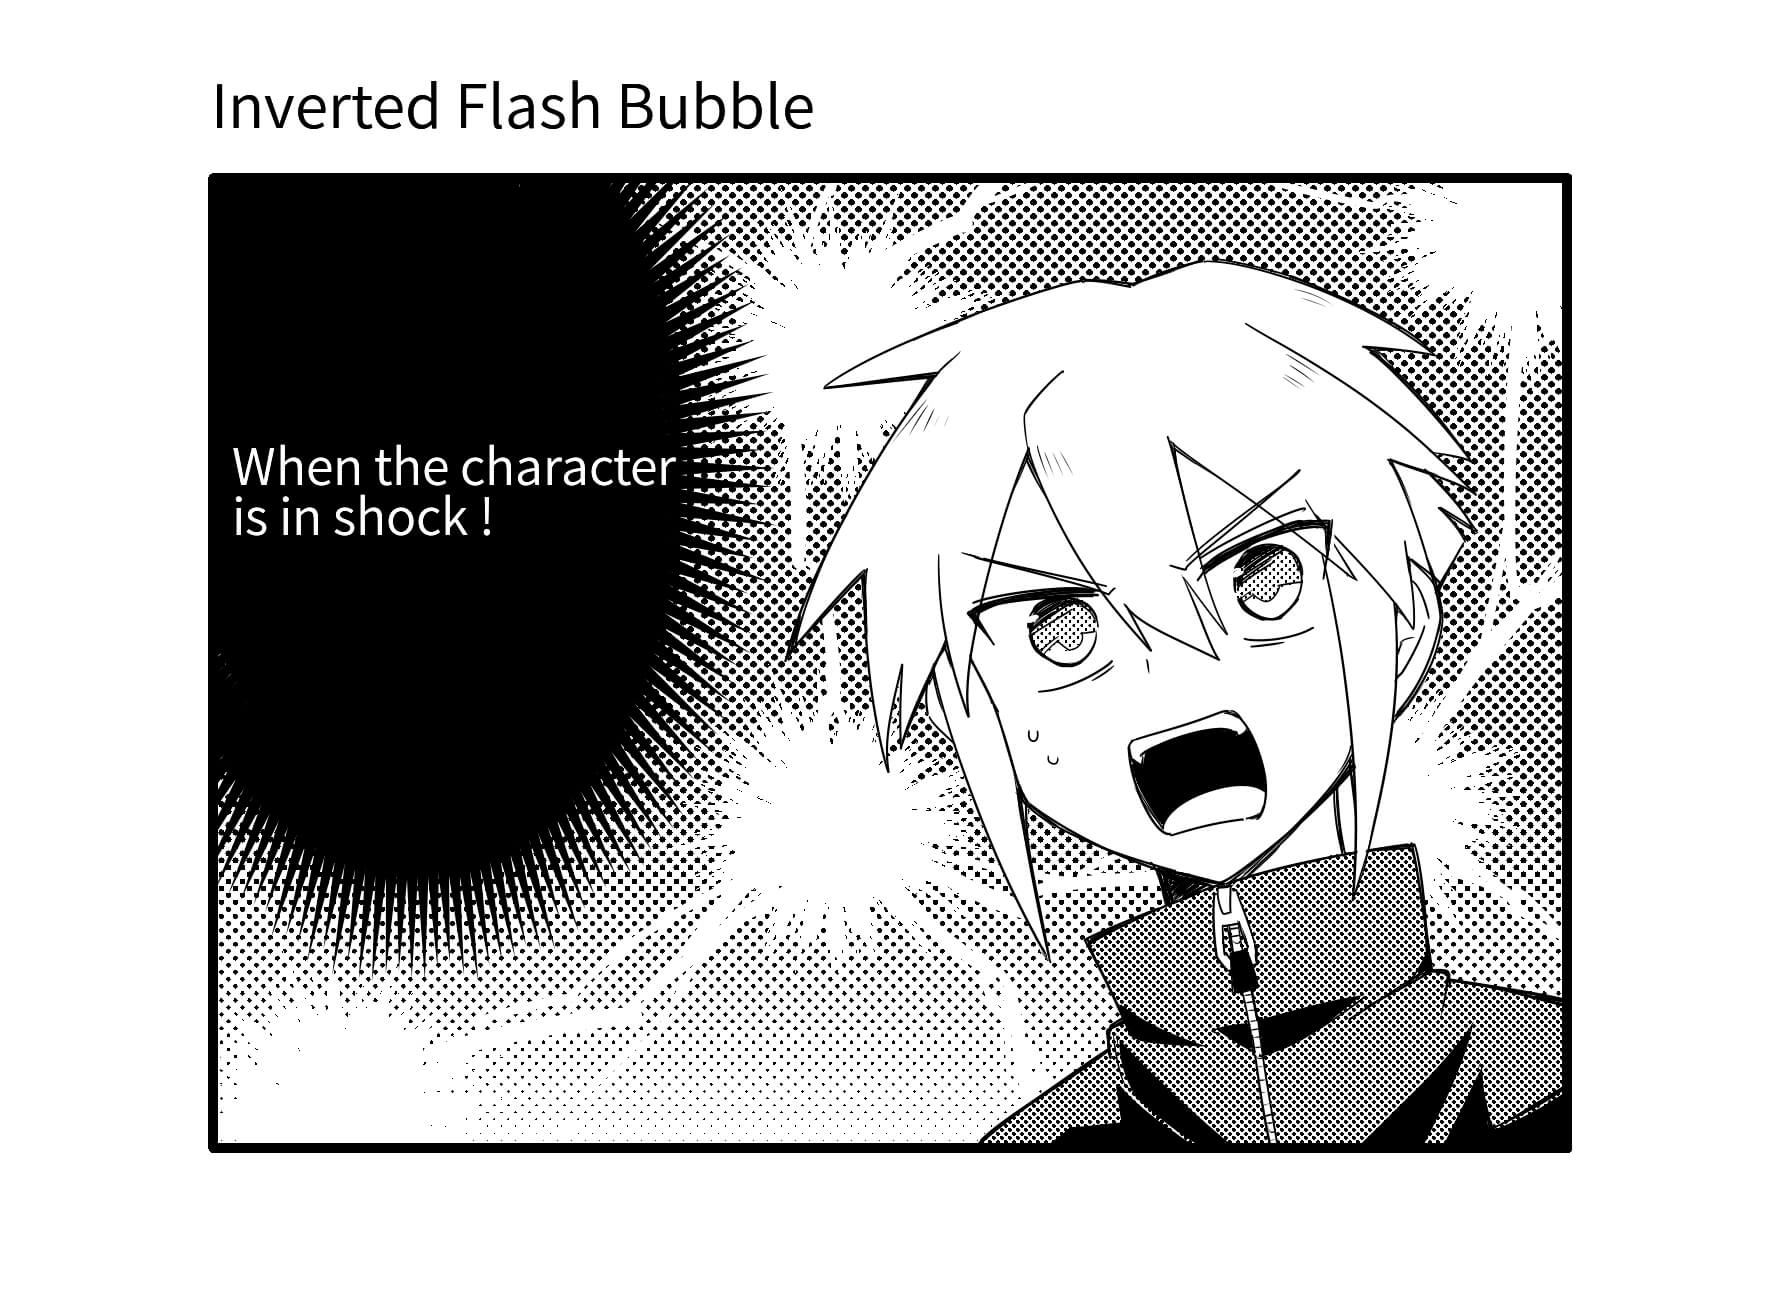
It is mostly used for when the character’s inner voice is speaking about something even more shocking. The explanation for Inverted Flash bubble is a little complicated so I will describe it in the later tutorial when I will be talking about spot fills.
The general types of speech bubbles are as described above, but you can get more variations by changing the line styles or adding some decorations. Look into changing the bubble styles appropriate for the scene you are drawing.
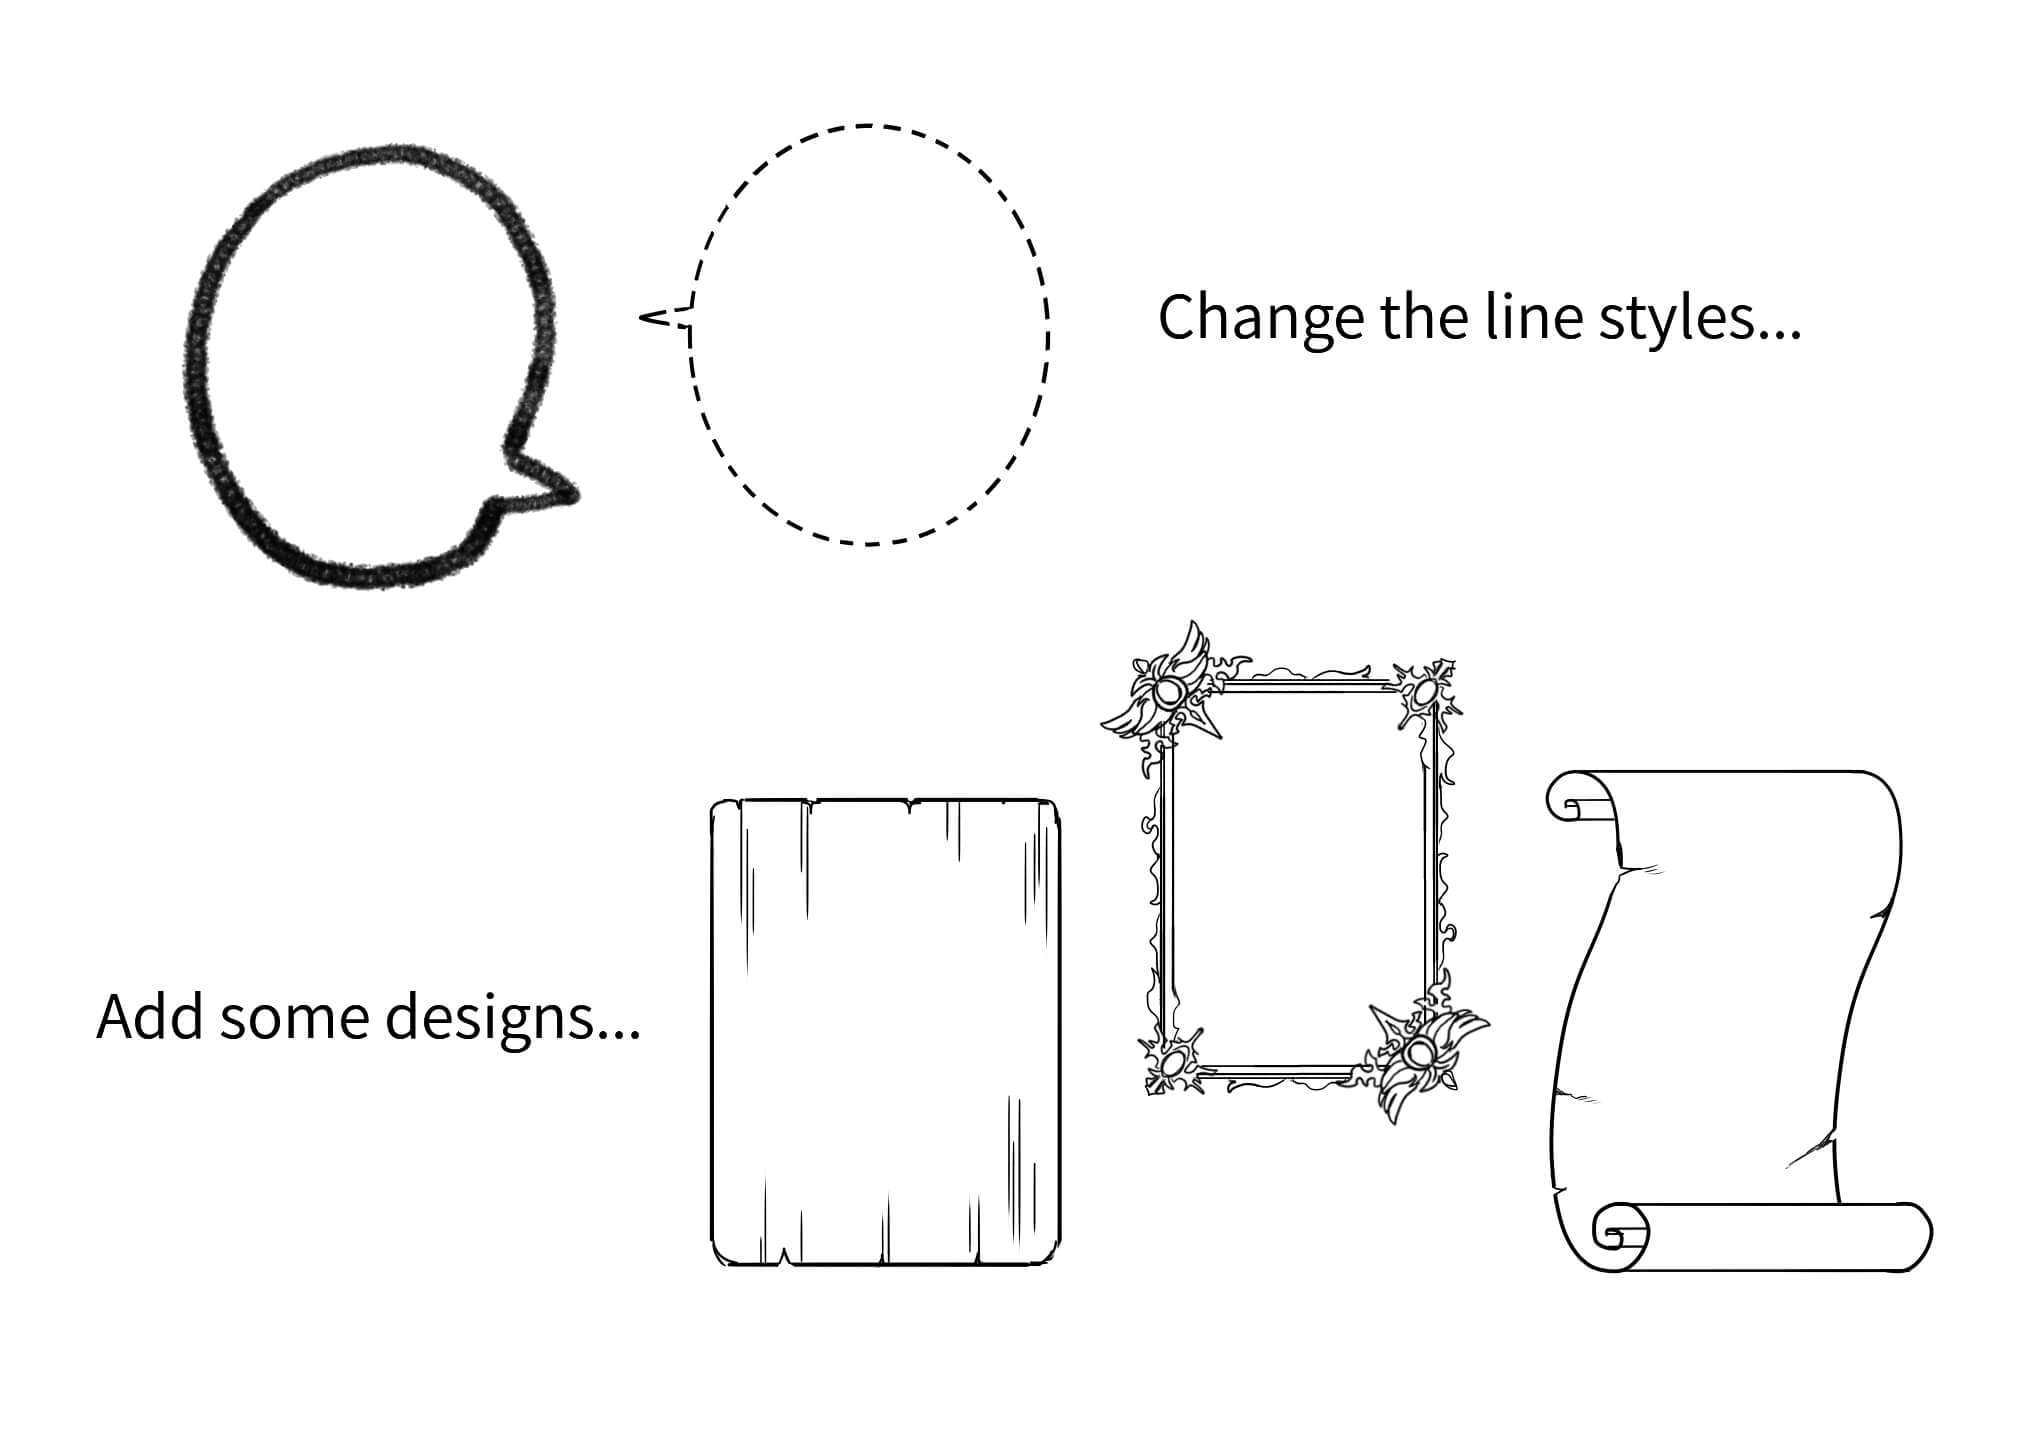
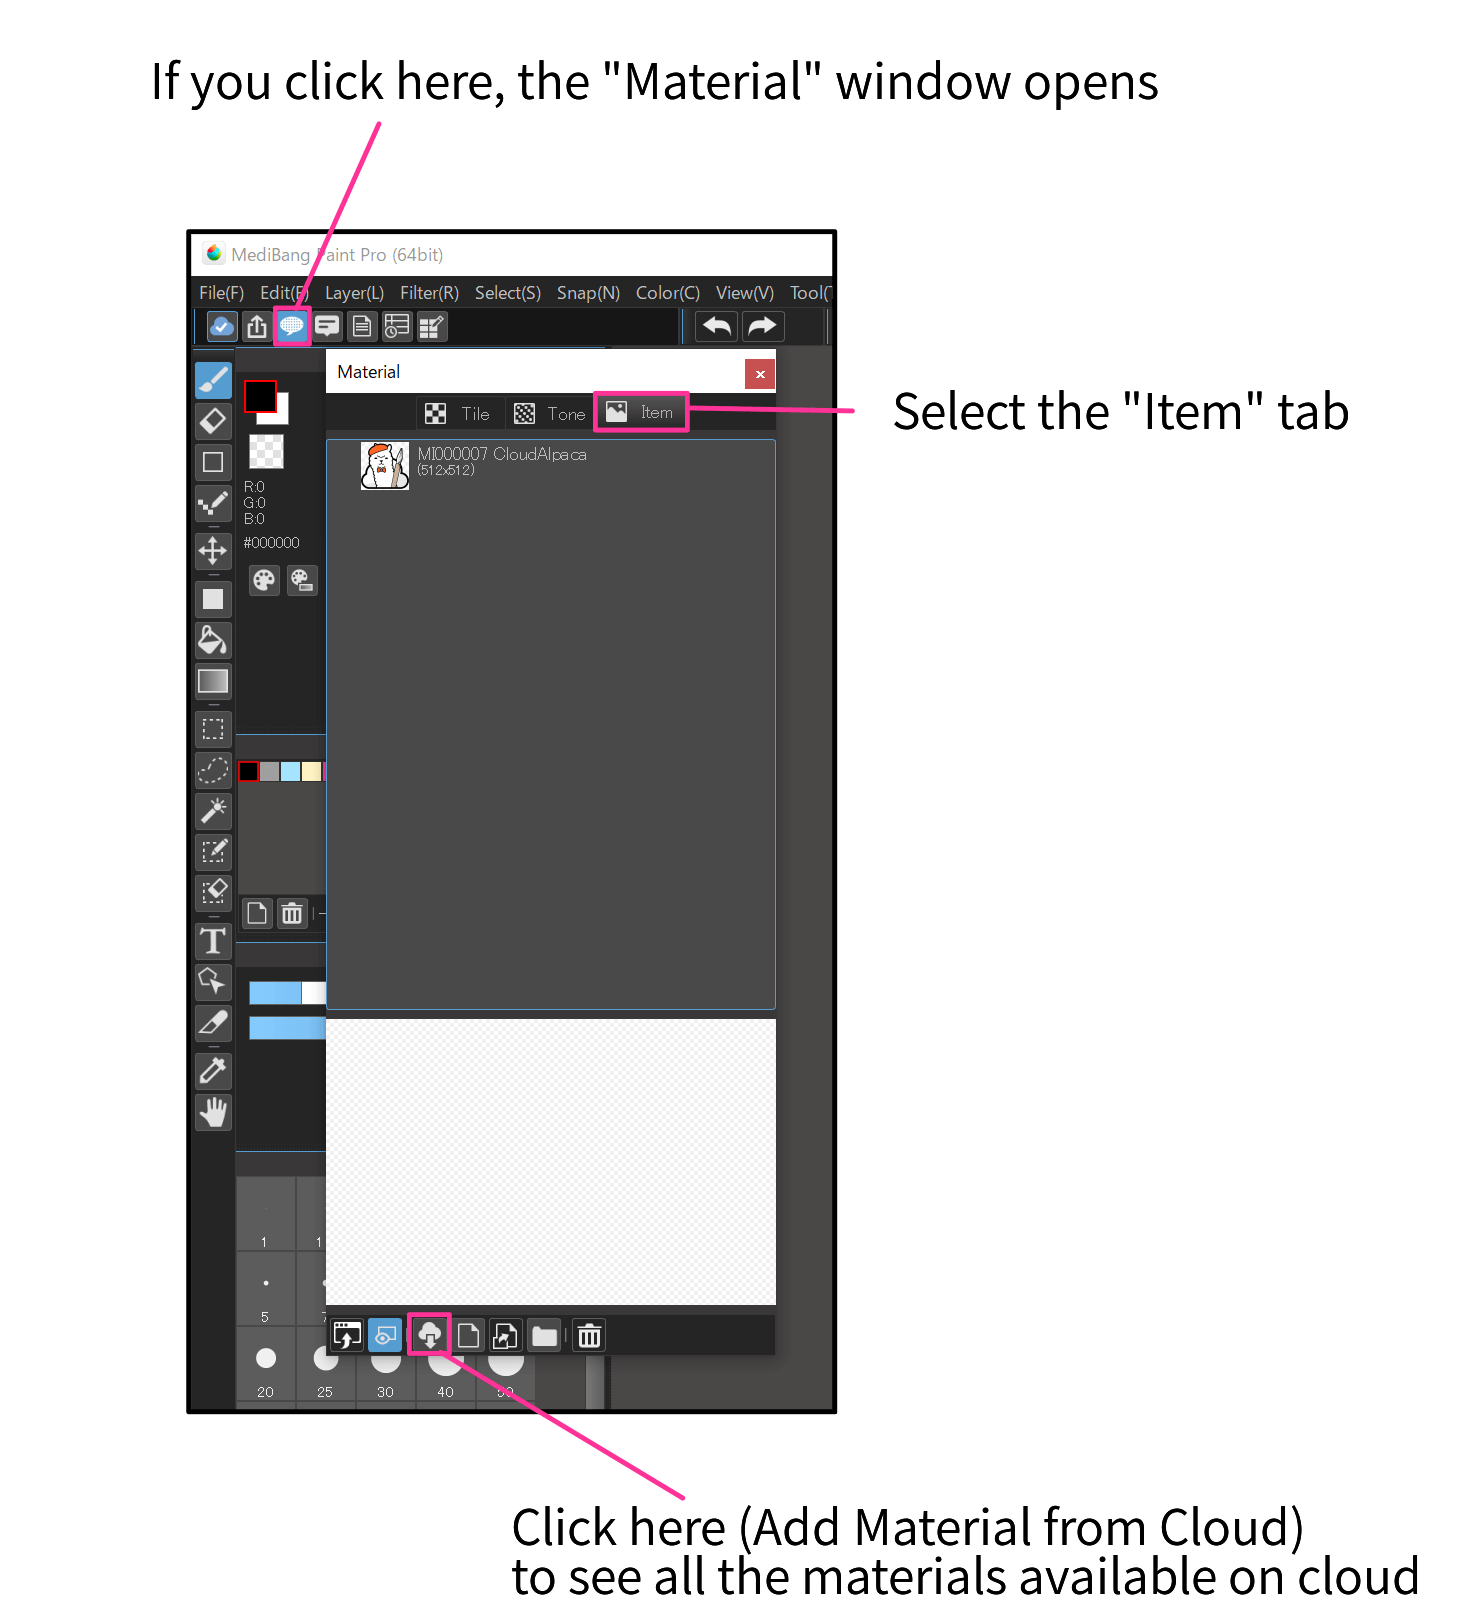
If you are not confident with drawing the bubbles yourself, you can also use the materials on cloud.
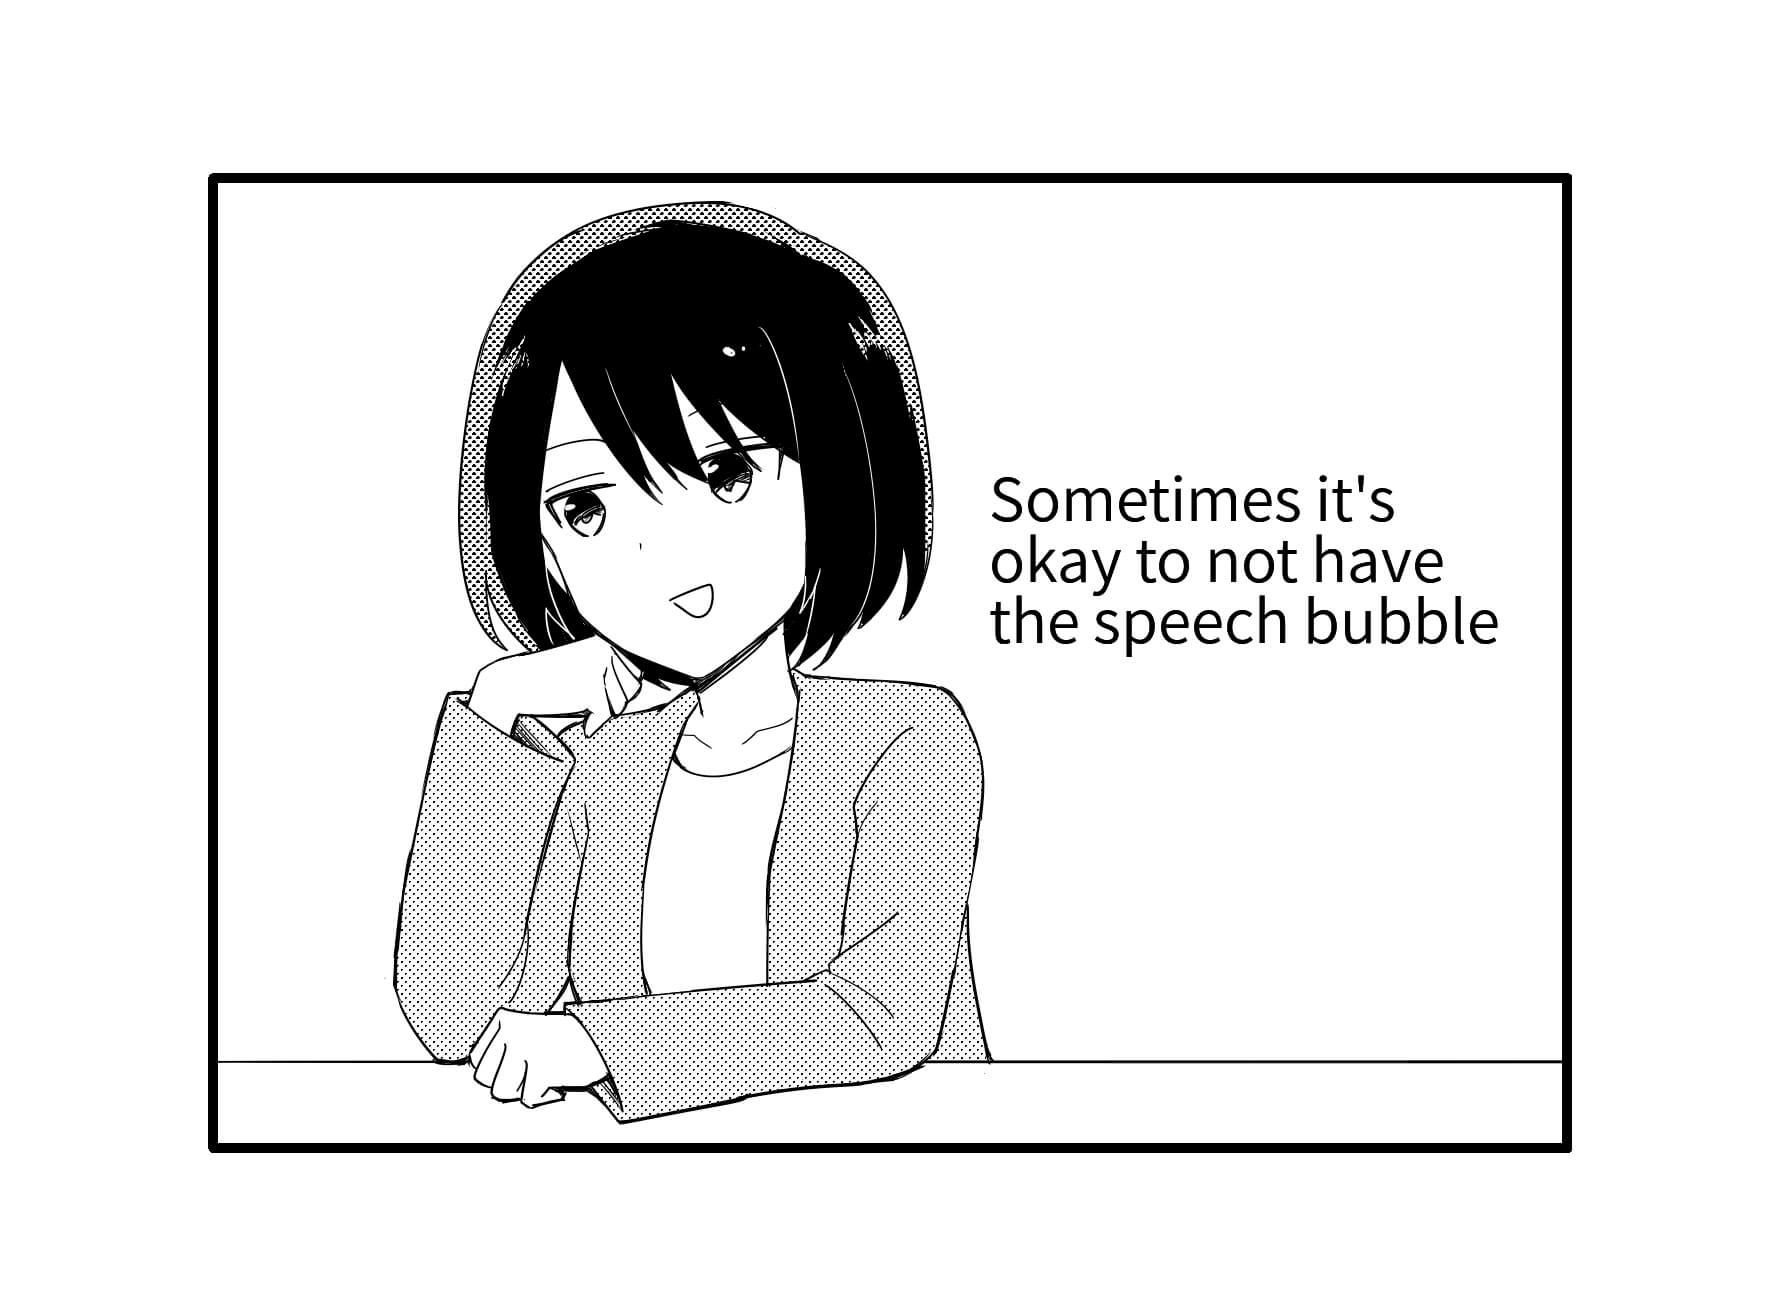
You can also leave out the speech bubble in some panels.
If you want to draw the bubble beyond the panel frame, you can erase a part of the frame, hide the frame line using the “Mask Layer” or cover it with white as I described earlier.
How was the tutorial ? Just adding the frame lines and speech bubbles will make it look much closer to a proper Manga. The next tutorial will be on “Drawing humans, animals and nature”.
「ГФ」 ART street Click here for the collection: https://medibang.com/u/seledkapodshboi/ You can read my manga here → https://medibang.com/book/0c2101280307258390018866367/ This is also a manga that I draw under a different name. → https://medibang.com/comics/official/dobs340000005872400000000000a/ twitter: https://twitter.com/seledkapodshboi
\ We are accepting requests for articles on how to use /
Download now for free
RELATED ARTICLES Related articles recommended for those who read this article
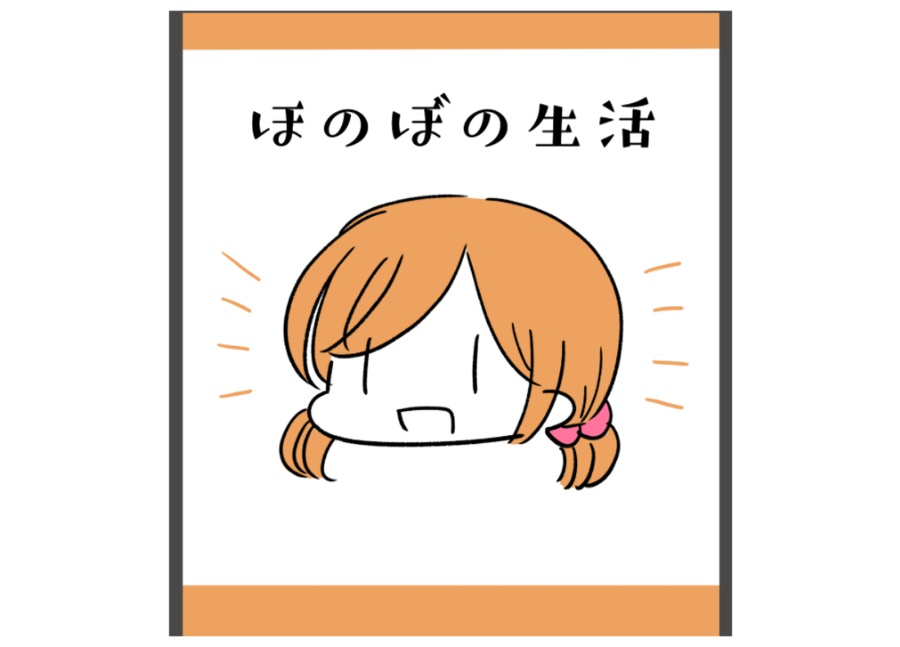
How to place an illustration or text in the middle of the canvas
- #For Beginners
- #Digital Beginner
- #Increase efficiency
Manga Tutorial for Beginners 09 Let’s draw people and natural objects
- #Manga Tutorials for Beginners
- #How to draw a Manga
- #Panel Division
- #Speech Bubble
Let’s get a handle on the “Extensions”!
- #Magic Wand
MediBang Paint Bead Brush Tutorial
- #Improve Quality
- #Cloud Brush
Let’s use “Draw Selected Borders” to draw comic strips!
- #Draw Selection Border
Easily change the color of your line art with 8bit layers
- #Convert Layer
- #Line Drawing
- #8bit Layer
- #Color Illustration
FEATURE Special feature

Your creativity will be more special!
MediBang Paint's new service, Unlimited use of exclusive brushes and materials, full access to MediBang Paint, and many other benefits to help your creativity.
Recommended features

We introduce cloud features available on MediBang Paint.

Group Project
We introduce specific examples of team production using MediBang Paint and mangainem.
MediBang's recommended app

We introiduce "JUMP PAINT", JUMP's official soft and app for manga creators.

MediBang Colors

MediBang Neppuri
Online Speech Bubble Maker
To get started, choose one of the two options below. You can create a speech bubble image with your own photo or choose a random stock photo.
- Speech balloons/text
Let’s create speech balloons! - How to use the balloon tool -
ClipStudioOfficial

Here we will explain how to create “Speech balloons” - a unique form of expression in comics - and well will introduce the balloon tools along with some other useful tips.
[1] Speech balloons in CLIP STUDIO PAINT
Speech balloon consists of a vector outline and an inner fill part (painted white in the figure below). The color and the opacity of the inner fill can be adjusted freely, and you can also hide or tone it. Furthermore, there are other ways to create balloons by freely drawing curves and going about it free hand all-together. In the example shown below, the outline is selected with the [Object] tool.
There are roughly 3 different ways to create speech balloon in CLIP STUDIO PAINT: [■1. Balloon (Creating with a tool)], [■2. Balloon (Material)], and [■3. Flash].
■1. How to make a speech balloon using the balloon tools.
The following will explain how to make a speech balloon using the [Ellipse balloon] sub tool.
① Entering characters (texts)
Enter text using the [Text] tool.
② Creating a balloon
Create the balloon’s body using the [Ellipse balloon] tool. The created balloon will be drawn on a [Balloon] layer.
- The [Ellipse balloon] sub tool is stored under [Balloon] in the [Balloon] tool palette in the initial settings.
③ Creating a balloon tail
Create the “tail” part sticking out of the balloon with the [Balloon tail] tool.
- The [Balloon tail] sub tool is stored under [Balloon] in the [Balloon] tool palette in the initial settings.
The order of creating balloons or text does not matter.
It does not matter, which is created first. A layer for the balloon or the text will be created regardless. By adding text or a balloon on the same layer, both can be managed collectively on the same layer.
④ Adjusting the balloon
After creating the balloon, clicking on it with the [Object] tool will display the handles. You can change the size and aspect ratio by adjusting the individual handles.
The settings can be adjusted in the [Tool Property] and [Sub Tool Detail] palettes before using the [Balloon] tool, or when selecting a balloon with the [Object] tool.
For details on the settings of the balloon tools, please refer to [2] “How to use balloon tools.”
■2. Speech balloons from balloon materials
Apart from using tools, speech balloons can also be created with default balloon materials, which can be selected from the [Material] palette under [Manga material] → [Balloon], and pasted onto the canvas.
The operations after pasting the balloons onto the canvas are the same as for the balloons created with the balloon tool.
■3. Balloon flash
Flash speech balloons consist of vector effect lines and an inner fill (painted white in the figure below). Like balloons, the color and opacity of the inner fill can be set freely, and be hidden or toned.
Flashes are stored under [Balloon] in the [Tool] palette, but they are also very similar to the [Saturated line] tool functionally.
- The [Flash] sub tool is contained in the [Flash] group under the [Balloon] tool in the initial settings.
The first two procedures when creating flashes are identical to normal speech balloons. However, as newly created flashes are drawn on a “saturated line” layer, operations differ from speech balloons created with balloon tools.
① Creating a flash
Use [Flash] from the [Sub Tool] palette to create a flash.
② Entering text
Enter text (characters) using the [Text] tool. Unlike the [Balloon] tool, the [Flash] tool does not combine as a text layer, but is operated separately.
③ Adjusting the flash
After creating the flash, click and select it with the [Object] tool to display the control handles. Change the size or aspect ratio by adjusting the individual handles.
Settings, such as the length of effect lines or the density of lines can be adjusted in the [Tool Property] and [Sub Tool Detail] palettes when using the [Flash] tool before creating the flash, or selecting the created flash with the [Object] tool. These can be used in the same way as the [Saturated line] tool.
[2] How to use balloon tools
The following will introduce how to create speech balloons using the [Balloon] sub tools.
■1. Ellipse balloon
Drag to select the start and end point of the ellipse, and determine the aspect ratio and size of it. Pressing the [Shift] key while dragging the balloon will draw a perfect circle.
This is the [Tool Property] of the [Ellipse balloon] sub tool.
① [Line color] and [Fill color]
Change the color of the line art and the balloon fill. Be aware that when making a new balloon, the colors may be limited to gray or monochrome depending on the canvas settings. Confirm or change this using the [Edit] menu → [Canvas properties] or [Page Management] → [Change basic page settings].
② [How to add]
If a text layer is already selected, selecting [Add to selected layer] will add a balloon to the same layer.
Turn [Layer effect] → [Toning] ON when applying a tone based on the color set by [① Fill color] to the created balloon. Set ⑥ Anti-aliasing to [None] when toning.
Select a balloon shape. Even if the figure changes, it can be created with the same steps.
⑤ [Brush Size]
Adjust the line width with this.
⑥ [Anti-aliasing]
Set whether or not to add anti-aliasing.
⑦ Brush shape
Select the shape of the brush tip.
The following are examples of [Pen], [Dotted line] and [Waved line] brush shapes.
■2. Curve balloon
Create a free shaped balloon by making curves. The method to create it changes with the selected ① [Curve].
Select a method to create a line.
・[Straight line]
Each time a point is clicked, a straight line between points will be drawn. Double click the final point to confirm.
A curve is drawn by clicking different points. Double click the final point (or press the Enter key) to confirm.
・[Quadratic Bezier] and [Cubic Bezier]
Create a balloon using a quadratic bezier or a cubic bezier.
Making ② pointed
If there are any corners on the line, they may become round when scaling up, due to the shape of the brush being used. Choose whether to sharpen these lines at the corners or not.
Items other than ① and ② in the [Tool Property] are the same as those in the [Ellipse balloon] tool.
■3. Balloon Pen
Create a balloon as if you are drawing with the [Pen] tool. This also supports pen pressure, therefore, speech bubbles with uneven strokes can be created.
In the settings, the thickness of the line can be adjusted so that the pen pressure works just like the [Pen] tool.
① Brush size
In the same way as the [Pen] tool, the line width can be changed by adjusting the brush size.
② Control brush size
Click on the icon to adjust the elements that affect the brush size. To apply pen pressure similarly to the [Pen] tool, check the [Pen pressure] and set it to ON. To prevent the pen pressure from being applied, turn all check marks OFF.
③ Post correction
This feature corrects lines to make them smoother.
■4. Settings when creating balloons: Other
In the [Sub Tool Detail] palette of the [Balloon] tool, there are items that are not displayed in the [Tool Property] palette. These special settings are as follows.
① [Line/Fill]
Select whether to display the balloon’s lines and fills. Increasing the transparency of the inside of the balloon, and adding edges when characters and images are superimposed will make it easier to read.
・ Create new layer
・ Add to selected layer
When creating a balloon near an existing balloon or text, select whether to create the balloon on a new layer or on the same one.
③ Combine with the text in the drawing area
Creating a balloon above inputted text will group the elements on the same text layer. Multiple text/balloon layers can also be combined into one layer afterwards.
[3] How to create balloon tails
Here we will show how to create a tail for a speech balloon. From [How to bend], choose a drawing type out of [Straight line], [Polyline] or [Spline].
[How to bend]
Choose between [Straight line], [Polyline] or [Spline].
A [Straight line] Creates a straight tail. Dragging between the start point 1 and the end point 2 creates a straight tail.
B [Polyline] Creates a tail with corners. Click to create corner parts starting from point 1, and keep clicking further to create more points. Confirm by double clicking at the last point.
C [Spline] Creates a curved tail. Start clicking the point 1to start, click in further to add more points, and confirm by double clicking at the last point.
[4] How to use the flash tool
Depending on the registered sub tool settings, the drawn content will change drastically.
To create a flash, set the size by dragging from the start point to the end point in the same way as the [Ellipse balloon].
■1. Creating a flash
Use the sub tool [Sea urchin flash] to create a flash.
■2. Adjusting the flash
We will adjust the created flash. In this example, the situation is that the lines are “too long”, “too thick” and “not blank inside” as compared to what is intended.
Selecting the [Object] tool will display the path of the flash sheech balloon.
■3. Adjusting the line width and density
Adjust the flash with the [Tool Property] palette.
・Make the lines thinner by adjusting the [Brush Size].
・Adjust the line density using [Gap of line (distance)].
This process is executed as thinner lines create wider gaps between lines.
■4. Adjusting the line length
・Shorten the [Length].
■Adjusting the “Rough edges”
Click the [+] mark on the left side of [Make the reference position jags] to access further settings. Lowering the value of [Height] and shortening the rough edges makes it more like a sea urchin flash.
■6. Adjusting the flash size
Using the handle displayed on the path of the flash, adjust the size of the flash so that it matches the text.
[5] Advanced use of Balloon/Flash
■1. Combining multiple balloons (* only speech balloons)
The overlapping parts will combine when multiple balloons are gathered on one layer. Keep the balloons on separate layers to display them separately, and create them on one layer to combine them.
To gather multiple existing balloon layers, select the layers to gather and use [Layer] menu → [Merge with layer below] or [Combine selected layer].
■2. Fitting a balloon in a frame border - advanced use of layer masks
Each balloon and flash created will be managed on its own layer. Drawing tools such as [Pen] and [Eraser] are unavailable on these layers. When erasing a section, use a mask. Furthermore, by rasterizing the layer with the [Layer] menu → [Rasterize], you can directly draw and erase the balloon. However, you will not be able to make any further edits to the contents.
When using balloons and flash tools, it may overlap with frame borders. A [Mask] can be useful in that case.
- For more functional details on layer masks, please refer to “How to master the layer mask 1”.
① Specify the display area
Mask so that the speech bubble does not overlap with the frame border or the characters. Select the area using tools such as the [Auto select] tool.
Using the [Selection Area] menu → [Quick Mask] is beneficial as the area can be selected using the [Fill] tools or other drawing tools, etc.
② Creating a layer mask
After creating the selection area, select [Layer] menu → [Layer Mask] → [Mask Outside Selection] to create a layer mask. To hide the selected area, choose [Mask Selection]. The created mask can be checked via the thumbnail displayed in the [Layer] palette.
Display the mask from the [Layer] menu → [Layer Mask] → [Show Mask Area].
The mask can be toggled ON/OFF with the following operations.
・Color of the masked sections: [Alt] + thumbnail mask click
・Toggling ON/OFF of the mask itself: Click [Shift] + thumbnail mask
③ The completed masked flash
The flash is completed if the created flash is partially masked and hidden. Further adjustments are possible as long as the layer of the flash is not rasterized (by combining images etc.).
・Masking multiple flashes
For balloons created with the [Balloon] tool, multiple balloons can be registered on a single special layer, but for flashes created using the [Flash] tool, one flash occupies one layer.
To use the same mask on multiple flashes, make a folder containing multiple flash layers and apply a mask to the folder.
It is useful to use [Divide frame folder] when creating frame borders, as a mask is created on each frame. By creating a balloon or flash inside the frame border folder, the mask will hide the part sticking out of the frame border.
- In the initial settings, the [Divide frame folder] sub tool is stored under [Cut frame border] of the [Frame border] tool.
This concludes the lesson on how to use the balloon tool. When creating a balloons, please also have a look as “How to use text tools”.
Speech balloons/text #4 by ClipStudioOfficial
Users who liked this post
How To Use Filters
aniamtions keys frames and key caps #1
Kawaii animation andgenialkeys frames #characteranimation
USING FILTER FOR YOUR WEBTOON /COMIC /WEBCOMIC
Things to know when drawing backgrounds using 3D materials #2
How to adjust textured 3D materials after LT conversion
New Official Articles
New features of CLIP STUDIO PAINT #4
Experience stunning color variations with Color Match -Ver.3.0-
New features of CLIP STUDIO PAINT #1
Easily manage variations using layer comps [EX]-Ver.3.0-
New features of CLIP STUDIO PAINT #2
Change the atmosphere of your illustrations using new filters -Ver.3.0-
New features of CLIP STUDIO PAINT #3
You can use POSEMANIACS poses! -Ver.3.0-
- View Articles
- Create Article
- Create Blog
- Answers not accepted
- Solved answers
- Create Question
- Create Tips
- Photoshop CS5
- Adobe After Effects
- Adobe Premiere
- Microsoft 3D Builder
- Techyv Hardware reviews
- TechyV’s Best Pick
- TechyV Software Tips & Tricks
- Windows Tips & Tricks
- Administrators & Moderators
- Site-wide Activity
- Frequently Asked Questions
- Terms and Conditions
- Privacy Policy

How to make speech bubbles for word documents?

I need to make comic-style word document for a school project. How do I create a comic speech bubbles for word documents? I'm on Windows Vista 64 bit and Microsoft Office 2003. Does Microsoft Word 2003 have this option? Thanks.
- Status: Open
- Question Views: 3021
- Answer Count: 2
- Vote Up 0 Vote Down
- Answer Accepted: Yes
- Question Category: MS Word

Hi Brenda Lopez,
its possible to add speech bubbles in ms-word 2003.
1. Open Ms-Word Application
2. Once it opens create a new document.
3. On the standard toolbar, click on insert
4. select picture
5. on the dropdown menu that appears, select autoshapes
6. select the relevant shape to use as a speech bubble
if you want better speech bubbles, use ms-word 2007
Ford Smithkings
- Posted on - 03/03/2013
Hello brenda,
Inserting speech bubbles can be achieved by using default shapes in Microsoft Word. To do this please follow the steps mentioned below:
1. In Microsoft Word, open your document click shapes and illustration tab
2. Find the desired speech bubble from the list of shapes.
3. Click on it to insert.
4. To type inside the bubble just click inside the speech bubble and type your text.
5. You can also resize it by clicking on the bubble.
That will do your job.
- Posted on - 03/11/2013
Login/Register to Answer
Problems with sage businessvision Mac edition
Search arcgis wind rose (drawing wind rose), related questions.

Ways Of Editing A PDF File In Word Without Any Hassle.

How to retrieve overwritten Word files

How To Get Microsoft Word On My Computer In A Few Steps

There is an error after I download document.

Putting password on your Microsoft Office Word Document

Can someone help me with Office 2010 VBA indenter?
Latest articles.

Top Applications Of AI In Military

KjøPe Mobil Uten Abonnement Or With A Contract

Is Dream99 Really Reputable?
Latest blogs.

Top 10 New Laptop Entrants That Shook The Public

10 Facts About The Dark Web

Top 10 Latest Steam Cleaner Machines
Latest tips.

Top 10 Internet Monitoring Software

Top 10 Best Partition Manager Software

Top 10 Best Online Music Production Software
- Terms And Conditions
6 Printable Speech Bubbles for Scrapbooking
Rebecca Ludens is a paper crafts expert and writer with two decades of hands-on scrapbooking and paper crafting experience. She authored "Teach Yourself Visually Scrapbooking," designed products for craft companies such as Artistic Wire and The Paper Loft, and teaches scrapbooking at workshops nationwide.
Speech bubbles might make you think of classic comic books, but they also make a cute addition to scrapbooks and other paper projects. You can use the bubbles for journaling, quotes, or sayings on scrapbook page layouts of any theme.
Instructions for Using Speech Bubble Printables
To save the speech bubble templates to your computer, simply right-click the full-size image and select "save as."
To resize and print, right-click and select "copy." Open a word processing document and right-click on it and select "paste." Then, click anywhere on the image to select it and then click and drag one corner to resize it.
This is a classic speech bubble with clean lines.
Rounded Square
A rounded square pattern like this one works well with more text.
A square "bubble" can hold a large text block and gives a contemporary look to your scrapbook page.
Thought Bubble
Add a contemplative thought bubble to capture the thinking of your photo subject.
This pattern includes a fun arrow, which is a great visual queue for drawing the viewer's eyes to just the right point on the scrapbook page.
This design would be great on a superhero-themed scrapbook page. Can't you imagine it saying "Ka-pow!"?
More from The Spruce Crafts
- Free Thanksgiving Clip Art
- Free Star Clip Art
- Free Fall Leaves Clip Art Images
- Free, Printable Fourth of July Coloring Pages
- How to Make a Scrapbook Page
- Free, Printable Earth Day Coloring Pages
- Make Custom Craft Projects with Our Free Printable Uppercase Letters Template
- Free Birthday Clip Art
- 5 Places to Find Free Stencils
- Flower Pattern Templates for Scrapbooking
- 10 Places to Find Free Printable Father's Day Coloring Pages for Kids
- Free Valentine Clip Art Images for Valentine's Day
- How to Make Flat Paper Flowers
- How to Create Printable Block Letters in Microsoft Word
- Free, Printable Coloring Pages for Adults
- 9 Best Places for Free Easter Egg Coloring Pages

Create a free profile to get unlimited access to exclusive videos, sweepstakes, and more!
Katie Maloney Finally Reveals Exactly Why She Fell Out with Brittany: "So Many Lies"
Vanderpump Rules ' Katie Maloney explained that the drama has to do with Stassi Schroeder's wedding.

Katie Maloney and Jax Taylor 's heated conversation about rumors that he cheated on Brittany Cartwright during Vanderpump Rules Season 11, Episode 13 brought to light another point of contention — but not one for Katie and Jax.
How to Watch
Watch Vanderpump Rules on Bravo Tuesdays at 8/7c and next day on Peacock . Catch up on the Bravo app .
Instead, Jax confronted Katie on behalf of his then-wife: Apparently, the two aren't friends anymore. Katie and Jax further expanded on the tension between Katie and Brittany during a new episode of the Vanderpump Rules After Show.
What happened between Katie Maloney and Brittany Cartwright?
Jax alleged on the April 23 episode of the Vanderpump Rules After Show that Katie "abandoned" Brittany after they didn't go to Stassi Schroeder and Beau Clark 's 2020 wedding in Italy.
"For [Katie] not to respond to her texts or messages, it hurt [Brittany]. She was a big part of her life," Jax said, insisting that Katie "had no part of that situation."
"So you're mad just to be mad, or just because you're up Stassi's ass," Jax continued. "[It's] one of the two. That's the only two reasons I can think of."
Katie, meanwhile, defended her decision to stop talking to Brittany.
"We were all planning to go to Italy. We were making plans and arrangements and all that, and I remember Stassi and I were talking to Brittany for the longest time about all that, and she was very sort of avoiding the questions and didn't really want to get involved in the planning of it all, but she would still. She'd get excited and talk about it," she explained on the Vanderpump Rules After Show . "But then right up until like the days before, she became very avoidant of it all. So then the morning that we're all supposed to go to Italy, Brittany sends a message saying, 'Oh my god, we're not going to be able to make it, we didn't get the passport in time, yada yada yada. Just excuse, excuse, excuse."
For Katie, this was dishonest.
"I just feel like there were so many lies, and I don't like lies," Katie added. "I just, I f-cking hate lies, man. Like, nothing more than that. So I'm just like, you know, I need a break ... and also Jax has just been such a f-cking asshole to me for no reason."
More from Bravo:
Yes, Brittany Cartwright Is Still Close with Vanderpump Rules Cast — Some of Them, Anyway
Here's How Ariana Madix Has Been "Checking In On" Brittany Cartwright After Jax Taylor Split
Why Tom Schwartz Thinks Brittany Cartwright & Jax Taylor’s Split Was “Necessary”
Katie and Jax's drama, explained
Elaborating on her comment about Jax being an "asshole" to her on the Vanderpump Rules After Show , Katie recalled a time when her then-husband Tom Schwartz "accidentally posted" Cruz's name before Jax and Brittany had announced it.
"[Jax] didn't talk to him for months, and then he decided not to talk to me. I got roped into it somehow while I was throwing Brittany's baby shower, " Katie explained. "I had literally nothing to do with it, he just is such a f-cking asshole. I was just ready for a break."
Why did Jax and Brittany skip Stassi and Beau's wedding?
Jax shared on the Vanderpump Rules After Show that he and Brittany weren't "trying to cancel" their trip to Italy for Stassi's wedding.
As he recalled, "I wasn't gonna go because my son didn't have a passport. We thought we were gonna get the expedited passport for Cruz, it didn't come in time. So, I said, 'You know what, somebody from our family needs to be at this wedding, so Brittany, why don't you call your mom, you guys go, and I'll stay back.' Then when Brittany's mom's best friend's husband died, it was just like, you know what? It's not in the cards for us to go."
Still, Jax insisted he gave Stassi and Beau "lots of money." More specifically, "I gave them $1,000," he noted. "We said, 'I'm sorry.'"
Brittany Cartwright Wants to Be “Clear” About Jax Taylor’s Publicist After Viral Photo
Katie, however, accused Jax of "very openly talking about how they [weren't] going to the wedding; they had a golf tournament they [were] doing instead."
"It was just very kind of rude the way he was just speaking so freely to other people, not thinking it would get back to either of them," she added.
Jax, for his part, noted, "Did I handle it wrong? Absolutely. I handled it completely wrong. And I apologize. I made a mistake. Is it a reason to squash and ruin a whole friendship over? I don't think so. I don't know what else I can do."

Katie and Brittany have conflicting views on their fallout
Katie clarified that she didn't want her break from Brittany "to be permanent," but her mind was ultimately made up after "Brittany texted me once [and] asked me how the move was going," but "never checked in on me, never once asked me anything" during her divorce from Schwartz .
"So I was like, you know, I'm good on you," Katie added.
Katie Maloney Says Her & Ariana Madix's Sandwich Shop Will Open "Very, Very Soon"
Lala Kent , who appeared alongside Brittany on the Vanderpump Rules After Show , sees things differently, though.
"She says Brittany hasn't reached out and I'm like, she did reach out while you were moving and asked if you need help," Lala noted. "She'll say, 'Need help with what?' And I'm like, well, then you can't say she didn't reach out, 'cause she did. Like, you don't get to decide how and when and what people say when they reach out. So it's sometimes hard to gauge with Katie because you're like, how do I approach this? Should I reach out? And if I reach out, is the timing OK? Is what I said OK? it becomes very intimidating."
"Very intimidating," Brittany said in agreement. "She was the matron of honor in my wedding. Like, I love her so much. I still have a lot of love for her. But it's just crazy how we just don't talk anymore ."
Hear more about the drama in the above Vanderpump Rules After Show clip.
- Brittany Cartwright
- Katie Maloney
Vanderpump Rules
- Relationships
Related Stories

Lindsay Shares If She's "Relieved" Her Engagement Ended

Daniel Breaks Down the "Good and Bad" of Relationship with Ariana
Here's when lindsay and carl's apartment lease is up.

Are Jax and Brittany "Getting Along Better"? Janet Explains

Carl's Stepdad Has Zero Regrets About *That* Conversation

LVP Reacts to Tom Schwartz's New Girlfriend, Sophia

Carl Spoke to Lindsay's Ex Everett About Their Relationship

Lindsay Reveals She Ran into Carl at a Wedding: Details

Kim Zolciak Addresses *That* Instagram Post About Kroy

Where Is Every Former Summer House Cast Member Now?

Who Is Denise Richards' Husband Aaron Phypers?

Ciara Has Questions About Status with West After "Girlfriend" Comment

Latest Videos

How Is Long Distance Affecting Ariana Madix's New Relationship?

Tom Sandoval Says This One Person "Is One of the Coolest MotherF—ers On the Planet"

The Real Reason James Kennedy Doesn't Want to Go to a Wedding with Ally Lewber
Recommended for you.

We Have a Major Update on Tom, Katie, and Katie
Kyle Says She Will Spend Christmas with Mauricio

Kim Richards Just Shocked Kyle with a New Update

IMAGES
VIDEO
COMMENTS
To get the following speech bubble, drag the yellow handle on the right upwards and to the right. Do the same with the yellow handle on the left. The curve looks fine as it leaves the bottom point, but it soon goes awry further up. We can fix that by selecting the point (click on it) and then by dragging the leftmost yellow handle to the right.
Step by Step Tutorial: Creating Text Bubbles in Microsoft Word. Before we start, make sure you've got Microsoft Word open and a document ready to go. The steps we'll go through will help you add some personality to your text with customizable bubbles. Step 1: Open the Insert Tab. Click on the Insert tab at the top of the screen.
Step 8. Add text to the bubble by clicking the "Draw Text Box" button on the Drawing Tools tab's ribbon. Click and drag the mouse inside the word bubble to create a text area, and then release the button when the desired field appears in the document. Start typing to insert text in the word bubble. You can also format the fill and border of the ...
https://www.youtube.com/channel/UCmV5uZQcAXUW7s4j7rM0POg?sub_confirmation=1How to create callout or speech balloon in word: How to Insert Word Bubbles in Word
How to Insert Speech Bubble in MS Word | How to Draw Speech Bubble in MS Word | Speech Bubblethis video tutorial will show you the method of inserting a draw...
In this video, you will learn How to make a speech bubble in Microsoft Word?
5. Press the "Shift" key on your computer keyboard, and then click and drag the cursor to the right or left depending on the direction you want the bubble tail to point until the bubble is the ...
How to create speech bubble in Word, Excel, and PowerPoint files. The previous methods describe how to add a text bubble to a photo. However, you may need to add it to a text document, spreadsheet, or presentation to make a note, pay attention to a specific statement or give an example. Another reason you might want to know how to add a text ...
Launch Microsoft Word. Click "File" and then "Open" to open the document in which you want to add the word-bubble shape. Click "New" to create a new Word document. Click "Shapes" in the "Illustrations" group on the "Insert" tab. Locate your preferred word-bubble illustration from the thumbnails in the "Callouts" section of the "Shapes" context ...
To duplicate speech bubbles follow these steps. Click on the speech bubble and select it. Use the copy option in the Home tab or use keyboard shortcuts to copy. Ctrl + C on Windows and Command + C on Mac. Now click where you would like the second bubble. Use the paste option in the home tab or use keyboard shortcuts.
Open Word on your Computer. Select the Insert tab. Click on "forms". Under the sub-item "legends" you find bubbles has several speech variants. Select a speech bubble and you click on your document. The speech bubble is thus created. Under "type" you can fill color, and border color of the speech bubble change. Word: speech bubble create.
The style is called Jumble and it's available in Word on Windows and Mac. Select the text you want to turn into bubble letters and head to the Home tab. Tip: Bubble letter words often look better in all uppercase, but you can include lowercase if you prefer. Open the Font drop-down box which displays your current font style.
After inserting the shape, while it's still selected, click the Edit Shape button on the Shape Format ribbon and click Edit Points in the menu. A square dot appears on the shape where the position and curvature can be changed. By right-clicking a point or a place on the shape's border, you can also add or delete points, change straight lines to ...
Remember the bubbles when you are going to give your next speech! 1. Brainstorm and Ideas. A light bulb inside your brain: the perfect metaphor for brilliant ideas! This is exactly what this free Brainstorm and Ideas template for Google Slides and PowerPoint illustrates.
In this video we will learn that how to make a speech bubble in Microsoft Word ?How do you insert a speech bubble in Microsoft word? Microsoft | MS Word Tuto...
2. Speech Bubbles. There are various styles of speech bubbles as shown below. Before drawing the bubbles, create a layer for speech bubbles. Select "Add / 1 Bit" from the Layer tab and change the name to "Speech Bubbles" etc. After creating the layer, begin drawing the speech bubbles. Let's start off with the standard oval bubble ...
Phrase.It is a simple and free speech bubble photo generator. Add speech bubbles to photos and create your own comic strips online within seconds. Great looking results guaranteed, completely free, no sign-up required. To get started, choose one of the two options below. You can create a speech bubble image with your own photo or choose a ...
Mask so that the speech bubble does not overlap with the frame border or the characters. Select the area using tools such as the [Auto select] tool. Using the [Selection Area] menu → [Quick Mask] is beneficial as the area can be selected using the [Fill] tools or other drawing tools, etc.
To do this please follow the steps mentioned below: 1. In Microsoft Word, open your document click shapes and illustration tab. 2. Find the desired speech bubble from the list of shapes. 3. Click on it to insert. 4. To type inside the bubble just click inside the speech bubble and type your text.
Instructions for Using Speech Bubble Printables. To save the speech bubble templates to your computer, simply right-click the full-size image and select "save as." To resize and print, right-click and select "copy." Open a word processing document and right-click on it and select "paste." Then, click anywhere on the image to select it and then ...
Subscribe Now:http://www.youtube.com/subscription_center?add_user=ehowtechWatch More:http://www.youtube.com/ehowtechCreating text bubbles in Microsoft Word i...
Customize your speech bubble's colors to accent your photos. Harmonize your design by customizing the colors of your speech bubble. Select the bubble and click on the colored circles to choose new colors from the color palette, or get the exact right hue from the color wheel. For example, if your friends are perched among autumn foliage ...
She was a big part of her life," Jax said, insisting that Katie "had no part of that situation." "So you're mad just to be mad, or just because you're up Stassi's ass," Jax continued. " [It's] one ...
But in a March speech in Alabama, Harris called for "an immediate ceasefire," waited for applause, and only then added, "for at least the next six weeks" to get the Israeli hostages out of ...
Was this video helpful? Support the channel, here: 🚨 https://www.patreon.com/BrinkleyComicsAffiliate Links:🎨 Get Clip Studio Paint🎨https://www.kqzyfj.com/...
Now Meghan is hoping that a British PR who once worked for Haribo can make her personal brand taste just as sweet. As The Telegraph reported earlier this week, Meghan and Harry's company ...