Setting All PowerPoint Slides to Switch After 10 Seconds: A Step-by-Step Guide
Setting all PowerPoint slides to switch after 10 seconds is a breeze. All you need to do is access the “Transitions” tab, set the timing on one slide, and then apply it to all slides. Let’s jump into the specifics so you can get your presentation flowing seamlessly!
After you complete the action of setting your PowerPoint slides to switch after 10 seconds, each slide will automatically advance after the specified time interval, creating a consistent, hands-free presentation that allows your audience to absorb the content without manual intervention.

Introduction
PowerPoint presentations are a staple in both academic and professional settings. Whether you’re presenting a school project or pitching an idea to your colleagues, the flow of your PowerPoint can make or break the impact of your presentation. That’s where slide timing comes in. Imagine you’re in the zone, presenting your heart out, and then—oops—you have to fumble with the clicker or keyboard to get to the next slide. It disrupts your flow and your audience’s focus. To avoid this, setting your PowerPoint slides to switch automatically after a certain time can be incredibly useful.
Being able to set your slides to automatically advance after 10 seconds is particularly relevant to those who have time restrictions or want a consistent pace throughout their presentation. It’s also helpful for kiosk displays or photo slideshows where manual advancing isn’t feasible. Knowing how to set your slides to switch automatically is a skill that saves time, adds professionalism to your presentation, and ensures that your audience stays engaged with a steady stream of information.
Step by Step Tutorial: Setting All PowerPoint Slides to Switch After 10 Seconds
In this tutorial, we’ll go through the steps to set your PowerPoint slides to switch every 10 seconds.
Step 1: Open your PowerPoint presentation.
Open the PowerPoint presentation you wish to set the timing for.
This is straightforward—just fire up PowerPoint and open the presentation you’re working on.
Step 2: Select the “Transitions” tab.
Click on the “Transitions” tab in the PowerPoint ribbon.
This tab contains everything you need to manage the transitions between slides, including timing.
Step 3: Set the timing.
Under the “Timing” group on the right, type “10” in the “After” box.
This tells PowerPoint to automatically advance the slide 10 seconds after the previous slide has appeared.
Step 4: Apply to all slides.
Click on “Apply To All” to set all slides to switch after 10 seconds.
By doing this, you don’t have to repeat the timing process for each individual slide—it’s a great time-saver!
Additional Information
When you’re setting your PowerPoint slides to switch after 10 seconds, it’s essential to keep your content concise. Since you only have a brief window to convey the information on each slide, prioritize clarity and brevity. Use bullet points, short phrases, and impactful images to get your message across quickly. It’s also a good idea to rehearse your presentation with the timing to ensure that you’re comfortable with the pace. Remember, while the automatic transition is convenient, it should enhance—not hinder—your presentation.
Another helpful tip is to consider your audience when deciding if setting your slides to switch after 10 seconds is appropriate. For instance, if your audience is comprised of individuals who may need more time to read or comprehend the content, a longer interval might be necessary. On the flip side, if you’re displaying simple visuals or quick facts, a shorter interval could keep the audience’s attention.
Lastly, always have a backup plan. Technology can be unpredictable, so be prepared to advance your slides manually if needed. Familiarize yourself with the keyboard shortcuts for PowerPoint, like the arrow keys for advancing slides, so you can smoothly transition if the automatic timing fails.
- Open your PowerPoint presentation.
- Select the “Transitions” tab.
- Set the timing to 10 seconds.
- Apply to all slides.
Frequently Asked Questions
What happens if i need to pause on a slide longer than 10 seconds.
You can manually override the timing by clicking on the slide to keep it in view for as long as you need.
Can I set different timing intervals for different slides?
Yes, simply adjust the timing for individual slides in the “Transitions” tab for custom intervals.
Will the slides still switch automatically if I click to advance them?
Yes, manual clicks to advance will not affect the automatic timing settings.
Can I apply this setting to only a portion of my presentation?
Absolutely! Just select the slides you want to apply the timing to, instead of clicking “Apply To All.”
What if I need to adjust the timing after I’ve already set it?
No problem—just go back to the “Transitions” tab and adjust the timing as needed, then reapply to all slides if necessary.
Setting all PowerPoint slides to switch after 10 seconds is a fantastic way to maintain a smooth and consistent presentation. It adds a level of professionalism and efficiency that can significantly enhance the delivery of your content. Plus, it allows you to focus on engaging with your audience instead of worrying about slide transitions.
As with any presentation tool, it’s important to use automatic slide transitions judiciously and ensure they complement your presentation style and objectives. With a bit of practice and preparation, this feature can be a powerful addition to your PowerPoint skillset. Remember, the key to a successful presentation is not just the content you deliver, but also how you deliver it.

Matthew Burleigh has been writing tech tutorials since 2008. His writing has appeared on dozens of different websites and been read over 50 million times.
After receiving his Bachelor’s and Master’s degrees in Computer Science he spent several years working in IT management for small businesses. However, he now works full time writing content online and creating websites.
His main writing topics include iPhones, Microsoft Office, Google Apps, Android, and Photoshop, but he has also written about many other tech topics as well.
Read his full bio here.
Share this:
Join our free newsletter.
Featured guides and deals
You may opt out at any time. Read our Privacy Policy
Related posts:
- How to Set Time for Slides in Powerpoint
- How to Loop a Slideshow on Powerpoint 2013
- How to Save Powerpoint as PDF with Notes
- Can I Convert My Powerpoint to Google Slides?
- How to Add Page Numbers in Powerpoint 2010
- How to Unhide a Slide in Powerpoint 2013
- How to Make a Powerpoint Slide Vertical in Powerpoint 2013
- How to Delete a Slide in Powerpoint 2010
- How to Rotate a Slide in PowerPoint: A Step-by-Step Guide
- How to Hide a Slide in Powerpoint 2010
- How to Change the Font on All Slides in Google Slides
- How to End Powerpoint on Last Slide in Powerpoint 2010
- How to Delete Multiple Slides in Google Slides
- How to Insert Slides from Another Presentation in Powerpoint 2010
- How to Change Line Spacing in Powerpoint for Every Slide at Once
- How to: Effortlessly Create PowerPoint Looping Presentations
- How to Change Hyperlink Color in Powerpoint 2010 (An Easy 5 Step Guide)
- How to Duplicate a Slide in Powerpoint 2010
- What Are Benefits of PowerPoint? A Comprehensive Guide
- How to Insert a Google Slides Page Number
Home Blog PowerPoint Tutorials How To Set Time Duration To Switch Slides in PowerPoint
How To Set Time Duration To Switch Slides in PowerPoint
Usually, presenters use mouse clicks, keys from a keyboard or a remote to switch slides in PowerPoint . However, if you have your presentation well-timed or have to account for every second in a presentation due to time constraints, you might want to make sure that your slides are well-timed. To do this, you can add a time duration to switch your slides. In this tutorial we will show you how to set time duration to switch slides in PowerPoint. For the purpose of this post, we will be using the Financial PowerPoint Template .
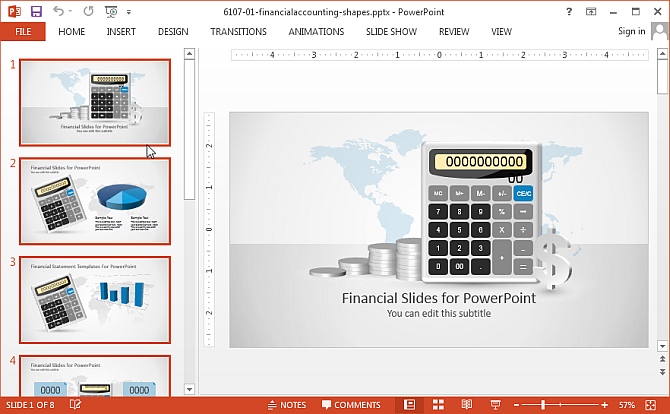
Select Your Slides from Slides Pane
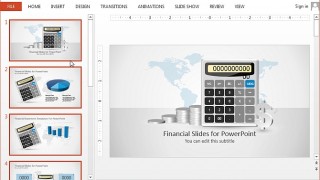
In the first step, click the slide preview for the slide you wish to set time for. In case you want all your slides to switch according to a set time limit (e.g. 10 seconds), select one slide and hit CTRL+A to select all slides.
In case you want to set a different time for each slide, you will have to select each slide one by one and follow the steps shown below.
Select a Time Duration for Your Slides from the Transitions Tab
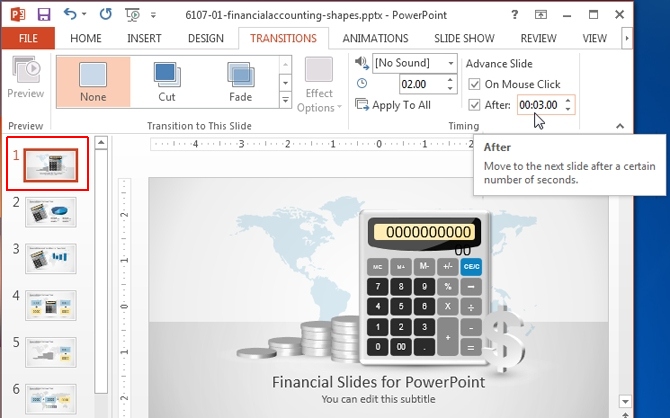
From the Transitions tab, go to ‘After’ and add a time duration after which you wish to switch your slide(s). Also make sure that ‘ On Mouse Click’ is unchecked.
The process for switching slides is similar in various versions across PowerPoint and while we are demonstrating this method using PowerPoint 2013, you will find similar options in older versions (e.g. PowerPoint 2010).
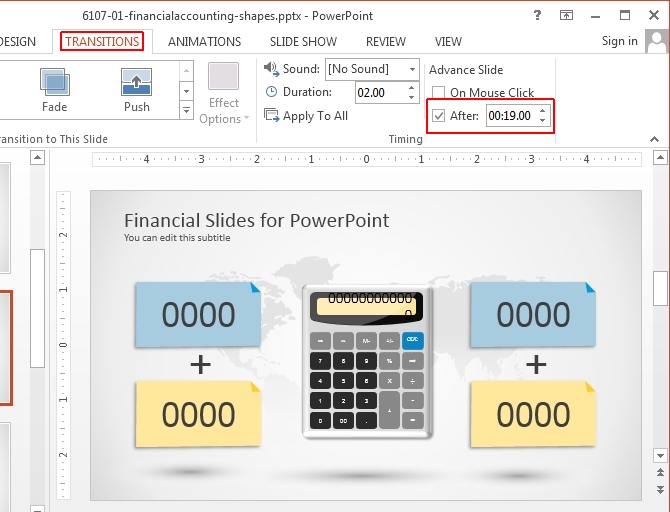
For a Single slide: For a single slide, select the respective slide from the Preview pane and add a time duration for switching the slide.
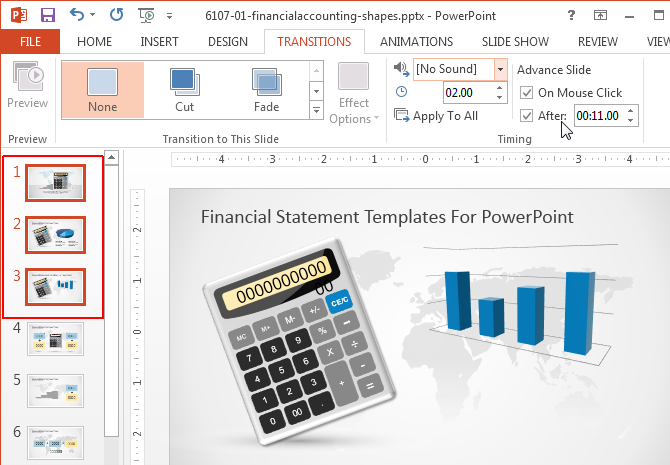
For Multiple Slides: To apply the same time duration to multiple slides, select the slides from the Preview pane using CTRL+Mouse Click, go to the Transitions tab and set a time to switch them. As mentioned earlier, you can also select all slides by clicking a single slide preview, followed by CTRL+A.
In case you have applied slide transitions, you can also set the length of the transitions using the ‘Duration’ option from the same section.
Once you have followed the aforementioned steps, switch to Slide Show mode and your slides will switch according to the set time duration.

While having well-timed slides might help in good time management, you nevertheless need good presentation slides to make an impression on your audience. Slide Model provides High-Quality PowerPoint Templates with editable slide elements which have been designed by expert professionals to give you the imagery that can be attention grabbing and visually appealing. For more details, see our plans and pricing.
Like this article? Please share
PowerPoint 2013, PowerPoint Tips, Presentation, Presentation Tips, Time, Time Management, View Presentation Filed under PowerPoint Tutorials
Related Articles

Filed under PowerPoint Tutorials • March 26th, 2024
How to Translate in PowerPoint
Unlock the experience of PowerPoint translation! Learn methods, tools, and expert tips for smooth Spanish conversions. Make your presentations global.

Filed under Google Slides Tutorials • March 22nd, 2024
How to Share a Google Slides Presentation
Optimize your presentation delivery as we explore how to share a Google Slides presentation. A must-read for traveling presenters.
Filed under PowerPoint Tutorials • March 19th, 2024
How to Change Line Spacing in PowerPoint
Adjust text formatting by learning how to change line spacing in PowerPoint. Instructions for paragraph indenting included.
Leave a Reply


How to Set up Timings in PowerPoint

If you want to create a professional PowerPoint presentation, setting up timings is a crucial aspect to consider. By synchronizing slides, transitions, audio, and video elements, your presentation can flow seamlessly and effectively convey your message to your audience. In this article, we’ll take a comprehensive look at everything you need to know about setting up timings in PowerPoint.
Table of Contents
Introduction to Timings in PowerPoint
In simple terms, timings in PowerPoint refer to the duration of time each slide remains visible on the screen. By setting slide timings, you can control how long viewers will see each slide before transitioning to the next one. Additionally, timings can be set for slide transitions, audio and video elements, and animations, which can further enhance your presentation and create a more engaging experience for your audience.
It is important to note that timings can also be adjusted during a presentation. This means that if you need to spend more time on a particular slide, you can easily extend the duration of that slide without disrupting the flow of your presentation. Similarly, if you need to shorten the duration of a slide, you can do so without having to manually skip ahead to the next slide. By mastering the use of timings in PowerPoint, you can create a seamless and professional presentation that effectively communicates your message to your audience.
Understanding the Importance of Timings in PowerPoint Presentations
Setting up timings in your PowerPoint presentation is critical as it has a significant impact on the effectiveness of your message. By controlling the amount of time viewers see each slide, you can ensure that your message is conveyed clearly and effectively without losing your audience’s attention. Moreover, timing your presentation appropriately allows you to communicate your ideas in an organized and logical manner, making it easier for your viewers to follow your message from start to finish.
Another important aspect of timing in PowerPoint presentations is the ability to pace yourself and stay on track. By setting up timings for each slide, you can ensure that you are not spending too much time on one particular point, and that you are able to cover all the necessary information within the allotted time frame. This can be especially important when presenting to a large audience or in a time-sensitive situation. Additionally, timing your presentation can help you to rehearse and refine your message, ensuring that you are delivering the most impactful and effective presentation possible.
Types of Timings Available in PowerPoint
There are several types of timings that you can set up in PowerPoint, depending on the type of content you have on your slides. Some of the most common timings include slide timings, transition timings, and audio and video timings.
Slide timings are used to control the amount of time a slide is displayed on the screen before moving on to the next slide. This is useful when you want to give your audience enough time to read and understand the content on a slide before moving on to the next one.
Transition timings, on the other hand, control the speed and style of the transition between slides. You can choose from a variety of transition effects, such as fade, dissolve, and slide, and set the duration of each effect to create a more engaging and dynamic presentation.
Setting Up Slide Timings in PowerPoint
To set up slide timings in PowerPoint, navigate to the “Transitions” tab and click on “Timing.” This will bring up a menu where you can adjust the duration of time each slide remains on the screen. You can also set up automatic timings for each slide and adjust the duration of any animations (if included).
It is important to note that setting up slide timings can greatly enhance the flow and professionalism of your presentation. By ensuring that each slide is displayed for an appropriate amount of time, you can keep your audience engaged and prevent them from becoming bored or distracted. Additionally, automatic timings can be especially useful if you are presenting to a large group and need to keep the presentation on schedule.
Setting Up Slide Transitions in PowerPoint
In addition to slide timings, you can also set up slide transitions, which refer to the movement between each slide. To set up slide transitions, navigate to the “Transitions” tab and choose one from the available options. You can choose to have a transition for all slides or select specific slides for each transition. In addition, you can adjust the timing of each transition.
It is important to note that while slide transitions can add visual interest to your presentation, they should be used sparingly and appropriately. Too many transitions or overly flashy transitions can be distracting and take away from the content of your presentation. When choosing a transition, consider the tone and purpose of your presentation and choose a transition that complements it.
Adding Audio and Video Timings in PowerPoint
If you have audio or video elements in your presentation, you can also set up timings for them. To set up timings for audio or video elements, navigate to the “Playback” tab and select “Play Across Slides.” This will allow you to have the audio or video play synchronously across all slides, and you can adjust the duration accordingly.
It is important to note that when adding audio or video timings, you should also consider the file size of the media. Large media files can slow down your presentation and cause it to lag or freeze. To avoid this, you can compress the media files before adding them to your presentation. This can be done by selecting the media file, navigating to the “Format” tab, and selecting “Compress Media.”
Another useful feature when adding audio or video elements to your presentation is the ability to trim the media. This allows you to remove any unwanted sections of the media file, and only include the relevant parts in your presentation. To trim a media file, select the media file, navigate to the “Playback” tab, and select “Trim Audio” or “Trim Video.” From there, you can adjust the start and end points of the media file to include only the desired section.
Tips and Tricks for Setting Up Timings in PowerPoint
Here are some tips and tricks to keep in mind when setting up timings in PowerPoint:
- Practice your presentation several times to get a feel for the timing
- Don’t overcrowd your slides and keep your text minimal
- Use visual aids and graphics to enhance your message
- Make sure your timings are appropriate and not too short or too long
Another important tip to keep in mind when setting up timings in PowerPoint is to consider your audience. If you are presenting to a group of experts in your field, you may be able to move through your slides more quickly. However, if you are presenting to a group of beginners, you may need to slow down and provide more detailed explanations. It’s important to keep your audience in mind when setting up your timings to ensure that they are engaged and able to follow along with your presentation.
How to Edit and Adjust Timings in PowerPoint
If you need to edit or adjust timings in your presentation, you can do so by going back to the “Transitions” tab and selecting “Timing.” From here, you can make adjustments to the duration of slide timings, transition timings, and audio and video timings.
It is important to note that when adjusting timings, you should consider the pace of your presentation and the amount of information on each slide. If you have a lot of content on a slide, you may want to increase the duration of the slide timing to give your audience enough time to read and absorb the information.
Additionally, if you have audio or video in your presentation, you may want to adjust the timings to ensure that they are synchronized with your slides. This can help to create a more seamless and professional presentation.
How to Rehearse Your Presentation with Timings
To rehearse your presentation with timings, click on the “Rehearse Timings” button under the “Slideshow” tab. This will allow you to practice your presentation while recording the timing between each slide. You can then review the timing information and make any necessary adjustments before the final presentation.
It is important to rehearse your presentation with timings to ensure that you stay within the allotted time frame and keep your audience engaged. By practicing with timings, you can also identify any areas where you may need to adjust your pace or add additional content. Additionally, rehearsing with timings can help you feel more confident and prepared for the actual presentation.
Troubleshooting Common Issues with Timings in PowerPoint
Some common issues that you may face when setting up timings in PowerPoint include slides displaying too quickly or too slowly, transitions not working correctly, and audio or video elements not playing correctly. If you encounter any of these issues, double-check your settings and make adjustments as necessary. You can also reach out to Microsoft support for further assistance if needed.
Another common issue that may arise when working with timings in PowerPoint is the timing of animations. If you have animations set up on your slides, they may not play at the correct time or may not play at all. To troubleshoot this issue, make sure that the animations are set to start after the previous animation has finished and that they are set to play automatically. You can also try adjusting the duration of the animations to ensure that they fit within the timing of the slide.
Best Practices for Using Timings in Your PowerPoint Presentations
When using timings in your PowerPoint presentation, here are some best practices to follow:
- Keep your timings organized and logical
- Practice your presentation several times to ensure the timing is correct
- Consider your audience and their preferences when setting up timings
Conclusion: Enhancing Your Presentations with Effective Timing Techniques
By setting up timings in your PowerPoint presentation, you can enhance the effectiveness of your message and create a more engaging experience for your audience. From setting up slide timings to adjusting the durations of audio and video elements, PowerPoint provides numerous options to make your presentation more engaging and effective. By following the tips and best practices outlined in this article, you can ensure that your audience remains engaged and interested in your message throughout the presentation.
By humans, for humans - Best rated articles:
Excel report templates: build better reports faster, top 9 power bi dashboard examples, excel waterfall charts: how to create one that doesn't suck, beyond ai - discover our handpicked bi resources.
Explore Zebra BI's expert-selected resources combining technology and insight for practical, in-depth BI strategies.

We’ve been experimenting with AI-generated content, and sometimes it gets carried away. Give us a feedback and help us learn and improve! 🤍
Note: This is an experimental AI-generated article. Your help is welcome. Share your feedback with us and help us improve.

- Start the presentation and see your notes in Presenter view Article
- Add speaker notes to your slides Article
- Rehearse and time the delivery of a presentation Article
- Record a slide show with narration and slide timings Article
- Print your PowerPoint slides, handouts, or notes Article
- Create a self-running presentation Article

Rehearse and time the delivery of a presentation
PowerPoint helps you record and time a presentation before you present it to an audience.

Tip: For the most powerful rehearsal experience consider opening your presentation in PowerPoint for the web and using Presenter Coach. For more information see: Rehearse your slide show with Presenter Coach.
Rehearse the presentation
Select Slide Show > Rehearse Timings .
Select Next , click the mouse or press the Right Arrow key to go to the next slide.
The time for the current slide is shown to the right of the Pause icon. The time to the right of that is the time for the whole presentation.
Select Pause to pause the recording. Select Resume Recording to resume.
Select Yes to save the slide timings, or No to discard them.
You can also press Esc to stop the recording and exit the presentation.
View the timings
Select View > Slide Sorter . The amount of time allotted to a slide is shown at the bottom-right of the slide.
Turn off recorded slide timings before you give a presentation
To prevent slides from automatically advancing, use the recorded slide timings as follows:
On the Slide Show tab of the ribbon, select Set Up Slide Show .
In the dialog, under Advance slides , select Manually .
To turn the slide timings on again, switch back to Use Timings, if present .

Need more help?
Want more options.
Explore subscription benefits, browse training courses, learn how to secure your device, and more.

Microsoft 365 subscription benefits

Microsoft 365 training

Microsoft security

Accessibility center
Communities help you ask and answer questions, give feedback, and hear from experts with rich knowledge.

Ask the Microsoft Community

Microsoft Tech Community

Windows Insiders
Microsoft 365 Insiders
Was this information helpful?
Thank you for your feedback.
How-To Geek
How to time your powerpoint slides for more effective presentations.
Delivering a presentation is not just about giving good slides, it is also about making sure that our presentation finishes by the time our audience w
Delivering a presentation is not just about giving good slides, it is also about making sure that our presentation finishes by the time our audience wants to have their tea break---so practicing how long to speak for each slide is essential for a proper presentation.
Rehearsing our Slides
Before we rehearse, make sure that we select our first slide. Now open the 'Slide Show' tab and click the 'Rehearse Timings' button.
Powerpoint will start the usual presentation mode with a timer panel. The clock on the panel will start ticking once we enter the presentation mode.
Click on the arrow button to move on the next slide and Microsoft Powerpoint will record each timing as you progress from one slide to the next one. You can also click on the pause button just in case you need to answer the phone or turn off the oven while you're rehearsing your slides.
You will see a summary on how much time you have spent on each slide at the end of the rehearsal.
Create a Self-Running Presentation
You can even set a self-running power point slides and let it run according to these timing, relieving us from the need to manually navigate the slides. Bear in mind that we can run into a situation where Powerpoint changes the slides before we finish, so make sure that you can deliver each slide based on your rehearsal timing.
Click on the setup slide show button.
Select the 'Browsed at a kiosk (full screen)' option to setup a self-running Powerpoint presentation. Press the 'esc' key to stop the self-running presentation.
You can re-adjust the presentation timing by recording back from the beginning or from the current slide.
If we're still not happy with the timing, we can clear all the slides timing and redo our presentation rehearsal.
Delivering a good presentation is not an easy task and requires a lot of practice. There are tons of great things that we can do with Powerpoint to add punch to our presentation, for example:
- Adding live web pages to our presentation
- Animating text and objects
- Putting video from the web in our presentation
- Using your mouse as a laser pointer in PowerPoint 2010
What other tips do you have for giving an effective presentation?

IMAGES
VIDEO
COMMENTS
Step 1: Open your PowerPoint presentation. Open the PowerPoint presentation you wish to set the timing for. This is straightforward—just fire up PowerPoint and open the presentation you’re working on. Step 2: Select the “Transitions” tab. Click on the “Transitions” tab in the PowerPoint ribbon.
Select Your Slides from Slides Pane. In the first step, click the slide preview for the slide you wish to set time for. In case you want all your slides to switch according to a set time limit (e.g. 10 seconds), select one slide and hit CTRL+A to select all slides. In case you want to set a different time for each slide, you will have to select ...
In this Microsoft PowerPoint 2019 tutorial you are going to learn how to set the time duration between PowerPoint Slides ( Set a different timings on each Po...
Rehearse your presentation. As you rehearse, the timer records the amount of time you spend on each slide and the total amount of time spent on all slides. The timer automatically starts when you enter Presenter View. In the latest PowerPoint for Mac: Go to Slide Show > Set Up > Rehearse Timings.
You can use a self-running presentation to run unattended in a booth or kiosk at a trade show or convention, or you can save it as a video and send it to a client. On the Slide Show tab, click Set Up Slide Show. To allow the people watching your slide show to have control over when they advance the slides, select Presented by a speaker (full ...
Here’s how: Select the slide you want to apply the transition to. Go to the “Transitions” tab on the PowerPoint ribbon at the top of your screen. Choose the transition you want to apply by clicking on the thumbnail image. Select “Apply to All Slides” if you want the transition to apply to all slides in your presentation.
Here’s how: Open your PowerPoint presentation and navigate to the “Transitions” tab on the ribbon. Select the slide or slides you want to apply the transition to. Choose a transition effect from the “Transition to This Slide” section of the ribbon. In the “Timing” section, set the duration of the transition and choose whether you ...
Setting Up Slide Timings in PowerPoint. To set up slide timings in PowerPoint, navigate to the “Transitions” tab and click on “Timing.”. This will bring up a menu where you can adjust the duration of time each slide remains on the screen. You can also set up automatic timings for each slide and adjust the duration of any animations (if ...
Rehearse the presentation. Select Slide Show > Rehearse Timings. Select Next, click the mouse or press the Right Arrow key to go to the next slide. The time for the current slide is shown to the right of the Pause icon. The time to the right of that is the time for the whole presentation. Select Pause to pause the recording.
Now open the 'Slide Show' tab and click the 'Rehearse Timings' button. Powerpoint will start the usual presentation mode with a timer panel. The clock on the panel will start ticking once we enter the presentation mode. Click on the arrow button to move on the next slide and Microsoft Powerpoint will record each timing as you progress from one ...