How to Format a Picture in PowerPoint for Maximum Impact


Table of Contents
An image carries immense communicative power, a timeless reality when dealing with presentations rich in visuals. Yet, the mere inclusion of an image in your slides falls short; you must also skillfully format it to elevate its visual appeal and captivate your audience’s attention.
In this blog, you’ll learn how to format a picture in PowerPoint with the tools and techniques it provides to manipulate and enhance your pictures, ensuring they grab attention and convey your message effectively.
We will share tips and tricks to make your images stand out — whether it’s a compelling chart, a breathtaking photograph, or a playful infographic — you can always ace your PPTs with these.

Formatting pictures in PowerPoint for maximum impact creates visually engaging and effective presentations. The goal here is not to overload your presentation with images but to use them strategically to complement your message and engage your audience effectively.
Here are the basics of formatting a picture in PowerPoint:
Step 1: Select the right image
Choose high-quality, relevant images that support your content and message. Ensure they are not pixelated or distorted when stretched.
Step 2: Insert the picture

Select the slide you want to insert the image in by clicking on it. Then, go to the ‘Insert’ tab, select ‘Picture,’ and choose the image from your computer.
Step 3: Resize and crop
Click on the image to reveal the Format tab. You can resize and crop the image to fit your slide correctly. Use cropping to focus on the key elements.
Step 4: Adjust brightness and contrast

Under the Format tab, click on the ‘Corrections’ button. Tweak brightness and contrast to enhance visibility and make the image pop.
Step 5: Apply styles
Explore various Picture Styles from the Format tab to add effects such as shadows, borders, or reflections for a more polished look.
Step 6: Compress images
If your presentation file size is a concern, use PowerPoint’s image compression feature to reduce the image size while maintaining quality.
Step 7: Arrange and layer

Use the ‘Arrange’ options to layer images, align them with other elements, or group them with other objects on the slide.
Step 8: Add alt text

For accessibility, don’t forget to add alternative text to describe the image.
Step 9: Animate (if needed)

If animation suits your presentation, use PowerPoint’s animation tools to introduce pictures in an engaging manner.
Step 10: Preview and test
Always preview your slides to ensure the images appear as intended, especially if you share your presentation on different devices.
Why Do You Need To Format Pictures and Not Just the Text?
While text is essential for conveying information, adequately formatted pictures are equally critical for enhancing your content’s visual appeal, clarity, engagement, and impact.
Several factors make it necessary to format pictures while creating visual materials, such as presentations, documents, or graphics:

- Visual Appeal: Properly formatted images enhance engagement and memorability.
- Complementary Visuals: Formatted images reinforce your message effectively.
- Clarity: Sizing, alignment, and cropping ensure clear understanding.
- Consistency: Uniform formatting maintains a professional look.
- Emphasis and Hierarchy: Visual formatting emphasizes key points.
- Accessibility: Alt text and captions aid those with disabilities.
- Impact: Striking images engage and evoke emotions.
- Brand Identity: Proper formatting aligns with your brand style.
How To Change the Format of a Picture in PowerPoint?
Formatting a picture in PowerPoint is a simple yet valuable skill for improving your presentations. Here’s how you can do it:

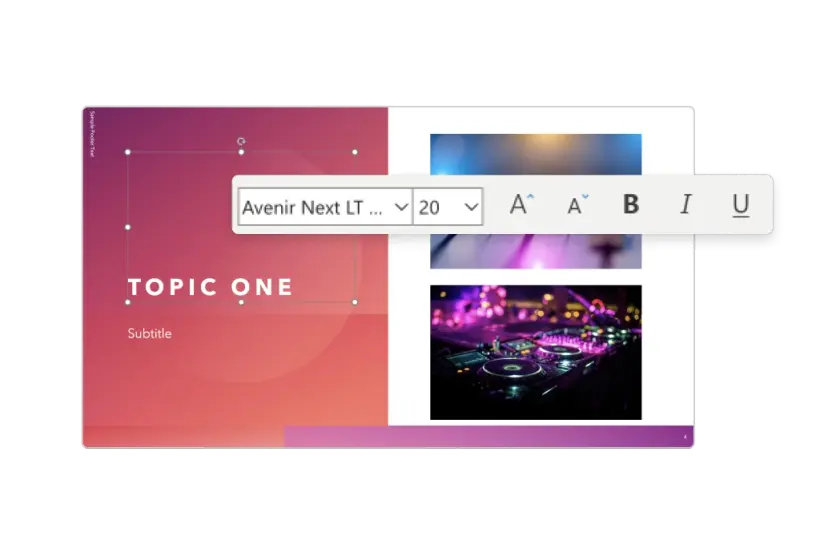
Insert & Select the Picture: Follow the instructions in this blog to insert your image into the slide you’re working on. Then, select the picture by clicking on it, and small white boxes or circles called ‘handles’ appear around the image.

Format Tab: A ‘Format’ tab will appear in the PowerPoint ribbon at the top once your picture is selected. Click on it. You can access the ‘Picture Styles’ group to apply preset picture formats here. For further customizations, explore the ‘Picture Effects Options’ and ‘Picture Border Options’ to tailor your image to your requirements.
Common Image Formatting Features in PowerPoint
PowerPoint provides various image formatting features to help you enhance the visual appeal of your presentations. These image formatting features in PowerPoint allow you to manipulate and enhance images within your presentations.
Here are the twenty most common image formatting features in PowerPoint:
- Crop: You can crop images to remove unwanted portions, focus on a specific area, or change the aspect ratio.
- Resize: Adjust the size of images to fit them within your slides or to create a specific visual impact.
- Rotate and Flip: Image rotation options include clockwise, counterclockwise, and horizontal or vertical flipping.
- Brightness and Contrast: Images’ brightness and contrast can be changed to enhance visibility or reflect a certain mood.
- Color Corrections: You can adjust the color temperature, saturation, and tone of images to correct or enhance their appearance.
- Artistic Effects: Apply artistic effects like watercolor, pencil sketch, or paint strokes to images to create unique visuals.
- Shadow and Reflection: Add shadows or reflections to images to make them appear three-dimensional and add depth.

- Glow and Soft Edges: Apply a soft glow or an edge effect to images for a softer, more highlighted appearance.
- Transparency: Adjust the transparency of an image, making it semi-opaque to overlay it with other elements or achieve a specific visual effect.

- Image Borders: Add borders to images, adjusting the color, thickness, and style of the border.
- Compress Images: Reduce the file size of your presentation by compressing images without significantly affecting their quality.
- Replace Image: Easily swap one image for another while retaining the same formatting applied to the original image.
- Remove Background: Remove the background of a picture using the ‘Remove Background’ tool, preserving only the main subject.
- Picture Styles: To polish your photographs, use pre-defined picture styles like bevels, gradients, or 3D effects.
- Image Alignment: Align images precisely on your slides using alignment and distribution tools.
- Image Order: Change the layering order of images to bring some forward or send them backward relative to other objects on the slide.
- Grouping: Group multiple images together to move or format them as a single unit, preserving their relative positions.
- Image Effects: Add various artistic and visual effects to images, like reflections, glows, and soft edges, to make them visually appealing.
- Image Compression: Reduce the file size of your presentation by compressing images while maintaining their quality.
- Image Cropping Aspect Ratio: Maintain the aspect ratio when cropping images to ensure they stay proportional.
How To Format a Picture as a Background in PowerPoint?
Formatting a picture as a background in PowerPoint can give your slides a unique and visually appealing look. This is especially useful for creating themed presentations or incorporating branding elements into your slides.
Unsure how to format the background of a slide in PowerPoint with a picture? Here’s how to do it:

Insert the Picture: Refer to the instructions provided earlier.
Position and Resize: You must adjust the image’s size and position once inserted. Click on the image, drag the corners to resize it, and use the center handle to move it around until it covers the entire slide.
Send to Back: To make the picture the background, it should be placed behind other slide elements (text, shapes, etc.). Select the picture and choose ‘Send Backwards’ or ‘Send to Back.’
Adjust Brightness and Contrast: If you want to make your slide’s text and other elements more visible, you might have to alter how bright or dark your picture is. Select your picture, click the ‘Format’ tab, and choose ‘Corrections’.
Set Transparency: Changing the image’s transparency can make it look understated. Select the image, go to the ‘Format’ tab, and move the ‘Transparency’ slider to get the desired effect.
Lock the Background: Right-click on the image and choose ‘Lock Anchor’ to avoid the background image being unintentionally moved or edited.
Apply to All Slides: If you want the same background image on all your slides, right-click on the image and select ‘Apply to All Slides’ to ensure it’s consistent throughout your presentation.
How To Cite a Picture in APA Format in a PowerPoint?
To cite a picture in APA format within a PowerPoint presentation, include an in-text citation and a corresponding reference in the slide notes or a separate reference slide.
- In-Text Citation: Add the photographer’s or designer’s last name and the year of publication in parentheses after using the image (e.g., Smith, 2022).
- Reference Slide or Notes: Create a slide titled ‘References.’ Here, make a bulleted list of the full citations for the images used, including titles, sources, publication dates, and URLs, if applicable.
Images are not just decorative elements; they play a pivotal role in engaging your audience with impactful presentations. Proper formatting ensures they align with your content, maintain visual appeal, and contribute to the overall professionalism of your presentation.
While formatting can take you only so far and with much extra effort, AI can do all the heavy lifting within seconds. So, if you need to make a presentation with stunning images and formatting, use SlidesAI to create AI presentations that win over your audience and leave them in awe.
SlidesAI is an add-on tool for Google Slides, leveraging the prowess of AI to deliver stunning presentations. Users can simply create compelling slides by adding text prompts to this tool and getting results; it is that easy.
Check out SlidesAI now to simplify your journey!
What is the best format for pictures in PowerPoint?
The best picture format in PowerPoint is typically JPEG (Joint Photographic Experts Group) or PNG (Portable Network Graphics) for high-quality images, as these formats balance quality and file size.
Where is the picture format tool in PowerPoint?
The picture format tool in PowerPoint is found in the ‘Format’ tab, which appears when you select an image on your slide.
How do I get picture format suggestions in PowerPoint?
To get picture format suggestions in PowerPoint, select the image, go to the ‘Format’ tab, and click ‘Design Ideas’ on the right-hand side of the ribbon to access a variety of formatting suggestions.
Frequently Asked Questions
The picture format tool in PowerPoint is found in the 'Format' tab, which appears when you select an image on your slide.
To get picture format suggestions in PowerPoint, select the image, go to the 'Format' tab, and click 'Design Ideas' on the right-hand side of the ribbon to access a variety of formatting suggestions.
Save Time and Effortlessly Create Presentations with SlidesAI

Presentation Design and PowerPoint Formatting Services
Consultants need overnight PowerPoint formatting -- We do it! Companies need presentation design inline with corporate style guide - We do that too!
How to Pick the Right Image Format for Your Presentations

Presentations without visuals are like sleeping pills. Who would want to read lines and lines of boring text? I would say no one.
I recently gave a presentation about communication to a few team members from our production team. My presentation was filled with text in bullet points.
When I started my presentation, the team was all pumped up before the meeting, and 15 minutes into it, you could see yawning and fidgeting.
After the meeting, the feedback I got was as expected – "The presentation was so dull and boring", "I wish it was explained in a more elaborate way that I could relate to".
I am sure, we all have been through a non-visual presentation and we were ready to drop dead!
Now, what are the elements that can make our presentations eye-catching and visually attractive? Animations, illustrations, transitions, icons, images, graphics.
Images can make our presentations beautiful. They add emphasis to our presentations and make them livelier.
The only problem is figuring out which image format we should choose.
10 Easy Tips to Choose the Right Images for Presentations .
Picking the right image is one thing, but selecting the right image format is another.
In this article, I will be talking more about image formats and how to pick the right one for your presentation.
Here are the Top 5 Image Formats
Each of these formats is not the same. They have their unique features with advantages and disadvantages.
Let’s look at them.
JPEG or Joint Photographic Experts Group is the most popular among all image formats used on the web. JPEG files are lossy, which means that when the original image is saved as a JPEG file, the image size is reduced, and a lot of information is discarded. The quality is also lost.
The JPEG format is a popular choice for PowerPoint.
- Wide 16 million colors range
- Most commonly used and widely accepted image format
- Compatible with many Operating Systems
- Tend to discard data
- Cannot be animated
- Do not support transparency

Graphics Interchange Format is a bitmap image format that is popularly known for its size. It is relatively small in comparison to other image types. They are the most widely used form of communication. But they are not a form we would recommend for PowerPoint.
GIF has an 8-bit palette with only 256 colors.
- Minimal animation effects
- Supports transparency
- It is Lossless which means that every single bit of data that was originally in the file remains after being uncompressed and no data is lost
- Images with limited colors look great in GIF format
- Larger file size than PNG
- Limited colors, 256 varieties only

BMP files or bitmap image is a raster graphics image file format used to store bitmap digital images. They are image files within the Microsoft Windows operating system.
The images are rich in color, high in quality and compatible with all Windows OS and programs.
BMP files are made of millions of dots called ‘pixels’ and they can be 8-bit, 16-bit or 24-bit images.
- Compatible with Windows programs and Operating System
- Because of its large file size, it is not web-friendly
- Lags in comparison to other image formats
- Does not scale or compress well

TIFF or Tag Image File Format is the perfect image format for page layout, publishing, and photo manipulation software.
TIFF images are crisp in quality and rich in colors. They are flexible and can be lossy or lossless.
They are supported by many imaging programs. However, they are not the best format for PowerPoint. But they can be converted into JPEG, PNG, and other formats that best fit PowerPoint.
- High-quality image format
- Flexible format that supports several types of compression like JPEG, LZW, ZIP and can be sent without compression
- Rich in color and can be saved in layers
- The file size is very large hence longer transfer/loading time and huge disk space consumption.

PNG or Portable Network Graphics is an image format specifically designed for the web. PNG is similar to GIF format. It is saved with 256 colors maximum, but it saves the color information more efficiently than GIF. It also supports 8-bit transparency. It is also best suited for PowerPoint.
- Supports transparency better than GIF
- PNG often creates smaller file sizes than GIF format
- If the images are large, they tend to generate a very large file, sometimes creating larger files than JPEG
- Does not support animation
- Not compatible with all web browsers

10 Common PowerPoint Formatting Mistakes to Avoid
Choosing the right format for the right project will have impactful results on clarity and visibility. Especially when you are presenting to a crowd of more than 100 people, you have to be smart about images.
If it is a reading Presentation and you have to share it with a number of people via email or file sharing, then it’s best to use light images like PNG.
Knowing the different image formats will help you weigh in the file size, the color range and compatibility to help you decide which is the best fit for your presentation.
Do not forget why you are adding images to your presentation in the first place.
Do’s & Don’ts When Using Images In Your PowerPoint Slides
Including graphics elements to your presentations is not to make them just visually appealing but also to convey the presentation’s message effectively.
Be smart when deciding what your image should convey. Keeping a random image in a slide without giving any thought on what the content conveys is pointless. It may even lead to confusion for your audience.
On the other hand, getting the right image that relates to the content can do wonders. It simply paints the message conveyed clearer.
Was this article helpful to you? Leave us a comment.

Related posts:
- 5 Fail-Proof Visual Communication Tips to Enhance Presentations
- What’s the Fuss About Presentations? (With Design Tips on What Not To Do)
- How to Pick the Right Logo Design for Your Company
- 4 Impactful Ideas to Use 3D Pyramid Shapes in Presentations
Chillibreeze Presentation Design Experts To Your Rescue
Our customers have deadlines and need our help. Our PowerPoint design experts take their rough content - format it - apply style guidelines and deliver a polished PowerPoint deck. They appreciate the way we learn their needs, keep their information safe and rapidly deliver on-time.
Get Rescued

About Chillibreeze
Chillibreeze is fast & reliable. Our PowerPoint design experts come to the rescue of corporates & consultants in 12 - 24 hours. Try our Presentation service.
Leave a Reply Cancel reply
Your email address will not be published. Required fields are marked *
How We Work Getting Started Examples Pricing FAQs Happy Customers Contact Us Onboarding Process Creative Services
Chillibreeze wall Timeline History Chillibreeze Stories Privacy Policy Customer Experience Holiday List Presentation Challenges and Solutions
Leadership Team Chillibreeze wall Timeline History Chillibreeze Stories Privacy Policy Production Stories Holiday List
Purpose Values and Behaviours Opportunity in Northeast India Rethink Social Responsibility The Big Picture Chillibreeze CSR Initiative
Work in Chillibreeze FAQs Career Advice
We use cookies to improve your experience on our website. You can disable them from your browser. Read more about our privacy policy.
Copyright © 2004 - 2024 Chillibreeze Solutions Pvt. Ltd.
- Frequently Asked Questions (FAQ)
Understanding PowerPoint File Formats
It’s possible to use PowerPoint for years without ever thinking about the various file formats that are available to you. By learning about PowerPoint’s file formats and options, however, you can do a much more effective job of creating presentations, backing them up, sharing them with colleagues, and protecting the information that they contain.
Ordinary PowerPoint Presentations
When you save a simple PowerPoint presentation, you give it a name, and PowerPoint adds the file extension .pptx. Your Sales Presentation file becomes Sales Presentation.pptx .
If your PowerPoint presentation contains one or more macros, PowerPoint will automatically detect their presence and save your presentation as a .pptm file. You can force PowerPoint to save a presentation that includes macros as a .pptx file, but PowerPoint won’t let you play the macros that you’ve included in your slide slow. So it’s best to let it save your file with the .pptm extension.

If you need to share your presentation with a colleague who is using an older version of PowerPoint, then save your slides as a .ppt file. PowerPoint 97 through 2003 cannot open and process .pptx or .pptm files.
If you’re using PowerPoint 2007 or newer, you should always save your work in .pptx format (or in .pptm format if you’ve used macros in your presentation). The options described below are additional ways to save your work. Be sure to save them first as ordinary .pptx or .pptm files before you save them in any of these other formats.
PowerPoint Shows
If you want to give your PowerPoint presentation to a friend or colleague, and you don’t want them to change anything, then save your presentation as a PowerPoint Show file. Your colleagues can display your slides, but they will be unable to change any part of your presentation.
There are three types of PowerPoint Shows: Save an ordinary presentation as a .ppsx file. If you’re using macros in your presentation, save it as a .ppsm file. If you’re sending your slide show to somebody who is using PowerPoint 97 through 2003, then create a .pps PowerPoint Show file.
Be sure to save your presentation as a plain vanilla (.pptx) file or as a macro-enabled (.pptm) file. If you’ve only saved the Show file, you won’t be able to make changes to your presentation.
PowerPoint Picture Presentations
Picture Presentations add an additional layer of protection to your work. To the casual observer, a PowerPoint Picture Presentation looks like an ordinary PowerPoint slideshow. But when you save your work as a Picture Presentation, each slide is converted to a simple image.
Slides contain text objects, image objects, animations, transitions, and many other special effects. By contrast, Picture Presentations contain only snapshots of your slides.
If somebody wants to copy your work, they can see each of the images and retype the text. They can even grab (and re-crop) the images. But they cannot capture any of the magic that is PowerPoint.
If you create a Picture Presentation, be sure to give it a unique name. If you only save the Picture Presentation .pptx file, you won’t be able to modify your presentation in the future.
Windows Media Videos
You can convert your PowerPoint presentation to an ordinary Windows Media Video (.wmv) file, and play it using the built-in Windows Media Player or any other video player. Your .wmv file can be enjoyed by any Windows or Mac user, even if they don’t have PowerPoint installed on their computer.
As always, don’t make your .wmv file the only version of your slideshow or you’ll be very disappointed when you want to make changes to the presentation.
Outline/RTF
PowerPoint lets you turn your slideshow into plain text. This is handy if you want to move some of the presentation’s text to your website or blog.
When you create a rich text format (.rtf) file, you save only the text. You lose all of the images, animations, slide-to-slide transitions, and other non-text objects.
It’s easy to save your presentation as a portable document format (.pdf) file. These .pdf files can be opened on any Windows, Mac, Unix/Linux, iOS, or Android device. The resulting file, however, is a static document. Don’t expect to see slides fade in and out. All of your animated objects will become static.
You can save your slides as an XML Paper Specification (.xps) file. That’s a fancy way to say that if you double-click your .xps file in Windows Explorer, the operating system will open your file using its built-in XPS Viewer.
The XPS format is ideal for sending your slideshow to users who have neither PowerPoint nor Adobe Acrobat Reader installed on their computers. As with the .pdf format above, .xps files have text and images, but no animation.
If you’re happy with this year’s Financial Results slideshow, and you want to create next year’s presentation using the same colors and fonts, then save your current presentation as a template, and use it over and over.
As you may have guessed, save your work as a .potx file for use in PowerPoint 2007 and newer, as a .potm file for a 2007 or newer macro-enabled presentation, and as a .pot file for use on PowerPoint 97 through 2003.
Office Themes and Backups
Because Microsoft PowerPoint is part of Microsoft Office, you can use two Office file types to make your PowerPoint work easier and safer.
You can save your presentation theme as an Office .thmx file. Future PowerPoint presentations, as well as Word documents and Excel spreadsheets, can use this Office theme to set their fonts and colors. This results in a consistent look and feel to all of the Office documents that you present to prospects and customers.
Autosave is built into most Office applications, including PowerPoint. If you experienced a power outage and hadn’t saved your PowerPoint presentation before you lost power, it’s possible that there’s a recent version of your slideshow in the Office Autosave library. If you click File , click Open , and click Recover Unsaved Presentation , you may be pleased by the information that PowerPoint saved for you.
The Bottom Line
There’s no need to memorize all of the PowerPoint file extensions and options that are available. But be sure that you’re including all of these files when you do your regular on-site and off-site backups. And bookmark this blog page so that you can return to it when you need to save or open a PowerPoint presentation in one of the less popular file formats.
- September 20, 2014
About ShapeChef

Blog Categories
- Slides and Objects
- Video and Audio
- Presentation Tips and Techniques
Copyright © 2024 Wulfsoft. All rights reserved.
- Terms of Service
- Legal Notice
Find the perfect PowerPoint presentation template
Bring your next presentation to life with customizable powerpoint design templates. whether you're wowing with stats via charts and graphs or putting your latest and greatest ideas on display, you'll find a powerpoint presentation template to make your ideas pop., presentations.
Help your data, insights, and recommendations make a statement with beautiful and easily customizable presentation templates.

Certificates
Celebrate accomplishments big and small with customizable certificate templates. From gift certificates to awards for finishing a course or training, find a template that highlights their accolades.

Boost visibility for your show, project, or business with easily customizable poster templates. Find templates for all your promotion needs and make them uniquely yours in a flash.

Keep track of whatever you need to in style. From personal planning to promotional calendars, find templates for every kind of project and aesthetic.

Infographics
Say more with less using helpful and easily customizable infographic templates. Add clarity to business presentations, school projects, and more with these helpful templates.

Start with the best PowerPoint templates

Elevate your storytelling
Tips, tricks, and insider advice from our business and design experts
A quick way to create beautiful, powerful PowerPoint presentations
Create captivating, informative content for PowerPoint in just a few minutes—no graphic design experience needed. Here's how:

1. Find the perfect PowerPoint template
2. Customize your creation

3. Show it off
Let's create a powerpoint design, frequently asked questions, where can i find slide templates and themes that i can customize.
To find customizable slide templates and themes, you can explore the business presentations templates or search by PowerPoint templates . Once you find a template that resonates with you, customize it by changing its color scheme, add in your own photos, and swap out the font.
How do I use pre-made PowerPoint templates?
After you've chosen a PowerPoint template to use, customize it. Explore [design tips] on how to customize a deck that resonates with your brand while putting emphasis on the topic at hand. Play with other design elements, like photo shapes, to make each slide unique.
How can I make or edit my own custom PowerPoint templates?
Start from scratch by creating your own PowerPoint template . Follow tips for designs and business presentations so that your unique template is cohesive and relevant to your brand. Incorporate your brand's color scheme and graphics so that all your slides aren't text only.
What kinds templates can I get online for PowerPoint?
You can get PowerPoint templates that have modern designs, animated ones, or even hand-drawn art in each slide. The color schemes range from bold to subtle. Each template's slides are also organized based on what you may want to include in your presentation . You can use the template as a starting point and customize its specific details from theme.
Popular categories


- Get started with computers
- Learn Microsoft Office
- Apply for a job
- Improve my work skills
- Design nice-looking docs
- Getting Started
- Smartphones & Tablets
- Typing Tutorial
- Online Learning
- Basic Internet Skills
- Online Safety
- Social Media
- Zoom Basics
- Google Docs
- Google Sheets
- Career Planning
- Resume Writing
- Cover Letters
- Job Search and Networking
- Business Communication
- Entrepreneurship 101
- Careers without College
- Job Hunt for Today
- 3D Printing
- Freelancing 101
- Personal Finance
- Sharing Economy
- Decision-Making
- Graphic Design
- Photography
- Image Editing
- Learning WordPress
- Language Learning
- Critical Thinking
- For Educators
- Translations
- Staff Picks
- English expand_more expand_less
PowerPoint - Formatting Pictures
Powerpoint -, formatting pictures, powerpoint formatting pictures.

PowerPoint: Formatting Pictures
Lesson 16: formatting pictures.
/en/powerpoint/inserting-pictures/content/
Introduction
There are a variety of ways to format the pictures in your slide show. The picture tools in PowerPoint make it easy to personalize and modify the images in interesting ways. PowerPoint allows you to change the picture style and shape , add a border , crop and compress pictures, add artistic effects , and more.
Optional: Download our practice presentation .
Watch the video below to learn more about formatting pictures in PowerPoint.
To crop an image:
When you crop an image, a part of the picture is removed. Cropping may be helpful when a picture has a lot of content and you want to focus on only part of it.
- Select the image you want to crop. The Format tab appears.

- Click the Crop command again. The image will be cropped.
To crop an image to a shape:
- Select the image you want to crop, then click the Format tab.

You may want to crop the image to the desired size before cropping it to a shape.
To add a border to an image:
- Select the image you want to add a border to, then click the Format tab.
- Click the Picture Border command. A drop-down menu will appear.

Image adjustments
PowerPoint offers several options for changing the way images appear in your slide show. For example, you can add a frame , make image corrections , change the image's color or brightness , and even add some stylish artistic effects . These options are located in the Adjust and Picture Styles groups on the Format tab.

When you're ready to make adjustments or experiment with the look of an image, select the picture and choose one of these options from the Format tab.

Compressing pictures
If you want to email a presentation that contains pictures, you'll need to monitor its file size . Large high-resolution pictures can quickly cause your presentation to become very large, which may make it difficult or impossible to attach to an email. Additionally, cropped areas of pictures are saved with the presentation by default, which can add to the file size. PowerPoint can reduce the file size by compressing pictures, lowering their resolution , and deleting cropped areas .
To compress a picture:
- Select the picture you want to compress, then click the Format tab.

- A dialog box will appear. Place a check mark next to Delete cropped areas of pictures . You can also choose whether to apply the settings to this picture only or to all pictures in the presentation.

Compressing your pictures in PowerPoint may not reduce the file size enough for your needs. For better results, you can use an image editing program to resize the image before you insert it in your presentation. To learn more, review our Image Editing 101 tutorial.
- Open our practice presentation .
- On slide 7, select the treadmill picture.
- Crop the picture so it's slightly smaller and the treadmills take up a majority of the frame.
- Change the style of the picture.
- Apply a correction to the picture. For example, increase the brightness .
- Compress your picture and choose Email as your target output.

/en/powerpoint/shapes/content/

Microsoft 365 Life Hacks > Presentations > How to Format Presentation Slides
How to Format Presentation Slides
Learn how to give your presentation slides a facelift so they captivate your audience.

Why is Presentation Design and Formatting Important?
A well-designed presentation can help you connect with your audience and gets your message across in an easily digestible manner. Great presentation design can impart a positive first impression and is more likely to draw in and engage an audience.
Pretend you’re attending a presentation and instead of formatted PowerPoint slides, each one is plain white with a lot of dark text that’s hard to read. And even though the background and text colors are the same, none of the text is lined up and multiple fonts are used. There are no transitions or title pages that help to differentiate between topics being discussed and you’re presented with slide after slide of confusing, jumbled text.

Tell your story with captivating presentations
Powerpoint empowers you to develop well-designed content across all your devices
Formatting slides in your presentation is what enhances the look of the slides and transforms them into something that complements the content and resonates with the audience.
What Else Should a Good Presentation Include?
While formatted slides can help to connect with the audience, a good presentation should also include:
- Well-written, concise content that clearly explains the problem that you’re trying to solve and the unique solution you’ve come up with.
- A great hook or emotionally compelling introduction.
- Visuals that support your message and aren’t too busy.
Most importantly, a good presentation should be efficient and engage with the audience. And that engagement can be found in the content as well as how the slides are formatted.
Tips for Creating & Formatting Presentation Slides
Before you start creating your PowerPoint presentation, make sure that your content is solid. Making an outline can help you keep information organized, clear, and concise before you put it into a presentation. The outline can also help you break down what information is shared on each slide to keep things from being overcrowded or wordy. Take a minute to consider your audience and the best ways to connect with them and present what you’re trying to share.
Once your content is finalized, you can get to work on creating and formatting your presentation slides.
How to Make a Slide
A PowerPoint presentation is sometimes known as a deck and is composed of different slides. When you’re putting your own deck together, you’ll certainly need to add slides and format them in different ways.
In order to make a new slide appear in your presentation, first select the slide that you’d like your new slide to follow. Then click Home and choose New Slide . From there, you can choose your desired layout , and start inputting content. The layout options in PowerPoint are great for keeping your text lined up and consistent through the deck. You can also rearrange, duplicate, and delete slides as necessary.
Formatting Your Presentation Slides
Once you’ve created your content or slides, it’s time to consider design and formatting. This is where you make choices about themes, templates, color schemes, and fonts.
If you don’t feel confident about your design abilities, you might want to try applying a template . This customizable option offers a variety of artistic skins that can give your deck a professional polish. There is even a range of downloadable templates available from Microsoft to suit any kind of presentation.
Don’t feel like you must use a template, though. Many users may prefer to use or create a theme to visually tie together their presentations. PowerPoint provides a variety of themes which include color schemes, backgrounds, fonts, and placeholder slides. In the Design tab, you can choose a theme that appeals to you or matches with your content. You can even try different color variations within the theme by selecting Variants . Each variant has built in options for colors, fonts, and background colors and styles that can help you format your slides and create a cohesive look throughout the deck.
There are a few things to keep in mind if you decide to eschew the suggestions made by PowerPoint:
- Consider the colors you’re using. There are definitely a few color combinations you should avoid .
- Choose fonts that are easy to read and make sure that your text isn’t too small to be read across a large room. You’ll also want to remember to keep the text on your slides relatively sparse, with no more than three bullet points per slide.
Using Visual Aids in Your Presentation
One way to break up the monotony of an all-text presentation is to use visual aids like charts, graphs, static images, gifs, and movies.
As with all other aspects of your deck, ensure that your visuals are easy to see and understand, and aren’t too wordy. Imagine trying to read a line graph with lots of muddy colors and small text from across a conference room. The goal of a visual aid is to make the presentation you’re giving more compelling and the information you’re sharing easier to understand.
Here are a few tips for adding visuals to your presentation:
- Make sure the images you use are of high quality and that they fit in your deck. They shouldn’t be distorted or pixelated, as this will distract from the content.
- All charts should be very easy to read and understand. If someone can’t immediately glean what information is presented, you may be trying to fit too much into a single chart.
- Don’t use more than one chart per slide unless it’s necessary. Keep it simple.
- If you’re including a brand or logo in your deck, make sure you’re adhering to that brand’s style guide .
A great way to get design ideas for slides in your presentation us to use the Designer feature in PowerPoint. It automatically generates design ideas for you to choose from based on the content of your slide. Designer detects when you’re using pictures, charts, and tables and gives you suggestions for arranging them on your slides in a cohesive layout that’s easy on the eyes. Designer can also help to format your lists and timelines into easy-to-read graphics and suggests relevant graphics to pair with keywords that it finds within your content.
Create a PowerPoint deck that stands out and resonates with your audience by formatting it in a professional manner. And don’t forget to prep for your presentation !
Get started with Microsoft 365
It’s the Office you know, plus the tools to help you work better together, so you can get more done—anytime, anywhere.
Topics in this article
More articles like this one.

How to create an educational presentation
Use PowerPoint to create dynamic and engaging presentations that foster effective learning.

Five tips for choosing the right PowerPoint template
Choose an appropriate PowerPoint template to elevate your presentation’s storytelling. Consider time length, audience and other presentation elements when selecting a template.

How you can use AI to help you make the perfect presentation handouts
Learn how AI can help you organize and create handouts for your next presentation.

How to use AI to help improve your presentations
Your PowerPoint presentations are about to get a boost when you use AI to improve a PowerPoint presentation.
Everything you need to achieve more in less time
Get powerful productivity and security apps with Microsoft 365

Explore Other Categories
17 PowerPoint Presentation Tips to Make More Creative Slideshows [+ Templates]
Published: August 16, 2023
Creating a great PowerPoint presentation is a skill that any professional can benefit from. The problem? It’s really easy to get it wrong. From poor color choices to confusing slides, a bad PowerPoint slideshow can distract from the fantastic content you’re sharing with stakeholders on your team.

That’s why it’s so important to learn how to create a PowerPoint presentation from the ground up, starting with your slides. Even if you’re familiar with PowerPoint, a refresher will help you make a more attractive, professional slideshow. Let’s get started.
How to Make a PowerPoint Presentation
- Presentation Tips
PowerPoint Design
I like to think of Microsoft PowerPoint as a test of basic professional skills. To create a passing presentation, I need to demonstrate design skills, technical literacy, and a sense of personal style.
If the presentation has a problem (like an unintended font, a broken link, or unreadable text), then I’ve probably failed the test. Even if my spoken presentation is well rehearsed, a bad visual experience can ruin it for the audience.
Expertise means nothing without a good PowerPoint presentation to back it up. For starters, grab your collection of free PowerPoint templates below.
10 Free PowerPoint Templates
Download ten free PowerPoint templates for a better presentation.
- Creative templates.
- Data-driven templates.
- Professional templates.
You're all set!
Click this link to access this resource at any time.
Tell us a little about yourself below to gain access today.
No matter your topic, successful PowerPoints depend on three main factors: your command of PowerPoint's design tools, your attention to presentation processes, and your devotion to consistent style. Here are some simple tips to help you start mastering each of those factors, and don't forget to check out the additional resources at the bottom of this post.
A presentation is made up of multiple slides, let's delve deeper into PowerPoint's capabilities.
Getting Started
1. open powerpoint and click ‘new.’.
If a page with templates doesn‘t automatically open, go to the top left pane of your screen and click New. If you’ve already created a presentation, select Open then double-click the icon to open the existing file.


That said, you can still use fun and eccentric fonts — in moderation. Offsetting a fun font or large letters with something more professional can create an engaging presentation.
Above all, be sure you're consistent so your presentation looks the same throughout each slide. That way, your audience doesn't become distracted by too many disparate fonts. Check out this example from HubSpot’s company profile templates:
Interested in this presentation template? Download it for free here.
5. Make sure all of your objects are properly aligned.
Having properly aligned objects on your slide is the key to making it look polished and professional. You can manually try to line up your images ... but we all know how that typically works out. You're trying to make sure all of your objects hang out in the middle of your slide, but when you drag them there, it still doesn't look quite right. Get rid of your guessing game and let PowerPoint work its magic with this trick.
Here’s how to align multiple objects:
- Select all objects by holding down Shift and clicking on all of them.
- Select Arrange in the top options bar, then choose Align or Distribute .
- Choose the type of alignment you'd like.
Here’s how to align objects to the slide:
- Select Align to Slide .
- Select Arrange in the top options bar again, then choose Align or Distribute .
6. Use "Format Object" to better control your objects' designs.
Format menus allow you to do fine adjustments that otherwise seem impossible. To do this, right-click on an object and select the Format Object option. Here, you can fine-tune shadows, adjust shape measurements, create reflections, and much more. The menu that will pop up looks like this:

Although the main options can be found on PowerPoint’s format toolbars, look for complete control in the format window menu. Other examples of options available include:
- Adjusting text inside a shape.
- Creating a natural perspective shadow behind an object.
- Recoloring photos manually and with automatic options.
7. Take advantage of PowerPoint's shapes.
Many users don’t realize how flexible PowerPoint’s shape tools have become. In combination with the expanded format options released by Microsoft, the potential for good design with shapes is readily available. PowerPoint provides the user with a bunch of great shape options beyond the traditional rectangle, oval, and rounded rectangle patterns.
Today’s shapes include a highly functional Smart Shapes function, which enables you to create diagrams and flow charts in no time. These tools are especially valuable when you consider that PowerPoint is a visual medium. Paragraphing and bullet lists are boring — you can use shapes to help express your message more clearly.
8. Create custom shapes.
When you create a shape, right click and press Edit Points . By editing points, you can create custom shapes that fit your specific need. For instance, you can reshape arrows to fit the dimensions you like.
Another option is to combine two shapes together. To do so, select the two shapes you’d like to work with, then click Shape Format in the top ribbon. Tap Merge Shapes .
You’ll see a variety of options.
- Combine creates a custom shape that has overlapping portions of the two previous shapes cut out.
- Union makes one completely merged shape.
- Intersect builds a shape of only the overlapping sections of the two previous shapes.
- Subtract cuts out the overlapping portion of one shape from the other.
- Fragment will split your shape into different parts depending on where they overlap.
By using these tools rather than trying to edit points precisely, you can create accurately measured custom shapes.
9. Crop images into custom shapes.
Besides creating custom shapes in your presentation, you can also use PowerPoint to crop existing images into new shapes. Here's how you do that:
- Click on the image and select Picture Format in the options bar.
- Choose Crop , then Crop to Shape , and then choose your desired shape. Ta-da! Custom-shaped photos.
10. Present websites within PowerPoint.
Tradition says that if you want to show a website in a PowerPoint, you should just create a link to the page and prompt a browser to open. For PC users, there’s a better option.
Third party software that integrates fully into PowerPoint’s developer tab can be used to embed a website directly into your PowerPoint using a normal HTML iframe. One of the best tools is LiveWeb , a third-party software that you can install on your PowerPoint program.
By using LiveWeb, you don’t have to interrupt your PowerPoint, and your presentation will remain fluid and natural. Whether you embed a whole webpage or just a YouTube video, this can be a high-quality third party improvement. To install the add-on, simple head to the LiveWeb website and follow the instructions.
Unfortunately, Mac users don’t have a similar option. A good second choice is to take screenshots of the website, link in through a browser, or embed media (such as a YouTube video) by downloading it directly to your computer.
11. Try Using GIFs.
GIFs are looped animated images used to communicate a mood, idea, information, and much more. Users add GIFs to PowerPoints to be funny or quickly demo a process. It's easy to add GIFs to your slides. To do so, simply follow these steps:
- Download and save the GIF you want.
- Go to the slide you want the GIF on.
- Go to the Home tab, and click either Insert or Picture .
- From the Picture drop-down menu, choose Picture from File .
- Navigate to where you saved your GIF and select it. Then, choose Insert .
- It will play automatically the moment you insert it.
PowerPoint Process
12. keep it simple..
PowerPoint is an excellent tool to support your presentation with visual information, graphics, and supplemental points. This means that your PowerPoint should not be your entire presentation. Your slides — no matter how creative and beautiful — shouldn't be the star of the show. Keep your text and images clear and concise, using them only to supplement your message and authority.
If your slides have dense and cluttered information, it will both distract your audience and make it much more likely that you will lose their attention. Nothing in your slides should be superfluous! Keep your presentation persuasive by keeping it clean. There are a few ways to do this:
- Limit bullet points and text.
- Avoid paragraphs and long quotes.
- Maintain "white space" or "negative space".
- Keep percentages, graphs, and data super basic.
13. Embed your font files.
One constant problem presenters have with PowerPoint is that fonts seem to change when presenters move from one computer to another. In reality, the fonts are not changing — the presentation computer just doesn’t have the same font files installed . If you’re using a PC and presenting on a PC, then there is a smooth workaround for this issue.
Here’s the trick: When you save your PowerPoint file (only on a PC), you should click File , then Options, then open up the Save tab. Then, select the Embed fonts in the file check box under Preserve fidelity when sharing this presentation . Now, your presentation will keep the font file and your fonts will not change when you move computers.
The macOS PowerPoint version has a similar function. To embed your fonts on a Mac, do the following:
- Open up your presentation.
- On the top bar, click PowerPoint , then click Preferences .
- Under Output and Sharing , click Save .
- Under Font Embedding , click Embed fonts in the file.
14. Save your slides as a PDF file for backup purposes.
If you’re still scared of your presentation showing up differently when it’s time to present, you should create a PDF version just in case. This is a good option if you’ll be presenting on a different computer. If you also run into an issue where the presenting computer doesn’t have PowerPoint installed, you can also use the system viewer to open up the PDF. No laptop will ever give you trouble with this file type.
The only caveat is that your GIFs, animations, and transitions won’t transfer over. But since the PDF will only work as a backup, not as your primary copy, this should be okay.
To save your presentation as a PDF file, take the following steps:
- Go to File , then click Save as …
- In the pop-up window, click File Format.
- A drop-down menu will appear. Select PDF .
- Click Export .
You can also go to File , then Export , then select PDF from the file format menu.
15. Embed multimedia.
PowerPoint allows you to either link to video/audio files externally or to embed the media directly in your presentation. You should embed these files if you can, but if you use a Mac, you cannot actually embed the video (see note below). For PCs, two great reasons for embedding are:
- Embedding allows you to play media directly in your presentation. It will look much more professional than switching between windows.
- Embedding also means that the file stays within the PowerPoint presentation, so it should play normally without extra work (except on a Mac).
Note: macOS users of PowerPoint should be extra careful about using multimedia files.
If you use PowerPoint for Mac, then you will always need to bring the video and/or audio file with you in the same folder as the PowerPoint presentation. It’s best to only insert video or audio files once the presentation and the containing folder have been saved on a portable drive in their permanent folder. Also, if the presentation will be played on a Windows computer, then Mac users need to make sure their multimedia files are in WMV format. This tip gets a bit complicated, so if you want to use PowerPoint effectively, consider using the same operating system for designing and presenting, no matter what.
16. Bring your own hardware.
Between operating systems, PowerPoint is still a bit jumpy. Even between differing PPT versions, things can change. One way to fix these problems is to make sure that you have the right hardware — so just bring along your own laptop when you're presenting.
If you’re super concerned about the different systems you might have to use, then upload your PowerPoint presentation into Google Slides as a backup option. Google Slides is a cloud-based presentation software that will show up the same way on all operating systems. The only thing you need is an internet connection and a browser.
To import your PowerPoint presentation into Google Slides, take the following steps:
- Navigate to slides.google.com . Make sure you’re signed in to a Google account, preferably your own.
- Under Start a new presentation , click the empty box with a plus sign. This will open up a blank presentation.
- Go to File , then Import slides .
- A dialog box will come up. Tap Upload , then click Select a file from your device .
- Select your presentation and click Open .
- Select the slides you’d like to import. If you want to import all of them, click All in the upper right-hand corner of the dialog box.
- Click Import slides.

When I tested this out, Google Slides imported everything perfectly, including a shape whose points I had manipulated. This is a good backup option to have if you’ll be presenting across different operating systems.
17. Use Presenter View.
In most presentation situations, there will be both a presenter’s screen and the main projected display for your presentation. PowerPoint has a great tool called Presenter View, which can be found in the Slide Show tab of PowerPoint. Included in the Presenter View is an area for notes, a timer/clock, and a presentation display.

For many presenters, this tool can help unify their spoken presentation and their visual aid. You never want to make the PowerPoint seem like a stack of notes that you’re reading off of. Use the Presenter View option to help create a more natural presentation.
Pro Tip: At the start of the presentation, you should also hit CTRL + H to make the cursor disappear. Hitting the "A" key will bring it back if you need it!
Your Next Great PowerPoint Presentation Starts Here
With style, design, and presentation processes under your belt, you can do a lot more with PowerPoint than just presentations for your clients. PowerPoint and similar slide applications are flexible tools that should not be forgotten. With a great template, you can be on your way to creating presentations that wow your audience.
Editor's note: This post was originally published in September 2013 and has been updated for comprehensiveness.
![Blog - Beautiful PowerPoint Presentation Template [List-Based]](https://no-cache.hubspot.com/cta/default/53/013286c0-2cc2-45f8-a6db-c71dad0835b8.png "powerpoint presentation image formats")
Don't forget to share this post!
Related articles.
![How to Write an Ecommerce Business Plan [Examples & Template]](https://blog.hubspot.com/hubfs/ecommerce%20business%20plan.png "powerpoint presentation image formats")
How to Write an Ecommerce Business Plan [Examples & Template]
![How to Create an Infographic in Under an Hour — the 2024 Guide [+ Free Templates]](https://blog.hubspot.com/hubfs/Make-infographic-hero%20%28598%20%C3%97%20398%20px%29.jpg "powerpoint presentation image formats")
How to Create an Infographic in Under an Hour — the 2024 Guide [+ Free Templates]
![20 Great Examples of PowerPoint Presentation Design [+ Templates]](https://blog.hubspot.com/hubfs/powerpoint-presentation-examples.webp "powerpoint presentation image formats")
20 Great Examples of PowerPoint Presentation Design [+ Templates]

Get Buyers to Do What You Want: The Power of Temptation Bundling in Sales

How to Create an Engaging 5-Minute Presentation
![How to Start a Presentation [+ Examples]](https://blog.hubspot.com/hubfs/how-to-start-presenting.webp "powerpoint presentation image formats")
How to Start a Presentation [+ Examples]

120 Presentation Topic Ideas Help You Hook Your Audience
![How to Create the Best PowerPoint Presentations [Examples & Templates]](https://blog.hubspot.com/hubfs/Powerpoint%20presentation.jpg "powerpoint presentation image formats")
How to Create the Best PowerPoint Presentations [Examples & Templates]

The Presenter's Guide to Nailing Your Next PowerPoint
![How to Create a Stunning Presentation Cover Page [+ Examples]](https://blog.hubspot.com/hubfs/presentation-cover-page_3.webp "powerpoint presentation image formats")
How to Create a Stunning Presentation Cover Page [+ Examples]
Marketing software that helps you drive revenue, save time and resources, and measure and optimize your investments — all on one easy-to-use platform
Blog > How to export high resolution images from PowerPoint
How to export high resolution images from PowerPoint
07.10.20 • #powerpoint #tip #export.
Unfortunately PowerPoint can only save slides as images at 96dpi by default. This is too little if you want to print your slides (300dpi is required here) or share them in high quality. However, with this little trick, you can increase the export resolution in Microsoft PowerPoint and thus save images of your slides with up to 1000dpi.
The process consists of two parts:
- Using the system registry to change the default resolution setting for exported slides
- Save the slide as an image with the new resolution
The first step is a bit more complicated and dives deeper into the system registration, but we will help you and support you at every step with images!
Step 1: Change the export resolution setting
By default, the export resolution of a PowerPoint slide is 96 dots per inch (dpi) . To increase the resolution, follow these steps:
Note: Carry out the following steps carefully and calmly. If you change the registry incorrectly, you may experience problems!
- Right click on the Start button at the bottom left and then choose Run .

- Enter regedit in the text field, then click on OK .

- Now a control window appears, where you have to confirm that changes can be made. To do this, click on Yes .
Computer\HKEY_CURRENT_USER\Software\Microsoft\Office\16.0\PowerPoint\Options
Computer\HKEY_CURRENT_USER\Software\Microsoft\Office\15.0\PowerPoint\Options
Computer\HKEY_CURRENT_USER\Software\Microsoft\Office\14.0\PowerPoint\Options
Computer\HKEY_CURRENT_USER\Software\Microsoft\Office\12.0\PowerPoint\Options
Computer\HKEY_CURRENT_USER\Software\Microsoft\Office\11.0\PowerPoint\Options

- Now click on the folder Options , choose Edit > New in the menu bar and then click on DWORD value (32-bit) .

- Enter ExportBitmapResolution in the text field and press Enter.

- Make sure that ExportBitmapResolution entry is selected, then click on Modify in the Edit menu.

Search for the desired resolution, e.g. 3000x2250, from the following table and enter the corresponding decimal value (e.g. 300) in the opened window.

Theoretically you can enter even higher values up to 1000dpi (but only if you use PowerPoint 2013 or later).
- Save the setting with OK .
- Finally, close the window.
Step 2: Export slides as images
- In PowerPoint, open your presentation and then select the slide you want to export.

- Go to the File tab.
- Now select Save As .

- JPEG File Interchange Format (* .jpg)
- PNG Portable Network Graphics Format (* .png)
- GIF Graphics Interchange Format (.gif)
- Device Independent Bitmap (* .bmp)
- TIFF Tag Image File Format (* .tif)

- Select Save . The following dialog box appears:

You can now decide whether you want to export only a specific or all slides of your presentation. The slide will be saved in the selected format and resolution in the location you have just specified.
Can you change the DPI (resolution) of exported PowerPoint slides?
Yes you can. However, it's not possible within PowerPoint itself, you need to change a value in the Windows registry. Check this blog post to learn how to change the PowerPoint export resolution .
How to export PowerPoint slides as high resolution images?
You must first change a value in the Windows registry to change the export resolution. How you can do this you can read in our tutorial. Then go to "Save as" in the "File" tab and select a suitable image format in the file type field.
Related articles
About the author.

Philipp Angerer
Philipp is a creative supporter at SlideLizard in marketing and design. There he uses his imagination and provides creative freshness, also in blog articles.

Get 1 Month for free!
Do you want to make your presentations more interactive.
With SlideLizard you can engage your audience with live polls, questions and feedback . Directly within your PowerPoint Presentation. Learn more
Top blog articles More posts

Create mindmaps in PowerPoint

Family Feud – PowerPoint Quiz Template

Get started with Live Polls, Q&A and slides
for your PowerPoint Presentations
The big SlideLizard presentation glossary
A pitch is a short presentation that is given with the intention of persuading someone (a person or company) to buy or invest. There are various forms of pitches, depending on the goal and intended outcome.
Animated GIF
An animated GIF enables images to be played in a specific order. It is created when several individual images are saved in a GIF file.
Personal Response System (PRS)
A Personal Response System (PRS) provides lecturers, presenters or teachers with the opportunity to ask a group of students or their audience questions. The questions are usually in a multiple choice format. PRS increase student engagement and provide an opportunity to receive instant feeback.
.pps file extension
A .pps file is a slide show. They are similiar to .ppt files but they open as a slide show if you double-klick them. They later got replaced by .ppsx files.
Be the first to know!
The latest SlideLizard news, articles, and resources, sent straight to your inbox.
- or follow us on -
We use cookies to personalize content and analyze traffic to our website. You can choose to accept only cookies that are necessary for the website to function or to also allow tracking cookies. For more information, please see our privacy policy .
Cookie Settings
Necessary cookies are required for the proper functioning of the website. These cookies ensure basic functionalities and security features of the website.
Analytical cookies are used to understand how visitors interact with the website. These cookies help provide information about the number of visitors, etc.
10 Free PowerPoint Templates to Present Your Photos With Style
The most common use of PowerPoint with photos is their use as photo albums. Create your own...or use the hundreds of free templates in the Office template gallery. We pick ten attractive ones.
You might think Photoshop is the best tool for putting together a photo collage, but actually PowerPoint offers plenty of free templates for you to use instead. Here's how to use a template in PowerPoint along with all the best PowerPoint photo collage templates you have to choose from.
Why Use PowerPoint Photo Collage Templates?
Share your photos: For our most popular preoccupation with photos—sharing.
Show off photos with style: A professional photo collage template can add gravity and enhance your photos.
Save time: Microsoft PowerPoint templates for photos are molds for standard layouts. Why reinvent the wheel? Save time with pre-made photography templates so you can focus on other things instead.
Showcase creativity: Turn a long-term photography project into a creative PowerPoint photo album presented as a slideshow.
How to Search for Free PowerPoint Photo Collage Templates
The most common use of Microsoft PowerPoint with photos is to use it as a photo album. PowerPoint ships with some default photo templates, but you can also use free templates in the Office Online Template & Themes gallery.
Follow these steps in Office 365. It should be similar for other versions of Microsoft Office as well.
- You can tweak your slides further by applying Themes from the Design tab with just a click. A theme is a predefined combination of colors, fonts, and effects. Different themes are suitable for different slide layouts.
Tip: You can pin your favorite templates to the New screen.
The 10 Best PowerPoint Photo Templates
Good presenters know not only what to present but also how to present. These 10 professional photo collage templates do some of the handholding for you.
1. Stay Minimal With the Classic Photo Album
The Classic Photo Album PowerPoint template is a minimal theme suitable for black and white street photography. Use this to create a personal portfolio. Limited to two colors, it doesn't distract from the photos you use the template for.
If you want to go with color, customize the default theme background, colors, number of images, alignment of thumbnails, and more by using the Ribbon.
2. Make a Baby Photo Collage
This PowerPoint photo slideshow template presents your cute baby pictures in a vertical style. You can use a different number of photos in the slides and write down memories associated with the photos.
3. A PowerPoint Collage for Wedding Photos
The elegant Wedding Photo Album is a compilation of 17 slides in different layouts. You will find other wedding album templates in the gallery, but this is an understated photo collage. You can add up to five wedding photos to create a collage. For more choices, search with a "wedding photo album" keyword.
4. Birthday Photo Album Template for Any Age
A common use of collages is to put together a birthday photo album. This PowerPoint template for birthday photos is easy to adapt to your needs. The 15 deck template also comes with editing instructions if you are a beginner on PowerPoint and need some help.
5. A Stylish Biography Template for Class
Studying the biographies of achievers is required reading in many grade levels. This is not for your photos but for profiling the life of famous men and women in the class. The Biography Presentation template is a well-designed template with space for photos and biographical information. Use each slide to focus on a single aspect of the achiever's life.
6. Escape With a Road Trip Photo Album Template
Just looking at the collage of placeholders for your road trip photos might make you want to take one. This beautiful PowerPoint template has eight slides, so you might need more of them if you bring back lots of memories.
7. Have Fun With a Party Photo Album Template
A fun party can throw up a lot of little moments. Capture them all in a slideshow with this 21-slide PowerPoint template. This photo collage template is colorful to match any fun theme for your party.
8. Remember Someone With a Memorial Album
Use the Floral memorial album template to pay tribute with a PowerPoint slideshow. The eight slides in the template are designed for different photos and one of the slides can even hold eight photos. This presentation design is somber but stylish at the same time.
9. Send a Reunion Reminder With a Family Photo Album
Present a few loving family photos to inspire everyone to start preparing for Thanksgiving and Christmas. The theme of these PowerPoint slides is simple, and you can easily add a few more slides to the default five this deck comes with.
10. Create a Stunning Photo Book
You might feel overwhelmed if someone asked you to put together a quick photo book. But use this subtle yet stylish PowerPoint photo book template to get the job done in no time. The name and the placeholder images might suggest a fashion theme, but you can easily repurpose it for any photos.
Let's Not Forget Office Online
You might not use PowerPoint Online for crafting that killer presentation, but it's still a free alternative to Microsoft Office with plenty of templates.
While most of the online photo templates are crossovers from the Office suite gallery, there are still some exceptions. For example, the Animated picture collection template.
You can always download a template from the online gallery to your desktop. And you can save your presentation to a web location just as easily with OneDrive, then access it from there with Office 365.
Other Sources of Free PowerPoint Templates
There also lots of non-Microsoft sources of free Microsoft PowerPoint templates and backgrounds. Search with a keyword like "photos" or "photo album" to find them. Here are a few suggestions:
- SlideHunter
- PPTtemplate.net
- PresenterMedia
- Powered Template
- Graphic River (paid)
Templates can help you take shortcuts through the time-consuming task of designing a presentation. That way you can save more time for perfecting the look of your presentation with a few profession design tips.
Top searches
Trending searches

suicide prevention
8 templates

computer network
75 templates

spring season
28 templates

cybersecurity
6 templates

46 templates

18 templates
Create engaging presentations, faster
Free templates for google slides and powerpoint, or kick off your next project with ai presentation maker, create your presentation, writing tone, number of slides.

New AI icebreaker generator The smartest way to drop the mic in every intro Drop the mic with AI icebreaker generator

119 templates

Slidesclass
285 templates

Editor’s Choice
3074 templates

Interactive
336 templates

220 templates

312 templates

19 templates

387 templates

875 templates

416 templates

Presentation Maker
1208 templates

Teacher Toolkit
121 templates

2943 templates
Latest themes

Spring Season Theme
Download the "Spring Season Theme" presentation for PowerPoint or Google Slides and start impressing your audience with a creative and original design. Slidesgo templates like this one here offer the possibility to convey a concept, idea or topic in a clear, concise and visual way, by using different graphic resources....

Premium template
Unlock this template and gain unlimited access
Lovely Hearts Template
Download the "Lovely Hearts Template" presentation for PowerPoint or Google Slides and start impressing your audience with a creative and original design. Slidesgo templates like this one here offer the possibility to convey a concept, idea or topic in a clear, concise and visual way, by using different graphic resources....

Camp Educational Programs Infographics
Download the "Camp Educational Programs Infographics" template for PowerPoint or Google Slides and discover this set of editable infographics for education presentations. These resources, from graphs to tables, can be combined with other presentations or used independently. The most important thing is what you will achieve: transmit information in an...

Beauty Standards in Social Media
Download the "Beauty Standards in Social Media" presentation for PowerPoint or Google Slides. How do you use social media platforms to achieve your business goals? If you need a thorough and professional tool to plan and keep track of your social media strategy, this fully customizable template is your ultimate...

Bowling Equipment Marketing Plan
Download the "Bowling Equipment Marketing Plan" presentation for PowerPoint or Google Slides. This incredible template is designed to help you create your own marketing plan that is sure to impress your entire team. Using this amazing tool, you'll be able to analyze your target audience, assess your competitors, map out...

Suicide Prevention Newsletter
Download the "Suicide Prevention Newsletter" presentation for PowerPoint or Google Slides. Attention all marketers! Are you looking for a way to make your newsletters more creative and eye-catching for your target audience? This amazing template is perfect for creating the perfect newsletter that will capture your audience's attention from the...
Popular themes

World Environment Day
We know that taking care of the environment is of a paramount importance, and it is the perfect time of the year to encourage awareness and action for the protection of nature. Let’s teach our kids about the necessity of preserving nature with this cool template!

Minimalist Business Slides
Minimalism is an art style that frees the canvas and that lets the content stand out for itself. It’s a way of conveying modernism, simplicity and elegance and can be your best ally in your next presentation. With this new design from Slidesgo, your business presentations will be as professional...

Notebook Lesson
These are the last days before the Summer break! We know that there are some pending lessons that you need to prepare for your students. As they may be thinking about their friends and their holidays, catch their attention with this cool template!

World Mother Earth Day
It’s World Mother Earth Day, and everyone’s invited! If you’re in need of a template for this occasion, we have good news for you. This one right here is as good as it gets: with its design filled with shades of green and illustrations of vegetation, it’s super environmentally-conscious, and...

Minimal Charm
Are you looking for a monochromatic theme that is interesting at the same time? How about using a simple and clean theme, along with black-and-white pictures, to convey business or corporate content in a professional way?

Futuristic Background
When you need to impress everybody and stay relevant, you must look ahead and aim to be the first. Take a peek into the future with this new template Slidesgo has just designed. It’s free and perfect for techie topics or just for giving your presentation a futuristic vibe!
Infographics

Bar Graph Infographics
Download the "Bar Graph Infographics" template for PowerPoint or Google Slides and discover the power of infographics. An infographic resource gives you the ability to showcase your content in a more visual way, which will make it easier for your audience to understand your topic. Slidesgo infographics like this set...

Bee Infographics
Download the "Bee Infographics" template for PowerPoint or Google Slides and discover the power of infographics. An infographic resource gives you the ability to showcase your content in a more visual way, which will make it easier for your audience to understand your topic. Slidesgo infographics like this set here...

Aesthetic Infographics
Download the "Aesthetic Infographics" template for PowerPoint or Google Slides and discover the power of infographics. An infographic resource gives you the ability to showcase your content in a more visual way, which will make it easier for your audience to understand your topic. Slidesgo infographics like this set here...
Education presentation templates

625 templates

486 templates

96 templates

673 templates

798 templates

2525 templates

Thesis Defense
622 templates

321 templates

617 templates
35 templates
Interactive & Animated

Athletics Newsletter
Download the "Athletics Newsletter" presentation for PowerPoint or Google Slides. Attention all marketers! Are you looking for a way to make your newsletters more creative and eye-catching for your target audience? This amazing template is perfect for creating the perfect newsletter that will capture your audience's attention from the get-go....

Creative and Bold Theme for Marketing
Download the "Creative and Bold Theme for Marketing" presentation for PowerPoint or Google Slides and take your marketing projects to the next level. This template is the perfect ally for your advertising strategies, launch campaigns or report presentations. Customize your content with ease, highlight your ideas and captivate your audience...

Mathematical Challenge. Three-digit Numbers. GBL
Download the "Mathematical Challenge. Three-digit Numbers. GBL" presentation for PowerPoint or Google Slides and teach with confidence. Sometimes, teachers need a little bit of help, and there's nothing wrong with that. We're glad to lend you a hand! Since Slidesgo is committed to making education better for everyone, we've joined...
What's new on Slidesgo
See the latest website updates, new features and tools and make the most of your Slidesgo experience.
Make presentations with AI

Work faster, teach better: boost your skills with Slidesgo Academy

The easy way to wow with Slidesgo for Google Slides
Browse by tags.
- Kids 1522 templates
- Food 769 templates
- Technology 799 templates
- Travel 333 templates
- Animal 797 templates
- Art 617 templates
- Health 3095 templates
- History 1027 templates
- Environment 380 templates
- Galaxy 149 templates
- Fashion 202 templates
- Biology 348 templates
- Summer 135 templates
- Architecture 120 templates
- Music 321 templates
- Research 1249 templates
- Culture 1706 templates
- Background 7529 templates
- Back to School 163 templates
- Coloring Page 352 templates
What do our users say about us?

I just wanted to thank you! I learned more about slides in one day of quarantine than in my whole life
Gabriela Miranda

Your slides are so unique and gorgeous! They really help me with PowerPoint presentations for school and now even my mom uses them for work
Marie Dupuis

I would like to thank to you for these amazing templates. I have never seen such service, especially free! They are very useful for my presentation.
Ali Serdar Çelikezen

Thank you Slidesgo for creating amazing templates for us. It's made my presentation become much better.
Thiên Trang Nguyễn

Register for free and start editing online
How To Edit Or Modify a PowerPoint Template
Easier than starting from scratch
PowerPoint is a useful program to help you create slides for a presentation and even turn them into a video. It has aged well and is still one of the most popular choices for educators, in-house business presentations and home theatre applications.
You can add graphics, text, and multimedia to enhance the appearance and make your presentations more engaging. The list of rich media, including music and video continues to grow.
Along with those features is the ever-expanding variety of templates. Even so, not every template has all that you want or need. Some editing is still required from time to time. The good news is that those templates, purchased or free, can usually be modified and edited by you.
Edit Or Modify a PowerPoint Template
When it comes to Powerpoint templates you can:
- Start from scratch with a blank presentation and use it as a one-off or create a custom template
- Use one of the themes provided from the program or downloaded for free
- Purchase templates from various sources
Learning how to edit a presentation is a valuable tool to have in your kit. Many tutorials suggest using the Slide Master view. However, Slide Master provides blank layouts. It is not a way to edit an existing template.
Let’s say you just purchased a bundle of templates because they look impressive and you want to use them for your business. However, the templates are niche-based, and your business provides online services such as website design.
For example, maybe you like the layout and built-in animations of a real estate Powerpoint template. Does that mean you can’t use it? No, you can customize it for your business by swapping out the images with ones that are more relevant to your industry.
There are many ways to edit a Powerpoint presentation. For the purposes of this tutorial, we are going to outline the steps to turn a real estate template into one for a website design company.
Start With The Cover Slide
Below is the first slide in a purchased real estate Powerpoint presentation.

The first thing you will want to do is to replace the house image with an image of a website. There are two different ways to do this.
Right-Click On An Image To Change It
Some templates will allow you to swap out the picture simply by right-clicking on it and choosing Change picture . Then select the source of your new image ( File, Online Sources, Icons, Clipboard ).

I prefer to use image sites that I know are free and not subject to any copyright laws. As you can see in the image below, when you select From Online Source , you are taken to a screen where you can choose pictures under Creative Commons .
However, there is also a disclaimer on the bottom of the pop-up that says: You are responsible for respecting others’ rights, including copyright.

To be safer legally, use the From a file option and choose an image from a free stock photo website .
Use The Selection Panel To Change Images
Templates that have more complicated animations and transitions will require a different method to change the images.
Start by making sure you are on the Home tab in the top navigation bar.

Now you want to look for and click the Select drop-down menu on the right slide of the top navigation. Choose Selection pane .

This will open a new tab that shows you all the elements on the slide and gives you the ability to “show” or “hide” them.

Your goal in this step is to isolate the image from any other elements on the slide so that you can change it.
Click on Hide All so that you see a blank white screen. The number of elements you will see in the selection panel will depend upon the complexity of the slide.
In this example, it is easy to identify which element is the image as there is only one picture. If your slide has many photos, you will want to click on the dash (-) next to the name of each picture element to find the one you want to change.
Click them on and off until you find the right one.

Make sure that once you find the right picture, it is the only element that is showing. By hiding the other items, you can isolate the image to change it.
At this point, you can follow the same instructions above by right-clicking on the image and selecting Change Picture .
Change Font & Shape Colors
You can also change the font colors and type, as well as the transparency and color of the shapes.
If you choose an image that uses the same color scheme as the template, you will probably only need to do minimal changes, if any. But if you find a picture you want to use that doesn’t match the color scheme, don’t worry. It’s easy to change.
The image below shows the cover slide with a website image that replaced the picture of the home.

It looks out of place from a color perspective. So, let’s change the colors to match our new image for a more congruent look.
Change The Color Of The Shapes
Right-click with your cursor on the background shape that contains the title and select Format Shape .

This process will open a side panel where you can see that the bottom bar is filled with a solid color with 30% transparency. You can also see the color that is used.

Let’s select a color that blends better with our new image. Click the dropdown arrow next to Color and choose the Eyedropper option. You can also select any theme, standard, or custom colors. But if you want to match the colors in the image, using the Eyedropper works best.

Move your cursor to any part of the image that is the color you want to use and click return . You will now see that the bottom bar is the color you chose using the Eyedropper.

Now, remember that the original slide had a 30% transparency effect. This is removed when you change the color. If you want to use that with your new color, right-click the bottom bar, select Format and put the Transparency level back to 30%.

Follow the same procedures as above to change the right color column to the same color. You will notice that now there is an additional section called Recent Color to make it even easier for you to use the same color you used before.

You can change the color, font, size, and location of any text in your template. Start by highlighting the text and looking at the top navigation section that refers to what you can do with text.

With the text highlighted, you can make several edits, including:
- Style (bold, italic, underlined, shadowed)
If you are not sure what any of the options mean, hover your mouse over it to see a description. Of course, you will want to replace what the text says to match your business.
To move the location of the text, put your mouse over one of the dots you see in the highlighted section until your cursor turns into a vertical arrow.
Then use the arrows on your keyboard to move the text up, down, right, or left.
In this sample, the white text looks good with the image and color scheme. However, it could use a few tweaks to the location and style.
See the new slide below and how we transformed it from the original slide by customizing it while keeping the same basic design, animations, and transitions as the template.

The benefit of editing and customizing pre-made templates is that you can benefit from the design skills, animations, and transitions of professional Powerpoint creators.
There is no need to avoid a template that is geared towards an industry or niche that isn’t yours. By following the instructions above, you can have the best of both worlds.

David has a background in small business and lives in Australia. He is a WordPress and Ubuntu Developer who enjoys design, CSS and tech tool integration. Read David's Full Bio
Read More Posts:

Leave a Reply
Your email address will not be published. Required fields are marked *
- PowerPoint Themes
- Latest PowerPoint Templates
- Best PowerPoint Templates
- Free PowerPoint Templates
- Simple PowerPoint Templates
- PowerPoint Backgrounds
- Project Charter
- Project Timeline
- Project Team
- Project Status
- Market Analysis
- Marketing Funnel
- Market Segmentation
- Target Customer
- Marketing Mix
- Digital Marketing Strategy
- Resource Planning
- Recruitment
- Employee Onboarding
- Company Profile
- Mission Vision
- Meet The Team
- Problem & Solution
- Business Model
- Business Case
- Business Strategy
- Business Review
- Leadership Team
- Balance Sheet
- Income Statement
- Cash Flow Statement
- Executive Summary
- 30 60 90 Day Plan
- SWOT Analysis
- Flow Charts
- Gantt Charts
- Text Tables
- Infographics
- Google Slides Templates
- Presentation Services
- Ask Us To Make Slides
- Data Visualization Services
- Business Presentation Tips
- PowerPoint Tutorials
- Google Slides Tutorials
- Presentation Resources
How To Save PowerPoint Slide As Image? A Complete Guide
This Blog will help you save your PowerPoint Presentation slides as images. It follows an in-detail explanation with a step-by-step guide to help you save single or multiple slides as images. Moreover, It explains all the best methods for Windows OS and macOS users.

Powerpoint presentations consist of slides that match the content the presenters want to convey to their listeners. It may occasionally be necessary to save specific images from PowerPoint presentations to use them for the intended purpose. Using an application, you can swiftly process and create a PPT slide and save it as an image for a required presentation. While using such third-party applications, it is vital to ensure compatibility, as specific devices require the assistance of a third-party application, like PPTX viewer, to access PPTX files.

In this article, you will profit from learning how to save PowerPoint slide as image using the quick and easy techniques listed below.
Methods To Save Powerpoint Slide as Image In Windows
You can maintain the visual appeal of your presentation in many ways by exporting PowerPoint slides as photos. This section will walk you through a detailed procedure to ensure that every piece of your content is preserved in vivid clarity. These instructions will enable you to quickly produce excellent images from your PPT slides, regardless of whether your goal is to share individual slides or turn your entire presentation into a visual masterpiece:
Method 1: Save PowerPoint Slide as Image
- Open PowerPoint and go to the File tab. After selecting Export, click Change File Type. Then, click the Save As option.
- Now, select a location where you save the slide and give the file a name. Click Tools and select Compress Pictures to save up some space. Confirm that the option labeled “Delete cropped areas of pictures” is checked. Next, select Web Resolution to make those images smaller.
- It will save the images in a smaller format to prevent the final JPEG images from being excessively huge.
- Hit Save now. You can find a JPEG file for every slide in the presentation by going to the folder where we saved it.
- You can transmit these files to view the presentation on any device that supports JPEGs.
With this simple export option, you can get your presentation to function on any device or with any software.
Method 2: Export PowerPoint Slide to an Image
- Launch your PowerPoint presentation first. Select the slide that you want to export as a picture. Depending on your need, this could be one or a series of slides.
- Select the “File” tab by navigating to the upper-left corner of the screen. There will be a drop-down menu. From the options, pick the “Save As” option.
- A dropdown option labeled “Save as” is located beneath the location bar. To view a list of supported formats, click this dropdown menu. Select the file type for your images, such as PNG or JPEG.
- Different quality options are available in many formats. To balance file size and image clarity, select the option that best meets your requirements.
- After deciding on the format and quality options, click “Save” to store the high-quality image of your PowerPoint slide at the designated place.
These easy-to-follow instructions will help you turn your PowerPoint content into visually striking graphics that you can share, print, or use in various applications.
Visit SlideUpLift for the Best PowerPoint Presentation Templates.
Method 3: Save PowerPoint Slides as Images Using Google Slides
- Google Slides provides an alternative solution if you lack access to PowerPoint or a Microsoft account.
- Open your PowerPoint file within the Google Slides interface.
- Navigate to the “File” menu and select “Download” in the Google Slides application.
- Choose your preferred output format for the conversion process, including PNG, JPG, or SVG.
- Save the existing slide as an image through Google Slides.
Visit SlideUpLift for the Best Google Slides Templates.
Methods To Save Powerpoint Slide as Image In macOS
Below are the 2 methods with which you can easily save your PowerPoint slide as an image on MacOS:
Method 1: Save PowerPoint slide As Image
- Open your PowerPoint presentation.
- Open the slide you wish to save in Normal view.
- Click the File menu and choose Export.
- Choose your preferred image format (JPEG, TIFF, PNG, or BMP) under File Format.
- Select ‘Save Current Slide Only’. Additionally, you can specify the dimensions of your slide image in the Width and Height boxes.
- Choose the location where you want to save the image and click “Save”.
Method 2: Screenshot
- Display the PowerPoint slide you want to capture.
- Use the keyboard shortcut Command + Shift + 4. It will change the cursor to a crosshair.
- Press the Spacebar. The cursor will change to a camera icon.
- Move the camera icon over the PowerPoint window to highlight it.
- Click to capture the screenshot. The screenshot will be saved to your desktop by default.
Limitations :
While saving PowerPoint slides as images can be a convenient way to share or use specific visuals, there are some limitations associated with this process:
- You can’t alter individual elements like text, shapes, or charts once a PowerPoint slide has been saved as an image.
- File sizes for images can get huge, especially when they are high definition. It might be a problem because it can use more internet speed and disc space when sharing or storing several photos.
- For certain PowerPoint versions, there is a maximum DPI limit to consider when you specify the ExportBitmapResolution registry value. The slide size affects the maximum DPI. For example, for a standard 13.3″ x 7.5″ slide, the equation would be: sqrt(100,000,000 / (13.333 * 7.5) ) = 1000.
- The chosen image format and settings may cause a loss of resolution, which could lead to a decline in the image quality. Consider this if you want to print your images.

This ends our thorough tutorial on how to save a PowerPoint slide as an image. Regardless of your approach, remember to organize your stored slides and consider file size carefully.
How to export high-resolution images from PowerPoint?
To export high-resolution images from PowerPoint, open your presentation and go to the desired slide. Click on “File,” select “Export,” and choose an image format (such as PNG or JPEG) while ensuring a high resolution before saving.
Does it affect the resolution of the Image?
Yes, be mindful of file sizes and resolution, especially when saving multiple slides. Consider the resolution and compression settings to balance image quality and file size.
Can I export PowerPoint slide as image directly to a specific folder?
Yes, you can export ppt slide as image by specifying the destination folder where you want to save the images. This allows for easy organization and retrieval.
Can I convert slides into PDFs too?
Using PDF software, you can convert slides into PDF files. Many presentation tools, such as Microsoft PowerPoint, Google Slides, and Adobe Acrobat, can save or export presentations as PDF files. When saving or exporting, select the “Save As” or “Export” option, choose PDF from the file format list, and provide additional settings if necessary.
What are the different Image file types I can Save?
You can save your image file in multiple formats. The most common formats or file types used are JPEG, PNG, TIFF, BMP, and GIF.
Table Of Content
Related presentations.

Title Slides Template Collection For PowerPoint & Google Slides

PowerPoint Images For Presentations

Background Images
Related blogs.

10 Bad PowerPoint Slides Examples to Avoid

10 Best Animated PowerPoint Templates

10 Best Business PowerPoint Templates for Presentations

10 Best Free PowerPoint Templates
Tags and categories, privacy overview.
Necessary cookies are absolutely essential for the website to function properly. This category only includes cookies that ensures basic functionalities and security features of the website. These cookies do not store any personal information
Any cookies that may not be particularly necessary for the website to function and is used specifically to collect user personal data via ads, other embedded contents are termed as non-necessary cookies. It is mandatory to procure user consent prior to running these cookies on your website.
Video and audio file formats supported in PowerPoint
Recommended formats.
Video : .mp4 files encoded with H.264 video and AAC audio
Audio : .m4a files encoded with AAC audio
These names and formats may sound complicated, but you can easily convert to and use these formats without having to know anything more than the names.
Supported video file formats
* When you are using Windows 7 running on a virtual machine (VM) , the QuickTime Player is required to be installed for playing MP4 video files. (Read Download QuickTime for Windows , on the Apple site, for more information.)
Supported audio file formats
Additional information
If you experience slow playback, a lag between audio and video, audio stuttering, or frames being lost, see Tips for improving audio and video playback and compatibility .
PowerPoint may also support additional file types if you install additional codecs on your PC. If you want to learn about finding codecs for your PC, read Are you having playback issues (in PowerPoint)?
Certain older video file formats may not compress or export properly in Office on a Windows RT PC. Instead, use modern media formats such as H.264 and Advanced Audio Coding (AAC).
Add audio to your presentation
Insert and play a video file from your computer
File formats that are supported in PowerPoint
PowerPoint videos not playing on secondary monitor
Insert or link to a video on YouTube
Video recommendations
.mp4 files encoded with H.264 video and AAC audio
Audio recommendations
.m4a files encoded with AAC audio
These names and formats sound complicated, but you can easily convert to and use these formats without having to know anything more than the names.
Audio from the iTunes Store may not play back when shared
Music files purchased from the iTunes Store can only be played on authorized computers, so people whom you share presentations with might be unable to play iTunes files.
PowerPoint for macOS supported formats
Windows Media files (.wmv, .wma) aren't supported on PowerPoint for macOS. There are a number of third- party tools for Mac that can convert your .wmv or .wma file to one of the supported formats listed above.
Alternatively, if you have a Microsoft 365 subscription that includes Microsoft Stream, you can upload the .wmv or .wma file to Stream and insert it into your presentation from there. Learn more about Microsoft Stream.
Music files purchased from the iTunes Store can only be played on authorized computers, and people with whom you share presentations might be unable to play iTunes files.
Insert media into your slide
Once you have a converted media file in a suitable format with the correct encoding, go back to the PowerPoint slide where you want to insert your video or audio file. On the Insert tab of the ribbon, click Audio or Video . (For complete details about inserting the media file, see Insert and play a video file from your computer or Add audio to your slides .)

Need more help?
Want more options.
Explore subscription benefits, browse training courses, learn how to secure your device, and more.

Microsoft 365 subscription benefits

Microsoft 365 training

Microsoft security

Accessibility center
Communities help you ask and answer questions, give feedback, and hear from experts with rich knowledge.

Ask the Microsoft Community

Microsoft Tech Community

Windows Insiders
Microsoft 365 Insiders
Was this information helpful?
Thank you for your feedback.
How-To Geek
How to reduce the file size of a powerpoint presentation.
Need to chip off some KB from your presentation's file size? Try some of these handy tips.
Quick Links
Convert your presentation to the pptx format, insert your pictures—don’t copy and paste, do image edits in an image editor—not in powerpoint, compress all of the images in your presentation, don’t use embedded fonts, link to files instead of embedding them, don’t store a thumbnail for the presentation, remove personal and hidden information from your presentation, turn off autorecover, copy everything into a new presentation, a possibility: unzip the presentation and compress it.
Considering that Microsoft PowerPoint presentations are generally accompanied with tons of images, gifs , embedded videos , charts , graphs, and other content, it’s no surprise that you get some pretty big files. Here are a few steps you can take to reduce a presentation's file size.
Large files can be annoying. They take up loads of precious disk space, slow down playback performance, and can cause emails to bounce back due to exceeding the file size limit. You can prevent all of these things by reducing the file size of your presentation.
We’ve mentioned it before, but the first thing you’d think of when considering file size reduction is images—and for a good reason. Image files can be quite large. There are steps you can take to reduce the size, such as compressing the images in the presentation. If you suspect the reason your PowerPoint file is so large is due to images, then be sure to read the article we’ve written on how to reduce the size of Office documents that contain images .
Related: How to Reduce the Size of a Microsoft Word Document
We do have some additional tips to add if you followed these steps but still need to reduce your presentation’s file size.
Microsoft released the PPTX format in Office 2007. Still, it’s not uncommon to see PPT files floating around. So what’s the difference between a PPT and PPTX file? The PPTX version compresses all of the content within the presentation. If you have a PPT file and convert it into a PPTX file, you’ll notice a decrease in the file size.
Converting the file is as simple as pressing a button and choosing the file type. Go ahead and open your PPT file, head over to the “File” tab, and then click “Convert.”
Windows File Explorer will appear. You’ll notice the Save As type is set as "PowerPoint Presentation." This is the PPTX file type. Click “Save.”
Your PPT file will now be converted to a PPTX file. As you can see, the size of the file has been reduced.
HTG Presentation 2 is our PPT file, and HTG Presentation 3 is our PPTX file. Merely converting the file type reduced the size by 335 KB.
While this isn’t a breathtaking drop in file size, we managed to reduce a Word document file size from 6,001 KB to 721 KB. It all depends on what’s inside the file. With any luck, this will be the only step you need to take. If not, keep reading.
It’s tempting to copy and paste an image in PowerPoint instead of using the insert function. This won’t be an issue if you’re not concerned about file size, but if you are, then beware of copy and paste—it may reformat your image to BMP or PNG. Why is this an issue? Both of those file formats are larger than JPG.
You can see in the above screenshot that the PNG file is 153KB compared to the 120KB JPG file of the same image. Each time you copy and paste a JPG file to PowerPoint, and it gets converted to PNG, you’re adding a bit of unnecessary file size to the presentation. Using the insert function will ensure your images are inserted as intended.
When you insert an image in PowerPoint, it’s best to make sure that it doesn’t need any edits. If it does require edits, you’re better off doing it in an image editor. Why? When you use PowerPoint to edit your image, it stores all of those edits as part of the presentation. For example, when you change an image to black and white, PowerPoint retains the full-color image as well. That’s a lot of extra bites being stored.
If you don’t have an image editor ( you do ) or you simply must use PowerPoint, be sure to tell PowerPoint to discard all of that excess data saved from the edits . It won't save you as much space as working in a dedicated editor, but it will help.
You can compress images in PowerPoint one at a time or all at once. If you’re looking to do the latter, here’s how.
Open your presentation, head over to the “File” tab, and then select “Save As” in the left-hand pane.
Next, select “More Options,” which you'll find under the area where you would name your file and choose the file type.
The “Save As” window will appear—this time with a few extra options available to you. Next to the “Save” button, click “Tools.”
In the drop-down menu that appears, select “Compress Pictures.”
The “Compress Pictures” window will appear. Here, you can choose the resolution type of the images (based on PPI) in the presentation. You’ll also notice that you’re not able to select the “Apply only to this picture” option in the “Compression Options” group. That’s because, due to the way we accessed this tool, this option isn’t available.
Note: If you do want to compress a single picture, select it and then head to Picture Tools Format > Compress Pictures.
Once you’re happy with your selection, click “OK.”
Be sure to save your presentation afterward.
We get why you might want to embed fonts—you might be making a Star Wars themed presentation and, as a result, anyone you may be sharing the presentation with is not likely to have those special fonts available to them. Embedding the fonts in your presentation could prevent issues down the line, but it comes at the cost of increased file sizes.
In general, unless you are sure you need to display a particular font, we recommend turning off font embedding.
Head over to the “File” tab and select “Options” at the bottom of the left-hand pane.
On the “Save” tab, untick the “Embed fonts in the file” checkbox and then click “OK.”
We saved a copy of our presentation with all fonts embedded, without fonts embedded, and with only the fonts used in the presentation embedded. Look at the difference if file sizes:
Convinced yet?
Consider the difference in file size if you embed an entire YouTube video in your presentation instead of linking back to it. Embedding an entire video will significantly increase the size of your presentation. There are certainly some valuable benefits when embedding a file vs. linking to it (such as when the recipient might not have internet access to play the video), but if the file size is an issue, just don’t do it.
Way back when Office let you save thumbnail images of your presentation so that you could get a sneak preview of the file when searching for it in File Explorer. Windows has grown to be more sophisticated, so it no longer requires the help of Office applications to do this. But, the option is still available.
We ran a little test to see the difference in file size with and without this option enabled. Here are the results:
With the thumbnail option enabled, our file size was 2,660 KB. Without the option enabled, the file size was reduced to 2,662 KB, saving a total of 7 KB.
This is a pretty small save, but when we tested it with a Word document, the difference was significant, showing 721 KB without the option enabled, and 3,247 KB with the option enabled.
While this is a large gap between applications and it’s not exactly clear why the difference is so large, it’s still an option worth exploring. To disable the feature, open your presentation, head over to the “File” tab, and then select “Properties” found on the right-hand side, then “Advanced Properties.”
You’ll now be in the “Summary” tab of the “Properties” window. At the bottom of the window, uncheck the box next to “Save preview picture,” and then click “OK.”
Microsoft Office will store your personal information (such as author name) and hidden properties within your presentation. Getting rid of this information can save you a bit of space.
Open your presentation, head over to the “File” tab, select the “Check for Issues” option, then select “Inspect Document."
The “Document Inspector” window will appear. Make sure the “Document Properties and Personal Information” box is checked, and then click “Inspect."
In the next window, select “Remove All.” The information will now be removed, saving you a few KB of space.
We don’t necessarily recommend this, and it should only be used as a last resort effort. AutoRecover is an essential tool in Office, and if you’ve ever lost a document before saving, then you understand precisely what we mean.
Each time Office uses AutoRecover, it adds a little to the size of the file. To turn AutoRecover off, head over to the “File” tab and select “Options” found at the bottom of the left-hand pane.
In the “Save” tab of the “Options” window, uncheck the box next to “Save AutoRecover information ever xx minutes.”
If you save and exit out of the presentation immediately, you won’t notice a difference. Over time though, as you continue to progress through the presentation, the AutoRecover feature will add KB to your file.
While you’re creating your presentation, PowerPoint will save various things in the background to help you out. We’ve mentioned how to turn off a lot of these features, delete data PowerPoint saves, and so on, but there’s always a chance something slipped through the cracks, and PowerPoint stored some information you don’t need. Copying your content over to a new presentation may be a good solution to the problem.
This may be a bit of a hassle though as, with PowerPoint, you’ll need to copy and paste each slide (and master slides). Once you do though, the new presentation won’t have any of the previous background saves, AutoRecover information, or previous versions of the file. As a result, you should see a change in file size.
While we can’t tell you exactly how much this will reduce your file size since each presentation will be different, it’s worth a shot.
As we mentioned earlier, a PPTX file is a compressed file (which is why the size is much smaller than an old-school PPT file). This means you can open it with a tool such as 7-Zip or WinRar, extract all the files from your PPTX, add them to a compressed archive, and then rename the archive to a PPTX file extension.
We had some issues here, though.
In Rob’s testing with his Word document, it successfully reduced the size of the file from 721 KB to 72 KB. However, it corrupted the file in the process. In my testing with my 2,614 KB file, it didn’t corrupt it, but it only reduced it to 2,594KB—a total of only 20 KB. We’re unsure what’s at play here, so if you want to give this a go, be sure to have a backup copy of your file before doing so.
That’s all the tips we've got for reducing the size of your PowerPoint presentation. We’re always looking for new and interesting ways to reduce the size of our files, so if you have any tips, let us know in the comment section, and we’ll be happy to test them out!
Contribute to the Microsoft 365 and Office forum! Click here to learn more 💡
April 9, 2024
Contribute to the Microsoft 365 and Office forum!
Click here to learn more 💡
PowerPoint Top Forum Contributors: Steve Rindsberg - John Korchok 👍✅
April 17, 2024
PowerPoint Top Forum Contributors:
Steve Rindsberg - John Korchok 👍✅
- Search the community and support articles
- Microsoft 365 and Office
- Search Community member
Ask a new question
PPTX Powerpoint slides have all converted into pictures?
I've been making a Powerpoint for my university course. Everything had been going fine.
I saved it for the night, loaded up my PC the next day, opened up Powerpoint to find that all my slides have turned into pictures.
I've checked the file format is PPTX and not PPSX.
It definitely wasn't saved as a picture presentation because it was saving fine before hand.
Can this be undone because I really don't want to rewrite the 15+ slides I made.
I'm using Office 365 installed to my PC.
Thanks in advance.
Report abuse
Replies (2) .
- Volunteer Moderator
10 people found this reply helpful
Was this reply helpful? Yes No
Sorry this didn't help.
Great! Thanks for your feedback.
How satisfied are you with this reply?
Thanks for your feedback, it helps us improve the site.
Thanks for your feedback.
I'm sorry to hear this, but I'm afraid that JohnK's answer is correct; saving to a Picture Presentation, however it may have happened, is a one-way street.
But it seems this happens to other people as well; not frequently but often enough to make me wonder why. Whenever it happens, people swear they never saved as a Picture Presentation, and I completely believe that they didn't do so deliberately. I'm wondering if there's something in the UI that makes it (too) easy to save as Picture Presentation accidentally.
How do you save each time? File | Save, File | Save As, using shortcut keys or ???
You might want to try using Ctrl + S to save after you've once saved using File | Save/Save As.
That should ALWAYS save back to the original file name and format.
12 people found this reply helpful
Question Info
- Norsk Bokmål
- Ελληνικά
- Русский
- עברית
- العربية
- ไทย
- 한국어
- 中文(简体)
- 中文(繁體)
- 日本語
How to Save a PowerPoint Presentation? [PPT & Other Formats!]
By: Author Shrot Katewa
![How to Save a PowerPoint Presentation? [PPT & Other Formats!]](https://artofpresentations.com/wp-content/uploads/2022/03/Featured-Image-How-to-Save-a-PowerPoint-Presentation.webp "powerpoint presentation image formats")
Saving a PowerPoint presentation is one of the most important things that you need to do when you are creating a presentation using PowerPoint. Unlike some of the modern web-based presentation applications, you need to make sure that you save a PowerPoint presentation when you are using an offline version!
To save a PowerPoint presentation, click on the “File” tab. Then, from the backstage view, click on the “Save” option from the left panel. Choose the location or the folder where you want to save the presentation on your computer, and click on “Save”.
In this article, we shall not only understand how to save a standard PPT or PPTx file, but we shall also take a look at how to save a PowerPoint presentation in different file formats such as a PDF, video or an image!
So, let’s get started!
1. How to Save a PowerPoint Presentation?
Once you have saved a PowerPoint presentation, you can easily save it again with just one click. Furthermore, you can also save a PowerPoint presentation in other formats. However, the process of saving a PowerPoint presentation is slightly different on Windows and on Mac.
Let’s understand the process in further detail.
1a. Saving a PowerPoint Presentation on Windows
To save a PowerPoint Presentation on Windows PC, you can follow either of the 2 simple methods.
Method-1: Using the “Save” button on Quick Access Toolbar
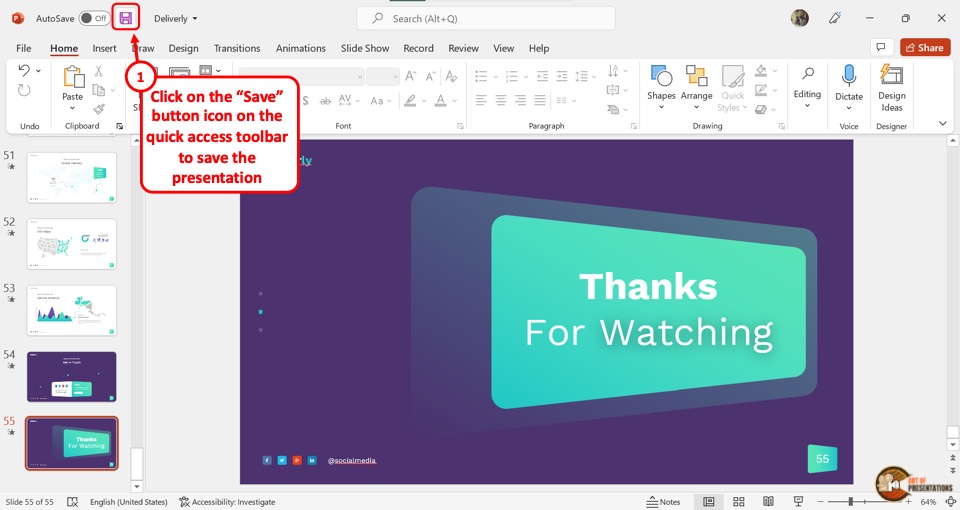
In the Quick Access Toolbar located at the very top of the screen, click on the “Save” icon.
The “Save” icon is located on the left side in the Quick Access Toolbar and looks like a floppy disk. Clicking on the “Save” button will immediately save the PowerPoint presentation in its current location as a “.pptx” file.
If you have opened a new presentation and you are saving it for the first time, clicking on the “Save” button will open a new explorer window. Simply navigate to the folder where you wish to save the new presentation on your computer, and click on “ Save “.
Method-2: Using the “File” tab
Another, more common method is to use the “File” tab in PowerPoint to save your PowerPoint presentation.
Here’s what you need to do –
Step 1 – Click on the “File” Tab
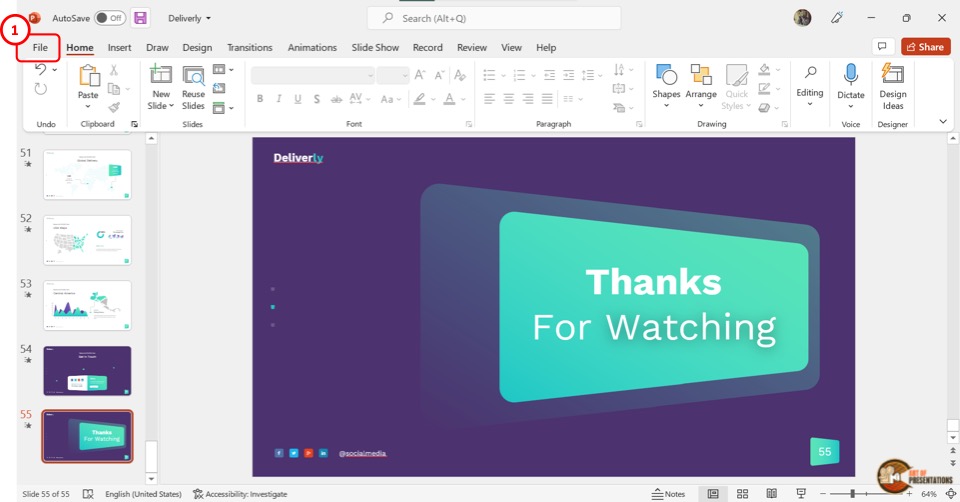
Another way to save a PowerPoint presentation is to use the “File” menu. You have to first click on the “File” tab located at the left corner of the menu ribbon at the top of the screen.
Step 2 – Click on the “Save” option
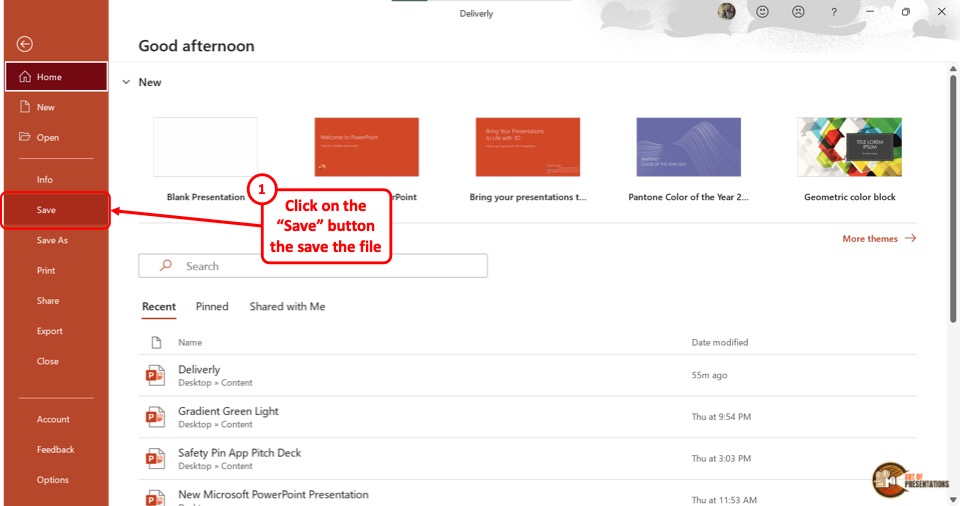
This will open the backstage view in PowerPoint. Now, click on the “Save” option from the sidebar on the left side of the screen. This will save the Microsoft PowerPoint as a “.pptx” file in the current location.
1b. Saving a PowerPoint Presentation on Mac
On a Mac computer, you can use the “File” menu as well to save the PowerPoint presentation.
The first step is to click on the “File” menu in the menu bar located at the top of the screen (above the PowerPoint window). This will open a dropdown menu. Click on the “Save” option from the dropdown menu to save the presentation as a “.pptx” file which is the standard format for presentations.
1c. Shortcut Keys to Save a PowerPoint Presentation
Microsoft PowerPoint also allows you to save a presentation with keyboard shortcuts. All you have to do is press the “Ctrl+S” keys on your keyboard in an open PowerPoint file. This will save the PowerPoint presentation.
1d. Best Format to Save a PowerPoint Presentation?
PowerPoint allows you to save a presentation in various different file formats! For instance, you can use the .ppt format if you wish to open the presentation file using PowerPoint 2007 or earlier. You can use .ppsx to open presentation directly as a PowerPoint Show file that opens it in the presentation mode.
In fact, there are several other formats you can save a presentation in. We shall explore how to save a PowerPoint presentation in several different formats later in the article.
However, the best format to save a PowerPoint Presentation is a “.pptx” file. This type can support all the latest as well as the older features of the PowerPoint presentation.
If you will be opening the presentation using a different software other than Microsoft PowerPoint, “.odp” is the best format. For printing, make sure to save the PowerPoint presentation as a PDF. That said, .pptx file format can help serve these purposes too.
2. How to Save a PowerPoint Presentation as PDF
Saving a PowerPoint presentation in PDF format is the suitable method for printing out your presentation. To save the PowerPoint presentation as a PDF file, follow the 4 easy steps.
Step-1: Click on the “File” Tab
First, click on the “ File ” tab in PowerPoint to open the back stage view of PowerPoint.
Step 2 – Click on the “Save As” option
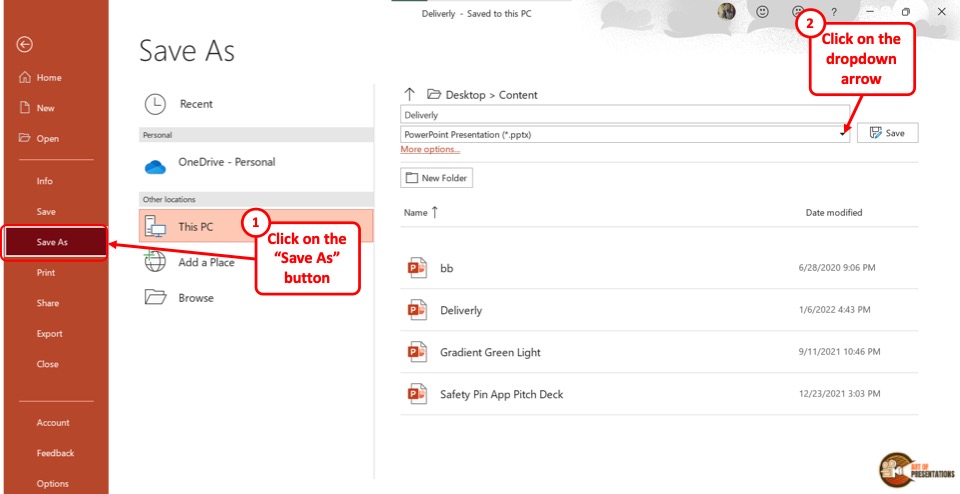
In the menu ribbon located at the top of the screen, click on the “File” tab. In the “File” menu, click on the “Save As” option from the sidebar on the left side of the screen.
Step-3: Click on the “PDF (*.pdf)” option
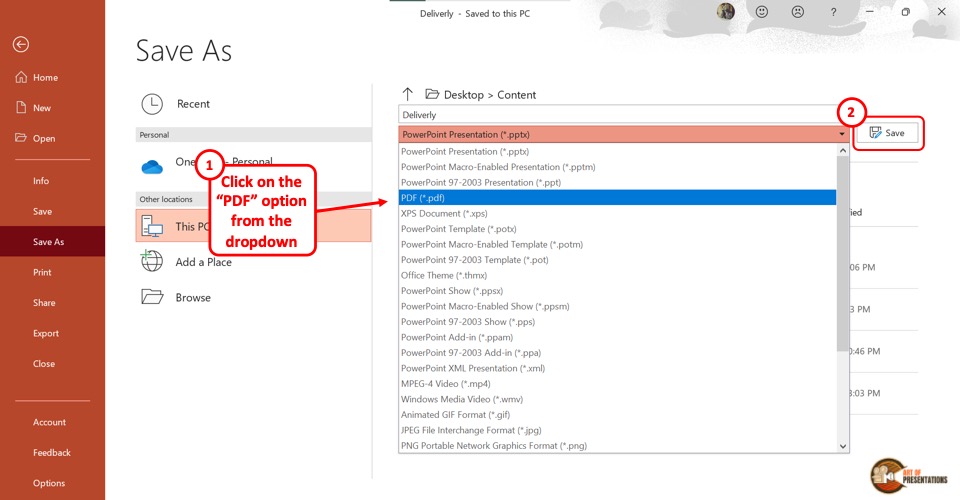
In the “Save As” screen, click on the box that shows “PowerPoint Presentation (*.pptx)” . This will open a dropdown menu. Click on the “PDF (*.pdf)” option from the dropdown menu.
Step-4: Click on the “Save” button
Now all you have to do is click on the “Save” button beside the box to save the PowerPoint presentation as a PDF file (as shown in the image in step 2).
3. How to Save a PowerPoint Presentation as a Video?
In Microsoft PowerPoint, you can also save a presentation as a video. This allows you to play the presentation slides as a video rather than a slide show.
3a. On Windows
To save a PowerPoint presentation as a video on a Windows PC, follow the 3 easy steps.
Step-1: Click on the “File” tab
The first step is to open the “Save As” screen. To do so, click on the “File” tab in the menu ribbon. In the “File” menu, click on the “Save As” option.
Step-2: Choose the “.mp4” file format from the “Save As” tab
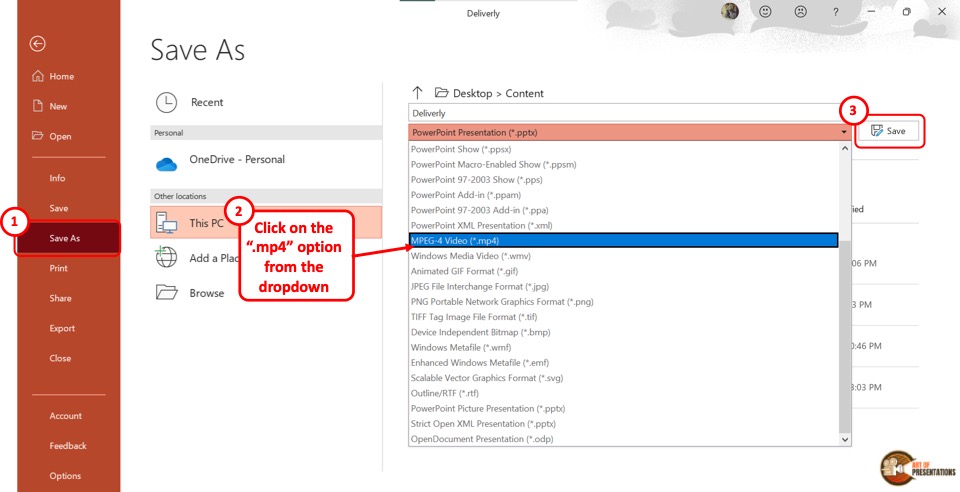
The next step is to click on the “Save As Options” box. It is the second box on the right side of the “Save As” screen. In the dropdown menu, click on either the “MPEG-4 Video (*.mp4)” option or the “Windows Media Video (*.wmv)” option.
Step-3: Click on the “Save” button
The final step is to click on the “Save” button (as indicated in step 2 above). It is located on the right side of the “Save As Options” box. This will save your PowerPoint presentation as a video.
To save a PowerPoint presentation as a video on a Mac device, follow the 3 simple steps.
Step-1: Click on the “Export” option
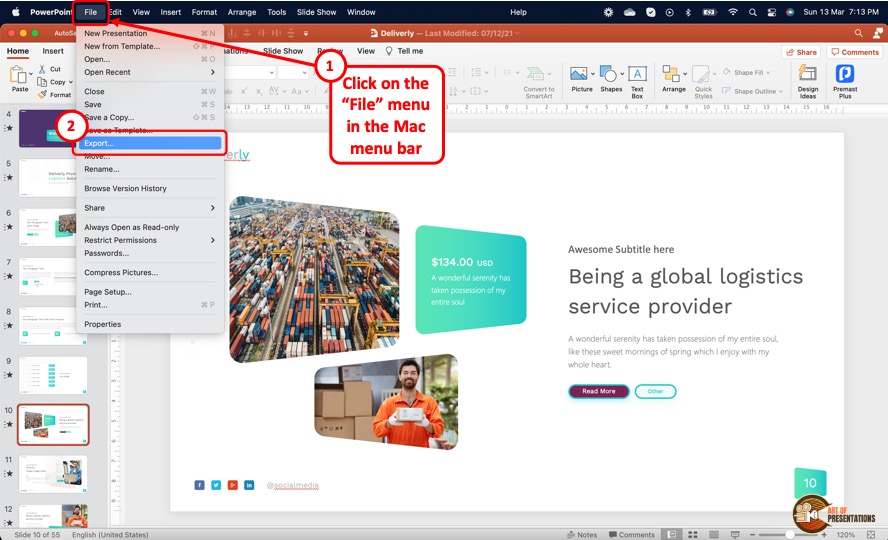
In the menu bar at the top of the screen, click on the “File” option. In the “File” dropdown menu, click on the “Export” option. This will open a dialog box.
Step-2: Click on the “File Format” box
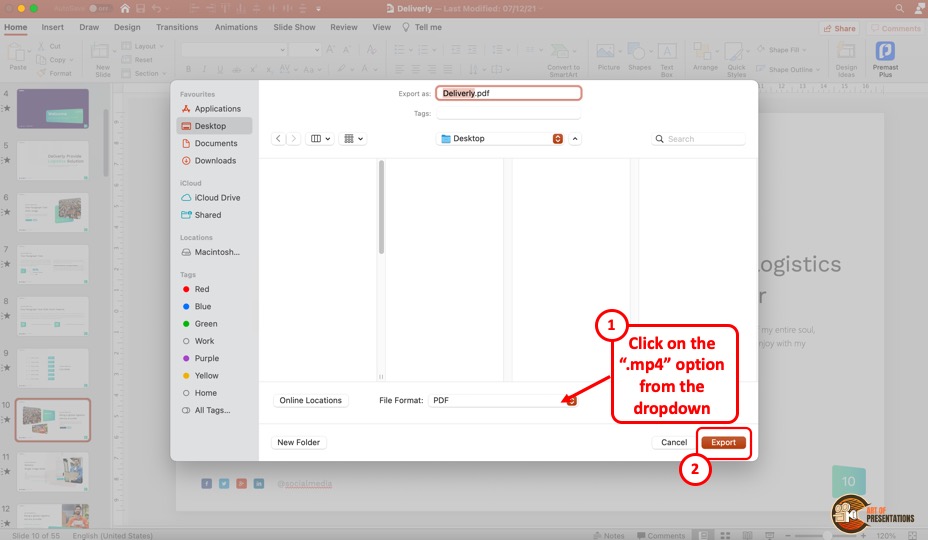
In the dialog box, click on the “File Format” box. This will open a dropdown menu. You can click on either the “MP4” option or the “MOV” option as you prefer.
Step-3: Click on the “Export” button
In the dialog box, you can also click on the “Quality” option to select the quality of the video. Once you are satisfied with the selections in the dialog box, click on the “Export” button at the bottom (as shown in the image in the previous step). This will save the presentation as a video.
4. How to Save a PowerPoint Presentation to Open in Slideshow Mode?
Microsoft PowerPoint allows you to save the PowerPoint presentation as a “PowerPoint Show” file. This opens directly as a slideshow. To save a PowerPoint presentation to open in slideshow mode, follow the 2 easy steps.
In the open PowerPoint file, click on the “File” tab from the menu ribbon which is located at the top of the screen. In the “File” menu, click on the “Save As” option.
Step-2: Click on the “PowerPoint Show (*.ppsx)” option
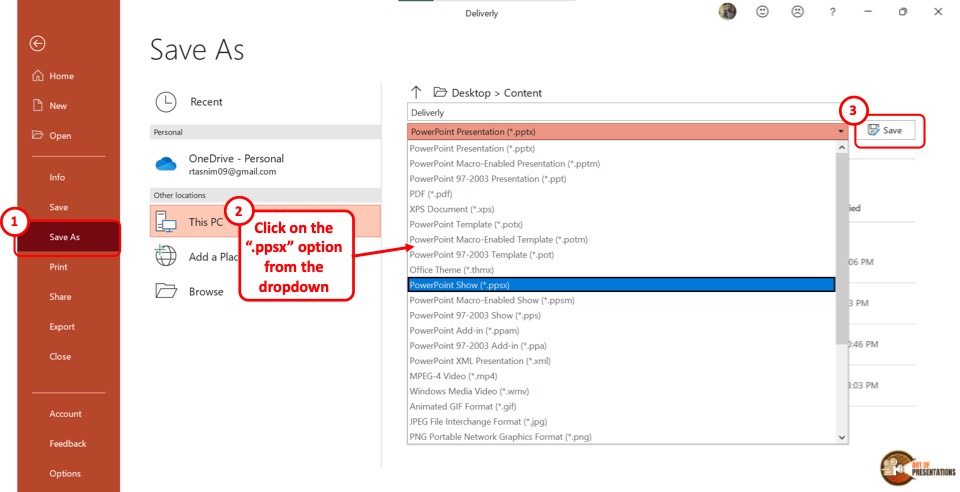
In the “Save As” screen, click on the “Save As Options” box which shows “PowerPoint Presentation (*.pptx)” . This will open a dropdown menu. Click on the “PowerPoint Show (*.ppsx)” option.
Now all you have to do is click on the “Save” button to save the PowerPoint presentation to open as a slideshow.
5. How to Save a PowerPoint Presentation as an Image?
In Microsoft PowerPoint, you can save the presentation as an image in five different formats: “Animated GIF Format (*.gif)” , “JPEG File Interchange Format (*.jpeg)” , “PNG Portable Network Graphics Format (*.png)” , “TIFF Tag Image File Format (*.tif)”, and “Scalable Vector Graphics Format (*.svg)” .
To save your presentation as an image, follow the 3 simple steps.
Step-1: Click on the “Save As” option from the “File” tab
The first step is to click on the “File” tab in the menu ribbon. Then click on the “Save As” option from the “File” menu.
Step-2: Select your preferred image format
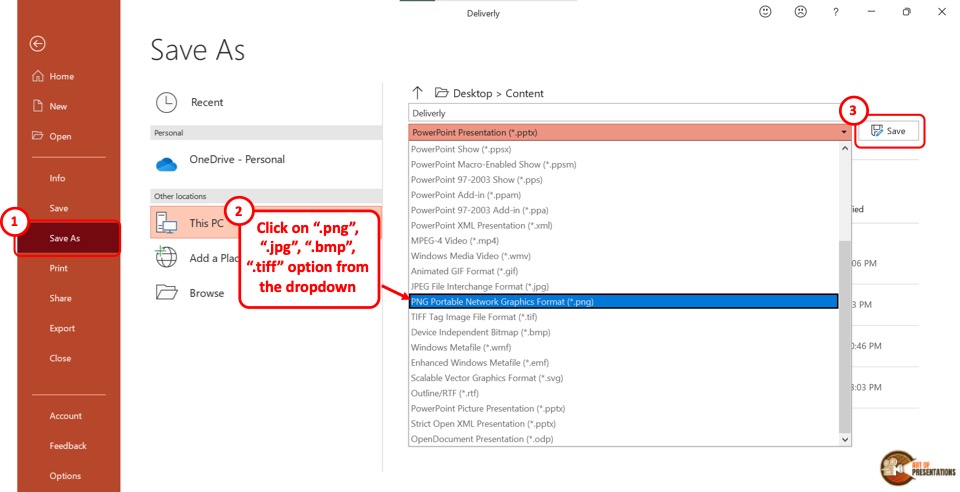
In the “Save As” screen, click on the “Save As Type” box which is the second box in the right column. From the dropdown menu, click on your preferred image format from the five available formats.
Now all you have to do is click on the “Save” button (as shown in the image in step 2) beside the “Save As Type” box. This will save your presentation in a folder containing each slide as a separate image file.
6. How to Save a PowerPoint Presentation as a Template?
A PowerPoint template is a predesigned presentation that you can edit to add your own content. To save a presentation as a template, follow the 3 easy steps.
The first step is to click on the “File” tab in the menu ribbon. Then click on the “Export” option from the sidebar in the “File” menu.
Step-2: Click on “Change File Type”
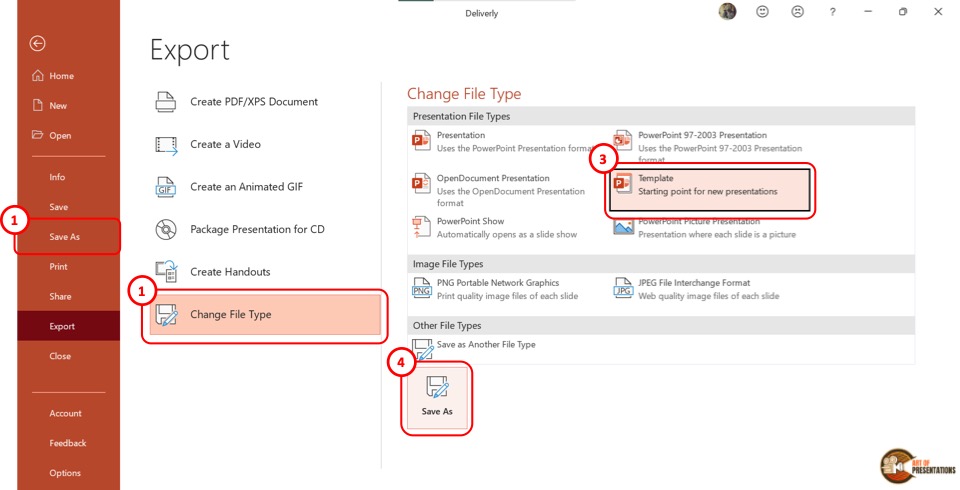
Now you have to click on the “Change File Type” option. Under the “Presentation File Types” group in the right column, click on the “Templates” option. Then click on the “Save As” button at the bottom of the screen.
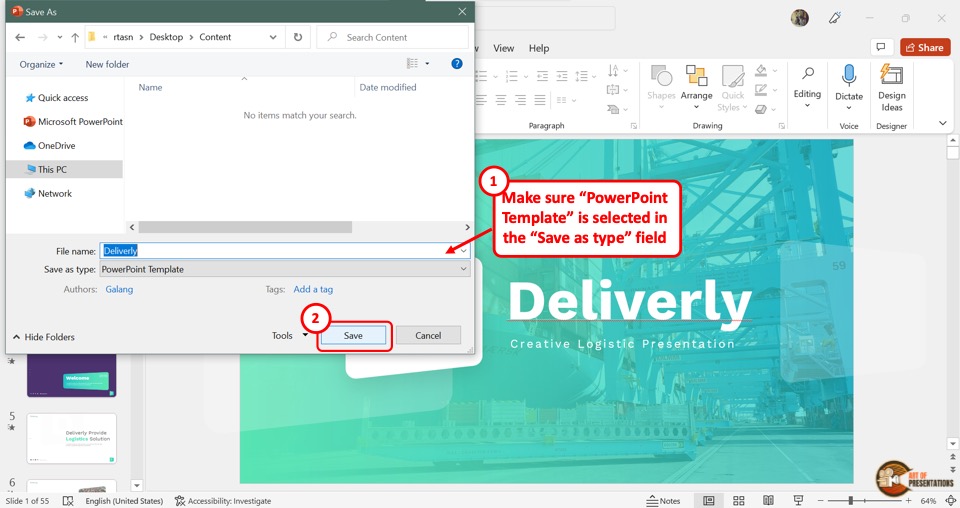
In the “Save As” dialog box, you will see that the “Save as type” box shows the “PowerPoint Template” format. Now all you have to do is click on the “Save” button.
7. How to Save PowerPoint Presentation as Google Slides?
Microsoft PowerPoint does not offer any feature to upload a presentation to Google Slides directly. However, Google Slides does offer you an option to upload your PowerPoint presentation and save it in Google Slides!
Step-1: Save Your PowerPoint Presentation
The first step is to save your PowerPoint presentation using any method described in the section 1 of this article.
Make sure that you note down the location of the folder in which you have save the PowerPoint file.
Step-2: Click on the “Open file picker” option in Google Slides
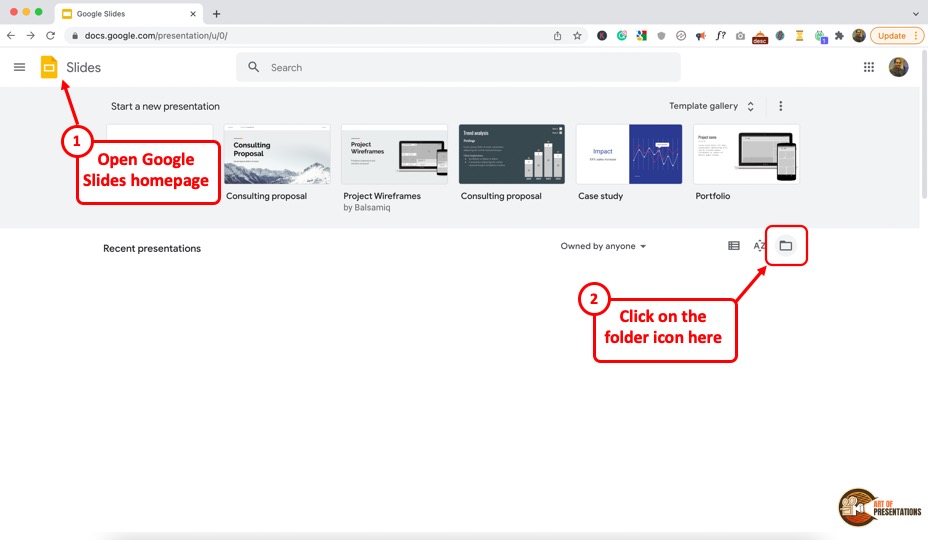
Now, the next thing you need to do is open your Google Slides account by visiting slides.google.com . If you aren’t logged in, make sure you sign in with your account credentials.
Next, you will be presented with Google Slides home screen (as shown in the image above). In Google Slides, click on the “Open file picker” icon which looks like a folder. This will open the “Open a file” dialog box.
Step-2: Click on “Upload”

In the “Open a file” dialog box, click on the “Upload” tab.
From your “File Explorer” window, drag and drop the PowerPoint presentation in the dialog box. Now the presentation will automatically open in Google Slides.
Also Read – How to “ Make a Copy of a Google Slides Presentation ” and how to “ Share a Google Slides Presentation Correctly ” with others!
You can also click on the “ Select a file from your device ” button (blue button in the center of the screen). This will open the file explorer window. Navigate to the folder in which you have saved your PowerPoint presentation, and click on “OK”. This will open and save the presentation file in Google Slides.
8. How to Save a PowerPoint Presentation to a Flash Drive?
To save a PowerPoint presentation on a flash drive or any external device, follow the 3 simple steps.
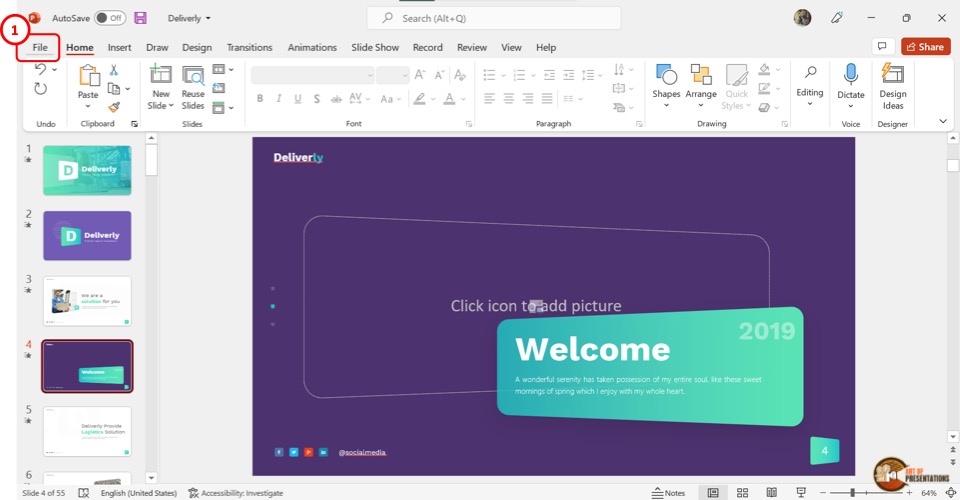
In the menu ribbon located at the top of the screen, click on the “File” tab. In the “File” menu, click on the “Save As” option.
Step-2: Click on “Browse”
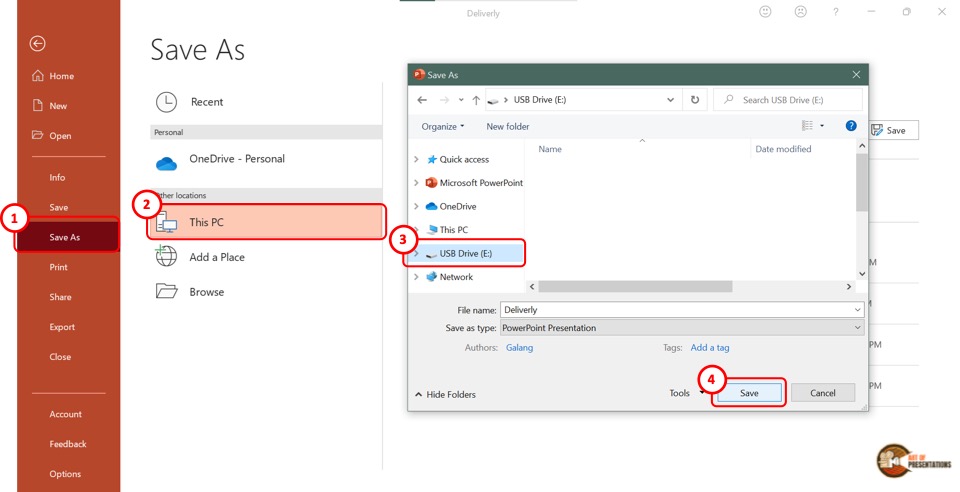
In the “Save As” screen, click on the “Browse” option which is the last option in the left column. This will open the “Save As” dialog box. In the sidebar on the left of the dialog box, click on the external disc.
Now all you have to do is click on the “Save” button at the bottom of the dialog box to save the PowerPoint presentation on the flash drive (as shown in the image in step 2).
9. How to Save a Copy of a PowerPoint Presentation?
The “Save A Copy” feature of Microsoft PowerPoint allows you to save changes in your presentation in a copied file without changing the original file.
Check out my article to learn detailed steps on how to save a copy of a PowerPoint presentation .
10. How to Save a Read-Only PowerPoint Presentation?
The “Read-Only” feature of Microsoft PowerPoint allows you to protect your PowerPoint presentation .
Using this feature, you can share your presentation with others without giving them the access to change your presentation. To save a read-only PowerPoint presentation, follow the steps mentioned below –
The first step is to click on the “File” tab in the menu ribbon. From the sidebar in the “File” menu, click on the “Info” option.
Step-2: Click on the “Protect Presentation” button

The next step is to click on the “Protect Presentation” option in the “Info” screen. This will open a dropdown menu. Click on the “Always Open Read-Only” option from the dropdown menu.
Step-3: Click on the “Save” option
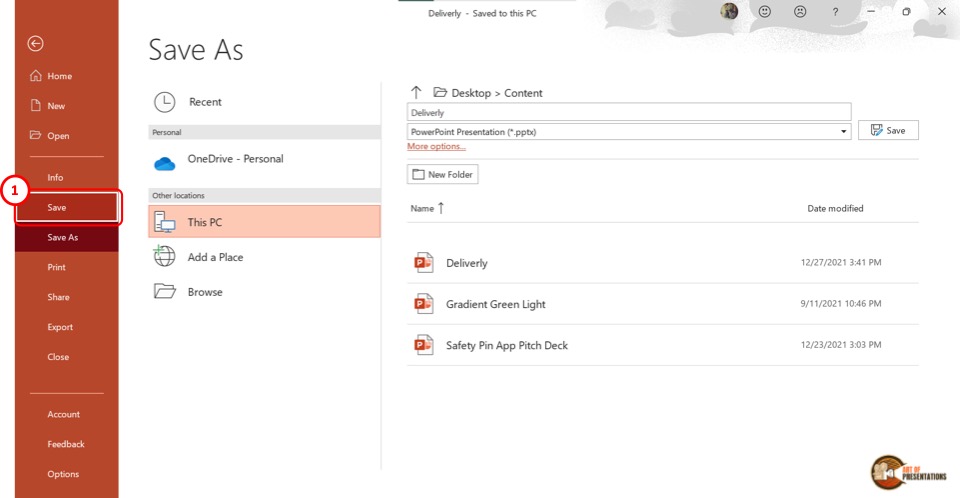
Now all you have to do is save the presentation. To do so, click on the “Save” option in the sidebar right under the “Info” option. Alternatively, you can press the “Ctrl+S” keys on your keyboard.
If you have received a presentation that opens only in the read-only mode, but you don’t know how to work with it, check out my other article on “ How to Edit a Presentation in Read-Only Mode “.
11. How to Save a PowerPoint Presentation Without Notes?
When saving a PowerPoint presentation, you might want to remove the speaker notes. To do so, all you have to do is follow the 5 quick steps.
In the menu ribbon, click on the “File” tab. Then click on the “Info” option from the “File” menu.
Step-2: Click on “Check for Issues” on the “Info” tab
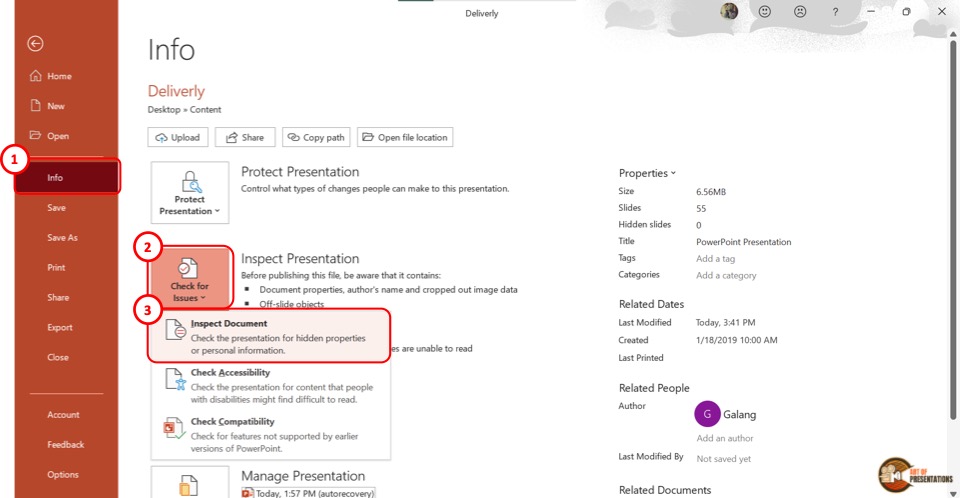
In the “Info” option, click on the “Check for Issues” button. Then click on the “Inspect Document” option from the dropdown menu. This will prompt a dialog box.
Step-3: Click on the “Inspect” option
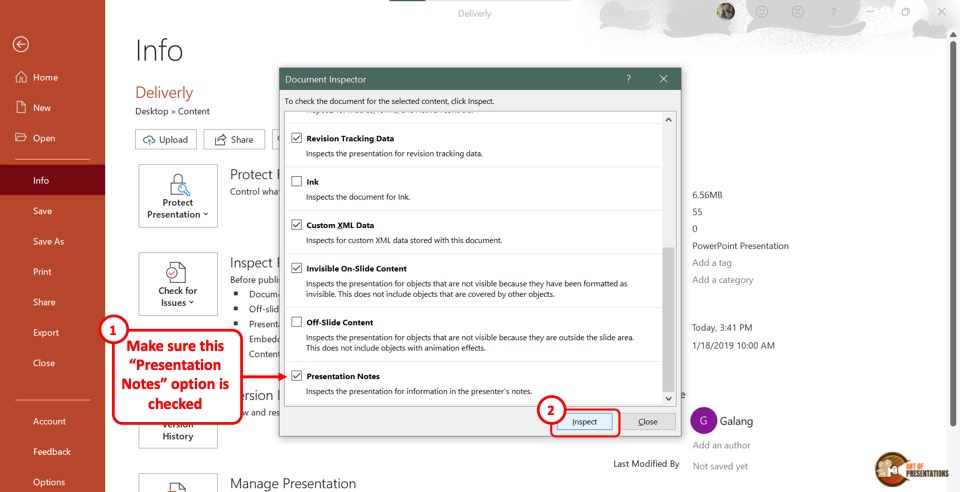
In the “Document Inspector” dialog box, scroll all the way to the bottom and make sure the “Presentation Notes” option is selected. Then click on the “Inspect” button at the bottom of the dialog box.
Step-4: Click on the “Remove All” option
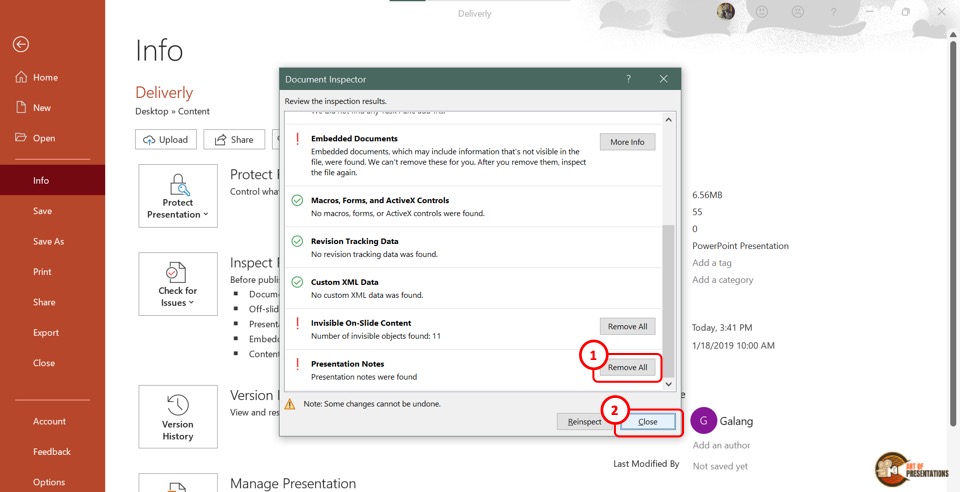
Once the inspection results are shown in the “Document Inspector” dialog, scroll to the bottom again to find the “Presentation Notes” option. Then click on the “Remove All” button at the right side of the “Presentation Notes” option.
Now all you have to do is click on the “Close” button at the bottom of the dialog box to finish the process.
Step-5: Click on the “Save” option
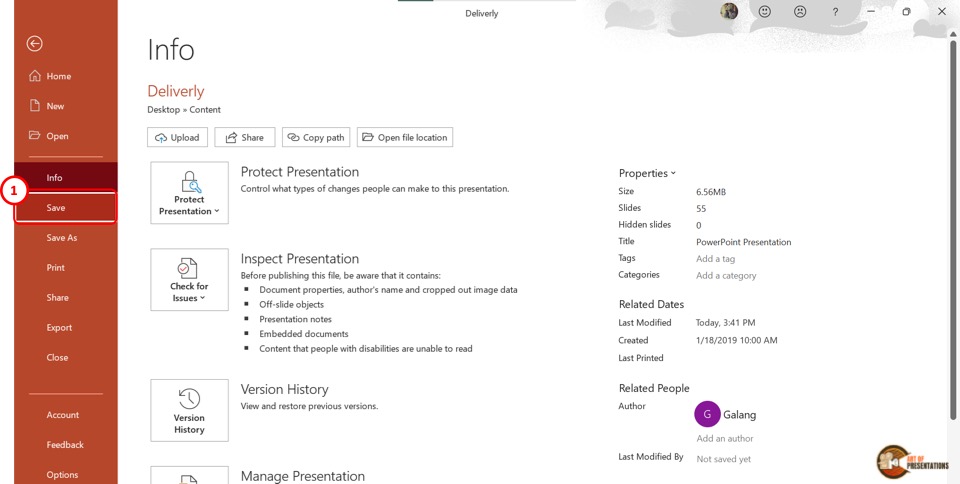
The final step is to click on the “ Save ” option in the sidebar of the “File” menu to save the presentation without notes. You can alternatively press the “Ctrl+S” keys on your keyboard.
12. How to Save PowerPoint Presentation Directly in Microsoft Teams?
If you are delivering a PowerPoint presentation to an audience using Microsoft teams, you can easily share a PowerPoint deck with your audience in the following steps –
- First, open the Microsoft Teams application and login to the meeting.
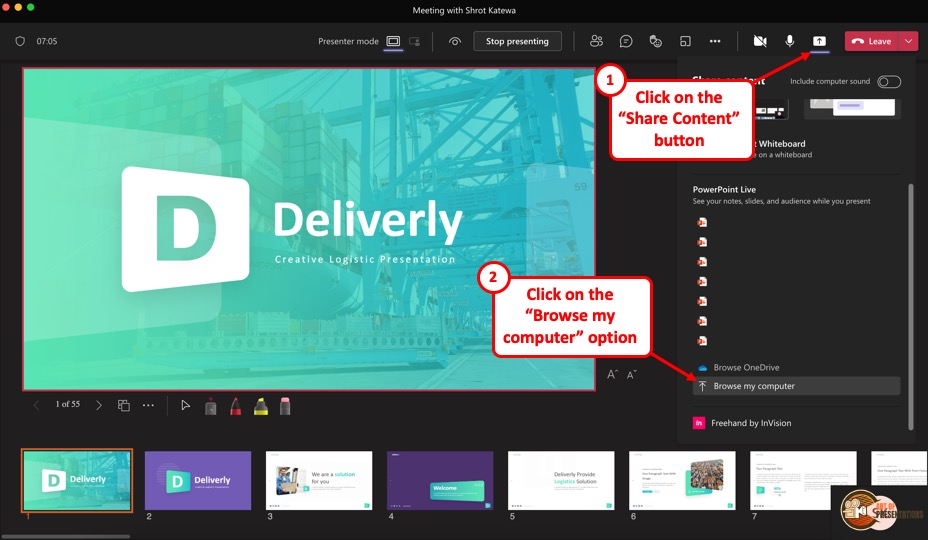
- On the “ Meeting Controls ” menu available in the top part of your meeting screen, locate the “ Share Content ” option.
- Click on the share content button. This will show the most recent PowerPoint files that you opened. You can either choose to click on one of the files visible. Alternatively, scroll down on the right panel and click on the “ Browse my computer ” option.
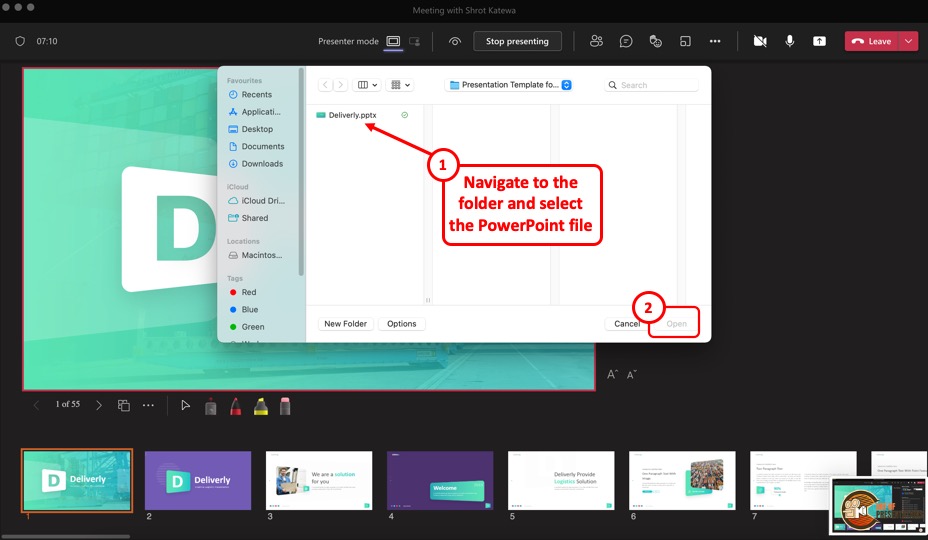
- This will open a new file browser window. Navigate to the respective location where your PowerPoint presentation is saved, click on it to select it. Then, click on “Open” to open the presentation in Microsoft Teams.
- The presentation will open by default in the presenter mode and shared with the audience of the meeting.
13. How to Enable Autosave in PowerPoint Presentation?
The autosave option is only available if you are using the Microsoft Office 365 version of PowerPoint . Other than that, you will have to manually save the PowerPoint file in all other versions.
You can autosave the PowerPoint presentation to the OneDrive cloud, and also autosave recovery files. To enable autosave in PowerPoint presentation, follow the 4 simple steps.
Step-1: Click on the “AutoSave” button
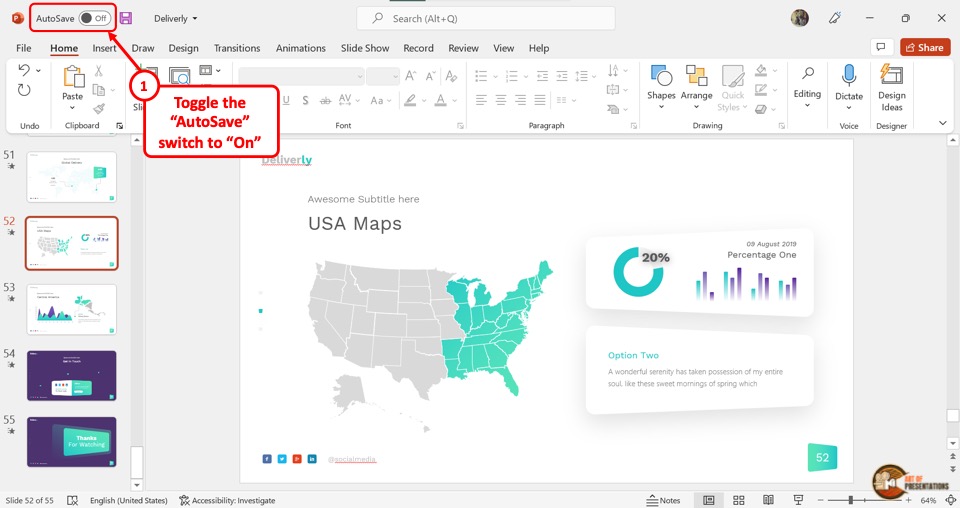
To simply turn on autosave in the OneDrive cloud for the PowerPoint presentation, all you have to do is click on the slider beside the “Autosave” option.
It is located in the left corner of the Quick Access Toolbar at the top of the screen.
Step-2: Click on “Options”
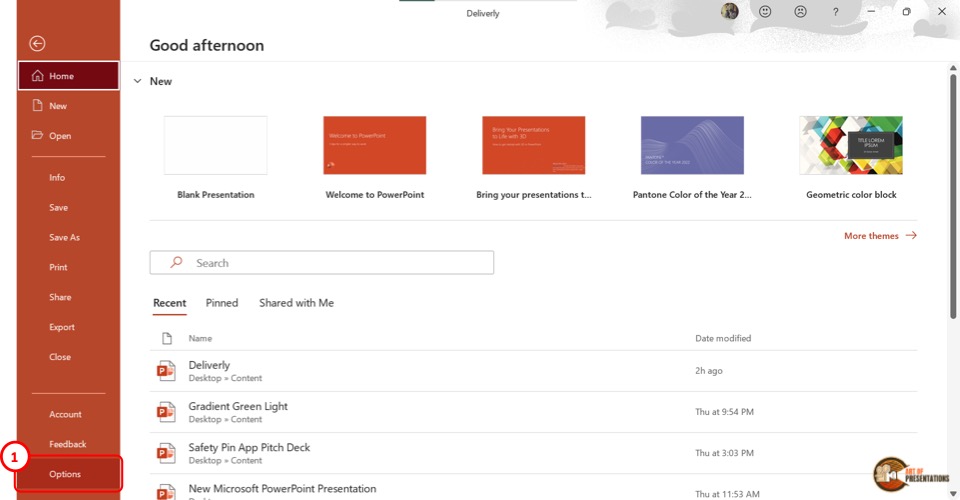
To access more autosave options, click on the “File” tab in the menu ribbon. Then click on the “Options” option which is the last option in the sidebar in the “File” menu. It will open a dialog box.
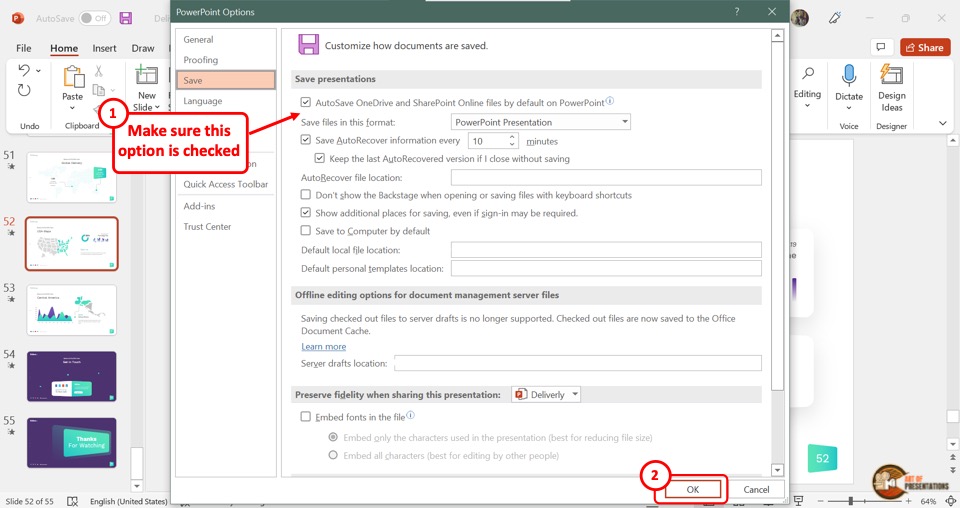
In the “PowerPoint Options” dialog, click on the “Save” option from the sidebar located on the left side. Now you can enable your preferred autosave options in the “Save presentations” section.
Click on the “Autosave OneDrive and SharePoint Online files by default on PowerPoint” for auto-saving on the cloud. You can also select how often the auto-recovery copy is saved by clicking on the box at the right side of the “Save Autorecover information” option.
Step-4: Click on the “OK” button
Now all you have to do is click on the “OK” button at the bottom of the “PowerPoint Options” dialog box to enable your autosave preference (as shown in the image in step 2).
Credit to Cookie_studio (on Freepik) for the featured image of this article (further edited).
COMMENTS
Ensure they are not pixelated or distorted when stretched. Step 2: Insert the picture. Select the slide you want to insert the image in by clicking on it. Then, go to the 'Insert' tab, select 'Picture,' and choose the image from your computer. Step 3: Resize and crop. Click on the image to reveal the Format tab.
On the Picture Format tab, select Picture Effects. Select the one you want: Shadow , Reflection , Glow , Soft Edges , Bevel , or 3-D Rotation . Add a border
PNG. PNG or Portable Network Graphics is an image format specifically designed for the web. PNG is similar to GIF format. It is saved with 256 colors maximum, but it saves the color information more efficiently than GIF. It also supports 8-bit transparency. It is also best suited for PowerPoint. PROS.
PowerPoint lets you turn your slideshow into plain text. This is handy if you want to move some of the presentation's text to your website or blog. When you create a rich text format (.rtf) file, you save only the text. You lose all of the images, animations, slide-to-slide transitions, and other non-text objects.
Create captivating, informative content for PowerPoint in just a few minutes—no graphic design experience needed. Here's how: 1. Find the perfect PowerPoint template. Search for anything—type of template, image, color, —or take a look around by browsing the catalog. Select the template that fits you best, from pitch decks to data ...
Select the image you want to modify. On the Picture Format tab, in the Arrange group, click the Rotate drop-down arrow and select the desired option. Rotating or flipping an image. Cropping an Image. Select the image you want to modify in your PowerPoint presentation. On the Picture Format tab, in the Size group, click Crop.
A good PowerPoint presentation keeps the focus on your argument by keeping animations and transitions to a minimum. I suggest using them tastefully and sparingly to emphasize a point or bring attention to a certain part of an image. 2. Cohesive Color Palette. I like to refresh my memory on color theory when creating a new PowerPoint presentation.
There are a variety of ways to format the pictures in your slide show. The picture tools in PowerPoint make it easy to personalize and modify the images in interesting ways. PowerPoint allows you to change the picture style and shape, add a border, crop and compress pictures, add artistic effects, and more. Optional: Download our practice ...
When you're putting your own deck together, you'll certainly need to add slides and format them in different ways. In order to make a new slide appear in your presentation, first select the slide that you'd like your new slide to follow. Then click Home and choose New Slide. From there, you can choose your desired layout, and start ...
Create a presentation. Open PowerPoint. In the left pane, select New. Select an option: To create a presentation from scratch, select Blank Presentation. To use a prepared design, select one of the templates. To see tips for using PowerPoint, select Take a Tour, and then select Create, . Add a slide.
Image formats for presentations JPEG vs. PNG vs. GIF - MLC Presentation Design Consulting.
A good presentation needs two fonts: a serif and sans-serif. Use one for the headlines and one for body text, lists, and the like. Keep it simple. Veranda, Helvetica, Arial, and even Times New Roman are safe choices. Stick with the classics and it's hard to botch this one too badly.
1. Open PowerPoint and click 'New.'. If a page with templates doesn't automatically open, go to the top left pane of your screen and click New. If you've already created a presentation, select Open then double-click the icon to open the existing file. Image Source.
Step 2: Export slides as images. In PowerPoint, open your presentation and then select the slide you want to export. Go to the File tab. Now select Save As. In the file type field, select one of the following image formats: JPEG File Interchange Format (* .jpg) PNG Portable Network Graphics Format (* .png)
These 10 professional photo collage templates do some of the handholding for you. 1. Stay Minimal With the Classic Photo Album. The Classic Photo Album PowerPoint template is a minimal theme suitable for black and white street photography. Use this to create a personal portfolio.
GIF (Graphics Interchange Format) This file type saves individual slides from the presentation as GIF graphic files you can use on the web or open in an image editing application. These GIFs are static GIFs and not animated ones. Animated GIF exports are available in PowerPoint 365 versions.
Download the "Lovely Hearts Template" presentation for PowerPoint or Google Slides and start impressing your audience with a creative and original design. Slidesgo templates like this one here offer the possibility to convey a concept, idea or topic in a clear, concise and visual way, by using different graphic resources.... Multi-purpose. 16:9.
Edit Or Modify a PowerPoint Template. Start With The Cover Slide. Right-Click On An Image To Change It. Use The Selection Panel To Change Images. Change Font & Shape Colors. Change The Color Of The Shapes. Edit Text. Along with those features is the ever-expanding variety of templates.
Method 1: Save PowerPoint Slide as Image. Open PowerPoint and go to the File tab. After selecting Export, click Change File Type. Then, click the Save As option. Now, select a location where you save the slide and give the file a name. Click Tools and select Compress Pictures to save up some space. Confirm that the option labeled "Delete ...
Recommended formats. Video : .mp4 files encoded with H.264 video and AAC audio. Audio : .m4a files encoded with AAC audio. These names and formats may sound complicated, but you can easily convert to and use these formats without having to know anything more than the names.
Converting the file is as simple as pressing a button and choosing the file type. Go ahead and open your PPT file, head over to the "File" tab, and then click "Convert.". Windows File Explorer will appear. You'll notice the Save As type is set as "PowerPoint Presentation." This is the PPTX file type. Click "Save.".
In spite of your certainty that you didn't save in this format, you inadvertently saved your presentation as a Picture Presentation. This still has a .PPTX file ending, but all content is converted to bitmaps. There is no going back unless you save a backup file of the original deck. Author of "OOXML Hacking - Unlocking Microsoft Office's ...
To save the PowerPoint presentation as a PDF file, follow the 4 easy steps. Step-1: Click on the "File" Tab. First, click on the " File " tab in PowerPoint to open the back stage view of PowerPoint. Step 2 - Click on the "Save As" option. In the menu ribbon located at the top of the screen, click on the "File" tab.